


Dell™ Color Laser Printer 1320c User's Guide
Dell Color Laser Printer 1320c User's Guide |
Understanding Your Printer Software |
Finding Information |
Printing |
About Your Printer |
Setting Up for Shared Printing |
Installing the Toner Cartridges and PHD (Print Head Device) Unit |
Clearing Jams |
Connecting Your Printer |
Troubleshooting Guide |
Dell Printer Configuration Web Tool |
Installing Printer Drivers |
Print Media Guidelines |
Maintaining Your Printer |
Loading Print Media |
Printer Specifications |
Operator Panel |
Safety and Regulatory Information |
Printer Settings |
Appendix |
Understanding Tool Box Menus |
|
Notes, Notices, and Cautions
NOTE: A NOTE indicates important information that helps you make better use of your printer.
NOTICE: A NOTICE indicates either potential damage to hardware or loss of data and tells you how to avoid the problem.
CAUTION: A CAUTION indicates a potential for property damage, personal injury, or death.
Information in this document is subject to change without notice.
© 2008 Dell Inc. All rights reserved.
Reproduction in any manner whatsoever without the written permission of Dell Inc. is strictly forbidden.
Dell, the DELL logo, Dell Precision, Dimension, Inspiron, Latitude, OptiPlex, PowerConnect, PowerEdge, PowerVault, and XPS are trademarks of Dell Inc.; Microsoft, Windows, Windows Server, and Windows Vista are either trademarks or registered trademarks of Microsoft Corporation in the United States and/or other countries; EMC is the registered trademark of EMC Corporation; ENERGY STAR is a registered trademark of the U.S. Environmental Protection Agency. As an ENERGY STAR Partner, Dell Inc. has determined that this product meets the ENERGY STAR guidelines for energy efficiency; Adobe and Photoshop are registered trademarks or trademarks of Adobe Systems Incorporated in the United States and/or other countries.
Other trademarks and trade names may be used in this document to refer to either the entities claiming the marks and names of their products. Dell Inc. disclaims any proprietary interest in trademarks and trade names other than its own.
UNITED STATES GOVERNMENT RESTRICTED RIGHTS
This software and documentation are provided with RESTRICTED RIGHTS. Use, duplication or disclosure by the Government is subject to restrictions as set forth in subparagraph (c)(1)(ii) of the Rights in Technical Data and Computer Software clause at DFARS 252.227-7013 and in applicable FAR provisions: Dell Inc., One Dell Way, Round Rock, Texas, 78682, USA.
This equipment has been tested and found to comply with the limits for a Class B digital device, pursuant to Part 15 of the FCC rules.
November 2008 Rev. A00
back to contents page
Dell™ Color Laser Printer 1320c User's Guide
Click the links on the left for information on the features, options, and operation of your printer. For information on other documentation included with your printer, see "Finding Information".
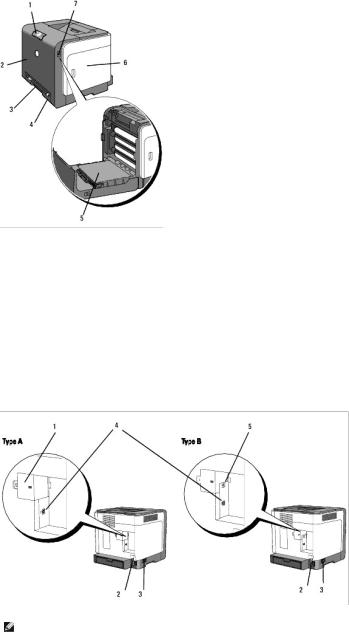
Front View
1 |
Operator panel |
5 |
Belt unit |
2 |
Front cover |
6 |
Side cover (toner cartridges inside) |
|
NOTE: You can open the front cover by pushing the button (right side). |
|
|
3 |
Single sheet feeder |
7 |
Button (right side) |
|
|
|
|
4 |
Tray 1 |
|
|
|
|
|
|
Rear View
NOTE: You can use your network as standard, if your printer is type B as shown in the illustration.
1 |
Network cover |
3 |
Power switch |
|
|
|
|
2 |
Reset button |
4 |
USB port |

5 Ethernet port
To order replacement toner cartridges or supplies from Dell:
1. Double-click the icon on your desktop.
2.Visit the Dell Printer Supplies website at www.dell.com/supplies, or order Dell printer supplies by phone.
For best service, have your Dell printer Service Tag available.
For help locating your Service Tag number, see "Express Service Code and Service Tag number."
back to contents page
back to contents page
Finding Information
NOTE: The following are options you need to buy separately.
nUSB cable
nEthernet cable
What are you looking for? |
Find it here |
|
|
Drivers for my printer |
Drivers and Utilities CD |
My User's Guide |
|
|
The Drivers and Utilities CD contains documentation and drivers for your printer. You can use the CD to uninstall/reinstall |
|
drivers or access your documentation. |
|
Readme files may be included on your CD to provide last-minute updates about technical changes to your printer or |
|
advanced technical reference material for experienced users or technicians. |
|
|
Safety information |
Owner's Manual |
How to use my printer |
|
Warranty information |
|
|
NOTE: The Owner's Manual may not be available in your country or region. |
|
|
Safety information |
Product Information Guide |
Warranty information |
|
|
CAUTION: Read and follow all safety instructions in your Product Information Guide prior to setting up and |
|
operating your printer. |
|
|
How to set up my printer |
Setup diagram |
|
|
Troubleshooting |
Troubleshooting Guide |
|
|
Express Service Code and |
|
Service Tag number |
|
|
The Express Service Code and Service Tag numbers are located inside the side door of your printer. |
|
|
Latest drivers for my printer |
See the Dell Support website at support.dell.com |

Answers to technical service and support questions
Documentation for my printer
The Dell Support website, support.dell.com provides several online tools, including: Solutions - Troubleshooting hints and tips, articles from technicians, and online courses Upgrades - Upgrade information for components, such as printer driver
Customer Care - Contact information, order status, warranty, and repair information Downloads - Drivers
Reference - Printer documentation and product specifications
You can access the Dell Support website at support.dell.com. Select your region on the support page, and fill in the requested details to access help tools and information.
back to contents page

back to contents page
About Your Printer
Operator Panel
Protecting Your Printer
The following illustrations show the standard Dell™ Color Laser Printer 1320c.
1 |
Operator panel |
4 |
Tray 1 |
|
|
||
|
|
|
|
2 |
Front cover |
5 |
Belt unit |
|
|
||
|
|
|
|
3 |
Single sheet feeder |
6 |
Button (right side) |
|
|
||
|
|
|
|
Provide enough room to open the printer tray, covers, and option. It is also important to allow space around the printer for proper ventilation.
Operator Panel

For details on the operator panel, see "Operator Panel."
Protecting Your Printer
To protect your printer from theft, you can use the optional Kensington lock.
Attach the Kensington lock to the security slot of your printer.
For details, see the operating instructions supplied with the Kensington lock.
back to contents page
back to contents page
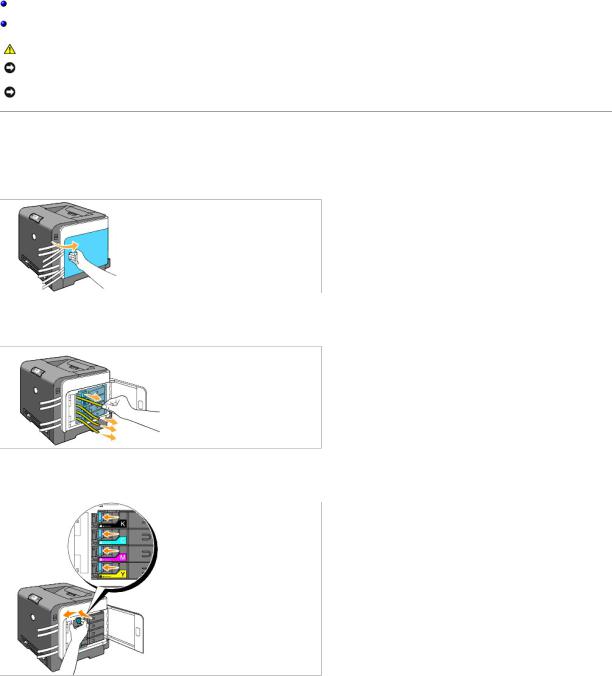
Installing the Toner Cartridges and PHD (Print Head Device) Unit
Installing the Toner Cartridges
Installing the PHD (Print Head Device) Unit
CAUTION: Before performing any of the following procedures, read and follow the safety instructions in your Product Information Guide.
NOTICE: To protect the drums of the toner cartridges against bright light, close the front cover within three minutes. If the front cover remains open for more than three minutes, print quality may deteriorate.
NOTICE: Ensure that nothing touches or scratches the surface (black-colored film) of the belt unit. Scratches, dirt, or oil from your hands on the film of the belt unit may affect print quality.
Installing the Toner Cartridges
1. Open the side cover.
2. Completely pull out and remove the four ribbons.
3. Press and slide the blue latches of four toner cartridges to the locked position.
4. Close the side cover.

Installing the PHD (Print Head Device) Unit
1. Press the button (right side) and open the front cover.
2. Turn the four PHD lock levers counterclockwise to unlock the unit.
NOTICE: Do not touch the belt unit.
3. Pull the PHD unit out of the printer.
NOTICE: Do not remove the protective sheet on the PHD unit.
4. Completely remove the four yellow ribbons from the PHD unit.
5. Use the small gray tabs to place the PHD unit back into the printer completely.
6. Turn the four PHD lock levers clockwise to lock the PHD, and then remove the protective sheet.
7. Close the front cover.
back to contents page
back to contents page
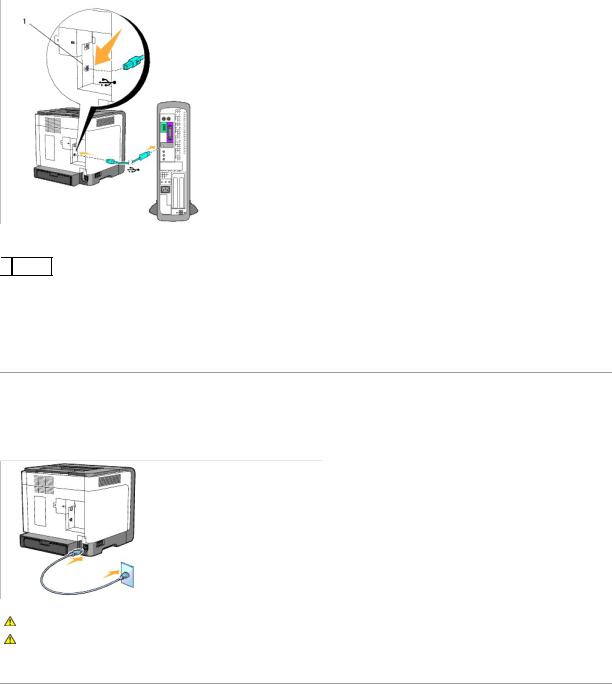
Connecting Your Printer
Choosing the Right Cable
Connecting the Printer Directly to a Computer
Turn On the Printer
Connecting the Printer to a Network
Using the Reset button
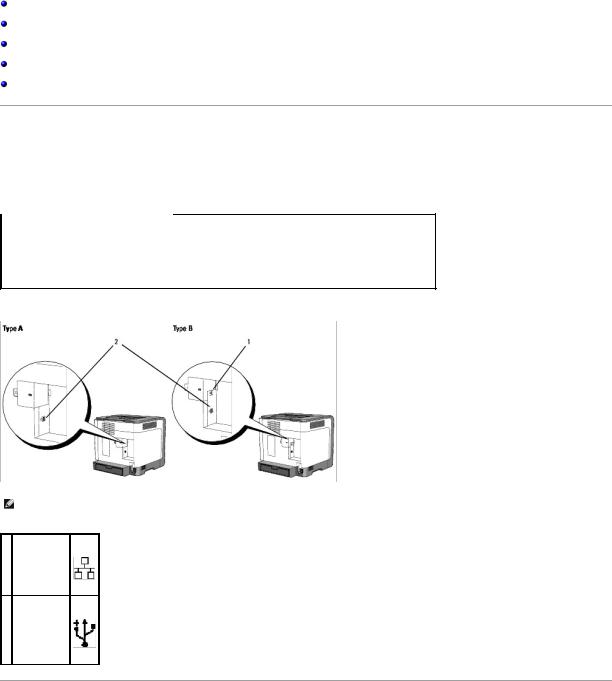
Choosing the Right Cable
Your Dell™ Color Laser Printer 1320c interconnection cable must meet the following requirements:
Connection type |
Connection specifications |
|
|
USB |
USB 2.0 |
|
|
Ethernet* |
10 Base-T/100 Base-TX |
|
|
* If your printer is type A, an optional Network Adapter for Dell 1320c is required to connect the Ethernet cable.
NOTE: You can use your network as standard, if your printer is type B as shown in the illustration.
1 Ethernet port
2 USB port
Connecting the Printer Directly to a Computer
A local printer is a printer attached to your computer using a USB cable. If your printer is attached to a network instead of your computer, skip this section and go to "Turn On the Printer."
Microsoft® Windows® 2000, Windows XP, Windows XP 64-bit Edition, Windows Server® 2003, Windows Server 2008, Windows Vista®, and Windows Vista 64bit Edition support USB connections. See your computer operating system documentation to see if your system supports USB.
To attach the printer to a computer:
1.Ensure that the printer, computer, and any other attached devices are turned off and unplugged.
2.Connect the printer to the computer using a USB.
 1 USB port
A USB port requires a USB cable. Ensure that you match the USB symbol on the cable to the USB symbol on the printer.
Plug the other end of the cable into a USB port on the back of the computer. For a USB cable, do not plug it into the USB keyboard.
Turn On the Printer
1. Connect the power cable to the printer and plug it into an electrical wall outlet.
CAUTION: Do not use extension cords or power strips.
CAUTION: The printer should not be plugged into a UPS system.
2. Turn on the computer and the printer. When you use the USB cable, the USB driver is automatically installed.
Connecting the Printer to a Network

To attach the printer to a network:
NOTE: If your printer is type A, an optional Network Adapter for Dell 1320c is required to connect the Ethernet cable. In that case, follow the next 2 to 3 steps. Otherwise, proceed with step 4.
1.Ensure that the printer, computer, and any other attached devices are turned off and unplugged.
2.Remove the network cover.
3. Insert the Network Adapter for Dell 1320c.
4. Connect the printer to the network using an Ethernet cable.
 1 Ethernet port
To connect the printer to the network, plug one end of an Ethernet cable into the Ethernet port on the back of the printer, and the other end into a LAN drop or hub.

Turn On the Printer
1. Plug one end of the printer power cable into the socket at the back of the printer and the other end into a properly grounded outlet.
CAUTION: Do not use extension cords or power strips.
CAUTION: The printer should not be plugged into a UPS system.
2. Turn on the computer and the printer.
NOTE: If your printer is type A, the LED of the Network Adapter for Dell 1320c lights.
Print and Check the Printer Settings Page
Print the Printer Settings page.
When the Ready/Data indicator lights (ready status), press and hold the Continue button on the printer's operator panel until the Ready/Data indicator blinks.
Advanced Funtions
NOTE: The following sections are considered advaned functions and should only be carried out by a system administrator. These sections assume you have already installed the Dell Color Laser Software on your PC.
1.Click Start® All Programs® Dell Printers® Additional Color Laser Software® Status Monitor Console.
The Printer Selection dialog box opens.
2.Click Dell Color Laser 1320c listed in Printer Name. The Dell Color Laser 1320c Launcher window opens.
3.Click the Tool Box button. The Tool Box opens.
You can also launch the Tool Box from the printer icon on the taskbar.
4.Click the Printer Settings Report tab.
5.Select Reports from the list at the left side of the page. The Reports page is displayed.
Assign an IP Address
An IP address is a unique number that consists of four sections that are delimited by a period and can include up to three digits in each section, for example,
111.222.33.44.
Assigning an IP address already in use can cause network performance issues.
NOTE: Assigning an IP address is considered as an advanced function and is normally done by a system administrator.
1.Click Start® All Programs® Dell Printers® Additional Color Laser Software® Status Monitor Console.
The Printer Selection dialog box opens.
2.Click Dell Color Laser 1320c listed in Printer Name. The Dell Color Laser 1320c Launcher window opens.
3.Click the Tool Box button. The Tool Box opens.
You can also launch the Tool Box from the printer icon on the taskbar.
4.Click the Printer Maintenance tab.
5.Select TCP/IP Settings from the list at the left side of the page. The TCP/IP Settings page is displayed.
6.Select the mode from IP Address Mode, and then enter the values in IP Address, Subnet Mask, and Gateway Address.
7.Press the Apply New Settings button to take effect.
You can also assign the IP address to the printer when installing the printer drivers with installer. When you use the Network Installation feature, you can set the IP address from 0.0.0.0 to the desired IP address on the printer selection window.
Verify the IP Settings
1.Print another Printer Settings page.
2.Look under the TCP/IP heading on the Printer Settings page to ensure that the IP address, netmask, and gateway are what you expected.
or
Ping the printer and verify that it responds. For example, at a command prompt on a network computer, type ping followed by the new printer IP address (for example, 192.168.0.11):
ping 192.168.0.11
If the printer is active on the network, you will receive a reply.
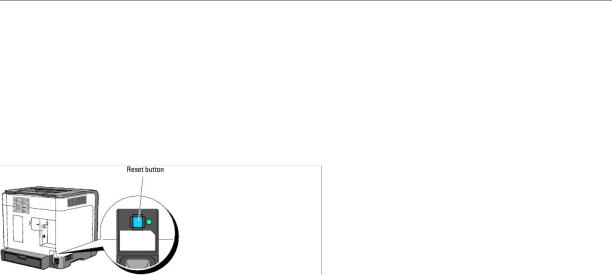
Using the Reset button
Your printer is supplied with an electric leakage detector, which prevents electric shock or fire due to electric leakage by automatically cutting circuits inside the printer.
When electric leakage is detected, the Reset button is tripped. In this case, press the Reset button to turn the printer back on. If the Reset button is tripped again after you press the Reset button, contact Dell.
Check whether or not the electric leakage detector is functioning at least once a month by following the steps below:
1. Turn on the printer, and then press the Test button.
•If the Reset button is tripped and the printer is turned off, the electric leakage detector functions correctly. Press the Reset button to turn the printer back on.
•If the Reset button is not tripped, contact Dell. Do not continue to use the printer if the electric leakage detector is not functioning.
back to contents page

back to contents page
Dell Printer Configuration Web Tool
Using the Dell Printer Configuration Web Tool
NOTE: This web tool is not available unless the printer is connected using a network cable.
One of the features of the Dell™ Printer Configuration Web Tool is E-Mail Alert Setup, which sends an e-mail to you or the key operator when the printer needs supplies or intervention.
To fill out printer inventory reports requiring the asset tag number of all the printers in your area, use the Printer Information feature in the Dell Printer Configuration Web Tool. Just type the IP address of each printer on the network to display the asset tag number.
The Dell Printer Configuration Web Tool feature also allows you to change the printer settings and keep track of printing trends. If you are a network administrator, you can easily copy the printer settings to one or all printers on the network using your Web browser.
To launch the Dell Printer Configuration Web Tool, type your network printer's IP address in your Web browser.
If you do not know the IP address of your printer, print a printer settings page, which lists the IP address:
1.Click Start® All Programs® Dell Printers® Additional Color Laser Software® Status Monitor Console. The Printer Selection dialog box opens.

2.Click Dell Color Laser 1320c listed in Printer Name. The Dell Color Laser 1320c Launcher window opens.
3.Click the Tool Box button. The Tool Box opens.
You can also launch the Tool Box from the printer icon on the taskbar.
4.Click the Printer Maintenance tab.
5.Select EWS (Embedded Web Server or Dell Printer Configuration Web Tool) from the list on the left side of the page. The EWS page is displayed.
6.Press the Print Server Settings button. The printer settings page is printed.
If the IP address shows 0.0.0.0 (the factory default), an IP address has not been assigned. To assign one for your printer, see "Assign an IP Address."
Use the Dell Printer Configuration Web Tool for:
Printer Status
Use the Printer Status menu to get immediate feedback on printer supply status. When toner cartridge is running low, click the order supplies link on the first screen to order additional toner cartridges.
Printer Jobs
Use the Printer Jobs menu to contain information on Job List page and Completed Jobs page.
These pages show the details of the status regarding each protocol or the print jobs.
Printer Settings
Use the Printer Settings menu to change printer settings and view the settings in the Tool Box remotely.
Print Server Settings
Using the Print Server Settings menu, you can change the type of printer interface and necessary conditions for communications.
Copy Printer Settings
Use the Copy Printer Settings menu to copy the printer's settings to another printer or printers on the network just by typing each printer's IP address.
NOTE: You must log in as an administrator to use this feature.
Print Volume
Use the Print Volume option to check the histories of printing, such as paper usage and types of jobs being printed, and limit which users use the color mode and the maximum number of pages they can print.
Printer Information
Use the Printer Information menu to get the information on service calls, inventory reports, or the status of current memory and engine code levels.
E-Mail Alert
Use the E-Mail Alert menu to receive an e-mail when the printer needs supplies or intervention. Type your name or the key operator's name in the e-mail list box to be notified.
Set Password

Use the Set Password menu to lock the Dell Printer Configuration Web Tool with a password so that other users do not inadvertently change the printer settings you selected.
NOTE: You must log in as an administrator to use this feature.
Online Help
Click Online Help to visit the Dell Support website, and see the User's Guide on that page to verify configured settings.
Order Supplies at:
www.dell.com/supplies
Contact Dell Support at:
support.dell.com
Using the Dell Printer Configuration Web Tool
Ensure that you activate JavaScript in your browser before using the Dell Printer Configuration Web Tool.
Environment Settings for Web Browsers
Dell recommends configuring the environment settings for your Web browsers, before using the Dell Printer Configuration Web Tool.
NOTE: The Dell Printer Configuration Web Tool pages may be displayed unreadable if the pages were configured by the different language with your browser's.
For Internet Explorer® 6.0 or Internet Explorer 7.0:
Setting Up the Display Language
1.Select Internet Options from Tools on the menu bar.
2.Select Languages in the General tab.
3.Specify the display language in order of preference in the Language in order of preference list.
For example:
Italian (Italy) [it]
Spanish (Traditional Sort) [es] German (Germany) [de] French (France) [fr]
English [en] or English (United States) [en-us]
Setting the Printer's IP Address to Non-Proxy
1.Select Internet Options from the Tools menu.
2.Select Proxy server under LAN Settings in the Connections tab.
3.Do either of the following:
•Clear the Use a proxy sever for your LAN check box.
•Click Advanced, and then specify the printer's IP address in the Do not use proxy server for addresses beginning with field under Exceptions.
After setting the language and proxy, type <http://nnn.nnn.nnn.nnn/> (the printer's IP address) in the URL entry field of the browser to activate the Dell Printer Configuration Web Tool.
For Firefox 1.5 or Later:
Setting Up the Display Language
1.Select Options from the Tools menu.
2.Click Advanced.
3.Click Edit Languages in the General tab.
4.Specify the display language in order of preference in the Languages in order of preference list.
For example:
English [en] or English/United States [en-us]
Italian [it] Spanish [es] German [de] French [fr] Dutch [nl] Norwegian [no] Swedish [sv]
Setting the Printer's IP Address to Non-Proxy
1.Select Options from the Tools menu.
2.Click General on the Options dialog box.
3.Click Connection Settings® Connection Settings.
4.Do one of the following:
•Select the Direct connection to the Internet check box.
•Select the Auto-detect proxy settings for this network check box.
•Select the Manual proxy configuration check box, and then enter the printer's IP address in the No Proxy for edit box.
•Select the Automatic proxy configuration URL check box.
After setting the language and proxy, type <http://nnn.nnn.nnn.nnn/> (the printer's IP address) in the URL entry field of the browser to activate the Dell Printer Configuration Web Tool.
Page Display Format
The layout of the page is divided into three sections mentioned below:
Top Frame
The Top Frame is located at the top of all pages. When Dell Printer Configuration Web Tool is activated, the current status and specifications of the printer are displayed in the Top Frame on every page.
The following items are displayed in the Top Frame.
Dell Color Laser |
Displays the printer product name. |
1320c |
|
|
|
IP Address |
Displays the printer's IP address. |
|
|
Location |
Displays the printer's location. The location can be changed in Basic Information on the Print Server Settings page. |
|
|
Contact Person |
Displays the printer's administrator's name. The name can be changed in the Basic Information on the Print Server Settings page. |
|
|
Printer Console |
Displays the status of the printer settings and indicators and automatically refreshes at the set interval. The interval can be changed in |
|
the Basic Information on Print Server Settings page. |
|
|
Help |
Links to the Dell web page. See the User's Guide on the Dell Support website, support.dell.com for help on this product. |
|
|
Printer Bitmap |
Shows the printer bitmap. The Printer Status menu appears in the Right Frame by clicking the bitmap. |
|
|
Left Frame
The Left Frame is located at the left side of all pages. The menu titles displayed in the Left Frame are linked to corresponding menus and pages. You can go to the corresponding page by clicking their characters.
The following menus are displayed in the Left Frame.
Printer Status |
Links to the Printer Status menu. |
|
|
|
|
Printer Jobs |
Links to the Printer Jobs menu. |
Printer Settings |
Links to the Printer Settings Report menu. |
|
|
Print Server Settings |
Links to the Print Server Reports menu. |
|
|
Copy Printer Settings |
Links to the Copy Printer Settings menu. |
|
|
Print Volume |
Links to the Print Volume menu |
|
|
Printer Information |
Links to the Printer Status menu. |
|
|
E-Mail Alert |
Links to the Print Server Settings menu. |
|
|
Set Password |
Links to the Other Features menu. |
|
|
Online Help |
Links to the Dell Support website. See the User's Guide on that page. |
|
|
Order Supplies at: |
Links to the Dell web page. |
|
|
Contact Dell Support at: |
Links to the Dell support page |
|
web address: support.dell.com/ |
|
|
Right Frame
The Right Frame is located at the right side of all pages. The contents of the Right Frame correspond to the menu that you select in the Left Frame. For details on the items displayed in the Right Frame, see "Details of Menu Items."
Buttons on the Right Frame
Refresh Button |
|
|
Receives the current printer configuration and updates the latest information in the Right Frame. |
|
|
Apply New Settings Button |
Submits new settings made on the Dell Printer Configuration Web Tool to the printer. The old printer settings will be |
|
replaced by the new settings. |
|
|
Restart printer to apply new |
Submits new settings made on the Dell Printer Configuration Web Tool to the printer and reboots the printer. The old |
settings Button |
printer settings will be replaced by the new settings. |
|
|
Restore Settings Button |
Restores the old settings from before changes made. New settings will not be submitted to the printer. |
|
|
Changing the Settings of Menu Items
Some menus allow you to change the printer settings through the Dell Printer Configuration Web Tool. When you are accessing these menus, the authentication dialog appears on the screen. Type a user name and password for the printer's administrator by following the prompts displayed in the dialog box.
The default user name is admin, and the default password is left blank (NULL). You can change only the password in the Set Password page in the Print Server Settings menu. The user name cannot be changed. See "Set Password" for more information.
Details of Menu Items
Printer Status |
|
Printer Status |
|
|
|
|
|
Printer Events |
|
|
|
|
|
Printer Information |
|
|
|
Printer Jobs |
|
Job List |
|
|
|
|
|
Completed Jobs |
|
|
|
Printer Settings |
Printer Settings Report |
Menu Settings |
|
|
|
|
|
Reports |
|
|
|
|
Printer Settings |
System Settings |
|
|
|
|
Printer Maintenance |
Paper Density |
|
|
|
|
|
Adjust BTR (Bias Transfer Roll) |
|
|
|
|
|
Adjust Fuser |
|
|
|
|
|
Auto Registration Adjustment |
|
|
|
|
|
Color Registration Adjustments |
|
|
|
|
|
|
|
|
Adjust Altitude |
|
|
Reset Defaults |
|
|
|
|
|
Non-Dell Toner |
|
|
|
|
|
Initialize PrintMeter |
|
|
|
|
|
Web Link Customization |
|
|
|
Print Server Settings |
Print Server Reports |
Print Server Setup Page |
|
|
|
|
|
E-Mail Alert Setup Page |
|
|
|
|
Print Server Settings |
Basic Information |
|
|
|
|
|
Port Settings |
|
|
|
|
|
TCP/IP |
|
|
|
|
|
E-Mail Alert |
|
|
SNMP (Simple Network Management Protocol) |
|
|
|
|
Other Features |
Set Password |
|
|
|
|
|
Reset Print Server |
Copy Printer Settings |
Copy Printer Settings |
|
|
|
|
|
|
Copy Printer Settings Report |
|
|
|
Print Volume |
Print Volume |
|
|
|
Dell ColorTrack |
|
|
|
Printer Status
Use the Printer Status menu to check the status of consumables, hardware, and specifications of the printer.
The following pages are displayed in the Printer Status menu.
Printer Status
Purpose:
To check the status of remaining consumables and trays.
Values:
Cyan Cartridge Level |
Displays the percentage of toner remaining in each toner cartridge. When a cartridge is empty, a message appears. The text |
|||
Magenta Cartridge Level |
Print Cartridge is linked to the Dell Printer Supplies website, www.dell.com/supplies. |
|||
|
||||
Yellow Cartridge Level |
|
|||
Black Cartridge Level |
|
|||
|
|
|
|
|
Paper |
Status |
OK |
Indicates that there is some paper in the tray but the quantity is unknown. |
|
Trays |
|
|
|
|
|
Add |
Indicates that there is no paper in the tray. |
||
|
|
|||
|
|
Paper |
|
|
|
|
|
|
|
|
Capacity |
Displays the maximum capacity of the paper tray. |
||
|
|
|
||
|
Size |
Not available for this printer. |
||
|
|
|
|
|
Output |
Status |
OK |
Indicates that the tray is available. |
|
Tray |
|
|
|
|
Capacity |
Displays the maximum capacity of the paper tray. |
|||
|
||||
|
|
|
||
Cover |
Status |
Closed |
Indicates that the cover is closed. |
|
|
|
|
|
|
|
|
Open |
Indicates that the cover is open. |
|
|
|
|
|
|
Printer Type |
Displays the type of printing for the printer. Color Laser is displayed normally. |
|||
Printing Speed |
Displays the printing speed for the printer. |
|||
|
|
|
|
|
Printer Events

Purpose:
When printer errors occur such as running out of paper or running out of toner cartridge, the details of all alerts or indications of errors are displayed in the
Printer Events page.
Values:
Location Displays the location where the printer error occurred.
Details Displays the details of the printer fault.
Printer Information
Purpose:
To verify the printer details such as hardware configuration and software version. This page can also be displayed by clicking Printer Information in the Left Frame.
Values:
Dell Service Tag Number |
Displays Dell's service tag number. |
|
|
|
|
Asset Tag Number |
Displays the printer's asset tag number. |
|
|
|
|
Printer Serial Number |
Displays the printer's serial number. |
|
|
|
|
Memory Capacity |
Displays the memory capacity. |
|
|
|
|
Processor Speed |
Displays the processing speed. |
|
|
|
|
Printer Revision Levels |
Firmware Version |
Displays the revision date (revision level). |
|
|
|
|
Network Firmware Version |
Displays the revision date (revision level). |
Printer Jobs |
|
|
The Printer Jobs menu contains information on the Job List and Completed Jobs pages. These pages show the details of the status regarding each protocol or the print jobs.
Job List
Purpose:
To confirm the print jobs that are being processed. Click Refresh to update the screen.
Values:
ID |
Displays the job id. |
|
|
Job Name |
Displays the file name of the job being printed. |
|
|
Owner |
Displays the job owner's name. |
|
|
Host Name |
Displays the name of the host computer. |
|
|
Job Status |
Displays the status of the job being printed. |
|
|
Host I/F |
Displays the status of the host interface. |
|
|
Job Submitted Time |
Displays the date the print job was submitted. |

Completed Jobs
Purpose:
To check the completed print jobs. Up to the last 22 print jobs are displayed. Click Refresh to update the screen.
Values:
ID |
Displays the job ID. |
Job Name |
Displays the file name of the completed print job. |
|
|
Owner |
Displays the job owner's name. |
|
|
Host Name |
Displays the name of the host computer. |
|
|
Output Result |
Displays the status of completed print jobs. |
|
|
Impression Number |
Displays the number of pages in the print job. |
|
|
No. of Sheets |
Displays the number of sheets in the print job. |
|
|
Host I/F |
Displays the status of the host interface. |
|
|
Job Submitted Time |
Displays the date the print job was submitted. |
|
|
Printer Settings
Use the Printer Settings menu to display the printer settings report and to configure printer settings.
The following tabbed pages are displayed at the top of the Right Frame.
Printer Settings Report
The Printer Settings Report tab includes the Menu Settings and Reports pages.
Menu Settings
Purpose:
To display the current settings of the printer.
Values:
System Settings |
Power Saver Timer |
Displays the amount of time before the printer enters the power saver timer mode 1 after it finishes |
|
Mode 1 |
a print job. |
|
|
|
|
Power Saver Timer |
Displays the amount of time before the printer enters the power saver timer mode 2 after it finishes |
|
Mode 2 |
a print job. |
|
|
|
|
Control Panel Tone |
Displays whether the printer sounds the tone for the panel. |
|
|
|
|
Machine Ready Tone |
Displays whether the printer sounds the tone when the machine becomes ready. |
|
|
|
|
Job Complete Tone |
Displays whether the printer sounds the tone when a job is completed. |
|
|
|
|
Fault Tone |
Displays whether the printer sounds the tone when an error occurs. |
|
|
|
|
Alert Tone |
Displays whether the printer sounds an alarm when an error occurs. |
|
Out of Paper Alert Tone |
Displays whether the printer sounds the tone when the paper runs out. |
|
|
|
|
|
|

|
Low Toner Alert Tone |
Displays whether the printer sounds the tone when the toner is low. |
|
|
Time-Out |
Displays the amount of time the printer waits to receive additional bytes of data from the computer. |
|
|
|
|
|
|
Device Language |
Displays the language to be used for E-mail Alert. |
|
|
|
|
|
|
Auto Log Print |
Displays whether the printer outputs logs automatically. |
|
|
|
|
|
Paper Density |
Plain |
Light |
Displays the paper density in Light for the plain paper. |
|
|
|
|
|
|
Normal* |
Displays the paper density in Normal for the plain paper. |
|
|
|
|
|
Label |
Light |
Displays the paper density in Light for the label. |
|
|
|
|
|
|
Normal* |
Displays the paper density in Normal for the label. |
|
|
|
|
Adjust BTR |
Plain |
Displays the voltage settings of the transfer roller (-6-6) for plain paper. The default is 0. |
|
|
|
|
|
|
Plain Thick |
Displays the voltage settings of the transfer roller (-6-6) for thick plain paper. The default is 0. |
|
|
|
|
|
|
Covers |
Displays the voltage settings of the transfer roller (-6-6) for cover paper. The default is 0. |
|
|
Covers Thick |
Displays the voltage settings of the transfer roller (-6-6) for thick cover paper. The default is 0. |
|
|
|
|
|
|
Label |
Displays the voltage settings of the transfer roller (-6-6) for labels. The default is 0. |
|
|
|
|
|
|
Coated |
Displays the voltage settings of the transfer roller (-6-6) for coated paper. The default is 0. |
|
|
Coated Thick |
Displays the voltage settings of the transfer roller (-6-6) for thick coated paper. The default is 0. |
|
|
|
|
|
|
Envelope |
Displays the voltage settings of the transfer roller (-6-6) for envelopes. The default is 0. |
|
|
|
|
|
|
Recycled |
Displays the voltage settings of the transfer roller (-6-6) for recycled paper. The default is 0. |
|
|
Coated JPN |
Displays the voltage settings of the transfer roller (-6-6) for Japanese coated paper. The default is 0. |
|
|
|
|
|
|
Postcard JPN |
Displays the voltage settings of the transfer roller (-6-6) for Japanese postcards. The default is 0. |
|
|
|
|
|
Adjust Fuser |
Plain |
Displays the temperature settings of the fuser (-2-2) for plain paper. The default is 0. |
|
|
Plain Thick |
Displays the temperature settings of the fuser (-2-2) for thick plain paper. The default is 0. |
|
|
|
|
|
|
Covers |
Displays the temperature settings of the fuser (-2-2) for cover paper. The default is 0. |
|
|
|
|
|
|
Covers Thick |
Displays the temperature settings of the fuser (-2-2) for thick cover paper. The default is 0. |
|
|
Label |
Displays the temperature settings of the fuser (-2-2) for labels. The default is 0. |
|
|
|
|
|
|
Coated |
Displays the temperature settings of the fuser (-2-2) for coated paper. The default is 0. |
|
|
|
|
|
|
Coated Thick |
Displays the temperature settings of the fuser (-2-2) for thick coated paper. The default is 0. |
|
|
Envelope |
Displays the temperature settings of the fuser (-2-2) for envelopes. The default is 0. |
|
|
|
|
|
|
Recycled |
Displays the temperature settings of the fuser (-2-2) for recycled paper. The default is 0. |
|
|
|
|
|
|
Coated JPN |
Displays the temperature settings of the fuser (-2-2) for Japanese coated paper. The default is 0. |
|
|
Postcard JPN |
Displays the temperature settings of the fuser (-2-2) for Japanese postcards. The default is 0. |
|
|
|
|
|
Auto Registration |
Auto Registration |
Displays whether to adjust the registration automatically. |
|
Adjustment |
Adjustment |
|
|
Adjust Altitude |
Adjust Altitude |
Displays whether to adjust the height of the installation location of the printer. |
|
|
|
|
|
Non-Dell Toner |
Non-Dell Toner |
Displays whether to use a refilled toner cartridge. |
|
|
|
|
|
Web Link Customization |
Select Reorder URL |
Regular* |
Displays the URL (accessories.us.dell.com/sna) that can be linked from Order Supplies |
|
|
|
at in the left frame. |
|
|
|
|
|
|
Premier |
Displays the URL (premier.dell.com) that can be linked from Order Supplies at in the left |
|
|
|
frame. |
|
|
|
|
Reports |
|
|
|
Purpose: |
|
|
|
To print various types of reports and lists.
Values:
Printer Settings Click the Start button to print the printer settings page.
Device Settings Click the Start button to print the device settings page.
Job History |
Click the Start button to print the job history report. |
|
|
Error History |
Click the Start button to print the error history report. |
|
|
Color Test Page |
Click the Start button to print the color test page. |
|
|
Printer Settings
The Printer Settings tab includes System Settings page.
System Settings
Purpose:
To configure the basic printer settings.
Values:
Power Saver Timer |
Displays the amount of time before the printer enters the power saver timer mode 1 after it finishes a print job. |
Mode 1 |
|
|
|
Power Saver Timer |
Displays the amount of time before the printer enters the power saver timer mode 2 after it finishes a print job. |
Mode 2 |
|
|
|
Control Panel Tone |
Displays whether the printer sounds the tone for the panel. |
|
|
Machine Ready Tone |
Displays whether the printer sounds the tone when the machine becomes ready. |
|
|
Job Complete Tone |
Displays whether the printer sounds the tone when a job is completed. |
|
|
Fault Tone |
Displays whether the printer sounds the tone when an error occurs. |
|
|
Alert Tone |
Specifies whether the printer sounds an alarm when an error occurs. |
|
|
Out of Paper Alert Tone |
Displays whether the printer sounds the tone when the paper runs out. |
|
|
Low Toner Alert Tone |
Displays whether the printer sounds the tone when the toner is low. |
|
|
Time-Out |
Specifies the amount of time the printer waits to receive additional bytes of data from the computer. When this timeout expires, |
|
the print job is canceled. |
|
|
Device Language |
Determine the language to be used for E-mail Alert. |
|
|
Auto Log Print |
Specifies whether the printer outputs logs automatically. |
Printer Maintenance
The Printer Maintenance tab includes Paper Density, Adjust BTR, Adjust Fuser, Auto Registration Adjustment, Color Registration Adjustments, Adjust Altitude, Reset Defaults, Non-Dell Toner, Initialize PrintMeter, and Web Link Customization pages.
Paper Density
Purpose:
To specify the paper density.
Values:
Plain |
Light |
Sets the paper density in Light for the plain paper. |
|
|
|
|
Normal |
Sets the paper density in Normal for the plain paper. |
|
|
|
|
|
|

Label Light Sets the paper density in Light for the label.
Normal Sets the paper density in Normal for the label.
Adjust BTR
Purpose:
To specify the reference voltage settings for the transfer roller.
Values:
Plain |
Sets the reference voltage settings for the transfer roller for plain paper. |
|
|
Plain Thick |
Sets the reference voltage settings for the transfer roller for thick plain paper. |
Covers |
Sets the reference voltage settings for the transfer roller for cover paper. |
|
|
Covers Thick |
Sets the reference voltage settings for the transfer roller for thick cover paper. |
|
|
Label |
Sets the reference voltage settings for the transfer roller for labels. |
Coated |
Sets the reference voltage settings for the transfer roller for coated paper. |
|
|
Coated Thick |
Sets the reference voltage settings for the transfer roller for thick coated paper. |
|
|
Envelope |
Sets the reference voltage settings for the transfer roller for envelopes. |
Recycled |
Sets the reference voltage settings for the transfer roller for recycled paper. |
|
|
Coated JPN |
Sets the reference voltage settings for the transfer roller for Japanese coated paper. |
|
|
Postcard JPN |
Sets the reference voltage settings for the transfer roller for Japanese postcards. |
|
|
Adjust Fuser
Purpose:
To specify the temperature settings value for the fuser.
Values:
Plain |
Sets the temperature settings for the fuser for plain paper. |
|
|
Plain Thick |
Sets the temperature settings for the fuser for thick plain paper. |
|
|
Covers |
Sets the temperature settings for the fuser for cover paper. |
|
|
Covers Thick |
Sets the temperature settings for the fuser for thick cover paper. |
|
|
Label |
Sets the temperature settings for the fuser for labels. |
|
|
Coated |
Sets the temperature settings for the fuser for coated paper. |
|
|
Coated Thick |
Sets the temperature settings for the fuser for thick coated paper. |
|
|
Envelope |
Sets the temperature settings for the fuser for envelopes. |
|
|
Recycled |
Sets the temperature settings for the fuser for recycled paper. |
|
|
Coated JPN |
Sets the temperature settings for the fuser for Japanese coated paper. |
|
|
Postcard JPN |
Sets the temperature settings for the fuser for Japanese postcards. |
|
|
Auto Registration Adjustment
Purpose:
Specifies whether to adjust the color registration automatically.
Values:
 Auto Registration Adjustment Specifies whether to adjust the color registration automatically.
Color Registration Adjustments
Purpose:
To print the color registration chart and to adjust the color registration by using the chart.
This function is required after the printer is set up or moved.
Values:
Auto Correct |
|
Click Start to adjust color registration automatically. |
|
|
|
Color Regi Chart |
|
Click Start to print the color registration chart. |
|
|
|
1 (Lateral) - Enter Number |
Yellow |
Specifies the values for lateral that are found in the color registration chart. |
|
|
|
|
Magenta |
|
|
|
|
|
Cyan |
|
|
|
|
2 (Process) - Enter Number |
Yellow |
Specifies the values for process that are found in the color registration chart. |
|
Magenta |
|
|
|
|
|
Cyan |
|
|
|
|
Adjust Altitude |
|
|
Purpose: |
|
|
To adjust the height of the installation location of the printer.
Values:
0 meter Select the value close to the height of the installation location of the printer.
1000 meters
2000 meters
3000 meters

Reset Defaults
Purpose:
To initialize the non-volatile memory (NVM). After executing this function and rebooting the printer, all the menu parameters are reset to their default values.
Values:
 Reset Defaults and restart printer Click Start to initialize the non-volatile memory (NVM) memory.
Non-Dell Toner
Purpose:
Specifies whether to use the refilled toner cartridge or not. When this setting is on, you can use toner cartridges provided by other companies.
Values:
Non-Dell
Toner
Overrides factory toner cartridge setting.
Using non-Dell-brand toner cartridges may make some printer features unusable, reduce print quality and decrease the reliability of your printer.
Dell recommends only new Dell-brand toner cartridges for your printer.
Dell does not provide warranty coverage for problems caused by using accessories, parts, or components not supplied by Dell. Using "Copy Printer Settings" will not copy the settings to another printer.
Initialize PrintMeter
Purpose:
To initialize the data for the print meter. After executing this function to automatically restart the printer, the value of the meter resets to 0.
Values:
 Initialize PrintMeter Click Start to initialize the print meter.
Web Link Customization
Purpose:
To configure the link used for ordering supplies.
Values:
Select Reorder URL Specifies the URL that Order Supplies at links to in the left frame. |
|
Regular |
accessories.us.dell.com/sna |
Premier |
premier.dell.com |
Print Server Settings
Use the Print Server Settings menu to set the type of printer interface and necessary conditions for communications.
The following tabbed pages are displayed in the top of the Right Frame.
Print Server Reports
The Print Server Reports tab includes Print Server Setup Page, and E-Mail Alert Setup Page.
Print Server Setup Page
Purpose:
To verify the current settings of TCP/IP (Transmission Control Protocol/Internet Protocol) protocol and printing ports. On this page, you can only verify the settings of items. If you want to change the settings, go to the pages in the Print Server Settings tab.
Values:
Ethernet |
Ethernet Settings |
Displays the current settings of Ethernet transmission rate and the duplex settings. |
|
|
|
|
|
|
Current Ethernet |
Displays the current Ethernet settings. |
|
|
Settings |
|
|
|
|
|
|
|
MAC Address |
Displays the printer's MAC (Media Access Control) address. |
|
|
|
|
|
TCP/IP Settings |
Host Name |
Displays the host name. |
|
|
|
|
|
|
IP Address Mode |
Displays the settings for the IP address. |
|
|
|
|
|
|
IP Address |
Displays the printer's IP address. |
|
|
|
|
|
|
Subnet Mask |
Displays the subnet mask. |
|
|
|
|
|
|
Gateway Address |
Displays the gateway address. |
|
|
|
|
|
DNS |
DNS Mode |
Select the check box to get the DNS (Domain Name System) server address automatically from the DHCP |
|
|
|
(Dynamic Host Configuration Protocol) server. |
|
|
|
|
|
|
Current DNS Server |
Displays the DNS server address. |
|
|
Address |
|
|
|
|
|
|
LPD (Line Printer |
Port Status |
Displays the port status. |
|
Daemon) |
|
|
|
Connection Time-Out |
Displays the connection timeout period. |
||
|
|||
|
|
|
|
Port9100 |
Port Status |
Displays the port status. |
|
|
|
|
|
|
Port Number |
Displays the port number. |
|
|
|
|
|
|
Connection Time-Out |
Displays the connection timeout period. |
|
|
|
|
|
HTTP |
Port Status |
Displays the HTTP (Hyper Text Transfer Protocol) port status. |
|
|
|
|
|
|
Port Number |
Displays the HTTP port number. |
|
|
|
|
|
|
Simultaneous |
Displays the number of connections received simultaneously by the client. |
|
|
Connections |
|
|
|
|
|
|
|
Connection Time-Out |
Displays the connection timeout period. |
|
|
|
|
|
FTP |
Port Status |
Displays the port status. |
|
|
|
|
|
|
Connection Time-Out |
Displays the connection timeout period. |
|
|
|
|
|
SNMP Agent |
Port Status |
Displays the port status. |
|
|
|
|
|
|
Trap Notification (IP) |
Displays the status of the Trap Notification (IP) feature and IP address. |
|
|
1-3 |
|
|
|
|
|
|
|
Authenticate Error Trap |
Displays the status of the Authenticate Error Trap. |
|
|
|
|
 Loading...