


 Loading...
Copyright
Information in this document is subject to change without notice. ©2010 Dell Inc. All rights reserved.
Reproduction of these materials in any manner whatsoever without the written permission of Dell Inc. is strictly forbidden.
Trademarks used in this text: Dell, the DELL logo, and Dell Toner Management System are trademarks of Dell Inc.; Microsoft, Windows, Windows Vista, and Windows Server are registered trademarks of Microsoft Corporation in the United States and/or other countries; Adobe and Acrobat Reader are either registered trademarks or trademarks of Adobe Systems Incorporated in the United States and/or other countries.
Other trademarks and trade names may be used in this document to refer to the entities claiming the marks and names of their products.
Dell Inc. disclaims any proprietary interest in trademarks and trade names other than its own. Refer to the 'LICENSE.txt' file in the provided CD-ROM for the open source license information. REV. 1.02
Multi-Functional Printer
User’s Guide
www.dell.com | support.dell.com?

Safety information
These warnings and precautions are included in order to prevent injury to you and others, as well as preventing any potential damage to your machine. Be sure to read and understand all of these instructions before using the machine.
Use common sense for operating any electrical appliance and whenever using your machine. Also, follow all warnings and instructions marked on the machine and in the accompanying literature. After reading this section, keep it in a safe place for future reference.
Important safety symbols
This section explains the meanings of all icons and signs in the user's guide. These safety symbols are in order, according to the degree of danger.
Explanation of all icons and signs used in the user’s guide:
 Warning Hazards or unsafe practices that may result in severe personal injury or death.
 Caution Hazards or unsafe practices that may result in minor personal injury or property damage.
 Do not attempt.
 Do not disassemble.
 Do not touch.
 Unplug the power cord from the wall socket.
 Make sure the machine is grounded to prevent electric shock.
 Call the service center for help.
 Follow directions explicitly.
Operating environment
Warning
Do not use if the power cord is damaged or if the electrical outlet is not grounded.
This could result in electric shock or fire.
Do not bend, or place heavy objects on the power cord.
Stepping on or allowing the power cord to be crushed by a
heavy object could result in electric shock or fire.
Do not place anything on top of the machine (water, small metal or heavy objects, candles, lit cigarettes, etc.).
This could result in electric shock or fire.
If the machine gets overheated, it releases smoke, makes strange noises, or generates an odd odor, immediately turn off the power switch and unplug the machine.
This could result in electric shock or fire.
Do not remove the plug by pulling on the cord; do not handle the plug with wet hands.
This could result in electric shock or fire.
Caution
During an electrical storm or for a period of non-operation, remove the power plug from the electrical outlet.
This could result in electric shock or fire.  Be careful, the paper output area is hot.
Burns could occur.
 If the plug does not easily enter the electrical outlet, do not attempt to force it in.
Call an electrician to change the electrical outlet, or this could result in electric shock.
 Do not allow pets to chew on the AC power, telephone or PC interface cords.
 If the machine has been dropped, or if the cabinet appears damaged, unplug the machine from all interface connections and request assistance from qualified service personnel.
Otherwise, this could result in electric shock or fire.
 If the machine exhibits a sudden and distinct change in performance, unplug the machine from all interface connections and request assistance from qualified service personnel.
Otherwise, this could result in electric shock or fire.
This could result in electric shock or fire and/or injury to your pet.
 If the machine does not operate properly after these instructions have been followed, unplug the machine from all interface connections and request assistance from qualified service personnel.
Otherwise, this could result in electric shock or fire.
Operating method
Caution
Do not forcefully pull the paper out during printing.
It can cause damage to the machine.
Be careful not to put your hand between the machine and paper tray.
You may get injured.
When printing large quantities, the bottom part of the paper output area may get hot. Do not allow children to touch.
Children may be burned.
When removing jammed paper, do not use tweezers or sharp metal objects.
It can cause damage to the machine.
 Do not block or push objects into the ventilation opening.
This could result in elevated component temperatures which can cause damage or fire.
 Use care to avoid paper cuts when replacing paper or removing jammed paper.
You may get hurt.
 Do not allow too many papers to stack up in the paper output tray.
It could cause damage to the machine.
 This machine's power interception device is the power cord.
To switch off the power supply, remove the power cord from the electrical outlet.
Installation / Moving
Warning
Do not place the machine in an area with dust, humidity or water leaks. This could result in electric shock or fire.
Caution
When moving the machine, turn the power off and disconnect all cords; then lift the machine with at least two people are required to lift printer.
The machine could fall, causing human injury or machine damage.
 Do not place the machine on an unstable surface.
The machine could fall, causing human injury or machine damage.
 The machine should be connected to the power level which is specified on the label.
If you are unsure and want to check the power level you are using, contact the electrical utility company.
 Use only No.26 AWG[a] or larger, telephone line cord, if necessary.
 Do not put a cover over the machine or place it in an airtight location, such as a closet.
If the machine is not well-ventilated, this could result in fire.
 Make sure you plug the power cord into a grounded electrical outlet.
Otherwise, this could result in electric shock or fire.
 Do not overload wall outlets and extension cords.
This can diminish performance, and could result in electric shock or fire.
 Use the power cord supplied with your machine for safe operation. If you are using a cord which is longer than 2 meters (79”) with a 140V machine, then the gauge should be

Otherwise, it can cause damage to the machine. 16 AWG or larger.
Otherwise, it can cause damage to the machine, and could result in electric shock or fire.
[a] AWG: American Wire Gauge
Maintenance / Checking
Caution
Unplug this product from the wall outlet before cleaning the inside of the machine. Do not clean the machine with benzene, paint thinner or alcohol; do not spray water directly into the machine.
This could result in electric shock or fire.
When you are working inside the machine replacing supplies or cleaning the inside, do not operate the machine.
You may get injured.
Keep cleaning supplies away from children.
Children may get hurt.
Do not disassemble, repair or rebuild the machine by yourself.
It can cause damage to the machine. Call a certified technician when the machine needs repair.
 Keep the power cable and the contact surface of the plug clean from dust or water.
This could result in electric shock or fire.
 Do not remove any covers or guards that are fastened with screws. The machine should only be repaired by Dell service technician.
 To clean and operate the machine, follow the user's guide provided with the machine.
Otherwise, it can cause damage to the machine.
Supply usage
Caution
Do not disassemble the toner cartridge.
Toner dust can hazardous.
Do not burn any of the supplies such as toner cartridge or fuser unit.
It can cause an explosion or fire.
 When changing the toner cartridge or removing jammed paper, be careful not to let toner dust touch your body or clothes.
Toner dust can be dangerous to humans.
When storing supplies such as toner cartridges, keep them away from children.
Toner dust can be hazardous.
 Using recycled supplies, such as toner, can cause damage to the machine.
In case of damage due to the use of recycled supplies, a service fee will be charged.
Introduction
This chapter gives you an overview of your machine:
This chapter includes:
Machine overview
Control panel overview
Understanding the Status LED
Introducing the useful buttons
Turning on the machine
Machine overview
Front view
This illustration may differ from your machine depending on its model.
1 |
Document feeder cover |
6 |
Front door handle |
11 |
Document output tray |
16 |
Scanner glass |
|
|
|
|
|
|
|
|
2 |
Document feeder width guides |
7 |
Handle |
12 |
Control panel |
17 |
Scan unit |
|
|
|
|
|
|
|
|

3 |
Document feeder input tray |
8 |
Tray 1 |
13 |
Toner cartridge |
18 |
Scan unit close button[a] |
4 |
Document feeder output tray |
9 |
Manual tray |
14 |
Manual tray paper width guides |
|
|
|
|
|
|
|
|
|
|
5 |
Output support |
10 |
Front door |
15 |
Scanner lid |
|
|
|
|
|
|
|
|
|
|
[a] This button is used when you close the scan unit.
Rear view
This illustration may differ from your machine depending on its model.
1 |
Network port |
5 |
Power receptacle |
|
|
|
|
2 |
USB port |
6 |
Rear door |
|
|
|
|
3 |
Telephone line socket |
7 |
Rear door handle |
|
|
|
|
4 |
Extension telephone socket (EXT) |
|
|
|
|
|
|
Control panel overview
1 |
ID Copy ( |
) |
You can copy both sides of an ID Card, such as a driver’s license, to a single side of paper (See ID card copying). |
|
|
|
|

2 |
Reduce/Enlarge ( |
) |
Makes a copy smaller or larger than the original. |
||
|
|
|
|
|
|
3 |
Display |
|
|
|
Shows the current status and prompts during an operation. |
|
|
|
|
|
|
4 |
Status ( |
) |
|
|
Shows the status of your machine (See Understanding the Status LED). |
|
|
|
|
|
|
5 |
Fax ( ) |
|
|
|
Activates fax mode. |
|
|
|
|
|
|
6 |
Copy ( |
) |
|
|
Activates copy mode. |
|
|
|
|
|
|
7 |
Scan ( |
) |
|
|
Activates scan mode. |
|
|
|
|
|
|
8 |
Arrow |
|
|
|
Scroll through the options available in the selected menu, and increase or decrease values. |
|
|
|
|
|
|
9 |
Menu ( |
) |
|
|
Enters Menu mode and scrolls through the available menus (See Machine status and advanced feature). |
|
|
|
|
|
|
10 |
OK |
|
|
|
Confirms the selection on the screen. |
|
|
|
|
|
|
11 |
Back |
|
|
|
Sends you back to the upper menu level. |
|
|
|
|
||
12 |
Numeric keypad |
|
Dials fax number, and enters the number value for document copies or other options. |
||
|
|
|
|
|
|
13 |
Address Book ( |
) |
|
Allows you to store frequently used fax numbers or search for stored fax numbers. |
|
|
|
|
|
|
|
14 |
Redial/Pause ( |
) |
|
In standby mode, redials the last number. Also in edit mode, inserts a pause into a fax number. |
|
|
|
|
|
|
|
15 |
On Hook Dial ( |
) |
|
Enables you to dial a number with the receiver on the hook. |
|
|
|
|
|
|
|
16 |
Start ( |
) |
|
|
Starts a job. |
|
|
|
|
|
|
17 |
Stop/Clear ( ) |
|
|
Stops an operation at any time. The pop-up window appears on the screen showing the current job that the user can stop or resume. |
|
|
|
|
|
|
|
18 |
Power ( |
) |
|
|
You can turn the power on and off (See Power button). |
|
|
|
|
|
|
Understanding the Status LED
The color of the status LED indicates the machine's current status.
Status |
Description |
|||
|
|
|
|
|
Off |
|
The machine is off-line. |
|
|
|
|
The machine is in power saver mode. When data is received, or any button is pressed, it switches to on-line automatically. |
||
|
|
|
||
Green |
Blinking |
When the backlight slowly blinks, the machine is receiving data from the computer. |
||
|
|
When the backlight blinks rapidly, the machine is printing data. |
|
|
|
|
|
|
|
|
On |
The machine is on-line and can be used. |
|
|
|
|
|
||
Red |
Blinking |
A minor error has occurred and the machine is waiting for the error to be cleared. Check the display message. When the problem is cleared, the |
||
|
|
machine resumes. |
|
|
|
|
Small amount of toner is left in the cartridge. The estimated cartridge life [a] of toner is close. Prepare a new cartridge for replacement. You may |
||
|
|
temporarily increase the printing quality by redistributing the toner. (See Redistributing toner.) |
||
|
|
|
|
|
|
On |
A toner cartridge has almost reached the end of its estimated cartridge life |
[a] |
. It is recommended to replace the toner cartridge (See Replacing the |
|
|
|
||
|
|
toner cartridge). |
|
|
|
|
A paper jam has occurred (See Clearing paper jams). |
|
|
|
|
The cover is opened. Close the cover. |
|
|
|
|
|
|
|
There is no paper in the tray. Load paper in the tray.
The machine has stopped due to a major error. Check the display message (See Understanding display messages).
[a] Estimated cartridge life means the expected or estimated toner cartridge life, which indicates the average capacity of print-outs and is designed pursuant to
ISO/IEC 19752. The number of pages may be affected by operating environment, printing interval, media type, and media size. Some amount of toner may remain in the cartridge even when End of life Replace new cart appears and the printer stops printing.
Dell does not recommend using a non-genuine Dell toner cartridge such as one that is refilled or remanufactured. Dell cannot guarantee a non-genuine Dell toner cartridge's quality. Service or repair required as a result of using non-genuine Dell toner cartridges will not be covered under the machine warranty.
Check the message on the display. Follow the instructions in the message or refer to troubleshooting part (See Understanding display messages). If the problem persists, call for service.
All printing errors will appear in the Printer Status Monitor program window. If the problem persists, call for service.
Introducing the useful buttons
Menu button
When you want to know the machine status and set your machine to use an advanced feature, click the Menu button (See Machine status and advanced feature).
Power button
When you want to turn the power off, press this button until Power Down appear. Choose Yes, to turn the power off. This button can also be used to turn the machine on.
Status |
Description |
|
|
Off |
The machine is in ready mode. |
|
The machine’s power is off. |
|
|
On |
The machine is in power save mode. |
|
|
Turning on the machine
Plug in the power cord, the machine will be turned on.
If you want to turn the power off, press the Power ( ) button until Power Down appear on the display.

About this user’s guide
This user’s guide provides information about how to use the machine.
Read the safety information before using the machine.
If you have a problem using the machine, refer to the troubleshooting chapter (See Troubleshooting). Terms used in this user’s guide are explained in the glossary chapter (See Glossary).
Illustrations in this user’s guide may differ from your machine depending on its options or models. The procedures in this user’s guide are mainly based on Windows XP.
Convention
Some terms in this guide are used interchangeably, as below:
Document is synonymous with original.
Paper is synonymous with media, or print media.
Machine refers to printer or MFP.
The following table offers the conventions of this guide:
Convention |
Description |
|
Example |
|
|
|
|
Bold |
For texts on the display or button names on the machine. |
Start |
|
|
|
|
|
Note |
Provides additional information or detailed specification of the |
|
|
|
The date format may differ from |
||
|
machine function and feature. |
|
|
|
|
country to country. |
|
|
|
|
|
|
|
|
|
Caution |
Gives users information to protect the machine from possible |
|
|
|
Do not touch the green underside |
||
|
mechanical damage or malfunction. |
|
|
|
|
of the toner cartridge. |
|
|
|
|
|
|
|
|
|
Footnote |
Provides additional more detailed information on certain words |
a. pages per minute |
|
|
or a phrase. |
|
|
|
|
|
|
(“Cross- |
Guides users to a reference page for the additional detailed |
(See Finding more information). |
|
reference”) |
information. |
|
|
|
|
|
|
Finding more information
You can find information for setting up and using your machine from the following resources: either as a print-out or on screen.
Material |
Description |
|
name |
||
|
||
|
|
|
Quick |
This guide provides basic information on setting up your machine. |
|
Install |
|
|
Guide |
|
|
|
|
|
User’s |
This guide provides you with step-by-step instructions for using your machine’s full features, and |
|
Guide |
contains information for maintaining your machine, troubleshooting, and replacing supplies. |
|
|
|
|
Machine |
This help provides you with help information on printer driver and instructions for setting up the options |
|
Driver |
for printing (See Using help). |
|
Help |
|
|
|
|
|
Dell |
If you have Internet access, you can get help, support, machine drivers, manuals, and order information |
|
website |
from the Dell website, www.dell.com or support.dell.com. |
|
|
|

Features of your new product
Your new machine is equipped with a number of special features that improve the quality of the documents you print.
Special Features
Print with excellent quality and speed
You can print with a resolution of up to 1200 x 1200 dpi effective output.
Your machine prints A4-sized paper at up to 22 ppm and letter-sized paper at up to 23 ppm.
Handle many different types of printable material
Manual tray supports plain paper in various sizes, letterhead, envelopes, labels, custom-sized media, postcards, and heavy paper.
The 250-sheet tray supports plain paper.
Create professional documents
Print Watermarks. You can customize your documents with words, such as “Confidential” (See Using watermarks).
Print Posters. The text and pictures of each page of your document are magnified and printed across the sheet of paper and can then be taped together to form a poster (See Printing posters).
You can use preprinted forms with plain paper (See Using overlay).
Save time and money
To save paper, you can print multiple pages on one single sheet of paper (See Printing multiple pages on one sheet of paper).
This machine automatically conserves electricity by substantially reducing power consumption when not in use.
To save paper, you can print on both sides of the paper (manual) (See Printing on both sides of paper (Manual)).
Print in various environments
You can print with various operating system such as Windows, Linux, and Macintosh systems (See System requirements).
Your machine is equipped with a USB interface and a network interface.
Copy originals in several formats
Your machine can copy multiple image copies from the original document on a single page (See 2- up or 4-up copying (N-up)).
The print quality and image size may be adjusted and enhanced at the same time.
Scan the originals and send it right away
Scan in color and use the precise compressions of JPEG, TIFF, and PDF formats.
Quickly scan and send files to multiple destinations using Networks scanning (See For network connected machine).
Set a specific time to transmit a Fax
You can specify a certain time to transmit the fax and also send the fax to several stored destinations.
After the transmission, the machine may print out the fax reports according to the setting.
IPv6
This machine supports IPv6.
Features by Model
The machine is designed to support all of your document needs from printing and copying to more advanced networking solutions for your business.
Some features and optional goods may not be available depending on models or countries.
Features by model include:
|
FEATURES |
Dell 1135n |
|
|
|
|
? |
|
|
|
|
|
Duplex (2-sided) printing (manual) |
? |
|
|
|
|
Copy |
? |
|
|
|
|
FAX |
? |
|
|
|
|
Network PC fax |
? |
|
|
|
|
Fax to PC (Dell Scan and Fax Manager) |
? |
|
|
|
|
On hook dial |
? |
|
|
|
|
USB 2.0 |
? |
|
|
|
|
Network Interface Ethernet 10/100 Base TX wired LAN |
? |
|
|
|
|
IPv6 |
? |
|
|
|
|
Embedded Web Service |
? |
|
|
|
|
Document Feeder |
? |
|
|
|
( ?: Included) |
|
|

Getting started
This chapter gives you step-by-step instructions for setting up the USB connected machine and software.
This chapter includes:
Setting up the hardware
Supplied software
System requirements
Installing USB connected machine’s driver Sharing your machine locally
Supported optional devices and features may differ according to your model. Please check your model name. (See Features by Model).
Setting up the hardware
This section shows the steps to set up the hardware, as explained in the Quick Install Guide. Make sure you read the Quick Install Guide first and follow the steps below:
1.Select a stable location.
Select a level, stable place with adequate space for air circulation. Allow extra space to open covers and trays.
The area should be well ventilated and away from direct sunlight or sources of heat, cold, and humidity. Do not set the machine close to the edge of your desk or table.
Printing is suitable for altitudes under 1,000 m (3,281 ft.). Refer to the altitude setting to optimize your printing (See Altitude adjustment).
Place the machine on a flat, stable surface so that there is no incline greater than 2 mm (0.08 inch). Otherwise, printing quality may be affected.
2.Unpack the machine and check all the enclosed items.
3.Remove all tape.
4.Install the toner cartridge.
5.Load paper (See Loading paper in the tray).
6.Make sure that all cables are connected to the machine.
7.Turn the machine on.
This equipment will be inoperable when mains power fails.
Supplied software
After you have set up your machine and connected it to your computer, you must install the printer software using the supplied CD. The software CD provides you with the following software.
OS |
Contents |
|
|
Windows |
Printer driver: Use this driver to take full advantage of your machine’s features. |
|
Scanner driver: TWAIN and Windows Image Acquisition (WIA) drivers are available for scanning |
|
documents on your machine. |
|
Printer Settings Utility: This program allows you to set up printer’s other options from your |
|
computer desktop. |
|
Printer Status Monitor: This program allows you to monitor the machine’s status and alerts you |
|
when an error occurs during printing. |
|
SmarThru[a]: This program is the accompanying Windows-based software for your multifunctional |
|
machine. |
|
Dell Scan and Fax Manager: You can find out about Dell Scan and Fax Manager program information |
|
and installed scan driver's condition. |
|
Dell 1135n Laser MFP Toner Reorder: The Dell 1133 Laser MFP Toner Reorder window also displays |
|
the level of toner remaining and allows you to order replacement toner cartridge. |
|
Firmware Update Utility: This program helps you to update printer’s firmware. |
|
SetIP: Use this program to set your machine’s TCP/IP addresses. |
|
|
Macintosh |
Printer driver: Use this driver to take full advantage of your machine’s features. |
|
Scanner driver: TWAIN driver is available for scanning documents on your machine. |
|
SetIP: Use this program to set your machine’s TCP/IP addresses. |
|
|
Linux |
Unified Linux Driver: Use this driver to take full advantage of your machine’s features. |
|
SANE: Use this driver to scan documents. |
|
SetIP: Use this program to set your machine’s TCP/IP addresses. |
|
|
[a] Allows you to edit a scanned image in various ways using a powerful image editor and to send the image by email. You can also open another image editor program, such as Adobe Photoshop, from SmarThru. For details, refer to the on screen help supplied on the SmarThru program (See Smarthru).
System requirements
Before you begin, ensure that your system meets the following requirements:
Microsoft® Windows®
Your machine supports the following Windows operating systems.
OPERATING |
Requirement (recommended) |
|
|
|
|
|
|
|
|
free HDD |
|
SYSTEM |
CPU |
RAM |
|
|
space |
||
|
|
|
|
Windows® 2000 |
Intel® Pentium® II 400 MHz (Pentium III 933 MHz) |
64 MB (128 |
600 MB |
|
|
MB) |
|
|
|
|
|
Windows® XP |
Intel® Pentium® III 933 MHz (Pentium IV 1 GHz) |
128 MB (256 |
1.5 GB |
|
|
MB) |
|
|
|
|
|
Windows Server® |
Intel® Pentium® III 933 MHz (Pentium IV 1 GHz) |
128 MB (512 |
1.25 GB to 2 |
2003 |
|
MB) |
GB |
|
|
|
|
Windows Server® |
Intel® Pentium® IV 1 GHz (Pentium IV 2 GHz) |
512 MB (2048 |
10 GB |
2008 |
|
MB) |
|
|
|
|
|
Windows Vista® |
Intel® Pentium® IV 3 GHz |
512 MB (1024 |
15 GB |
|
|
MB) |
|
|
|
|
|
|
|
|
|

Windows® 7 |
Intel® Pentium® IV 1 GHz 32-bit or 64-bit processor or |
1 GB (2 GB) |
16 GB |
|
higher |
|
|
|
|
|
|
|
Support for Direct® 9 graphics with 128 MB memory (to enable the Aero theme). |
||
|
DVD-R/W Drive |
|
|
|
|
|
|
Windows Server® |
Intel® Pentium® IV 1 GHz (x86) or 1.4 GHz (x64) processors |
512 MB (2048 |
10 GB |
2008 R2 |
(2 GHz or faster) |
MB) |
|
|
|
|
|
Internet Explorer® 5.0 or higher is the minimum requirement for all Windows operating systems.
Administrator rights are required to install the software.
Windows Terminal Services is compatible with this machine.
Macintosh
|
OPERATING |
|
Requirements (recommended) |
|
||
|
|
|
|
|
|
|
|
|
|
|
|
free HDD |
|
|
SYSTEM |
|
CPU |
RAM |
||
|
|
|
space |
|||
|
|
|
|
|
|
|
|
Mac OS X 10.3 ~ |
|
Intel® Processors |
128 MB for a PowerPC based Mac |
1 GB |
|
|
10.4 |
|
PowerPC G4/ G5 |
(512 MB) |
|
|
|
|
|
|
|
|
|
|
|
|
|
512 MB for a Intel-based Mac (1 GB) |
|
|
|
|
|
|
|
|
|
|
Mac OS X 10.5 |
|
Intel® Processors |
512 MB (1 GB) |
1 GB |
|
|
|
|
867 MHz or faster Power PC |
|
|
|
|
|
|
G4/ G5 |
|
|
|
|
|
|
|
|
|
|
|
Mac OS X 10.6 |
|
Intel® Processors |
1 GB (2 GB) |
1 GB |
|
|
|
|
|
|
|
|
Linux |
|
|
|
|
|
|
|
|
|
|
|
|
|
|
Item |
|
Requirement (recommended) |
|
|
|
|
|
|
|
|
||
|
Operating system |
RedHat® Enterprise Linux WS 4, 5 (32/64 bit) |
|
|
||
|
|
Fedora Core 2~10 (32/64 bit) |
|
|
|
|
|
|
SuSE Linux 9.1 (32 bit) |
|
|
|
|
|
|
OpenSuSE® 9.2, 9.3, 10.0, 10.1, 10.2, 10.3, 11.0, 11.1 (32/64 bit) |
|
|
||
|
|
Mandrake 10.0, 10.1 (32/64 bit) |
|
|
|
|
|
|
Mandriva 2005, 2006, 2007, 2008, 2009 (32/64 bit) |
|
|
||
|
|
Ubuntu 6.06, 6.10, 7.04, 7.10, 8.04, 8.10 (32/64 bit) |
|
|
||
|
|
SuSE Linux Enterprise Desktop 9, 10 (32/64 bit) |
|
|
||
|
|
Debian 3.1, 4.0, 5.0 (32/64 bit) |
|
|
|
|
|
|
|
|
|
|
|
|
CPU |
Pentium® IV 2.4 GHz (Intel Core™2) |
|
|
|
|
|
|
|
|
|
|
|
|
RAM |
512 MB (1024 MB) |
|
|
|
|
|
|
|
|
|
|
|
|
Free HDD space |
1 GB (2 GB) |
|
|
|
|
|
|
|
|
|
|
|
It is necessary to claim swap partition of 300 MB or larger for working with large scanned images. The Linux scanner driver supports the optical resolution at maximum.
Installing USB connected machine’s driver
A locally connected machine is a machine directly attached to your computer using the USB cable. )
Only use an USB cable shorter than 3 m (118 in. ).
Windows
You can install the machine software using the typical or custom method.
The following steps below are recommended for most users who use a machine directly connected to your computer. All components necessary for machine operations will be installed.
1. Make sure that the machine is connected to the computer and powered on.
If the “Found New Hardware Wizard” window appears during the installation procedure, click Cancel in close the window.
2. Insert the supplied software CD into your CD/DVD drive.
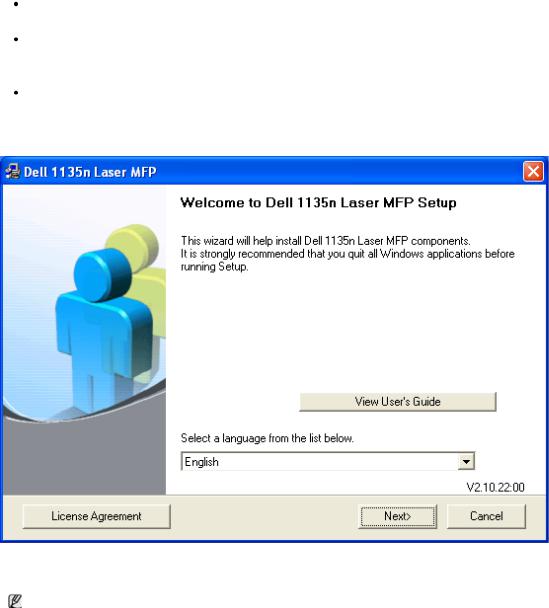
The software CD should automatically run and an installation window should appear.
If the installation window does not appear, click Start and then Run. Type X:\Setup.exe, replacing “X” with the letter which represents your CD/DVD drive. Click OK.
If you use Windows Vista, Windows 7, or Windows 2008 Server R2 click Start > All programs >
Accessories > Run.
Type X:\Setup.exe replacing “X” with the letter which represents your CD/DVD drive and click OK.
If the AutoPlay window appears in Windows Vista, Windows 7, or Windows 2008 Server R2, click Run Setup.exe in Install or run program field, and click Continue or Yes in the User Account Control windows.
3. Click Next.
If necessary, select a language from the drop-down list.
4. Select Typical installation for a local printer. Then, click Next.
The Custom allows you to select the machine’s connection and choose individual component to install. Follow the on-screen instructions.

If your machine is not connected to the computer, the following window will appear.
After connecting the machine, click Next.
If you don’t want to connect the printer at this time, click Next, and No on the following screen. The installation starts and a test page will not print at the end of the installation.
The installation window in this user guide may differ depending on the machine and interface in use.
5.After the installation is finished, a window asking you to print a test page appears. If you choose to print a test page, select the checkbox and click Next. Otherwise, just click Next and skip to step 7.
6.If the test page prints out correctly, click Yes. If not, click No to reprint it.
7.Click Finish.
If the printer driver does not work properly, follow the steps below to repair or reinstall the driver.
1.Make sure that the machine is connected to your machine and powered on.
2.From the Start menu, select Programs or All Programs > Dell > Dell Printers > your printer

driver name > Maintenance.
3. Select the option as you wish, follow the instruction on the window.
Macintosh
The software CD provides the driver files that allow you to use the CUPS driver for printing on a Macintosh computer.
Also, it provides you with the TWAIN driver for scanning on a Macintosh computer.
1.Make sure that the machine is connected to your computer and powered on.
2.Insert the supplied software CD into your CD/DVD drive.
3.Double-click the CD-ROM icon that appears on your Macintosh desktop.
4.Double-click the MAC_Installer folder.
5.Double-click the Installer OS X icon.
6.Enter the password and click OK.
7.The Dell Installer window opens. Click Continue.
8.Read the license agreement and click Continue.
9.Click Agree to agree to the license agreement.
10.Select Easy Install and click Install. Easy Install is recommended for most users. All components necessary for machine operations will be installed.
If you select Custom Install, you can choose individual components to install.
11.When the message which warns that all applications will close on your computer appears, click Continue.
12.After the installation is finished, click Quit.
If you have installed scanner driver, click Restart.
13. Open the Applications folder > Utilities > Print Setup Utility.
For Mac OS X 10.5 ~ 10.6, open the Applications folder > System Preferences and click Print & Fax.
14. Click Add on the Printer List.
 For Mac OS X 10.5 ~ 10.6, press the “ +” icon; a display window will pop up. 15. For Mac OS X 10.3, select the USB tab.
For Mac OS X10.4, click Default Browser and find the USB connection. For Mac OS X 10.5 ~ 10.6, click Default and find the USB connection.
16.For Mac OS X 10.3, if Auto Select does not work properly, select Dell in Printer Model and your machine name in Model Name.
For Mac OS X 10.4, if Auto Select does not work properly, select Dell in Print Using and your machine name in Model.
For Mac OS X 10.5 ~ 10.6, if Auto Select does not work properly, select Select a driver to use... and your machine name in Print Using.
Your machine appears on the Printer List, and is set as the default machine. 17. Click Add.
If the printer driver does not work properly, uninstall the driver and reinstall it.
Follow steps below to uninstall the driver for Macintosh.
1.Make sure that the machine is connected to your computer and powered on.
2.Insert the supplied software CD into your CD/DVD drive.
3.Double-click CD-ROM icon that appears on your Macintosh desktop.
4.Double-click the MAC_Installer folder.
5.Double-click the Installer OS X icon.
6.Enter the password and click OK.
7.The Dell Installer window opens. Click Continue.
8.Select Uninstall and click Uninstall.
9.When the message which warns that all applications will close on your computer appears, click
Continue.
10.When the uninstall is done, click Quit.
Linux
Follow the steps below to install the driver for Linux. While installing the driver, the Unified Linux Driver package will automatically be installed as well.
The supplied software CD provides you with the Unified Linux Driver package for using your machine with a

Linux computer easily in UI based management tool.
1.Make sure that the machine is connected to your computer and powered on.
2.When the Administrator Login window appears, type in root in the Login field and enter the system password.
You must log in as a super user (root) to install the machine software. If you are not a super user, ask your system administrator.
3.Insert the supplied software CD into your CD/DVD drive. The software CD will run automatically.
If the software CD does not run automatically, click the  icon at the bottom of the desktop. When the Terminal screen appears, type in the following:
If the software CD is secondary master and the location to mount is /mnt/cdrom, [root@localhost root]#mount -t iso9660 /dev/hdc /mnt/cdrom
[root@localhost root]#cd /mnt/cdrom/Linux [root@localhost Linux]#./install.sh
If you still failed to run the software CD type the followings in sequence: [root@localhost root]#umount /dev/hdc
[root@localhost root]#mount -t iso9660 /dev/hdc /mnt/cdrom
The installation program runs automatically if you have an autorun software package installed and configured.
4. When the welcome screen appears, click Next.
5. When the installation is complete, click Finish.
The installation program has added the Unified Driver Configurator desktop icon and the Unified Driver group to the system menu for your convenience. If you have any difficulties, consult the on screen help that is available through your system menu or can otherwise be called from the driver package Windows applications, such as Unified Driver Configurator or Image Manager.
Installing the driver in the text mode:
If you do not use the graphical interface or have been unable to install the driver, you have to use the driver in the text mode.
Follow the steps 1 to 3, then type [root@localhost Linux]# ./install.sh. Follow the instructions on the terminal screen. The installation is completed.
When you want to uninstall the driver, follow the installation instructions above, but type [root@localhost Linux]# ./uninstall.sh on the terminal screen.
If the printer driver does not work properly, uninstall the driver and reinstall it.
Follow the steps below steps to uninstall the driver for Linux.
1.Make sure that the machine is connected to your computer and powered on.
2.When the Administrator Login window appears, type in “root” in the Login field and enter the system password.
You must log in as a super user (root) to uninstall the printer driver. If you are not a super user, ask your system administrator.
3.Insert the supplied software CD into your CD/DVD drive. The software CD will run automatically.
If the software CD does not run automatically, click the  icon at the bottom of the desktop. When the Terminal screen appears, type in:
If the software CD is secondary master and the location to mount is /mnt/cdrom, [root@localhost root]#mount -t iso9660 /dev/hdc /mnt/cdrom
[root@localhost root]#cd /mnt/cdrom/Linux
[root@localhost Linux]#./uninstall.sh
The installation program runs automatically if you have an autorun software package installed and configured.
4.Click Uninstall.
5.Click Next.
6.Click Finish.
Sharing your machine locally
Follow the steps below to set up the computers to share your machine locally.
If the host computer is directly connected to the machine with a USB cable and is also connected to the local network environment, the client computers connected to the local network can use the shared machine through the host computer to print.
1 |
Host computer |
A computer which is directly connected to the machine by USB cable. |
|
|
|
2 |
Client computers |
Computers which use the machine shared through the host computer. |
|
|
|
Windows
Setting up a host computer
1.Install your printer driver (See Installing USB connected machine’s driver).
2.Click the Windows Start menu.
3.For Windows 2000, select Settings > Printers.
For Windows XP/2003, select Printers and Faxes.
For Windows 2008/Vista, select Control Panel > Hardware and Sound > Printers. For Windows 7, select Control Panel > Hardware and Sound > Devices and Printers.
For Windows Server 2008 R2, select Control Panel > Hardware > Devices and Printers.
4.Right click your printer icon.
5.For Windows XP/2003/2008/Vista, selet/click Properties.
For Windows 7 and Windows Server 2008 R2, from context menus, select the Printer properties.
If Printer properties item has ? mark, you can select other printer drivers connected with selected printer.
6.Select the Sharing tab.
7.Check the Change Sharing Options.
8.Check the Share this printer.
9.Fill in the Share Name field. Click OK.
Setting up a client computer
1.Install your printer driver (See Installing USB connected machine’s driver).
2.Click the Windows Start menu.
3.Select All programs > Accessories > Windows Explorer.
4.Enter in IP address of the host computer and press Enter in your keyboard.
In case host computer requires User name and Password, fill in User ID and password of the host computer account.
5.Right click the printer icon you want to share and select Connect.
6.If a set up complete message appears, click OK.
7.Open the file you want to print and start printing.

Macintosh
The following steps are for Mac OS X 10.5 ~ 10.6. Refer to Mac Help for other OS versions.
Setting up a host computer
1.Install your printer driver (See Macintosh).
2.Open the Applications folder > System Preferences and click Print & Fax.
3.Select the printer to share in the Printers list.
4.Select Share this printer.
Setting up a client computer
1.Install your printer driver (See Macintosh).
2.Open the Applications folder > System Preferences and click Print & Fax.
3.Press the “+” icon.
A display window showing the name of your shared printer appears.
4.Select your machine and click Add.
Basic setup
After installation is complete, you may want to set the machine’s default settings. Refer to the next section if you would like to set or change values. This chapter gives you step-by-step instructions for setting up the machine.
This chapter includes:
Altitude adjustment
Changing the display language
Setting the date and time
Changing the clock mode
Changing the default mode
Setting sounds
Entering characters using the number keypad
Using the save modes
Setting the default tray and paper Setting job timeout
Altitude adjustment
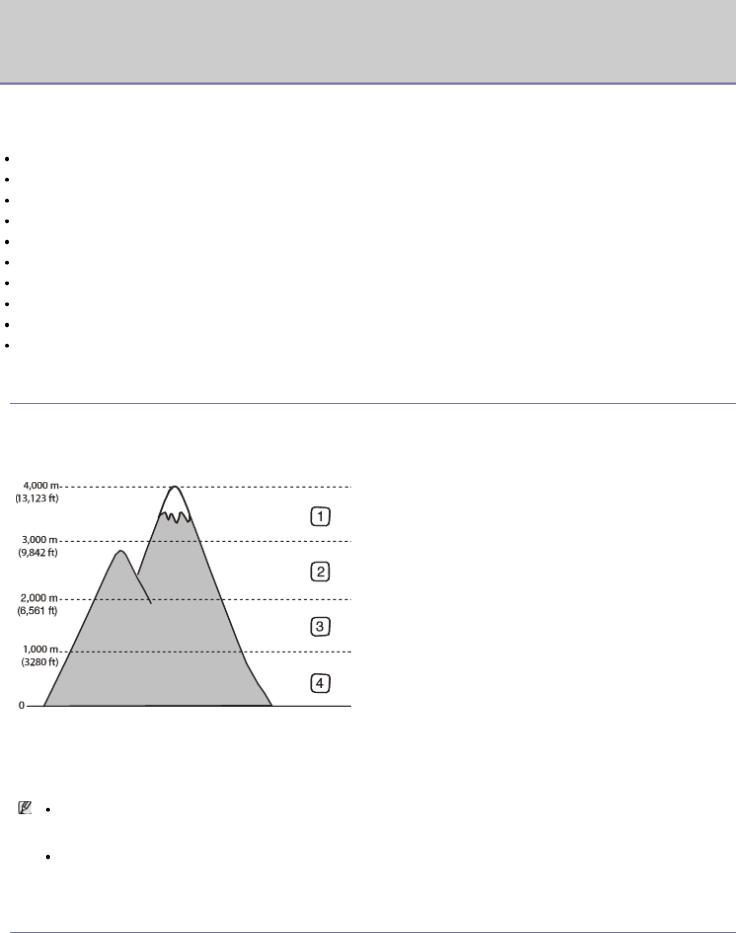
The print quality is affected by atmospheric pressure, which is determined by the height of the machine above sea level. The following information will guide you on how to set your machine to the best print quality or best quality of print.
Before you set the altitude value, determine the altitude where you are.
1. High 1
2. High 2
3. High 3
4. Normal
1.Ensure that you have installed the printer driver with the provided software CD.
2.You can launch Printer Settings Utility from the Start menu, select Programs or All Programs > Dell > Dell Printers > your printer driver name > Printer Settings Utility.
3.Click Setting > Altitude Adjustment. Select the appropriate value from the dropdown list, and then click Apply.
If your machine is connected to a network, Embedded Web Service screen appears automatically. Click
Machine Settings > System Setup > Machine Setup > Altitude Adj. Select the appropriate altitude value, and then click Apply.
If your machine is connected via a USB cable, set the altitude in Altitude Adj. option on the machine’s display.
Changing the display language
To change the language that appears on the display, follow the steps below:
1.Press Menu ( ) on the control panel.
2.Press the left/right arrow until System Setup appears and press OK. Press the left/right arrow until Machine Setup appears and press OK.

3.
4.Press the left/right arrow until Language appears and press OK.
5.Press the left/right arrow to display the language you want.
6.Press OK to save the selection.
7.Press Stop/Clear ( ) to return to ready mode.
Setting the date and time
When you set the time and date, they are used in delay fax and delay print. They are printed on reports. If, however, they are not correct, you need to change it for the correct time being.
If the machine’s power is cut off, you need to reset the correct time and date once the power has been restored.
1.Press Menu ( ) on the control panel.
2.Press the left/right arrow until System Setup appears and press OK.
3.Press the left/right arrow until Machine Setup appears and press OK.
4.Press the left/right arrow until Date & Time appears and press OK.
5.Enter the correct time and date using left/right arrow or numeric keypad. Month = 01 to 12,
Day = 01 to 31,
Year = requires four digits, Hour = 01 to 12,
Minute = 00 to 59,
and you can also select AM or PM.
6.Press OK to save the selection.
7.Press Stop/Clear ( ) to return to ready mode.
Changing the clock mode
You can set your machine to display the current time using either a 12-hour or 24-hour format.
1.PressMenu ( ) on the control panel.
2.Press the left/right arrow until System Setup appears and press OK.
3.Press the left/right arrow until Machine Setup appears and press OK.
4.Press the left/right arrow until Clock Mode appears and press OK.
5.Press the left/right arrow to select the other mode and press OK.
6.Press Stop/Clear ( ) to return to ready mode.
Changing the default mode
Your machine is preset to Copy mode. You can switch this default mode between Fax mode and Copy mode.
1.Press Menu ( ) on the control panel.
2.Press the left/right arrow until System Setup appears and press OK.
3.Press the left/right arrow until Machine Setup appears and press OK.
4.Press the left/right arrow until Default Mode appears and press OK.
5.Press the left/right arrow to select the mode you want.
6.Press OK to save the selection.
7.Press Stop/Clear ( to return to ready mode.
Setting sounds
You can control the following sounds:
Key sound: Turns the key sound On or Off. With this option set to On, a tone sounds each time a key is pressed.
Alarm Sound: Turns the alarm sound On or Off. With this option set to On, an alarm tone sounds when an error occurs or fax communication ends.
Speaker: Turns On or Off the sounds from the telephone line through the speaker, such as a dial tone or a fax tone. With this option set to Comm. which means “Common”, the speaker is on until the remote machine answers.
You can adjust the volume level using On Hook Dial. If your machine has a handset, you can adjust the volume level using the handset.

Ringer: Adjusts the ringer volume. For the ringer volume, you can select Off, Low, Mid, and High.
Speaker, ringer, key sound, and alarm sound
1.Press Menu ( ) on the control panel.
2.Press the left/right arrow until System Setup appears and press OK.
3.Press the left/right arrow until Sound/Volume appears and press OK.
4.Press the left/right arrow until the sound option you want appear and press OK.
5.Press the left/right arrow until the desired status or volume for the sound you have selected appears and press
OK.
6.If necessary, repeat steps 4 through 5 to set other sounds.
7.Press Stop/Clear ( ) to return to ready mode.
Speaker volume
To adjust the volume using On Hook Dial:
1.Press Fax ( ) on the control panel.
2.Press On Hook Dial. A dial tone sounds from the speaker.
3.Press the left/right arrow until you hear the volume you want.
4.Press On Hook Dial to save the change and return to ready mode. If your machine has a handset:
1.Pick up the handset. A dial tone sounds from the earpiece.
2.Press the left/right arrow until you hear the volume you want.
3.Press OK to save the change and replace the handset.
You can adjust the speaker volume only when the telephone line is connected.
Entering characters using the number keypad
As you perform various tasks, you may need to enter names and numbers. For example, when you set up your machine, you enter your name or your company’s name, and the fax number.
Entering alphanumeric characters
1.When you are prompted to enter a letter, locate the button labeled with the character you want. Press the button until the correct letter appears on the display.
For example, to enter the letter O, press 6, labeled with MNO.
Each time you press 6, the display shows a different letter, M, N, O, m, n, o and finally 6.
You can enter special characters, such as space, plus sign, and etc. For details, see the below section.
2.To enter additional letters, repeat step 1.
If the next letter is printed on the same button, move the cursor by pressing the left/right arrow button and then press the button labeled with the letter you want. The cursor will move to the right and the next letter will appear on the display.
You can enter a space by pressing 1 twice.
3.When you have finished entering letters, press OK.
Keypad letters and numbers
Key |
Assigned numbers, letters, or characters |
|
|
1 |
@ / . ‘ 1 |
|
|
2 |
A B C a b c 2 |
|
|
3 |
D E F d e f 3 |
|
|
4 |
G H I g h i 4 |
|
|
5 |
J K L j k l 5 |
|
|
6 |
M N O m n o 6 |
|
|
7 |
P Q R S p q r s 7 |
|
|
8 |
T U V t u v 8 |
|
|
9 |
W X Y Z w x y z 9 |
|
|
0 |
& + - , 0 |
|
|
* |
* |
|
|
|
|

##
Correcting numbers or names
If you make a mistake while entering a number or name, press the left/right arrow button to delete the last digit or character. Then enter the correct number or character.
Inserting a pause
With some telephone systems, you must dial an access code (9, for example) and listen for a second dial tone. In such cases, you must insert a pause in the telephone number. You can insert a pause while you are setting up speed dial numbers.To insert a pause, press Redial/Pause at the appropriate place while entering the telephone number. A - appears on the display at the corresponding location.
Using the save modes
Using the toner saving feature
Toner save mode allows your machine to use less toner on each page. Activating this mode extends the life of the toner cartridge beyond what one would experience in the normal mode, but it reduces print quality.
1.Press Menu ( ) on the control panel.
2.Press the left/right arrow until System Setup appears and press OK.
3.Press the left/right arrow until Machine Setup appears and press OK.
4.Press the left/right arrow until Toner Save appears and press OK.
5.Press the left/right arrow until On appears and press OK.
6.Press Stop/Clear ( ) to return to ready mode.
When PC-printing, you can also turn on or off toner save mode in the printer properties.
Using the power saving feature
When you are not using the machine for a while, use this feature to save power.
1.Press Menu ( ) on the control panel.
2.Press the left/right arrow until System Setup appears and press OK.
3.Press the left/right arrow until Machine Setup appears and press OK.
4.Press the left/right arrow until Power Save appears and press OK.
5.Press the left/right arrow to select the time you want.
6.Press OK to save the selection.
7.Press Stop/Clear ( ) to return to ready mode.
Available settings range from 1-120 minutes. The factory default setting is 1 minute.
Setting the default tray and paper
You can select the tray and paper you would like to keep using for printing job.
In the control panel
Setting the paper size
1.Press Menu ( ) on the control panel.
2.Press the left/right arrow until System Setup appears and press OK.
3.Press the left/right arrow until Paper Setup appears and press OK.
4.Press the left/right arrow until Paper Size appears and press OK.
5.Press the left/right arrow to select the paper tray you want and press OK.
6.Press the left/right arrow to select the paper size you want.
7.Press OK to save the selection.
8.Press Stop/Clear ( ) to return to ready mode.
Setting the paper type
1.Press Menu ( ) on the control panel.
2.Press the left/right arrow until System Setup appears and press OK.

3.Press the left/right arrow until Paper Setup appears and press OK.
4.Press the left/right arrow until Paper Type appears and press OK.
5.Press the left/right arrow to select the paper tray you want and press OK.
6.Press the left/right arrow to select the paper type you want.
7.Press OK to save the selection.
8.Press Stop/Clear ( ) to return to ready mode.
Setting the paper source
1.Press Menu ( ) on the control panel.
2.Press the left/right arrow until System Setup appears and press OK.
3.Press the left/right arrow until Paper Setup appears and press OK.
4.Press the left/right arrow until Paper Source appears and press OK.
5.Press the left/right arrow until Copy Tray or Fax Tray appears and press OK.
6.Press the left/right arrow to select the paper tray you want.
7.Press OK to save the selection.
8.Press Stop/Clear ( ) to return to ready mode.
In the computer
Windows
1.Click the Windows Start menu.
2.For Windows 2000, select Settings > Printers.
For Windows XP/2003, select Printers and Faxes.
For Windows 2008/Vista, select Control Panel > Hardware and Sound > Printers. For Windows 7, select Control Panel > Hardware and Sound > Devices and Printers.
For Windows Server 2008 R2, select Control Panel > Hardware > Devices and Printers.
3.Right-click your machine.
4.For Windows XP/2003/2008/Vista, press Printing Preferences.
For Windows 7 and Windows Server 2008 R2, from context menus, select the Printing Preferences.
If Printing Preferences item has ? mark, you can select other printer drivers connected with selected printer.
5.Click Paper tab.
6.Select tray and its options, such as paper size and type.
7.Press OK.
If you want to use special-sized paper such as a billing paper, select Paper tab > Size > Edit... in the Printing Preferences (See Opening printing preferences).
Macintosh
Macintosh users need to change the default setting manually each time they want to print using other settings.
1.Open a Macintosh application and select the file you want to print.
2.Open the File menu and click Print.
3.Go to Paper Feed pane.
4.Open the File menu and click Print.
5.Go to Paper Feed.
6.Set appropriate tray from which you want to print.
7.Go to Paper pane.
8.Set paper type to correspond to the paper loaded in the tray from which you want to print.
9.Click Print to print.
Linux
1.Open Terminal Program
2.When the Terminal screen appears, type in the following: [root@localhost root]# lpr <FileName>
3.Select Printer and click Properties…
4.Click Advanced tab.

5.Select tray (source) and its options, such as paper size and type.
6.Press OK.
Setting job timeout
When there is no input for a certain period of time, the machine exits the current menu and goes in to the default settings. You can set the amount of time the machine will wait.
1.Press Menu ( ) on the control panel.
2.Press the left/right arrow until System Setup appears and press OK.
3.Press the left/right arrow until Machine Setup appears and press OK.
4.Press the left/right arrow until Job Timeout appears and press OK.
5.Enter the time using left/right arrow or numeric keypad.
6.Press OK to save the selection.
7.Press Stop/Clear ( ) to return to ready mode.

Printing
This chapter explains common printing tasks.
This chapter includes:
Printer driver features
Basic printing
Opening printing preferences
Using help
Using special print features
Changing the default print settings
Setting your machine as a default machine
Printing to a file (PRN)
Macintosh printing
Linux printing
The procedures in this chapter are mainly based on Windows XP.
Printer driver features
Your printer drivers support the following standard features:
Paper orientation, size, source, and media type selection
Number of copies
In addition, you can use various special printing features. The following table shows a general overview of features supported by your printer drivers:
Printer driver
|
Feature |
Windows |
|
|
|
|
Machine quality option |
? |
|
|
|
|
Booklet printing |
? |
|
|
|
|
Poster printing |
? |
|
|
|
|
Multiple pages per sheet |
? |
|
|
|
|
Fit to page printing |
? |
|
|
|
|
Reduce and enlarge printing |
? |
|
|
|
|
Different source for first page |
? |
|
|
|
|
Watermark |
? |
|
|
|
|
Overlay |
? |
|
|
|
|
Double-sided printing (manual) |
? |
|
|
|
(?: supported) |
|
|
Basic printing
Your machine allows you to print from various Windows, Macintosh, or Linux applications. The exact steps for printing a document may vary depending on the application you use.
Your Printing Preferences window that appears in this user’s guide may differ depending on the machine in use. However, the composition of the Printing Preferences window is similar. Check the operating system(s) that are compatible with your machine. Refer to the OS compatibility section of Printer Specifications (See System requirements).
When you select an option in Printing Preferences, you may see a warning mark,  , or
, or  . An exclamation mark (
 ) means you can select that certain option but it is not recommended, and (
  ) mark means you

cannot select that option due to the machine’s setting or environment.
The following procedure describes the general steps required for printing from various Windows applications.
Macintosh basic printing (See Macintosh printing). Linux basic printing (See Linux printing).
The following Printing Preferences window is for Notepad in Windows XP. Your Printing Preferences window may differ, depending on your operating system or the application you are using.
1.Open the document you want to print.
2.Select Print from the File menu. The Print window appears.
3.Select your machine from the Select Printer list.
The basic print settings including the number of copies and print range are selected within the Print window.
To take advantage of the printer features provided by your printer driver, click Properties or Preferences in the application’s Print window to change the print setting (See Opening printing preferences).
4. To start the print job, click OK or Print in the Print window.
If you are using Windows Internet Explorer, the Dell AnyWeb Print too will save your time for screen-captured images or printing the image. Click Start > All programs > Dell Printers > Dell AnyWeb Print > Download the latest version to link the website where the tool is available for the download.
Canceling a print job
If the print job is waiting in a print queue or print spooler, cancel the job as follows:
1.Click the Windows Start menu.
2.For Windows 2000, select Settings > Printers.
For Windows XP/2003, select Printer and Faxes.
For Windows 2008/Vista, select Control Panel > Hardware and Sound > Printers. For Windows 7, select Control Panel > Hardware and Sound > Devices and Printers.
For Windows Server 2008 R2, select Control Panel > Hardware > Devices and Printers.
3.For Windows 2000, XP, Server 2003, Vista, or Server 2008, double-click your machine.
For Windows 7, or Windows Server 2008 R2, right click your printer icon > context menus > See what’s printing.
If See what’s printing item has ? mark, you can select other printer drivers connected with selected printer.
4. From the Document menu, select Cancel.
You can also access this window by simply double-clicking the machine icon (  ) in the Windows task bar. You can also cancel the current job by pressing Stop/Clear (
 ) on the control panel.
Loading...