


Dell™ OptiPlex™ 380 Service Manual—Mini-Tower
Working on Your Computer
Specifications
Removing and Replacing Parts
System Board Layout
System Setup
Diagnostics
Notes, Cautions, and Warnings
NOTE: A NOTE indicates important information that helps you make better use of your computer.
CAUTION: A CAUTION indicates potential damage to hardware or loss of data if instructions are not followed. WARNING: A WARNING indicates a potential for property damage, personal injury, or death.
If you purchased a Dell™ n Series computer, any references in this document to Microsoft® Windows® operating systems are not applicable.
Information in this document is subject to change without notice.
© 2010 Dell Inc. All rights reserved.
Reproduction of this material in any manner whatsoever without the written permission of Dell Inc. is strictly forbidden.
Trademarks used in this text: Dell, the DELL logo, and OptiPlex are trademarks of Dell Inc.; ATI Radeon is a trademarks of
Advanced Micro Devices, Inc; Intel, Pentium, Celeron, and Core are either trademarks or registered trademarks of Intel Corporation; Microsoft, Windows, Windows Vista, and the Windows Vista start button are either trademarks or registered trademarks of Microsoft Corporation in the United States and/or other countries.
Other trademarks and trade names may be used in this document to refer to either the entities claiming the marks and names or their products. Dell Inc. disclaims any proprietary interest in trademarks and trade names other than its own.
March 2010 |
Rev. A01 |

Back to Contents Page
System Setup
Dell™ OptiPlex™ 380 Service Manual—Mini-Tower
Boot Menu
Navigation Keystrokes
Entering System Setup
System Setup Simulation
System Setup Menu Options
Boot Menu
Press <F12> when the Dell™ logo appears to initiate a one-time boot menu with a list of the valid boot devices for the computer.
The options listed are:
Internal HDD
CD/DVD/CD-RW Drive
Onboard NIC
BIOS Setup
Diagnostics
This menu is useful when you are attempting to boot to a particular device or to bring up the diagnostics for the computer. Using the boot menu does not make any changes to the boot order stored in the BIOS.
Navigation Keystrokes
Use the following keystrokes to navigate the System Setup screens.
|
Navigation Keystrokes |
Action |
Keystroke |
Expand and collapse field |
<Enter>, leftor right-arrow key, or +/– |
Expand or collapse all fields |
< > |
Exit BIOS |
<Esc>—Remain in Setup, Save/Exit, Discard/Exit |
Change a setting |
Left or right-arrow key |
Select field to change |
<Enter> |
Cancel modification |
<Esc> |
Reset defaults |
<Alt><F> or Load Defaults menu option |
Entering System Setup
Your computer offers the following BIOS and System Setup options:
•Bring up a one-time boot menu by pressing <F12>
•Access System Setup by pressing <F2>
<F12> Menu
Press <F12> when the Dell™ logo appears to initiate a one-time boot menu with a list of the valid boot devices for the computer. Diagnostics and Enter Setup options are also included in this menu. The devices listed on the boot menu depend on the bootable devices installed in the computer. This menu is useful when you are attempting to boot to a particular device or to bring up the diagnostics for the computer. Making changes in the boot menu does not make any changes to the boot order stored in the BIOS.
<F2>
Press <F2> to enter System Setup and make changes to user-definable settings. If you have trouble entering System Setup using this key, press <F2> when the keyboard lights first flash.
System Setup Menu Options
NOTE: System Setup options may vary depending on your computer and may not appear in the exact same order.
General
System |
Displays the following information: |
Board |
|
•System information: Displays BIOS Info,, System Info, Service Tag, Express Service Code, Asset Tag, Manufacture Date, and the
Ownership Date..
•Memory information: Displays Installed Memory, Usable Memory, Memory Speed, Memory Channel Mode, Memory Technology, DIMM_1 Size, DIMM_2 Size, DIMM_3 Size, and DIMM_4 Size. .
•Processor information: Displays the Processor Type, Processor Speed, Processor Bus Speed, Processor L2 cache, Processor ID, Microcode Version, Multi Core Capable and HT Capable 64-bit Technology..
•PCI information: Displays available slots on the system board.
|
|
|
|
|
|
|
Date/Time |
|
Displays the computer date and time. Changes to the system date and time take effect immediately. |
|
|||
|
|
|
|
|
|
|
Boot |
|
Specifies the order in which the computer attempts to find an operating system from the devices specified in this list. |
|
|||
Sequence |
|
|
|
|
|
|
|
|
|
• |
Onboard or USB Floppy |
|
|
|
|
|
• Hard drive (lists the model number of the hard drive currently installed in the computer) |
|
||
|
|
|
• |
Onboard or USB CD-Rom Drive |
|
|
|
|
|
• |
USB Device |
|
|
|
|
|
|
|
|
|
|
|
|
|
|
|
|
Drives |
|
|
|
|
|
|
|
|
|
|
|
||
Diskette drive |
|
This field determines how the BIOS configures floppy drives, Operating Systems with USB support will recognize USB Floppy drives |
|
|||
|
|
|
regardless of this setting: |
|
||
|
|
|
|
• Disable - All Floppy drive are disable |
|
|
|
|
|
|
• Enable - All floppy drive are enable. |
|
|
|
|
|
The "USB Controller" Setup option will affect floppy operation. |
|
||
|
|
|
|
|||
SATA Operation |
configures the operating mode of the integrated hard drive controller. |
|
||||
|
|
|
|
• RAID Autodetect / AHCI = RAID if signed drives, otherwise AHCI |
|
|
|
|
|
|
• RAID Autodetect / ATA= RAID if signed drives, otherwise ATA |
|
|
|
|
|
|
• RAID On / ATA= SATA is configured for RAID on every boot |
|
|
|
|
|
|
• Legacy = The hard drive controller is configured for legacy mode |
|
|
|
|
|
Legacy mode provides for compatibility with some older operating systems that do not support native resources assigned to the drive |
|
||
|
|
|
controller. |
|
|
|
|
|
|
NOTE: RAID Mode is incompatible with ImageServer. Disable RAID mode to enable Image Server. |
|
||
|
|
|
|
|
||
S.M.A.R.T. |
|
This field controls whether hard drive errors for integrated drives are reported during startup. This technology is part of the Self Monitoring |
|
|||
Reporting |
|
Analysis and Reporting Technology (SMART) specification. |
|
|||
|
|
|
This option is disabled by default. |
|
||
|
|
|
|
|
||
Drives |
|
Enables or disables the SATA or ATA drives connected to the system board. |
|
|||
|
|
|
|
|
||
|
|
|
|
|||
System Configuration |
|
|
||||
|
|
|
|
|||
Integrated NIC |
|
Enables or disables the integrated network card. You can set the integrated NIC to: |
|
|||
|
|
|
|
• |
Disable |
|
|
|
|
|
• |
Enable (default) |
|
|
|
|
|
• |
Enable with PXE |
|
|
|
|
|
• |
Enable with ImageSever |
|
|
|
|
|
ImageServe is incompatible with RAID mode. Please disable RAID if enabling ImageServer. |
|
|
|
|
|
|
PXE is needed only if intending to boost to an operating system located on a server, not if you are booting on an OS located on a hard |
|
|
|
|
|
|
drive in this computer. |
|
|
|
|
|
|
|
|
|
|
|
|
|
This field enable and disable the internal USB for FlexBay, you can set: |
|
|
USB for Flexbay |
|
• |
Disable - Internal USB for FlexBay is disable |
|
||
|
• |
Enable - Internal USB for FlexBay is enable |
|
|||
|
|
|
|
|
||
|
|
|
|
• No Boot - Internal USB for FlexBay is enable, but not bootable. (default) |
|
|
|
|
|
|
|
||
USB Controller |
|
|
Enables or disables the integrated USB controller. You can set the USB controller to: |
|
||
|
|
|
|
• |
Enable (default) |
|
|
|
|
|
• |
Disable |
|
|
|
|
|
• |
No boot |
|
|
|
|
|
Operating systems with USB support will recognize USB Storage |
|
|
|
|
|
|
|
||
Parallel Port |
|
|
Identifies and defines the parallel port settings. You can set the parallel port to: |
|
||
|
|
|
|
• |
Disable |
|
|
|
|
|
• |
AT |
|
|
|
|
|
• |
PS/2 (default) |
|
|
|
|
|
• |
EPP |
|
|
|
|
|
• |
ECP No DMA |
|
|
|
|
|
• |
ECP DMA 1 |
|
|
|
|
|
• |
ECP DMA 3 |
|
|
|
|
||||
Parallel Port Address |
Sets the base I/O address of the integrated parallel port. |
|
||||
|
|
|
|
|
||
Serial Port #1 |
|
|
Identifies and defines the serial port settings. You can set the serial port to: |
|
||
|
|
|
|
• |
Disable |
|
|
|
|
|
• |
Auto (default) |
|
|
|
|
|
• |
COM1 |
|
|
|
|
|
• |
COM3 |
|
|
|
|
|
The Operating System may allocate resources even though the setting is disabled. |
|
|
|
|
|
|
|
||
Serial Port #2 |
|
|
Identifies and defines the serial port settings. You can set the serial port to: |
|
||
|
|
|
|
|
|
|

|
• |
Disable |
|
• |
Auto (default) |
|
• |
COM2 |
|
• |
COM4 |
|
The Operating System may allocate resources even though the setting is disabled. |
|
|
|
|
Miscellaneous |
Enables or disables the following onboard devices: |
|
Devices |
|
|
|
• |
Front USB |
|
• |
PCI slots |
|
• |
Audio |
|
|
|
Video
Primary |
|
This field determines which video controller will become the primary video controller when 2 controllers are available in the computer. This |
||||
Video |
|
selection matters only if there are 2 video controller present. |
||||
|
|
|
• |
Auto(default) - Use the add-in video controller. |
||
|
|
|
• |
Onboard/Card - Use the integrated video controller unless a Graphic care is installed. A PCI Express Graphic(PEG) card will override and |
||
|
|
|
|
disable the integrated video controller. |
||
|
|
|
|
|
|
|
|
|
|
|
|
||
Performance |
|
|
|
|||
Multi Core |
|
This field specifies whether the processor will have one or all cores enable. The performance of some application will improve with the |
||||
Support |
|
additional cores. |
||||
|
|
|
|
|||
Intel® |
|
This Option enables or disables the Intel® SpeedStep™ mode of the processor. When disabled, the computer is placed into the highest |
||||
SpeedStep™ |
|
performance state and the Intel® SpeedStep™ applet or native operating system driver are prevented from adjusting the processor's |
||||
|
|
|
performance. When enable. the Intel® SpeedStep™, enabled CPU is allowed to operate in multiple performance states. |
|||
|
|
|
This option is disabled by default. |
|||
|
|
|
This option enables or disables additional processor sleep states. The operating system may optionally use these for additional power saving |
|||
C States |
|
when idle. |
|
|||
Control |
|
|
|
|
|
|
|
|
|
This option is disabled by default. |
|||
|
|
|
|
|||
Limit CPUID |
|
This field limits the maximum value the processor Standard CPUID Function will support. Some operating systems will not complete installation |
||||
Value |
|
when the maximum CPUID Function supported is greater than 3. |
||||
|
|
|
This option is disabled by default. |
|||
|
|
|
|
|||
HDD Acoustic |
|
This option allows you to optimize your hard drives performance and acoustic noise level based on your personal preferences. |
||||
Mode |
|
|
|
|
|
|
|
|
|
|
• |
Bypass(default)- Do nothing (needed for older drives) |
|
|
|
|
|
• |
Quiet- The drive is slower, but quieter. |
|
|
|
|
|
• |
Suggested - Allow drive manufacturer to select the mode. |
|
|
|
|
|
• |
Performance- The drive is faster, but possibly noisier. |
|
|
|
|
|
|||
|
|
|
|
|||
Virtualization Support |
|
|
||||
|
|
|
|
|
||
|
|
|
This Option specifies whether a Virtual Machine Monitor (VMM) can utilize the additional hardware capabilities provided by Intel® Virtualization |
|||
Virtualization |
|
Technology. |
|
|||
|
|
|
|
|
||
|
|
|
Enable Intel® Virtualization Technology - This option is disabled by default. |
|||
|
|
|
|
|||
VT for Direct |
|
Enables or disables the Virtual Machine Monitor (VMM) from utilizing the additional hardware capabilities provided by Intel® Virtualization |
||||
I/O |
|
technology for direct I/O. |
||||
|
|
|
Enable Intel® Virtualization Technology for Direct I/O - This option is disabled by default. |
|||
|
|
|
|
|
||
|
|
|
Field specifies whether a Measured Virtual Machine(MVMM) can utilize the additional hardware capabilities provided by Intel® Trusted |
|||
Trusted |
|
Execution Technology. The TPM Virtualization Technology and Virtualization Technology for Direct I/O must be enable to use this feature. |
||||
Execution |
|
|
|
|
|
|
|
|
|
Enable Intel® Trusted Execution Technology - This option is disabled by default. |
|||
|
|
|
|
|
|
|
|
|
|
|
|
|
|
Security |
|
|
|
|
|
|
|
|
|
||||
Administrative |
|
Provides restricted access to the computer's system setup program in the same way that access to the computer can be restricted |
||||
Password |
|
|
|
with the System Password option. |
||
|
|
|
|
|
This option is not set by default. |
|
|
|
|
||||
System Password |
|
Displays the current status of the system password security feature and allows a new system password to be assigned and verified. |
||||
|
|
|
|
|
This option is not set by default. |
|
|
|
|
||||
Password Changes |
|
Enables or disables the user from changing the system password without the administrative password. |
||||
|
|
|
|
|
This option is enabled by default. |
|
|
|
|
|
|
||
TPM Security |
|
|
|
Enables or disables the trusted platform module (TPM) security. |
||
|
|
|
|
|
You can set the TPM security to: |
|
|
|
|
|
|
• |
Deactivate (default) |
|
|
|
|
|
• |
Activate |
|
|
|
|
|
• |
Clear |
|
|
|
|
|
|
|
|
|
|
NOTE: When TPM Security is set to Clear the system setup program clears the user information stored in the TPM. |
|||
CPU XD Support |
|
|
Enables or disables the execute disable mode of the processor. |
|||
|
|
|
This option is enabled by default. |
|||
Computrace(R) |
|
|
Enables or disables the optional Computrace® service designed for asset management. |
|||
|
|
|
You can set this option to: |
|||
|
|
|
|
• |
Deactivate (default) |
|
|
|
|
|
• |
Disable |
|
|
|
|
|
• |
Activate |
|
|
|
|
|
|
|
|
SATA-0 Password |
|
|
Displays the current status of the password set for the hard drive connected to the SATA-0 connector on the system board. |
|||
|
|
|
You can also set a new password. This option is not set by default. |
|||
|
|
|
NOTE: The system setup program displays a password for each of the hard drives connected to your system board. |
|||
|
|
|
|
|
|
|
|
|
|
|
|
|
|
Power Management |
|
|
|
|
||
|
|
|
|
|||
AC Recovery |
Determines how the computer responds when AC power is re-applied after a power loss. You can set the AC Recovery to: |
|||||
|
• |
|
Power Off (default) |
|||
|
• |
|
Power On |
|||
|
• |
|
Last State |
|||
|
|
|
|
|||
Auto On Time |
Sets time to automatically turn on the computer. |
|||||
|
Time is kept in the standard 12-hour format (hours:minutes:seconds). |
|||||
|
Change the startup time by typing the values in the time and AM/PM fields. |
|||||
|
NOTE: This feature does not work if you turn off your computer using the switch on a power strip or surge protector or if Auto Power On is |
|||||
|
set to disabled. |
|||||
|
|
|
|
|||
Low Power Mode |
Enables or disables low power mode. |
|||||
|
This option is disabled by default. |
|||||
|
When low power mode is enabled, the integrated network card is disabled when the computer shutsdown or hibernates. Only add-in |
|||||
|
network cards will be able to remotely wake the computer. |
|||||
|
|
|
|
|||
Remote Wakeup |
Allows the computer to power up when a network interface controller receives a wake up signal. You can set Remote Wakeup to: |
|||||
|
• |
|
Disable (default) |
|||
|
• |
|
Enable |
|
||
|
• |
|
Enable with Boot NIC |
|||
|
|
|
|
|||
Suspend Mode |
Sets the power management suspend mode to: |
|||||
|
• |
|
S1 |
|
|
|
|
• |
|
S3 (default) |
|||
|
|
|
|
|||
Fan Control |
Controls the speed of the system fan. |
|||||
Override |
|
|
|
|
|
|
|
NOTE: When enabled, the fan runs at full speed. |
|||||
|
|
|
|
|
|
|
|
|
|
|
|
|
|
Maintenance |
|
|
|
|
|
|
|
|
|
|
|
|
|
Service Tag |
|
|
|
|
Displays the Service Tag of your computer. |
|
|
|
|
|
|
|
|
Asset Tag |
|
|
|
|
Allows you to create a system asset tag if an asset tag is not already set. |
|
|
|
|
|
|
This option is not set by default. |
|
|
|
|
|
|
|
|
SERR Messages |
|
|
|
|
Controls the SERR Message mechanism. |
|
|
|
|
|
|
This option is enabled by default. |
|
|
|
|
|
|
Some graphics cards require the SERR Message mechanism be disabled. |
|
|
|
|
|
|
|
|
Image Server |
|
|
|
|
|
|
|
|
|
|
|
||
Lookup Method |
|
|
|
Specifies how the ImageServer looks up the server address. |
||
|
|
|
|
|
• |
Static IP |
|
|
|
|
|
• |
DNS |
|
|
|
|
NOTE: You must set the Integrated NIC to Enable with ImageServer to set the Lookup Method. |
||
|
|
|
|
|
||
ImageServer IP |
|
|
|
Specifies the primary static IP address of the ImageServer with which the client software communicates. |
||
|
|
|
|
The default IP address is 255.255.255.255 |
||
|
|
|
|
NOTE: You must set the Integrated NIC to Enable with ImageServer to set the ImageServer IP. |
||
|
|
|
|
|
|
|
|
|
|
|
|
|
|
ImageServer Port |
|
Specifies the primary IP port of the image server with which the client software communicates. |
||||||
|
|
|
|
The default IP port is 06910. |
||||
|
|
|
|
|
|
|
||
Client DHCP |
|
|
Specifies how the client obtains the IP address. |
|||||
|
|
|
|
• |
Static IP |
|
|
|
|
|
|
|
• |
DHCP (default) |
|||
|
|
|
|
|
|
|
||
Client IP |
|
|
Specifies the static IP address of the client. |
|||||
|
|
|
|
The default IP address is 255.255.255.255 |
||||
|
|
|
|
NOTE: To set Client IP you must set Client DHCP to Static IP |
||||
|
|
|
|
|
|
|||
Client SubnetMask |
|
Specifies the subnet mask for the client. |
||||||
|
|
|
|
The default setting is 255.255.255.255 |
||||
|
|
|
|
NOTE: To set the Client SubnetMask you must set Client DHCP to Static IP |
||||
Client Gateway |
|
|
Specifies the gateway IP address for the client. |
|||||
|
|
|
|
The default setting is 255.255.255.255 |
||||
|
|
|
|
NOTE: To set the Client SubnetMask you must set Client DHCP to Static IP |
||||
|
|
|
|
|
|
|
||
License Status |
|
|
Displays the current license status. |
|||||
|
|
|
|
|
|
|
|
|
|
|
|
|
|
|
|
|
|
Post Behavior |
|
|
|
|
|
|
|
|
|
|
|
|
|
||||
Fast Boot |
|
When enabled (default), your computer starts more quickly because it skips certain configurations and tests. |
||||||
|
|
|
|
|
||||
NumLock LED |
|
Enables or disables the NumLock feature when your computer starts. |
||||||
|
|
When enabled (default), this option activates the numeric and mathematical features shown at the top of each key. When disabled, this option |
||||||
|
|
activates the cursor-control functions labeled on the bottom of each key |
||||||
|
|
|
|
|
||||
POST |
|
Allows you to specify the function keys to display on the screen when the computer starts. |
||||||
Hotkeys |
|
|
|
|
|
|
|
|
|
|
• |
Enable F2 = Setup (enabled by default) |
|||||
|
|
• |
Enable F12 = Boot menu (enabled by default) |
|||||
|
|
|
|
|
||||
Keyboard |
|
Enables or disables keyboard error reporting when the computer starts. |
||||||
Errors |
|
|
|
|
|
|
|
|
|
|
This option is enabled by default. |
||||||
|
|
|
|
|
||||
|
|
sign-on displays a message stating the keystroke sequence required to enter the Manageability Engine BIOS Extensions(MEBx) Setup program. |
||||||
MEBx Hotkey |
|
|
|
|
|
|
|
|
|
|
This option is enabled by default. |
||||||
|
|
Set the maximum memory for operating system to load while installation. If enabled the maximum available memory is 256 MB RAM. |
||||||
OS Install |
|
This option is disable by default. |
||||||
|
|
Reason being some operating system will not complete install with more then 2 GB of memory. |
||||||
|
|
|
|
|
|
|
|
|
|
|
|
|
|
|
|
|
|
System Logs |
|
|
|
|
|
|
|
|
|
|
|
|
|
|
|
||
BIOS Events |
|
|
|
|
Displays the system event log and allows you to: |
|||
|
|
|
|
|
|
• |
Clear Log |
|
|
|
|
|
|
|
• |
Mark all Entries |
|
|
|
|
|
|
|
|
|
|
|
|
|
|
|
|
|
|
|
Back to Contents Page
Back to Contents Page
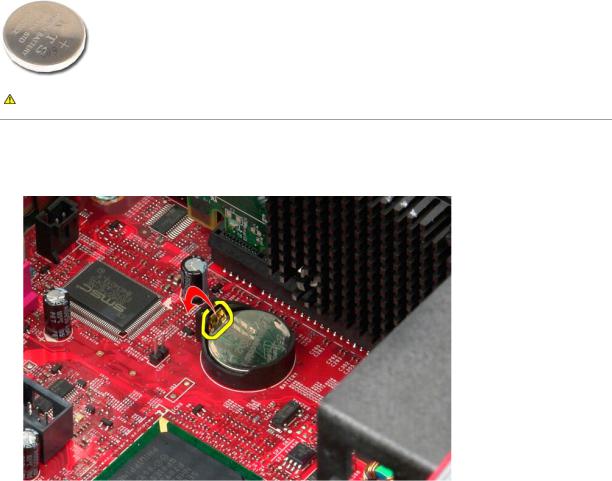
Coin-Cell Battery
Dell™ OptiPlex™ 380 Service Manual—Mini-Tower
WARNING: Before working inside your computer, read the safety information that shipped with your computer. For additional safety best practices information, see the Regulatory Compliance Homepage at www.dell.com/regulatory_compliance.
Removing the Coin-Cell Battery
1.Follow the procedures in Before Working Inside Your Computer.
2.Pull the retention clip away from the coin-cell battery.
3. Lift up the coin-cell battery from its socket and remove the battery from the computer.
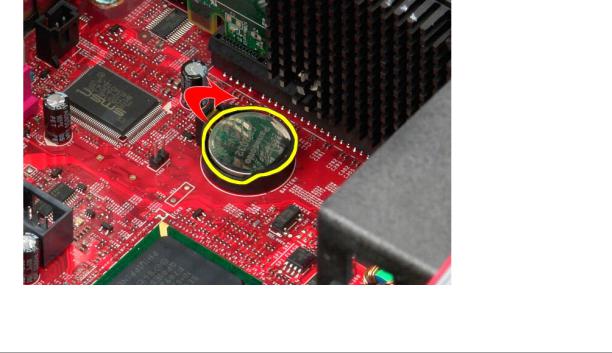
Replacing the Coin-Cell Battery
To replace the coin-cell battery, perform the above steps in reverse order.
Back to Contents Page
Back to Contents Page
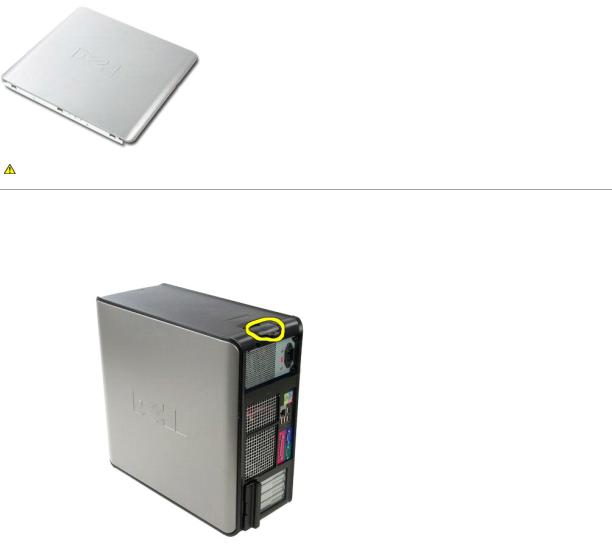
Cover
Dell™ OptiPlex™ 380 Service Manual—Mini-Tower
WARNING: Before working inside your computer, read the safety information that shipped with your computer. For additional safety best practices information, see the Regulatory Compliance Homepage at www.dell.com/regulatory_compliance.
Removing the Cover
1.Follow the procedures in Before Working Inside Your Computer.
2.Pull back the cover release latch.
3. Tilt the cover from the top outward.
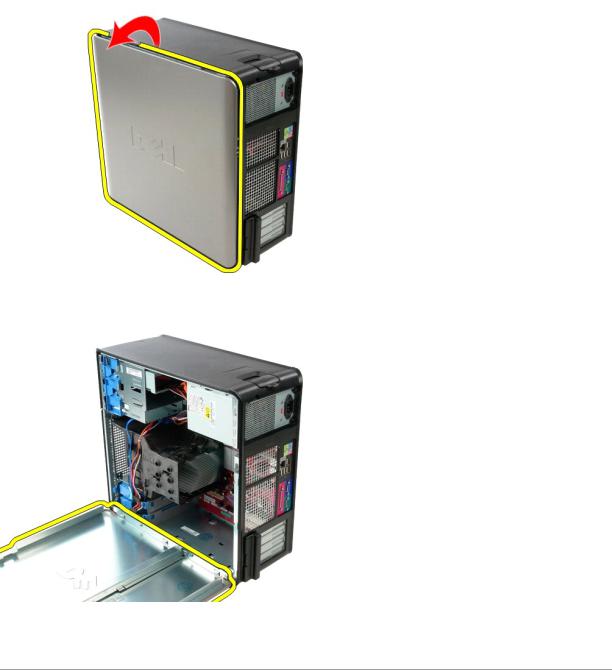
4. Remove the cover from the computer.
Replacing the Cover
To replace the cover, perform the above steps in reverse order.
Back to Contents Page
Back to Contents Page
Diagnostics
Dell™ OptiPlex™ 380 Service Manual—Desktop
Dell Diagnostics
Power Button Light Codes
Beep Codes
Diagnostic Lights
Dell Diagnostics
When to Use the Dell Diagnostics
It is recommended that you print these procedures before you begin.
NOTE: The Dell Diagnostics software works only on Dell computers.
NOTE: The Drivers and Utilities media is optional and may not ship with your computer.
Enter system setup (see Entering System Setup), review your computer's configuration information, and ensure that the device you want to test displays in System Setup and is active.
Start the Dell Diagnostics from either your hard drive or from the Drivers and Utilities media.
Starting the Dell Diagnostics From Your Hard Drive
1.Turn on (or restart) your computer.
2.When the DELL logo appears, press <F12> immediately.
NOTE: If you see a message stating that no diagnostics utility partition has been found, run the Dell Diagnostics from your Drivers and Utilities media.
If you wait too long and the operating system logo appears, continue to wait until you see the Microsoft® Windows® desktop. Then shut down your computer and try again.
3.When the boot device list appears, highlight Boot to Utility Partition and press <Enter>.
4.When the Dell Diagnostics Main Menu appears, select the test that you want to run.
Starting the Dell Diagnostics From the Drivers and Utilities Disc
1.Insert the Drivers and Utilities disc.
2.Shut down and restart the computer.
When the DELL logo appears, press <F12> immediately.
If you wait too long and the Windows logo appears, continue to wait until you see the Windows desktop. Then shut down your computer and try again.
NOTE: The next steps change the boot sequence for one time only. On the next startup, the computer boots according to the devices specified in the system setup program.
3.When the boot device list appears, highlight Onboard or USB CD-ROM Drive and press <Enter>.
4.Select the Boot from CD-ROM option from the menu that appears and press <Enter>.
5.Type 1 to start the menu and press <Enter> to proceed.
6.Select Run the 32 Bit Dell Diagnostics from the numbered list. If multiple versions are listed, select the version appropriate for your computer.
7.When the Dell Diagnostics Main Menu appears, select the test you want to run.
Dell Diagnostics Main Menu
1. After the Dell Diagnostics loads and the Main Menu screen appears, click the button for the option you want.
Option |
Function |
|
|
Express Test |
Performs a quick test of devices. This test typically takes 10 to 20 minutes and requires no interaction on your part. Run Express Test first to |
|
increase the possibility of tracing the problem quickly. |
|
|
Extended |
Performs a thorough check of devices. This test typically takes 1 hour or more and requires you to answer questions periodically. |
Test |
|
|
|
Custom Test |
Tests a specific device. You can customize the tests you want to run. |
|
|
Symptom |
Lists the most common symptoms encountered and allows you to select a test based on the symptom of the problem you are having. |
Tree |
|
|
|
2.If a problem is encountered during a test, a message appears with an error code and a description of the problem. Write down the error code and problem description and follow the instructions on the screen.
3.If you run a test from the Custom Test or Symptom Tree option, click the applicable tab described in the following table for more information.
Tab |
Function |
|
|
Results |
Displays the results of the test and any error conditions encountered. |
|
|
Errors |
Displays error conditions encountered, error codes, and the problem description. |
|
|
Help |
Describes the test and may indicate requirements for running the test. |
|
|
Configuration |
Displays your hardware configuration for the selected device. |
|
The Dell Diagnostics obtains configuration information for all devices from system setup, memory, and various internal tests, and it displays |
|
the information in the device list in the left pane of the screen. The device list may not display the names of all the components installed on |
|
your computer or all devices attached to your computer. |
|
|
Parameters |
Allows you to customize the test by changing the test settings. |
4.When the tests are completed, if you are running the Dell Diagnostics from the Drivers and Utilities disc, remove the disc.
5.Close the test screen to return to the Main Menu screen. To exit the Dell Diagnostics and restart the computer, close the Main Menu screen.
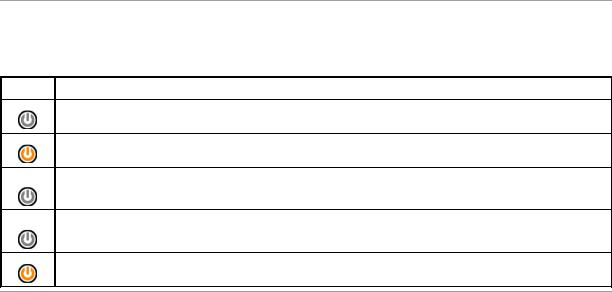
Power Button Light Codes
The diagnostic lights give much more information about the system state, but legacy power light states are also supported in your computer. The power light states are shown in following table.
Power Light
Description
State
Off
Power is off, light is blank. The computer is either turned off or is not receiving power.
Solid Blue
Power light is steady blue and the computer is not responding, ensure that the display is connected and powered on.
Blinking
Blue Indicates the computer is in standby mode. Press a key on the keyboard, move the mouse, or press the power button to resume normal operation. If the power light is blinking amber, the computer is receiving electrical power, a device such as a memory module or graphics card might be malfunctioning or incorrectly installed.
Blinking
Amber Indicates the computer is receiving electrical power but a device such as a memory module or graphics card might be malfunctioning or incorrectly installed.
Solid Amber
Indicates the computer is facing the power issue or an internal device is malfunctioning.
Beep Codes
If the monitor cannot display error messages during the POST, the computer may emit a series of beeps that identifies the problem or that can help you identify a faulty component or assembly. The following table lists the beep codes that may be generated during the POST. Most beep codes indicate a fatal error that prevents the computer from completing the boot routine until the indicated condition is corrected.
Code |
Cause |
Cause |
|
|
|
|
|
1 |
BIOS checksum failure. |
Possible system board failure. Contact Dell. |
|
|
|
|
|
2 |
No memory modules are |
1. |
If you have two or more memory modules installed, remove the modules, reinstall one module, and then |
|
detected |
|
restart the computer. If the computer starts normally, reinstall an additional module. Continue until you have |
|
|
|
identified a faulty module or reinstalled all modules without error. |
|
|
2. |
If available, install good memory of the same type into your computer. |
|
|
3. |
If the problem persists, contact Dell. |
|
|
|
|
3 |
Possible system board failure |
Contact Dell. |
|
|
|
|
|
4 |
RAM Read/Write failure |
1. |
Ensure that no special memory module/memory connector placement requirements exist. |
|
|
2. |
Verify that the memory modules that you are installing are compatible with your computer. |
|
|
3. |
If the problem persists, contact Dell. |
|
|
|
|
5 |
Real-time clock failure. Possible |
Replace the battery. If the problem persists, contact Dell. |
|
|
battery failure or system board |
|
|
|
failure. |
|
|
|
|
|
|
6 |
Video BIOS Test Failure |
Contact Dell. |
|
|
|
|
|
7 |
CPU-cache test failure |
Contact Dell. |
|
|
|
|
|

Diagnostic Lights
To help troubleshoot a problem, your computer has four lights labeled 1, 2, 3, and 4 on the bank panel. When the computer starts normally, the lights flash before turning off. If the computer malfunctions, the sequence of the lights help to identify the problem.
NOTE: After the computer completes POST, all four lights turn off before booting to the operating system.
Light Pattern |
Problem Description |
Suggested Resolution |
|
|
The computer is in a normal off |
• |
Plug the computer into a working electrical outlet. |
|
condition or a possible pre-BIOS |
• |
If the problem persists, contact Dell. |
|
failure has occurred. |
|
|
|
The diagnostic lights are not lit |
|
|
|
after the computer successfully |
|
|
|
boots to the operating system. |
|
|
|
A possible processor failure has |
• |
Reseat the processor (see Processor information for your computer). |
|
occurred. |
• |
If the problem persists, contact Dell. |
|
|
|
|
|
Memory modules are detected, but |
• |
If two or more memory modules are installed, remove the modules, then reinstall one module |
|
a memory failure has occurred. |
|
and restart the computer. If the computer starts normally, continue to install additional |
|
|
|
memory modules (one at a time) until you have identified a faulty module or reinstalled all |
|
|
|
modules without error. |
|
|
• |
If available, install working memory of the same type into your computer. |
|
|
• |
If the problem persists, contact Dell. |
|
|
|
|
|
A possible graphics card failure has |
• |
Reseat any installed graphics cards. |
|
occurred. |
• |
If available, install a working graphics card into your computer. |
|
|
• |
If the problem persists, contact Dell . |
|
|
|
|
|
A possible floppy drive or hard |
Reseat all power and data cables. |
|
|
drive failure has occurred. |
|
|
|
|
|
|
|
A possible USB failure has occurred. |
Reinstall all USB devices and check all cable connections. |
|
|
|
|
|
|
No memory modules are detected. |
• |
If two or more memory modules are installed, remove the modules, then reinstall one module |
|
|
|
and restart the computer. If the computer starts normally, continue to install additional |
|
|
|
memory modules (one at a time) until you have identified a faulty module or reinstalled all |
|
|
|
modules without error. |
|
|
• |
If available, install working memory of the same type into your computer. |
|
|
• |
If the problem persists, contact Dell. |
|
|
|
|
|
Memory modules are detected, but |
• |
Ensure that no special requirements for memory module/connector placement exist. |
|
a memory configuration or |
• |
Ensure that the memory you are using is supported by your computer (see the Specifications |
|
compatibility error has occurred. |
|
section for your computer). |
|
|
• |
If the problem persists, contact Dell. |
|
|
|
|
|
A possible expansion card failure |
• |
Determine if a conflict exists by removing an expansion card (not a graphics card) and |
|
has occurred. |
|
restarting the computer. |
|
|
• |
If the problem persists, reinstall the card you removed, then remove a different card and |
|
|
|
restart the computer. |
|
|
• |
Repeat this process for each expansion card installed. If the computer starts normally, |
|
|
|
troubleshoot the last card removed from the computer for resource conflicts. |
|
|
• |
If the problem persists, contact Dell. |
|
|
|
|
|
Another failure has occurred. |
• |
Ensure that all hard drive and optical drive cables are properly connected to the system |
|
|
|
board . |
|
|
• |
If there is an error message on the screen identifying a problem with a device (such as the |
|
|
|
floppy drive or hard drive), check the device to make sure it is functioning properly. |
|
|
• |
If the operating system is attempting to boot from a device (such as the floppy drive or optical |
|
|
|
drive), check system setup to ensure the boot sequence is correct for the devices installed on |
|
|
|
your computer. |
|
|
• |
If the problem persists, contact Dell. |
|
|
|
|
|
|
|
|
Back to Contents Page

Back to Contents Page
Drive Bezel
Dell™ OptiPlex™ 380 Service Manual—Mini-Tower
WARNING: Before working inside your computer, read the safety information that shipped with your computer. For additional safety best practices information, see the Regulatory Compliance Homepage at www.dell.com/regulatory_compliance.
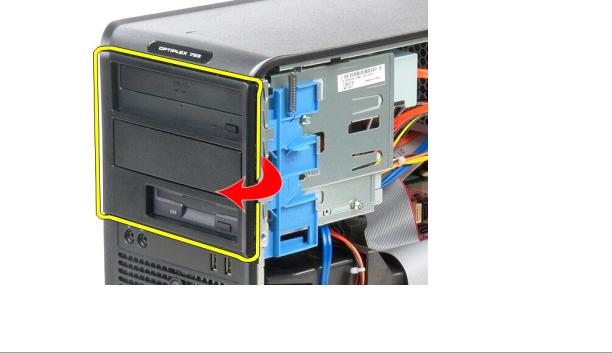
Removing the Drive Bezel
1.Follow the procedures in Before Working Inside Your Computer.
2.Slide the drive release latch toward the base of the computer.
3. Swing the drive bezel out from the computer.
Replacing the Drive Bezel
To replace the drive bezel, perform the above steps in reverse order.
Back to Contents Page
Back to Contents Page
Hard Drive
Dell™ OptiPlex™ 380 Service Manual—Mini-Tower
WARNING: Before working inside your computer, read the safety information that shipped with your computer. For additional safety best practices information, see the Regulatory Compliance Homepage at www.dell.com/regulatory_compliance.
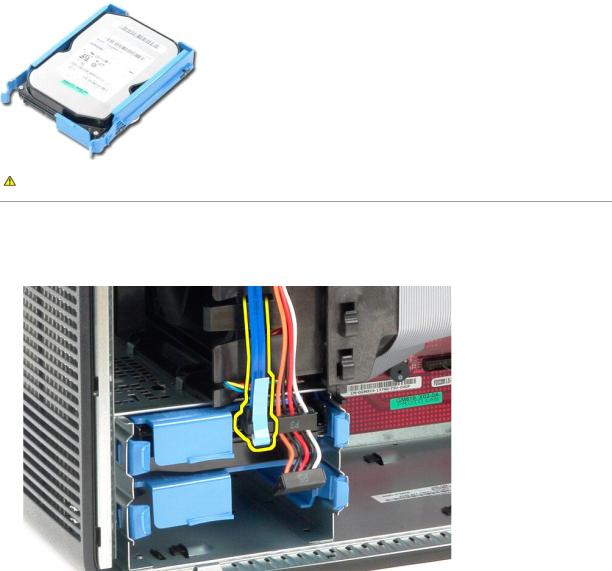
Removing the Hard Drive
1.Follow the procedures in Before Working Inside Your Computer.
2.Remove the drive bezel.
3.Disconnect the data cable from the hard drive.
4. Disconnect the power cable from the hard drive.

5. Press in on the blue release tabs on each side of the hard drive and slide the hard drive out of the computer.
Replacing the Hard Drive
To replace the hard drive, perform the above steps in reverse order.
Back to Contents Page
 Loading...