


Dell™ 2009W Flat Panel Monitor User's Guide
About Your Monitor |
Solving Problems |
Product Features |
Troubleshooting Your Monitor |
Identifying Parts and Controls |
Common Problems |
Monitor Specifications |
Product Specific Problems |
Universal Serial Bus (USB) Interface |
Universal Serial Bus (USB) Specific Problems |
Plug and Play Capability |
Troubleshooting the Dell™ Soundbar |
Maintenance Guidelines |
|
Setting Up the Monitor |
Appendix |
Attaching the Stand |
Safety Instructions |
Connecting the Monitor |
FCC Notice (U.S. Only) and Other Regulatory Information |
Organizing the Cables |
Contacting Dell |
Attaching the Soundbar (Optional) |
|
Removing the Stand |
|
Operating the Monitor |
|
Using the Front Panel Controls |
|
Using the On-Screen Display (OSD) |
|
Setting the Optimal Resolution |
|
Using the Dell Soundbar (Optional) |
|
Using the Tilt, Swivel, and Vertical Extension |
|
Rotating the monitor |
|
Adjusting the Rotation Settings of Your Operating System |
|
|
|
Notes, Notices, and Cautions
NOTE: A NOTE indicates important information that helps you make better use of your computer.
NOTICE: A NOTICE indicates either potential damage to hardware or loss of data and tells you how to avoid the problem.
CAUTION: A CAUTION indicates a potential for property damage, personal injury, or death.
Information in this document is subject to change without notice.
© 2008 Dell Inc. All rights reserved.
Reproduction in any manner whatsoever without the written permission of Dell Inc. is strictly forbidden.
Trademarks used in this text: Dell, the DELL logo are trademarks of Dell Inc; Microsoft, Windows, and Windows NT are registered trademarks of Microsoft Corporation; Adobe is a trademark of Adobe Systems Incorporated, which may be registered in certain jurisdictions. ENERGY STAR is a registered trademark of the U.S. Environmental Protection Agency. As an ENERGY STAR partner, Dell Inc. has determined that this product meets the ENERGY STAR guidelines for energy efficiency.
Other trademarks and trade names may be used in this document to refer to either the entities claiming the marks and names or their products. Dell Inc. disclaims any proprietary interest in trademarks and trade names other than its own.
Model 2009W
January 2008 Rev. A00
Back to Contents Page
About Your Monitor
Dell™ 2009W Flat Panel Monitor User's Guide
Product Features
Identifying Parts and Controls
Monitor Specifications
Universal Serial Bus (USB) Interface
Plug and Play Capability
Maintenance Guidelines
Product Features
The Dell™ 2009W flat panel display has an active matrix, thin-film transistor (TFT), liquid crystal display (LCD). The monitor features include:
■20-inch (508 mm) viewable area display.
■1680 x 1050 resolution, plus full-screen support for lower resolutions.
■Wide viewing angle to allow viewing from a sitting or standing position, or moving side-to-side.
■Tilt, swivel, vertical extension and rotate adjustment capabilities.
■Removable pedestal and VESA 100 mm mounting holes for flexible mounting solutions.
■Plug and play capability if supported by your system.
■On-Screen Display (OSD) adjustments for ease of set-up and screen optimization.
■Software and documentation CD includes an information file (INF), Image color Matching File (ICM), and product documentation.
■Energy Saver feature for Energy Star compliance.
■Security lock slot.
Identifying Parts and Features
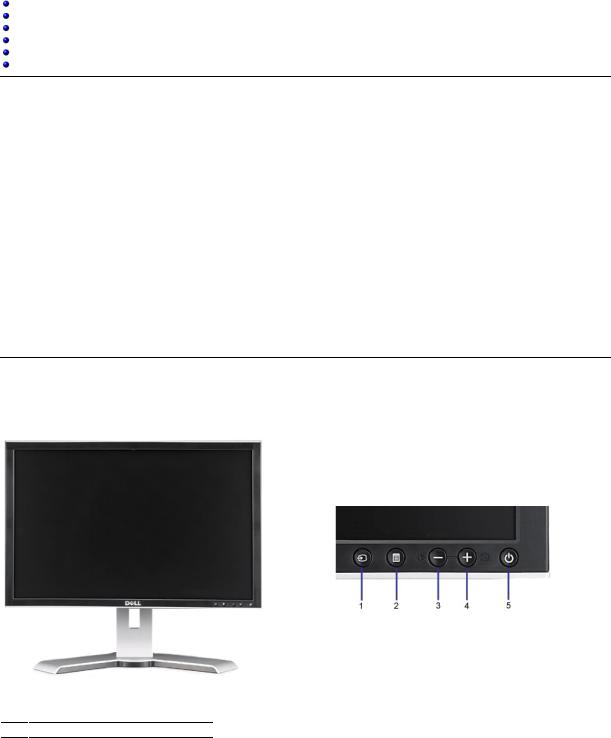
Front View
Front View |
Front panel controls |
Label Description
1Input Source select
2OSD Menu/Select button

3Brightness & Contrast/Down (-) button
4Auto-adjust/Up (+) button
5Power button (with power light indicator)
Back View
Back view
Label
1
VESA mounting holes (100mm) (Behind attached base plate)
2Barcode serial number label
3Security lock slot
4Dell Soundbar mounting brackets
5Regulatory rating label
6Stand removal button
7Cable management slot
8Lock down/release button
Back View with monitor stand
Description/Use
Use to mount the monitor.
Refer to this label if you need to contact Dell for technical support.
Use a security lock with the slot to help secure your monitor.
Attach the optional Dell Soundbar.
Lists the regulatory approvals.
Press to release the stand.
Help organize cables by placing them through the slot.
Push the monitor down, press the button to unlock the monitor, and then lift the monitor to the desired height.
Side View
USB connectors (downstream)
Left view |
Right view |
|
|
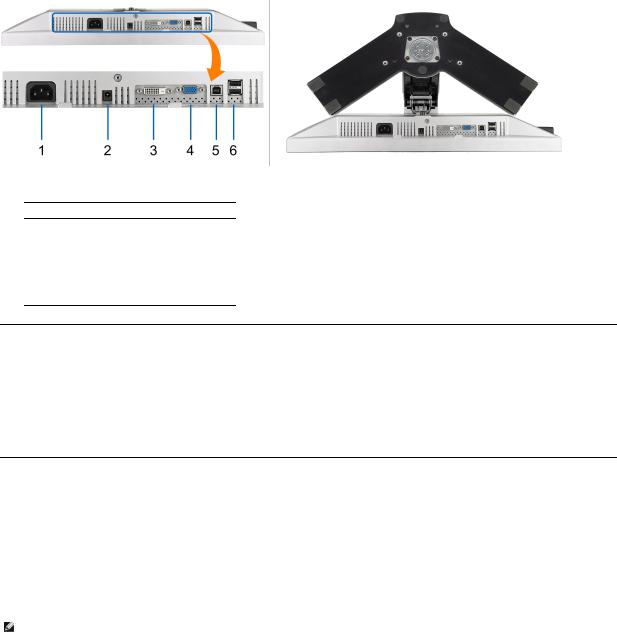
Bottom View
Bottom view |
Bottom view with monitor stand |
Label Description
1AC power cord connector
2DC power connector for Dell Soundbar
3DVI connector
4VGA connector
5USB upstream port
6USB downstream ports
Monitor Specifications
The following sections give you information about the various power management modes and pin assignments for various connectors for your monitor.
Power Management Modes
If you have VESA's DPM™ compliance display card or software installed in your PC, the monitor can automatically reduce its power consumption when not in use.
Mode*. If the computer detects input from keyboard, mouse, or other input devices, the monitor automatically resumes functioning. The following table shows th of this automatic power saving feature:
VESA Modes |
Horizontal Sync |
Vertical Sync |
Video |
Power Indicator |
Power Consu |
Normal operation (with Dell Soundbar and USB active) |
Active |
Active |
Active |
Green |
70 W (maximu |
Normal operation |
Active |
Active |
Active |
Green |
42 W (typical) |
Active-off mode |
Inactive |
Inactive |
Blanked |
Amber |
Less than 2 W |
Switch off |
- |
- |
- |
Off |
Less than 1 W |
|
|
|
|
|
|
The OSD will only function in the normal operation mode. When the menu or plus buttons are pressed in Active-off mode, one of the following messages will be d
Analog Input In Power Save Mode. Press Computer Power Button or Any Key on Keyboard or Move Mouse
OR
Digital Input In Power Save Mode. Press Computer Power Button or Any Key on Keyboard or Move Mouse
Activate the computer and the monitor to gain access to the OSD.
NOTE: This monitor is ENERGY STAR®-compliant as well as TCO '99/TCO '03 power management compatible.
* Zero power consumption in OFF mode can only be achieved by disconnecting the main cable from the monitor.
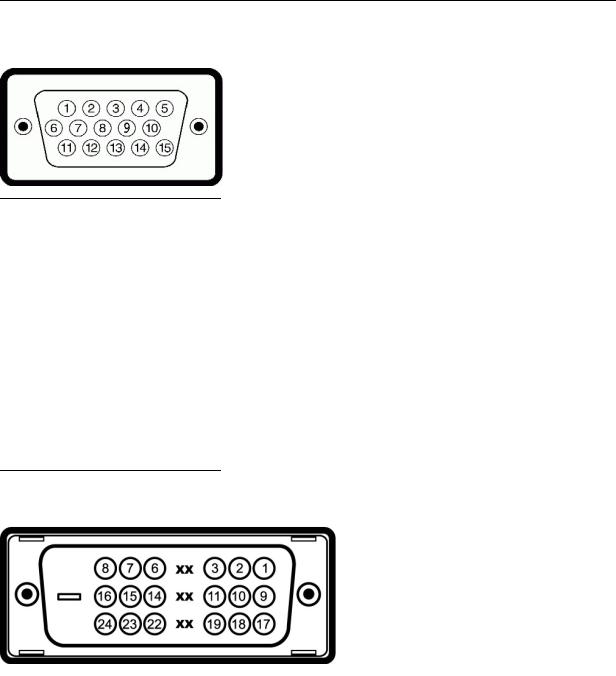
Pin Assignments
VGA Connector
Pin |
15-pin Side of the Connected Signal Cable |
Number |
|
1Video-Red
2Video-Green
3Video-Blue
4GND
5Self-test
6GND-R
7GND-G
8GND-B
9Computer 5V/3.3V
10GND-sync
11GND
12DDC data
13H-sync
14V-sync
15DDC clock
DVI Connector
Pin |
24-pin Side of the Connected Signal Cable |
Number |
|
1TMDS RX2-
2TMDS RX2+
3TMDS Ground
4Floating
5Floating
6DDC Clock
7DDC Data
8Floating

9TMDS RX1-
10TMDS RX1+
11TMDS Ground
12Floating
13Floating
14+5V/+3.3V power
15Self test
16Hot Plug Detect
17TMDS RX0-
18TMDS RX0+
19TMDS Ground
20Floating
21Floating
22TMDS Ground
23TMDS Clock+
24TMDS Clock-
Universal Serial Bus (USB) Interface
This section gives you information about the USB ports that are available on the left side of your monitor.
NOTE: This monitor supports High-Speed Certified USB 2.0 interface
Transfer speed |
Data Rate |
Power Consumption |
|
|
|
High speed |
480 Mbps |
2.5W (Max., each port) |
Full speed |
12 Mbps |
2.5W (Max., each port) |
Low speed |
1.5 Mbps |
2.5W (Max., each port) |
|
|
|
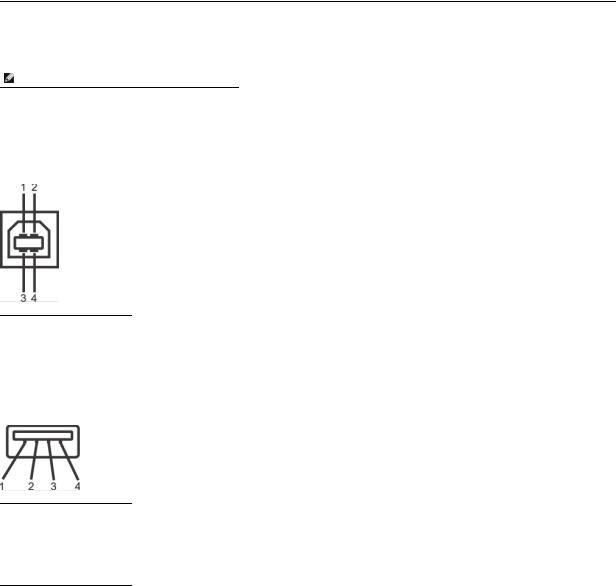
USB Upstream Connector
Pin Number |
4-pin Side of |
|
the connector |
1DMU
2VCC
3DPU
4GND
USB Downstream Connector
Pin Number |
4-Pin Side of |
|
the Signal |
|
Cable |
1VCC
2DMD
3DPD
4GND
USB Ports
•1 upstream - rear
•4 downstream - 2 on rear; 2 on left side
 NOTE: USB 2.0 functionality requires a USB 2.0-capable computer.
 NOTE: The monitor's USB interface works only when the monitor is on or in power save mode. If you turn off the monitor and then turn it on, the attached p to resume normal functionality.

Plug and Play Capability
You can install the monitor in any Plug and Play-compatible system. The monitor automatically provides the computer system with its Extended Display Identificat Channel (DDC) protocols so the system can configure itself and optimize the monitor settings. Most monitor installations are automatic; you can select differ information about changing the monitor settings, see Operating the Monitor.
Flat Panel Specifications
Screen type |
|
Active matrix - TFT LCD |
Screen dimensions |
|
20 inches (20-inch viewable image size) |
Preset display area: |
|
|
Horizontal |
|
433.44 mm (17.06 inches) |
Vertical |
|
270.90 mm (10.67 inches) |
Pixel pitch |
|
0.258 mm |
Viewing angle |
|
160° (vertical) typ, 170° (horizontal) typ |
Luminance output |
|
300 cd/m ²(typ) |
Contrast ratio |
|
1000 to 1 (typ) |
Dynamic contrast ratio |
|
2000 to 1 (typ) |
Faceplate coating |
|
Antiglare with hard-coating 3H |
Backlight |
|
CCFL (4) edgelight system |
Response Time |
|
5ms typical |
Color gamut (Typical) |
102%* |
|
|
|
|
* 2009W color gamut (typical) is based on CIE1976 (102%) and CIE1931 (92%) test standards.
 Loading...