


TP4 / TP5
Electronic Programmable Room Thermostat
®
Certification Mark
User & Installation Instructions

INDEX
GB
ES
GR
PL
Installation Instructions
User Instructions
Instrucciones de instalación Instrucciones del usuario
ПдзгЯет егкбфЬуфбузт ПдзгЯет чсЮузт
Instrukcja instalacji Instrukcja Użytkownika
3-7
8-23
4-289-42
43-47
48-62
63-67
68-81
Please Note:
This product should only be installed by a qualified electrician or competent heating installer and should be in accordance with the current edition of the IEEE wiring
regulations.

Installation Instructions
Product Specification
Thermostat features |
TP4 |
|
TP5 |
|
|
|
|
Power supply |
2 x AA/MN1500/LR alkaline cells |
||
|
|
|
|
24 hour programming |
l |
|
|
5/2 day programming |
|
|
l |
Memory back-up |
1 min for battery change |
||
|
|
|
|
Switching action of output relay |
|
1 x SPDT,Type 1B |
|
|
|
|
|
Switch rating of relay contact |
|
6(2)A, 10-264Vac |
|
Temperature range |
|
5-30°C |
|
Dimensions, mm |
98 wide, 81 high, 34 deep |
||
Design standard |
|
EN60730-2-9 |
|
Rated impulse voltage |
|
2.5Kv |
|
Ball hardness test |
|
75°C |
|
Control pollution situation |
|
Degree 2 |
|
|
|
|
|
Temperature accuracy |
|
±1°C |
|
|
|
|
|
Time accuracy |
|
±1 min. |
|
|
|
|
|
GB
Installation Instructions

GB
Installation Instructions
Installation
o There must be clearances of at least 110mm around the unit.
110mm |
60mm fixing |
minimum |
centres |
from nearest |
|
obstruction |
|
110mm minimum from nearest obstruction
oFix at a height of approximately 1.5m from the floor, away from draughts or heat sources such as radiators, open fires or direct sunlight.
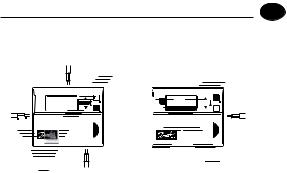
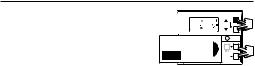
Wiring
oCable entry is from behind if fitted to a single gang flush box, or from above, below or from the left if surface fixed cable is used.
GB
Installation Instructions

GB Wiring
Installation Instructions
!Some existing thermostats wil have a Neutral wire and/or Earth wire connected. These are not required by the TP4/5 and must NOT be connected to any TP4/5 terminals. Instead they should be made electrically safe and coiled in the recess at the back of the TP4/5.

GB
Installation Instructions

GB
User Instructions
What is a programmable room thermostat?
...an explanation for householders.
A programmable room thermostat is both a programmer and a room thermostat. A programmer allows you to set ‘On’ and ‘Off’ time periods to suit your own lifestyle. A room thermostat works by sensing the air temperature, switching on the heating when the air temperature falls below the thermostat setting,and switching it off once this set temperature has been reached.
So, a programmable room thermostat lets you choose what times you want the heating to be on,and what temperature it should reach while it is on.It will allow you to select different temperatures in your home at different times of the day (and days of the week) to meet your particular needs.
Turning a programmable room thermostat to a higher setting will not make the room heat up any faster. How quickly the room heats up depends on the design of the heating system,for example,the size of boiler and radiators.

Neither does the setting affect how quickly the room cools down. Turning a programmable room thermostat to a lower setting will result in the room being controlled at a lower temperature,and saves energy.
The way to set and use your programmable room thermostat is to find the lowest temperature settings that you are comfortable with at the different times you have chosen, and then leave it alone to do its job. The best way to do this is to set low temperatures first, say 18°C, and then turn them up by one degree each day until you are comfortable with the temperatures.You won’t have to adjust the thermostat further. Any adjustments above these settings will waste energy and cost you more money.
If your heating system is a boiler with radiators, there will usually be only one programmable room thermostat to control the whole house. But you can have different temperatures in individual rooms by installing thermostatic radiator valves (TRVs) on individual radiators. If you don’t have TRVs, you should choose a temperature that is reasonable for the whole house. If you do have TRVs, you can choose a slightly higher setting to make sure that even the coldest room is comfortable,then prevent any overheating in other rooms by adjusting the TRVs.
The time on the programmer must be correct. Some types have to be adjusted in spring and autumn at the changes between Greenwich Mean Time and British Summer Time.
You may be able to temporarily adjust the heating programme, for example, ‘Override’,‘Advance’or‘Boost’.These are explained in the manufacturer’s instructions. Programmable room thermostats need a free flow of air to sense the temperature, so they must not be covered by curtains or blocked by furniture.Nearby electric fires, televisions,wall or table lamps may prevent the thermostat from working properly.
GB
User Instructions

GB User Instructions
User Instructions
Your programmable room thermostat
TP4 & TP5 room thermostats let you programme up to 6 times and temperatures at which your heating will come on and go off each day. With the TP5 you can programme one set of times and temperatures for weekdays and another set for weekends. They feature several user overrides including frost protection.
10
Preset Programmes
TheTP4 & TP5 come ready programmed with a set of operating times and temperatures which often suit most people.
TP4 - Everyday
TP5 - Weekdays (Mon-Fri)
Event |
Time |
Temp °C |
|
|
|
1 |
6:30am |
20 |
|
|
|
2 |
8:30am |
16 |
|
|
|
3 |
12:30pm |
19 |
|
|
|
4 |
1:30pm |
16 |
|
|
|
5 |
5:30pm |
21 |
|
|
|
6 |
10:30pm |
16 |
|
|
|
TP5 - Weekend (Sat-Sun)
Event |
Time |
Temp °C |
|
|
|
1 |
7:00am |
20 |
|
|
|
2 |
10:00am |
16 |
|
|
|
3 |
12:00pm |
19 |
|
|
|
4 |
2:00pm |
16 |
|
|
|
5 |
5:00pm |
21 |
|
|
|
6 |
10:30pm |
16 |
|
|
|
GB
User Instructions
If you want to change any of these settings you can do so by following |
|
the instructions on page 16-17 (TP4) or pages 18-19 (TP5). |
|
First, follow the steps on pages 12-15 to set the correct time and |
|
date. |
11 |
GB
User Instructions
 Before you start
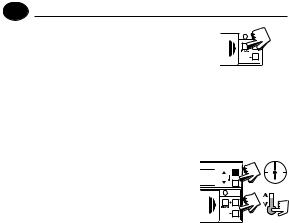
Slide the battery cover to the left to reveal the programming buttons.
Press and hold the +, – , s & tbuttons at the same time, to reset the unit.
This will reinstate the preset programmes and will set the time to 12:00 on Monday (MO) and the temperature to 16°C.


 PM
PM
12
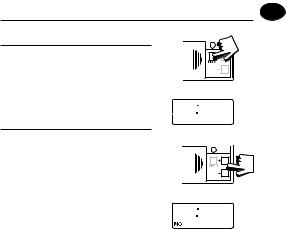
Setting the Clock & Day
CLOCK
Press PROG to begin programming.
Use + or - to adjust the TIME (press and hold to change in 10 min increments).
DAY (TP5 only) |
i2 00 PM |
Press PROG again.
Use + or - buttons until correct DAY is shown (MO = Monday,TU = Tuesday,etc)
Press PROG again to accept the settings.
!Remember - you will have to reset the time when the clocks change in Spring and Autumn.
GB
User Instructions
13
GB
User Instructions
Running your programme
If you are happy to |
use the preset |
|
pm |
programmes on page 11, you don’t need |
|
i2 2420 |
|
to do anything else. |
|
|
|
|
|
||
To accept the factory presets close the front cover and after 2 minutes the presettings will automatically be accepted.
Your unit is now in RUN mode and the heating will come on and go off at the programmed times.
14

Before you change the preset programmes
Please Note
The unit must be programmed in sequence and EVENT times cannot be programmed out of sequence.
The event 1 time setting can be set at any time of day (normally in the morning). The time settings for events 2 to 6 can only be placed between the previous setting and 1.59.
If you want to leave a preset time as it is, simply press PROG to move on to the next setting.
During programming, if no buttons are pressed for 2 to 3 minutes the unit will automatically return to RUN mode, and the programme set up to that minute will be active.
!If at any time you get confused and need to reset the unit to the preset programmes,press and hold the + ,– , s & tbuttons at the same time.
GB
User Instructions
15
GB
User Instructions
Changing the preset programmes - TP4
a) Press PROG twice to show the 1st pre-set time and temperature (Event 1).
b)Use + or – buttons to adjust the TIME (press and hold to change in 10 min increments).
c)Use s or t buttons to adjust the TEMPERATURE.
d) Press PROG to move to next preset time & temperature (Event 2).
e) Repeat steps b, c & d for programming Events 3, 4, 5 & 6.
16

Press PROG until the colon in the LCD display starts to flash.
The unit is now in RUN mode and the heating will come on and go off at the programmed times
Note: A flame symbol will appear in the display whenever the thermostat is calling for heat.
!Ensure the TP4 is in RUN mode before sliding the cover shut.
Please go to page 20.
i2 24 pm 
20
GB
User Instructions
17

GB
User Instructions
Changing the preset programmes - TP5
For Days 1-5 (weekdays)
a) Press PROG 3 times to show the 1st pre-set time and temperature (Event 1, MOTUWETHFR). Please note MOTUWETHFR is the abbreviation for the days of the week.
b) Use + or – buttons to adjust the |
AM |
|
20 |
||
TIME (press and hold to change in |
||
10 min increments). |
|
c)Use s or t buttons to adjust the TEMPERATURE.
d) Press PROG to move to next preset time & temperature (Event 2, MOTUWETHFR).
e) Repeat steps b, c & d for programming Events 3, 4, 5 & 6.
18
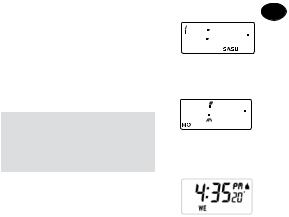
For Days 6-7 (weekends)
oPress PROG to show 1st pre-set time and temperature (Event 1, SASU).
oRepeat steps b, c and d on previous page to programme time and temperature events for the weekend.
Press PROG until the colon in the LCD display starts to flash.
The unit is now in RUN mode and the heating will come on and go off at the programmed times.
Note: A flame symbol will appear in the display whenever the thermostat is calling for heat.
!Ensure the TP5 is in RUN mode before sliding the cover shut.
7 00 |
20 |
GB |
|
||
|
am |
Instructions |
|
|
|
i2 2420 |
User |
|
|
pm |
|
19

GB
User Instructions
User Overrides
Sometimes you may need to change the way you use your heating temporarily, i.e. due to unusually cold weather.The TP4 and TP5 have several user overrides, which can be selected without affecting the thermostat programming.
Temporary override of programmed temperature
The override buttons, s and t, can be used to temporarily override the events you have programmed.
For example, you may arrive home early and while you normally have the thermostat set for 16°C, you may require more heat now. By pressing the up button son the front of the TP5, the set temperature on the top right of the display begins to increase.
20
oPress s or t until required temperature is displayed.
oAn up or down arrow (s or t) will appear in the display to remind you that you have over-ridden the programmed temperature.
The TP5 will remain at this higher temperature until the next pre-set temperature change.
GB
User Instructions
pm
20
21

GB
User Instructions
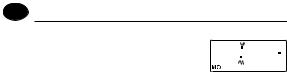
Frost Protection
A constant low temperature of 5°C can be selected whilst away from home. Setting the thermostat to this temperature will effectively switch off the heating and provide frost protection to areas of the house with central heating.
oTo set, press the sand tbuttons at the same time. The display
will show a blinking colon, the low temperature (5°C) and a snowflake.
o To |
return |
to |
automatic |
: |
programming |
press |
s and t |
||
together again.
22

Battery Replacement
o When batteries are low a battery
symbol will flash in the LCD display. |
pm |
|
20 |
||
|
oYou have 15 days to replace the battery before the unit will switch off.
oWhen changing batteries, remove old batteries and insert new ones within one minute and programming will not be lost.
!IMPORTANT: always use high quality alkaline batteries.
NB. If the display ever goes blank during normal operation, the batteries will need to be renewed, the unit reset and the time and programmes reset.
GB
User Instructions
23

ES
Instrucciones de instalación
ESInstrucciones de instalación
Especificaciones |
TP4 |
|
TP5 |
|
|
|
|
Alimentación |
2 pilas AA / MIN 1500 / LR 6 |
||
|
|
|
|
Programación 24 horas |
l |
|
|
|
|
|
|
Programación diaria 5/2 (días de |
|
|
l |
semana/fines de semana) |
|
|
|
|
|
|
|
Respaldo de batería |
1 minuto, para cambio de batería |
||
Tipo de contacto |
|
1 x SPDT,Type 1B |
|
|
|
|
|
Carga de los contactos |
|
6(2)A, 10-264Vac |
|
|
|
|
|
Rango de temperatura |
|
5-30°C |
|
|
|
|
|
Dimensiones generales (mm) |
|
98 An, 81 Al, 34 Pr |
|
|
|
|
|
Norma de fabricación |
|
EN60730-2-9 |
|
Tensión nominal del impulso |
|
2.5Kv |
|
Ensayo de presión con bola |
|
75°C |
|
Control antipolución |
|
Grado 2 |
|
Precisión de temperatura |
|
±1°C |
|
|
|
|
|
Exactitud en la hora |
|
±1 min. |
|
|
|
|
|
24

Observe que:
Este producto deberá ser instalado solamente por un electricista cualificado o por un instalador de calefacción competente y deberá instalarse de acuerdo con la edición vigente de las normas de cableado de la IEEE.
Instalación
oDebe haber espacios de, al menos, 110 mm alrededor de la unidad.
110mm |
60mm fixing |
minimum |
centres |
from nearest |
|
obstruction |
|
110mm minimum from nearest obstruction
ES
Instrucciones de instalación
25

ES
Instrucciones de instalación
oMontarlo a una altura de aproximadamente 1,5 m desde el suelo, lejos de corrientes de aire o de fuentes de calor tales como radiadores,fuegos descubiertos o rayos solares directos.
26
 Loading...