


Getting Started
Démarrage
Руководство по началу работы
Посібник для початку роботи
ءدبلا ليلد
Read Safety and Important Information
\addendum\ first.
Lire Sécurité et informations importantes
\addendum\ en premier.
В первую очередь прочтите раздел
Информация о безопасности и важные сведения \приложение\.
Спершу прочитайте розділ Інформація щодо безпеки й важливі відомості \додаток\.
.ًلاوأ )قحلملاب( ةماهلا تامولعملاو ناملأا تامولعم أرقا

1 |
Installing the Printer |
page 1 |
|
||
|
Installation de l'imprimante....................................................................... |
page 1 |
|
Установка принтера.................................................................................. |
стр. 1 |
|
Установлення принтера................................................................... |
сторінка 1 |
|
..................................................................................................1 ةحفص |
ةعباطلا بيكرت |
|
|
|
2 |
Connecting with Computer and Smartphone/Tablet |
page 4 |
|
||
|
Connexion avec un ordinateur et un smartphone ou une tablette........... |
page 4 |
|
Подключение к компьютеру и смартфону или планшету...................... |
стр. 4 |
|
|
Підключення до комп’ютера та смартфона або планшета........... |
сторінка 4 |
|
|
4 ةحفص.......................................................... |
يحوللا زاهجلا/يكذلا فتاهلاو رتويبمكلاب ليصوتلا |
|
How to Hold Printer |
Explanatory Movies |
|
|
Manipulation de l'imprimante |
Vidéos explicatives |
|
|
Как держать принтер |
Информационные видеоролики |
|
|
Як тримати принтер |
Довідкові відео |
|
|
ةعباطلا لمح ةيفيك |
ةيحيضوت ملافأ |
|
|

1. Checking Included Items
□Power cord
□Setup CD-ROM for Windows PC
□Ink tanks for setup
□Modular cable
□Safety and Important Information
□Getting Started \this manual\
2. Removing Packing
Materials / Turning on
Printer
1 |
Remove the packing materials \such as orange |
|
tape and protective film on the touch screen\ from |
|
outside the printer. |
|
Using the printer with the protective film attached |
|
may cause malfunction. |
2 |
a Hook the hollows on the both sides of |
|
the printer with your fingers and open the |
|
scanning unit / cover. |
|
b Remove the orange tape. |
|
a |
|
b |
3 |
Close the scanning unit / cover. |
4 Connect the power cord diagonally from the back.
Back
Do not connect any cables except the power cord yet.
5 Lift the operation panel and press the ON button.
6 |
Drag the screen and tap the language to select. |
<![if ! IE]> <![endif]>ENGLISH |
|
7 |
|
|
|
|
|
|
|
|
|
|
|
|
|
|
|
|
|
|
|
|
|
|
|
|
|
|
|
|
|
|
|
|
|
|
|
|
|
|
|
|
|
|
|
|
|
|
|
|
|
|
|
|
|
|
|
|
|
|
|
If the following screen appears, tap your country or |
|||||||||||
|
region to select. |
||||||||||
|
|
|
|
|
|
|
|
|
|
|
|
|
|
|
|
|
|
|
|
|
|
|
|
8 |
Read the messages and follow the on-screen |
|
|||
|
instructions. |
|
|||
|
|
|
|
|
|
|
|
|
|
|
|
|
|
|
|
|
|
For details about information that is sent to Canon, refer to "Sending Data To Canon" in Safety and Important Information.
9 Select OK.
1

3. Installing Ink Tank |
|
If the color is not displayed on the screen even |
||
|
|
|
|
though you have installed the ink tank, the color |
|
|
|
|
of the ink tank may be wrong or you may have |
|
|
|
|
installed an ink tank, such as one with a different |
1 |
Open the scanning unit / cover. |
|
model number, that is not supported by this printer. |
|
|
Either install an ink tank for the correct color or use |
|||
|
Do not touch the print head holder \A\ until it |
|
the provided ink tank for setup. |
|
|
stops. |
|
5 |
Install all the ink tanks the same way as in step |
|
|
|
||
|
|
|
|
4, and then confirm that all the colors appear on |
|
|
|
|
screen. |
|
|
\A\ |
|
|
2 |
a COMPLETELY remove the orange tape. |
|
|
|
|
b Remove the protective wrap. |
|
|
|
|
|
|
6 |
Close the scanning unit / cover. |
|
b |
a |
|
|
|
|
|
|
|
3 |
Hook the orange cap with your finger to remove it |
|
|
|
|
GENTLY. |
|
|
|
|
|
|
|
If an error message appears on the screen, make |
|
|
|
|
sure the ink tanks are installed correctly. |
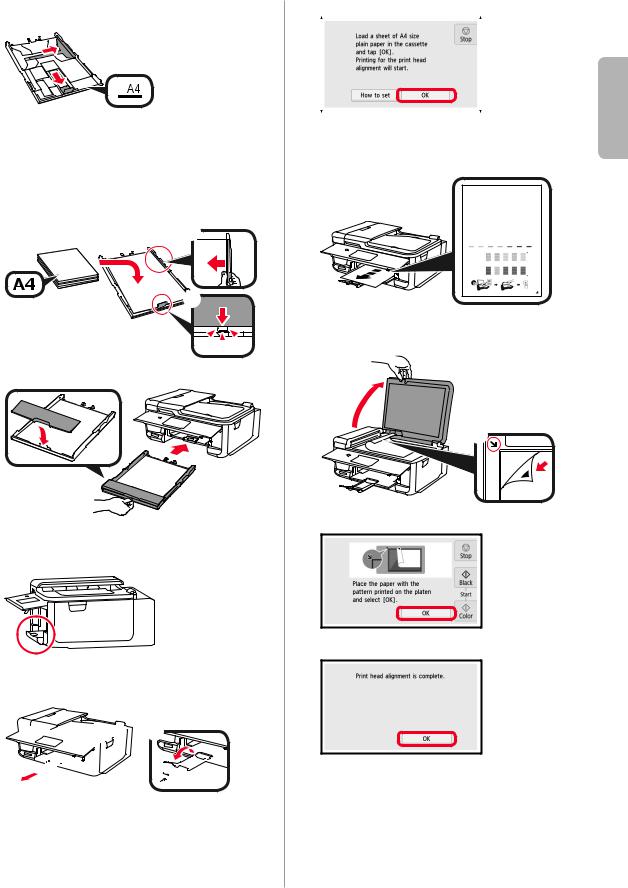
4. Loading Paper / Aligning |
Print Head |
|
|
|
To obtain a better print result, print a pattern for Print Head |
|
|
|
Alignment and scan it. |
|
ink tank with the Y-shape air hole |
Do not touch. |
1 a Pull out the cassette. |
|
Do not push the both sides of the |
|
|
|
blocked. |
|
b Remove the cassette cover. |
4 |
Insert the ink tank into the print head and push it |
a |
|
|
down firmly until it snaps into place. |
|
|
The color of the ink tank that you set appears on screen.
b
2 |
While pressing on the lock of the cassette, extend |
||||
|
|
|
|
|
the cassette. |
|
|
|
|
|
|
|
|
|
|
|
|
|
|
|
|
|
|
|
|
|
|
|
|
2
3 |
Open the paper guides, and then align the guide in |
|
front with the mark of A4. |
4 |
a Load plain A4 size paper with the print side |
|
|
facing down. |
|
|
b Slide the right paper guide to align it with the |
|
|
side of the paper stack. |
|
|
c Align the paper stack with the paper guide in |
|
|
front. |
|
|
a |
b |
|
|
|
|
|
c |
5 |
Attach the cassette cover and insert the cassette. |
|
The following figure shows the state after the cassette is inserted.
Side
6 a Pull out the paper output tray. b Open the output tray extension.

 b
b  a
a 


7 If the following screen appears, select OK.
8 |
|
|
|
<![if ! IE]> <![endif]>ENGLISH |
|
Make sure that a pattern is printed for Print Head |
|||||
|
|||||
|
Alignment. |
|
|||
It takes about 2 minutes to finish printing.
9 a |
Open the document cover. |
b |
Load the printed pattern on the platen glass. |
a
b
10 After closing the document cover, select OK.
11 If the following screen appears, select OK.
3

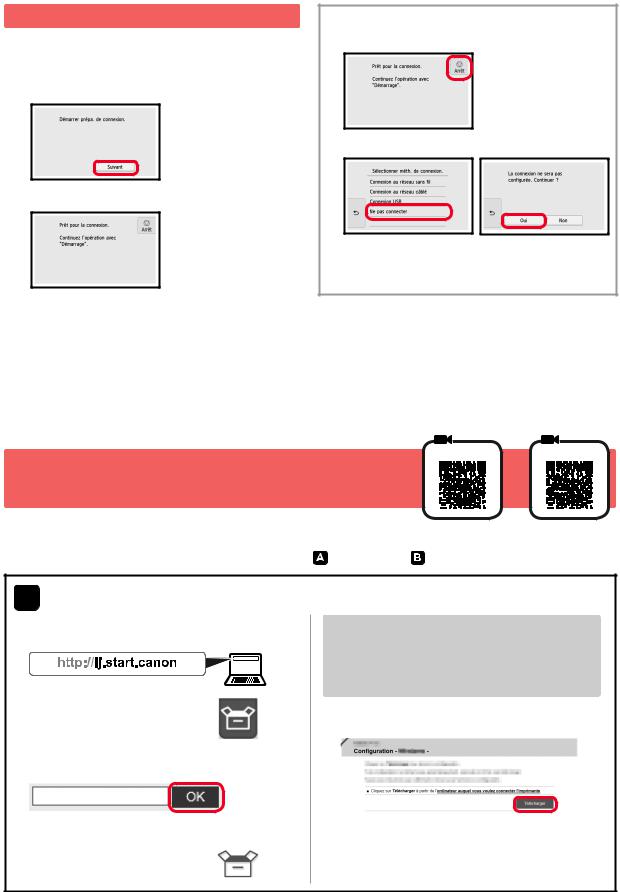
5. Preparing for Connection
In the following description, smartphones and tablet devices are collectively described as smartphone.
1 Select Next.
2 Make sure that the following screen appears.
Use Only Printer
a Select Stop button.
b Select Do not connect > Yes in this order.
The setup is now complete.
To continue fax setup, proceed to page 8.
From here on, proceed to a step according to how you use the printer.
•To use the printer by connecting only to a computer or both to a computer and smartphone
 "6-A. Connecting to Computer"
•To use the printer by connecting only to a smartphone

 "6-B. Connecting to Smartphone" on page 6
• To use the printer without connecting to a computer or smartphone

 "Use Only Printer"
6-A. Connecting to Computer |
|
Windows |
|
Mac OS |
|||||||||
|
|
|
|
|
|
|
|
|
|
|
|
|
|
|
|
|
|
|
|
|
|
|
|
|
|
|
|
|
|
|
|
|
|
|
|
|
|
|
|
|
|
|
|
|
|
|
|
|
|
|
|
|
|
|
|
|
|
|
|
|
|
|
|
|
|
|
|
|
|
|
|
|
|
|
|
|
|
|
|
|
|
|
|
|
|
|
|
|
|
|
|
|
|
|
|
|
|
You need a connection setup for each computer. Proceed with the setup from step 1 for each computer.
1 Start the setup file for either method or method
 .
.
 Downloading from the Internet
a Open a web browser \ etc.\ on your computer. |
|
e Click Setup. |
||
|
||||
b Input the following URL and access the Canon |
|
|
||
website. |
|
The procedures for Windows and Mac OS are shown |
||
|
|
|
|
|
|
|
|
|
below. If you are using a computer with an OS other |
|
|
|
|
|
|
|
|
|
|
|
|
|
|
than Windows or Mac OS, such as a Chrome OS, do |
|
|
|
|
the setup according to the on-screen instructions. |
c Select Set Up. |
|
f Click Download and download the setup file. |
||
|
|
|
|
|
d Input the model name of your printer and click OK. |
|
|
||
You can select a model name from the list. |
|
g Execute the downloaded file. |
||
|
|
|
|
Proceed to step on the next page to |
|
|
|
|
continue. |
4

 Using Setup CD-ROM (Windows Only) a Load the Setup CD-ROM in your computer.
■■When using Windows 10 or Windows 8.1:
b When the following message appears on the right side of your computer screen, click it.
c If the following screen appears, click Run Msetup4.exe.
d If the User Account Control dialog box appears, click Yes.
When This Message Does Not Appear \or Has Disappeared\
1. Click File Explorer on the taskbar.
or
2. Click This PC on the left side of the opened window.
3. Double-click the CD-ROM icon on the right side of the window.
If the contents of the CD-ROM appear, double-click
Msetup4.exe.
4. Proceed to step d.
■■When using Windows 7:
b When the AutoPlay screen appears, click Run Msetup4.exe.
c If the User Account Control dialog box appears, click Continue.
When AutoPlay Screen Does Not Appear
1.Click Computer from the start menu.
2.Double-click the  CD-ROM icon on the right side of the opened window.
If the contents of the CD-ROM appear, double-click
Msetup4.exe.
Proceed to step  to continue.
2 Click Start Setup. |
|
|
|
If the following screen appears, click Exit. |
||||||
|
|
|
|
|
|
|
|
|
|
|
Follow the on-screen instructions to proceed with the setup.
The connection with your computer is now complete. You can print from your computer.
To continue fax setup, proceed to page 8.
<![endif]>ENGLISH
5

6-B. Connecting to Smartphone
iOS Android
You need a connection setup for each smartphone. Proceed with the setup from step 1 for each smartphone.
Preparation
•Turn on Wi-Fi on your smartphone.
•If you have a wireless router, connect your smartphone to the wireless router you want to connect to the printer.
* For operations, refer to manuals of your smartphone and the wireless router or contact those manufacturers.
1
2
Install the application software Canon PRINT Inkjet/SELPHY in your smartphone.
 : Search "Canon PRINT" in App Store.


 : Search "Canon PRINT" in Google Play.
Or access the Canon website by scanning the QR code.
*You may not connect your smartphone to the Internet wirelessly during connecting the printer to the smartphone directly. In that case, you may be charged depending on the contract with your service provider.
*Up to 5 devices can be connected to the printer via wireless LAN connection directly.
Check the display on the printer.
The screen turns off when no operation is made for about 10 minutes. Tap the touch screen to display the screen.
■■If the following screen appears: |
■■If the following screen appears: |
|
|||||
Check the icon on the lower left, and then proceed |
Proceed to . |
|
|||||
to |
or . |
|
|
|
|
||
|
|
|
|
|
|
|
|
|
|
|
|
|
|
|
|
|
|
|
|
|
|
|
|
The following icon appears.
\The printer is connected to a network.\
YES
No \Proceed to .\
.\
If appears, the printer cannot communicate by wireless LAN connection. For details, access "http://ij.start.canon" to see Frequently Asked Questions.
a Tap the installed application software.
b Follow the on-screen instructions to register the printer.
c Make sure that the right screen appears.
6
The connection with your smartphone is now complete. You can print from your smartphone.
To print photos, load photo paper. Proceed to "Loading Photo Paper" on page 8.
To continue fax setup, proceed to page
8.
Procedures below vary depending on iOS or Android. Select your operating system and proceed to its procedure.
a Tap Settings on your smartphone's home screen, and tap Canon_ij_XXXX in the Wi-Fi settings.
If Canon_ij_XXXX does not appear on the list, see "Preparation for Printer" below to operate the printer, and then repeat step a.
b Tap the installed application software.
c Follow the on-screen instructions to register the printer.
Follow the on-screen instructions to proceed with the setup.
If you select Auto Select Conn. Method (recommended) on the connection method selecting screen, the appropriate connection method is selected automatically depending on your environment.
d Make sure that the right screen appears.
a Tap the installed application software.
b Follow the on-screen instructions to register the printer.
If a message saying "Printer is not registered. Perform printer setup?" does not appear, see "Preparation for Printer" below to operate the printer, and then wait for a while until the message appears.
Follow the on-screen instructions to proceed with the setup.
•The appropriate connection method is selected depending on your environment.
•If two printer names appear on the Register Printer screen as shown below, select A. A\ TR8500 series \xxx.xxx.xxx.xxx\
B\ Direct-xxxx-TR8500series
c Make sure that the right screen appears.
The connection with your smartphone is now complete. You can print from your smartphone.
To print photos, load photo paper. Proceed to "Loading Photo Paper" on page 8.
To continue fax setup, proceed to page 8.
Preparation for Printer
a Select on the touch screen of the printer.
b Select the icon on the lower left of the HOME screen.
c If the following screen appears, select No.
d Select LAN settings > Wireless LAN > Wireless LAN setup > Easy wireless connect in this order.
e Select Yes.
f Return to the operation of your smartphone.
<![endif]>ENGLISH
7
Loading Photo Paper
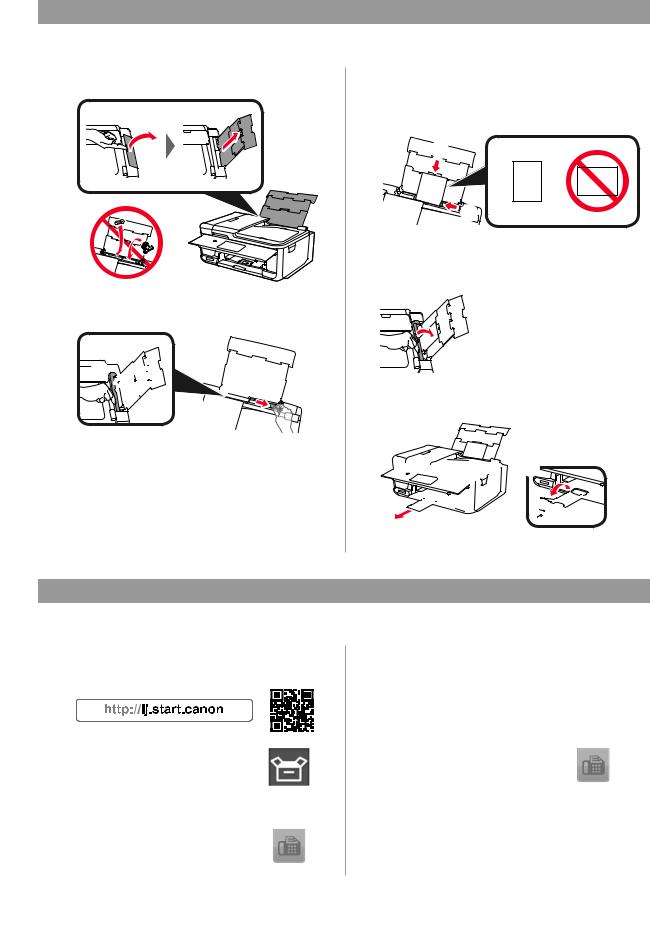
Load photo paper in the rear tray.
1 |
Open the rear tray cover and pull out the paper |
||||||||||||||
|
support. |
||||||||||||||
|
|
|
|
|
|
|
|
|
|
|
|
|
|
|
|
|
|
|
|
|
|
|
|
|
|
|
|
|
|
|
|
|
|
|
|
|
|
|
|
|
|
|
|
|
|
|
|
|
|
|
|
|
|
|
|
|
|
|
|
|
|
|
|
|
|
|
|
|
|
|
|
|
|
|
|
|
|
|
|
|
|
|
|
|
|
|
|
|
|
|
|
|
|
|
|
|
|
|
|
|
|
|
|
|
|
|
|
|
|
|
|
|
|
|
|
|
|
|
|
|
|
|
|
|
|
|
|
2 a Open the feed slot cover.
b Slide the right paper guide to the end.
 a
a


 b
b
3 |
a Load several sheets of photo paper with the |
|
print side facing up. |
|
b Slide the right paper guide to align it with the |
|
side of the paper stack. |
|
a |
|
b |
4 |
Close the feed slot cover. |
|
Read the message on the printer's screen and |
register the information of the loaded paper.
5 a Pull out the paper output tray. b Open the output tray extension.


 b
b  a
a 


Using Fax Function
Before using the fax function, refer to Setting Up the FAX to set up the fax function of your printer. You can refer to Setting Up the FAX by either of the following methods.
■■Opening from the website a Access the Canon website.
b Select Set Up.
c When the screen for selecting a model appears, input the model name of your printer.
d Select Making Fax Ready for Use.
■■Opening from the manual installed into your computer The following is an example using Windows 10.
a Click the Start button.
b Click All apps > Canon TR8500 series On-screen Manual in this order, and then open the Basic Manual.
c Select Setting Up the FAX.
8
1. Vérification des éléments fournis
□ Cordon d'alimentation |
□ Cartouches d'encre pour |
|
la configuration |
□ CD-ROM d'installation |
□ Câble modulaire |
pour PC Windows |
□ Sécurité et informations importantes |
|
|
|
□ Démarrage \ce manuel\ |
2. Retrait des matériaux d'emballage / Mise sous tension de l'imprimante
1 |
Retirez les matériaux d'emballage \tels que la |
|
bande orange et le film protecteur sur l'écran |
|
tactile\ de l'imprimante. |
|
L'utilisation de l'imprimante avec le film protecteur |
|
en place risque d'entraîner un dysfonctionnement. |
2 |
a Placez vos doigts dans les cavités de chaque |
|
côté de l'imprimante et ouvrez l'unité de |
|
numérisation / capot. |
|
b Retirez la bande orange. |
|
a |
|
b |
3 |
Fermez l'unité de numérisation / capot. |
4 |
Branchez le cordon d'alimentation en diagonale |
|
à partir de l'arrière. |
Arrière
Ne branchez aucun câble pour le moment, à l'exception du cordon d'alimentation.
5 |
Levez le panneau de contrôle et appuyez sur |
|
le bouton MARCHE (ON). |
6 |
Faites glisser l'écran et touchez la langue |
|
à sélectionner. |
|
<![if ! IE]> <![endif]>FRANÇAIS |
7 |
Si l'écran suivant s'affiche, appuyez sur le pays |
||
|
ou la région de votre choix. |
||
|
|
|
|
8 |
Lisez les messages et suivez les instructions |
|
|||
|
à l'écran. |
|
|||
|
|
|
|
|
|
|
|
|
|
|
|
|
|
|
|
|
|
Pour plus de détails sur les informations envoyées à Canon, reportez-vous à « Envoi De Données A Canon » dans Sécurité et informations importantes.
9 Sélectionnez OK.
1
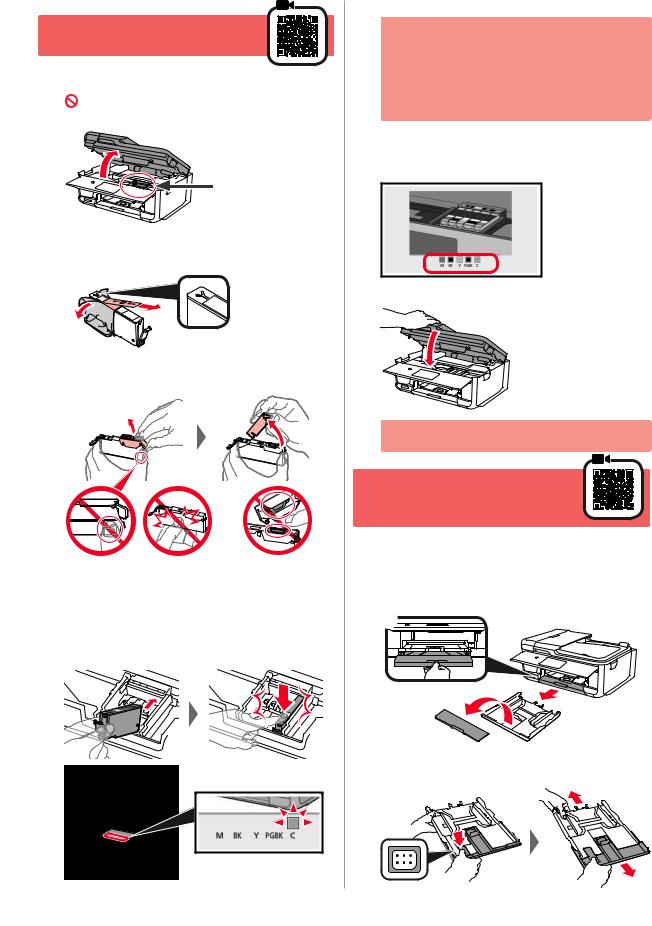
3. Installation d'une cartouche d'encre
1 |
Ouvrez l'unité de numérisation / capot. |
|
|
Évitez tout contact avec le support de tête |
|
|
d'impression \A\ jusqu'à l'arrêt du mécanisme. |
|
|
|
\A\ |
2 |
a Retirez COMPLÈTEMENT la bande orange. |
|
|
b Retirez l'emballage de protection. |
|
|
b |
a |
|
|
|
3 |
Placez vos doigts sur la capsule orange et retirez- |
|
|
la DOUCEMENT. |
|
|
Ne poussez pas sur les deux côtés de |
Ne pas toucher. |
|
la cartouche d'encre alors que le trou |
|
|
d'aération en forme deY est bloqué. |
|
4 |
Insérez la cartouche d'encre dans le support de tête d'impression |
|
|
et enfoncez-la fermement jusqu'à entendre un déclic. |
|
La couleur de la cartouche d'encre que vous configurez apparaît à l'écran.
2
|
Si la couleur ne s'affiche pas à l'écran alors que vous |
|
avez installé la cartouche d'encre, la couleur de la |
|
cartouche d'encre est peut-être fausse, ou vous avez |
|
peut-être installé une cartouche d'encre non prise en |
|
charge par l'imprimante, par exemple une cartouche |
|
avec un numéro de modèle différent. Installez une |
|
cartouche d'encre de la bonne couleur ou utilisez |
|
la cartouche d'encre fournie pour la configuration. |
5 |
Installez toutes les cartouches d'encre en procédant |
|
comme décrit à l'étape 4, puis confirmez que toutes |
les couleurs apparaissent à l'écran.
6 Fermez l'unité de numérisation / capot.
Si un message d'erreur apparaît à l'écran, vérifiez que les cartouches d'encre sont correctement installées.
4. Chargement du papier / Alignement de la tête d'impression
Pour obtenir une impression de meilleure qualité, imprimez un motif pour l'Alignement tête d'impression et numérisez-le.
1 a |
Retirez la cassette. |
b |
Retirez le couvercle de la cassette. |
a
|
b |
2 |
Tout en appuyant sur le verrou de la cassette, |
|
déployez la cassette. |

3 |
Ouvrez les guides papier, puis alignez le guide |
|
à l'avant avec la marque A4. |
4 |
a Chargez du papier ordinaire au format A4 avec |
|
|
la face à imprimer vers le bas. |
|
|
b Faites glisser le guide papier droit de manière |
|
|
à l'aligner avec le côté de la pile de papier. |
|
|
c Alignez la pile de papier avec le guide papier |
|
|
avant. |
|
|
a |
b |
|
|
|
|
|
c |
5 |
Attachez le couvercle de la cassette et insérez |
|
|
la cassette. |
|
Dans la figure suivante, la cassette est insérée.
Côté
6 a Retirez le bac de sortie papier.
b Ouvrez l'extension du bac de sortie papier.

 b
b  a
a 


7 Si l'écran suivant s'affiche, sélectionnez OK.
8 |
Assurez-vous qu'un motif est imprimé pour |
|
Alignement tête d'impression. |
L'impression nécessite environ 2 minutes.
<![if ! IE]><![endif]>FRANÇAIS
9 a Ouvrez le capot du scanner.
b Chargez le motif imprimé sur la vitre d'exposition.
a
b
10 Après avoir fermé le capot du scanner, sélectionnez OK.
11 Si l'écran suivant s'affiche, sélectionnez OK.
3
5. Préparation de la connexion
Dans la description suivante, les smartphones et les tablettes sont regroupés sous le terme smartphone.
1 Sélectionnez Suivant.
2 Assurez-vous que l'écran suivant s'affiche.
Poursuivez avec l'étape correspondant à la manière dont vous utilisez l'imprimante.
Utiliser uniquement l'imprimante
a Sélectionnez le bouton Arrêt (Stop).
b Sélectionnez Ne pas connecter > Oui dans cet ordre.
La configuration est terminée.
Pour poursuivre la configuration de la télécopie, passez à la page 8.
•Pour utiliser l'imprimante en la connectant uniquement à un ordinateur, ou à la fois à un ordinateur et à un smartphone
 « 6-A. Connexion à un ordinateur »
•Pour utiliser l'imprimante en la connectant uniquement à un smartphone

 « 6-B. Connexion à un smartphone » à la page 6
•Pour utiliser l'imprimante sans la connecter à un ordinateur ou à un smartphone

 « Utiliser uniquement l'imprimante »
6-A. Connexion à un ordinateur |
|
Windows |
|
Mac OS |
|||||||||
|
|
|
|
|
|
|
|
|
|
|
|
|
|
|
|
|
|
|
|
|
|
|
|
|
|
|
|
|
|
|
|
|
|
|
|
|
|
|
|
|
|
|
|
|
|
|
|
|
|
|
|
|
|
|
|
|
|
|
|
|
|
|
|
|
|
|
|
|
|
|
|
|
|
|
|
|
|
|
|
|
|
|
|
|
|
|
|
|
|
|
|
|
|
|
|
|
|
Vous devez configurer une connexion pour chaque ordinateur. Poursuivez la configuration à partir de l'étape 1pour chaque ordinateur.
1 Démarrez le fichier de configuration pour la méthode |
ou la méthode . |
 Téléchargement depuis Internet
a Ouvrez un navigateur Web \  etc.\ sur votre ordinateur. b Entrez l'URL suivante et accédez au site Web Canon.
c Sélectionnez Configuration.
d Entrez le nom de modèle de votre imprimante et cliquez sur OK.
Vous pouvez sélectionner un nom de modèle à partir de la liste.
e Cliquez sur Configuration.
4
Les procédures pour Windows et Mac OS sont présentées ci-dessous. Si vous utilisez un ordinateur équipé d'un système d'exploitation autre que Windows ou Mac OS \Chrome OS, par exemple\ procédez à la configuration en fonction des instructions qui s'affichent à l'écran.
f Cliquez sur Télécharger et téléchargez le fichier de configuration.
g Exécutez le fichier téléchargé.
Poursuivez avec l'étape à la page suivante pour continuer.
 Loading...