


 Loading...
HD Camcorder
Detailed User Guide
VIXIA_HF_W11_10_US_EN

Table of Contents |
|
Getting Started |
|
Verifying the Accessories ........................................................ |
3 |
Turning on this Unit .................................................................. |
4 |
Opening the Terminal Cover (SD Card Cover) ........................ |
4 |
Charging .................................................................................. |
5 |
Resetting this Unit .................................................................... |
5 |
Proof Functions ....................................................................... |
6 |
Before Using Underwater or under Low Temperature .......... |
6 |
Grip Adjustment ....................................................................... |
8 |
Attaching the Lens Cap ........................................................... |
8 |
Attaching the Core Filter .......................................................... |
8 |
Inserting an SD Card ............................................................... |
9 |
Types of Usable SD Card ..................................................... |
9 |
Using the Touch Screen ........................................................ |
10 |
Locking the Screen (when Shooting Underwater) .............. |
10 |
Adjusting the Touch Screen ............................................... |
11 |
Names of Buttons and Functions on the LCD Monitor ....... |
12 |
Clock Setting ......................................................................... |
15 |
Resetting the Clock ............................................................ |
15 |
Changing the Display Language ............................................ |
16 |
Holding this Unit .................................................................... |
17 |
Tripod Mounting .................................................................... |
17 |
Using this Unit Overseas ....................................................... |
18 |
Charging the Battery Pack Overseas ................................. |
18 |
Setting the Clock to Local Time when Traveling ................. |
18 |
Setting Daylight Saving Time ............................................. |
19 |
Recording |
|
Taking Videos in Auto Mode .................................................. |
20 |
Capturing Still Images During Video Recording ................. |
23 |
Taking Still Images in Auto Mode ........................................... |
23 |
Zooming ................................................................................ |
26 |
Manual Recording ................................................................. |
27 |
Adjusting Focus Manually (FOCUS) .................................. |
28 |
Adjusting Brightness .......................................................... |
29 |
Setting Backlight Compensation ........................................ |
30 |
Setting White Balance ........................................................ |
31 |
Taking Close-up Shots (TELE MACRO) ............................ |
32 |
Shooting under Water ............................................................ |
33 |
Recording with Effects (RECORDING EFFECT) ................... |
34 |
Recording Images Like an Old Black and White Photo |
|
(GRAINY MONOCHROME) ........................................... |
35 |
Recording Food Images (FOOD) ....................................... |
36 |
Recording Images of a Baby (BABY) ................................. |
37 |
Capturing Subjects Clearly (TOUCH PRIORITY AE/AF) ....... |
38 |
Reducing Camera Shake ....................................................... |
40 |
Recording at Intervals (TIME-LAPSE RECORDING) ............. |
41 |
Recording Video with Still Image Displayed in Sub Screen |
|
(PHOTO-INSERT RECORDING) ....................................... |
43 |
Using the Self-timer ............................................................... |
44 |
Recording Videos with Date and Time ................................... |
46 |
Recording Videos with Time Counter .................................... |
47 |
Checking the Remaining Recording Time ............................. |
48 |
Playback |
|
Playing Back Videos .............................................................. |
50 |
Normal Playback ................................................................ |
50 |
Checking the Recording Date and Other Information ......... |
53 |
TIME COUNTER PLAYBACK ............................................ |
54 |
DIGEST PLAYBACK .......................................................... |
55 |
PLAYBACK OTHER FILE .................................................. |
56 |
Playing Back Still Images ....................................................... |
57 |
Slideshow Playback ........................................................... |
58 |
Connecting to and Viewing on TV .......................................... |
59 |
Connecting via the HDMI Mini Connector .......................... |
59 |
Connecting via the AV Connector ...................................... |
61 |
Editing |
|
Deleting Unwanted Files ........................................................ |
62 |
Deleting the Currently Displayed File ................................. |
62 |
Deleting Selected Files ...................................................... |
62 |
Protecting Files ...................................................................... |
63 |
Protecting/Releasing Protection of the Currently Displayed |
|
File .................................................................................. |
63 |
Protecting/Releasing Protection of Selected Files .............. |
64 |
Capturing a Still Image in the Video During Playback ............ |
65 |
Combining Videos Recorded by Seamless Recording .......... |
66 |
Capturing a Required Part in the Video (TRIMMING) ............ |
67 |
Copying |
|
Dubbing Files to a Disc by Connecting to a Blu-ray Recorder 68 |
|
Copying Files to an SD Card .................................................. |
69 |
Copying to Windows PC ........................................................ |
70 |
Copying to Mac Computer ..................................................... |
71 |
List of Files and Folders ......................................................... |
72 |
Settings Menu |
|
Operating the Menu ............................................................... |
73 |
Operating the Top Menu .................................................... |
73 |
RECORD SETTING Menu (video) ......................................... |
74 |
RECORD SETTING Menu (still image) .................................. |
79 |
PLAYBACK SETTING Menu (video) ..................................... |
81 |
EDIT Menu (video) ................................................................. |
82 |
PLAYBACK SETTING Menu (still image) .............................. |
83 |
EDIT Menu (still image) ......................................................... |
84 |
SETUP (video/still image) ...................................................... |
85 |
CONNECTION SETTINGS (video/still image) ....................... |
87 |
USB CONNECTION MENU ................................................... |
88 |
Names of Parts ............................................................. |
89 |
Indications on the LCD monitor .................................. |
92 |
Troubleshooting ........................................................... |
95 |
When the unit is not working properly .................................... |
95 |
Charging ................................................................................ |
95 |
Power supply ......................................................................... |
96 |
Recording .............................................................................. |
96 |
SD Card ................................................................................. |
97 |
Playback ................................................................................ |
97 |
Editing/Copying ..................................................................... |
98 |
Computer ............................................................................... |
98 |
Screen/Image ........................................................................ |
99 |
Other Problems ..................................................................... |
99 |
Error Message? ................................................................... |
100 |
Maintenance ............................................................... |
102 |
Specifications ............................................................. |
103 |
Trademarks ................................................................. |
105 |
Warranty ..................................................................... |
106 |
2

Getting Started
Verifying the Accessories
If any of the items are missing or defective, consult your Canon dealer or the nearest Canon service center.
Illustration |
Description |
|
AC Adapter |
|
AC-V11U |
|
0 Charges this unit. Attach the charging adapter cable to the tip of the cord. |
|
It can also be used when recording or playing back videos indoors. |
.
Charging Adapter Cable
0 Attach to the tip of the cord of the AC adapter and connect to the USB connector of this unit to charge.
.
USB Cable
(Type A - Micro Type B)
0 Connects this unit to a computer.
.
Lens Cap
0 Attach the lens cap when this unit is not used or during transportation.
.
Large Core Filter (for Optional AV Cable)
Small Core Filter (for AC Adapter)
Basic User Guide
0 Read well and keep in a safe place where it can be accessed easily when necessary.
.
Memo :
0The large core filter is for use with an AV cable. Do not use it with any cable other than the AV cable. The small core filter is for use with the AC adapter. Do not use it with anything other than the AC adapter.
“Attaching the Core Filter” (A p. 8)
0SD cards are sold separately. “Types of Usable SD Card” (A p. 9)
0When using the AC adapter overseas, please prepare a commercially available converter plug for the country or region of visit. “Charging the Battery Pack Overseas” (A p. 18)
3

Getting Started
Turning on this Unit
Open the LCD monitor to turn on this unit.
To turn off the power, close the LCD monitor.
oTo turn on the power
Open the LCD monitor.
oTo turn off the power
Close the LCD monitor.
The POWER/ACCESS lamp goes off and the power is turned off. “POWER/ACCESS (Power/Access) Lamp” (A p. 90)
Memo :
0When “AUTO POWER OFF” is set to “ON”, this unit turns itself off automatically to conserve power when it is not operated for 5 minutes. (When using the AC adapter, this unit goes into standby mode.)
“ AUTO POWER OFF ” (A p. 85)
0If “LCD CLOSED RECORDING” is activated, this unit does not turn off even when the LCD monitor is closed during recording.
“LCD CLOSED RECORDING” (A p. 78)
Opening the Terminal Cover (SD Card Cover)
o To open
 (Rear)
.
A Open the LCD monitor.
B Slide down the cover lock and slide the cover aside. C Lift the cover slowly.
o To close
The cover is not properly closed if the red mark at the terminal cover lock is visible.
.
Leave the LCD monitor open first.
AFlip down the cover slowly while making sure the gray waterproof seal fits into the opening at the terminals.
BPress the entire cover against the camcorder with equal force and firmly attach the cover completely.
C Slide the cover until it clicks into place.
(The cover is not properly closed if the red mark on the cover lock is visible.)
Caution :
0Ensure that the terminal cover and the gray waterproof seal are not damaged and that there are no foreign materials (such as hair, lint, sand or dust) adhered on the cover.
0Stop using the unit underwater if there are damages to the cover, etc. and consult your Canon dealer or the nearest Canon service center.
0Do not apply excessive force when opening/closing the terminal cover.
0Read the “Cautions on Using Underwater” (A p. 6) before using the camera underwater or in places exposed to water droplets.
4
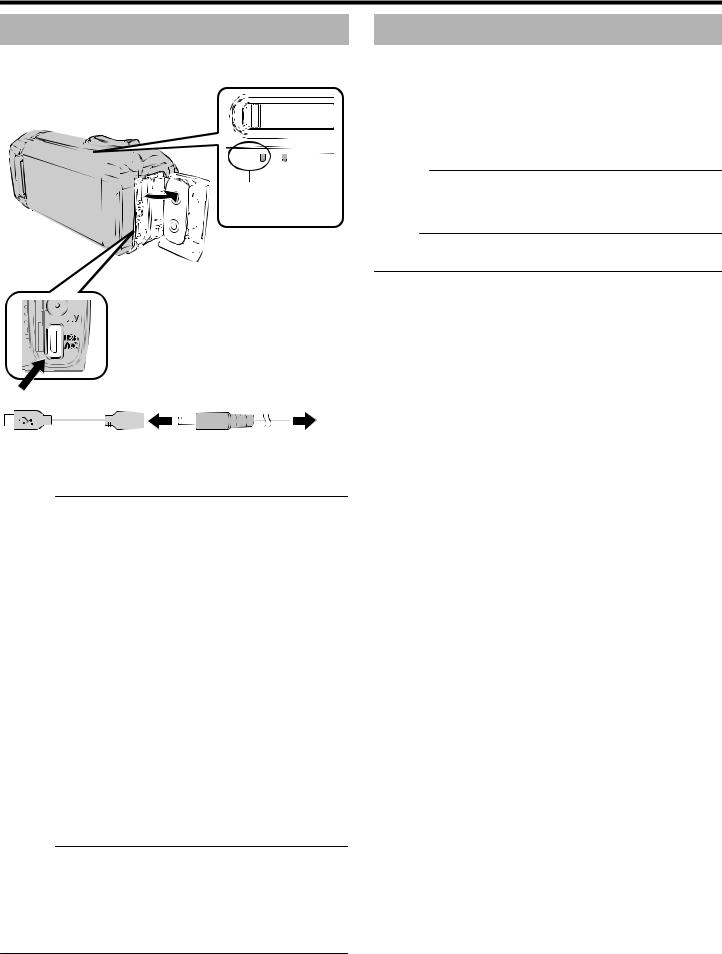
Charging
This unit is equipped with a built-in battery.
Open the connector cover, and connect the AC adapter for charging as shown in the figure.
T |
VOL. |
|
W |
|
|||
|
|||
CHARGE |
POWER/ACCESS |
||
|
|
|
|
CHARGE Lamp
Charging in progress: Lights up
Charging finished: Goes out
To USB Connector |
|
|
|
|||||||||||||
|
|
|
|
|
|
|
|
|
|
|
|
|
|
|
|
|
|
|
|
AC Adapter |
AC Adapter to AC |
||||||||||||
Charging Adapter Cable |
||||||||||||||||
|
|
|
|
|
|
|
(Provided) |
(Provided) |
Outlet |
|||||||
|
|
|
|
|
|
|
|
|
|
|
|
|
|
|
(AC 110 V to 240 V) |
|
.
Caution :
0The built-in battery is not charged at the time of purchase.
0At the time of purchase or in case of the battery is not used for a long period of time, the charging time will be longer than usual. The camera does not turn on if the remaining battery power is low. In this case, charge the battery for more than 40 minutes before turning on the power.
0Charging time: Approx. 6 h 10 m (when charging at 25°C (77°F))
0The battery cannot be charged outside the room temperature range of 10°C to 35°C (50°F to 95°F). The CHARGE lamp does not light up when the battery is not being charged. If the temperature increases or decreases during charging, the CHARGE lamp will blink slowly and charging will stop. In this case, remove the AC adapter, press the Reset button and wait until the room temperature is within the above stated range before charging again.
0You can record or play back videos during charging. (However, the charging time will be longer than usual. In addition, the remaining battery power may decrease according to conditions.) If the internal temperature rises when using the unit, stop the charging temporarily. (The CHARGE lamp goes off.)
0If malfunctions (such as overvoltage) occur, charging will stop. In these cases, CHARGE lamp blinks quickly as a notification.
0During charging, the Picon on the screen changes to Oto indicate that charging is in progress. (when the provided AC adapter is used)
0When the recording time becomes extremely short even when the battery is fully charged, the battery needs to be replaced. For details on replacing the built-in battery (subject to a fee), consult the nearest Canon service center.
Caution :
0There are certain specifications for a USB rechargeable device. To charge, use a device with the output voltage of 5 V/1 A or more.
0Depending on the specification of your charging device and the thickness and length of an USB cable used to connect to this unit, the charging time may be longer than usual, or it may not even start.
0We shall not be held liable for malfunctions that are due to using nonstandard device or a device with poor quality.
Getting Started
Resetting this Unit
When a malfunction occurs on this unit, reset the unit in the following way. (Resetting the unit does not erase the recorded data.)
1Open the terminal cover.
0 Remove the power cord and all connecting cables.
2Close the LCD monitor to turn off this unit.
3Press the Reset button gently using an object with pointed tip.
Caution :
0Press the Reset button just once gently.
0Do not use sharp pointed objects. It may damage the unit or cause electric shock.
Memo :
0If malfunction persists even after pressing the Reset button, consult the nearest Canon service center.
5
Getting Started
Proof Functions
This unit is equipped with Waterproof, Dust-proof, Drop-proof and Freezeproof features.
|
Waterproof: |
|
Dust-proof: Equivalent |
|
Equivalent to IEC |
|
to IEC Standard |
|
Standard publication |
. |
publication 529 IP5X |
|
529 IPX8 and IPX6 (1 |
|
|
|
hour at depths up to 5 |
|
|
|
m (16.4 ft)) |
|
|
|
Drop-proof: This |
|
Freeze-proof: |
|
camera clears |
|
Allowable operating |
. |
company testing |
. |
temperatures: −10°C |
|
compliant with MIL- |
|
to +40°C (14°F to |
|
STD-810F Method; |
|
104°F) |
|
516.5 |
|
Note: Temperatures |
|
Shock: Dropping onto |
|
between −10°C and |
|
plywood 3 cm |
|
0°C (14°F and 32°F) |
|
(1-3/16") thick from a |
|
temporarily lower |
|
height of 1.5 m (4.9 ft) |
|
battery performance, |
|
|
|
reducing the time |
|
|
|
available for recording. |
Caution :
0There is no guarantee that there will be no damages when the unit is used within the above-mentioned limits.
Scratches and dent caused by the impact if the unit is dropped, or other changes in appearance are not included in the warranty.
0Malfunction due to mishandling will void the warranty.
0Before use in water, be sure to read and understand the “Before Using Underwater or under Low Temperature” (A p. 6) .
0Close the terminal cover firmly until it clicks and confirm that the red sign completely goes off.
0Make sure that there is no damage to and no foreign material adhered to the packing inside the cover.
0Use within a water depth of 5 m (16.4 ft) and a duration of 1 hour.
0The waterproof performance cannot be guaranteed if the camcorder is subject to impact such as dropping.
0Do not jump or dive into water holding the camcorder.
0Do not use the camcorder in strong water flows such as in rapids or under waterfalls. The strong water pressure may impair the waterproof performance.
0Do not immerse into hot spring, or hot water above 40°C (104°F).
Before Using Underwater or under Low Temperature
“Cautions on Using Underwater” (A p. 6) “Maintenance after Use” (A p. 7)
“Cautions on Using under Low Temperature” (A p. 7)
Cautions on Using Underwater
Please take note of the followings when using this unit near water or underwater.
0 Ensure that the cover is closed tightly.
“Opening the Terminal Cover (SD Card Cover)” (A p. 4)
0Ensure that the terminal cover and the gray waterproof seal are not damaged and that there are no foreign materials (such as hair, lint, sand or dust) adhered on the cover.
0Stop using the unit underwater if there are damages to the cover, etc. and consult your Canon dealer or the nearest service center.
0Use within a water depth of 5 m (16.4 ft) and a duration of 1 hour.
Within Water
Depth of 5 m
Within 1
hour
.
0Do not open/close the cover or insert/remove an SD card or any cables while using underwater or on the beach, or if your hands contain water droplets or sands. Doing so may cause water to enter into the camera or malfunction.
0Do not subject the camera to high pressure or vibration resulted from swift current, waterfall or diving into water.
0The waterproof performance is not guaranteed if the camera is dropped or subjected to other impact shock. If the camera has been subjected to impact shock, consult your nearest service center.
0While shooting underwater, noise generated inside of the camera (zooming sounds, etc) may be picked up. This is not a malfunction.
0Do not immerse into hot spring, or hot water above 40°C (104°F). Doing so deteriorates waterproof performance.
0Keep away from hands with sun oil or sun screen. Doing so may cause discoloration or deterioration of material.
0The accessories are not waterproof.
0Do not use the lens filter or conversion lens underwater or at locations where there is water.
6

Getting Started
Maintenance after Use
After using underwater or in dusty places, rinse the camera with water immediately and dry it completely.
1Ensure that the terminal cover is closed.
2Rinse with clean water.
Soak the camera in a container filled with enough water to immerse the camera completely, and rinse it gently.
.
0After using the camera under the sea or on the beach, immerse the camera in fresh water for about 10 minutes to remove salt particles, replace the water and rinse the camera.
0Open and close the LCD screen, and operate the buttons or zoom operations to get rid of sands or dusts in the gap.
3Dry the camera.
Wipe the camera completely with a soft dry cloth and allow it to dry in a well-ventilated and shady location.
0Place the camera with the lens facing downward while the LCD monitor is closed, and leave it for approximately 10 minutes. (By doing so, microphone and LCD part are dried out easily.) Place the camera in a up right position on a dry cloth afterward Close the terminal cover after the camera is dried out completely.
0Wipe off any foreign materials or water droplets inside the cover.
* If you leave the camera immersed in salt water or allow water droplets from the salt water to remain on the camera, this may cause corrosion, discoloration or deterioration of waterproof performance.
*If you wipe or dry the camera with sand particles adhered, this may cause scratches on the camera.
*Do not wash with chemicals, soap, neutral detergents, or alcohol.
*Do not dry the camera with a hair dryer or other heat sources. This could impair its waterproof performance.
Cautions on Using under Low Temperature
0The performance of the battery will drop temporarily when the temperature is -10°C to 0°C (14°F to 32°F), this will cause the remaining recording time to shorten.
0Charging cannot be performed when the surrounding temperature is below 10°C (50°F).
0Turning on the camera while it is still cold will deteriorate the performance of the LCD monitor. Problems such as the screen becoming dark momentarily or residual image can occur.
0If snow or water droplets adhere to the camera under sub-zero temperature environment, ice can formed between the gaps around the buttons, speaker or microphone. This will cause difficulty in operating the buttons as well as decrease in the volume level.
0Direct contact with exposed metal part under cold temperature can cause the skin to stick on the metal part resulting in injuries such as frostbite. Do not touch with bare hands.
Other Precautions
0Do not leave the camera under low temperature in cold climates or under high temperature above 40 °C (such as under direct sunlight, inside a vehicle in the hot sun, or near a heater). This will cause deterioration of the waterproof performance.
0Malfunction due to mishandling will void the warranty.
0We are not responsible for any loss of data due to water entering into inside of the camera. Please be forewarned.
0It is recommended to replace the waterproof packing once a year to maintain the waterproof performance. Consult your nearest service center. (Subject to a fee)
7
Getting Started
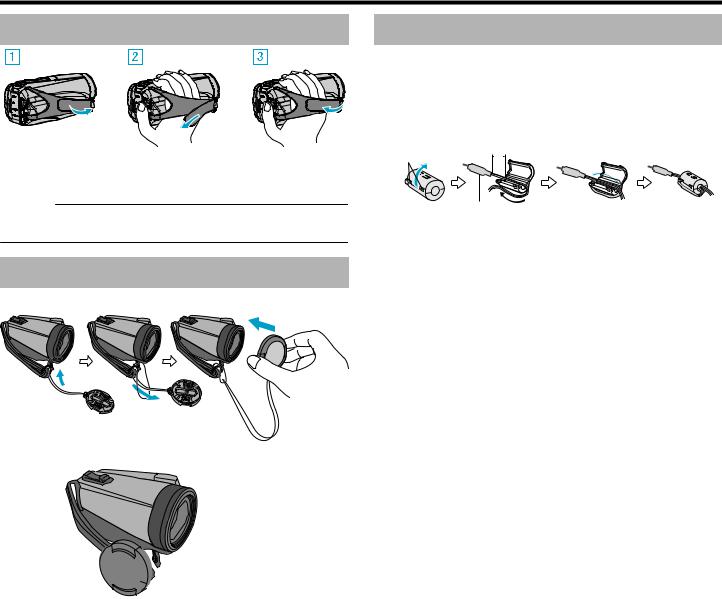
Grip Adjustment
.
A Open the belt
B Adjust the length of the belt
C Fasten the belt
Caution :
0Be sure to fasten the grip belt properly.
If the belt is loose, this unit may drop and result in injuries or damages.
Attaching the Lens Cap
Attach the cap to protect the lens when not shooting.
 Lens Cap
.
o During recording

 Fix to the grip belt
.
Attaching the Core Filter
Attaching core filter to the cable of the AC adapter and the optional AV cable (on the end connected to this unit) can reduce the interference generated when this unit is connected to an external device.
0Use the small core filter with the power cable, and the large core filter with the AV cable.
0Do not attach the core filter to the provided adapter cable.
Release the stopper |
3 cm |
Wind twice (for AC Adapter cable) |
|||
Wind once (for AV Cable) |
|||||
|
|
|
|
||
To be connected to this unit
.
8

Getting Started
Inserting an SD Card
When a commercially available SD card is inserted, recordings can still be made to the card without stopping when the remaining recording time on the built-in memory runs out.
“ SEAMLESS RECORDING ” (A p. 76)
Depending on the setting of the recording media, recording can be made to the SD card without using the built-in memory.
“Types of Usable SD Card” (A p. 9) “Approximate Video Recording Time” (A p. 49)
1Open the terminal cover.
.
2 Close the LCD monitor to turn off this unit.
3Insert an SD card.
Label
.
Warning
0Make sure not to insert the SD card in the wrong direction. It may cause damage to the unit and SD card.
0Before inserting or removing the SD card, close the LCD monitor and ensure that the POWER/ACCESS lamp goes off.
0Do not touch the metal contact area when inserting the SD card.
Memo :
0When “SEAMLESS RECORDING” is set to “ON”, recordings can still be made to the SD card without stopping when the remaining recording time on the built-in memory runs out.
“ SEAMLESS RECORDING ” (A p. 76)
0Both videos and still images can be recorded on one SD card. It is recommended to confirm the video operation of the SD card before usage.
0To record to an SD card, it is necessary to set the recording media to “SD CARD”.
“REC MEDIA FOR VIDEO ” (A p. 86)
“REC MEDIA FOR IMAGE ” (A p. 86)
0To use a new SD card, or SD card used on other devices, it is necessary to format (initialize) the SD card using “FORMAT SD CARD” from the “SETUP” menu.
“ FORMAT SD CARD ” (A p. 86)
Removing the Card
Push the SD card inward once, then pull it out straight.
.
Types of Usable SD Card
The following SD cards can be used on this unit.
Operations are confirmed on the SD cards from the following manufacturers.
0Panasonic
0TOSHIBA
0SanDisk
SD Card
0This unit supports 256 MB to 2 GB SD cards.
0Use a Class 4 or higher compatible SD card (2 GB) for video recording.
SDHC Card
0Use a Class 4 or higher compatible SDHC card (4 GB to 32 GB) for video recording.
SDXC Card
0Use a Class 4 or higher compatible SDXC card (Max. 128 GB) for video recording.
9
Getting Started
Memo :
0This unit is not guaranteed to operate with all SD cards.
0Do not use a miniSD card or microSD card (even if the card is inserted in an adapter). It may cause malfunction.
0To record videos with “VIDEO QUALITY” set to “UXP”, use of a Class 6 or higher compliant SDHC/SDXC card is recommended.
0To select “60p” in “SYSTEM SELECT”, use a Class 6 or higher compliant SDHC/SDXC card.
0UHS-I SDHC/SDXC cards can be used in the same manner as standard SDHC/SDXC cards.
UHS Speed Class is not supported.
0SD card used for recording and edited using this unit can only be played back and edited on this unit.
When your computer cannot recognize the SDXC card
Confirm and update the OS of your computer.
Windows 7 Download and install the updating program (KB976422) from the following URL.
32 bit version http://www.microsoft.com/downloads/details.aspx? displaylang=ja&FamilyID=3ee91fc2-a9bc-4ee1- aca3-2a9aff5915ea http://www.microsoft.com/downloads/en/details.aspx? FamilyID=3ee91fc2-a9bc-4ee1-aca3-2a9aff5915ea 64 bit version http://www.microsoft.com/downloads/details.aspx? displaylang=ja&FamilyID=73f766dd-7127-4445- b860-47084587155f http://www.microsoft.com/downloads/en/details.aspx? FamilyID=73f766dd-7127-4445-b860-47084587155f
Mac OS X Not compatible.
10.4 Tiger /
Mac OS X 10.5 Leopard
Mac OS X Update the OS version to 10.6.5 or later.
10.6 Snow
Leopard
Using the Touch Screen
The LCD monitor of this unit is a touch panel which enables operations by touching the screen with your finger.
The operation buttons, thumbnails, and menu items are displayed on the screen according to each mode (recording/playback/setting).
0There are two ways to operate the touch screen, namely “tap” and “drag”. The following are some examples.
ATap the button (icon) or thumbnail (file) on the screen to make a selection. B Drag the thumbnails on the screen to search for the desired file.
|
|
|
|
|
|
|
|
|
|
. |
|
|
|
|
|
|
|
|
|||||
|
|
Recording Screen |
Playback Screen |
|
Index screen (thumbnail display) |
||||||||||||||||||
|
|
|
|
|
|
|
|
|
|
|
|
|
|
|
|
|
|
|
|
|
|
|
|
|
|
|
|
|
|
|
|
|
0:01:23 |
|
|
|
|
|
|
0:12:34 |
|
|
|
|
|
|
|
|
|
|
|
|
|
|
|
|
|
|
|
|
|
|
|
|
|
|
|
|
|
|
|
|
|
|
|
|
|
|
|
|
|
|
|
|
|
|
|
|
|
|
|
|
|
|
|
|
|
|
|
|
|
|
|
|
|
|
|
|
|
|
|
|
|
|
|
|
|
|
|
|
|
|
|
|
|
|
|
|
|
|
|
|
|
|
|
|
|
|
|
|
|
|
|
Memo :
0The touch screen of this unit is pressure-sensitive. When the touch screen does not respond smoothly, apply slightly more force to your fingertip.
0Do not press or rub with excessive force.
0Do not operate the touch screen using an object with a sharp tip.
0Perform “TOUCH SCREEN ADJUST” if the reactive area of the screen is misaligned with the touched area.
“Adjusting the Touch Screen” (A p. 11)
0You cannot operate the touch screen under water. Lock the screen to prevent operation errors.
“Shooting under Water” (A p. 33)
Locking the Screen (when Shooting Underwater)
Lock the screen before using this unit underwater to prevent operation errors on the touch screen due to water pressure.
0Once the screen is locked, operations on the touch screen except Lare disabled.
0The START/STOP (recording) button and the zoom lever can be used while the screen is locked.
0You can set for both video and still image modes.
0If “SCREEN LOCK” has been set, it will take a longer time for the unit to power off after closing the LCD monitor.
o Setting the “SCREEN LOCK”
A Check that the unit is in the recording mode. B Tap “MENU”.
C Tap “RECORD SETTING”. D Tap “SCREEN LOCK”.
0 The Lbutton appears on the screen.
.
o To cancel “SCREEN LOCK”
Tap the Lbutton.
Memo :
0Once “SCREEN LOCK” is set, only the Lbutton on the touch screen can be operated.
0“SCREEN LOCK” cannot be set for the following cases:
-during recording
-when “TIME-LAPSE RECORDING” or “DATE/TIME RECORDING” has been set
10
Getting Started
Adjusting the Touch Screen
Adjust the response position when the touch screen is touched.
1Tap “MENU”.
PLAY |
REC |
MENU |
.
2Tap “SETUP”.
 TOP MENU
|
RECORD |
SETUP |
|
OFF |
SETTING |
||
|
CONNECTION
SETTINGS
.
3Tap “TOUCH SCREEN ADJUST”.
 SETUP
SETUP
TOUCH SCREEN ADJUST
.
0 The touch screen adjustment screen appears.
4Tap “+”. (3 times in total)
PRESS THE + MARK
1/3
.
0Keep tapping “+” as its position changes with every tap.
0If areas other than the “+” mark are tapped, errors will occur. Make sure to tap the “+” mark.
5Tap “+” again to confirm the adjusted positions. (3 times in total)
CONFIRM THE ADJUSTMENT
PRESS + MARK AGAIN
1/3
.
0 Keep tapping “+” as its position changes with every tap.
6Tap “OK”.
COMPLETED
OK
.
0 Setting ends and returns to the menu screen.
Caution :
0Do not tap areas other than the “+” mark during touch screen adjustment (steps 4 - 5). Doing so may cause the touch screen to malfunction.
Memo :
0Adjust by lightly tapping with a corner of an SD card, etc.
0Do not press with an object with a sharp tip or do not press hard.
11
Getting Started
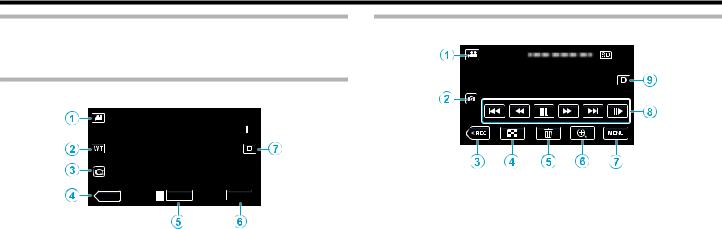
Names of Buttons and Functions on the LCD Monitor
The following screens are displayed during A video and B still image modes.
Recording Screen (Video/Still Image)
 8
8
PLAY |
REC |
MENU |
.
1A/B(Video/Still Image) Mode Button
0 Switches between A video (60i/60p) and B still image modes.
2Zoom Button “Zooming” (A p. 26)
3Still Image Recording Button
0 Records still images during video recording.
“Capturing Still Images During Video Recording” (A p. 23)
4Playback Mode Button
0 Switches to the playback mode.
5Recording Start/Stop Button
0 6: Video Recording Start Button
0 7: Video Recording Stop Button
6Menu Button
“Operating the Menu” (A p. 73)
7Display Button
Switches the display between full (m) and simple (n) with every tap of the button.
0Simple display: Some displays disappear automatically when the screen is not operated.
0Full display: Displays everything. The display button changes from n to m.
0When the power is turned off, the display setting will revert to simple display (n).
8Recording Mode Button
Switches the recording mode (P Intelligent Auto/H Manual).
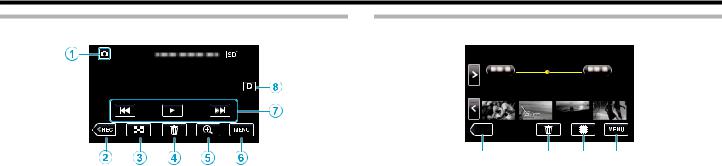
Playback Screen (Video)
00:01:23  00:12:34
.
0When this unit is not operated for a certain period of time, the operation buttons on the LCD monitor disappear automatically. Tap on the screen to display the operation buttons again.
1A/B(Video/Still Image) Mode Button
0 Switches between A video (60i/60p) and B still image modes.
2Video Scene Capture Button
0 Displayed when playback is paused.
0 Saves one scene of the video being played back as a still image.
3Recording Mode Button
0 Switches to the recording mode.
4Index Screen (Thumbnail Display) Button
0 Returns to the index screen (thumbnail display). “Operation Buttons for Video Playback” (A p. 51)
5Delete Button
“Deleting the Currently Displayed File” (A p. 62)
6Playback Zoom Button
0 Enlarges the video image that is played back. “During Video Playback” (A p. 51)
7Menu Button
“Operating the Menu” (A p. 73)
8Operation Buttons
“Operation Buttons for Video Playback” (A p. 51)
9Display Button
Switches the display between full (m) and simple (n) with every tap of the button.
0Simple display: Some displays disappear automatically when the screen is not operated.
0Full display: Displays everything. The display button changes from n to m.
0When the power is turned off, the display setting will revert to simple display (n).
12
Getting Started
Playback Screen (Still Image)
.
0When this unit is not operated for a certain period of time, the operation buttons on the LCD monitor disappear automatically. Tap on the screen to display the operation buttons again.
1A/B(Video/Still Image) Mode Button
0 Switches between A video (60i/60p) and B still image modes.
2Recording Mode Button
0 Switches to the recording mode.
3Index Screen (Thumbnail Display) Button
0 Returns to the index screen (thumbnail display). “Operation Buttons for Still Image Playback” (A p. 57)
4Delete Button
“Deleting the Currently Displayed File” (A p. 62)
5Playback Zoom Button
0 Enlarges the still image that is being played back. “Playing Back Still Images” (A p. 58)
6Menu Button
“Operating the Menu” (A p. 73)
7Operation Buttons
“Operation Buttons for Still Image Playback” (A p. 57)
8Display Button
Switches the display between full (m) and simple (n) with every tap of the button.
0Simple display: Some displays disappear automatically when the screen is not operated.
0Full display: Displays everything. The display button changes from n to m.
0When the power is turned off, the display setting will revert to simple display (n).
Index Screen (Thumbnail Display) Display
1

 7 2
7 2


REC
.3 4 5 6
1 A/B(Video/Still Image) Mode Button
0 Switches between A video (60i/60p) and B still image modes.
2Page Forward/Back Button
“Operation Buttons for Video Playback” (A p. 51) “Operation Buttons for Still Image Playback” (A p. 57)
3Recording Mode Button
0 Switches to the recording mode.
4Delete Button
“Deleting Selected Files” (A p. 62)
“Deleting the Currently Displayed File” (A p. 62)
5Playback Media Button
0 Switches between SD card and built-in memory.
6Menu Button
“Operating the Menu” (A p. 73)
7Date Button
“Operation Buttons for Video Playback” (A p. 51) “Operation Buttons for Still Image Playback” (A p. 57)
13

Getting Started
Menu screen (recording mode)
|
|
|
|
TOP MENU |
|
|
|
6 |
|
|
|
|
|
|
|
||
1 |
|
|
|
RECORD |
SETUP |
|
|
|
|
|
OFF |
SETTING |
|
|
|||
|
|
|
|
|
|
|
||
2 |
|
|
CONNECTION |
|
|
|
|
|
|
|
|
|
SETTINGS |
|
|
|
|
|
|
|
|
|
|
|
|
|
. |
|
|
|
3 4 |
5 |
|
|
|
1SILENT Button
“Using the Silent Mode” (A p. 22)
2INFO. Button
“Checking the Remaining Recording Time” (A p. 48)
3SETUP Menu
“SETUP (video/still image)” (A p. 85)
4CONNECTION SETTINGS Menu
“CONNECTION SETTINGS (video/still image)” (A p. 87)
5RECORD SETTING Menu
“RECORD SETTING Menu (video)” (A p. 74) “RECORD SETTING Menu (still image)” (A p. 79)
6Close Button Exit the menu.
Menu screen (playback mode)
|
|
|
TOP MENU |
|
|
|
|
|
7 |
|
|
|
|
|
|
|
|
||
1 |
|
|
PLAYBACK |
EDIT |
|
|
|
6 |
|
|
|
OFF |
SETTING |
|
|
|
|
|
|
2 |
|
|
SETUP |
CONNECTION |
|
|
|||
|
|
SETTINGS |
|
|
|||||
|
|
|
|
|
|
||||
|
|
|
|
|
|
|
|
|
|
|
|
|
3 4 |
|
|
|
|
|
|
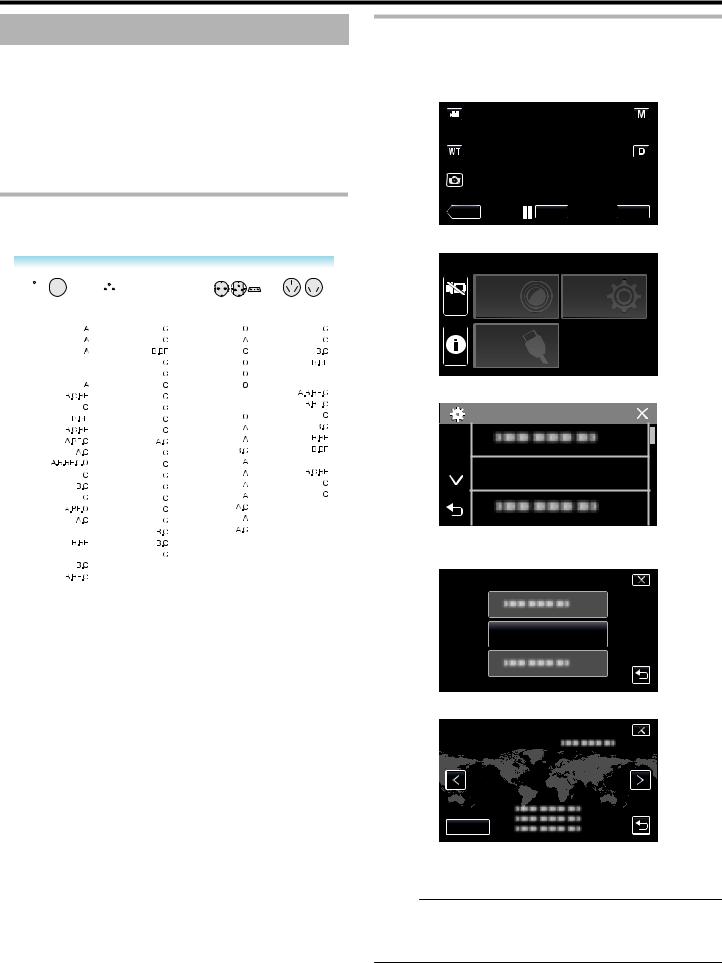
. |
|
|
5 |
|
|
|
|
||
1SILENT Button
“Using the Silent Mode” (A p. 22)
2INFO. Button (Displayed only after playback)
“Checking the Recording Date and Other Information” (A p. 53)
3PLAYBACK SETTING Menu
“PLAYBACK SETTING Menu (video)” (A p. 81) “PLAYBACK SETTING Menu (still image)” (A p. 83)
4SETUP Menu
“SETUP (video/still image)” (A p. 85)
5CONNECTION SETTINGS Menu
“CONNECTION SETTINGS (video/still image)” (A p. 87)
6EDIT Menu
“EDIT Menu (video)” (A p. 82) “EDIT Menu (still image)” (A p. 84)
7Close Button Exit the menu.
14
Getting Started
Clock Setting
“SET DATE/TIME!” is displayed when you turn on the unit for the first time or when the unit has not been used for a prolonged period.
Set the clock before recording.
1Open the LCD monitor.
. 
0The unit turns on.
0When the LCD monitor is closed, the unit turns off.
2Tap “OK” when “SET DATE/TIME!” is displayed.
SET DATE/TIME!
OK
.
3Set the date and time.
DATE & TIME SETTING |
|
24 DATE |
TIME |
12 2019 AM 10  00
00
SAVE
.
0When the day, month, year, hour, or minute item is tapped, “3” and “2” will be displayed.
0Tap 3or 2to adjust the year, month, day, hour, and minute.
4After setting the date and time, tap “SAVE”.
5Select the region where you live and tap “SAVE”.
DATE & TIME/AREA
GMT 
SAVE
.
0Time difference between the selected city and the GMT (Greenwich Mean Time) is displayed.
0Tap 0or 1to select the city name.
Memo :
0The clock can be reset again later. “Resetting the Clock” (A p. 15)
0When using this unit overseas, you can set it to the local time for recording. “Setting the Clock to Local Time when Traveling” (A p. 18)
0The clock is reset about one month after the battery is depleted. “SET DATE/TIME!” is displayed the next time you turn on this unit. Set the clock again after charging the battery.
Resetting the Clock
Set the clock with “DATE & TIME” from the menu.
1Tap “MENU”.
PLAY |
REC |
MENU |
.
2Tap “SETUP”.
 TOP MENU
|
RECORD |
SETUP |
|
OFF |
SETTING |
||
|
CONNECTION
SETTINGS
.
3Tap “DATE & TIME”.
SETUP
DATE & TIME
.
0 Tap 3or 2to scroll the screen.
4Tap “CLOCK SETTING”.
DATE & TIME
DATE & TIME SETTING
.
5Set the date and time.
DATE & TIME SETTING |
|
|
24 DATE |
|
TIME |
12 2019 |
10 |
00 AM |
SET
.
0When the day, month, year, hour, or minute item is tapped, “3” and “2” will be displayed.
0Tap 3or 2to adjust the year, month, day, hour, and minute.
6After setting the date and time, tap “SET”.
15

Getting Started
7Select the region where you live and tap “SAVE”.
DATE & TIME/AREA
GMT 
SAVE
.
0Time difference between the selected city and the GMT (Greenwich Mean Time) is displayed.
0Tap 0or 1to select the city name.
Changing the Display Language
The language on the display can be changed.
1Tap “MENU”.
PLAY |
REC |
MENU |
.
2Tap “SETUP”.
 TOP MENU
|
RECORD |
SETUP |
|
OFF |
SETTING |
||
|
CONNECTION
SETTINGS
.
3Tap “LANGUAGE”.
SETUP
LANGUAGE
.
0 Tap 3or 2to scroll the screen.
4Tap to the desired language.
 LANGUAGE
ENGLISH
.
0 Tap 3or 2to scroll the screen.
16
Getting Started
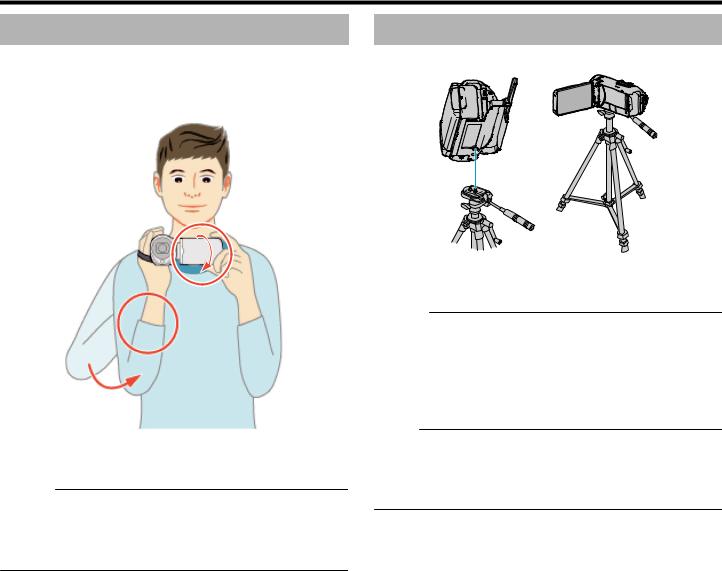
Holding this Unit
When holding this unit, keep your elbows close to your sides to prevent camera shake.
0Hold the LCD monitor with your left hand and adjust the angle accordingly. Holding the LCD monitor with your left hand helps to stabilize the camera for recording.
Caution :
0The photographer should pay attention to the surroundings during shooting, making sure that he/she is in no danger of falling or collision with another person or vehicle.
0Be careful not to drop this unit during transportation.
0Guardians should pay close attention when this unit is used by children.
Tripod Mounting
This unit can be mounted on a tripod (or monopod). This is useful for preventing camera shake and recording from the fixed position.
.
0To prevent this unit from falling off, check the tripod mounting screw holes and positioning holes on the unit carefully before mounting, and turn the screws until they are fastened firmly.
Caution :
0To prevent injuries or damages which may result if this unit falls off, read the instruction manual of the tripod (or monopod) to be used and make sure that it is securely attached.
0In strong wind conditions and when placed at an unstable location, there is a risk of the tripod toppling and falling.
0Please check beforehand if the use of a tripod is allowed as it may be prohibited depending on the shooting location.
Memo :
0It is recommended to use a tripod or monopod when recording in conditions prone to camera shake (such as in dark places or when zoomed to the telephoto end).
0Set the image stabilizer to b(OFF) when using a tripod for recording. “Reducing Camera Shake” (A p. 40)
17
Getting Started
Using this Unit Overseas
The shape of the power outlet varies according to countries and regions. To charge the battery pack, you need a converter plug that matches the shape of the outlet.
“Charging the Battery Pack Overseas” (A p. 18)
Change the date and time display to the local time by selecting your travel destination in “AREA SETTING” of “DATE & TIME”.
“Setting the Clock to Local Time when Traveling” (A p. 18)
When “ON” is selected in “DST SETTING” of “DATE & TIME”, the time is set 1 hour ahead.
“Setting Daylight Saving Time” (A p. 19)
Charging the Battery Pack Overseas
The shape of the power outlet varies according to countries and regions. To charge the battery pack, you need a converter plug that matches the shape of the outlet.
|
|
|
|
|
|
|
|
|
|
|
|
|
|
|
|
|
|
|
|
|
|
|
|
|
|
|
|
|
|
|
|
A |
|
|
|
B |
|
BF |
|
C |
|
|
|
O |
|||||||||||||
|
|
|
|
|
|
|
|
|
|
|
|
|
|
|
|
|
|
|
|
|
|
|
|
|
|
|
|
|
|
|
|
|
|
|
|
|
|
|
|
|
|
|
|
|
|
|
|
|
|
|
|
|
|
|
|
|
|
|
|
|
|
|
|
|
|
|
|
|
|
|
|
|
|
|
|
|
|
|
|
|
|
|
|
|
|
|
|
|
|
|
|
|
|
|
|
|
|
|
|
|
|
|
|
|
|
|
|
|
|
|
|
|
|
|
|
|
|
|
|
|
|
|
|
|
|
|
|
|
|
|
|
|
|
|
|
|
|
|
|
|
|
|
|
|
|
|
|
|
|
|
|
|
|
|
|
|
|
|
|
|
|
|
|
|
|
|
|
|
|||||
|
|
North America |
|
|
|
|
Europe |
|
|
|
Oceania |
|
|
|
|
Middle East |
|
|
|
|
||||||||
|
United States |
|
|
Iceland |
|
|
Australia |
|
|
|
Israel |
|
|
|
|
|
||||||||||||
|
Canada |
|
|
Ireland |
|
|
Guam |
|
|
|
Iran |
|
||||||||||||||||
|
Mexico |
|
|
United Kingdom |
|
|
Tahiti |
|
|
|
Kuwait |
|
||||||||||||||||
|
|
|
|
|
|
|
|
Italy |
|
|
Tonga |
|
|
|
Jordan |
|||||||||||||
|
|
|
Asia |
|
|
Austria |
|
|
New Zealand |
|
|
|
|
|
|
|
|
|
|
|
|
|||||||
|
Japan |
|
|
Netherlands |
|
|
Fiji |
|
|
|
|
Africa |
|
|||||||||||||||
|
|
|
|
|
|
|
|
|
|
|
|
|
|
|
|
|
|
|
|
Algeria |
|
|
||||||
|
India |
|
|
Canary Islands |
|
|
|
|
|
|
|
|
|
|||||||||||||||
|
Indonesia |
|
|
Greece |
|
|
|
|
Latin |
|
|
|
Egypt |
|||||||||||||||
|
|
|
|
|
Argentina |
|
|
|
Guinea |
|
|
|
|
|||||||||||||||
|
Singapore |
|
|
Switzerland |
|
|
|
|
|
|
|
|
|
|||||||||||||||
|
|
|
|
|
|
|
|
Kenya |
|
|||||||||||||||||||
|
|
|
|
|
Colombia |
|
|
|||||||||||||||||||||
|
Sri Lanka |
|
|
Sweden |
|
|
|
|
|
|
|
|
|
|||||||||||||||
|
|
|
|
|
|
|
|
Zambia |
|
|||||||||||||||||||
|
|
|
|
|
Jamaica |
|
|
|
|
|
|
|
|
|
||||||||||||||
|
Thailand |
|
|
Spain |
|
|
|
|
|
|
|
|
|
|||||||||||||||
|
|
|
|
|
|
|
|
Tanzania |
|
|||||||||||||||||||
|
|
|
|
|
Chile |
|
|
|||||||||||||||||||||
|
South Korea |
|
|
Denmark |
|
|
|
|
|
|
|
|
|
|||||||||||||||
|
|
|
|
|
|
|
|
Republic of South |
||||||||||||||||||||
|
|
|
|
|
|
|
|
|
|
|
|
|
|
Haiti |
|
|
|
|||||||||||
|
China |
|
|
Germany |
|
|
|
|
|
|||||||||||||||||||
|
|
|
|
|
|
|
|
|
|
|
|
|
|
Panama |
|
|
|
Africa |
|
|
||||||||
|
Nepal |
|
|
Norway |
|
|
|
|
|
|
|
|||||||||||||||||
|
|
|
|
|
|
|
|
Mozambique |
||||||||||||||||||||
|
|
|
|
|
Bahamas |
|
|
|
|
|||||||||||||||||||
|
Pakistan |
|
|
Hungary |
|
|
|
|
|
|
||||||||||||||||||
|
|
|
|
|
|
|
|
Morocco |
|
|||||||||||||||||||
|
|
|
|
|
Puerto Rico |
|
|
|
|
|
|
|||||||||||||||||
|
Bangladesh |
|
|
Finland |
|
|
|
|
|
|
||||||||||||||||||
|
|
|
|
|
|
|
|
|
||||||||||||||||||||
|
|
|
|
|
Brazil |
|
|
|||||||||||||||||||||
|
Philippines |
|
|
France |
|
|
|
|
|
|
|
|
|
|
|
|
|
|
||||||||||
|
|
|
|
|
Venezuela |
|
|
|
|
|
|
|
|
|
|
|
|
|||||||||||
|
Vietnam |
|
|
Belgium |
|
|
|
|
|
|
|
|
|
|
|
|
|
|
||||||||||
|
|
|
|
|
Peru |
|
|
|
|
|
|
|
|
|
|
|
|
|||||||||||
|
Hong Kong Special |
|
|
Poland |
|
|
|
|
|
|
|
|
|
|
|
|
|
|
||||||||||
|
|
|
|
|
|
|
|
|
|
|
|
|
|
|
|
|
|
|||||||||||
|
Administrative Region |
|
|
Portugal |
|
|
|
|
|
|
|
|
|
|
|
|
|
|
|
|
|
|||||||
|
Macau Special |
|
|
Romania |
|
|
|
|
|
|
|
|
|
|
|
|
|
|
|
|
|
|||||||
|
Administrative Region |
|
|
|
|
|
|
|
|
|
|
|
|
|
|
|
|
|
|
|
|
|
|
|
||||
. |
Malaysia |
|
|
|
|
|
|
|
|
|
|
|
|
|
|
|
|
|
|
|
|
|
|
|
||||
Setting the Clock to Local Time when Traveling
Change the date and time display to the local time by selecting your travel destination in “AREA SETTING” of “DATE & TIME”.
Restore the region settings after you returned from the trip.
1Tap “MENU”.
PLAY |
REC |
MENU |
.
2Tap “SETUP”.
 TOP MENU
|
RECORD |
SETUP |
|
OFF |
SETTING |
||
|
CONNECTION
SETTINGS
.
3Tap “DATE & TIME”.
SETUP
DATE & TIME
.
0 Tap 3or 2to scroll the screen.
4Tap “AREA SETTING”.
DATE & TIME
AREA SETTING
.
5Select the area you are traveling to and tap “SAVE”.
AREA SETTING
GMT 
SAVE
.
0Time difference between the selected city and the GMT (Greenwich Mean Time) is displayed.
0Tap 0or 1to select the city name.
Memo :
0Setting “AREA SETTING” changes the clock time such that time difference is accounted for.
After returning to your country, re-select the region that was set initially to restore the original clock settings.
18
Getting Started
Setting Daylight Saving Time
When “ON” is selected in “DST SETTING” of “DATE & TIME”, the time is set 1 hour ahead.
1Tap “MENU”.
PLAY |
REC |
MENU |
.
2Tap “SETUP”.
 TOP MENU
|
RECORD |
SETUP |
|
OFF |
SETTING |
||
|
CONNECTION
SETTINGS
.
3Tap “DATE & TIME”.
SETUP
DATE & TIME
.
0 Tap 3or 2to scroll the screen.
4Tap “DST SETTING”.
DATE & TIME
DST SETTING
.
5Tap “ON”.
DST SETTING
DAYLIGHT SAVING TIME (DST)
CURRENT SETTING: OFF
ON |
OFF |
.
Memo :
0What is daylight saving time?
Daylight saving time is the system of setting the clock 1 hour ahead for a fixed period in summer.
It is used mainly in the Western countries.
0Restore the daylight saving time settings after you returned from the trip.
19

Recording
Taking Videos in Auto Mode
With Intelligent Auto recording, the camera automatically adjusts the settings such as brightness and focus to suit the shooting conditions.
0In case of specific shooting scenes such as person etc., its icon is displayed on the screen.
0Before recording an important scene, it is recommended to conduct a trial recording.
1Open the LCD monitor.
A
.
0Check if the recording mode is A.
0If the mode is Bstill image, tap Bon the recording screen to display the mode switching screen.
Tap A to switch the mode to video.
2Check if the recording mode is P Intelligent Auto.
PLAY
.
0If the mode is H Manual, tap H on the recording screen to display the mode switching screen.
Tap P to switch the recording mode to Intelligent Auto.
intelligent AUTO |
MANUAL |
.
3Press the START/STOP button to start recording.
.
0Press again to stop.
0Some displays disappear after approximately 3 seconds. Use the nbutton to change the displays.
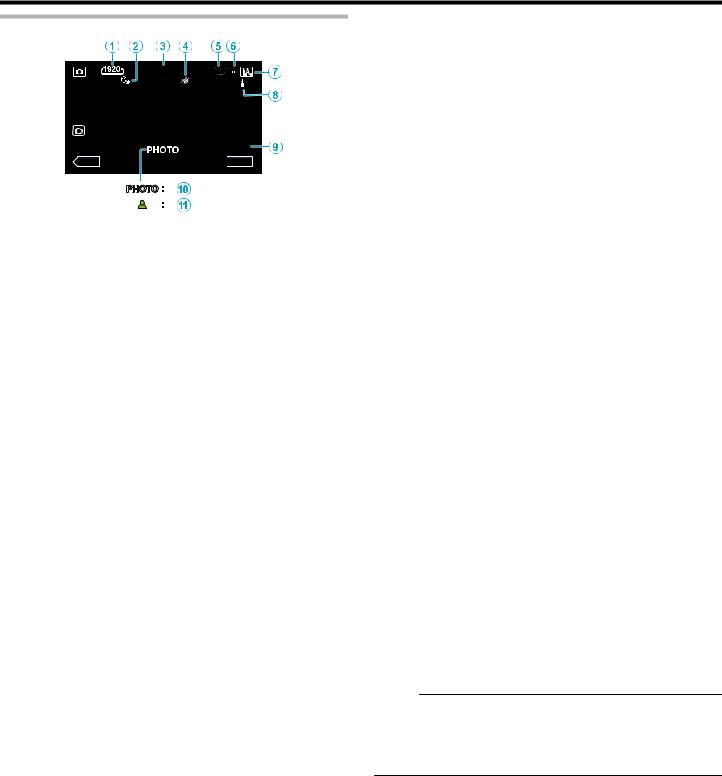
Indications for Video Recording
10:10
|
|
0:00:00 |
[2:04] |
|
|
|||||
|
|
|
|
|||||||
|
PLAY |
|
|
|
|
REC |
|
MENU |
||
|
|
|
|
|||||||
. |
|
|
|
|
|
|
|
|
|
|
|
|
|
|
|
|
|
|
|
||
|
|
|
|
|
|
|
||||
|
Display Icon |
|
|
|
|
Description |
||||
A |
Video Quality |
Displays the icon of the “VIDEO QUALITY” |
||||||||
|
|
setting selected in the recording menu when |
||||||||
|
|
“SYSTEM SELECT” is set to “60i”. |
||||||||
|
|
“ VIDEO QUALITY ” (A p. 76) |
||||||||
B |
TOUCH PRIORITY |
Displays the setting of “TOUCH PRIORITY AE/ |
||||||||
|
AE/AF |
AF”. |
|
|
|
|||||
|
|
By default, it is set to “FACE TRACKING”. |
||||||||
|
|
“Capturing Subjects Clearly (TOUCH |
||||||||
|
|
PRIORITY AE/AF)” (A p. 38) |
||||||||
C |
Time |
Displays the current time. |
||||||||
|
|
“Clock Setting” (A p. 15) |
||||||||
D |
RECORDING |
Displays the corresponding icon when a |
||||||||
|
EFFECT |
recording effect is specified. |
||||||||
|
|
C: GRAINY MONOCHROME |
||||||||
|
|
D: FOOD |
|
|
|
|||||
|
|
B: BABY |
|
|
|
|||||
|
|
“Recording with Effects (RECORDING |
||||||||
|
|
EFFECT)” (A p. 34) |
|
|
|
|||||
E |
Image Stabilizer |
Displays the image stabilizer setting. |
||||||||
|
|
“Reducing Camera Shake” (A p. 40) |
||||||||
F |
Recording Media |
Displays the icon of the media where videos |
||||||||
|
|
are recorded to. |
|
|
|
|||||
|
|
The recording media can be changed. |
||||||||
|
|
“ REC MEDIA FOR VIDEO ” (A p. 86) |
||||||||
G |
Battery Indicator |
Displays the approximate remaining battery |
||||||||
|
|
power during use. |
|
|
|
|||||
|
|
“Checking the Remaining Recording Time” |
||||||||
|
|
(A p. 48) |
|
|
|
|||||
H |
Recording Mode |
Displays the current recording mode of P |
||||||||
|
|
(Intelligent Auto) or H (Manual). |
||||||||
|
|
Current shooting mode is displayed. |
||||||||
I |
Setting Scenes of |
Displays scenes detected automatically in the |
||||||||
|
Intelligent Auto |
Intelligent Auto function. Multiple scenes may |
||||||||
|
|
be detected. |
|
|
|
|||||
J |
SEAMLESS |
Displays the seamless recording icon when it |
||||||||
|
RECORDING |
is set. q appears if seamless recording |
||||||||
|
|
cannot be performed. |
||||||||
|
|
“ SEAMLESS RECORDING ” (A p. 76) |
||||||||
K |
Remaining |
Displays the remaining time for video |
||||||||
|
Recording Time |
recording. |
|
|
|
|||||
|
|
“Checking the Remaining Recording Time” |
||||||||
|
|
(A p. 48) |
|
|
|
|||||
L |
Scene Counter |
Displays the elapsed time of the video that is |
||||||||
|
(Recorded Time) |
currently being recorded. |
||||||||
20
Recording
o Scenes of Intelligent Auto
Display Icon |
Description |
g |
Captures one’s skin beautifully. |
|
|
V |
Allows people to be captured naturally. |
f |
Record a group of people with the most suitable |
|
settings. |
S |
Records while focusing on a near object. |
|
|
a |
Focuses at a far distance and captures a sharp |
|
image with vivid colors. |
Z |
Records in dark places with minimal noise in the |
|
overall image. |
T |
Allows night scenes to be captured accurately with |
|
minimal noise in the overall image. |
d |
Prevents colors from fading even when recording |
|
in a bright environment, such as snowfield and |
|
beaches. |
X |
Prevents colors from fading when recording a |
|
subject in a spotlight. |
i |
Reproduces the green color of trees vividly. |
Y |
Reproduces the colors of sunset naturally. |
|
|
h |
Adjusts settings so that the subject does not |
|
appear too dark due to backlight. |
k |
Records while emphasizing the brightness of the |
|
colors. |
U |
Reproduces the natural colors of the outdoors |
|
during the day. |
c |
Reproduces the natural colors of the indoors in a |
|
cold-color illumination. |
b |
Reproduces the natural colors of the indoors in a |
|
warm-color illumination. |
e |
Selects the most suitable settings for handheld |
|
shooting. |
j |
Selects the most suitable settings when a tripod is |
|
used for shooting. |
Memo :
0Scenes can be detected according to the shooting conditions and automatically adjusted in Intelligent Auto mode.
0Multiple scenes may be detected depending on the recording conditions.
0Some functions may not work properly depending on the shooting conditions.
Operation Buttons for Video Recording
.
|
Operation |
Description |
|
Buttons |
|
A |
Video/Still Image |
Switches between video and still image |
|
Mode |
modes. |
|
A/B |
|
B |
WT Zoom |
Allows the same functions as the zoom |
|
|
lever to be performed. |
|
|
Camera shake that often occurs when |
|
|
using the zoom lever can be minimized. |
|
|
“Zooming” (A p. 26) |
C |
Still Image |
Tap this button to record a still image during |
|
Recording A |
video recording. |
|
|
“Capturing Still Images During Video |
|
|
Recording” (A p. 23) |
D |
Playback Mode |
Switches to the playback mode. |
|
|
|
E/ F |
Recording Start |
Functions as the START/STOP button. |
|
6 |
|
|
Record-Standby |
|
|
7 |
|
|
|
|
G |
MENU |
Displays the various menus of video |
|
|
recording. |
|
|
“Operating the Menu” (A p. 73) |
H |
Display Button n |
Switches the display between full (m) and |
|
|
simple (n) with every tap of the button. |
|
|
0 Simple display: Some displays |
|
|
disappear automatically when the |
|
|
screen is not operated. |
|
|
0 Full display: Displays everything. The |
|
|
display button changes from nto m. |
|
|
0 When the power is turned off, the display |
|
|
setting will revert to simple display (n). |
|
|
|
I |
Recording Mode |
Switches between the P Intelligent Auto |
|
P/H |
and H Manual recording mode. |
21
Recording
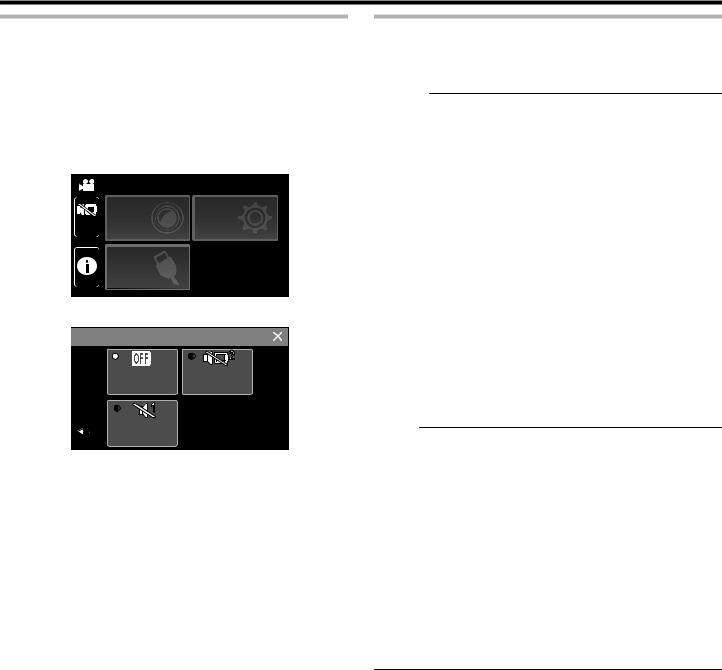
Using the Silent Mode
The Silent mode is a function for turning off the operation sound. The screen can also be dimmed depending on the setting. Use this mode to record quietly in events such as recitals, presentations etc.
0When “SILENT MODE” is set to “LCD DARKENED AND SOUND OFF”, Tis displayed.
o Operating procedure
A Tap “MENU”.
0The top menu appears. B Tap T.
|
TOP MENU |
|
|
|
RECORD |
SETUP |
|
|
SETTING |
||
OFF |
|||
|
CONNECTION
SETTINGS
.
C Tap Gto turn off the operation sound only. And tap Fto dim the screen and turn off the operation sound.

 SILENT MODE
OFF |
LCD DARKENED |
AND SOUND OFF |
OPERATION
SOUND OFF
.
Useful Settings for Recording
0When “DATE/TIME RECORDING” is used, the date and time can be recorded together with the video.
“Recording Videos with Date and Time” (A p. 46)
Caution :
0Do not expose the lens to direct sunlight.
0While this unit can be used with the LCD monitor reversed or the LCD monitor closed with “LCD CLOSED RECORDING” activated, the temperature of this unit rises more easily. Leave the LCD monitor open when using this unit for long periods of time, or in places exposed to direct sunlight or high temperatures.
0The power may turn off to protect the circuit if the temperature of this unit rises too much.
0If the temperature of this unit rises during recording, 7changes color to yellow as a notification.
0This unit is a microcomputer-controlled device. Electrostatic discharge, external noise and interference (from a TV, a radio, etc.) might prevent it from functioning properly. In such a case, close the monitor screen to turn off the power and remove the AC adapter, then press the Reset button to reset this unit.
“Resetting this Unit” (A p. 5)
0Disclaimer
-We shall not be held responsible for loss of recorded contents when recording videos/audio or playback cannot be operated due to malfunctions in this unit, provided parts, or SD card.
-Once deleted, recorded contents (data), including data loss due to malfunctions in this unit, cannot be restored. Please be forewarned.
-Canon will not be responsible for any lost data.
Memo :
0Check that the remaining recording time in the media is sufficient before you start recording. “Checking the Remaining Recording Time”
(A p. 48)
If the remaining recording time is not sufficient, save the files on a PC or disc before deleting the files from the unit. “Deleting Unwanted Files” (A p. 62)
0When there are many files in the media, it may take time for them to be displayed on the playback screen. Wait for a while as the POWER/ ACCESS lamp blinks, indicating normal operation.
0Recording stops automatically as it cannot be performed for 12 or more consecutive hours according to specifications.
(It may take some time to resume recording.)
0Up to 4GB per video file can be recorded. File recorded using long recordings that exceeds 4GB is split and recorded into several video files.
0Depending on the shooting conditions, the four corners of the screen may appear dark, but this is not a malfunction. In this case, change the shooting conditions by moving the zoom lever, etc.
22

Recording
Capturing Still Images During Video Recording
Still images can be captured by tapping the Abutton while in the video mode (standby or recording).
Taking Still Images in Auto Mode
You can record without worrying about the setting details by using the P Intelligent Auto mode.
1Open the LCD monitor.
B
PLAY |
REC |
MENU |
.
0 “PHOTO” lights up on the screen when a still image is being captured.
0 |
The still images captured during video recording are saved to the |
|
. |
|
|
destination set in “REC MEDIA FOR IMAGE”. |
0 |
Check if the recording mode is B. |
|
Memo : |
||||
0 |
If the mode is A video, tap A on the recording screen to display the |
|||
0 |
The size of the still image that is captured in the video mode is 1,920 x |
|||
|
mode switching screen. |
|||
|
1,080. |
|
Tap B to switch the mode to still image. |
|
0 |
Operation is invalid under the following conditions: |
2 Check if the recording mode is P Intelligent Auto. |
||
|
- when menu is being displayed |
|||
- when remaining recording time or battery power is being displayed - when any functions in “TIME-LAPSE RECORDING”, “RECORDING EFFECT” or “DATE/TIME RECORDING” is set
-when the AV cable is connected to the AV connector
-when the HDMI cable is connected and a resolution other than 1080i is output
PLAY |
MENU |
.
0 If the mode is H Manual, tap H on the recording screen to display the mode switching screen.
Tap P to switch the recording mode to Intelligent Auto.
intelligent AUTO |
MANUAL |
.
3 Press the START/STOP button.
.
0 PHOTO lights up when a still image is being captured.
Memo :
0 Depending on the subject and shooting conditions, recording may not be performed properly even in the Intelligent Auto mode.
o Start recording after adjusting the focus
A Press and hold the Abutton on the touch screen until the focus is adjusted.
 Lights up in green when in focus
.
B Remove your finger from the button to release the shutter.
Available only when “SHUTTER MODE” is set to “RECORD ONE SHOT”.
23
Recording
Indications During Still Image Recording
10:10
|
[6630] |
PLAY |
MENU |
.
0Some displays disappear after approximately 3 seconds. Use the nbutton to change the displays.
|
Display Icon |
Description |
A |
Image Size |
Displays the icon of the image size. |
|
|
0 The size of still images can be changed. |
|
|
“ IMAGE SIZE ” (A p. 80) |
B |
TOUCH PRIORITY |
Displays the setting of “TOUCH PRIORITY AE/ |
|
AE/AF |
AF”. |
|
|
By default, it is set to “FACE TRACKING”. |
|
|
“Capturing Subjects Clearly (TOUCH |
|
|
PRIORITY AE/AF)” (A p. 38) |
C |
Time |
Displays the current time. |
|
|
“Clock Setting” (A p. 15) |
D |
RECORDING |
Displays the corresponding icon when a |
|
EFFECT |
recording effect is specified. |
|
|
C: GRAINY MONOCHROME |
|
|
D: FOOD |
|
|
B: BABY |
|
|
“Recording with Effects (RECORDING |
|
|
EFFECT)” (A p. 34) |
E |
Recording media |
Displays the icon of the media where still |
|
|
images are recorded to. |
|
|
The recording media can be changed. |
|
|
“ REC MEDIA FOR IMAGE ” (A p. 86) |
F |
Battery Indicator |
Displays the approximate remaining battery |
|
|
power during use. |
|
|
“Checking the Remaining Recording Time” |
|
|
(A p. 48) |
G |
Recording Mode |
Displays the current recording mode of P |
|
|
(Intelligent Auto) or H (Manual). |
H |
Setting Scenes of |
Displays scenes detected automatically in the |
|
Intelligent Auto |
Intelligent Auto function. Multiple scenes may |
|
|
be detected. |
I |
Remaining Number |
Displays the remaining number of shots for still |
|
of Shots |
image recording. |
|
|
“Approximate Number of Still Images (Unit: |
|
|
Number of Shots)” (A p. 49) |
J |
Recording in |
“PHOTO” appears when a still image is being |
|
Progress |
captured. |
K |
Focus |
Lights up in green when focused. |
|
|
|
o Scenes of Intelligent Auto
Display Icon |
Description |
g |
Captures one’s skin beautifully. |
|
|
V |
Allows people to be captured naturally. |
f |
Record a group of people with the most suitable |
|
settings. |
S |
Records while focusing on a near object. |
|
|
a |
Focuses at a far distance and captures a sharp |
|
image with vivid colors. |
Z |
Records in dark places with minimal noise in the |
|
overall image. |
T |
Allows night scenes to be captured accurately with |
|
minimal noise in the overall image. |
d |
Prevents colors from fading even when recording |
|
in a bright environment, such as snowfield and |
|
beaches. |
X |
Prevents colors from fading when recording a |
|
subject in a spotlight. |
i |
Reproduces the green color of trees vividly. |
Y |
Reproduces the colors of sunset naturally. |
|
|
h |
Adjusts settings so that the subject does not |
|
appear too dark due to backlight. |
k |
Records while emphasizing the brightness of the |
|
colors. |
U |
Reproduces the natural colors of the outdoors |
|
during the day. |
c |
Reproduces the natural colors of the indoors in a |
|
cold-color illumination. |
b |
Reproduces the natural colors of the indoors in a |
|
warm-color illumination. |
e |
Selects the most suitable settings for handheld |
|
shooting. |
j |
Selects the most suitable settings when a tripod is |
|
used for shooting. |
Memo :
0Scenes can be detected according to the shooting conditions and automatically adjusted in Intelligent Auto mode.
0Multiple scenes may be detected depending on the recording conditions.
0Some functions may not work properly depending on the shooting conditions.
24
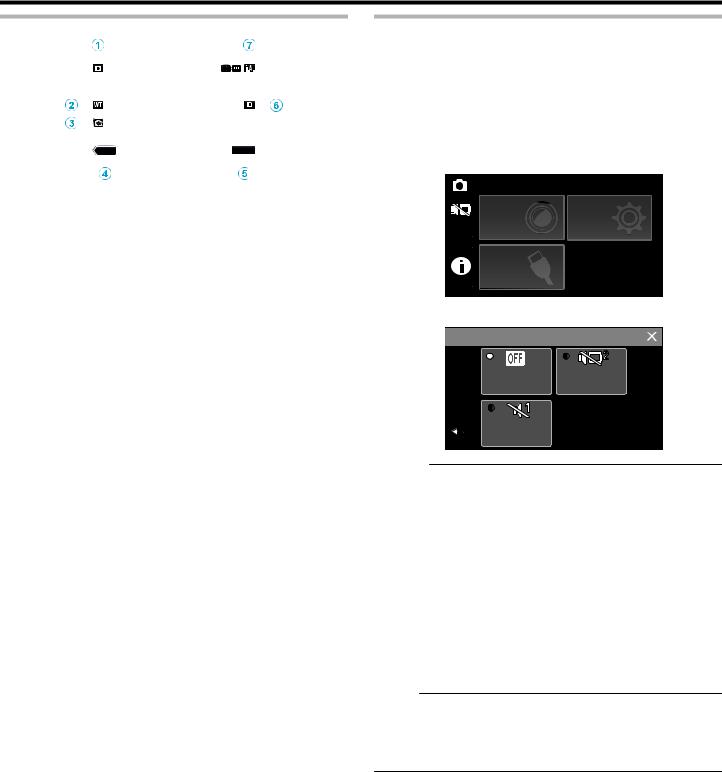
Recording
Operation Buttons for Still Image Recording
|
|
|
|
|
|
|
|
|
|
|
|
|
|
|
|
|
|
|
|
[6630] |
|
|
|
||
|
|
|
|
|
|
|
|
|
|
|||
|
|
|
|
|
|
|
|
|
|
|||
|
|
|
|
PLAY |
MENU |
|
|
|||||
|
. |
|
|
|
|
|
|
|
|
|
|
|
|
|
|
|
|
|
|
|
|
|
|
|
|
|
|
|
||||||||||
|
Operation |
Description |
||||||||||
|
Buttons |
|
|
|
|
|
|
|||||
A |
Video/Still Image |
Switches between video and still image |
||||||||||
|
Mode |
modes. |
||||||||||
|
A/B |
|
|
|
|
|
|
|||||
B |
WT Zoom |
Allows the same functions as the zoom |
||||||||||
|
|
|
|
|
|
|
lever to be performed. |
|||||
|
|
|
|
|
|
|
Camera shake that often occurs when |
|||||
|
|
|
|
|
|
|
using the zoom lever can be minimized. |
|||||
|
|
|
|
|
|
|
“Zooming” (A p. 26) |
|||||
C |
Still Image |
Allows you to take still images using the |
||||||||||
|
Recording A |
touch panel. Pressing and holding the |
||||||||||
|
|
|
|
|
|
|
button allows you to adjust the focus before |
|||||
|
|
|
|
|
|
|
shooting. |
|||||
|
|
|
|
|
|
|
“Start recording after adjusting the focus” |
|||||
|
|
|
|
|
|
|
(A p. 23) |
|||||
D |
Playback Mode |
Switches to the playback mode. |
||||||||||
E |
MENU |
Displays the various menus of still image |
||||||||||
|
|
|
|
|
|
|
recording. |
|||||
|
|
|
|
|
|
|
“Operating the Menu” (A p. 73) |
|||||
F |
Display Button n |
Switches the display between full (m) and |
||||||||||
|
|
|
|
|
|
|
simple (n) with every tap of the button. |
|||||
|
|
|
|
|
|
|
0 Simple display: Some displays |
|||||
|
|
|
|
|
|
|
disappear automatically when the |
|||||
|
|
|
|
|
|
|
screen is not operated. |
|||||
|
|
|
|
|
|
|
0 Full display: Displays everything. The |
|||||
|
|
|
|
|
|
|
display button changes from nto m. |
|||||
|
|
|
|
|
|
|
0 When the power is turned off, simple |
|||||
|
|
|
|
|
|
|
display (n) will be set. |
|||||
G |
Recording Mode |
Switches between the P Intelligent Auto |
||||||||||
|
P/H |
and H Manual recording mode. |
||||||||||
Using the Silent Mode
The Silent mode is a function for turning off the operation sound. The screen can also be dimmed depending on the setting. Use this mode to record quietly in events such as recitals, presentations etc.
0When “SILENT MODE” is set to “LCD DARKENED AND SOUND OFF”, Tis displayed.
o Operating procedure
A Tap “MENU”.
0The top menu appears. B Tap T.
|
TOP MENU |
|
|
|
RECORD |
SETUP |
|
|
SETTING |
||
OFF |
|||
|
CONNECTION
SETTINGS
.
CTap Gto turn off the operation sound only. And tap Fto dim the screen and turn off the operation sound.

 SILENT MODE
OFF |
LCD DARKENED |
AND SOUND OFF |
OPERATION
SOUND OFF
.
Caution :
0Do not expose the lens to direct sunlight.
0While this unit may be used with the LCD monitor reversed and closed, the temperature rises more easily. Leave the LCD monitor open when using this unit for long periods of time, or in places exposed to direct sunlight or high temperatures.
0The power may turn off to protect the circuit if the temperature of this unit rises too much.
0Do not remove the AC adapter or SD card when the POWER/ACCESS lamp is lighted. The recorded data may become unreadable.
0This unit is a microcomputer-controlled device. Electrostatic discharge, external noise and interference (from a TV, a radio, etc.) might prevent it from functioning properly. In such a case, close the monitor screen to turn off the power and remove the AC adapter, then press the Reset button to reset this unit.
“Resetting this Unit” (A p. 5)
Memo :
0Before recording an important scene, it is recommended to conduct a trial recording.
0Depending on the shooting conditions, the four corners of the screen may appear dark, but this is not a malfunction. In this case, change the shooting conditions by moving the zoom lever, etc.
25

Recording
Zooming
The angle of view can be adjusted using zoom.
0Use the W end (wide angle end) to shoot a wider field of view.
0Use the T end (telephoto end) to magnify the subject for shooting.
|
T |
|
|
|
VOL. |
|
W |
W (Wide Angle End) |
T (Telephoto End) |
.
0The following zoom options are available:
-Optical Zoom (1 - 40x)
-Digital Zoom (41 - 200x)
0You can also use the zoom (WT) button on the touch screen to zoom.
0Tap the WT button, then press and hold the T (telephoto end) or W (wide angle end) button.
Zoom Button (T/W)
PLAY |
REC |
MENU |
.
Memo :
0When digital zoom is used, the image becomes grainy as it is digitally enlarged.
0The zoom ratio range can be changed.
“ ZOOM ” (A p. 77)
Zoom Memory
The zoom position can be stored by the Zoom Memory icon (WT) on the touch screen.
o Storing Method
1Zoom to the position to reach to the desired position for storing.
T
VOL.
W
.
2Tap “WT”.
PLAY |
REC |
MENU |
.
3Press and hold “M” (approx. 1 second).
REC MENU
.
0 Store the zoom position. o Operating Detail
1Tap “WT”.
PLAY |
REC |
MENU |
.
2Tap “M”.
REC MENU
.
0 Zoom to the point that is stored in advance.
Memo :
0If the setting of DIS, VIDEO QUALITY, SYSTEM SELECT or ZOOM is changed, the zoom position stored will be erased.
26
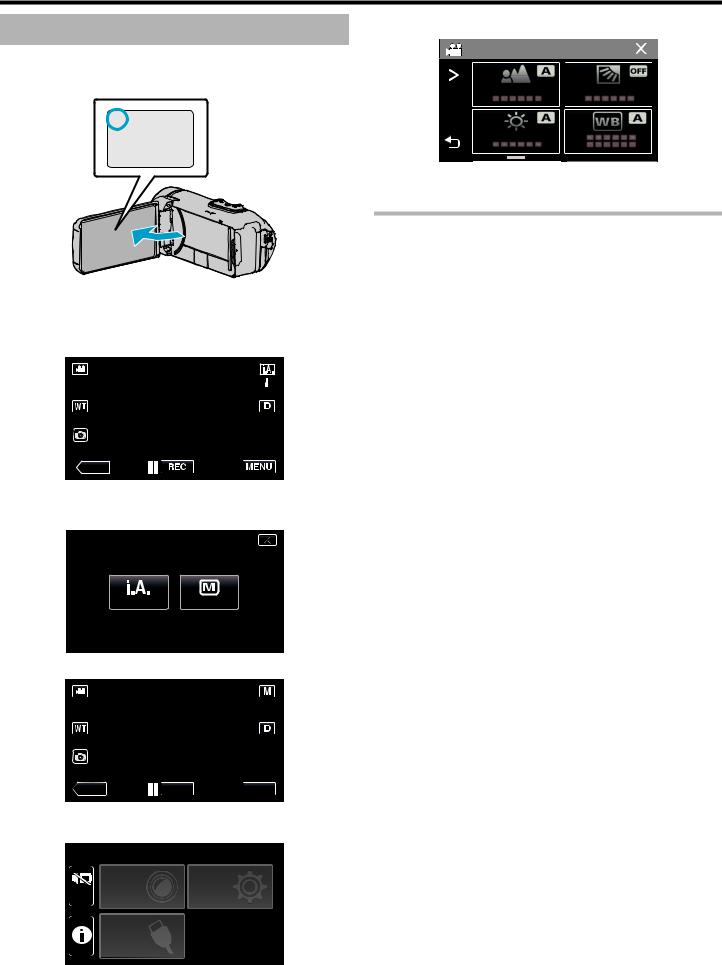
Recording
Manual Recording
In situations where you are unable to record properly using Intelligent Auto recording, you can change the settings and record using manual recording.
1Open the LCD monitor.
A
.
0Set the recording mode to either A video or B still image.
0To switch the mode between video and still image, tap Aor Bon the recording screen to display the mode switching screen.
Tap A or B to switch the mode to video or still image respectively.
2Select the Manual recording mode.
PLAY
.
0If the mode is P Intelligent Auto, tap P on the recording screen to display the mode switching screen.
Tap H to switch the recording mode to Manual.
intelligent AUTO |
MANUAL |
.
3Tap “MENU”.
5Tap the item to set manually.
RECORD SETTING
.
0For details on the various manual settings, refer to “Manual Recording Menu”.
Manual Recording Menu
The following items can be set.
Name |
|
Description |
FOCUS |
0 |
Use manual focus if the subject is not |
|
|
focused automatically. |
|
“Adjusting Focus Manually (FOCUS)” |
|
|
(A p. 28) |
|
BRIGHTNESS |
0 |
Overall brightness on the screen can be |
ADJUST |
|
adjusted. |
|
0 |
Use this when recording in a dark or bright |
|
|
location. |
|
“Adjusting Brightness” (A p. 29) |
|
BACKLIGHT COMP. |
0 |
Corrects the image when the subject |
|
|
appears dark due to backlight. |
|
0 |
Use this when shooting against the light. |
|
“Setting Backlight Compensation” (A p. 30) |
|
WHITE BALANCE |
0 |
Overall color on the screen can be adjusted. |
|
0 |
Use this when the color on the screen |
|
|
appears differently from the actual color. |
|
“Setting White Balance” (A p. 31) |
|
TELE MACRO |
0 |
Use this to take close-up (macro) shots of the |
|
|
subject. |
|
“Taking Close-up Shots (TELE MACRO)” |
|
|
(A p. 32) |
|
PLAY |
REC |
MENU |
.
0 The top menu appears.
4Tap “RECORD SETTING”.
 TOP MENU
|
RECORD |
SETUP |
|
|
SETTING |
||
OFF |
|||
|
CONNECTION
SETTINGS
.
27
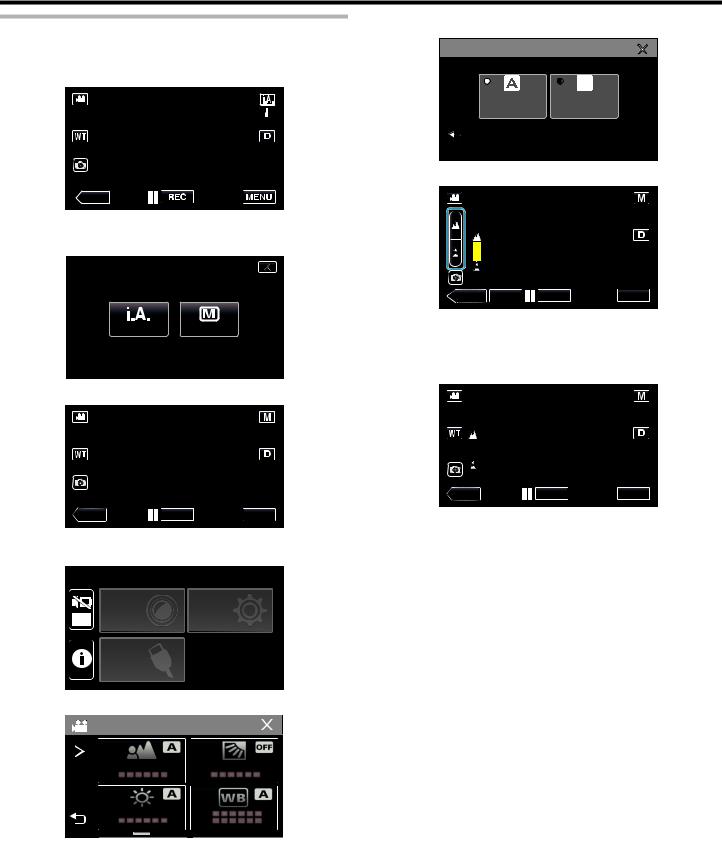
Recording
Adjusting Focus Manually (FOCUS)
Adjust the focus manually when you are unable to focus clearly using Intelligent Auto or when you want to lock the focus.
1Select the Manual recording mode.
5Tap “MANUAL”.
 FOCUS
FOCUS
AUTO MANUAL
.
6 Adjust the focus.
PLAY
.
0If the mode is P Intelligent Auto, tap P on the recording screen to display the mode switching screen.
Tap H to switch the recording mode to Manual.
PLAY SET |
REC |
MENU |
.
intelligent AUTO |
MANUAL |
.
2Tap “MENU”.
0Tap E to focus on a distant subject.
If E appears blinking, focus cannot be set any further.
0Tap pto focus on a near subject.
If pappears blinking, focus cannot be set any nearer.
7Tap “SET” to confirm.
PLAY REC
.
0 The top menu appears.
3Tap “RECORD SETTING”.
 TOP MENU
RECORD
OFF SETTING
CONNECTION
SETTINGS
MENU
SETUP
PLAY |
REC |
MENU |
.
0When focus is confirmed, the focusing frame disappears and E and pare displayed.
.
4Tap “FOCUS”.
RECORD SETTING
.
0Tap L to exit the menu.
0Tap J to return to the previous screen.
28

Recording
Adjusting Brightness
You can adjust the brightness to your preferred level.
1Select the Manual recording mode.
PLAY
.
0If the mode is P Intelligent Auto, tap P on the recording screen to display the mode switching screen.
Tap H to switch the recording mode to Manual.
intelligent AUTO |
MANUAL |
.
2Tap “MENU”.
PLAY REC
.
0 The top menu appears.
3Tap “RECORD SETTING”.
 TOP MENU
RECORD
OFF SETTING
CONNECTION
SETTINGS
MENU
SETUP
.
4Tap “BRIGHTNESS ADJUST”.
RECORD SETTING
.
0Tap L to exit the menu.
0Tap J to return to the previous screen.
5Tap “MANUAL”.
 BRIGHTNESS ADJUST
AUTO MANUAL
.
6Adjust the brightness value.
PLAY SET |
REC |
MENU |
.
0Compensation range: -2.0 to +2.0
0Tap 3to increase the brightness.
0Tap 2to decrease the brightness.
7Tap “SET” to confirm.
PLAY |
REC |
MENU |
.
Memo :
0 Settings can be adjusted separately for videos and still images.
29
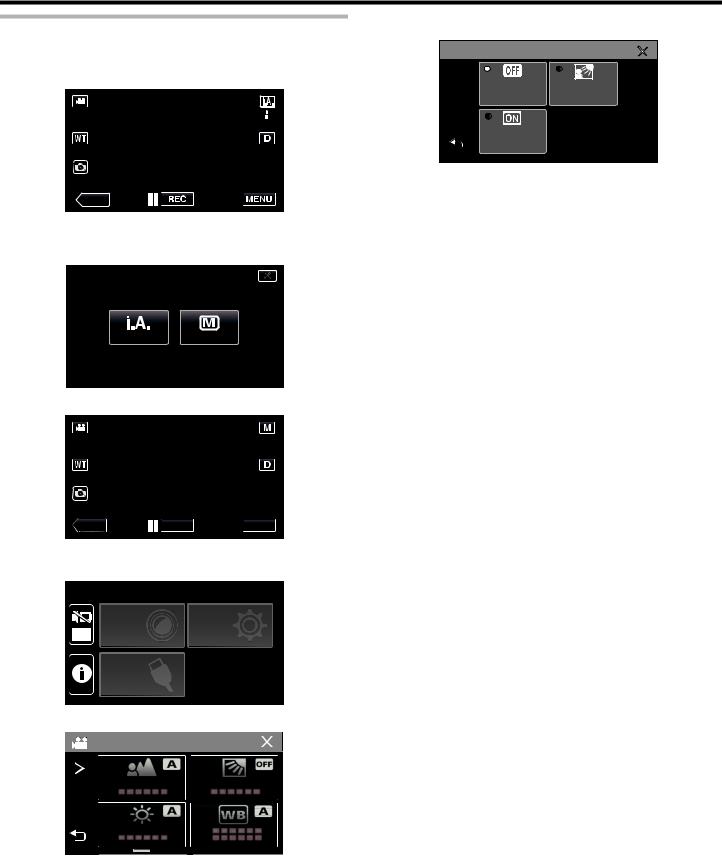
Recording
Setting Backlight Compensation
You can correct the image when the subject appears too dark due to backlight.
1Select the Manual recording mode.
PLAY
.
0If the mode is P Intelligent Auto, tap P on the recording screen to display the mode switching screen.
Tap H to switch the recording mode to Manual.
intelligent AUTO |
MANUAL |
5Tap “ON” or “ADVANCE”.
 BACKLIGHT COMP.
OFF ADVANCE
ON
.
0“ADVANCE” is designed to perform more effective backlight compensation. Choose this when the backlight compensation is not adjusted appropriately by “ON”.
0After setting, the l icon (Advance: Q) appears.
Setting |
Details |
OFF |
Backlight compensation is disabled. |
ON |
Backlight compensation is enabled. |
|
|
ADVANCE |
Should be selected for a better backlight |
|
compensation effect. |
.
2Tap “MENU”.
PLAY REC
.
0 The top menu appears.
3Tap “RECORD SETTING”.
 TOP MENU
RECORD
OFF SETTING
CONNECTION
SETTINGS
.
4Tap “BACKLIGHT COMP.”.
RECORD SETTING
MENU
SETUP
.
0Tap L to exit the menu.
0Tap J to return to the previous screen.
30
Loading...