


Document Scanner
User’s Guide
Please read this manual before using this unit. After you finish reading this manual, keep it in a safe place for future reference.

Document Scanner DR-6030C
Easy Start Guide
This manual describes the procedures for setting up the scanner for use. For details on how to use the scanner, read the after p. 1.
 Checking the Package Contents
If any of the items listed below are missing or damaged, contact your local authorized Canon dealer or service representative. Keep the package and packing materials for storing or transporting the scanner. Items included in this package are subject to change without notice.
Power Cord |
Document Eject Guide |
USB Cable |
User’s Guide |
DR-6030C |
|
|
(This Manual) |
|
|
|
|
|
|
|
|
|
|
|
|
|
|
|
|
|
|
|
|
|
|
|
|
|
|
|
|
|
|
|
|
|
|
|
|
|
|
|
|
|
|
|
|
|
|
|
|
|
|
|
|
|
|
|
|
|
|
|
|
|
|
|
|
|
|
|
|
|
|
|
|
|
|
|
|
|
|
|
|
|
|
|
|
|
|
|
|
|
|
|
|
|
|
|
|
|
|
|
|
|
|
|
|
|
|
|
|
|
|
|
|
|
|
|
DR-6030C |
Adobe Acrobat |
Warranty Card |
Registration Card |
Cleaning Cloth (1) |
|||||||||||
Setup Disc* |
Setup Disc |
(U.S.A and Canada only) |
(U.S.A and Canada only) |
|
|||||||||||
*This setup disc is inserted in this manual.
For details on the disc, refer to “About the Setup Disc”(See p. 17).
 Removing the Packing Materials
Perform the following steps to remove all the orange tape and protective materials from it. After removing them, replace the cover and unit.
1. Peel off the orange tape. |
2. Carefully open the |
3. Peel off the orange tape. |
|
document feed tray. |
|
4. Open the upper unit. |
5. Remove the packing materials. |
6. Remove the roller cover and take out the packing materials.
 Installing the Software
Install the “DR-6030C driver” to use the scanner and the “CapturePerfect 3.0” to use scanning function.
Log on to Windows with an account that has administrator privileges.
Close all other applications before installing the software.
1. Insert the DR-6030C Setup Disc into the computer’s CD-ROM drive.
The setup wizard automatically starts up when you insert the CD-ROM into the CD-ROM drive. If the setup wizard does not start up, run the setup.exe application on the CDROM.
 For Windows Vista
When the “User Account Control” screen appears, log on as an administrator and click [OK].
2. Click [Typical Installation] and follow the |
3. After the installation click [Exit] to close the |
|||||
instructions to install the software. |
installation window. |
|||||
|
|
|
|
|
|
|
|
|
|
|
|
|
|
|
|
|
|
|
|
|
|
|
|
|
|
|
|
Do not grab this protrusion.
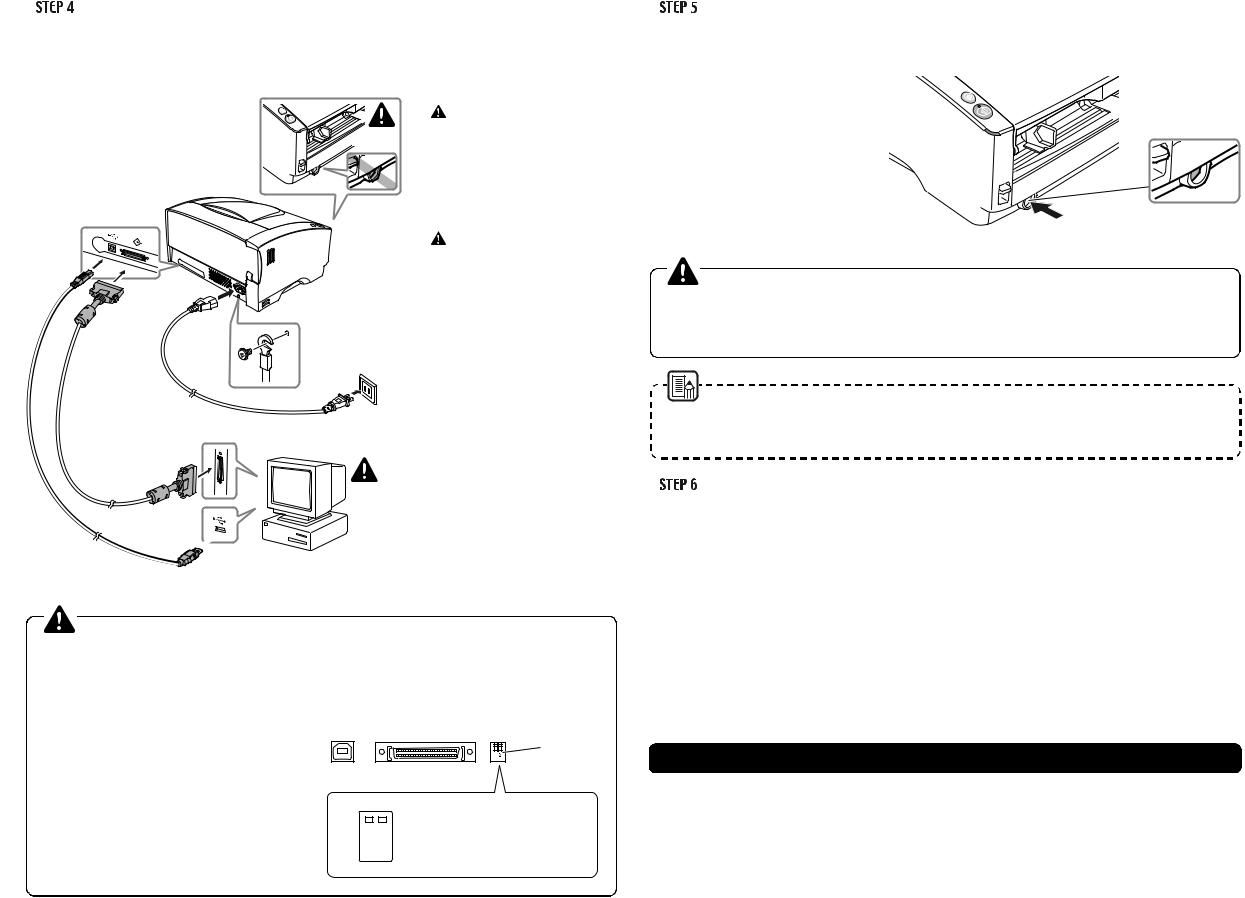
Connecting the Scanner to Your PC
Connect the scanner with the following 1 to 5 procedures. The scanner can be connected to a computer in two ways. Select a connection method appropriate to your computing environment.
•“USB connection”…connecting to a standard USB port on the computer.
•“SCSI connection”…connecting an SCSI card to one of the computer's expansion slots.
1. |
1. |
Turn OFF the scanner. |
|
|
|||
Turn OFF |
2. Plug the power cord into the |
||
|
|
power connector of the scanner. |
|
|
3. Plug the power cord into the |
||
|
|
power outlet. |
|
|
4. |
Turn OFF your computer |
|
Type B |
|
(when connecting by SCSI). |
|
5. Connect the USB cable or the |
|||
2. |
|||
|
|
SCSI cable to your computer. |
|
5. SCSI cable |
3. |
(when connecting by SCSI) |
Power cord |
4. Turn OFF
(when connecting by SCSI)
Type A  5. USB cable


(when connecting by USB)
Do not use both a USB connection and an SCSI connection at the same time.
Use only the supplied power cord.
SCSI cable is not supplied. Acquire an SCSI cable beforehand that matches the shape of the connectors on your SCSI card and the scanner.
When using the scanner in a daisy chain connection with other SCSI devices, pay attention to the following points:
zThe default setting for the SCSI ID is “SCSI
ID=2.” Set the dip switches so that the |
|
|
|
|
|
|
|
|
|
|
|
|
|
|
|
|
|
|
|
|
|
|
|
|
Dip Switches |
||
scanner’s SCSI ID is different from all other |
|
|
|
|
|
|
|
|
|
|
|
|
|
|
|
|
|
|
|
|
|
|
|
|
|
|
|
|
|
|
|
|
|
|
|
|
|
|
|
|
|
SCSI devices on the chain. |
|
|
|
|
|
|
|
||||||
|
Default Position (SCSI ID=2) |
|
|
|
|
|
|||||||
zThe scanner has a built-in SCSI terminator that |
|
|
|
|
|
|
|
|
|
|
|
|
|
|
|
|
|
|
|
|
|
|
|
|
|
|
|
is permanently set to [ON]. When using the |
|
|
|
|
|
|
|
|
|
|
|
|
|
OFF |
|
|
|
|
SCSI ID |
|
SW1 |
SW2 |
|
||||
scanner in a daisy chain connection, make |
|
|
|
|
2 |
|
OFF |
OFF |
|
||||
|
|
|
|
||||||||||
sure that it is connected as the terminating |
|
ON |
|
|
|
|
3 |
|
ON |
OFF |
|
||
|
|
|
|||||||||||
device and that the terminators of all other |
1 2 |
|
4 |
|
OFF |
ON |
|
||||||
SCSI devices in the chain have been set to |
|
|
|
|
|
|
5 |
|
ON |
ON |
|
||
|
|
|
|
|
|
|
|
|
|
|
|
|
|
[OFF].
Turning On the Power (Scanner Recognition)
When you turn the scanner connected to the PC ON, the plug-and-play function recognizes the scanner, and the device driver is automatically installed.
1. Check the connection between the scanner and the computer.
2. Turn ON the scanner.
3. Turn ON your computer (when connecting by SCSI).
4. Windows recognizes the scanner and performs installation automatically.
Power Switch
ON Position
When the scanner is connected by an SCSI cable, always turn on the scanner before the computer. Turning on the computer first may prevent it from recognizing the scanner properly.
Log on to Windows with an account that has administrator privileges.
Wait at least 10 seconds before turning the scanner on again after turning it off.
z When installation is finished, a balloon help pop-up appears.
z The scanner is registered on the computer as “CANON DR-6030C USB” (or “CANON DR-6030C SCSI”) in the “Imaging Device” directory of the Device Manager.
Selecting the Scanner
You must select your scanner before using it with an ISISor TWAINcompatible scanning application or “CapturePerfect 3.0” installed on step 3.
When you select your scanner with the “Using CapturePerfect 3.0.” (p. 32)
If you use another application, refer to the manual for your scanning application when selecting the scanner.
The setup is now complete.
FCC REGULATIONS (For 120 V model)
Document Scanner, Model M111061
This device complies with Part 15 of the FCC Rules. Operation is subject to the following two conditions:
(1) This device may not cause harmful interference, and (2) this device must accept any interference received, including interference that may cause undesired operation.
Note: This equipment has been tested and found to comply with the limits for a Class B digital device, pursuant to Part 15 of the FCC Rules. These limits are designed to provide reasonable protection against harmful interference in a residential installation. This equipment generates, uses, and can radiate radio frequency energy and, if not installed and used in accordance with the instructions, may cause harmful interference to radio communications. However, there is no guarantee that interference will not occur in a particular installation. If this equipment does cause harmful interference to radio or television reception, which can be determined by turning the equipment off and on, the user is encouraged to try to correct the interference by one or more of the following measures:
-Reorient or relocate the receiving antenna.
-Increase the separation between the equipment and receiver.
-Connect the equipment into an outlet on a circuit different from that to which the receiver is connected.
-Consult the dealer or an experienced radio/TV technician for help.
Use of shielded cable is required to comply with class B limits in Subpart B of Part 15 of FCC Rules.
Do not make any changes or modifications to the equipment unless otherwise specified in the manual. If such changes or modifications should be made, you could be required to stop operation of the equipment.
Canon U.S.A. Inc.
One Canon Plaza, Lake Success NY 11042, U.S.A.
Tel. No. (516)328-5600
RADIO INTERFERENCE REGULATIONS (For 120 V models)
This digital apparatus does not exceed the Class B limits for radio noise emissions from digital apparatus as set out in the Interference-causing equipment standard entitled “Digital Apparatus”, ICES-003 of the Industry Canada.
RÈGLEMENT SUR LE BROUILLAGE RADIOÉLECTRIQUE (For 120 V models)
Cet appareil numérique respecte les limites de bruits radioélectriques applicables aux appareils numériques de Classe B prescrites dans la norme sur le matériel brouilleur: “Appareils Numériques”, NMB-003 édictée par l’Industrie Canada.
MODEL NAMES
The following names may be provided for the sefety regulations in each sales region of this Document Scanner.
Model DR-6030C: M111061
i
READ CAREFULLY BEFORE OPENING THE SEALED DISK PACKAGE
CANON SOFTWARE LICENSE AGREEMENT
IMPORTANT-READ THIS AGREEMENT BEFORE OPENING THE SEALED DISK PACKAGE! BY OPENING THE SEALED DISK PACKAGE, YOU ARE DEEMED TO AGREE TO BE BOUND BY THIS AGREEMENT.
This legal document is a license agreement between you and Canon Electronics Inc. (“Canon”). BY OPENING THE SEALED DISK PACKAGE, YOU ARE DEEMED TO AGREE TO BE BOUND BY THE TERMS OF THIS AGREEMENT. IF YOU DO NOT AGREE TO THE TERMS OF THIS AGREEMENT, DO NOT OPEN THE SEALED DISK PACKAGE AND PROMPTLY RETURN THE CANON SCANNER, THE DISK PACKAGE CONTAINING SCANNER DRIVER SOFTWARE PROGRAMS AND/OR SCANNER UTILITY SOFTWARE PROGRAM PROPRIETARY TO CANON OR ITS LICENSOR (THE “SOFTWARE”) AND THE ACCOMPANYING DOCUMENTATION AND OTHER ITEMS TO THE PLACE WHERE YOU OBTAINED THEM FOR A REFUND BEFORE THEY ARE USED OR OPENED OR UNPACKED.
In consideration of the right to use the SOFTWARE, you agree to abide by the terms and conditions of this Agreement.
1. GRANT OF LICENSE: Canon grants you the personal, non-exclusive right to use the SOFTWARE only on a single computer. You shall need to obtain multiple licenses separately from Canon when you shall install the SOFTWARE on multiple computers.
You shall not assign, sublicense, sell, rent, lease, loan, convey or transfer to any third party, or send or bring the SOFTWARE out of the country where you originally obtain it to other countries without required authorization of applicable governments, or copy, duplicate, translate or convert to another programming language the SOFTWARE or accompanying documentation, except as expressly provided herein.
Except as expressly permitted under the applicable law, you shall not alter, modify, disassemble, decompile or otherwise reverse engineer the SOFTWARE or accompanying documentation and you also shall not have any third party do so.
2.BACK-UP COPY: You may make one copy of the SOFTWARE solely for a back-up purpose or copy the SOFTWARE onto the permanent storage device (e.g. a hard disk) of your computer and retain the original for a back-up purpose. Except as expressly permitted under the applicable law, any other copying of the SOFTWARE is a violation of this Agreement. You must reproduce and include the copyright notice on the back-up copy.
3.SUPPORT AND UPDATE: Canon, Canon’s affiliate, their distributor or dealer is not responsible for maintaining or helping you to use the SOFTWARE. No updates, fixes or support will be made available for the SOFTWARE.
4.LIMITED WARRANTY AND DISCLAIMER OF INDEMNITY: Canon, Canon’s affiliate, their distributor or dealer will not guarantee uninterrupted service, or absence or correction of errors. Therefore, the SOFTWARE is licensed on an “AS IS” basis without warranty of any kind. The diskette on which the SOFTWARE is recorded is warranted against defective material or workmanship under normal use for a period of ninety (90) days from the date you purchased the same as evidenced by a receipt or otherwise. The limited warranty does not apply if the failure of the diskette resulted from accident, abuse or misapplication of the SOFTWARE and shall not extend to anyone other than the original user of the SOFTWARE.
CANON, CANON’S AFFILIATE, THEIR DISTRIBUTOR OR DEALER DISCLAIMS ALL IMPLIED WARRANTIES, INCLUDING ANY WARRANTY OF MERCHANTABILITY OR FITNESS FOR A PARTICULAR PURPOSE, WITH RESPECT TO THE SOFTWARE OR ACCOMPANYING DOCUMENTATION.
NEITHER CANON, CANON’S AFFILIATE, THEIR DISTRIBUTOR NOR DEALER IS LIABLE FOR ANY LOSS OR DAMAGE INCLUDING CONSEQUENTIAL OR INCIDENTAL LOSS OR DAMAGE SUCH AS LOSS OF PROFITS, EXPENSE OR INCONVENIENCE, WHATSOEVER CAUSED BY OR ARISING OUT OF THE SOFTWARE, ACCOMPANYING DOCUMENTATION OR THE USE THEREOF.
CANON, CANON’S AFFILIATE, THEIR DISTRIBUTOR OR DEALER SHALL HAVE NO OBLIGATION TO INDEMNIFY YOU AGAINST ANY CLAIM OR SUIT BROUGHT BY A THIRD PARTY ALLEGING THAT THE SOFTWARE, ACCOMPANYING DOCUMENTATION OR THE USE THEREOF INFRINGES ANY INTELLECTUAL PROPERTY OF SUCH THIRD PARTY.
THE ABOVE IS CANON’S ENTIRE LIABILITY AND YOUR EXCLUSIVE REMEDY IN CONNECTION WITH THE SOFTWARE AND ACCOMPANYING DOCUMENTATION.
5.TERM: This Agreement is effective upon opening the sealed disk package and remains in effect until terminated. You may terminate this Agreement by destroying the SOFTWARE and any copy thereof. This Agreement will also terminate if you fail to comply with any of the terms of this Agreement. In addition to Canon enforcing its respective legal rights, you must then promptly destroy the SOFTWARE and any copy thereof.
6.U.S. GOVERNMENT RESTRICTED RIGHTS NOTICE: The SOFTWARE is provided with RESTRICTED RIGHTS. Use, duplication or disclosure is subject to restrictions as set forth in either subparagraph (c) (1) (ii) of the Rights in Technical Data and Computer Software clause at DFARs 252.227-7013 or subparagraph (c) (1) and (2) of the Commercial Computer Software Restricted Rights Clause at FAR 52.227-19, as applicable.
7.SEVERABILITY: In the event that provision of this Agreement is declared or found to be illegal by any court or tribunal of competent jurisdiction, such provision shall be null and void with respect to the jurisdiction of that court or tribunal and all the remaining provisions of this Agreement shall remain in full force and effect.
8.ACKNOWLEDGEMENT: BY OPENING THE SEALED DISK PACKAGE, YOU ACKNOWLEDGE THAT YOU HAVE READ THIS AGREEMENT, UNDERSTOOD IT, AND AGREE TO BE BOUND BY ITS TERMS AND CONDITIONS. YOU ALSO AGREE THAT THIS AGREEMENT IS THE COMPLETE AND EXCLUSIVE STATEMENT OF AGREEMENT BETWEEN YOU AND CANON CONCERNING THE SUBJECT MATTER HEREOF AND SUPERSEDES ALL PROPOSALS OR PRIOR AGREEMENTS, VERBAL OR WRITTEN, AND ANY OTHER COMMUNICATIONS BETWEEN YOU AND CANON RELATING TO THE SUBJECT MATTER HEREOF. NO AMENDMENT TO THIS AGREEMENT SHALL BE EFFECTIVE UNLESS SIGNED BY A DULY AUTHORIZED REPRESENTATIVE OF CANON.
Should you have any questions concerning this Agreement, or if you desire to contact Canon for any reason, please write to Canon’s local affiliate.
ii

International ENERGY STAR Program
As an ENERGY STAR® Partner, Canon Electronics Inc., has determined that this machine meets the ENERGY STAR® Program guidelines for energy efficiency.
The International ENERGY STAR® Office Equipment Program is an international program that promotes energy saving through the use of computers and other office equipment. The program backs the development and dissemination of products with functions that effectively reduce energy consumption. It is an open system in which business proprietors can participate voluntarily. The targeted products are office equipment, such as computers, monitors, printers, fax, machine, copiers, and scanners. The standards and logos are uniform among participating nations.
Under factory default settings, the scanner will enter Sleep Mode after 10 seconds of inactivity. Although you can change the period of time before the scanner enters Sleep Mode to up to 240 minutes, we recommend using the default setting.
Trademarks
•Canon and the Canon logo are registered trademarks of Canon Inc. in the United States and may also be trademarks or registered trademarks in other countries.
•Microsoft and Windows are registered trademarks of Microsoft Corporation in the United States and other countries.
•ISIS is a trademark of EMC Corporation, in the United States.
•Intel and Pentium are registered trademarks of Intel Corporation.
•ENERGY STAR® is a U.S. registered mark.
•Adobe is the registered trademark of Adobe Systems Incorporated in the United States and/or other countries.
•Adaptec is registered trademark of Adaptec Inc.
•Other product and company names herein may be the trademarks of their respective owners.
Copyright
Copyright 2010 by CANON ELECTRONICS INC. All rights reserved.
No part of this publication may be reproduced or transmitted in any form or by any means, electronic or mechanical, including photocopying and recording, or by any information storage or retrieval system without the prior written permission of CANON ELECTRONICS INC.
Disclaimers
The information in this document is subject to change without notice.
CANON ELECTRONICS INC. MAKES NO WARRANTY OF ANY KIND WITH REGARD TO THIS MATERIAL, EITHER EXPRESS OR IMPLIED, EXPECT AS PROVIDED HERE IN, INCLUDING WITHOUT LIMITATION, THERE OF, WARRANTIES AS TO MARKETABILITY, MERCHANTABILITY, FITNESS FOR A PARTICULAR PURPOSE OF USE OR NON-INFRINGEMENT. CANON ELECTRONICS INC. SHALL NOT BE LIABLE FOR ANY DIRECT, INCIDENTAL, OR CONSEQUENTIAL DAMAGES OF ANY NATURE, OR LOSSES OR EXPENSES RESULTING FROM THE USE OF THIS MATERIAL.
iii

INTRODUCTION
Thank you for purchasing the Canon DR-6030C document scanner. Please read this manual thoroughly before using the machine to familiarize yourself with its capabilities, and to make the most of its many functions. After reading this manual, store it in a safe place for future reference.
Manuals for the Scanner
The DR-6030C Scanner has a User’s Guide (this manual) included in the package, a CapturePerfect 3.0 Operation Guide, and Online Help.
For details on checking the packing list, software installation, computer connections, and scanner setup, see the Easy Start Guide on foldout page in this manual. For details on preparing the scanner, and details on scanning and how to handle the scanner, see the User’s Guide.
The following describes the manuals packaged with the scanner. Before you start using the scanner, be sure to read this User’s Guide.
Easy Start Guide (foldout page in this manual)
This manual describes the procedure for removing the scanner from its box through to setting up the scanner for scanning.
User’s Guide (this manual)
This manual describes the basic operations for using the scanner, performing routine maintenance, and troubleshooting, and provides the scanner specifications.
CapturePerfect 3.0 Operation Guide (PDF manual)
CapturePerfect 3.0 and its Operation Guide are both installed on your computer with CapturePerfect 3.0 Operation Guide. (See p. 34.)
INTRODUCTION 1

Symbols Used in This Manual
The following symbols are used in this manual to explain procedures, restrictions, handling precautions, and instructions that should be observed for safety.
WARNING
Indicates a warning concerning operations that may lead to death or injury to persons if not performed correctly. To use the machine safely, always pay attention to these warnings.
CAUTION
Indicates a caution concerning operations that may lead to injury to persons, or damage to property if not performed correctly. To use the machine safely, always pay attention to these cautions.
 IMPORTANT
Indicates operational requirements and restrictions. Be sure to read these items carefully to operate the machine correctly, and avoid damage to the machine.
 Note
Note
Indicates a clarification of an operation, or contains additional explanations for a procedure. Reading these notes is highly recommended.
2 INTRODUCTION

Contents |
|
Easy Start Guide .......................................................... |
Foldout |
INTRODUCTION ...................................................................... |
1 |
Manuals for the Scanner ............................................................... |
1 |
Symbols Used in This Manual ....................................................... |
2 |
Chapter 1 Before Using the Scanner ................................. |
5 |
1. Important Safety Instructions ..................................................... |
6 |
Installation Location ................................................................ |
6 |
Power ...................................................................................... |
7 |
Moving the Scanner ................................................................ |
7 |
Handling .................................................................................. |
8 |
Disposal .................................................................................. |
9 |
2. Features of the DR-6030C Document Scanner ....................... |
10 |
3. Names and Functions of Parts ................................................ |
13 |
4. Installation Requirements ........................................................ |
15 |
5. About the Setup Disc ............................................................... |
17 |
Chapter 2 Using the Scanner ............................................ |
19 |
1. Documents ............................................................................... |
20 |
2. Preparing the Trays ................................................................. |
22 |
Setting Up the Document Feed Tray .................................... |
22 |
Document Eject Tray ............................................................ |
23 |
Installing the Document Eject Guide ..................................... |
25 |
3. Placing Documents .................................................................. |
27 |
How to Feed with the Page Separation Mode ...................... |
27 |
How to Feed with the Bypass Mode ..................................... |
30 |
4. Scanning Documents ............................................................... |
32 |
Using CapturePerfect 3.0 ...................................................... |
32 |
Starting CapturePerfect 3.0 with the Start Button ................. |
40 |
Before using Adobe Acrobat 9.0 ........................................... |
45 |
5. Using Patchcode Sheets ......................................................... |
47 |
About Patchcode Sheets ...................................................... |
48 |
Patchcode Pattern Function .................................................. |
49 |
How to Use Patchcode Sheets ............................................. |
49 |
6. Clearing a Paper Jam .............................................................. |
51 |
7. Other Functions ....................................................................... |
54 |
Double Feed Detection Function .......................................... |
54 |
Skew Detection Function ...................................................... |
55 |
Long Document Mode ........................................................... |
55 |
Standby Mode Settings ......................................................... |
61 |
MultiStream Function ............................................................ |
62 |
Contents 3

Chapter 3 |
Software Setup ................................................. |
63 |
1. ISIS/TWAIN Driver Properties Dialog Box ............................... |
64 |
|
[Basic] Tab Sheet .................................................................. |
65 |
|
[Brightness] Tab Sheet ......................................................... |
74 |
|
[Image processing] Tab Sheet .............................................. |
78 |
|
[Others] Tab Sheet ................................................................ |
81 |
|
[Addon] Dialog Box ............................................................... |
85 |
|
2. Practical Examples .................................................................. |
92 |
|
Scanning Both Sides of Pages ............................................. |
92 |
|
Scanning Non-Standard-Size Documents ............................ |
93 |
|
Adjusting the Scan Area ....................................................... |
93 |
|
Scanning Multiple Documents .............................................. |
94 |
|
Image Adjustments for Scanning .......................................... |
96 |
|
Prescan ................................................................................. |
99 |
|
Preserving Your Settings ...................................................... |
99 |
|
Chapter 4 |
Appendices ..................................................... |
101 |
1. Regular Maintenance ............................................................. |
102 |
|
Cleaning the Scanner ......................................................... |
102 |
|
Cleaning the feed path ........................................................ |
102 |
|
Cleaning the Sensor Glass, Shading Boards, |
|
|
and the Rollers .................................................................... |
103 |
|
Cleaning the Shading Boards ............................................. |
106 |
|
2. Removing and Attaching the Rollers ..................................... |
108 |
|
Roller Replacement Cycle .................................................. |
108 |
|
Resetting the Counter ......................................................... |
109 |
|
Removing and Attaching the Pickup Roller ......................... |
113 |
|
Removing and Attaching the Feed Roller ........................... |
116 |
|
Removing and Attaching the Retard Roller ......................... |
119 |
|
3. Troubleshooting ..................................................................... |
123 |
|
4. Uninstalling Software ............................................................. |
131 |
|
5. Specifications ......................................................................... |
134 |
|
Specifications ...................................................................... |
134 |
|
Options ................................................................................ |
136 |
|
Replacement parts .............................................................. |
136 |
|
External Dimensions ........................................................... |
137 |
|
Index .................................................................................... |
|
138 |
4 Contents
Chapter 1
Before Using the Scanner
1. |
Important Safety Instructions .............. |
6 |
|
Installation Location ..................................... |
6 |
|
Power .......................................................... |
7 |
|
Moving the Scanner .................................... |
7 |
|
Handling ...................................................... |
8 |
|
Disposal ....................................................... |
9 |
2. |
Features of the DR-6030C Document |
|
|
Scanner ............................................... |
10 |
3. |
Names and Functions of Parts .......... |
13 |
4. |
Installation Requirements .................. |
15 |
5. |
About the Setup Disc ......................... |
17 |
1. Important Safety Instructions
To ensure the safe operation of this scanner, be sure to read the safety warnings and precautions described below.
Installation Location
The performance of this scanner is affected by the environment in which it is installed. Make sure that the location where the scanner is installed meets the following environmental requirements.
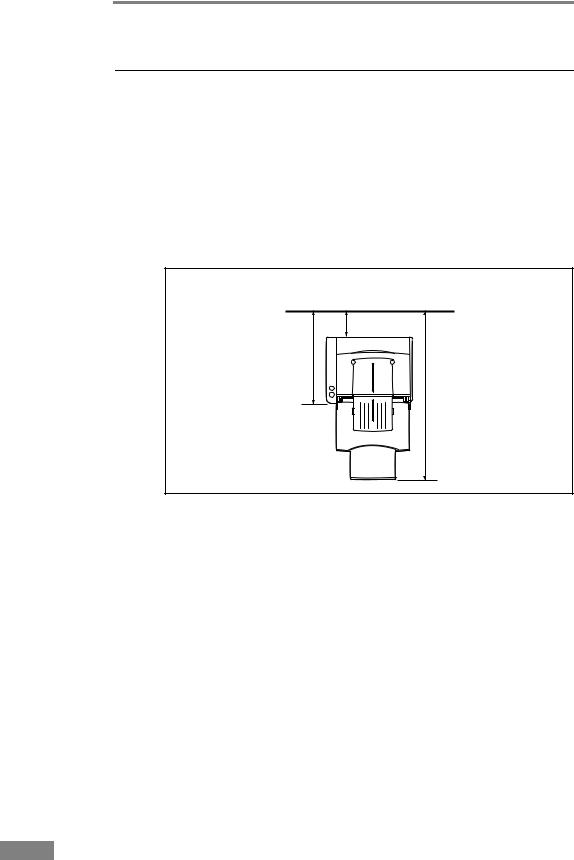
• Provide adequate space around the scanner for operation and maintenance.
At least 3.9" (100 mm) when eject tray is empty.
17.7" (450 mm) |
|
when the document |
|
feed tray and |
29.5" (750 mm) |
document feed tray |
|
extension are |
when the document |
closed. |
feed tray and |
|
document feed tray |
|
extension are |
|
open. |
•If scanned documents are ejected to the back of the scanner, provide adequate space behind the scanner for documents ejected after being scanned. (See “Document Eject Tray,” on p. 23.)
•Avoid installing the machine in direct sunlight. If this is unavoidable, use curtains to shade the scanner.
•Avoid locations where a considerable amount of dust accumulates.
•Avoid warm or humid locations, such as in the vicinity of a water faucet, water heater, or humidifier, and avoid locations where the fumes from ammonia, paint thinner, or other volatile chemicals may be present.
•Avoid locations where ammonia gas is emitted.
•Avoid locations near volatile or flammable materials, such as alcohol or paint thinner.
•Avoid locations that are subject to vibration.
•Avoid exposing the scanner to rapid changes in temperature. If the room in which the scanner is installed is cold but rapidly heated, water droplets (condensation) may form inside the scanner. This may result in a noticeable degradation in scanning quality.
6 Before Using the Scanner

The following conditions are recommended for optimal scanning quality:
Room temperature: |
10 °C to 32.5 °C (50 °F to 90.5 °F) |
Humidity: |
20% to 80% RH |
•Avoid installing the scanner near equipment that generates a magnetic field (e.g. speakers, televisions, or radios).
Power
•Connect only to a power outlet of the rated voltage and power supply frequency. (either 120 V, 60 Hz or 220-240 V, 50/60 Hz depending on your region)
•Do not use a power supply that is not rated for the specified voltage. Doing so might cause fire or electric shock.
•Do not connect other electrical equipment to the same power outlet to which the scanner is connected. Also, when using an extension cord, make sure that the extension cord is rated for the current requirements of the scanner.
•The power cord may become damaged if they are often stepped on or if heavy objects are placed on them. Continued use of a damaged power cord can lead to an accident, such as a fire or electrical shock.
•Do not use the power cord while it is coiled.
•Do not pull directly on the power cord. When disconnecting the power cord, grasp the plug and remove it from the outlet.
•Keep the area around the power plug clear of objects so that the power cord can be disconnected easily in an emergency.
•If you have any questions regarding the power supply, contact your local authorized Canon dealer or service representative for further information.
Moving the Scanner
•When moving the scanner, always hold it with both hands to avoid dropping it. The scanner weighs approximately 23 lb (10.2 kg) alone.
•Make sure to disconnect the interface cable and power cord. If the scanner is transported with these items plugged in, the plugs and connectors may be damaged due to physical shock.
Chapter 1
Before Using the Scanner |
7 |
|
|
||
|
|
|

Handling
WARNING
Note the following precautions whenever using the scanner. Failure to do so may result in a fire or electric shock.
•Never use alcohol, benzene, paint thinner, aerosol sprays, or any other highly flammable substance near the scanner.
•Do not cut, damage, or modify the power cord. Do not place heavy objects on the power cord, and do not pull or excessively bend the power cord.
•Never connect the power cord when your hands are wet.
•Do not connect the scanner to a multi plug power strip.
•Do not knot or coil the power cord as this may result in a fire or electric shock. When connecting the power cord, make sure that the power plug is securely and completely inserted into the power outlet.
•Do not use power cords other than the power cord provided with this scanner.
•Never try to take the scanner apart or modify it in any way, as this is dangerous and may lead to a fire or electric shock.
•Do not use flammable aerosol sprays products near the scanner.
•When cleaning the scanner, turn the power switch OFF and disconnect the power cord from the power supply.
•Clean the scanner using a slightly dampened cloth which has been well wrung out. Never use alcohol, benzene, paint thinner, or any other flammable substances.
•If the scanner makes strange noises, or gives off, smoke, heat, or strange odors, or the scanner does not function or other abnormalities occur when you use the machine, immediately turn the power switch OFF, and disconnect the power plug from the power outlet. Then, contact your local authorized Canon dealer or the service representative for further information.
•Do not drop the scanner, or subject it to impact or strong shock. Should the scanner ever become damaged, immediately turn the power switch OFF, and disconnect the power plug from the power outlet. Then, contact your local authorized Canon dealer or service representative to have the unit serviced.
•Before moving the scanner, be sure to turn the power switch OFF, and disconnect the power plug from the power outlet.
CAUTION
•Do not install the scanner on a surface that is unstable or tilted, or in an area subject to excessive vibrations, as this may cause the scanner to fall, resulting in personal injury or damage to the scanner.
8 Before Using the Scanner

•Do not block ventilation openings. Doing so could case the scanner to overheat, creating a risk of fire.
•Never place small metal objects such as staples, paper clips, or jewelry on the scanner. These items may fall into the scanner, and cause a fire or electric shock. Should such objects ever fall inside the scanner, immediately turn the power switch OFF, and disconnect the power plug from the power outlet. Then, contact your local authorized Canon dealer or service representative to have the unit serviced.
•Do not locate the scanner in a humid or dusty location. Doing so might cause fire or electric shock.
•Do not place objects on top of the scanner. Such objects may tip or fall over, resulting in personal injury.
•When unplugging the power cord, grasp it firmly by its plug. Do not pull directly on the power cord, as this may damage or expose the cord’s internal wiring, resulting in a fire or electric shock.
•Leave sufficient space around the power plug so that it can be unplugged easily. If objects are placed around the power plug, you will be unable to unplug it in an emergency.
•Do not allow water or flammable substances (alcohol, paint thinner, benzene, etc.) to spill into the scanner, as this may result in a fire or electric shock.
•Turn OFF the power switch for safety when not using the scanner for a long period of time, such as overnight. Also, turn OFF the power switch, and disconnect the power cord from the power outlet for safety when the machine will not be used for an extended period of time, such as during consecutive holidays.
•Do not wear loose clothing or jewelry that may get caught in the scanner while you are using it. This may result in personal injury. Be extra careful of neckties and long hair. If anything becomes caught in the scanner, immediately disconnect the power cord to stop the scanner.
•Be careful when placing paper in the scanner and when removing jammed paper. It is possible to cut your hand on the edge of a sheet of paper.
Disposal
•When disposing of this scanner, be sure to follow all local ordinances and laws or consult with the retailer who sold you the scanner.
Chapter 1
Before Using the Scanner |
9 |
|
|
||
|
|
|

2.Features of the DR-6030C Document Scanner
The main features of the DR-6030C document scanner are described below.
Fast Document Feeding
The scanner can scan a maximum of 60 documents per minute in a range of sizes from business cards to A3 size. (Scanning conditions: Black and white, LTR/A4 size portrait, two sided, 200 dpi.)
USB/SCSI interface supported
USB interface that was provided as standard on your computer and SCSI extension cards are both supported. (See “Installation Requirements,” on p. 15.)
Color/Grayscale Support
Documents can be scanned in 24-bit color or 256-level grayscale.
Supports a Variety of Scanning Modes
The scanner supports the following scanning modes, depending on the document type:
•Single-sided/double-sided mode
•Single sheet/dual feeding path
U-Turn Path
Documents are fed and ejected from the front of the scanner. (See “Document Eject Tray,” on p. 23.)
Straight Path
Documents are ejected to the back of the scanner. Note, the ejected documents are stacked in reverse order to how they were fed. (See “Document Eject Tray,” on p. 23.)
Paper Size Detection
The scanner automatically detects the size of a scanned document and eliminates any unnecessary space around the edges of the image when storing it, even when storing a document of irregular size. (See “Page Size,” on p. 68.)
Double Feed Detection
The scanner stops feeding documents after detecting more than one document being fed at the same time. (See “Double Feed Detection Function,” on p. 54.)
Skew Detection
The scanner stops feeding documents after detecting skewed document hitting the edges of the document feed opening. (See “Skew Detection Function,” on p. 55.)
10 Before Using the Scanner

Deskew |
1 |
|
Chapter |
||
The scanner straightens an image after detecting an image on a document |
||
|
||
that was loaded askew. (See “[Deskew] Check Box,” on p. 70.) |
|
|
Auto Color Detection |
|
|
The scanner detects whether the scanned document is in color or black-and- |
|
|
white, and save the image accordingly. (See “[Auto Color Detection],” on |
|
|
p. 66.) |
|
|
Card Scan |
|
|
It is possible to scan business card. (See “Documents,” on p. 20.) |
|
|
Character Orientation Detector |
|
|
Identifies the orientation of characters in a document, and rotates the image |
|
|
so the orientation of the scanned characters is straight. (See “[Text |
|
|
Orientation Recognition] Check Box,” on p. 79.) |
|
|
Advanced Text Enhancement |
|
|
Documents with dark backgrounds or documents with faint text written in |
|
|
pencil can be scanned clearly. (See “Mode,” on p. 66.) |
|
|
* This function sometimes does not function effectively on some |
|
|
documents. |
|
|
Dropout Color |
|
|
The scanner is equipped with a Dropout Color function that allows you to |
|
|
specify a color for the scanner to omit from scanned images. (See “Color |
|
|
Drop-Out,” on p. 80.) |
|
|
Auto Start |
|
|
The scanner is equipped with an Auto Start function that automatically |
|
|
initiates scanning when a document is placed in the document feed tray. |
|
|
(See “Feeding Option,” on p. 83.) |
|
|
Skip Blank Page Function |
|
|
The scanner is equipped with a Skip Blank Page function that allows it to |
|
|
scan a document regardless of whether every document is two-sided or |
|
|
onesided. (See “Scanning Side,” on p. 69.) |
|
|
Prescan Function |
|
|
The scanner is equipped with a Prescan function that allows you to adjust |
|
|
the contrast and brightness of a prescanned image and then send the |
|
|
adjusted image to the application software, without needing to scan the |
|
|
document again. (See “ [Prescan] Check Box,” on p. 84 and “Prescan,” on |
|
|
p. 99.) |
|
|
MultiStream Function |
|
|
The scanner supports MultiStream, which, according to the application, can |
|
|
create two images with different scanning conditions from one image. |
|
|
However, this function can only be used when the software supports |
|
|
MultiStream. (See “MultiStream Function,” on p. 62.) |
|
Before Using the Scanner |
11 |
|
|
||
|
|
|

Remove Binder Holes
Deletes black spots left when scanning documents that have had holes punched in them to be stored in a binder. (See “[Border Removal] Check Box,” on p. 79.)
Long Paper Compatibility
You can scan documents that are a maximum of 118.1 inches (3000 mm) long by setting the scanner in the Long document mode. (See “Long Document Mode,” on p. 55.)
Compatible with Carbonless Duplicating Paper
The scanner is able to scan carbonless duplicating paper.
Energy Saving Mode
This scanner is compatible with the International Energy Star Program, and is designed to save power by using the energy saving feature except when scanning is being performed. (See “Standby Mode Settings,” on p. 61.)
 Note
Note
Some functions may not be available depending on the software you are using.
12 Before Using the Scanner
3. Names and Functions of Parts
This section describes the name and function of each part. Make sure to read this section and familiarize yourself with the parts of the scanner before using the scanner.
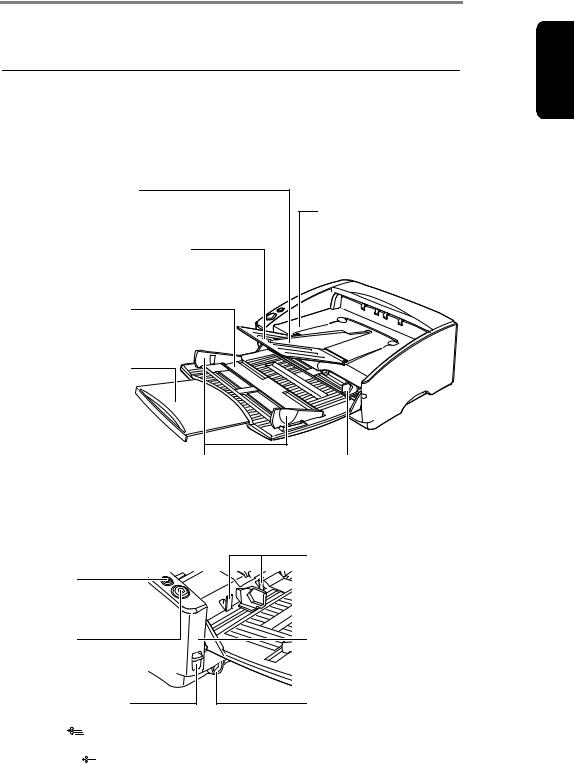
Front (Feed Tray Open)
Document Eject Guide
Attach it to prevent thin or long documents from jamming when being scanned. (See p. 25.)
Document Eject Tray Extension
Open if the document extends beyond the edge of the eject tray. (See p. 24.)
Document Feed Tray
Place the document to be scanned here. (See p. 22.)
Document Feed Tray Extension
Pull this tray out if the document hangs over the edge of the main tray. (See p. 22.)
Document Guides
Adjust them to align with the width of the document. (See p. 28 and p. 30.)
Document Eject Tray 1
Scanned documents are ejected here. (See p. 23.)
Document Guides 2
Adjust them to align with the width of the document. (See p. 28 and p. 30.)
Controls
|
Document Stoppers |
|
Stop Button |
Moves up and down |
|
according to the paper feed |
||
Push it to stop scanning. |
||
switch lever. (See p. 27 and |
||
|
p. 30.) |
Start Button |
|
Power Indicator |
Push it to start scanning. |
This indicator lights when |
|
|
|
the scanner is turned ON. |
Feed Selection Lever |
Power Switch |
|
Use it to change the way the documents are fed. |
This switch is used to turn |
|
Move it up ( |
) to continuously feed documents |
the scanner on. |
(page separation mode). (See p. 27.) |
|
|
Move it down ( |
) to feed documents one at a time or |
|
to feed documents that are fastened together, such as |
|
|
invoices, without separating them (bypass mode). |
|
|
(See p. 30.) |
|
|
Chapter 1
Before Using the Scanner |
13 |
|
|
||
|
|
|
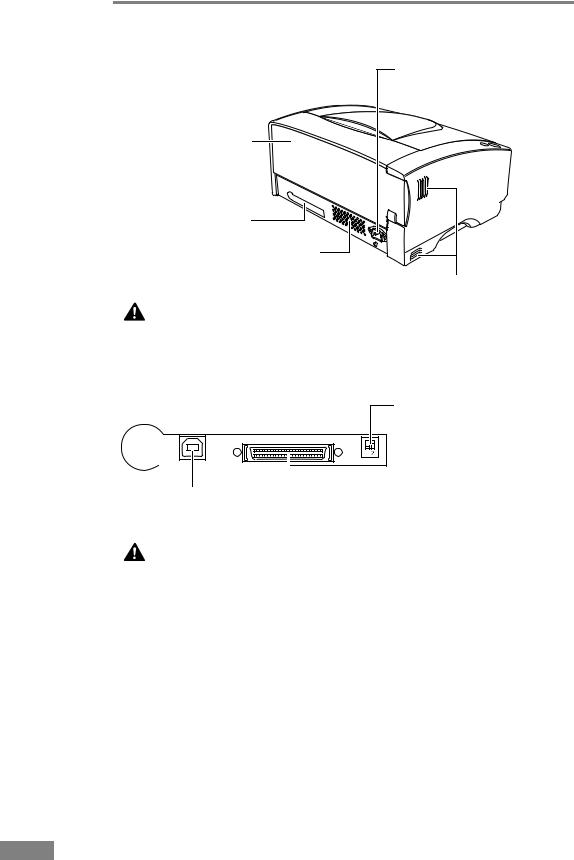
Rear
Power Connector
Connect to the power cord.
Document Eject Tray 2
Switch the direction documents are eject by opening or closing this tray. (See p. 23 and p. 24.)
Interface
Ventilation Openings
Ventilation Openings
CAUTION
Do not block the ventilation openings. Doing so could cause the scanner to overheat, creating a risk of fire.
Interfaces
DIP Switches
Set the SCSI ID. (See “Step 4,
Connecting the Scanner to your
PC,” in the Easy Start Guide.)
|
|
|
|
|
|
USB Connector |
|
|
|||
SCSI Connector |
|||||
Connect the USB cable. |
Connect to a 50-pin half-pitch (pin type) |
||||
|
|
|
|
SCSI cable. |
|
CAUTION
Do not connect both a USB cable and a SCSI cable at the same time. Doing so may cause a malfunction.
14 Before Using the Scanner
4. Installation Requirements
To use the DR-6030C, your computer must satisfy the following system requirements.
•One of the following operating systems:
-Microsoft Windows XP Professional SP3 or later
-Microsoft Windows XP Home Edition SP3 or later
-Microsoft Windows XP Professional x64 Edition SP2 or later
-Microsoft Windows Vista Home Basic SP2 or later
-Microsoft Windows Vista Home Premium SP2 or later
-Microsoft Windows Vista Business SP2 or later
-Microsoft Windows Vista Ultimate SP2 or later
-Microsoft Windows Vista Enterprise SP2 or later
-Microsoft Windows 7 Home Premium x32 Edition/x64 Edition
-Microsoft Windows 7 Professional x32 Edition/x64 Edition
-Microsoft Windows 7 Ultimate x32 Edition/x64 Edition
•A computer that meets the following specifications:
-CPU: Celeron M, 1.4 GHz or faster
-Memory: 512 MB or more
-Hard disk: 1 GB or more available space
-USB interface or SCSI board
-Monitor: Resolution of 1024 × 768 (XGA) or better recommended.
•USB interface complies with the following:
-Hi-Speed USB 2.0/USB Full-Speed (equal to USB 1.1)
•Use the following recommended SCSI cards with the scanner. SCSI cards made by Adaptec (for PCI bus)
-AVA-2915LP
-AVA-2930LP
SCSI card made by RATOC Systems (for Card bus)
- REX-CB31
•An ISIS-compatible application or a TWAIN-compatible application that is compatible with the above operating systems.
 IMPORTANT
•If you do not know the requirements for your computer system, contact the store where you purchased the computer or the manufacturer of the computer for more information.
•Do not connect both a USB interface and a SCSI card at the same time.
•Note the following points when using the USB interface that was provided as standard with your computer.
-Use the most recently available USB 2.0 driver provided by Microsoft. Contact your local authorized Canon dealer for more detailed information.
Chapter 1
Before Using the Scanner |
15 |
|
|
||
|
|
|

-Not all USB interfaces provided as standard with personal computers are guaranteed. Contact your local authorized Canon dealer for more detailed information.
-Scanning speeds are lower if your computer’s standard USB interface is USB Full-Speed (equal to USB 1.1).
-The USB cable you are using should be the one originally bundled with the scanner or a Hi-Speed USB 2.0 compatible cable.
•Note the following points when using a SCSI card.
-Be sure to use the procedure in the manual for the SCSI card and the computer that you are using when installing a SCSI card in your computer.
-The overall length of the SCSI cable you can use is determined by the SCSI standards. Refer to the manual for the SCSI card you are using for more information.
-When using the ASC-19160 SCSI card in Windows XP, make sure that your driver version is 6.2.0.0 or later. Download the driver from the Adaptec Web site if necessary.
•If the CPU, memory, interface card, and other specifications do not satisfy the installation requirements, the scanning speed may be greatly reduced and transmission may take a long time.
•Even if the computer satisfies the recommended specifications, the scanning speed may vary, depending on the scan settings.
•The ISIS/TWAIN Drivers provided with the scanner do not necessarily operate on all ISISor TWAIN-compatible applications. For details, contact your application software retailer.
CAUTION
Precautions for Use in 64-bit Operating Systems
•The ISIS/TWAIN driver supplied with this product supports scanning with 32-bit applications only.
•Even with 32-bit applications, not all ISIS/TWAIN compliant applications are guaranteed to operate.
•Scanning speed may vary depending on the specifications of your computer.
Installing the Software
Follow the installation procedure in the supplied manual to install the software. When following the procedure, substitute any differences in terminology with the user interface and folder names that are appropriate for your operating system.
16 Before Using the Scanner

5. About the Setup Disc
The Canon DR-6030C scanner setup disc contains the software listed below:
•DR-6030C Driver
Scanner driver for use with the DR-6030C scanner.
•CapturePerfect 3.0
ISIS-compatible application developed for Canon document scanners.
 Note
Note
The following shows how the DR-6030C setup disc is configured.
For instructions on how to install the software included on the setup disc, see the Easy Start Guide.
Menu screen |
|
Typical Installation |
|
|
|
|
|
|
|
|
* All of the indicated software is installed. |
|
|
|
|
|
|
Read the manual |
|
|
Custom Installation |
||
|
|
|
|
|
|
* The “Easy Start Guide”, “User’s Guide” |
* Only the software selected in the |
and “CapturePerfect 3.0 operation |
checkboxes is installed. |
guide” provided with the scanner. |
|
Chapter 1
Before Using the Scanner |
17 |
|
|
||
|
|
|

18 Before Using the Scanner

Chapter 2
Using the Scanner
1. |
Documents .......................................... |
20 |
2. |
Preparing the Trays ............................ |
22 |
|
Setting Up the Document Feed Tray ......... |
22 |
|
Document Eject Tray ................................. |
23 |
|
Installing the Document Eject Guide ......... |
25 |
3. |
Placing Documents ............................ |
27 |
|
How to Feed with the Page Separation |
|
|
Mode ......................................................... |
27 |
|
How to Feed with the Bypass Mode .......... |
30 |
4. |
Scanning Documents ......................... |
32 |
|
Using CapturePerfect 3.0 .......................... |
32 |
|
Starting CapturePerfect 3.0 with the Start |
|
|
Button ........................................................ |
40 |
|
Before using Adobe Acrobat 9.0 ............... |
45 |
5. |
Using Patchcode Sheets .................... |
47 |
|
About Patchcode Sheets ........................... |
48 |
|
Patchcode Pattern Function ...................... |
49 |
|
How to Use Patchcode Sheets .................. |
49 |
6. |
Clearing a Paper Jam ......................... |
51 |
7. |
Other Functions .................................. |
54 |
|
Double Feed Detection Function ............... |
54 |
|
Skew Detection Function ........................... |
55 |
|
Long Document Mode ............................... |
55 |
|
Standby Mode Settings ............................. |
61 |
|
MultiStream Function ................................ |
62 |

1. Documents
This scanner can scan documents ranging in size from business cards and checks to A3 size documents. It can also scan business cards.
The size of documents that this scanner can scan is shown below.
Eject Direction (*1) |
U-Turn Path |
Straight Path |
|
|
|
Width |
2.08" to 11.8" |
2.08" to 11.8" |
|
(53 mm to 300 mm) |
(53 mm to 300 mm) |
|
|
|
Length (*2) |
2.75" to 17" |
2.75" to 17" |
|
(70 mm to 432 mm) |
(70 mm to 432 mm) |
|
|
|
Weight (*3) |
|
|
Feeding |
14 to 32 lb bond |
11 to 32 lb bond |
documents are |
(52 to 128 g/m2) |
(42 to 128 g/m2) |
separated |
0.0024" to 0.0059" |
0.0020" to 0.0059" |
|
(0.06 mm to 0.15 mm) |
(0.05 mm to 0.15 mm) |
Feeding |
11 to 40 lb bond |
11 to 144 lb bond |
documents are not |
(42 to 157 g/m2) |
(42 to 546 g/m2) |
separated |
0.0020" to 0.0079" |
0.0020" to 0.0026" |
|
(0.05 mm to 0.20 mm) |
(0.05 mm to 0.66 mm) |
|
|
|
Business Cards |
Cannot be scanned |
Can be scanned |
|
|
(not separated) |
|
|
Size: 2.12" × 3.37" |
|
|
(53.9 mm × 85.5 mm) |
|
|
Thickness: 0.03" ± 0.003" |
|
|
(0.76 ± 0.08 mm) |
|
|
without embossing |
|
|
|
(*1) For information about the output directions, see “Document Eject Tray,” on p. 23.
(*2) You can scan documents that are a maximum of 118.1 inches (3000 mm) long by setting the scanner in the Long document mode. (See “Long Document Mode,” on p. 55.)
(*3) For information about feeding a document, see “Placing Documents,” on p. 27.
 IMPORTANT
A document must meet the following criteria to be scannable:
•When scanning a multipage document, pages must be grouped together so that they have the same size, thickness, and weight. Scanning different types of paper at one time can cause the scanner to jam.
•Scanning documents before the ink is dry can cause problems with the scanner. Always make sure that the ink on a document is dry before scanning it.
20 Using the Scanner
•Scanning documents that are written in pencil or similar material can make the rollers dirty, which can then transfer the dirt to subsequent documents. Always clean the rollers after scanning a document written in pencil.
•When scanning a two-sided document that is printed on thin paper, the image on the opposite side of each page may show through. Adjust the scanning intensity in the application software before scanning the document.
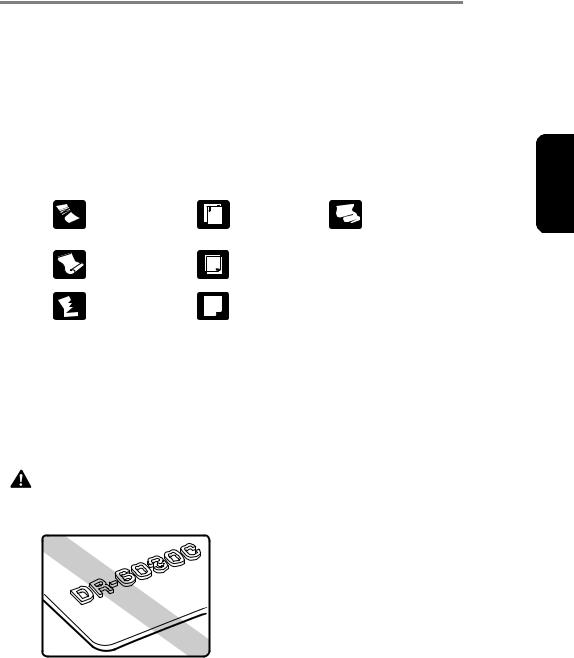
•Scanning the following types of documents can cause a paper jam or malfunction. To scan such a document, make a photocopy of the document and then scan the photocopy.
Wrinkled or |
Documents with |
Extremely thin, |
creased documents |
paper clips or |
translucent paper |
|
staples |
|
Curled document |
Carbon paper |
|
Torn documents |
Coated paper |
|
•When you scan a batch of NCR documents, make sure that they are not stuck together.
•Note that glossy documents or business card sometimes cannot be scanned correctly, or functions such as paper size detection and deskew do not function properly due to reflected light.
•When scanning business cards, make sure to select the bypass mode and straight path.
CAUTION
The results of scanning embossed cards are not guaranteed. Note that scanning embossed cards may scratch the sensor glass.
Embossed Card
Chapter 2
Using the Scanner |
21 |
|
|
||
|
|
|
2. Preparing the Trays
Prepare the document feed tray and document eject tray according to the paper size and feed/eject method.
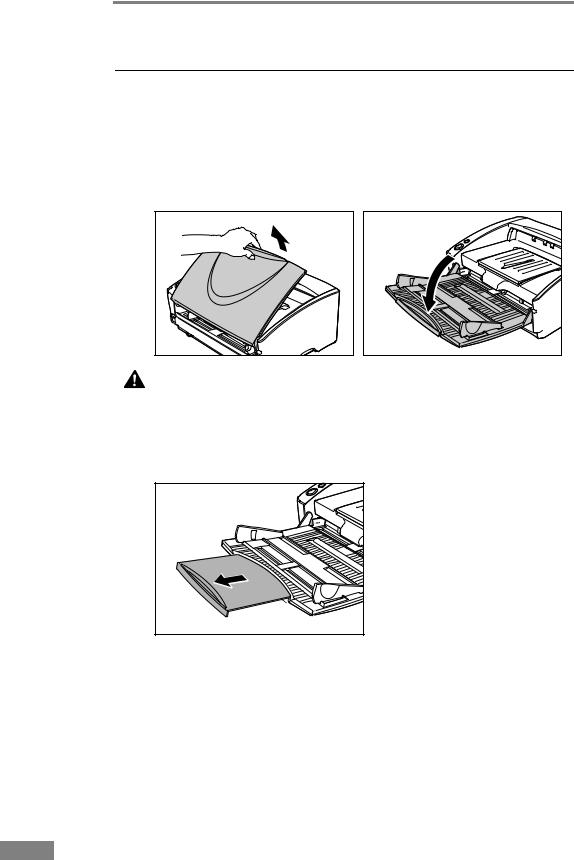
Setting Up the Document Feed Tray
1. Hold the middle of the document feed tray and slowly open it toward you.
CAUTION
Do not place anything other than documents on the Document feed tray. Doing so may damage the scanner, reduce scanning quality, or cause the feed tray to fall off and injure someone.
2. Pull out the document feed tray extension when scanning large documents.
22 Using the Scanner

Document Eject Tray
The scanner has two eject methods; documents can be ejected to the front of the scanner in a U-turn path, or to the back of the scanner in a straight path. This is done according to whether document eject tray 2 is opened or closed. Select the eject method according to what you need to do.
Document Eject Tray 1 |
U-Turn Path |
|
Straight Path |
|
Document Eject Tray 2 |
 Note
Note
•The U-turn path is used to scan documents on paper of normal thickness. Scanned documents are ejected to the document eject tray.
•The straight path is used to scan documents on thin paper, base paper and business cards that cannot be scanned through the U-turn path. Scanned documents are ejected to the back of the scanner.
Chapter 2
Using the U-Turn Path
1. If document eject tray 2 is open, close it.
 Note
Note
The U-turn path cannot be used if document eject tray 2 is open.
Using the Scanner |
23 |
|
|
||
|
|
|
2. Pull the document eject tray extension towards you to open it.
 IMPORTANT
Make sure the document eject tray extension is open when using the scanner. If the document eject tray extension is not opened, ejected documents can fall from the tray and become jammed in the scanner.
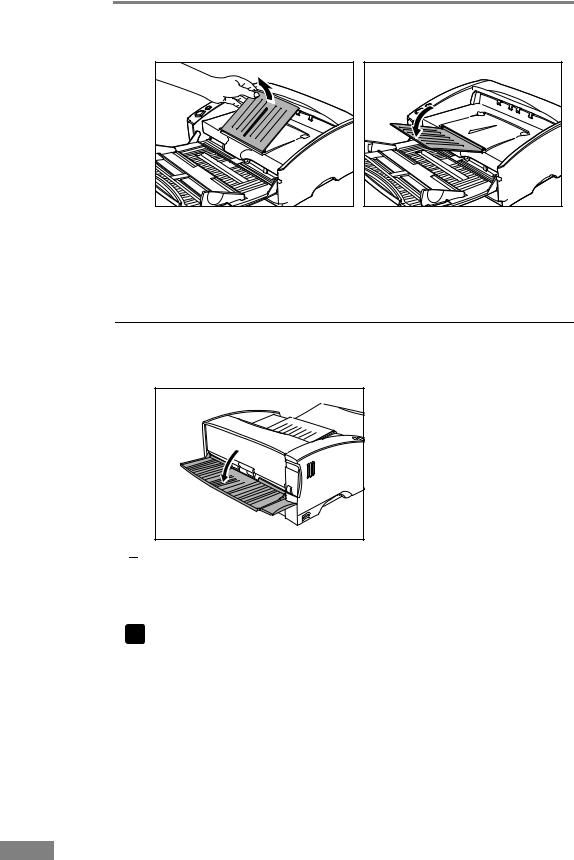
Using the Straight Path
1. Open document eject tray 2.
 Note
Note
When using the straight path, the ejected documents are stacked in reverse order to how they were fed.
 IMPORTANT
•Be sure there is enough space for documents that are ejected behind the scanner when using the straight path. If there is not enough space for ejected documents, the documents may be damaged or a paper jam may occur.
•Open or close document eject tray 2 before starting to scan documents. Opening or closing document eject tray 2 while scanning may cause a paper jam.
24 Using the Scanner
 Loading...