


E 700
Table of contents
 Loading...
Introduction
1
C
I
Basic Operation
I
Advanced Functions I
Additional Information

Important Usage Instructions
c
O
O
3
■O
O
CAUTION:
TO REDUCE THE RISK OF ELECTRIC SHOCK, DO NOT REMOVE
COVER (OR BACK). NO USER SERVICEABLE PARTS INSIDE.
REFER SERVICING TO QUALIFIED SERVICE PERSONNEL.
WARNING:
TO REDUCE THE RISK OF FIRE OR ELECTRIC SHOCK, DO NOT
EXPOSE THIS PRODUCT TO RAIN OR MOISTURE.
CAUTION:
TO REDUCE THE RISK OF ELECTRIC SHOCK AND TO REDUCE
ANNOYING INTERFERENCE, USE THE RECOMMENDED
ACCESSORIES ONLY.
For more information, refer to “Basic Recording,” “Power Sources,”
“Cassettes” and “Preparing the Camera.”
liiid? iplìsìf!b^®!k (©3jM©
IPUSHI
U Charge the battery pack and attach it to the
camera.
• You can also power the camera directly from an a mains outlet.
Qo
Press the OPERATE button to turn the camera
on.
• The camera is now in ‘record pause mode’. If you leave it in
this mode for more than about seven minutes, it will turn
itself off.
I
ENGLISH
E700 PAL
PUB. DIEN-093
0993AB2.74
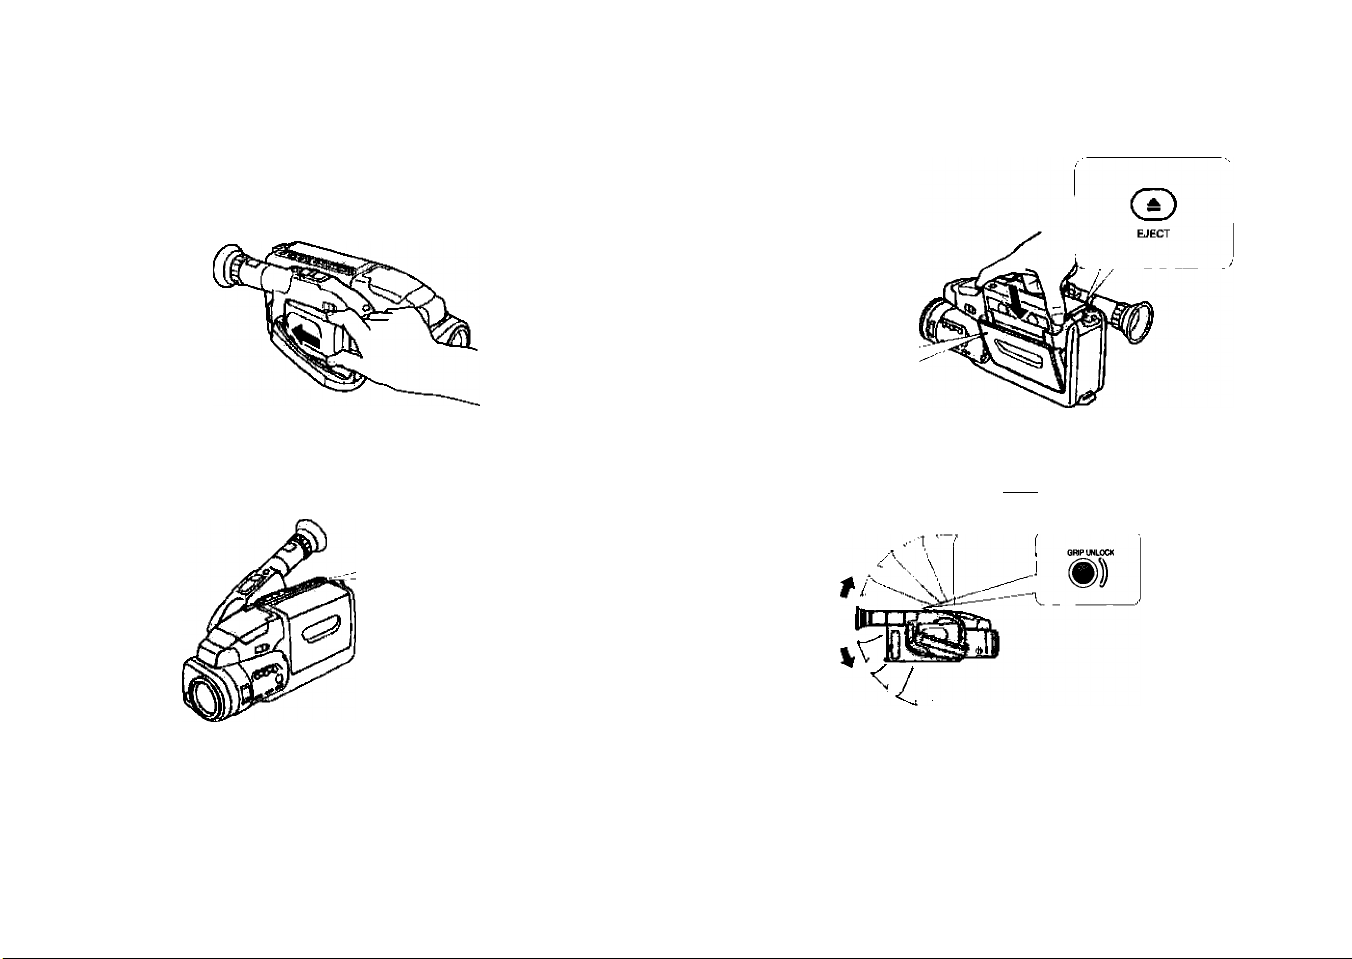
Load the cassette.
f
• Press the EJECT button to open the cassette
compartment. Press the Ipushi mark to close it.
Adjust the FlexiGrip.
• Press the GRIP UNLOCK button while you rotate the
FlexiGrip to the most comfortable viewing position.
• Make sure the grip belt fits your hand securely.
© CANON INC. 1993
Continued....
PRINTED IN JAPAN
IMPRIME AU JAPON
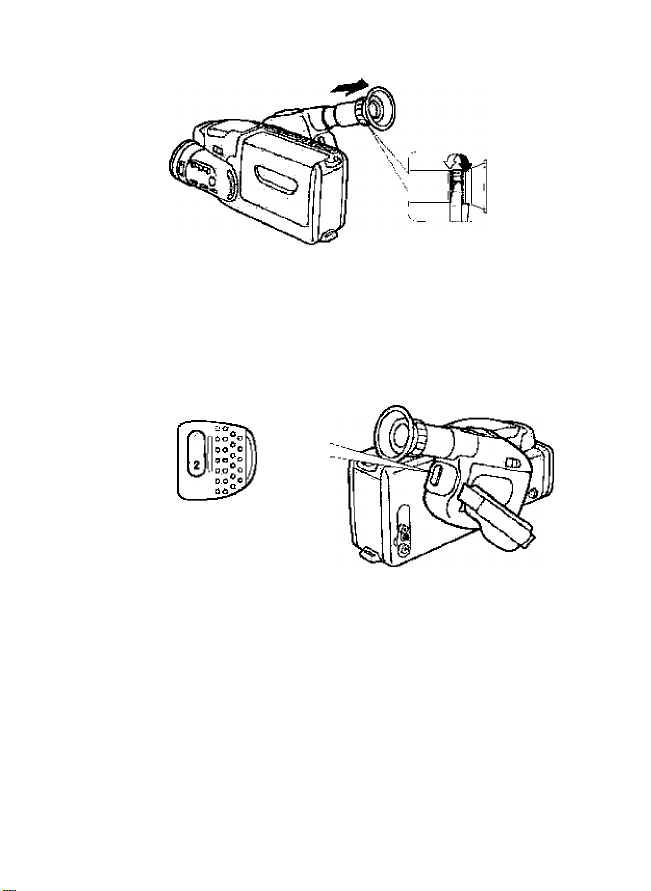
Pull out the finder and adjust the dioptre.
• Rotate the adjustment ring until the viewfinder dispiays are
clearly focused.
• Don’t forget to remove the lens cap.
Press the start/stop button to begin recording.
• You can stop and restart recording as often as you like by
pressing the start/stop button.
When you have finished using the camera:
• Press the OPERATE button to turn the camera off.
• Unload the cassette.
• Detach the battery pack.
• Cover the lens.

You can play back your recordings in the viewfinder right away. See
“Playback” for details.
For playback on a TV, refer to “Playback Connection.”
Press the ■ STOP button to switch from record
pause mode to playback mode.
• If you don’t do this, none of the playback functions will
work.
• Press the REC MODE button if you want to return to record
pause mode without turning the camera off.
STOP FF/a
Press the ^ PLAY button to start playback.
• To end playback, press the ■ STOP button.
• To wind the tape forwards, stop piayback and press the
FF button.
• To wind the tape backwards, stop playback and press the
►> REW button.
Thank you for choosing a Canon
This camcorder’s advanced technology makes it very easy to use — you will soon be making high-quality
home videos which will give you pleasure for years to come.
I
To get the most out of your new camcorder, you should read this manual thoroughly — there are many
sophisticated features which will add to your recording enjoyment.
I To get started, you will need to read these sections:
"Basic Recording"
1 “Power Sources"
“Cassettes"
“Preparing the Camera”
I Then you can go on to find out about the more advanced features.
As well as using the alphabetical index, you can look up the different parts and functions in the sections
called “Nomenclature” and “Viewfinder Displays.” There’s also a “Troubleshooting” section in case you
run into any problems.
I
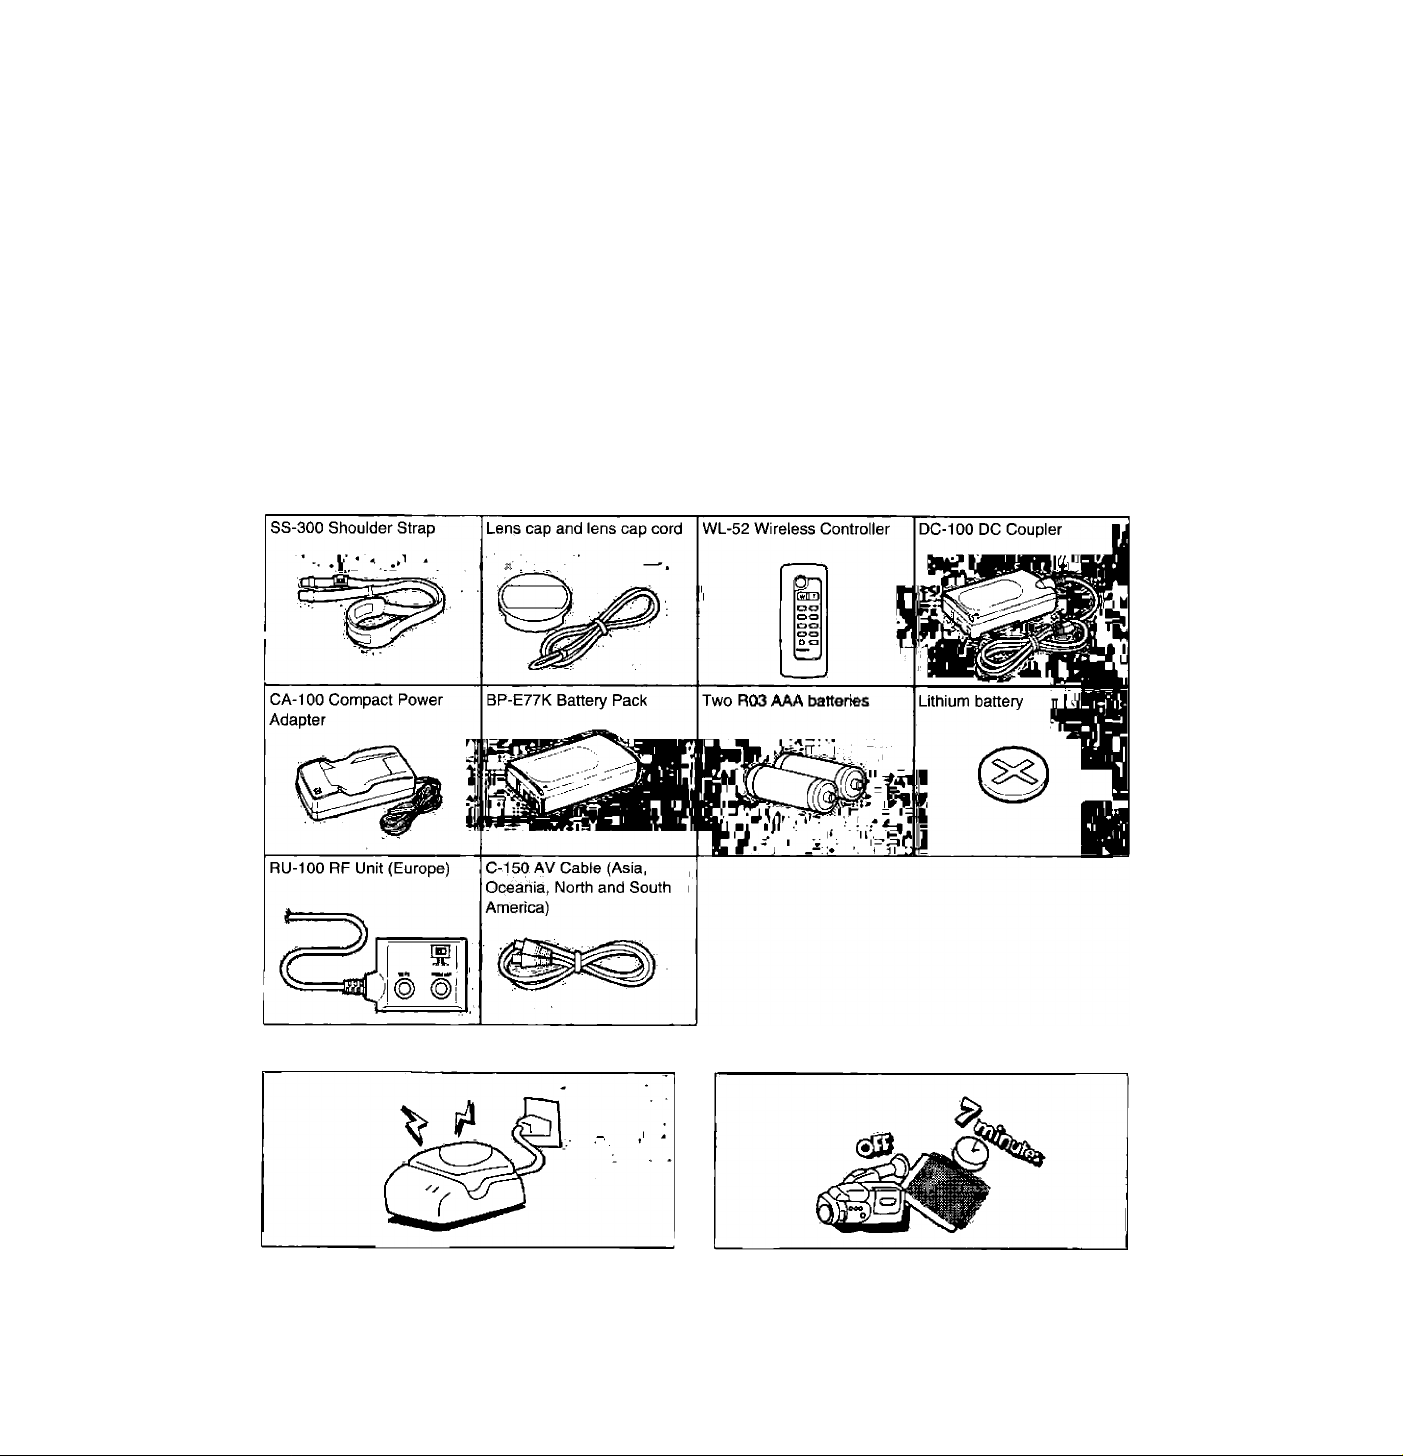
First, check that this package contains the following accessories:
о
a.
c
о
5'
3
And while you are finding out how your camcorder works, remember:
The battery pack must be charged before it can
power the camcorder. Recharge it only when it is
completely exhausted
The camcorder turns off automatically if you leave
it in record pause mode for more than about seven
minutes.

Main Features
Optical Image Stabilizer
O
"5
■o
o
Canon’s revolutionary VariAngle Prism compensates for
the slightest movement of the
camera, producing stabie
images without sacrificing
picture quality.
Pop-Up light
The E700’s built-in video iight
pops up and turns on at the
touch of a switch. Recording
in iow light (or no iight) has
never been easier.
12X zoom
The 12X power zoom lens
can cover group shots and
wide-angle setting and then
— with a choice of zoom
speeds.
Macro autofocus
With fast and accurate
focusing down to 1 centimetre
the screen.
1-2 Recording
Just turn the camera on and
to concentrate on the action.
Program AE
180 FlexiGrIp
panoramic views with its
move in to catch the details
(3/8 inch), you can zoom in to
make the smaiiest details fill
start shooting. Autofocus,
auto exposure and auto white
balance are activated
immediately, leaving you free
The E700 puts advanced
recording techniques at your
fingertips with three
programmed auto exposure
modes for the most testing
situations.
The versatile FlexiGrip rotates
to match your viewing angle
for more comfortable shooting
— and even better results.
High-speed shutter
Capture action scenes for still
or slow playback without
blurring; add creative touches
to your recordings. Seven fast
shutter speeds (up to 1/10000
sec) give you all the choice
you’ll ever need.
Two-lux recording
The E700 is ideally suited to
low-light conditions. It can
record with outstanding
resolution in light as low as 2
lux, thanks to its highsensitivity CCD. And that’s
without using the pop-up light.
Fade
Add an atmospheric touch to
your video productions with
smooth fades, synchronized
with the sound track.
Titler and age Insert
You’re bound to want to add
titles to your video
masterpieces — the E700
makes it easy. And to make a
lasting record of those
precious early years, it can
automatically add your child’s
age as well.
Remote control
With the supplied wireless
controller, you can operate
the camera from as far away
as 4 metres (13 feet), giving
you shake-free recordings
and relaxed playback.
Handy power supply
Connect the camera directly
to a mains outlet for indoor
recording; charge a battery
pack and you can take it
anywhere. There’s even an
optional car battery adapter.

Contents
Introduction I
Important Usage Instructions.................................................................2 c
Thank you for choosing a Canon............................................................3 5
Main Features.................................................................................4
Basic Operation
Basic Recording.............................................................................6
Notes for Better Recording...........................................................7
Power Sources...............................................................................8
Battery Pack Notes......................................................................12
Cassettes......................................................................................13
Preparing the Camera
Playback........................................................................................15
Playback Connection
.................................................................
..................................................................
14
16
Advanced Functions
Zooming........................................................................................19
Image Stabilizer
Wireless Controller
Date and Time
Age Insert......................................................................................23
Titles..............................................................................................24
Fade...............................................................................................25
Program AE..................................................................................26
White Balance...............................................................................27
Pop-up Light.................................................................................28
High-Speed Shutter
Focusing.......................................................................................30
Check and Edit Functions..........................................................31
Editing to a VCR...........................................................................32
...........................................................................
.....................................................................
..............................................................................
.....................................................................
20
21
22
29
I
Additional Information
Video System................................................................................33
Optionai Accessories..................................................................34
Cautions and Maintenance
Troubleshooting...........................................................................38
Viewfinder Displays.....................................................................39
Nomenclature...............................................................................40
Specifications...............................................................................42
Index..............................................................................................43
.........................................................
36
Basic Recording
eH Before you start recording: Selecting the tape speed
Complete the following steps:
‘i?
(S
• Attach a power source (p. 8).
1-
«
• Load a cassette (p. 13).
a
O
• Take off the lens cap, extend the viewfinder, and
o
adjust the FlexGrip and dioptre (p. 14).
»
n
m
You can refer to the list of viewfinder displays on
p. 39 as you go through the steps below.
To record:
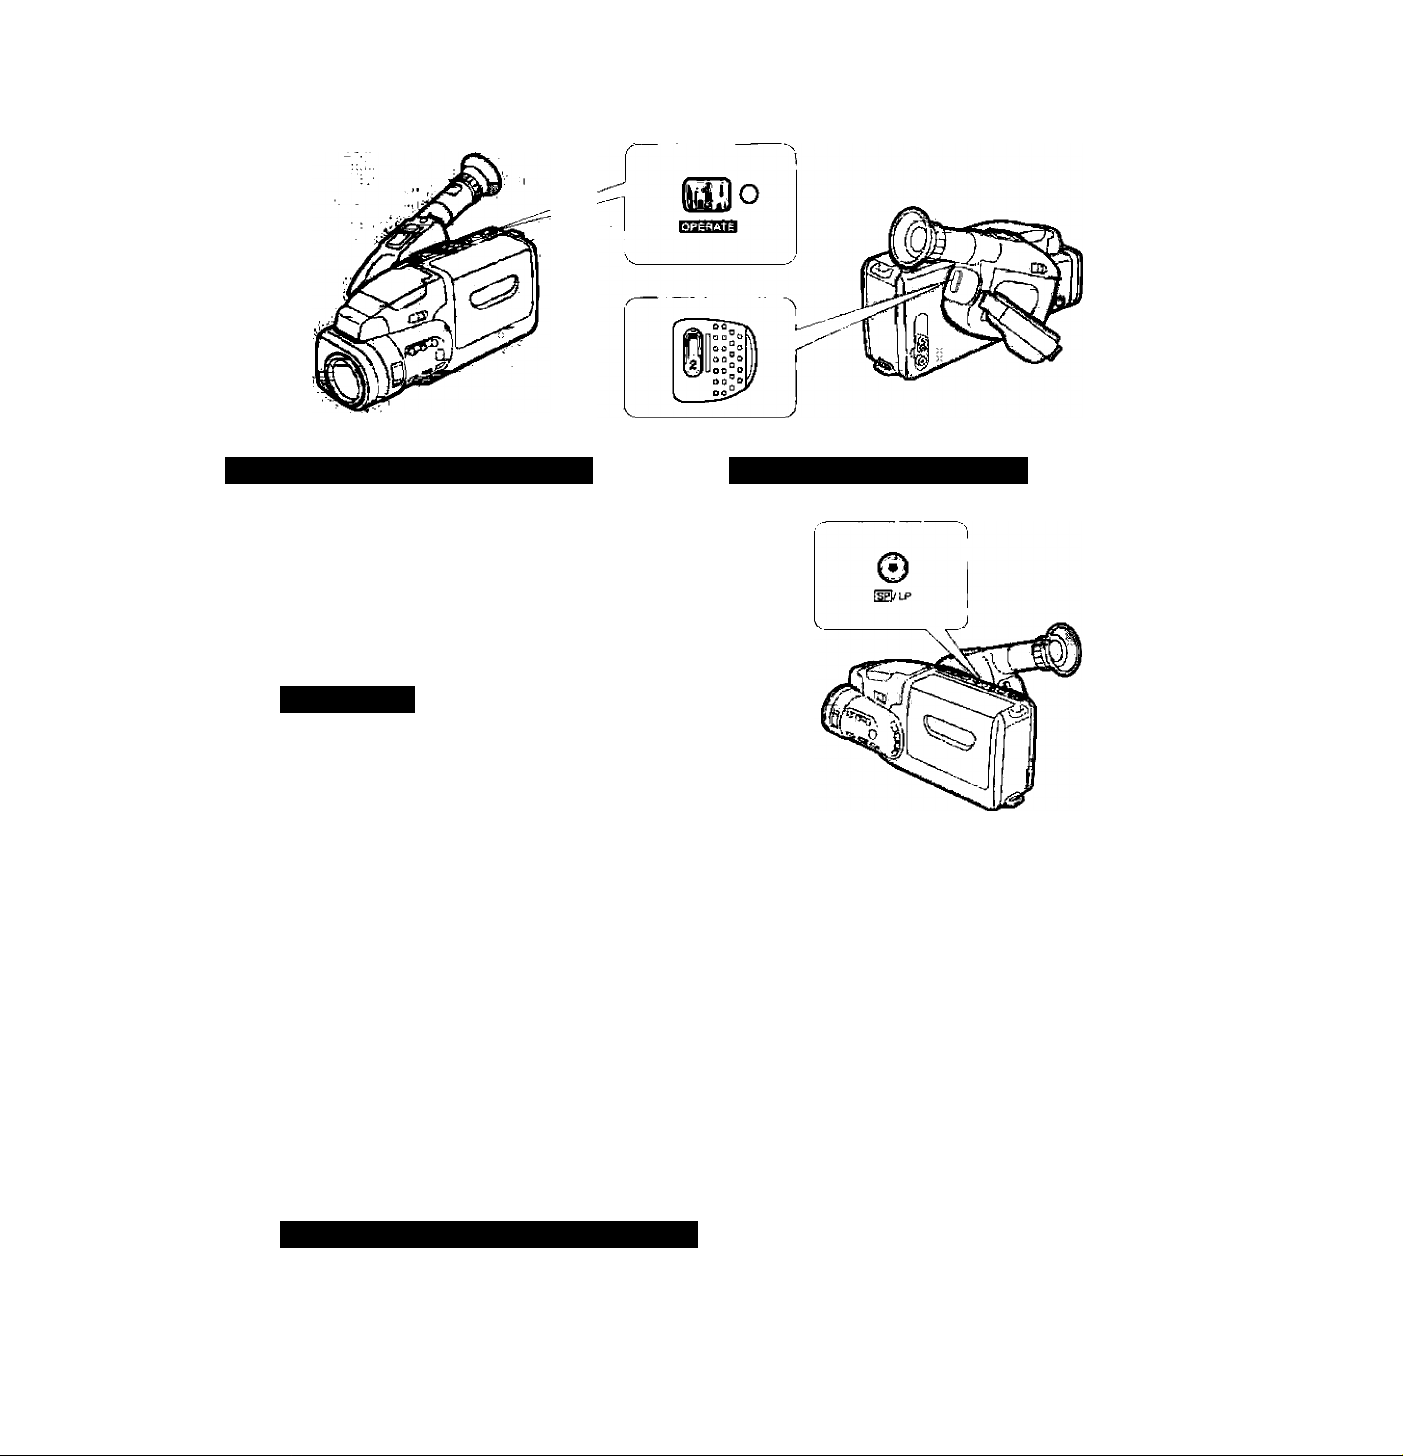
1. Press the OPERATE button to turn the
camera on.
• The OPERATE indicator lights up and
“PAUSE” appears in the viewfinder — the
camera is now in “record pause mode.”
2. Press the start/stop button to begin
recording.
• The tally lamp flashes rapidly and “REG”
appears in the viewfinder.
3. Press the start/stop button again to
pause recording.
• The camera returns to record pause mode
and "PAUSE” reappears in the viewfinder.
• You can stop and start recording as often as
you like by pressing the start/stop button.
• The camera wiil turn itself off if you ieave it in
record pause mode for more than about
seven minutes. To resume recording, simply
turn it on again and press the start/stop
button.
When you have finished recording:
Replace the lens cap.
Unload the cassette.
Turn the camera off.
Disconnect the power source.
You have a choice of two recording speeds:
• Standard Play (SP) for maximum quality
• Long Play (LP) for double recording time
You can change the tape speed by pressing the
H@/LP button. (“SP” or “LP” is displayed in the
viewfinder.) Change tape speed in record pause
mode — changing during recording will cause
noise on the tape.
The camera automatically selects the appropriate
speed for playback.
Note:
• Press the REC MODE button if you have put the
camera in playback mode (p. 15), and want to
return to record pause mode without turning the
camera off.
Notes for Better Recording
Holding the camera
For maximum stability:
• Place your right hand
through the grip belt and
keep your right elbow
pressed against your body.
• Rest your left hand lightly
on the side of the camera.
Vary your stance to suit the recording situation:
Lean against a wall for extra
support.
Rest on a table or other solid
object.
Lie on the ground, propping
yourself up with your elbows.
Crouch down and support the
camera on your knee.
Make sure you are holding the camera level.
Planning ahead
If you are going to edit your recording later, shoot
an extra five seconds or so at the beginning and
end of each scene. This will make editing much
easier.
If you are not planning to edit, you should choose
each scene carefully, making use of the check and
edit functions (p. 31).
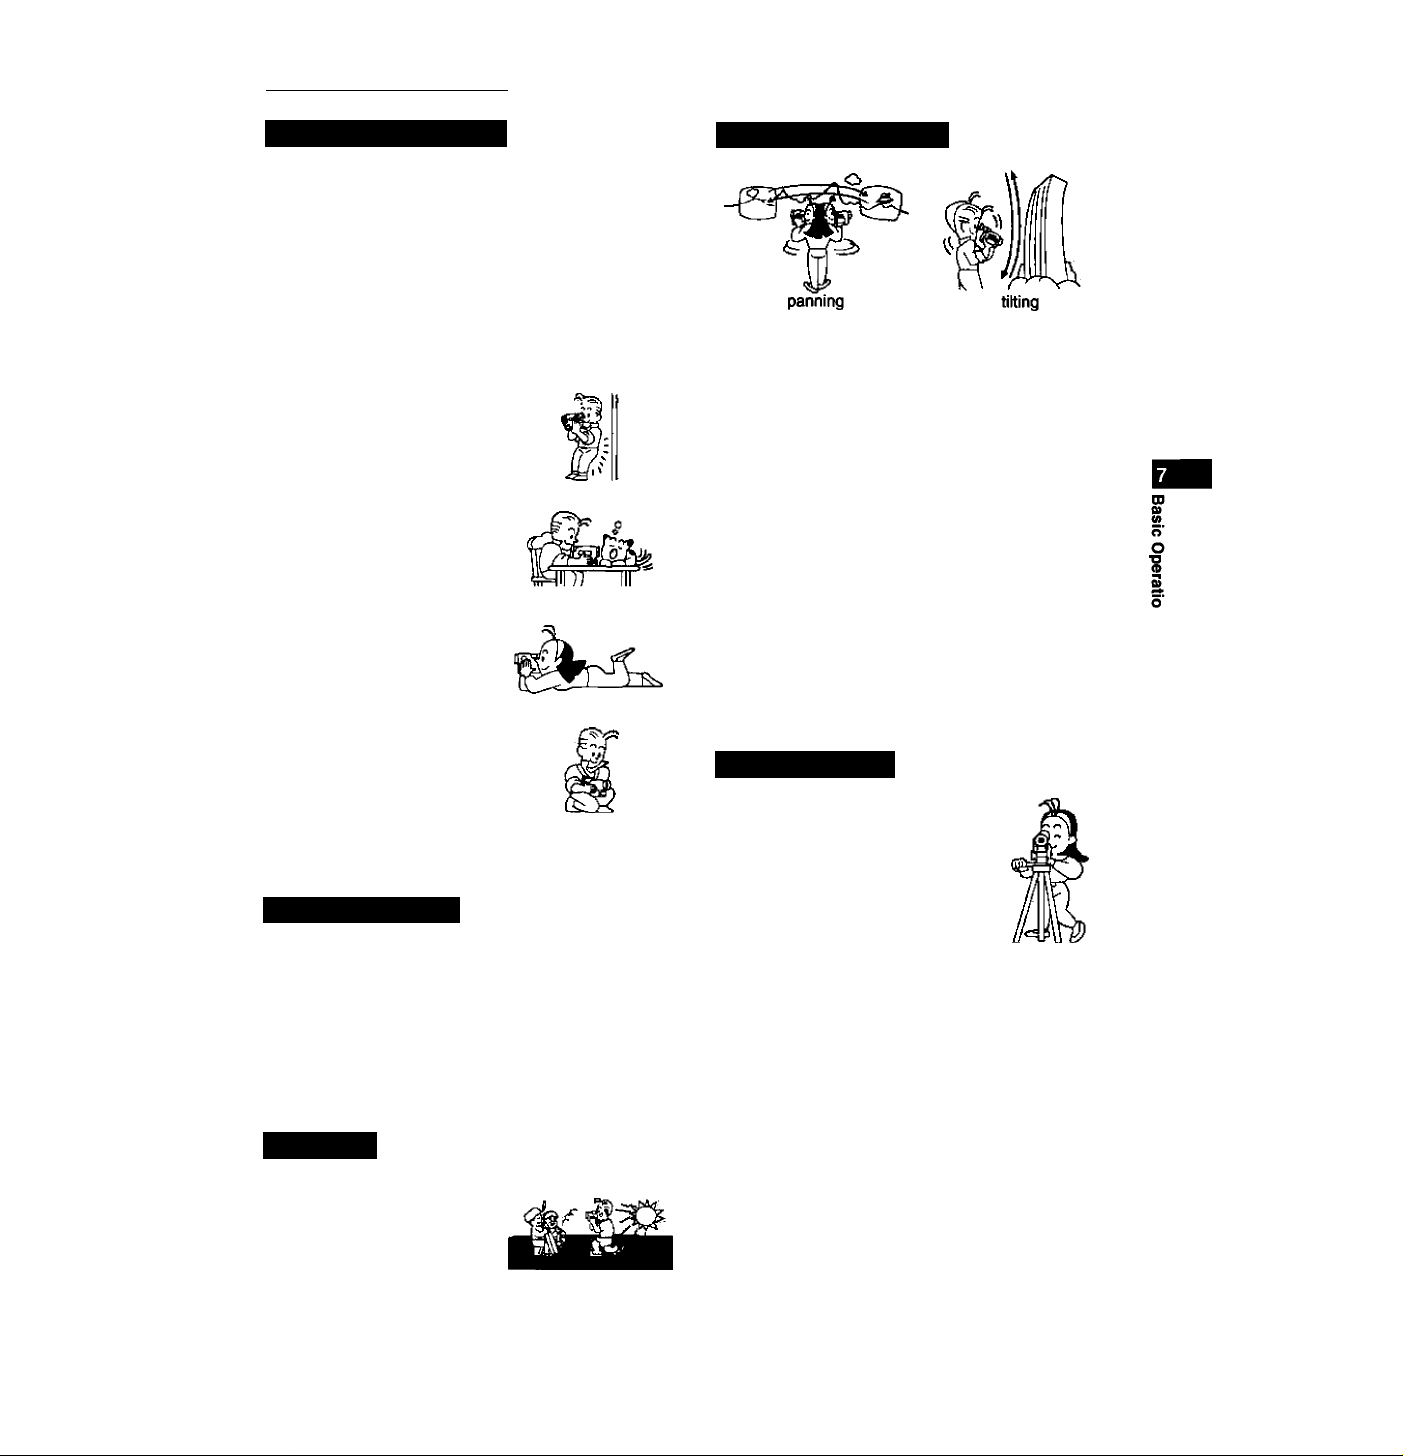
Panning and tilting
Use panning to record a landscape or follow a
moving subject:
• First decide the area you want to cover and stand
facing the end of your panning angle.
• Without moving your feet, turn your waist to the
starting position.
• Start recording and hold your position for five
seconds or so.
• Pan slowly, turning from the waist and allowing
plenty of time to take in each new image.
• Hold the final image for another five seconds
before you stop recording.
You can also use a vertical movement across the
scene:
• Tilt the camera up to exaggerate the height of the
subject.
• Tilt down from the top of a building, for example,
as an introduction to subjects at the bottom.
Using a tripod
Using a tripod will improve the
quality of your videos. It is
especially useful for telephoto
recording as it eliminates
camera shake, and it will safely
hold the camera when you are
operating it from a distance
with the wireless controller.
Lighting
Make sure to have the sun
behind you when you are
recording outside.
Notes:
• Make sure that the fastening screw of the tripod
is no longer than 6.5 mm (1/4 inch) or it will
damage the camera.
• Do not leave the viewfinder exposed to bright
sunlight or it will melt. (The light is concentrated
by the dioptre lens.)
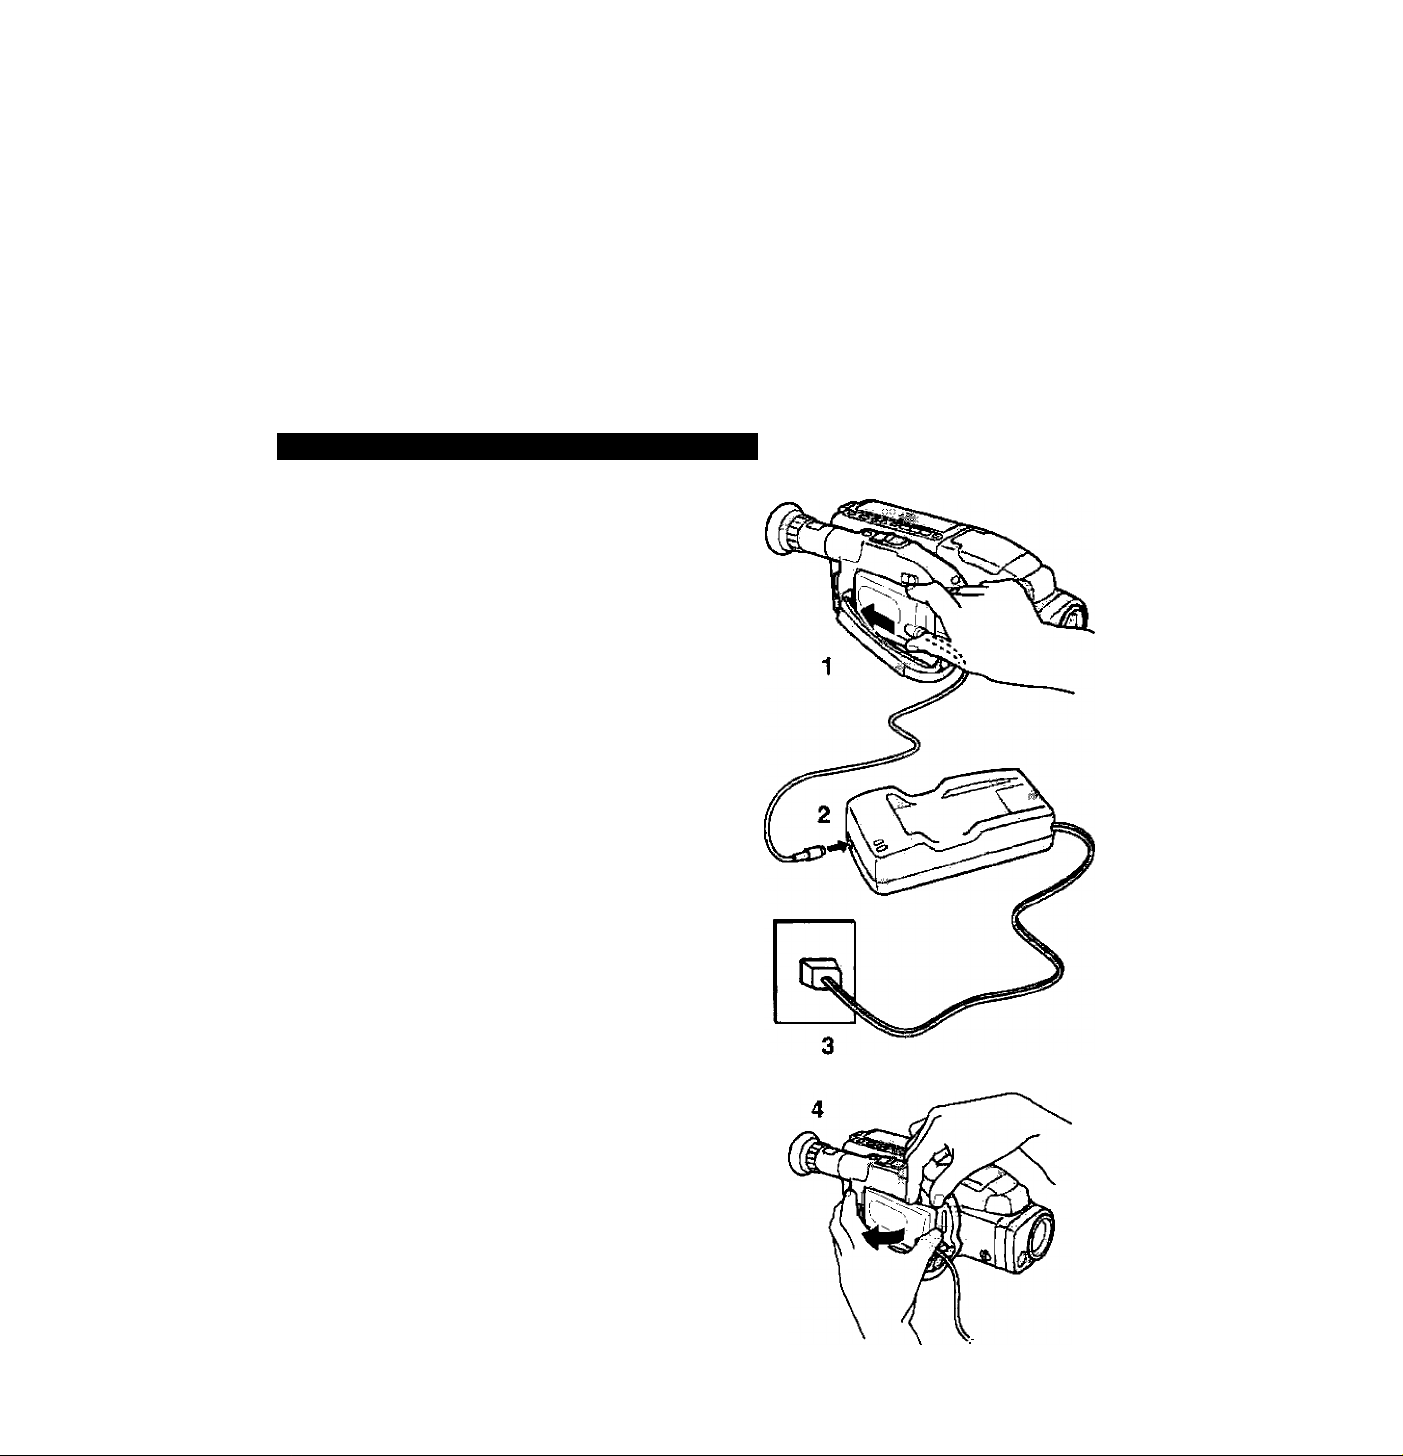
Power Sources
Before operating your camera, you will need to use
the CA-100 Compact Power Adapter to:
provide power from a mains outiet
or
charge a battery pack
Connecting the camera to a mains outlet
Use the CA-100 Compact Power Adapter and the
DC-100 DC Coupler to provide your camera with
a
instant power from a mains outlet.
ь
0)
Q.
О
1. Insert the DC coupier in the camera’s
о
w
to
Ш
power source compartment.
• Slide it in, then press it until it clicks and locks
into place.
Notes;
• The CA-100 Compact Power Adapter converts
current from a household mains outlet (100-240
V AC, 50/60 Hz) to the 6 V DC current used by
your camera.
• If the adapter is used next to a TV, it may cause
the TV to emit noise — move the adapter away
from the TV or the aerial cable.
• See the CA-100 instruction manual for further
details.
2. Connect the DC coupler to the adapter.
3. Plug the adapter into a mains outlet.
• The green OPERATE indicator lights up.
4. Detach the DC coupler after use.
• Slide and hold the ВАТТ EJECT lever while
you pull the DC coupler outwards from the
front.
• Always turn the camera off before removing
the power source.
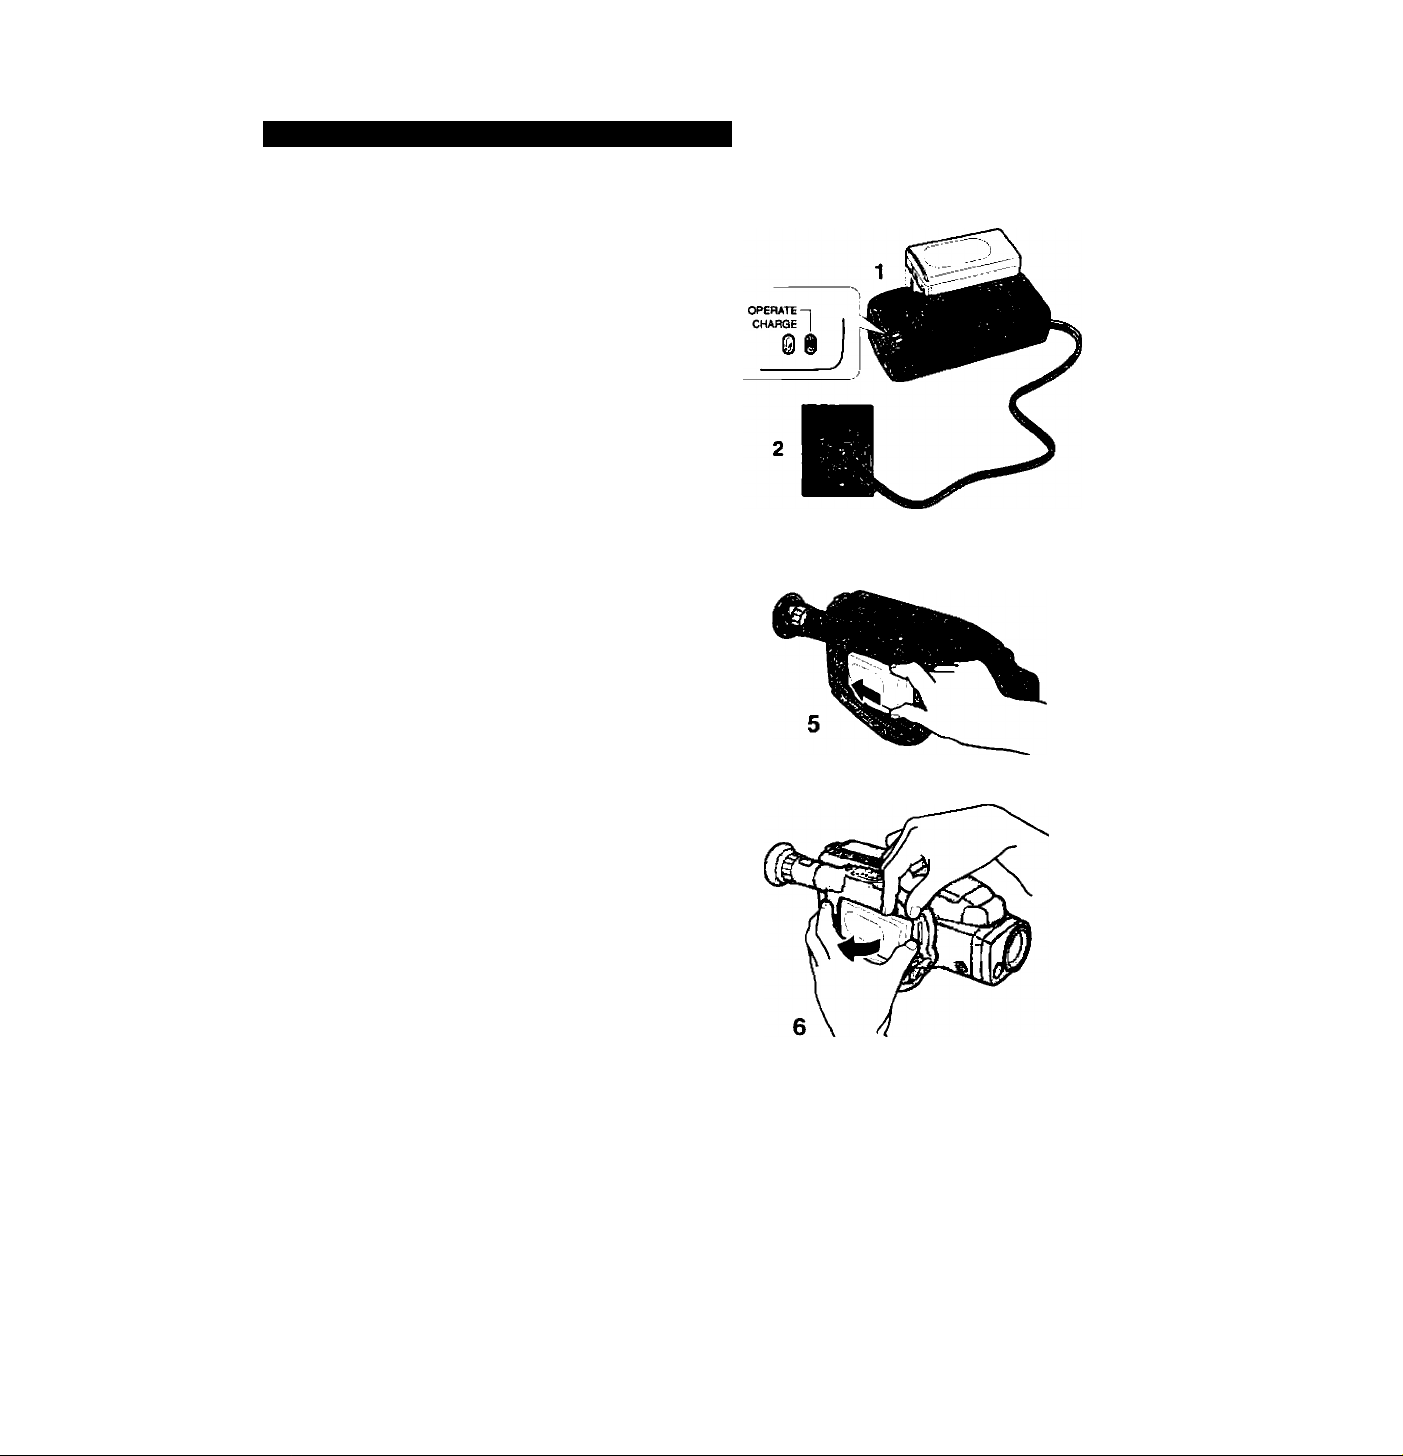
Charging and attaching the battery pack
You will have to charge the battery pack before you
can use it. A brand new battery pack must be
charged twice before use.
Use the CA-100 Compact Power Adapter.
BP-E77K Battery Pack
I Charging time: 70 minutes
Continuous recording time: 50 minutes
These times vary — the safest policy is to
always have two or three times as many battery
I packs as you think you will need.
1. Insert the battery pack in the adapter as
shown.
• Make sure the DC coupler is not connected.
2. Plug the adapter into a mains outlet.
• The green OPERATE indicator lights up.
• The red CHARGE indicator flashes to show
that charging is in progress.
3. Wait until the battery pack is fully
charged.
• The CHARGE indicator glows steadily when
the battery pack is fully charged.
Ш
0)
tf>
o*
о
E
5‘
Э
4. If the battery pack is brand new, remove
it from the adapter, then insert it again
and charge it one more time.
5. Remove the battery pack from the adapter and attach it to the camera.
• Slide it in, then press it until it clicks and locks
into place.
6. Detach the battery pack after use.
• Slide and hold the ВАТТ EJECT lever while
you pull the battery pack outwards from the
front.
• Always turn the camera off before removing
the power source.

Discharging the battery pack
Make sure to fully discharge the battery pack
before you recharge it. If it is recharged while it still
has some power left, its capacity will be reduced.
1. Attach the battery pack to the camera.
2. Remove the cassette.
3. Press the OPERATE button to turn the
camera on.
4. Press the ■ STOP button to select
playback mode.
5. Remove the battery pack as soon as the
,o
'iS
<D
SL
o
u
'5
«
m
camera turns itself off.
How long do battery packs last?
As well as the BP-E77K supplied with your camera,
there are optional battery packs which offer longer
recording times. The length of time you can record
after charging the battery pack depends on
whether or not you are using the pop-up light.
Continuous recording times
BP-E77K BP-E718 BP-E722
Normal recording
Using the pop-up light
50 90
25
(approximate times, in minutes)
45
Please read “Battery Pack Notes” on
page 12 for important information on
charging and using your battery packs
safely and effectively.
100
55
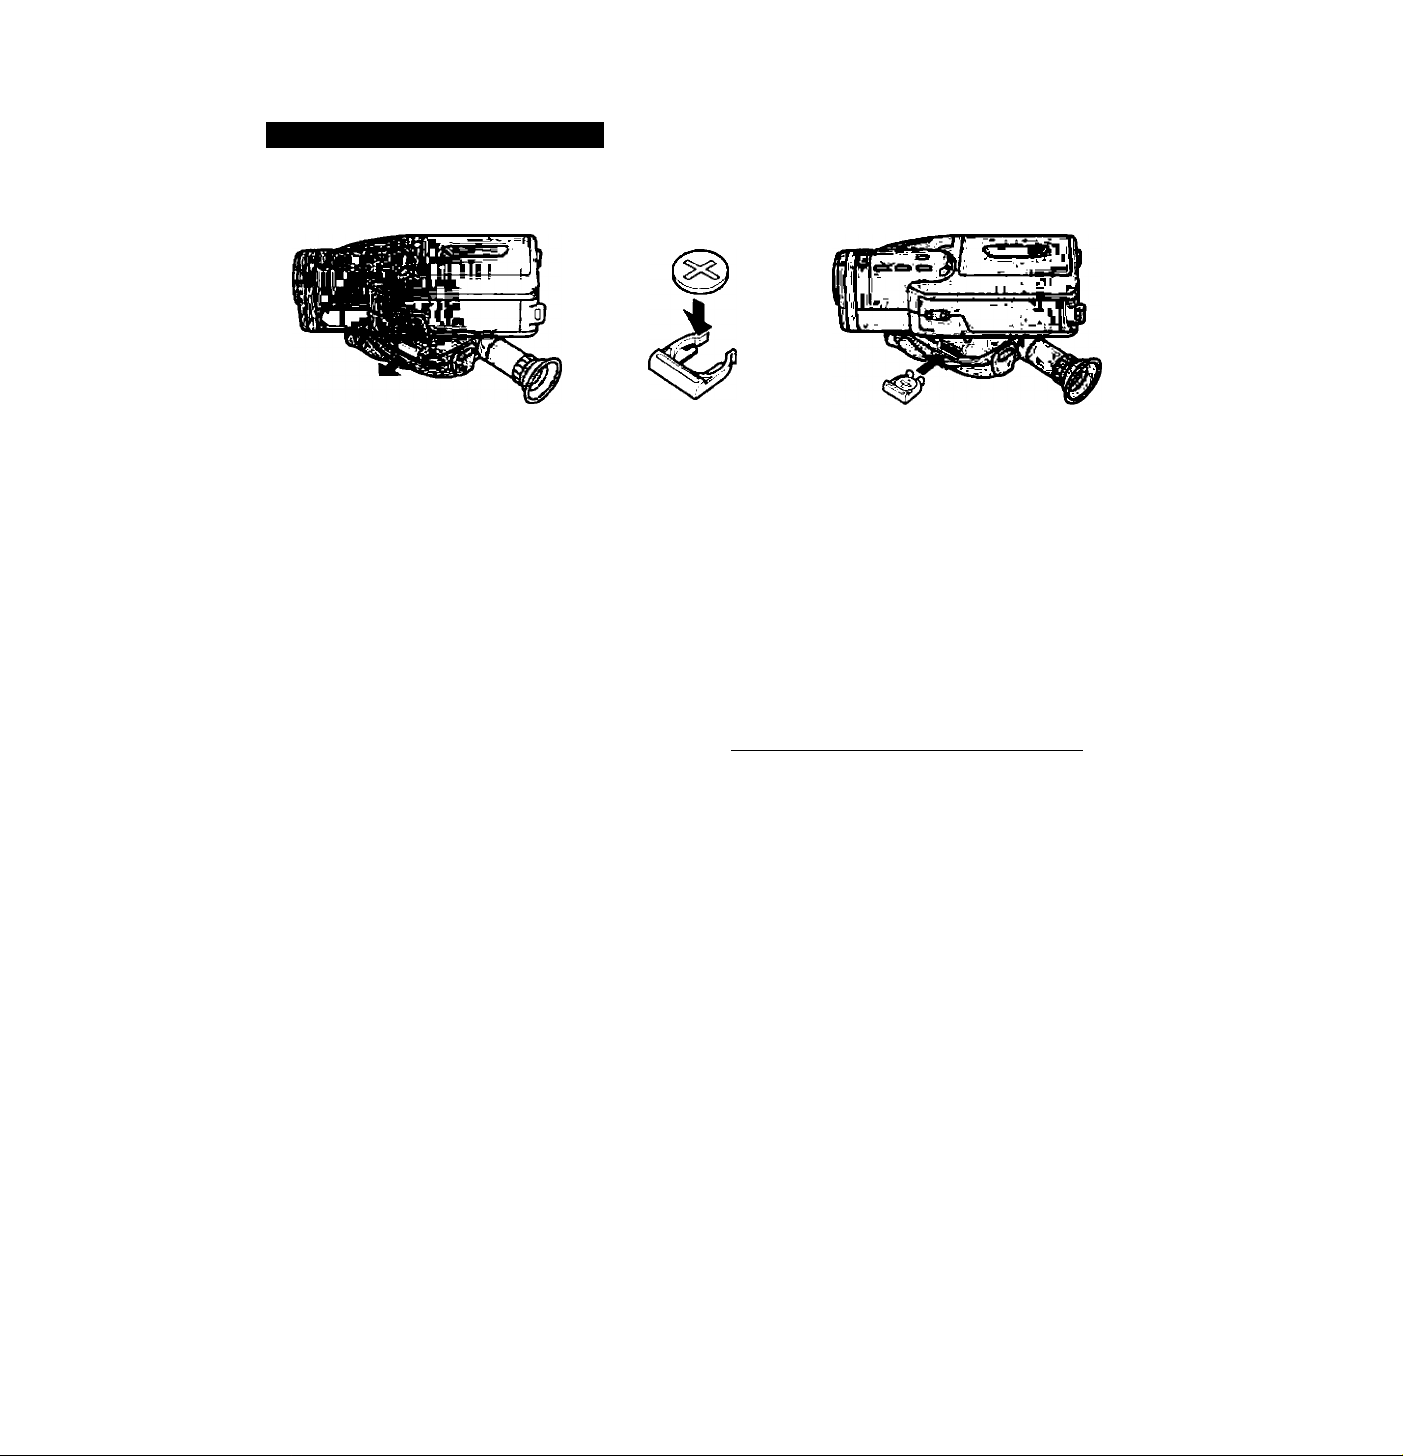
Installing the lithium battery
Even when the camera is turned off, it can
remember the date and time, an age and a title. Its
memory is powered by a CR2025 lithium battery
with a lifespan of about a year.
“DATE” flashes in the viewfinder if you have not
installed the lithium battery, or if it is almost
exhausted.
1. If you are replacing an old battery,
attach a power source to the camera.
• If the memory does not have another power
source while you are changing the lithium
battery, it will be erased and you will have to
reset the date, time, age and title.
2. Rotate the FlexIGrip downwards so the
lithium battery compartment is visible.
• Hold down the GRIP UNLOCK button while
you rotate the FlexiGrip.
3. Pull out the lithium battery holder.
• Hold the camera with the FlexiGrip
underneath, or the old battery will fall out
when you remove the holder.
4. Place the new battery in the holder with
the + side facing upwards.
• Do not pick up the battery using tweezers or
other metal tools — this may cause a short
circuit.
• Wipe the battery with a clean, dry cloth to
ensure proper contact.
WARNING
• The battery used in this device may present a
fire or chemical burn hazard if mistreated. Do not
recharge, disassemble, heat above 100°C or
incinerate.
• Replace the battery with a Sanyo CR2025,
Panasonic CR2025 or Duraceli DL2025B. Use of
another battery may present a risk of fire or
explosion.
• The used battery should be handed back to the
supplier for safe disposal.
• Keep the battery out of reach of children — if it is
swallowed, contact a physician immediately.
n
a
0)
0)
o'
O
D)
5. Click the battery holder back into place.

Battery Pack Notes
Charge the battery pack before you use it...
• You should charge a brand new battery pack
twice before using it for the first time — a single
charge may not be enough. Charge it completely
(until the adapter’s charge indicator glows
steadily), then disconnect it and charge it again.
This is the only time you should ever “double
charge” the battery pack.
• The battery pack will naturally discharge itself
over time. You should charge it the same day you
plan to use it, or the day before.
• The battery pack becomes warm during use (and
during charging). Wait for it to cool before
&
charging or using it again.
о
о
• See the adapter instructions for details.
‘й
(S
m
...save power while you are recording...
• You will get more recording time from your
battery pack if you turn the camera off between
shots, instead of leaving it in record pause mode.
• Recording time will be shorter than usual at low
temperatures. You can use the battery pack
between 0° and 40° C (32°-104° F), but it works
best between 10° and 30° C (50°-86° F).
...and don’t recharge it until it is
exhausted.
• The camera flashes a “ВАТТ’ warning when the
charge has almost run out. After a few more
minutes’ use, the camera turns off automatically.
You can now either recharge or store the battery
pack.
Disconnect the battery pack when you are
not using it.
• Even when it is turned off, the camera will
continue to slowly drain power from the battery
pack. This means the battery pack will be
discharged beyond the normal level if you leave it
attached for a long time.
DANGER!
Always attach the terminal cover.
• Do not allow any metal objects to touch the
terminals. The battery pack contains a great deal
of energy and short-circuiting it may cause a fire.
Attach the terminal cover whenever you are not
using the battery pack.
Treat the battery pack with care.
• Keep it away from fire (or it might explode).
• Do not try to disassemble or modify it.
• Do not drop or knock it.
• Do not get it wet.
Keep the terminals clean.
• The camera, adapter or battery pack will not work
properly if the terminals are dirty. Check them
before use, and wipe them with a dry cloth or
tissue if necessary.
Remember, it may start to give you less
recording time...
• If you recharge it without first completely
discharging it.
• If you leave it attached to the camera (or video
light) for more than a week.
• If you don’t use it for three months or more.
...but you should be able to “refresh” it.
• Discharge the battery pack by operating the
camera until it turns ofif automatically (see p. 10).
Recharge and repeat a few times.
• The MC-100 Multi-battery Charger (p. 34)
refreshes battery packs automatically.
• If this does not improve the battery pack’s
performance, it has reached the end of its life and
must be replaced.
Loading...