


GO W164-10S
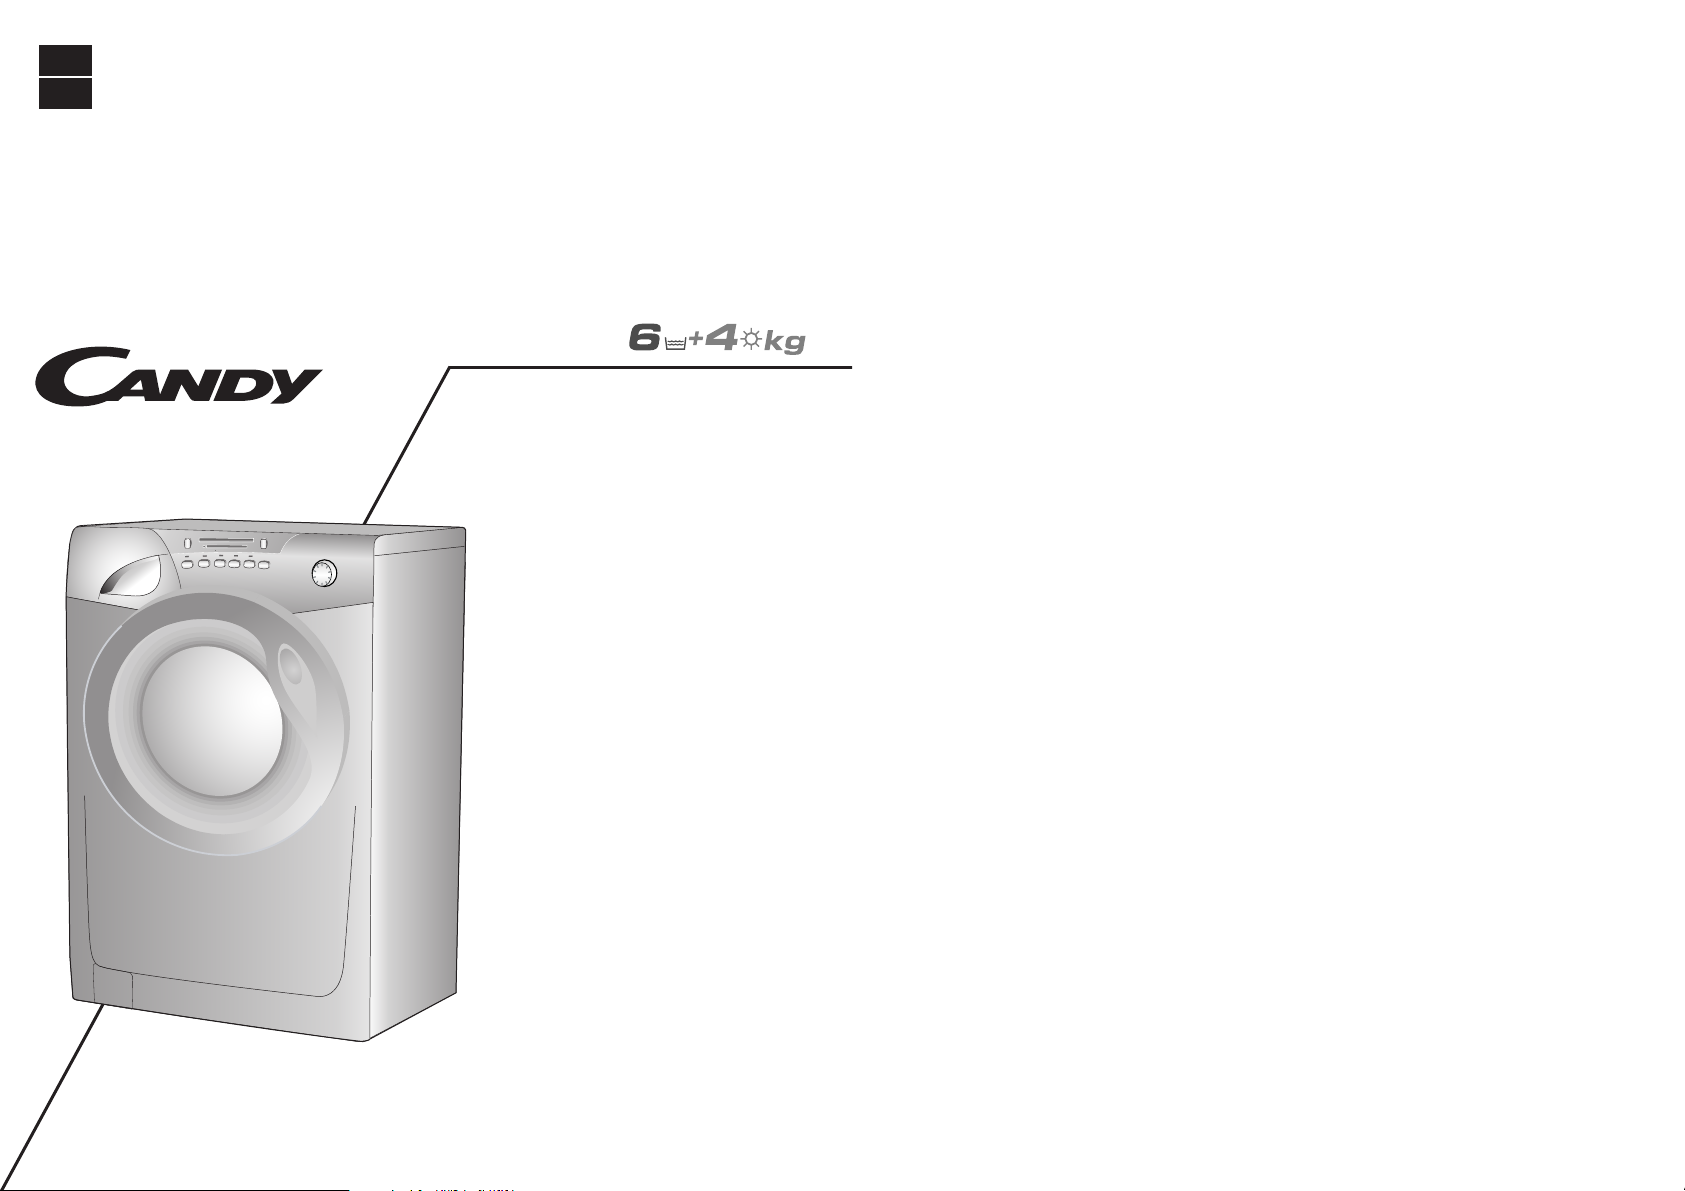
GO W 164
NNaavvooddiilloo zzaa uuppoorraabboo
User instructions
SL
EN
POGLAVJE
CHAPTER
1
2
3
4
5
6
7
8
9
10
11
12
13
14
15
3
EN
INDEX
Introduction
General points on delivery
Guarantee
Safety Measures
Technical Data
Setting up and Installation
Control Description
Table of Programmes
Selection
Detergent drawer
The Product
Washing
Drying cycle
Automatic washing/Drying
cycle
Cleaning and routine
maintenance
Faults Search
SL
KAZALO
Uvod
Splo‰na opozorila in nasveti
ob prevzemu aparata
Garancija
Varnostni predpisi
Tehniãni podatki
Namestitev in prikljuãitev
stroja
Opis stikalne plo‰ãe
Razpredelnica s programi
Izbiranje programov in
temperatur
Predalãek za pralna
sredstva
Priprava perila na pranje
Razpredelnica programov
pranja
Su‰enje
Automatsko Pranje/Su‰enje
âi‰ãenje in vzdrÏevanje
stroja
Ugotavljanje motenj pri
delovanju
2
EN
OUR COMPLIMENTS
With the purchase of this
Candy household
appliance, you have shown
that you will not accept
compromises: you want only
the best.
Candy is happy to present
their new washing machine,
the result of years of
research and market
experience through direct
contact with Consumers.
You have chosen the quality,
durability and high
performance that this
washing machine offers.
Candy is also able to offer a
vast range of other
household appliances:
washing machines,
dishwashers, washer-dryers,
cookers, microwave ovens.
Traditional ovens and hobs,
refrigerators and freezers.
Ask your local retailer for the
complete catalogue of
Candy products.
Please read this booklet
carefully as it provides
important guide lines for
safe installation, use and
maintenance and some
useful advise for best results
when using your washing
machine.
Keep this booklet in a safe
place for further
consultation.
When contacting Candy
or a Customer Services
Centre always refer to the
Model, No., and G number
(if applicable of the
appliance see panel).
SL
âESTITAMO!
Z nakupom na‰ega stroja ste
pokazali, da ne i‰ãete
kompromisnih re‰itev in da
ste kupec, ki hoãe le
najbolj‰e.
Z velikim zadovoljstvom vam
ponujamo nov pralni stroj,
rezultat dolgoletnih
raziskovanj in izku‰enj, ki
smo jih pridobili na trÏi‰ãu v
neposrednem stiku s kupci.
Izbrali ste kakovost,
vzdrÏljivost in zanimivo
obliko.
Razen stroja, ki ste ga izbrali,
pa imamo na izbiro ‰e
pomivalne in su‰ilne stroje,
prostostojeãe ‰tedilnike,
kuhalne plo‰ãe,
mikrovalovne peãice,
vgradne peãice in ‰tedilnike
ter hladilnike in
zamrzovalnike. Pri svojem
prodajalcu zahtevajte
najnovej‰i Candyjev
katalog.
Uporaba tega novega
pralnega stroja je
enostavna, vendar pa vas
prosimo, da skrbno
preberete NAVODILO ZA
UPORABO in ga v celoti
upo‰tevate.
V navodilu so navedene vse
pomembne informacije v
zvezi s prikljuãitvijo,
vzdrÏevanjem in uporabo
stroja.
Priporoãamo, da skrbno
shranite to knjiÏico z navodili,
da jo boste lahko prebrali
tudi kdaj kasneje, ãe bo
potrebno.
Kadar boste morali zaradi
morebitne okvare pralnega
stroja poklicati enega od
na‰ih serviserjev mu
obvezno sporoãite oznako
modela, ‰t. stroja in ‰t. G, ãe
je navedena na plo‰ãici s
tehniãnimi podatki, ki je
pritrjena na stroju.
5
EN
CHAPTER 2
GUARANTEE
The appliance is supplied
with a guarantee certificate
which allows free use of the
Technical Assistance Service.
SL
2. POGLAVJE
GARANCIJA
Ob nakupu aparata vam
mora prodajalec izdati
izpolnjen in potrjen
garancijski list.
Na osnovi potrjenega
garancijskega
lista in raãuna imate v roku
enega leta od dneva
nakupa pravico do
brezplaãnega servisiranja
va‰ega aparata s strani na‰e
tehniãne sluÏbe, oziroma
na‰ih poobla‰ãenih
serviserjev pod pogoji, ki so
navedeni v garancijskem
listu.
Poleg garancijskega lista
vam mora trgovec izroãiti
tudi spisek na‰ih
poobla‰ãenih serviserjev, ki so
edini pristojni za popravila
Candyjevih aparatov v
garancijskem roku.
4
EN
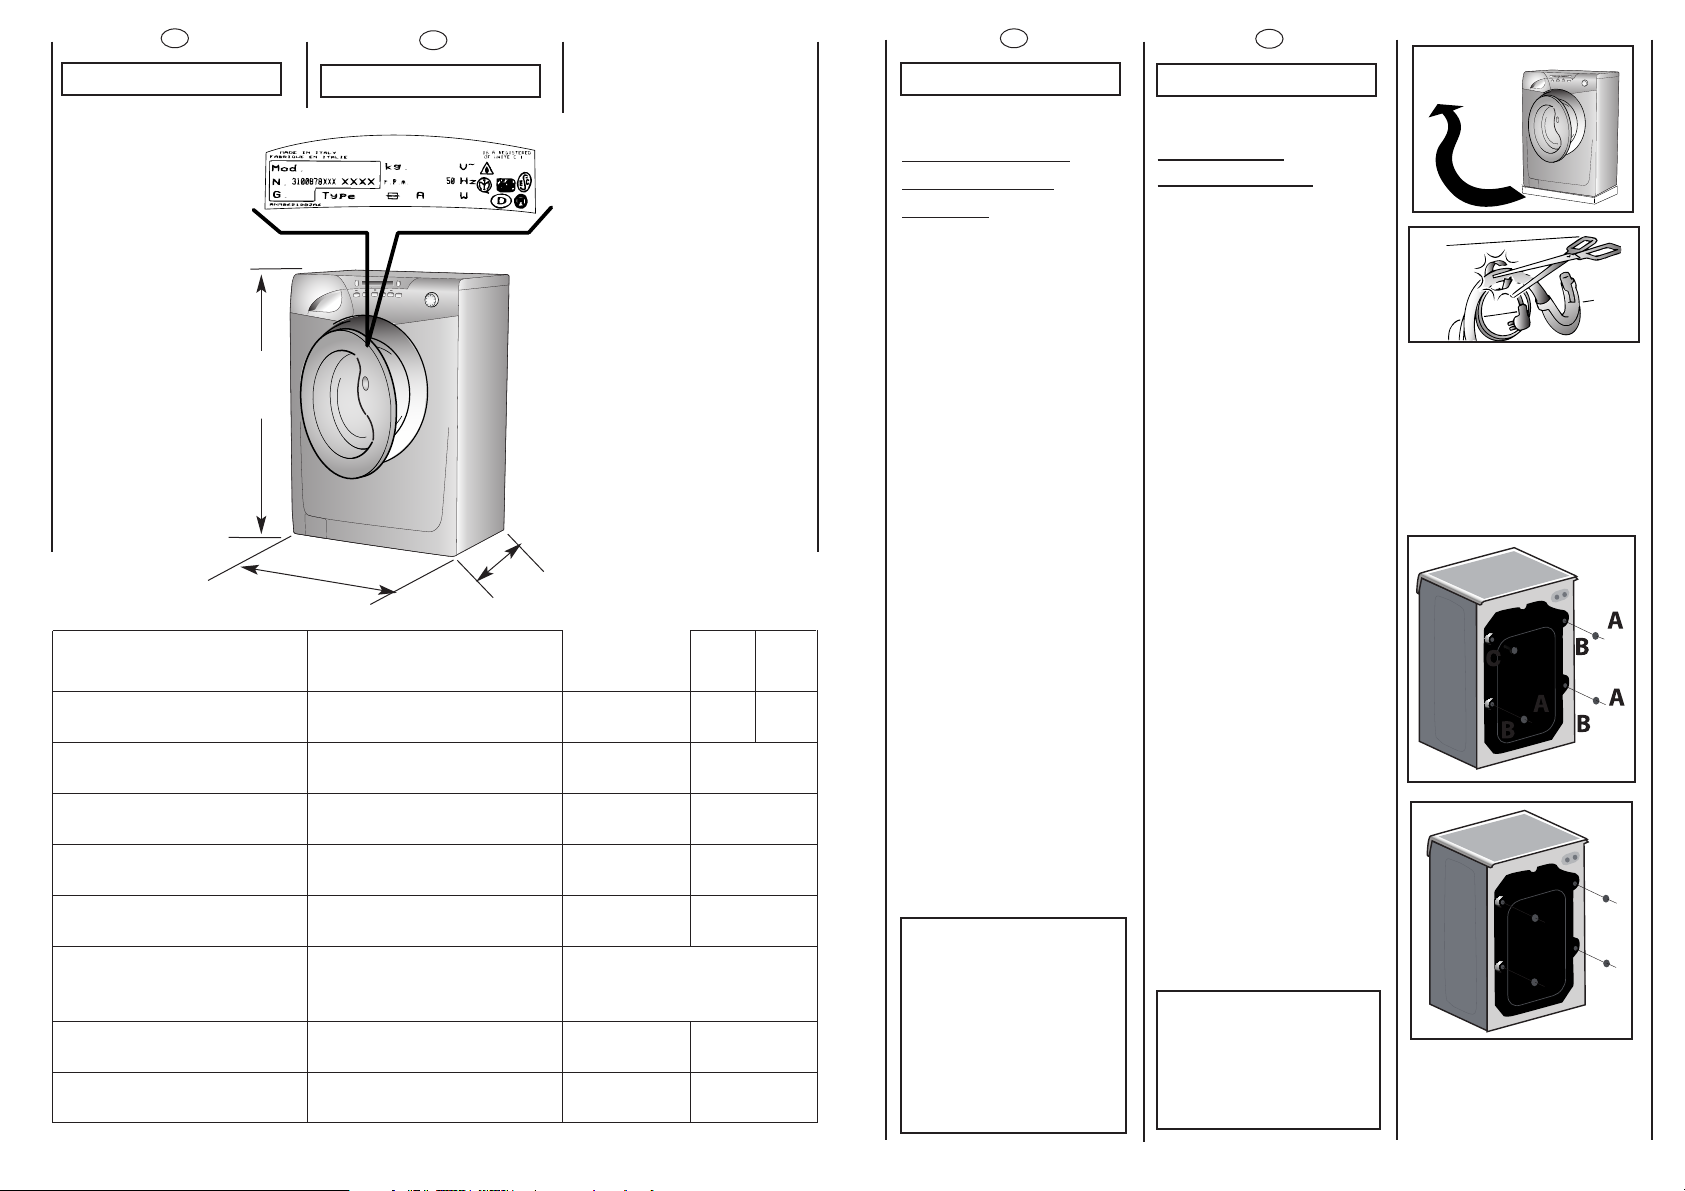
CHAPTER 1
GENERAL POINTS
ON DELIVERY
On delivery, check that the
following are included with
the machine:
A) INSTRUCTION MANUAL
B) CUSTOMER SERVICE
ADDRESSES
C) GUARANTEE
CERTIFICATES
D) CAPS
E) BEND FOR OUTLET TUBE
KEEP THEM IN A SAFE
PLACE
Check that the machine has
not incurred damage during
transport. If this is the case,
contact your nearest Candy
Centre.
E
AB
C
D
SL
1. POGLAVJE
SPLO·NA
OPOZORILA IN
NASVETI OB
PREVZEMU APARAT
A
Ob prevzemu aparata vam
mora trgovec izroãiti
naslednje dokumente
in pribor:
A) NAVODILO ZA
UPORABO
B) SPISEK POOBLA·âENIH
SERVISOV
C) GARANCIJSKI LIST
D) POKROVâKI
E) UKRIVLJENI NOSILEC
ODTOâNE CEVI
PROSIMO, DA VSE
NA·TETO SKRBNO
SHRANITE!
Kupec mora stroj pregledati
ob prevzemu pri trgovcu in
preveriti, ãe na njem ni
vidnih po‰kodb!
7
EN
● Do not use adaptors or
multiple plugs.
● This appliance is not
intended for use by persons
(including children) with
reduced physical,sensory or
mental capabilities, or lack of
experience and knowledge,
unless they have been given
supervision or instruction
concerning use of the
appliance by a person
responsible for their safety.
Children should be
supervised to ensure that
they do not play with the
appliance.
● Do not pull the mains lead
or the appliance itself to
remove the plug from the
socket.
● Do not leave the
appliance exposed to
atmospheric agents (rain, sun
etc.)
● In the case of removal,
never lift the appliance by
the knobs or detersive
drawer.
● During transportation
do not lean the door against
the trolley.
Important!
When the appliance
location is on carpet floors,
attention must be paid so as
to ensure that there is no
obstruction to the bottom
vents.
● Lift the appliance in pairs
as illustrated in the diagram.
● In the case of failure
and/or incorrect operation,
turn the washing machine
off, close the water inlet tap
and do not tamper with the
appliance. Contact a Candy
Technical Assistance Centre
for any repairs and ask for
original Candy spare parts.
Avoidance of these norms
may compromise the safety
of the appliance.
● Should the supply cord
(mains cable) be demaged,
this is to be replaced by a
specific cable available from
the after sales service centre.
SL
● Odsvetujemo prikljuãitev
stroja na elektriãno omreÏje
preko razliãnih pretvornikov ali
razdelilnikov.
● Osebe (vkljuãno z otroci) z
zmanj‰animi fiziãnimi,
zaznavnimi ali du‰evnimi
sposobnostmi ter osebe, ki
nimajo zadostnih izku‰enj ali
predznanja, smejo uporabljati
aparat le pod nadzorom in z
navodili oseb, ki so seznanjene s
pravilno uporabo aparata in ki
so odgovorni za njihovo varnost.
Otroke med uporabo aparata
nadzirajte. Poskrbite, da se ne
bodo igrali z aparatom.
● Ne vlecite prikljuãnega kabla
ali celo aparata samega, ãe
Ïelite iztakniti vtiã iz vtiãnice.
● Elektriãni aparati ne smejo biti
izpostavljeni razliãnim
atmosferskim vplivom kot so npr.
deÏ, sonce ipd.
● Pazite, da stroja ob
preme‰ãanju ali prevaÏanju ne
dvigajte na strani, kjer so
name‰ãene stikala in gumbi,
oziroma na strani, kjer je
name‰ãena posodica za
detergent.
● Med prevaÏanjem nikoli ne
naslonite sprednje strani stroja
(tj., strani, kjer so name‰ãena
vrata) na voziãek.
POMEMBNO!
âe postavite stroj na pod, ki je
prekrit s tekstilnimi oblogami,
skrbno preverite, ãe vlakna take
talne obloge ne zapirajo
odprtin za zraãenje, ki so
name‰ãene na spodnjem robu
stroja.
Stroj morata dvigniti vedno dve
osebi, tako kot je prikazano na
skici.
● V primeru okvare ali
nepravilnega delovanja stroja,
stroj takoj izklopite in iztaknite
vtikaã iz vtiãnice ter zaprite pipo
za dotok vode do stroja. Nato
pokliãite enega od
poobla‰ãenih Candyjevih
serviserjev, da vam stroj
popravi.
Ob morebitni zamenjavi
vgradnih delov vedno
zahtevajte vgradnjo originalnih
Candyjevih rezervnih delov.
Neupo‰tevanje gornjih
navodil lahko vpliva na varno in
pravilno delovanje stroja.
● âe se po‰koduje prikljuãni
kabel, ga morate zamenjati s
POSEBNIM PRIKLJUâNIM
KABLOM, ki ga lahko nabavite
kot rezervni del pri
poobla‰ãenem prodajalcu.
6
EN
CHAPTER 3
SAFETY MEASURES
IMPORTANT:
FOR ALL CLEANING
AND MAINTENANCE
WORK
● Remove the plug
● Turn off the water inlet tap.
● All Candy appliances are
earthed. Ensure that the
main electricity circuit is
earthed. Contact a qualified
electrician if this is not the
case.
Appliance complies
with European Directives
73/23/EEC and 89/336/EEC,
replaced by 2006/95/EC and
2004/108/EC, and
subsequent amendments.
● Do not touch the
appliance with wet or damp
hands or feet.
● Do not use the appliance
when bare-footed.
● Extreme care should be
taken if extension leads are
used in bathrooms or shower
rooms. Avoid this where
possible.
WARNING: DURING THE
WASHING CYCLE,THE
WATER CAN REACH A
TEMPERATURE OF 90°C.
● Before opening the
washing machine door,
ensure that there is no water
in the drum.
SL
3. POGLAVJE
VARNOSTNI
PREDPISI
PRED ZAâETKOM
âI·âENJA ALI
VZDRÎEVANJA
PRALNEGA
STROJA OBVEZNO
UPO·TEVAJTE
NASLEDNJE
VARNOSTNE PREDPISE:
● Iztaknite vtiã iz vtiãnice.
● Zaprite pipo za dotok
vode.
● Vsi Candyjevi gospodinjski
aparati so opremljeni z
ozemljitvenim kablom.
Preverite, ãe je va‰a
elektriãna napeljava pravilno
ozemljena! âe ni, naj vam
napeljavo pred prikljuãitvijo
pravilno napelje strokovnjak!
Aparat je skladen z
doloãili Evropske
gospodarske zbornice 73/23
in 89/336 , nadomestnimi
doloãili 2006/95 in 2004/108
ter kasnej‰imi modifikacijami.
● Z vlaÏnimi rokami ali
nogami se aparata ne
dotikajte. Ne uporabljajte
pomivalnega stroja
bosonogi.
● Ne uporabljajte podalj‰kov
za prikljuãitev stroja na
elektriãno omreÏje, ãe je stroj
name‰ãen v kopalnici ali
drugem vlaÏnem prostoru.
OPOZORILO!
MED PRANJEM SE
VODA V STROJU
LAHKO SEGREJE TUDI
DO 90° C.
● Pred odpiranjem vrat stroja
se prepriãajte, ãe v bobnu
stroja ni vode.
9
EN
CHAPTER 5
SETTING UP
INSTALLATION
Move the machine near its
permanent position without
the packaging base.
Carefully cut the securing
strap that holds the main
cord and the drain hose.
Remove the 3 fixing screws
marked (A) and remove the
3 spacers marked (B)
Remove the screw (C).
A spacer will fall inside the
machine.
By tilting the machine,
remove the above
mentioned spacer.
Cover the 4 holes using the
caps provided in the
instruction booklet pack.
WARNING:
DO NOT LEAVE THE
PACKAGING IN THE
REACH OF CHILDREN
AS IT IS A POTENTIAL
SOURCE OF DANGER.
SL
55.. PPOOGGLLAAVVJJEE
NAMESTITEV IN
PRIKLJUâITEV
STROJA
Stroj brez podstavka
postavite v bliÏino mesta,
kjer bo stalno prikljuãen.
Previdno prereÏite
jermenãek, ki pridrÏuje
prikljuãni kabel in odtoãno
cev.
Odvijte 3 vijake (A) in
odstranite 3 podloÏke (B).
Odvijte vijak (C).
PodloÏka bo padla v
notranjost stroja.
Nagnite stroj in odstranite
omenjeno podloÏko.
Zakrijte luknje s priloÏenimi
pokrovãki; na‰li jih boste v
vreãki z Navodili za
uporabo.
OPOZORILO:
DELOV EMBALAÎE NE
SMETE PU·âATI NA
DOSEGU OTROK, KER JE
ZANJE LAHKO ZELO
NEVARNA! PROSIMO,
DA EMBALAÎO
ODLOÎITE V SKLADU Z
VELJAVNIMI
OKOLJEVARNOSTNIMI
PREDPISI!
8
kg 4
6÷15
2150
1,8
10
min. 0,05
max. 0,8
220-240
l
W
kWh
A
1000
MPa
V
6
Pranje
Washing
Su‰enje
Drying
EN
CHAPTER 4
MAXIMUM WASH
LOAD DRY
NORMAL WATER LEVEL
POWER INPUT
ENERGY CONSUMPTION
(PROG. 90°C)
POWER CURRENT FUSE
AMP
SPIN
r.p.m.
WATER PRESSURE
SUPPLY VOLTAGE
TECHNICAL DATA
SL
44.. PPOOGGLLAAVVJJEE
NAJVEâJA KOLIâINA SUHEGA
PERILA ZA ENO PRANJE
KOLIâINA VODE PRI
OBIâAJNEM PRANJU
NAPETOST
SKUPNA PRIKLJUâNA MOâ
PORABA ELEKTRIâNE ENERGIJE
(PROGRAM ZA PRANJE PRI 90°C)
MOâ VAROVALKE
·TEVILO VRTLJAJEV
CENTRIFUGE (vrt./min.)
DOVOLJENI TLAK VODE V
VODOVODNEM OMREÎJU
TEHNIâNI PODATKI
52 cm
60 cm
85
cm
11
EN
Use the 4 feet to level the
machine with the floor:
a) Turn the nut clockwise to
release the screw adjuster of
the foot.
b) Rotate foot to raise or
lower it until it stands firmly on
the ground.
c) Lock the foot in position
by turning the nut anti-
clockwise until it comes up
against the bottom of the
machine.
Ensure that the knob is on the
“OFF” position and the load
door is closed
Insert the plug.
ATTENTION:
should it be necessary to
replace the supply cord,
connect the wire in
accordance with the
following colours/codes:
BLUE - NEUTRAL (N)
BROWN - LIVE (L)
YELLOW-GREEN - EARTH ( )
After installation, the
appliance must be
positioned so that the plug is
accessible.
A
B
C
SL
Uporabite vse 4 nogice,
zravnate pralni stroj z tlemi
a) Matico, s katero je pritrjena
nogica sprostite tako, da jo
odvijete z
ustreznim kljuãem.
b) Nogico z obraãanjem
zvi‰ujte ali zniÏujte toliko ãasa,
dokler se ne bo povsem
prilegala tlom.
c) Po konãanem izravnavanju
nogico ponovno pritrdite tako,
da jo z ustreznim kljuãem
privijate v smeri nasprotni od
gibanja urinih kazalcev dokler
se povsem ne prileÏe dnu
stroja.
Prepriãajte se, da je gumb
programatorja v izklopljenem
poloÏaju in da so vrata stroja
zaprta.
Vtaknite vtiã v vtiãnico.
POZOR:
ãe je treba zamenjati prikljuãni
elektriãni kabel, prikljuãite Ïice
skladno s spodaj navedenimi
barvami/kodami:
MODRA - NULA (N)
RJAVA - FAZA (L)
RUMENA-ZELENA - OZEMLJITEV ( )
Stroj mora biti name‰ãen tako,
da lahko vtiãnico doseÏete v
vsakem trenutku.
10
min 50 cm
max 85 cm
+2,6 mt max
max 100 cm
min 4 cm
EN
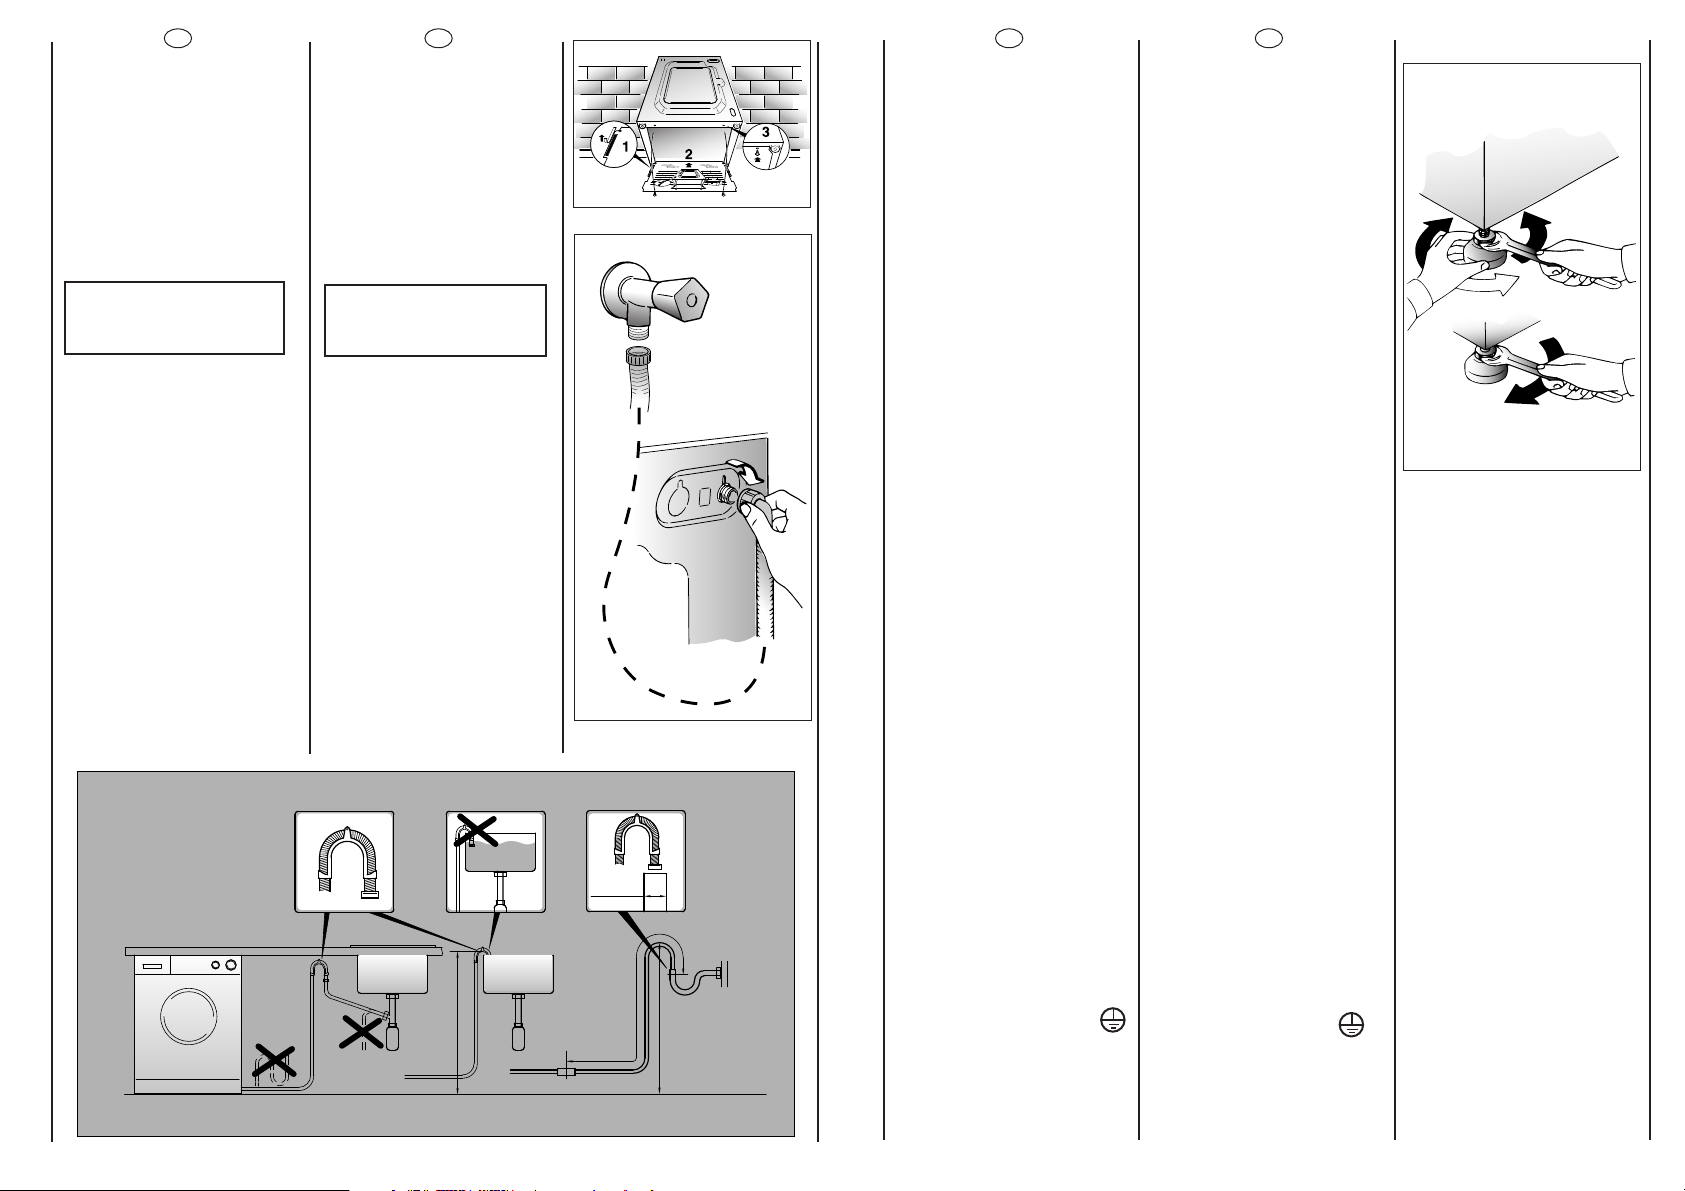
Fix the sheet of corrugated
material on the bottom as
shown in picture.
Connect the fill hose
to the tap.
The appliance must be
connected to the water
mains using new hose-sets.
The old hose-sets should not
be reused.
IMPORTANT:
DO NOT TURN THE TAP
ON AT THIS TIME.
Position the washing
machine next to the wall.
Hook the outlet tube to the
edge of the bath tub,
paying attention that there
are no bends or
contractions along the tube.
It is better to connect the
discharge hose to a fixed
outlet of a diameter greater
than that of the outlet tube
and at a height of min. 50
cm. If is necessary to use the
plastic sleeve supplied.
The appliance must not be
installed behind a lockable
door,a sliding door or a door
with a hinge on the opposite
side to that of the washer
dryer.
SL
Izolacijsko plo‰ão iz
valovitega kartona
namestite na dno stroja
tako, kot je prikazano na sliki.
Dotoãno cev za vodo
privijte na pipo.
Aparat smete prikljuãiti na
vodovodno omreÏje
izkljuãno z novimi, priloÏenimi
dovodnimi cevmi. Starih
cevi ne smete uporabiti.
OPOZORILO!
PIPE ZA VODO ·E NE
ODPRITE!
Stroj potisnite k steni in pri
tem pazite, da dotoãna in
odtoãna cev za vodo nista
zviti ali stisnjeni. Odtoãno
cev za vodo obesite nato
preko robu kadi.
Mnogo bolje pa je, ãe v
vodovodni napeljavi
predvidite stalni odtok, ki
mora biti enakega premera
kot je odtoãna cev,
namestiti pa ga morate v
vi‰ini najmanj 50 cm od tal.
âe je potrebno, namestite
na konec odtoãne cevi ‰e
ãvrsto nosilno koleno, ki je
priloÏeno v vreãki s priborom.
Aparata ne smete postaviti
za vrati, ki se zaklenejo, za
drsnimi vrati ali za vrati, pri
katerih so teãaji na nasprotni
strani od tiste, na kateri stoji
pralo-su‰ilni stroj!
13
A
2 min.
B
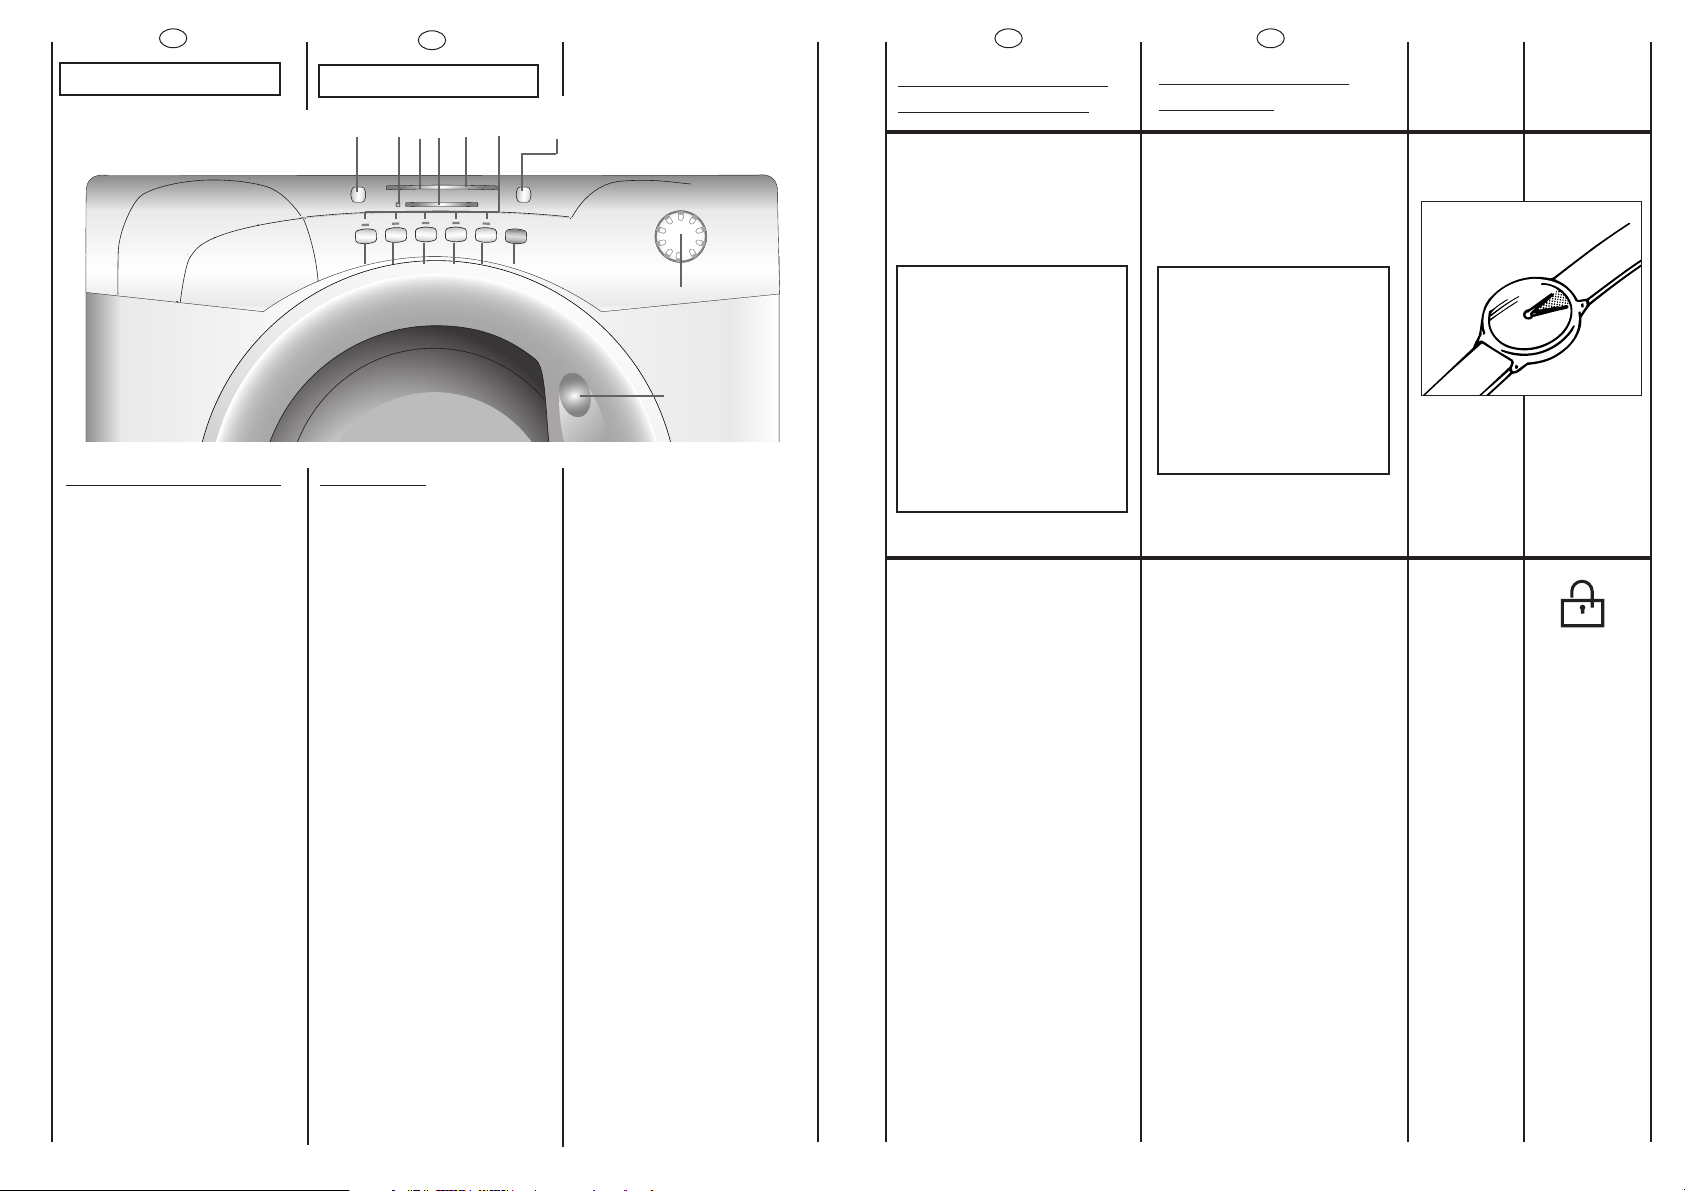
DESCRIPTION OF
CONTROL
DOOR HANDLE
Press the finger-bar inside
the door handle to open the
door
IMPORTANT:
A SPECIAL SAFETY
DEVICE PREVENTS THE
DOOR FROM OPENING
AT THE END OF THE
WASH/SPIN CYCLE.AT
THE END OF THE SPIN
PHASE WAIT UP TO 2
MINUTES BEFORE
OPENING THE DOOR.
DOOR LOCKED INDICATOR
The “Door Locked” indicator
light is illuminated when the
door is fully closed and the
machine is ON.
When START/PAUSE is pressed
on the machine with the
door closed the indicator will
flash momentarily and then
illuminate.
If the door is not closed the
indicator will continue to
flash.
A special safety device
prevents the door from being
opened immediately after
the end of the cycle.Wait for
2 minutes after the wash
cycle has finished and the
Door Locked light has gone
out before opening the door.
At the end of cycle turn the
programme selector to OFF .
EN
OPIS POSAMEZNIH
TIPK IN GUMBOV
ROâAJ VRAT
Vrata odprete tako, da
pritisnete na vzvod v
notranjosti vrat.
POMEMBNO:
POSEBNA VARNOSTNA
NAPRAVA PREPREâUJE
ODPIRANJE VRAT TAKOJ
PO KONâANEM PRANJU.
PO KONâANEM
CENTRIFUGIRANJU
POâAKAJTE ·E PRIBLIÎNO
2 MIN., DA SE VARNOSTNA
NAPRAVA SPROSTI, ·ELE
NATO LAHKO ODPRETE
VRATA STROJA.
LUâKA 'ZAKLENJENA VRATA'
Luãka se osvetli, ko pravilno
zaprete vrata in vklopite stroj.
Ko pritisnete na tipko START,
medtem ko so vrata zaprta,
luãka kratek ãas utripa, nato
pa ostane osvetljena.
âe vrata niso pravilno zaprta,
luãka ‰e naprej utripa.
Posebna varnostna naprava
prepreãuje takoj‰nje
odpiranje vrat po koncu
programa. Poãakajte 2
minuti in ko luãka ugasne,
lahko odprete vrata. Ko je
program pranja zakljuãen,
obrnite stikalo programatorja
na OFF.
SL
12
A
B
C
D
E
F
G
H
I
L
M
N
O
P
Q
R
EN
CHAPTER 6
CONTROLS
Door handle
Door locked indicator light
Timer knob for wash
programmes with OFF position
Start Delay button
Time countdown system
Spin Speed button
Spin speed indicator light
Buttons indicator light
Intensive button
Aquaplus button
Drying programme selection
button
Drying programme indicators
Cold wash button
Crease Guard button
Start/Pause button
Detergent drawer
6. POGLAVJE
OPIS STIKALNE PLO·âE
Roãaj vrat
Kontrolna luãka zaklenjena
vrata
Gumb za nastavitev
programov pranja – gumb
programatorja
Tipka za zamik vklopa
Sistem za prikaz ãasa do
konca programa
Gumb za nastavitev ‰tevila
vrtljajev centrifuge
Kontrolna luãka za nastavljeno
hitrost centrifugiranja
Kontrolne luãke posameznih
tipk
Tipka za intenzivno pranje
Tipka za Allergie
Tipka za izbiranje programov
su
‰enja
Indikatorji programov
su‰enja
Tipka za pranje s hladno vodo
Tipka za lahko likanje
Tipka Start
Predalãek za pralna sredstva
SL
C
A
R
G
DH
F
I L M O P Q
EBN
15
D
START DELAY BUTTON
Appliance start time can be
set with this button, delaying
the star by 3, 6 or 9 hours.
Proceed as follow to set a
delayed start:
Select a programme
(“STOP”indicator light blinks)
Press Start Delay button
(each time the button is
pressed the start will be
delayed by 3,6 or 9 hours
respectively and the
corresponding light will
blink).
Press START to commence
the Start Delay operation
(the indicator light
associated with the
selected Start Delay time
stops blinking and remains
ON).
At the end of the required
time delay the programme
will start.
To cancel the Start Delay
function :
press the Start Delay button
until the indicator lights will
be off (The STOP light blinks)
and the programme can be
started manually using the
START button or switch off
the appliance by turning the
programme selector to off
position.
TIME COUNTDOWN SYSTEM
INDICATOR LIGHTS
In order to better manage
your time,this washing
machine features an
indicator light system that
keeps you constantly
informed on the remaining
cycle time.
Indicator light 90: Remaining
time above 60 minutes
Indicator light 60: Remaining
time less than 60 minutes
Indicator light 30: Remaining
time less than 30 minutes
Indicator light 15: Remaining
time less than 15 minutes
Indicator light Stop: End of
the programme.
EN
SL
âASOVNI ZAMIK VKLOPA
S pomoãjo tipke lahko
nastavite ãasovni zamik
vklopa za 3, 6 ali 9 ur. To
storite na naslednji naãin:
Izberite program (kontrolna
luãka "STOP" utripa). Pritisnite
na tipko za zamik vklopa; ob
vsakem pritisku se spremeni
vrednost - 3 - 6 - 9; utripa
ustrezna kontrolna luãka.
S pritiskom na tipko START
aktivirate od‰tevanje
nastavljenega ãasa
nastavljenega ãasovnega
zamika (kontrolna luãka
nastavljene vrednosti
preneha utripati in ostane
osvetljena).
Ko preteãe nastavljeni
ãasovni zamik, zaãne stroj
prati.
âe Ïelite preklicati
nastavljeni ãasovni zamik,
pritiskajte na tipko za
nastavljanje ãasovnega
zamika, dokler vse luãke (3-6-
9) ne ugasnejo (kontrolna
luãka STOP utripa). Zdaj
lahko roãno vklopite
program pranja - pritisnite na
tipko START, ali pa izklopite
stroj - obrnite gumb
programatorja v izklopljeni
poloÏaj.
PRIKAZ âASA DO KONCA
PROGRAMA
Da bi vam omogoãili bolj‰e
razpolaganje s ãasom, smo
ta pralni stroj opremili s
sistemom za prikaz ãasa, ki
mora ‰e preteãi do konca
programa. Tako ste sproti
obve‰ãeni, kdaj bo perilo
oprano.
Indikator 90 minut: do konca
programa je veã kot 60
minut
Indikator 60 minut: do konca
programa je manj kot 60
minut
Indikator 30 minut: do konca
programa je manj kot 30
minut
Indikator 15 minut: do konca
programa je manj kot 15
minut
Osvetljen indikator STOP:
Program je zakljuãen.
E
14
C
EN
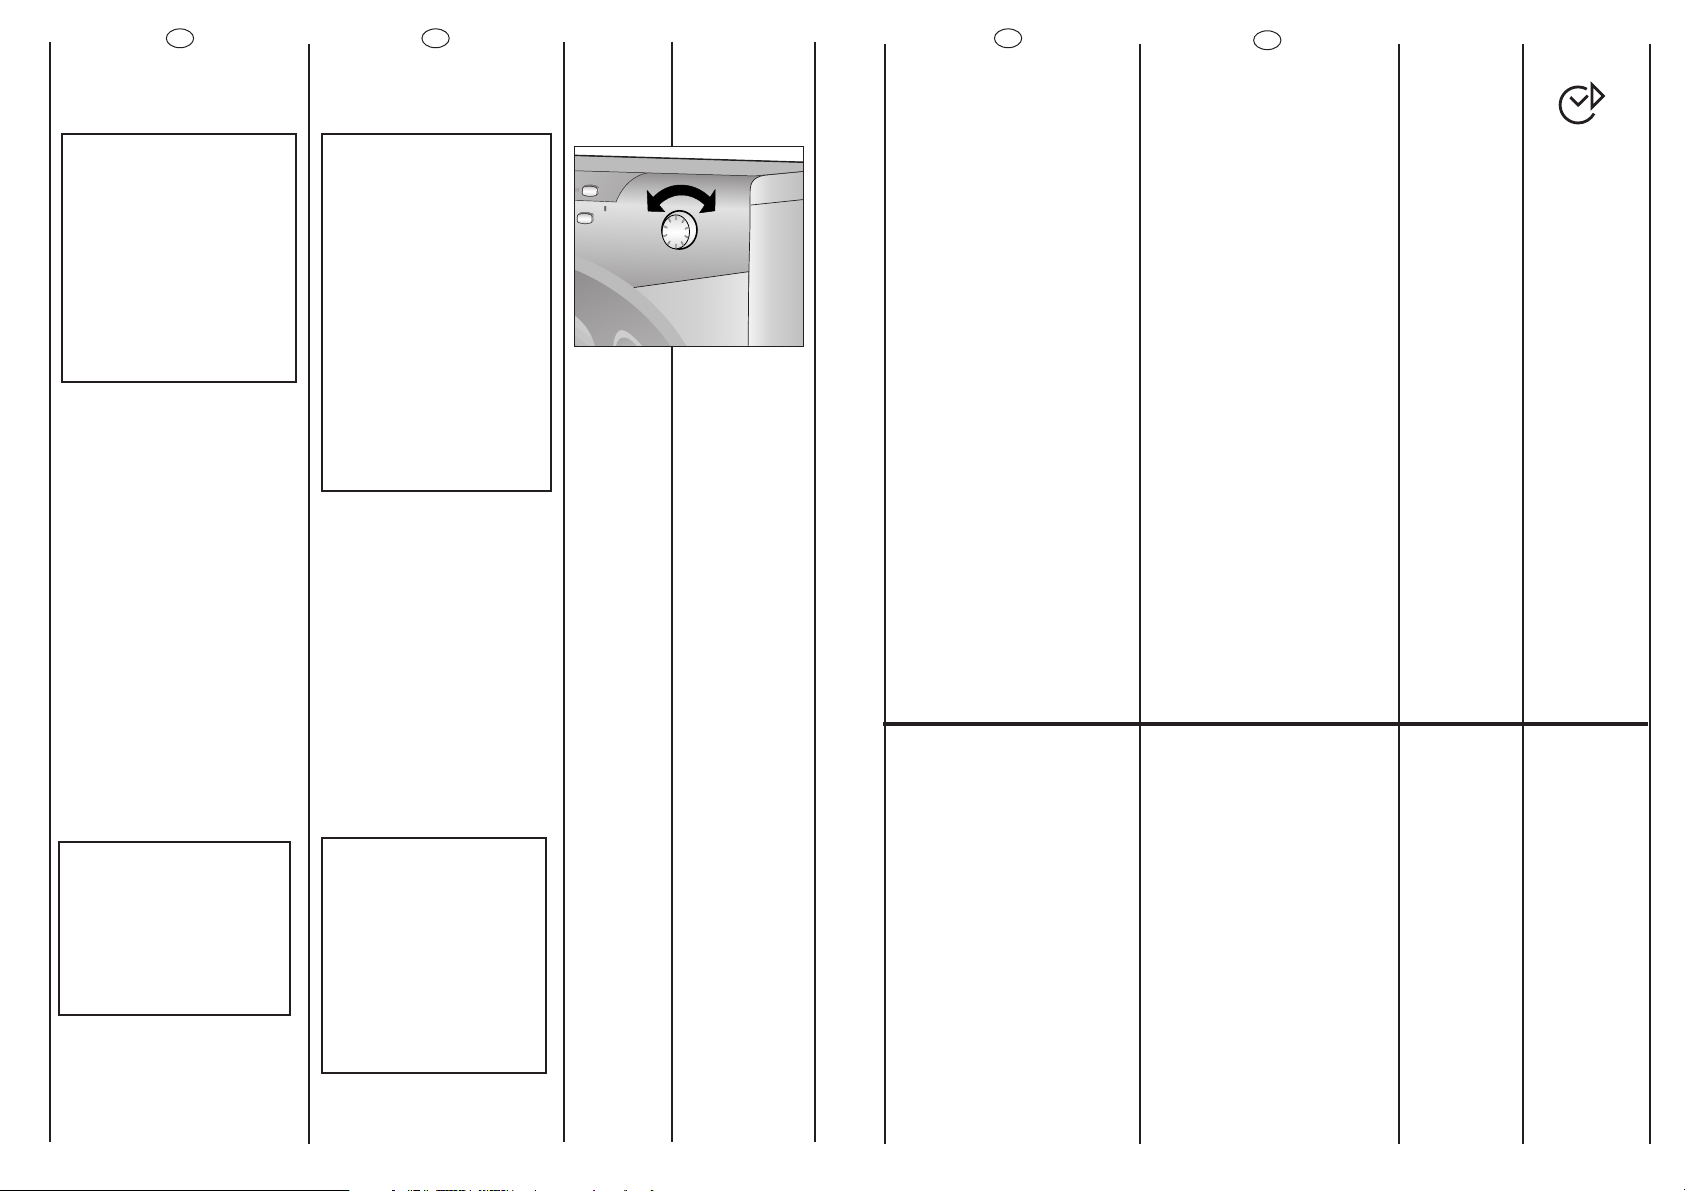
PROGRAMME SELECTOR WITH
OFF POSITION
ROTATES IN BOTH
DIRECTIONS.
THE MACHINE IS
TURNED ON BY
SELECTING A
PROGRAMME VIA THE
PROGRAMME
SELECTOR.
THIS STATUS WILL BE
INDICATED BY THE STOP
INDICATOR LIGHT
FLASHING, THIS LIGHT
WILL CONTINUE TO
FLASH UNTIL THE
MACHINE HAS STARTED
OR THE MACHINE IS
RETURNED TO THE OFF
POSITION.
Press the "Start/Pause"
button to start the selected
cycle.
The programme carries out
with the programme
selector stationary on the
selected programme till
cycle ends.
Switch off the washing
machine by turning the
selector to OFF.
NOTE:
THE PROGRAMME
SELECTOR MUST BE
RETURN TO THE OFF
POSITION AT THE END
OF EACH CYCLE OR
WHEN STARTING A
SUBSEQUENT WASH
CYCLE PRIOR TO THE
NEXT PROGRAMME
BEING SELECTED AND
STARTED.
SL
GUMB PROGRAMATORJA ZA
IZBIRANJE PROGRAMOV IN
OZNAKO OFF (IZKLOPLJENO)
GUMB SE VRTI V OBE
SMERI. STROJ VKLOPITE
TAKO, DA OBRNETE GUMB
NA ÎELENI PROGRAM.
UTRIPATI ZAâNE
KONTROLNA LUâKA STOP,
KI UTRIPA, DOKLER STROJ
NE ZAâNE DELOVATI OZ.
DOKLER NE OBRNETE
GUMBA NAZAJ V
IZKLOPLJENI POLOÎAJ
(OFF).
Stroj zaÏenete s pritiskom na
tipko Start/pavza.
Med potekom programa
gumb programatorja miruje
(se ne obraãa).
Stroj izklopite tako, da obrnete
gumb programatorja na OFF.
OPOMBA:
GUMB PROGRAMATORJA
MORATE OBRNITI NA OFF
PO ZAKLJUâENEM
PROGRAMU PRANJA OZ.
âE ÎELITE IZBRATI IN
ZAGNATI NOVI
PROGRAM.
 Loading...