


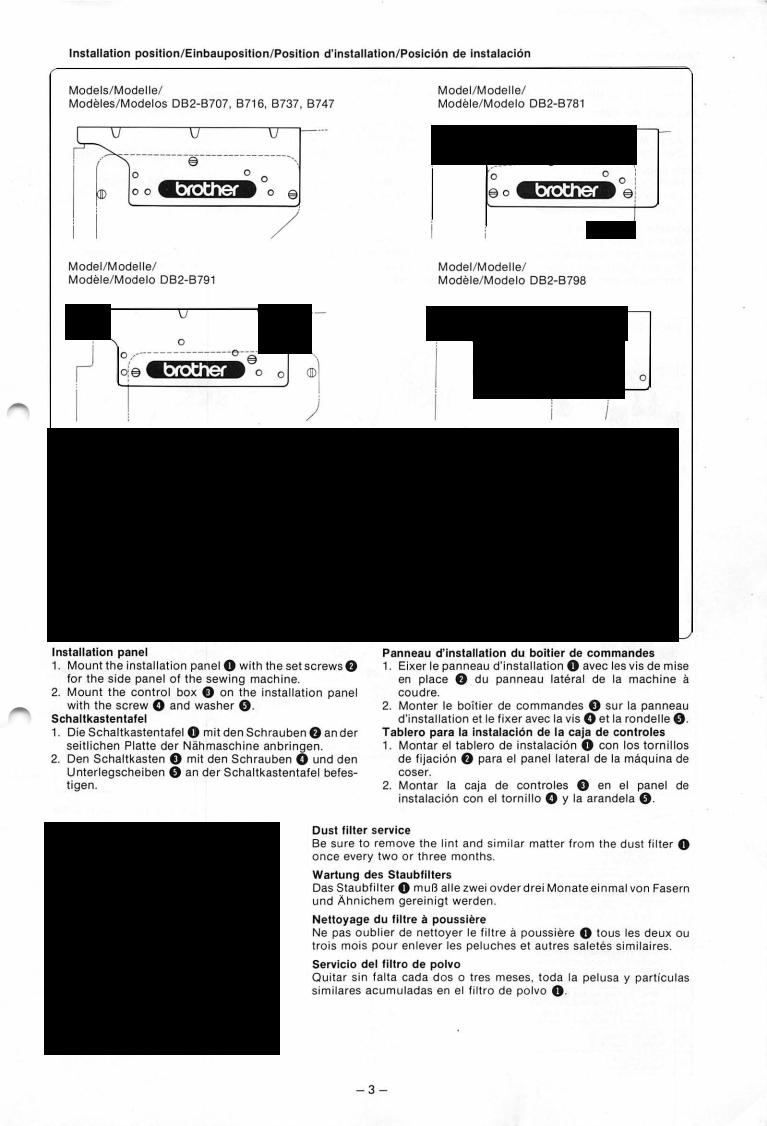
Motor installation
*Install the motor to the table.
*Tighten the nut 0 securely.
*If a commercially available sewing table is used, refer to the included (motor side) figure before making the
holes.
Befestigung des Motors
*Den Motor am Tisch befestigen.
*Die Mutter 0 richtig anziehen.
*Falls ein handelsublicher Nahtisch verwendet wird,
mussen die Locher nach der beiliegenden Vorlage gemacht werden.
Installation du moteur
*Installer le moteur sur Ia table.
*Serrer fermement l'ecrou0.
*Si on utilise une table de machine acoudre courante (que l'onpeut acheter dans le commerce), avant de faire les trous de montage, consulter le schema de montage inclus (du cote du moteur).
*lnstalar el motor en Ia mesa.
*Apretar firmemente Ia tuerca 0.
*Si se utiliza una mesa comun, consultar Ia figura
incluida (en el lado del motor) antes de realizar los orificios.lnstalaci6n del motor
|
|
|
Installation of the switch assembly |
|
|
|
|
* |
Install the switch assembly 0 to the table by using |
~ |
|||
|
115 mm |
the screws 8. |
· |
|
||
|
|
|
* Staple the lead wiring to the table to prevent it from |
|
||
|
|
|
||||
|
|
|
|
contacting the belt. |
|
|
|
|
|
|
|
|
|
Befestigung der Schaller
*Die Schalter 0 mit den Schrauben 8 am Nahtisch befestigen.
*Das Netzkabel am Tisch befestigen, so daB es den Riemen nicht beruhren kann.
Installation de l'unltede commande
*Fixer l'unitede commande 0 aIa table au moyen des vis 8.
*Agrafer le fil conducteur contre Ia table afin d'empecherqu'iltouche Ia courroie.
lnstalacion del conjunto del interrupter
*lnstalar el conjunto del interrupter 0 en Ia mesa utilizando los tornillos 8.
*Enganchar el cable en Ia mesa para evitar que entre en contacto con Ia correa.
*Install the control switch 0 to the table by using the screws 8.lnstallation of the control switch (MDS-404/414)
* The control switch 0 cannot be used for the MDS- ~ 403/413 motor.
*Den Schaltkasten 0 mit den Schrauben 8 am Nahtisch befestigen.
*Der Schaltkasten 0 kann nicht fUr den Motor MDS- 403/413 verwendet werden.Befestigung des Schaltkastens (MDS-404/414)
Mise en place de l'unitede commande (MDS-404/414)
*Fixer l'unitede commande 0 aIa table au moyen des vis 8.
*Cette unite de commande 0 ne peut pas etre utiIisee avec·les moteurs MDS-403/413.
lnstalaclon del interrupter de control (MDS-404/414)
*lnstalar el interrupter de control 0 en Ia mesa
*utilizando los tornillos 8. nose puede utilizar con elEl interruptor de control 0
motor MDS-403/413.
LE-C4-BR control unit/
Schaltkasten LE-C4-BR/
Unite de commande LE-C4-BR/
Unidad de control LE-C4-BR
- 2 -
\
From the library of: Superior Sewing Machine & Supply LLC

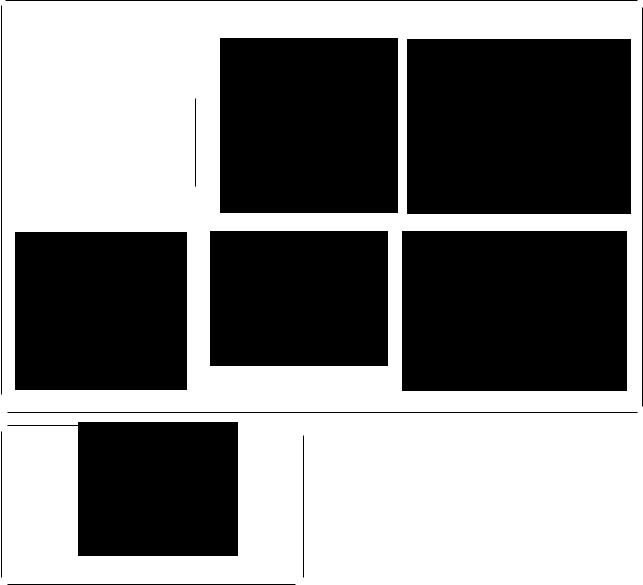
Connection of wires
•Turn the power switch off before installation or removal of the plug.
*Take care to keep the wires away from the rotating parts.
*Pass the plug through the wire hole on the table, then install by following the figures.
AnschluB der Kabel
•Die Kabel durfen nur bei ausgeschalteter Maschine angeschlossen und gelost werden.
*Vergewissern Sie sich, daB die Kabel keine beweglichen Teile beruhren.
*Den Stecker durch das Kabelfuhrungsloch im Tisch stecken und wie in den Abbildungen gezeigt anschlieBen.
Branchement des fils
•N'effectueraucun branchement ni debranchement des fiches pendant que Ia machine est sous tension.
*Verifier que tous les fils sous Ia table ne sont en contact avec aucune piece mobile.
*Passer Ia fiche par !'orificedans Ia table, puis installer comme indique sur Ia figure.
Conexlon de los cables
• Nunca conectar ni desconectar Ia clavijas con Ia corriente encendida.
* Revisar para cerciorarse que los cables que se hallan debajo de Ia mesa no toquen piezas que se mueven. * Primero habra que pasar Ia clavija a traves del agujero para el cable en Ia mesa pasando, luego, a hacer Ia
instalaci6n como se ilustra en las figuras siguientes.
[MDS-403·413][8716]
(For -700) |
(For -900) |
[MDS-404·414]
®
Options/Sonderzubehor |
Options/Sonderzubehor |
En option/Opciones · |
En option/Opciones |
(For -700)
(For -900)
|
|
I |
|
|
|
|
|
|
|
|
|
|
|
I |
|
-100 |
|
-400 |
-700 |
-900 |
|||
|
|
I |
|
|
|||||||
|
|
|
|
|
|
|
|
|
|
||
|
I |
|
|
|
|
|
|
|
|
||
|
a |
|
|
|
|
|
|
|
|
||
® |
Plug 12 (Sewing machine)/Stecker 12 (Nahmaschine)/ |
|
0 |
|
|
0 |
0 |
|
0 |
||
Fiche 12 (Machine a coudre)/ |
|
|
|
|
|||||||
|
Clavija 12 (Maquina de coser) |
|
|
|
|
|
|
|
|
||
® |
Plug 9 (Synchronizer)/Stecker 9 (Synchronisator)/ |
|
0 |
|
|
0 |
0 |
|
0 |
||
Fiche 9 (Synchronisateur)/Ciavija 9 (Sincronizador) |
|
|
|
|
|||||||
@ |
Plug 6 (Option)/Stecker 6 (Sonderausstattung)/ |
|
/ |
|
/ |
|
0 |
|
0 |
||
Fiche 6 (en option)/Ciavija 6 (opcional) |
|
|
|
|
|
|
|||||
|
|
|
|
|
|
|
|
|
|
||
|
Plug 1 (Thread-wiper switch)/ |
|
v |
|
|
|
|
|
|||
@ |
Stecker 1 (Fadenwischerschalter)/ |
|
|
0 |
0 |
|
0 |
||||
Fiche 1 (l~rrupteur tire-fils)/ |
|
|
|
||||||||
|
Clavlja 1 (Interrupter del limpiahilos) |
|
|
|
|
|
|
||||
|
Plug 2 (Presser bar lifter)/ |
|
|
|
|
|
|
|
|||
®·® |
Stecker 2 (Stoffdruckerheber)/ |
|
|
|
|
|
® |
|
@ |
||
Fiche 2 (Levee de barre de pied presseur)/ |
|
|
|
|
|
|
|||||
|
Clavija 2 (Levantador de prensatelas) |
|
/ |
|
v |
v |
|
||||
|
Plug 3/Stecker 3/ |
|
|
|
|||||||
® |
|
v |
I |
|
|
® |
|||||
Fiche 3/Ciavija 3 |
|
|
|
|
|
|
|
||||
® |
Plug/Stacker/ |
|
|
MDS-404·414 tip |
|||||||
Fiche/Ciavija |
|
|
|||||||||
*The plug ® is the control switch of the MDS-404/414 motor.
•Der Stecker ® ist vom Schaltkasten
des Motors MDS~404/414.
•La fiche® correspond a l'interrupteur de commande du moteur MDS-404/ 414.
•La clavija ® es el interruptor de control para el motor MDS-404/414.
From the library of: Superior Sewing- 4 - Machine & Supply LLC
[MDS-403·413][8737]
©® |
D |
DIP switches/Dip-Schalter/ lnterrupteurs DIP/Interruptores DIP
Selector switch
•There are two types of electromagnetic presser bar lifters, those with a control box and those built into the motor. When using the control box type, be sure to check the DIP switch settings.
1.Remove the cover to the motor control box.
2.DIP switch No.5 should be ON when the solenoid type presser bar lifter control box is in use.
3.DIP switch No.5 should be OFF when the solenoid
type presser bar lifter control box is not in use.
•The presser bar Iifter may not function properly or the solenoid may become excessively hot if this adjustment is not made.
Schaller
;ae Es gibt zwei verschiedene elektromagnetische Stoffdruckerstangenheber, mit einem Schaltkasten und im Motor eingebaut. Bei Verwendung mit einem Schaltkasten mussen die Stellungen der Dip-Schalter kontrolliert werden.
1. Die Abdeckung des Motor-Schaltkastens abnehmen.
~2. Bei Verwendung des Schaltkasten fur den Solenoid-Stoffdruckerstangenheber muB der Dip-Schalter Nr. 5
eingeschaltet warden.
3.Wenn der Schaltkasten fur den Solenoid-StoffdnJckerstangenheber nicht verwendet wird, muB der Dip-Schalter Nr. 5 ausgeschaltet sein.
•Falls diese Einstellung nicht gemacht wird, konnen Fehlfunktionen des Stoffdruckerstangenhebers auftreten bzw. das Solenoid kann uberhitzt werden.
Selecteur.
•II y a deux types de releveur de barre du pied presseur electromagnetique, celui avec un boitier de commande et celui incorpore dans le moteur. Lorsqu'onutilise le type aboitier de controle, prendre soin de verifier les reglages de l'interrupteurDIP.
1.Retirer le couvercle du boitier de commande du moteur.
2.L'interrupteurDIP n°5 doit etre sur Ia position "ON" lorsque le boitier de comman de du releveur de barre du pied presseur atype solenoide est utilise.
3.L'interrupteurDIP no 5 doit etre sur Ia position "OFF" lorsque le boitier de commande du releveur de barre du pied presseur atype solenoide n'estpas utilise.
•Le releveur de barre du pied presseur peut ne pas fonctionner correctement ou le soleno"ide peut devenir excessivement chaud si ce reglage n'estpas effectue.
Conmutador selector
•·Hay dos tipos de levantadores electromagneticos de barra de prensatelas, aquellos con caja de controles y aquellos incorporados en el motor. Si se utiliza el tipo que tiene una caja de controles, verificar las posiciones de
los interruptores DIP. |
· |
1.Quitar Ia cubierta de Ia caja de controles del motor.
2.El interrupter DIP No. 5 debe estar conectado a "ON" cuando se utiliza Ia caja de controles de barra de prensatelas de tipo solenoide.
3.El interrupter DIP No.5 debe estar desconectado a "OFF" cuando nose utiliza Ia caja de controles de barra de
prensatelas de tipo solenoide.
•El levantador de Ia barra del prensatelas puede no funcionar correctamente o el solenoide se puede calentar excesivamente si no se realiza este ajuste.
From the library of: Superior- 5Sewing- Machine & Supply LLC

 Loading...