


HL-1000
Table of contents
 Loading...
Please read this manual thoroughly before using t he print er.
HL-800/1000 Series
User’s Guide
Keep this manual in a convenient place for quick and easy reference at all times.

TABLE OF CONTENTS
CHAPTER 1 INTRODUCTION....................................................................................1–1
ABOUT THE GUIDEBOOKS..........................................................................................1–1
Finding Out How to Use the Printer..............................................................................1–1
ABOUT YOUR PRINTER................................................................................................1–2
Printer Overview............................................................................................................1–2
System Requirements in Brother Printing Solution for Windows.................................1–3
Features..........................................................................................................................1–3
OPERATING AND STORAGE ENVIRONMENT..........................................................1–7
Power Supply.................................................................................................................1–7
Environment..................................................................................................................1–7
CHAPTER 2 PAPER HANDLING................................................................................2–1
PAPER SPECIFICATIONS..............................................................................................2–1
MULTI-PURPOSE SHEET FEEDER...............................................................................2–5
Loading Paper into the Feeder.......................................................................................2–6
Two Side Printing (Manual Duplexing)........................................................................2–8
MANUAL FEED SLOT....................................................................................................2–9
OUTPUT TRAY AND PAPER SUPPORT WIRE.........................................................2–11
CHAPTER 3 CONTROL PANEL.................................................................................3–1
LAMPS AND SWITCH....................................................................................................3–1
Ready (Paper) Lamp......................................................................................................3–1
Data (Toner) Lamp........................................................................................................3–2
Drum Lamp....................................................................................................................3–2
Alarm Lamp...................................................................................................................3–2
Switch............................................................................................................................3–3
Other Control Features..................................................................................................3–3
Sleep Mode................................................................................................................3–3
Test Print Mode.........................................................................................................3–4
CHAPTER 4 OPTIONS..................................................................................................4–1
SERIAL INTERFACE BOARD RS-100M (HL-1040/1050 Only)...................................4–1
Selecting the RS-422A (Apple) or RS-232C (IBM) Serial Interface............................4–1
Setting the Serial Interface Parameters..........................................................................4–2
Connecting the Serial Interface Cable...........................................................................4–4
ADDITIONAL MEMORY (HL-1050 Only)....................................................................4–6

CHAPTER 5 MAINTENANCE.....................................................................................5–1
REPLACING THE TONER CARTRIDGE......................................................................5–1
REPLACING THE DRUM UNIT.....................................................................................5–7
CLEANING THE PRINTER...........................................................................................5–11
Cleaning the Printer Exterior.......................................................................................5–11
Cleaning the Printer Interior and Drum Unit...............................................................5–12
RE-PACKING THE PRINTER.......................................................................................5–15
CHAPTER 6 TROUBLESHOOTING...........................................................................6–1
ALARM INDICATIONS AT A GLANCE.......................................................................6–1
Operator Calls................................................................................................................6–1
Service Calls..................................................................................................................6–4
PAPER JAMS....................................................................................................................6–5
Q & A................................................................................................................................6–8
Setting Up the Printer Hardware....................................................................................6–8
Setting Up the Printer for Windows..............................................................................6–8
Setting Up the Printer for DOS....................................................................................6–10
Setting Up the Printer for Apple Macintosh Computers .............................................6–11
Paper Handling............................................................................................................6–11
Printing........................................................................................................................6–12
Print Quality................................................................................................................6–14
CHAPTER 7 APPENDIX..............................................................................................A–1
PRINTER SPECIFICATIONS.........................................................................................A–1
Printing.........................................................................................................................A–1
Functions......................................................................................................................A–2
Electrical and Mechanical.............................................................................................A–3
PARALLEL INTERFACE SPECIFICATIONS...............................................................A–4
UNIVERSAL SERIAL BUS (USB) INTERFACE (HL-1050 Only).....................A–6
RESIDENT FONTS.........................................................................................................A–7
SYMBOL SETS/CHARACTER SETS............................................................................A-9
INDEX ......................................................................................................................Index–1
Definitions of Warnings, Cautions, and Notes
The following conventions are used in this User’s Guide:
Warning
Indicates warnings that must be observed to prevent possible
personal injury.
!
Caution
Indicates cautions that must be observed to use the printer properly or
prevent damage to the printer.
✒ Note
Indicates notes and useful tips to remember when using the printer.
To Use the Printer Safely
Warning
After you have just used the printer, some internal parts of the
printer are extremely hot. When you open the top cover of the
printer, never touch the shaded parts shown in the following
illustration.
High Temperature
Inside the Printer
Warning
There are high voltage electrodes inside the printer. Before cleaning
the printer, make sure to turn off the power switch and unplug the
power cord from the power outlet.
Turning off the Switch and Unplugging the Printer
Shipment of the Printer
If for any reason you must ship your Printer, carefully package the
Printer to avoid any damage during transit. It is recommended that you
save and use the original packaging. The Printer should also be
adequately insured with the carrier.
Warning
When shipping the Printer, the DRUM UNIT assembly including the
TONER CARTRIDGE must be removed from the Printer and placed in
the plastic bag.
during shipping will cause severe damage to the Printer and will
VOID THE WARRANTY.
1Remove the drum unit. 2Place it in the plastic bag and seal the
Failure to remove and place it in the plastic bag
bag completely.
3Remove the AC cord and the extention
wire of the paper tray from the printer.
Re-pack the printer. See
“REPACKING THE PRINTER” in
Chapter 5.

(For USA & CANADA Only)
For technical and operational assistance, please call:
In USA 1-800-276-7746 (outside California)
714-859-9700 Ext. 329(within California)
In CANADA 1-800-853-6660
514-685-6464 (within Montreal)
If you have comments or suggestions, please write us at:
In USA Printer Customer Support
Brother International Corporation
15 Musick
Irvine, CA 92718
In CANADA Brother International Corporation (Canada), Ltd.
- Marketing Dept.
1, rue Hôtel de Ville
Dollard-des-Ormeaux, PQ, Canada H9B 3H6
BBS
For downloading drivers from our Bulletin Board Service, call:
In USA 1-888-298-3616
In CANADA 1-514-685-2040
Please log on to our BBS with your first name, last name and a four digit
number for your password. Our BBS supports modem speeds up to 14,400,
8 bits no parity, 1 stop bit.
Fax-Back System
Brother Customer Service has installed an easy to use Fax-Back System so
you can get instant answers to common technical questions and product
information for all Brother products. This is available 24 hours a day, 7 days
a week. You can use the system to send the information to any fax machine,
not just the one you are calling from.
Please call 1-800-521-2846 (USA) or 1-800-681-9838 (Canada) and follow
the voice prompts to receive faxed instructions on how to use the system and
your index of Fax-Back subjects.
DEALERS/SERVICE CENTERS (USA only)
For the name of an authorized dealer or service center, call 1-800-284-4357.
SERVICE CENTERS (Canada only)
For service center addresses in Canada, call 1-800-853-6660
INTERNET ADDRESS
For technical questions and downloading drivers: http://www.brother.com

CHAPTER 1 INTRODUCTION
ABOUT THE GUIDEBOOKS
Finding Out How to Use the Printer
You have two guidebooks for this printer. Read each guidebook in the
following order:
1. Read the Quick Setup Guide to set up your printer and to ensure
proper connection with your computer. It also contains information
for installing the printer driver, fonts an d Remote Printer Console
Program. (HL-1040/1050 only)
2. Read this On-line User’s Guide to get information about the
following.
• Features and operating environment requirements of your printer –
Chapter 1
• Paper Handling – Chapter 2
• Control Panel – Chapter 3
• Options – Chapter 4
• Maintenance – Chapter 5
• Troubleshooting – Chapter 6
• Specifications – Appendices
• Index
1-1
ABOUT YOUR PRINTER
y)
Printer Overview
Multi-Purpose Sheet Feeder
Top Cover
Extension Support Wire
Output Tray
RS-422A/RS-232C
Serial Interface Po rt
(HL-1040/1050 only)
Paper Support
Fig. 1-1 Front View
Paper Guide
Manual Feed Slot
ON
1234 5678
Control Panel
Parallel Interface Port
USB Port (HL-1050 Onl
1-2
AC Inlet
Power Cord
Fig. 1-2 Rear View
Power Switch
✒ Note
An RS-422A/RS-232C Serial Interface Port, containing an RS-422A/RS232C Slide Switch and DIP Switches for Serial setting is optionally
available for the HL-1040/1050 series printers only. Some models may
have this option pre-installed.
System Requirements in Brother Printing Solution for Windows
Check the following system requirements to setup and operate the printer
in Brother Printing Solution for Windows:
IBM PC or compatible with 80486 SX or higher microprocessor
Parallel interface (or printer port)
4 MB or more of memory (8 MB recommended)
10 MB of space available on your hard disk for the printer driver and all
fonts
Microsoft Windows 95/98, 3.1/3.11 or Windows NT 4.0
Caution
!
The HL-820/1020 printer has been designed specifically for Windows
95/98, 3.1/3.11 and Windows NT 4.0. It cannot work in a DOS
environment such as MS-DOS.
Features
This printer has the following features:
❏ High Resolution and Fast Printing Speed
HL-820 :
True 600 dots per inch (dpi) with microfine toner and up to 8
pages per minute (ppm) printing speed (A4 or Letter paper).
HL-1020 :
True 600 dots per inch (dpi) with microfine toner and up to 10
pages per minute (ppm) printing speed (A4 or Letter paper).
HL-1040 :
True 600 dots per inch (dpi) with microfine toner and up to 10
pages per minute (ppm) printing speed (A4 or Letter paper).
HL-1050 :
True 600 dots per inch (dpi) and 1200 x 600 dpi for graphics with
microfine toner and up to 10 pages per minute (ppm) printing
speed (A4 or Letter paper).
❏ Versatile Paper Handling
The printer has a multi-purpose sheet feeder an d straight paper path
mechanism. Using this mechanism, you can load A4, letter, legal, B5,
A5, A6 and executive sizes of paper, and various types of paper
including envelopes, organizer paper, and your custom paper size.
The multi-purpose sheet feeder also allows manu al paper loading, so
you can also use labels and transparencies.
1-3

❏Enhanced Printing Performance and User-Friendly Operation f or
Windows
The dedicated printer driver and TrueType-compatible fonts for
Microsoft
®
®
Windows 95/98 and Windows 3.1 are available on the floppy
disk and CD-ROM supplied with your printer. You can easily install
them into your Windows system using our installer program. The
driver supports our unique compression mode to enhance printing
speed in Windows applications and allows you to choose various
printer settings including toner saving mode, custom paper size, sleep
mode, gray scale adjustment, resolution and so forth. You can easily
set these print options through the Printer Setup Menu within the
Windows Control Panel.
❏(For HL-1040/1050 Only)
Remote Printer Console Program for DOS
The utility program, Remote Printer Console (RPC), is av ailab le o n a
floppy disk supplied with your printer. When you operate your
computer in the DOS (Disk Operating System) environment, this
program allows you to easily change the default settings of the printer
such as fonts, page setup, emulations and so on.
This program also provides a status monitor program, which is a
Terminate-and-Stay Resident (TSR) program. It can monitor the
printer status while running in the background and report the current
status or errors on your computer screen.
❏(For HL-1040/1050 Only)
Popular Printer Emulation Support
These printers support the following popular printer emulation modes.
The HL-1040 supports HP LaserJet IIP, Epson FX-850, and IBM
Proprinter XL.
The HL-1050 supports HP LaserJet 6P/6L, Epson FX-850 and IBM
Proprinter XL. When you use DOS application software or Windows
version 3.0 or earlier, you can use any of these emulations to operate
the printer. The printer also supports auto-emulation switching
between HP and Epson or HP and IBM. If you want to select the
printer emulation, you can do it using the Remote Printer Console
Program.
1-4

❏ Printer Status Monitor with Bi-directional Parallel Interface
The printer driver can monitor your printer’s status using bidirectional parallel communications. A high quality bi-directional
parallel printer cable is recommended.
The printer status monitor program can show the current status of
your printer. When printing, the animated dialog box appears on your
computer screen to show the current printing process. If an error
occurs, a dialog box will appear to let you know what to correct. For
example: when your printer is out of paper, the dialog box will display
“Paper Empty” and instructions for the proper corrective action.
❏ (For HL-1050 Only)
USB Interface
The Universal Serial Bus Interface is an interface which allows the
printer to connect to multiple periph eral devices.
❏ (For HL-1050 Only)
High Resolution Control & Advanced Photoscale Technology
High resolution control (HRC) technology provides clear and crisp
printouts. Use this function to get smooth text print quality.
Advanced Photoscale Technology enables the printer to print graphics
in 256 grayscales, producing nearly photographic quality. Use this
function when you want to print photographic images.
❏ (For HL-1040/1050 Only)
Optional Apple Macintosh
®
Interface
An optional Apple Macintosh serial interface is available, which
allows your printer to be connected to Apple Macintosh computers.
With this option, you can use your printer with both an IBM PC, or
compatible, and an Apple Macintosh at the same time. This optional
interface board can be used as an RS-422A interface for Macintosh or
an RS-232C serial interface for an IBM PC or compatible.
❏ Enhanced Memory Management
The printer provides its own data compression technology in the
printer hardware and the supplied printer driver software, which can
automatically compress graphic data and font data efficiently into the
printer’s memory. You can avoid memory errors and print most full
page 600 dpi graphic and text data, including larger fonts, with the
printer’s standard memory.
1-5

❏ Environment-Friendly
Economy Printing Mode
This feature will cut your printing cost by saving toner. It is useful to
obtain draft copies for proof-reading. You can select from two
economy modes—25% toner saving and 50% toner saving—through
the Windows printer driver supplied with your printer.
Sleep Mode (Power Save Mode)
When the printer is not used for a certain amount of time, sleep mode
automatically reduces power consumption. The printer consumes less
than 13 W when in sleep mode.
Low Running Cost
Since the toner cartridge is separate from the drum unit, you need to
replace only the toner cartridge after approximately 2,400 pages,
which is cost effective and ecologically friendly. (Some models are
supplied with a starter toner cartridge which must be replaced
after 1,000 pages.)
The actual number of pages printed with each toner cartridge may
vary depending on your average type of print job.
1-6

OPERATING AND STORAGE ENVIRONMENT
Please take note of the following before using the printer.
Power Supply
Use the printer within the specified power range.
AC power: ±10% of the rated power voltage in your country
Frequency: 50/60 Hz (220 V– 240 V) or 50/60 Hz (110–120 V)
The power cord, including extensions, should not exceed 5 meters (16.5
feet).
Do not share the same power circuit with other high-power appliances,
particularly an air conditioner, copier, shredder and so on. If it is
unavoidable that you must use the printer with these appliances, it is
recommended that you use an isolation transformer or a high-frequency
noise filter.
Use a voltage regulator if the power source is not stable.
Environment
The printer should be installed near a power outlet, which is easily
accessible.
Use the printer only within the following ranges of temperature and
humidity.
Ambient temperature: 10°C to 32.5°C (50°F to 90.5°F)
Ambient humidity: 20% to 80% (without condensation)
The printer should be used in a well ventilation room.
Place the printer on a flat, horizontal surface.
Keep the printer clean. Do not place the printer in a dusty place.
Do not place the printer where the ventilation hole of the printer is
blocked.
Do not place the printer where it is exposed to direct sunlight. Use a blind
or a heavy curtain to protect the printer from direct sunlight when the
printer is unavoidably set up near a window.
Do not place the printer near devices that contain magnets or generate
magnetic fields.
1-7

Do not subject the printer to strong physical shocks or vibrations.
Do not expose the printer to open flames or salty or corrosive gasses.
Do not place objects on top of the printer.
Do not place the printer near an air conditioner.
Keep the printer horizontal when carrying.
Do not cover the slots in the top cover.
1-8

CHAPTER 2 PAPER HANDLING
CHAPTER 2
PAPER HANDLING
PAPER SPECIFICATIONS
The printer can handle paper that has the following specifications.
Paper Type Paper Size
Cut sheet A4, Letter, Legal, B5(JIS/ISO), A5, A6, Executive, Custom
size (70-216 x 127-356 mm, 2.75-8.5 x 5-14 inches)
Envelopes DL, C5, COM-10, Monarch, 9” x 12”
Organizer Day-Timer® J, K, L
(70-216 x 127-356 mm, 2.75-8.5 x 5-11 inches)
Labels and
Transparencies
Paper Capacity in Feeder
Multi-purpose Sheet Feeder:
A4/Letter paper: Up to 22 mm (0.87 inch) in height (up to the mark)
Legal paper: 100 sheets
Envelopes, Organizer:10 sheets
Output Tray: Approx. 100 sheets of 75 g/m
A4, Letter (70-216 x 127-356 mm, 2.75-8.5 x 5-14 inches)
2
Approx. 200 sheets of 75 g/m
30 sheets of 157 g/m
2
(42 lb.) A4/Letter paper
(20 lb.)
2
(20 lb.) A4/Letter
paper
Cut Sheet Envelope
Basis Weight 60 to 157 g/m
(16 to 42 lb.)
Caliper
0.03 to 0.08 in.
(0.08 to 0.2 mm)
2
75 to 90 g/m
2
(20 to 24 lb.)
single thickness
0.0033 to 0.0058 in.
(0.084 to 0.14 mm)
single thickness
Moisture Content 4% to 6% by weight 4% to 6% by weight
Recommended paper
Cut sheet: Xerox 4200
(in USA) / Xerox 80 Premier Paper (in Europe)
or equivalent
Label: Avery laser label or equivalent
Transparency:3M CG3300 or equivalent
2-1

USER’S GUIDE
Remarks
It is recommended that you test paper, especially special sizes and types
of paper and heavy paper, on this printer before purchasing large
quantities.
Avoid using coated paper, such as vinyl coated paper.
Avoid using preprinted or highly textured paper.
Use a recommended type of paper, especially plain paper and
transparencies, for optimum printing. For more information on paper
specifications, consult your nearest authorized sales representative or the
place you purchased your printer.
If the paper has problems feeding from th e multi-purpose sheet feeder,
use the manual feed slot and try again.
Use neutral paper. Do not use acid paper to avoid any damage to the
printer drum unit.
You can use recycled paper in this printer.
Make sure to select the appropriate media type in the printer driver for
optimum printing.
The print quality might be degrad ed or the life of drum unit might be
shortened with the following usage.
Using paper with narrower width than A4/Letter continuously
Using the printer for a special job (i.e. printing of name cards etc.)
Cut Sheet
We recommend you use long-grained paper for the best print quality.
If you are using short-grained paper, it could be the cause of paper jams.
Labels / Transparencies
Avoid feeding labels with carrier sheets exposed, or your printer will be
damaged.
We recommend you use label or transparencies which are designed for
use in laser printers.
2-2
CHAPTER 2 PAPER HANDLING
Special Paper
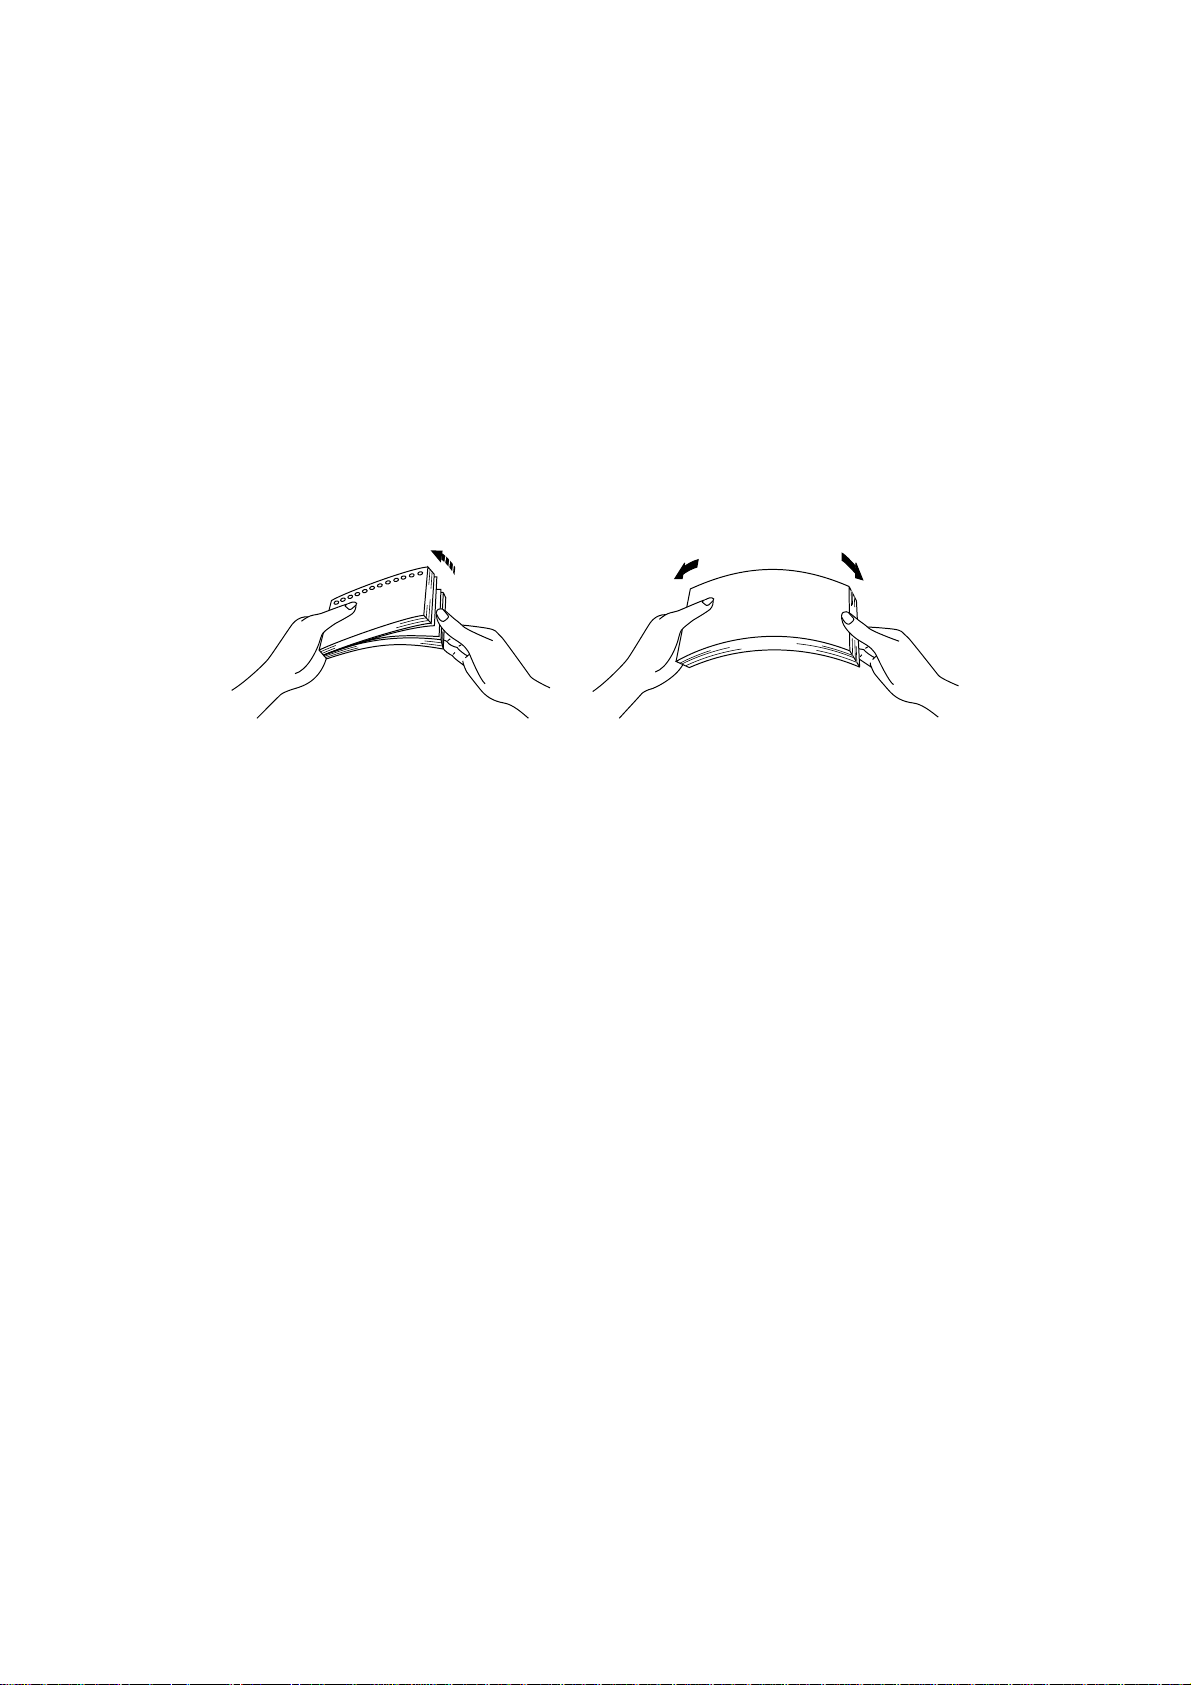
Before using paper with holes such as organizer sheets, you must fan the
stack well to avoid paper jams and misfeeds.
Do not use organizer sheets that are stuck together. The paste used might
cause damage to the printer.
Before using any paper, make sure that it is not curled. If it is, you should
straighten the paper as much as possible. Feeding curled paper can cause
paper jams and misfeeds.
Fig. 2-1 Fan the Paper and
Straighten the Paper
The printer can handle 9” width paper. However, you may get stains on
the paper outside 8.5” width or on the back of the paper.
If different types of paper are loaded at the same time in the feeder, it
may cause paper jams or mis-feeds.
2-3
USER’S GUIDE
Envelopes
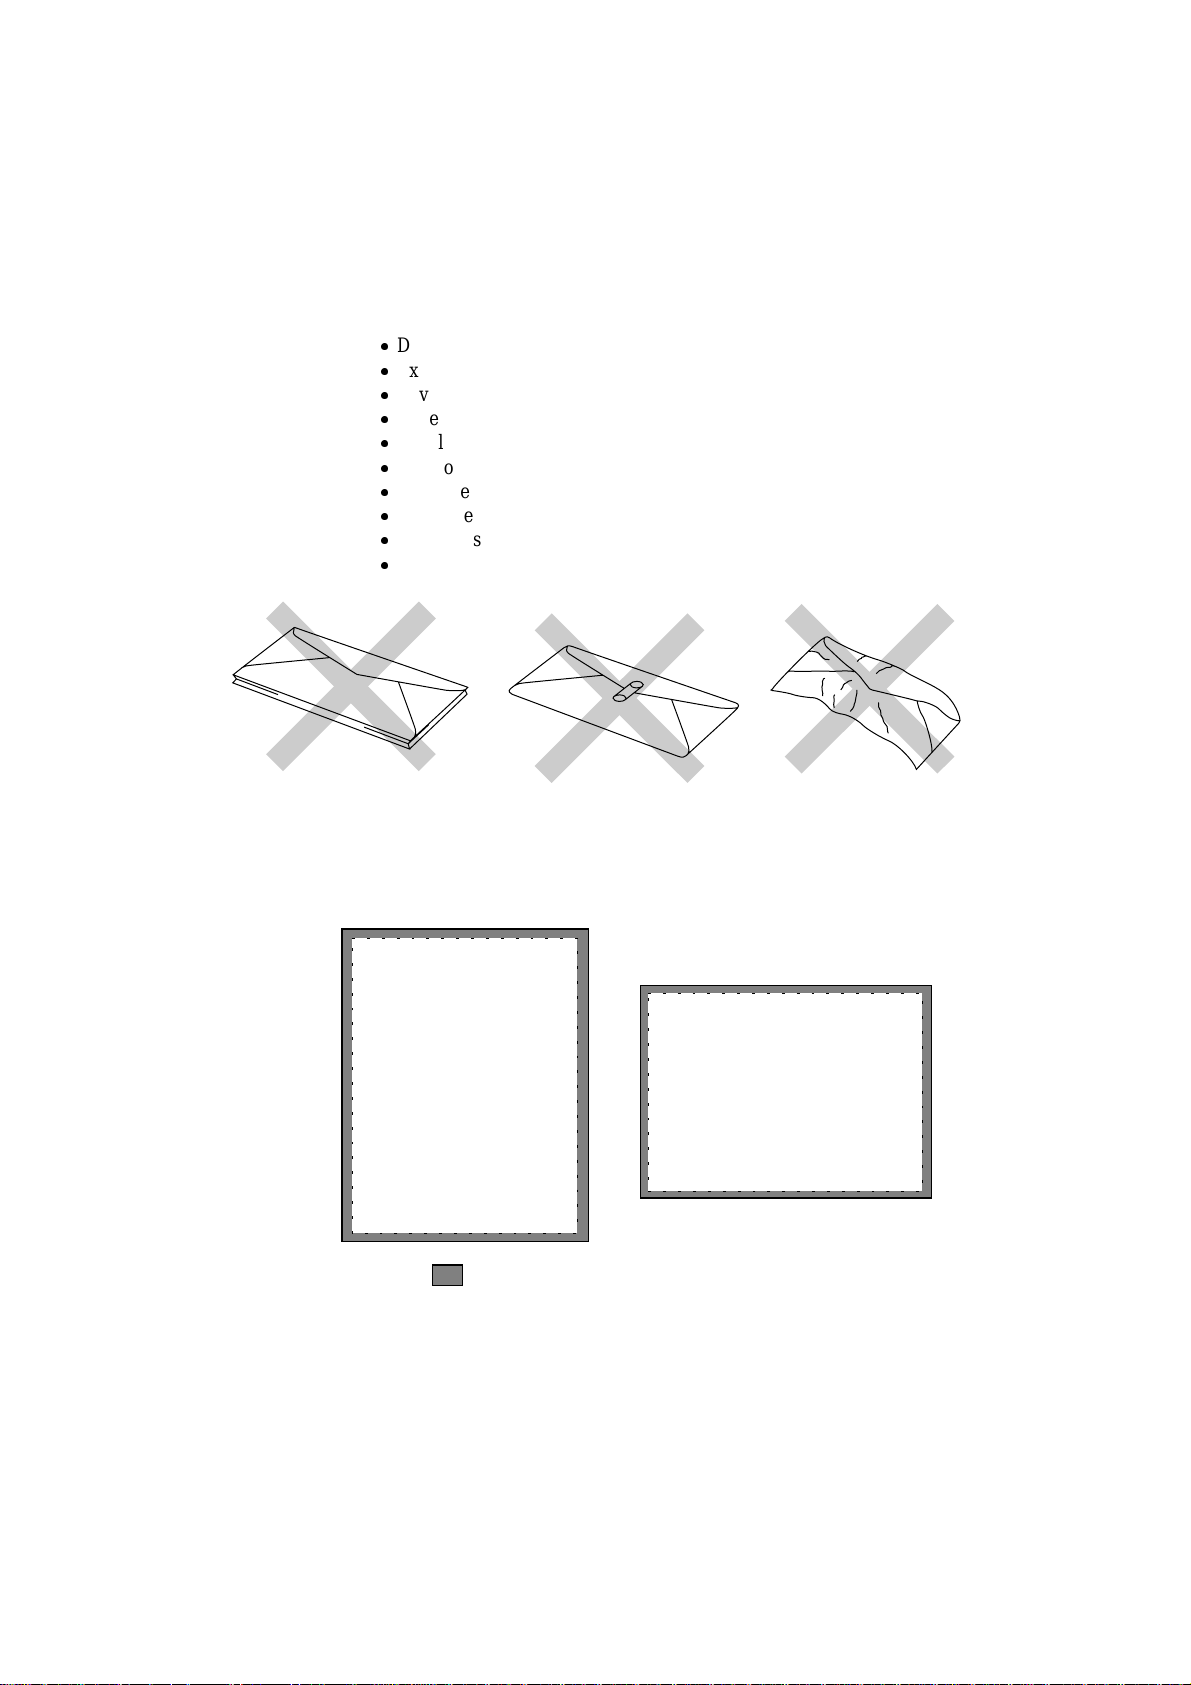
The following types of envelopes are not recommended for use.
Damaged, curled, wrinkled, or irregularly shaped envelopes
Extremely shiny or highly textured envelopes
Envelopes with clasps
Envelopes with self-adhesive closures
Envelopes of baggy construction
Envelopes not sharply creased
Embossed envelopes
Envelopes already printed by a laser printer
Envelopes pre-printed on the inside
Envelopes that cannot be arranged uniformly when placed in a pile
Fig. 2-2 Envelopes
Printable Area The figure below shows the physically printable area.
(Except 9”x12” envelope)
Unprintable area
Approximately 4 mm(0.16 inch) for any sizes of paper
Fig. 2-3 Printable Area
2-4

MULTI-PURPOSE SHEET FEEDER
The printer has a multi-purpose sheet feeder th at can feed plain paper,
envelopes, transparencies and organizer paper.
To use the multi-purpose sheet feeder, follow these step s:
1. Make sure that you have selected the proper paper source, paper size,
media type and orientation.
✒ Note
You may select the proper paper source, paper size, and orientation in
your application software.
If your application software does not support your custom paper size,
select the next paper size up that is closest but larger than the custom
size. Then adjust the print area by changing the right and left margins
in your application software.
2. Make sure that the multi-purpose sheet feeder contains the selected
size of paper in the selected orientation. If necessary, change the paper
in the feeder.
CHAPTER 2 PAPER HANDLING
3. Send your file or document to the printer.
When the printer receives data, it begins the print process by loading
paper from the multi-purpose sheet feeder. If the printer is in sleep
mode when it receives data, it will wake up an d start the printing
process automatically.
2-5

USER’S GUIDE
Loading Paper into the Feeder
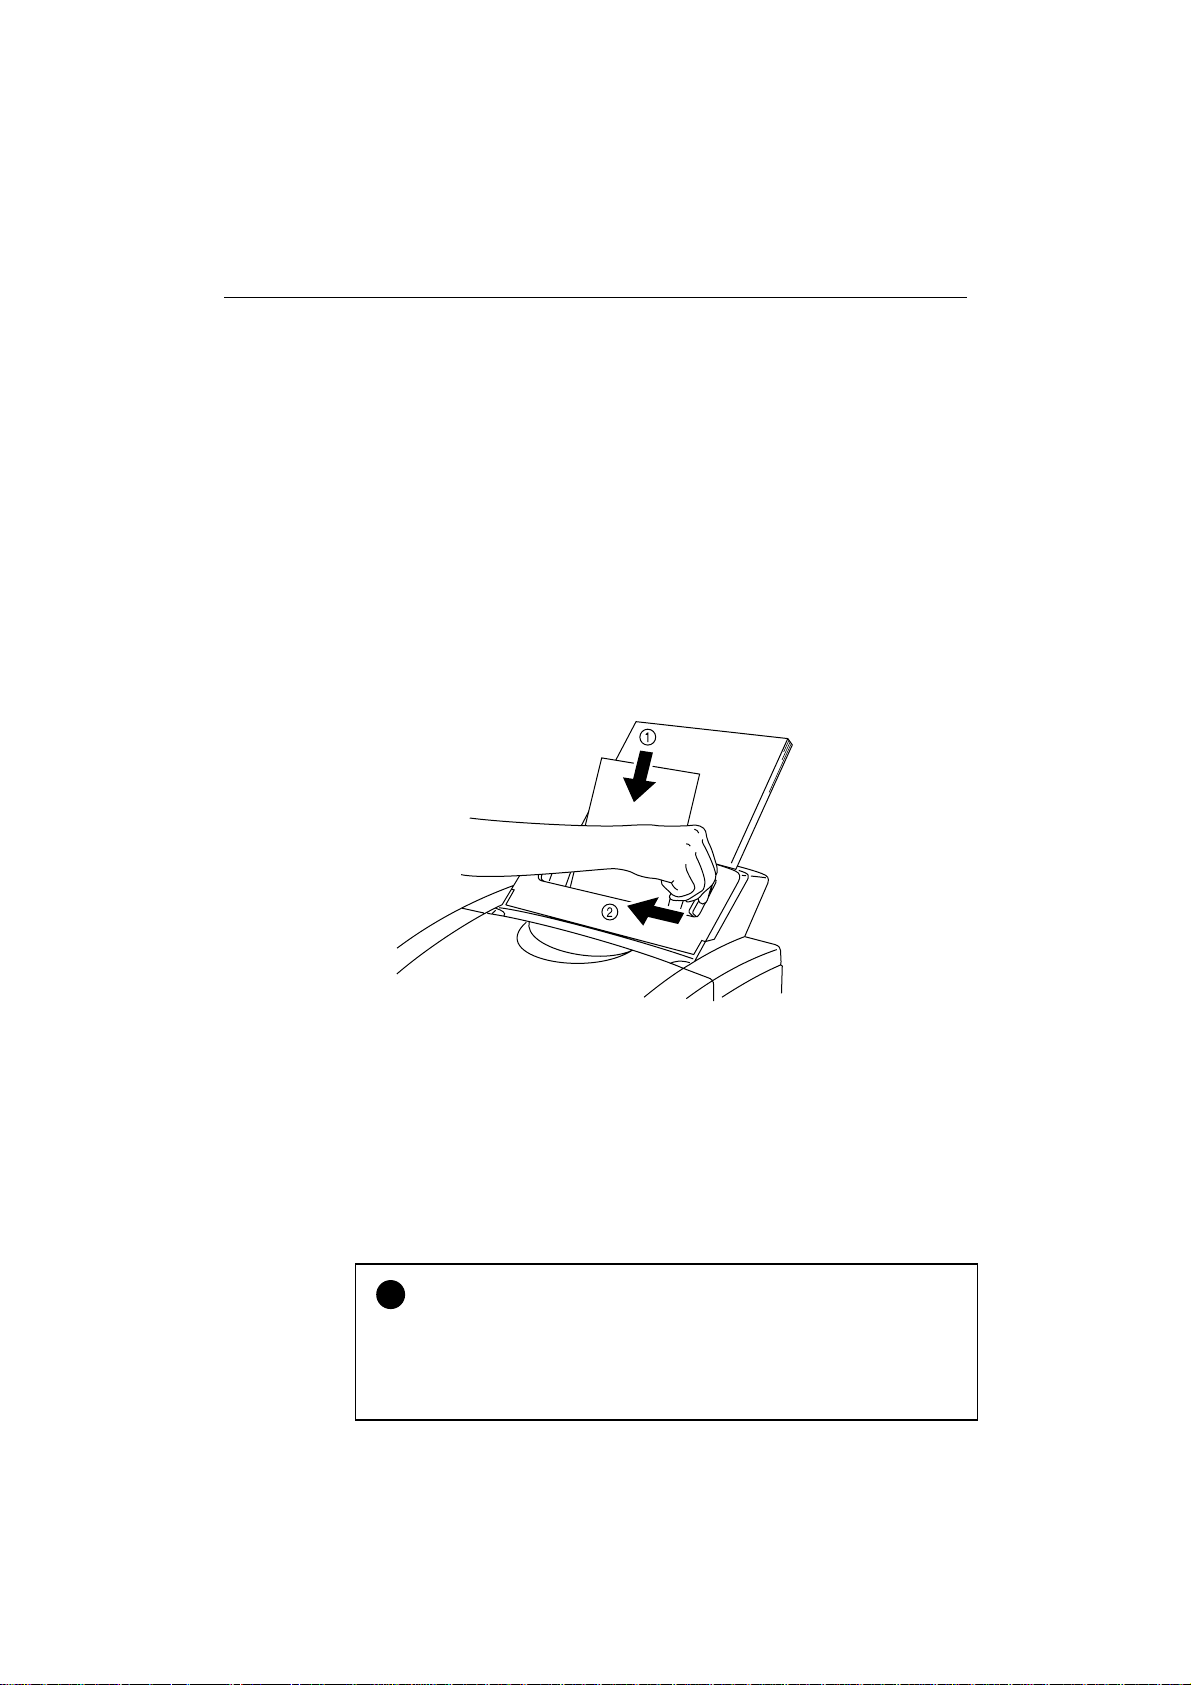
To load paper into the feeder, follow these steps.
1.Open the multi-purpose sheet feeder b y gently pulling the lid forward
towards you. ( ➀ )
2.Load paper into the multi-purp ose sheet feeder with the printing
surface face down. ( ➁ )
Caution
!
The feeder can hold up to 200 sheets of plain paper (75 g/m2, 20 lb.).
If you load too many sheets, paper jams could occur.
Make sure that the paper is stacked below the ▼ mark.
If there is still some paper in the feeder, you must first remove it, put
it together with the new paper and then in sert the stack in the feeder.
2-6
Fig. 2-4 Opening the Feeder and
Loading Paper or Envelopes in the Feeder
✒Note
If you load envelopes in the feeder, make sure they are inserted in the
direction shown above.
CHAPTER 2 PAPER HANDLING
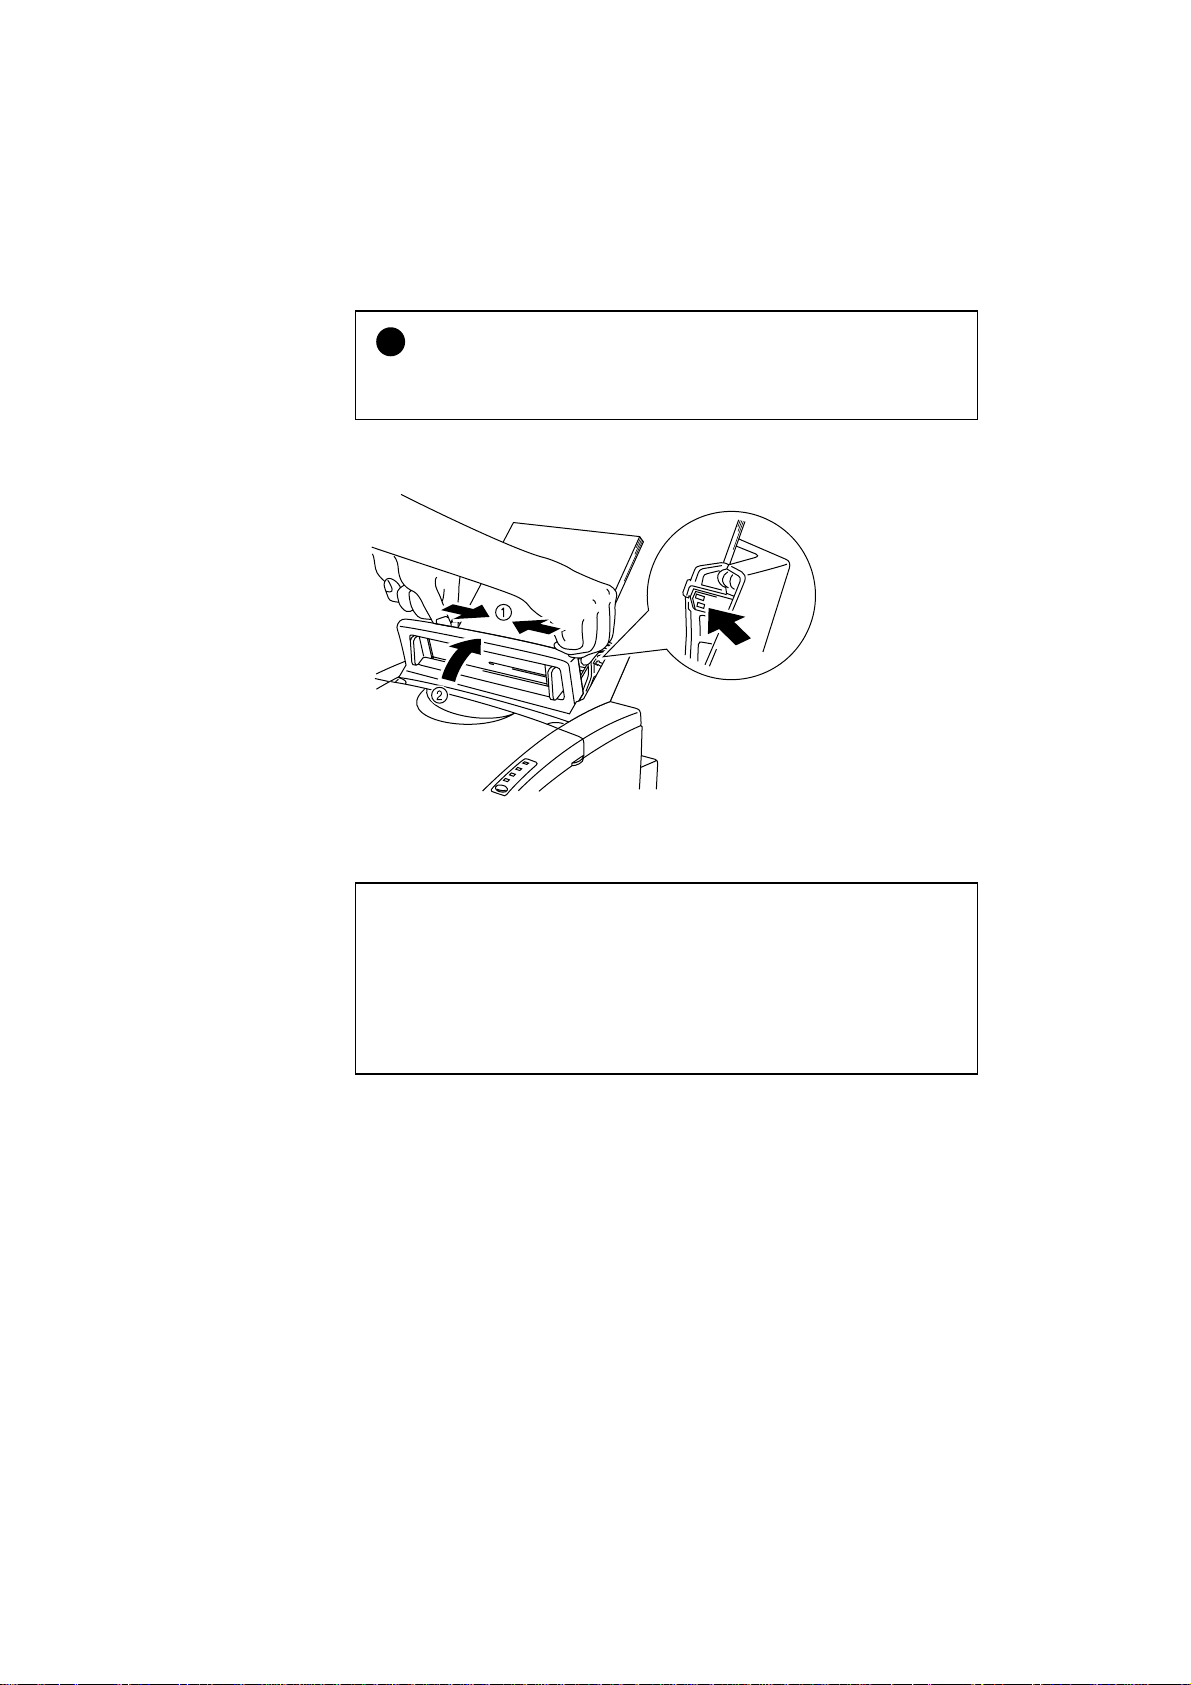
3.Move the paper guide to the paper width. ( ➀ )
Caution
!
Failure to set the paper guide to the paper size may cause paper skew or
jams.
4.Close the multi-purpose sheet feeder. ( ➁ )
Fig. 2-5 Moving the Paper Guide
and Closing the Feeder
✒Note
If the multi-purpose sheet feeder runs out of paper when you try to print,
Alarm
the
You have to load paper in the feeder and push the panel switch to cancel
the alarm and continue printing. If p a p e r jam s in the printer, the
Paper
and
to “PAPER JAMS” in Chapter 6.
Paper
and
lamps also blink. If the error is a paper jam, clear it referring
lamps blink to alert you to a paper empty error.
Alarm
2-7

USER’S GUIDE
Two Side Printing (Manual Duplexing)
The supplied printer driver for Windows 95/98 or Windows 3.1 enables
manual duplex printing. For more information about settings, see the help
text in the printer driver.
The printer prints all the even numbered pages on one side of the paper
first, and then prints all the odd pages on the reverse side of the paper.
When you have finished printing the even numbered sides of the paper,
the driver instructs you to re-insert the paper by a pop-up message on the
computer screen. Follow the instructions on how to reinsert the paper.
✒Note
Before re-inserting the sheets, you have to straighten them, or you will
get paper errors.
The use of very thin or very thick paper is not recommended.
If you encounter a double feeding error, we recommend that you hold
all sheets of paper except the front sheet while the paper is feeding.
2-8
Fig. 2-6 Notes for Manual Duplexing
✒Note
When you use the Manual Duplex function, it is possible that paper jams
may occur or print quality migh t n ot be satisfactory.
MANUAL FEED SLOT
The multi-purpose sheet feeder also has a man u a l feed slot. You can
manually load paper sheet by sheet from this slot. You do not need to
remove paper from the multi-purpose sheet feeder when using the manual
feed slot.
❏When you load one sheet of paper manually:
You do not need to choose manual feed in the Setup dialog box of
your printer driver. Holding the selected size of paper in the selected
orientation (Portrait or Landscape), place the side of the paper you
wish to print on face down into the manual feed slot. Align the paper
at the center of the manual feed slot, and be su re to insert it all the
way until the top edge of the paper ( or envelope) strikes the bottom of
the manual feed slot to avoid paper mis-feeding. ( ➀ ) Move the
paper guide of the manual feed slot to the paper width you are using. (➁)
CHAPTER 2 PAPER HANDLING
Fig. 2-7 Moving the Paper Guide
❏When you load more than one sheet of paper manually:
Open the Setup dialog box of the supplied Windows printer driver and
choose Manual Feed in the Paper Source section. Follow the above
instructions to load the first page. The printer automatically starts
printing. After the first page is printed, the dialog box appears and
prompts you to load the next page. Load a sheet and choose OK to
resume printing. Repeat these steps until you have finished printing all
the pages.
Caution
!
If bi-directional communication is not operational between the printer and
the computer, such as when the printer is shared on a network, the dialog
box will not appear to load the next page. Manual paper feeding is not
recommended when your printer is attached to a network.
2-9

USER’S GUIDE
✒ Note
Insert paper firmly into the manual feed slot.
Be sure to load sheet by sheet when using the manual feed slot.
2-10
CHAPTER 2 PAPER HANDLING
!
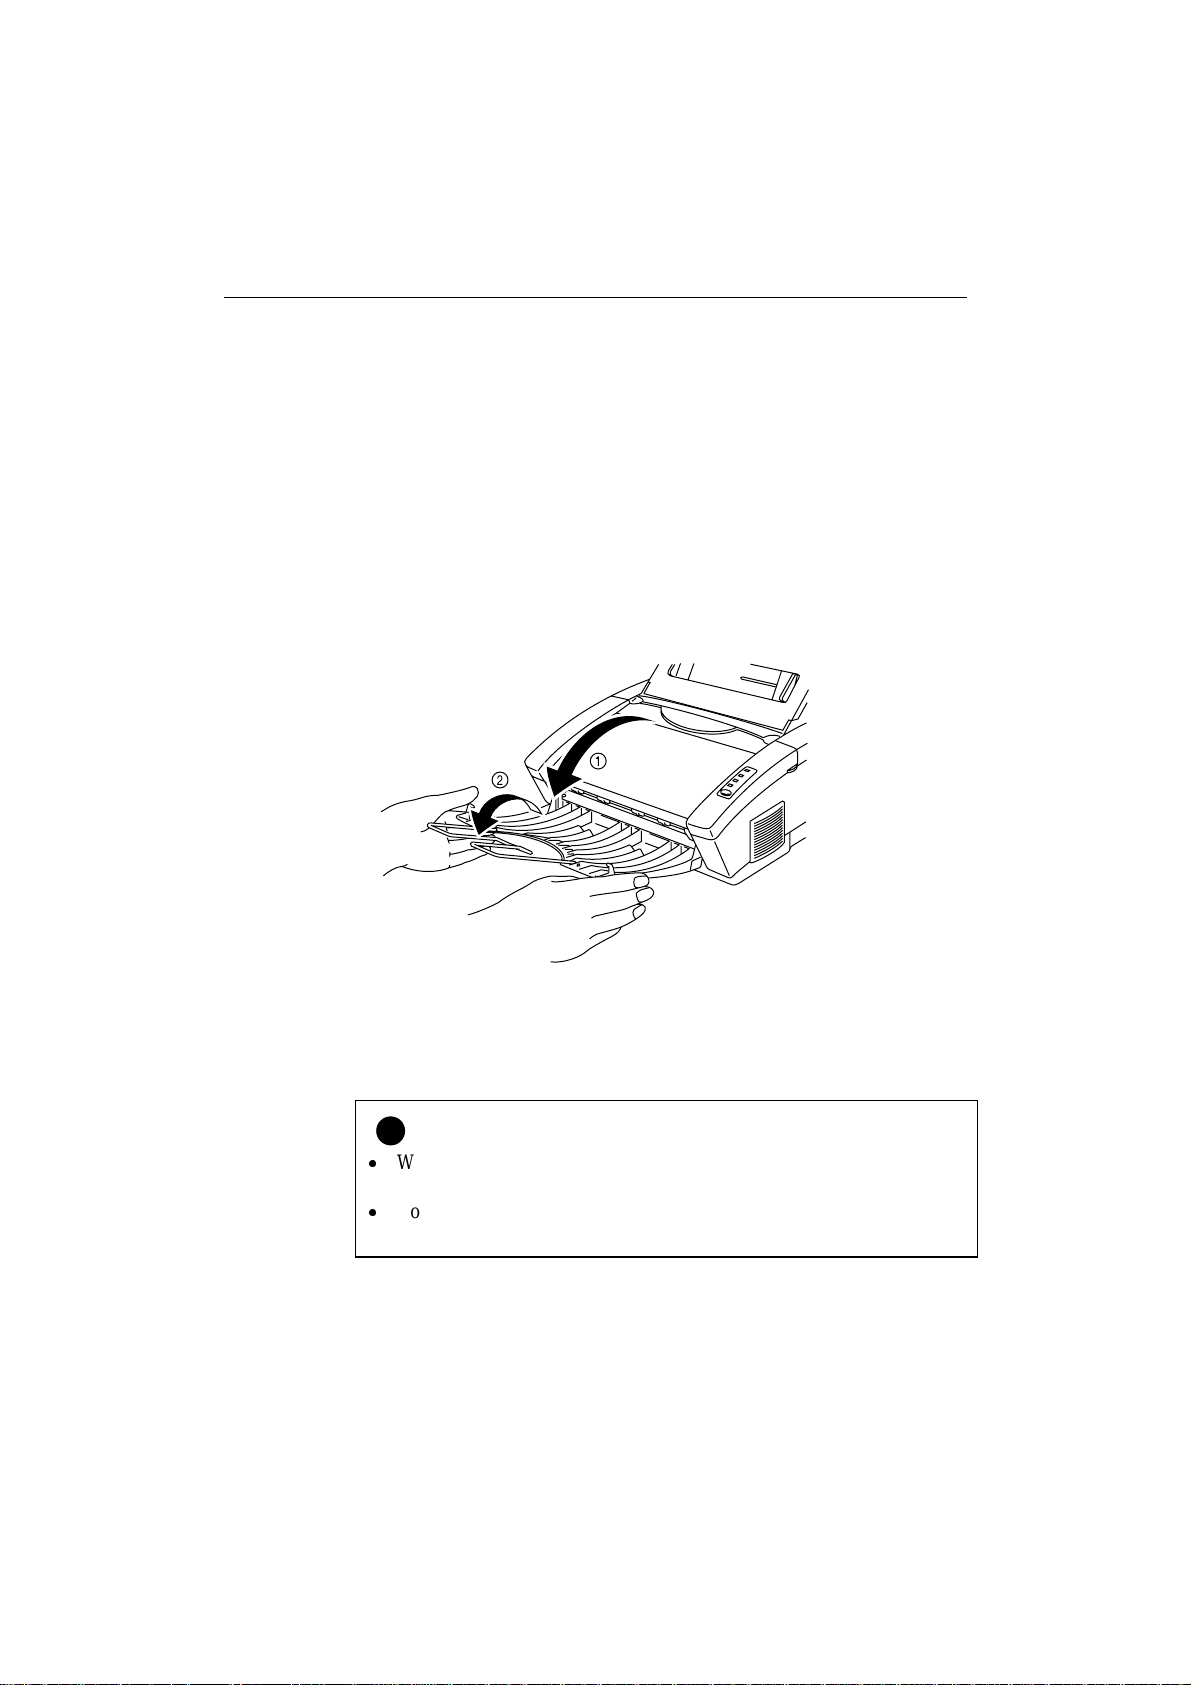
OUTPUT TRAY AND PAPER SUPPORT WIRE
The printer ejects paper with printed surfaces face down into the output
tray at the front of the printer.
When the output tray is closed, the ejected paper comes out sheet by sheet
through the slit at the front. When you open the tray, sheets can be
stacked on the tray.
Follow these steps to open the output tray:
1. Pull the top of the tray down (➀).
2. Extend the extension support wire (➁).
Fig. 2-8 Opening the Output Tray and
Extending the Extension Support Wire
You can stack up to 100 sheets in the output tray.
Caution
When you use transparencies, remove each sheet immediately after
printing. Stacking sheets may cause paper curled or paper jam.
Continuous printing with the output tray closed may cause
condensation inside the output tray.
2-11

CHAPTER 3 CONTROL PANEL
LAMPS AND SWITCH
This section refers to the following lamps and switch on the printer
control panel.
Data
Toner
Ready
Paper
CHAPTER 3 CONTROL PANEL
Drum
Alarm
Fig. 3-1 Lamps and Switch on Control Panel
✒ Note
When the
including the
Ready (Paper) Lamp
Ready
The
Lamp Printer status
Off
❍
Blinking
❍↔●
Blinking
❍↔●
On
●
This lamp also works as the
blink simultaneously to indicate a paper error. See “Operator Calls”
Chapter 6.
power
switch is off or the printer is in sleep mode, all lamps
Ready
lamp are off.
lamp indicates the current status of the printer.
power
The
mode. If the printer is in sleep mode, it will wake
up automatically when it receives data or you
press the control panel switch.
The printer is warming up.
(Blinking at 1 second intervals)
The printer is cooling down and stops printing
until the printers internal temperature lowers.
(Blinking at 2 seconds intervals)
The printer is ready to print.
switch is off or the printer is in sleep
Paper
lamp with the
Alarm
lamp. They
3-1

USER’S GUIDE
Data (Toner) Lamp
Data
The
lamp indicates the current status of the print data process.
Lamp Printer status
Off
❍
Blinking
❍↔●
On
●
The printer has no print data.
The printer is receiving data from the computer or
the printer is processing data in memory.
Print data remains in the printer memory. If th e
Data
lamp is on for a long period of time and
nothing has printed, you need to press the
to print the remaining data.
switch
Drum Lamp
Alarm Lamp
This lamp also works as the
blink simultaneously to indicate a toner error. See “REPLACING THE
TONER CARTRIDGE” in Chapter 5 and “Operator Ca lls” in Chapter 6.
Drum
The
The
OPEN” and “MEMORY FULL.” If any other error occurs, the printer
indicates the error by blinking the
printing an error report.
lamp indicates the drum unit is nearly at the en d of its life.
Lamp Printer status
Off
❍
On
●
Alarm
The drum unit can be used.
The drum unit is nearly at the end of its life.
Installing a new drum unit turns off th is lam p. See
“REPLACING THE DRUM UNIT” in Chapter 5.
lamp blinks to indicate a printer error status such as “COVER
Toner
Alarm
lamp with the
lamp with another lamp or by
Alarm
lamp. They
3-2
✒ Note
Ready, Data
The
with the
in Chapter 6 and take corrective action for the error.
Alarm
lamp. See “ALARM INDICATIONS AT A GLANCE”
and
Drum
lamps are used to indicate printer errors

Switch
switch
This
situation.
Cancel printing
If you press the
printing and ejects the paper.
Wake-up
If the printer is in sleep mode, pressing the
ready state.
Form Feed
If the
remaining in the printer memory: th is o p e ratio n is called “Form Feed.”
Error Recovery
If an error occurs, the printer will recover from some errors
automatically. If the error does not clear automatically, press the
to clear the error and continue printer operation.
will be used for the following purpose de p e n ding on the
Data
lamp is on, press the
Other Control Features
The printer has the following useful features:
switch
CHAPTER 3 CONTROL PANEL
during printing, the printer immediately stops
switch
switch
. The printer prints any data
wakes it up into the
switch
Sleep Mode
When the printer does not receive data for a certain period of time (timeout), it enters sleep mode. Sleep mode acts as though the printer was
turned off. The default time-out is 5 minutes. Wh ile the printer is in sleep
mode, all the
can still receive data from the computer. Receiving a print file or
document automatically wakes up the printer to start printing. Pressin g
switch
the
✒ Note
When the printer goes into sleep mode, the fan will not stop until the
printer engine has cooled down.
Sleep mode allows the print engine to cool, so the temperature of your
room and how long the printer has been in sleep mode affects the
warm-up time. This warm-up time can take up to 30 seconds. The
Ready
You can change the time out for the sleep mode with the supplied
printer driver (all models) or Remote Printer Console program (HL1040/1050 only). Refer to the Help section in the printer driver or
RPC program for more information about the sleep mode setting.
lamps
are off and it is as if it was turned off, but the printer
also wakes up the printer.
lamp blinks to indicate that the printer is warming up.
3-3
Loading...