


 Loading...
USER’S GUIDE
DCP-7030
DCP-7040
DCP-7045N
Version A
UK/IRE/SAF

If you need to call Customer Service
Please complete the following information for future reference:
Model Number: DCP-7030, DCP-7040 and DCP-7045N (Circle your model number)
Serial Number: 1
Date of Purchase:
Place of Purchase:
1The serial number is on the back of the unit. Retain this User’s Guide with your sales receipt as a permanent record of your purchase, in the event of theft, fire or warranty service.
Register your product on-line at
http://www.brother.com/registration/
By registering your product with Brother, you will be recorded as the original owner of the product. Your registration with Brother:
may serve as confirmation of the purchase date of your product should you lose your receipt; and
may support an insurance claim by you in the event of product loss covered by insurance.
© 2008 Brother Industries, Ltd.

Compilation and Publication Notice
Under the supervision of Brother Industries Ltd., this manual has been compiled and published, covering the latest product descriptions and specifications.
The contents of this manual and the specifications of this product are subject to change without notice.
Brother reserves the right to make changes without notice in the specifications and materials contained herein and shall not be responsible for any damages (including consequential) caused by reliance on the materials presented, including but not limited to typographical and other errors relating to the publication.
i |
EC Declaration of Conformity
ii

Table of Contents |
|
|
Section I General |
|
|
1 |
General information |
2 |
|
Using the documentation....................................................................................... |
2 |
|
Symbols and conventions used in the documentation .................................... |
2 |
|
Accessing the Software User’s Guide and Network User’s Guide |
|
|
(DCP-7045N only) .............................................................................................. |
3 |
|
Viewing documentation ................................................................................... |
3 |
|
Control panel overview .......................................................................................... |
5 |
2 |
Loading paper and documents |
6 |
|
Loading paper and print media.............................................................................. |
6 |
|
Loading paper in the paper tray....................................................................... |
6 |
|
Loading paper in the manual feed slot ............................................................ |
7 |
|
Unprintable area ............................................................................................ |
10 |
|
Acceptable paper and other print media.............................................................. |
11 |
|
Recommended paper and print media .......................................................... |
11 |
|
Type and size of paper .................................................................................. |
11 |
|
Handling and using special paper ................................................................. |
12 |
|
Loading documents ............................................................................................. |
15 |
|
Using the automatic document feeder (ADF) (DCP-7040 and DCP-7045N).. |
15 |
|
Using the scanner glass ................................................................................ |
16 |
3 |
General setup |
17 |
|
Paper settings...................................................................................................... |
17 |
|
Paper type ..................................................................................................... |
17 |
|
Paper size...................................................................................................... |
17 |
|
Volume settings ................................................................................................... |
17 |
|
Beeper volume .............................................................................................. |
17 |
|
Ecology features .................................................................................................. |
18 |
|
Toner Save .................................................................................................... |
18 |
|
Sleep time...................................................................................................... |
18 |
|
LCD contrast........................................................................................................ |
19 |
|
User Settings List................................................................................................. |
19 |
|
Network Configuration List (DCP-7045N only) ................................................... |
19 |
Section II Copy
4 |
Making copies |
22 |
|
How to copy ......................................................................................................... |
22 |
|
Entering copy mode....................................................................................... |
22 |
|
Making a single copy ..................................................................................... |
22 |
iii

Making multiple copies .................................................................................. |
22 |
Stop copying.................................................................................................. |
22 |
Copy options (temporary settings)....................................................................... |
23 |
Enlarging or reducing the image copied ........................................................ |
23 |
Adjusting contrast .......................................................................................... |
24 |
Using the Options key ................................................................................... |
25 |
Improving copy quality................................................................................... |
25 |
Sorting copies using the ADF (DCP-7040 and DCP-7045N) ........................ |
26 |
Making N in 1 copies (page layout) ............................................................... |
26 |
Out of memory message ..................................................................................... |
27 |
Section III Software
5 |
Software and Network (DCP-7045N only) features |
30 |
|
How to read HTML User’s Guide......................................................................... |
30 |
|
For Windows®................................................................................................ |
30 |
|
For Macintosh................................................................................................ |
31 |
Section IV Appendixes
A |
Safety and legal |
34 |
|
Choosing a location ............................................................................................. |
34 |
|
Important information........................................................................................... |
35 |
|
Safety precautions......................................................................................... |
35 |
|
IEC60825-1+A2:2001 Specification............................................................... |
38 |
|
Disconnect device ......................................................................................... |
38 |
|
Wiring information (U.K. only)........................................................................ |
38 |
|
LAN connection (DCP-7045N only) .............................................................. |
39 |
|
Radio interference ......................................................................................... |
39 |
|
EU Directive 2002/96/EC and EN50419........................................................ |
39 |
|
International ENERGY STAR® Compliance Statement................................. |
40 |
|
Important safety instructions.......................................................................... |
40 |
|
Trademarks.......................................................................................................... |
42 |
B |
Troubleshooting and routine maintenance |
43 |
|
Troubleshooting ................................................................................................... |
43 |
|
If you are having difficulty with your machine ................................................ |
43 |
|
Improving the print quality ............................................................................. |
48 |
|
Error and maintenance messages....................................................................... |
54 |
|
Document jams (DCP-7040 and DCP-7045N only) ...................................... |
56 |
|
Paper jams .................................................................................................... |
57 |
|
Routine maintenance........................................................................................... |
62 |
|
Cleaning the outside of the machine ............................................................. |
62 |
|
Cleaning the scanner glass ........................................................................... |
63 |
|
Cleaning the laser scanner window............................................................... |
63 |
|
Cleaning the corona wire............................................................................... |
65 |
iv

|
Cleaning the drum unit .................................................................................. |
67 |
|
Replacing the consumable items......................................................................... |
69 |
|
Replacing a toner cartridge ........................................................................... |
69 |
|
Replacing the drum unit................................................................................. |
73 |
|
Changing LCD language ..................................................................................... |
76 |
|
Machine information ............................................................................................ |
76 |
|
Checking the serial number........................................................................... |
76 |
|
Checking the page counters.......................................................................... |
76 |
|
Checking the Drum life .................................................................................. |
76 |
|
Packing and shipping the machine...................................................................... |
77 |
C |
Menu and features |
78 |
|
On-screen programming...................................................................................... |
78 |
|
Menu table..................................................................................................... |
78 |
|
Memory storage............................................................................................. |
78 |
|
Menu keys ........................................................................................................... |
78 |
|
How to access the menu mode ..................................................................... |
79 |
|
Menu table........................................................................................................... |
80 |
D |
Specifications |
85 |
|
General................................................................................................................ |
85 |
|
Print media........................................................................................................... |
87 |
|
Copy .................................................................................................................... |
88 |
|
Scan .................................................................................................................... |
89 |
|
Print ..................................................................................................................... |
90 |
|
Interfaces............................................................................................................. |
90 |
|
Computer requirements ....................................................................................... |
91 |
|
Consumable items ............................................................................................... |
93 |
|
Ethernet wired network (DCP-7045N only).......................................................... |
94 |
E |
Glossary |
95 |
F |
Index |
96 |
v |

vi

Section I
General
General information |
2 |
Loading paper and documents |
6 |
General setup |
17 |

1 General information
Using the documentation
Thank you for buying a Brother machine! Reading the documentation will help you make the most of your machine.
 Note
Note
Illustrations in this User’s Guide are based on the DCP-7045N.
Symbols and conventions used in the documentation
The following symbols and conventions are used throughout the documentation.
Bold |
Bold style identifies keys on the |
|
machine control panel or |
|
computer screen. |
Italics |
Italicized style emphasizes an |
|
important point or refers you to |
|
a related topic. |
Courier |
Courier New font identifies the |
New |
messages shown on the LCD |
|
of the machine. |
Warnings tell you what to do to prevent possible personal injury.
Cautions specify procedures you must follow or avoid to prevent possible damage to the machine or other objects.
Electrical Hazard icons alert you to a possible electrical shock.
Hot Surface icons warn you not to touch machine parts that are hot.
Incorrect setup icons alert you to devices and operations that are not compatible with the machine.
Note icons give useful tips.
2 |
Accessing the Software User’s Guide and Network User’s Guide (DCP-7045N only)
This User’s Guide does not contain all the information about the machine such as how to use the advanced features of Printer, Scanner and Network (DCP-7045N only). When you are ready to learn detailed information about these operations, read the
Software User’s Guide and Network User’s Guide (DCP-7045N only).
Viewing documentation
Viewing documentation (Windows®)
To view the documentation, from the Start menu, point to Brother, DCP-XXXX (where XXXX is your model name) from the program group, and then click User’s Guides in HTML format.
If you have not installed the software, you can find the documentation by following the instructions below:
a Turn on your PC.
Insert the Brother CD-ROM labelled Windows® into your CD-ROM drive.
b If the language selection screen appears, click your language.
General information |
|
c If the model name screen appears, click |
|
your model name.The CD-ROM main |
|
menu will appear. |
1 |
If this window does not appear, use
Windows® Explorer to find and run the Start.exe program from the root directory of the Brother CD-ROM.
d Click Documentation.
e Click the documentation you want to read:
HTML documents (3 manuals): User’s Guide for stand-alone operations, Software User’s Guide and Network User’s Guide (DCP7045N only) in HTML format.
This format is recommended for viewing on your computer.
PDF documents (4 manuals):
User’s Guide for stand-alone operations, Software User’s Guide, Network User’s Guide (DCP7045N only) and Quick Setup Guide.
This format is recommended for printing the manuals. Click to go to the Brother Solutions Center, where you can view or download the PDF documents. (Internet access and PDF Reader software are required.)
3 |

Chapter 1
How to find scanning instructions
There are several ways you can scan documents. You can find the instructions as follows:
Software User's Guide:
Scanning a document using the TWAIN driver in Chapter 2
Scanning a document using the WIA driver (For Windows® XP/Windows Vista® only) in Chapter 2
Using ControlCenter3 in Chapter 3
Network Scanning in Chapter 4 (DCP-7045N only)
ScanSoft™ PaperPort™ 11SE with OCR How-to-Guides
The complete ScanSoft™ PaperPort™ 11SE with OCR How-to-Guides can be viewed from the Help selection in the ScanSoft™ PaperPort™ 11SE application.
Viewing documentation (Macintosh)
a Turn on your Macintosh.
Insert the Brother CD-ROM labelled Macintosh into your CD-ROM drive.
b The following window will appear.
c Double-click the Documentation icon.
d If the language selection screen appears, double-click your language.
e Double-click the top page file to view the
User’s Guide, Software User’s Guide and Network User’s Guide (DCP7045N only) in HTML format.
f Click the documentation you want to read.
User’s Guide
Software User’s Guide
Network User’s Guide
(DCP-7045N only)
 Note
Note
The documents are also available in PDF format (4 manuals):
User’s Guide for stand-alone operations,
Software User’s Guide, Network User’s Guide (DCP-7045N only) and Quick Setup Guide.
The PDF format is recommended for printing the manuals.
Double-click Brother Solutions Center icon to go to the Brother Solutions Center, where you can view or download the PDF documents. (Internet access and PDF Reader software are required.)
How to find scanning instructions
There are several ways you can scan documents. You can find the instructions as follows:
Software User's Guide:
Scanning in Chapter 9
Using ControlCenter2 in Chapter 10
Network Scanning in Chapter 11 (DCP-7045N only)
Presto! PageManager User's Guide:
The complete Presto! PageManager User’s Guide can be viewed from the Help selection in the Presto! PageManager application.
4 |
General information
Control panel overview
DCP-7030, DCP-7040 and DCP-7045N have the same keys. |
1 |
||
|
|
|
|
|
|
|
|
1Print key Job Cancel
Cancels a programmed print job and clears it from the machine’s memory.
To cancel multiple print jobs, hold down this key until the LCD shows
Job Cancel (All).
2Scan key
Puts the machine in Scan mode. (For details about scanning, see the Software User’s Guide on the CD-ROM.)
3Copy keys: Options
You can quickly and easily choose temporary settings for copying.
Enlarge/Reduce
Reduces or enlarges copies.
Contrast
You can increase or decrease the contrast of your copies.
Number of Copies
Use this key to make multiple copies.
4LCD
Displays messages to help you set up and use your machine.
5Menu keys: Clear/Back
Deletes entered data or lets you cancel the current setting.
a + or b -
Press to scroll through the menus and options.
OK
Lets you store your settings in the machine.
Menu
Lets you access the Menu to program your settings in this machine.
6Start
Lets you start making copies or scanning.
7Stop/Exit
Stops an operation or exits from a menu.
5 |
2 Loading paper and documents
Loading paper and print media
The machine can feed paper from the standard paper tray or manual feed slot.
When you put paper into the paper tray, note the following:
If your application software supports paper size selection on the print menu, you can choose it through the software. If your application software does not support it, you can set the paper size in the printer driver or by using the control panel buttons.
Before using paper that has holes in it, such as organizer sheets, you must ‘fan’ the stack to avoid paper jams and misfeeds.
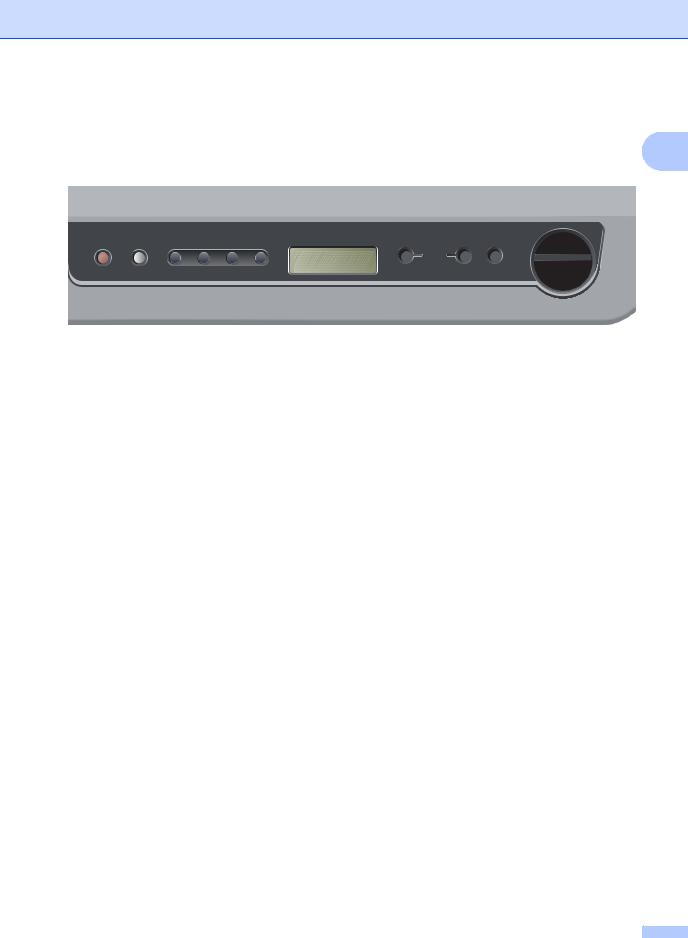
Loading paper in the paper tray
Printing on plain paper, recycled paper or transparencies from the paper tray
a Pull the paper tray completely out of the machine.
b While pressing the green paper guide release lever, slide the paper guides to fit the paper size. Make sure that the guides are firmly in the slots.
6 |

c Put paper in the tray, and make sure that the paper is below the maximum paper mark (1). The side to be printed on must be face down.
1
CAUTION
To prevent damage to your machine caused by paper misfeeding, make sure the paper guides touch the sides of the paper.
d Put the paper tray firmly back in the machine. Make sure that it is completely inserted into the machine.
e Fold out the support flap (1) to prevent paper from sliding off the face-down output tray.
1
Loading paper and documents
Loading paper in the manual feed slot
You can load envelopes and special print
media one at a time into this slot. Use the 2 manual feed slot to print or copy on labels, envelopes or thicker paper.
Printing on plain paper, recycled paper or transparencies from the manual feed slot
 Note
Note
The machine automatically turns on the Manual Feed mode when you put paper in the manual feed slot.
a Fold out the support flap (1) to prevent paper from sliding off the face-down output tray, or remove each page as soon as it comes out of the machine.
1
b Open the manual feed slot cover.
7 |

Chapter 2
c Using both hands, slide the manual feed slot paper guides to the width of the paper that you are going to use.
d Using both hands, put one sheet of paper or one transparency in the manual feed slot until the front edge touches the paper feed roller. When you feel the machine pull in the paper, let go.
Printing on thick paper, bond paper, labels and envelopes
When the back output tray is pulled down, the machine has a straight paper path from the manual feed slot through to the back of the machine. Use this paper feed and output method when you want to print on thick paper, labels or envelopes.
 Note
Note
•Remove each printed sheet or envelope immediately to prevent a paper jam.
•The machine automatically turns on the Manual Feed mode when you put paper in the manual feed slot.
a Open the back cover (back output tray).
b Open the manual feed slot cover.
8 |

c Using both hands, slide the manual feed slot paper guides to the width of the paper that you are going to use.
d Using both hands, put one sheet of paper or one envelope in the manual feed slot until the front edge of the paper or envelope touches the paper feed roller. When you feel the machine pull in the paper, let go.
Loading paper and documents
 Note
Note
•Put the paper into the manual feed slot with the side to be printed face up.
• Make sure that the print media (See |
2 |
Acceptable paper and other print media |
on page 11) is straight and in the proper position on the manual feed slot. If it is not, the paper or the transparency may not be fed correctly, resulting in a skewed printout or a paper jam.
•Do not put more than one sheet of paper in the manual feed slot at any one time, as it may cause a jam.
•If you put any print media in the manual feed slot before the machine is in the Ready state, the print media may be ejected without being printed on.
•To easily remove a small printout from the output tray, lift up the scanner cover by using both hands as shown in the illustration.
•You can still use the machine while the scanner cover is up. To close the scanner cover, push it down with both hands.
9 |

Chapter 2
Unprintable area
Unprintable area for copies
The printable area of your machine begins at approximately 3 mm from the top and bottom and 2 mm from both sides of the paper.
2 2
1 
13 mm
22 mm
 Note
Note
This unprintable area shown above is for a single copy or a 1 in 1 copy using A4 size paper. The unprintable area changes with the paper size.
 1
1
Unprintable area when printing from a computer
When using the printer driver the printable area is smaller than the paper size, as shown below.
Portrait |
|
|
|
Landscape |
|
|
|
|||||
2 |
2 |
2 |
2 |
|||||||||
1 |
|
|
|
|
|
|
||||||
|
|
|
|
|
|
|||||||
|
|
|
|
|
|
1 |
|
|
|
|
|
|
|
|
|
|
|
|
|
|
|
|
|
|
|
|
|
|
|
|
|
|
|
|
|
|
|
|
|
|
|
|
|
|
1 |
1 |
|
|
|
|
|
|
|
|
|
|
|
|
|
|||
|
|
|
|
|
|
|
|
|
|||
|
|
|
|
|
|
|
|
|
|
||
|
|
|
|
|
|
|
|
|
|||
|
|
|
|
|
|
|
|
|
|||
|
|
|
|
|
|
|
|
|
|
|
|
|
|
|
Windows® printer driver and |
|
BRScript Driver for Windows® |
||||||
|
|
|
Macintosh printer driver |
|
and Macintosh |
||||||
|
|
|
|
|
|
|
|
(DCP-7045N only) |
|||
Portrait |
1 |
4.23 mm |
|
4.23 mm |
|||||||
|
|
|
|
|
|
|
|
|
|
|
|
|
|
2 |
6.01 mm |
|
4.23 mm |
||||||
|
|
|
|
|
|
|
|
|
|
|
|
Landscape |
1 |
4.23 mm |
|
4.23 mm |
|||||||
|
|
|
|
|
|
|
|
|
|
|
|
|
|
2 |
5 mm |
|
4.23 mm |
||||||
|
|
|
|
|
|
|
|
|
|
|
|
 Note
Note
The unprintable area shown above is for A4 size paper. The unprintable area changes with the paper size.
10

Acceptable paper and other print media
Print quality may vary according to the type of paper you are using.
You can use the following types of print media: plain paper, bond paper, recycled paper, transparencies, labels or envelopes.
For best results, follow the instructions below:
Use paper made for plain paper copying.
Use paper that is 75 to 90 g/m2.
Use labels and transparencies which are designed for use in laser machines.
Do not put different types of paper in the paper tray at the same time because it may cause paper jams or misfeeds.
For correct printing, you must choose the same paper size from your software application as the paper in the tray.
Avoid touching the printed surface of the paper immediately after printing.
When you use transparencies remove each sheet immediately to prevent smudging or paper jams.
Use long grain paper with a neutral Ph value, and a moisture content of approx. 5%.
Loading paper and documents
Recommended paper and print media
To get the best print quality, we suggest using |
|
|
the following paper. |
2 |
|
|
|
|
|
|
|
Paper Type |
Item |
|
Plain Paper |
Xerox Premier TCF 80 g/m2 |
|
|
Xerox Business 80 g/m2 |
|
Recycled Paper |
Xerox Recycled Supreme |
|
|
80g/m2 |
|
Transparency |
3M CG3300 |
|
|
|
|
Labels |
Avery laser label L7163 |
|
|
|
|
Envelope |
Antalis River series (DL) |
|
|
|
|
Type and size of paper
The machine loads paper from the installed standard paper tray or manual feed slot.
Standard paper tray
Since the standard paper tray is a universal type, you can use any of the paper sizes (one paper type and size at a time) listed in the table in Paper capacity of the paper trays on page 12. The standard paper tray can hold up to 250 sheets of Letter/A4 size paper
(80 g/m2). Paper can be loaded up to the maximum paper mark on the sliding paper width guide.
Manual Feed Slot
The manual feed slot can hold a sheet with a size of 76.2 to 220 mm wide and 116 to 406.4 mm long. You can use the manual feed slot if you are using special paper, envelopes or labels.
11

Chapter 2
Paper capacity of the paper trays
|
Paper size |
Paper types |
No. of sheets |
Paper Tray |
A4, Letter, Executive, |
Plain paper and recycled |
up to 250 |
|
A5, A6, B5, B6. |
paper |
[80 g/m2] |
|
|
Transparency |
up to 10 |
|
|
|
|
Manual Feed Slot |
Width: 76.2 to 220 mm |
Plain paper, recycled |
1 |
|
Length: 116 to 406.4 mm |
paper, bond paper, |
|
|
|
envelopes, labels and |
|
|
|
transparencies |
|
|
|
|
|
Recommended paper specifications
The following paper specifications are suitable for this machine.
Basis weight |
75-90 (g/m2) |
Thickness |
80-110 µm |
|
|
Roughness |
Higher than 20 sec. |
|
|
Stiffness |
90-150 cm3/100 |
Grain direction |
Long grain |
|
|
Volume resistivity |
10e9-10e11 ohm |
Surface resistivity |
10e9-10e12 ohm-cm |
Filler |
CaCO3 (Neutral) |
Ash content |
Below 23 wt% |
|
|
Brightness |
Higher than 80 % |
|
|
Opacity |
Higher than 85 % |
|
|
Handling and using special paper
The machine is designed to work well with most types of xerographic and bond paper. However, some paper variables may have an effect on print quality or handling reliability. Always test samples of paper before purchasing to ensure desirable performance. Store paper in its original packaging and keep it sealed. Keep the paper flat and away from moisture, direct sunlight and heat.
Some important guidelines when selecting paper are:
Do not use inkjet paper because it may cause a paper jam or damage your machine.
Preprinted paper must use ink that can withstand the temperature of the machine’s fusing process (200 degrees centigrade).
If you use bond paper, paper having a rough surface or paper that is wrinkled or creased, the paper may exhibit degraded performance.
12
Types of paper to avoid
CAUTION
Some types of paper may not perform well or may cause damage to your machine.
DO NOT use paper:
•that is highly textured
•that is extremely smooth or shiny
•that is curled or warped
1
1
1 2 mm
•that is coated or has a chemical finish
•that is damaged, creased or folded
•that exceeds the recommended weight specification in this guide
•with tabs and staples
•with letterheads using low temperature dyes or thermography
•that is multipart or carbonless
•that is designed for inkjet printing
If you use any of the types of paper listed above, they may damage your machine. This damage is not covered under any Brother warranty or service agreement.
Loading paper and documents
Envelopes
Most envelopes will be suitable for your machine. However, some envelopes may have feed and print-quality problems
because of the way they have been made. A 2 suitable envelope should have edges with straight, well-creased folds and the leading
edge should not be thicker than two sheets of paper. The envelope should lie flat and not be of baggy or flimsy construction. You should buy quality envelopes from a supplier who understands that you will be using the envelopes in a laser machine.
Envelopes can be fed from manual feed slot one at a time. We recommend that you print a test envelope to make sure the print results are what you want before you print or purchase a large quantity of envelopes.
Check the following:
Envelopes should have a lengthwise sealing flap.
The sealing flaps should be folded crisply and correctly (irregularly cut or folded envelopes may cause paper jams).
Envelopes should consist of two layers of paper in the area circled in figure below.
1 |
1 |
1 Feeding direction
We recommend that you do not print within 15 mm of the edges of envelopes.
Envelope joints that are sealed by the manufacturer should be secure.
13

Chapter 2
Types of envelopes to avoid
CAUTION
DO NOT use envelopes:
•that are damaged, curled, wrinkled or an unusual shape
•that are extremely shiny or textured
•with clasps, staples, snaps or tie strings
•with self-adhesive closures
•that are of a baggy construction
•that are not sharply creased
•that are embossed (have raised writing on them)
•that were previously printed by a laser machine
•that are pre-printed on the inside
•that cannot be arranged neatly when stacked
•that are made of paper that weighs more than the paper weight specifications for the machine
•with edges that are not straight or consistently square
•with windows, holes, cut-outs or perforations
•with glue on surface as shown in figure below
•with double flaps as shown in figure below
•with sealing flaps that have not been folded at purchase
•with sealing flaps as shown in figure below
•with each side folded as shown in figure below
If you use any of the types of envelopes listed above, they may damage your machine. This damage is not covered under any Brother warranty or service agreement.
Occasionally you may experience paper feed problems caused by the thickness, size and flap shape of the envelopes you are using.
14

Labels
The machine will print on most types of labels designed for use with a laser machine. Labels should have an adhesive that is acrylic-based since this material is more stable at the high temperatures in the fuser unit. Adhesives should not come in contact with any part of the machine, because the label stock may stick to the drum unit or rollers and cause jams and print quality problems. No adhesive should be exposed between the labels. Labels should be arranged so that they cover the entire length and width of the sheet. Using labels with spaces may result in labels peeling off and causing serious jams or print problems.
All labels used in this machine must be able to withstand a temperature of 392 degrees Fahrenheit (200 degrees centigrade) for a period of 0.1 seconds.
Label sheets should not exceed the paper weight specifications described in this User’s Guide. Labels exceeding this specification may not feed or print correctly and may cause damage to your machine.
Labels can be fed from the manual feed slot only.
Types of labels to avoid
Do not use labels that are damaged, curled, wrinkled or an unusual shape.
CAUTION
DO NOT feed part used label sheets. The exposed carrier sheet will damage your machine.
Loading paper and documents
Loading documents
Using the automatic |
|
|
document feeder (ADF) |
2 |
|
(DCP-7040 and DCP-7045N) |
||
|
The ADF can hold up to 35 pages and feeds each sheet individually. Use standard
80 g/m2 paper and always fan the pages before putting them in the ADF.
Recommended environment
Temperature: 20 to 30° C
Humidity: 50% - 70%
Paper: Xerox Premier TCF 80 g/m2 or Xerox
Business 80 g/m2
CAUTION
DO NOT leave thick documents on the scanner glass. If you do this, the ADF may jam.
DO NOT use paper that is curled, wrinkled, folded, ripped, stapled, paper-clipped, pasted or taped.
DO NOT use cardboard, newspaper or fabric.
To avoid damaging your machine while using the ADF, DO NOT pull on the document while it is feeding.
To scan non-standard documents see
Using the scanner glass on page 16.
Make sure documents written with ink are completely dry.
15
Chapter 2
Documents must be from 148 to
215.9 mm wide and from 148 to 355.6 mm
long, and of a standard weight 80 g/m2.
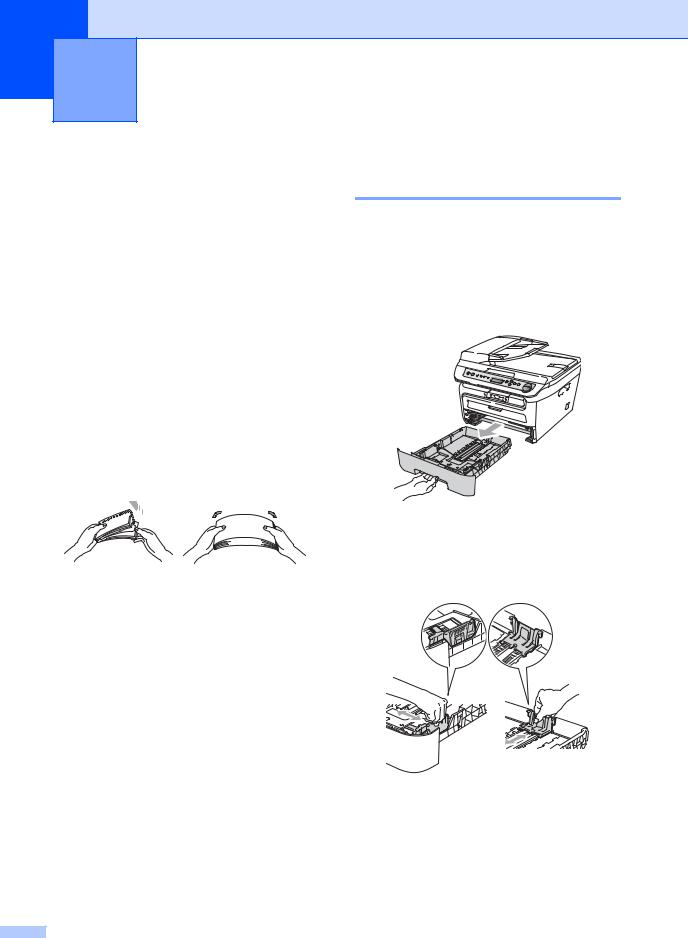
a Fold out the ADF document output support flap (1) and the ADF support flap (2).
2  1
1
b Fan the pages well.
c Place your document, face up top edge first, in the ADF until you feel it touch the feed roller.
d Adjust the paper guides (1) to fit the width of your document.
1 
Using the scanner glass
You can use the scanner glass to copy or scan pages of a book or one page at a time. Documents can be up to 215.9 mm wide and 297 mm long.
16
 Note
Note
(DCP-7040 and DCP-7045N) To use the scanner glass, the ADF must be empty.
a Lift the document cover.
b Using the document guidelines on the left, centre the document face down on the scanner glass.
c Close the document cover.

 CAUTION
If the document is a book or is thick do not slam the cover or press on it.

3 General setup
Paper settings
Paper type
Set up the machine for the type of paper you are using. This will give you the best print quality.
e Press Stop/Exit.
 Note
Note
If you chose Transparency as the paper |
|
type you will only be able to choose |
3 |
Letter or A4 size paper in Step d. |
a Press Menu.
b Press a or b to choose 1.General Setup.
Press OK.
c Press a or b to choose 1.Paper Type. Press OK.
d Press a or b to choose Thin, Plain,
Thick, Thicker, Transparency or Recycled Paper.
Press OK.
e Press Stop/Exit.
Paper size
You can use seven sizes of paper for printing copies: A4, Letter, Executive, A5, A6, B5 and B6.
When you change the size of paper in the tray, you will also need to change the setting for paper size at the same time so your machine can fit the document on the page.
a Press Menu.
b Press a or b to choose 1.General Setup.
Press OK.
c Press a or b to choose 2.Paper Size. Press OK.
d Press a or b to choose A4, Letter,
Executive, A5, A6, B5 or B6. Press OK.
Volume settings
Beeper volume
When the beeper is on, the machine will beep when you press a key or make a mistake. You can choose a range of volume levels, from
High to Off.
a Press Menu.
b Press a or b to choose 1.General Setup.
Press OK.
c Press a or b to choose 3.Beeper. Press OK.
d Press a or b to choose Off, Low, Med or
High. Press OK.
e Press Stop/Exit.
17

Chapter 3
Ecology features
Toner Save
You can save toner using this feature. When you set Toner Save to On, print appears lighter. The default setting is Off.
a Press Menu.
b Press a or b to choose 1.General Setup.
Press OK.
c Press a or b to choose 4.Ecology. Press OK.
d Press a or b to choose 1.Toner Save. Press OK.
e Press a or b to choose On or Off. Press OK.
f Press Stop/Exit.
 Note
Note
We do not recommend Toner Save for printing Photo or Greyscale images.
18
Sleep time
Setting the sleep time reduces power consumption by turning off the fuser while the machine is idle.
You can choose how long the machine must be idle (from 00 to 99 minutes) before it goes into sleep mode. When the machine receives computer data, or makes a copy, the timer will be reset. The default setting is 05 minutes.
While the machine is in sleep mode the LCD will display Sleep. When printing or copying in sleep mode, there will be a short delay while the fuser warms up.
a Press Menu.
b Press a or b to choose 1.General Setup.
Press OK.
c Press a or b to choose 4.Ecology. Press OK.
d Press a or b to choose 2.Sleep Time. Press OK.
e Enter the length of time the machine is idle before entering sleep mode (00 to 99). Press OK.
f Press Stop/Exit.
 Note
Note
To turn off sleep mode, press Start and Options at the same time in e. Press a or b to choose Off. Press OK.

LCD contrast
You can change the contrast to make the LCD look lighter or darker.
a Press Menu.
b Press a or b to choose 1.General Setup.
Press OK.
c Press a or b to choose 5.LCD Contrast.
Press OK.
d Press a to make the LCD darker. Or, press b to make the LCD lighter. Press OK.
e Press Stop/Exit.
User Settings List
You can print a list of the settings you programmed.
a Press Menu.
b Press a or b to choose 1.General Setup.
Press OK.
c Press a or b to choose 6.User Settings.
Press OK.
d Press Start.
e Press Stop/Exit.
General setup
Network Configuration List (DCP-7045N only)
The Network Configuration List prints a report listing all the current network configuration including the network print server settings.
Note |
|
3 |
|
Node name: Node name appears in the Network Configuration List. The default node name is “BRNXXXXXXXXXXXX”.
a Press Menu.
b Press a or b to choose 1.General Setup.
Press OK.
c Press a or b to choose 7.Network Config.
Press OK. d Press Start.
e Press Stop/Exit.
19

Chapter 3
20

Section II
Copy
Making copies |
22 |

4 Making copies
How to copy |
|
Stop copying |
||||||||||||||||
Entering copy mode |
|
To stop copying, press Stop/Exit. |
||||||||||||||||
|
|
|||||||||||||||||
|
|
|
|
|
|
|
|
|
|
|
|
|
|
|
|
|
|
|
|
|
|
|
|
|
|
|
|
|
|
|
|
|
|
|
|
|
|
|
|
|
|
|
|
|
|
|
|
|
|
|
|
|
|
|
|
|
|
|
|
|
|
|
|
|
|
|
|
|
|
|
|
|
|
|
|
|
|
|
|
|
|
|
|
|
|
|
|
|
|
|
|
|
|
|
1Stack/Sort 1
2Copy ratio and copy layout
3Contrast
4Quality
5Number of copies
1Sort is only available for the DCP-7040 and DCP7045N.
Making a single copy
a b
Load your document.
Press Start.
Making multiple copies
a b
Load your document.
Do one of the following:
Press Number of Copies to enter the number of copies (up to 99).
Press or hold a or b to increase or decrease the number of copies.
c Press Start.
 Note
Note
To sort your copies, see Sorting copies using the ADF (DCP-7040 and DCP7045N) on page 26.
22
Loading...