


 Loading...
USER’S GUIDE
DCP-770CW
If you need to call Customer Service
Please complete the following information for future reference:
Model Number: DCP-770CW
Serial Number: 1
Date of Purchase:
Place of Purchase:
1The serial number is on the back of the unit. Retain this User's Guide with your sales receipt as a permanent record of your purchase, in the event of theft, fire or warranty service.
Register your product on-line at
http://www.brother.com/registration/
By registering your product with Brother, you will be recorded as the original owner of the product. Your registration with Brother:
may serve as confirmation of the purchase date of your product should you lose your receipt; and
may support an insurance claim by you in the event of product loss covered by insurance.
© 2007 Brother Industries, Ltd.

Compilation and Publication Notice
Under the supervision of Brother Industries Ltd., this manual has been compiled and published, covering the latest product descriptions and specifications.
The contents of this manual and the specifications of this product are subject to change without notice.
Brother reserves the right to make changes without notice in the specifications and materials contained herein and shall not be responsible for any damages (including consequential) caused by reliance on the materials presented, including but not limited to typographical and other errors relating to the publication.
i

EC Declaration of Conformity under the R & TTE Directive
ii

Table of Contents |
|
|
Section I General |
|
|
1 |
General Information |
2 |
|
Using the documentation....................................................................................... |
2 |
|
Symbols and conventions used in the documentation .................................... |
2 |
|
Accessing the Software User’s Guide and Network User’s Guide ........................ |
3 |
|
Viewing Documentation................................................................................... |
3 |
|
Control panel overview .......................................................................................... |
6 |
|
LCD display indications ................................................................................... |
7 |
|
Basic Operations ............................................................................................. |
7 |
|
Warning LED indications ................................................................................. |
8 |
|
Printing Reports............................................................................................... |
8 |
2 |
Loading documents and paper |
9 |
|
Loading documents ............................................................................................... |
9 |
|
Using the scanner glass .................................................................................. |
9 |
|
Scannable area ............................................................................................... |
9 |
|
Acceptable paper and other media...................................................................... |
10 |
|
Recommended media ................................................................................... |
10 |
|
Handling and using media ............................................................................. |
11 |
|
Choosing the right media............................................................................... |
12 |
|
Loading paper and other media........................................................................... |
14 |
|
Loading envelopes and post cards................................................................ |
16 |
|
Loading photo paper...................................................................................... |
17 |
|
Removing small printouts from the machine ................................................. |
18 |
|
Printable area ................................................................................................ |
19 |
3 |
General setup |
20 |
|
Paper settings...................................................................................................... |
20 |
|
Paper Type .................................................................................................... |
20 |
|
Paper Size ..................................................................................................... |
20 |
|
LCD display ......................................................................................................... |
21 |
|
LCD Contrast................................................................................................. |
21 |
|
Setting the backlight brightness..................................................................... |
21 |
|
Setting the Dim Timer for the backlight ........................................................ |
22 |
|
Setting the Off Timer ..................................................................................... |
22 |
iii

Section II Copy |
|
|
4 |
Making copies |
24 |
|
How to copy ......................................................................................................... |
24 |
|
Making a single copy ..................................................................................... |
24 |
|
Making multiple copies .................................................................................. |
24 |
|
Stop copying .................................................................................................. |
24 |
|
Copy options........................................................................................................ |
24 |
|
Changing copy speed and quality ................................................................ |
25 |
|
Enlarging or reducing the image copied ........................................................ |
25 |
|
Making N in 1 copies or a poster (page layout) ............................................ |
26 |
|
Adjusting Brightness, Contrast and Colour.................................................... |
27 |
|
Paper options ................................................................................................ |
28 |
|
Setting your changes as a new default.......................................................... |
28 |
|
Restoring all settings to the factory settings .................................................. |
28 |
Section III Direct Photo Printing |
|
|
5 |
Printing photos from a memory card or USB Flash memory drive |
30 |
|
PhotoCapture Center™ Operations..................................................................... |
30 |
|
Printing from a memory card or USB Flash memory drive without a PC....... |
30 |
|
Scanning to a memory card or USB Flash memory drive without a PC ........ |
30 |
|
Using PhotoCapture Center™ from your computer....................................... |
30 |
|
Using a memory card or USB Flash memory drive ....................................... |
30 |
|
Memory cards or a USB Flash memory drive folder structure....................... |
31 |
|
Getting started ..................................................................................................... |
32 |
|
Entering PhotoCapture mode ........................................................................ |
33 |
|
Print Images......................................................................................................... |
33 |
|
View Photo(s) ................................................................................................ |
33 |
|
Print Index (Thumbnails) ............................................................................... |
34 |
|
Print Photos ................................................................................................... |
34 |
|
Photo Effects ................................................................................................. |
35 |
|
Search by Date.............................................................................................. |
38 |
|
Print All Photos .............................................................................................. |
39 |
|
Slide show ..................................................................................................... |
39 |
|
Trimming........................................................................................................ |
40 |
|
DPOF printing................................................................................................ |
40 |
|
PhotoCapture Center™ print settings.................................................................. |
41 |
|
Print Speed and Quality................................................................................. |
42 |
|
Paper options ................................................................................................ |
42 |
|
Adjusting Brightness, Contrast and Colour.................................................... |
43 |
|
Cropping ........................................................................................................ |
44 |
|
Borderless printing......................................................................................... |
44 |
|
Setting your changes as a new default.......................................................... |
44 |
|
Restoring all settings to the factory settings .................................................. |
44 |
|
Scan to a memory card or USB Flash memory drive .......................................... |
45 |
|
Entering Scan mode ...................................................................................... |
45 |
|
How to scan to a memory card or USB Flash memory drive......................... |
45 |
|
Understanding the Error Messages ..................................................................... |
46 |
iv |
|
|

6 |
Printing photos from a camera |
47 |
|
Printing photos directly from a PictBridge camera............................................... |
47 |
|
PictBridge requirements ................................................................................ |
47 |
|
Setting your digital camera ............................................................................ |
47 |
|
Printing Images.............................................................................................. |
48 |
|
DPOF printing................................................................................................ |
48 |
|
Printing photos directly from a digital camera (without PictBridge)...................... |
49 |
|
Printing Images.............................................................................................. |
49 |
|
Understanding the Error Messages..................................................................... |
50 |
Section IV Software |
|
|
7 |
Software and Network features |
52 |
Section V Appendixes |
|
|
A |
Safety and Legal |
54 |
|
Choosing a location ............................................................................................. |
54 |
|
To use the machine safely............................................................................. |
55 |
|
Important safety instructions.......................................................................... |
58 |
|
IMPORTANT - For your safety ...................................................................... |
59 |
|
LAN connection ............................................................................................. |
59 |
|
Radio interference ......................................................................................... |
59 |
|
EU Directive 2002/96/EC and EN50419........................................................ |
60 |
|
Legal limitations for copying .......................................................................... |
60 |
|
Trademarks ................................................................................................... |
61 |
B |
Troubleshooting and Routine Maintenance |
62 |
|
Troubleshooting .................................................................................................. |
62 |
|
If you are having difficulty with your machine ................................................ |
62 |
|
Error messages ................................................................................................... |
66 |
|
Changing LCD language ............................................................................... |
68 |
|
Error animation .............................................................................................. |
68 |
|
Printer jam or paper jam ................................................................................ |
68 |
|
Routine maintenance........................................................................................... |
70 |
|
Replacing the ink cartridges .......................................................................... |
70 |
|
Cleaning the outside of the machine ............................................................. |
73 |
|
Cleaning the scanner..................................................................................... |
73 |
|
Cleaning the machine printer platen.............................................................. |
74 |
|
Cleaning the paper pick-up roller................................................................... |
74 |
|
Cleaning the print head ................................................................................. |
75 |
|
Checking the print quality .............................................................................. |
76 |
|
Checking the print alignment ......................................................................... |
77 |
|
Checking the ink volume ............................................................................... |
77 |
|
Machine Information ............................................................................................ |
78 |
|
Checking the serial number........................................................................... |
78 |
|
Packing and shipping the machine ...................................................................... |
78 |
v

C |
Menu and Features |
80 |
|
On-screen programming |
......................................................................................80 |
|
Menu table..................................................................................................... |
80 |
|
Mode and menu keys .......................................................................................... |
80 |
|
Menu table..................................................................................................... |
81 |
D |
Specifications |
90 |
|
General ................................................................................................................ |
90 |
|
Print media........................................................................................................... |
91 |
|
Copy .................................................................................................................... |
92 |
|
PhotoCapture Center™ ....................................................................................... |
93 |
|
PictBridge ............................................................................................................ |
94 |
|
Scanner ............................................................................................................... |
95 |
|
Printer .................................................................................................................. |
96 |
|
Interfaces ............................................................................................................. |
97 |
|
Computer requirements ....................................................................................... |
98 |
|
Consumable items ............................................................................................... |
99 |
|
Network (LAN) ................................................................................................... |
100 |
E |
Glossary |
101 |
F |
Index |
102 |
vi

Section I
General
General Information |
2 |
Loading documents and paper |
9 |
General setup |
20 |
1 General Information
Using the documentation
Thank you for buying a Brother machine! Reading the documentation will help you make the most of your machine.
Symbols and conventions used in the documentation
The following symbols and conventions are used throughout the documentation.
Bold |
Bold typeface identifies specific |
|
keys on the machine’s control |
|
panel. |
Italics |
Italicized typeface emphasizes |
|
an important point or refers you |
|
to a related topic. |
Courier |
Text in the Courier New font |
New |
identifies messages on the |
|
LCD of the machine. |
Warnings tell you what to do to prevent possible personal injury.
Electrical Hazard icons alert you to possible electrical shock.
Cautions specify procedures you must follow or avoid to prevent possible damage to the machine or other objects.
Notes tell you how you should respond to a situation that may arise or give tips about how the operation works with other features.
Improper Setup icons alert you to devices and operations that are not compatible with the machine.
2
Accessing the
Software User’s Guide
and Network User’s
Guide
This User’s Guide does not contain all the information about the machine such as how to use the advanced features of Printer, Scanner and Network. When you are ready to learn detailed information about these operations, read the Software User’s Guide and Network User’s Guide.
Viewing Documentation
Viewing Documentation (For Windows®)
To view the documentation, from the Start menu, point to Brother, DCP-770 from the programs group, and then choose
User’s Guides in HTML format.
If you have not installed the software, you can find the documentation by following the instructions below:
a Turn on your PC. Insert the Brother CD-ROM into your CD-ROM drive.
b If the model name screen appears, click your model name.
General Information |
|
c If the language screen appears, click |
|
your language. The CD-ROM main |
1 |
menu will appear. |
 Note
Note
If this window does not appear, use
Windows® Explorer to run the start.exe program from the root directory of the Brother CD-ROM.
d Click Documentation.
e Click the documentation you want to read.
HTML documents: Software User’s Guide and Network User’s Guide in HTML format.
This format is recommended for viewing on your computer.
PDF documents: User’s Guide for stand-alone operations, Software User’s Guide and Network User’s Guide in PDF format.
This format is recommended for printing the manuals. Click to go to the Brother Solutions Center, where you can view or download the PDF documents. (Internet access and PDF Reader software are required.)
3
Chapter 1
How to find Scanning instructions
There are several ways you can scan documents. You can find the instructions as follows:
Software User’s Guide
Scanning
(For Windows® 2000 Professional/Windows® XP and Windows Vista™)
ControlCenter3
(For Windows® 2000 Professional/Windows® XP and Windows Vista™)
Network Scanning
Scansoft™ PaperPort™ 11SE with OCR How-to-Guides
The complete ScanSoft™ PaperPort™ 11SE with OCR How-to-Guides can be viewed from the Help selection in the ScanSoft™ PaperPort™ 11SE with OCR application.
How to find Network setup instructions
Your machine can be connected to a wireless or wired network. You can find basic setup instructions in the Quick Setup Guide. For more information, or if your access point supports SecureEasySetup™ or AOSS™, please see the Network User’s Guide.
Viewing Documentation
(For Macintosh®)
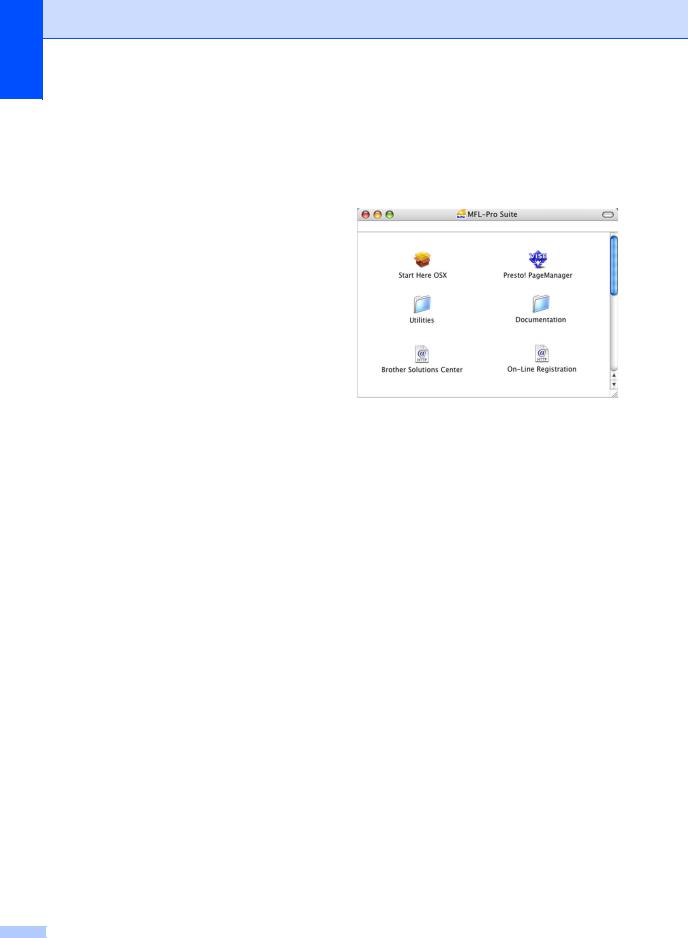
a Turn on your Macintosh®. Insert the Brother CD-ROM into your CD-ROM drive. The following window will appear.
b Double-click the Documentation icon. c Double-click your language folder.
d Double-click the top page file to view the
Software User’s Guide and Network User’s Guide in HTML format.
e Click the documentation you want to read.
Software User’s Guide
Network User’s Guide
4

How to find Scanning instructions
There are several ways you can scan documents. You can find the instructions as follows:
Software User’s Guide
Scanning
(For Mac OS® X 10.2.4 or greater)
ControlCenter2
(For Mac OS® X 10.2.4 or greater)
Network Scanning
(For Mac OS® X 10.2.4 or greater)
Presto!® PageManager® User’s Guide
The complete Presto!® PageManager® User's Guide can be viewed from the Help selection in the Presto!® PageManager® application.
How to find Network setup instructions
Your machine can be connected to a wireless or wired network. You can find basic setup instructions in the Quick Setup Guide. For more information, or if your access point supports SecureEasySetup™ or AOSS™, please see the Network User’s Guide.
General Information
1
5

Chapter 1
Control panel overview
Quality |
Normal |
Enlarge/Reduce |
100% |
Ratio: |
100% |
Paper Type |
Plain Paper |
Mem.
1LCD (liquid crystal display)
Displays messages on the screen to help you set up and use your machine.
Also, you can adjust the angle of the LCD display by lifting it.
2Menu keys:
d or c
Press to scroll backward or forward to a menu selection.
Also, press to choose options.
a or b
Press to scroll through the menus and options.
Clear/Back
Press to cancel the current setting.
Menu
Lets you access the main menu to program the machine.
OK
Lets you choose a setting.
3Number of Copies
Use this key to make multiple copies.
4Start keys:
 Colour Start
Lets you start making copies in full colour. Also lets you start a scanning operation (in colour or mono, depending on the scanning setting in the ControlCenter software).
6
 Mono Start
Lets you start making copies in monochrome. Also lets you start a scanning operation (in colour or mono, depending on the scanning setting in the ControlCenter software).
5 Stop/Exit
Stops an operation or exits from a menu.
6On/Off
You can turn the machine on and off.
If you turn the machine off, it will still periodically clean the print head to maintain print quality.
7Ink Management
Lets you clean the print head, check the print quality, and check the available ink volume.
8Mode keys:
 Scan
Scan
Lets you access Scan mode.
 PhotoCapture
Lets you access PhotoCapture Center™ mode.
9 Warning LED
Turns red when the LCD displays an error or an important status message.

LCD display indications
The LCD display screen shows the mode the machine is in, the current settings, and the available ink volume.
01 |
2 |
|
|
Quality |
Normal |
Enlarge/Reduce |
100% |
Ratio: |
100% |
Paper Type |
Plain Paper |
|
Mem. |
1
1Wireless Status
A four level indicator shows the current wireless signal strength if you are using a wireless connection.
|
|
|
|
0 |
Max |
||
2Ink indicator
Lets you see the available ink volume.
General Information
Basic Operations
The following steps show how to change a |
1 |
setting in the machine. In this example the Paper Type setting is changed from
Plain Paper to Inkjet Paper.
a Press Menu.
b Press a or b to choose
General Setup.
General Setup
LAN
Print Reports
Machine Info.
Initial Setup
MENU |
Select & Press OK |
Press OK.
c Press a or b to choose Paper Type.
d Press d or c to choose Inkjet Paper. Press OK.
You can see the current setting on the LCD:
General Setup |
|
|
Paper Type |
|
Inkjet Paper |
|
||
|
|
|
Paper Size |
|
A4 |
|
||
|
|
|
LCD Settings |
|
|
|
|
|
|
|
|
|
|
Select & Press OK |
MENU |
|
e Press Stop/Exit.
7

Chapter 1
Warning LED indications
The Warning LED (light emitting diode) is a light that shows the status of the machine, as shown in the table.
Quality |
Normal |
Enlarge/Reduce |
100% |
Ratio: |
100% |
Paper Type |
Plain Paper |
|
Mem. |
LED |
DCP status |
Description |
|
|
Ready |
The DCP is ready for |
|
|
|
use. |
|
Off |
|
|
|
|
|
|
|
|
Cover open |
The cover is open. Close |
|
|
|
the cover. (See Error |
|
Red |
|
messages on page 66.) |
|
|
|
||
Ink empty |
Replace the Ink |
||
|
|||
|
|
cartridge with a new one. |
|
|
|
(See Replacing the ink |
|
|
|
cartridges on page 70.) |
|
|
|
|
|
|
Paper error |
Put paper in the tray or |
|
|
|
clear the paper jam. |
|
|
|
Check the LCD |
|
|
|
message. (See Error |
|
|
|
messages on page 66.) |
|
|
|
|
|
|
Other |
Check the LCD |
|
|
messages |
message. (See Error |
|
|
|
messages on page 66.) |
|
|
|
|
8
Printing Reports
The following reports are available:
Help List
A help list about how to quickly program your machine.
User Settings
Lists your settings.
Network Config
Lists your Network settings.
How to print a report
a Press Menu.
b Press a or b to choose
Print Reports. Press OK.
c Press a or b to choose the report you want.
Press OK.
d Press Mono Start.
2 Loading documents and paper
Loading documents
You can make copies, and scan from the scanner glass.
Using the scanner glass
You can use the scanner glass to copy or scan pages of a book or one page at a time.
Document Sizes Supported
Length: |
Up to 297 mm |
Width: |
Up to 215.9mm |
Weight: |
Up to 2 kg |
|
|
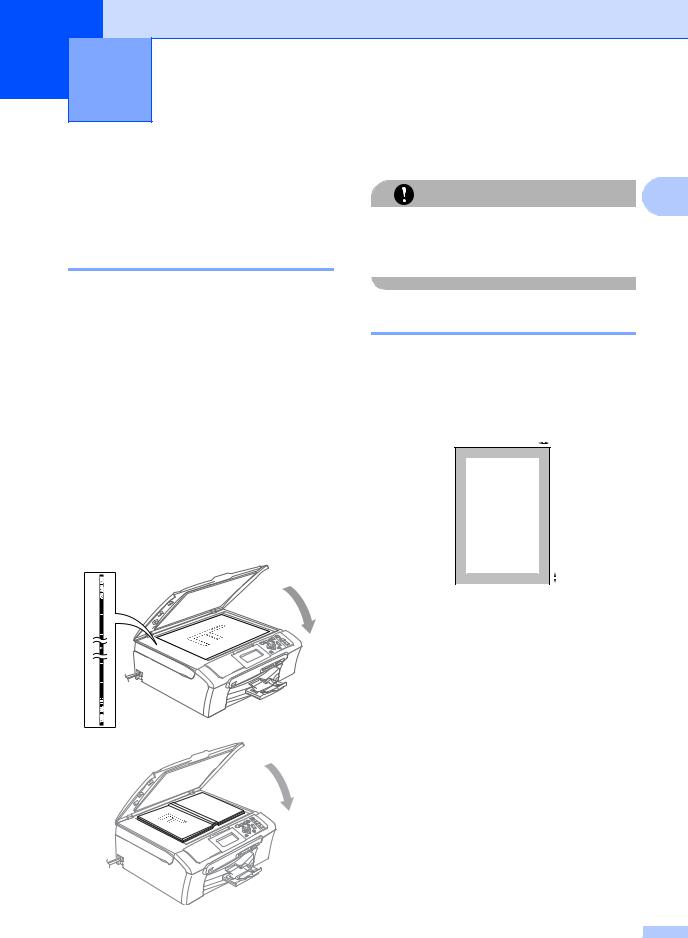
How to load documents
a Lift the document cover.
b Using the document guidelines on the left, center the document face down on the scanner glass.
c Close the document cover.
CAUTION |
2 |
If you are scanning a book or thick document, DO NOT slam the cover down or press on it.
Scannable area
The scannable area depends on the settings in the application you are using. The figures below show the areas you cannot scan on A4 or Letter paper.
3 4
1 

|
|
|
|
|
2 |
|
|
|
|
|
|
||
|
|
|
|
|
||
|
|
|
|
|
|
|
Usage |
Document |
Top (1) |
|
Left (3) |
||
|
Size |
Bottom (2) |
|
Right (4) |
||
|
|
|
|
|||
Copy |
Letter |
3 mm |
|
3 mm |
||
|
|
|
|
|
|
|
|
A4 |
3 mm |
|
3 mm |
||
|
|
|
|
|
|
|
Scan |
Letter |
3 mm |
|
3 mm |
||
|
|
|
|
|
|
|
|
A4 |
3 mm |
|
0 mm |
||
|
|
|
|
|
|
|
9

Chapter 2
Acceptable paper and other media
The print quality can be affected by the type of paper you are using in the machine.
To get the best print quality for the settings you have chosen, always set the Paper Type to match the type of paper you load.
You can use plain paper, inkjet paper (coated paper), glossy paper, transparencies and envelopes.
We recommend testing various paper types before buying large quantities.
For best results, use the Brother paper.
When you print on inkjet paper (coated paper), transparencies and photo paper, be sure to choose the correct media in the ‘Basic’ tab of the printer driver or in the Paper Type setting of the menu
(See Paper Type on page 28).
When you print on Brother photo paper, load the instruction sheet included with the photo paper in the paper tray first, and then put the photo paper on top of the instruction sheet.
When you use transparencies or photo paper, remove each sheet at once to prevent smudging or paper jams.
Avoid touching the printed surface of the paper immediately after printing; the surface may not be completely dry and may stain your fingers.
Recommended media
To get the best print quality, we suggest using Brother paper. (See table below.)
If Brother paper is not available in your country, we recommend testing various papers before purchasing large quantities.
We recommend using ‘3M Transparency Film’ when you print on transparencies.
Brother paper
Paper Type |
Item |
|
A4 |
Plain |
BP60PA |
|
|
|
A4 Glossy Photo |
BP61GLA |
|
|
|
|
A4 |
Inkjet (Matte) |
BP60MA |
|
|
|
10 x 15 cm Glossy Photo |
BP61GLP |
|
|
|
|
10
Handling and using media
Store paper in its original packaging, and keep it sealed. Keep the paper flat and away from moisture, direct sunlight and heat.
The coated side of photo paper is shiny. Avoid touching the shiny (coated) side. Load photo paper with the shiny side facing down.
Avoid touching either side of transparencies because they absorb water and perspiration easily, and this may cause decreased output quality. Transparencies designed for laser printers/copiers may stain your next document. Use only transparencies recommended for inkjet printing.
 Improper Setup
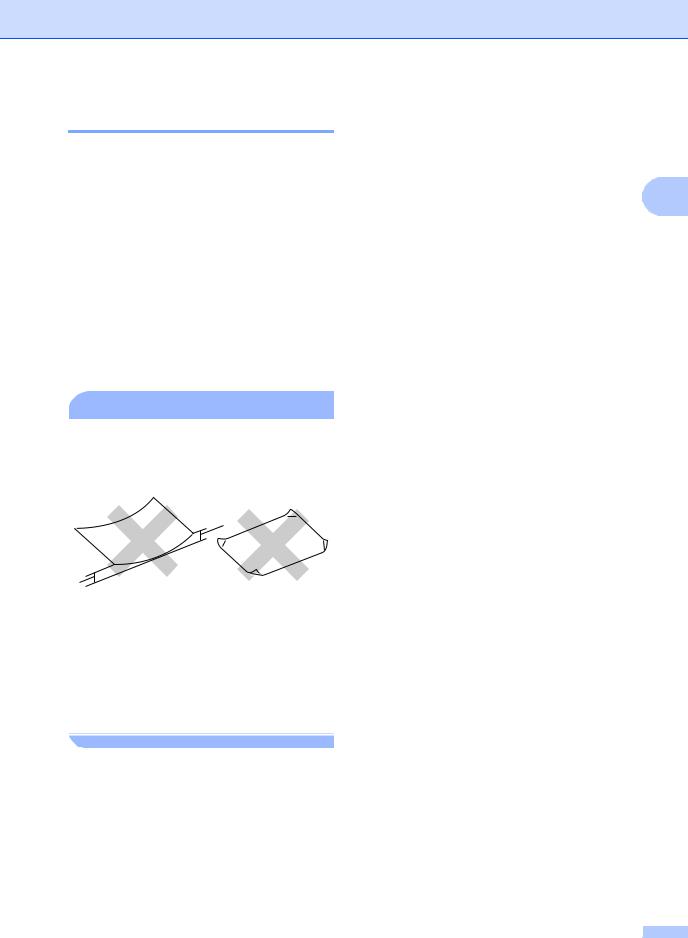
DO NOT use the following kinds of paper:
•Damaged, curled, wrinkled, or irregularly shaped paper
1
1 
1 2 mm or longer
•Extremely shiny or highly textured paper
•Paper already printed on by a printer
•Paper that cannot be arranged uniformly when stacked
•Paper made with a short grain
Loading documents and paper
Paper capacity of the output paper tray
Up to 50 sheets of 20 lb Letter or 80 g/m2 A4 paper.
Transparencies or photo paper must be |
2 |
picked up from the output paper tray one page at a time to avoid smudging.
11

Chapter 2
Choosing the right media
Paper type and size for each operation
Paper Type |
Paper Size |
|
|
Usage |
|
|
|
|
|
|
Copy |
Photo |
Printer |
|
|
|
|
|
Capture |
|
Cut Sheet |
Letter |
216 |
× 279 mm (8 1/2 × 11 in.) |
Yes |
Yes |
Yes |
|
A4 |
210 |
× 297 mm (8.3 × 11.7 in.) |
Yes |
Yes |
Yes |
|
Legal |
216 |
× 356 mm (8 1/2 × 14 in.) |
Yes |
– |
Yes |
|
Executive |
184 |
× 267 mm (7 1/4 × 10 1/2 in.) |
– |
– |
Yes |
|
JIS B5 |
182 |
× 257 mm (7.2 × 10.1 in.) |
– |
– |
Yes |
|
A5 |
148 |
× 210 mm (5.8 × 8.3 in.) |
Yes |
– |
Yes |
|
A6 |
105 |
× 148 mm (4.1 × 5.8 in.) |
– |
– |
Yes |
|
|
|
|
|
|
|
Cards |
Photo |
10 × 15 cm (4 × 6 in.) |
Yes |
Yes |
Yes |
|
|
Photo L |
89 × 127 mm (3 1/2 × 5 in.) |
– |
– |
Yes |
|
|
Photo 2L |
13 × 18 cm (5 × 7 in.) |
– |
Yes |
Yes |
|
|
Index Card |
127 |
× 203 mm (5 × 8 in.) |
– |
– |
Yes |
|
Post Card 1 |
100 |
× 148 mm (3.9 × 5.8 in.) |
– |
– |
Yes |
|
Post Card 2 |
148 |
× 200 mm (5.8 × 7.9 in.) |
– |
– |
Yes |
|
(Double) |
|
|
|
|
|
|
|
|
|
|
|
|
Envelopes |
C5 |
162 |
× 229 mm (6.4 × 9 in.) |
– |
– |
Yes |
|
Envelope |
|
|
|
|
|
|
DL |
110 |
× 220 mm (4.3 × 8.7 in.) |
– |
– |
Yes |
|
Envelope |
|
|
|
|
|
|
COM-10 |
105 |
× 241 mm (4 1/8 × 9 1/2 in.) |
– |
– |
Yes |
|
Monarch |
98 × 191 mm (3 7/8 × 7 1/2 in.) |
– |
– |
Yes |
|
|
JE4 |
105 |
× 235 mm (4.1 × 9.3 in.) |
– |
– |
Yes |
|
Envelope |
|
|
|
|
|
|
|
|
|
|
|
|
Transparencies |
Letter |
216 |
× 279 mm (8 1/2 × 11 in.) |
Yes |
– |
Yes |
|
A4 |
210 |
× 297 mm (8.3 × 11.7 in.) |
Yes |
– |
Yes |
|
|
|
|
|
|
|
12
Loading documents and paper
Paper weight, thickness and capacity
Paper Type |
Weight |
Thickness |
No. of |
|
||
|
|
|
|
sheets |
|
|
Cut |
Plain Paper |
64 to 120 g/m2 |
0.08 to 0.15 mm |
100 |
1 |
2 |
Sheet |
|
|
|
|
|
|
Inkjet Paper |
64 to 200 g/m2 |
0.08 to 0.25 mm |
20 |
|
||
|
|
|
||||
|
Glossy Paper |
Up to 220 g/m2 |
Up to 0.25 mm |
20 2 |
|
|
Cards |
Photo Card |
Up to 220 g/m2 |
Up to 0.25 mm |
20 2 |
|
|
|
Index Card |
Up to 120 g/m2 |
Up to 0.15 mm |
30 |
|
|
|
Post Card |
Up to 200 g/m2 |
Up to 0.23 mm |
30 |
|
|
Envelopes |
75 to 95 g/m2 |
Up to 0.52 mm |
10 |
|
|
|
Transparencies |
– |
– |
10 |
|
|
|
|
|
|
|
|
|
|
1Up to 50 sheets for Legal size paper 80 g/m2. Up to 100 sheets of A4 80 g/m2 paper.
2For Photo 10×15cm and Photo L paper, use the photo paper tray. (See Loading photo paper on page 17.)
13

Chapter 2
Loading paper and other media
 Note
Note
To print on Photo L or 10 x 15 cm paper, you must use the photo paper tray. (See
Loading photo paper on page 17.)
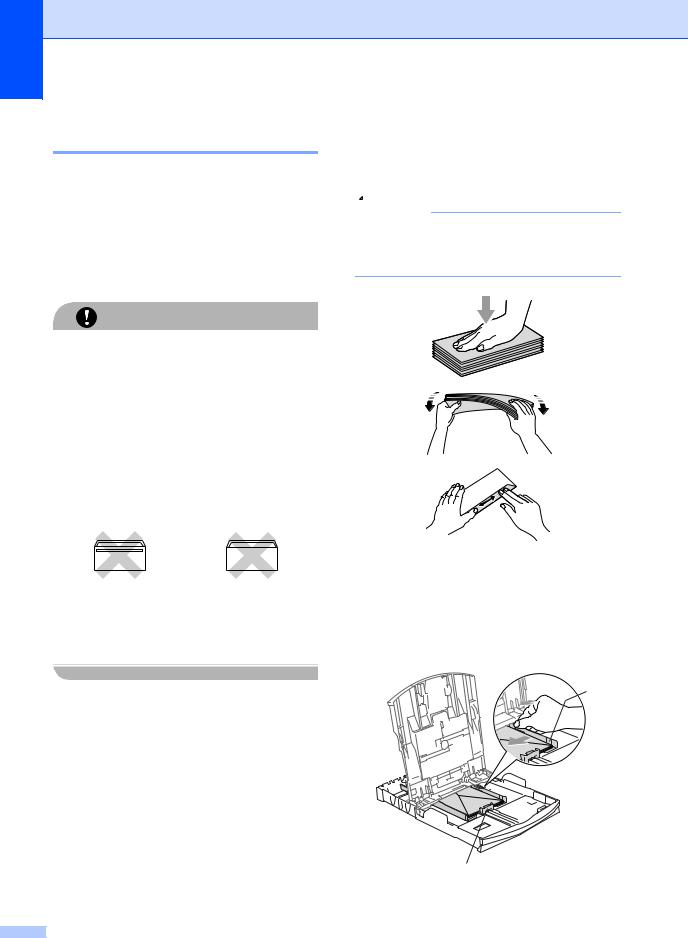
a If the paper support flap is open, close it, and then pull the paper tray completely out of the machine.
Lift the output paper tray cover (1).
1
b Press and slide the paper side
guides (1) and paper length guide (2) to fit the paper size.
1
2
c Fan the stack of paper well to avoid paper jams and misfeeds.
 Note
Note
Always make sure that the paper is not curled.
d Gently put the paper into the paper tray print side down and top edge first. Check that the paper is flat in the tray.
14

 Note
Note
When you use Legal size paper, press and hold the universal guide release button as you slide out the front of the paper tray.
e Gently adjust the paper side guides to the paper with both hands.
Make sure the paper side guides touch the sides of the paper.
 Note
Note
Be careful that you do not push the paper in too far; it may lift at the back of the tray and cause feed problems.
Loading documents and paper
f Close the output paper tray cover.
2
g Slowly push the paper tray completely into the machine.
h While holding the paper tray in place, pull out the paper support (1) until it clicks and unfold the paper support flap (2).
 Note
Note
Do not use the paper support flap for Legal paper.
15
Chapter 2
Loading envelopes and post cards
About envelopes
Use envelopes that weigh from 75 to 95 g/m2.
Some envelopes need margin settings to be set in the application. Make sure you do a test print first.
CAUTION
DO NOT use any of the following types of envelopes, as they will cause paper feed problems:
•That are of a baggy construction.
•That are embossed (have raised writing on them).
•That have clasps or staples.
•That are pre-printed on the inside.
Glue |
Double flap |
|
|
Occasionally you may experience paper feed problems caused by the thickness, size and flap shape of the envelopes you are using.
16
How to load envelopes and post cards
a Before loading, press the corners and sides of the envelopes or post cards to make them as flat as possible.
 Note
Note
If the envelopes or post cards are ‘doublefeeding,’ put one envelope or post card in the paper tray at a time.
b Put the envelopes or post cards into the paper tray with the address side down and the leading edge in first as shown in the illustration. Slide the paper side guides (1) and paper length guide (2) to fit the size of the envelopes or post cards.
1
2

If you have problems when printing on envelopes, try the following suggestions:
a Open the envelope flap.
b Make sure the open flap is either to the side of the envelope or to the back edge of the envelope when printing.
c Adjust the size and margin in your application.
Loading documents and paper
Loading photo paper
Use the photo paper tray which has been |
|
assembled on the top of the output paper tray |
|
cover to print on photo 10 × 15 cm and photo |
2 |
L size paper. When you use the photo paper |
tray, you do not have to take out the paper that is in the tray beneath it.
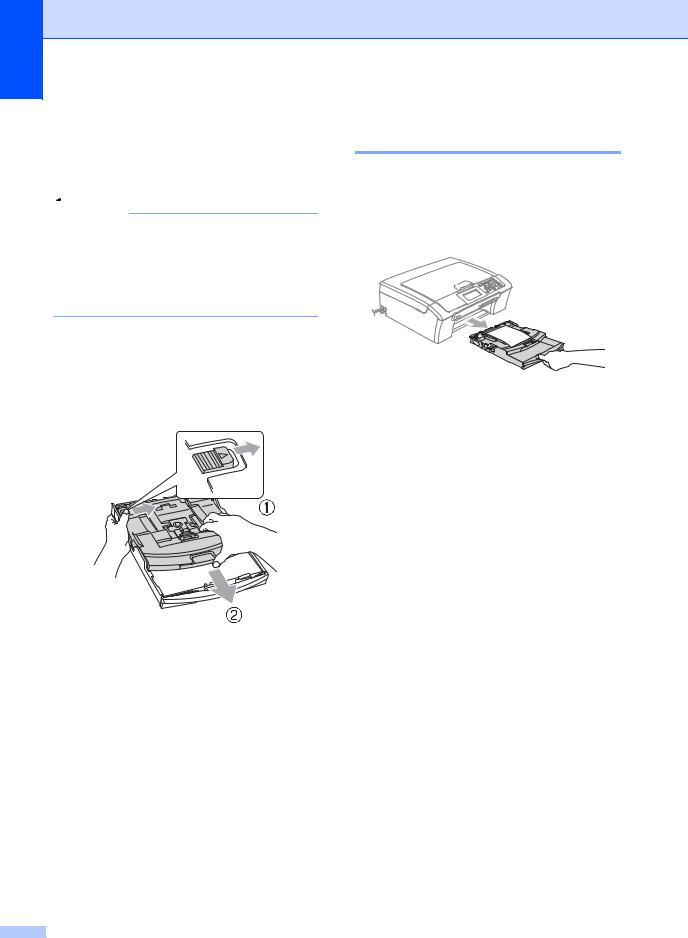
a Press the photo paper tray release button with your left thumb and push the photo paper tray backward until it clicks into the photo printing position.
1
1 Photo Paper Tray
b Press and slide the paper side
guides (1) and paper length guide (2) to fit the paper size.
1
2
17
Chapter 2
c Put the photo paper into the photo paper tray and gently adjust the paper side guides to the paper.
Make sure the paper side guides touch the sides of the paper.
 Note
Note
•Be careful that you do not push the paper in too far; it may lift at the back of the tray and cause feed problems.
•Always make sure that the paper is not curled.
d When you have finished printing photos return the photo paper tray to the normal printing position.
Press the photo paper tray release button with your left thumb and pull the photo paper tray forward until it clicks.
18
Removing small printouts from the machine
When the machine ejects small paper onto the output paper tray you may not be able to reach it. Make sure printing has finished, and then pull the tray completely out of the machine.
Loading documents and paper
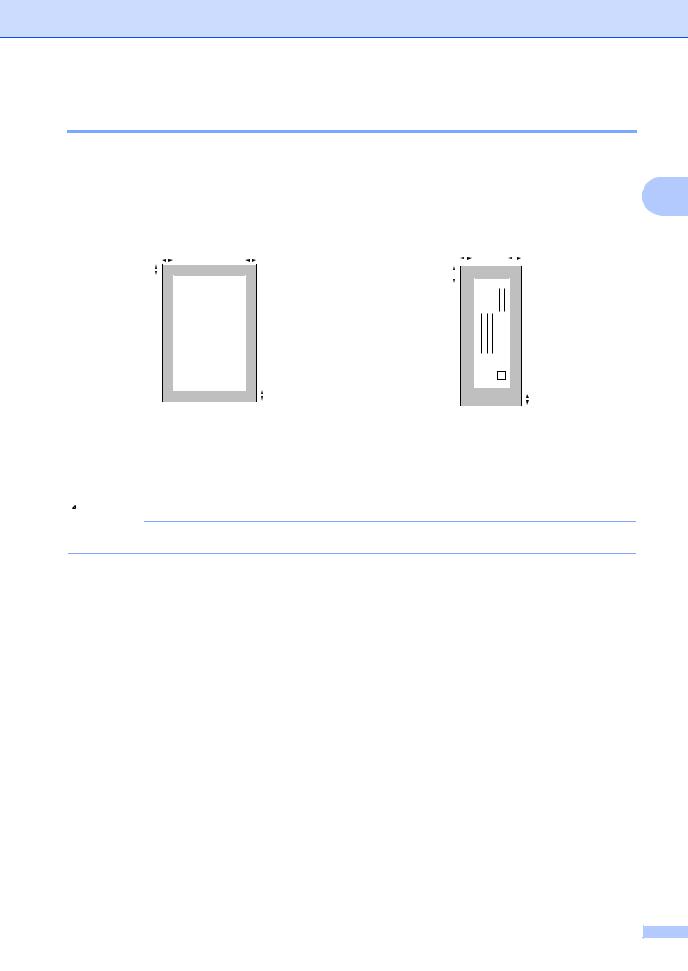
Printable area
The printable area depends on the settings in the application you are using. The figures below show the unprintable areas on cut sheet paper and envelopes. The machine can only print in the
shaded areas when the Borderless print feature is available and turned on.
2
Cut Sheet Paper |
|
|
|
Envelopes |
|
|
||||||||
3 |
4 |
3 |
4 |
|||||||||||
1 |
|
|
|
|
|
|
|
|
1 |
|
|
|
|
|
|
|
|
|
|
|
|
|
|
|
|
|
|
||
|
|
|
|
|
|
|
|
|
|
|
|
|
|
|
|
|
|
|
|
2 |
|
|
|
|
|
2 |
|
|
|
|
|
|
|
|
|
|||
|
|
|
|
|
|
|
|
|
|||
|
|
|
|
|
|
|
|
|
|
|
|
|
|
Top (1) |
|
|
|
Bottom (2) |
Left (3) |
Right (4) |
|||
Cut Sheet |
3 mm |
|
|
|
3 mm |
3 mm |
3 mm |
||||
|
|
|
|
|
|
|
|
|
|
|
|
Envelopes |
12 mm |
|
|
|
24 mm |
3 mm |
3 mm |
||||
|
|
|
|
|
|
|
|
|
|
|
|
 Note
Note
The Borderless feature is not available for envelopes.
19

3 General setup
Paper settings
Paper Type
To get the best print quality, set the machine for the type of paper you are using.
a Press Menu.
b Press a or b to choose
General Setup. Press OK.
c Press a or b to choose Paper Type.
d Press d or c to choose Plain Paper,
Inkjet Paper, Brother Photo,
Other Photo or Transparency. Press OK.
e Press Stop/Exit.
 Note
Note
The machine ejects paper with printed surfaces face up onto the paper tray in front of the machine. When you use transparencies or glossy paper, remove each sheet at once to prevent smudging or paper jams.
Paper Size
You can use five sizes of paper for printing copies: Letter, Legal, A4, A5, and
10 × 15 cm. When you change the size of paper you load in the machine, you will need to change the paper size setting at the same time.
a Press Menu.
b Press a or b to choose
General Setup. Press OK.
c Press a or b to choose Paper Size.
d Press d or c to choose Letter, Legal,
A4, A5 or 10x15cm. Press OK.
e Press Stop/Exit.
20

LCD display
LCD Contrast
You can adjust the LCD contrast for a sharper and more vivid display. If you are having difficulty reading the LCD, try changing the contrast setting.
a Press Menu.
b Press a or b to choose
General Setup. Press OK.
c Press a or b to choose LCD Settings. Press OK.
d Press a or b to choose LCD Contrast.
e Press d or c to choose Light, Med or
Dark. Press OK.
f Press Stop/Exit.
General setup
Setting the backlight brightness
If you are having difficulty reading the LCD, try changing the brightness setting.
a Press Menu. |
|
b Press a or b to choose |
3 |
General Setup. |
|
Press OK. |
|
c Press a or b to choose LCD Settings. Press OK.
d Press a or b to choose Backlight.
e Press d or c to choose Light or Dark. Press OK.
f Press Stop/Exit.
21

Chapter 3
Setting the Dim Timer for the backlight
You can set how long the LCD backlight stays on after the last key press.
a Press Menu.
b Press a or b to choose General Setup. Press OK.
c Press a or b to choose LCD Settings. Press OK.
d Press a or b to choose Dim Timer.
e Press d or c to choose 10Secs,
20Secs, 30Secs or Off. Press OK.
f Press Stop/Exit.
Setting the Off Timer
You can set how long the LCD stays on after the last key press. This is a power saving feature. The machine can print and scan from your computer when the LCD is off.
a Press Menu.
b Press a or b to choose
General Setup. Press OK.
c Press a or b to choose LCD Settings. Press OK.
d Press a or b to choose Off Timer.
e Press d or c to choose 1Min, 2Mins,
3Mins, 5Mins, 10Mins, 30Mins or
Off. Press OK.
f Press Stop/Exit.
 Note
Note
When the display is off you can press any key to turn it back on.
22
Loading...