Broan RMP4204, RMP3004, RMP3604, RMP5404, RMP4804 Installation Manual
...
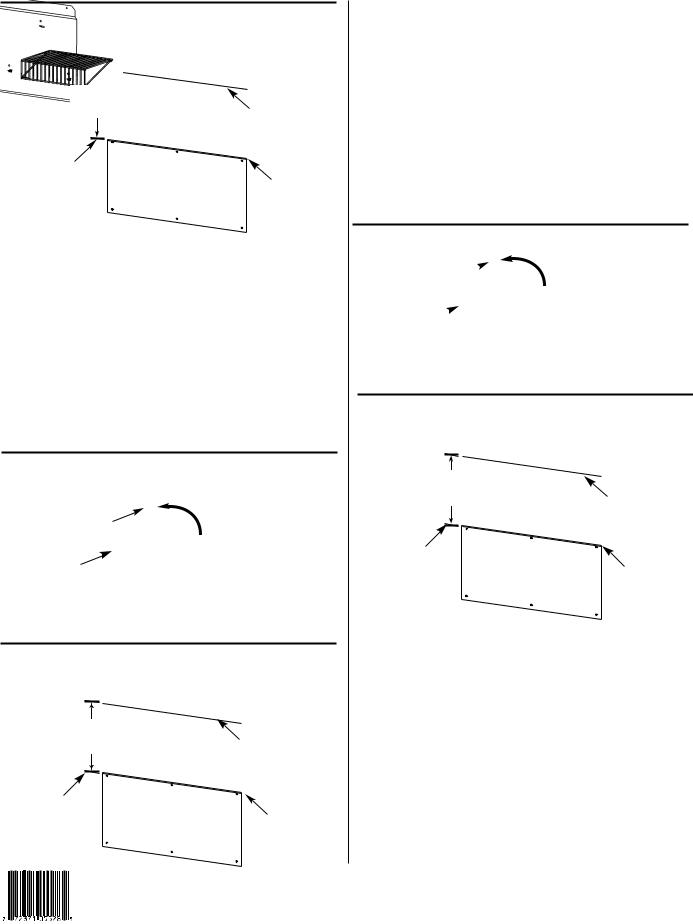
BACKSPLASH WALL COVERING WITH WARMING SHELVES / DOSSERET AVEC TABLETTES RÉCHAUDS / PLACA SALPICADURA CON ESTANTES QUE CALIENTAN
INSTALLATION INSTRUCTIONS
NOTE: This backsplash must be installed before the hood shell. The hood shell covers the mounting screws at the top of the backsplash.
16’’
(41 cm) Bottom of hood location
Level line for |
Flange |
mounting holes |
HA0013
1.Mark a level line on the wall at 16” (41 cm) below bottom of hood location.
2.Position the lower section of the backsplash (flat part with flange at top) on the wall. Center it side to side and mark the top mounting holes on this line. DO NOT USE THE LEVEL LINE TO LOCATE TOP EDGE OF THE BACKSPLASH LOWER SECTION! Mark also bottom holes and remove the lower section from the drywall.
3.Drill 3/16” diameter holes through drywall where marked. Insert wall anchors and use a soft hammer to set them flush with the drywall.
4.Fix lower section of backsplash to wall with screws provided.
5.Position upper section of backsplash by engaging its flange with the lower section. Push up to fully engage flanges, center it side to side, and mark the location of the mounting holes. Remove the upper section from the drywall.
6.Drill 3/16” diameter holes through drywall where marked. Insert wall anchors and use a soft hammer to set them flush with the drywall.
7.Fix upper section to wall with screws provided.
ATTACH WARMING SHELVES
Retaining clip
Hinge clip
HA0003
1.Snap the warming shelves into the hinge clips on the backsplash as shown.
2.If narrower shelves are desired: Rotate upwards, as shown, and secure with the retaining clip.
INSTRUCTIONS D’INSTALLATION
NOTE : Ce dosseret doit être installé avant la hotte ; celle-ci recouvre les vis d’installation de la partie supérieure du dosseret.
16’’
(41 cm) Localisation du bas de la hotte
Ligne horizontale
(pour les trous de Rebord fixation)
HA0013
1.Faire une ligne de niveau sur le mur à 16” (41 cm) en dessous du bas de la hotte.
2.Positionner la partie inférieure du dosseret (partie plate avec rebord) sur le mur. Centrer la pièce horizontalement et marquer les trous de fixation supérieurs sur cette ligne. NE PAS UTILISEZ LA LIGNE SUR LE MUR POUR LOCALISER LE BORD SUPÉRIEUR DU DOSSERET! Marquer les trous du bas également et retirer la partie inférieure du dosseret.
3.Percer des trous de 3/16” de diamètre dans le mur aux endroits indiqués. Insérer les ancrages de gypse à égalité avec le mur en utilisant un marteau mou.
4.Fixer la partie inférieure du dosseret en utilisant les vis fournies.
5.Positionner la partie supérieure du dosseret en engageant le rebord avec la section inférieure. Pousser vers le haut pour engager totalement les rebords, centrer horizontalement et marquer les trous de fixation. Retirer la partie supérieure du dosseret.
6.Percer des trous de 3/16” de diamètre dans le mur aux endroits indiqués. Insérer les ancrages de gypse à égalité avec le mur en utilisant un marteau mou.
7.Fixer la partie supérieure du dosseret en utilisant les vis fournies.
INSTALLATION DES TABLETTES RÉCHAUDS
Loquet 
Crochet 
HA0003
1.Insérer les tablettes réchauds dans les crochets sur le dosseret tel qu’illustré.
2.Pour obtenir des tablettes plus étroites, faire pivoter, tel qu’illustré, et enclencher avec le loquet.
INSTRUCCIONES DE LA INSTALACIÓN
NOTA : Este placa salpicadura debe estar colocado antes de la campana. La campana cubre los tornillos de la parte superior de la placa salpicadura.
16’’ (41 cm)
Línea nivelada (para los agujeros de fijacíon)
HA0013
Lugar de la parte de abajo de la campana
Orilla
1.Marque una línea nivelada en la pared a 16” (41 cm) debajo de la campana.
2.Posicione la seccíon más baja de la placa salpicadura (pedazo llano con orilla) en la pared. Centre la pieza horizontalmente y marcar los agujeros de fijacíon superiores en esta línea. ¡NO USE LA LÍNEA NIVELADA PARA LOCALIZAR LA ORILLA SUPERIOR DE LA PLACA SALPICADURA! Marque los agujeros más bajos igualmente y quite la seccíon inferior.
3.Perforar agujeros de 3/16” en diámetro a traves la pared donde marcado. Insertar las anclas con uniformidad de la pared utilizando un martillo blando.
4.Colocar la partida inferior de la placa salpicadura utilizando los tornillos dados.
5.Colocar las seccíon superior de la placa salpicadura coprometiendo la orilla con la seccíon inferior. Empuje hacia arriba para comprometer totalmente las orillas, centre horizontalmente y marcar los agujeros de la fijación. Quite la seccíon superior de la placa salpicadura.
6.Perforar agujeros de 3/16” en diámetro a traves la pared donde marcado. Insertar las anclas con uniformidad de la pared utilizando un martillo blando.
7.Colocar la seccíon superior de la placa salpicadura don los tornillos dados.
V03916 C
 Loading...