


Bosch GSP36A30, GSP40A10, GS40NA30GB, GSP36A31, GSP36A31CH Manual
...Montageanleitung |
de |
||
Installation |
instructions |
en |
|
Notice |
de montage |
fr |
|
Istruzioni per |
I'installazione |
it |
|
Installatievoorschrift |
nl |
||
Monteringsvejledning |
da |
||
Monteringsveiledning |
no |
||
Monteringsanvisning |
sv |
||
|
Asennusohje |
fi |
|
Instrucciones |
de montaje |
es |
|
Instruções |
de montagem |
pt |
|
OдзгЯет |
фoрoиЭфзузт |
el |
|
Montaj |
talimatlarž |
tr |
|
195 437 (8607)
9000

de Inhaltsverzeichnis
Gerät aufstellen. . . . . . . . . . . . 4. . . Gerät. . . ausrichten. . . . . . . . . . . . . . 4. . .
Wechsel des Türanschlages. . . . . . . . 4. . Belüftung . . . . . . . . . . . . . . .4 . . .
en Index
Installing the appliance. . . . . . . . . . 5. . Aligning. . the appliance. . . . . . . . . . .5 . . Changing over the door hinges. . . . . . . 5 Ventilation . . . . . . . . . . . . . . 5. . .
fr Table des matières
Installation |
de l'appareil. . . . . . . . . |
.6 . . Ajuster. . |
l'appareil . . . |
. . . |
. . . |
. |
. |
. 6. . . |
Inversion |
du sens d'ouverture de porte. |
6Aération |
. . . . . . . |
. . . |
. . |
. |
. |
. 6. . . |
it Istruzioni per l'uso
Installazione |
dell'apparecchio. . . . . . . 7. . |
Livellare l'apparecchio. |
. . . |
. . |
. . . |
. 7. . . |
|
Reversibilità |
della porta. . . . . . . . . . 7. |
. Ventilazione. . |
. . . . . |
. . . |
. . |
. . . |
.7 . . . |
nl Inhoud
Apparaat opstellen . . . . . . . . . . |
. 8. |
. .Apparaat. . . |
horizontaal |
zetten. . . |
. . |
. |
. . 8. . |
Verwisselen van de deurophanging. . . . |
8 |
Beluchting |
. . . . . |
. . . . . |
. . |
. |
. 8. . . |
da Inholdsfortegnelse
Opstilling af skabet. . . . . . . . . . . .9 . .Justering. . . af skabet. . . . . . . . . . . .9 . . Flytning af dørhængsler. . . . . . . . . .9 . .Ventilation. . . . . . . . . . . . . . . 9. . .
no Bruksanvisning
Plassering av apparatet. . |
. |
. |
. |
. |
. |
. |
. |
10. . |
. |
Innretting. . |
av |
apparatet. . . . . . . |
. . .10. . |
Omhengsling av døren. . |
. |
. |
. |
. |
. |
. |
. |
.10. |
. |
Ventilasjon. . |
. . |
. . . . . . . . . . |
. .10. . . |

sv Bruksanvisning
Installera skåpet. . . . . . . . . . . . 11. . . Ställa. . . upp. . skåpet. . . . . . . . . . . . 11. . . |
|||||||||||||||
Hänga om dörrarna. . . . . . . . . . |
. 11. . .Ventilation. . . |
. . . . . |
. |
. |
. |
. |
. |
. |
. |
. |
.11. . . |
||||
|
|
|
|
|
|
|
|
|
|
|
|
|
|
|
|
|
fi Käyttöohje |
|
|
|
|
|
|
|
|
|
|
|
|
|
|
|
|
|
|
|
|
|
|
|
|
|
|
|
|
|
|
Laitteen sijoitus. . . . . . . . . . . . 12. . . Laitteen. . . . suoristaminen. |
. |
. |
. |
. |
. |
. . . . 12. . . |
|||||||||
Oven kätisyyden vaihto. . . . . . . . . .12. . Ilmankierto. . |
. . . . . |
. |
. |
. |
. |
. |
. |
. |
. |
.12. . . |
|||||
|
|
|
|
|
|
|
|
|
|
|
|
|
|
|
|
|
|
|
|
|
|
|
|
|
|
|
|
|
|
|
|
es Índice |
|
|
|
|
|
|
|
|
|
|
|
|
|
|
|
Instalación del aparato. . . . . . . . . .13. . Nivelar. . |
el aparato. . . . . . . . . . . . 13. . . |
||||||||||||||
Cambio del sentido de apertura de |
|
Ventilación . . . . . |
. |
. |
. |
. |
. |
. |
. |
. |
.13. . . |
||||
la puerta. . . . . . . . . . . . . |
. |
. |
13. . . . . . . . . . . |
|
|
||||||||
|
|
|
|
|
|
|
|
|
|
|
|||
|
pt Indicacões |
|
|
|
|
|
|
|
|
|
|||
|
|
|
|
|
|
|
|
|
|
||||
Instalação do aparelho. . . . . . . . . .14. . |
Alinhar. . |
o aparelho. . . . . . . . . . . .14. . |
|||||||||||
Alteração |
do |
sentido |
de |
abertura |
|
|
|
|
Ventilação . . . . . . . . . . . . . |
.14. . . |
|||
da porta. . . . . . . . . . . . . |
. |
. |
14. . . . . . . . . . . |
|
|
||||||||
|
|
|
|
|
|
|
|
|
|||||
|
|
|
|
|
|
|
|
|
|
|
|
|
|
el Ресйечьменб |
|
|
|
|
|
|
|
|
|||||
ФпрпиЭфзуз |
фзт ухукехЮт . . . . |
. |
. |
.15. . |
ЕхихгсЬммйуз фзт ухукехЮт. . . . |
. . 15. |
|||||||
БллбгЮ |
ôçò |
цпсЬт |
ôçò |
рьсфбт. . |
. |
. |
. 15 |
Бесйумьт . . . . . . . . . . . . . |
. 15. . . |
||||
|
|
|
|
|
|
|
|
|
|
||||
|
tr ŽçŽndekiler |
|
|
|
|
|
|
|
|
|
|||
|
|
|
|
|
|
|
|
|
|
||||
Cihazžn kurulmasž . . . . . . . . |
. |
. |
.16. . |
.Cihazžn. . . düzgün yerleåtirilmesi. . . . |
. . 16. |
||||||||
Kapž menteåelerinin |
de•iåtirilmesi. . |
. |
. |
16 |
Havalandžrma . . . . . . . . . . . |
. 16. . . . |
|||||||

de
Gerät |
aufstellen |
|
|
|
Wechsel |
des |
|
|
|
|||||||||||||||||||
|
|
|
|
|
|
|
|
|
|
|
|
|
|
|
|
|
|
|
Türanschlages |
|
|
|
||||||
|
|
|
|
|
|
|
|
|
|
|
|
|
|
|
|
|
|
|
(falls |
erforderlich) |
|
|
|
|
||||
|
|
|
|
|
|
|
|
|
|
|
|
|
|
|
|
|
|
|
Montage |
in |
Reihenfolge der |
Zahlen. |
||||||
|
|
|
|
|
|
|
|
|
|
|
|
|
|
|
|
|
|
|
1. |
Wechsel |
des |
TürgriffsBild 1/A oder |
||||||
|
|
|
|
|
|
|
|
|
|
|
|
|
|
|
|
|
|
|
Bild 1/B |
(je |
nach Modell). |
|
|
|||||
|
|
|
|
|
|
|
|
|
|
|
|
|
|
|
|
|
|
|
|
|
||||||||
|
|
|
|
|
|
|
|
|
|
|
|
|
|
|
|
|
|
|
|
|
||||||||
|
|
|
|
|
|
|
|
|
|
|
|
|
|
|
|
|
|
|
2. |
Wechsel |
des |
TüranschlagesBild 2 |
|
|||||
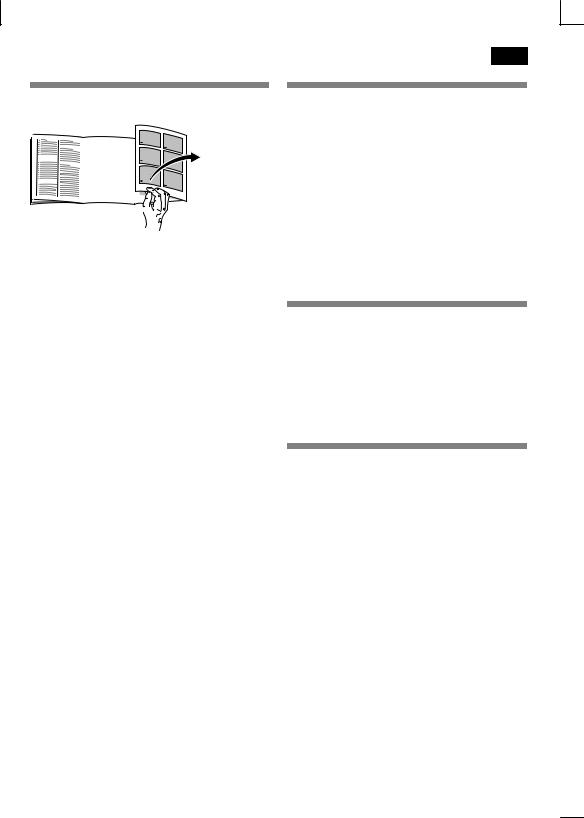
Bitte |
klappen |
Sie |
|
die |
letzte |
Seite |
mit |
den |
|
|
Gerät |
vorsichtig |
auf |
die |
|
|||||||||||||
Abbildungen |
aus. |
|
Diese |
|
|
|
|
Achtung! |
|
|||||||||||||||||||
|
|
|
|
|
Rückseite |
legen. |
|
|
|
|
|
|||||||||||||||||
Montageanleitung |
|
gilt |
für |
mehrere |
|
|
|
|
|
|
||||||||||||||||||
|
|
|
|
|
|
|
|
|
|
|
|
|||||||||||||||||
Modelle. |
|
|
|
|
|
|
|
|
|
|
|
|
|
|
|
|
|
|
|
|
|
|
|
|||||
Abweichungen bei den Abbildungen sind |
|
|
ausrichten |
|
|
|||||||||||||||||||||||
möglich. |
|
|
|
|
|
|
|
|
|
|
|
|
|
Gerät |
|
|
||||||||||||
Zum Aufstellen eignet sich ein trockener,Bild 4 |
|
|
|
|
|
|
|
|||||||||||||||||||||
belüftbarer Raum. |
|
Der |
Aufstellplatz |
sollteGerät auf den vorgesehenen |
Platz |
stellen |
||||||||||||||||||||||
nicht |
direkter |
Sonnenbestrahlung |
|
|
und ausrichten. |
|
|
|
|
|
||||||||||||||||||
ausgesetzt und nicht in der Nähe einerZum Verstellen der Schraubfüße einen |
||||||||||||||||||||||||||||
Wärmequelle |
wie |
|
Herd, |
|
Heizkörper |
etc. |
Schraubenschlüssel |
verwenden. |
|
|||||||||||||||||||
sein. Wenn das Aufstellen neben einer |
|
|
|
|
|
|
|
|
|
|
||||||||||||||||||
Wärmequelle |
unvermeidbar ist, |
|
|
|
|
|
|
|
|
|
|
|
|
|||||||||||||||
verwenden |
Sie |
eine |
geeignete |
|
|
Belüftung |
|
|
|
|
|
|||||||||||||||||
Isolierplatte oder |
|
halten |
Sie |
folgende |
|
|
|
|
|
|||||||||||||||||||
Mindestabstände |
zur |
Wärmequelle |
ein: |
|
|
|
|
|
||||||||||||||||||||
Zu |
Elektroherden |
3 |
cm. |
|
|
|
|
Bild |
5 |
|
|
|
|
|
|
|
||||||||||||
|
|
|
cm. Die |
|
Luft |
an |
der Rückwand |
des |
Geräts |
|||||||||||||||||||
Zu |
Öl> |
|
oder Kohleanstellherden |
30 |
|
|||||||||||||||||||||||
|
|
|
|
|
|
|
|
|
|
|
|
|
|
|
|
|
|
|
erwärmt sich. Die erwärmte Luft muss |
|||||||||
Geräte |
mit |
aufgesetzten |
Griffen |
benötigenungehindert |
abziehen |
können. |
Die |
|
||||||||||||||||||||
auf |
|
der |
|
Anschlagseite |
mindestens |
55 mmKühlmaschine |
muss |
sonst |
mehr |
leisten. |
||||||||||||||||||
Wandabsta d, damit die Tür 90° |
geöffnetDies |
erhöht den Stromverbrauch. |
|
|||||||||||||||||||||||||
werden |
kannBild |
3. |
|
|
|
|
|
|
Daher: Nie Be> und Entlüftungsöffnungen |
|||||||||||||||||||
|
|
|
|
|
|
|
|
|
|
|
|
|
|
|
|
|
|
|
abdecken |
oder |
zustellen! |
|
|
|
||||
4
|
|
|
|
|
|
|
|
|
|
|
|
|
|
|
|
|
|
|
|
|
|
|
en |
|
|
|
|
|
|
|
|
|
|
|
|||||||||||||||||
Installing |
the |
|
applianceChanging |
over |
the |
door |
|||||||||||||||||||
|
|
|
|
|
|
|
|
|
|
|
|
|
|
|
hinges |
|
|
|
|
|
|
|
|
||
|
|
|
|
|
|
|
|
|
|
|
|
|
|
|
(If required) |
|
|
|
|
|
|
|
|
||
|
|
|
|
|
|
|
|
|
|
|
|
|
|
|
Installation |
in |
numerical |
sequence. |
|
|
|||||
|
|
|
|
|
|
|
|
|
|
|
|
|
|
|
1. Changing |
the |
door |
handle,Fig. 1/A |
|
|
|||||
|
|
|
|
|
|
|
|
|
|
|
|
|
|
|
or Fig. 1/B |
(depending on model). |
|||||||||
|
|
|
|
|
|
|
|
|
|
|
|
|
|
|
|||||||||||
|
|
|
|
|
|
|
|
|
|
|
|
|
|
|
|||||||||||
|
|
|
|
|
|
|
|
|
|
|
|
|
|
|
2. Changing over the door hingesFig. 2 |
||||||||||
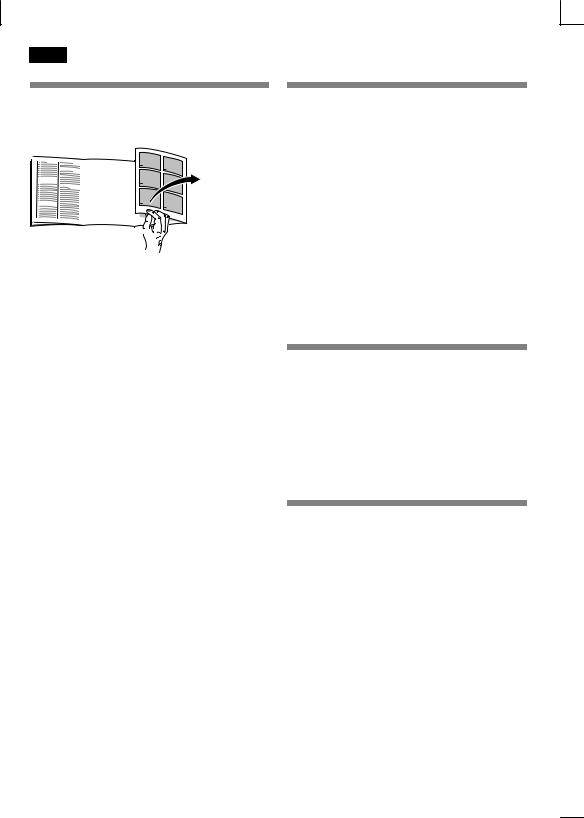
Please |
fold out the illustrated last page.Attention! Carefully place the appliance |
||||||||||||||||||||||||
These |
installation |
|
instructions refer |
to |
on its |
back. |
|
|
|
|
|
|
|
||||||||||||
several |
models. |
|
|
|
|
|
|
|
|
|
|
|
|
|
|
||||||||||
|
|
|
|
|
|
|
|
|
|
|
|
|
|
|
|
|
|
||||||||
The illustrations may |
differ. |
|
|
|
|
|
|
|
|
|
|
|
|
||||||||||||
Install the appliance |
in |
a |
dry, well |
venti/ |
|
|
|
the |
appliance |
||||||||||||||||
lated room. The installation location |
Aligning |
||||||||||||||||||||||||
|
|
|
|
|
|
|
|
|
|
|
|||||||||||||||
should |
neither be exposed to direct |
Fig. |
4 |
|
|
|
|
|
|
|
|
|
|||||||||||||
sunlight |
|
nor near |
|
a |
heat |
source, e.g. |
Place |
the |
appliance in |
the |
designated |
||||||||||||||
a cooker, radiator, |
|
etc. |
If |
installation next |
|
and |
align. |
|
|
|
|
|
|||||||||||||
|
|
|
|
|
|
|
|
|
|
|
|
|
|
|
location |
|
|
|
|
|
|||||
to a heat source is unavoidable, use |
aAdjust |
the |
height/adjustable |
feet with |
|||||||||||||||||||||
suitable |
|
insulating |
|
plate |
or |
observe |
the |
a screwdriver. |
|
|
|
|
|
|
|
||||||||||
following minimum distances to a heat |
|
|
|
|
|
|
|
|
|
|
|
||||||||||||||
source: |
|
|
|
|
|
|
|
|
|
|
|
|
|
|
|
|
|
|
|
|
|
||||
3 cm to an electric cooker. |
|
|
|
|
|
|
|
|
|
|
|
|
|||||||||||||
from an oil or solid/fuel cooker 30 cm. Ventilation |
|
|
|
|
|
|
|||||||||||||||||||
Appliances with fitted handles must be Fig. 5 |
|
|
|
|
|
|
|
|
|
||||||||||||||||
situated |
|
at least |
55 mm from the wall Theon |
air |
on |
the rear panel |
of the |
applianc |
|||||||||||||||||
the hinge side so that the door can |
beheats up. The warm air must be able to |
||||||||||||||||||||||||
opened |
by 90°Fig. |
3. |
|
|
|
|
|
escape. Otherwise, the refrigerator must |
|||||||||||||||||
|
|
|
|
|
|
|
|
|
|
|
|
|
|
|
work |
harder. |
This |
will |
increase the |
power |
|||||
consumption.
Therefore: Never cover or block ventilation openings!
5
fr
Installation |
|
|
|
|
|
Inversion |
du |
sens |
|
||||||||||||||||||
de l'appareil |
|
|
|
|
d'ouverture |
de |
porte |
|
|||||||||||||||||||
|
|
|
|
|
|
|
|
|
|
|
|
|
|
|
|
|
|
(si |
nécessaire) |
|
|
|
|
|
|||
|
|
|
|
|
|
|
|
|
|
|
|
|
|
|
|
|
|
Effectuez le montage dans l'ordre des |
|||||||||
|
|
|
|
|
|
|
|
|
|
|
|
|
|
|
|
|
|
chiffres. |
|
|
|
|
|
|
|
||
|
|
|
|
|
|
|
|
|
|
|
|
|
|
|
|
|
|
1. Inversion de la poignée de porte |
|||||||||
|
|
|
|
|
|
|
|
|
|
|
|
|
|
|
|
|
|
||||||||||
|
|
|
|
|
|
|
|
|
|
|
|
|
|
|
|
|
|
Fig. 1/A ou Fig. 1/B, |
selon |
|
|||||||
|
|
|
|
|
|
|
|
|
|
|
|
|
|
|
|
|
|
|
|||||||||
|
|
|
|
|
|
|
|
|
|
|
|
|
|
|
|
|
|
|
|||||||||
|
|
|
|
|
|
|
|
|
|
|
|
|
|
|
|
|
|
le modèle). |
|
|
|
|
|
|
|||
|
|
|
|
|
|
|
|
|
|
|
|
|
|
|
|
|
|
2. Inversion du sens d'ouverture de porte |
|||||||||
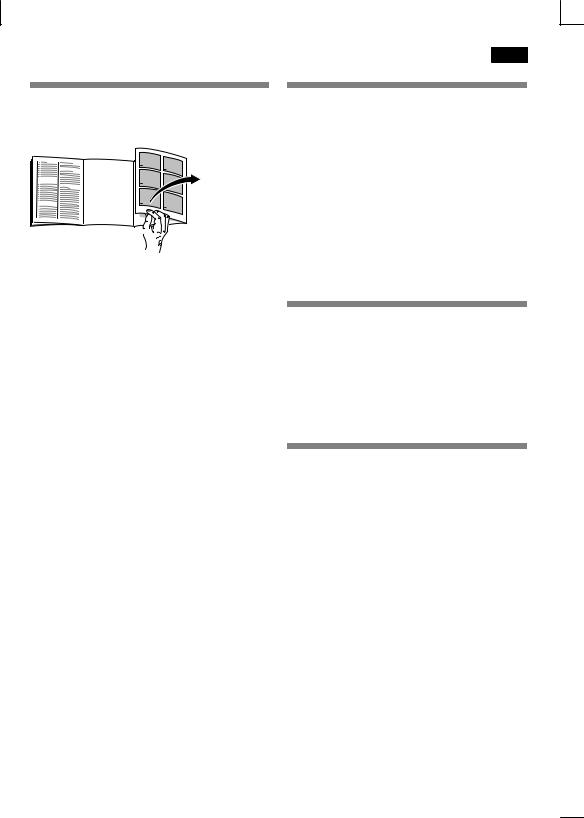
Veuillez |
|
déplier |
la |
|
dernière |
page, |
illustrée, Fig. 2 |
|
|
|
|
|
|
|
|||||||||||||
de la notice. Cette notice de montage |
Attention |
! |
Couchez |
prudemment |
|
||||||||||||||||||||||
vaut pour |
plusieurs |
modèles. |
|
|
|||||||||||||||||||||||
Selon |
le |
modèle, |
|
l'appareil |
peut |
différer l'appareil |
sur le |
côté. |
|
|
|
||||||||||||||||
du contenu |
des |
|
illustrations. |
|
|
|
|
|
|
|
|
|
|
|
|
||||||||||||
Un local sec et aérable convient pour |
Ajuster |
l'appareil |
|
||||||||||||||||||||||||
installer l'appareil. Evitez de placer |
|
||||||||||||||||||||||||||
l'appareil |
à |
un |
|
endroit |
directement exposé |
4 |
|
|
|
|
|
|
|
||||||||||||||
|
|
|
|
|
|
|
|
|
|
|
|
|
|
|
|
|
|
Fig. |
|
|
|
|
|
|
|
||
aux rayons solaires ou à proximité d'une |
|
|
|
|
|
|
|
|
|
||||||||||||||||||
source |
de |
chaleur |
telle |
|
une cuisinière, |
Amenez |
l'appareil |
sur |
l'emplacement |
retrouv |
|||||||||||||||||
un radiateur, |
|
etc. |
|
Si |
l'installation |
près |
prévu |
puis |
ajustez6le |
pour |
qu'il se |
||||||||||||||||
|
|
bien |
|
d'aplomb. |
|
|
|
|
|
||||||||||||||||||
d'une |
source |
de |
|
chaleur est inévitable, |
|
réglage des pieds |
à vis, |
||||||||||||||||||||
utilisez |
une |
plaque |
isolante |
appropriée |
Pour |
modifier le |
|||||||||||||||||||||
servez6vous |
d'une clé |
à |
fourche. |
|
|||||||||||||||||||||||
ou respectez |
les |
|
|
distances |
minimales |
|
|||||||||||||||||||||
|
|
|
|
|
|
|
|
|
|
|
|
||||||||||||||||
suivantes:
3 cm par rapport à une cuisinière électrique,
30 cm par rapport à un appareil
de chauffage au fuel ou au charbon.
Aération
Fig. 5
Les appareils à poignée saillante |
|
L'air |
entrant en contact avec |
la |
paroi |
|||||||||||
|
|
|
|
|
|
|
|
|
|
|
||||||
requièrent, sur le côté où la porte butearrière de |
l'appareil |
se réchauffe. |
Cet |
|||||||||||||
contre |
le mur, |
un |
espace |
d'au |
moins |
air chaud |
doit |
pouvoir |
s'échapper |
sans |
||||||
55 mm |
par rapport |
à |
ce |
dernier |
afin |
obstacle. |
S'il ne |
le |
peut |
pas, |
le |
groupe |
||||
que |
|
doit |
fonctionner |
plus long6 |
||||||||||||
la porte |
puisse |
s'ouvrir |
à Fig90°. 3. |
|
frigorifique |
|||||||||||
|
temps, ce qui |
augmente |
la consommation |
|||||||||||||
|
|
|
|
|
|
|
||||||||||
|
|
|
|
|
|
|
de |
courant. |
|
|
|
|
|
|
|
|
|
|
|
|
|
|
|
Pour cette raison, ne recouvrez ni |
|||||||||
|
|
|
|
|
|
|
n'obstruez |
jamais |
les |
orifices |
d'aération |
|||||
|
|
|
|
|
|
|
de |
l'appareil. |
|
|
|
|
|
|
|
|
6
Installazione dell'apparecchio
|
|
Attenzione! |
Deporre l'apparecchio con |
Aprire l'ultima pagina |
con le figure. |
cautela sul |
lato posteriore. |
Il presente manuale di |
montaggio vale |
per |
|
più modelli. |
|
|
|
Nelle figure sono possibili differenze nelleLivellare l'apparecchio figure.
Per |
l'installazione |
è |
idoneo |
un |
ambienteFigura 4 |
|
|
|
|
|
|
|
|
||||||||||||
asciutto, |
ventilabile. |
Il |
|
luogo |
|
|
|
Disporre e livellare l'apparecchio nel luogo |
|||||||||||||||||
|
d'installazione |
|
|
|
|
|
|
|
|
|
|
||||||||||||||
non |
deve |
essere |
esposto |
all'irradiazione previsto. |
|
i |
piedini a |
vite |
utilizzare |
||||||||||||||||
solare |
diretta |
e |
non |
essere |
|
vicino |
ad |
Per |
regolare |
||||||||||||||||
|
una |
|
|
|
|
|
|
|
|
|
|
||||||||||||||
fonte di |
|
calore, |
come |
stufa, |
calorifero |
un cacciavite. |
|
|
|
|
|
|
|
||||||||||||
|
ecc. |
|
|
|
|
|
|
|
|
|
|
||||||||||||||
Se |
è |
inevitabile |
|
l'installazione |
accanto |
ad |
|
|
|
|
|
|
|
|
|
|
|||||||||
una fonte di calore, utilizzare un idoneo |
|
|
|
|
|
|
|
|
|
|
|||||||||||||||
pannello isolante, oppure rispettate le |
Ventilazione |
|
|
|
|
||||||||||||||||||||
seguenti |
distanze |
minime dalla |
fonte |
|
|
|
|
||||||||||||||||||
di calore. |
|
|
|
|
|
|
|
|
|
|
|
|
Figura 5 |
|
|
|
|
|
|
|
|
||||
|
|
|
|
|
|
|
|
|
|
|
|
|
|
|
|
|
|
|
|
|
|
|
|||
Da |
stufe |
|
elettriche |
3 |
cm. |
|
|
|
|
L'aria |
sulla |
parete |
posteriore |
|
|
|
|||||||||
Da |
stufe |
|
ad |
olio |
combustibile |
o |
carbonedell'apparecchio |
si |
riscalda. |
L'aria |
calda |
||||||||||||||
30 cm. |
|
|
|
|
|
|
|
|
|
|
|
|
|
deve poter defluire liberamente. Altrimenti |
|||||||||||
Gli |
apparecchi |
|
con |
maniglie |
sovrapposteil refrigeratore |
|
deve |
lavorare |
più |
a |
lungo. |
||||||||||||||
sul |
lato |
cerniere |
richiedono |
|
almeno |
Ciò |
aumenta |
il consumo di energia |
|||||||||||||||||
55 mm |
di |
distanza |
dal |
muro, |
per |
aprireelettrica. |
|
|
assolutamente |
di |
coprire |
||||||||||||||
la porta |
a |
|
90°figura 3. |
|
|
|
|
|
|
Perciò: |
evitare |
||||||||||||||
|
|
|
|
|
|
|
o di |
ostruire |
le |
aperture |
di afflusso |
|
|||||||||||||
|
|
|
|
|
|
|
|
|
|
|
|
|
|
|
|
||||||||||
|
|
|
|
|
|
|
|
|
|
|
|
|
|
|
e deflusso |
dell'aria. |
|
|
|
|
|
||||
7
 Loading...