


TravelPilot Navigation Radio/CD
TravelPilot DX-R52 / DX-R5
Operating instructions
http://www.blaupunkt.com

INTRODUCTION |
NAVIGATION |
RADIO MODE |
CD MODE |
CD CHANGER |
SETUP |
162
Device overview
|
2 |
4 |
6 |
|
|
1 |
3 |
5 |
7 |
8 |
9 |
16 |
15 |
14 |
13 |
12 |
11 |
10 |

1MENU button - to activate the setup menu.
2Volume control - turn clockwise to increase the volume, anticlockwise to decrease the volume.
3Switching the device on/off and operating the mute volume function.
4FM•AM button.
Short press: Activate radio mode and select the FM, MW and LW wavebands.
Long press: Start the Travelstore function.
5CD•C button - to activate CD mode or CD-changer mode (if connected).
6Display containing a segment display, fixed symbols and a dot-matrix field.
7NAV button.
Short press: Activates the navigation system. Long press: Accesses the route options.
8ESC button - to close menus and delete characters in input menus.
9
 button - to open the flip-release control panel.
:Arrow buttons - to selection items and input data in lists and selection menus.
;OK button - to confirm menu entries and start the scan function in the various audio modes.
< button.
If pressed briefly during navigation: The active destination is displayed and the last voice output is repeated.
If pressed longer during navigation: The route list calculated by the navigation system is displayed.
If pressed briefly whilst navigation is inactive: The current position is displayed.
= button.
Short press: To access the traffic jam function for manually bypassing traffic jams.
Long press: To conveniently switch dynamic navigation with TMC on/off.
>Buttons 1 - 6.
?AUD button - to adjust the bass, treble, digital equalizer, balance and fader.
@TRAF button.
Short press: To switching traffic information standby on/off.
Long press: To view TMC messages.
ENGLISH PORTUGUÊS ESPAÑOL
163
INTRODUCTION |
NAVIGATION |
RADIO MODE |
CD MODE |
CD CHANGER |
SETUP |

INTRODUCTION |
NAVIGATION |
RADIO MODE |
CD MODE |
|
|
|
|
Dear Customer, |
|
Guarantee |
|
Congratulations on buying a TravelPilot. You can be sure you have made the right choice in purchasing a TravelPilot.
The TravelPilot is a radio navigation system the size of a standard car radio. However, it offers a whole lot more! The TravelPilot is a reliable and easy-to-use navigation system that will lead you precisely to your destination.
These operating instructions will take you step-by-step through the functions of the TravelPilot and will answer the most frequently asked questions. You will find further information on using these operating instructions in the section entitled “About these instructions”.
If you have any further questions or comments regarding the TravelPilot, please do not hesitate to call our telephone hotline at any time or contact your dealer. The international telephone hotline numbers are printed on the last page of these instructions.
We provide a manufacturer guarantee for our products bought within the European Union. You can view the guarantee conditions at www.blaupunkt.de or ask for them directly at:
Blaupunkt GmbH
Hotline
Robert Bosch Str. 200
D-31139 Hildesheim
CD CHANGER |
SETUP |
164
Notice regarding liability
Despite constant technical developments, the navigation system may in isolated cases provide incorrect or unoptimised navigation due to improper operation, changes to the traffic flow regulation, construction sites, traffic load, errors or missing information on the navigation data media or general computer and positioning errors. Blaupunkt does not accept liability and does not provide compensation for any damages or other drawbacks arising from this.

Overview of navigation functions
N1 NAVI
LAST DESTN
BERLIN, UNT
ER DEN LIN NAV
DEN
Press the NAV button 7 once in order to switch from the radio or CD-changer (optional) audio sources to the main navigation menu. The last destination in the current navigation memory bank is displayed for seven seconds.
Wait seven seconds or press the ESC button 8.
N1 SELECT // // //
DESTN TYPE...
CITY
SPEC DESTN NAV
Use the  or
or  button :to select the CITY entry and press the OK button ;.
N1 ENTER // // //
CITY
BER
NAV
Use the  or
or  button :to select the first letter of the required place in the text input line. Move the input cursor one position to the right using the
  button :.
Use the  or
or  button :to select the subsequent letters. To simplify text input, only the letters that can logically follow on from the first letter will be available for selection (intelligent text input line).
As soon as the TravelPilot recognises that the entry matches a place name stored on the CD, it completes the name automatically.
In the majority of cases, only a few letters are required in order to enter the required place name.
If the name of the place you are looking for appears in the text input line, press the OK button ;.
N1 LIST |
// // // |
CITY...
BERLIN
NAV
The selected place name is then displayed in the list of destination places.
If you want to select a different place name from the list of destination places, you can scroll through the list using the  or
or  button :.
When the place name that you are looking for appears, press the OK button ;.
If the selected place appears several times, you will need to specify the place name more precisely in an additional list. Use the  or
or  button : to scroll through the list until the required place is displayed, and press the OK button ;.
ENGLISH PORTUGUÊS ESPAÑOL
165
INTRODUCTION |
NAVIGATION |
RADIO MODE |
CD MODE |
CD CHANGER |
SETUP |
INTRODUCTION NAVIGATION
N1 SELECT // // //
CITY
STREET
CENTRE NAV
SPEC DESTN
In the following selection, choose between
STREET, CENTRE or SPECial DESTinatioN.
Streets can only be selected if the data are available on the navigation CD that is being used.
If you selected STREET, you can subsequently also select intersections or house numbers. Enter the name in the same way as described for CITY.
Select CENTRE if you want to be guided directly to the centre of a town district.
You can use SPECial DESTinatioN option if you want to be navigated directly to destinations like train stations, motorway junctions or tourist attractions.
RADIO MODE |
CD MODE |
|
|
FM 1 EUROPE
TMC
NAV
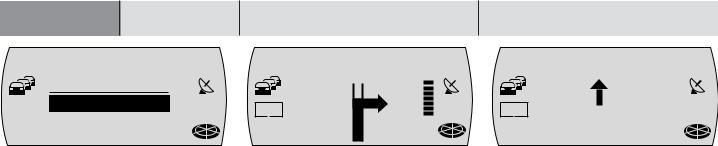
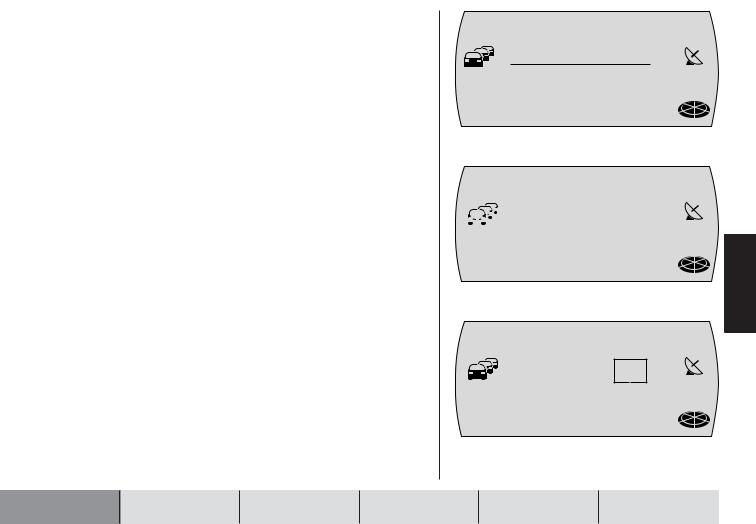
When you have finished entering the destination, the selected destination appears in the display.
Activate navigation by pressing the OK button ;.
Navigation will begin as soon as the route has been calculated.
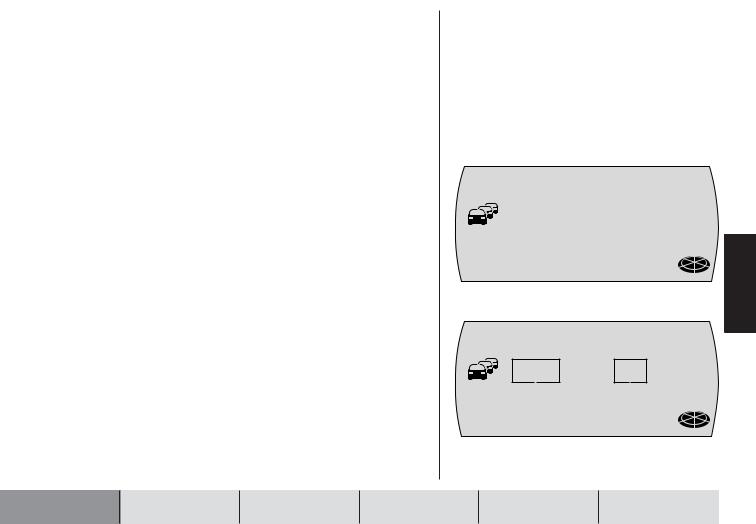
The visual driving recommendations appear in the middle of the display.
In the display containing the turning instructions, you will see an indicator to the right of the driving recommendations that provides a symbolic representation of the distance to the next decision point (e.g. an intersection).
If you are driving straight on, the name of the road you are currently driving down is displayed beneath the driving recommendations. In the top right you will see the current distance to the destination and in the top left the estimated time of arrival.
CD CHANGER |
SETUP |
|
166 |
FM 1 |
EUROPE |
|
07p16 |
26 |
|
|
mi |
|
TMC B6/WESTSCH |
NAV |
|
NELLWEG |
|
|
The current audio source is displayed above the driving recommendations. In radio mode you will see the station name or frequency being displayed, and in CDchanger mode the track and CD.
You can control the audio functions during navigation using the arrow buttons : and 1 - 6 buttons >.

Safety information
The TravelPilot has been designed for use in passenger cars.
Special information such as height restrictions or maximum permitted road load, which is required for navigating trucks and buses, is not included on the navigation CDs.
Inserting / removing a CD
•For safety reasons, you should only insert or remove a CD when the vehicle is stationary.
•Only open the control panel to insert / remove a CD.
•After inserting / removing a CD, close the control panel immediately to ensure that the unit is ready for operation before setting off on your journey.
Operating whilst driving
If you do not pay attention to the road and traffic situation, you could cause serious accidents. In order to avoid being distracted by the TravelPilot, please observe the following:
•Familiarise yourself with the TravelPilot and how to operate it before setting off on your journey.
•Stop your vehicle at a suitable location if you wish to reprogram the TravelPilot.
•Operate the TravelPilot whilst driving only if the road and traffic situation allows you to do so.
•Only enter a destination whilst the vehicle is stationary.
ENGLISH PORTUGUÊS ESPAÑOL
167
INTRODUCTION |
NAVIGATION |
RADIO MODE |
CD MODE |
CD CHANGER |
SETUP |

INTRODUCTION NAVIGATION
Device overview .................... |
162 |
Overview of navigation |
|
functions ................................ |
165 |
Safety information ................. |
167 |
Compatible navigation |
|
CD-ROMs ............................... |
170 |
Care tips for CD-ROMs .............................. |
170 |
About these instructions ...... |
171 |
Removable control panel ...... |
172 |
Theft protection .......................................... |
172 |
Detaching the control panel ...................... |
172 |
Attaching the control panel ....................... |
173 |
Switching the device on/off .. |
174 |
Selecting the operating |
|
mode ....................................... |
175 |
Adjusting the volume ............ |
176 |
Display ................................... |
178 |
Switching on a coded device |
|
after disconnection from the |
|
battery power supply ............ |
179 |
RADIO MODE |
CD MODE |
|
Navigation .............................. |
|
181 |
How navigation works ............................... |
|
181 |
Inserting the navigation CD ...................... |
|
181 |
Starting navigation .................................... |
|
182 |
Entering a destination ............................... |
|
182 |
Entering destinations using the |
|
|
text input line .............................................. |
|
183 |
Entering a destination - place ................... |
186 |
|
Entering a destination - street, |
|
|
intersection and house number ................ |
187 |
|
Entering a destination - centre ................. |
189 |
|
Special destinations .................................. |
|
190 |
Entering a destination - from the |
|
|
destination memory ................................... |
|
193 |
Entering a destination - position marker .. |
194 |
|
Navigation (route guidance) ...................... |
|
195 |
Dynamic navigation ................................... |
|
197 |
NO MAP navigation .................................... |
|
198 |
Bypassing a traffic jam during |
|
|
navigation ................................................... |
|
199 |
Defining route options ............................... |
|
200 |
Displaying the route list ............................ |
|
201 |
Traffic announcements during |
|
|
navigation ................................................... |
|
201 |
Destination memory .................................. |
|
202 |
CD CHANGER |
SETUP |
|
|
|
168 |
Radio mode ............................ |
|
205 |
Convenient RDS functions (AF, REG) ...... |
205 |
|
Switching to radio mode ........................... |
|
206 |
Selecting the waveband / memory bank .. |
206 |
|
Tuning into a station .................................. |
|
207 |
Storing stations .......................................... |
|
208 |
Listening to stored stations ...................... |
|
208 |
Scanning receivable stations (SCAN) ...... |
209 |
|
Traffic information ...................................... |
|
209 |
CD mode ................................ |
|
211 |
Switching to CD mode ............................... |
|
211 |
Traffic announcements during CD mode . 212 |
||
Selecting tracks .......................................... |
|
213 |
Fast searching ............................................ |
|
213 |
Random play (MIX) ..................................... |
|
213 |
Scanning all tracks on a CD (SCAN) ........ |
214 |
|
Repeating tracks (REPEAT) ...................... |
|
214 |

CD changer mode ................. |
215 |
Switching to CD changer mode ................ |
215 |
Selecting CDs ............................................. |
216 |
Selecting tracks .......................................... |
216 |
Fast searching ............................................ |
216 |
Random play (MIX) ..................................... |
217 |
Scanning all tracks on all CDs (SCAN) .... |
218 |
Repeating tracks or CDs (REPEAT) .......... |
218 |
Activating / deactivating traffic |
|
announcements (CD changer) .................. |
219 |
Steering wheel remote |
|
control .................................... |
220 |
Selecting an audio source ......................... |
220 |
Activating navigation ................................. |
220 |
Adjusting the volume ................................. |
220 |
Muting ......................................................... |
221 |
Setup - basic settings ........... |
222 |
Setting the maximum power-on |
|
volume - “ON VOLUME” ............................. |
223 |
Setting the minimum volume for navi- |
|
gation voice output - “NAVI VOLUME” ..... |
223 |
Setting the minimum volume for traffic |
|
announcements - “TA VOLUME” ............... |
224 |
Setting the volume for telephones - |
|
“TEL VOLUME” ........................................... |
224 |
Setting the loudness boost ....................... |
225 |
Setting the speed-dependent automatic |
|
volume adjustment feature - “GALA” ....... |
225 |
Displaying scrolling text ............................ |
226 |
Switching the RDS function on/off ........... |
226 |
Switching the regional function on/off - |
|
“REG” .......................................................... |
227 |
Treble reduction feature during |
|
interference - “HICUT” ............................... |
227 |
Setting seek tuning sensitivity ................. |
228 |
Setting the system time ............................. |
228 |
Setting the day/night display |
|
brightness ................................................... |
229 |
Display contrast ......................................... |
230 |
Setting the system language .................... |
230 |
Enabling/disabling the device code ......... |
231 |
Calibrating the device ........... |
232 |
New installation .......................................... |
232 |
Calibration after a tyre change ................. |
234 |
Manually calibrating the system ............... |
234 |
Carrying out the system test .................... |
235 |
Cancelling calibration ................................ |
235 |
Adjusting the audio settings |
|
and sound distribution |
|
settings .................................. |
236 |
Adjusting the bass ..................................... |
236 |
Adjusting the treble ................................... |
236 |
Setting the left/right sound distribution |
|
(balance) ..................................................... |
237 |
Setting the front/back sound distribution |
|
(fader) .......................................................... |
237 |
Equalizer ................................ |
238 |
Notes on adjusting the settings ............... |
238 |
Help adjusting the equalizer ..................... |
239 |
Adjusting the equalizer ............................. |
240 |
Specifications ........................ |
241 |
Installation instructions ........ |
256 |
ENGLISH PORTUGUÊS ESPAÑOL
169
INTRODUCTION |
NAVIGATION |
RADIO MODE |
CD MODE |
CD CHANGER |
SETUP |
INTRODUCTION |
NAVIGATION |
RADIO MODE |
CD MODE |
CD CHANGER |
SETUP |
170
Compatible navigation CD-ROMs
The TravelPilot can only be used with navigation CD-ROMs that are labelled with a “DX”. If no CD-ROM is inserted in the unit, a message informing you of this appears in the display.
Note: The TravelPilot is not designed for use with CD-ROMs that you have burned yourself. Any faults or limitations to navigation performance as a result of this are not covered by the guarantee.
Care tips for CD-ROMs
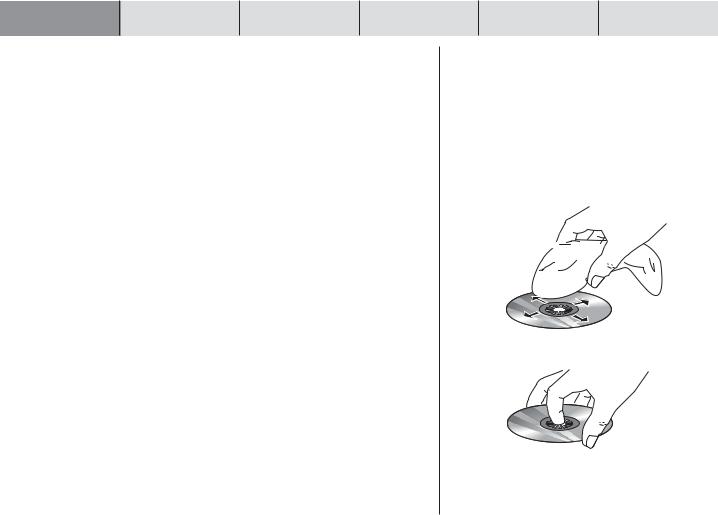
If a CD-ROM becomes dirty, never clean it using a circular motion but always from its centre to its outer edge using a soft lint-free cloth. If the CD is very dirty, we recommend you wash the CD using standard washing-up liquid. Again, when washing the CD, never clean it using a circular motion but wipe it from its centre to its outer edge and leave it to dry.
We also recommend that you handle both the under and upper sides of the CD with care, since the structure of the CD is such that the information layer is located directly beneath the printed layer (i.e. label side).
Some comments regarding questions on reading quality:
A dirty or damaged CD can lead to difficulties when reading the CD. The severity of the reading error depends on the amount of dirt present and the severity of the physical damage. Severe scratches cause “read errors (data errors)”, which lead to the CD jumping or getting stuck during playback. All CDs must be handled with care and always stored in a protective case.
About these instructions
The aim of these instructions is to familiarize you with the functions of the TravelPilot and ensure that you can safely and successfully operate the unit. Before starting to use your TravelPilot, please read these instructions carefully and keep them in a safe place in your vehicle.
Note: Please make sure that you do not keep the equipment pass, which is enclosed with these instructions, in your vehicle.
To help you find the information you need as quickly as possible, these instructions use the following symbols to denote individual steps:
1 … Indicates the steps informing you how to carry out a particular action in order to achieve the intended system response to that action.
Indicates the reaction of the unit towards the user’s actions.
Plus Point: Provides information and tips on operating the TravelPilot.
ENGLISH PORTUGUÊS ESPAÑOL
171
INTRODUCTION |
NAVIGATION |
RADIO MODE |
CD MODE |
CD CHANGER |
SETUP |
INTRODUCTION |
NAVIGATION |
RADIO MODE |
CD MODE |
CD CHANGER |
SETUP |
172
Removable control panel
Theft protection
As a way of protecting your car radio against theft, the unit is equipped with a removable control panel (flip-release panel). Without this control panel, the car radio is worthless to a thief.
Protect your equipment against theft by taking the control panel with you every time you leave your vehicle. Do not leave the control panel in your vehicle - not even in a hiding place.
The control panel has been designed to be simple to detach and attach.
Notes: Never drop the control panel. Never expose the control panel to direct sunlight or other heat sources. Store the control panel in the supplied case. Avoid making direct skin contact with the control panel’s contacts. If necessary, clean the contacts with a lintfree cloth and some alcohol.
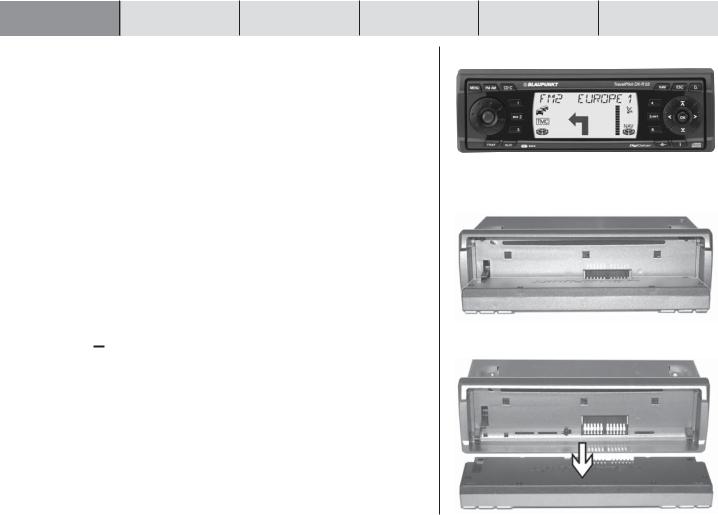
Detaching the control panel
1 Press the 
 button 9.
The control panel opens out towards you.
2 Pull the control panel straight off the bracket within 5 seconds.
The unit switches off after the control panel is removed. All the current settings are saved. Any CD already inserted in the unit remains there.
Note: If the inserted CD is ejected, it will be drawn back in automatically.
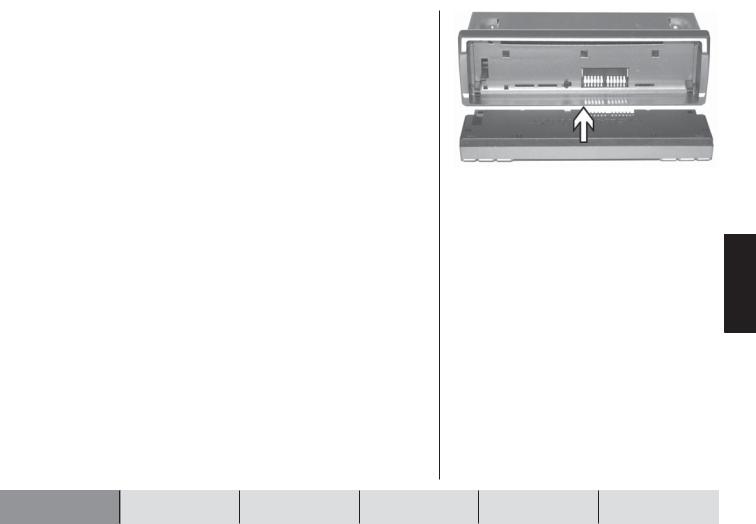
Attaching the control panel
1Slide the control panel straight into the device’s bracket.
2Close the control panel.
Note: When attaching the control panel, make sure you do not press the display.
ENGLISH PORTUGUÊS ESPAÑOL
173
INTRODUCTION |
NAVIGATION |
RADIO MODE |
CD MODE |
CD CHANGER |
SETUP |

INTRODUCTION |
NAVIGATION |
RADIO MODE |
CD MODE |
CD CHANGER |
SETUP |
174
Switching the device on/off
1 To switch your TravelPilot on, press button 3.
The device plays the last active audio source at the volume level that was set when the unit was switched off. You can limit the power-on volume to a maximum value.
Note: For further information on how to limit the power-on volume, read the section entitled “Setting the maximum power-on volume - ON VOLUME” in the “Setup - basic settings” chapter.
1 To switch the unit off, press button 3 for longer than two seconds.
Switching on/off using the vehicle ignition
If the TravelPilot is correctly connected to the vehicle’s ignition and it was not switched off using button 3, it will switch on/off simultaneously with the ignition.
You can also operate the TravelPilot when the ignition is off.
1 To do so, press button 3.
After an hour has elapsed, the unit switches off automatically in order to protect the vehicle battery. You can repeat this procedure as often as you like. The imposed time limit is cancelled as soon as the ignition is turned on.
Note: To ensure that the TravelPilot functions properly and that increased power consumption is avoided, the unit must be connected to the continuous power source and the power source via the ignition, as described in the installation instructions.
Selecting the operating mode
To select navigation mode,
1 press the NAV button 7.
The navigation memory bank that you used last and the last destination in this memory bank are displayed.
To select radio mode,
1 press the FM•AM button 4.
The top line of the display contains the current station name or frequency. Beneath it you see the clock time and activated functions like RDS and Loudness.
To select CD mode or CD changer mode,
1 press the CD•C button 5.
The top display line contains the current track, the total number of tracks on the CD, and the number of the CD in the CD changer. Beneath it you see the playing time of the current track.
N1 NAVI
LAST DESTN
BERLIN, UNT
ER DEN LIN NAV
DEN
FM 1 EUROPE
|
|
|
|
|
RDS |
p |
|
LD |
|
||||
|
|
|
|
|
|
|
|||||||
|
|
|
|
||||||||||
|
|
|
|
|
|
|
|
|
|
|
|
|
|
|
|
|
|
O3m |
45 NAV |
||||||||
TO1/ 12 D1O
LD
 O5:22 NAV
ENGLISH PORTUGUÊS ESPAÑOL
175
INTRODUCTION |
NAVIGATION |
RADIO MODE |
CD MODE |
CD CHANGER |
SETUP |

INTRODUCTION |
NAVIGATION |
RADIO MODE |
CD MODE |
CD CHANGER |
SETUP |
176
Adjusting the volume
To increase the system volume,
1 turn the volume control 2 in a clockwise direction.
To decrease the system volume,
1 turn the volume control 2 in an anticlockwise direction.
Whilst you are making your adjustments, the currently set value is displayed in the top line of the display.
Plus Point: During a spoken driving recommendation by the navigation system, you can use the volume control 2 to adjust the volume of the driving recommendation independently of the basic volume level of the audio source. The difference in volume levels is stored automatically.
Activating mute
You can instantaneously reduce the volume.
1 Briefly press button 3.
MUTE appears in the top line of the display.
Plus Point: The navigation system’s spoken driving recommendations can still be heard.
To cancel mute,
1 press button 3 again.

Automatically putting through telephone calls
If the device is suitably connected to a car telephone, the telephone call will be outputted over the TravelPilot’s loudspeakers. TELEPHONE appears in the top line of the display. You can set the volume level for telephone calls. For further information, read the section entitled “Setting the volume for telephones - TEL VOLUME” in the “Setup - basic settings” chapter.
If you are making a telephone call during an active navigation session, the visual driving recommendations remain visible and the audio driving recommendations are not silenced.
ENGLISH PORTUGUÊS ESPAÑOL
177
INTRODUCTION |
NAVIGATION |
RADIO MODE |
CD MODE |
CD CHANGER |
SETUP |

INTRODUCTION |
NAVIGATION |
RADIO MODE |
CD MODE |
CD CHANGER |
SETUP |
178
Display
The TravelPilot’s display contains all the navigation information (e.g. visual driving recommendations), menus and lists, as well as the radio, CD and CD changer (optional) audio sources.
The display’s brightness and readability can be optimised to suit the viewing angle in your vehicle. For further information, read the sections entitled “Setting the day/night display brightness” and “Display contrast” in the “Setup - basic settings” chapter.
Note: Please treat the display with care. Contact with sharp objects causes scratches and damages the display. Only clean the display with a lint-free cloth and, if necessary, with some cleaning alcohol. Do not use any solvents such as turpentine or petrol when cleaning, since these will affect and damage the display.
Switching on a coded device after disconnection from the battery power supply
If you switch on a coded unit after having disconnected it from the battery power supply (for instance, after having carried out a repair to the vehicle), a message will appear requesting that you enter the code. You will find the numerical code printed on your device’s equipment pass. Never store the equipment pass in the vehicle!
To enter the numerical code, proceed as follows:
1For the first digit of the numerical code: press button 1 > repeatedly until the first digit of the code appears in the display.
2For the second digit of the numerical code: press button 2 >repeatedly until the second digit of the code appears in the display.
3For the third digit of the numerical code: press button 3 > repeatedly until the third digit of the code appears in the display.
4For the fourth digit of the numerical code: press button 4 > repeatedly until the fourth digit of the code appears in the display.
Once you have finished entering the whole numerical code,
5 keep the OK button ; pressed for longer than two seconds.
The device switches on.
The clock time must be entered manually if the power supply was cut.
6Set the hours by pressing the  or
or  button :.
7Press the  button :.
The minutes flash.
8Set the minutes by pressing the  or
or  button :.
9Press the OK button ;.
1OOO
NAV
TIME ——·——
RDS LD
NAV
ENGLISH PORTUGUÊS ESPAÑOL
179
INTRODUCTION |
NAVIGATION |
RADIO MODE |
CD MODE |
CD CHANGER |
SETUP |

INTRODUCTION |
NAVIGATION |
RADIO MODE |
CD MODE |
CD CHANGER |
SETUP |
180
Entering the wrong code number
If you inadvertently entered and confirmed the wrong code, you can enter it again. To prevent thieves from working out the numerical code by trial and error, the unit will be locked for one hour if the code is entered incorrectly three times.
The device must remain switched on for one hour before you can try entering the code again. If the unit is disconnected from the power supply during this waiting period, the countdown will be reset and the waiting period will be set to one hour again.
You can also disable the code request feature. For further information, read the section entitled “Enabling/disabling the device code” in the “Setup - basic settings” chapter.
Navigation
The TravelPilot’s navigation system helps you find your way to destinations quickly and safely without first having to spend time studying a roadmap. When navigation is active, you will be guided by the device’s voice output feature. The system will warn you in good time about approaching turning-off points. In addition, the display contains visual driving recommendations, the current distance to your destination, and the estimated time of arrival at your destination.
Road safety has absolute priority. Please be aware that the current way in which traffic is being directed always has priority over the driving recommendations made by the navigation system.
How navigation works
The current vehicle position is determined with the aid of the electronic odometer, the gyro and a signal transmitted by GPS (Global Positioning System) satellites. The navigation system compares the data with the map stored on the navigation CD and uses this information to calculate your position and the routes used for navigation.
Inserting the navigation CD
1 Press the 
 button 9 to open the control panel.
The control panel opens out towards you and any CD that is already inserted is then ejected.
2If a CD is ejected, remove it and then carefully insert the navigation CD with the printed side uppermost into the device’s CD compartment. Push the CD until you feel some resistance. From this point onwards, the CD will be drawn in automatically.
The software is loaded from the CD. The progress is indicated in the display.
INTRODUCTION |
NAVIGATION |
RADIO MODE |
CD MODE |
CD CHANGER |
SETUP |
|
|
|
|
|
|
ENGLISH PORTUGUÊS ESPAÑOL
181

INTRODUCTION |
NAVIGATION |
RADIO MODE |
CD MODE |
|
|
|
|
Note: The process of loading the software from the navigation CD must not be interrupted.
Starting navigation
1 Press the NAV button 7 whilst the unit is switched on.
The last destination in the current navigation memory bank is displayed for seven seconds.
Similar to the radio, the navigation system also has several memory banks at its disposal (N1, N2, N3 and N4). You can store six destinations in each of these memory banks with buttons 1 - 6 >. When you access a memory bank, the last destination in the memory bank is displayed. This last destination is not necessarily one which is stored in the memory bank - it is merely the last destination that was being driven to from this memory bank.
After the seven seconds have elapsed or after the ESC button 8 has been pressed, a menu for selecting the destination type (CITY or SPECial DESTinatioN) is displayed.
To switch between the navigation memory banks N1...N4,
1press the NAV button 7 repeatedly until the required memory bank appears in the top line of the display.
Before navigation can begin, a TravelPilot DX navigation CD must first be inserted and a destination selected.
Entering a destination
The destination can be entered from the destination memory or by entering a place name, a centre, the road name, intersection or house number, or by selecting a special destination (e.g. a motorway junction, train station, hotel, shopping centre, etc.).
CD CHANGER |
SETUP |
182
N1 NAVI
LAST DESTN
BERLIN, UNT
ER DEN LIN NAV
DEN
N1 SELECT // // //
DESTN TYPE...
CITY
SPEC DESTN NAV
N4 NAVI
NO
LAST NAV
DESTN

After navigation is activated using the NAV button 7, the last destination of the current memory bank is displayed for seven seconds. After the seven seconds have elapsed or after the ESC button 8 has been pressed, a menu for selecting the destination type (CITY or SPECial DESTinatioN) is displayed.
Destinations
The following destinations are allowed:
●the centre of a place or the centre of a city district,
●a road,
●an intersection where two or more roads intersect,
●a house number or a range of house numbers.
●special destinations such as train stations, airports, petrol stations and other public buildings.
●position markers that you have stored. Position markers are useful if you notice an interesting location during your journey (like a shop or restaurant) and want to be guided back to that point at some other time.
●destinations from the destination memory.
Entering destinations using the text input line
The text input line is used for entering such things as town and road names in the navigation system. The text input line is equipped with an intelligent text input completion feature. This means you can only enter characters that can logically follow on from the ones you have already entered.
INTRODUCTION |
NAVIGATION |
RADIO MODE |
CD MODE |
|
|
|
|
N1 NAVI |
ESPAÑOL |
LAST DESTN |
|
BERLIN, UNT |
|
ER DEN LIN NAV |
|
DEN |
|
|
PORTUGUÊS |
|
ENGLISH |
183
CD CHANGER |
SETUP |
INTRODUCTION |
NAVIGATION |
RADIO MODE |
CD MODE |
|
|
|
|
Example: If you are entering a street name and there are no streets beginning with the letter A in the destination town, the letter A will not be displayed. Similarly, the letter C will not be displayed if you entered B as the first letter and there are no streets in the destination town with the BC letter combination.
As soon as the system finds a clear match for the characters you have entered, it will automatically complete your text entry. This means that usually only a few characters need be entered in order to specify a place or street name.
Example: If in Germany you were to enter YO as the first two letters of a place name, the system would automatically complete your entry with RCKGEBIET because no other possible entry exists in the list of place names on the Germany CD.
Selecting letters
If you want to enter a name using the text input line, proceed as follows:
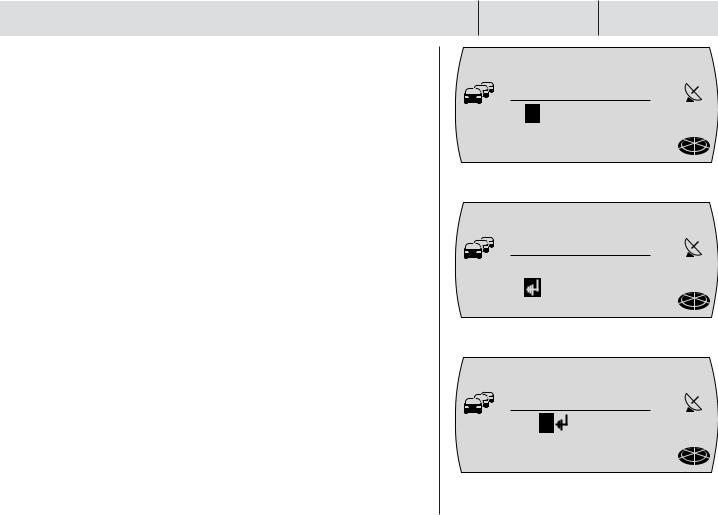
As soon as the text input line is displayed, the first possible character is displayed and the input cursor is displayed inversed.
1Keep pressing the  or
or  button : until the first letter of the name appears in the display.
2Press the  button : to move the input cursor one position to the right.
3Keep pressing the  or
or  button : until the next letter of the name appears in the display.
If the characters entered so far allow the system to find a name match, it will automatically complete the name.
4Repeat steps 1...3 until the required name is displayed in the text input line.
CD CHANGER |
SETUP |
184
N1 ENTER |
// / |
|
/ // |
CITY
YO
NAV
N1 ENTER |
// / |
|
/ // |
CITY
YORCKGEBIE |
|
T |
NAV |
N1 ENTER |
// / |
|
/ // |
CITY |
|
BER |
|
|
NAV |

5 If you want to accept the name, press the OK button ;.
The entered name is displayed in the list of place names (if entering a place) or street names (if entering a street).
Deleting letters
To delete an incorrect letter that you entered accidentally,
1 press the  button :.
The input cursor is moved one position to the left. Any text automatically entered by the system to complete the name will be deleted.
Browsing through lists
Since the number of available lines on the display is limited, lists are spread over several pages. Lists are indicated by 
 arrows on the right-hand side. If only the
  arrow is visible you can only scroll downwards. If only the
  arrow is visible you can only scroll upwards.
1 To scroll through a list, press the  or
or  button :.
The next or previous entry in the list is then displayed.
Selecting list entries
1To select an entry from a list (e.g. as the destination place name), press the OK button ;.
N1 ENTER
CITY
BERLIN
N1 LIST
CITY...
BERLIN
N1 LIST
CITY...
BERLIN
/ |
// |
// /
NAV
/ |
// |
// /
NAV
/ |
// |
// /
NAV
ENGLISH PORTUGUÊS ESPAÑOL
185
INTRODUCTION |
NAVIGATION |
RADIO MODE |
CD MODE |
CD CHANGER |
SETUP |
 Loading...