


Seite 3
Page 11
Page 19
Blz. 28
Sidan 36
Side 44
Str. 51
Stronie 60
Strana 69
Brennholzspalter
Bedienungsanleitung – Sicherheitshinweise – Ersatzteile
Log splitter
Operating Manual – Safety instructions – Spare parts
Fendeur de bois à brûler
Instructions d’utilisation – Consignes de sécurité – Pièces de rechange
Brandhoutsplijter
Bedieningshandleidning – Veiligheidsinstructies – Reserveonderdelen
Vedklyv
Bruksanvisning – Säkerhetsanvisningar – Reservdelar
Brændekløver
Brugsanvisning – Sikkerhedshenvisninger – Reservdele
Štípač palivového dřeva
Návod k použití – Bezpečnostní pokyny – Náhradní díly
Łuparka do trewna
Instrukcja obsługi – Wskazówki bezpieczeństwa – Części zamienne
Štiepač palivového dreva
Návod na obsluhu - Bezpečnostné pokyny - Náhradné dielce
ASP 4-370
ASP 5-520

Lieferumfang
Überprüfen Sie nach dem Auspacken den Inhalt des Kartons auf
!Vollständigkeit
!evtl. Transportschäden
Teilen Sie Beanstandungen umgehend dem Händler, Zulieferer bzw. Hersteller mit. Spätere Reklamationen werden nicht anerkannt.
!1 vormontierte Geräteeinheit
!1 Bedienungsanleitung
!1 Bedienhebel
Extend of delivery
After unpacking, check the contents of the box
!That it is complete
!Check for possible transport damage
Report any damage or missing items to your dealer, supplier or the manufacturer immediately. Complaints made at a later date will not be acknowledged.
!1 ready mounted machine unit
!1 operating manual
!1 operating lever
Fourniture
Après le déballage de la machine, vérifiez le contenu du carton quant à
!l’intégralité des pièces
!la présence éventuelle de dommages dus au transport.
Informez immédiatement le revendeur, le transporteur et / ou le fabricant en cas de réclamation. Sachez que les réclamations ultérieures ne sont plus acceptées.
!1 bloc d'assemblage prémonté
!1 instructions
!1 manette de commande d’utilisation
Lever hoeveelheid
Controleer na het uitpakken de inhoud van de ver-pakking op:
!Aanwezigheid van alle onderdelen
!Eventuele transportschade
In het geval van onvolkomenheden dit direct aan uw leverancier melden. Latere reclamaties worden niet in behandeling genomen.
!1 voorgemonteerde apparaatunit
!1 bedieningshendel
!1 bedieningshandleiding
Leveringsomfang
Efter udpakning skal kartonens indhold kontrolleres med hensyn til
!fuldstændighed
!evt. transportskader
Reklamationer skal omgående meddeles forhandleren, leverandøren eller producenten. Senere reklamationer anerkendes ikke.
!1 formonteret apparatenhed
!1 brugsanvisning
!1 manöverspaken
1

Leveransomfattning
Kontrollera innehållet i kartongen dvs.
!om leveransen är komplett
!om leveransen ev. har tagit skada
Informera din återförsäljare, leverantören resp. tillverkaren omgående om någon del fattas eller har tagit skada. Senare reklamationer kan inte accepteras.
!1 förmonterad klyvenhet
!1 bruksanvisning
!1 betjeningsarme
Obsah dodávky
Po rozbalení dodávky z kartonu překontrolujte:
!úplnost dodávky
!event. škody způsobené transportem
Jestliže zjistíte závady, sdělte tyto neprodleně svému prodejci nebo přímo výrobci. Pozdější reklamace nebudou uznány.
!1 předmontovaná jednotka stroje
!1 ovládací rukojeť
!1 návod k použití
Zakres dostawy
Po rozpakowaniu kartonów należy sprawdzić
!kompletność dostawy
!ew. szkody transportowe
Należy odwrotnie poinformować dystrybutora, dostawcę bądź producenta o zastrzeżeniach. Późniejsze reklamacje nie zostaną uwzględnione.
!1 wstępnie zmontowany moduł urządzenia
!1 uchwyt obsługowy
!1 instrukcja obsługi
Obsah dodávky
Po vybalení obsahu krabice skontrolujte na
!kompletnosť dodávky
!prípadné škody alebo poškodenia zposobené prepravou.
Vaše reklamácie oznámte obratom predajni, dodávateľovi popr. výrobcovi. Neskoršie reklamácie sa neuznávajú.
!1 zmontovaná jednotka prístroja
!1 ovladacia rukoväť
!1 návod na obsluhu
2

Sie dürfen die Maschine nicht in Betrieb nehmen, bevor Sie diese Bedienungsanleitung gelesen, alle angegebenen Hinweise beachtet und das Gerät wie beschrieben montiert haben.
Anleitung für künftige Verwendungen aufbewahren.
Inhalt
Lieferumfang |
1 |
Symbole Gerät / Bedienungsanleitung |
3 |
Bestimmungsgemäße Verwendung |
3 |
Restrisiken |
4 |
Sicheres Arbeiten |
4 |
Gerätebeschreibung |
5 |
Aufstellen |
6 |
Inbetriebnahme |
6 |
Arbeiten mit dem Brennholzspalter |
6 |
Wartung und Pflege |
8 |
Garantie |
9 |
Mögliche Störungen |
10 |
Technische Daten |
10 |
Konformitätserklärung |
77 |
Ersatzteile |
79 |
Schnittund Quetschgefahr; niemals gefährliche Bereiche berühren, wenn sich der Spaltkeil bewegt.
Achtung!
Immer auf die Bewegung des Stammschiebers achten.
Achtung!
Niemals einen Stamm der im Keil feststeckt mit der Hand entfernen.
Achtung!
Vor Reparatur-, Wartungsund Reinigungsarbeiten Motor abstellen und Netzstecker ziehen.
Stop!
Bedienungsanleitung beachten.
Entlüftungsschraube lösen
Î Entlüften Seite 7
Symbole Bedienungsanleitung
Symbole Gerät
Vor Inbetriebnahme die Bedienungsanleitung und Sicherheitshinweise lesen und beachten.
Beim Arbeiten Sicherheitsschuhe tragen, um den Fuß vor fallenden Stämmen zu schützen.
Beim Arbeiten Schutzhandschuhe tragen, um die Hände vor Spänen und Splittern zu schützen.
Beim Arbeiten Schutzbrille oder Schutzvisier tragen, um die Augen vor Spänen und Splittern zu schützen.
Es ist verboten, Schutzund Sicherheitseinrichtungen zu entfernen oder zu verändern.
Nur der Bediener darf im Arbeitskreis der Maschine stehen. Unbeteiligte Personen sowie Hausund Nutztiere aus dem Gefahrenbereich (Mindestabstand 5 m) fernhalten.
Drohende Gefahr oder gefährliche Situation. Das Nichtbeachten dieser Hinweise kann Verletzungen zur Folge haben oder zu Sachbeschädigung führen.
Wichtige Hinweise zum sachgerechten Umgang. Das Nichtbeachten dieser Hinweise kann zu Störungen führen.
Benutzerhinweise. Diese Hinweise helfen Ihnen, alle Funktionen optimal zu nutzen.
Montage, Bedienung und Wartung. Hier wird Ihnen genau erklärt, was Sie tun müssen.
Symbol Gerät / Verpackung
Elektrische Geräte gehören nicht in den Hausmüll. Geräte, Zubehör und Verpackung einer umweltfreundlichen Wiederverwertung zuführen.
Bestimmungsgemäße Verwendung
Der Brennholzspalter ist nur zum Spalten von Holz einsetzbar.
Der Brennholzspalter ist nur für die private Nutzung im Hausund Hobby-Bereich einsetzbar.
Nur gerade abgeschnittenes Holz ist für den Brennholzspalter geeignet.
Metallteile (Nägel, Draht etc.) sind aus dem zu spaltenden Holz unbedingt zu entfernen.
3

|
Jeder darüber hinausgehende Gebrauch gilt als nicht |
|
− |
unter Einfluss von Drogen, Alkohol oder Medikamenten |
||||
|
|
bestimmungsgemäß. Für daraus resultierende Schäden |
|
|
stehen, die Ihr Urteilungsvermögen beeinflussen kön- |
|||
|
|
haftet der Hersteller nicht – das Risiko dafür trägt aus- |
|
|
nen. |
|||
|
|
schließlich der Benutzer. |
|
Tragen Sie beim Arbeiten |
||||
|
|
|
|
|
− |
Schutzbrille oder Schutzvisier |
||
|
|
|
|
|
− |
Arbeitshandschuhe |
||
|
|
|
Restrisiken |
|
||||
|
|
|
|
− |
ggf. Gehörschutz |
|||
|
|
|
|
|
− |
Sicherheitsschuhe mit Stahlkappe |
||
|
|
|
Auch bei bestimmungsgemäßer Verwendung können |
|
Tragen Sie geeignete Arbeitskleidung: |
|||
|
trotz Einhaltung aller einschlägigen Sicherheitsbestimmungen |
|
− |
keine weite Kleidung oder Schmuck (sie können von |
||||
|
aufgrund der durch den Verwendungszweck bestimmten Kon- |
|
|
beweglichen Teilen erfasst werden) |
||||
|
struktion noch Restrisiken bestehen. |
|
Der Bedienende ist im Arbeitsbereich der Maschine |
|||||
|
Restrisiken können minimiert werden, wenn die „Sicherheits- |
|
gegenüber Dritten verantwortlich. |
|||||
|
|
Kinder und Jugendliche unter 18 Jahren dürfen die Ma- |
||||||
|
hinweise“ und die „Bestimmungsgemäße Verwendung“, sowie |
|
schine nicht bedienen. |
|||||
|
die Bedienungsanleitung insgesamt beachtet werden. |
|
Kinder von der Maschine fernhalten. |
|||||
|
Rücksichtsnahme und Vorsicht verringern das Risiko von |
|
Setzten Sie die Maschine niemals ein, während unbeteilig- |
|||||
|
Personenverletzungen und Beschädigungen. |
|
te Personen in der Nähe sind. |
|||||
|
Ignorierte oder übersehene Sicherheitsvorkehrungen kön- |
Lassen Sie die Maschine nie unbeaufsichtigt. |
||||||
|
|
Halten Sie Ihren Arbeitsbereich in Ordnung! Unordnung |
||||||
|
|
nen zu Verletzungen beim Bediener oder zu Beschädi- |
|
kann Unfälle zur Folge haben. |
||||
|
|
gungen von Eigentum führen. |
|
Überlasten Sie die Maschine nicht! Sie arbeiten besser |
||||
|
Gefährdung durch Strom, bei Verwendung nicht ord- |
|
und sicherer im angegebenen Leistungsbereich. |
|||||
|
|
nungsgemäßer Elektro-Anschlußleitungen. |
|
Betreiben Sie die Maschine nur mit kompletten und korrekt |
||||
|
Berührung spannungsführender Teile bei geöffneten elekt- |
|
angebrachten Schutzeinrichtungen und ändern Sie an |
|||||
|
|
rischen Bauteilen. |
|
der Maschine nichts, was die Sicherheit beeinträchtigen |
||||
|
Brandund Rutschgefahr durch ausgelaufene Hydraulik- |
|
könnte. |
|||||
|
|
flüssigkeit. |
|
Die Maschine bzw. Teile der Maschine nicht verändern. |
||||
|
Des weiteren können trotz aller getroffener Vorkehrungen |
Die Maschine nicht mit Wasser abspritzen. (Gefahrenquel- |
||||||
|
|
le elektrischer Strom). |
||||||
|
nicht offensichtliche Restrisiken bestehen. |
|
||||||
|
|
Maschine nicht im Regen stehen lassen oder bei Regen |
||||||
|
|
|
|
|||||
|
|
|
|
|
arbeiten. |
|||
|
|
|
Sicheres Arbeiten |
|
Nur an einem trockenen Ort außerhalb der Reichweite |
|||
|
|
|
|
|
von Kindern aufbewahren. |
|||
|
|
|
|
|
||||
|
|
|
|
Schalten Sie die Maschine ab und ziehen Sie den Netz- |
||||
|
|
|
|
|||||
|
|
|
Lesen und beachten Sie vor Inbetriebnahme dieses |
|
stecker aus der Steckdose bei: |
|
|
|
|
|
|
|
|
||||
|
Erzeugnisses die folgenden Hinweise und die im jeweili- |
|
− Reparaturarbeiten |
|
|
|||
|
gen Land gültigen Sicherheitsbestimmungen, um sich |
|
− Wartungsund Reinigungsarbeiten |
|
|
|||
|
selbst und andere vor möglichen Verletzungen zu schüt- |
|
− Beseitigung von Störungen |
|
|
|||
|
zen. |
|
− Transport |
|
|
|||
|
|
|
||||||
|
|
|
Geben Sie die Sicherheitshinweise an alle Personen |
|
− Verlassen (auch bei kurzzeitigen Unterbrechungen) |
|||
|
|
|
|
Überprüfen Sie die Maschine auf eventuelle Beschädi- |
||||
|
|
|
weiter, die mit der Maschine arbeiten. |
|||||
|
|
|
|
gungen: |
||||
|
|
|
Bewahren Sie diese Sicherheitshinweise gut auf. |
|
− |
Vor weiterem Gebrauch des Gerätes müssen Schutz- |
||
|
|
|
|
|
|
vorrichtungen sorgfältig auf ihre einwandfreie und be- |
||
|
Machen Sie sich vor Gebrauch mit Hilfe der Bedienungs- |
|
|
stimmungsgemäße Funktion untersucht werden. |
||||
|
|
anleitung mit der Maschine vertraut. |
|
− |
Überprüfen Sie, ob Teile beschädigt oder defekt sind. |
|||
|
Benützen Sie die Maschine nicht für Zwecke, für die sie |
|
|
Sämtliche Teile müssen richtig montiert sein und alle |
||||
|
|
nicht bestimmt ist (siehe „Bestimmungsgemäße Verwen- |
|
|
Bedingungen erfüllen, um einwandfreien Betrieb si- |
|||
|
|
dung“ und „Arbeiten mit dem Brennholzspalter“). |
|
|
cherzustellen. |
|||
|
Sorgen Sie für sicheren Stand und halten Sie jederzeit |
|
− |
Beschädigte Schutzvorrichtungen und Teile müssen |
||||
|
|
das Gleichgewicht. |
|
|
sachgemäß durch eine anerkannte Fachwerkstatt re- |
|||
|
Nehmen Sie eine Arbeitsstellung ein, die sich hinter dem |
|
|
pariert oder ausgewechselt werden, soweit nichts an- |
||||
|
|
Schieber im Bereich des Bedienungsgriffs befindet. Nie- |
|
|
deres in der Gebrausanweisung angegeben ist. |
|||
|
|
mals im Bereich des Spaltkeils stehen. |
|
− |
Beschädigte oder unleserliche Sicherheitsaufkleber |
|||
|
Niemals auf der Maschine stehen. |
|
|
sind zu ersetzen. |
||||
Seien Sie aufmerksam. Achten Sie darauf, was Sie tun. Gehen Sie mit Vernunft an die Arbeit. Verwenden Sie das Gerät nicht:
− wenn Sie müde sind.
4

Elektrische Sicherheit
Ausführung der Anschlussleitung nach IEC 60245 (H 07 RN-F) mit einem Aderquerschnitt von mindestens
2,5 mm² bei einer Kabellänge bis max. 10 m
Niemals Anschlussleitungen über 10 m verwenden. Längere Anschlussleitungen erzeugen einen Spannungsabfall. Der Motor erreicht nicht mehr seine maximale Leistung, die Funktion der Maschine wird reduziert.
Beim Verlegen der Anschlussleitungen darauf achten, dass sie nicht gequetscht, geknickt und die Steckverbindung nicht nass wird.
Verwenden Sie das Kabel nicht für Zwecke, für die es nicht bestimmt ist. Schützen Sie das Kabel vor Hitze, Öl und scharfen Kanten. Verwenden Sie das Kabel nicht, um den Stecker aus der Steckdose zu ziehen.
Kontrollieren Sie Verlängerungskabel regelmäßig und ersetzen Sie sie, wenn sie beschädigt sind.
Verwenden Sie keine defekten Anschlussleitungen.
Verwenden Sie im Freien nur dafür zugelassene und entsprechend gekennzeichnete Verlängerungskabel.
Keine provisorischen Elektroanschlüsse einsetzen.
Schutzeinrichtungen niemals überbrücken oder außer Betrieb setzen.
Der Elektroanschluss bzw. Reparaturen an elektrischen Teilen der Maschine hat durch eine konzessionierte Elektrofachkraft oder den Hersteller zu erfolgen. Örtliche Vorschriften insbesondere hinsichtlich der Schutzmaßnahmen sind zu beachten.
Reparaturen an anderen Teilen der Maschine haben durch den Hersteller zu erfolgen.
Nur Originalersatz-, Zubehörteile verwenden. Durch den
Gebrauch anderer Ersatzteile und anderen Zubehörs können Unfälle für den Benutzer entstehen. Für hieraus resultierende Schäden haftet der Hersteller nicht.
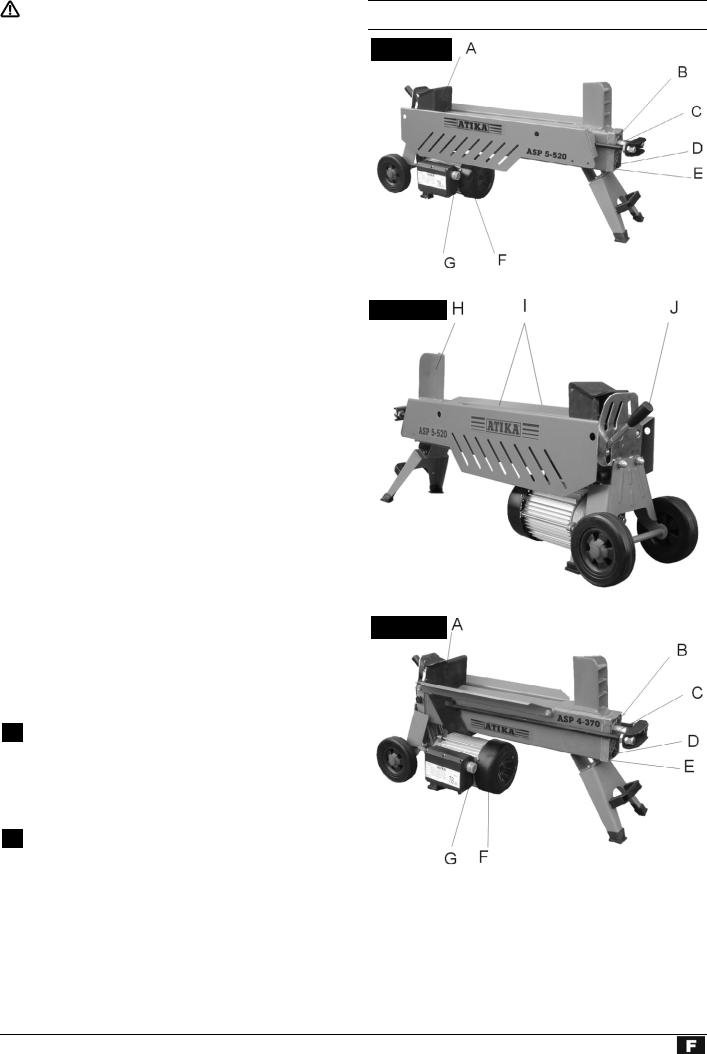
Gerätebeschreibung
Abb. 1
Abb. 2
Abb. 3
Abb. 4
AStammschieber
BEntlüftungsschraube
CKolbenstange
DÖlmessstab
EZylinderdeckel
FElektromotor
GBedienungstaster
HSpaltkeil
IStammführungbleche
JBedienungsgriff
5

Aufstellen
Um eine bequeme Arbeitshaltung einzunehmen, stellen Sie den Brennholzspalter auf eine 60 – 75 cm hohe Arbeitsfläche.
Blockieren Sie die Räder mit Keilen, um ein Rollen während des Betriebes zu vermeiden.
Achten Sie darauf, dass der Arbeitsbereich folgende Bedingungen erfüllt:
−rutschfest
−eben
−frei von Stolpergefahren
−ausreichende Lichtverhältnisse
Die Maschine nicht in der Nähe von Erdgas, Benzinrinnen oder anderen leicht brennbaren Materialien betreiben.
Inbetriebnahme
Vergewissern Sie sich, dass die Maschine komplett und vorschriftsmäßig montiert ist.
Überprüfen Sie vor jedem Gebrauch:
−die Anschlussleitungen auf defekte Stellen (Risse, Schnitte o. dgl.)
 verwenden Sie keine defekten Leitungen
−die Maschine auf eventuelle Beschädigungen (s. Sicheres Arbeiten)
−ob alle Schrauben fest angezogen sind
−die Hydraulik auf Leckstellen
Netzanschluß
Vergleichen Sie die auf dem Gerätetypenschild angegebene Spannung mit der Netzspannung und schließen Sie das Gerät an die entsprechende und vorschriftsmäßige Steckdose an.
Verwenden Sie Verlängerungskabel mit ausreichendem Querschnitt.
Schließen Sie die Maschine über einen Fi-Schutzschalter (Fehlerstrom-Schutzschalter) 30 mA an.
Absicherung: 16 A
Bedientaster
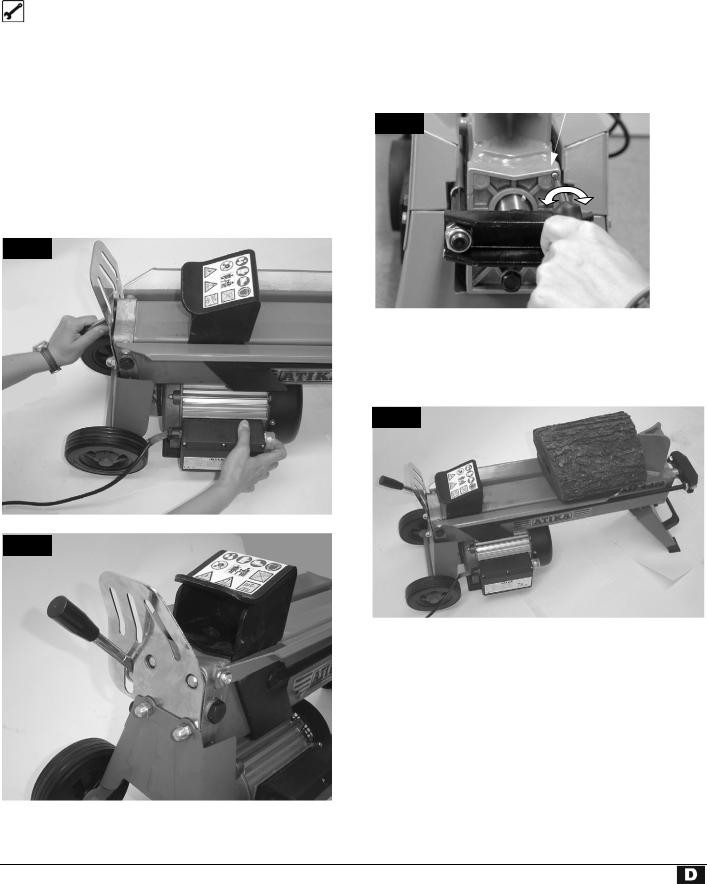
Abb. 5
Bedientaster
 Einschalten
Drücken Sie den grünen Knopf. Der Motor läuft solange Sie den grünen Knopf gedrückt halten.
 Ausschalten
Lassen Sie den grünen Knopf wieder los.
 Benutzen Sie kein Gerät, bei dem der Bedientaster nicht ordnungsgemäß funktioniert. Lassen Sie beschädigte Bedientaster unverzüglich reparieren oder ersetzen.
Hydraulik
Niemals die Maschine betreiben, wenn eine Gefahr durch Hydraulikflüssigkeit besteht.
Stellen Sie sicher, dass die Maschine und der Arbeitsbereich sauber und frei von Ölflecken sind.
Rutschund Feuergefahr!
Überprüfen Sie regelmäßig, ob genügend Hydrauliköl im Behälter ist (siehe Wartung und Pflege)
Inhalt: 2,7 Liter |
ASP 4-370 |
3,2 Liter |
ASP 5-520 |
Arbeiten mit dem Brennholzspalter
 zusätzliche SICHERHEITSHINWEISE
Der Holzspalter darf nur von einer einzelnen Person bedient werden.
Nur Personen über 18 Jahre, die die Bedienungsanleitung gelesen und verstanden haben, dürfen die Maschine bedienen.
Tragen Sie Ihre Schutzausrüstungen (Schutzbrille/-visier, Handschuhe, Sicherheitsschuhe), um sich vor möglichen Verletzungen zu schützen.
Niemals Stämme spalten, die Nägel, Draht oder andere Gegenstände enthalten.
Bereits gespaltenes Holz und Holzspäne erzeugen einen gefährlichen Arbeitsbereich. Es besteht die Gefahr des Stolperns, Ausrutschens oder Hinfallens. Halten Sie den Arbeitsbereich immer aufgeräumt.
Niemals bei eingeschalteter Maschine die Hände auf sich bewegende Teile der Maschine legen. Halten Sie Sicherheitsabstand von Holzstamm, Schieber und Spaltkeil, um Ihre Hände vor Verletzungen zu schützen.
Spalten Sie nur Holz, dass der max. zu verarbeitenden Länge entspricht.
Was kann ich spalten?
Größe der zu spaltenden Stämme
|
ASP 4-370 |
|
ASP 5-520 |
Holzlänge: |
max. 370 mm |
|
max. 520 mm |
Holzdurchmesser: |
|
50 – 250 mm |
|
6
Der Holzdurchmesser ist ein empfohlener Richtwert, weil:
−dünnes Holz kann schwer zu spalten sein, wenn es Astlöcher enthält oder die Fasern zu stark sind.
−dickeres Holz als 250 mm kann gespalten werden, wenn die Fasern glatt und locker sind.
Spalten Sie keine grünen Stämme. Trockene, gelagerte Stämme spalten sich viel leichter und verursachen nicht so oft ein Festfressen wie grünes (nasses) Holz.
Bedienung
Zweihandbetrieb
1.Drücken Sie den Bedientaster am Elektromotor. Warten Sie ein paar Sekunden, damit der Motor seine Enddrehzahl erreicht und der Druck in der Hydraulikpumpe aufgebaut wird – Abb. 5.
2.Drücken Sie gleichzeitig den Bedienungsgriff nach unten – Abb. 6.
Î Der Stammschieber drückt den Stamm gegen den Spaltkeil. Der Stamm wird gespalten.
3.Lassen Sie den Bedienungsgriff und den Bedientaster los, der Stammschieber fährt in seine Ausgangsposition zurück
– Abb. 7.
Abb. 6
Abb. 7
Besondere Hinweise zum Spalten:
Vorbereitungen:
Bereiten Sie das zu spaltende Holz auf die maximal zu verarbeitenden Abmessungen (370 bzw. 520 mm lang, 50 – 250 mm) vor und achten Sie darauf, dass das Holz gerade geschnitten ist.
Legen Sie sich das Holz am Holzspalter so zurecht, dass keine Gefahr für Sie besteht (Stolpergefahr).
Entlüften
Lösen Sie die Entlüftungsschraube um 3 – 4 Umdrehungen. Abb. 8.
Ziehen Sie die Schraube erst wieder an, wenn Sie mit dem Holzspalten fertig sind.
Entlüftungsschraube
Abb. 8
lösen
festziehen
Holz spalten:
¾Legen Sie die Stämme immer länglich und flach auf den Hauptrahmen des Spalters. Der Stamm muss von den Stammführungsblechen umschlossen sein. Abb. 9
Abb. 9
¾Den Stamm niemals schräg auf den Hauptrahmen legen. Abb. 10
7

Abb. 10 |
Beachten Sie folgendes, um die Funktionsfähigkeit des |
|
Brennholzspalters zu erhalten: |
|
Reinigen Sie die Maschine nach Arbeitsende gründ- |
|
lich. |
|
Entfernen Sie Harzrückstände. |
|
Ölen Sie die Kolbenstange (Abb. 1/ 3) regelmäßig mit |
|
einem umweltfreundlichen Sprühöl ein. |
|
Ölstand prüfen bzw. Öl auswechseln |
Spaltkeil schärfen
Nach langer Betriebsdauer oder bei verminderter Spaltleistung, den Spaltkeil mit einer feinen Feile schärfen (Grate entfernen). Abb. 11
¾Immer darauf achten, dass der Spaltkeil und der Stammschieber die Stammenden senkrecht erfassen kann.
¾Niemals zwei Stämme in einem Arbeitsgang spalten.
¾Niemals Holz während des Arbeitvorganges nachlegen oder ersetzen.
Niemals durch Aufrechterhalten des Schubs über mehrere Sekunden ein Spalten des Stammes erzwingen. Dies kann zu Beschädigungen an der Maschine führen.
Positionieren Sie den Stamm erneut auf dem Hauptrahmen und wiederholen Sie den Spaltvorgang oder legen Sie den Stamm zur Seite.
Wie wird ein festgeklemmter Stamm gelöst?
1.Den Bedienungsgriff und den Bedientaster loslassen, damit der Stammschieber zurückfahren kann.
2.Legen Sie einen dreieckigen Holzkeil unter den Stamm, Stammschieber ausfahren damit dieser den Keil unter den festgeklemmten Stamm drückt.
3.Löst sich der Stamm nicht, den Vorgang mit immer größeren Keilen wiederholen.
 Beim Lösen niemals auf den festgeklemmten Stamm hämmern oder die Hände nahe am Stamm halten.
Bitten Sie keine zweite Person um Unterstützung.
Versuchen Sie nicht den Stamm durch Schlagen mit einem Werkzeug herauszubekommen, denn es kann zum Bruch des Motorblocks kommen.
Arbeitsende:
¾Achten Sie darauf, dass der Stammschieber in seine Ausgangsposition zurückgefahren ist.
¾Ziehen Sie dann den Netzstecker.
¾Schrauben Sie die Entlüftungsschraube wieder fest. Abb. 8
¾Wartungsund Pflege-Hinweise beachten.
Abb. 11
Kante schärfen
Wie überprüfe ich den Ölstand?
1.Der Stammschieber muss in seine Ausgangsposition zurückgefahren sein.
2.Kippen Sie den Holzspalter so, dass die Füllöffnung nach oben zeigt. Abb. 12
 Zum Aufrichten und Festhalten des Holzspalters ist eine zweite Person erforderlich.
3.Schrauben Sie den Ölmessstab heraus – Abb. 13. Achten Sie beim herausnehmen auf die Öldichtung.
4.Säubern Sie den Ölmessstab und die Öldichtung.
5.Stecken Sie den Messstab bis zum Anschlag wieder in die Öffnung.
6.Ziehen Sie den Ölmessstab wieder heraus.
Liegt der Ölpegel zwischen den beiden Markierungen, ist genug Öl im Behälter.
Liegt der Ölpegel unterhalb der unteren Markierung muss Öl mit Hilfe eines sauberen Trichters nachgefüllt werden.
untere Markierung |
obere Markierung |
Wartung und Pflege
|
|
|
Vor Wartungsund Reinigungsarbeiten Netz- |
|
|
|
|
stecker ziehen. |
8. Überprüfen Sie die Öldichtung. Diese muss bei Beschädi- |
|
|
|
|
gungen ausgetauscht werden. |
|
|
Schutzhandschuhe tragen, um Verletzungen an den |
||
|
|
|
||
Händen zu vermeiden. |
|
|||
8

Öldichtung
9.Schrauben Sie den Ölmessstab wieder fest.
Achtung! Um Beschädigungen an der Öldichtung und im Gewinde des Zylinderdeckels zu vermeiden, die Schraube nicht zu fest anziehen.
Abb. 12
Abb. 13
Ölmessstab
6.Füllen Sie das neue Hydrauliköl (2,7 bzw. 3,2 Liter) mit Hilfe eines sauberen Trichters ein.
7.Säubern Sie den Ölmessstab und die Öldichtung.
8.Überprüfen Sie die Öldichtung. Diese muss bei Beschädigungen ausgetauscht werden.
9.Schrauben Sie den Ölmessstab wieder fest.
Achtung! Um Beschädigungen an der Öldichtung und im Gewinde des Zylinderdeckels zu vermeiden, die Schraube nicht zu fest anziehen.
Entsorgen Sie das Altöl ordnungsgemäß (Altölsammelstelle vor Ort). Es ist verboten das Altöl in den Boden abzulassen oder mit Abfall zu vermischen.
Hydrauliköl
Für den Hydraulikzylinder empfehlen wir die folgenden Hydrauliköle:
¾Shell Tellus T 22
¾Aral Vitam Gf 22
¾BP Energol HLP 22 Î Bestell-Nr. 400142 (1 Liter)
¾Mobil DTE 11
¾oder gleichwertiges
Keine anderen Ölsorten verwenden. Der Gebrauch von anderen Ölsorten beeinflusst die Funktion des Hydraulikzylinders.
Garantie
Bitte beachten Sie die beiliegende Garantieerklärung.
Wann wechsle ich das Öl aus?
Erster Ölwechsel nach 50 Betriebsstunden, dann alle 250 Betriebsstunden.
Auswechseln:
1.Der Stammschieber muss in seine Ausgangsposition zurückgefahren sein.
2.Stellen Sie einen Behälter, der mindestens 4 Liter Öl aufnehmen kann, unter den Holzspalter.
3.Schrauben Sie den Ölmessstab heraus. Achten Sie beim Herausnehmen auf die Öldichtung.
4.Kippen Sie dann die Maschine, um das Öl in den Behälter zu entleeren.
5.Kippen Sie dann den Holzspalter so, dass die Einfüllöffnung nach oben zeigt – Abb. 12.
 Zum Aufrichten und Festhalten des Holzspalters ist eine zweite Person erforderlich.
9
Mögliche Störungen
Problem |
mögliche Ursache |
Beseitigung |
Stamm wird nicht gespalten |
Stamm ist nicht richtig positioniert |
positionieren Sie den Stamm erneut |
(zu wenig Spaltleistung) |
Stamm überschreitet die zulässigen Ab- |
Stamm auf zulässige Abmessungen |
|
messungen oder das Holz ist für die Leis- |
schneiden |
|
tung der Maschine zu hart |
|
|
Spaltkeil spaltet nicht |
Spaltkeil schärfen, auf Grat oder Kerben |
|
|
prüfen |
|
Öl-Leck |
Legen Sie ein Stück Karton unter den |
|
|
Holzspalter, um das Leck zu finden. Zur |
|
|
Problembehebung wenden Sie sich an |
|
|
den Hersteller. |
|
Hydraulikdruck zu niedrig |
Ölstand überprüfen; wenn nötig Öl nach- |
|
|
füllen. |
|
|
Problem ist nicht zu beheben, bitte wen- |
|
|
den Sie sich an den Hersteller. |
|
falsche Anschlussleitung (länger als 10 m |
richtige Anschlussleitung verwenden |
|
oder zu kleiner Aderquerschnitt) |
Entlüftungsschraube öffnen |
Stammschieber fährt schwankend |
Luft im Kreislauf |
|
oder mit starken Vibrationen aus |
|
Ölstand überprüfen; wenn nötig Öl nach- |
|
|
füllen. |
|
|
Problem ist nicht zu beheben, bitte wen- |
|
|
den Sie sich an den Hersteller. |
Stammschieber fährt nicht aus |
Hydraulikpumpe defekt |
Zur Problembehebung wenden Sie sich |
|
|
an den Hersteller. |
Motor läuft nicht an |
Netzspannung fehlt |
Absicherung überprüfen (16 A) |
|
Anschlusskabel defekt |
Anschlusskabel austauschen bzw. von |
|
|
einem Elektrofachmann überprüfen las- |
|
|
sen |
|
Elektromotor defekt |
Zur Problembehebung wenden Sie sich |
|
|
an den Hersteller. |
Öl-Leck am Ölmessstab |
Öldichtung am Ölmessstab undicht |
Öldichtung auswechseln |
Technische Daten
Modell |
ASP 4-370 |
ASP 5-520 |
|
|
|
|
ASP 5-520 |
Typ-Bezeichnung |
ASP 4 |
||
|
|
|
50 kN (5 t) ± 10 % |
Spaltkraft |
40 kN (4 t) ± 10 % |
||
|
|
|
520 |
Holzlänge |
370 mm |
||
Holzdurchmesser |
50 – 250 mm |
||
|
|
|
392 mm |
Spalthub |
302 mm |
||
|
|
mm |
|
Durchmesser Kolbenstange |
30 |
||
|
|
|
3,2 Liter |
Hydrauliköl (max.) |
2,7 Liter |
||
|
|
W |
( S3 ) |
Elektromotorleistung |
P = 1500 |
||
|
230 V ~ 50 Hz |
||
Anschluss |
|||
|
2850 min -1 |
||
Drehzahl |
|||
|
|
|
Länge 940 x Breite 260 x Höhe 455 mm |
Abmessungen |
Länge 770 x Breite 260 x Höhe 455 mm |
||
|
|
|
44 kg |
Gewicht |
36 kg |
||
10

Do not operate machine before having read the operating instructions, understood all the notes and assembly the machine as described here.
Keep the instructions in a safe place for future use.
Contents
Extent of delivery |
1 |
Symbols machine / operating manual |
11 |
Proper use |
11 |
Residual risks |
12 |
Safe working |
12 |
Description of device |
13 |
Positioning |
13 |
Start-up |
14 |
Working with the log splitter |
14 |
Maintenance and care |
16 |
Guarantee |
17 |
Possible problems |
18 |
Technical data |
18 |
Declaration of Conformity |
77 |
Spare parts |
79 |
Symbols machine
Read the operating and safety instructions thoroughly before commissioning the machine.
Wear safety shoes when working with the machine to protect the feet from falling logs.
Wear safety gloves when working with the machine to protect the hands from chips and splinters.
Wear safety goggles when working with the machine to protect the eyes from chips and splinters.
Do not remove or modify any protection or safety devices.
Caution!
Always note when the log ram is in motion.
Caution!
Never remove a log jammed against the wedge by hand.
Caution!
Before starting any repair, maintenance or cleaning work, always switch off the motor and remove the plug from the socket.
Stop!
Follow the operating instructions.
Open the bleed screw
Î Bleeding Page 15
Symbol machine / packaging
Electrical devices do not go into the domestic rubbish. Give devices, accessories and packaging to an ecofriendly recycling.
Proper use
The log splitter must only be used for splitting logs.
The log splitter is only applicable for the private utilization in the field of house and hobby.
Only straight-cut logs are suitable for use with the log splitter.
Metal parts (nails, wire etc.) must be removed from logs before splitting.
Every other form of use is considered improper use. The manufacturer accepts no liability for any damages resulting from improper use, and any risk is in this case borne solely by the user.
Residual risks
Nobody else should be in the working area of the machine other than the operator. Keep other persons or animals out of the danger area (minimum distance 5 m).
Danger of being cut or trapped; never touch any dangerous parts when the splitting wedge is in motion.
 Even if used properly, residual risks can exist even if the relevant safety regulations are complied with due to the design determined by the intended purpose.
Residual risks can be minimised if the “Safety information” and the “Intended usage” as well as the whole of the operating instructions are observed.
Observing these instructions, and taking proper care, will reduce the risk of personal injury or damage to the equipment.
11

Failure to observe the safety precautions can lead to injury |
|
Only operate the machine with complete and correctly |
|||||||||||
|
|
to the operator or damage to property. |
|
|
attached safety equipment and do not alter anything on |
||||||||
|
Risk from electricity, by using non-standard electrical |
|
|
the machine that could impair the safety. |
|||||||||
|
|
connections. |
|
Faulty or damaged parts in the device must be replaced |
|||||||||
Touching live parts of opened electrical components. |
|
|
immediately. |
||||||||||
Risk of fire and slipping by leaking hydraulic fluid. |
Do not spray machine with water |
||||||||||||
|
|
(this is hazardous due to live components). |
|||||||||||
|
|
|
|
|
|
|
|||||||
In addition, in spite of all the precautionary measures taken, |
|
Do not leave the machine standing in the rain or use |
|||||||||||
non-obvious residual risks can still exist. |
|
|
when raining. |
||||||||||
|
|
|
|
|
Store the unused machine in a dry locked place away |
||||||||
|
|
|
|
|
|
|
from the reach of children. |
||||||
|
|
|
|
Safe working |
|
Switch the machine off and remove the mains plug from |
|||||||
|
|
|
|
|
|
|
the socket when |
|
|
||||
|
|
|
|
Before commissioning this product, read and keep |
|
|
− carrying out repair works |
|
|
||||
|
|
|
|
|
|
||||||||
|
|
|
|
|
|
− carrying out servicing and repair works, |
|
|
|||||
|
|
|
|
|
|
||||||||
to the following advice. Also observe the preventive |
|
|
|
|
|
removal of faults |
|
|
|||||
regulations of your professional association and the |
|
|
− |
Transporting |
|
|
|||||||
|
|
|
|||||||||||
safety provisions applicable in the respective country, in |
|
|
− leaving unattended (even during short interruptions) |
||||||||||
order to protect yourself and others from possible injury. |
|
|
|||||||||||
|
Check the machine for possible damage |
||||||||||||
|
|
|
|
Pass the safety instructions on to all persons who |
|
|
− |
Before continuing to use the machine, the protective |
|||||
|
|
|
|
|
|
|
|
|
devices must be inspected to ensure that they work |
||||
|
|
|
|
work with the machine. |
|
|
|
|
|
||||
|
|
|
|
|
|
|
|
|
perfectly and with their intended function |
||||
|
|
|
|
Keep these safety instructions in a safe place. |
|
|
|
|
|
||||
|
|
|
|
|
|
− Check whether the parts are damaged. All parts must |
|||||||
|
|
|
|
|
|
|
|
|
|
be correctly installed and fulfil all conditions to ensure |
|||
Make yourself familiar with the equipment before using it, |
|
|
|
|
|
perfect operation of the saw |
|||||||
|
|
by reading and understanding the operating instructions. |
|
|
− Damaged guards and parts must be properly repaired |
||||||||
|
Do not use the machine for unsuitable purposes (see |
|
|
|
|
|
or exchanged by a recognized, specialist workshop; |
||||||
|
|
“Normal intended use” and “Working with the log splitter”). |
|
|
|
|
|
insofar as nothing else is stated in the instructions for |
|||||
Ensure that you have stand in a secure standing position |
|
|
|
|
|
use. |
|||||||
|
|
and maintain your balance at all times. |
|
|
− Damaged or illegible safety warning labels should be |
||||||||
Take a working position, which is behind the slide of the |
|
|
|
|
|
replaced immediately. |
|||||||
|
|
area of the operating lever. Never stand in the splitting |
|
|
|
|
|
|
|
|
|||
|
|
wedge’s zone. |
|
|
|
|
|
Electrical safety |
|||||
Never stand on top of the machine. |
|
|
|
|
|
||||||||
|
Electrical connections must conform to IEC 60245 (H 07 |
||||||||||||
Pay attention at all times. Take care with what you are |
|||||||||||||
|
|
doing, and approach the work sensibly. Do not use the |
|
|
RN-F) with a cable cross-section of at least |
||||||||
|
|
machine: |
|
|
2.5 mm² for a maximum cable length of up to 10 m |
||||||||
|
|
− when you are tired. |
|
Never use the machine with a power supply cable of over |
|||||||||
|
|
− |
under the influence of drugs, alcohol or medications |
|
|
10 m in length. Longer power supply cables will cause a |
|||||||
|
|
|
|
drop in voltage. The motor will not be able to provide its |
|||||||||
|
|
|
|
that may impair your powers of judgement. |
|
|
|||||||
|
|
|
|
|
|
maximum performance and the operation of the machine |
|||||||
When working with the machine, always wear |
|
|
|||||||||||
|
|
will be impaired. |
|||||||||||
|
|
− protective goggles or face mask |
|
|
|||||||||
|
|
|
When laying the connecting attachments, be sure that |
||||||||||
|
|
− |
safety gloves |
||||||||||
|
|
|
|
they do get crushed or bent, and that the plug-and-socket |
|||||||||
|
|
− ear protection, if necessary |
|
|
|||||||||
|
|
|
|
connection does not get wet. |
|||||||||
|
|
− safety shoes with steel toe-caps |
|
|
|||||||||
|
|
|
Do not use the cable for purposes for which it is not meant. |
||||||||||
Wear suitable work clothing: |
|||||||||||||
|
|
Protect the cable against heat, oil and sharp edges. Do |
|||||||||||
|
|
− do not wear any loose-fitting clothing or jewellery, since |
|
|
|||||||||
|
|
|
|
not use the cable to pull the plug from the socket. |
|||||||||
|
|
|
|
these may be caught or trapped by moving parts |
|
|
|||||||
|
|
|
|
|
Regularly check the extension cables and replace them if |
||||||||
|
Within his area of work the operator is responsible for |
||||||||||||
|
|
they are damaged. |
|||||||||||
|
|
third parties. |
|
|
|||||||||
|
|
|
Do not use any defective connection cables. |
||||||||||
The machine may not be operated by children or young |
|||||||||||||
|
When working outdoors, only use extension cables |
||||||||||||
|
|
people under the age of 18. |
|||||||||||
|
|
|
|
especially approved and appropriately labelled for outdoor |
|||||||||
Keep children away form machine. |
|
|
|||||||||||
|
|
use. |
|||||||||||
Never operate the machine if other persons are in the |
|
|
|||||||||||
|
Do not set up any provisional electrical connections. |
||||||||||||
|
|
immediate vicinity. |
|||||||||||
|
|
|
Never bypass protective devices or deactivate them. |
||||||||||
Never leave the saw unattended. |
|||||||||||||
|
|
|
|
|
The electrical connection or repairs to electrical parts |
||||||||
Keep your workplace in an orderly condition! Untidiness |
|
|
|
|
|
||||||||
|
|
|
|
|
|||||||||
|
|
can result in accidents. |
|
|
|
|
|
of the machine must be carried out by a certified |
|||||
Do not overload the machine! You work better and safer in |
|
|
|
|
|
electrician or one of our customer service points. Local |
|||||||
the given performance range.
12

regulations – especially regarding protective measures – must be observed.
Repairs to other parts of the machine must be carried out by the manufacturer or one of his customer service points.
 Use only original spare parts, accessories and special accessory parts. Accidents can arise for the user through the use of other spare parts. The manufacturer is not liable for any damage or injury resulting from such action.
Description of device
Fig. 1
Fig. 2
Fig. 3
Fig. 4
A |
Log ram |
F |
Electric motor |
B |
Bleed screw |
G |
Operating pushbutton |
C |
Piston rod |
H |
Splitting wedge |
D |
Dipstick |
I |
Log guide plates |
E |
Cylinder cover |
J |
Operating lever |
Positioning
Position the log splitter on a work surface at a height of about 60 – 75 cm, this will create an comfortable working position.
Place chocks under the wheels to prevent the machine rolling during operation.
Ensure that the working area meets the following conditions:
−no danger of slipping
−level
−free of obstacles
−sufficiently well lit
Do not operate the machine in the direct vicinity of gas or petrol pipes or containers, or any other easily inflammable materials.
13

Start-up
Check that the machine is completely and correctly assembled.
Before using the shredder, make sure each time that
−there are no faulty connections (tears, cuts, etc.)
−there are no damage at the machine
−all screws are tight
−check the hydraulic system for any possible leaks
Mains connection
Compare the voltage given on the machine model plate e.g. 230 V with the mains voltage and connect the machine to the relevant and properly earthed plug.
Only use connection cables with sufficient diameters.
Connect the machine via a 30 mA fault current safety switch.
Fuse protection: 16 A
Operating pushbutton
Fig. 5
Operating pushbutton
 Switching on
Push the green button. The motor is running as long as the green button remains pushed.
Working with the log splitter
 additional SAFETY INSTRUCTIONS
The log splitter may only be operated by a single person.
The machine may only be operated by persons over the age of 18 years, and who have read and understood these operating instructions.
Wear protective equipment (safety goggles/mask, gloves, safety shoes) to protect yourself from possible injury.
Never try to split logs containing nails, wire or other similar objects.
Already split wood and wood chips create a dangerous working area. The operator may stumble, slip or fall. Always keep the working area neat and tidy.
Never place the hands on or near any moving parts of the machine when it is switched on. Maintain a safe distance from the log, the ram and the wedge in order to protect your hands from injury.
Split only timber which corresponds to the maximal length to be worked with.
What type of logs can I split?
Size of logs
|
ASP 4-370 |
|
ASP 5-520 |
Length |
max. 370 mm |
|
max. 520 mm |
Diameter |
|
50 – 250 mm |
|
The log diameter is a recommended guideline figure, because:
−thin logs can be difficult to split if they contain knots or if the fibres are too strong.
−logs with a diameter of over 250 mm can be split if the fibres are smooth and open.
Do not try to split green logs. Dry logs are much easier to split, and do not cause jams as often as green (damp) wood.
 Switching off
Stop pushing the green button.
 Do not use any device where the operating pushbutton does not work properly. Repair or replace damaged pushbuttons immediately.
Hydraulics
Never operate the machine in the event of any possible danger from hydraulic fluid.
Ensure that the machine and working area are clean and free of oil.
Danger of slippage or fire!
Check the hydraulic reservoir regularly to ensure that it contains enough hydraulic oil (see “Care and maintenance”)
Operation
Two-hand operation
1.Press the operating pushbutton on the electric motor. Wait a few moments until the motor has reached its operating revolutions and the required pressure has been built up in
the hydraulic pump – Fig. 5.
2. Press the operating lever down simultaneously – Fig. 6. Î The log ram pushes the log against the splitting wedge, and the log will be split.
3.Release the operating lever as well as the operating pushbutton. The log ram will now return to its original starting position – Fig. 7.
Capacity: |
2.7 litres |
ASP 4-370 |
|
3,2 litres |
ASP 5-52 |
14

Fig. 6
Fig. 7
Special instructions for splitting logs:
Preparations:
The logs to be split should be cut to the maximum dimensions (370 or 520 mm long, 50 – 250 mm). Ensure also that the logs are cut straight and square.
Place the log properly on the log splitter, so as not to cause any risk of stumbling or falling to the operator.
Bleeding
Open the bleed screw 3 – 4 complete turns – Fig. 8.
Close the bleed screw again when you are finished splitting logs.
Bleed screw
Fig. 8
open
tighten
Splitting logs:
¾Always place the logs lengthwise and flat on the main frame of the log splitter. The log must be enclosed by the log guide plates. Fig. 9
Fig. 9
¾ Never place the log on the frame at an angle. Fig. 10
Fig. 10
¾Always ensure that the splitting wedge and the log ram contact the ends of the log at right-angles.
¾Never try to split two logs at once.
¾Never try to remove or replace the log during the splitting process.
15

Never try to force the splitting of the log by maintaining the pressure for several seconds. This can lead to damage to the machine.
Reposition the log on the main frame and repeat the splitting process, or put the log to one side.
How to release a jammed log?
1.Loose the operating lever as well as the operating pushbutton that the log ram can go back.
1.Place a triangular wooden chock under the log, then move the log ram forward so that it pushes the chock under the jammed log.
2.If the log is not released, keep repeating this procedure, using larger chocks, until the log is released.
 Never use a hammer to release a jammed log, and keep your hands away from the log.
Do not enlist the aid of a second person - this is a one-man job.
Do not try to release the log by using a hammer, since this may break the motor block.
Finishing work:
Attend to that the log ram has gone back to its basic position.
Then remove the plug from the power socket.
Close the bleed screw. Fig. 5
Follow the care and maintenance instructions.
Care and maintenance
Remove the plug from the power socket before starting any maintenance or cleaning work.
 Wear protective gloves in order to avoid injury to the hands.
Observe the following in order to keep the log splitter in good working order:
Clean the machine thoroughly after you have finished using it.
Remove any resin remains on the machine.
Oil the piston rod (Fig. 1 / 3) regularly with an environmentally friendly spray oil.
Check the oil level and change the oil as necessary.
Sharpening the splitting wedge
After extended periods of use, or if the splitting performance is reduced, sharpen the splitting wedge with a file (and remove any burrs). Fig. 11
Fig. 11
Sharpen wedge
How do I check the oil level?
1.The log ram must be in its starting position.
2.Stand the log splitter on end, with the filler opening at the top. Fig 12
 A second person will be required to up-end and hold the log splitter.
3.Unscrew the dipstick – Fig. 13. Do not drop or lose the oil seal when removing the dipstick.
4.Clean the dipstick and the oil seal.
5.Replace the dipstick fully into the oil reservoir.
6.Now remove the dipstick again, and read off the oil level.
If the oil level is between the two marking on the dipstick, there is sufficient oil in the reservoir.
If the oil level is below the lower marking, more oil should be added with the aid of a clean funnel.
lower marking |
upper marking |
7.Check the oil seal and replace it if it is damaged in any way.
Oil seal
8.Replace the dipstick and screw it firmly into place. Caution! Do not tighten the screw too tightly, since this may damage the oil seal or the thread in the cylinder cover.
Fig. 12
16

Fig. 13
Dipstick
When should I change the oil?
The first oil change should be carried out after 50 operating hours, and then every 250 operating hours.
Changing the oil:
1.The log ram must be in its starting position.
2.Place a container under the log splitter to catch the old oil. The container should have a capacity of at least 4 litres.
3.Unscrew the dipstick. Do not drop or lose the oil seal when removing the dipstick.
4.Now tip the machine to empty the oil into the container.
5.Stand the log splitter on end, with the filler opening at the top. Fig 12.
 A second person will be required to up-end and hold the log splitter.
6.Pour in the new hydraulic oil (2.7 or 3.2 litres) using a clean funnel.
7.Clean the dipstick and the oil seal.
8.Check the oil seal and replace it if it is damaged in any way.
9.Replace the dipstick and screw it firmly into place. Caution! Do not tighten the screw too tightly, since this may damage the oil seal or the thread in the cylinder cover.
Dispose of the old oil properly (local oil disposal point). The old oil must not be poured into the ground or drainage system, or mixed with other waste.
Hydraulic oil
We recommend the following hydraulic oils for the hydraulic cylinder:
¾Shell Tellus T 22
¾Aral Vitam Gf 22
¾BP Energol HLP 22 Î order no. 400142 (1 litre)
¾Mobil DTE 11
¾or equivalent
Do not use any other types of oil. The use of any other type of oil will adversely affect the operation of the hydraulic cylinder.
Guarantee
Please observe the enclosed terms of guarantee.
17

Possible problems
Problem |
possible cause |
|
remedy |
|
Logs are not being split properly |
The log is not positioned correctly |
Reposition the log correctly |
||
(insufficient splitting performance) |
The |
log exceeds |
the maximum |
Cut the log to the required dimensions |
|
dimensions or the wood is too hard for |
|
||
|
the performance of the machine |
|
||
|
The |
splitting wedge |
is not working |
Sharpen the splitting wedge, and check |
|
properly |
|
for any burrs or notches |
|
|
Oil leak |
|
Place a sheet of cardboard under the |
|
|
|
|
|
log splitter in order to locate the leak. |
|
|
|
|
To correct the problem, refer to the |
|
|
|
|
manufacturer. |
|
Hydraulic pressure too low |
Check the oil level and add more oil if |
||
|
|
|
|
necessary. |
|
|
|
|
If the problem cannot be rectified, refer |
|
|
|
|
to the manufacturer. |
|
Incorrect connecting lead (longer than |
Use the correct connecting lead |
||
|
10 m or too small cable cross-section) |
|
||
Log ram travels out jerkily or under heavy |
Air in the circuit |
|
Open the bleed screw |
|
vibration |
|
|
|
Check the oil level and add more oil if |
|
|
|
|
necessary. |
|
|
|
|
If the problem cannot be rectified, refer |
|
|
|
|
to the manufacturer. |
Log ram will not move out |
Hydraulic pump defective |
To correct the problem, refer to the |
||
|
|
|
|
manufacturer. |
Motor will not start |
No electrical power |
|
Check the fuse (16 A). |
|
|
Connection cable defective |
Replace the connection cable or have |
||
|
|
|
|
it checked by an electrician. |
|
Electric motor defective |
To correct the problem, refer to the |
||
|
|
|
|
manufacturer. |
Oil leak at the dipstick |
Oil seal at the dipstick not sealing |
Replace the oil seal. |
||
Technical data
Model |
ASP 4-370 |
ASP 5-520 |
Name |
ASP 4 |
ASP 5-520 |
Splitting force |
40 kN (4 t) ± 10 % |
50 kN (5 t) ± 10 % |
Log length |
370 mm |
520 mm |
Log diameter |
50 – 250 mm |
|
Stroke |
302 mm |
392 |
Piston rod diameter |
30 mm |
|
Hydraulic oil (max.) |
2.7 litres |
3.2 litres |
Electric motor performance |
P = 1500 W |
( S3 ) |
Power supply |
230 V ~ 50 Hz |
|
Revolutions |
2850 rpm |
|
Dimensions (Length x Width x Height) |
770 x 260 x 455 mm |
940 x 260 x 455 mm |
Weight |
36 kg |
44 kg |
18

Vous ne devez pas mettre la machine en route avant d’avoir lu attentivement ce mode d’emploi, d’avoir observé toutes les informations indiquées et d’avoir monté la machine comme décrit.
Conserver ces notice d’utilisation pour tout utilisateur futur.
Table des matières
Fourniture |
1 |
Symboles utilisés sur cet appareil / Instructions |
19 |
de service |
|
Utilisation dans les règles de l’art |
20 |
Risques résiduels |
20 |
Consignes de sécurité |
20 |
Description de l'équipement |
21 |
Installation |
22 |
Mise en service |
22 |
Travaux avec fendeur de bois à brûler |
23 |
Maintenance et entretien |
24 |
Pannes |
26 |
Caractéristiques techniques |
27 |
Garantie |
27 |
Déclaration de conformité |
77 |
Pièces de rechange |
79 |
Symboles utilisés sur ces appareils
Avant la mise en service, lire et respecter les instructions de service ainsi que les consignes de sécurité.
Durant les travaux, porter des chaussures de sécurité afin de protéger les pieds contre une chute accidentelle des troncs.
Durant les travaux, porter des gants de protection afin de protéger les mains contre les copeaux et les éclats.
Durant les travaux, porter des lunettes ou une visière de protection afin de protéger les yeux contre les copeaux et les éclats.
Il est interdit de démonter ou de modifier les dispositions de protection et de sécurité.
Seul l’utilisateur doit se tenir dans la zone de travail de la machine. Les autres personnes, tout comme les animaux domestiques et de rente, doivent respecter une distance minimale (5 m).
Risque de coupure et d’écrasement ; ne jamais s’approcher des zones dangereuses tant que le coin à refendre est en mouvement.
Attention !
Toujours observer le mouvement du pousse-tronc.
Attention !
Ne jamais retirer à la main les troncs coincés dans le coin.
Attention !
Avant de réaliser les travaux de réparation, de maintenance et d’entretien, arrêter le moteur et retirer la fiche secteur.
Stop!
Respecter les instructions d’utilisation. Dévisser la vis d’évacuation d’air.
Î Purge (cf. page 23)
Symboles utilisés dans ces notices d’utilisation
Danger imminent ou situation dangereuse. L’inobservation de ces indications génère des risques de blessures ou d’endommagements matériels.
Indications importantes pour un emploi conforme à l’usage prévu. L’inobservation de ces indications peut provoquer des défauts de fonctionnement.
Indications pour l’usager. Ces indications sont d’une aide précieuse pour un emploi optimal des différentes fonctions.
Montage, exploitation et maintenance. Ce symbole attire votre attention sur ce que vous devez faire.
Symboles utilisés sur l’appareil / l’emballage
Les appareils électriques ne doivent pas être éliminer via les ordures ménagères. Éliminer les appareils, les accessoires et leur emballage par voie du recyclage écologique.
19
|
|
Utilisation dans les règles de l’art |
|
Ne pas utiliser l’appareil à des fins non appropriées (voir |
|||||||||||||||||||||
|
|
|
|
« Utilisation dans les règles de l’art » et « Travaux avec le |
|||||||||||||||||||||
|
|
|
|
|
|
|
|
|
|
|
|
|
|
||||||||||||
|
Le fendeur de bois à |
brûler convient uniquement pour |
|
feudeur de bois à brûler » ). |
|
|
|
|
|
|
|||||||||||||||
|
Prenez correctement appui sur vos jambes et veillez à |
||||||||||||||||||||||||
|
|
fendre le bois. |
|
|
|
|
|
|
|
|
|||||||||||||||
|
|
|
|
|
|
|
|
|
|
|
votre équilibre à tout moment. |
|
|
|
|
|
|
||||||||
|
La fendeuse |
est destinée |
exclusivement à |
l'utilisation |
|
|
|
|
|
|
|
||||||||||||||
|
Prendre une Position de travail située derrière le poussoir |
||||||||||||||||||||||||
|
|
privée dans les domaines du bricolage et de l'entretien de |
|||||||||||||||||||||||
|
|
|
dans la zone de la manette de commande. Ne jamais |
||||||||||||||||||||||
|
|
la maison. |
|
|
|
|
|
|
|
|
|
||||||||||||||
|
|
|
|
|
|
|
|
|
|
|
rester dans la zone du coin de fendage. |
|
|
|
|
||||||||||
|
Seul le bois découpé convient pour le fendeur de bois à |
|
|
|
|
|
|||||||||||||||||||
|
|
Ne vous tenez jamais sur la machine. |
|
|
|
|
|
||||||||||||||||||
|
|
brûler. |
|
|
|
|
|
|
|
|
|
|
|
|
|
|
|||||||||
|
|
|
|
|
|
|
|
|
|
|
|
Soyez attentif. Soyez conscient de ce que vous faites. |
|||||||||||||
|
Les |
pièces |
métalliques |
(clous, |
fil, |
etc.) |
doivent |
||||||||||||||||||
|
Faites preuve de prudence |
lors |
du |
travail. |
N’utilisez |
||||||||||||||||||||
|
|
impérativement être retirées du bois à fendre. |
|
|
|
|
|||||||||||||||||||
|
|
|
|
|
|
jamais l’appareil : |
|
|
|
|
|
|
|
|
|||||||||||
|
Toute utilisation autre est non conforme. Le constructeur |
|
|
|
|
|
|
|
|
|
|||||||||||||||
|
− lorsque vous êtes fatigué. |
|
|
|
|
|
|
||||||||||||||||||
|
|
décline toute responsabilité pour les dommages en résultat |
|
|
|
|
|
|
|
||||||||||||||||
|
|
|
− |
Sous |
l’influence |
de |
drogues, |
de |
l’alcool |
ou de |
|||||||||||||||
|
|
– le risque incombe alors exclusivement à l’utilisateur. |
|
|
|||||||||||||||||||||
|
|
|
|
|
médicaments pouvant influencer votre jugement. |
||||||||||||||||||||
|
|
|
|
|
|
|
|
|
|
|
|
|
|
|
|||||||||||
|
|
|
|
|
|
|
|
|
|
|
|
|
Lors des travaux, portez |
|
|
|
|
|
|
|
|||||
|
|
|
|
Risques résiduels |
|
|
|
|
|
− des lunettes ou une visière de protection |
|
|
|||||||||||||
|
|
|
|
|
|
|
|
|
|
|
|
|
|
− des gants de travail |
|
|
|
|
|
|
|
||||
|
|
|
|
|
|
|
|
|
|
|
|
|
|
|
|
|
|
|
|
|
|||||
|
|
|
Même un emploi conforme à l’usage prévu et le respect |
|
− une protection de l'ouïe le cas échéant |
|
|
||||||||||||||||||
|
|
|
|
|
|
||||||||||||||||||||
|
|
|
|
− |
des |
chaussures |
de |
sécurité munies de chapeaux |
|||||||||||||||||
|
des consignes de sécurité applicables |
en |
la |
matière |
ne |
|
|||||||||||||||||||
|
|
|
d’acier. |
|
|
|
|
|
|
|
|
||||||||||||||
|
sauraient |
exclure |
tous les |
risques résiduels |
générés |
par |
la |
|
|
|
|
|
|
|
|
|
|
||||||||
|
|
Portez des vêtements de travail appropriés : |
|
|
|||||||||||||||||||||
|
construction et l’emploi de la machine, notamment. |
|
|
|
|
|
|||||||||||||||||||
|
|
|
|
|
− pas de vêtements amples ni bijoux (ils pourraient être |
||||||||||||||||||||
|
|
|
|
|
|
|
|
|
|
|
|
|
|
||||||||||||
|
Les risques résiduels sont minimisés |
en |
respectant |
les |
|
|
happés par les pièces mobiles) |
|
|
|
|
|
|||||||||||||
|
« consignes de sécurité » et un « emploi conforme à l’usage |
|
L’utilisateur est responsable de la machine à l’égard de |
||||||||||||||||||||||
|
prévu » |
comme |
toutes |
les |
indications |
des |
présentes |
|
tiers dans la zone de travail. |
|
|
|
|
|
|
||||||||||
|
instructions de service. |
|
|
|
|
|
|
|
|
Il est interdit aux enfants et aux adolescents de moins de |
|||||||||||||||
|
La prise de conscience et la prudence réduisent les risques de |
|
18 ans d’utiliser la machine. |
|
|
|
|
|
|
||||||||||||||||
|
|
Il convient de s’assurer que des enfants ne soient jamais à |
|||||||||||||||||||||||
|
blessures et d’endommagements. |
|
|
|
|
|
|||||||||||||||||||
|
|
|
|
|
|
|
proximité de l’appareil. |
|
|
|
|
|
|
|
|||||||||||
|
Les mesures de sécurité ignorées ou |
omises peuvent |
|
Ne mettez jamais l’appareil en marche lorsque des |
|||||||||||||||||||||
|
|
occasionner des blessures ou des endommagements. |
|
|
personnes étrangères se trouvent à proximité. |
|
|
||||||||||||||||||
|
Dangers d’électrocution en cas d’utilisation de câbles de |
|
Ne laissez jamais l’a sans surveillance. |
|
|
|
|
||||||||||||||||||
|
|
raccordement non conformes. |
|
|
|
|
|
|
|
Veillez à maintenir la zone de travail en ordre ! Le |
|||||||||||||||
|
Contact avec des pièces sous tension |
de composants |
|
désordre peut être la cause d’accidents. |
|
|
|
|
|||||||||||||||||
|
|
électriques ouverts. |
|
|
|
|
|
|
|
|
Ne surchargez pas la machine ! Elle travaille mieux et avec |
||||||||||||||
|
Tout déversement d'huile hydraulique provoque le risque |
|
une sécurité accrue dans la plage indiquée. |
|
|
||||||||||||||||||||
|
|
de glissement de l'opérateur et d'incendie des chutes de |
|
Veillez au montage complet et correct des équipements |
|||||||||||||||||||||
|
|
bois. |
|
|
|
|
|
|
|
|
|
|
de sécurité pendant l’exploitation et ne modifiez rien sur la |
||||||||||||
|
Il se pourrait donc que des risques résiduels non apparents |
|
machine qui risquerait d’influencer sa sécurité. |
|
|
||||||||||||||||||||
|
|
Ne pas modifier l'appareil ou des parties ou pièces de |
|||||||||||||||||||||||
|
persistent bien que toutes les mesures de protection aient été |
|
l'appareil. |
|
|
|
|
|
|
|
|
||||||||||||||
|
prises. |
|
|
|
|
|
|
|
|
|
|
L’appareil ne doit être arrosé d’eau (source de risque car |
|||||||||||||
|
|
|
|
|
|
|
|
|
|
|
|
|
|
présence de courant électrique). |
|
|
|
|
|
|
|||||
|
|
|
|
|
|
|
|
|
|
|
|
|
|
Ne pas travailler avec l'appareil |
lorsqu'il pleut. |
|
|
||||||||
|
|
|
|
Consignes de sécurité |
|
|
|
|
|
||||||||||||||||
|
|
|
|
|
|
|
|
Conservez les outillages non utilisés dans un endroit sec |
|||||||||||||||||
|
|
|
|
|
|
|
|
|
|
|
|
|
|
et verrouillé et hors de portée de main des enfants. |
|||||||||||
|
|
|
|
|
|
|
|
|
|
|
|
|
|
||||||||||||
|
|
|
Avant toute mise en service de ce produit, lire et |
|
Débranchez la machine et retirez la fiche de la prise au |
||||||||||||||||||||
|
respecter les indications suivantes et les règlements de |
|
secteur en cas de |
|
|
|
|
|
|
|
|
||||||||||||||
|
|
|
|
|
|
|
|
|
|
||||||||||||||||
|
prévention d’accident de l’association préventive des |
|
− |
travaux de réparation |
|
|
|
|
|
|
|
||||||||||||||
|
accidents du travail, particulièrement les règlements de |
|
− travaux de maintenance et de nettoyage |
|
|
|
|||||||||||||||||||
|
sécurité en vigueur dans les pays respectifs afin d’éviter |
|
− |
l’élimination de perturbations |
|
|
|
|
|
|
|||||||||||||||
|
tout risque d’accident possible. |
|
|
|
|
|
|
− |
transport |
|
|
|
|
|
|
|
|
||||||||
|
|
|
|
|
|
|
|
|
|
|
|
|
|
|
|||||||||||
|
|
|
Remettez les consignes de sécurité à toute personne |
|
− et si vous quittez (même s’il ne s’agit que d’une brève |
||||||||||||||||||||
|
|
|
|
|
interruption du travail) |
|
|
|
|
|
|
|
|||||||||||||
|
|
|
devant de travailler avec la machine. |
|
|
|
|
|
Vérifiez la machine afin de découvrir tout |
||||||||||||||||
|
|
|
Conservez ces consignes de sécurité avec soin. |
|
|
|
endommagement éventuel. |
|
|
|
|
|
|
||||||||||||
|
|
|
|
|
|
|
|
|
|
|
|
|
|
− Contrôlez le fonctionnement impeccable et conforme à |
|||||||||||
|
Avant l‘utilisation, familiarisez-vous avec l‘appareil à l‘aide |
|
|
l’usage prévu des équipements de sécurité avec soin |
|||||||||||||||||||||
|
|
des instructions de service. |
|
|
|
|
|
|
|
|
avant de poursuivre l’utilisation de la machine. |
|
|
||||||||||||
|
|
|
|
|
|
|
|
|
|
|
|
|
|
|
|
|
|
|
|
|
|
|
|
|
|
|
|
|
|
|
|
|
|
|
|
|
|
|
20 |
|
|
|
|
|
|
|
|
|
|
|
|
−Vérifiez le fonctionnement correct des pièces mobiles et assurez-vous qu’elles ne sont ni coincées ni partiellement endommagées. Toutes les pièces sont à monter correctement et toutes les conditions requises sont à remplir afin de garantir une exploitation impeccable de l’appareill.
−Les dispositifs de sécurité et les pièces endommagés doivent être réparés ou remplacés convenablement dans un atelier spécialisé reconnu, à moins que d’autres informations ne soient mentionnées dans le mode d’emploi.
−Les autocollants de sécurité endommagés ou illisibles doivent être remplacés.
 Sécurité électrique
Réalisation de la ligne d’alimentation conformément à IEC 60245 (H 07 RN-F) avec une section de conducteur minimale de 2,5 mm² avec une longueur maximale de 10 m.
Ne jamais employer de lignes d’alimentation de plus de 10 m de long. Les lignes d’alimentation plus longues occasionnent une chute de tension. Le moteur n’atteint plus sa puissance, le fonctionnement de la machine est restreint.
Lors de la pose de la ligne de raccordement, veiller à ce qu'elle ne soit ni coincée, ni compressée, ni pliée et à ce que le connecteur ne soit pas soumis à l'humidité ou tombe dans un liquide quelconque.
N’employez pas le câble à des fins pour lesquelles il n’est pas prévu. Protégez le câble contre la chaleur, l’huile et les arêtes vives. Ne tirez pas sur le câble pour retirer la fiche de la prise au secteur.
Vérifiez le câble de rallonge à intervalles réguliers et remplacez-le dès que vous constatez un endommagement.
Ne vous servez jamais de lignes de raccordement défectueuses.
Servez-vous exclusivement de câbles de rallonge spéciaux et homologués pour l’extérieur le cas échéant.
Ne vous servez jamais de raccordements électriques provisoires.
Ne pontez jamais les équipements de sécurité et ne les mettez jamais hors service.
Tout raccordement électrique, voire des réparations sur des parties électriques de la machine doivent être effectuées par des personnes compétentes ou remises à l’un de nos services après-vente. Les règlements locaux, particulière-ment en ce qui concerne les mesures de protection sont à respecter.
Toutes réparations des différentes pièces de la machine sont à effectuer par le fabricant, ou l’un de ses services après-vente.
 N’utiliser que des pièces détachées d’origine ou des pièces d’accessoires spéciales. L’utilisation d’autres pièces détachées et d’autres accessoires pourraient entraîner un risque d’accident pour l’utilisateur, le fabricant dégageant toute responsabilité pour tout dommage encouru.
Description de l'équipement
Illustration 1
Illustration 2
Illustration 3
21
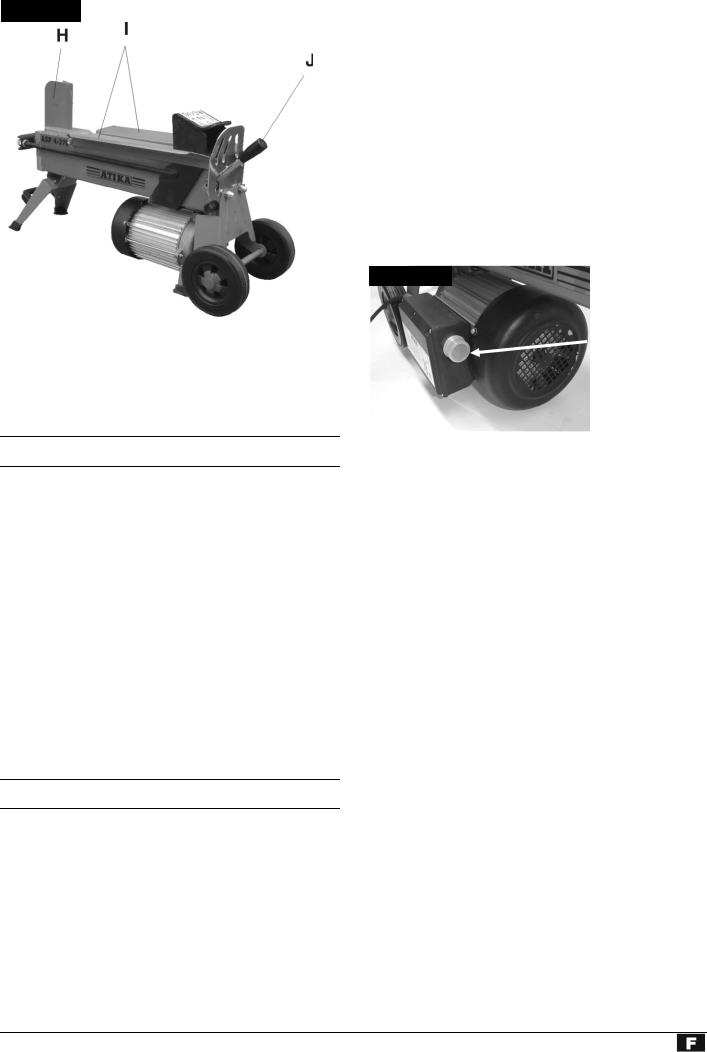
Illustration 4
A |
Pousse-tronc |
F |
Moteur électrique |
B |
Vis d’évacuation d’air |
G |
Touches de commande |
C |
Tige de piston |
H |
Coin à refendre |
D |
Jauge d’huile |
I |
Guides-tronc en tôle |
E |
Culasse de cylindre |
J |
Manette de commande |
Branchement au secteur
Comparez la tension de votre secteur, p. ex. 230 V, avec la tension indiquée sur la plaque signalétique de la machine et raccordez la machine à une prise mise à la terre appropriée et conforme aux prescriptions.
Utilisez un câble de rallonge de section sufficante.
Raccordez la machine au moyen d’un commutateur de sécurité (interrupteur m de protection contre les courants de court-circuit) 30 mA.
Fuse: 16 A
Touches de commande
Illustration 5
Touches de commande
Installation
Installez le fendeur de bois à brûler sur un plan de travail de 60 à 75 cm de haut; cela vous oblige à travailler confortablement.
Bloquez les roues au moyen de cales afin d’éviter tout déplacement durant l’exploitation.
Veillez à ce que la zone de travail remplisse les conditions suivantes :
−antidérapante
−plane
−exempte de risques de trébuchement
−éclairage suffisant.
Il est interdit d’exploiter la machine à proximité de gaz naturel, de conduits d’essence ou d’autres matériaux très inflammables.
Mise en service
Assurez-vous que l'appareil est intégralement monté et conformément aux réglementations.
Avant toute utilisation, veuillez vérifier
−que les lignes de raccordement ne présentent pas de défectuosités (fissures, sou pures ou semblables).
−l‘appareil quant aux éventuels endommagements
−que toutes les vis sont serrées à fond
−l’absence de fuites sur le système hydraulique.
 Mise en service
Actionner le bouton vert. Le moteur tourne tant que la touche est maintenue appuyée.
 Arrêt
Arrêt
Relâcher le bouton vert.
 Ne jamais utiliser un appareil dont la touche de commande ne fonctionne pas correctement. Faire réparer ou remplacer immédiatement les touches de commande endommagées.
Système hydraulique
Ne jamais exploiter la machine lorsque le liquide hydraulique présente un risque.
Assurez-vous que la machine et la zone de travail sont propres et exemptes de tâches d’huiles.
Risque de glissement et d’incendie !
Contrôlez régulièrement si le réservoir contient suffisamment d’huile hydraulique (cf. entretien et maintenance)
Contenance : 2,7 litres |
ASP 4-370 |
3,2 litres |
ASP 5-520 |
22
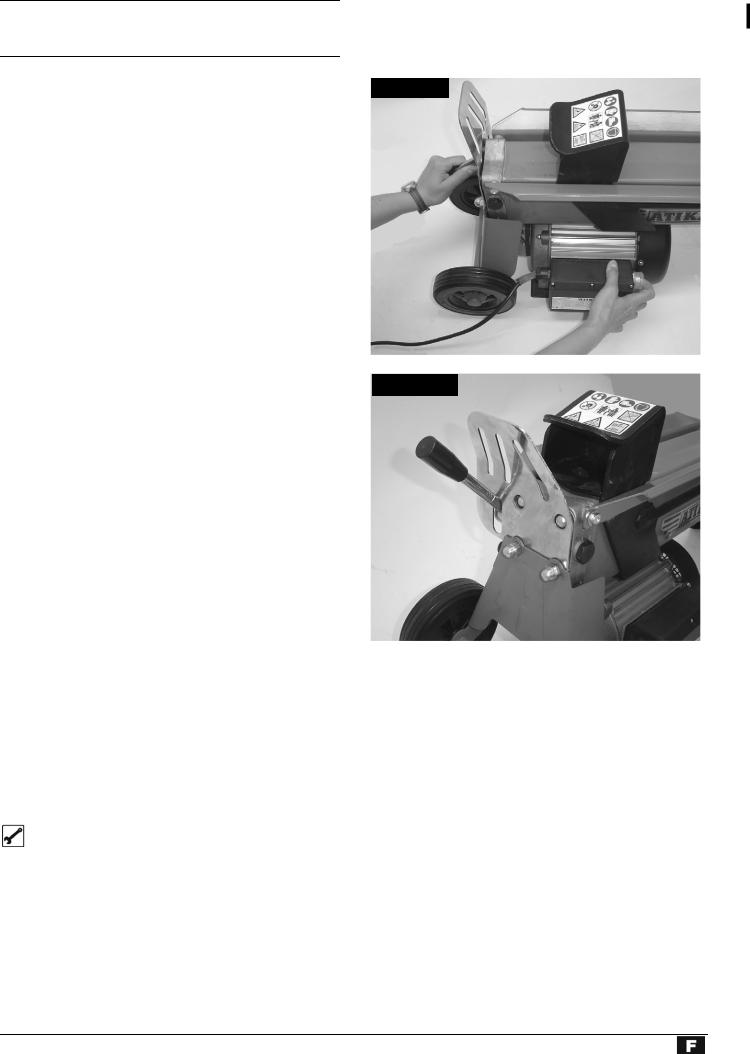
Travailler avec le fendeur de bois à brûler
 CONSIGNES DE SECURITE complémentaires
Le fendeur de bois à brûler doit uniquement être utilisé par une seule personne à la fois.
Seules les personnes de plus de 18 ans ayant lu et compris les instructions de service peuvent utiliser la machine.
Portez votre équipement de protection personnelle (lunettes/visière de protection, gants, chaussures de protection) afin de vous protéger contre d’éventuelles blessures.
Ne jamais fendre de troncs contenant des clous, du fil ou d’autres objets.
Le bois fendu et les copeaux de bois rendent la zone de travail dangereuse. Risque de trébuchement, glissement et de chute. Veillez à ce que la zone de travail reste ordonnée.
Ne jamais placer les mains sur les pièces mobiles de la machine lorsque que cette dernière est en marche. Veillez à respecter une distance de sécurité avec le tronc, le poussoir et le coin à refendre afin de protéger vos mains contre les blessures.
Ne fendre que des morceaux de bois dont la longueur est inférieure ou égale à la longueur max. à traiter.
Que puis-je fendre?
Dimensions des troncs à fendre
|
ASP 4-370 |
|
ASP 5-520 |
Longueur : |
370 mm maxi |
|
520 mm maxi |
Diamètre : |
|
50 – 250 mm |
|
Le diamètre est la valeur recommandée fournie à titre indicatif car :
−le bois de faible épaisseur se laisse difficilement fendre car il contient des trous provenant de nœuds ou les fibres sont trop épaisses.
−le bois d’épaisseur supérieure à 250 mm peut être fendu lorsque les fibre sont lisses et lâches.
Ne fendez pas de troncs verts. Les troncs secs entreposés se fendent beaucoup plus facilement et n’occasionnent pas de grippage aussi souvent que le bois vert (mouillé).
3.Relâchez le levier de commande et la touches de commande, le pousse-troncs revient en position initiale (illustration 7).
Illustration 6
Illustration 7
Instructions particulières pour la fente :
Conditionnement :
Conditionnez le bois à fendre aux dimensions maximales (370 ou 520 mm de long, 50 à 250 mm) et veillez à ce que le bois soit découpé en ligne droite.
Positionnez le bois sur le fendeur de manière à ne pas vous mettre en danger (risque de trébuchement).
Utilisation
Exploitation à deux mains
1.Appuyez sur le touches de commande du moteur électrique. Attendez quelques secondes jusqu’à ce que le moteur atteigne sa vitesse finale et que la pression soit générée dans la pompe hydraulique (illustration 5).
2.Abaissez simultanément la manette de commande (illustration 6).
Î Le pousse-troncs pousse le tronc contre le coin à refendre. Le tronc est fendu.
Purge
Dévissez la vis d’évacuation d’air de 3 à 4 tours (illustration 8). Resserrez seulement la vis après avoir achevé la fente du bois.
23
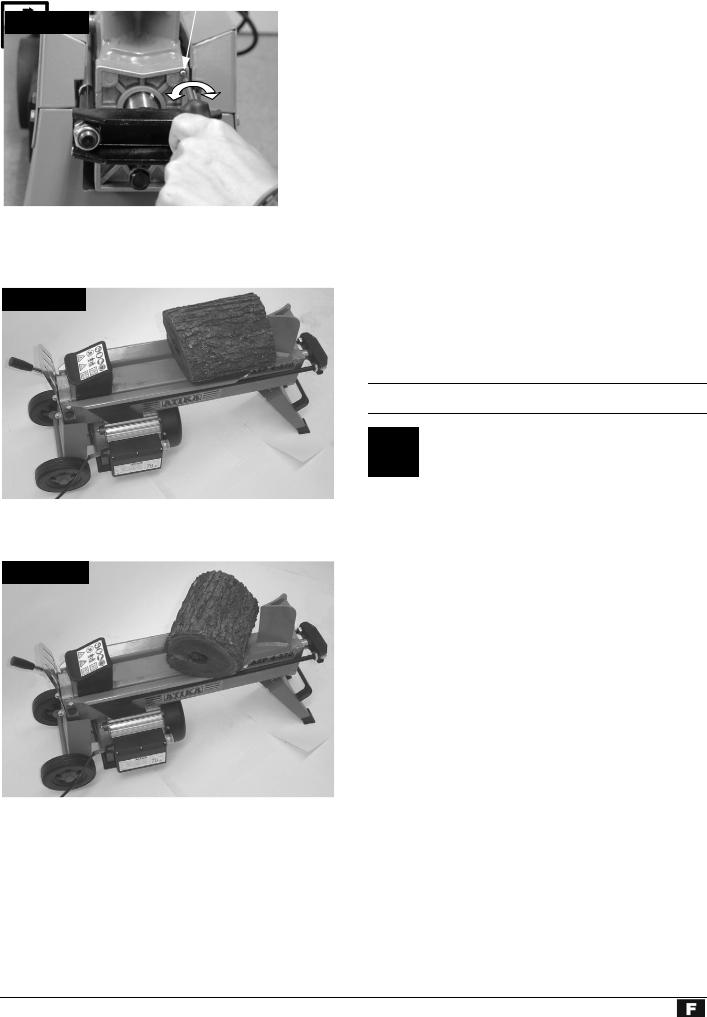
Serrer à fond la
Illustration 8
dévisser
vis d’évacuation d’air
Fente du bois:
¾Positionnez toujours les troncs dans le sens de la longueur et à plat sur le châssis principal du fendeur. Le tronc doit être entouré par les guides-troncs (illustration 9).
Illustration 9
¾Ne jamais positionner le tronc en biais sur le châssis porteur (illustration 10).
Illustration 10
¾Toujours veillez à ce que le coin à refendre et le poussetronc saisissent verticalement les extrémités du tronc.
¾Ne jamais fendre deux troncs d’un coup.
¾Ne jamais rajouter ou remplacer le bois durant la procédure.
Repositionnez le tronc sur le châssis principal puis répéter la procédure de fente ou mettez le tronc de côté.
Comment libérer un tronc coincé ?
1.Relâcher la manette de commande et la touches de commande afin de pouvoir rentrer le poussoir de bûches.
1.Insérez une cale triangulaire en bois sous le tronc, déployez le pousse-tronc de manière à ce qu’il pousse la cale sous le tronc coincé.
2.Si le tronc ne se libère pas, répéter la procédure avec des cales toujours plus grandes.
 Lors de la libération, ne jamais frapper avec un marteau sur le tronc ou placez les mains à proximité du tronc.
Ne demandez pas d’aide à une seconde personne.
N’essayez pas de libérer le tronc en frappant à l’aide d’un outil. Cela pourrait occasionner une rupture du bloc-moteur.
Achèvement du travail :
¾Veiller à ce que le poussoir de bûches soit rentré dans sa position de départ.
¾Retirez ensuite la fiche secteur.
¾Resserrez à fond la vis d’évacuation d’air (illustration 8).
¾Observer les instructions d’entretien et de maintenance.
Entretien et maintenance
Avant d’effectuer des travaux d’entretien et de maintenance, retirer la fiche secteur.
 Porter des gants de protection afin d’éviter de se blesser les mains.
Observer les points suivants afin de ne pas entraver le bon fonctionnement du fendeur de bois à brûler :
Nettoyez soigneusement la machine après chaque utilisation.
Eliminez les résidus de résine.
Lubrifiez régulièrement la tige du piston (illustration 7) à l’aide d’huile pulvérisée respectant les impératifs écologiques.
Contrôlez le niveau d’huile, respectivement remplacez l’huile.
Affûtage du coin à refendre
Après une utilisation prolongée ou lorsque l’aptitude au dédoublement est réduit, affûter le coin à refendre à l’aide d’une lime fine (éliminer les ébarbures) (illustration 1/ 3).
Ne jamais forcer la fente du tronc en maintenant la poussée durant plusieurs secondes. Cela pourrait endommager la machine.
24
 Loading...