


Brennholzspalter
Bedienungsanleitung – Sicherheitshinweise – Ersatzteile
Log splitter
Operating Manual – Safety instructions – Spare parts
Fendeur de bois à brûler
Instructions d’utilisation – Consignes de sécurité Pièces de rechange
Ŝtípač palivolého dřeva
Návod k použití – Bezpečnostní pokyny – Náhradní díly
Trækløvnings
Brugsanvisning – Sikkerhedshenvisninger – Reservdeler
Brandhoutsplijter
Bedieningshandleiding
Veiligheidsinstructies
Reserveonderdelen
Łuparka do trewna
Instrukcja obsługi Wskazówki bezpieczeństwa – Części zamienne
Vedklyv
Bruksanvisning – Säkerhetsanvisningar – Reservdelar
Štiepač palivovéha dreva
Návod na obsluhu – Bezpečnostné pokyny Náhradné dielce
Seite 7
Page 16
Page 25
Str 35
Side 45
Blz. 54
Stronie 64
Sidan 73
Strana 83
ASP 10 N

EG-Konformitätserklärung entsprechend der Richtlinie 98/37 EG
EC Declaration of Conformity according to Directive 98/37 EC
Déclaration de conformité de la CE conformément à la directive 98/37 CE
Prohlášení o shoděpodle směrnice EU č. 98/37 EG
EF-overensstemmelseserklæring i henhold til EF-direktiv 98/37/EF
EG-Verklaring van overeenstemming volgens richtlijn 98/37 EG
Deklaracja zgodności WE z dyrektywą 98/37 WE
EG-konformitetsförklaring enligt EG-direktiv 98/37/EG
Prehlásenie o zhode podľa smernice EU č. 98/37 EG
ATIKA GmbH & Co. KG, Schinkelstraße 97, 59227 Ahlen, Germany
erklären in alleiniger Verantwortung, dass das Produkt Brennholzspalter ASP 10 N
auf das sich diese Erklärung bezieht, den einschlägigen grundlegenden Sicherheitsund Gesundheitsanforderungen der Richtlinien 98/37/EG, sowie den Anforderungen der anderen einschlägigen Richtlinien entspricht: 89/336/EWG, 2006/95/EG.
declare under our sole responsibility, that the product Log splitter ASP 10 N
to which this declaration relates corresponds to the relevant basic safety and health requirements of the Directive 98/37/EC, and to the requirements for the other relevant Directives: 89/336/EWG, 2006/95/EC.
déclarons en responsabilité propre que le produit Fendeur de bois à brûler ASP 10 N
auquel se rapporte la présente déclaration est conforme aux exigences de sécurité et de santé fondamentales des directives 98/37/CE, ainsi qu’aux exigences des autres directives en la matière : 89/336/CEE, 2006/95/CEE.
verklaren in uittsluitende verantwoordelijkheid dat het produkt Brandhoutsplijter ASP 10 N
waarop deze verklaring betrekking heeft, aan de desbetreffende veiligheiden gezonheidseisen van de richtlijn 98/37/EG alsmede aan de eisen van de andere desbetreffende richlijnen: 89/336/EWG, 73/23/EWG voldoet .
förklarar, som ensam ansvarig, att nedanstående produkt, Vedklyv ASP 10 N
för vilken denna förklaring gäller, uppfyller, grundläggande säkerhetsoch hälsoskyddsfäreskrifter enligt EG-direktiv 98/37/EG, samt uppfyller kraven enligt övriga gällnade EG-direktiv: 89/336/EWG, 2006/95/EG.
erklærer på eget ansvar, at produkt, Brændekløver ASP 10 N
som er omfattet af denne erklæring, overholder de relevante grundlæggende sikkerhedsog sundhedskrav i EF-direktiv 98/37/EF samt kravene i andre EF-direktiver, der kan finde anvendelse: 89/336/EWG, 2006/95/EG.
prohlašuje se vší odpovědností, že výrobek Štípač palivového dřeva ASP 10 N
na který se vztahuje toto prohlášení, odpovídá příslušným základním bezpečnostním a zdravotním podmínkám směrnice 98/37 EG, jakož i podmínkám dalších příslušných směrnic: 89/336/EWG, 2006/95/EG.
oświadcza, przyjmując na siebie wyłączną odpowiedzialność, że produkt Łuparka do drewna ASP 10 N
którego to oświadczenie dotyczy, odpowiada dyrektywie 98/37/WE określającej podstawowewymagania w zakresie bezpieczeństwa i ochrony zdrowia, a także wymaganiom innych dyrektyw w tym zakresie: 89/336/EWG,2006/95/EG.
vyhlasuje so všetkou zodpovednosťou, že výrobok Štiepačka palivového dreva ASP 10 N
na ktorú sa vzťahuje toto prehlásenie zodpovedá príslušným základným bezpečnostným a zdravotným podmienkam smernice 98/37 EG, ako aj podmienkam ďalších príslušných smerníc: 89/336/EWG, 2006/95/EG.
|
|
|
|
|
|
|
|
Ahlen, 22.10.2007 |
A. Pollmeier, Geschäftsführung |
|
|
1
Gerätebeschreibung – |
Description of device |
Description de l'appareil – Popis přístroje |
|
Beskrivelse af apparatet – |
Beschrijving van het toestel |
 Opis urządzenia –
  Apparatbeskrivning –
  Popis prístroja
2

|
|
|
Gerätebeschreibung – |
Description of device |
|
|
|||||||||||
|
|
|
Description de l'appareil – |
Popis přístroje |
|
|
|||||||||||
|
|
|
Beskrivelse af apparatet – |
Beschrijving van het toestel |
|
||||||||||||
|
|
Opis urządzenia – |
Apparatbeskrivning – |
Popis prístroja |
|
||||||||||||
|
|
|
|
|
|
|
|
|
|
|
|
|
|
|
|
|
|
|
|
Ersatzteil-Nr. |
|
|
|
|
|
|
|
|
|
|
|
|
|
|
|
|
|
Spare part no. |
|
|
|
|
|
|
|
|
|
|
|
|
|
|
|
|
|
N° de pièce de |
Bezeichnung |
|
Description |
|
|
Désignation |
|
|
Popis |
|
|
||||
|
|
rechange |
|
|
|
|
|
|
|
|
|
|
|
|
|
|
|
|
|
číslo náhr.dílu |
|
|
|
|
|
|
|
|
|
|
|
|
|
|
|
|
1 |
|
Spaltmesser |
|
Splitting blade |
|
|
Lame de fendage |
|
|
Štípací nůž |
|
|||||
|
2 |
359386 |
Bedienarm-links |
|
Control arm-left |
|
|
Bras de commande-gauche |
|
Ovládaci ramino levé |
|
||||||
|
3 |
359376 |
Tischplatte |
|
Table plate |
|
|
|
Dessus de table |
|
|
Stolní deska |
|
||||
|
4 |
359387 |
Motor |
|
Motor |
|
|
|
Moteur |
|
|
|
|
Motor |
|
|
|
|
5 |
359389 |
Ein- / Ausschalter |
|
On / Off-switch |
|
|
Interrupteur marche / arrêt |
|
Zapínač / vypínač |
|
||||||
|
6 |
359379 |
Öltankverschluss mit Öl- |
|
Oil tank cap with dip stick |
|
Bouchon du réservoir d’huile avec jauge |
|
Zátka olejové nádrže s měrkou |
|
|||||||
|
messstab |
|
|
d’huile |
|
|
|
|
oleje |
|
|
||||||
|
|
|
|
|
|
|
|
|
|
|
|
|
|
||||
|
7 |
359377 |
Tisch |
|
Table |
|
|
|
Table |
|
|
|
|
Stůl |
|
|
|
|
8 |
359378 |
Rad |
|
Wheel |
|
|
|
Roue |
|
|
|
|
Kola |
|
|
|
|
9 |
359373 |
Arretierungshebel |
|
Locking lever |
|
|
Levier de blocage |
|
|
Aretovací páka |
|
|||||
|
10 |
359385 |
Bedienarm-rechts |
|
Control arm-right |
|
|
Bras de commande droit |
|
|
Ovládaci rameno levé |
|
|||||
|
11 |
359384 |
Bedienungshebel |
|
Control handle |
|
|
Poignée de commande |
|
|
Ovládaci úchyty |
|
|||||
|
12 |
359381 |
Spannpratze links |
|
Clamping claw left |
|
|
Griffes de serrage |
|
|
Upínací lišty |
|
|||||
|
13 |
359383 |
Haltebolzen |
|
Retaining pin |
|
|
Bouton d'immobilisation |
|
|
Záchytný svorník |
|
|||||
|
14 |
|
Handgriff |
|
Handle |
|
|
|
Poignée |
|
|
|
|
Držadlo |
|
||
|
15 |
359365 |
Hubeinstellstange |
|
Stroke adjustment rod |
|
|
Tige de réglage de la course |
|
Tyč pro nastavení zdvihu |
|
||||||
|
16 |
359364 |
Feststellschraube |
|
Holding screw |
|
|
Vis de fixation |
|
|
Zajišt' ovaci šroub |
|
|||||
|
17 |
359362 |
Spaltkreuz |
|
Splitting cross |
|
|
Croix de fendage |
|
|
Štípací kříž |
|
|||||
|
18 |
359057 |
Hydraulikventil |
|
Hydraulic valve |
|
|
Valve hydraulique |
|
|
Hydraulický ventil |
|
|||||
|
19 |
400142 |
Hydrauliköl (1 Liter) |
|
Hydraulic oil (1 litre) |
|
|
Huile hydraulique (1 litres) |
|
|
Hydraulický olej (1 liter) |
|
|||||
|
20 |
359319 |
Sicherheitsaufkleber 1 |
|
Safety label 1 |
|
|
Autocollant de sécurité 1 |
|
|
Bezpečnostní nálepka 1 |
|
|||||
|
21 |
359320 |
Sicherheitsaufkleber 2 |
|
Safety label 2 |
|
|
Autocollant de sécurité 2 |
|
|
Bezpečnostní nálepka 2 |
|
|||||
|
22 |
359321 |
Sicherheitsaufkleber 3 |
|
Safety label 3 |
|
|
Autocollant de sécurité 3 |
|
|
Bezpečnostní nálepka 3 |
|
|||||
|
23 |
|
Sicherheitsaufkleber 4 |
|
Safety label 4 |
|
|
Autocollant de sécurité 4 |
|
|
Bezpečnostní nálepka 4 |
|
|||||
|
24 |
359382 |
Spannpratze rechts |
|
Clamping claw right |
|
|
Griffes de serrage |
|
|
Upínací lišty |
|
|||||
|
25 |
359334 |
Sterngriffschraube |
|
Star grip screw |
|
|
Vis à poignée étoile |
|
|
Zajišt' ovaci šroub |
|
|||||
|
26 |
|
Sockel |
|
Base |
|
|
|
Socle |
|
|
|
|
Sokl |
|
|
|
|
|
|
|
|
|
|
|
|
|
|
|
|
|
|
|
|
|
|
|
Reservedelsnr. |
|
|
|
|
|
|
|
|
|
|
|
|
|
|
|
|
|
Reserveonder- |
|
|
|
|
|
|
|
|
|
|
|
|
|
|
|
|
|
deelnummer |
Betegnelse |
Benaming |
|
Oznaczenie |
|
|
Beteckning |
|
|
Označenie |
|
||||
|
|
Nr części |
|
|
|
|
|
|
|
|
|
|
|
|
|
|
|
|
|
zamiennej |
|
|
|
|
|
|
|
|
|
|
|
|
|
|
|
|
|
Reservdelsnr. |
|
|
|
|
|
|
|
|
|
|
|
|
|
|
|
|
|
Objednávacie č |
|
|
|
|
|
|
|
|
|
|
|
|
|
|
|
|
1 |
|
Spaltekniv |
Splijtmes |
|
Nóż rozłupujący |
|
|
Klyvkniv |
|
|
Štiepací nôž |
|
||||
|
2 |
359386 |
Betjeningsarm til |
Bedieningsarm links |
Ramię obsługowe, lewe |
|
Manoverarm-vänster |
|
Ovládacie rameno ľavé |
|
|||||||
|
venstre |
|
|
|
|
|
|
|
|
|
|
|
|
|
|
||
|
|
|
|
|
|
|
|
|
|
|
|
|
|
|
|
|
|
|
3 |
359376 |
Bordplade |
Tafelplaat |
|
Płyta stołu |
|
|
|
Bordsplatta |
|
|
Stolová doska |
|
|||
|
4 |
359387 |
Motor |
Motor |
|
Silnik |
|
|
|
Motor |
|
|
Motor |
|
|||
|
5 |
359389 |
Tænd- / slukknap |
In- / uit-schakelaar |
|
Wyłącznik |
|
|
|
Till- / Från-brytare |
|
|
Zapínanie/Vypínanie |
|
|||
|
6 |
359379 |
Olietankdæksel med |
Olietanksluiting met |
Korek zbiornika oleju z prętem do |
|
Oljetanklock med |
|
|
Uzáver olejovej nádrže |
|
||||||
|
oliemålepind |
oliepeilstok |
|
pomiaru poziomu oleju |
|
|
oljemätsticka |
|
|
s odmerkou oleja |
|
||||||
|
|
|
|
|
|
|
|
|
|||||||||
|
7 |
359377 |
Bord |
Tafel |
|
Stół |
|
|
|
Bord |
|
|
Štiepací nôž |
|
|||
|
8 |
359378 |
Hjul |
Wielen |
|
Koło |
|
|
|
Hjul |
|
|
Kolesá |
|
|||
|
9 |
359373 |
Låsearm |
Vergrendelings-hendel |
Dźwignia blokująca |
|
|
Låsspak |
|
|
Aretovacia páka |
|
|||||
|
10 |
359385 |
Betjeningsarm til højre |
Bedienarm rechts |
|
Ramię obsługowe, prawe |
|
Manöverarm-höger |
|
Ovládacie rameno pravé |
|
||||||
|
11 |
359384 |
Betjeningshåndtag |
Bediengreep |
|
Uchwyt obsługowy |
|
|
Manöverspakarna |
|
|
Ovládacie úchytky |
|
||||
|
12 |
359381 |
Spændekløer |
Spanklauwen |
|
Łapa zaciskowa |
|
|
Spännklor |
|
|
Napínacie lišty |
|
||||
|
13 |
359383 |
Holdebolten |
Bevestigingsbout |
|
Kołek mocujący |
|
|
Låsbulten |
|
|
Záchytné čapy |
|
||||
|
14 |
|
Håndgreb |
Handgreep |
|
Uchwyt |
|
|
|
Handtag |
|
|
Držiak |
|
|||
|
15 |
359365 |
Stang til |
Slaginstelstang |
|
Drążek do nastawiania wielkości |
|
Slagningställings |
|
|
Tyč na nastavenie zdvihu |
|
|||||
|
slaglængdeinstilling |
|
skoku |
|
|
|
stång |
|
|
|
|||||||
|
|
|
|
|
|
|
|
|
|
|
|
|
|||||
|
16 |
359364 |
Låseskrue |
Vergrendelbout |
|
Śruba mocująca |
|
|
Låsskruv |
|
|
Zaisťovacia skrutka |
|
||||
|
17 |
359362 |
Kløvekryds |
Splijtkruis |
|
Krzyżak łuparki |
|
|
Klyvningskors |
|
|
Štiepací kríž |
|
||||
|
18 |
359057 |
Hydraulikventil |
Hydraulische klep |
|
Zawór hydrauliczny |
|
|
Hydraulikventil |
|
|
Hydraulický ventil |
|
||||
|
19 |
400142 |
Hydraulikolie (1liter) |
Hydraulische olie (1 liter) |
Olej hydrauliczny (1 l) |
|
|
Hydraulolja (1 liter) |
|
Hydraulický olej (1 liter) |
|
||||||
|
20 |
359319 |
Sikkerhedsmærkat 1 |
Veiligheidssticker 1 |
Naklejka bezpieczeństwa 1 |
|
Säkerhetsetikett 1 |
|
|
Bezpečnostná nálepka 1 |
|
||||||
|
21 |
359320 |
Sikkerhedsmærkat 2 |
Veiligheidssticker 2 |
Naklejka bezpieczeństwa 2 |
|
Säkerhetsetikett 2 |
|
|
Bezpečnostná nálepka 2 |
|
||||||
|
22 |
359321 |
Sikkerhedsmærkat 3 |
Veiligheidssticker 3 |
Naklejka bezpieczeństwa 3 |
|
Säkerhetsetikett 3 |
|
|
Bezpečnostná nálepka 3 |
|
||||||
|
23 |
|
Sikkerhedsmærkat 4 |
Veiligheidssticker 4 |
Naklejka bezpieczeństwa 4 |
|
Säkerhetsetikett 4 |
|
|
Bezpečnostná nálepka 4 |
|
||||||
|
24 |
359382 |
Spændekløer |
Spanklauwen |
|
Łapa zaciskowa |
|
|
Spännklor |
|
|
Napínacie lišty |
|
||||
|
25 |
359334 |
Låseskrue |
Stergreepschroef |
|
Śruba mocująca |
|
|
Låsskruv |
|
|
Zaisťovacia skrutka |
|
||||
|
26 |
|
Sokkel |
Sokkel |
|
Cokół |
|
|
|
Sockel |
|
|
Sokel |
|
|||
3
 Zusammenbau -
  Assembly -
  Montage -
  Montáž
 Montering -
  Montage -
  Montaż -
  Montering -
  Montáž
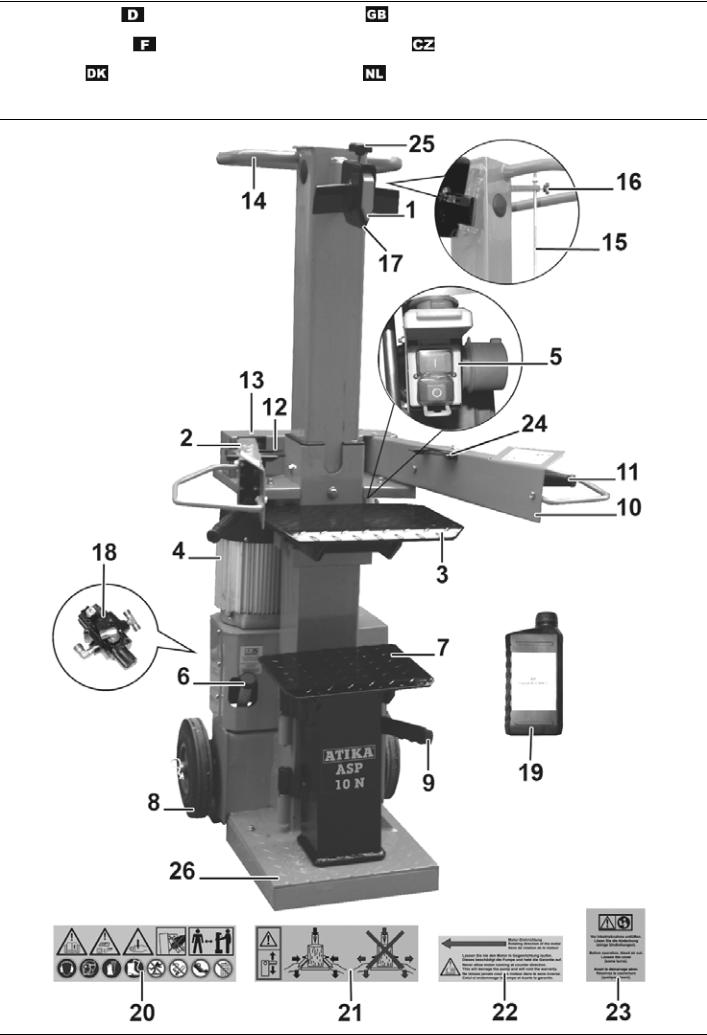
 Bedienarme montieren
Bedienarme einsetzen und das Rohr in die Aussparung der Querverbindung einführen.
 Mount control arms
Insert control arms and insert pipe in recess of cross connection.
 Montage des bras de commande
Mettre les bras de commande en place et introduire le tube dans la réservation de la jonction transversale.
 Montáž ovládacích ramen
Nasaďte ovládací ramena a zasuňte trubku do drážky příčné spojky.
 Montering af betjeningsarme
Betjeningsarmene sættes i og røret føres ind i tværforbindelsens udsparinger.
 Bedieningsarmen monteren
Bedieningsarmen aanbrengen en de buis in de uitsparing van de dwarsverbinding leiden.
 Montaż ramion obsługowych
Osadzić ramiona obsługowe i wsunąć rurę w wybranie łącznika poprzecznego.
 Montera manöverarmarna
Sätt i manöverarmarna och för in röret i tvärförbindningens ursparning.
 Montáž ovládacích ramien
Nasaďte ovládacie ramená a zasuňte trubicu do drážky priečnej.
 Tip: Fetten Sie vorher die Blechlaschen oben und unten ein!
 Tip: grease the metal plates at top and bottom first!
 Astuce: Graissez les pattes en tôle au préalable sur le dessus et le dessous!
 Tip: Namažte nejprve plechové spojky nahoře a dole!
 Tip: Smør forinden bliktungerne oppe og nede med fedt!
 Tip: Vet eerst de plaatlippen boven en onder in!
 Wskazówka: Wcześniej przesmaruj blaszane nakładki u góry i od dołu!
 Tips: Fetta in bindningsplåtarna i förväg, både upptill och nedtill!
  Tip: Najprv namažte plechové spojky hore aj dole!
4

 Zusammenbau -
  Assembly -
  Montage -
  Montáž
 Montering -
  Montage -
  Montaż -
  Montering -
  Montáž
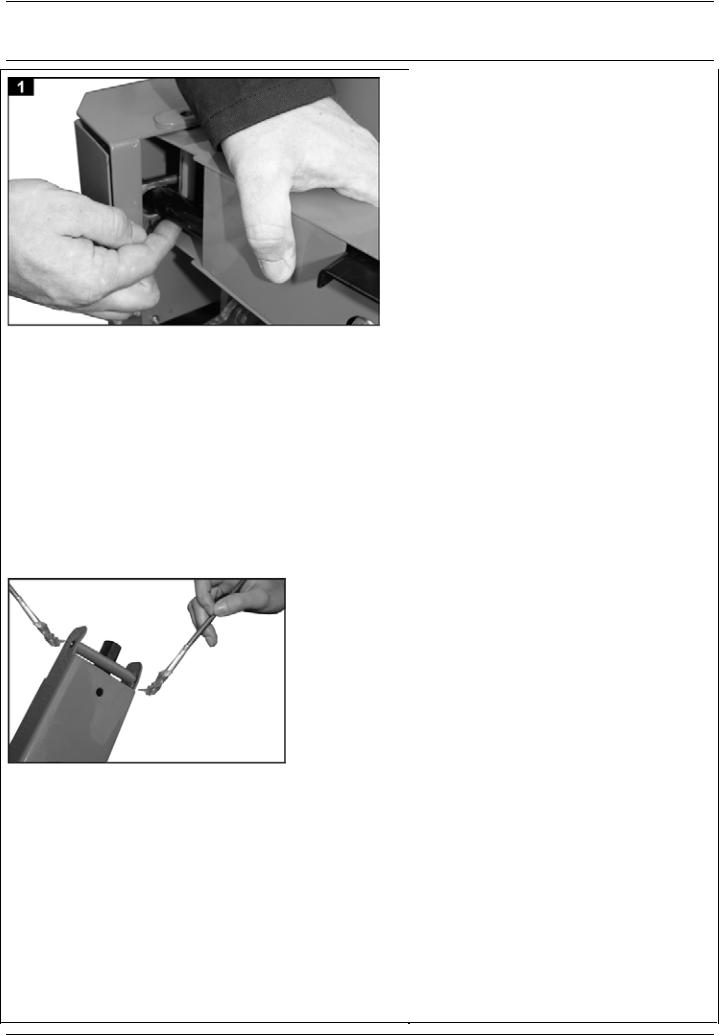
 Den Haltebolzen durchstecken.
 Push the holding bolt through.
 Faire traverser le boulon d’immobilisation.
 Prostrčte záchytné čepy.
 Stik holdebolten ind.
 De bevestigingsbout doorsteken.
 Przetknij kołek mocujący.
 Stick igenom låsbulten.
 Prepchajte záchytné čapy.
 Haltebolzen auf der Unterseite sichern.
 Lock the holding bolt at the bottom.
 Sécuriser le bouton d’immobilisation sur sa face inférieure.
 Záchytný čep zajistěte na spodní straně.
 Sikr holdebolten på undersiden.
 Bevestigingsbout aan de onderzijde borgen.
 Zabezpieczyć kołek mocujący na dolnej stronie.
 Säkra låsbulten på undersidan.
 Záchytný čap zaistite na spodnej strane.
 Räder montieren
Mount wheels
 Montage des roues
 Montáž kol
Montering af hjul
Wielen monteren
 Montera hjulen
 Hjul montering
 Montaż kół
5
 Zusammenbau -
  Assembly -
  Montage -
  Montáž
 Montering -
  Montage -
  Montaż -
  Montering -
  Montáž
- Setzen Sie die Tischplatte in den entsprechenden Haltewinkel ein.
- Sichern Sie die Tischplatte mit Hilfe der Sterngriffschraube (Die Sterngriffschraube greift in die Bohrung der Tischplatte).
- Fit the table into the appropriate mounting angles.
- Secure the table plate using the machine knob screw. (The machine knob screw engages in the table plate hole.)
-Intégrez la table dans l'angle de retenue correspondant.
-Fixer le plateau de la table a l’aide de la vis a poignee en etoile. (La vis a poignee en etoile se visse dans le trou du plateau de la table)
-Stůl vložte do příslušných přídržných úhelníků.
-Zajistěte pracovní stůl pomocí hvězdicových šroubů (Tyto šrouby zasahují do vývrtů v pracovním stole).
-Placer bordet i den tilsvarende holdevinkel.
-Lås bordpladen med stjernegrebskruen. (Stjernegrebskruen griber ind i bordpladens boring).
-Plaats de tafel in het overeenkomstige houderelement.
-Zeker het tafelblad met behulp van de stergreepschroef (de stergreepschroef grijpt in de boring van het tafelblad).
-Osadź stół w odpowiednich kątownikach mocujących.
-Proszę zabezpieczyć blat stołu za pomocą śruby z uchwytem gwiaździstym. (śruba z uchwytem gwiaździstym wejdzie w otwór blatu)
-Sätt i bordet i önskad hållvinkel.
-Säkra bordsplattan med hjälp av skruven med korshandtag. (Skruven med korshandtag griper in i hålet i bordsplattan)
-Stůl vložte do příslušných přídržných úhelníků.
-Zajistitě pracovný stol s pomocou hvezdicových šroubou (Týto zasahujú do vývrtou v pracovnom stole).
6
Sie dürfen die Maschine nicht in Betrieb nehmen, bevor Sie diese Bedienungsanleitung gelesen, alle angegebenen Hinweise beachtet und das Gerät wie beschrieben montiert haben.
Anleitung für künftige Verwendungen aufbewahren.
Inhalt
Konformitätserklärung |
1 |
Gerätebeschreibung / Ersatzteile |
2 |
Zusammenbau |
4 |
Lieferumfang |
7 |
Symbole |
7 |
Bestimmungsgemäße Verwendung |
8 |
Restrisiken |
8 |
Sicheres Arbeiten |
8 |
Transporthinweise |
9 |
Aufstellen |
9 |
Inbetriebnahme |
10 |
Arbeiten mit dem Brennholzspalter |
11 |
Wartung und Pflege |
13 |
Garantie |
14 |
Technische Daten |
15 |
Mögliche Störungen |
15 |
Lieferumfang
Überprüfen Sie nach dem Auspacken den Inhalt des Kartons auf
>Vollständigkeit
>evtl. Transportschäden
Teilen Sie Beanstandungen umgehend dem Händler, Zulieferer bzw. Hersteller mit. Spätere Reklamationen werden nicht anerkannt.
1 vormontierte Geräteeinheit |
2 |
Räder |
|||
▪ 1 Tischplatte |
1 |
Achse |
|||
|
1 |
Bedienarm rechts |
|
1 |
Zubehörbeutel |
|
1 |
Bedienarm links |
|
1 |
Bedienungsanleitung |
Symbole Gerät
Vor Inbetriebnahme die Bedienungsanleitung und Sicherheitshinweise lesen und beachten.
Achtung!
Vor Reparatur-, Wartungsund Reinigungsarbeiten Motor abstellen und Netzstecker ziehen.
Schnittund Quetschgefahr; niemals gefährliche Bereiche berühren, wenn sich das Spaltmesser bewegt.
Entfernen Sie verklemmte Stämme nicht mit Ihren Händen.
Nur der Bediener darf im Arbeitskreis der Maschine stehen. Unbeteiligte Personen sowie Hausund Nutztiere aus dem Gefahrenbereich (Mindestabstand 5 m) fernhalten.
Beim Arbeiten Gehörschutz tragen, um das Gehör zu schützen.
Beim Arbeiten Schutzvisier tragen, um die Augen vor Spänen und Splittern zu schützen.
Beim Arbeiten Schutzhandschuhe tragen, um die Hände vor Spänen und Splittern zu schützen.
Beim Arbeiten Sicherheitsschuhe tragen, um den Fuß vor fallenden Stämmen zu schützen.
Halten Sie Ihren Arbeitsbereich in Ordnung! Unordnung kann Unfälle zur Folge haben.
Öl ist feuergefährlich und kann explodieren. Rauchen und offenes Feuer verboten.
Entsorgen Sie das Altöl ordnungsgemäß (Altölsammelstelle vor Ort). Es ist verboten das Altöl in den Boden abzulassen oder mit Abfall zu vermischen.
Es ist verboten, Schutzund Sicherheitseinrichtungen zu entfernen oder zu verändern.
Richten Sie immer Ihre volle Aufmerksamkeit auf die Bewegung des Spaltmessers.
Halten Sie das Werkstück während des Spaltens mit den Spannpratzen fest.
Symbol Gerät / Verpackung
Elektrische Geräte gehören nicht in den Hausmüll. Geräte, Zubehör und Verpackung einer umweltfreundlichen Wiederverwertung zuführen.
Symbole Bedienungsanleitung
Drohende Gefahr oder gefährliche Situation. Das Nichtbeachten dieser Hinweise kann Verletzungen zur Folge haben oder zu Sachbeschädigung führen.
Wichtige Hinweise zum sachgerechten Umgang. Das Nichtbeachten dieser Hinweise kann zu Störungen führen.
7

Benutzerhinweise. Diese Hinweise helfen Ihnen, alle Funktionen optimal zu nutzen.
Montage, Bedienung und Wartung. Hier wird Ihnen genau erklärt, was Sie tun müssen.
Bestimmungsgemäße Verwendung
Der Brennholzspalter ist nur zum Spalten von Holz einsetzbar.
Nur gerade abgeschnittenes Holz ist für den Brennholzspalter geeignet.
Fremdkörper (Nägel, Draht, Beton etc.) sind aus dem zu spaltenden Holz unbedingt zu entfernen.
Zur bestimmungsgemäßen Verwendung gehört auch die Einhaltung der vom Hersteller vorgeschriebenen Betriebs-, Wartungsund Instandsetzungsbedingungen und die Befolgung der in der Anleitung enthaltenen Sicherheitshinweise.
Jeder weiter darüber hinausgehende Gebrauch gilt als nicht bestimmungsgemäß. Für hieraus resultierende Schäden jeder Art haftet der Hersteller nicht: Das Risiko trägt allein der Benutzer.
Eigenmächtige Veränderungen an dem Brennholzspalter schließen eine Haftung des Herstellers für daraus entstehende Schäden jeder Art aus.
Das Gerät darf nur von Personen gerüstet, genutzt und gewartet werden, die damit vertraut und über die Gefahren unterrichtet sind. Instandsetzungsarbeiten dürfen nur durch uns bzw. durch von uns benannte Kundendienststellen durchgeführt werden.
Restrisiken
 Auch bei bestimmungsgemäßer Verwendung können trotz Einhaltung aller einschlägigen Sicherheitsbestimmungen aufgrund der durch den Verwendungszweck bestimmten Konstruktion noch Restrisiken bestehen.
Restrisiken können minimiert werden, wenn die „Sicherheitshinweise“ und die „Bestimmungsgemäße Verwendung“, sowie die Bedienungsanleitung insgesamt beachtet werden.
Rücksichtnahme und Vorsicht verringern das Risiko von Personenverletzungen und Beschädigungen.
Ignorierte oder übersehene Sicherheitsvorkehrungen können zu Verletzungen beim Bediener oder zu Beschädigungen von Eigentum führen.
Durch Unachtsamkeit, Nichteinhaltung der Sicherheitsbestimmungen und unsachgemäßer Verwendung kann es zu Verletzungen an der Hand oder an den Fingern durch das bewegte Spaltmesser kommen.
Gefährdung durch Strom, bei Verwendung nicht ordnungsgemäßer Elektro-Anschlussleitungen.
Berührung spannungsführender Teile bei geöffneten elektrischen Bauteilen.
Des weiteren können trotz aller getroffener Vorkehrungen nicht offensichtliche Restrisiken bestehen.
Sicheres Arbeiten
 Lesen und beachten Sie vor Inbetriebnahme dieses Erzeugnisses die folgenden Hinweise und die im jeweiligen Land gültigen Sicherheitsbestimmungen, um sich selbst und andere vor möglichen Verletzungen zu schützen.
Geben Sie die Sicherheitshinweise an alle Personen weiter, die mit der Maschine arbeiten.
Bewahren Sie diese Sicherheitshinweise gut auf.
Seien Sie aufmerksam. Achten Sie darauf, was Sie tun. Gehen Sie mit Vernunft an die Arbeit. Verwenden Sie das Gerät nicht, wenn Sie müde sind oder unter dem Einfluss von Drogen, Alkohol oder Medikamenten stehen. Ein Moment der Unachtsamkeit beim Gebrauch des Gerätes kann zu ernsthaften Verletzungen führen.
Machen Sie sich vor Gebrauch mit Hilfe der Bedienungsanleitung mit der Maschine vertraut.
Benützen Sie die Maschine nicht für Zwecke, für die sie nicht bestimmt ist (siehe „Bestimmungsgemäße Verwendung“ und „Arbeiten mit dem Brennholzspalter“).
Sorgen Sie für sicheren Stand und halten Sie jederzeit das Gleichgewicht.
Nehmen Sie eine Arbeitsstellung ein, die sich im Bereich der Bedienungsgriffe befindet.
Niemals auf der Maschine stehen.
Tragen Sie beim Arbeiten
−Schutzvisier
−Arbeitshandschuhe
−Gehörschutz
−Sicherheitsschuhe mit Stahlkappe
Tragen Sie geeignete Arbeitskleidung:
−keine weite Kleidung oder Schmuck (sie können von beweglichen Teilen erfasst werden)
Der Bedienende ist im Arbeitsbereich der Maschine gegenüber Dritten verantwortlich.
Kinder und Jugendliche unter 18 Jahren dürfen die Maschine nicht bedienen.
Kinder von der Maschine fernhalten.
Setzen Sie die Maschine niemals ein, während unbeteiligte Personen in der Nähe sind.
Lassen Sie die Maschine nie unbeaufsichtigt.
Halten Sie Ihren Arbeitsbereich in Ordnung! Unordnung kann Unfälle zur Folge haben.
Überlasten Sie die Maschine nicht! Sie arbeiten besser und sicherer im angegebenen Leistungsbereich.
Betreiben Sie die Maschine nur mit kompletten und korrekt angebrachten Schutzeinrichtungen und ändern Sie an der Maschine nichts, was die Sicherheit beeinträchtigen könnte.
Die Maschine bzw. Teile der Maschine nicht verändern.
Die Maschine nicht mit Wasser abspritzen. (Gefahrenquelle elektrischer Strom).
Maschine nicht im Regen stehen lassen oder bei Regen arbeiten.
8
Nur an einem trockenen Ort außerhalb der Reichweite von Kindern aufbewahren.
Schalten Sie die Maschine ab und ziehen Sie den Netzstecker aus der Steckdose bei:
−Reparaturarbeiten
−Wartungsund Reinigungsarbeiten
−Beseitigung von Störungen
−Überprüfungen der Anschlussleitungen, ob diese verschlungen oder beschädigt sind
−Transport
−Verlassen (auch bei kurzzeitigen Unterbrechungen)
Überprüfen Sie die Maschine auf eventuelle Beschädigungen:
−Vor weiterem Gebrauch des Gerätes müssen Schutzvorrichtungen sorgfältig auf ihre einwandfreie und bestimmungsgemäße Funktion untersucht werden.
−Überprüfen Sie, ob die beweglichen Teile einwandfrei funktionieren und nicht klemmen oder ob Teile beschädigt sind. Sämtliche Teile müssen richtig montiert sein und alle Bedingungen erfüllen, um einwandfreien Betrieb sicherzustellen.
−Beschädigte Schutzvorrichtungen und Teile müssen sachgemäß durch eine anerkannte Fachwerkstatt repariert oder ausgewechselt werden, soweit nichts anderes in der Gebrauchsanweisung angegeben ist.
−Beschädigte oder unleserliche Sicherheitsaufkleber sind zu ersetzen.
Elektrische Sicherheit
Ausführung der Anschlussleitung nach IEC 60245 (H 07 RN-F) mit einem Aderquerschnitt von mindestens
230 V ~
3 x 1,5 mm² bei einer Kabellänge bis max. 10 m
400 V 3~
5 x 1,5 mm² bei einer Kabellänge bis max. 10 m
Niemals Anschlussleitungen über 10 m verwenden. Längere Anschlussleitungen erzeugen einen Spannungsabfall. Der Motor erreicht nicht mehr seine maximale Leistung, die Funktion der Maschine wird reduziert.
Stecker und Kupplungsdosen an Anschlussleitungen müssen aus Gummi, Weich-PVC oder anderem thermoplastischen Material der gleichen mechanischen Festigkeit sein oder mit diesem Material überzogen sein.
Die Steckvorrichtung der Anschlussleitung muss spritzwassergeschützt sein.
Beim Verlegen der Anschlussleitung darauf achten, dass sie nicht gequetscht, geknickt und die Steckverbindung nicht nass wird.
Wickeln Sie bei Verwendung einer Kabeltrommel das Kabel vollständig ab.
Verwenden Sie das Kabel nicht für Zwecke, für die es nicht bestimmt ist. Schützen Sie das Kabel vor Hitze, Öl und scharfen Kanten. Verwenden Sie das Kabel nicht, um den Stecker aus der Steckdose zu ziehen.
Kontrollieren Sie Verlängerungskabel regelmäßig und ersetzen Sie sie, wenn sie beschädigt sind.
Verwenden Sie keine defekten Anschlussleitungen.
Verwenden Sie im Freien nur dafür zugelassene und entsprechend gekennzeichnete Verlängerungskabel.
Keine provisorischen Elektroanschlüsse einsetzen.
Schutzeinrichtungen niemals überbrücken oder außer Betrieb setzen.
Der Elektroanschluss bzw. Reparaturen an elektrischen Teilen der Maschine haben durch eine konzessionierte Elektrofachkraft oder eine unserer Kundendienststellen zu erfolgen. Örtliche Vorschriften insbesondere hinsichtlich der Schutzmaßnahmen sind zu beachten.
Reparaturen an anderen Teilen der Maschine haben durch den Hersteller bzw. einer seiner Kundendienststellen zu erfolgen.
Nur Originalersatzteile verwenden. Durch den Gebrauch anderer Ersatzteile und anderen Zubehörs können Unfälle für den Benutzer entstehen. Für hieraus resultierende Schäden haftet der Hersteller nicht.
Transporthinweise
 Vor jedem Transport das Spaltmesser ganz nach unten fahren.
Zum |
Transportieren |
|
|||
fassen Sie mit einer |
Transportband |
||||
Hand an den Bügel |
|||||
|
|||||
und |
kippen |
den |
|
||
Holzspalter leicht zu |
|
||||
sich |
hin. |
In dieser |
|
||
Stellung |
kann |
der |
|
||
Spalter |
mühelos |
|
|||
transportiert werden. |
|
||||
Um |
Ölaustritt |
beim |
|
||
Transport |
zu |
ver- |
|
||
meiden, |
muss |
der |
|
||
Öltankverschluss |
|
||||
fest |
verschraubt |
|
|||
sein. |
|
|
|
|
|
Aufstellen
Achten Sie darauf, dass der Arbeitsbereich folgende Bedingungen erfüllt:
−rutschfest
−eben
−frei von Stolpergefahren
−ausreichende Lichtverhältnisse
 Die Maschine nicht in der Nähe von Erdgas, Benzinrinnen oder anderen leicht brennbaren Materialien betreiben.
9
Inbetriebnahme
Vergewissern Sie sich, dass die Maschine komplett und vorschriftsmäßig montiert ist.
Überprüfen Sie vor jedem Gebrauch:
−die Anschlussleitungen auf defekte Stellen (Risse, Schnitte o. dgl.)
 verwenden Sie keine defekten Leitungen
−die Maschine auf eventuelle Beschädigungen
(siehe. Sicheres Arbeiten)
−ob alle Schrauben fest angezogen sind
−die Hydraulik auf Leckstellen
−den Ölstand
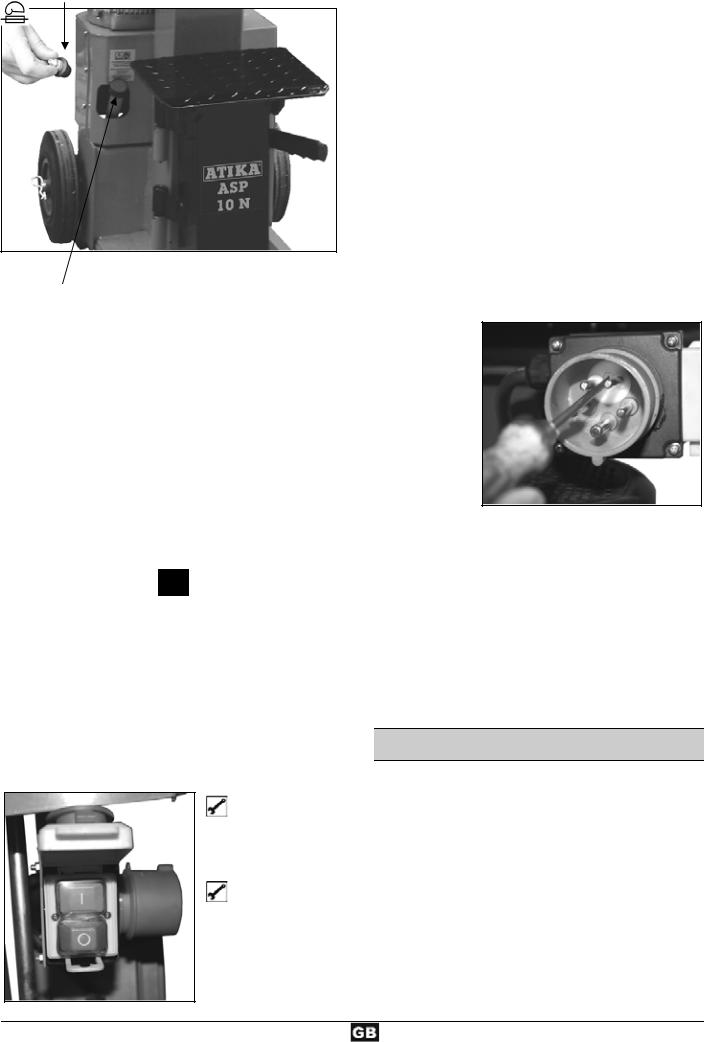
Der Transportverschluss muss vor Inbetriebnahme durch den Ölmessstab ersetzt werden.
Transportverschluss
Ein- / Ausschalten
Überprüfen Sie vor jedem Gebrauch die Funktion der Ausschaltvorrichtung (durch Einund Ausschalten).
Benutzen Sie kein Gerät, bei dem sich der Schalter nicht ein und ausschalten lässt. Beschädigte Schalter müssen unverzüglich vom Kundendienst repariert oder ersetzt werden.
 Einschalten
Drücken Sie den grünen Knopf.
 Ausschalten
Drücken Sie den roten
Knopf.
Ölmessstab

Wenn die Hydraulikanlage nicht entlüftet wird, beschädigt die eingeschlossene Luft die Dichtungen und verursacht eine dauerhaft Beschädigung des Brennholzspalters.
Netzanschluss
Vergleichen Sie die auf dem Gerätetypenschild angegebene Spannung mit der Netzspannung und schließen Sie das Gerät an die entsprechende und vorschriftsmäßige Steckdose an.
Verwenden Sie Verlängerungskabel mit ausreichendem Querschnitt.
Schließen Sie die Maschine über einen Fi-Schutzschalter (Fehlerstrom-Schutzschalter) 30 mA an.
Absicherung
400 V 3~ Î 16 A
Wiederanlaufsicherung bei Stromunterbrechung (Nullspannungsauslöser)
Bei Stromausfall, unbeabsichtigtes Ziehen des Steckers, defekte Sicherung usw. schaltet das Gerät automatisch ab. Zum Wiedereinschalten drücken Sie erneut den grünen Knopf am Ein-/Ausschalter.
Brennholzspalter mit 400 V 3~
Achten Sie auf die Drehrichtung des Motors (siehe Motorpfeil), denn der Betrieb mit falscher Drehrichtung beschädigt die Ölpumpe.
Überprüfen der Drehrichtung:
Motor einschalten; das Spaltmesser fährt automatisch in die höchste Position.
Befindet sich das Spaltmesser bereits in der höchsten Position: greifen Sie beide Bedienarme und drücken Sie sie herunter, das Spaltmesser fährt nach unten.
Bewegt sich das Spaltmesser nicht, nachdem der Motor anläuft, schalten Sie den Motor aus, und ändern die Drehrichtung.
Sie können die Drehrichtung ändern, indem Sie einen Schraubendreher in den hierfür vorgesehenen Schlitz im Steckerkragen führen und mit leichtem Druck durch Linksoder Rechtsbewegung
die richtige Drehrichtung einstellen.
10
Hydraulik
Niemals die Maschine betreiben, wenn eine Gefahr durch Hydraulikflüssigkeit besteht.
Stellen Sie sicher, dass die Maschine und der Arbeitsbereich sauber und frei von Ölflecken sind.
Rutschund Feuergefahr!
Überprüfen Sie regelmäßig, ob genügend Hydrauliköl im Behälter ist (siehe Wartung und Pflege)
Inhalt: ca. 9,5 Liter
Arbeiten mit dem Brennholzspalter
 zusätzliche SICHERHEITSHINWEISE
Der Holzspalter darf nur von einer einzelnen Person bedient werden.
Nur Personen über 18 Jahre, die die Bedienungsanleitung gelesen und verstanden haben, dürfen die Maschine bedienen.
Tragen Sie Ihre Schutzausrüstungen (Schutzbrille/-visier, Handschuhe, Sicherheitsschuhe), um sich vor möglichen Verletzungen zu schützen.
Niemals Stämme spalten, die Nägel, Draht oder andere Gegenstände enthalten.
Bereits gespaltenes Holz und Holzspäne erzeugen einen gefährlichen Arbeitsbereich. Es besteht die Gefahr des Stolperns, Ausrutschens oder Hinfallens. Halten Sie den Arbeitsbereich immer aufgeräumt.
Niemals bei eingeschalteter Maschine die Hände auf sich bewegende Teile der Maschine legen.
Spalten Sie nur Holz, das der max. zu verarbeitenden Länge von 1300 mm entspricht.
Überprüfen Sie vor dem Spalten, ob die Spaltsäule ausreichend gefettet ist, damit diese problemlos einund ausfahren kann.
Was kann ich spalten?
Größe der zu spaltenden Stämme
Holzlänge: |
max. 1300 mm |
Holzdurchmesser: |
min. 120 – max. 400 mm |
Der Holzdurchmesser ist ein empfohlener Richtwert, weil:
−dünnes Holz kann schwer zu spalten sein, wenn es Astlöcher enthält oder die Fasern zu stark sind.
−dickeres Holz als 400 mm kann gespalten werden, wenn die Fasern glatt und locker sind.
Spalten Sie keine grünen Stämme. Trockene, gelagerte Stämme spalten sich viel leichter und verursachen nicht so oft ein Festfressen wie grünes (nasses) Holz.
Blockieren Sie niemals die Bedienungsgriffe (Spannpratzen).
1.Drücken Sie den grünen Einschaltknopf. Warten Sie ein paar Sekunden, damit der Motor seine Enddrehzahl erreicht und der Druck in der Hydraulikpumpe aufgebaut wird.
Achten Sie auf die Motorlaufrichtung bei Brennholzspaltern mit Drehstrommotor (400 V 3~), denn der Betrieb mit falscher Drehrichtung beschädigt die Ölpumpe.
Bei Temperaturen unter –5° C den Holzspalter mindestens 15 min. im Leerlaufbetrieb laufen lassen, damit sich das Öl erwärmen kann.
2. Stellen Sie den Stamm auf den Tisch des Spalters.
Bearbeiten Sie das Spaltgut ausschließlich in Faserrichtung.
3. Halten Sie den Stamm mit den Spannpratzen fest.
4.Drücken Sie beide Bedienungsgriffe gleichzeitig nach unten.
Î Das Spaltmesser fährt herunter und der Stamm wird gespalten.
5.Lassen Sie beide Bedienungsgriffe los, das Spaltmesser fährt in seine Ausgangsposition zurück.
Lassen Sie nur einen Bedienungsgriff los, bleibt das Spaltmesser stehen.
Besondere Hinweise zum Spalten:
Vorbereitungen:
Bereiten Sie das zu spaltende Holz auf die maximal zu verarbeitenden Abmessungen vor und achten Sie darauf, dass das Holz gerade geschnitten ist.
Legen Sie sich das Holz am Holzspalter so zurecht, dass keine Gefahr für Sie besteht (Stolpergefahr).
Bedienung
Zweihandbetrieb
Bedienen Sie den Holzspalter niemals mit zwei Perso-
nen.
Hubhöhenverstellung
Bei kürzeren Holzstücken können Sie die Arbeitsleistung durch Verkürzen des Spaltmesserrücklaufs steigern.
11

1.Stellen Sie den Stamm auf den Spalttisch und fahren das Spaltmesser durch herunterdrücken der beiden Bedienungsgriffe bis ca. 2 cm an den Stamm heran.
2.Lassen Sie einen Bedienungsgriff los, damit das Spaltmesser in dieser Position stehen bleibt und schalten Sie das Gerät aus.
3.Netzstecker ziehen.
4.Lassen Sie den zweiten Bedienungsgriff los.
5.Verkürzen Sie den Rücklauf an der seitlich angebrachten Stange, indem Sie die Feststellschraube in der erforderlichen Höhe fixieren.
Feststellschraube
Tischhöhe einstellen
Obere Position der Tischplatte für Stämme bis 590 mm. Mittlere Position des Tisches für Stämme bis 900 mm. Untere Position des Sockels für Stämme bis 1325 mm.
1.Spalten Sie Stämme bis 590 mm auf der Tischplatte. Sichern Sie die Tischplatte mit Hilfe der Sterngriffschraube (Die Sterngriffschraube greift in die Bohrung der Tischplatte).
2.Spalten Sie Stämme bis 900 mm auf dem Tisch. Lösen Sie vorher die Sterngriffschraube und ziehen die Tischplatte heraus.
3.Spalten Sie Stämme bis 1325 mm auf dem Sockel.
Drücken Sie vorher den Arretierungshebel herunter und schwenken Sie den Tisch zur Seite.
Sterngriffschraube
Tischplatte
Tisch
Sockel
Arretierungshebel
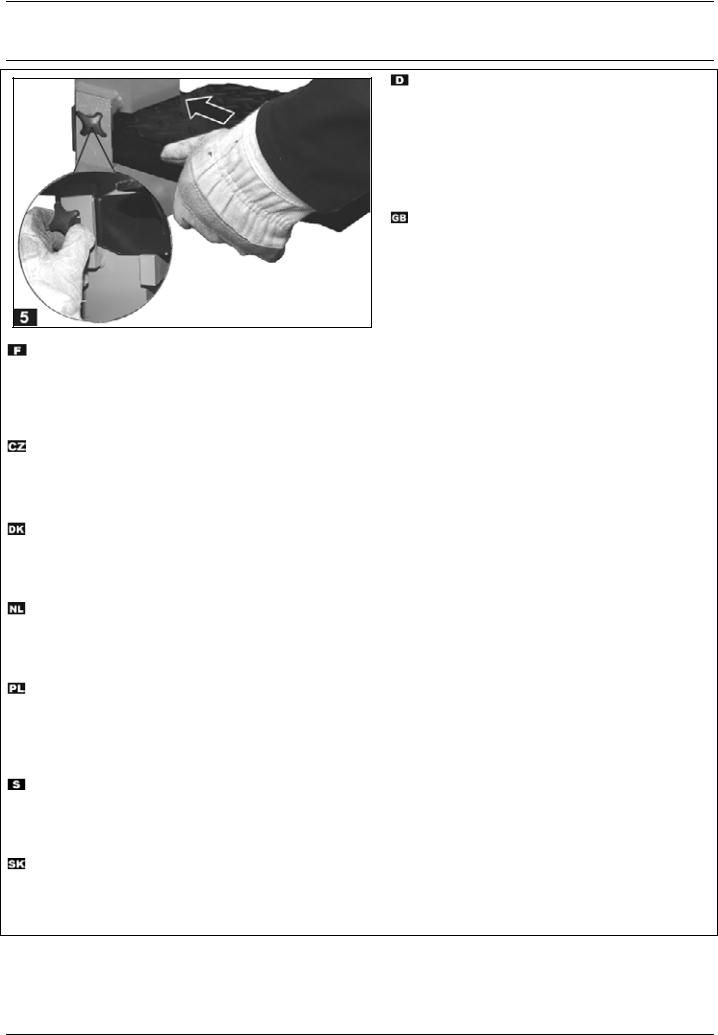
Spaltkreuz justieren:
1.Sterngriffschraube lösen.
2.Das Spaltkreuz in die richtige Position schieben (Die Sterngriffschraube liegt über der Bohrung im Spaltmesser).
Sterngriffschraube
Spaltkreuz
3. Sterngriffschraube wieder festziehen.
Kurzholz spalten:
1.Obere Position der Tischplatte.
2.Stellen Sie den Stamm auf die Tischplatte des Spalters.
3.Halten Sie den Stamm mit den Spannpratzen fest.
Bearbeiten Sie das Spaltgut ausschließlich in Faserrich-
tung.
12
Langholz spalten:
1.Mittlere Position des Tisches oder untere Position des Sockels.
2.Entfernen Sie das Spaltkreuz.
3.Stellen Sie den Stamm auf den Tisch oder den Sockel des Spalters.
Mögliche Störung beim Langholz spalten: Das Spaltgut wird nicht durchgespalten, klemmt am Spaltmesser fest und wird beim Rücklauf mit hochgezogen.
In diesem Fall gehen Sie folgendermaßen vor:
1.Schalten Sie das Gerät aus.
2.Befestigen Sie, je nach Länge des noch zu spaltenden Stammes, die Tischplatte in der oberen Position oder den Tisch in der mittleren Position.
3.Schalten Sie das Gerät ein und setzen Sie den Spaltvorgang fort.
Niemals zwei Stämme in einem Arbeitsgang spalten.
Niemals Holz während des Arbeitvorganges nachlegen oder ersetzen.
Niemals durch Aufrechterhalten des Schubs über mehrere Sekunden ein Spalten des Stammes erzwingen. Dies kann zu Beschädigungen an der Maschine führen.
Positionieren Sie den Stamm erneut auf dem Tisch und wiederholen Sie den Spaltvorgang oder legen Sie den Stamm zur Seite.
Wie wird ein festgeklemmter Stamm gelöst?
Es besteht die Gefahr, dass sich astiges Spaltgut beim Spaltvorgang verklemmt.
1.Gerät ausschalten und Netzstecker ziehen.
2.Entfernen Sie verklemmte Stämme nicht mit Ihren Händen.
3.Den festgeklemmten Stamm vorsichtig mit einer Brechstange hinund herbewegen, damit sich der Stamm lösen kann. Spaltsäule nicht beschädigen!
 Beim Lösen niemals auf den festgeklemmten Stamm hämmern.
Sägen Sie den eingeklemmten Stamm niemals heraus. Bitten Sie keine zweite Person um Unterstützung.
Arbeitsende:
Fahren Sie das Spaltmesser in die untere Position (eingefahrener Zustand).
Lassen Sie einen Bedienungsgriff los.
Schalten Sie das Gerät aus und ziehen Sie den Netzstecker.
Wartungsund Pflegehinweise beachten.
Wartung und Pflege
Vor Wartungsund Reinigungsarbeiten Netzstecker ziehen.
 Schutzhandschuhe tragen, um Verletzungen an den Händen zu vermeiden.
Beachten Sie folgendes, um die Funktionsfähigkeit des Brennholzspalters zu erhalten:
Reinigen Sie die Maschine nach Arbeitsende gründlich.
Entfernen Sie Harzrückstände.
Fetten Sie die Spaltsäule regelmäßig ein oder ölen Sie diese mit einem umweltfreundlichen Sprühöl ein.
Überprüfen Sie Hydraulikschläuche und Schlauchverbindungen regelmäßig auf Dichtigkeit und Festigkeit.
Spaltmesser schärfen
Nach langer Betriebsdauer, bei verminderter Spaltleistung oder bei leichter Verformung der Schneide das Spaltmesser abschleifen oder mit einer feinen Feile schärfen (Grate entfernen).
Kanten schärfen
Wie überprüfe ich den Ölstand?
1.Die Spaltsäule muss im eingefahrenen Zustand sein.
2.Ziehen Sie den Ölmessstab heraus.
3.Säubern Sie den Ölmessstab und die Öldichtung.
4.Stecken Sie den Messstab bis zum Anschlag wieder in die Öffnung.
5.Ziehen Sie den Ölmessstab wieder heraus.
13
Ölmessstab
Liegt der Ölpegel zwischen den beiden Markierungen, ist genug Öl im Behälter.
Liegt der Ölpegel unterhalb der unteren Markierung muss Öl mit Hilfe eines sauberen Trichters nachgefüllt werden.
obere Markierung
untere Markierung
6.Überprüfen Sie die Öldichtung. Diese muss bei Beschädigungen ausgetauscht werden.
7.Stecken Sie den Messstab wieder in die Öffnung.
Entsorgen Sie das Altöl ordnungsgemäß (Altölsammelstelle vor Ort). Es ist verboten das Altöl in den Boden abzulassen oder mit Abfall zu vermischen.
Hydrauliköl
Für den Hydraulikzylinder empfehlen wir die folgenden Hydrauliköle:
¾Shell Tellus T 22
¾Aral Vitam Gf 22
¾BP Energol HLP 22
¾Mobil DTE 11
¾oder gleichwertiges
Keine anderen Ölsorten verwenden. Der Gebrauch von anderen Ölsorten beeinflusst die Funktion des Hydraulikzylinders.
Wann wechsle ich das Öl aus?
Erster Ölwechsel nach 50 Betriebsstunden, dann alle 500 Betriebsstunden.
Es sind zwei Personen erforderlich.
Auswechseln:
1.Die Spaltsäule muss im eingefahrenen Zustand sein.
2.Ziehen Sie den Ölmessstab heraus.
3.Stellen Sie einen Behälter, der mindestens 10 Liter Öl aufnehmen kann, unter den Holzspalter.
4.Schrauben Sie den Ablassstopfen ab, damit das Öl raus laufen kann.
5.Dichtung und Ablassstopfen wieder einsetzen.
6.Füllen Sie das neue Hydrauliköl (ca. 9,5 Liter) mit Hilfe eines sauberen Trichters ein.
7.Säubern Sie den Ölmessstab und die Öldichtung.
8.Überprüfen Sie die Öldichtung. Diese muss bei Beschädigungen ausgetauscht werden.
9.Stecken Sie den Messstab wieder in die Öffnung.
Garantie
Bitte beachten Sie die beiliegende Garantieerklärung.
14

Technische Daten
Modell |
ASP 10 N |
Typ-Bezeichnung |
ASP 10 N |
Spaltkraft |
100 kN (10 t) ± 10 % |
Holzlänge |
max. 1300 mm |
Holzdurchmesser |
min. 120 mm – max. 400 mm |
Spalthub |
≈ 515 mm |
Vorlaufgeschwindigkeit |
ca. 0,05 m/sek. |
Rücklaufgeschwindigkeit |
ca. 0,25 m/sek. |
Hydrauliköl (max.) |
10 Liter |
Hydraulikdruck |
21,4 MPa (214 bar) |
Elektromotorleistung (Aufnahmeleistung) |
P1 4,0 kW (S6-40%) |
Anschluss |
400 V 3~ 50 Hz, 16 A |
Abmessungen |
Länge 580 x Breite 530 x Höhe 1530 mm |
Gewicht |
ca. 178 kg |
Mögliche Störungen
|
Problem |
mögliche Ursache |
Beseitigung |
|
|
Stamm wird nicht gespalten |
Stamm ist nicht richtig positioniert |
positionieren Sie den Stamm erneut |
|
|
(zu wenig Spaltleistung) |
Stamm überschreitet die zulässigen Ab- |
Stamm auf zulässige Abmessungen schneiden |
|
|
|
messungen oder das Holz ist für die Leis- |
|
|
|
|
tung der Maschine zu hart |
|
|
|
|
Spaltmesser spaltet nicht |
Spaltmesser schärfen, auf Grat oder Kerben |
|
|
|
|
prüfen |
|
|
|
Hydraulikdruck zu niedrig |
Ölstand überprüfen; wenn nötig Öl nachfüllen. |
|
|
|
|
Problem ist nicht zu beheben, bitte wenden Sie |
|
|
|
|
sich an den Hersteller oder an von ihm benannte |
|
|
|
|
Firma. |
|
|
|
Auslösegestänge verbogen (Hydraulikstö- |
Gestänge vom Hersteller oder von ihm benannte |
|
|
|
ßel wird nicht ganz eingedrückt) |
Firma nachjustieren lassen |
|
|
|
falsche Anschlussleitung (länger als 10 m |
richtige Anschlussleitung verwenden |
|
|
|
oder zu kleiner Aderquerschnitt) |
|
|
|
Spaltsäule fährt schwankend oder |
Luft im Kreislauf |
Ölstand überprüfen; wenn nötig Öl nachfüllen. |
|
|
mit starken Vibrationen ein |
Spaltsäule nicht ausreichend eingefettet |
Spaltsäule einfetten oder mit einem umwelt- |
|
|
|
bzw. eingeölt |
freundlichen Sprühöl einölen |
|
|
|
|
Problem ist nicht zu beheben, bitte wenden Sie sich |
|
|
|
|
an den Hersteller oder an eine von ihm benannte |
|
|
|
|
Firma. |
|
|
Spaltsäule fährt nicht ein |
Hydraulikpumpe defekt |
Zur Problembehebung wenden Sie sich an den |
|
|
|
|
Hersteller oder an eine von ihm benannte Firma. |
|
|
Motor läuft an, aber die Spaltsäule |
falsche Drehrichtung des Motors |
Drehrichtung des Motors überprüfen |
|
|
wird nicht eingefahren |
|
Drehstrom: Drehrichtung umstellen |
|
|
|
|
Wechselstrom: Zur Problembehebung wenden |
|
|
|
|
Sie sich an den Hersteller oder an eine von ihm |
|
|
|
|
benannte Firma. |
|
|
Motor läuft nicht an |
Netzspannung fehlt |
Absicherung überprüfen |
|
|
|
2-Phasenlauf bei Drehstrommotor |
Sicherung und Zuleitung von einem Elektrofach- |
|
|
|
|
mann überprüfen lassen |
|
|
|
Anschlusskabel defekt |
Anschlusskabel austauschen bzw. von einem |
|
|
|
|
Elektrofachmann überprüfen lassen |
|
|
|
Elektromotor defekt |
Zur Problembehebung wenden Sie sich an den |
|
|
|
|
Hersteller oder an eine von ihm benannte Firma. |
|
|
|
|
|
|
|
|
|
15 |
|

Do not operate machine before having read the operating instructions, understood all the notes and assembly the machine as described here.
Keep the instructions in a safe place for future use.
Contents
Declaration of Conformity |
1 |
|
|
Spare parts / Description of device |
2 |
|
|
Assembly |
4 |
|
|
Extent of delivery |
16 |
|
|
Symbols |
16 |
|
|
|
|
|
|
Proper use |
17 |
|
|
|
|
||
Residual risks |
17 |
|
|
Safe working |
17 |
|
|
Transport instructions |
18 |
|
|
|
|
||
Positioning |
18 |
|
|
Start-up |
18 |
|
|
Working with the log splitter |
19 |
|
|
|
|
||
|
|
||
Care and maintenance |
22 |
|
|
Guarantee |
23 |
|
|
Technical data |
24 |
|
|
|
|
||
Possible problems |
24 |
|
|
Extend of delivery
After unpacking, check the contents of the box > That it is complete
> Check for possible transport damage
Report any damage or missing items to your dealer, supplier or the manufacturer immediately. Complaints made at a later date will not be acknowledged.
1 ready mounted machine unit |
1 axle |
||
1 table plate |
1 bag of accessories |
||
|
1 control arm, right |
|
1 operating manual |
|
1 control arm, left |
|
2 wheels |
Nobody else should be in the working area of the machine other than the operator. Keep other persons or animals out of the danger area (minimum distance 5 m).
Wear hearing protection when working with the machine to protect your hearing.
Wear face mask when working with the machine to protect the eyes from chips and splinters.
Wear safety gloves when working with the machine to protect the hands from chips and splinters.
Wear safety shoes when working with the machine to protect the feet from falling logs.
Keep your work space tidy! Untidiness may result in accidents.
Oil is a fire hazard and can explode. Smoking and open fire are prohibited.
Dispose of the old oil properly (local oil disposal point). The old oil must not be poured into the ground or drainage system, or mixed with other waste.
Do not remove or modify any protection or safety devices.
Always pay full attention to the splitting blade’s movement.
Hold the work piece when splitting with the clamping claw.
Symbols machine
Read the operating and safety instructions thoroughly before commissioning the machine.
Caution!
Before starting any repair, maintenance or cleaning work, always switch off the motor and remove the plug from the socket.
Cutting and crushing risk! Never touch dangerous areas when splitting blade is moving.
Do not remove jammed logs with your hands.
Symbols machine / packaging
Do not dispose of electrical devices as domestic waste. Dispose of devices, accessories and packaging by means of environmentally friendly recycling.
Symbols operating manual
Threatened hazard or hazardous situation. Not observing this instruction can lead to injuries or cause damage to property.
Important information on proper handling. Not observing this instruction can lead to faults.
16

User information. This information helps you to use all the functions optimally.
Assembly, operation and servicing. Here you are explained exactly what to do.
Proper use
The log splitter must only be used for splitting logs.
Only straight-cut logs are suitable for use with the log splitter.
Foreign bodies (nails, wire, concrete etc.) must always be removed from the wood before it is split.
The intended usage also includes compliance with the operating, servicing and repair conditions prescribed by the manufacturer and following the safety instructions included in the instructions.
Any other use is deemed not to be use as prescribed. The manufacturer is not liable for any type of damage resulting from this: the user bears the sole risk.
Unauthorised modifications on the log splitter exclude a liability of the manufacturer for damages of any kind resulting from it.
Only persons who are familiarised with the device and informed about possible risks are allowed to prepare, operate and service this device. Repair works may only be carried out by us or by a customer service agent nominated by us.
Residual risks
 Even if used properly, residual risks can exist even if the relevant safety regulations are complied with due to the design determined by the intended purpose.
Residual risks can be minimised if the “Safe working” and the “Proper use” as well as the whole of the operating instructions are observed.
Observing these instructions, and taking proper care, will reduce the risk of personal injury or damage to the equipment.
Failure to observe the safety precautions can lead to injury to the operator or damage to property.
Carelessness, failure to comply with the safety regulations and incorrect use can result in injuries to your hands and fingers when the splitting blade is moving.
Risk from electricity, by using non-standard electrical connections.
Touching live parts of opened electrical components.
In addition, in spite of all the precautionary measures taken, non-obvious residual risks can still exist.
Safe working
 Before commissioning this product, read and keep to the following advice. Also observe the preventive regulations of your professional association and the safety provisions applicable in the respective country, in rder to protect yourself and others from possible injury.
Pass the safety instructions on to all persons who work with the machine.
Keep these safety instructions in a safe place.
Be observant. Attend to what you do. Start working with rationality. Do not use the device when you are tired or under the influence of drugs, alcohol or medicaments. One moment of carelessness when using the device can result in serious injuries.
Make yourself familiar with the equipment before using it, by reading and understanding the operating instructions.
Do not use the machine for unsuitable purposes (see “Proper use” and “Working with the log splitter”).
Ensure that you have stand in a secure standing position and maintain your balance at all times.
Take up a working position which is close to the controls.
Never stand on top of the machine.
When working with the machine, always wear
−face mask
−safety gloves
−hearing protection
−safety shoes with steel toe-caps
Wear suitable work clothing:
−do not wear any loose-fitting clothing or jewellery, since these may be caught or trapped by moving parts
Within his area of work the operator is responsible for third parties.
The machine may not be operated by children or young people under the age of 18.
Keep children away form machine.
Never operate the machine if other persons are in the immediate vicinity.
Never leave the machine unattended.
Keep your workplace in an orderly condition! Untidiness can result in accidents.
Do not overload the machine! You work better and safer in the given performance range.
Only operate the machine with complete and correctly attached safety equipment and do not alter anything on the machine that could impair the safety.
Do not modify the machine or parts of it.
Do not spray machine with water
(this is hazardous due to live components).
Do not leave the machine standing in the rain or use when raining.
Store the unused machine in a dry locked place away from the reach of children.
Switch the machine off and remove the mains plug from the socket when
−carrying out repair works
−maintenance and cleaning work
−checking connecting lines, whether these are knotted or damaged
−removing faults
−transporting
−leaving unattended (even during short interruptions)
17

Check the machine for possible damage
−Before continuing to use the machine, the protective devices must be inspected to ensure that they work perfectly and with their intended function
−Check whether the movable parts function perfectly and do not stick or whether the parts are damaged. All parts must be correctly installed and fulfil all conditions to ensure perfect operation of the machine.
−Damaged guards and parts must be properly repaired or exchanged by a recognized, specialist workshop; insofar as nothing else is stated in the instructions for use.
−Damaged or illegible safety warning labels should be replaced immediately.
Electrical safety
Electrical connections must conform to IEC 60245 (H 07 RN-F) with a cable cross-section of at least
230 V ~
3 x 1.5 mm² for a maximum cable length of up to 10 m
400 V 3~
5 x 1.5 mm² for a maximum cable length of up to 10 m
Never use the machine with a power supply cable of over 10 m in length. Longer power supply cables will cause a drop in voltage. The motor will not be able to provide its maximum performance and the operation of the machine will be impaired.
Plugs and coupler outlets on connection cables must be made of rubber, plasticised PVC or other thermoplastic material of same mechanical stability or be covered with this material.
The connector of the connection cable must be splashproof.
When running the connection line observe that it does not interfere, is not squeezed, bended and the plug connection does not get wet.
Wind off completely the cable when using a cable drum.
Do not use the cable for purposes for which it is not meant. Protect the cable against heat, oil and sharp edges. Do not use the cable to pull the plug from the socket.
Regularly check the extension cables and replace them if they are damaged.
Do not use any defective connection cables.
When working outdoors, only use extension cables especially approved and appropriately labelled for outdoor use.
Do not set up any provisional electrical connections.
Never bypass protective devices or deactivate them.
The electrical connection or repairs to electrical parts of the machine must be carried out by a certified electrician or one of our customer service points. Local regulations – especially regarding protective measures
– must be observed.
Repairs to other parts of the machine must be carried out by the manufacturer or one of his customer service points.
Use only original spare parts. Accidents can arise for the user through the use of other spare parts. The
manufacturer is not liable for any damage or injury resulting from such action.
Transport Instructions
 Move the splitting blade right down every time before the machine is transported.
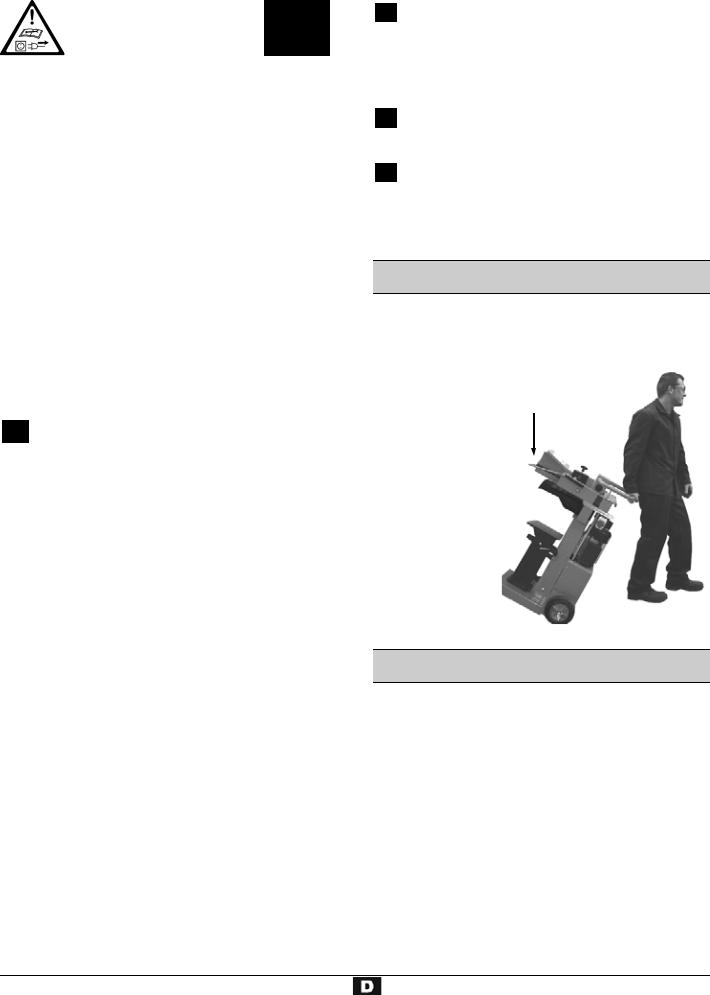
To |
transport |
the |
|
|||
machine, grasp the |
transport belt |
|||||
handle |
and |
tilt |
the |
|||
|
||||||
log |
splitter |
slightly |
|
|||
towards |
you. |
The |
|
|||
log |
splitter |
can |
be |
|
||
easily |
transported |
|
||||
in this position. |
|
|
||||
Make sure that the oil tank cap is securely tightened to prevent oil from leaking during transport.
Positioning
Ensure that the working area meets the following conditions:
−no danger of slipping
−level
−free of obstacles
−sufficiently well lit
 Do not operate the machine in the direct vicinity of gas or petrol pipes or containers, or any other easily inflammable materials.
Start-up
Check that the machine is completely and correctly assembled.
Before using the log splitter, make sure each time that
−there are no faulty connections (tears, cuts, etc.)  Do not use defective power supply cables.
−there are no damages at the machine
−all screws are tight
−check the hydraulic system for any possible leaks
−the oil level
The transport closure must be replaced by the oil dipstick before start up the machine.
18
Transport closure
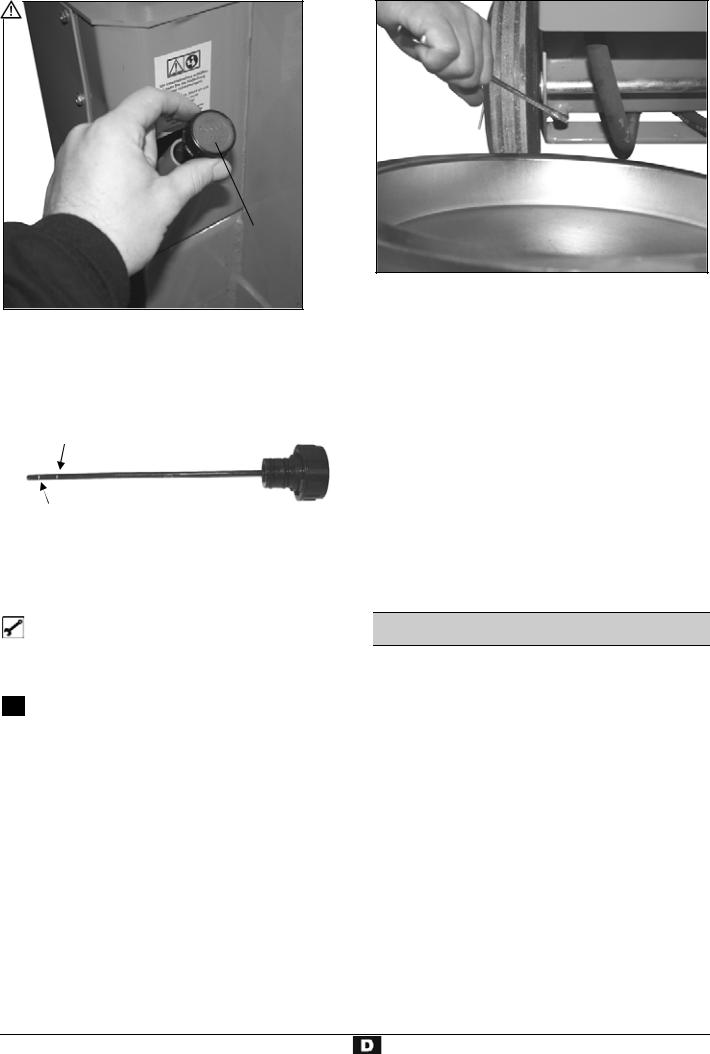
Oil dipstick
If the hydraulic system is not vented, the trapped air will damage the seals and cause permanent damage to the log splitter.
Mains connection
Compare the voltage given on the machine model plate e.g. 230 V with the mains voltage and connect the machine to the relevant and properly earthed plug.
Only use connection cables with sufficient crosssections.
Connect the machine via a 30 mA fault current safety switch.
Fuse protection
400 V 3~ Î 16 A
Switching on / off
 Prior to every use, check the function of the disconnection mechanism (by switching on and off).
Do not use any device where the switch can not be switched on and off. Damaged switches must be repaired or replaced immediately by the customer service.
Switching on
Press the green button.
Switching off
Press the red button.
Lock in case of power (zero-voltage initiator)
The equipment will switch off automatically if there is a power cut. Repress the green button to switch it on again.
Log splitter with 400 V 3~
Make sure that the motor turns in the correct direction (see motor arrow), because operation in the wrong direction damages the oil pump.
Switch on motor; the splitting blade automatically moves to the highest position.
If the splitting blade is already in its highest position: grip both operating handles and push them down. The splitting blade moves downwards.
If the splitting blade does not move after the motor has started, switch off the motor and change the direction of rotation.
You can change the direction by placing a screwdriver in the slot provided in the plug collar, and adjust the correct direction by moving to the left or right applying slight pressure.
Hydraulics
Never operate the machine in the event of any possible danger from hydraulic fluid.
Ensure that the machine and working area are clean and free of oil.
Danger of slippage or fire!
Check the hydraulic reservoir regularly to ensure that it contains enough hydraulic oil (see “Care and maintenance”).
Capacity: approx. 9.5 litres
Working with the log splitter
 Additional SAFETY INSTRUCTIONS
The log splitter may only be operated by a single person.
The machine may only be operated by persons over the age of 18 years, and who have read and understood these operating instructions.
Wear protective equipment (safety goggles/mask, gloves, safety shoes) to protect yourself from possible injury.
Never try to split logs containing nails, wire or other similar objects.
Already split wood and wood chips create a dangerous working area. The operator may stumble, slip or fall. Always keep the working area neat and tidy.
19
Never place the hands on or near any moving parts of the machine when it is switched on. Maintain a safe distance from the log, the ram and the wedge in order to protect your hands from injury.
The machine should only be used for splitting logs with a maximum length of 1300 mm.
Check before splitting if the splitting column has been sufficiently lubricated to allow its trouble-free retraction and extension.
What type of logs can I split? Size of logs
Length: |
max. 1300 mm |
Diameter: |
min. 120 – max. 400 mm |
The log diameter is a recommended guideline figure, because:
−thin logs can be difficult to split if they contain knots or if the fibres are too strong.
−logs with a diameter of over 400 mm can be split if the fibres are smooth and open.
Do not try to split green logs. Dry logs are much easier to split, and do not cause jams as often as green (damp) wood.
Operation
Two-hand operation
Never operate the log splitter with two people. Never block the control handles (clamping claws).
1.Press the green switch on the electric motor. Wait a few moments until the motor has reached its operating revolutions and the required pressure has been built up in the hydraulic pump.
Check the direction of the motor in the log splitter with threephase motor (400 V 3~), because operation in the wrong direction damages the oil pump.
At temperatures below –5° C, let the log splitter run for at least 15 min. in neutral to heat up the oil.
2. Place the log on the log splitter table.
Only split the logs in the direction of the wood fibres. Hold the log tight with the clamping claws.
3.Press both operating handles down simultaneously: Î The splitting blade falls down and splits the log.
4.Release the two control handles, the splitting blade returns to its initial position.
If you only release one control handle, then the splitting blade remains where it is.
Special instructions for splitting logs:
Preparations:
The logs to be split should be cut to the maximum dimensions. Ensure also that the logs are cut straight and square.
Place the log properly on the log splitter, so as not to cause any risk of stumbling or falling to the operator.
Adjusting the stroke height
In case of shorter wood pieces the efficiency can be increased by shortening the return of the splitting cutter.
1.Place the log on the splitting table and press the two control handles to bring the splitting blade down to approx. 2 cm above the log.
2.Release one control handle so that the blade stays in this position.
3.Switch the machine off and disconnect the power.
4.Release the second control handle.
5.Shorten the return path at the rod fitted to the side by
fixing |
the |
Holding screw |
|
holding |
screw |
||
|
|||
at |
the |
|
|
necessary |
|
||
height. |
|
|
|
|
|
||
20

Adjusting the table height |
|
Only split the logs in the direction of the wood fibres. |
||||
Upper table plate position for logs up to 590 mm. |
3. |
Hold the log tight with the clamping claws. |
||||
Middle table position for logs up to 900 mm. |
|
Splitting long wood: |
||||
Lower base position for logs up to 1325 cm. |
||||||
|
|
|
|
1. |
Middle position |
|
|
|
|
|
|
||
1. |
Split logs up to 590 mm on the table plate. |
|
of table or low |
|
||
|
Secure the table plate using the machine knob screw. |
|
position of base. |
|
||
|
(The machine knob screw engages in the table plate |
2. |
Remove the |
|
||
|
hole.) |
|
splitting cross. |
|
||
2. |
Split logs up to 900 mm on the table. Pull out the table |
3. |
Place the log on |
|
||
|
|
plate. |
|
the splitter’s |
|
|
3. |
Split logs up to 1325 mm on the base. Press the locking |
|
table or base. |
|
||
|
lever down and swing aside the table. |
|
|
|
||
|
|
Star grip screw |
|
|
|
|
|
|
|
|
|
|
|
|
|
Possible malfunction when cleaving logs: The log to |
|
|
be cleaved is not cleaved right through, jams on the cleaving |
||
Table plate |
blade and is pulled up during the blade’s return movement. |
||
In this case, proceed as follows: |
|||
|
|||
Table |
1. Switch off the device. |
||
|
2. Depending on the log still to be cleaved fix the table plate |
||
|
in the upper or the table in the middle position. |
||
|
3. Switch on the device and continue the splitting operation. |
||
Base |
|
Never try to split two logs at once. |
|
|
|||
|
|||
|
|
Never try to remove or replace the log during the |
|
Locking lever |
|
splitting process. |
|
|
Never try to force the splitting of the log by maintaining |
||
|
|
||
|
the pressure for several seconds. This can lead to damage |
||
|
to the machine. |
||
|
Position the log on the table again and repeat the splitting |
||
|
phase, or put the log on one side. |
||
|
Adjusting the splitting cross: |
How to release a jammed log? |
|||||||
There is a risk of knotted logs getting stuck during the |
|||||||||
1. |
Loosen |
star |
grip |
|
|||||
Star grip screw |
splitting process. |
||||||||
|
screw. |
|
|
||||||
|
|
|
|
1. Switch machine off and disconnect the power. |
|||||
2. |
Move the splitting |
|
|||||||
|
cross |
to |
the |
|
2. |
|
Do not remove jammed logs with your hands. |
||
|
correct position |
|
|
|
|
|
|||
|
(The |
star |
grip |
|
|
|
|
|
|
|
screw |
is beyond |
Splitting cross |
3. |
Carefully move the stuck log with a crowbar backwards |
||||
|
the borehole |
in |
|
|
|
and forwards to loosen it. Don´t damage the splitting |
|||
|
the |
splitting |
|
|
|
pillar. |
|||
|
blade). |
|
|
|
|
|
|
|
|
3. |
Mount star grip screw. |
|
|
|
Never hammer on the stuck log. |
||||
|
|
|
|||||||
|
Splitting short wood: |
|
|
|
Never use a saw to cut the stuck log out of the machine. |
||||
|
|
|
|||||||
|
|
|
Do not enlist the aid of a second person - this is a one- |
||||||
1. |
Upper position of table plate. |
|
|
|
man job. |
||||
2. |
Place the log on the splitter’s table plate. |
|
|
|
|
||||
|
|
|
|
|
|
|
21 |
||
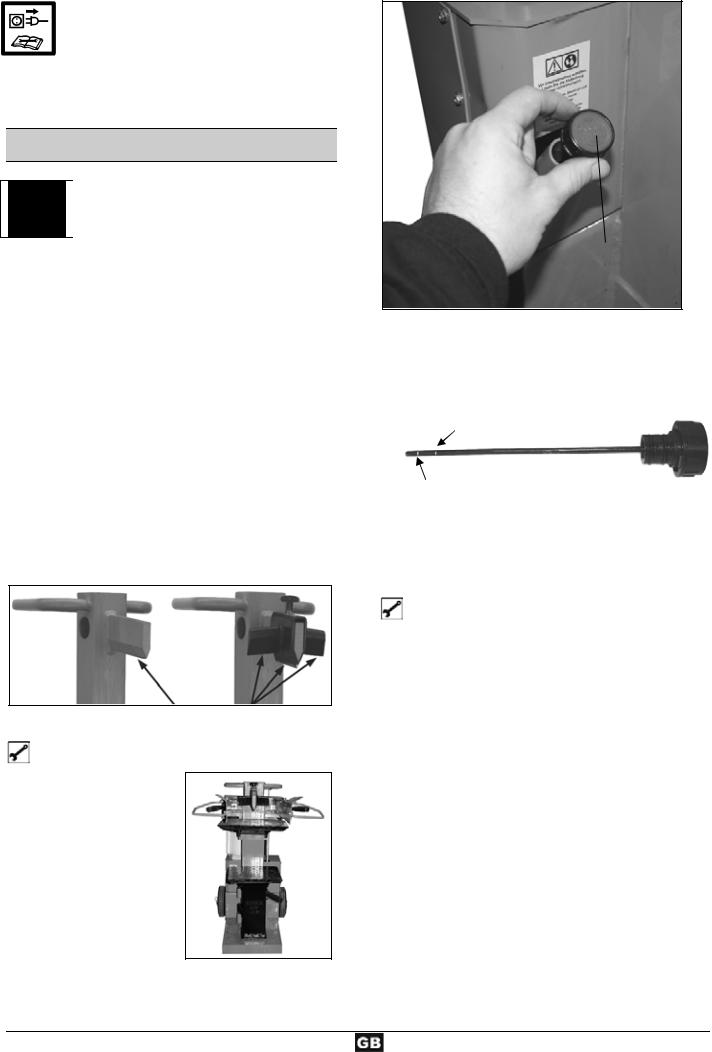
Finishing work:
Bring the splitting blade to the lower position (run-in state).
Release one of the control handles.
Switch the machine off and disconnect the power.
Follow the care and maintenance instructions.
Care and maintenance
Remove the plug from the power socket before starting any maintenance or cleaning work.
 Wear protective gloves in order to avoid injury to the hands.
Observe the following in order to keep the log splitter in good working order:
Clean the machine thoroughly after you have finished using it.
Remove any resin remains on the machine.
Lubricate the splitting column regularly or oil it using environmentally friendly spray oil.
Check the oil level and change the oil as necessary.
Check hydraulic hoses and hose connections regularly for any leaks and firm fitting.
Sharpening the splitting blade
After longer operating periods, for reduced splitting performance or slight deformation of the cutting edge, grind the splitting blade or sharpen it with a fine file (remove burrs).
Sharpen wedges
How do I check the oil level?
1.The splitting column must be in run-in state. Now remove the dipstick.
2.Clean the dipstick and the oil seal.
3.Replace the dipstick fully into the oil reservoir.
4.Now remove the dipstick again and read off the oil level.
Oil dipstick
If the oil level is between the two marking on the oil dipstick, there is sufficient oil in the reservoir.
If the oil level is below the lower marking, more oil should be added with the aid of a clean funnel.
upper marking
lower marking
6.Check the oil seal and replace it if it is damaged in any way.
7.Replace the dipstick into the oil reservoir.
When should I change the oil?
The first oil change should be carried out after 50 operating hours, and then every 500 operating hours.
 Two persons are required for this.
Changing the oil:
1.The splitting column must be in run-in state.
2.Now remove the dipstick.
3.Place a container under the log splitter to catch the old oil. The container should have a capacity of at least 10 litres.
4.Screw off the drain plug to allow the oil to flow out.
5.Insert the seal and drain plug again.
6.Pour in the new hydraulic oil (approx. 9.5 litres) using a clean funnel.
7.Clean the dipstick and the oil seal.
8.Check the oil seal and replace it if it is damaged in any way.
9.Replace the dipstick.
22
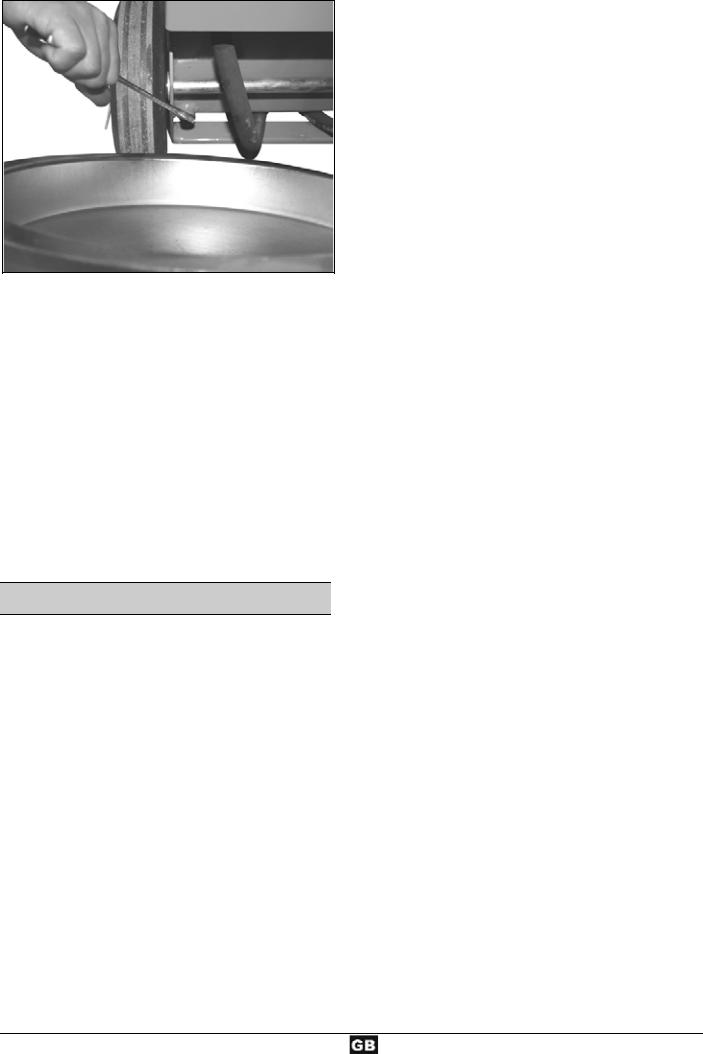
Dispose of the old oil properly (local oil disposal point). The old oil must not be poured into the ground or drainage system, or mixed with other waste.
Hydraulic oil
We recommend the following hydraulic oils for the hydraulic cylinder:
¾Shell Tellus T 22
¾Aral Vitam Gf 22
¾BP Energol HLP 22
¾Mobil DTE 11
¾or equivalent
Do not use any other types of oil. The use of any other type of oil will adversely affect the operation of the hydraulic cylinder.
Guarantee
Please observe the enclosed terms of guarantee.
23

Technical data
Model
Type
Splitting force
Log length
Log diameter
Stroke
Feed speed
Return speed
Hydraulic oil (max.)
Hydraulic pressure
Electric motor performance (power consumption)
Power supply
Dimensions
Weight
ASP 10 N
ASP 10 N
100 kN (10 t) ± 10 % max. 1300 mm
min. 120 mm – max. 400 mm ≈ 515 mm
approx. 0.05 m/sek. approx. 0.25 m/sek.
10litres
21.4MPa (214 bar) P1 4.0 kW (S6-40%)
400 V 3~ 50 Hz, 16 A
length 580 x width 530 x height 1530 mm approx. 178 kg
Possible problems
Problem |
|
|
Possible cause |
Remedy |
|
|
|
|
|
|
|
Logs are not being split |
The log is not positioned correctly. |
Reposition the log correctly. |
|
|
|
||||||
properly |
|
|
The log exceeds the maximum dimensions |
Cut |
the |
log to |
the |
required |
dimensions. |
||
(insufficient |
splitting |
or the wood is too hard for the performance |
|
|
|
|
|
|
|
|
|
performance). |
|
of the machine. |
Sharpen splitting |
|
|
|
|
|
|||
|
|
|
Splitting blade does not split log. |
blade, |
check |
for |
burrs |
or |
|||
|
|
|
|
notches. |
|
|
|
|
|
|
|
|
|
|
Hydraulic pressure too low. |
Check the oil level and add more oil if necessary. |
|||||||
|
|
|
|
If the problem cannot be rectified, refer to the |
|||||||
|
|
|
|
manufacturer or other approved service centre. |
|||||||
|
|
|
Release rods bent (hydraulic tappet not |
Arrange for manufacturer or authorised company |
|||||||
|
|
|
quite pressed in). |
to adjust the rods. |
|
|
|
|
|
||
|
|
|
Incorrect connecting lead (longer than 10 m |
Use the correct connecting lead. |
|
|
|
||||
|
|
|
or too small cable cross-section). |
|
|
|
|
|
|
|
|
Splitting |
column |
moves |
Air in the circuit. |
Check the oil level and add more oil if necessary. |
|||||||
unsteadily |
or with |
strong |
Splitting column not sufficiently lubricated or |
Lubricate |
splitting column or |
oil |
with |
||||
vibrations. |
|
|
oiled. |
environmentally friendly spray oil. |
|
|
|
||||
|
|
|
|
If the problem cannot be rectified, refer to the |
|||||||
|
|
|
|
manufacturer or other approved service centre. |
|
||||||
Splitting column does not |
Hydraulic pump defective. |
To correct the problem, refer to the manufacturer |
|||||||||
move in. |
|
|
|
or other approved service centre. |
|
|
|
||||
Motor starts, but |
splitting |
Motor turns in wrong direction |
Check the motor direction |
|
|
|
|
||||
column does not move in. |
|
Threephase: adjust the motor direction |
|
|
|||||||
|
|
|
|
AC: To correct the problem, refer to the manu- |
|||||||
|
|
|
|
facturer or other approved service centre. |
|
||||||
Motor will not start. |
|
No electrical power. |
Check the fuse. |
|
|
|
|
|
|||
|
|
|
2-phase mode in threephase motor. |
Have |
fuse |
and |
lead |
checked |
by |
qualified |
|
|
|
|
|
electrician. |
|
|
|
|
|
|
|
|
|
|
Connection cable defective. |
Replace the connection cable or have it checked |
|||||||
|
|
|
|
by an electrician. |
|
|
|
|
|
||
|
|
|
Electric motor defective. |
To correct the problem, refer to the manufacturer |
|||||||
|
|
|
|
or other approved service centre. |
|
|
|
||||
24

Vous ne devez pas mettre la machine en route avant d’avoir lu attentivement ce mode d’emploi, d’avoir observé toutes les informations indiquées et d’avoir monté la machine tel que cela est décrit.
Conserver cette notice d’utilisation pour toute utilisation future.
Table des matières
Déclaration de conformité |
1 |
Description de l'appareil/ Pièces de rechange |
2 |
Montage |
4 |
Fourniture |
25 |
Symboles |
25 |
Utilisation conforme |
25 |
Risques résiduels |
26 |
Consignes de sécurité |
26 |
Consignes de transport |
27 |
Installation |
28 |
Mise en service |
28 |
Travaux avec le fendeur de bûches |
29 |
Entretien et maintenance |
31 |
Garantie |
33 |
Caractéristiques techniques |
33 |
Pannes possibles |
34 |
Fourniture
Après le déballage de la machine, vérifiez le contenu du carton quant à
>l’intégralité des pièces
>la présence éventuelle de dommages dus au transport.
Informez immédiatement le revendeur, le transporteur et / ou le fabricant en cas de réclamation. Sachez que les réclamations ultérieures ne sont plus acceptées.
1 bloc d'assemblage prémonté |
1 axe |
1 dessus de table |
1 sachet d’accessoires |
1 bras de commande droit |
1 notice d’utilisation |
1 bras de commande gauche |
2 roues |
Symboles utilisés sur cet appareil
Avant la mise en service, lire et respecter les instructions de service ainsi que les consignes de sécurité.
Attention !
Avant de réaliser les travaux de réparation, de maintenance et d’entretien, arrêter le moteur et retirer la fiche secteur.
Danger de coupure et de coincement, ne jamais toucher les zones dangereuses tant que le fendoir se déplace.
N'enlevez pas les souches coincées avec les mains.
Seul l’utilisateur doit se tenir dans la zone de travail de la machine. Les autres personnes, tout comme les animaux domestiques et de rente, doivent respecter une distance minimale (5 m).
Durant les travaux, porter un dispositif de protection de l'ouïe, de protéger de l'ouïe.
Durant les travaux, porter une visière de protection, de protéger les yeux contre les copeaux et les éclats.
Durant les travaux, porter des gants de protection afin de protéger les mains contre les copeaux et les éclats.
Durant les travaux, porter des chaussures de sécurité afin de protéger les pieds contre une chute accidentelle des troncs.
Tenez votre zone de travail en ordre ! Le désordre peut causer des accidents.
L’huile est inflammable et peut exploser. Il est interdit de fumer et de faire un feu nu.
Éliminez l’huile usée conformément à la réglementation en vigueur (point de collecte d’huile usée sur place). Il est interdit de vidanger les huiles usées dans le sol ou de les mélanger aux déchets.
Il est interdit de démonter ou de modifier les dispositions de protection et de sécurité.
Fixez toujours toute votre attention sur le mouvement de la lame à fendre.
Pendant le fendage, fixer le morceau de bois à l'aide des griffes.
Symboles utilisés sur l’appareil / l’emballage
Les appareils électriques ne doivent pas être éliminer via les ordures ménagères. Éliminer les appareils, les accessoires et leur emballage par voie du recyclage écologique.
25

Symboles utilisés dans cette notices d’utilisation
Danger imminent ou situation dangereuse. L’inobservation de ces indications peut entraîner des blessures ou des dégâts matériels.
Indications importantes pour un emploi conforme à l’usage prévu. L’inobservation de ces indications peut provoquer des dysfonctionnements.
Indications pour l’usager. Ces indications sont d’une aide précieuse pour un emploi optimal des différentes fonctions.
Montage, exploitation et maintenance. Ce symbole attire votre attention sur ce que vous devez faire.
Utilisation conforme
Le fendeur de bûches convient uniquement pour fendre le bois.
Seul le bois découpé convient pour le fendeur de bûches.
Éliminer impérativement les corps étrangers (clous, fils de fer, béton etc.) du bois à fendre.
Un emploi conforme à l’usage prévu implique notamment aussi l’observation des instructions de service, de maintenance et de réparation du fabricant et le respect des consignes de sécurité contenues dans ces instructions.
Toute utilisation divergente de la machine est considérée comme emploi non conforme à l’usage prévu. Le fabricant décline toute responsabilité pour les dommages en résultant : le risque incombe exclusivement à l’usager.
La machine ne doit être utilisé, entretenu et ajusté que par des personnes connaissant l'appareil et averties des risques qui y sont liés. Les réparations demeurent strictement réservées à notre SAV ou à un service aprèsvente nommé par nos soins.
Risques résiduels
 Même un emploi conforme à l’usage prévu et le respect des consignes de sécurité applicables en la matière ne sauraient exclure tous les risques résiduels générés par la construction et l’emploi de la machine, notamment.
Les risques résiduels peuvent être minimisés en respectant les « consignes de sécurité » et une « utilisation conforme » ainsi que toutes les indications de cette notice d’utilisation.
La prise de précautions et la prudence réduisent les risques de blessures corporelles et d’endommagements.
Les mesures de sécurité ignorées ou omises peuvent occasionner des blessures ou des endommagements.
Le fendeur en déplacement risque de causer des blessures aux mains ou aux doigts pour autant que l'utilisateur soit inattentif, qu'il ne respecte pas les consignes de sécurité ou en cas d'emploi non conforme à l'usage prévu.
Risque d’électrocution en cas d’utilisation de câbles de raccordement non conformes.
Contact avec des pièces sous tension de composants électriques ouverts.
Il se pourrait donc que des risques résiduels non apparents persistent bien que toutes les mesures de protection aient été prises.
Consignes de sécurité
Avant toute mise en service de ce produit, lire et respecter les indications suivantes et les règlements de prévention d’accident de l’association préventive des accidents du travail, particulièrement les consignes de sécurité en vigueur dans les pays respectifs afin d’éviter tout risque d’accident sur vous et les autres.
Remettez les consignes de sécurité à toutes les personnes devant travailler avec la machine.
Conservez ces consignes de sécurité en lieu sûr.
Soyez attentif. Veillez à ce que vous faites. Travaillez de façon raisonnable. N'utilisez pas l'équipement si vous êtes fatigué ou sous l'emprise de drogues, d'alcool ou de médicaments. La moindre inattention pendant l'utilisation de l'équipement peut provoquer de graves blessures.
Avant utilisation, familiarisez-vous avec l‘appareil à l‘aide de la notice d’utilisation.
Ne pas utiliser l’appareil à des fins non appropriées (voir « Utilisation conforme » et « Travaux avec le fendeur de bûches » ).
Prenez correctement appui sur vos jambes et veillez à conserver un bon équilibre.
Veuillez adopter une position de travail située dans la zone des poignées de commande.
Ne vous tenez jamais debout sur la machine.
Lors des travaux, portez
− une visière de protection
− un dispositif de protection de l'ouïe − des gants de travail
− des chaussures de sécurité munies d’un revêtement en acier.
Portez des vêtements de travail appropriés :
− pas de vêtements amples ni de bijoux (ils pourraient être happés par les pièces en mouvement)
L’utilisateur est responsable de la machine à l’égard de tiers dans la zone de travail.
Il est interdit aux enfants et aux adolescents de moins de 18 ans d’utiliser la machine.
Maintenez les enfants à distance de l’appareil.
Ne mettez jamais l’appareil en marche lorsque des personnes étrangères se trouvent à proximité.
Ne laissez jamais l’appareil sans surveillance.
Veillez à maintenir la zone de travail en ordre ! Le désordre peut être la cause d’accidents.
Ne surchargez pas la machine ! Elle travaille mieux et avec une sécurité accrue dans la plage indiquée.
Veillez au montage complet et correct des équipements de sécurité pendant l’exploitation et ne modifiez rien sur la machine qui risquerait d’influencer sa sécurité.
26

Ne pas modifier l'appareil ou des parties ou pièces de l'appareil.
L’appareil ne doit pas être arrosé d’eau (source de risque car présence de courant électrique).
Ne pas travailler avec l'appareil lorsqu'il pleut et ne pas laisser l’appareil sous la pluie.
Conservez les outillages non utilisés dans un endroit sec et verrouillé et hors de portée de main des enfants.
Débranchez la machine et retirez la fiche de la prise au secteur en cas de
−travaux de réparation
−travaux de maintenance et de nettoyage
−réparation de dysfonctionnements
−vérifications pour savoir si les conduites de raccordement sont enchevêtrées ou endommagées
−transport
−et si vous éloignez de l’appareil (même s’il ne s’agit que d’une brève interruption du travail)
Vérifiez si la machine est éventuellement endommagée.
−Contrôlez avec soin le fonctionnement impeccable et conforme à l’usage prévu des équipements de sécurité avec soin avant de poursuivre l’utilisation de la machine.
−Vérifiez le fonctionnement correct des pièces mobiles et assurez-vous qu’elles ne sont ni coincées ni partiellement endommagées. Toutes les pièces sont à monter correctement et toutes les conditions requises sont à remplir afin de garantir une exploitation impeccable de l’appareill.
−Les dispositifs de sécurité et les pièces endommagés doivent être réparés ou remplacés convenablement dans un atelier spécialisé agréé, à moins que d’autres informations ne soient mentionnées dans le mode d’emploi.
−Les autocollants de sécurité endommagés ou illisibles doivent être remplacés.
 Sécurité électrique
Réalisation de la ligne d’alimentation conformément à IEC 60245 (H 07 RN-F) avec une section de conducteur minimale de
230 V ~
3 x 1,5 mm² avec une longueur maximale de 10 m.
400 V 3~
5 x 1,5 mm² avec une longueur maximale de 10 m.
Ne jamais employer de lignes d’alimentation de plus de 10 m de long. Les lignes d’alimentation plus longues occasionnent une chute de tension. Le moteur n’atteint plus sa puissance, le fonctionnement de la machine est
restreint.
 Les fiches et les prises femelles sur les conduites de raccordement doivent être en caoutchouc, en PVC souple ou en une autre matière thermoplastique de même résistance mécanique ou bien recouvertes d‘une de ces matières.
Le système d’enfichage de la conduite de raccordement doit être protégé contre les projections d’eau.
Lors de la pose de la ligne de raccordement, veiller à ce qu'elle ne soit pas coincéeni pliée et à ce que le connecteur ne soit pas mouillé.
En cas d'utilisation d'un tambour, dérouler le câble complètement.
N’employez pas le câble à des fins pour lesquelles il n’est pas prévu. Protégez le câble de la chaleur, l’huile et des arêtes tranchantes. Ne tirez pas sur le câble pour retirer la fiche de la prise au secteur.
Vérifiez le câble de rallonge à intervalles réguliers et remplacez-le dès que vous constatez un endommagement.
Ne vous servez jamais de lignes de raccordement défectueuses.
Servez-vous exclusivement de câbles de rallonge spéciaux et homologués pour l’extérieur le cas échéant.
Ne vous servez jamais de raccordements électriques provisoires.
Ne pontez jamais les équipements de sécurité et ne les mettez jamais hors service.
 Tout raccordement électrique, voire toute réparation sur des parties électriques de la machine doivent être effectués par des électriciens agréés ou être confiés à l’un de nos services après-vente. Les règlements locaux, particulièrement en ce qui concerne les mesures de protection sont à respecter.
 Toute réparation des différentes pièces de la machine est à effectuer par le fabricant, ou l’un de ses services après-vente.
 N’utilisez que des pièces de rechange d’origine. L’utilisation d’autres pièces détachées et d’autres accessoires pourraient entraîner un risque d’accident pour l’utilisateur, le fabricant déclinant toute responsabilité pour tout dommage encouru.
Consignes de transport
 Amener toujours le fendeur à sa position la plus basse avant chaque transport.
Lors |
du |
transport, |
la jauge d´huile |
empoignez |
l’arceau |
||
d’une main et basculez |
|
||
le fendeur |
de bûches |
|
|
légère-ment vers vous. |
|
||
Le u fendeur peut se |
|
||
trans-porter |
facilement |
|
|
dans cette position. |
|
||
Bien visser le bouchon du réservoir d’huile afin d’éviter tout écoulement d’huile pendant le transport.
27
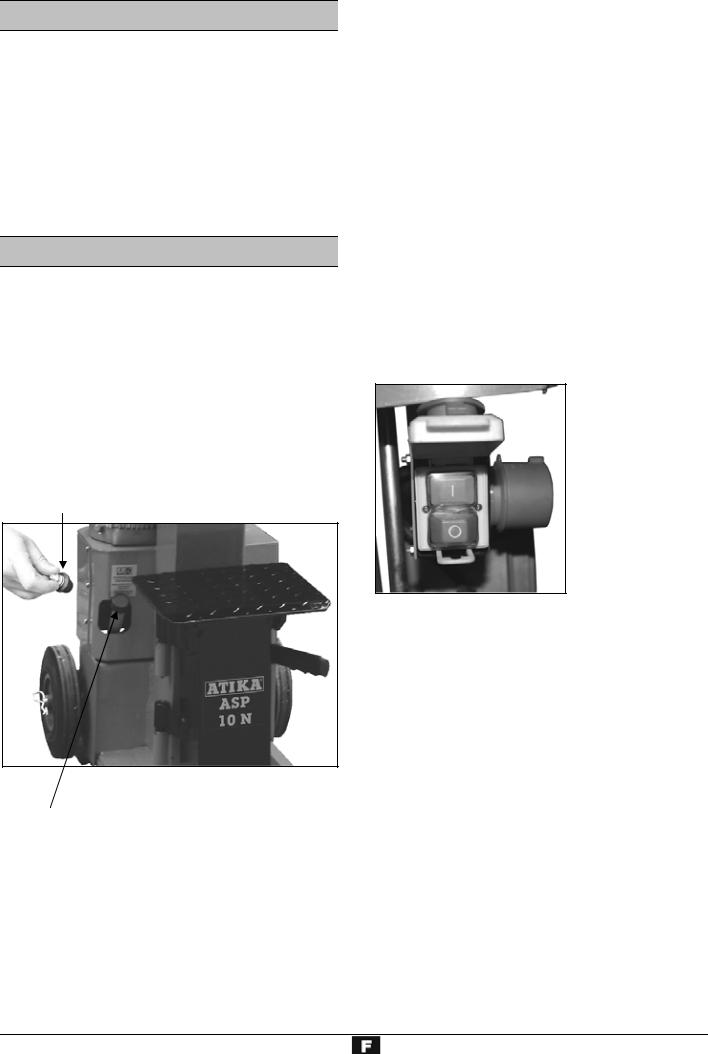
Installation
Veillez à ce que la zone de travail remplisse les conditions suivantes :
−antidérapante
−plane
−exempte de risques de trébuchement
−éclairage suffisant.
Il est interdit d’exploiter la machine à proximité de gaz naturel, de conduits d’essence ou d’autres matériaux très inflammables.
Mise en service
Assurez-vous que l'appareil est monté intégralement et conformément aux réglementations.
Avant toute utilisation, veuillez vérifier
−que les lignes de raccordement ne présentent pas de défectuosités (fissures, coupures ou autres).
−si l‘appareil présente d’éventuels endommagements
−que toutes les vis sont serrées à fond
−l’absence de fuites sur le système hydraulique.
−le niveau d’huile
Avant la mise en service, remplacer le bouchon de transport par la jauge d'huile.
bouchon de transport
raccordez la machine à une prise appropriée et conforme aux prescriptions.
Utilisez un câble de rallonge de section sufficante.
Raccordez la machine au moyen d’un commutateur de sécurité (interrupteur de protection contre les courants de court-circuit) de 30 mA.
Fusible
400 V 3~ Î 16 A 
Mise en marche/ Arrêt
 Vérifiez avant chaque mise en marche si le dispositif de déconnexion (en mettant en marche et en arrêtant l’appareil) fonctionne correctement.
Ne jamais utiliser un appareil dont l'interrupteur ne fonctionne pas Les interrupteurs endommagés doivent être immédiatement réparés ou remplacés par le S.A.V.
 Mise en marche
Appuyez sur le bouton vert.
 Arrêt
Arrêt
Appuyez sur le bouton rouge.
jauge d´huile
Si le système hydraulique n'est pas purgé d'air, l'air enfermé détériorera les joints et la fendeuse de bois de chauffage de façon durable.
Branchement au secteur
Comparez la tension de votre secteur avec la tension indiquée sur la plaque signalétique de la machine et
Sécurité de remise en marche en cas panne de courant (déclencheur à tension nulle)
En cas de panne de courant, l‘appareil s’arrête automatiquement. Pour le remettre en marche, appuyez à nouveau sur le bouton vert.
Fendeur de bois à brûler d’une puissance de 400 V 3~
Veiller au sens de rotation du moteur (cf. flèche du moteur) car toute utilisation dans un sens de rotation erroné risque d’endommager la pompe à huile.
Mettez le moteur en marche ; la lame de fendage se déplace automatiquement dans la position la plus élevée.
Si la lame de fendage se trouve déjà dans la position la plus élevée : Prenez les deux bras de commande en main et poussez-les vers le bas, la lame de fendage se déplacera vers le bas.
Si la lame de fendage ne se déplace pas après le démarrage du moteur, arrêtez le moteur et modifiez le sens de rotation.
28
 Loading...