


NT CM10 8BSK 60Hz
THANK YOU FOR BUYING A ARISTON PRODUCT.
In order to receive a more complete assistance,
please register your product on
www.aristonchannel.com/register
EN
Quick guide
Before using the appliance carefully read the Safety Instructions.
PROGRAMMES
1.Mixed kg 4 Time 100'
This programme is ideal for drying cotton and synthetic fabrics
together.
2.Eco Cotton kg Max* Time 130'
Standard cotton programme, suitable to dry normally wet
cotton laundry. Most ecient programme in terms of energy
consumption for drying cotton laundry. The values on the Energy
Label are based on this programme.
3.Synthetics kg 4 Time 90'
This programme is suitable for synthetic garments or cotton
blends/synthetic.
4.Wool kg 1 Time 100'
Programme for drying wool clothing. It is advisable to turn the
garments inside out before drying. Leave to dry naturally the heaviest
edges that are still damp.
5.Silk kg 0,5 Time 95'
Gentle drying of silk garments.
6.Anti Allergy kg Max* Time 160'
This cycle has the “Allergy UK” approval of “The British Allergy
Foundation” attesting the eective reduction and elimination of
allergens. It can be used both with damp load (drying and treatment)
and dry load (half load only).
7.Daily kg 2 Time 100'
Ideal for drying garments of cotton blends or synthetics spun at
high speed in the washing machine.
8.Cuddly Toys Kg 2,5 Time 196'
The cycle preserves the original appearance and brilliance of the cuddly
toys at best. Remove all accessories before proceeding with drying.
Every single piece must not exceed 600 gr.
FIRST TIME USE
Make sure that the water tank is correctly inserted. Make sure
that the drain hose on the back of the dyrer is properly xed,
either to the dryers's water tank or to the domestic sewage
system.
Should you wish to change the opening side of the door, please
contact our After-sales Service. (See phone number in the
warranty booklet).
DAILY USE
Doing this will keep your machine working at its BEST!
Remember to empty your water tank after each drying cycle.
Remember to clean your lters after each drying cycle. (Refer to
section Care & Maintanence).
1. Open the door and load garments. Always refer to instructions
on clothing labels and the max loads indicated in the programme
section. Empty pockets. Make sure garments do not get caught
between the door and/or the door lter.
2. Close the door.
3. Press the button On/O.
4. Select the programme according to the laundry type.
5. Select the options, if necessary.
6. To start the cycle, press the Start/Pause button.
7. At the end of the drying cycle, a buzzer will beep. An indicator on
the control panel signals the end of the cycle. Pull the load out
immediately to prevent the formation of creases on laundry.
8. Turn the machine o by pressing the button On/O, open the
door and pull clothing out. If the machine is not switched o
manually, after about a quarter of an hour from the cycle end, the
appliance turns o automatically to save energy.
If this last stage is not carried out immediately, some machines
and/or some programmes/options are equipped with Crease Care
system. For some hours, after the end of drying, the drum rotates
at regular intervals to prevent the formation of creases.
In case of power failure, it is necessary to press the button Start/
Pause to restart the cycle.
OPENING OF THE DOOR DURING THE CYCLE
During operation, it is possible to open the door. After having
closed it, press the button Start/Pause again to restart the dryer.
*MAX LOAD 8 Kg (Dry load)
CARE LABEL
Always check the care labels, especially when placing garments in
the tumble dryer for the rst time. Below are the most commonly
used symbols:
May be tumble dried.
Do not tumble dry.
Tumble dry – high heat.
Tumble dry – low heat.
1
3
2
9
7
8
4 56
3“
60’
30’ 1h
3h
6h
9h
90’
120’
180’
h
END
DEMO
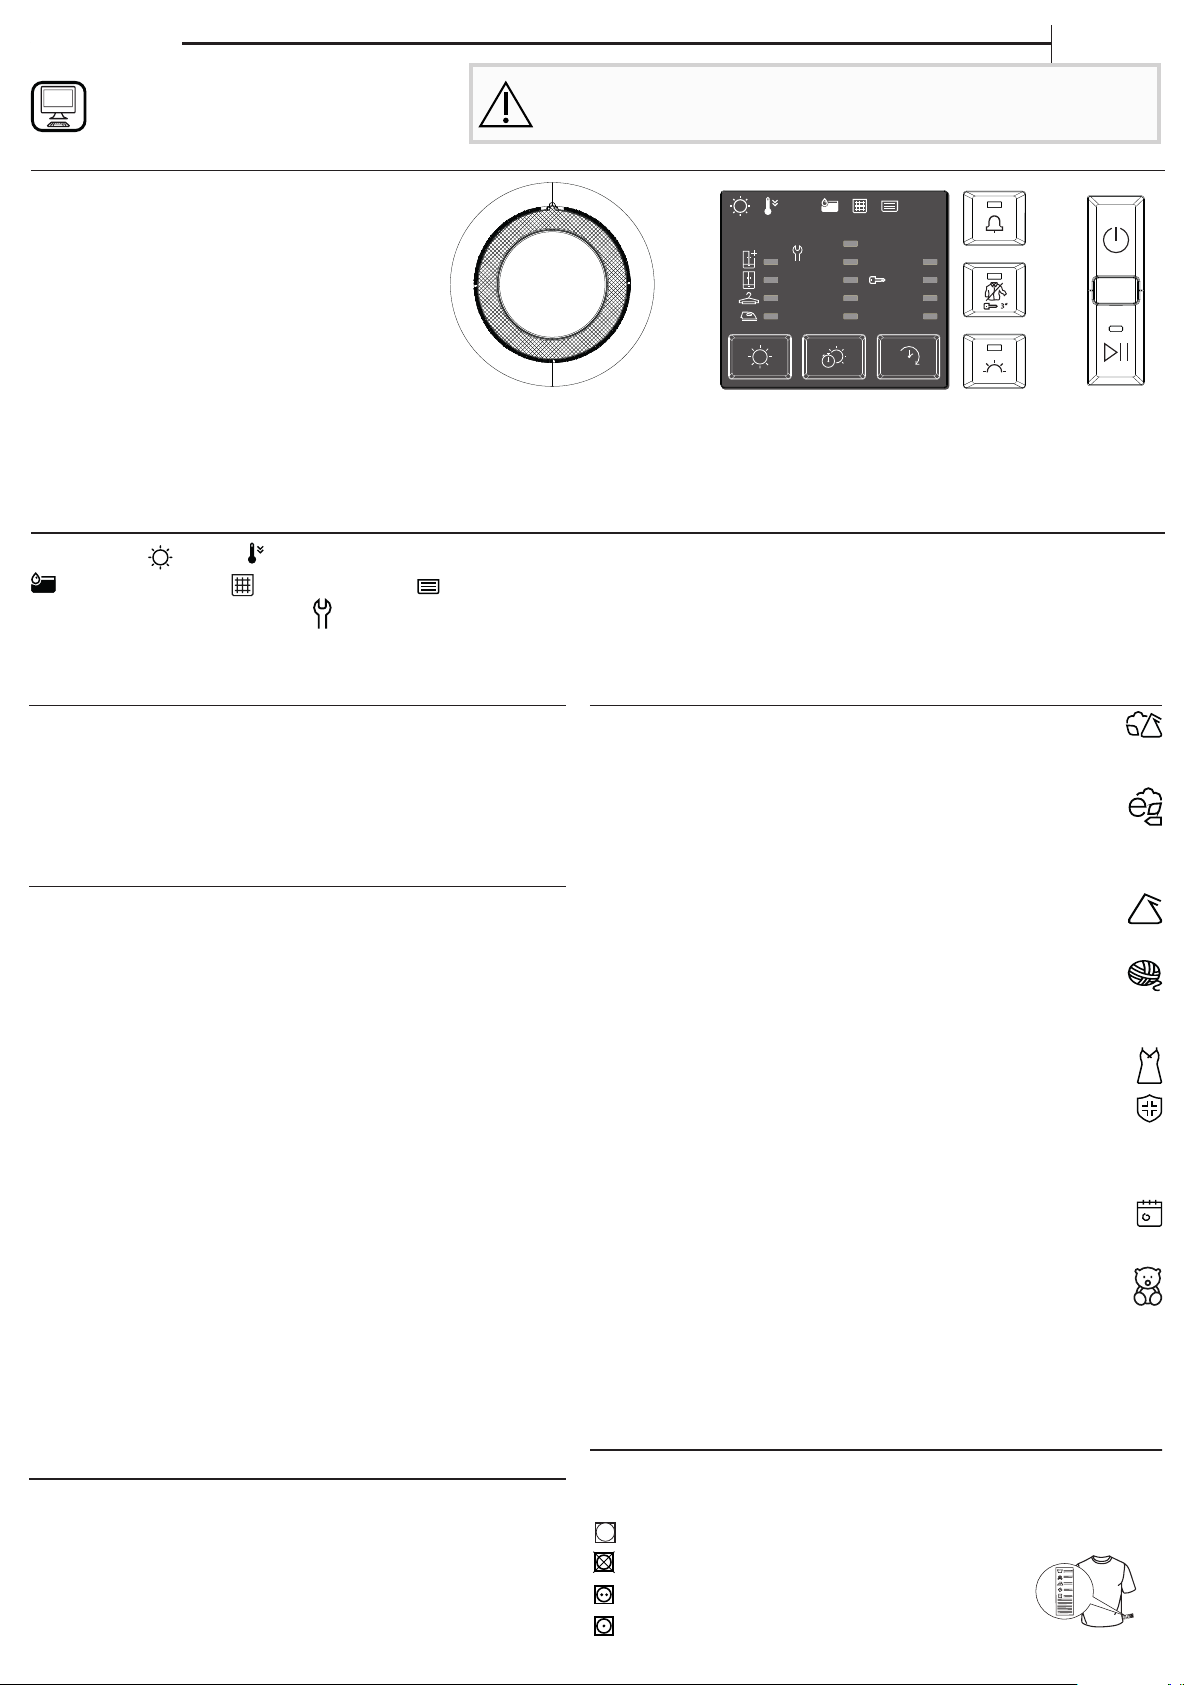
CONTROL PANEL
1 On/O Button (Reset if long pressed)
2 Programme Selection Knob
3 Start/Pausa
Options Buttons*
4 Dryness Level
5 Timed Drying
6 Start Delay
7 Gentle
8 Crease Care (if long pressed Key Lock)
9 Cycle End
*Note: some models may have the wording in full instead of the icons
INDICATORS
Cycle Phase: Drying - Cool Down - END End of Cycle
Empty water tank - Clean door lter - Clean bottom lter -
Refer to troubleshooting section: Failure: Call after sales service.
DEMO
Demo Mode
OPTIONS BUTTONS
These buttons serves to personalise the selected programme
according to personal requirements.
Not all options are available for all programmes. Some options
are incompatible with the ones previously set. The buzzer and/or
blinking indicators will signal the incompatibility. If the option is
available, the option indicator will stay on. Some options may be
kept in the memory of the programme if selected in the previous
drying.
9.Refresh
A short programme suitable for refreshing bres and
garments by means of fresh air. Do not use with garments that are
still wet. It can be used on with any load size but is more eective
with small loads. The cycle duration is about 20 minutes.
10.Duvet Time 240'
Programme intended to dry bulky garments, as single duvet.
11.Bed & Bath Kg Max* Time 170'
This programme is intended for drying cotton towels and
sheets.
12.Fitness Kg 4 Time 90'
For drying sports garments made of synthetics or cotton.
13.Baby kg 2 Time 70'
A programme intended to dry garments and linen of new-
born babies (cotton and chenille), as well as delicate garments.
Do not dry garments having plastic covering.
14.Jeans kg 3 Time 80'
For drying cotton jeans-wear and garments made of robust
cotton, like denim, such as trousers and jackets.
15.Shirts kg 3 Time 70'
This is a programme for Shirts made from cotton or cotton
blend/synthetics.
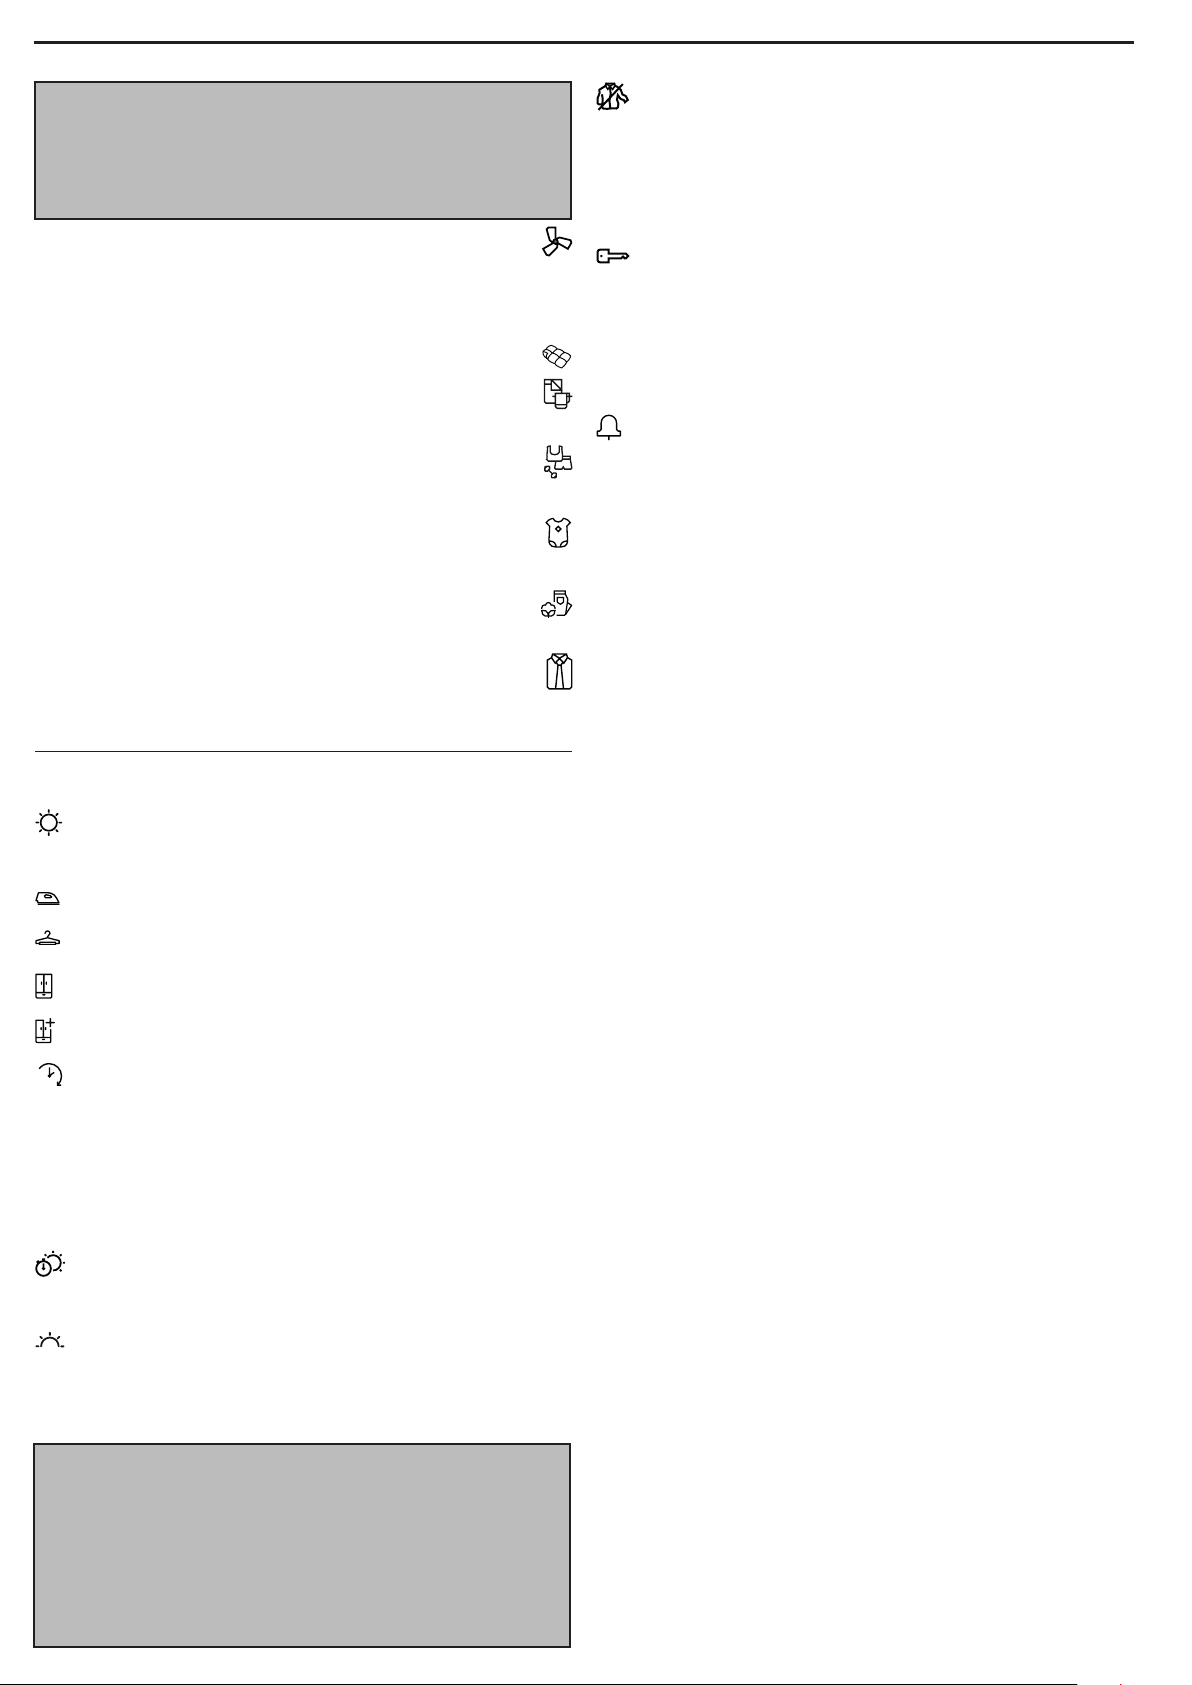
OPTIONS
After selecting the programme, the various options can be
set, if necessary.
Dryness Level
Press the related button several times to obtain a dierent
level of residual moisture on garments. An indicator signals the
level being selected.
Iron Dry: a very delicate ironing. Suitable for making ironing
of garments easier immediately after the end of the cycle.
Hanger Dry: a level intended for delicate garments ready to
be hanged.
Cupboard Dry: the garments are ready to be folded and put
away.
Extra Dry: used for garments to be worn at the end of the
cycle.
h
Start Delay
This option allows you to set the delay of the cycle start. Press
the corresponding button several times to obtain the required
delay. After having reached the max. settable time, the option is
reset by pressing the button again. An indicator on the control
panel signals the time being selected. After having pressed the
button Start/Pause, the machine signals the remaining time
for the cycle start. In case of door opening, after closing, it is
necessary to press the button Start/Pause.
Timed Drying
This option allows to set the drying time. Press the
corresponding button to set the required time for drying. An
indicator on the control panel signals the time being selected.
Gentle
Enables a more gentle treatment of the laundry by reducing the
drying temperature.
Crease Care
This option add a crease treatment at the end of the cycle
by means of a periodic rotation of the drum (duration up to 10
hours). It is particularly suitable when it is not possible to remove
the laundry as soon as the drying ends. If this option is used
together with the Start Delay, the crease treatment is added
also in the Start Delay phase. This option remains in memory if
selected in the previous drying.
Key Lock
This option makes all machine controls inaccesible, except
the button On/O. When the machine is on:
• to activate the option, keep the button pressed until the
indicator goes on.
• to disable the option, keep the button pressed until the
indicator goes o. This option remains in memory if selected in
the previous drying.
Cycle End
This option activates a prolonged buzzer at the end of the
cycle. Enable it if you are not sure to hear the normal sound at the
end of the cycle. This option remains in memory if selected in the
previous drying.
The duration of these programs will depend on the size of the
load, types of textiles, the spin speed used in your washer and
any extra options selected. In machines equipped with display,
the duration of the cycles is shown on the control panel. The
remaining time is constantly checked and adjusted during the
drying cycle to show the best possible estimate.
 Loading...