

Page 1

Mac OS X v10.5 Leopard
Installation and Setup Guide
If you already have Mac OS X v10.3 or later installed on your computer:
is upgrade to Leopard. See “Upgrading Mac OS X” on page 1.
To install a fresh system, erase your hard disk before installing Mac OS X, or install
additional software:
To find out what version of Mac OS X you have installed on your computer, choose
Apple (
) > About This Mac.
Go to “Custom Installations” on page 4
.
All you need to do
Upgrading Mac OS X
Upgrade to Leopard and start using its great new features. It’s easy—just follow these
steps.
WARNING:
installer finish. If you quit, you may not be able to start up using your current
Mac OS X startup disk.
If you’re installing Mac OS X on your current Mac OS X startup disk, let the
1
Page 2

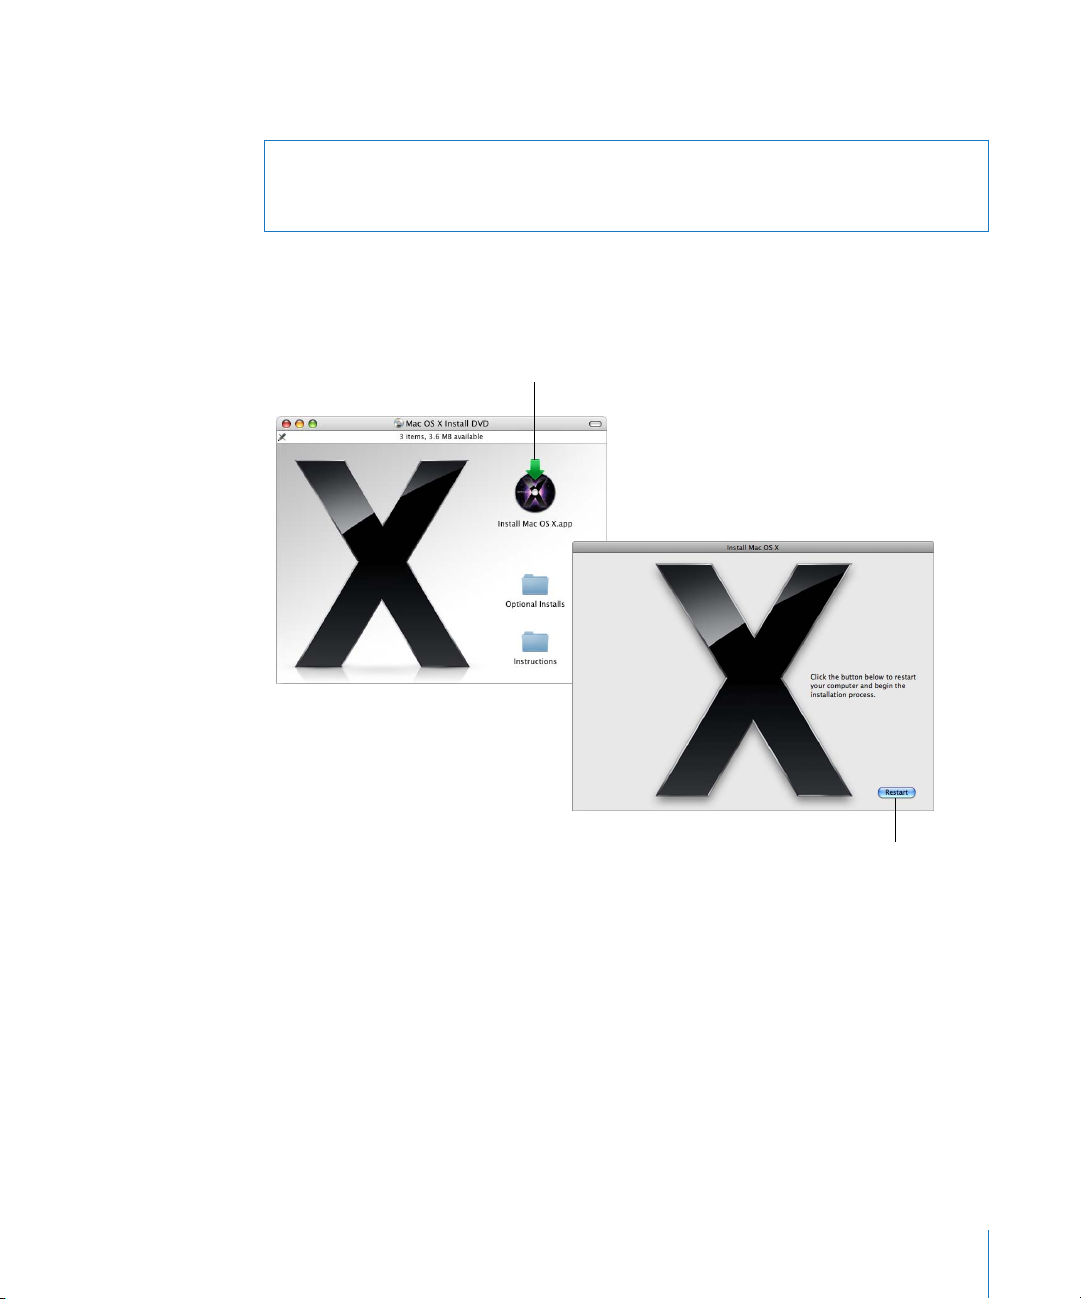
Step 1: Insert the Mac OS X Install disc
Double-click the Install Mac OS X icon, and then click Restart. The installer opens
automatically when your computer restarts.
Double-click this icon
on the Install disc.
Click Restart
to begin.
Step 2: Follow the onscreen instructions
Select the language you want to use, and then click the forward arrow. The Welcome
screen appears.
2
Page 3

The installer guides you through the installation process:
Welcome
License
Select a Destination
Installation Summary
Install
Click More Information on the Welcome page to learn about
system requirements and other information you may need to know
before installing.
Read and agree to the software license agreement.
If you have access to more than one disk volume, select a
destination, and then click Continue.
Click Install to start installing Leopard.
The installer displays the progress of the installation.
That’s it. Enjoy using Mac OS X Leopard!
3
Page 4

Custom Installations
This section tells you how to install Mac OS X if you want to:
Â
Install Mac OS X on your computer for the first time
Â
Archive your current Mac OS X system
Â
Erase your hard disk before installing Mac OS X
Â
Install additional software available on the Mac OS X Install disc
Preparing for Installation
If you plan to erase your hard disk or archive your current system without preserving
your users and network settings, you’ll need to note your current network settings to
make it easier to get connected again after installing Mac OS X. Go to System
Preferences > Network, and then check for these settings:
If your network uses: Write down the following:
Ethernet, DSL, or cable
connected via DHCP
AirPort connected via DHCP
Ethernet, DSL, or cable
connected manually
Dial-up modem
Nothing. DHCP automatically configures your Internet connection.
AirPort or wireless network name and password provided by your
AirPort network administrator
Internet Protocol (IP) address (number that looks like 12.345.56.789)
Subnet mask (number that looks like 10.255.255.255)
Router address (number that looks like 10.208.32.2)
Domain Name System (DNS) servers (optional number that looks
ISPname
like 10.255.255.255, and name that looks like
Search domains (optional name that looks like
Telephone number, user name, and password provided by your
service provider
DNS servers (optional number that looks like 10.255.255.255, and
ISPname
name that looks like
Search domains (optional name that looks like
.com)
.com)
ISPname
ISPname
.com)
.com)
4
Page 5
Installing Mac OS X
To begin a custom installation of Mac OS X Leopard, follow these steps.
WARNING:
If you’re installing Mac OS X on your current Mac OS X startup disk, let the
installer finish. If you quit, you may not be able to start up using your current
Mac OS X startup disk.
Step 1: Insert the Mac OS X Install disc
Double-click the Install Mac OS X icon, and then click Restart. The installer opens
automatically when your computer restarts.
Double-click this icon
on the Install disc.
Click Restart
to begin.
5
Page 6

Step 2: Follow the onscreen instructions
Select the language you want to use, and then click the forward arrow. The Welcome
screen appears.
The installer guides you through the installation process. Refer to the sections that
follow for information about selecting a destination when you have more than one
volume, selecting installation options, and selecting additional software to install.
Step 3: Select a destination
On the “Select a Destination” pane, select the volume on which you want to install
Mac OS X. The screen tells you how much space is required for installation.
6
Page 7
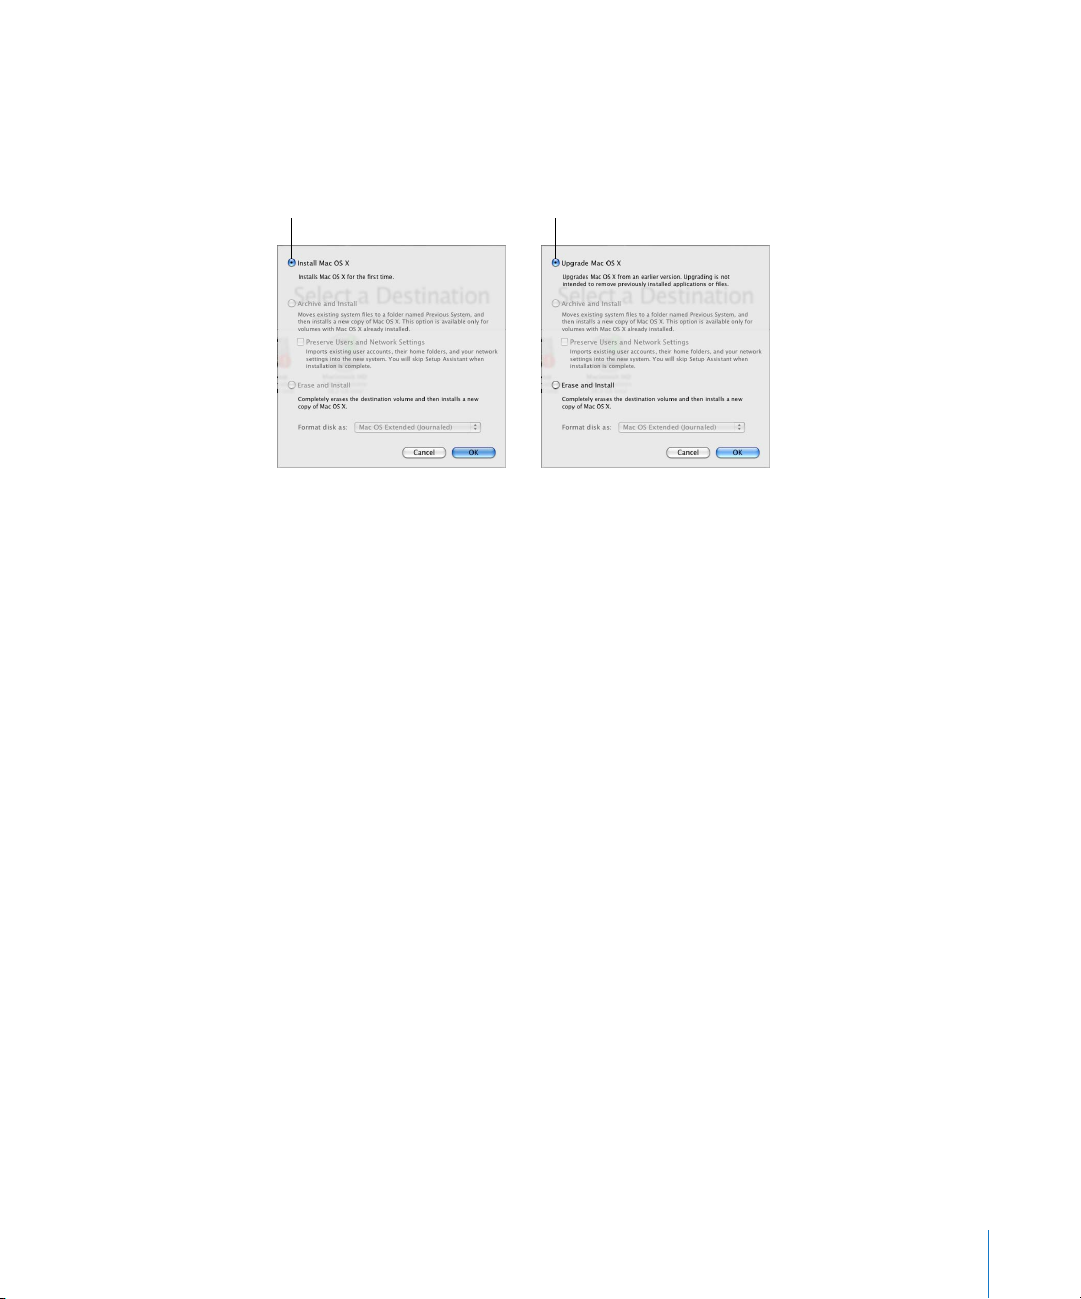
Step 4: Select how you want to install Mac OS X
Click the Options button to select “Archive and Install” or “Erase and Install.” One of the
following screens appears:
This is selected if
This is selected if Mac OS X
isn’t installed.
Mac OS X is already
installed on the volume.
Select how you want to install Mac OS X, and then click OK. Click Continue when you’re
ready to proceed to the next pane.
Install Mac OS X
This option appears if you don’t have Mac OS X installed on your computer or you have
an early version of Mac OS X (v10.2.8) that can’t be upgraded. Select this option to
install Leopard on your computer.
Archive and Install
Select this option if you want to install a fresh system on your computer.
“Archive and Install” moves your existing Mac OS X system files to a folder named
Previous System, and then installs a new copy of Mac OS X on the selected volume.
Mac OS X–installed applications, such as Address Book and Safari, are archived, and
new versions are installed in the Applications folder.
Unless you choose “Preserve Users and Network Settings,” user accounts and their
home folders are also archived in the Previous System folder.
7
Page 8

Select the “Preserve Users and Network Settings” checkbox to import your existing user
accounts, home folders, and network settings into the new system. User accounts
include such things as:
Â
Home folders and their contents
Â
Preference settings
Â
Address Book databases
Â
Browser favorites
Â
Network settings and locations
“Preserve Users and Network Settings” also copies the existing Shared folder in the
Users folder to your new system.
Note:
You can’t start up your computer using the Previous System folder, but settings,
preference files, fonts, plug-ins, and other items remain available in case you need
them.
Some applications, plug-ins, and other software may have to be reinstalled after an
“Archive and Install.” Fonts that were installed in the Fonts folder in the top-level
Library folder can be installed in your new system by copying them from the Previous
System folder.
Erase and Install
This method completely erases the destination volume, and then installs a new copy of
Mac OS X.
WARNING:
If you erase the destination volume, everything on the volume—your
user accounts, network settings, and all of your files and folders—will be deleted.
If necessary, quit the installer and back up your files before you erase the destination
volume.
Step 5: Select additional software packages to install
The default installation contains all the software you need to use Mac OS X. However,
the Mac OS X Install disc contains additional software—such as printer drivers, fonts,
and language translations—that you may want to install. To see the available packages,
click Customize on the Install Summary screen.
The Custom Install pane appears, as shown on the following page. Click the arrows
to reveal specific components. Select the software you want to install, and then
click Done.
8
Page 9

Note:
You can always use the Mac OS X Install disc to install additional software
packages later.
Click the arrow to
reveal components.
Only the selected
components will
be installed.
All components
will be installed.
When you’re ready to install Mac OS X and the selected software, click Install on the
Install Summary screen.
9
Page 10

Setting Up Mac OS X after a new installation
Read this section if you installed Mac OS X for the first time or if you performed a
custom installation that didn’t preserve your user and network settings.
After installing Mac OS X, the installer restarts your computer. Mac OS X Setup Assistant
appears to help you set up your new system. The setup assistant guides you through
the process of transferring information, creating an Apple ID and .Mac membership,
creating your user account, setting up your Internet connection, and registering your
copy of Mac OS X.
Transferring Information From Another Mac or Volume
The setup assistant can help you transfer information from another Mac OS X computer
or volume to your new Mac OS X system. If you choose to transfer information, you will
be asked to select which items you want transferred. You can transfer user accounts,
network and other settings, applications, and files and folders. Some transferred
applications may not work and will have to be reinstalled.
Note:
You don’t have to transfer information during installation. You can use Migration
Assistant, a utility installed with Mac OS X Leopard, to transfer applications, files, and
folders from another computer or volume at any time.
Creating a User Account
The user account you create during installation is an administrator of your computer.
You’ll be asked to create a user name and password. It’s important to remember exactly
how you enter them, including capitalization. You may need to use both to log in to
your computer or to perform administrative tasks, such as installing new software.
10
Setting Up Your Internet Connection
The setup assistant makes it easy to set up your connection to the Internet. If you don’t
have an Internet connection, you can get one from an Internet service provider (ISP).
Note:
If you aren’t able to connect to the Internet during setup, you can always use the
Network Setup Assistant to get connected later. Open System Preferences, click
Network, and click “Assist me.”
If you have an existing Internet connection, you may want to gather information about
it before installing Mac OS X. That way you can be prepared to set up your connection
using the setup assistant.
Page 11

The connection information you need is available on your computer in the following
locations:
If you currently use: Look here for information:
Mac OS X
Windows
Network preferences pane
Internet, Modems, and Network control panels
The following table lists the information you’ll need to connect to the Internet:
If your network uses: Write down the following:
Ethernet, DSL, or cable
connected via DHCP
AirPort connected via DHCP
Ethernet, DSL, or cable
connected manually
Dial-up modem
Nothing. DHCP automatically configures your Internet connection.
AirPort or wireless network name and password provided by your
AirPort network administrator
Internet Protocol (IP) address (number that looks like 12.345.56.789)
Subnet mask (number that looks like 10.255.255.255)
Router address (number that looks like 10.208.32.2)
Domain Name System (DNS) servers (optional number that looks
ISPname
like 10.255.255.255, and name that looks like
Search domains (optional name that looks like
Telephone number, user name, and password provided by your
service provider
DNS servers (optional number that looks like 10.255.255.255, and
ISPname
name that looks like
Search domains (optional name that looks like
.com)
.com)
ISPname
ISPname
.com)
.com)
If you already have a .Mac membership, keep your member name and password handy
during setup. If you don’t remember your .Mac password, visit the .Mac website
(www.mac.com).
If you don’t know your connection information, contact your Internet service provider,
network administrator, or the person who administers your home network.
Setting Up Your Email Account
If you already have an email account, you just need your email address (for example,
tclark3@mac.com) and password to set up your account in Leopard.
The first time you open Mail, the Mail setup assistant appears to help you set up your
email accounts.
11
Page 12

Backing up your system using Time Machine
After you’ve installed Leopard, connect an external drive to your computer and use
Time Machine to make an up-to-date copy of everything on your computer.
Restoring your System
If you need to install Leopard again and you’ve created a Time Machine backup, use the
Restore Utility to restore everything on your computer to its previous condition.
Step 1: Insert the Mac OS X Install disc
Double-click the Install Mac OS X icon, and then click Restart. The installer opens
automatically when your computer restarts.
Step 2: Choose Restore System From Backup
Choose Restore System From Backup from the Utilities menu, and then click Continue
on the screen that appears.
12
WARNING:
Step 3: Select a backup source
Select the volume that contains the Time Machine backup you want to restore, and
then click Continue.
After you restore your system, your computer restarts using the volume on which you
restored your settings and data.
Restoring your system erases all the contents of the volume you select.
Page 13

Answers to Common Questions
Use the following sections to find answers to questions you may have about installing
and using Mac OS X.
Installing Mac OS X
You want to quit the installer.
1
Choose Mac OS X Installer > Quit Mac OS X Installer, and then click Startup Disk.
2
Select the startup disk you want to use, and then click Restart.
WARNING:
installer finish. If you quit, you may not be able to start up using your current
Mac OS X startup disk.
You want to use the keyboard instead of the mouse.
You have full keyboard access while using the installer and Mac OS X Setup Assistant.
Press the Tab key to highlight buttons, pop-up menus, and other options. Press the
Down Arrow key to open pop-up menus. Press the Space bar to select items.
You’re not allowed to start the installer.
If your computer is connected to a network, your network administrator may prevent
you from installing software or upgrading Mac OS X.
The installer doesn’t open.
If the installer doesn’t open, restart your computer while holding down the C key to
start up your computer using the install disc.
If the installer still doesn’t appear, restart your computer and hold down the mouse
button or trackpad button to eject the disc. After your computer starts up, insert the
Mac OS X Install disc. Use Startup Disk preferences to select the Install disc as your
startup disk, and then restart.
The installer can’t repair your disk.
If a message says the installer can’t repair the disk, you may need to erase it. This
deletes all the files on your disk.
If you’re installing Mac OS X on your current Mac OS X startup disk, let the
WARNING:
user accounts, network settings, and all of your files and folders—will be deleted.
If necessary, quit the installer and back up your files before you erase the destination
volume.
Before you erase your disk, you can quit the installer and back up desired files (copy
them to another disk). When you’re ready to erase the disk, open the installer, follow
the instructions in “Custom Installations” on page 4, and select “Erase and Install.”
13
If you erase the destination volume, everything on the volume—your
Page 14

The installer can’t update the hard disk driver.
The installer can’t update the drivers for non-Apple hard disks. Use the disk utility
recommended by the manufacturer to update the disk’s driver before installing
Mac OS X. Make sure to use a version of the utility that’s compatible with Mac OS X.
The installation wasn’t successful.
If you were unable to install Mac OS X, try the following:
Â
Disconnect external devices you don’t need during installation.
Â
Use Disk Utility to repair your hard disk.
After disconnecting unnecessary devices, start up from the Mac OS X Install disc. Select
your language and click the forward arrow. To open Disk Utility, choose Utilities > Disk
Utility. Select the volume on which you want to install, and click Repair Disk. After
repairing any problems, quit Disk Utility and click Continue to try installing again.
If you were still unable to install Mac OS X, try installing one more time using the “Erase
and Install” option. See “Custom Installations” on page 4.
Mac OS X installation was interrupted and you can’t start up your computer.
Restart your computer while holding down the mouse or trackpad button to eject the
Install disc. Your computer may start up using the last system you were using. If it
doesn’t and you have another Mac OS system installed on your computer, restart your
computer while holding down the Option key to select a startup disk.
If your computer doesn’t start up this way, insert the Mac OS X Install disc in your
computer and hold down the C key while restarting. Open Startup Disk preferences
and select a startup disk.
You need to reinstall Mac OS X.
To reinstall this version of Mac OS X, select “Archive and Install” in the Options pane,
and select the option to preserve your user accounts and network settings.
If you need to restore your computer’s software, use the software disc that came with
your computer. For help, see the user’s guide that came with your computer.
You want to install Mac OS X on more than one computer.
Refer to the license agreement that came with your copy of Mac OS X.
14
Page 15

Logging In to Mac OS X
To “log in” means to access your computer using the name and password for a user
account on the computer. Mac OS X is set up to log in automatically using the user
account that you create when you set up Mac OS X.
You can’t log in to your computer.
Make sure you’re typing the name and password exactly the way they were created,
including capitalization. If you still can’t log in but you know the name and password of
an administrator user (such as the first user you created), log in as the administrator
and use Accounts preferences to change your password.
You don’t remember your password and need to reset it.
If you don’t remember your password and you have the Mac OS X Install disc, insert the
disc and restart your computer while holding down the C key. When the installer
appears, choose your language and click the forward arrow. Choose Utilities > Reset
Password, and follow the onscreen instructions.
Tips for creating a good password.
Create a phrase that has meaning to you and pick the first letter of each word, or take
out all the vowels. For better security, don’t use an actual word; use at least eight
characters; and include upper- and lowercase letters, numbers, and symbols. Here are
some examples:
Â
“I love to shop for sandals in the Spring.” (Il2s4sitS)
Â
“I work 8 hours a day.” (wrk8hrsdy)
Â
“My son Aiden is three years older than my daughter Anna.” (M$8ni3y0tmd@)
You can’t log in to your remote user account.
If you are logging in to a server to access your user account and you can’t log in,
contact your system administrator.
Getting Information About Mac OS X
To get answers to your questions about using Mac OS X, use Mac OS Help. You’ll find
information about what’s new in Mac OS X and you can get help with customer issues.
Mac OS Help contains thousands of pages of helpful information. Use the search
feature to quickly find your topic of interest, or click Index and look for your topic there.
To use Mac OS Help:
1
In the Finder, choose Help > Mac Help.
2
Type your question in the text box and press Return.
To get help for an application that’s included with Mac OS X, choose the Help menu for
the application while you’re using it.
15
Page 16

Getting Help On the Internet
To get help on the Internet, visit the Apple website at www.apple.com.
The Apple website provides lots of information about Mac OS X. No matter what your
interest is, you’ll find help from Apple or the community of Mac users.
When you visit the Apple website, check out these areas:
 Click Mac to find lots of ideas for what you can do using Mac OS X and information
about new applications available for Mac OS X.
 Click Support to visit the Apple Support area, where you’ll find support and technical
information about all Apple products. Here you can:
 Enter text in the Search field and click the magnifying glass button to search
thousands of articles about Apple products. Click Advanced Search to perform
more specific searches.
 Click Downloads for Apple software updates.
 Click Manuals or Specifications to get PDF files of manuals and other information
about Apple products.
 Click Discussions to find answers from or post questions to other Mac users.
© 2007 Apple Inc. All rights reserved.
Apple, the Apple logo, AirPort, Mac, and Mac OS are trademarks of Apple Inc., registered in the U.S. and other
countries. Finder and Safari are trademarks of Apple Inc. .Mac is a service mark of Apple Inc.
019-1039 10/2007
 Loading...