


 Loading...
Macintosh
User’s Guide
for Macintosh PowerBook 145
Part I
Getting Started
Part II
Learning
Part III
Reference
Part IV
Index
Includes setup instructions and important health-related information

K Apple Computer, Inc.
This manual and the software described in it are copyrighted, with all rights reserved. Under the copyright laws, this manual or the software may not be copied, in whole or part, without written consent of Apple, except in the normal use of the software or to make a backup copy of the software. The same proprietary and copyright notices must be affixed to any permitted copies as were affixed to the original. This exception does not allow copies to be made for others, whether or not sold, but all of the material purchased (with all backup copies) may be sold, given, or loaned to another person. Under the law, copying includes translating into another language or format.
You may use the software on any computer owned by you, but extra copies cannot be made for this purpose.
The Apple logo is a trademark of Apple Computer, Inc., registered in the U.S. and other countries. Use of the “keyboard” Apple logo (Option-Shift-K) for commercial purposes without the prior written consent of Apple may constitute trademark infringement and unfair competition in violation of federal and state laws.
© Apple Computer, Inc., 1992 20525 Mariani Avenue Cupertino, CA 95014-6299 (408) 996-1010
Apple, the Apple logo, APDA, AppleLink, AppleShare, AppleTalk, ImageWriter, LaserWriter, LocalTalk, Macintosh, ProDOS, and StyleWriter are trademarks of Apple Computer, Inc., registered in the U.S. and other countries.
Apple Desktop Bus, Balloon Help, Chicago, Finder, Disk First Aid, Monaco, PowerBook, System 7, and TrueType are trademarks of Apple Computer, Inc.
AppleCare is a service mark of Apple Computer, Inc., registered in the U.S. and other countries.
Adobe, Adobe Illustrator, and PostScript are trademarks of Adobe Systems Incorporated, registered in the United States. Adobe Photoshop is a trademark of Adobe Systems Incorporated.
AGFA is a registered trademark of Agfa-Gevaert, AG.
Classic is a registered trademark licensed to Apple Computer, Inc.
Exposure is a registered trademark of Preferred Publishers, Inc.
Helvetica and Times are registered trademarks of Linotype Company.
ITC Garamond is a registered trademark of International Typeface Corporation.
MacWrite is a registered trademark of Claris Corporation.
MS-DOS is a registered trademark of Microsoft Corporation.
QMS is a registered trademark and ColorScript is a trademark of QMS, Inc.
QuarkXPress is a registered trademark of Quark, Inc.
SelectSet is a trademark of Miles, Inc., Agfa Division.
SuperPaint is a registered trademark of Aldus Corporation.
Tektronix is a registered trademark and Phaser is a trademark of Tektronix, Inc.
Simultaneously published in the United States and Canada.
Mention of third-party products is for informational purposes only and constitutes neither an endorsement nor a recommendation. Apple assumes no responsibility with regard to the performance or use of these products.

Contents
Preface How to Use This Book xiii
Radio and television interference xv
nPart I Getting Started With Your Computer 1
Chapter 1 Setting Up Your Macintosh
PowerBook 1
Setting up the computer 2
Step 1: Plug in the power adapter 2
Step 2: Open the display 3
Step 3: Turn on the computer 4
Trouble? 5
Installing system software 6
Continuing your work 7
What to do next 8
Your computer at a glance 9
Learning the basics |
10 |
|
|
|
Before you begin |
10 |
|
|
|
Finding the tour |
11 |
|
|
|
Starting the tour from the hard disk |
11 |
|
||
Starting the tour from a floppy disk |
15 |
|
||
Turning the Powerbook on and off 17 |
|
|
||
Off 17 |
|
|
|
|
Sleep 18 |
|
|
|
|
On 19 |
|
|
|
|
On/off summary |
19 |
|
|
|
When you turn on your computer |
20 |
|
||
Restarting a computer that’s already on |
21 |
|||
Restarting a computer that can’t be turned on normally 21 |
||||
Important care and safety instructions 23 |
|
|
||
± Warning |
23 |
|
|
|
s Caution |
24 |
|
|
|
S Important 25 |
|
|
|
|
Health concerns associated with computer use |
26 |
|||
Repetitive stress injuries 26 |
|
|
||
Arranging your work space and equipment 27
iii

n Part II |
Learning Macintosh |
31 |
||
Chapter 2 |
Working on the Desktop |
31 |
||
Use the trackball |
32 |
|
|
|
Point |
32 |
|
|
|
Click |
33 |
|
|
|
Press |
34 |
|
|
|
Drag |
35 |
|
|
|
Choose a command 36 |
|
|
||
Giving orders to your computer |
36 |
|
||
Open an icon 37 |
|
|
||
Look at the contents of a window 38 |
|
|
||
Make a window the active window 38 |
|
|||
Make a window larger or smaller |
40 |
|
||
Move the hidden contents of a window into view 42 |
||||
Close a window |
44 |
|
|
|
Move a window |
45 |
|
|
|
What’s on the desktop? 46
Using the keyboard 49
Chapter 3 Creating and Changing
a Document 51
Open a program 52
Create a document 53
Save your work 53
Switch programs 54
Close a document 56
Two types of programs 57
Open a document 57
Change a document 58
Save your work so far 61
Taking a shortcut 62
Make more changes 62
Quit a program 64
Opening and closing documents and programs 65 Make a copy of a document 65
Change the name of an icon 66
Use the Trash 67
iv Contents

Chapter 4 Working With Disks |
69 |
|
Insert a floppy disk 70 |
|
|
Floppy disks and hard disks |
71 |
|
Initialize a disk 72 |
|
|
Copy the contents of a disk 74 |
|
|
Taking care of floppy disks |
75 |
|
Take a floppy disk out of its drive |
76 |
|
Protect the contents of disk 77 |
|
|
On your own: Install your programs 78 |
|
|
Throw away extra System Folders |
79 |
|
Chapter 5 Learning More About
Your Computer 81
Open the Battery desk accessory 82 Open the PowerBook control panel 82
Use Balloon Help 83 |
|
Turn on Balloon Help |
84 |
Turn off Balloon Help |
84 |
Use Part III of this book 85 |
|
What next? 85 |
|
n Part III |
Macintosh Reference |
87 |
|
Chapter 6 |
Setting Up Your Programs 87 |
||
Installing or updating system software 87 |
|
|
|
Before you install 88 |
|
|
|
Installing system software 88 |
|
|
|
Installing customized system software 90 |
|
||
Starting up with a floppy disk 91 |
|
|
|
Installing your programs 92 |
|
|
|
Installing programs without a floppy disk drive |
92 |
||
Checking for computer viruses 93 |
|
|
|
Working with several programs at a time 94 |
|
||
Finding out what programs are open |
94 |
|
|
Switching programs 94 |
|
|
|
Hiding and showing windows on the desktop |
94 |
||
Changing the amount of memory a program uses 95 |
|||
Using the Scrapbook 96 |
|
|
|
Storing items in the Scrapbook 96 |
|
|
|
Copying items from the Scrapbook |
96 |
|
|
Deleting items from the Scrapbook |
96 |
|
|
Contents v

Using a RAM disk 97
Creating a RAM disk 97
Erasing a RAM disk 98
Resizing or removing a RAM disk 98
Making a RAM disk the startup disk 99
Chapter 7 Power Management |
101 |
||
Monitoring the battery charge level |
101 |
|
|
Using the battery desk accessory 101 |
|||
Responding to low-power messages |
102 |
||
Recharging the battery |
103 |
|
|
Recharging with the power adapter |
103 |
||
Recharging with a recharger |
105 |
|
|
Removing or replacing the battery |
106 |
|
|
Maximizing battery life |
108 |
|
|
Maximizing work time |
109 |
|
|
Ways to conserve battery power 109
Adjusting the battery conservation settings 110 Using the battery conservation options 111
Chapter 8 Using Disks |
113 |
|
|
||
Preparing a new disk for use |
113 |
|
|
||
Initializing a hard disk |
113 |
|
|
||
Initializing a floppy disk 115 |
|
|
|||
Erasing a floppy disk |
116 |
|
|
|
|
Designating a startup disk |
116 |
|
|
||
Scanning order for startup disks |
117 |
||||
Protecting the information on a disk |
117 |
||||
Locking a floppy disk |
117 |
|
|
||
Locking a file |
118 |
|
|
|
|
Backing up your files |
119 |
|
|
||
If you can’t save files on a floppy disk |
119 |
||||
Ejecting a disk 120 |
|
|
|
|
|
If you can’t eject a floppy disk |
120 |
||||
Caring for disks 121 |
|
|
|
|
|
Hard disk precautions |
121 |
|
|
||
Testing and repairing disks |
121 |
|
|
||
If a hard disk icon doesn’t appear |
121 |
||||
Using Disk First Aid |
122 |
|
|
||
Testing a hard disk |
124 |
|
|
||
vi Contents

Chapter 9 Organizing Your Files |
125 |
||||
Straightening up your files 125 |
|
|
|
||
Using folders to organize your files |
126 |
|
|||
Creating and naming folders |
126 |
|
|||
Filing documents when you save them |
127 |
||||
Making items easier to find 128 |
|
|
|
||
Creating an alias |
128 |
|
|
|
|
Installing an item in the Apple menu |
129 |
||||
Moving an item to the desktop |
129 |
|
|||
Finding an item 130 |
|
|
|
|
|
Finding an item by name 130 |
|
|
|||
Finding an item using other criteria |
131 |
||||
Finding items that meet two criteria |
133 |
||||
Ways to use the Find command |
132 |
|
|||
Creating a template or stationery 134 |
|
|
|||
Getting information about your files |
135 |
|
|||
Using the Info window |
135 |
|
|
|
|
Using the View menu |
136 |
|
|
|
|
Assigning a label to a file |
136 |
|
|
|
|
Tips on transferring files |
137 |
|
|
|
|
Chapter 10 Adapting Your Computer to Your Own Use 139
Specifying which items you want opened at startup |
140 |
||||
Installing an item in the Apple menu |
140 |
|
|
|
|
Installing files in the System Folder |
140 |
|
|
|
|
Removing files from the System Folder |
141 |
|
|||
Changing the items in the Label menu 142 |
|
|
|
||
Setting the time and date 142 |
|
|
|
|
|
Setting a time for the Alarm Clock to go off 143 |
|
|
|||
Turning the alarm off 144 |
|
|
|
|
|
Changing time and date formats |
144 |
|
|
|
|
Changing the date format |
145 |
|
|
|
|
Changing the time format |
146 |
|
|
|
|
Changing number and currency formats 147 |
|
|
|
||
Adjusting the way the trackball or mouse works |
148 |
||||
Adjusting the way the keyboard works 149 |
|
|
|
||
Making keyboard shortcuts easier to type |
150 |
||||
Adjusting the keyboard for very slow typing |
150 |
||||
Adjusting the blinking of a menu item 151 |
|
|
|
||
Adjusting the blinking of the insertion point |
151 |
|
|||
Changing the way the contents of windows appear |
152 |
||||
Changing an icon 153 |
|
|
|
|
|
Contents vii

Turning off the Empty Trash warning 154
Managing memory 155
Checking memory use 155
Making the most of your memory 155
Adjusting the disk cache 156
Using hard disk space as memory 157
Turning on 32-bit addressing 158
Setting the beep sound 159
Installing a sound 160
Removing a sound 160
Recording sounds 161
Changing the background pattern 162
Magnifying the screen image 164
Chapter 11 Printing 167
Before you print 167
Choosing a printer 167
Selecting Page Setup options 170
Updating printer software on networked computers 171 Printing your work 172
Printing the contents of a window or the desktop 173 Solutions to common printing problems 174
Controlling background printing 175
Working with fonts 176
Outline fonts and bitmap fonts 176
Installing fonts |
177 |
Removing fonts |
178 |
Transferring fonts to a LaserWriter printer 178 |
|
Finding out about available fonts 180 |
|
Other ways to use the LaserWriter Font Utility 180
Chapter 12 Using Your Computer
on a Network 183
What networking offers 183
Setting up your computer on a network 184
Connecting to a network 185
Turning on AppleTalk 185
Naming your computer and its owner 186 Gaining access to files on shared disks 187
Before you begin 187
Connecting to a shared disk 187
Disconnecting from a shared disk 189 Connecting quickly to a shared disk 190 Connecting automatically when you start up 190
viii Contents

Working with files and folders on other computers |
191 |
||
Creating a new folder on another computer |
191 |
||
Changing your password |
191 |
|
|
Giving folder ownership to someone else 193 |
|||
Sharing your own files 193 |
|
|
|
How file sharing works |
193 |
|
|
Turning file sharing on |
194 |
|
|
Turning on guest access |
|
194 |
|
Selecting a folder or disk to share 195 |
|
||
Naming a registered user |
197 |
|
|
Setting a registered user’s password 198 |
|
||
Naming a group of users |
198 |
|
|
Seeing who’s in a group |
|
199 |
|
Selecting a user or group to share a folder or disk 200 |
|||
Preventing specific users or guests from accessing your |
|||
computer 201 |
|
|
|
Removing a user from a group 202 |
|
||
Removing a user or group from your list of registered |
|||
users 202 |
|
|
|
Giving away ownership of a folder or disk on your |
|||
computer 203 |
|
|
|
Turning file sharing off |
203 |
|
|
Monitoring file-sharing activity 204
Disconnecting someone who is connected to your computer 205
Gaining access to your computer from another computer 205
Changing your password 206 |
|
|
Using access privileges 207 |
|
|
Understanding access privileges |
207 |
|
Setting access privileges to folders and disks |
208 |
|
Access privilege strategies 209 |
|
|
Working with privileges others have set 211 |
|
|
Checking your access privileges |
211 |
|
Linking programs 212 |
|
|
Linking to a program on another computer |
212 |
|
Disconnecting a program link 213
Allowing other people to link to your programs 213
Chapter 13 Expanding Your Computer
System 217
Using SCSI devices 217 |
|
Installing software |
218 |
Setting SCSI ID numbers 218 |
|
Checking that the SCSI chain is properly terminated 220 |
|
Connecting cables |
221 |
Contents ix

Connecting a modem 222
Connecting a printer 223
Connecting a mouse or other ADB device 223
Using sound input and output devices 224
Connecting a microphone 224
Sound output devices 225
Adding memory to your computer 225
Chapter 14 Travel, Storage, and Service |
227 |
|
Traveling with the PowerBook |
227 |
|
Storing the PowerBook 228 |
|
|
Short-term storage (up to 2 weeks) 228 |
|
|
Long-term storage (more than 2 weeks) 229 |
|
|
Service and support 229 |
|
|
If the PowerBook malfunctions or is damaged |
229 |
|
How to get help 230 |
|
|
For more information about Macintosh computers 231 |
||
Macintosh user groups |
231 |
|
Technical information |
231 |
|
Quick Reference |
Summary and Shortcuts 233 |
||
Shift-Click 233 |
|
|
|
Working with icons |
233 |
|
|
Selecting icons |
233 |
|
|
Opening an icon |
234 |
|
|
Moving, copying, and renaming an icon |
234 |
||
Working with windows |
234 |
|
|
Making a window the active window 234 |
|||
Moving a window and changing its size |
234 |
||
Scrolling through the contents of a window 235
Opening higher-level folder windows 235
Using the outline form in list views 236
Working with menus 236
Choosing an item from a menu 237
Choosing an item from a submenu 237
Keyboard shortcuts in the Finder and in directory dialog boxes 238
x Contents
Troubleshooting 239
The PowerBook 239
Power 241
The Screen 243
Memory 244
SCSI devices 244
Disk drives and disks 245 Modems 248
Printers 248
Networks 250 Application programs 251
Appendix A Keyboard and Character Sets 253
Using Caps Lock 254
Typing special characters and symbols 254
Appendix B Exchanging Disks and Files with MS-DOS Computers 257
Initializing a disk in MS-DOS format 257
Converting files to and from MS-DOS format 269
Other file-conversion options 261
Contents xi

Appendix C Map 263
Setting your location 263
Comparing locations 264
Finding a location 265
Adding or removing a location 266
Adding a location 266
Changing or removing a location 266
n Part IV Index 271
xii Contents

Preface
How to Use This Book
This book has several parts.
nChapter 1 explains how to set up your computer and learn how to use it.
nChapters 2–5 are a tutorial designed for people who have not used a Macintosh computer before. If you are new to the Macintosh, you should read this section of the book before you start your own work.
nChapters 6–14 contain reference information that will help you as you become more proficient with your computer. You can turn to these chapters for information about a particular topic.
nAt the back of the book you’ll find a troubleshooting section and an index.
Certain kinds of information are not included in this book.
nInformation about modems. If your computer has a built-in modem, or if you purchase one later, you receive a separate modem manual with instructions for its use.
nInformation about application programs. Your best source of information about a particular program is the set of books and disks that came with that program.
nTechnical specifications for your PowerBook model. These are on a separate sheet in the box with your computer.
Turn now to Chapter 1 to set up your new PowerBook computer.
Welcome to Macintosh.
xiii

xiv

Radio and television interference
The equipment described in this manual generates, uses, and can radiate radiofrequency energy. If it is not installed and used properly—that is, in strict accordance with Apple’s instructions—it may cause interference with radio and television reception.
This equipment has been tested and found to comply with the limits for a Class B digital device in accordance with the specifications in Part 15 of FCC rules. These specifications are designed to provide reasonable protection against such interference in a residential installation. However, there is no guarantee that the interference will not occur in a particular installation.
You can determine whether your computer system is causing interference by turning it off. If the interference stops, it was probably caused by the computer or one of the peripheral devices.
If your computer system does cause interference to radio or television reception, try to correct the interference by using one or more of the following measures:
nTurn the television or radio antenna until the interference stops.
nMove the computer to one side or the other of the television or radio.
nMove the computer farther away from the television or radio.
nPlug the computer into an outlet that is on a different circuit from the television or radio. (That is, make certain the computer and the television or radio are on circuits controlled by different circuit breakers or fuses.)
If necessary, consult your authorized Apple dealer or an experienced radio/television technician for additional suggestions. You may find helpful the following booklet, prepared by the Federal Communications Commission: Interference Handbook (stock number 004-000-00345-4). This booklet is available from the U.S. Government Printing Office, Washington, DC 20402.
SImportant: Changes or modifications to this product not authorized by Apple Computer, Inc., could void the FCC Certification and negate your authority to operate the product.
This product was tested for FCC compliance under conditions that included the use of shielded cables and connectors between system components. It is important that you use shielded cables and connectors to reduce the possibility of causing interference to radios, television sets, and other electronic devices. For Apple peripheral devices, you can obtain the proper shielded cables from your authorized Apple dealer. For non-Apple peripheral devices, contact the manufacturer or dealer for assistance. S
Important
This equipment has been tested and found to comply with the limits for a Class B digital device in accordance with the specifications in Part 15 of FCC rules. See instructions if interference to radio or television reception is suspected.
DOC Class B Compliance This digital apparatus does not exceed the Class B limits for radio noise emissions from digital apparatus set out in the radio interference regulations of the Canadian Department of Communications.
Observation des normes—Classe B Le présent appareil numérique n’émet pas de bruits radioélectriques dépassant les limites applicables aux appareils numériques de la Classe B prescrites dans les règlements sur le brouillage radioélectrique édictés par le Ministère des Communications du Canada.
xv

yyyyyyyyy
yyyyyyyyy
yyyyyyyyy
yyyyyyyyy

Chapter 1
Setting Up Your
Macintosh PowerBook
In this chapter
mSetting up your computer
mInstalling system software
mLearning how to use your computer
mTurning the computer on and off
mImportant care and safety instructions
mBeing comfortable while you work
mNew Macintosh users: If you have never used a Macintosh computer before, read this entire chapter. It explains how to set up your computer, learn how to use it, and turn it on and off.
mNew PowerBook users: If you have used other Macintosh computers but are new to the PowerBook, follow the setup instructions that begin on the next page and then go to the section on turning the PowerBook on and off.
mExperienced PowerBook users: Skim this chapter for information that applies to your computer.
Important: No matter what your level of experience, please read the safety information in this chapter before beginning your own work. This information can help protect you and your computer equipment from possible harm.
1

Setting up the computer
Step 1: Plug in the power adapter
Plugging in the power adapter recharges the computer’s battery while you work. You should plug it in now in case the battery has drained during shipping and storage.
sWarning: Use only the power adapter that came with your PowerBook computer. Adapters for other electronic devices (including other portable computers) may look similar, but they may damage your computer. s
mPlug the power adapter into a standard electrical outlet or power strip. Then plug the power adapter cable into the power adapter port (marked with the icon ¯) on the back panel of the computer.
Power adapter port
2 Chapter 1: Setting Up Your Macintosh PowerBook
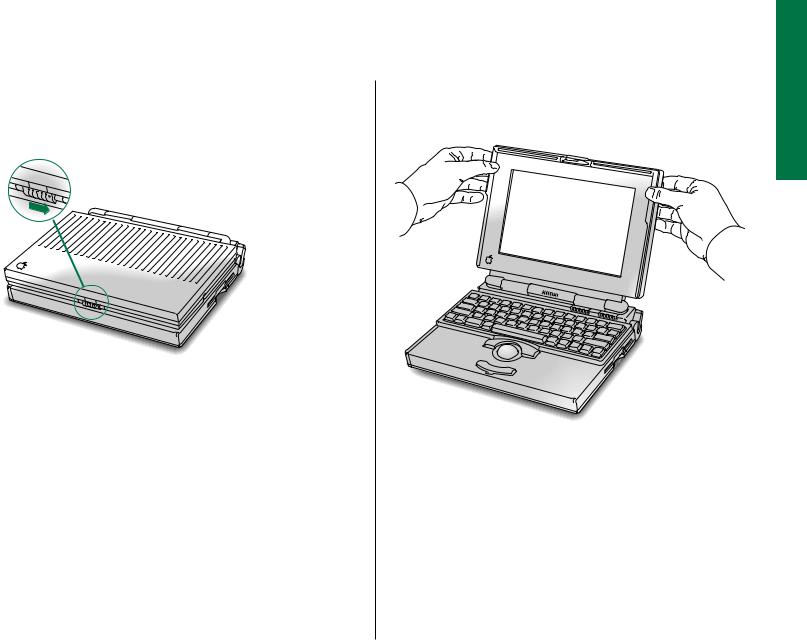
Step 2: Open the display |
Position the display at a comfortable viewing angle. You can |
|
adjust the angle of the display at any time. |
m Slide the latch to the right and lift up the display.
Chapter 1: Setting Up Your Macintosh PowerBook 3
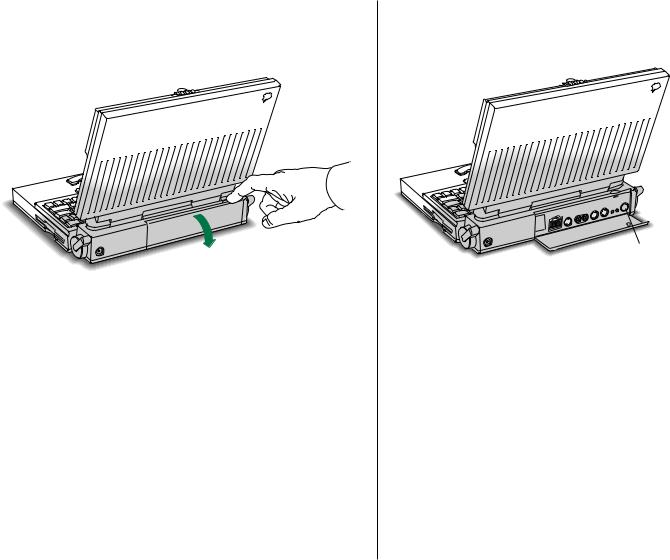
Step 3: Turn on the computer
m Open the door to the back panel of your computer.
mPress the power button to turn the computer on. The power button has this icon: I
Power button
You hear a tone when you turn on the computer. It takes the computer a moment to start up.
4 Chapter 1: Setting Up Your Macintosh PowerBook
mIf you see a blinking question mark on your screen, you need to install system software on the computer’s hard disk. System software includes the programs the computer uses to start itself up. Continue with the section “Installing System Software.”
mIf you see the Macintosh desktop on your screen, the computer is ready to use. You do not need to install system software. Continue with the section “What to Do Next.”
Trouble?
mThe computer made a sound, but you can’t see anything on the screen.
Adjust the brightness control (marked with the icon ¤) and the contrast control (O) until an image appears and the screen is easy to read.
Contrast control
Brightness control
mNothing happened when you pressed the power button.
Make sure the power adapter is firmly connected to both the computer and a power source. If the power adapter is plugged into a power strip, make sure the power strip is plugged in and turned on. Then try pressing the power button again.
Chapter 1: Setting Up Your Macintosh PowerBook 5
Installing system software
System software is a set of programs that your computer uses to start up and operate. To install system software on your hard disk, follow these steps.
You do not need to install system software if you see the Macintosh desktop on your screen when you turn on the computer.
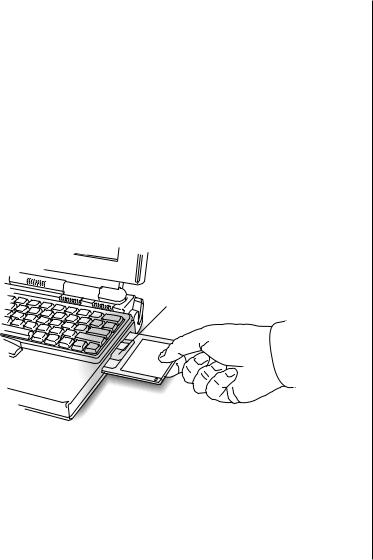
1.Find the Install disk provided with your computer. Insert the disk into the floppy disk drive (metal end first, label side up).
Insert metal end first.
After a few moments, you’ll see the Welcome box of the Installer, the program that installs system software on your hard disk.
2.Press the Return key on your keyboard to continue.
The Easy Install dialog box appears. Easy Install puts the system software that you’ll need right away onto your hard disk.
3.Press the Return key again to start installing system software.
Messages on your screen report how installation is progressing.
4.When the computer prompts you, remove the Install disk and insert the next disk the computer requests.
During installation, the computer automatically ejects a disk it has finished with and requests the next disk it needs.
5.Insert the remaining disks as the computer prompts you.
6.When you see a message reporting that installation was successful, press the Return key once more to quit the Installer program.
If you see a message saying that installation was not successful, you need to try again. Follow the instructions on the screen.
6 Chapter 1: Setting Up Your Macintosh PowerBook

Continuing your work
Next you see a message that asks whether you want to continue using your Macintosh. To continue working or to learn how to use the computer, use the trackball to choose Restart.
1.Place the index and middle fingers of your dominant hand on the trackball and the thumb of the same hand on the lower trackball button. Don’t press either button yet.
2.Roll the trackball around with your fingers.
Notice that the arrow (8) on the screen moves in the direction that you roll the trackball. For example, rolling the trackball to the right moves the arrow to the right.
3.Roll the trackball so the arrow rests over the word Restart.
Make sure that the tip of the arrow is inside the box with the word Restart.
continues .
Chapter 1: Setting Up Your Macintosh PowerBook 7

4.Press and release one of the trackball buttons.
Both buttons do the same thing.
The screen darkens, you hear a sound, and then after a moment the Macintosh desktop appears on the screen.
If nothing happens, try clicking the word Restart again. Make sure that the tip of the arrow is inside the box with the word Restart.
What to do next
mIf you have never used a Macintosh computer before, continue with the section “Learning the Basics.”
mOtherwise, continue with the section “Turning the PowerBook On and Off.” This section contains information that can help you use your computer efficiently.
mBe sure to read the safety instructions and the section on health concerns before beginning to use your PowerBook.
8 Chapter 1: Setting Up Your Macintosh PowerBook
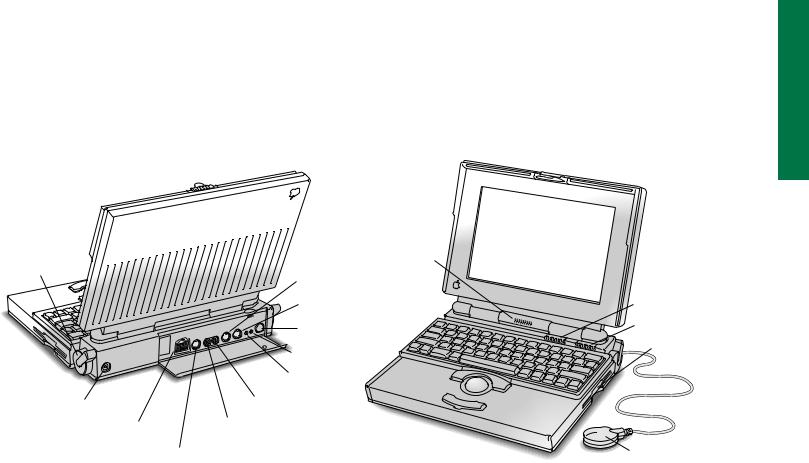
Your computer at a glance
Speaker
Elevation feet |
[ Printer port |
|
|
|
W Modem port |
|
I Power button |
|
P Reset button |
|
¥ Interrupt button |
¯ Power adapter port |
- Sound out port |
g SCSI port (HDI-30) |
Sound in port |
V Apple Desktop Bus (ADB) port
O Contrast control
¤ Brightness control Floppy disk drive
 Microphone (optional)
Chapter 1: Setting Up Your Macintosh PowerBook 9

Learning the basics
The PowerBook comes with a tour and a tutorial to help you start using your computer as quickly as possible.
mThe Macintosh Basics tour teaches the most basic skills you need to master before you can use your computer.
mThe tutorial section of this book (Chapters 2–5) reviews the basic skills taught in the tour, and teaches a few additional skills you’ll find helpful as you become more proficient.
Take the Macintosh Basics tour first.
Before you begin
Make sure your computer is turned on. If the screen is dark, try the following steps in order until you see the Macintosh desktop on your screen.
1.Adjust the screen brightness and contrast controls.
If you see the Macintosh desktop, skip to “Finding the Tour.”
2.Press any key on the keyboard (except Caps Lock).
Pressing a key wakes the computer if it was in sleep (a powerconserving state described later in this chapter). If you see the Macintosh desktop, skip to “Finding the Tour.”
3.Press the power button on the computer’s back panel.
Pressing the power button turns the computer on if it was off. Continue with “Finding the Tour.”
10 Chapter 1: Setting Up Your Macintosh PowerBook

Finding the tour
Your Macintosh Basics tour may be on a floppy disk, or it may be on the computer’s hard disk.
mIf the Macintosh desktop appeared on the screen when you first turned on your computer, then the system software and the Macintosh Basics tour were installed on your
computer’s hard disk at the factory. Continue with the section “Starting the Tour From the Hard Disk.”
mIf you needed to install system software when you set up your computer (as described in the previous section of this chapter), then the Macintosh Basics tour is on a floppy disk in the box with your computer. Locate the disk and continue with the section “Starting the Tour From a Floppy Disk.”
Starting the tour from the hard disk
1.Roll the trackball to move the arrow over the picture labeled “Macintosh HD.”
Make sure the tip of the arrow is over the picture, not over the words “Macintosh HD.”
continues .
Chapter 1: Setting Up Your Macintosh PowerBook 11

2.Being careful not to roll the trackball, press the trackball button twice in quick succession.
Now your screen should look like the picture following step 3. If it doesn’t, try steps 1 and 2 again, paying special attention to the following:
m Make sure the tip of the arrow is touching the picture, not the words beneath it.
m Be sure to press the trackball button twice.
m Try pressing twice more quickly and be careful not to roll the trackball while you press.
3.Roll the trackball to move the arrow over the picture of the folder labeled “Macintosh Basics.”
Make sure the tip of the arrow is over the picture, not over the words “Macintosh Basics.”
The items in the illustration below may not exactly match those on your screen. The only item you need right now is the Macintosh Basics folder.
12 Chapter 1: Setting Up Your Macintosh PowerBook

4.Being careful not to roll the trackball, press the trackball button twice in quick succession.
Now your screen should look like the following illustration:
5.Roll the trackball to move the arrow over the picture of the man labeled “Macintosh Basics.”
Make sure the tip of the arrow is over the picture of the man, not over the words “Macintosh Basics.”
continues .
Chapter 1: Setting Up Your Macintosh PowerBook 13

6.Press the trackball button twice in quick succession.
Now your screen should look like the following picture:
If you don’t see this screen, try again, paying special attention to the following:
mMake sure the tip of the arrow is touching the picture, not the words beneath it.
mBe sure to press the trackball button twice.
mTry pressing twice more quickly and be careful not to roll the trackball while you press.
7.Follow the instructions on the screen and work through the tour.
When you finish the tour, continue with “Turning the PowerBook On and Off ” and read the rest of this chapter for information that can help you use your computer safely and efficiently. Then turn to Chapter 2 and begin the tutorial.
14 Chapter 1: Setting Up Your Macintosh PowerBook
Loading...