


 Loading...
User Guide
Version 3.0

Table of Contents
Introduction...................................................... |
4 |
Getting Started ................................................ |
5 |
1. Set Up VIP............................................... |
5 |
2. Select a Plugin & Patch ......................... |
7 |
3. Load More Plugins & Patches .............. |
8 |
Operation ....................................................... |
11 |
Overview ................................................... |
11 |
Plugin Mode vs. Standalone Mode......... |
13 |
Plugin Mode ......................................... |
13 |
Managing Multiple Instances..................... |
13 |
Saving...................................................... |
14 |
Standalone Mode ................................. |
15 |
Audio ....................................................... |
15 |
Opening ................................................... |
15 |
Saving...................................................... |
15 |
Multiple Keyboards .................................. |
16 |
Menu Bar................................................... |
17 |
File ........................................................ |
17 |
Settings................................................. |
19 |
Plugin Manager ........................................ |
19 |
Audio/MIDI Settings.................................. |
23 |
Preferences.............................................. |
24 |
Help ...................................................... |
26 |
Feedback .............................................. |
26 |
Quick Patch Changer ........................... |
27 |
Tempo................................................... |
28 |
Channel Selector .................................. |
30 |
Icons ..................................................... |
31 |
2

Selection Panel ........................................ |
33 |
Instrument & Effect Browsers............... |
33 |
Plugin.................................................... |
37 |
Setlist.................................................... |
39 |
Store ..................................................... |
41 |
Patch Browser.......................................... |
42 |
Information Panel..................................... |
46 |
Control View Information ...................... |
46 |
Encoders ................................................. |
46 |
Switches .................................................. |
48 |
Multi View Information .......................... |
50 |
Effects Stack............................................ |
50 |
Sends ...................................................... |
53 |
Pads/Keys View Information ................ |
54 |
Pad Layout .............................................. |
56 |
Pad/Bank................................................. |
58 |
Articulation ............................................... |
60 |
Snapshot Mode .................................... |
63 |
Key Control Mode................................. |
65 |
Scales...................................................... |
66 |
Harmonize................................................ |
68 |
Progression.............................................. |
70 |
Global Plugin Settings .......................... |
74 |
Control Area ............................................. |
76 |
Control View ......................................... |
78 |
Assigning & Configuring Controls .............. |
81 |
Learn Mode.............................................. |
85 |
Pads/Keys View .................................... |
87 |
Assigning & Configuring Pads ................... |
91 |
Learn Mode.............................................. |
92 |
Multi View ............................................. |
94 |
Multi Channels.......................................... |
94 |
Buses .................................................... |
105 |
Master Channel ...................................... |
109 |
MIDI Mapping ......................................... |
111 |
Trademarks & Licenses .............................. |
113 |
3
Introduction
VIP is an intelligent production hub and advanced content library that you can use with your VIPsupported keyboard controller. Use the intelligent content filter parameters to find the sound you need, quickly. VIP integrates directly into popular digital audio workstations (DAWs), but can also be run in Standalone Mode. The latter lets you utilize VST instruments and plugins without firing up your DAW and is ideal for software-based stage performance. Finally, VIP’s interface lets you map the hardware controls visually, making customization and workflow a breeze.
4

Getting Started
To use VIP with your keyboard, follow the instructions below to:
1.Set Up VIP (with your keyboard and your DAW, if applicable)
2.Select a Plugin & Patch
3.Load More Plugins & Patches
1.Set Up VIP
To set up your keyboard with VIP in a DAW:
1.Power on your keyboard, and open your DAW in your computer.
2.Make sure your keyboard is selected as a controller in your DAW—you can usually do this in your DAW’s Preferences, Device Setup, or Options.
3.In your DAW, create a new MIDI track (i.e., not an audio track).
4.Open VIP in your DAW as you would open a standard plugin. By default, VIP is installed in the following location, depending on your operating system and desired plugin format:
•Windows (VST): [your hard drive]\Program Files\VstPlugins
•macOS (VST): Library/Audio/Plug-Ins/VST
•macOS (AU): Library/Audio/Plug-Ins/Components
•macOS (AAX): Library/Application Support/Avid/Audio/Plug-Ins
5.In VIP, click the Settings menu and select Plugin Manager.
5

6.At the bottom of the Plugin Manager window, click one of the Plugin Folder fields, and then select the folder where your VST instrument and effect plugins are located on your computer. You can select up to two locations (one for each Plugin Folder field).
7.Click Scan. VIP will scan the folder/folders for available VST instrument and effect plugins, which will appear in the list. When the process is complete, click OK to close the Settings window. VIP will return to its main window and begin importing the patches (presets) for all of your scanned plugins. This can take several minutes.
We highly recommend seeing Operation > Plugin Mode vs. Standalone Mode to learn more about the differences between using VIP with and without a DAW.
To set up your keyboard with VIP in Standalone Mode (without a DAW):
1.Power on your keyboard.
2.Open VIP. By default, VIP is installed in [your hard drive]\Program Files\VstPlugins (Windows) or
Applications (macOS).
3.In VIP, click the Settings menu and select Plugin Manager.
4.At the bottom of the Plugin Manager window, click one of the Plugin Folder fields, and then select the folder where your VST instrument and effect plugins are located on your computer. You can select up to two locations (one for each Plugin Folder field).
5.Click Scan. VIP will scan the folder/folders for available VST instrument and effect plugins, which will appear in the list. When the process is complete, click OK to close the Settings window. VIP will return to its main window and begin importing the patches (presets) for all of your scanned plugins. This can take several minutes.
We highly recommend seeing Operation > Plugin Mode vs. Standalone Mode to learn more about the differences between using VIP with and without a DAW.
6
2. Select a Plugin & Patch
To select a plugin and patch in VIP:
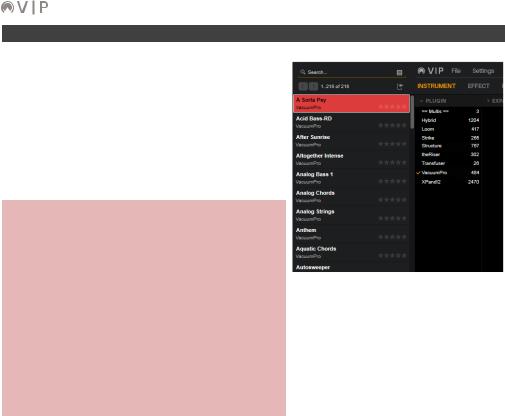
1.In VIP, click the Instrument tab at the top of the window.
2.Click a patch in the patch browser to load it.
To view only the patches from a specific plugin, click the desired plugin in the Plugin column. Its patches will appear in the patch browser on the left.
To select a plugin and patch on your keyboard:
1.Press Main.
2.Turn the data dial to browse your list of patches, and then press the data dial to select one.
Alternatively:
1.Press Browser.
2.Turn the data dial to browse your list of plugins, and then press the data dial to select one.
3.Press the right cursor to move the selector to the list of patches.
4.Turn the data dial to browse your list of patches, and then press the data dial to select one.
7
3. Load More Plugins & Patches
To load additional VST instrument plugins in VIP:
1.In VIP, click the Settings menu and select Plugin Manager.
2.At the bottom of the Plugin Manager window, click one of the Plugin Folder fields, and then select the folder where your VST plugins are located on your computer. You can select up to two locations (one for each Plugin Folder field).
8

3.Click Scan. VIP will scan the folder/folders for available plugins, which will appear in the list.
Note: You can scan up to two locations at once, but you can keep selecting new locations and scanning, which will keep adding plugins to the plugin manager. In other words, scanning is a cumulative process.
Note: To scan while overwriting the entire plugin manager, press and hold your keyboard’s Ctrl (Windows) or (macOS) button, and then click Scan.
4.When the process is complete, click OK to close the Settings window. VIP will return to its main window and begin importing the patches (presets) for all of your scanned plugins. This can take several minutes.
For some plugins, VIP may not automatically import its patches (presets) even though it has scanned them. This is easy to fix manually (see the next page).
9

To manually import patches in VIP:
1.In VIP, click the Instrument or Effect tab at the top of the window, depending on the type of plugin.
2.Click a patch in the patch browser on the left.
Optional: Click the desired plugin in the Plugin column. Any imported patches will appear in the patch browser.
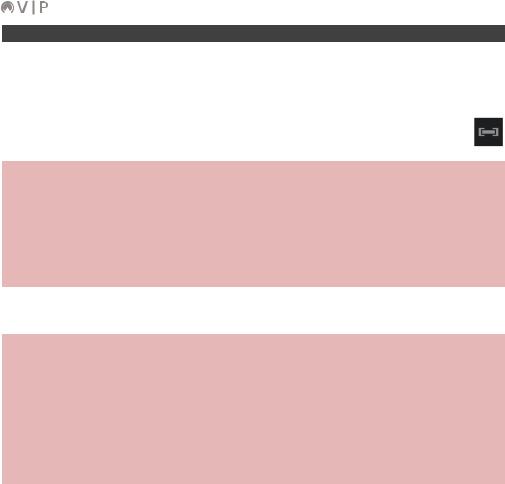
3.Click the Plugin tab at the top of the window or the graphic of the plugin in the lower-right corner. The plugin’s user interface will appear in the selection panel.
Alternatively, click the Plugin Window ( ) icon in the upper-right corner. The plugin’s user interface will open in a window of its own.
Note: You must have a patch loaded to view the plugin’s user interface (see Step 2 above).
4.In your plugin’s user interface, select the patch you want to manually import.
5.In VIP, click the Import Patch ( ) icon above the patch browser. The patch will be imported and will appear in the patch browser.
You can also select other options by right-clicking the Import Patch ( ) icon:
•Auto-Import: Select this to set VIP to import any patch that plugin’s user interface loads. In other words, when you load a patch in the plugin’s own user interface, it will also import automatically into VIP.
•Import Bank: Select this to import the current bank of the current plugin. (This may not work with all plugins.)
Tip: Click the gear (
 ) icon near the bottom of the information panel (lower-right corner of the window) so it shows the Allow duplicate patches checkbox. Click it to enable or disable importing of duplicate patches into VIP.
10

Operation |
|
|
Overview |
|
|
|
|
1 |
3 |
2 |
5 |
|
|
4 |
|
|
11 |

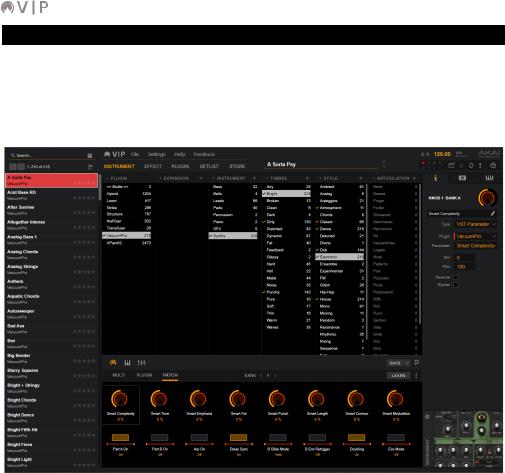
VIP’s interface is divided into five different parts:
1.The menu bar contains menus that let you configure VIP and manage files. Learn more about this in the Menu Bar chapter.
2.The selection panel’s appearance will depend on what tab (above it) is selected: Instrument or Effect, the browsers that show the tags for your plugins; Plugin, the current plugin’s graphical user interface; Setlist, your setlists—groups of instrument patches and multis that you can save for future sessions; and Store, a display of additional plugins you can purchase. Learn more about this in the Selection Panel chapter.
3.The patch browser is a list of your plugins’ patches. The patches shown in this list depend on the currently selected (highlighted) tags in the Instrument or Effect tab of the selection panel and the text in the Search field above (if any). You can filter your patches by different tags or by simply searching for keywords used in patches’ names. Learn more about this in the Patch Browser chapter.
4.The control area is a visual representation of the keyboard controls that VIP can use (the encoders, switches, pads, and keybed). Control View lets you assign parameters to your keyboard’s controls, Pads/Keys View shows a representation of your keyboard’s pads and piano keys, and Multi View lets you control and edit the channels of a “multi” (a set of 2–8 patches that you can control simultaneously). Learn more about this in the Control Area chapter.
5.The information panel shows the parameter settings of currently selected control in the control area (in Control View) or information about the currently selected channel of a multi (in Multi View). Learn more about this in the Information Panel chapter.
12

Plugin Mode vs. Standalone Mode
You can use VIP in two different modes:
•In the studio, you’ll probably use Plugin Mode more often. In this scenario, VIP acts as a VST plugin manager within your DAW.
•For live performance, you’ll probably use Standalone Mode as you likely don’t need to manage your DAW project onstage. In this scenario, VIP acts as a VST host itself without a DAW.
We recommend reading the following Plugin Mode and Standalone Mode sections of this chapter to understand the differences between them.
Plugin Mode
Managing Multiple Instances
While using multiple instances of VIP in your DAW project, you can use a different plugin and/or patch in each instance. Keep in mind, however, that the following items will be the same across all instances in that project:
1.the available patches and multis as well as their associated tags
2.the available plugins and their controller settings (for your keyboard)
3.the pads’ MIDI notes and channels (in the control area’s Pads/Keys View)
In other words, if you change any of these three things, you will see those changes in the other instances of VIP immediately.
Please also note that if you delete a plugin from VIP—in Standalone more or in any instance in Plugin Mode—that plugin will not be available in VIP when you open it, regardless of the mode, instance, or project. You can, however, simply rescan the plugin to make it available in VIP again in all modes, all instances, and all projects.
13

On your keyboard:
While in Main Mode, you can use the Page Left/Right buttons to switch between the normal Main Mode screen and the DAW Control screen.
The DAW Control screen shows a list of all available instances of VIP. The current instance is highlighted yellow. The left column shows the patch name, the center column shows the plugin name, and the right column indicates which keyboard is controlling the current instance.
To select another instance of VIP, turn the data dial to select it, and then press it to confirm your choice.
Note that only the encoders and switches will control this currently selected instance of VIP. The pads and keys will send their MIDI note messages to record-armed tracks in your DAW. Keep this in mind as you switch between instances of VIP and/or record-arm/-disarm tracks in your DAW.
Saving
When you save your DAW project, all instances of VIP will be saved in their current state. When you reopen your DAW project, all instances of VIP will reappear exactly as you saved them, even if you made changes to VIP in other DAW projects, in Standalone Mode, etc. In other words, the DAW project is selfcontained in terms of VIP’s settings.
Although you can manually save your VIP multis or setlists (see Menu Bar > File), you do not need to do this to maintain these items in a DAW project. They will be automatically saved within your DAW project when you save it.
Please also note that if you delete a plugin from VIP—in Standalone more or in any instance in Plugin Mode—that plugin will not be available in VIP when you open it, regardless of the mode, instance, or project. You can, however, simply rescan the plugin to make it available in VIP again in all modes, all instances, and all projects.
14

Standalone Mode
Audio
While using VIP in Standalone Mode, click the Settings menu and select Audio/MIDI Settings to configure VIP’s audio and MIDI settings in the same way you would configure those of your DAW. See
Menu Bar > Settings > Audio/MIDI Settings to learn more.
Opening
Each time you open VIP in Standalone Mode, it will be identical to VIP in the last DAW project you opened. In other words, it will have these items from the last-opened project:
1.the available patches and multis as well as their associated tags
2.the available plugins and their controller settings (for your keyboard)
3.the pads’ MIDI notes and channels (in the control area’s Pads/Keys View)
Please also note that if you delete a plugin from VIP—in Standalone more or in any instance in Plugin Mode—that plugin will not be available in VIP when you open it, regardless of the mode, instance, or project. You can, however, simply rescan the plugin to make it available in VIP again in all modes, all instances, and all projects.
Saving
Regardless of what changes you make in VIP in Standalone Mode, all instances of VIP in your DAW projects (Plugin Mode) will remain unchanged. This is to prevent unintentional changes to your projects.
Although you can manually save your VIP multis or setlists (see Menu Bar > File), you do not need to do this to maintain these items in a DAW project. They will be automatically saved within your DAW project when you save it.
Please also note that if you delete a plugin from VIP—in Standalone more or in any instance in Plugin Mode—that plugin will not be available in VIP when you open it, regardless of the mode, instance, or project. You can, however, simply rescan the plugin to make it available in VIP again in all modes, all instances, and all projects.
15
Multiple Keyboards
You can connect multiple VIP-supported keyboards to your computer to enhance your setup. This is useful if you want to use each keyboard to control a separate instance of VIP.
You can right-click the Hardware-Connect ( ) icon in the upper-right corner to see which keyboard is controlling this instance of VIP. To select a different keyboard to control this instance, click it in this menu. See Menu Bar > Icons to learn more about this.
To set a keyboard to control a different instance of VIP:
1.Press Main to enter Main Mode.
2.Press Page Right to view the DAW Control screen. This screen shows a list of all available instances of VIP. The current instance is highlighted yellow. The left column shows the patch name, the center column shows the plugin name, and the right column indicates which keyboard is controlling the current instance.
3.Turn the data dial to select the instance of VIP you want to control, and then press it to confirm your choice.
Keep the following notes in mind.
On each keyboard:
While in Main Mode, you can use the Page Left/Right buttons to switch between the normal Main Mode screen and the DAW Control screen.
Only the encoders and switches will control the keyboard’s instance of VIP. The pads and keys will send their MIDI note messages to record-armed tracks in your DAW. Keep this in mind as you switch between instances of VIP and/or record-arm/-disarm tracks in your DAW.
Also, if multiple keyboards are controlling the same instance of VIP, they will control same banks of encoders, switches, and pads at the same time. In other words, if you switch to your encoders on your first keyboard to a specific bank, the encoders your second keyboard will now also select that bank. If each keyboard is controlling a different instance of VIP, their banks will be independent of each other.
16
Menu Bar
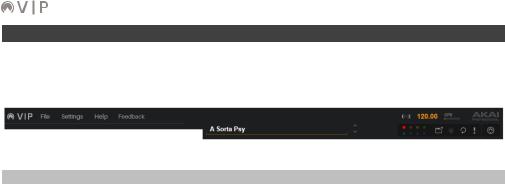
The menu bar includes the File, Settings, Help, and Feedback menus as well as the Quick Patch Changer, Tempo, Channel Selector, and Icons important to VIP’s overall operation.
File
Click File to select an available option for importing, exporting, backing up, or restoring various files.
Import Setlist: Select this option to import a previously exported setlist. In the window that appears, locate and select the desired setlist file (.set), and then click Open.
To learn more about how to use setlists, see Selection Panel > Setlist.
Import Multi: Select this option to import a previously exported multi. In the window that appears, locate and select the desired multi file (.vipp), and then click Open. Alternatively, click and drag one or more multi files directly onto the software window.
To learn more about how to use multis, see Control Area > Multi View.
Restore Backup: Select this option to restore a previously saved VIP backup file. In the window that appears, locate and select the desired backup file (.bak), and then click Open.
Export Setlist: Select this option to export a setlist for later use. In the window that appears, select the location and enter a name for the file (.set), and then click Save.
To learn more about how to use setlists, see Selection Panel > Setlist.
17

Export Multi: Select this option to export a multi for later use. In the window that appears, select the location and enter a name for the file (.vipp), and then click Save.
To learn more about how to use multis, see Control Area > Multi View.
Back Up: Select this option to save a VIP backup file for later use. In the window that appears, select the location and enter a name for the backup file (.bak), and then click Save.
18

Settings
Click Settings to show the Settings menu, which lets you configure VIP.
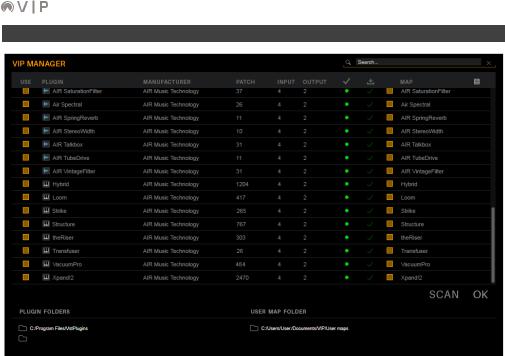
Plugin Manager
This is the Plugin Manager window, which contains a list of all available plugins, based on your selected plugin folders.
19

The columns (described below, left to right) indicate the plugins’ status:
•Use: Check this box to allow VIP access to this plugin. If this box is unchecked, it will not appear in Plugin category in VIP’s selection panel. To select multiple adjacent plugins, hold down Shift
on your computer keyboard while clicking a plugin. To select multiple non-adjacent plugins, hold down Ctrl (Windows) or (macOS) on your computer keyboard while clicking each plugin.
•Plugin: This is the plugin’s name. If there is a right arrow ( or ) next to it, click it to show or hide available expansion maps in the Map column.
•Manufacturer: This is the plugin’s maker.
•Patch: This is how many default patches are available for the scanned plugin.
•Input: This is the number of audio input channels the plugin uses.
•Output: This is the number of audio output channels the plugin uses.
•Validation: This indicates whether the plugin has been successfully scanned or not.
o A green circle in this column indicates that the plugin is properly scanned and can be used by VIP.
oAn orange triangle with an exclamation point (!) indicates that the plugin was not properly scanned. If you see this, hover the mouse cursor over the icon to see a tooltip that will indicate why the item did not scan.
To clear the scan from the plugin manager, right-click and select Clear Scan.
To rescan the plugin, right-click it and select Rescan [plugin name].
Important: VIP can validate plugins only if they have the same bit depth as your version of VIP (click Help and select About to check VIP’s bit depth).
Important: This icon may appear if you have imported the plugin’s patches into VIP but later deleted the plugin. Rescan the plugin properly to re-validate it.
oA red circle indicates that a plugin has been “blacklisted.” If you try to scan an invalid plugin and it fails, you will be asked whether or not you want to blacklist the plugin. To remove the plugin from the blacklist, simply click the red circle, and its status will change to “invalid” (described above).
Note: VIP supports VST plugins only. It will not scan VST3, AU, or AAX plugins.
20
•Download Status: This indicates the download status for a plugin map.
A downward arrow icon (

 ) indicates there is a map available to download. Click the icon to start downloading it.
Note: This will work only if your computer is connected to the Internet.
During the download, the icon will be an X with a progress circle around it. Wait for it to reach the 12 o’clock position, or click the X to cancel the download.
Once the map is downloaded, the icon will be a green checkmark ().
•Map: Any available maps for each plugin or expansion will appear in this column. Click the checkbox next to the map name to enable or disable the map. If there is an arrow ( or , next to the plugin’s Use box on the left of the window), click it to show or hide available expansion maps.
Note: A single plugin or expansion may have more than one map. If you have multiple maps enabled simultaneously for the same plugin, this may result in duplicate patches in the patch browser. If this happens, you can disable any of the maps in this plugin manager—the patches belonging to that map will be removed instantly when you return to the patch browser. Keep this in mind if you export your own maps or when you download additional maps for plugins or expansions in the future.
Search: Click this field and enter a name to search for a patch by keyword. The results will appear in the list below. To clear the field and the results, click the X icon.
To sort the plugins by name or vendor, click the menu icon (≡), select Sort, and select By name or By vendor.
To show all plugins, instrument plugins only, or effect plugins only, click the menu icon (≡), select Filter, and select Show all, Show instruments only, or Show effects only.
Plugin Folders: Click either of these fields, and then select where your plugins are stored. VIP will scan this location when you click Scan. You can then use any supported plugins in that location with VIP (after they are validated in the plugin manager). You can scan up to two locations at once, but you can keep selecting new locations and scanning, which will keep adding plugins to the plugin manager. In other words, scanning is a cumulative process.
21

User Map Folder: Click this field, and then select where your user maps are stored. VIP will scan this location when you click Scan. You can then use any supported maps in that location in VIP (after the plugins are validated in the plugin manager).
Scan: Click this to prompt VIP to scan the Plugin Folder locations. You can then use any supported plugins in that location with VIP (after they are validated in the plugin manager). You can scan up to two locations at once, but you can keep selecting new locations and scanning, which will keep adding plugins to the plugin manager. In other words, scanning is a cumulative process. To scan while overwriting the entire plugin manager, press and hold your keyboard’s Ctrl (Windows) or (macOS) button, and then click Scan.
OK: Click this to close the Plugin Manager window (and to import any new plugins or presets that have been added to the plugin manager).
If you have downloaded a new map, you will be asked if you want the selected maps. Click Import to import the plugin map or Back to return to the plugin manager and cancel the operation.
See Selection Panel > Instrument & Effects Browsers to learn how to export (save) a Plugin Map.
22
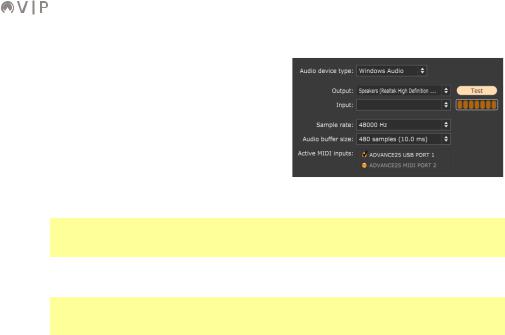
Audio/MIDI Settings
While using VIP in Standalone Mode (without a DAW), select this to open the Audio/MIDI Settings window, which lets you configure VIP’s audio and MIDI settings in the same way you would configure those of your DAW.
•Audio Device Type: Click this and select the type of device you want to use for audio input and output.
•Output: Click this menu to select the audio hardware driver you want to use to play audio from VIP. Click the Test button to play a tone through that driver.
Note: We recommend setting the Input and Output menus to inputs and outputs from the same sound card. Selecting an input and output from different sound cards can produce unexpected results due to their respective drivers.
•Input: Click this menu to select your desired audio input (e.g., a USB audio interface), if your plugin requires one to send audio into VIP. If your plugin requires MIDI input only, disregard this menu.
Note: We recommend setting the Input and Output menus to inputs and outputs from the same sound card. Selecting an input and output from different sound cards can produce unexpected results due to their respective drivers.
•Sample Rate: Click this menu to select the desired sample rate. Your selection should depend on your audio interface’s available sample rates.
•Audio Buffer Size: Click this menu to set the latency of your audio system. Lower values result in a more immediate response but also more CPU consumption, which may result in audible clicks and pops. Higher values are much more CPU-friendly but produce a higher latency, resulting in a delay between playing and hearing the corresponding sound. The ideal audio buffer size also depends on your computer’s CPU performance. Experiment with this to find the best setting for your system.
•Active MIDI Inputs: These checkboxes represent the active MIDI inputs on your computer system.
23
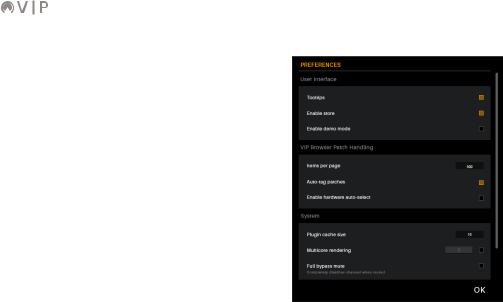
Preferences
This window contains settings that affect VIP’s user interface, patch handling, and cache size.
User Interface:
•Tooltips: Check this box to enable tooltips— explanations that will appear above different VIP controls or icons when you hover your mouse cursor over them.
•Enable Store: Check this box to enable the
Store tab in the selection panel. See Selection Panel > Store to learn more about this feature.
•Enable Demo Mode: Check this box to enable Demo Mode.
VIP Browser Patch Handling:
•Items per Page: This field determines the maximum number of patches shown in each page of the patch browser (you can use the left and right arrows [< or >] in the upper left corner to move between the different pages). Its range is 10–500.
To change this number, click and drag the field up or down. Alternatively, double-click the field, type a number, and press Enter on your computer keyboard. Note that higher numbers may take more time to load when moving between pages.
•Auto-Tag Patches: Check this box to allow VIP to automatically apply tags to plugins’ patches, if available. This will work only for certain supported plugins. To learn how to manually tag your patches, see Selection Panel > Instrument & Effects Browsers.
•Enable Hardware Auto-Select: Check this box to allow patches to automatically load when you scroll through the patch browser on your keyboard. This lets you skip the step of pressing its data dial to load a patch. It’s also useful for quickly auditioning your patches.
24

System:
•Plugin Cache Size: This field determines the maximum number of plugins stored in your computer’s memory (0–32). A higher number can reduce the amount of time needed for a patch to load (if the plugin has already been loaded), but it also requires more memory usage. To change this number, click and drag the field up or down. Alternatively, double-click the field, type a number, and press Enter on your computer keyboard.
You can enable or disable the caching of individual plugins. See Global Plugin Settings to learn about this.
•Multicore Rendering: Check this box to allow your computer to spread VIP’s processing across multiple cores. Multicore processing will improve VIP’s performance, especially while playing live.
To change the number, click and drag the field up or down. Alternatively, double-click the field, type a number, and press Enter on your computer keyboard. The available range depends on the number of cores your computer has.
•Full Bypass Mute: Check this box to completely disable a channel of multi when it is muted. This is useful for conserving CPU; the CPU used to process those muted channels can then be used for other processes.
•Setlist Control Edit: Check this box to set VIP to save control values when you save a patch or multi to a setlist. This includes the following:
o For patches: Parameter values in the Control View (encoder positions and states of switches).
o For multis: Parameter values in the Control View (encoder positions and states of switches) for each patch in the multi, plus the following for each channel in the multi: levels, panning positions, solo/mute states, bus levels, key ranges, transpositions, MIDI channels, and output routings.
•Boost VIP Output: This field determines how much louder VIP’s output volume is than the master channel’s level (0–12 dB). To change this number, click and drag the field up or down. Alternatively, double-click the field, type a number, and press Enter on your computer keyboard.
OK: Click this to close the Preferences window.
25

Help
Click Help to show the Help menu, which lets you view information about VIP:
•About: Click this to show information about this version of VIP, including the current software version and bit depth.
•Manual: Click this to show this user guide.
•VIP 3.0 Release Notes: Click this to show the release notes for the current software version.
•MIDI Learn Tutorial: Click this to view a brief step-by-step tutorial about MIDI Mapping Mode. See MIDI Mapping for a more complete explanation.
•Browser Tutorial: Click this to view a brief step-by-step tutorial about browsing plugins and patches. See Patch Browser and Selection Panel > Instrument & Effects Browsers for a more complete explanation.
•Edit Parameters Tutorial: Click this to view a brief step-by-step tutorial about Learn Mode. See Control Area > Control View > Learn Mode for a more complete explanation.
•Multi Tutorial: Click this to view a brief step-by-step tutorial about multis. See Control Area > Multi View for a more complete explanation.
Feedback
Click Feedback to show the Feedback menu so you can send us valuable comments about VIP. These options will work only if your computer is connected to the Internet.
•Thumbs Up: Click this if you’re enjoying using VIP! If possible, please tell us what you like about it!
•Thumbs Down: Click this if aren’t liking your experience with VIP. If possible, please comment on what you think we could do to improve it!
•Suggest a Feature: Click this to open a page in your web browser where you can request a new feature for a future release of VIP.
•Report a Bug: Click this to open a page in your web browser where you can report a bug you’ve encountered in VIP. Please specify your operating system and version (e.g., “Windows 8” or “macOS 10.12”) and how to reproduce the issue, if possible.
26

Quick Patch Changer
The quick patch changer lets you move through your currently selected plugin’s list of patches without having to use the patch browser.
To select the previous or next patch, click the up or down ( or ) arrow, respectively.
On your keyboard: Press Main to enter Main Mode, turn the data dial to move through the list of patches (for the current plugin), and press the data dial to load it.
To rename the patch, right-click the patch name, type in a new name, and then press Enter on your computer keyboard.
27

Tempo
The Tempo field shows the current tempo, which affects any tempo-/sync-based parameters of your patches.
Although the Tempo field will always be shown, the actual source (also known as MIDI Clock) may be different, depending on how you are using VIP:
In Standalone Mode (without a DAW):
•If your keyboard is not connected, the Tempo field will determine the tempo.
•If your keyboard is connected, your keyboard’s internal clock will determine the tempo. See the next page to learn how to change the tempo.
In Plugin Mode (with a DAW):
•If your keyboard is not connected, your DAW will determine the tempo.
•If your keyboard is connected, either your DAW or your keyboard or the DAW will determine the tempo. This depends on whether your keyboard’s Clock Source is set to Internal or External. See the next page to learn more about this.
To change the Clock Source on your keyboard:
1.Press and hold Shift and press Browser to enter Global Mode.
2.Use the Page Left/Right buttons to find the Clock Source option.
3.Use the cursors to select Clock Source, and then turn the data dial to set it to Internal or External.
28

Depending on the above scenarios, you can change the tempo by doing one of the following:
In Standalone Mode (without a DAW):
•If your keyboard is not connected, click the Tempo field, type the desired tempo, and press Enter on your computer keyboard.
•If your keyboard is connected, do either of the following:
On your keyboard:
Press the Tap Tempo button several times at the desired rate. or
1.Press and hold Shift and press Browser to enter Global Mode.
2.Use the Page Left/Right buttons to find the Internal Tempo option.
3.Use the cursors to select Internal Tempo, and then turn the data dial to set the desired tempo.
In Plugin Mode (with a DAW):
•If your keyboard is not connected, change the tempo of the project in your DAW.
•If your keyboard is connected, do either of the following:
o If your keyboard’s MIDI Clock source is set to Internal, do either of the following:
On your keyboard:
Press the Tap Tempo button several times at the desired rate. or
1.Press and hold Shift and press Browser to enter Global Mode.
2.Use the Page Left/Right buttons to find the Internal Tempo option.
3.Use the cursors to select Internal Tempo, and then turn the data dial to set the desired tempo.
oIf your keyboard’s Clock Source is set to External, change the tempo of the project in your DAW.
29
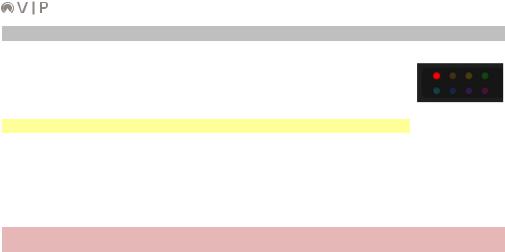
Channel Selector
The channel selector indicates which channel is selected when using a multi. A multi is collection of 2–8 patches (from one or more plugins). Each patch is assigned to a channel with a designated color. When using a multi, you can use and control all channels at the same time.
Note: Read more about using multis in Control Area > Multi View.
To select a channel, click the circle with the color that corresponds to the desired channel. Alternatively, click the channel directly in the control area when in Multi View.
You can also press and hold Shift on your computer keyboard and use its left/right arrow (/) buttons to move through the channels. This includes the four buses, which are not shown in the channel selector.
To select a channel on your keyboard, press Multi to enter Multi Mode, and turn the data dial to select the desired channel.
30
Loading...