


User Guide
English ( 2 – 13 )
Guía del usuario
Español ( 14 – 25 )
Guide d’utilisation
Français ( 26 – 37 )
Guida per l’uso
Italiano ( 38 – 49 )
Benutzerhandbuch
Deutsch ( 50 – 61 )
Appendix
English ( 62 )
User Guide (English)
Introduction
Box Contents
Timbre Wolf |
User Guide |
Power Adapter |
Safety & Warranty Manual |
Support
For the latest information about this product (system requirements, compatibility information, etc.) and product registration, visit akaipro.com.
For additional product support, visit akaipro.com/support.
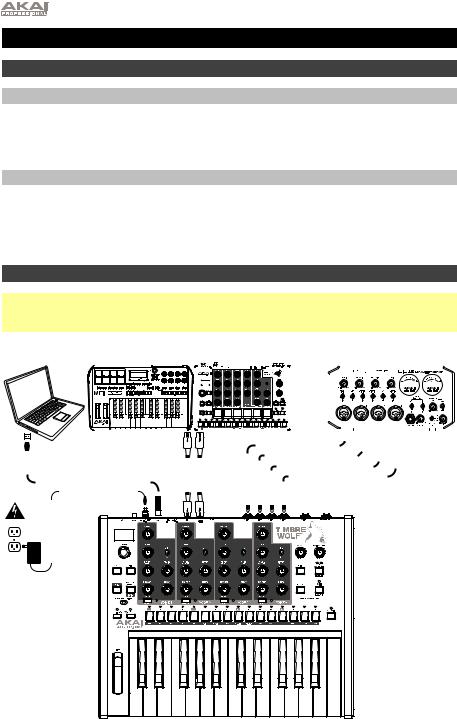
Quick Start / Connection Diagram
Important: After powering Timbre Wolf on, let it warm up before using it. Its tuning can be affected by the temperature. After it warms up for the first time, we recommend calibrating it (see Calibration to learn how to do this).
Computer |
|
|
MIDI Keyboard |
|
External MIDI Device |
|
|
|
|
Audio interface, |
|||||||||||||||||||||||||||||||||||||||||||||||||||||||||||
|
|
|
(e.g., drum machine) |
|
|
|
|
|
mixer, etc. |
||||||||||||||||||||||||||||||||||||||||||||||||||||||||||||
|
|
|
|
|
|
|
|
|
|
|
|
|
|
|
|
|
|
|
|
|
|
|
|
|
|
|
|
|
|
|
|
|
|
|
|
|
|
|
|
|
|
|
|
|
|
|
|
|
|
|
|
|
|
|
|
|
|
|
|
|
|
|
|
|
|
|
|
|
|
|
|
|
|
|
|
|
|
|
|
|
|
|
|
|
|
|
|
|
|
|
|
|
|
|
|
|
|
|
|
|
|
|
|
|
|
|
|
|
|
|
|
|
|
|
|
|
|
|
|
|
|
|
|
|
|
|
|
|
|
|
|
|
|
|
|
|
|
|
|
|
|
|
|
|
|
|
|
|
|
|
|
|
|
|
|
|
|
|
|
|
|
|
|
|
|
|
|
|
|
|
|
|
|
|
|
|
|
|
|
|
|
|
|
|
|
|
|
|
|
|
|
|
|
|
|
|
|
|
|
|
|
|
|
|
|
|
|
|
|
|
|
|
|
|
|
|
|
|
|
|
|
|
|
|
|
|
|
|
|
|
|
|
|
|
|
|
|
|
|
|
|
|
|
|
|
|
|
|
|
|
|
|
|
|
|
|
|
|
|
|
|
|
|
|
|
|
|
|
|
|
|
|
|
|
|
|
|
|
|
|
|
|
|
|
|
|
|
|
|
|
|
|
|
|
|
|
|
|
|
|
|
|
|
|
|
|
|
|
|
|
|
|
|
|
|
|
|
|
|
|
|
|
|
|
|
|
|
|
|
|
|
|
|
|
|
|
|
|
|
|
|
|
|
|
|
|
|
|
|
|
|
|
|
|
|
|
|
|
|
|
|
|
|
|
|
|
|
|
|
|
|
|
|
|
|
|
|
|
|
|
|
|
|
|
|
|
|
|
|
|
|
|
|
|
|
|
|
|
|
|
|
|
|
|
|
|
|
|
|
|
|
|
|
|
|
|
|
|
|
|
|
|
|
|
|
|
|
|
|
|
|
|
|
|
|
|
|
|
|
|
|
|
|
|
|
|
|
|
|
|
|
|
|
|
|
|
|
|
|
|
|
|
|
|
|
|
|
|
|
|
|
|
|
|
|
|
|
|
|
|
|
|
|
|
|
|
|
|
|
|
|
|
|
|
|
|
|
|
|
|
|
|
|
|
|
|
|
|
|
|
|
|
|
|
|
|
|
|
|
|
|
|
|
|
|
|
|
|
|
|
|
|
|
|
|
|
|
|
|
|
|
|
|
|
|
|
|
|
|
|
|
|
|
|
|
|
|
|
|
|
|
|
|
|
|
|
|
|
|
|
|
|
|
|
|
|
|
|
|
|
|
|
|
|
|
|
|
|
|
|
|
|
|
|
|
|
|
|
|
|
|
|
|
|
|
|
|
|
|
|
|
|
|
|
|
|
|
|
|
|
|
|
|
|
|
|
|
|
|
|
|
|
|
|
|
|
|
|
|
|
|
|
|
|
|
|
|
|
|
|
|
|
|
|
|
|
|
|
|
|
|
|
|
|
|
|
|
|
|
|
|
|
|
|
|
|
|
|
|
|
|
|
|
|
|
|
|
|
|
|
|
|
|
|
|
|
|
|
|
|
|
|
|
|
|
|
|
|
|
|
|
|
|
|
|
|
|
|
|
|
|
|
|
|
|
|
|
|
|
|
|
|
|
|
|
|
|
|
|
|
|
|
|
|
|
|
|
|
|
|
|
|
|
|
|
|
|
|
|
|
|
|
|
|
|
|
|
|
|
|
|
|
|
|
|
|
|
|
|
|
|
|
|
|
|
|
|
|
|
|
|
|
|
|
|
|
|
|
|
|
|
|
|
|
|
|
|
|
|
|
|
|
|
|
|
|
|
|
|
|
|
|
|
|
|
|
|
|
|
|
|
|
|
|
|
|
|
|
|
|
|
|
|
|
|
|
|
|
|
|
|
|
|
|
|
|
|
|
|
|
|
|
|
|
|
|
|
|
|
|
|
|
|
|
|
|
|
|
|
|
|
|
|
|
|
|
|
|
|
|
|
|
|
|
|
|
|
|
|
|
|
|
|
|
|
|
|
|
|
|
|
|
|
|
|
|
|
|
|
|
|
|
|
|
|
|
|
|
|
|
|
|
|
|
|
|
|
|
|
|
|
|
|
|
|
|
|
|
|
|
|
|
|
|
|
|
|
|
|
|
|
|
|
|
|
|
|
|
|
|
|
|
|
|
|
|
|
|
|
|
|
|
|
|
|
|
|
|
|
|
|
|
|
|
|
|
|
|
|
|
|
|
|
|
|
|
|
|
|
|
|
|
|
|
|
|
|
|
|
|
|
|
|
|
|
|
|
|
|
|
|
|
|
|
|
|
|
|
|
|
|
|
|
|
|
|
|
|
|
|
|
|
|
|
|
|
|
|
|
|
|
|
|
|
|
|
|
|
|
|
|
|
|
|
|
|
|
|
|
|
|
|
|
|
|
|
|
|
|
|
|
|
|
|
|
|
|
|
|
|
|
|
|
|
|
|
|
|
|
|
|
|
|
|
|
|
|
|
|
|
|
|
|
|
|
|
|
|
|
|
|
|
|
|
|
|
|
|
|
|
|
|
|
|
|
|
|
|
|
|
|
|
|
|
|
|
|
|
|
|
|
|
|
|
|
|
|
|
|
|
|
|
|
|
|
|
|
|
|
|
|
|
|
|
|
|
|
|
|
Power
Items not listed in Box Contents are sold separately.
2

Features
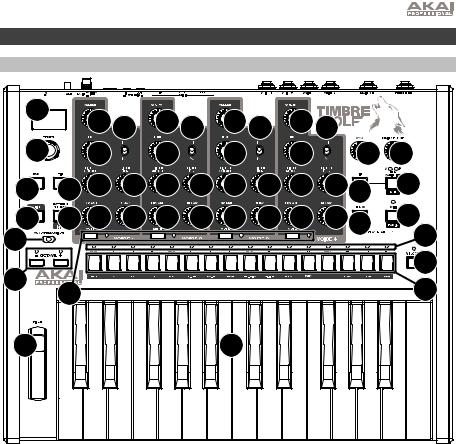
Top Panel
1 |
12 |
12 |
12 12 |
12 12 |
12 12 |
|
|||
2 |
|
||||||||
12 |
|
12 |
|
12 |
|
12 |
20 |
21 |
|
3 |
7 12 |
12 |
12 |
12 |
12 |
12 |
12 |
1218 |
17 |
4 |
19 12 |
12 |
12 |
12 |
12 |
12 |
12 |
1215 |
14 |
11 |
|
|
|
|
|
|
|
|
6 |
9 |
|
|
|
|
|
|
|
|
16 |
13 |
|
|
|
|
|
|
|
5 |
|
|
|
|
|
|
|
|
|
||
10 |
|
|
|
|
8 |
|
|
|
|
1.Display: This display shows Timbre Wolf’s tempo or other relevant values described in this guide.
2.Tempo: Turn this knob to adjust Timbre Wolf’s global tempo (20–300 BPM or beats per minute). The number will be shown in the display. You also use this knob to perform other operations such as selecting note values, swing amount, patterns, or the pattern length.
3.Tap: Press this button at the desired rate to enter a new tempo. Timbre Wolf will detect the new tempo after three taps.
4.Shift: Press and hold this button to access the secondary functions of certain buttons.
5.Step Switches: Press these buttons to enter or erase a step/note from the pattern. Press and hold Shift to access their secondary functions:
•Tune: Use this button to calibrate the tuning of Timbre Wolf’s voices. See Calibration to learn how to do this.
•1/4, 1/8, 1/16, 1/32: Use these buttons to select the pattern’s time division (i.e., the note value of each Step Switch). When holding Shift, the Step Indicator above the current time division will be lit.
•Triplet: Press this button activate or deactivate Triplet, which turns the time division into triplet-based one (except for 1/32). When holding Shift, the Step Indicator above this button is lit when activated.
3

•Swing: Press this button and then turn the Tempo knob to adjust how much swing is applied to the pattern. At 50, no swing is applied. At 75, the pattern is entirely swung. (This is identical to Akai Professional MPCs.)
•Legato: Press this button to configure the legato settings for each voice. When legato is on, playing a note while another note is being held will not retrigger the envelope for the new note, resulting in a smooth glide from the original note to the new note. When legato is off, playing a note will always trigger the envelope, giving each note more definition. See Voice Settings > Legato to learn more.
•Priority: Press this button to set which note will be replaced when the number of simultaneously played notes exceeds the voice limit (1 while the Voice Mode Selector is set to Mono or Unison or 5 while the Voice Mode Selector is set to
Poly). See Voice Settings > Priority to learn more.
•MIDI Ch: Press this button to set the MIDI channels to which the voices respond (from Timbre Wolf’s keyboard or from an external MIDI device). This setting determines the channel for Voice 1 only. Voices 2–4 will use the three next-highest MIDI channels in sequential order. See Voice Settings > MIDI Channel to learn more.
•Local: Press this button to turn the Local setting on or off. When on, its Step Indicator will be lit and Timbre Wolf’s keyboard will send its MIDI messages to the four internal voices. When off, its Step Indicator will be off and Timbre Wolf’s keyboard will send its MIDI messages to the MIDI Out.
Note: You can still record and edit patterns when Local is off.
•Sync: Press this button to select Timbre Wolf’s MIDI clock source: Internal, External, USB, or Gate. See the Transport Control section to learn more.
•Copy, Clear, Save: Use these buttons to copy, clear, or save the current pattern. See the Saving, Copying, and Clearing section to learn more.
6.Step Indicators: These LEDs will light up to indicate various states:
•While playing a pattern, they show the current position in the Sequence.
•When viewing a pattern, they show which steps contain a note (i.e., which Step Switches are active). See Sequencer > Step Switches to learn more.
•While holding down the Velocity button in Record Mode, their colors show the velocity of each step. See Sequencer > Step Switches to learn more.
•While selecting a pattern, the red Step Indicator shows which pattern is currently selected. See About Patterns to learn more.
7.Tie: Press and hold this button, and then press a Step Switch to “tie” its note to the previous step or to return it to its previous (“un-tied”) state. A tied note is “held over” from the previous note, meaning that its envelope is not retriggered. When you press and hold this button, the Step Indicators of tied steps will be lit amber, those with “un-tied” notes will be lit red, and those with no notes will be unlit.
You can do this to multiple Step Switches at once, and you can tie several consecutive notes together. Tied notes can also “wrap around” from the end to the beginning of a sequence.
8.Keyboard: This 25-note keyboard is velocity-sensitive and, in conjunction with the Octave Up/Down buttons, can control a 4-octave range.
9.Octave Down/Up: Use these buttons to shift the keyboard’s range up or down.
10.Pitch-Bend Wheel: Move this wheel to bend the pitch of the notes you are playing on the keyboard.
4

11.Voice Mode Selector: Use this switch to set Timbre Wolf’s voice mode (Mono, Poly, or Unison), which determines which voice/voices you will hear. See Voice Settings > Mono, Poly, or Unison to learn more.
12.Voice Controls: Use these controls to adjust the sounds of their respective voices.
•Volume: Turn this to set the voice’s volume.
•Tune: Turn this to tune the pitch of the voice.
•Filter Cutoff: Turn this to set the cutoff frequency of the voice’s low-pass filter.
•Filter Res: Turn this to set the resonance of the voice’s low-pass filter. This determines the slope of filter at the cutoff frequency.
•Env Amt: Turn this to set how much the voice is affected by the filter envelope. (The envelope’s effect will still be heard even at the minimum setting.)
•Decay: Turn this to set how long it takes for the voice’s amplitude envelope to continue after the note stops playing.
13.Mute/Select: Press and hold Shift and then press this button to mute or unmute the corresponding voice. The light next to the button is lit if the voice is unmuted, unlit if the voice is muted. This affects sequencer playback only; you can still use play the voice using the keyboard or an external MIDI device.
14.Play/Stop: Press this button to start or stop playback. During playback, press and hold Rec and then press this button to restart playback from the very beginning of the pattern.
Press and hold Shift and then press this button to send a MIDI Panic (All Notes Off) message.
When Sync is set to Gate, press this button to return to Step 1. See Transport Controls to learn more.
15.Rec: Press this button to record-arm the sequencer. See the Sequencer section of this guide to learn more. During playback, press and hold this button and then press Play/Stop to restart playback from the very beginning of the pattern.
16.Velocity: Press this button to edit the velocity of a step. See the Sequencer section of this guide to learn more.
17.Seq Variation: Press this button to select whether you are playing/editing Sequence A, Sequence B, or Sequence A and B. See the About Patterns section to learn more.
18.Fill: Press this button to play the fill for the current sequence (A, B, or A and B). See the About Patterns section to learn more.
19.Pattern Select: Press this button and then select a pattern by (A) pressing one of the 16 Step Switches to select the pattern of the same number or (B) turning the Tempo knob (when selecting a pattern, the Tempo knob will not adjust the tempo). Press Pattern Select again to return to normal operation. If you do this during playback, the current pattern will finish before moving to the next one.
Press and hold Shift and then press this button to set the pattern’s length. The pattern’s length (in steps) will appear in the display, and the same number Step Indicators will light up amber. Press one of the 16 Step Switches or turn the Tempo knob to set the pattern’s length (in steps). If the Seq Variation button has either A or B lit, the maximum pattern length is 16 steps. If both A and B are lit, the maximum pattern length is 32 steps, and the minimum pattern length is 17 steps. Press Pattern Select (without holding Shift) to return to normal operation.
20.Main Volume: Turn this knob to set the output volume of Timbre Wolf’s Main Out and
Phones Out.
21.Howl: Turn this knob to set the amount of overdrive (distortion) applied to Timbre Wolf’s Main Out and Phones Out. This does not affect the sound of Voice Outs 1–4.
5

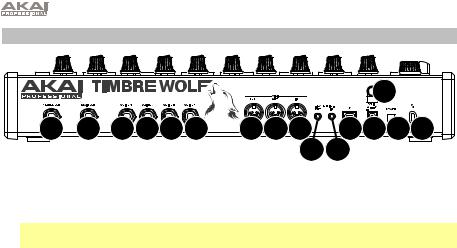
Rear Panel
|
|
|
|
3 |
8 |
6 |
7 7 7 7 |
1110 9 |
5 1 2 4 |
|
|
|
12 13 |
|
1.DC In: Use the included power adapter (12V, 2A, center-positive) to connect this jack to a power outlet.
2.Power Button: Press this button to power Timbre Wolf on or off.
Important: After powering Timbre Wolf on, let it warm up before using it. Its tuning can be affected by the temperature.
3.Cable Restraint: You can secure a cable to this restraint to prevent it from accidentally unplugging.
4.Kensington® Lock Slot: You may use this Kensington lock slot to secure the Timbre Wolf to a table or other surface.
5.USB Port: Use a standard USB cable to connect this port to an available USB port on your computer. This connection lets Timbre Wolf send and receive MIDI over USB to and from your computer.
6.Main Out: Use a standard 1/4” (6.35 mm) TRS or TS cable to connect this output to the input of an audio interface, mixer, amplifier system, etc.
7.Voice Outs 1–4: Use standard 1/4” (6.35 mm) TRS or TS cables to connect these outputs to the inputs of an audio interface, mixer, amplifier system, etc. Each Timbre Wolf voice is sent separately to each of these outputs, so you can record or mix them independently of each other. When a cable is connected to one of these outputs, that voice will be removed from the Main Out and Phones Out. The Howl knob does not affect these outputs.
8.Phones Out: Connect your standard 1/4” (6.35 mm) stereo headphones to this output.
9.MIDI In: Use a standard five-pin MIDI cable to connect this MIDI In to the MIDI Out of an external MIDI device (e.g., another MIDI controller).
10.MIDI Out: Use a standard five-pin MIDI cable to connect this MIDI Out to the MIDI In of an external MIDI device (e.g., a synthesizer, sequencer, drum machine, etc.).
11.MIDI Thru: Use a standard five-pin MIDI cable to connect this MIDI Thru to the MIDI In of an external MIDI device (e.g., a synthesizer, sequencer, drum machine, etc.). All messages sent from this MIDI Thru are identical to the messages received by Timbre Wolf’s MIDI In.
12.Gate Trig Out: Use a standard 1/8” (3.5 mm) TS cable to connect this output to the input of an optional external device that can receive Timbre Wolf’s Gate (trigger) messages.
13.Gate Trig In: Use a standard 1/8” (3.5 mm) TS cable to connect this input to the output of an optional external device to send Gate (trigger) messages to Timbre Wolf.
6

Calibration
Before using Timbre Wolf for the first time (after letting it warm up), we recommend calibrating its voices. You can also do this in the future as needed, though you shouldn’t have to do it often.
Important: During calibration, Timbre Wolf’s keyboard and sequencer will be disabled, and no audio signal or messages will be sent out of the Gate Out, MIDI Out, Voice Outputs, Main Out, or Phones Out. Also, the calibration process ignores the positions of each voice’s Tune knob, so all voices will calibrate properly regardless of their control settings.
To calibrate the tuning of Timbre Wolf’s voices:
1.Press and hold Shift and then press Step Switch 1 (Tune). CAL will appear in the display.
2.While still holding Shift, do one of the following:
•Press Step Switch 1 (Tune) again to confirm that you want to calibrate.
•Release Shift to cancel the operation.
3.After pressing Step Switch 1 (Tune), the display will show various note values as the voices calibrate, and the Step Indicators will light in various patterns.
4.When the calibration is done, Step Indicator 1 will flash. To return to normal operation, press
Step Switch 1 (Tune).
Voice Settings
In addition to the seven Voice Controls for each of the four voices, there are a few other settings that affect how Timbre Wolf uses its voices.
Mono, Poly, or Unison
Use the Voice Mode Selector to set Timbre Wolf’s voice mode (Mono, Poly, or Unison). This setting determines how its voices are played as well as other features (Priority, Legato, and MIDI Channel).
Mono
Each voice is played monophonically and independently.
The keyboard will play the currently selected voice. To select a voice, press its Mute/Select button.
The sequencer will play all four voices independently and simultaneously as each voice has its own track in a sequence. The Step Indicators will show the steps for the currently selected track (one of four) in the current sequence. To select a track, press its Mute/Select button. The sequences of all four tracks will also be sent out as MIDI note messages, which can be used to sequence external devices (drum machines, other synths, etc.) along with Timbre Wolf.
When Timbre Wolf receives MIDI note messages (through its MIDI In) on the MIDI channel for each voice, all four voices can play independently simultaneously.
Poly
As a series of notes plays, each note will be played by a separate voice in sequential order (Voice 1 will play the first note, Voice 2 will play the second note, etc. and eventually cycle back to Voice 1).
Notes played by the keyboard will be played by each voice in a rotation, as described above.
The sequencer will play the steps for the first track (of four) only, but the notes will be played by each voice in a rotation, as described above. The sequences of all four tracks will also be sent out as MIDI note messages, which can be used to sequence external devices (drum machines, other synths, etc.) along with Timbre Wolf.
When Timbre Wolf receives MIDI note messages (through its MIDI In) on the MIDI channel for the first voice only, that voice will play. MIDI note messages sent to the other voices will be ignored.
7

Unison
All voices are played simultaneously. The Priority setting will determine how the voices are silenced when more than one note is played at the same time.
The keyboard will play all voices simultaneously.
The sequencer will play the steps for the first track (of four) only, but the notes will be played by all four voices simultaneously. The sequences of all four tracks will also be sent out as MIDI note messages, which can be used to sequence external devices (drum machines, other synths, etc.) along with Timbre Wolf.
When Timbre Wolf receives MIDI note messages (through its MIDI In) on the MIDI channel for the first voice only, all four voices will play simultaneously. MIDI note messages sent to the other voices will be ignored.
Priority
The priority setting determines how which note will be replaced when the number of simultaneously played notes exceeds the voice limit (1 while the Voice Mode Selector is set to Mono or Unison or 5 while the Voice Mode Selector is set to Poly).
To set the priority of each voice:
1.Press and hold Shift and then press Step Switch 9 (Priority). Keep holding Shift.
2.The display will show the number of current voice (1–4) and a two-letter indicator of the priority:
To select a voice, press Step Switch 8 (Legato) to move to the next voice (1–4).
To change the priority, turn the Tempo knob to select low (LO), high (HI), or last (LS). The effects of this setting depend on the voice mode.
•When the Voice Mode Selector is set to Mono:
o Low (LO): The voice will play the lowest note of the notes sent to that voice. o High (HI): The voice will play the highest note of the notes sent to that voice.
oLast (LS): The voice will play the newest note of the notes sent to that voice.
•When the Voice Mode Selector is set to Poly:
oLow (LO): The voice playing the lowest note will play the new note, silencing the note that is currently playing.
oHigh (HI): The voice playing the highest note will play the new note, silencing the note that is currently playing.
oLast (LS): The voice playing the oldest note will play the new note, silencing the note that is currently playing.
•When the Voice Mode Selector is set to Unison:
oLow (LO): The voices will play the new note if it is lower than the notes that are currently playing.
oHigh (HI): The voices will play the new note if it is higher than the notes that are currently playing.
oLast (LS): The voices will always play the new note, silencing any notes that are currently playing.
To return to normal operation, release Shift.
8

Legato
When the legato feature is on, playing a note while another note is being held will not retrigger the envelope for the new note, resulting in a smooth glide from the original note to the new note.
When the legato feature is off, playing a note will always trigger the envelope, giving each note more definition.
To turn the legato feature on or off for each voice:
1.Press and hold Shift and then press Step Switch 8 (Legato). Keep holding Shift.
2.The display will show the number of current voice (1–4) and a two-letter indicator that legato is off (Of) or on (On).
To select a voice, press Step Switch 8 (Legato) to move to the next voice (1–4).
To activate/deactivate the legato feature, turn the Tempo knob to turn the setting off (Of) or on (On).
To return to normal operation, release Shift.
MIDI Channel
Each of the four voices responds to messages on a MIDI channel from Timbre Wolf’s keyboard or from an external MIDI device. The MIDI Channel setting determines the channel for Voice 1. Voices 2–4 use the three next-highest MIDI channels in sequential order.
Example: If the MIDI Channel is set to 3, Voice 1 will respond to messages on Channel 3. Voices 2, 3, and 4 will respond to messages on Channels 4, 5, and 6 (respectively).
When the Voice Mode Selector is set to Mono, each voice will respond independently to MIDI messages on their respective MIDI channel. The keyboard will always send its messages on the channel of the currently selected voice.
When the Voice Mode Selector is set to Poly or Unison, all four voices will respond to incoming MIDI messages on Voice 1’s MIDI channel only (playing polyphonically or in unison, respectively). The keyboard will always send its messages on Voice 1’s channel.
Important: Because all four voices use adjacent MIDI channels, as described above, the ranges of available channels are different for each voice:
•Voice 1 can use Channels 1–13
•Voice 2 can use Channels 2–14
•Voice 3 can use Channels 3–15
•Voice 4 can use Channels 4–16
Note: While Timbre Wolf’s sequencer plays, it will send out its MIDI note messages for all four tracks (each on its corresponding channel) through its USB port and MIDI Out, regardless of the voice mode or any performance on Timbre Wolf’s keyboard. You can use this feature to sequence external devices (drum machines, other synths, etc.) along with Timbre Wolf.
To set the MIDI channel:
1.Press and hold Shift and then press Step Switch 10 (MIDI Ch). Keep holding Shift.
2.Do either of the following to set the channel:
Press Step Switch 10 (MIDI Ch) to move to the next channel, which is shown in the display.
Turn the Tempo knob to select the channel, which is shown in the display.
9

Transport Controls
Timbre Wolf’s Play/Stop button operates differently depending on its Sync setting (Step Switch 13).
When set to Internal:
•Press the Play/Stop button to start or stop playback.
•During playback, press and hold Rec and then press Play/Stop to restart playback from the very beginning of the pattern.
•Timbre Wolf will send MIDI Start, Stop, Continue, Clock, and SongPosPtr=0 depending on its transport state.
•Timbre Wolf’s Gate Trig Out will pulse each time it advances one step.
When set to External or USB:
•Timbre Wolf’s playback will respond to incoming MIDI Start, Stop, Continue, Clock, and SongPosPtr=0 messages.
•Timbre Wolf’s transport controls will not function.
When set to Gate:
•Timbre Wolf will not receive any sequence position information, but you can return it immediately to Step 1 by doing either of the following:
o While stopped, press Play/Stop.
oDuring playback, press and hold Rec and then press Play/Stop at the same time.
•Timbre Wolf can receive Gate messages with time divisions of 1/8 or 1/16 only:
o1/8: Two pulses will advance playback by one step.
o 1/16: One pulse will advance playback by one step.
Note: Unlike normal MIDI messages, Gate messages contain Note On messages only (no CC messages, Note Off messages, etc.). Because of this, the Gate messages Timbre Wolf receives are simplified.
•Timbre Wolf’s Gate Trig Out will mimic its Gate Trig In.
About Patterns
Timbre Wolf can store up to 16 patterns. Each pattern consists of four sequences: Sequence A, Sequence B, Fill A, and Fill B.
To simply play your patterns, press the Play/Stop button. To edit a Sequence or Fill, see the end of this chapter and the Sequencer chapter.
To select a pattern, press Pattern Select and then (A) press one of the 16 Step Switches to select the pattern of the same number or (B) turn the Tempo knob (when selecting a pattern, the Tempo knob will not adjust the tempo). The current pattern’s Step Indicator will be lit red. The Step Indicator of the pattern that will play next will flash. Press Pattern Select again to return to normal operation.
10
To set the pattern length, press Last Step. The pattern’s length (in steps) will appear in the display, and the same number Step Indicators will light up amber. Press one of the 16 Step Switches or turn the Tempo knob to set the pattern’s length (in steps). If the Seq Variation button has either A or B lit, the maximum pattern length is 16 steps. If both A and B are lit, the maximum pattern length is 32 steps, and the minimum pattern length is 17 steps. Press Pattern Select (without holding Shift) to return to normal operation.
To select which sequence you are playing/editing during playback, press Seq Variation to switch between Sequence A or Sequence B. The LED for the currently playing sequence will be lit solid. If the other sequence will play next, its LED will flash.
To automatically switch to playing Sequence hold Shift and then press Seq Variation. A-b
A and then Sequence B (or vice versa), press and will appear in the display.
To return to playing only Sequence A or Sequence B, either press Seq Variation while the desired sequence is playing, or press and hold Shift and then press Seq Variation. A or b will appear in the display.
To select which sequence(s) you are playing/editing while stopped, press Seq Variation to switch between: Sequence A only (A will be lit) and Sequence B only (B will be lit).
To switch to playing Sequence A and then Sequence B (or vice versa), press and hold Shift and then press Seq Variation. The current mode (A, b, or A-b) will appear in the display. Keep holding Shift and press Seq Variation to switch between A and A-b or between b and A-b.
Note: To select a fill to loop and/or edit, see below.
To play a fill followed by a sequence, press the Fill button during playback. The fill that plays will be determined by (1) the state of the Seq Variation button and (2) which sequence is currently playing.
Important: When a fill plays, playback will switch from the current sequence to the fill without automatically resetting to Step 1. For example, if you press Fill while the sequence is currently on Step 5, the fill will start from its own Step 6 and play through Step 16.
When Seq Variation is set to Sequence A only or Sequence B only:
•Press Fill to play the corresponding fill. When the fill is finished, the other sequence will start playing.
•Press and hold Fill to play the corresponding fill. When the fill is finished, the original sequence will continue playing.
When Seq Variation is set to both Sequences A and B:
•Press Fill during Sequence A to play Fill A and then Fill B. When Fill B is finished, Sequence A will start playing again.
•Press Fill during Sequence B to play Fill B. When Fill B is finished, Sequence A will start playing again.
To select a fill to loop and/or edit during playback, press and hold the Fill button, press the
Seq Variation button, and then release both buttons. Fil will appear in the display. The fill you selected will now loop. This also lets you edit the fill (as you would edit Sequence A or Sequence B). If playback was alternating between Sequence A and Sequence B, Fill A and Fill B will alternate. To return to normal operation, press the Seq Variation button.
To select a fill to edit while stopped, press the Fill button, and then press the Seq Variation button to select either A or B buttons. Fil will appear in the display.This lets you edit the fill (as you would edit Sequence A or Sequence B). To return to normal operation, press the Fill button.
11

Sequencer
You can edit the sequences (and fills) of each pattern using Timbre Wolf’s Step Switches and/or keyboard.
Note: While Timbre Wolf’s sequencer plays, it will send out its MIDI note messages for all four tracks (each on its corresponding channel) through its USB port and MIDI Out, regardless of the voice mode or any performance on Timbre Wolf’s keyboard. You can use this feature to sequence external devices (drum machines, other synths, etc.) along with Timbre Wolf.
Step Switches
You can use the 16 Step Switches to enter or remove notes from the sequence simply by pressing the corresponding Step Switches.
To enter or remove steps, press the Mute/Select button for the voice whose steps you want to enter or remove, and then press one or more Step Switches to enter or remove notes at those positions. The notes are entered with the default Step Switch velocity (described below).
For each voice, each step has a note value, which you can set in two different ways:
•To set the note value of one or more specific steps, press and hold the desired Step Switches and turn the Tempo knob. If you are adjusting only one note, the note value will be shown in the display. If you are adjusting multiple notes, the display will show how many semitones up or down you are shifting them. Each voice has a three-octave range.
•To set the default note value, press a key on Timbre Wolf’s keyboard. This will be the note value that is recorded when you select a step. This is useful for setting the note value before entering your steps.
For each voice, each step has a velocity, which determines how loud the note is played. You can set this in two different ways:
•To edit a single step’s velocity, press and hold the Velocity button and then press the desired Step Switch to cycle between the available velocities: low (green), medium (amber), high (red), and off (unlit).
•To select the default Step Switch velocity, press the Velocity button to cycle through the available default velocities: low (green), medium (amber), and high (red). This will be the velocity that is recorded when you select a step or press the pad. This is useful for setting the velocity before entering your steps.
Keyboard
You can use Timbre Wolf’s keyboard to record a sequence in real time. The notes you play will be quantized (aligned) automatically with the steps. Your recording will be “overdubbed” onto the sequence(s), but recording a note over an already existing note will replace it.
To record while stopped, press Rec to record-arm the sequencer, and then press Play/Stop to start recording, or press Rec to cancel recording.
To record during playback, press Rec. Recording will begin immediately. Press Rec again to stop recording while playback continues, or press Play/Stop to stop both recording and playback.
Before or while you are recording, press the Mute/Select button for the voice you want to use to record.
12

Saving, Copying, and Clearing
Saving
To save patterns, sequences/fills, or global settings:
1.Press and hold Shift, and then press Step Switch 16 (Save). (To cancel and exit the process at any time, release Shift.)
2.While still holding Shift, turn the Tempo knob to select what you want to save: all patterns and global settings (All), the current pattern only (One), or the global settings only (Glo).
Important: Global settings include the tempo and Sync settings.
3.Press Step Switch 16 (Save), and then release Shift.
Copying
Important: Copying does not save a pattern, sequence, or fill. You must save it, as well.
To copy the current pattern:
1.Press and hold Shift, and then press Step Switch 14 (Copy). Keep holding Shift. The Step Indicators for non-empty patterns will flash amber. The Step Indicators for empty patterns will be unlit. (To cancel and exit the process at any time, release Shift.)
2.Turn the Tempo knob to select Pat in the display.
3.Press the Step Switch with the same number as your desired “destination” pattern (the pattern you want to copy to). The pattern will copy and load the destination pattern. After that, release
Shift.
To copy the current sequence or fill:
Important: You can copy a sequence or fill only to another sequence or fill in the same pattern.
1.Press and hold Shift, and then press Step Switch 14 (Copy). Keep holding Shift. The Step Indicators for non-empty patterns will flash amber. The Step Indicators for empty patterns will be unlit. (To cancel and exit the process at any time, release Shift.)
2.Turn the Tempo knob to select where you want to copy the sequence or fill (within the same pattern):
•S-A: The sequence or fill will be copied over Sequence A.
•S-b: The sequence or fill will be copied over Sequence B.
•F-A: The sequence or fill will be copied over Fill A.
•F-b: The sequence or fill will be copied over Fill B.
3.Press Step Switch 14 (Copy), and then release Shift.
Clearing
Important: Clearing does not save the empty pattern, sequence, or fill. You must save it, as well.
To clear the current pattern, sequence, or fill:
1.Press and hold Shift, and then press Step Switch 15 (Clear). Keep holding Shift. (To cancel and exit the process at any time, release Shift.)
2.Turn the Tempo knob to select which part of the current pattern you want to clear.
•Pat: Both sequences and fills will be cleared.
•S-A: Only Sequence A will be cleared.
•S-b: Only Sequence B will be cleared.
•F-A: Only Fill A will be cleared.
•F-b: Only Fill B will be cleared.
3.Press Step Switch 15 (Clear) again, and then release both buttons.
13

Guía del usuario (Español)
Introducción
Contenido de la caja
Timbre Wolf |
Guía del usuario |
Adaptador de corriente |
Manual sobre la seguridad y garantía |
|
|
Soporte |
|
Para obtener la información más reciente acerca de este producto (requisitos de sistema, información de compatibilidad, etc.) y registrarlo, visite akaipro.com.
Para obtener soporte adicional del producto, visite akaipro.com/support.
Diagrama de inicio y conexión rápida
Importante: Tras encender el Timbre Wolf, déjelo calentar antes de usarlo. La temperatura puede afectar su afinación. Luego de que se caliente por primera vez, recomendamos calibrarlo (consulte Calibración para aprender a hacer esto).
Ordenador |
|
|
|
|
|
|
|
|
|
|
|
|
|
|
|
|
|
|
|
|
|
|
Dispositivo MIDI externo |
|
|
|
|
Interfaz de audio, |
|||||||||||||||||||||||||||||||||||||||||
|
|
|
Teclado MIDI (por ejemplo, caja de ritmos) |
|
|
|
|
|
mezclador, etc. |
||||||||||||||||||||||||||||||||||||||||||||||||||||||||||||
|
|
|
|
|
|
|
|
|
|
|
|
|
|
|
|
|
|
|
|
|
|
|
|
|
|
|
|
|
|
|
|
|
|
|
|
|
|
|
|
|
|
|
|
|
|
|
|
|
|
|
|
|
|
|
|
|
|
|
|
|
|
|
|
|
|
|
|
|
|
|
|
|
|
|
|
|
|
|
|
|
|
|
|
|
|
|
|
|
|
|
|
|
|
|
|
|
|
|
|
|
|
|
|
|
|
|
|
|
|
|
|
|
|
|
|
|
|
|
|
|
|
|
|
|
|
|
|
|
|
|
|
|
|
|
|
|
|
|
|
|
|
|
|
|
|
|
|
|
|
|
|
|
|
|
|
|
|
|
|
|
|
|
|
|
|
|
|
|
|
|
|
|
|
|
|
|
|
|
|
|
|
|
|
|
|
|
|
|
|
|
|
|
|
|
|
|
|
|
|
|
|
|
|
|
|
|
|
|
|
|
|
|
|
|
|
|
|
|
|
|
|
|
|
|
|
|
|
|
|
|
|
|
|
|
|
|
|
|
|
|
|
|
|
|
|
|
|
|
|
|
|
|
|
|
|
|
|
|
|
|
|
|
|
|
|
|
|
|
|
|
|
|
|
|
|
|
|
|
|
|
|
|
|
|
|
|
|
|
|
|
|
|
|
|
|
|
|
|
|
|
|
|
|
|
|
|
|
|
|
|
|
|
|
|
|
|
|
|
|
|
|
|
|
|
|
|
|
|
|
|
|
|
|
|
|
|
|
|
|
|
|
|
|
|
|
|
|
|
|
|
|
|
|
|
|
|
|
|
|
|
|
|
|
|
|
|
|
|
|
|
|
|
|
|
|
|
|
|
|
|
|
|
|
|
|
|
|
|
|
|
|
|
|
|
|
|
|
|
|
|
|
|
|
|
|
|
|
|
|
|
|
|
|
|
|
|
|
|
|
|
|
|
|
|
|
|
|
|
|
|
|
|
|
|
|
|
|
|
|
|
|
|
|
|
|
|
|
|
|
|
|
|
|
|
|
|
|
|
|
|
|
|
|
|
|
|
|
|
|
|
|
|
|
|
|
|
|
|
|
|
|
|
|
|
|
|
|
|
|
|
|
|
|
|
|
|
|
|
|
|
|
|
|
|
|
|
|
|
|
|
|
|
|
|
|
|
|
|
|
|
|
|
|
|
|
|
|
|
|
|
|
|
|
|
|
|
|
|
|
|
|
|
|
|
|
|
|
|
|
|
|
|
|
|
|
|
|
|
|
|
|
|
|
|
|
|
|
|
|
|
|
|
|
|
|
|
|
|
|
|
|
|
|
|
|
|
|
|
|
|
|
|
|
|
|
|
|
|
|
|
|
|
|
|
|
|
|
|
|
|
|
|
|
|
|
|
|
|
|
|
|
|
|
|
|
|
|
|
|
|
|
|
|
|
|
|
|
|
|
|
|
|
|
|
|
|
|
|
|
|
|
|
|
|
|
|
|
|
|
|
|
|
|
|
|
|
|
|
|
|
|
|
|
|
|
|
|
|
|
|
|
|
|
|
|
|
|
|
|
|
|
|
|
|
|
|
|
|
|
|
|
|
|
|
|
|
|
|
|
|
|
|
|
|
|
|
|
|
|
|
|
|
|
|
|
|
|
|
|
|
|
|
|
|
|
|
|
|
|
|
|
|
|
|
|
|
|
|
|
|
|
|
|
|
|
|
|
|
|
|
|
|
|
|
|
|
|
|
|
|
|
|
|
|
|
|
|
|
|
|
|
|
|
|
|
|
|
|
|
|
|
|
|
|
|
|
|
|
|
|
|
|
|
|
|
|
|
|
|
|
|
|
|
|
|
|
|
|
|
|
|
|
|
|
|
|
|
|
|
|
|
|
|
|
|
|
|
|
|
|
|
|
|
|
|
|
|
|
|
|
|
|
|
|
|
|
|
|
|
|
|
|
|
|
|
|
|
|
|
|
|
|
|
|
|
|
|
|
|
|
|
|
|
|
|
|
|
|
|
|
|
|
|
|
|
|
|
|
|
|
|
|
|
|
|
|
|
|
|
|
|
|
|
|
|
|
|
|
|
|
|
|
|
|
|
|
|
|
|
|
|
|
|
|
|
|
|
|
|
|
|
|
|
|
|
|
|
|
|
|
|
|
|
|
|
|
|
|
|
|
|
|
|
|
|
|
|
|
|
|
|
|
|
|
|
|
|
|
|
|
|
|
|
|
|
|
|
|
|
|
|
|
|
|
|
|
|
|
|
|
|
|
|
|
|
|
|
|
|
|
|
|
|
|
|
|
|
|
|
|
|
|
|
|
|
|
|
|
|
|
|
|
|
|
|
|
|
|
|
|
|
|
|
|
|
|
|
|
|
|
|
|
|
|
|
|
|
|
|
|
|
|
|
|
|
|
|
|
|
|
|
|
|
|
|
|
|
|
|
|
|
|
|
|
|
|
|
|
|
|
|
|
|
|
|
|
|
|
|
|
|
|
|
|
|
|
|
|
|
|
|
|
|
|
|
|
|
|
|
|
|
|
|
|
|
|
|
|
|
|
|
|
|
|
|
|
|
|
|
|
|
|
|
|
|
|
|
|
|
|
|
|
|
|
|
|
|
|
|
|
|
|
|
|
|
|
|
|
|
|
|
|
|
|
|
|
|
|
|
|
|
|
|
|
|
|
|
|
|
Suministro eléctrico
Los elementos que no se enumeran en Contenido de la caja se venden por separado.
14
Características
Panel superior
1 |
12 |
12 |
12 12 |
12 12 |
12 12 |
|
|||
2 |
|
||||||||
12 |
|
12 |
|
12 |
|
12 |
20 |
21 |
|
3 |
7 12 |
12 |
12 |
12 |
12 |
12 |
12 |
1218 |
17 |
4 |
19 12 |
12 |
12 |
12 |
12 |
12 |
12 |
1215 |
14 |
11 |
|
|
|
|
|
|
|
|
6 |
9 |
|
|
|
|
|
|
|
|
16 |
13 |
|
|
|
|
|
|
|
5 |
|
|
|
|
|
|
|
|
|
||
10 |
|
|
|
|
8 |
|
|
|
|
1.Pantalla: Esta pantalla muestra el tempo del Timbre Wolf u otros valores relevantes descritos en esa guía.
2.Tempo: Gire esta perilla para ajustar el tempo global del Timbre Wolf (20 a 300 BPM o beats por minuto). El número se muestra en la pantalla. También puede utilizar esta perilla para realizar otras operaciones tales como seleccionar los valores de la nota, cantidad de swing, patrones o longitud del patrón.
3.Toque ligero: Pulse este botón al ritmo deseado para introducir un nuevo tempo. El Timbre Wolf detecta el nuevo tempo tras tres toques.
4.Función secundaria: Mantenga pulsado este botón para acceder a las funciones secundarias de ciertos botones.
5.Interruptores de pasos: Pulse estos botones para añadir o eliminar un paso/nota del patrón. Mantenga pulsado Shift (Función secundaria) para acceder a sus funciones secundarias:
•Afinación: Utilice este botón para calibrar la afinación de las voces del Timbre Wolf. Consulte Calibración para aprender a hacer esto.
•1/4, 1/8, 1/16, 1/32: Utilice estos botones para seleccionar la división de tiempo del patrón (es decir, el valor de la nota de cada interruptor de paso) Al mantener pulsado Shift, el indicador de pasos que está encima de la división de tiempo actual se iluminará.
•Triplete: Pulse este botón para activar o desactivar Triplet (Tresillo), lo que transforma la división de tiempos en una división basada en tresillos (excepto para 1/32). Al mantener pulsado Shift, el indicador de pasos que está encima de este botón se ilumina cuando está activado.
15

•Swing: Pulse este botón y después gire la perilla Tempo para ajustar la cantidad de swing que se aplica al patrón. A 50, no se aplica swing. A 75, el patrón tiene swing en su totalidad. (Al igual que en los MPC de Akai Professional).
•Legato: Pulse este botón para configurar los ajustes del legato para cada voz. Cuando el legato está encendido, si se toca una nota mientras se mantiene pulsada otra nota, no se volverá a disparar la envolvente para la nueva nota, dando como resultado una suave transición desde la nota original a la nueva. Cuando el legato está apagado, siempre se disparará la envolvente al tocar una nota, dándole a cada nueva nota una mayor definición. Consulte Ajustes de voz > Legato para aprender más.
•Prioridad: Pulse este botón para definir la nota que se remplazará cuando la cantidad de notas pulsadas simultáneamente supere el número de voces (1 si el selector de modo de voz se ajusta a Mono [Monofónico] o Unison [Unísono] o 5 si dicho selector se ajusta a Poly [Polifónico]). Consulte Ajustes de voz > Prioridad para aprender más.
•Canal MIDI: Pulse este botón para ajustar los canales MIDI a los que responden las voces (desde el teclado del Timbre Wolf o desde un dispositivo MIDI externo). Estos ajustes determinan el canal para la Voz 1 solamente. Las voces 2–4 utilizarán los tres canales MIDI superiores en el orden de la secuencia. Consulte Ajustes de voz > Canal MIDI para aprender más.
•Local: Pulse este botón para activar o desactivar el ajuste Local. Al activarse, su indicador de paso se encenderá y el teclado del Timbre Wolf enviará sus mensajes MIDI a las cuatro voces internas. Al desactivarse, su indicador de paso se apagará y el teclado del Timbre Wolf enviará sus mensajes MIDI a la salida MIDI Out.
Nota: Todavía puede grabar y editar patrones cuando Local está desactivado.
•Sincronización: Pulse este botón para seleccionar la fuente de reloj MIDI del Timbre Wolf: Interna, externa, USB o compuerta. Consulte la sección Control de transporte para aprender más.
•Copiar, Borrar, Guardar: Utilice estos botones para copiar, borrar o guardar el patrón actual. Consulte la sección Guardar, copiar y borrar para aprender más.
6.Indicadores de pasos: Estos LED se encenderán para indicar diversos estados:
•Al tocar un patrón, muestran la posición actual en la secuencia.
•Al visualizar un patrón, indican qué pasos contienen una nota (es decir, qué interruptores de pasos están activos). Consulte Secuenciador > Interruptores de pasos para aprender más.
•Manteniendo pulsado el botón Velocity (Velocidad) en el modo Grabación de pasos, sus colores muestran la velocidad de cada paso. Consulte Secuenciador > Interruptores de paso para aprender más.
•Al seleccionar un patrón, el indicador de paso rojo muestra el patrón actualmente seleccionado. Consulte Acerca de los patrones para aprender más.
7.Atadura: Mantenga pulsado este botón y luego pulse un interruptor de pasos para “atar” su nota al paso previo o para regresarla a su estado previo (“desatada”). Una nota atada “se mantiene” desde la anterior, lo que significa que su envolvente no se vuelve a disparar. Cuando mantiene pulsado este botón, los indicadores de pasos de los pasos que estén atados se iluminarán en ámbar, los que estén “desatados” se iluminarán en rojo y los que no tengan notas, estarán apagados.
Puede hacer esto para múltiples interruptores de pasos a la vez y puede atar varias notas consecutivas. Las notas también pueden “envolverse” desde el final al principio de una secuencia.
8.Teclado: Este teclado de 25 notas es sensible a la velocidad y, en conjunto con los botones Octave Up/Down (Octava arriba/abajo), puede controlar un rango de 4 octavas.
9.Subir/Bajar octava: Utilice estos botones para desplazar el rango del teclado hacia arriba o abajo.
10.Rueda de inflexión de pitch (tono): Mueva esta rueda para flexionar el pitch de las notas que está tocando en el teclado.
11.Selector del modo de voz: Utilice este interruptor para ajustar el modo de voz del Timbre Wolf (Mono, Poly o Unison), el cual determina la(s) voz/voces que escuchará. Consulte Ajustes de voz > Mono, Poly o Unison para aprender más.
16

12.Controles de voz: Utilice estos controles para ajustar los sonidos de sus respectivas voces.
•Volumen: Gire esta perilla para ajustar el volumen de la voz.
•Afinación: Gire esta perilla para afinar el tono de la voz.
•Corte del filtro: Gire esta perilla para ajustar la frecuencia de corte del filtro pasabajos de la voz.
•Resonancia del filtro: Gire esta perilla para ajustar la resonancia del filtro pasabajos de la voz. Esta perilla determina la pendiente del filtro en la frecuencia de corte.
•Envolvente de amplitud: Gire esta perilla para ajustar qué tanto afectará la envolvente del filtro a la voz. (El efecto de la envolvente podrá escucharse aun en el ajuste mínimo).
•Decaimiento: Gire esta perilla para ajustar el tiempo que tarda la envolvente de amplitud de la voz en continuar una vez que la nota deja de reproducirse.
13.Silenciamiento/Selección: Mantenga pulsado Shift (Función secundaria) y pulse este botón para activar/desactivar el silenciamiento de la voz correspondiente. La luz junto a este botón se enciende si la voz no está silenciada y se apaga si la luz está silenciada. Esto solo afecta a la reproducción del secuenciador; todavía puede utilizar/reproducir la voz mediante el teclado o un dispositivo de MIDI externo.
14.Reproducir/Parar: Pulse este botón para iniciar o detener la reproducción. Durante la reproducción, mantenga pulsado Rec (Grabar) y luego pulse este botón para reiniciar la reproducción desde el comienzo del patrón.
Mantenga pulsado Shift y pulse este botón para enviar un mensaje MIDI Panic (Todas las notas desactivadas).
Cuando Sync está ajustado a Gate (Compuerta), pulse este botón para regresar al paso 1. Consulte Control de transporte para aprender más.
15.Grabación: Pulse este botón para preparar el secuenciador para grabar. Consulte la sección Secuenciador de esta guía para aprender más. Durante la reproducción, mantenga pulsado este botón y luego pulse Play/Stop para reiniciar la reproducción desde el comienzo del patrón.
16.Velocidad: Pulse este botón para editar la velocidad de un paso. Consulte la sección Secuenciador de esta guía para aprender más.
17.Variación de secuencia: Pulse este botón para seleccionar si reproduce/edita la secuencia A, la secuencia B o la secuencia A y la B. Consulte la sección Acerca de los patrones para aprender más.
18.Relleno: Pulse este botón para reproducir el relleno de la secuencia actual (A, B, o A y B). Consulte la sección Acerca de los patrones para aprender más.
19.Selección de patrón: Pulse este botón y luego seleccione un patrón (A) pulsando uno de los 16 interruptores de paso para seleccionar el patrón del mismo número o (B) girando la perilla Tempo (al seleccionar un patrón, la perilla tempo no ajustará el tempo). Pulse Pattern Select nuevamente para volver al funcionamiento normal. Si hace esto durante la reproducción, el patrón actual terminará antes de continuar con el siguiente.
Mantenga pulsado Shift y luego pulse este botón para ajustar la duración del patrón. La longitud del patrón (en pasos) aparecerá en la pantalla y se iluminarán de color ámbar el mismo número de indicadores de paso. Pulse uno de los 16 interruptores de pasos o gire la perilla Tempo para establecer la longitud del patrón (en pasos). Si el botón Seq Variation (Variación de secuencia) tiene ya sea A o B iluminados, la longitud máxima del patrón es de 16 pasos. Si ambos A y B están encendidos, la longitud máxima del patrón es de 23 pasos y la mínima es de 17. Pulse Pattern Select (Selección de patrón) (sin pulsar Shift) nuevamente para volver al funcionamiento normal.
20.Volumen principal: Gire esta perilla para ajustar el volumen de las salidas Main Out (Salida principal) y Phones Out (Salida para auriculares) del Timbre Wolf.
21.Aullido: Gire esta perilla para ajustar la cantidad de overdrive (distorsión) aplicada a las salidas Main Out y Phones Out del Timbre Wolf. Esto no afecta al sonido de las salidas Voice Out 1 a 4.
17
Panel trasero
|
|
|
|
3 |
8 |
6 |
7 7 7 7 |
1110 9 |
5 1 2 4 |
|
|
|
12 13 |
|
1.Entrada de CC: Utilice el adaptador de corriente incluido (12 V, 2 A, centro positivo) para conectar esta entrada a una toma de corriente.
2.Botón de encendido: Pulse este botón para encender o apagar el Timbre Wolf.
Importante: Tras encender el Timbre Wolf, déjelo calentar antes de usarlo. La temperatura puede afectar su afinación.
3.Presilla del cable: Puede asegurar el cable a esta presilla para evitar que se desconecte accidentalmente.
4.Puerto USB: Utilice un cable USB estándar para conectar este puerto a un puerto USB disponible en su ordenador. Esta conexión le permite al Timbre Wolf enviar y recibir datos MIDI a través de USB hacia y desde su ordenador.
5.Ranura de bloqueo Kensington: Puede utilizar esta ranura de bloqueo Kensington a fin de sujetar el Timbre Wolf a una mesa u otra superficie.
6.Salida principal: Utilice un cable TRS o TS de 6,35 mm (1/4 pulg.) estándar para conectar esta salida de nivel de línea a la entrada de una interfaz de audio, mezclador, sistema de amplificación, etc. También puede conectar auriculares estéreo a esta salida.
7.Salidas de voz 1 a 4: Utilice cables TRS o TS de 6,35 mm (1/4 pulg.) para conectar estas salidas a las entrada de una interfaz de audio, mezclador, sistema amplificado, etc. Cada voz del Timbre Wolf se envía por separado a cada una de estas salidas, de manera que pueda grabarlas o mezclaras de forma independiente. Cuando se conecta un cable a una de estas salidas, esa voz se eliminará de las salidas Main Out y Phones Out. La perilla Howl (Aullido) no afecta estas salidas.
8.Phones Out (Salida para auriculares): Conecte sus auriculares estéreo estándar de 1/4 pulg. (6,35 mm) a esta salida.
9.Entrada MIDI: Utilice un cable MIDI estándar de cinco patillas para conectar esta entrada MIDI a la salida MIDI de un dispositivo MIDI externo (por ejemplo, otro controlador MIDI).
10.Salida MIDI: Utilice un cable MIDI estándar de cinco patillas para conectar esta salida MIDI a la entrada MIDI de un dispositivo MIDI externo (por ejemplo, un sintetizador, secuenciador, caja de ritmos, etc.).
11.Pasante MIDI: Utilice un cable MIDI estándar de cinco patillas para conectar este pasante MIDI a la entrada MIDI de un dispositivo MIDI externo (por ejemplo, un sintetizador, secuenciador, caja de ritmos, etc.). Todos los mensajes enviados por este pasante MIDI son idénticos a los mensajes recibidos por la entrada MIDI del Timbre Wolf.
12.Salida de disparo de compuerta: Utilice un cable TS de 3,5 mm (1/8 pulg.) estándar para conectar esta salida a la entrada de un dispositivo externo opcional que pueda recibir mensajes de compuerta (de disparo) desde el Timbre Wolf.
13.Entrada de disparo de compuerta: Utilice un cable TS de 3,5 mm (1/8 pulg.) estándar para conectar esta entrada a la salida de un dispositivo externo opcional que pueda enviar mensajes de compuerta (de disparo) al Timbre Wolf.
18

Calibración
Antes de utilizar el Timbre Wolf por primera vez (una vez que se calentó) recomendamos calibrar sus voces. También puede hacer esto en el futuro según sea necesario, aunque no debería tener que hacerlo muy seguido.
Importante: Durante la calibración, el teclado del Timbre Wolf y el secuenciador estarán desactivados y no se enviarán mensajes ni señales de audio por las salidas Gate Out, MIDI Out, Voice Out, Main Out, o Phones Out. Además, el proceso de calibración ignora las posiciones de la perilla Tune (Afinación) de cada voz, por lo que todas las voces se calibrarán correctamente sin importar sus ajuste de control.
Para calibrar la afinación de las voces del Timbre Wolf:
1.Mantenga pulsado Shift y luego presione el interruptor de paso 1 (Tune). Aparecerá CAL en la pantalla.
2.Mientras mantiene pulsado Shift, realice una de las siguientes acciones:
•Pulse el interruptor de paso 1 (Tune) nuevamente para confirmar que desea calibrar.
•Suelte Shift para cancelar la operación.
3.Luego de pulsar el interruptor de paso 1 (Tune), la pantalla mostrará diversos valores de nota a medida que se calibra la voz, y los indicadores de paso se iluminarán con diversos patrones.
4.Una vez finalizada la calibración, parpadeará el indicador de paso 1. Para volver al funcionamiento normal, pulse el interruptor de paso 1 (Tune).
Ajustes de voz
Además de los siete controles de voz para cada una de las cuatro voces, existen algunos ajustes más que afectan la forma en la que Timbre Wolf utiliza sus voces.
Mono (Monofónico), Poly (Polifónico) o Unison (Unísono)
Utilice el selector de modo de voz para ajustar el modo de voz del Timbre Wolf (Mono, Poly o Unison). Este ajuste determina como se reproducen sus voces así como también sus otras características (Prioridad, Legato y Canal MIDI).
Mono
Cada voz se reproduce de forma monofónica e independiente.
El teclado reproducirá la voz actualmente seleccionada. Para seleccionar una voz, pulse su botón de silenciamiento/selección.
El secuenciador reproducirá las cuatro voces independiente y simultáneamente ya que cada voz tiene su propia pista en una secuencia. Los indicadores de paso mostrarán los pasos para la pista actualmente seleccionada (una de cuatro) en la secuencia actual. Para seleccionar una pista, pulse su botón de silenciamiento/selección. Las secuencias de todas las pistas también se enviarán hacia afuera como mensajes de nota MIDI, los cuales pueden utilizarse para secuenciar dispositivos externos (cajas de ritmos, otros sintetizadores, etc.) junto con el Timbre Wolf.
Cuando el Timbre Wolf recibe mensajes de nota MIDI (a través de su entrada MIDI In), en el canal MIDI de cada voz, todas las voces pueden reproducirse de forma independiente y simultánea.
Poly
Al reproducirse una serie de notas, una voz separada reproducirá cada nota en el orden de la secuencia (la voz 1 reproducirá la primera nota, la voz 2 reproducirá la segunda nota, etc. y eventualmente volverá a la voz 1).
Las notas reproducidas por el teclado serán reproducidas por cada voz rotativamente, como se describe anteriormente.
19

El secuenciador reproducirá los pasos para la primera (o las cuatro) pistas solamente, pero las notas serán reproducidas por cada voz rotativamente, como se describe anteriormente. Las secuencias de todas las pistas también se enviarán hacia afuera como mensajes de nota MIDI, los cuales pueden utilizarse para secuenciar dispositivos externos (cajas de ritmos, otros sintetizadores, etc.) junto con el Timbre Wolf.
Cuando el Timbre Wolf recibe mensajes de nota MIDI (a través de su entrada MIDI In) en el canal MIDI de la primera voz, sólo se reproducirá esa voz. Los mensajes de nota MIDI enviados a otras voces serán ignorados.
Unison
Todas las voces se reproducen simultáneamente. El ajuste Priority (Prioridad) determinará qué tanto se silencian las voces cuando se reproduce más de una nota al mismo tiempo.
El teclado reproducirá todas las voces simultáneamente.
El secuenciador reproducirá los pasos para la primera (o las cuatro) pistas solamente, pero las notas serán reproducidas por todas las voces simultáneamente. Las secuencias de todas las pistas también se enviarán hacia afuera como mensajes de nota MIDI, los cuales pueden utilizarse para secuenciar dispositivos externos (cajas de ritmos, otros sintetizadores, etc.) junto con el Timbre Wolf.
Cuando el Timbre Wolf recibe mensajes de nota MIDI (a través de su entrada MIDI In) en el canal MIDI de la primera voz, las cuatro voces se reproducirán simultáneamente. Los mensajes de nota MIDI enviados a otras voces serán ignorados.
Prioridad
El ajuste de prioridad determina la nota que se remplazará cuando la cantidad de notas pulsadas simultáneamente supere el número de voces (1 si el selector de modo de voz se ajusta a Mono [Monofónico] o Unison [Unísono] o 5 si dicho selector se ajusta a Poly [Polifónico]).
Para establecer la prioridad de cada voz:
1.Mantenga pulsado Shift y luego pulse el interruptor de paso 9 (Prioridad). Continúe pulsando Shift.
2.El indicador ahora mostrará el número de la voz actual (1–4) y un indicador de dos letras para la prioridad:
Para seleccionar una voz, presione el interruptor de paso 8 (Legato) para pasar a la siguiente voz (1–4).
Para cambiar la prioridad, gire la perilla Tempo para seleccionar baja (LO), alta (HI) o última (LS). Los efectos de este ajuste dependen del modo de voz.
•Cuando el selector de modo de voz se ajusta a Mono:
o Baja (LO): La voz reproducirá la nota más baja de las notas enviadas a esa voz. o Alta (HI): La voz reproducirá la nota más alta de las notas enviadas a esa voz.
oÚltima (LS): La voz reproducirá la nota más reciente de las notas enviadas a esa voz.
•Cuando el selector de modo de voz se ajusta a Poly:
oBaja (LO): La voz que está reproduciendo la nota más baja reproducirá la nota nueva, silenciando la nota que se está reproduciendo actualmente.
oAlta (HI): La voz que está reproduciendo la nota más alta reproducirá la nota nueva, silenciando la nota que se está reproduciendo actualmente.
oÚltima (LS): La voz que está reproduciendo la nota más antigua reproducirá la nota nueva, silenciando la nota que se está reproduciendo actualmente.
20
 Loading...