

Page 1

MPC60 Software Version 3.1
Operator’s Manual
For the Akai MPC60 and MPC60-II
MIDI Production Center
Written by Roger Linn and David Battino
Page 2

Document revision date: January 22, 2002
Copyright 1995-1999 Roger Linn Design
Roger Linn Design
2269 Chestnut St. Suite 602, San Francisco, CA 94123
Phone: (415) 474-0903
Fax: (415) 474-1118
E-mail: Mail@RLinnDesign.com
Web: www.RLinnDesign.com
Page 3

Table of Contents
Chapter 1: Introduction............................................................................................................. 1
Welcome!........................................................................................................................2
What Are the New Features in Version 3.1?.................................................................. 3
Chapter 2: The Basics............................................................................................................... 9
Hooking Up Your System ............................................................................................... 10
Getting Around on the MPC60 ....................................................................................... 11
The Cursor, Cursor Keys, Data Fields, and Command Keys ........................... 11
The Numeric Keypad, Data Entry Knob, and [+] & [–] Keys ............................. 12
The Soft Keys .................................................................................................... 13
The HELP key ................................................................................................... 13
‘Definitions: Sequence, Track, Song, Sound, Pad, Note Number, and Program’.......... 14
Loading and Playing Sounds and Programs.................................................................. 17
Playing the Pads, the BANK 2, & FULL LEVEL Keys ....................................... 18
Selecting Programs ........................................................................................... 18
The Note Variation Slider (the new name for the Hihat Decay Slider) and
AFTER key.................................................................................................. 19
The 16 LEVELS key .......................................................................................... 21
Chapter
Chapter 4: Editing Sequences ................................................................................................. 65
3: Recording Sequences............................................................................................ 25
How Sequences are Organized ..................................................................................... 26
The MAIN SCREEN Key & Play/Record Screen ........................................................... 27
The Play/Record Keys.................................................................................................... 34
‘Sequence Recording Example 1: A Looped Drum Pattern’ .......................................... 37
‘Sequence Recording Example 2: A Multitrack Sequence’............................................ 39
‘The TIMING CORRECT Key: Correcting Timing Errors, Swing Timing’....................... 43
The Note Repeat Feature.................................................................................. 45
Tempo and the TEMPO/SYNC Key ............................................................................... 47
Mid-Sequence Tempo Changes........................................................................ 50
The TAP TEMPO Key ....................................................................................... 51
The WAIT FOR KEY and COUNT IN Keys .................................................................... 53
The AUTO PUNCH Key .................................................................................................54
The 2nd SEQ Key........................................................................................................... 56
The OTHER Key............................................................................................................. 57
Metronome, Foot Switches, and Free Sequence Memory................................ 57
Initializing System Parameters .......................................................................... 60
‘The Record 16 Channels Function: Multichannel Recording’.......................... 60
Recording MIDI System-Exclusive Data ........................................................................ 64
The ERASE Key ............................................................................................................. 66
Erasing Notes in Real Time While in Overdub Mode........................................ 66
Erasing Notes or Other Events While Stopped ................................................. 66
Initializing a Sequence ...................................................................................... 68
The EDIT Key ................................................................................................................. 71
Viewing and Changing Time Signature............................................................. 71
Rearranging the Track Order ............................................................................ 72
Inserting Blank Bars Into a Sequence............................................................... 73
Deleting Bars From a Sequence ....................................................................... 73
Copying Bars (All Tracks).................................................................................. 74
Copying Events ................................................................................................. 75
Copying an Entire Sequence to Another........................................................... 77
Shifting the Timing of Many Notes .................................................................... 78
Global Editing of Note Event Data..................................................................... 79
Editing Note Velocity or Duration Data................................................. 80
Page 4

Editing Note Number Assignment of Drum Note Events ..................... 82
Editing Note Variation Data of Drum Note Events ............................... 83
The STEP EDIT Key....................................................................................................... 85
Using Step Edit.................................................................................................. 86
Step Edit Event Types ....................................................................................... 87
Step Edit Options............................................................................................... 91
Step Recording.................................................................................................. 94
The EDIT LOOP Key ...................................................................................................... 95
Using Edit Loop as an Undo Function............................................................... 96
The TRANSPOSE Key ................................................................................................... 97
Transposing in Real Time While Playing .......................................................... 98
Chapter 5: Song Mode ..............................................................................................................99
Overview......................................................................................................................... 100
The SONG MODE Key and Song Mode Screen............................................................ 101
An Example of Creating and Playing a Song ................................................................. 104
Converting a Song Into a Long Sequence .....................................................................106
Chapter 6: Creating and Editing Programs............................................................................. 107
What Are Programs? ...................................................................................................... 108
Selecting the Active Program, Assigning Sounds .......................................................... 111
Envelope, Velocity Modulation, Tuning, Poly Mode ....................................................... 116
Copying and Initializing Programs.................................................................................. 119
Chapter 7: The DRUM MIX Key................................................................................................. 123
The Stereo Output Mixer ................................................................................................ 124
The Individual Outputs/Echo Send Mixer....................................................................... 126
Viewing the Mix Data in Text Form ................................................................................ 128
Mixer Source Select, Automated Mix ............................................................................. 131
Chapter 8: Creating and Editing Sounds ................................................................................ 135
Sampling a New Sound.................................................................................................. 136
Editing a sound............................................................................................................... 141
Renaming, Copying, and Deleting a Sound ................................................................... 145
Triggering a Sound from an External Signal—the Audio Trigger................................... 148
Stereo Sampling ............................................................................................................. 149
Sound Compression....................................................................................................... 152
Chapter 9: Saving to and Loading from Disk .........................................................................153
Overview......................................................................................................................... 154
Saving Files .................................................................................................................... 156
Saving a SEQ File (Single Sequence) ..............................................................156
Saving an ALL File (All Sequences and Songs) ............................................... 157
Saving a SND File (Single Sound) .................................................................... 158
Saving a PGM File (Single Program & Sounds) ............................................... 159
Saving an APS File (All Programs and Sounds) ............................................... 161
Saving a PAR File (System Parameters) .......................................................... 163
Loading, Erasing, or Renaming Files ............................................................................. 165
Loading a SEQ File (Single Sequence) ............................................................ 167
Loading an ALL File (All Sequences and Songs).............................................. 169
Loading a SND File (Single Sound) ..................................................................170
Loading a PGM File (Single Program and Sounds).......................................... 170
Loading an APS File (All Programs and Sounds) ............................................. 172
Loading an MPC60 Version 1 or 2 SET or ST1 File ......................................... 172
Loading a PAR File (System Parameters) ........................................................176
Files That Automatically Load on Power-Up ..................................................... 176
Page 5

Saving and Loading MIDI Files ...................................................................................... 177
Copying an Entire Floppy Disk ....................................................................................... 181
Formatting a Floppy Disk................................................................................................ 182
Floppy disk errors ........................................................................................................... 183
Using the Marion Systems MPC-SCSI Interface for External Hard Disk Storage ......... 184
Formatting a SCSI hard disk ............................................................................. 184
Making a SCSI Hard Disk Active....................................................................... 186
Chapter 10: Syncing to Tape and Other Devices ................................................................... 189
The SYNC Screen .......................................................................................................... 190
Syncing to Tape and Other Devices: Examples............................................................. 197
Syncing to MIDI Clock ....................................................................................... 197
Syncing to SMPTE ............................................................................................ 197
Syncing to MIDI Time Code .............................................................................. 199
Syncing to FSK24.............................................................................................. 200
Syncing to 1/4-note Clicks................................................................................. 201
Chapter 11: MIDI Functions...................................................................................................... 203
Assigning Pads to Note Numbers .................................................................................. 204
MIDI Receive Channel, Local Mode, Soft Thru, Note Variation Controller Assign
and Sustain Pedal Processing................................................................................. 206
MIDI Input Filter .............................................................................................................. 209
Using the MPC60 with External Sequencers ................................................................. 212
Turning All Notes Off ...................................................................................................... 213
The MIDI Implementation Charts ................................................................................... 214
Appendix ....................................................................................................................................217
Technical Specifications of Akai MPC60........................................................................ 218
Answers to Frequent Questions ..................................................................................... 220
Contents of Disk Files..................................................................................................... 223
MPC60 Options .............................................................................................................. 227
Expanding the Sound Memory .......................................................................... 227
The SCSI Hard Disk Option .............................................................................. 227
Using Version 3.1 Software in the Akai ASQ10 Sequencer........................................... 228
Index ........................................................................................................................................... 229
Page 6

Page 7

Chapter 1:
Introduction
Page 8

Chapter 1: Introduction
Welcome!
Since its release in 1988, the Akai MPC60 MIDI Production Center has
earned a reputation not only as the world’s greatest drum machine but
also as a powerful sequencer for those who desire an alternative to the
complexity and confusion of computer sequencers.
In developing the successor to the MPC60 — the new MPC3000 — we
expanded the MPC60’s popular features, added many new ones, and
reworked some concepts to make them more powerful, efficient, and
intuitive. While the MPC3000 also offers significant hardware
improvements, the good news is that we were able to port much of its
advanced software back into the MPC60. We think you’ll find that the
Version 3.1 software will greatly enhance your music making.
Since the advent of sequencers I have tracked their evolution with great
interest, and in my view, sequencers have evolved to a point where they
are now a legitimate instrument on their own. Many of today’s musicians
could be better described as sequencer players than as keyboardists or
guitarists. Album credits often read “programming by...” to denote a
musician who has used a sequencer to create the backing track for a
recording. These new musicians think and compose in terms of total
arrangement as opposed to single instruments. In many ways, the
sequencer’s panel and display screens are their strings and keys,
allowing them to reach heights of creativity never before possible.
In this light, I like to think of the MPC60 as the piano or violin of our time,
and of you as an MPC60ist. In the same way a violinist’s style is
identified by his or her vibrato and phrasing, your MPC60 virtuosity may
be identified by your particular swing settings, your creative use of Note
Repeat, or your real-time use of the Note Variation feature. As an
MPC60ist, if you find the instrument useful in your creative process,
please let the world know. Next time you perform on a recording, ask to
be credited not with, “Keyboards played by...” or “Programming by...” but
rather with, “MPC60 played by....”
Thanks for your continued support of the MPC60. I hope you enjoy
playing it as much as we have enjoyed developing it.
Page 2
Page 9

Chapter 1: Introduction
What Are the New Features in Version 3.1?
The MPC60 Version 3.1 software contains many changes and
improvements over version 2. The major changes are listed below.
Sound Generator Changes
• The former 4.5 second limit on new samples has been eliminated.
New samples may now be as long as available memory, up to 26.2
seconds in an expanded MPC60. Also, it is no longer necessary to
erase all sequence memory before sampling.
• You may now sample stereo sounds. This accomplished by first
sampling one side of the stereo sound, then afterwards sampling the
other side. Then, a new feature resynchronizes these two mono
sounds and converts them into a single stereo sound.
• The new Sound Compression feature squeezes any sound into ½
the memory space, at the expense of lower treble fidelity. If all
sounds in memory are compressed, this effectively doubles available
sound memory.
• You may now load all MPC3000 disk files, including stereo sounds.
However, the MPC60 cannot read the high-density MPC3000-format
disks. To read MPC3000 files, they must first be saved from an
MPC3000 onto an MPC60-format disk.
• Total sound capacity is increased from 34 to 128 sounds.
• The new programs system of sound assignment allows all sound
assignments to be instantly changed merely by changing the active
program number, instead of by loading a new SET file as before.
There are eight programs, each with a unique set of sound
assignments from a common bank of 128 sounds. Unlike SET files,
saving a program to disk only saves assignment and parameter
information; the sounds used by the program are saved as individual
sound files. This allows multiple programs to be saved to the same
disk without redundantly saving sound data as SET files did.
• New Mono Mode parameter causes a voice to restart, terminating
earlier plays. Also, any sound can be set to terminate any two other
sounds.
• Sample editing is enhanced. Now, any portion of a sound can be
copied or removed and then inserted into another sound at any
location. Also, any portion can be silenced or reversed.
• The Double Play feature has been removed. Instead, up to three
sounds can be assigned to play from an incoming MIDI note number
or pad. The sounds can either play simultaneously, switch
depending on note velocity, or switch depending on envelope decay
(to simulate the old hi-hat decay slider function).
• The Best Start feature automatically finds the point within a sound at
which the drum strike begins, bypassing any dead space at the
beginning of the sound which could cause playback delays.
• The envelope decay parameter is now switchable between two
modes: END (same as the old Fadeout parameter) and START
(decay begins immediately following attack).
Page 3
Page 10

Chapter 1: Introduction
Sequencer Changes
• MIDI Files are now supported, allowing you to move your sequences
between the MPC60 and an external computer sequencer.
• In Step Edit, the REWIND [<] and FAST FORWARD [>] keys can
now be used to search to the previous or next event within a track.
• In Step Edit, events can be cut and pasted by changing the function
of Soft Keys 1 and 2 from <Insert> and <Delete> to <Paste> and
<Cut>.
• The number of pad banks has been increased from two to four for a
total of 64 pad/bank combinations. The active pad bank is indicated
by a letter (A–D) at the top right of the LCD screen. Also, check the
BANK 2 light: it’s off for bank A and on for banks B–D.
• In drum tracks, drum notes are now assigned to MIDI note numbers
instead of to pads. This provides easier compatibility with external
MIDI devices and allows pad assignments to be rearranged without
affecting sequence or program data. MPC60 Version 2 sequences
are automatically converted from pad assignment to note number
assignment when loaded.
• The Hi-hat Decay Slider has been renamed the Note Variation
Slider, since it can now generate a unique value of either decay,
tuning, or attack for every note, and can be assigned to any pad.
• The 16 Levels function can now provide 16 levels of velocity, tuning,
attack, or decay for every note.
• The Copy/Merge a Track feature (renamed Copy Events )now
permits specific drum notes to be copied.
• The Change Velocity/Duration feature now allows specific drum
notes to be edited.
• The new Shift Timing feature shifts track timing independently of
timing correction.
• The new Edit Note Number Assignment feature permits reassigning
specific drum notes from one note number (instrument) to another.
• The Count In feature can now be set to activate only before
recording.
• The Punch In feature can now be set to Punch-In Only or Punch-Out
Only.
• New MIDI Local Mode internally disconnects the pads from the
sound generator. This is useful when using the pads and sound
generator with external sequencers.
General Changes
• Hard disk save and load operations are now included. (This requires
a SCSI interface kit available from Marion Systems. See appendix
for more information.)
• In order to make room in ROM memory for the new features, we had
to remove all of the help screens, as well as three underused
features: MIDI Sample Dump (SDS), Pulse 96 sync and the “data
changed” indicator above the DISK key.
Page 4
Page 11

New Software Concepts — More Detail
Most of the operational differences between the old and new software
should be relatively simple for veteran MPC60 users to understand, but
some changes are more complex than others. Here is additional
information about the more complex changes.
The new Programs system
Version 3 software uses a new system of sound assignments called
programs. A program is a set of 64 sound assignments and sound
modifying parameters. There are eight different programs, each with a
unique set of sound assignments to a common bank of up to 128 sounds
in memory. Only one program can be active at a time. As result of this
new system, changing a pad’s assignment from one sound to another is
done merely by changing the contents of a data field. Changing from one
entire set of sound assignments to another is done by changing the
active program number. In addition to the sound assignments, each
program contains a unique set of sound modifying parameters for each
sound assignment. These parameters include envelope, tuning, velocity
modulation, and other data. This is explained further in Chapter 6,
“Creating and Editing Programs.”
SET files are replaced by the new Program files.
In the old software, all sounds and sound assignments were saved in
one large SET file. In order to change all pad assignments, it was
necessary to load a new SET file. Because of Version 3’s new Program
system of sound assignments, SET files have been replaced by PGM
(program) files. A PGM file contains all assignment information but no
sound data. Instead, when a PGM file is saved, all sounds used by the
program are also saved as individual sound files. This new method
allows different PGM files on the same disk to use the same sound files,
eliminating the problem of saving sound data redundantly in multiple SET
files. However, SET files can be loaded—the assignments are loaded
into a program and the sounds are added to sound memory.
There is another new save operation called Save All Programs and
Sounds. This saves a file with the extension APS containing the data of
all eight programs, followed by a sound file for every sound currently in
memory.
Saving of PGM and APS files is explained further in chapter 9, “Saving
To and Loading From Disk.”
Sounds and sequenced drum notes are now assigned to note
numbers instead of to pad names.
In the old software, sounds and sequenced drum notes were assigned to
one of a number of fixed drum pad names (HIHT, SNR1, DR01, etc.) In
Chapter 1: Introduction
Page 5
Page 12

Chapter 1: Introduction
Version 3, sounds in programs and drum notes in sequences are
assigned instead to one of 64 MIDI note numbers (35–98), as are each
of the 64 pad/bank combinations (A01–D16). The fixed four-character
drum names are no longer used. This new note number assignment
method provides the following advantages over the old pad-assign
method:
1. Because pads are assigned to MIDI note numbers
independently of sound assignments in programs or note
assignments in drum tracks, the pad assignments can be
freely rearranged to personal preference without affecting
sequences or sound assignments.
2. When using the MPC60 as a sound generator, it is no longer
necessary to use the old “Assign incoming notes to pads”
conversion table, which has been removed. Instead, simply
assign the received MIDI note number directly to a sound.
3. Notes can be recorded from MIDI directly into drum tracks
without the need for the old “Assign incoming notes to pads”
conversion table, which has been removed. Now, when
viewing a drum note in Step Edit, the actual MIDI note
number received is displayed, as well as the currently
assigned pad number (A01–D16) and sound name.
4. Drum notes are sent out over MIDI without the need for the
old “Assign pads to outgoing note numbers” conversions, a
function which has been removed. When viewing a drum note
in Step Edit, the actual MIDI note number displayed is sent
out.
When old SEQ or ALL files are loaded, a screen is presented explaining
that the pad assignments of drum notes will be converted to note number
assignments and offering conversion options.
For a more detailed explanation of how Version 3 uses note numbers,
please refer to the beginning of chapters 6 and 11, “Creating and Editing
Programs” and “MIDI Functions.”
Assigning tracks as either Drum or MIDI
In the old software, a track was assigned to drums by assigning its
output MIDI channel to the Drums Channel, which is the input MIDI
channel of the internal sound generator. In Version 3, assigning a track
to drums is simpler: a new data field in the Play/Record screen permits
each track to be assigned as either DRUM or MIDI. MIDI tracks contain
normal MIDI data recorded from the MIDI input and played out through
the MIDI outputs. Drum tracks are the same as MIDI tracks except for
the following:
1. The output of the track plays to the internal drum sound
generator.
2. You can record drum notes into the track using the front panel
pads.
3. In sequence editing screens, note events in Drum tracks are
visually identified and selected not by note number only as in
Page 6
Page 13

Chapter 1: Introduction
MIDI tracks, but also by the pad number and sound name
currently assigned to the displayed note number.
4. Drum tracks are not affected by the Transpose function.
Independently, each track (DRUM or MIDI) can be assigned to any MIDI
channel and MIDI output port. As a result of this change, the old Drums
Channel and Drum Data Sent Out fields have been removed.
New Note Variation system and revised 16 LEVELS function
In the old software, the Hi-hat Decay Slider controlled decay time and
sound selection for the hi-hat pad only. In Version 3, the new Note
Variation Slider provides all functions of the hi-hat decay slider, but can
be assigned to any pad and can alternately control either tuning, attack
or decay. As with the Hi-hat Decay Slider, this information is recorded
into each drum note.
The 16 Levels function does everything it did in the old software. In
addition, it can produce 16 levels of either attack or decay by working in
conjunction with the Note Variation system.
Delete Bars and Copy Bars: Last bar field has different function than
old To bar field
In the Delete Bars function, the Last Bar field now contains the actual
last bar of the region to be deleted. This is different from the old To Bar
field, which contained the first bar after the region to be deleted.
In the Copy Bars function, the Last Bar field now contains the actual last
bar of the region to be copied. This is different from the old To Bar field,
which contained the first bar after the region to be copied.
Page 7
Page 14

Page 15

Chapter 2:
The Basics
Page 16
Chapter 2: The Basics
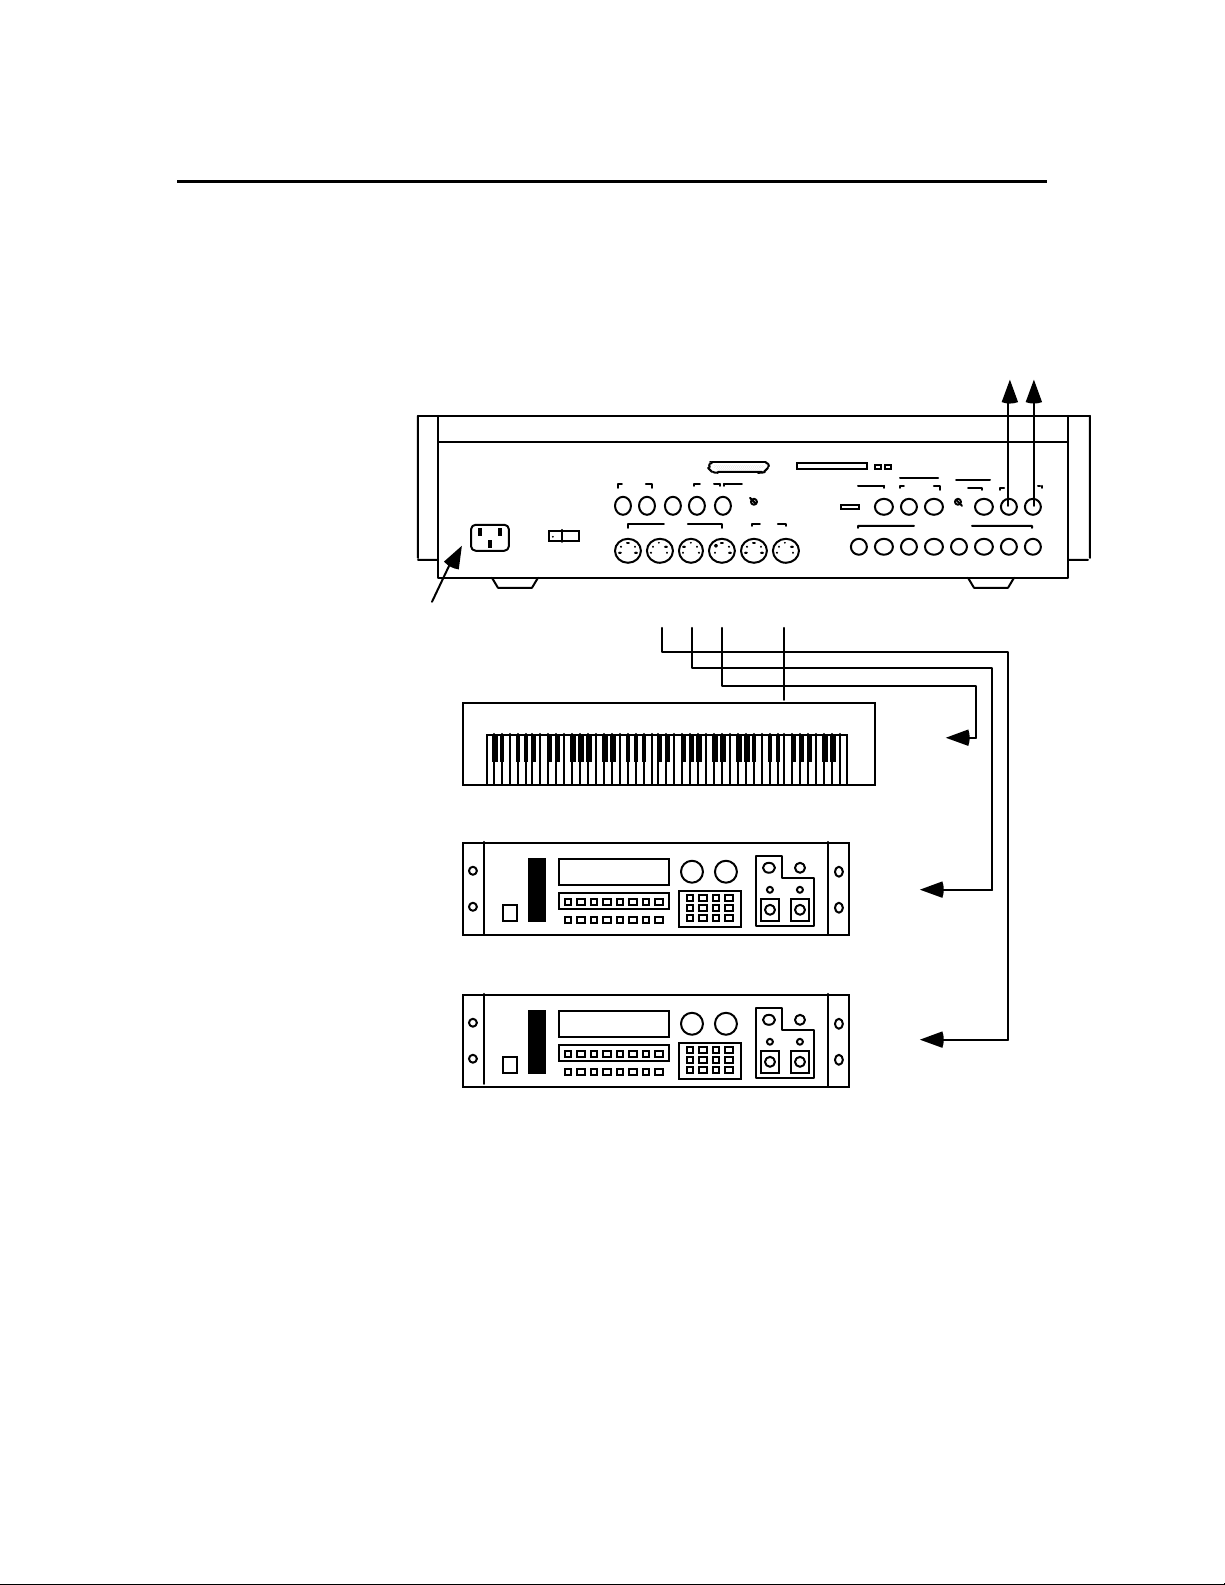
Hooking Up Your System
The following diagram shows how to hook up the MPC60 to a MIDI
keyboard and two sound modules. (Note that the MIDI OUT jacks on
older MPC60s are labeled 1–4, not A–D.)
MPC60
TO AUDIO CONSOLE
TO
POWER
WARNING: SHOCK HAZARD - DO NOT OPEN !
AVIS: RISQUE DE CHOC ELECTRIQUE - NE PAS OUVRIR!
VORSICHT : BERUHRUNGSGEFAHR - HICHT OFFNEN!
CAUTION TO REDUCE THE RISK OF ELECTRIC SHOCK DO NOT
REMOVE COVER. NO USER-SERVICEABLE PARTS INSIDE.
REFER SERVICING TO QUALIFIED SERVICE PERSONNEL.
POWER
AC 120V 60 HZ 40W
ON OFF
FOOT SW LEVEL
12 IN
OUT
MIDI OUT MIDI IN
RS-232C
SYNCMETRO
OUT
MIN MAX
MIDI OUT
D---C---B---A
MULTI TIMBRAL MIDI KEYBOARD
MULTI TIMBRAL MIDI SOUND MODULE
MIDI IN
2—1
MIDI OUT
AKAI ELECTRIC CO., LTD.
MODEL NUMBER MPC60
MADE IN JAPAN
GAIN
HI MID LO
• • •
8 7 6 5 4 3 2 1 D C B A 2 1
MIDI IN
WARNING
TO REDUCE THE RISK OF FIRE OR
ELECTRIC SHOCK DO NOT EXPOSE
AC
THIS PRODUCT TO RAIN OR MOISTURE.
RIGHT LEFT
ASSIGNABLE MIX OUT
ECHO
MIN MAX
REC IN
MIDI IN
LEVEL
MIX OUT RIGHT LEFT
STEREO OUTRETURN IN
MIDI IN
MULTI TIMBRAL MIDI SOUND MODULE
If you only want to use the MPC60 as a drum machine for now, don’t
connect the MIDI keyboard, the sound modules, or make any MIDI
connections. If you choose to make the MIDI connections, you can daisy
chain all of the sound generators to MIDI Output A of the MPC60.
(Connect MIDI Out A of the MPC60 to the MIDI in of the keyboard;
connect the keyboard’s MIDI thru to the MIDI in of the first sound
generator; and connect its MIDI thru to the MIDI in of the next sound
generator.) This method of connection, however, will limit the total
number of MIDI channels on all sound generators to 16. By using the
four independent MIDI outputs shown in the connection method above,
you can use all 16 MIDI channels on each of the four MIDI Outputs.
Page 10
Page 17

Getting Around on the MPC60
Before you can use the MPC60, you must learn how to use the cursor
keys, data fields, command keys, the data entry keys and data entry
knob, the soft keys and the HELP key.
While no disk is in the drive, turn the power on. After a few seconds, the
LCD screen will display the following text:
============== Play/Record ============A
Seq: 1-(unused) BPM:120.0 (SEQ)
Sig: 4/ 4 Bars: 0 Loop:TO BAR 1
============== Track Data ==============
Trk: 1-(unused) Type:DRUM On:YES
Chn:OFF-(off) & OFF Vel%:100 Pgm:OFF
===== Now:001.01.00 (00:00:00:00) ======
<Tk on/off> <Solo=OFF> <Track-> <Track+>
Chapter 2: The Basics
This is known as the Play/Record screen, as indicated by the title at the
top of the screen. It’s also known as the Main Screen. It is the main
operating state of the MPC60 and most playing and recording of
sequences is done when this screen is in view. It will be discussed
further in the chapter entitled “Recording Sequences.” If at any time
while operating the MPC60 you are confused and want to return to this
screen, press the MAIN SCREEN key.
COMMENT: If you can’t clearly see the text on the screen, try
adjusting the LCD CONTRAST knob.
The Cursor, Cursor Keys, Data Fields, and Command Keys
Make sure that the Play/Record screen is showing. If not, press MAIN
SCREEN.
Notice that a small rectangular block is blinking somewhere on the
screen. This is called the cursor. It is possible to move the cursor
around the screen using the four gray direction keys located toward the
right side of the panel. These four keys are referred to as the CURSOR
LEFT, CURSOR RIGHT, CURSOR UP and CURSOR DOWN keys. Try
moving the cursor around the LCD, then move it to the upper left corner.
Notice that the cursor does not move from letter to letter, but rather
jumps across many letters at a time, landing only in certain locations,
usually to the right of a colon (:). These areas are called data fields and
each one controls a specific parameter. For example, the upper left-most
data field is called Seq, an abbreviation for sequence. To the right of this
field is another field containing the name for the selected sequence.
Page 11
Page 18

Chapter 2: The Basics
The Play/Record screen is one of many display screens available on the
MPC60. Most of the panel keys present a unique screen, and each
screen has its own unique data fields. Try pressing a few of the different
keys in the Commands section of the panel, such as DISK or
TEMPO/SYNC.
The Numeric Keypad, Data Entry Knob, and [+] & [–] Keys
Make sure that the Play/Record screen is showing. If not, press MAIN
SCREEN.
To change the data in a data field, move the cursor to the field and type
in the new number using the numeric keypad, followed by ENTER. For
example, to change to sequence number 2:
1. Move the cursor to the Seq field in the upper left corner;
2. Type 2, followed by the ENTER key.
Notice that the sequence name (located immediately to the right of the
sequence number) now changes automatically, because it must now
display the name of sequence 2.
Another use of the numeric keypad is to select from a list of menu
options presented on the screen. For example, pressing the SOUNDS
key causes the following menu to be displayed:
===== Programs ===== ===== Sounds ====A
1.Sel pgm, asn snds 5.Sample new sound
2.Envel,veloc,tune.. 6.Edit sound
3.Note Variation Sldr 7.Renam,cpy,delete
4.Copy, initialize 8.Audio trigger
========================================
Select option:
When a screen like this is displayed, you are expected to select one of
the options by pressing a single number—it is not necessary to press
ENTER afterwards. Press MAIN SCREEN to return to the Play/Record
screen.
Another way of changing on-screen data is to use the data entry knob.
While the cursor is in a data field, if the data entry knob is rotated one
step to the right, the on-screen number will increment. If the data entry
knob is rotated one step to the left, the on-screen number will
decrement. Continuously turning the data entry knob will repeatedly
increment or decrement the on-screen value. It is not necessary to press
ENTER after turning the data entry knob.
There is a special type of data field called a choice field. Fields of this
type do not contain numeric data, but rather a specific number of preset
text selections, though only one can be active at a time. In this case, the
Page 12
Page 19

Chapter 2: The Basics
data entry knob is used to select from the available options. For
example, press the OTHER key and move the cursor to the Rate field,
which is a choice field. Now turn the data entry knob and notice that with
each step of the knob, a different preset option appears in the data field.
When finished, set this field back to 1/4 NOTE.
Pressing the [+] key has the same effect as turning the data entry knob
one step to the right. It either increments a number in a numeric field or
chooses the next option in a choice field.
Pressing the [-] key has the same effect as turning the data entry knob
one step to the left. It either decrements a number in a numeric field or
chooses the previous option in a choice field.
The Soft Keys
Make sure that the Play/Record screen is showing. If not, press MAIN
SCREEN.
Below the LCD screen are four keys labeled SOFT KEY 1, SOFT KEY 2,
SOFT KEY 3, and SOFT KEY 4. The functions of these keys change
from one screen to another; these functions are always displayed on the
lowest line of the screen. For example, while the Play/Record screen is
showing, the lowest line appears as:
<Tk on/off> <Solo=OFF> <Track-> <Track+>
The bottom line shows four titles enclosed in angle brackets. The titles
are <Tk On/Off >, <Solo=OFF>, <Track-> and <Track+>. These four
titles indicate the functions of the four soft keys, but only while this
screen is showing. Most of the screen displays in the MPC60 have soft
key functions, and the lowest line of each of these screens indicates the
function of the four soft keys while that screen is showing. You can see
this by pressing the ERASE key, then the TIMING CORRECT key, then
MAIN SCREEN to return to the Play/Record screen. Some screens have
fewer than four active soft keys and some have none.
The HELP key
Sorry, but in order to add all the new features contained in version 3.1,
we had to remove the HELP feature.
Page 13
Page 20

Chapter 2: The Basics
Definitions: Sequence, Track, Song, Sound, Pad,
Note Number, and Program
Here are some definitions of terms used in the MPC60 that you should
know:
Sequence
A sequence can be thought of as a segment of multitrack tape of
variable length. Depending on the sequence contents, it could be a twobar repeating drum pattern, an eight-bar verse, or an entire 200-bar
multitrack composition with time signature and tempo changes. The
MPC60 holds 99 sequences in memory at one time. Normally, only one
sequence can play at one time, unless the Second Sequence feature is
on, which allows two sequences or one sequence and one song to play
simultaneously.
Track
Within each of the 99 sequences are 99 tracks that contain the actual
MIDI events. These can be thought of as the tracks on a multitrack tape
recorder—they each contain a specific instrument or piece of the total
arrangement, but they all play simultaneously. For example, track 1
could be drums, track 2 percussion, track 3 bass, track 4 piano, track 5
horns, track 6 more horns, etc. Each track can be assigned as a Drum
track or a MIDI track, but not both. MIDI tracks contain normal MIDI data
recorded from the MIDI input and played out through the MIDI output.
Drum tracks are the same as MIDI tracks except for the following:
1. The output of the track plays the internal drum sound
generator.
2. You can record drum notes into the track using the front panel
pads.
3. In sequence editing screens, note events in drum tracks are
visually identified and selected not just by note number (as
are MIDI tracks), but also by the pad number and sound
name currently assigned to the displayed note number.
4. Drum tracks are not affected by the Transpose function.
Song
A song is a list of sequences that play consecutively, with each
sequence representing a section of a composition. In the MPC60 there
are 20 songs, each having up to 250 steps. Each step holds one
sequence and can repeat a specified number of times before the song
moves to the next step.
Page 14
Page 21

Chapter 2: The Basics
Sound
Each individual sampled recording in the MPC60 is called a sound. A
sound could be a recording of a single strike of a snare drum or cymbal,
or a sound effect. Sounds are sampled in a proprietary 12-bit non-linear
format at a sampling rate of 40kHz and can be any length up to the limit
of sound memory. A maximum of 128 sounds can reside in sound
memory.
Pad
When sounds are loaded into the MPC60, each pad plays a particular
sound. Though there are only 16 pads, the MPC60 can hold many more
than 16 sounds, To access more than 16 sounds from the pads, the
MPC60 provides four banks of pad assignments permitting up to 64
sounds to be played from the 16 pads. Only one bank can be active at a
time. The four banks are named A, B, C, and D, and the pads are
numbered 1 through 16. The 64 bank/pad combinations are named by
combining the bank letter (A–D) with the pad number:
Pads in bank A: A01 through A16
Pads in bank B: B01 through B16
Pads in bank C: C01 through C16
Pads in bank D: D01 through D16
Each of these 64 bank/pad combinations (A01–D16) is referred to as a
pad.
Notice that sounds are not assigned directly to pads, but rather to MIDI
Note Numbers. In order for a pad to play a sound, it is first assigned to a
MIDI note number, then that note number is assigned to a sound. This is
described further in the “MIDI Functions” and “Creating and Editing
Programs” chapters of this manual.
Note Number
In MIDI terminology, note number refers to the element in a MIDI Note
On event that supplies the pitch of the note. The note number range is
from 0 to 127. For example, if Middle C is played on a MIDI keyboard, a
Note On event is sent out over MIDI containing note number 60; the
receiving sound generator interprets this as Middle C and plays the
appropriate pitch. If the sound generator is playing drum sounds, the
note number is not used for pitch, but rather to select which drum will
play—one key for bass drum, one for snare, one for high tom, etc.
This system of using MIDI note numbers to select drums is used in the
MPC60’s sound assignment system. In programs (described below),
sounds are assigned directly to one of 64 MIDI note numbers (35–98). In
sequences, drum notes are also assigned to one of 64 note numbers
(35–98) to indicate which sound to play. Because of this assignment
method, there are many data fields in the MPC60 called Note, in which
you enter either the note number you wish to assign in a program, or the
note number you wish to edit in a sequence’s drum track. (For easy
Page 15
Page 22

Chapter 2: The Basics
visual identification in these Note fields, the note number is accompanied
by both the currently assigned pad number and sound name.)
Program
Once a sound is loaded into memory, it cannot be played by pads or
from MIDI until it is assigned within a program. A program is a collection
of 64 sound assignments and can be thought of as a drum set. In a
program, each of 64 MIDI note numbers (35–98) is assigned to one of
the 128 possible sounds currently residing in memory. Once assigned to
a note number, a sound can be played in one of three ways:
1. By receiving a Note On message from the MIDI input;
2. By playing a front panel drum pad (each pad is also assigned to one
of the 64 MIDI note numbers 35–98);
3. By playing drum tracks in sequences (each note event in a drum track
is assigned to one of the 64 MIDI note numbers 35–98).
In addition to the 64 sound assignments, each program also contains a
number of sound modifying parameters for each of the 64 sound
assignments, including envelope, tuning, mixer, and velocity response
data.
The MPC60 has 8 different programs (one of which can be active at a
time) each with its own unique set of 64 assignments. Simply by
changing the active program number (1–8), all 64 sound assignments
and their sound modifying settings will instantly change.
Page 16
Page 23

Chapter 2: The Basics
Loading and Playing Sounds and Programs
All sounds and programs are held in RAM memory and are therefore lost
whenever the power is turned off. In order to play any sounds after
turning the power on, you must load them in from disk. The procedure for
loading files from disk is described in the “Saving To and Loading From
Disk” chapter of this manual, but to get you started quickly, here’s how to
load sounds from disk.
COMMENT: Unlike version 2 software, SET files are no longer
used in the MPC60. The new PROGRAM file format is used
instead. However, your SET files may be loaded into version 3
software, and are automatically converted into the new
PROGRAM format.
To load a version 2 SET or ST1 file:
1. Place a disk containing a version 2 SET or ST1 file in the disk drive.
2. Press the DISK key, then 7.
3. When the “Load/Erase/Rename Files” screen appears, rotate the
DATA ENTRY control until the File field contains a file name ending with
the extension “.SET” or “.ST1”, then press Soft Key 1.
4. A screen will appear asking you if you want to load the entire file or
one sound. Press 1 to load the entire file.
5. Additional question screens will be presented. If confused, simply
press Soft Key 1 in response to each screen until the file starts loading.
When finished, your version 3 MPC60 will contain sounds. Press MAIN
SCREEN to return to the main Play/Record screen.
To load a version 3 Program or All Programs file:
1. Place a disk containing a Program file or an All Programs file in the
disk drive.
2. Press the DISK key, then 7.
3. When the “Load/Erase/Rename Files” screen appears, rotate the
DATA ENTRY control until the File field contains a file name ending with
the extension “.PGM” or “.APS”, then press Soft Key 1.
4. A screen will appear requiring user input. If confused, simply press
Soft Key 1 and the file will begin loading. When finished, your version 3
MPC60 will contain sounds. Press MAIN SCREEN to return to the main
Play/Record screen.
Page 17
Page 24

Chapter 2: The Basics
Playing the Pads, the BANK 2, & FULL LEVEL Keys
Each sampled recording in the MPC60 is called a sound. To hear some
of the drum sounds you have just loaded, play the 16 dynamic pads on
the front panel. To hear other sounds, press the BANK 2 key once so
that the light above the key is lit, then play the pads again. The MPC60
has four pad banks (A, B, C and D). To hear the sounds assigned to pad
bank C, press BANK 2 again and play the pads, and do the same to hear
bank D. Each time you press the BANK 2 key you change to the next
pad bank, and with each bank the 16 pads play different sounds. When
you return to pad bank A, the light will turn off. In almost all screens, a
letter at the extreme top right will display the active pad bank.
The 64 bank/pad combinations are named by combining the bank letter
(A–D) with the pad number:
Pads in bank A: A01 through A16
Pads in bank B: B01 through B16
Pads in bank C: C01 through C16
Pads in bank D: D01 through D16
Each of these 64 bank/pad combinations (A01–D16) is referred to as a
pad.
The 16 pads are dynamic—the harder you play them, the louder the
sound will play. If desired, however, this touch sensitivity can be
defeated. Press the FULL LEVEL key (the light will go on), and no
matter how softly you play the pads, the sound will play at its maximum
dynamic level. Press FULL LEVEL again to return to normal dynamic
operation.
Selecting Programs
The 64 sound assignments you have just heard (four pad banks of 16
sounds each) comprise a program. The MPC60 can hold up to 8
programs. Each program has a unique set of 64 sound assignments, so
you can think of programs as drum sets. If you change from one program
to another, playing the four banks of pads will produce entirely different
sounds.
When you just played the pads and heard the sounds, you were hearing
the sounds assigned in Program 1. If another program is currently
loaded into program 2, you can switch to program 2 in the following way:
1. Press the SOUNDS key and select 1, “Select program, assign
sounds,” from the menu. The following screen will appear:
Page 18
Page 25

Chapter 2: The Basics
============ Select Program ===========A
Active program: 1-PROGRAM_NAME
========== Assign Note:41/A08 ==========
Sound:BIG_BAD_DRUM Mode:NORMAL
General MIDI name for note:LO FLOR TOM
========================================
<Play>
2. Move the cursor to the Active Program field. It should display 1. Select
program 2 using the data entry knob.
3. Play the sounds in program 2: Select Pad Bank A and play the
sounds, then select Pad Bank B and play the sounds, then play bank
C, then bank D.
4. Repeat step 3, except select program 3 and play the sounds. Repeat
this procedure to hear the other programs.
5. To return to the Play/Record screen, press MAIN SCREEN.
The Note Variation Slider (the new name for the Hihat Decay
Slider) andAFTER key
In Version 3 software, the MPC60’s Hihat Decay Slider is called the Note
Variation Slider because its function is expanded beyond merely altering
the decay of the hihat sound as in Version 2 software.
The Note Variation slider can now be used in real time to change the
tuning, attack, or decay of a sound played from a single pad. Once the
slider is assigned to single pad and parameter, moving the slider while
playing the pad will cause the sound’s tuning, attack, or decay to be
determined by the current slider position.
Here are some examples of uses of Note Variation:
1. The slider can control decay for a hi-hat sound. This would simulate
the action of a drummer’s hi-hat pedal, allowing a unique hi-hat decay
time each time the pad is played.
2. The slider can be assigned to tuning for a tom tom sound. By moving
the slider while playing the tom pad, a wide range of tom tunings is
possible.
3. The slider can control a sound’s attack time (the amount of time it
takes to fade in). This is useful for adding subtle variations to a sound
or producing special effects.
How to Assign the Note Variation Slider
To assign the Note Variation Slider to a pad and parameter, press the
SOUNDS key, then 3. The following screen will appear:
Page 19
Page 26

Chapter 2: The Basics
=== Assign Note Var Slider (Pgm: 1) ===A
Note:64/A01-Sound_name
Param:TUNING
Low range:-120 High range: 60
========================================
To assign the slider to a pad and parameter:
1. Press the desired pad (the note number, pad number and sound
name of the pad you pressed will appear in the Note field).
2. Move the cursor to the Param field and select the desired parameter
(TUNING, ATTACK, or DECAY).
3. Press MAIN SCREEN to return to the Play/Record screen.
4. Play the selected pad while moving the Note Variation slider. Each
time the pad is played, the selected parameter (tuning, attack, or
decay) will change according to the slider position.
Here is additional information about the five fields:
• The Pgm field:
This is the active program number (1–8). The data in the Param field
applies only to the program number selected here.
• The Note field:
This field contains the note number to which the slider is assigned (35–
98). To change the assignment, press a pad. The note number to which
the pad is assigned will instantly appear in the Note field, along with the
pad number of the pad you pressed and the name of the sound currently
assigned to the note number. Alternately, you can enter the desired note
number by typing it then pressing ENTER.
• The Param (parameter) field:
This field determines which of the three possible parameters the slider
will control. The three choices are:
1. TUNING:
If selected, the slider alters tuning. Slider values are added to
the tuning settings used in the program and sound.
2. DECAY:
If selected, the slider alters envelope decay time. Slider
values override the program’s envelope decay setting.
3. ATTACK:
If selected, the slider alters envelope attack time. Slider
values override the program’s envelope attack setting.
The contents of this field are unique for each of the 64 note numbers
selected in the Note field above.
Page 20
Page 27

• The Low range and High range fields:
These two fields control the range of the slider. The Low range field
determines the parameter value that will be produced when the pad is hit
while the slider is at the bottom of its travel; the High range field
determines the parameter value that will be produced when the pad is hit
while the slider is at the top of its travel. Any position in between
produces a proportionate value between these two values. The type of
data shown in these fields is determined by the parameter selected in
the Param field. If TUNING is selected, these fields contain a signed
tuning number (e.g., -120 to +60); if ATTACK or DECAY is selected, they
contain a millisecond value (0–5000).
The contents of this field are not stored within the program when it is
saved; instead, they apply to all programs in memory and are stored in
All Programs files.
The AFTER key
Note Variation information can be recorded into sequences. Each drum
note in a sequence contains two pieces of data related to Note Variation:
Normally, the slider only affects new notes—it has no effect on notes
played back from sequences. However, if the AFTER key is pressed
(and the associated light goes on), the slider also overrides the Note
Variation data of any drum notes playing back from sequences, but only
drum notes that are assigned to the same note number (drum pad) and
parameter currently selected in the ASSIGN key’s screen. Further, if in
Overdub mode while the AFTER key light is on, these changes will be
recorded into the active track.
To return to normal operation, press AFTER again and the light will go
off.
The 16 LEVELS key
When the 16 Levels function is on, a single sound will play from all 16
pads but each pad will produce a different value of either velocity, tuning,
attack, or decay.
To set the parameters and turn 16 Levels mode on, press the 16
LEVELS key. The following screen will appear:
Chapter 2: The Basics
1. The Note Variation Parameter: This identifies which parameter
the Note Variation Data will affect (tuning, attack, or decay).
2. The Note Variation Data: This is the actual tuning, attack, or
decay information, representing the position of the slider
when the note was recorded.
Page 21
Page 28

Chapter 2: The Basics
========== Assign '16 Levels' =========A
Note:64/A06-Sound_name
Param:NOTE VAR (TUNING) Center pad:13
========================================
<Turn on, exit>
The fields and soft keys are:
• The Note field:
This field is used to assign the 16 Levels function to one of the 64
possible note numbers (35–98). When 16 Levels mode is on, all 16 pads
will play one sound but at 16 evenly spaced levels of either velocity,
tuning, attack, or decay. Select a sound by pressing a pad. This will
automatically select the note number that is currently assigned to the
selected pad. For convenience, the sound name currently assigned to
the selected note number in the active program is displayed.
• The Param field:
This is a choice field with two choices:
1. VELOCITY:
If this option is selected, and 16 LEVELS mode is on, then the
selected note number and sound will play from all 16 pads,
but at 16 fixed velocity levels with the softest level on the
lower leftmost pad and the loudest level on the upper
rightmost pad.
2. NOTE VAR:
If this option is selected, and 16 LEVELS mode is on, then the
selected note number and sound will play from all 16 pads,
but at 16 fixed levels of tuning, attack or decay using the Note
Variation data stored with each drum note in the sequence.
• The Note Variation Parameter field (NOTE VAR (TUNING) in the
screen example above):
This field has no label and appears only if NOTE VAR is selected in
the Param field. It is a choice field and is used to determine which of
the three Note Variation parameters is active. The three choices are:
1. (TUNING):
If selected, the 16 pads play a single sound but at 16
chromatic tunings. The tuning range is controlled by the
Center pad field to the right.
2. (DECAY):
If selected, the 16 pads play a single sound but at 16 evenly
spaced levels of envelope decay. The range of decay values
is set in the Assign Note Variation screen (SOUNDS, option
3).
3. (ATTACK):
If selected, the 16 pads play a single sound but at 16 evenly
spaced levels of envelope attack. The range of attack values
is set in the Assign Note Variation screen (SOUNDS, option
3).
Page 22
Page 29

Chapter 2: The Basics
• The Center pad field:
This field only appears if the Param field is set to NOTE VAR and the
Note Variation Parameter field is set to (TUNING). It is used to set the
tuning range of the 16 pads by selecting which of the 16 pads will play
the sound with no tuning change. Regardless of this center pad,
higher numbered pads play higher chromatic tunings and lower
numbered pads play lower chromatic tunings. In order to limit the
entire tuning range of the 16 pads to within +6 and -12 semitones (the
Note Variation tuning range), only pads 10 through 13 can be
selected. For example, if pad 13 is selected, the tuning range is from 120 (-12 semitones at pad 1) through 0 (no tuning change at pad 13)
to +30 (+3 semitones at pad 16).
To turn the 16 Levels function on:
1. Press the 16 LEVELS key. The 16 Levels screen will appear.
2. Press the pad of the drum you want to use. The Note field will
immediately show the note number assigned to that pad
along with the pad number pressed and the currently
assigned sound name.
3. Set the Param field to the desired parameter, and, if NOTE
VAR is selected, also set the Note Variation Parameter field
to the right.
4. Press the <Turn on, exit> soft key. This will turn the light
above the 16 LEVELS key on and cause the Play/Record
screen to be displayed. Now the sound you selected will play
from all 16 pads, but at 16 fixed levels of the parameter you
selected.
To turn the 16 Levels function off:
Press the 16 LEVELS key again. The light will go out, indicating that
normal pad function has returned.
Page 23
Page 30

Page 31

Chapter 3:
Recording
Sequences
Page 32

Chapter 3: Recording Sequences
How Sequences are Organized
A sequence can be thought of as a segment of multitrack tape of
variable length. Depending on the sequence contents, it could be a twobar repeating drum pattern, an eight-bar verse, or an entire 200-bar
multitrack composition with time signature and tempo changes. The
MPC60 holds 99 sequences in memory at one time. Only one sequence
can play at one time.
Within each of the 99 sequences are 99 tracks that contain the actual
MIDI events. These can be thought of as the tracks on a multitrack tape
recorder—they each contain a specific instrument or piece of the total
arrangement, but they all play simultaneously. For example, track 1
could be drums, track 2 percussion, track 3 bass guitar, track 4 piano,
track 5 horns, track 6 more horns, etc. Each track can be assigned as a
Drum track or a MIDI track, but not both. MIDI tracks contain normal
MIDI data recorded from the MIDI input and played out through the MIDI
output. Drum tracks are the same as MIDI tracks except for the following:
1. The output of the track plays to the internal drum sound
generator.
2. You can record drum notes into the track using the front panel
pads.
3. In sequence editing screens, note events in drum tracks are
visually identified and selected not by note number only (as
are MIDI tracks), but also by the pad number and sound
name currently assigned to the displayed note number.
4. Drum tracks are not affected by the Transpose function.
In order for the sequencer to play external synthesizers, it must send its
notes out through MIDI on one of the 64 output MIDI channels (16
channels for each of the 4 MIDI output jacks).
Ticks and Bar.Beat.Tick fields
The timing resolution of the sequencer is 96 parts per quarter note (96
ppq). Each one of these divisions is called a tick.
In many of the sequence editing screens it is necessary to enter the start
and end of the region to be edited. This is done using a three-part field,
called a bar.beat.tick field, containing a bar number, beat number, and
tick number. (A beat is the timing value of the lower half of the time
signature. For example, in 4/4 time, a beat is one quarter note.) In
bar.beat.tick fields, you enter the three parts separated by decimal points
(.), followed by ENTER. If you only want to enter the bar number, type it
followed by ENTER—the beat and tick portions will be reset to the start
of the bar.
Page 26
Page 33

Chapter 3: Recording Sequences
The MAIN SCREEN Key & Play/Record Screen
When the MPC60 is first powered on, the LCD screen shows the
following contents:
============== Play/Record ============A
Seq: 1-(unused) BPM:120.0 (SEQ)
Sig: 4/ 4 Bars: 0 Loop:TO BAR 1
============== Track Data ==============
Trk: 1-(unused) Type:DRUM On:YES
Chn:OFF-(off) & OFF Vel%:100 Pgm:OFF
===== Now:001.01.00 (00:00:00:00) ======
<Tk on/off> <Solo=OFF> <Track-> <Track+>
This is called the Play/Record screen. It is the main operating screen of
the MPC60 and most playing and recording of sequences is done while
this screen is showing. To return to this screen at any time, press the
MAIN SCREEN key. The following is an explanation of each of the data
fields and soft keys contained in this screen:
• The title line (===== Play/Record ====A) :
The title line not only displays the title of this screen but also indicates
whether Record Ready status is enabled or disabled by appearing in one
of two views:
1. Record disabled:
========== Play/Record ===========A
This is the normal mode for sequence playing. In this mode, it is
impossible to “punch in” to Record or Overdub mode while
playing the sequence. However, in this mode it is possible to
change sequences while playing. To do this, simply select a
new sequence while playing using the numeric keypad. When
the previously selected sequence finishes, the newly selected
one begins playing. This feature is very useful for creating the
structure of a song in real time while the MPC60 is playing.
COMMENT: If you use the data entry knob to select a
new sequence while playing, only the next highernumbered or next lower-numbered sequence can be
selected. If you want to select a sequence whose
number is not one higher or lower, you must use the
numeric keypad (remember to press ENTER after you
have entered the new sequence number).
2. Record ready:
Page 27
Page 34

Chapter 3: Recording Sequences
• The Sequence Number field (Seq: 1
This field displays the active sequence number, from 1 to 99. This is the
sequence that will play when either PLAY START or PLAY is pressed. If
you change the sequence number while a sequence is playing, the new
sequence will start playing when the current sequence finishes playing.
• The Sequence Name field (Seq: 1-(unused)
This is the 16-character name for the active sequence. To change the
sequence name, move the cursor to this field and turn the data entry
knob one step in either direction. This will cause the keys that have
alphabet letters printed above them to function as alphabet entry keys.
To indicate that alphabet mode is active, the cursor changes from the
normal blinking block to a blinking underline. Now change the name by
typing the letters printed above the keys. The CURSOR LEFT and
CURSOR RIGHT keys do not type letters, but allow you to move the
cursor left or right within the name. For punctuation, use the data entry
knob. When finished, press ENTER and the cursor will return to a
blinking block at the beginning of the field, indicating that the alpha keys
have returned to their normal functions. To discard any changes and
return to the old name before ENTER is pressed, press and release
HELP.
• The Tempo Display Mode field (BPM
screen):
This is a choice field with two options:
==== Play/Record (Record Ready) ==A
In this mode, it is possible to “punch in” to Record or
Overdub mode while playing the sequence. To punch in:
while playing a sequence, hold both PLAY and either RECORD
or OVERDUB simultaneously—the MPC60 will immediately
enter either Record or Overdub mode. In this mode it is
impossible to change sequences while playing.
COMMENT: The letter at the right end of the title line indicates
which pad bank (A–D) is active.
COMMENT: If you select a new sequence number while playing
by using the data entry knob, only the next higher or next lower
sequence can be selected. To select other sequences while
playing, use the numeric keypad.
1. BPM: The tempo is displayed in Beats Per Minute with one
digit to the right of the decimal point.
2. FPB: The tempo is displayed in Frames Per Beat with one
digit to the right of the decimal point indicating 1/8s of a
frame. If this option is selected, the Frames field (in the
Tempo/Sync screen) should be set to the desired frame rate.
-(unused) in the example screen):
in the example screen):
:120.0 (SEQ) in the example
Page 28
Page 35

Chapter 3: Recording Sequences
• The Active Tempo field (BPM:120.0
(SEQ) in the above example):
This is the active playing tempo. If the sequence contains tempo
changes, this shows the active tempo at the current sequence position
displayed in the Now field.
• The Tempo Source field (BPM:120.0 (SEQ)
in the above example):
This is a choice field with two options:
1. SEQ (sequence): Within each sequence is a unique tempo
setting. If this option is selected, the sequence’s unique
tempo is used in the Active Tempo field. In this case,
whenever the active sequence number is changed, the newly
selected sequence’s tempo immediately appears in the Active
Tempo field. When playing sequences, this is useful if you
want each newly selected sequence to play at its own preset
tempo. The sequence’s tempo is saved to disk when a
sequence is saved.
2. MAS (master): The master tempo is a single tempo setting
that applies to all sequences and songs. When playing
sequences this is useful if you always want each newly
selected sequence to play at the same tempo. This tempo
setting is not saved in the sequence file.
• The Time Signature field (Sig: 4/ 4
in the above example):
This field shows the time signature of the current bar (displayed in the
Now field) of the active sequence. It is for display only and cannot be
changed. For information on how to change the time signature of a bar
or to insert time signature changes, see the “Editing Sequences”
chapter of this manual.
• The Bars field:
This shows the total number of bars in the active sequence. It is for
display only and cannot be changed.
• The Loop field:
This is a choice field with two options:
1. OFF:
If this option is selected, the sequence stops playing when it
reaches its end. However, if in Record mode, recording
continues past the end, adding one measure (with the time
signature of the last bar) onto the end of the sequence as
each new bar is entered, until the sequence is stopped.
2. TO BAR 1:
If this option is selected, when the sequence plays to the end,
it immediately loops back to the bar number displayed to the
right of the word BAR. To set the number of the bar to which
the sequence loops back, move the cursor to the field to the
right of the word BAR and enter the new number.
COMMENT: If the bar to loop to is bar number 1 and the
sequence is in Record mode, the MPC60 will automatically
Page 29
Page 36

Chapter 3: Recording Sequences
The Track Data area (lines 4–6):
• The Active Track field (Trk: 1
This field displays the active track number within the sequence. The
active track is the track that, when Record or Overdub mode is entered,
will be recorded into from the MIDI keyboard or pads. Also, if the Soft
thru field is on (described in the “MIDI Functions” chapter of this manual)
and the pads or MIDI keyboard is played, the played notes will be sent
out over MIDI in real time using the active track’s MIDI channel and port
assignments. Only one track can be active at a time.
• The Track Name field (Trk: 1-(unused)
This field has no on-screen title, but is the 16-character name of the
active track, and is located directly to the right of the active track number.
It is changed in the same manner as the sequence name, detailed
above.
• The Type field:
This is a choice field with two options—MIDI and DRUM:
• The Track On/Off field (On:YES
This choice field turns the output of the active track on (YES) or off (NO).
Pressing SOFT KEY 1 toggles the field’s state between YES and NO.
switch from Record to Overdub mode at the moment the
sequence loops back—this will prevent accidental erasure of
any notes just recorded. In the event that the bar to loop to is
bar number 2 or higher and the sequence is in Record or
Overdub mode the MPC60 will automatically switch to Play
mode at the moment the sequence loops back to the
specified bar.
-(unused) in the example screen):
in the example screen)
1. MIDI: Select this option if you want to record normal non-drum
MIDI data from an external MIDI keyboard into the selected
track. MIDI tracks do not use the internal sound generator or
pads.
2. DRUM: Select this option if you want to record drum data into
the selected track. Drum tracks are the same as MIDI tracks
except for the following:
A. The output of the track plays the internal drum sound
generator.
B. You can record drum notes into the track using the
front panel pads.
C. In sequence editing screens, note events in drum
tracks are visually identified and selected not by note
number only (as are MIDI tracks), but also by the pad
number and sound name currently assigned to the
displayed note number.
D. Drum tracks are not affected by the Transpose
function.
in the example screen):
Page 30
Page 37

Chapter 3: Recording Sequences
• The MIDI Channel/Port fields (Chn:OFF
-(off) in the example screen):
There are actually two fields here, which together are used to determine
which MIDI channel and MIDI output port the active track will output its
data to. The to fields are:
1. The MIDI Channel field (Chn: 1
A-(off)):
This field determines which of the 16 MIDI channels the
active track will play through. If you don’t want the track to
play through any MIDI channels, select 0 and the word OFF
will appear.
2. The MIDI Port field (Chn:
1A-(off)):
This choice field determines which of the four MIDI output
ports (A, B, C, or D) the active track will play through. (On
earlier units, outputs A–D are labeled 1–4 on the back panel.)
If OFF is selected in the MIDI channel field to the left, this
field can’t be seen.
COMMENT: If OFF is displayed in this field (no MIDI output
assignment) and you want to select a MIDI channel or port, first
move the cursor to the letter “O” of OFF and turn the data entry
knob one step to the right.
• The MIDI Channel/Port Name field (Chn:OFF-(off)
in the example
screen):
This is the eight-character name for the currently selected MIDI output
channel/port combination. This would commonly contain the name of the
synthesizer that is being played from the displayed MIDI channel/port
combination. There are 64 names—one for each of the 64 output MIDI
channel/port combinations. The name is changed in exactly the same
way as the sequence name field.
COMMENT: These 64 names are intended to be used to identify
the MIDI devices that are externally connected—not the data
contained in the track. For this reason, they are not saved within
sequence files or ALL files. They are, however, retained in
memory after power is removed and are also saved within
Parameter files.
• The Auxiliary MIDI Channel/Port fields (& OFF
in the example screen):
These two fields have exactly the same function and operation as the
MIDI Channel/Port fields shown to the left. These two fields allow the
active track to play simultaneously through an additional channel/port
combination. If no additional output channel/port is desired, select OFF
here.
• The Velocity% field (Vel%:100
in the example screen):
This is an overall output volume control for the active track. However,
unlike a normal volume control, this function actually scales the velocities
of all notes that play from the track in real time, acting as a real-time
dynamics control. The range is from 0 to 200%. Values from 0 to 99
reduce velocities; values from 101 to 200 increase them. Select 100 for
no effect.
• The Program Number field (Pgm:OFF
):
This field permits a MIDI program number (1–128) to be assigned to the
active track. To select no program assignment for the active track, enter
Page 31
Page 38

Chapter 3: Recording Sequences
a 0 in this field and OFF will be displayed. Whenever a new sequence is
selected, if any of the sequence’s tracks contain program number
assignments, those program numbers will be immediately sent out over
the track’s assigned MIDI channel/port (not the auxiliary MIDI
channel/port) to the external synthesizer, causing it to change to the
assigned program number. This way, all external synthesizers are
immediately changed to the correct program numbers merely by
selecting the sequence. If a track’s Type field is set to DRUM, the
assigned program number will change the internal sound generator’s
active program number.
• The Now field (Now:001.01.00
This field displays the current position within the sequence. The left side
of this field shows the current position in musical terms—as a three-part
number separated by decimal points. The first part is the bar number;
the second is the beat number within the bar (the beat is equal to the
denominator of the time signature); and the third is the tick number
within the beat (there are 96 ticks to a quarter note). Bars and beats start
at 1; ticks start at 0.
To the right of the above-described bar.beat.tick number is another fourpart number, displayed in parentheses. This field shows the current
position of the sequence as a function of elapsed time from the
beginning of the sequence, in hours, minutes, seconds, and frames.
However, the number displayed when the sequence is set to the start is
not necessarily 00:00:00:00, but rather is equal to the SMPTE start time.
SMPTE operation is described in chapter 10, “Syncing to Tape and
Other Devices”.
This field is for display only and cannot be edited directly with the cursor.
It is normally changed by using the REWIND, FAST FORWARD and
LOCATE keys, described in the “Play/Record Keys” section of this
chapter.
The four soft keys are:
COMMENT: It is also possible to record MIDI program change
events at any location within a track, either in real time or in Step
Edit mode. (See the “Step Edit” section in the “Editing
Sequences” chapter of this manual for more details about this.) It
is important to note that if one of these program change events
is inserted mid-sequence and the portion of the sequence
containing the change is played (causing the external
synthesizer to change to the new program), the original program
number (as set up in the Program Number field) will not be resent over MIDI until the sequence is reselected in the Sequence
Number field. Simply restarting the sequence will not
implement
the program change. If the MPC60 did send out all assigned
program numbers whenever PLAY START were pressed, this
problem would be corrected, but there would also be a brief
delay at the start of the sequence because the external
synthesizers must take time to change their program data. If you
do want a program change to be sent out whenever PLAY
START is pressed, it is better to insert a MIDI Program Change
event at the start of the track, using Step Edit.
(00:00:00:00) in the example screen):
Page 32
Page 39

Chapter 3: Recording Sequences
• The <Tk on/off> soft key:
Pressing this soft key toggles the Track On/Off field between YES and
NO.
• The <Solo=OFF>soft key:
Pressing this soft key turns solo mode ON or OFF. If set to ON, only the
active track is heard and all other tracks are temporarily muted. The text
of the soft key indicates whether solo mode is ON or OFF.
• The <Track-> and <Track+> soft keys:
These soft keys decrement or increment the active track number by one.
Page 33
Page 40

Chapter 3: Recording Sequences
The Play/Record Keys
These ten keys operate similarly to the transport keys on a tape
recorder, with some very useful additions:
• The PLAY START key:
This key causes the active sequence to begin playing from the start of
bar 1.
• The PLAY key:
This key causes the sequence to begin playing from the current position
displayed in the Now field in the Play/Record screen.
• The STOP key:
This key causes the sequence to stop playing.
• The OVERDUB key:
This key, when held down while PLAY is pressed, causes Overdub
mode to be entered, in which new notes can be recorded into the active
track without erasing existing notes. While Overdub mode is active, the
light above the OVERDUB key is on.
It is also possible to punch-in to Overdub mode while playing. To do this:
1. The MPC60 must be in Record Ready mode. (The top line of
the Play/Record screen must display the words Play/Record
(Record ready).) If not, simply press and release the
RECORD or OVERDUB key once while the sequence is
stopped.
2.While the sequence is playing, simultaneously press the
OVERDUB and PLAY keys. Overdub mode is now active,
indicated by the light above the OVERDUB key.
To punch-out of Overdub mode, simply press the OVERDUB key once,
and the light above the OVERDUB key will turn off.
COMMENT: If Overdub mode is entered while the sequence is
set to loop to a higher-numbered bar than bar number1, Overdub
mode will automatically be turned off at the moment the
sequence reaches the end and starts to loop.
• The RECORD key:
This key, when held down while PLAY is pressed, causes Record mode
to be entered, in which new notes can be recorded into the active track
while existing notes are erased, just as with a tape recorder. While
Record mode is active, the light above the RECORD key is on.
It is also possible to punch-in to Record mode while playing. To do this:
1. The MPC60 must be in Record Ready mode. (The top line of
the Play/Record screen must display the words Play/Record
Page 34
Page 41

Chapter 3: Recording Sequences
(Record ready).) If not, simply press and release the
RECORD or OVERDUB key once while the sequence is
stopped.
2. While the sequence is playing, simultaneously press the
RECORD and PLAY keys. Record mode is now active, as
indicated by the light above the RECORD key.
To punch-out of Record mode, simply press the RECORD key once, and
the light above the RECORD key will turn off.
COMMENT: If Record mode is entered while the sequence is set
to loop to bar number1 (or a portion of the sequence is looped
with the Edit Loop function), Record mode automatically
switches to Overdub mode at the moment the sequence reaches
the end and starts to loop. This prevents accidental erasure of
any data that were recorded on the previous pass through the
loop. If, however, Record mode is entered while the sequence is
set to loop to a higher-numbered bar than bar 1, Record mode
will automatically be turned off at the moment the sequence
reaches the end and starts to loop.
COMMENT: If an empty sequence is selected (the sequence
name field shows “unused”), and either RECORD or OVERDUB
is pressed, the sequence will instantly be initialized using the
settings in the Initialize Sequence screen. This function is
normally accessed by pressing the ERASE key and selecting
<Initialize> (soft key 2).
• The REWIND [<<] and FAST FORWARD [>>] keys:
Use these two keys to change the current position within the sequence
to either the previous or next bar boundary. The actions of these keys
repeat when they are held.
• The REWIND [<] and FAST FORWARD [>] keys:
Use these two keys to move the current position within the sequence to
either the previous or next note boundary, as determined by the value in
the Note Value field of the Timing Correct screen (normally set to 1/16
NOTE). To change the amount of movement, simply change the setting
in this data field. The actions of these keys repeat when they are held.
While the Step Edit function is active, it is possible to set these keys to
an alternate function—to search to the previous or next event of a
specific type within the track. To learn how to do this, see the “Step Edit
Options” section in the “Editing Sequences” chapter of this manual.
• The LOCATE key:
This key is used to move instantly to a specific position within the active
sequence. When pressed, the following screen is displayed:
Page 35
Page 42

Chapter 3: Recording Sequences
================ Locate ===============A
Hit softkeys or LOCATE to go to markers:
Marker A: 001.01.00
Marker B: 001.01.00
Marker C: 001.01.00
===== Now:001.01.00 (00:00:00:00) ======
<Goto A> <Goto B> <Goto C> <Load'Now'>
There are three sequence position markers, labeled A, B, and C.
Pressing SOFT KEY 1, 2 ,or 3 causes the MPC60 to move immediately
to the location shown in either marker A, B, or C, respectively, and the
Play/Record screen to be redisplayed. Pressing SOFT KEY 4,
<Load'Now'>, causes the contents of the Now field to be loaded into the
marker field that currently contains the cursor. To load any of the three
markers, move the cursor to it and enter the desired bar numbers in the
bar.beat.tick format (separated by decimal points), using the numeric
keypad. If you only want to enter the bar number, type it, followed by
ENTER, and the beat and tick numbers will be reset to 01.00
automatically.
There is a faster way to use locate. While the Locate screen is showing,
press the LOCATE key again, and the MPC60 will immediately move to
the sequence location of the marker (A, B, or C) where the cursor is
currently positioned, exactly as if the SOFT KEY for that marker (SOFT
KEY 1, 2, or 3) had been pressed. Therefore, from the Play/Record
screen, “double-clicking” LOCATE will instantly move to location A, B, or
C, depending on where the cursor was last positioned in the Locate
screen.
Page 36
Page 43

Chapter 3: Recording Sequences
Sequence Recording Example 1: A Looped Drum
Pattern
The MPC60 is both a linear-type sequencer and a pattern-oriented
sequencer. The following examples use short, looped sequences and
are therefore examples of pattern-oriented recording. To record linearly,
simply set the Loop field (in the Play/Record screen) to OFF. Then, the
sequence length will automatically increase as you record past the
existing end. See the description above of the Loop field to learn more
about this.
The following is a step-by-step example of how to record a repeating
two-bar drum sequence:
1. Load some sounds into sound memory by loading a program file from
one of the sound disks included with your MPC60. If you don’t know
how to do this, see the chapter “Saving To and Loading From Disk”.
2. Press MAIN SCREEN to view the Play/Record screen.
3. Move the cursor to the Seq field and select 1 (ENTER) or any other
empty sequence.
4. The upper line of the screen should display:
====== Play/Record (Record ready) =====A
If not, press either the RECORD or OVERDUB keys once. This will
make the current sequence ready for recording.
5. Set the Trk field to 1 and the Type field to DRUM.
6. While holding RECORD, press PLAY START. The RECORD and
PLAY lights should go on, and the metronome should be heard
through the stereo outputs. It will also be heard at the dedicated
metronome output jack on the back panel. The metronome will play
on 1/4-notes, with a louder click at the start of each bar. Also, the
Now display will be changing constantly to reflect the current position
within the sequence. If you want to adjust the tempo, move the cursor
to the Active Tempo field (to the right of the word BPM in the upper
right corner) and enter the desired tempo. (continued...)
7. Start recording your drum pattern by playing the drum pads in time to
the metronome. Since no specific format of time signature or number
of bars has been entered, the sequence format defaults to two bars of
4/4 time signature. When the two-bar pattern loops back to the start,
Record mode switches automatically to Overdub mode to avoid
Page 37
Page 44

Chapter 3: Recording Sequences
erasing your new notes. The notes you played will be heard at the
position they were recorded, except that the Timing Correct function
has automatically moved all of your notes to the nearest 1/16-note.
(This can be defeated, as explained in “The TIMING CORRECT Key”
section, later in this chapter.)
8. Press STOP.
If you don’t think your pattern sounds as good as you intended, you may
need some practice in following the metronome. If you want to erase
what you’ve just recorded and start again, simply repeat steps 6 through
8 above.
To erase a particular drum from your new sequence
1. Press the ERASE key. The following screen will appear:
COMMENT: To initialize a sequence to a different time signature
or number of bars, press ERASE and select <Initialize>.
================= Erase ===============A
Seqnc: 1-SEQ01
Track: 1-TRK01 (0 = all)
Ticks:001.01.00-003.01.00
Erase:ALL EVENTS
Notes:ALL (Hit pads)
========================================
<Do it> <Initialize><Delete><Delete All>
2. To select a particular drum to erase, press the drum pad that was
used to record its notes. Immediately, the Notes field will display the
note number (35–98), pad number, and currently assigned sound for
the selected pad. To erase additional notes, continue pressing pads.
The Notes field will always display the last pad pressed, and the total
number of pads selected is displayed on the right side of the same
line.
3. Press Soft key 1: <Do it>. When you press this soft key, all notes
assigned to the note number(s) you selected will be erased
throughout the track, after which the Play/Record screen will be
displayed.
4. Now, enter Overdub mode by holding OVERDUB and PLAY START
simultaneously and re-record that pad into your track. (Unlike Record
mode, which erases existing notes as you record new notes, Overdub
mode merges the new notes into the existing notes.)
To hear your new drum pattern, press STOP then PLAY START.
Page 38
Page 45

Chapter 3: Recording Sequences
Sequence Recording Example 2: A Multitrack
Sequence
The following is a step-by-step example of recording a multitrack
sequence with a format of 4 bars of 4/4 time, containing the following
tracks:
Track 1: Drums
Track 2: Percussion
Track 3: Bass
Track 4: Piano
First, set up the instruments:
1. Using the connection diagram in the “Hooking Up Your System”
section (in the “Basics” chapter) as a guideline, connect the MIDI Out
connector of a MIDI keyboard to MIDI Input 1 of the MPC60 and
connect MIDI Output A of the MPC60 to a multitimbral synthesizer
that is set to play both bass and piano sounds simultaneously.
(Alternately, you could connect two synthesizers in a daisy chain, with
the MIDI Thru connector of the first synthesizer connecting to the
MIDI input of the second.)
2. Set up the synthesizer(s) so that a bass sound plays from MIDI
channel 1A and a piano sound plays from MIDI channel 2A. If you are
using a single integrated keyboard, set Local Control on your
keyboard to OFF during this tutorial.
3. If no sounds are loaded into sound memory, load a program file from
disk now. If you don’t know how to do this, see the chapter “Saving To
and Loading From Disk”.
4. The Play/Record screen should be showing. If not, press MAIN
SCREEN.
5. The upper line of the screen should display Play/Record (Record
ready). If not, press either the RECORD or OVERDUB key once. This
will make the current sequence ready for recording.
Next, initialize the sequence to 4 bars of 4/4 time:
1. Move the cursor to the Seq field and select 2 (ENTER) or any other
sequence that is currently empty.
2. Press the ERASE key, then select SOFT KEY 2 (<Initialize>). The
following screen will appear:
Page 39
Page 46

Chapter 3: Recording Sequences
========== Initialize Sequence ========A
Select sequence: 2-(unused)
===== General ===== ==== Track: 1 ====
Bars: 2 Sig: 4/ 4 Status:UNUSED
BPM:120.0 (SEQ) Type:DRUM Pgm:OFF
Loop:TO BAR 1 Chn:OFF & OFF
========================================
<Do it> <Track-> <Track+>
4. Enter 4 in the Bars field then press <Do it>. The Play/Record screen
will reappear, showing that the sequence has been initialized to 4
bars of 4/4.
Now, record the drums on track 1:
1. Move the cursor to the Trk field and select 1 (Enter) to make track
number 1 active.
2. Set the Type field to DRUM.
3. While holding RECORD, press PLAY START. The RECORD and
PLAY keys’ lights should go on, and the metronome should be heard
through the stereo outputs. The metronome will play on 1/4-notes,
with a louder sound at the start of each bar. Also, the Now field will be
changing constantly to reflect the current sequence position.
4. Record the bass drum and snare drum parts by playing the pads
labeled with those names. Notice that when the sequence loops back
to bar 1, Record mode automatically changes to Overdub mode so
that the new part won’t get erased. Notice also that every time the
four-bar pattern loops back to the start, any drums recorded on the
last pass will be heard at the position they were recorded, except that
your notes will have been moved to the nearest value specified in the
Timing Correct screen (in this case, 1/16-note).
5. Without stopping the sequence, record a 1/16-note hi-hat part by
simultaneously holding the TIMING CORRECT key and the HIHAT
pad, varying the pressure on the pad as the sequence plays. After
four bars, release both the key and the pad. Notice that hi-hats have
now been recorded on all 1/16-notes. This feature is called note
COMMENT: Whenever you select an empty sequence followed
by pressing either RECORD or OVERDUB, the sequence will be
initialized using the settings in this screen. Now that you have
changed these settings to 4 bars of 4/4, looped, whenever you
now select an empty sequence in the Play/Record screen and
press either RECORD or OVERDUB, the sequence will be
initialized instantly to 4 bars of 4/4, looped, instead of the factory
default of 2 bars of 4/4, looped. These settings, as well as the
contents of many other data fields in the MPC60, are
remembered when the power is turned off, so this new default
will remain in effect until changed.
Page 40
Page 47

Chapter 3: Recording Sequences
repeat and is described further in the “Timing Correct” section, later in
this chapter. If at any time you want to erase what you’ve recorded
and start over, go back to step 3.
5. If you accidentally played one or two wrong notes, you can erase them
without affecting any other notes by following these steps:
A) While still in Overdub mode, hold down the ERASE key.
B) Just before the wrong notes are about to play, hold that
drum’s pad down, then quickly release it as soon as the
wrong notes have passed.
C) Release the ERASE key. The wrong notes have now been
permanently erased from the sequence.
6. Press STOP.
Next, overdub the percussion part on track 2:
1. With the Play/Record screen showing, move the cursor to the Trk field
and select 2.
2. Set the Type field to DRUM.
3. Enter Record mode again by holding RECORD and pressing PLAY
START. You will hear the drum part you just recorded on track 1.
Don’t worry about erasing it: since track 2 is now the active track, all
recording and erasing occurs only on track 2.
4. Record the percussion part by playing pads assigned to percussion
instruments. (Try Pad Bank B.) Keep adding drums until your
percussion part is complete.
5. If any mistakes were made, use either of the two erase methods
described above.
Next, overdub the bass part on track 3:
1. With the Play/Record screen showing, move the cursor to the Trk field
and select 3 to make track 3 active.
2. Set the Type field to MIDI, indicating that this track will not play the
internal drum sounds.
3. Set the Chn field to 1A, indicating that track 3 will play through MIDI
channel 1 and MIDI output port A. The Chn field is actually two
fields—move the cursor to the position indicated by the underline
below and select 1:
Chn:O
FF becomes—> Chn: 1A
4. If you play the MIDI keyboard now, the synthesizer that is set to
receive on MIDI channel 1 should play a bass sound. If not, check the
previous steps and your MIDI hookup.
Page 41
Page 48

Chapter 3: Recording Sequences
5. Press the COUNT IN key—the light will go on. This will cause the
metronome to play one bar before the sequence plays to cue you to
start playing. By default, the count in will only play before you start
recording or overdubbing but not before playing. This can be changed
by pressing the OTHER key and changing the setting of the Count in
field in the screen that appears.
6. Enter RECORD MODE by holding RECORD and pressing PLAY
START.
7. Once the COUNT IN bar has passed, record your bass part in time to
the drums and percussion parts.
8. Press the COUNT IN key again to turn it off.
9. If you make a mistake while recording, you can correct it by punching
in the new note:
Now, overdub the piano part on track 4:
1. Move the cursor to the Trk field and select 4 to make track 4 active.
2. Set the Type field to MIDI, so that this track will not play the internal
drum sounds.
3. Set the Chn field to 2A, indicating that track 4 will play through MIDI
channel 2 and MIDI output port A.
4. If you play the MIDI keyboard now, the synthesizer that is set to
receive on MIDI channel 2 and port A should play a piano sound.
5. Enter Record mode by holding RECORD and pressing PLAY START.
6. Record your piano part in time to the drum, percussion and bass.
7. Press STOP.
A) Press the REWIND keys [<] or [<<] until the Now field shows
a location about one bar before the mistake.
B) Press PLAY (not PLAY START). The sequence will start
playing from the position shown in the Now field.
C) Just before the wrong note plays, press RECORD and PLAY
simultaneously to enter Record mode (in which existing notes
are erased while new notes are recorded) then play the
correct note. You can now either punch out by pressing
RECORD again or continue recording from that point. Don’t
worry: when the sequence loops back to bar 1, it will
automatically switch from Record to Overdub mode so that
those notes in the earlier part of the sequence won’t be
erased.
Page 42
Page 49

Chapter 3: Recording Sequences
The TIMING CORRECT Key: Correcting Timing
Errors, Swing Timing
The MPC60 corrects timing errors made as you are recording by moving
notes to the nearest perfect timing location. For example, if the timing
correct function is set to 1/16-notes, then all notes are moved to the
nearest perfect 1/16-note. The result is that all recorded notes play back
as perfectly even 1/16-notes. It is also possible to correct the timing of
notes after they have been recorded.
To inspect or change the timing correction settings, press TIMING
CORRECT while the MPC60 is not playing. The following screen will
appear:
====== Timing Correct / Step Size =====A
Note value:1/16 NOTE Swing%:50
Shift timing:LATER Shift amount: 0
========= Move Existing Notes ==========
Track: 1-(unused)
Ticks:001.01.00-001.01.00
Notes:ALL (Hit pads)
<Move existing>
This screen presents various parameters relevant to the timing correct
function. A description of each of the fields follows:
• The Note value field:
Timing correction works by moving your recorded notes to a preset note
timing value. This field is used to select that note value. The options are:
1.1/8 NOTE: All notes are moved to the nearest 1/8-note
2.1/8 TRPLT: All notes are moved to the nearest 1/8-note triplet
3.1/16 NOTE: All notes are moved to the nearest 1/16-note
4.1/16 TRPLT: All notes are moved to the nearest 1/16-note
triplet
5.1/32 NOTE: All notes are moved to the nearest 1/32-note
6. 1/32 TRPLT: All notes are moved to the nearest 1/32-note
triplet
7. OFF(1/384): No timing correction—in this setting, the highest
resolution of the MPC60 is used—96 divisions per 1/4-note.
This value also affects two other functions in the MPC60:
1. It sets the Note Repeat timing value, described later in this
chapter.
2. It sets the amount by which the current sequence position will
change when either the REWIND [<] or FAST FORWARD [>]
key is pressed.
Page 43
Page 50

Chapter 3: Recording Sequences
• The Swing% field:
This field only appears if the Note Value field is set to either 1/16- or 1/8notes. The swing feature is a variation of timing correction. Whereas
normal timing correction moves your notes to perfect 1/16- or 1/8-note
intervals, the swing feature moves your notes to swing-timing intervals.
The amount of swing is measured as a percentage of time given to the
first note in each pair of 1/16- or 1/8-notes. The range of values is from
50% to 75%. For example:
A very important use of the swing feature is to add a human rhythm feel
to the timing of your music. Here are a couple of useful settings to
experiment with:
As with timing correction, swing moves your notes in real time as they
are recorded into the sequence, so your notes are instantly played back
with the specified shift. Also, as with timing correction, this effect can be
used on existing sequence data by using SOFT KEY 1 (<Move
existing>).
• The Shift timing and Shift amount fields:
These two fields work in conjunction with the Note value and Swing%
fields to move your notes to shifted timing locations. The Shift timing field
sets the direction of shift (EARLIER or LATER) and the Shift amount field
sets the amount of timing shift in ticks (1/96 of a 1/4-note). For example,
in order to compensate for the slow attack time of a particular
synthesizer, you might set these two fields to EARLY, 1 tick. This would
cause all new notes to be recorded onto 1/16-notes but at 1 tick earlier
than normal.
• A swing setting of 50% gives perfectly even timing with no
swing effect; the first and second notes of each pair of 1/16- or
1/8-notes have equal (50%) timing.
• A swing setting of 66% indicates a technically perfect swing;
the first note of each pair of 1/8 or 1/16 notes has a timing value
of twice that of the second note, giving the effect of 1/16- or 1/8note triplets where the middle note of each triplet is silent.
• A swing setting of 75% is the highest swing setting; the first
note of each pair of 1/8 or 1/16 notes has a timing value of three
times that of the second note. This creates a very exaggerated
swing timing.
• Note Value = 1/16, Swing = 54%, Tempo = 100 BPM:
While not enough swing for a true swing feel, this small amount
of swing timing removes the stiffness from perfect 1/16-note
timing and is especially useful on drum sequences using 1/16note hi-hats.
• Note Value = 1/16, Swing = 62%, Tempo = 100 BPM:
This creates an 1/16-note swing feel that could be described as
more relaxed than a perfect triplet swing (66%).
COMMENT: It is not possible for this function to shift the timing
of notes without also correcting their timing. This also means that
the range of shift depends on the current Note value field’s
setting. For example, if the Note value field is set to 1/16-notes,
the maximum shift amount is 11 ticks, or slightly less than 1/2 of
one 1/16-note; if the Note value field is set to 1/32 notes, the
Page 44
Page 51

maximum shift amount is 5 ticks, or slightly less than 1/2 of one
1/32 note; and if the Note Value field is set to OFF(1/384), the
Shift amount is fixed at 0, meaning that no shift is possible since
timing correction is not being used. If you wish to shift the timing
of a track independently of the timing correction function, use the
Shift Timing function, accessed by pressing the EDIT key.
COMMENT: If the Shift Timing function is set to shift notes early
and one or more notes exist at the start of the sequence, those
starting notes will be deleted when the <Move Existing>
operation is performed, because there is no space before the
start of the sequence for them to be moved to. To avoid this
problem, insert a blank bar before bar 1 of the sequence before
performing the shift operation, then be sure to include this extra
bar within the range of bars to be shifted. This way, the notes
that would have been lost will now be moved onto this newly
inserted bar.
• The Ticks fields:
These two fields are used to specify the region of the sequence that will
be altered when the <Move Existing> soft key is pressed. These are
bar.beat.tick fields—the region starts at the location entered in the
leftmost field and ends one tick before
rightmost field.
• The Track field:
This field is only used in conjunction with the <Move Existing> soft key. It
is used to specify the track number that is to be altered. Entering a 0
indicates all tracks will be altered.
• The <Move Existing> soft key:
Normally, the timing correct function operates in real time, correcting
notes before they are recorded into the sequence. It is also possible to
correct the timing (or add swing or shift the timing) of an existing
sequence. Pressing this soft key will cause the region of the active
sequence specified by the Ticks and Track fields to be corrected
according to the settings of the Note value, Swing%, Shift timing and
Shift amount fields.
The Note Repeat Feature
Another very useful feature of the TIMING CORRECT key is the ability to
automatically repeat either drum or keyboard notes at a preset timing
interval. This is useful in creating:
• Drum rolls
• Repeating-note drum patterns, such as 1/16-note hi-hat patterns
• Repeating keyboard notes, such as a repeated 1/16-note bass part
The Note Repeat feature is used in real time while recording or playing.
To use this feature, press and hold TIMING CORRECT while in Play,
Chapter 3: Recording Sequences
the location entered in the
Page 45
Page 52

Chapter 3: Recording Sequences
Overdub, or Record mode. The top line of the Play/Record screen will
change to:
==== (Hold pads or keys to repeat) =====
If any drum pads (when the active track is a drum track) or keys (when
the active track is a MIDI track) are held while TIMING CORRECT is
being held, they will automatically be repeated at the timing interval
selected in the Note value field of the Timing Correct screen.
Furthermore, the velocity level of each repeating note is set by the
current pressure applied to the drum pad or key being played (if your
MIDI keyboard has channel pressure capability). To demonstrate this
effect:
1. Set up a sequence for recording, select a drum track to record, and
initiate recording.
2. While holding TIMING CORRECT, also hold the drum pad assigned to
the hi-hat, varying the pressure as you hold it. You should hear
repeating 1/16-note hi-hats.
3. Press STOP to stop playing.
4. Press TIMING CORRECT and select 1/32 TRPLT in the Note field.
5. Press MAIN SCREEN to return to the Play/Record screen.
6. Enter Overdub mode.
7. While holding TIMING CORRECT, also hold the pad assigned to
snare drum, varying the pressure as you hold it. You should hear a
snare drum roll with varying dynamics.
This same procedure can be used in exactly the same way when
recording keyboard sequences. In this case, hold TIMING CORRECT
while holding one or more keys on the MIDI keyboard. In order to use the
varying pressure technique, you will need to use a keyboard that sends
channel pressure messages.
Page 46
Page 53

Chapter 3: Recording Sequences
Tempo and the TEMPO/SYNC Key
Many of the functions in the MPC60 are associated with controlling the
playing tempo. First, there is the Tempo field in the Play/Record screen
(shown below in bold):
============== Play/Record ============A
Seq: 1-(unused) BPM:120.0 (SEQ)
Sig: 4/ 4 Bars: 0 Loop:TO BAR 1
============== Track Data ==============
Trk: 1-(unused) Type:DRUM On:YES
Chn:OFF-(off) & OFF Vel%:100 Pgm:OFF
===== Now:001.01.00 (00:00:00:00) ======
<Tk on/off> <Solo=OFF> <Track-> <Track+>
To change the tempo at any time while playing or recording sequences,
move the cursor to the Tempo field and change it with the data knob or
the numeric keypad.
The Tempo screen
To display the Tempo screen, press the TEMPO/SYNC key:
================ Tempo ================A
Tempo:120.0 Tempo source:SEQUENCE
============= Display mode =============
BPM/FPB:BPM Frames:30
============== Tap Tempo ===============
Tap averaging:3
========================================
<Sync> <TempoChanges>
This screen presents most of the parameters that are associated with
tempo. A detailed description of the individual screen fields and soft keys
follows:
• The Tempo field:
This is the active playing tempo. It is either the sequence’s assigned
tempo or the master tempo, depending on the setting of the Tempo
source field. This has the same function as the Active Tempo field in the
Play/Record screen except that this field doesn’t display tempo changes.
• The Tempo source field:
This field has the same function as the Tempo Source field in the
Play/Record screen: It determines whether the sequence’s tempo or the
master tempo is currently active. It is a choice field with two options:
Page 47
Page 54

Chapter 3: Recording Sequences
• Tempo Display Mode field (BPM/FPB:BPM
This field has the same function as the Tempo Display Mode field in the
Play/Record screen: it determines whether the active tempo is displayed
as Beats Per Minute or Frames Per Beat. It is a choice field with two
options:
• The Frames field:
This field selects one of four Frames Per Second standards, used to
calculate the current FPB (frames per beat) setting. It also sets the frame
rate (and therefore affects the tempo) for received SMPTE sync or MIDI
Time Code. The four options are:
1. SEQUENCE: Within each sequence is a unique tempo
setting. If this option is selected, this unique sequence tempo
is used. In this case, whenever the active sequence number
is changed, the newly selected sequence’s tempo
immediately becomes active. When playing sequences, this
is useful if you want each newly selected sequence to play at
its own preset tempo. Only the sequence’s tempo is saved to
disk when a sequence is saved.
2. MASTER: The master tempo is a single tempo setting that
applies to all sequences and songs. When playing sequences
this is useful if you want each newly selected sequence to
always play at the same tempo.
):
1. BPM: The tempo is displayed in Beats Per Minute, with the
digit to the right of the decimal point indicating tenths of a
beat. This is the most common format used to specify a
tempo setting. In this mode, the range of tempo settings in the
MPC60 is from 30 BPM to 300 BPM. Beats Per Minute is also
sometimes referred to as metronome marking, or MM.
2. FPB: This is another way of specifying tempo settings and is
often used in the making of music for film or video
soundtracks, because the tempo is referenced to the number
of film or video frames that pass for every beat of music.
Frames Per Beat is also sometimes referred to as click. If the
FPB setting is in use, the digit to the right of the decimal point
in any of the numeric tempo settings indicates eighths (1/8 of
a frame). The range is from 0 to 7. There are four different
types of FPB tempo, described in the Frames field below.
30 (30 frames per second, non-drop):
This is the most common frame rate for music production in the
United States. It was also the standard for black and white
television in the U.S. Using this mode, the tempo range of the
MPC60 is from 60.0 to 6.0 FPB.
Page 48
Page 55

Chapter 3: Recording Sequences
29.97 DROP (29.97 frames per second, drop frame):
This is the standard for NTSC color television in the United
States. Using this mode, the tempo range of the MPC60 is from
59.7 to 6.0 FPB.
COMMENT: In the MPC60 version 2 software, this
selection was erroneously called 30DROP, although it
was actually 29.97 frames per second drop frame time
code. Sorry.
25 (25 frames per second):
This is the standard for European television (PAL /SECAM
standard). Using this mode, the tempo range of the MPC60 is
from 50.0 to 5.0 FPB.
24 (24 frames per second):
This is the standard for film. However, since film is usually
transferred to video for scoring, the composer still works with the
video standard frame rates. Using this mode, the tempo range of
the MPC60 is from 48.0 to 5.0 FPB.
• The Tap averaging field
This parameter is used in conjunction with the TAP TEMPO key. The
TAP TEMPO key is used for quick setting of the playing tempo by
repeatedly tapping 1/4-notes on the key at the desired tempo. (This is
described further in the section “The Tap Tempo key.”) Repeated taps
are averaged to help reduce timing errors; this field sets the number of
taps that must be played successively before the tempo is recalculated.
The options are:
2 taps:
This should be used only if your timing is very good, or if you
want to set the new tempo roughly.
3 taps:
This is a good average setting.
4 taps:
This is useful if your timing is not very accurate, because it
smoothes out your timing errors.
• The <Sync> soft key :
This screen is described in the chapter entitled “Syncing to Tape and
Other Devices.”
• The <TempoChanges> soft key:
The function of this soft key is described in the following section.
Page 49
Page 56

Chapter 3: Recording Sequences
Mid-Sequence Tempo Changes
This feature allows the tempo to change automatically at preset locations
within a sequence. To insert tempo changes into the active sequence or
to view existing tempo changes, press the TEMPO/SYNC key, then
press the <TempoChanges> soft key. The following screen will appear:
====== Mid Sequence Tempo Changes =====A
Tempo changes:ON
Location for inserted change:001.01.00
Change#: Bar#: %Change: Tempo:
2 002.03.00 150.00 180.0 BPM
========================================
<Insert new> <Delete> <Previous> <Next>
In the center of the screen is a group of fields, labeled Change#, Bar#,
%Change and Tempo. In this case, the labels are located directly above
the actual data fields. These four fields work together to allow you to
view or edit any tempo changes that exist in the sequence.
There can be many tempo changes in the sequence. These four fields
show one of these changes at a time. The Change# field shows the
number of the currently displayed tempo change within the list of
changes; the other fields show the contents of that tempo change. For
example, the above screen example shows that tempo change number 2
will occur at bar 2, beat 3, and will change the tempo by 150% to 180
beats per minute.
The following is a description of each of these four fields:
• The Change# field:
This field displays the number of the tempo change currently
displayed. There can be many tempo changes within the
sequence, but only one can be viewed at a time. By changing
this number, each of the existing tempo changes can be viewed.
The <Previous> and <Next> soft keys can also be used to
decrement or increment this field.
• The Bar# field:
This field shows the location within the sequence where the
currently displayed tempo change will occur. This is a
bar.beat.tick field.
• The %Change field:
This field shows, as a percentage of the main starting tempo
(either MASTER or SEQUENCE), the amount of tempo change
that the currently displayed tempo will produce. Tempo changes
are always specified as a percentage of the main starting tempo
setting (not the previous tempo change), regardless of whether
the SEQUENCE or MASTER tempo setting is currently active.
This way, all tempo changes are automatically re-scaled when
Page 50
Page 57

To view the entire list of tempo changes, simply modify the Change# field
and notice the different settings of the other three fields as you change it.
Even if no changes have been entered, every sequence has one
change—to 100% at bar 1. This is because the current tempo setting is
always returned to when the sequence plays bar 1, whether it does so by
playing from the start or by looping back to the start.
To insert a new tempo change, enter the location within the sequence
where you want the change to occur into the Location for inserted
change field, which is a bar.beat.tick field. Then press the <Insert New>
soft key. Immediately, a new tempo change will be inserted into the list,
displayed on the screen with a default value in the %Change field of
100%. You must now enter a percentage of the main starting tempo. As
you enter the percentage, the Tempo field will show the actual tempo.
For example, to insert a tempo change to 60 BPM at bar 5 from a main
starting tempo of 120 BPM, you must insert a tempo change with a value
of 50% at bar 5 (120 BPM X 50% = 60 BPM).
To delete the currently displayed tempo change, press the <Delete> soft
key.
The field at the top of the screen, Tempo changes, is a choice field with
two options: ON and OFF. If set to ON, tempo changes are used; if set to
OFF, all tempo changes within the sequence are ignored.
The TAP TEMPO Key
The TAP TEMPO key allows the tempo to be set quickly by tapping two
beats (1/4-notes) on the TAP TEMPO key. After two taps, the MPC60
automatically assumes the two taps to be 1/4-notes and recalculates a
new tempo to match those 1/4-notes.
For example, to change to a tempo of 80 BPM quickly, tap two 1/4-notes
at a tempo of approximately 80 BPM on the TAP TEMPO key. After the
second tap, the new tempo will appear in the Active Tempo field of the
Play/Record screen. This can also be done while the sequence is
playing.
Normally, only two taps are required before the MPC60 recalculates the
new tempo. However, it is possible to set this feature so that it
recalculates the tempo by averaging the last three (or four) successive
Chapter 3: Recording Sequences
the main tempo setting (either SEQUENCE or MASTER) is
changed.
• The Tempo field:
This field displays the new tempo at which the sequence will play
once the tempo change is active. This number is automatically
computed from the displayed percentage of change multiplied by
the main playing tempo (either MASTER or SEQUENCE).
Page 51
Page 58

Chapter 3: Recording Sequences
tap intervals. This is set in the Tap averaging field, located in the Tempo
screen. More information about using the TAP TEMPO key is contained
in the “Tempo and the TEMPO/SYNC Key” section of the manual, earlier
in this chapter.
Page 52
Page 59

Chapter 3: Recording Sequences
The WAIT FOR KEY and COUNT IN Keys
These two keys make the process of real-time sequence recording
easier.
The WAIT FOR KEY key
This function is useful in the recording of keyboard sequences when your
keyboard is not located close to the MPC60. If Play, Record or Overdub
mode is entered while the Wait For Key function is on, the sequence will
not begin to play until a key is played on the MIDI keyboard. This acts as
a remote switch to start the sequence playing. Note that the first key that
is played to start the sequence is NOT recorded into the sequence—it
only starts the sequence. All keys played after recording has been
initiated are recorded into the sequence.
To turn Wait For Key mode on, press the WAIT FOR KEY key once; the
light goes on to indicate it has been activated. To turn the mode off,
press the WAIT FOR KEY key again and the light will go off. If set to ON,
it will automatically go OFF after it has been used once (for playback,
recording, or overdubbing a sequence). You must turn it on again each
time you want to use it.
The COUNT IN key
If the Count In function is on, one bar of metronome clicks will precede
the playing of the sequence or song whenever you initiate playback of a
sequence or song. The clicks provide a tempo guide to prepare you to
record or play along with the sequence.
Press COUNT IN to turn the function on and again to turn it off. While on,
the light above the key is lit.
It is possible to select a mode in which the count in only occurs before
recording and not before playing. To select this mode and to adjust other
metronome parameters, press the OTHER key. These features are
explained in the “OTHER Key” section, later in this chapter.
COMMENT: While the Count In bar is playing, keys played on
the MIDI keyboard will not be output through MIDI (via the
MPC60 ‘s Soft Thru function) until the Count In bar has finished.
For example, if you were to play a chord during the count in bar,
the chord would not sound until bar 1 started playing. This is
normal operation and serves as a reminder that no notes can be
recorded during the count in bar, and that any notes played
during that time will be held and recorded at the start of the
sequence.
Page 53
Page 60

Chapter 3: Recording Sequences
The AUTO PUNCH Key
The Auto Punch function allows Overdub or Record modes to be entered
and exited automatically at preset times while playing. This can be very
useful when you want to execute a very tight punch-in and there isn’t
enough time to get from the console keys to the MIDI keyboard to play
the new notes after the punch-in. The Auto Punch function punches in
for you, allowing you to concentrate on playing the new part.
Press AUTO PUNCH to display the following screen:
============== Auto Punch =============A
Mode:IN+OUT
Auto punch: In=001.01.000 Out=003.01.000
Last punch: In=001.01.000 Out=003.01.000
========================================
<Turn on ><Use 'Last'>
The fields and soft keys are:
• The Mode field:
This field is used to select one of three Auto Punch modes:
1. IN+OUT:
Both the punch-in and the punch-out is automated.
2. PUNCH IN ONLY:
Only the punch-in is automated. Once Record or Overdub
mode is automatically entered by the Auto Punch function, it
will not punch out—you must manually exit Record or
Overdub mode.
3. PUNCH OUT ONLY:
Only the punch-out is automated. You must enter Record or
Overdub mode manually, after which Auto Punch will
automatically exit Record or Overdub mode at the preset
punch-out time.
• The Auto Punch In= and Out= fields:
These two fields are used to specify the locations within the sequence at
which the punch-in and punch-out will occur. To enter a number into
either of these two fields, type the bar number, a decimal point, the beat
number, a decimal point, and the tick number, followed by ENTER. If the
number you wish to enter is at the start of a bar, simply enter the bar
number followed by ENTER, and the beat and tick numbers will
automatically be reset.
Page 54
Page 61

Chapter 3: Recording Sequences
• The Last Punch In= and Out= fields:
These two fields are indicators only—they cannot be manually changed.
They are used to indicate the exact locations of the punch-in and punchout that was last performed manually .
• The <Turn on > soft key:
Pressing this turns on the Auto Punch function, as indicated by the
status light above the key. If Auto Punch is already on, the soft key text
shows <Turn off> and pressing it turns both Auto Punch and the light off.
• The <Use 'Last'> soft key:
Pressing this soft key causes the contents of the Last Punch In= and
Out= fields to be copied into the Auto Punch In= and Out= fields. This is
useful when you want Auto Punch to repeat the last manual punch
automatically.
To perform the AUTO PUNCH:
Once you have entered the punch-in and punch-out locations and you
have turned Auto Punch mode on by pressing SOFT KEY 1, locate to a
position within the sequence that is a few bars before the punch-in point.
Then enter Record mode as usual by pressing PLAY and RECORD
simultaneously. Since the Auto Punch function is on, however, Record
mode is not yet entered. Instead, the RECORD light blinks until the
punch-in point is reached. When it is reached, Record mode is
automatically entered and the RECORD light stops blinking and stays on
continuously. When the punch-out point is reached, Record mode is
automatically exited and the RECORD light goes off, but play continues.
It is also possible to use Auto Punch to enter and exit Overdub mode
automatically. To do this, follow the example given above, but instead of
pressing RECORD, press OVERDUB. The mode that is entered is
determined by which key is pressed, RECORD or OVERDUB.
Page 55
Page 62

Chapter 3: Recording Sequences
The 2nd SEQ Key
This function allows the MPC60 to play two sequences simultaneously.
For example, you could use the active sequence to record all of your
keyboard tracks linearly while simultaneously using the Second
Sequence to play a looped drum sequence. The Second Sequence can
also play simultaneously with the active song, if song mode is active.
To use this feature, press the 2nd SEQ key, and the following screen will
appear:
============= 2nd Sequence ============A
On/Off:ON Sequence:23-A_funny_sequence
(This sequence will play simultaneously
with the active sequence or song.)
========================================
To turn the Second Sequence on, first enter the number of the sequence
that you would like to play simultaneously with the active sequence in the
Sequence field. The name of the selected sequence is displayed to the
right of the number for convenience. Next, move the cursor to the On/Off
field and select ON. The light above the key will turn on as an indicator.
Now, when you play the active sequence or song, the sequence you
selected in the Second Sequence screen will also play. To turn the
feature off, return to the Second Sequence screen and select OFF in the
On/Off field.
Page 56
Page 63

Chapter 3: Recording Sequences
The OTHER Key
The OTHER key gives you access to a number of additional features,
many of which are related to sequence recording:
• Metronome controls: Provides adjustments for the recording
metronome and Count In function.
• Foot Switches: Allows the two foot switch inputs to be assigned.
• Free sequence memory display: Shows the current percentage of
sequence memory available for recording.
• Initialize system parameters: Provides access to the Initialize PAR File
Data screen, which allows the initialization of all general parameters in
the MPC60. This function is further described in the “Initializing System
Parameters” section later in this chapter.
• Record 16 channels simultaneously: Provides access to the Record 16
Channels function, which allows all 16 incoming MIDI channels to be
recorded simultaneously, which is useful when transferring sequences
from another sequencer to the MPC60. This function is detailed in the
“Record 16 Channels Function: Multichannel Recording” section later in
this chapter.
Metronome, Foot Switches, and Free Sequence Memory
When the OTHER key is pressed, the following screen appears:
============== Metronome ==============A
Volume:14 In play:YES
Count in:REC ONLY Rate:1/4 NOTE
====== Foot switches / Free Memory =====
Foot1:PLAY-STRT/STP Foot2:RECORD IN/OUT
Free seq mem:100%
========================================
<Init PAR><Rec 16 Chs><Version>
The fields and soft keys are:
The Metronome section:
• The Volume field:
This field controls the volume of the metronome in the stereo mix, from 0
to 14.
• The In play field:
This is a choice field that has two options:
Page 57
Page 64

Chapter 3: Recording Sequences
• The Count in field:
This is a choice field with two options:
• The Rate field:
This choice field controls the note value of the metronome. Normally, the
metronome plays 1/4-notes. In this field it is possible to change that
value to one of eight options:
1/4 NOTE
1/4 TRPLT
1/8 NOTE
1/8 TRPLT
1/16 NOTE
1/16 TRPLT
1/32 NOTE
1/32 TRPLT
The Foot switches /Free Memory section:
• The Foot1 and Foot2 fields:
These two fields determine the function of foot switches connected to the
rear panel FOOT SW 1 and 2 inputs. These are choice fields, each of
which can be set independently to one of the following options:
1. NO: The metronome is heard during Record or Overdub
modes, but not while in Play mode.
2. YES: The metronome is heard in Play, as well as in Record
and Overdub modes.
1. REC+PLAY: If the Count In light is on, the count in will be
heard before recording, overdubbing, or playing.
2. REC ONLY: If the Count In light is on, the count in will only be
heard before recording.
PLAY/STOP:
Press the foot switch once for PLAY, press again for STOP.
PLAY-STRT/STP (Play start /stop):
Press once for PLAY START, press again for STOP.
ERASE:
Press to duplicate the function of pressing ERASE. This is very
useful for hands-free use of the real-time erase function.
TIMING CORECT (Timing correct):
Press to duplicate the function of pressing the TIMING
CORRECT key. This is very useful for hands-free use of the
Note Repeat function.
'+':
Press to duplicate the function of turning the data entry knob one
step to the right.
Page 58
Page 65

Chapter 3: Recording Sequences
'-':
Press to duplicate the function of turning the data entry knob one
step to the left.
RECORD IN/OUT:
Press once to duplicate the function of punching in to Record
mode while playing; press again to duplicate the function of
punching out of Record mode and back into Play mode.
OVRDUB IN/OUT (Overdub in/out):
Press once to duplicate the function of punching in to Overdub
mode while playing; press again to duplicate the function of
punching out of Overdub mode and back into Play mode.
'<':
Press to duplicate the function of pressing the REWIND [<] key.
This is very useful for stepping backward through the sequence
while Step Edit is on.
'>':
Press to duplicate the function of pressing the FAST FORWARD
[>] key. This is very useful for stepping forward through the
sequence while Step Edit is on.
TAP TEMPO:
Press to duplicate the function of pressing the TAP TEMPO key.
• The Free seq mem field:
This field shows the total amount of sequence memory currently
available for recording. It is for display only and cannot be edited.
The soft keys:
• The <Init PAR> soft key:
Pressing this soft key presents a screen used for initializing all general
system parameters, which are stored in PAR files. This function is
described in the following section of this chapter.
• The <Rec 16 Chs> soft key:
Pressing this soft key presents a screen used for setting up multichannel
recording. This is described in the section “The Record 16 Channels
Function: Multichannel Recording,” later in this chapter.
• The <Version> soft key:
Pressing this soft key presents the same screen as is shown when
power is turned on, showing the software operating system version
number and date.
Page 59
Page 66

Chapter 3: Recording Sequences
Initializing System Parameters
There are a number of parameters in the MPC60 that are not saved in
SEQ, ALL, SND, PGM, or APS disk files. These settings, called system
parameters, are retained in a special memory that doesn’t lose its
contents when the power is turned off. These settings include:
• Names for all 64 MIDI channels
• Master tempo
• BPM/FPB select and frames per second select
• MIDI Input Filter settings
• Default settings for initializing sequences
. . .and many more (see the Appendix for a complete list).
To initialize these system parameters to their factory preset state, press
the OTHER key, then select the <Init PAR> soft key. The following
screen will appear:
==== Initialize Parameter File Data ===A
Initialize:ALL PAR FILE DATA
========================================
<Do it>
The fields and soft keys are:
• The Initialize field:
This choice field is used to select whether all or only some of the system
parameters will be initialized. The options are:
ALL PAR FILE DATA
PAD TO NOTE ASSIGNMENTS
MIDI INPUT FILTER
MIDI CHANNEL NAMES
MISC. SINGLE DATA FIELDS
• The <Do it> soft key:
Pressing this soft key initializes the selected data.
The Record 16 Channels Function: Multichannel Recording
In its normal operating mode the MPC60 can only record one track at a
time. There is, however, a special mode of recording that allows you to
record on all 16 MIDI channels at once. This is very useful when
transferring sequences to the MPC60 from other sequencers. This
feature works by recording the 16 incoming MIDI channels into the first
Page 60
Page 67

Chapter 3: Recording Sequences
16 tracks of a newly-created empty sequence, with each track assigned
to the like-numbered MIDI channel. That is, track 1 records MIDI channel
1, track 2 records MIDI channel 2, and so on up to track 16, which
records MIDI channel 16. Track assignments are made automatically.
To use the Record 16 Channels function to transfer a sequence from an
external sequencer to the MPC60, you must first synchronize the MPC60
to the other sequencer using MIDI Clock. To do this:
1. Set the sending sequencer to generate MIDI clock and song position
pointer data.
2. Set the MPC60 to synchronize to incoming MIDI clock and song
position pointer data. (See the “MIDI Functions” chapter of this
manual for details.)
Press the OTHER key, then press SOFT KEY 2, <Rec 16 Chs>, to view
the first Record 16 Channels screen:
======== Record All 16 channels =======A
Seq: 1-SEQ01
Sig: 4/ 4 Drums on ch:10
========================================
Tracks 1-16 recv from chans 1-16. Timing
corr = off. Enter data, then <Proceed>.
========================================
<Proceed>
In this screen, you must select a sequence for recording, a time
signature for the new sequence, and select which channel will receive
drum data, if any. The fields and soft key of this screen are:
• The Seq field:
This is the sequence to be recorded into. When <Proceed> is pressed,
the contents of this sequence will be completely erased so that it can be
used for recording.
• The Sequence Name field (Seq: 1-SEQ01
screen):
This field shows the name of the current sequence. Once you have
selected the sequence number to be used, you can enter the new
sequence name here. It can be changed in the same manner as the
Sequence Name field in the Play/Record screen.
• The Sig field (time signature):
This is actually two fields—the upper and lower half of the time signature
to be used for recording. When <Proceed> is pressed, the selected
sequence will be initialized to one bar of the time signature entered in
these two fields.
• The Drums on ch field (drums on channel):
If one of the incoming MIDI channels will contain drum data and you
would like the corresponding MPC60 track to be a DRUM track, specify
in the above example
Page 61
Page 68

Chapter 3: Recording Sequences
that MIDI channel here. When <Proceed> is pressed, this track number
will have its Type field set to DRUM.
• The <Proceed> soft key:
When all of the above fields have been entered, press this soft key to
initialize the selected sequence and move on to the second Record 16
Channels screen:
======== Record All 16 Channels =======A
Seq: 1-Sequence⁄name BPM:120.0 (SEQ)
Sig: 4/ 4 Bars: 1 Loop:OFF
========================================
While holding RECORD, play ext sequencer
with MIDI clock.
===== Now:001.01.00 (00:00:00.00) ======
<Done>
This is the screen in which the actual recording will take place. The
selected sequence has now been initialized to contain one bar of the
time signature entered in the previous screen. The first 16 tracks have
been assigned to MIDI channels 1 through 16, as described above. All
tracks have their Type assigned to MIDI except for the track number
specified in the Drums on ch field in the previous screen, which has been
initialized to DRUM.
The fields and soft key are:
• The Seq field:
This field shows the sequence number that was entered in the previous
screen. In this screen it is for display only and cannot be changed.
• The Sequence Name field (Seq: 1-SEQ01
screen):
This is the selected sequence’s name. It can be changed in the same
manner as the Sequence Name field in the Play/Record screen.
• The Tempo Display Mode, Active Tempo, and Tempo Source fields:
These three fields operate exactly as their counterparts in the
Play/Record screen do.
• The Sig field (time signature):
This field shows the time signature entered in the previous screen. It is
for display only and cannot be changed.
• The Bars field
This shows the total number of bars in the newly initialized sequence,
which is always initialized to 1 bar. When recording begins, additional
bars will be added to the end of the sequence as needed, as is normal
when the Loop field is set to OFF in the Play/Record screen.
• The Loop field:
in the above example
Page 62
Page 69

Chapter 3: Recording Sequences
This is for display only and cannot be changed. It indicates that the
sequence’s Loop field is forced to OFF because loop recording is not
permitted during 16 channel recording.
• The <Done> soft key:
When finished recording, press this soft key to exit to the Play/Record
screen with your new sequence intact.
To record the incoming sequence:
While holding the RECORD key on the MPC60, start the external
sequencer playing from the beginning of its sequence. As soon as the
MPC60 receives the sync signals, it will enter Record mode and begin
recording the data from the other sequencer in real time. (Note: The
OVERDUB key is disabled during 16 channel recording.) Once the
transfer is finished, stop the external sequencer (the MPC60 will stop
automatically) or manually stop the MPC60.
The MPC60 now contains the transferred sequence, which can be
played using the PLAY, PLAY START, REWIND, FAST FORWARD and
LOCATE keys. Play the sequence; if the transfer was successful, press
<Done> to return to the Play/Record screen. If the transfer didn’t come
out as intended, try again by holding RECORD and starting the other
sequencer.
COMMENT: If the incoming multitrack sequence contains a large
amount of data or is playing at a very fast tempo, it is possible
for the MPC60 to become overloaded, causing delays in the
timing of the recorded sequence. If this occurs, reduce the
tempo of the sending sequencer. This will lower the MPC60’s
processing requirement, and should eliminate any overload
errors.
Page 63
Page 70

Chapter 3: Recording Sequences
Recording MIDI System-Exclusive Data
The MPC60 can record patch data or any other MIDI system-exclusive
messages from external synthesizers directly into tracks. To do this,
simply send the system-exclusive message to the MPC60 while in
Record, Overdub, or Step Edit mode, and it will be recorded into the
active track, just the same as any other MIDI data. The only limitation is
that the message must be smaller than 1000 bytes. If an attempt is made
to record a message that is larger than that, the entire message will be
rejected. 1000 bytes is enough to accommodate a single voice patch
data dump from virtually any synthesizer, but it is not large enough for
many voice bank data dumps (large files containing an entire bank of
synthesizer patches).
One way of using this feature is to insert a blank bar at the beginning of
your sequence and record the voice data dumps for each track into that
first bar. When the sequence is played from the start, each external
synthesizer will immediately receive the voice data in the first bar, so it
will be ready to play the note data starting in the second bar with the
proper sound.
There is one problem with playing system-exclusive messages from
sequences: there is no standard method for identifying the MIDI channel
number within the message, and therefore the MPC60 cannot assign the
output MIDI channel over which the message will be sent. This means,
for example, that a system-exclusive message received over MIDI
channel 3 while recording into the MPC60 will always be played out of
the MPC60 on MIDI channel 3, regardless of the track’s output MIDI
channel. To overcome this problem, you must send the system-exclusive
message on the desired MIDI channel while recording it into the MPC60.
Most synthesizers allow you to select the transmit channel. Note,
however, that some older synthesizers, such as the original Yamaha DX7, always transmit on MIDI channel 1.
However, there is a way to change the MIDI channel of a systemexclusive message while it is in the MPC60 — by using Step Edit. The
MIDI channel is assigned to a single byte within the message and the
Step Edit function allows you to change the contents of any byte within
the message. If you know which byte a particular manufacturer uses for
the channel number, you can change the contents of that byte to the
desired MIDI channel number. For example, the Yamaha DX-7 systemexclusive messages contain the MIDI channel in byte number 3, so
whatever number you put into byte number 3 of the message will be the
new output MIDI channel number. To learn more about editing in Step
Edit mode, read “The STEP EDIT Key” section in the “Editing
Sequences” chapter of this manual.
Page 64
Page 71

Chapter 4:
Editing Sequences
Page 72

Chapter 4: Editing Sequences
The ERASE Key
The ERASE key provides three main functions:
• Erasing notes in real time while in Overdub mode
• Erasing notes or other events while stopped
• Initializing or deleting sequences
Erasing Notes in Real Time While in Overdub Mode
If the ERASE key is pressed and held while in Overdub mode, the top
line of the Play/Record screen changes to the following for as long as
ERASE is held:
===== (Hold pads or keys to erase) =====
If during this time you hold a drum pad (if the active track is a Drum
track) or hold a key on a connected MIDI keyboard (if the active track is
a MIDI track), any notes assigned to that pad or key in the selected track
will be erased.
Erasing Notes or Other Events While Stopped
While not playing, the MPC60 allows the erasure of specific events from
any region within a sequence, on one or all tracks. This is done using the
ERASE key.
If the ERASE key is pressed while the MPC60 is not playing, the Erase
screen appears:
================= Erase ===============A
Seqnc: 1-SEQ01
Track: 1-TRK01 (0 = all)
Ticks:001.01.00-003.01.00
Erase:ALL EVENTS
Notes: 0(C.-2)-127(G.8 ) (Press keys)
========================================
<Do it> <Initialize><Delete><Delete All>
To erase the notes, enter the appropriate data into each of the data
fields, then press the <Do it> soft key. The fields and soft keys are:
Page 66
Page 73

Chapter 4: Editing Sequences
• The Seqnc (sequence) field:
In this field, enter the sequence number from which the data will be
erased. The sequence name is shown to the right for convenience.
• The Track field:
This field specifies the track from which the data will be erased. The
active track is automatically inserted here. To erase all tracks at once,
enter a 0 here. In that case, the Notes field will be forced to ALL because
it is not possible to select specific notes for erasure when erasing all
tracks.
• The Ticks fields:
These two fields are used to set the region to be erased, starting with the
location specified in the leftmost field, through one clock before the
location specified in the rightmost field. They are both bar.beat.tick fields,
allowing you to set the region to be erased in increments as small as one
tick.
• The Erase field:
This field allows you to select which types of events will be erased. It is a
choice field with three options:
1. ALL EVENTS: If this option is selected, all possible MIDI event
types will be erased.
2. ONLY ERASE: If this option is selected, only one event type
will be erased, and the type of event to be erased will appear
in a choice field directly to the right on the same line. In this
rightmost field, all event types are listed, including all 128
MIDI controllers.
3. ALL EXCEPT: If this option is selected, all MIDI event types
EXCEPT one specific type will be erased; the event type that
will NOT be erased will appear in a choice field directly to the
right on the same line. In this rightmost field, all event types
are listed, including all 128 MIDI controllers.
• The Notes field:
This field determines which notes will be erased. It appears in one of two
ways depending on whether the selected track is a Drum track or a MIDI
track:
1. If the source track is a MIDI track, two numeric fields—used to
set the lowest and highest notes to erase within the MIDI
keyboard’s range—will appear as above. Each of these
numeric fields is editable and has a range of 0 to 127; the
equivalent note name (C-2 to G8) is shown to the right of
each field. Alternately, these fields can be set by pressing two
notes on the MIDI input device’s keyboard. The fields will
automatically be set to the lowest and highest keys pressed.
2. If the source track is a Drum track, this field is used to select
specific MIDI note numbers for erasure, but cannot be
accessed by the cursor—it can only be changed by pressing
pads or by receiving external MIDI notes. When the screen is
first displayed, it contains the word ALL (erase all notes) and
the text (Hit pads) to the right. When a pad is pressed, its
currently assigned note number will appear in the field,
Page 67
Page 74

Chapter 4: Editing Sequences
• The <Do it> soft key:
Pressing this soft key performs the erasure specified by the data in the
screen fields.
• The <Initialize> soft key:
This soft key is used to erase and initialize the entire sequence to
specific values. Please see the following section, “Initializing a
Sequence,” for an explanation of this feature.
• The <Delete> soft key:
This soft key is used to delete the entire sequence, which erases all data
and sets the sequence to the same unused state as when power is first
turned on. When a sequence is deleted, it uses the least amount of
memory, less than if it is initialized. When SOFT KEY 3 (<Delete>) is
pressed, the following screen appears:
followed by the pad number and currently assigned sound
name. On the right side of the line is the text ( 1 pad )
indicating that 1 pad is selected for erasure:
Notes:36/A02-SNARE⁄DRUM ( 1 pad )
If another pad is then pressed, its note number, pad number,
and assigned sound are displayed instead, and the text to the
right displays ( 2 pads). This continues until you select all of
the pads you intend to erase.
============ Delete Sequence =========A
Sequence: 23-Sequence⁄name
(This will reset the sequence to its
unused state with no contents.)
========================================
<Do it>
Enter the desired sequence number and press <Do it>.
• The <Delete all> soft key:
This soft key is used to delete all 99 sequences, setting them to the
same state as when power is first turned on (maximum available
sequence memory). When pressed, a warning screen will appear before
the actual deletion occurs.
Initializing a Sequence
Page 68
Page 75

Chapter 4: Editing Sequences
To erase a sequence and initialize it to preset values, press the ERASE
key, followed by SOFT KEY 2 (<Initialize>). The following screen will
appear:
========== Initialize Sequence ========A
Select sequence: 1-(unused)
===== General ===== ==== Track: 1 ====
Bars: 2 Sig: 4/ 4 Status:UNUSED
BPM:120.0 Type:DRUM Pgm:OFF
Loop:TO BAR 1 Chn:OFF & OFF
========================================
<Do it> <Track-> <Track+>
The fields and soft keys are:
• The Select sequence field:
This field is used to enter the number of the sequence that is to be
initialized. The selected sequence’s name is shown for convenience.
The “General” section:
• The Bars field:
In this field enter the number of bars that you want the initialized
sequence to have.
• The Sig (time signature) field:
In this field enter the time signature that you want the initialized
sequence to have. It is actually two fields, one for the upper and one for
the lower parts of the time signature.
• The BPM field:
In this field enter the tempo that you want the initialized sequence to
have. To view the tempo in frames per beat, move the cursor to the word
BPM and use the data entry knob to change it to FPB, just as in the
Play/Record screen.
• The Loop field:
In this field enter the loop status (OFF or TO BAR) and the loop bar
number, if TO BAR is selected, that you want the initialized sequence to
have.
The “Track” section
• The Track field:
Any or all of the sequence’s tracks can be initialized. To enter the
settings for each track, first select the track number in this field, then
enter the initialization data for that track in the fields below. This feature
lets you create templates for new sequences, so that track 2 defaults to
Page 69
Page 76

Chapter 4: Editing Sequences
MIDI channel 6, for example. The contents of the five fields in this
section apply only to the track (1 of 99) that is selected in this field.
• The Status field:
This is a choice field with two options:
• The Type field:
The Type field for the selected track will be initialized to the option
selected in this field (DRUM or MIDI).
• The Pgm field:
The Pgm field for the selected track will be initialized to the option
selected in this field (1-128 or OFF).
• The Chn field:
In this field enter the output MIDI channel (1-16 or OFF) and port (A-D) to
which the selected track will be initialized, using the same data entry
method as for the Chn field in the Play/Record screen. To the right of this
field is another field for the auxiliary MIDI output channel assignment.
• The <Do it> soft key:
After values for all the fields have been entered, press this soft key to
initialize the sequence.
1. UNUSED: The track number displayed in the Track field will
not be initialized. Instead, it will be set to an unused state (as
when power is turned on), which requires the least amount of
memory. However, if this track is later recorded into, it will
immediately be initialized to default values.
2. IN USE: The track number displayed in the Track field will be
initialized to the values entered in the Type, Pgm and Chn
fields.
Page 70
Page 77

The EDIT Key
The EDIT key provides access to many features related to sequence
editing. Pressing it will display the following menu screen:
============= Edit Sequence ===========A
1)View/chng T sig 6)Copy events
2)Chng track order 7)Copy a sequence
3)Insert blank bars 8)Shift timing
4)Delete bars 9)Edit note data
5)Copy bars
========================================
Select option:
Pressing a single number key causes the screen for the selected feature
to appear. These features are described below:
Viewing and Changing Time Signature
This feature displays the time signature and number of bars in the active
sequence as well as any time signature changes. Press 1 (View/chng T
sig) from the EDIT key menu and the following screen will be displayed:
Chapter 4: Editing Sequences
========== View Time Signature ========A
Bar 1 - 2: 4/ 4
========================================
<Page -> <Page +> <Change TSig>
This screen displays all time signature changes within the active
sequence, and the number of bars associated with each change. If no
time signature changes exist, the existing single time signature and the
total number of bars in the sequence will be displayed. Space is given for
ten time signature changes, with two changes per line. If more exist, the
<Page +> soft key is used to view more pages of changes, and the
<Page -> soft key is used to display earlier pages.
Page 71
Page 78

Chapter 4: Editing Sequences
Changing the time signature of a single bar
To change the time signature of a specific bar, press <Change Tsig>.
The following screen will appear:
======== Change Time Signature ========A
Change the time signature of bar: 1
from 4/ 4 to 4/ 4.
(If the new time sig is shorter, the end
of the bar is truncated; if longer,
blank space is added to the end.)
========================================
<Do it>
This feature allows you to change the length of a particular bar within a
sequence by changing its time signature. If the time signature you
change to is shorter than the existing one, the unused end of the bar is
truncated. For example, if you need to remove one 1/8-note from the end
of a 4/4 bar, you would change its time signature to 7/8. If the new time
signature is longer than the existing one, a small amount of blank space
will be added onto the end of the bar.
To change the time signature of a bar, first select the bar number to be
changed in the top line. The existing time signature for that bar will be
displayed in the from field in the second line. Next, enter the time
signature you wish to change to in the to fields (2 parts) in the second
line. To perform the change, press the <Do it> soft key.
Rearranging the Track Order
This feature rearranges the track order by removing one track and
inserting it before another, causing all tracks in between to be renumbered. Multiple operations may be required to put the tracks in the
desired order. Select 2 (Chng track order) from the EDIT key menu and
the following screen will appear:
========== Change Track Order =========A
Sequence: 1-Seqnc⁄name
Place track: 1-Track_name
Before track: 2-Track_name
(Tracks in between will be renumbered.)
========================================
<Do it>
Page 72
Page 79

To rearrange tracks, enter the desired sequence number, source track
number and destination track number in the screen fields, then press
<Do it> to execute the move.
Inserting Blank Bars Into a Sequence
This feature inserts a specified number of blank bars into the current
sequence. Select option 3 (Insert blank bars) from the EDIT key menu,
and the following screen will appear:
========== Insert Blank Bars ==========A
Sequence:12-Sequence_name
Number of bars: 4
Time signature: 4/ 4
Insert before bar: 4
========================================
<Do it>
Chapter 4: Editing Sequences
The fields and soft key are:
• The Sequence field:
This is the sequence into which the bars will be inserted. The sequence’s
name is shown to the right.
• The Number of bars field:
This is the number of blank bars to be inserted.
• The Time signature field:
This is the time signature of the bars to be inserted. This is actually two
fields—one for each part of the time signature. The range of the first part
is from 1 to 31; the second part is a choice field with four selections: 4, 8,
16, and 32.
• The Insert before bar field:
This field specifies the bar number before which the new bars will be
inserted. To insert bars after the end of the sequence, enter a number
one higher than that of the last bar in the sequence.
• The <Do it> soft key:
Pressing this soft key performs the insertion according to the abovedisplayed parameters.
COMMENT: If the sequence is set to loop to an earlier bar and
the new bars are inserted before the loop bar, the bar number
specified in the Loop field will automatically be increased to
compensate for the insertion.
Deleting Bars From a Sequence
Page 73
Page 80

Chapter 4: Editing Sequences
This feature allows you to delete a specified number of bars from the
active sequence. To use this feature, select option 4 (Delete bars) from
the EDIT key menu. The following screen will be displayed:
============== Delete Bars ============A
Sequence:12-Sequence_name
First bar: 1 Last bar: 2
========================================
<Do it>
The on-screen fields and soft keys are:
• The Sequence field:
This is the sequence from which the bars will be deleted. The
sequence’s name is shown to the right.
• The First bar field:
This is the first bar to be deleted.
• The Last bar field:
This is the last bar to be deleted.
COMMENT: This field has a different function than the To bar
field in the Version 2 software’s Delete Bars function. This field
contains the last bar of the range of bars to be deleted, whereas
Version 2’s To Bar field contained the first bar number after
region to be deleted.
• The <Do it> soft key:
Pressing this soft key performs the specified deletion.
COMMENT: If the sequence is set to loop to an earlier bar (in
the Play/Record screen) and the deleted bars are before the
loop point, the bar number specified in the Loop field will
automatically be decreased to compensate for the deletion.
Copying Bars (All Tracks)
This feature allows you to copy a specified range of bars (across all
tracks) from one sequence and insert the copied data at any point within
the same sequence or any other sequence. In this mode of copying, the
overall length of the destination sequence will always be increased. To
use this feature, select option 5 (Copy bars) from the EDIT key menu.
The following screen will appear:
the
Page 74
Page 81

Copying Events
Chapter 4: Editing Sequences
============ Copy Bars From ===========A
Seq:12-Sequence_name
First bar: 1 Last bar: 2
============= Copy Bars To =============
Seq:12-Sequence_name Before bar: 1
Copies: 1
========================================
<Do it>
The fields and soft key are described below:
• The Seq field (in the Copy Bars From section):
This field is used to specify the sequence number to be copied from.
• The First bar and Last bar fields:
These fields set the range of bars to be copied. First bar sets the first bar
in the range that is to be copied, and Last bar sets the last bar to be
copied.
COMMENT: This field has a different function than the To bar
field in the Version 2 software’s Copy Bars function. This field
contains the last bar of the range of bars to be copied, whereas
Version 2’s To Bar field contained the first bar number after
region to be copied.
• The Seq field (in the Copy Bars To section):
This field is used to specify the sequence number to be copied to.
• The Before bar field:
This field specifies the bar number before which the copied data will be
inserted. To insert the bars at the end of the sequence, enter a number
one higher than that of the last bar in the sequence.
• The Copies field:
This field specifies how many repetitions of the source data will be
inserted into the destination sequence.
• The <Do it> soft key:
Pressing this soft key executes the copy according to the entered
parameters.
COMMENT: If the sequence is set to loop to an earlier bar and
the copied bars are inserted before the loop bar, the bar number
specified in the Loop field will automatically be increased to
compensate for the insertion. Also, when copying from one
sequence to another, be careful to copy MIDI track data only to
MIDI tracks and Drum track data only to Drum tracks. Otherwise,
keyboard notes can cause drum sounds to play or vice versa.
This feature permits the copying of all events within a specified region of
a single track to a different point in the same or another track in the
same or another sequence. In this feature, only the events
from the
the
Page 75
Page 82

Chapter 4: Editing Sequences
source track are copied—no time signature or tempo data are copied.
Unlike the Copy Bars feature, which inserts the copied data into the
sequence, thus increasing its overall length, this copy feature either
replaces the existing events or merges the copied data with existing
events, without adding additional bars. Therefore, in this feature, the
track’s overall length is unchanged after the copy has been executed.
To use this feature, select option 6 (Copy events) from the EDIT key
menu. The following screen will be displayed:
=========== Copy Events From ==========A
Sequence: 1 Track: 1-Track_name
Ticks:001.01.00-001.01.00
Notes:ALL (Hit pads)
============ Copy Events To ============
Sequence: 1 Track: 1-Track_name
Mode:REPLACE Copies: 3 Start:001.01.00
<Do it>
A description of the fields and soft key follows:
• The Sequence field (in the Copy Events From section):
This is the sequence from which the data will be copied.
• The Track field (in the Copy Events From section):
This is the track from which the data will be copied. Enter a 0 here to
copy all tracks at once. If you do this, the lower Track field (in the Copy
Events To section) will be forced to 0 also, because the destination must
also be all tracks.
• The Ticks fields:
These two fields are used to set the region of the track that will be copied
from, starting at the tick specified in the leftmost field and including all
data up to (but not including) the tick specified in the rightmost field.
These are bar.beat.tick fields, enabling you to specify the region in units
as small as one tick.
• The Notes field:
This field determines which notes will be copied. It appears in one of two
ways depending on whether the selected track is a Drum track or a MIDI
track:
1. If the source track is a Drum track, this field is used to select
the specific drum notes, represented as MIDI note numbers,
that are to be copied. It cannot be accessed with the cursor;
notes can only be entered by pressing pads or via the
reception of external MIDI notes. When the screen is first
displayed, it contains the word ALL (copy all notes) and the
text (Hit pads) to the right. When a pad is pressed, the pad’s
currently assigned note number appears in the field, followed
by the pad number and currently assigned sound name. On
the right side of the line is the text ( 1 pad ) indicating that 1
pad is selected for copying:
Page 76
Page 83

Notes:36/A02-SNARE_DRUM ( 1 pad )
If another pad is pressed, its note number, pad number, and
assigned sound are displayed instead, and the text to the
right displays ( 2 pads). This continues until the user has
selected all of the pads he or she intends to copy.
2. If the source track is a MIDI track, two numeric fields—used to
set the lowest and highest notes of the note range that is to
be erased—will appear. Each of these numeric fields is
editable via the cursor and has a range of 0 to 127.
Alternately, these fields can be set by pressing two notes on
the MIDI input device’s keyboard. The fields will automatically
be set to the lowest and highest keys pressed.
• The Sequence field (in the Copy Events To section):
This is the sequence into which the data will be copied.
• The Track field (in the Copy Events To section):
This is the track to be copied to. If this field can’t be changed from 0—(all
tracks), then the upper Track field (in the Copy Events From section)
must have been set to 0, indicating that all tracks will be copied.
• The Mode field:
This is a choice field with two options:
1. REPLACE:
In this mode, all existing events in the destination track are
overwritten by the newly copied data.
2. MERGE:
The copied data are merged into the existing events.
• The Copies field:
This field specifies the number of repetitions of the copied data that will
be added to the new sequence.
• The Start field:
The copied data can be added into the destination sequence and track
starting at any location. This field specifies the start location where the
copied data will be placed. This is a bar.beat.tick field.
• The <Do it> soft key:
Pressing this soft key performs the copy as specified in the above fields.
COMMENT : Be careful to copy MIDI track data only to MIDI
tracks and Drum track data only to Drum tracks. Otherwise,
keyboard notes can cause drum sounds to play or vice versa.
Copying an Entire Sequence to Another
This feature is useful if you want to make a perfect copy of a sequence,
including all parameters, to another sequence number, replacing all data
and parameters previously contained in the destination sequence. To
use this feature, select option 7 (Copy a sequence) from the EDIT key
menu. The following screen will appear:
Chapter 4: Editing Sequences
Page 77
Page 84

Chapter 4: Editing Sequences
===== Copy One Sequence To Another ====A
Copy contents of seq: 1-Sequence_name
Over contents of seq: 2-Sequence_name
========================================
<Do it>
A description of the screen fields and soft keys follows:
• The Copy contents of seq field:
This specifies the sequence to be copied from.
• The Over contents of seq field:
This specifies the sequence whose contents will be replaced by the
contents of the above specified sequence number. The lowest-numbered
empty sequence is automatically inserted here when this screen is
entered.
• The <Do it> soft key:
Pressing this soft key performs the above specified copy.
Shifting the Timing of Many Notes
This feature shifts a group of notes within a single track forward or
backward in time. To use this feature, select 8 (Shift timing) from the
EDIT key menu. The following screen will appear:
============= Shift Timing ============A
Seqnc: 1-Sequence_name Dir:EARLIER
Track: 1-Track_name Amount: 0
Ticks:001.01.00-001.01.00
Notes: 0(C.-2)-127(G.8 ) (Press keys)
========================================
<Do it>
The fields and soft keys are:
• The Seqnc field:
This specifies the sequence to be shifted.
• The Track field:
This specifies the track to be shifted. Only one track can be shifted at a
time.
Page 78
Page 85

• The Ticks fields:
These two bar.beat.tick fields are used to determine the region within the
track that will be shifted. The leftmost field sets the start point of the
region and the rightmost field holds the location that is one tick after the
region to be shifted.
• The Notes field:
This field determines which notes will be shifted. It appears in one of two
ways depending on whether the selected track is a drum or MIDI track:
1. If the source track is a MIDI track, two numeric fields—used to
set the lowest and highest notes of the note range that is to
be shifted—appear as above. Each of these numeric fields is
editable via the cursor, and has a range of 0 to 127; the
equivalent note name (C-2 to G8) is shown to the right of
each field. Alternately, these fields can be set by pressing two
notes on the MIDI input device’s keyboard. The fields will
automatically be set to the lowest and highest keys pressed.
2. If the source track is a Drum track, this field is used to select
specific drum notes, represented as MIDI note numbers, that
are to be copied. It cannot be accessed with the cursor; notes
can only be entered by pressing pads or via the reception of
external MIDI notes. When the screen is first displayed, it
contains the word ALL (shift all notes) and the text (Hit pads)
to the right. When a pad is pressed, the pad’s currently
assigned note number appears in the field, followed by the
pad number and currently assigned sound name. On the right
side of the line is the text ( 1 pad ) indicating that one pad is
selected for shifting:
Notes:36/A02-SNARE_DRUM ( 1 pad )
If another pad is then pressed, its note number, pad number,
and assigned sound are displayed instead, and the text to the
right displays ( 2 pads). This continues until the user has
selected all of the pads he or she intends to shift.
• The Dir (direction) field:
This choice field is used to determine the direction of shift and has two
options: EARLIER and LATER.
• The Amount field:
This field is used to determine the amount of shift in ticks.
• The <Do it> soft key:
Pressing this soft key performs the shift specified in the above fields.
Global Editing of Note Event Data
If option 9 (Edit note data) is selected from the EDIT key menu, the
following menu, which contains three choices for editing note data,
appears:
Chapter 4: Editing Sequences
Page 79
Page 86

Chapter 4: Editing Sequences
============ Edit Note Data ===========A
1.Edit velocity/duration
2.Edit note number assignment
3.Edit note variation data
========================================
Select option:
These these functions are described in the three sections below.
Editing Note Velocity or Duration Data
To edit the velocity or duration data of a group of notes in one operation,
select 1 from the Edit Note Data menu. The following screen will appear:
======== Edit Velocity/Duration =======A
Seqnc: 1-Seqnc_name Edit:VELOCITY
Track: 1-Track_name Do:ADD VALUE
Ticks:001.01.00-001.01.00 Value:120
Notes: 0(C.-2)-127(G.8 ) (Press keys)
========================================
<Do it>
The fields and soft keys are:
• The Seqnc field:
This specifies the sequence to be edited.
• The Track field:
This specifies the track to be edited. Only one track can be edited at a
time.
• The Ticks fields:
These two bar.beat.tick fields are used to determine the region within the
track that will be edited. The leftmost field sets the start of the region and
the rightmost field holds a location one tick after the region to be edited.
• The Notes field:
This field determines which notes will be edited. As shown above, it
appears in one of two ways depending on whether the selected track is a
Drum or MIDI track:
1. If the source track is a MIDI track, two numeric fields—used to
set the lowest and highest notes of the note range that is
selected for editing—appear as above. Each of these numeric
fields is editable via the cursor, and has a range of 0 to 127;
Page 80
Page 87

Chapter 4: Editing Sequences
the equivalent note name (C-2 to G8) is shown to the right of
each field. Alternately, these fields can be set by pressing two
notes on the MIDI input device’s keyboard. The fields will
automatically be set to the lowest and highest keys pressed.
2. If the source track is a Drum track, this field is used to select
specific drum notes, represented by MIDI note numbers, that
are to be edited. This field cannot be accessed by the
cursor—it can only be changed by pressing pads or receiving
external MIDI notes. When the screen is first displayed, it
contains the word ALL (edit all notes) and the text (Hit pads)
to the right. When a pad is pressed, the pad’s currently
assigned note number appears in the field, followed by the
pad number and currently-assigned sound name. On the right
side of the line is the text ( 1 pad ) indicating that one pad is
selected for editing:
Notes:36/A02-SNARE_DRUM ( 1 pad )
If another pad is then pressed, its note number, pad number,
and assigned sound are displayed instead, and the text to the
right displays ( 2 pads). This continues until you have
selected all of the pads you intend to edit.
• The Edit field:
This is a choice field with two options: VELOCITY and DURATION. It is
used to select which of these two parameters will be affected.
• The Do field:
This is a choice field with four options:
1. ADD VALUE: This selection adds the number in the Value
field to the velocity or duration of each note that has been
selected for editing.
2. SUB VALUE: This selection subtracts the number in the Value
field from the velocity or duration of each note that has been
selected for editing.
3. MULT VAL %: This selection multiplies the velocity or duration
of each note that has been selected for editing by the number
in the Value field. A value of 100% = no change; values of
101 to 200% proportionally increase each note’s velocity or
duration value; values of 0 to 99% proportionally decrease
each note’s velocity or duration value.
4. SET TO VAL: This selection changes the velocity or duration
of each note that has been selected for editing to the number
in the Value field.
• The Value field:
This field works in conjunction with the Do field and sets the number that
will be used to change the velocities or durations.
• The <Do it> soft key:
Pressing this soft key performs the edit specified in the above fields.
Page 81
Page 88

Chapter 4: Editing Sequences
Editing Note Number Assignment of Drum Note Events
This feature affects Drum tracks only. It is used to change all notes of
one drum to that of another drum. It does this by searching for all drum
notes of the specified note number and changing them to another note
number assignment. To change the note number assignment of a group
of notes, select 2 (Edit note number assignment) from the Edit Note Data
menu; the following screen will appear:
===== Edit Note Number Assignment =====A
Seqnc: 1-Seqnc_name
Track: 1-Track_name
Ticks:001.01.00-001.01.00
Change notes:64/A01-Sound_name
To notes:65/A07-Sound_name
========================================
<Do it>
The fields and soft keys are:
• The Seqnc field:
This specifies the sequence to be edited.
• The Track field:
This specifies the track to be edited. Only one track can be edited at a
time. Since this feature only works on Drum tracks, if a MIDI track is
selected the message “You must select a drums track” will appear.
• The Ticks fields:
These two bar.beat.tick fields are used to determine the region within the
track that will be edited. The leftmost field sets the start of the region and
the rightmost field holds a location that is one tick after the region to be
edited.
• The Change notes field:
This field is used to determine which drum notes will be affected. While
the cursor is in this field, press the pad of the drum notes to be
changed—its currently assigned note number and sound will appear in
the field. (You can also send a Note On message to the MIDI input or
enter the note number directly.) Only drum notes assigned to this note
number will be changed.
• The To notes field:
This field determines the note number to which the selected drum notes
will be reassigned. While the cursor is in this field, press the pad of the
drum note to be changed to—its currently assigned note number and
sound will appear in the field. (You can also send a Note On message to
the MIDI input or enter the note number directly.)
• The <Do it> soft key:
Pressing this soft key performs the edit as specified in the above fields.
Page 82
Page 89

Editing Note Variation Data of Drum Note Events
This feature affects Drum tracks only and is used to edit the Note
Variation data of many drum notes in one operation. Select 3 (Edit note
variation data) from the Edit Note Data menu. The following screen will
appear:
======= Edit Note Variation Data ======A
Seqnc: 1-Seqnc_name
Track: 1-Track_name
Ticks:001.01.00-003.01.00
Notes:ALL (Hit pads)
Set notes to param:TUNING & Value: 0
========================================
<Do it>
The fields and soft keys are:
• The Seqnc field:
This specifies the sequence to be edited.
• The Track field:
This specifies the track to be edited. Only one track can be edited at a
time. Since this feature works only on Drum tracks, if a MIDI track is
selected the message “You must select a drums track” will appear.
• The Ticks fields:
These two bar.beat.tick fields are used to determine the region within the
track that will be edited. The leftmost field sets the start of the region and
the rightmost field holds a location that is one tick after the region to be
edited.
• The Notes field:
This field determines which notes will be affected. It cannot be accessed
by the cursor. It can only be changed by pressing pads or receiving
external MIDI notes. When the screen is first displayed, it appears as
shown above with the word ALL (affect all notes) and the text (Hit pads)
to the right. When a pad is pressed, the pad’s currently assigned note
number appears in the field, followed by the pad number and currently
assigned sound name. On the right side of the line is the text ( 1 pad )
indicating that one pad is selected for editing:
Notes:36/A02-SNARE_DRUM ( 1 pad )
If another pad is then pressed, its note number, pad number, and
assigned sound are displayed instead, and the text to the right displays (
2 pads). This continues until you have selected all of the pads you intend
to edit.
• The Set notes to param field:
This choice field determines to which parameter (TUNING, ATTACK, or
DECAY) the selected notes’ Note Variation parameter will be set.
Chapter 4: Editing Sequences
Page 83
Page 90

Chapter 4: Editing Sequences
• The Value field:
This field selects what value of tuning, attack, or decay the selected
notes’ Note Variation data will be set to.
• The <Do it> soft key:
Pressing this key performs the edit as specified in the above fields.
Page 84
Page 91

The STEP EDIT Key
The Step Edit feature allows the contents of the active track to be edited
in precise detail. When the Step Edit key is pressed, any notes or events
that exist in the active track at the current sequence position are
displayed on the screen as a series of data fields, which can then be
edited. Also, any notes played at this time are recorded into the active
track at the current sequence position.
To enter step edit mode, press the STEP EDIT key. The following screen
will appear, displaying any notes or events that exist in the active track at
the current sequence position:
============== Step Edit ==============A
>N:64/A01-Sound_na V:127 Tun:-120 D: 96
Program_change Val:127
Pitch_bend Val:+ 0
Channel_pressure Val:127
Control:C1-MODULATION_WHEEL Val:127
===== Now:001.01.00 (00:00:00:00) ======
<Insert> <Delete> <PlayEvent> <Options>
Chapter 4: Editing Sequences
A description of the fields and soft keys follows:
• The event display area (lines 2 through 6 of the LCD screen).
This area of the screen displays up to five events, one per line, that exist
in the active track at the sequence location displayed in the Now field.
These events are most commonly notes (either drum or keyboard notes,
depending on whether the active track is a Drum track or a MIDI track),
but they can also be one of a number of special MIDI message types.
The format of each of the various event types is described in detail later
in this chapter, in the “Step Edit Event Types” section. The event
positioned at the uppermost line (preceded by the >) is called the active
event. It is the only event whose fields can be edited by the cursor.
• The Now field:
The field shows the current position within the sequence. As in the
Play/Record screen, this value is changed by using the REWIND, FAST
FORWARD, and LOCATE keys. As this value changes, the event display
area is continually updated to display the events contained at the newlydisplayed location.
Page 85
Page 92

Chapter 4: Editing Sequences
• SOFT KEY 1 (<Insert> or <Paste>):
This soft key has one of two functions, depending on the current setting
of the Function of soft key 1&2 field in the Step Edit Options screen
(described below):
• SOFT KEY 2 (<Delete> or <Cut>):
This soft key has one of two functions, depending on the current setting
of the Function of soft key 1&2 field in the Step Edit Options screen:
• SOFT KEY 3 (<PlayEvent>):
Pressing this soft key causes the active event to be played. The active
event is the event at the uppermost line of the screen (preceded by the
>).
• SOFT KEY 4 (<Options>):
Pressing this soft key causes the Step Edit Options screen, described
later in this chapter, to appear.
Using Step Edit
To use Step Edit to edit recorded events:
1. <Insert>: When pressed, a new event is inserted at the current
sequence position. The type of event inserted is determined
by the Event to insert field in the Step Edit Options screen.
2. <Paste>: Pressing this key inserts a copy of the event last
removed from the track by using the <Cut> soft key. If the
<Cut> soft key has not been used since turning the power on,
nothing will be inserted.
1. <Delete>: When pressed, the active event is deleted from the
screen. The active event is the event at the uppermost line of
the screen (preceded by the >).
2. <Cut>: When pressed, the active event is deleted from the
screen and saved internally. If the <Paste> soft key is then
pressed, a copy of that stored event will be inserted into the
screen.
1. Press STEP EDIT. The Now field will change to the nearest
step. A step is defined as a specific note timing value, 1/8
notes through 1/32 triplets, set in the Note value field in the
Timing Correct screen. Any notes or other MIDI events
existing in the active track at that location will be displayed on
the screen.
2. Use the REWIND, FAST FORWARD, or LOCATE keys to find
the desired location within the sequence. As in the
Play/Record screen, the [<<] and [>>] keys move to the
previous or next bar boundary and the [<] and [>] keys move
to the previous or next step within the active track. (It is also
possible to change the function of the [<] and [>] keys to
search forward or backward to the next event within the track.
This option is selected in the Step Edit Options screen.)
3. You can now edit any of the data fields for any of the
displayed events by moving the cursor to the desired field and
Page 86
Page 93

Of the five on-screen events, only the uppermost line can be edited. It is
edited by moving the cursor to the desired field within the line and editing
the field contents. This uppermost line is called the active event, and is
preceded by a >. To edit an event, it must be moved up to the active
event line using the CURSOR UP and CURSOR DOWN keys.
Use the [<] or [>] key to move to the previous or next step within the
active track, and the [<<] or [>>] key to move to the previous or next bar
boundary.
As you move through the sequence, any events in the active track at that
position will be displayed on the screen, and any events (on all tracks) at
the current position will be played (output through MIDI). If you don’t
want to hear a particular track, turn that track OFF in the Play/Record
screen; if you want to hear only the active track, turn solo mode to ON in
the Play/Record screen. To edit any of the fields in the active event
(uppermost line), move the cursor left or right to the desired field and
change the contents as desired. If there are multiple events at that step,
they will be displayed on the other on-screen event lines. Use the
CURSOR UP or CURSOR DOWN keys to access different events by
scrolling the screen’s five-line window UP or DOWN, thereby moving
higher- or lower-numbered events to the active event line.
Step Edit Event Types
The Step Edit screen can display up to five events, one on each line, that
exist in the active track at the current Now field position. The format of
the event line is different for each type of event. The following is a
description of each event type:
• The Drum Note event
Chapter 4: Editing Sequences
editing it. Also, any notes played from the pads or external
MIDI keyboard at this time will be recorded into this location
and immediately displayed on the screen.
4. To view other locations within the sequence, use the
REWIND, FAST FORWARD, and LOCATE keys.
5. Once you’re finished editing, press MAIN SCREEN to return
to the Play/Record screen.
COMMENT: All mid-sequence control messages, including the
128 Controllers, Pitch Bend, Program Change, Mixer Volume,
Mixer Pan, and Individual Out/Echo Send Level, only take effect
after being played in a sequence. This means that if you play a
section of a sequence that contains a specific controller event,
the last played value of that controller will remain active until
another occurrence of the same controller is played—even if you
stop the sequence and start playing it from another location.
Because of this, whenever you use one of these events within a
sequence, it is important to insert another event of the same type
at the beginning of the sequence to set the controller to an initial
value.
Page 87
Page 94

Chapter 4: Editing Sequences
>N:64/A01-My_Sound V:127 Tun:-120 D: 96
The fields are:
• The MIDI Note event
1. The Note Number field (N:64
This is the note number assignment (35–98) of the drum note
event.
2. The Pad Number field (N:64/A01
This is the pad number (A01–D16) that is currently assigned
to the note number displayed to the left. This field is for
display only and cannot be edited.
3. The Sound Name field (N:64/A01-My_Sound
This field shows the first eight characters of the sound name
currently assigned (in the active program) to the note number
selected to the left. This field is for display only and cannot be
edited.
4. The Velocity field (V:127
This is the velocity of the drum note.
5. The Note Variation Parameter field (Tun
Each drum note contains Note Variation data, a unique value
of either tuning, attack, or decay, for that note only. This field
determines which of those three parameters is contained in
this note, and therefore which of those three sound
parameters will be affected when this note plays. There are
three options: TUN (tuning), DCY (decay), or ATK (attack).
6. The Note Variation Data field (Tun:-120
This field works in conjunction with the Note Variation
Parameter field to the left. It contains the data for the
parameter selected in that field. If the parameter is set to
TUN, the range is -120 to 120 tenths of a semitone. When set
to either ATK or DCY, the range is from 0 to 5000
milliseconds.
7. The Duration field (D: 96
This field shows the note duration in ticks (96 ticks = one
quarter note). The range is 1–9999 ticks.
/A01-My_Sound):
-My_Sound):
):
):
:-120):
):
):
>Note: 60(C.3 ) V:127 ^V: 64 D: 96
The fields are:
1. The Note Number field (Note: 60
This is the MIDI note number (0–127) of the note, indicating
the pitch.
2. The Note Name field (Note: 60(C.3
This field shows the note name (C-2 to G8) for the note
number shown to the left.
3. The Velocity field (V:127
This is the Note On velocity of the note.
4. The Release Velocity field (^V: 64
This is the release velocity of the note.
Page 88
):
(C.3 ):
)):
):
Page 95

Chapter 4: Editing Sequences
5. The Duration field (D: 96
This field shows the note duration in ticks (96 ticks = one
quarter note). The range is 1–9999 ticks.
• The Program Change event
):
>Program_change Val: 1
The single field, Val, with a range of 1–128, is used to select the MIDI
program number.
• The Pitch Bend event
>Pitch_bend Val:+ 0
The single field, Val, contains the actual numeric value of the pitch bend
event. It is a signed field, with a range from -8192 to 8191.
• The Channel Pressure event
>Channel_pressure Val:127
The single field, Val, has a range of 0–127.
• The Poly Pressure event
>Poly_pressure Note: 60(C.3 ) Val:127
There are three fields:
1. The Note Number field (Note: 60
This is the note to which the pressure message applies.
2. The Note Name field (Note: 60<C.3
This is the note name for the note number selected at the left.
This is for display only and cannot be edited.
3. The Value field (Val:127
This is the pressure value for the selected note number (0 to
127).
• The System-Exclusive event
):
(C.3 )):
)):
>System_exc Size: 1 Byte: 1 Val: 0
There are three fields:
1. The Size field:
Page 89
Page 96

Chapter 4: Editing Sequences
• The Stereo Volume event
>Stereo_volume Pad:A01 Val:100
This message is exclusive to the MPC60 and is used to change the
Stereo Mixer Volume setting of a particular sound in mid-sequence.
When the Record mix changes feature is used (accessed by pressing
DRUM MIX, then 4), many of these events are recorded into the active
track to simulate a smooth and continuous mixer volume change. There
are two fields:
• The Stereo Pan event
This displays the total number of data bytes. The maximum
size of a system-exclusive event in the MPC60 is 999 bytes.
2. The Byte field:
The number of the byte whose contents are currently
displayed in the Val field.
3. The Val field:
The current value of the byte number displayed in the Byte
field.
1. The Pad field:
This field determines which of the 64 pad numbers/mixer
sliders (A01–D16) this message will affect.
2. The Val field:
This field contains the actual mixer slider value (0–100).
>Stereo_pan Pad:A01 Val:C
This message is exclusive to the MPC60 and is used to change the
stereo mixer pan setting of a particular sound in mid-sequence. When
the Record mix changes feature is used (accessed by pressing DRUM
MIX, then 4), many of these events are recorded into the active track to
simulate a smooth and continuous mixer pan change. There are two
fields:
1. The Pad field:
This field determines which of the 64 pad numbers/pan pots
(A01–D16) this message will affect.
2. The Val field:
This field contains the actual pan pot value (50L – C – 50R).
• The Echo Send Level event
>Echo_send_level Pad:A01 Val:127
This message is exclusive to the MPC60 and is used to change the
individual echo send level setting of a particular sound in mid-sequence.
When the Record Live Changes feature is used (accessed by pressing
DRUM MIX, then 4), many of these events are recorded into the active
Page 90
Page 97

Chapter 4: Editing Sequences
track to simulate a smooth and continuous individual echo send level
change. There are two fields:
1. The Pad field:
This field determines which of the 64 pad numbers/mixer
sliders (A01–D16) this message affects.
2. The Val field:
This field contains the actual mixer slider value (0–100).
• The Control Change event
>Control:C1-MODULATION WHEEL Val:127
There are two fields:
1. The Control field (Control:C1-MODULATION WHEEL
There are 128 MIDI continuous controllers (0–127), each with
an assigned control function. The control function, as defined
in the MIDI 1.0 Detailed Specification, is displayed to the right
of the selected controller number.
2. The Val field (Val:127
This field contains the data value of the displayed controller
event.
• The Tune Request event
):
):
This event type has no data fields.
Step Edit Options
Pressing the <Options> soft key in the Step Edit screen displays the
following screen:
This screen presents a number of options related to use of the Step Edit
feature:
>Tune request
=========== Step Edit Options =========A
Event to insert:NOTES
Auto step increment on key release:NO
Duration of recorded notes:AS PLAYED
Function of soft key 1&2:PASTE/CUT
Function of '<' and '>' keys:NEXT EVENT
======= Step Edit Display Filter =======
View:ALL EVENTS
Page 91
Page 98

Chapter 4: Editing Sequences
• The Event to insert field:
This parameter selects which type of MIDI event will be inserted when
the <Insert> soft key from the Step Edit screen is pressed. The options
include all the available MIDI event types and 128 MIDI controllers. If one
of these controllers is selected, the name assigned to that controller
number is also displayed.
• The Auto step increment on key release field:
If set to YES, the Step Edit screen’s Now field will automatically move
forward one step (as defined by the timing value set in the Note Value
field of the Timing Correct screen) after each key from the MIDI
keyboard is released or, if a chord was played, after the last key from the
chord is released. (If the active track is a Drum track, the Now field will
increment after a pad is released.) This allows, for example, the
recording of a series of notes or chords, one on each step, without
having to advance manually to the next step after playing each key. If
this field is set to NO, this function is defeated.
• The Duration of recorded notes field:
This field is used while in Step Edit mode to determine the method by
which durations are assigned to notes recorded from a MIDI keyboard or
the MPC60 pads. This is a choice field and has two options: SAME AS
STEP and AS PLAYED:
• The Function of soft key 1&2 field:
This choice field is used to determine the functions of soft keys 1 and 2.
It has two options:
• The Function of '<' And '>' keys field:
This choice field is used to determine the function of the REWIND [<]
and FAST FORWARD [>] keys. It has two options:
1. If set to SAME AS STEP, durations are always four ticks less
than the current step size (the current Note Value field setting
in the Timing Correct screen).
2. If set to AS PLAYED, the actual time the note is held (relative
to the current tempo) is used for the duration value, even
though the sequence is not playing. To guide your timing, if a
key is held down longer than one 1/4-note, a metronome click
plays exactly one 1/4-note after the key is depressed, and
sounds again for each additional 1/4-note the key is held
down. For example, if you wanted to record a note with a
duration of one 1/2-note, you would play the key and release
it after two metronome clicks were heard.
1. INSERT/DELETE:
The functions of soft keys 1 and 2 are <Insert> and <Delete>.
<Insert> causes an event to be inserted onto the screen. The
type of event is determined by the setting of the Event to
insert field above. <Delete> removes the active event from
the screen.
2. PASTE/CUT.
The functions of soft keys 1 and 2 are <Paste> and <Cut>.
<Cut> deletes the active event from the screen and saves a
copy of it internally. <Paste> inserts onto the screen a copy of
the event most recently cut.
Page 92
Page 99

Chapter 4: Editing Sequences
1. NEXT STEP:
This is the default setting. Pressing the REWIND [<] key
moves to the previous step within the sequence. Pressing the
FAST FORWARD [>] key moves to the next step within the
sequence. (The timing value of a step is set in the Timing
Correct screen’s Note Value field.)
COMMENT: If the current setting of the Swing% field
is set to a value other than 50%, pressing the
REWIND [<] and FAST FORARD [>] keys will move
forward or backward to locations that fall on swing
timing intervals. If you are editing a sequence that
contains 1/16-notes recorded at a swing setting of
50%, the even-numbered 1/16-notes will NOT be
heard as you step through the sequence, because
only notes existing in swung 1/16-note locations will
be viewed. This same rule applies to the Shift Timing
feature: if the Shift Amount field is set to 0 and you
are editing a sequence that was recorded while it was
set to any amount other than 0, none of the notes will
be seen as you step through the sequence, because
these notes fall on shifted locations, and you are
currently viewing only those notes that fall on nonshifted locations.
2. NEXT EVENT:
Pressing the REWIND [<] key searches to the previous event
within the track. Pressing the FAST FORWARD [>] key
searches to the next event within the track. To search for
specific event types, set the Step Edit Display Filter to the
desired event type; pressing these keys will then cause the
MPC60 to locate to the next or previous event of the specified
type, ignoring event types not included in the display filter
settings.
• The Step Edit Display Filter section.
This is similar to the erase filter or the MIDI input filter, except this one
controls which types of MIDI events are displayed in the Step Edit
screen. For example, if the only events you want to edit are pitch bend
messages, it is bothersome to view all the other events. Another use is to
filter out continuous controller data to make it easier to view only the note
events.
To use the display filter, move the cursor to the View field. This is a
choice field with three options:
1. ALL EVENTS: If this option is selected, all possible event
types will be displayed.
2. ONLY VIEW: If this option is selected, only one event type can
be displayed, and the type of event to be displayed is
selected in a new field appearing directly to the right on the
same line. In this rightmost field all event types are listed,
including all 128 MIDI controllers, each one individually
named as listed in the MIDI 1.0 Detailed Specification.
Page 93
Page 100

Chapter 4: Editing Sequences
Step Recording
Step Edit also makes it possible to record new notes from a MIDI
keyboard while the sequence is not playing. To record a note while in
Step Edit mode, move to the desired position within the sequence, then
play and release the desired note on the MIDI keyboard. This note will
then appear as the new active event, with its pitch, velocity, release
velocity, and duration displayed numerically. The duration of the note is
taken from the actual duration played, relative to the current tempo.
However, if the Duration of recorded notes field in the Step Edit Options
screen is set to SAME AS STEP, The duration always defaults to the
current step value.
If the Auto step increment on key release field in the Step Edit Options
screen is set to YES, the current position within the sequence will
automatically advance one step forward when the newly recorded note
(or chord) is released. This allow you to, for example, record a series of
notes (or chords) one at a time while stopped, and automatically play
them back with evenly spaced timing. To do this:
3. ALL EXCEPT: This option is similar to ONLY VIEW, detailed
above, except that all event types except
to the right of the words ALL EXCEPT are displayed.
1. Set up your sequence and track for recording from your MIDI
keyboard as you would to record in real time.
2. In the Timing Correct screen, set the Note value field to the
desired step value.
3. Rewind to the start of the sequence.
4. Press STEP EDIT.
5. Press SOFT KEY 4, <Options>.
6. Set the Auto step increment on key release field to YES.
7. Press STEP EDIT again.
8. Play a series of notes (or chords), one at a time.
9. Press PLAY START. The notes you have just entered will play
back with evenly spaced timing.
the event displayed
Page 94
 Loading...