

Version 1.20 Addendum
User Guide

IMPORTANT NOTE ON INTERCHANGEABILITY
Because of the new functions introduced in the OS V1.20, the programs created and/or saved
using V1.20 cannot be loaded on the MPC4000 of the previous version software.
Similarly, the programs created and/or saved on the MPC4000 using the OS V1.20 cannot be
loaded into the Z4/Z8 samplers with the OS version V1.16 or earlier.
On the S5000/S6000 samplers, the programs created and/or saved using V1.20 can be loaded
as they are not affected by these changes.
8/7/2002

Version 1.20 Addendum
MAIN MODE
Track Mute Event window and Use track mute event field added .......................................... 1
PROGRAM MODE
Zone Start Modulation function supported.............................................................................. 2
Zone Switch Modulation function added................................................................................. 3
AUTO FIND KG function added.............................................................................................. 3
SAMPLE MODE
BEAT display function added.................................................................................................. 3
Send field in Quick-FX-Resampling window added................................................................ 3
SEQ EDIT MODE
[F4] (ALL NOTE) Key in Copy Data window added................................................................ 4
SONG MODE
Sync field and Sync In/Out window added ............................................................................. 4
RECORD MODE
Audio CD Player function added............................................................................................. 4
MISC. MODE
Step event monitor field added ............................................................................................... 5
NOTE REPEAT key field added ............................................................................................. 5
ERASE key field added .......................................................................................................... 5
OTHER CHANGES
OS update via Drive media supported.................................................................................... 6
EIIITM Sound Library supported ............................................................................................... 6
EJECT function in other than Disk List window supported ..................................................... 6
Edit Part function added ......................................................................................................... 6
Destination field added ........................................................................................................... 7
USB Host Driver improved and others.................................................................................... 8
i
Version 1.20 Addendum
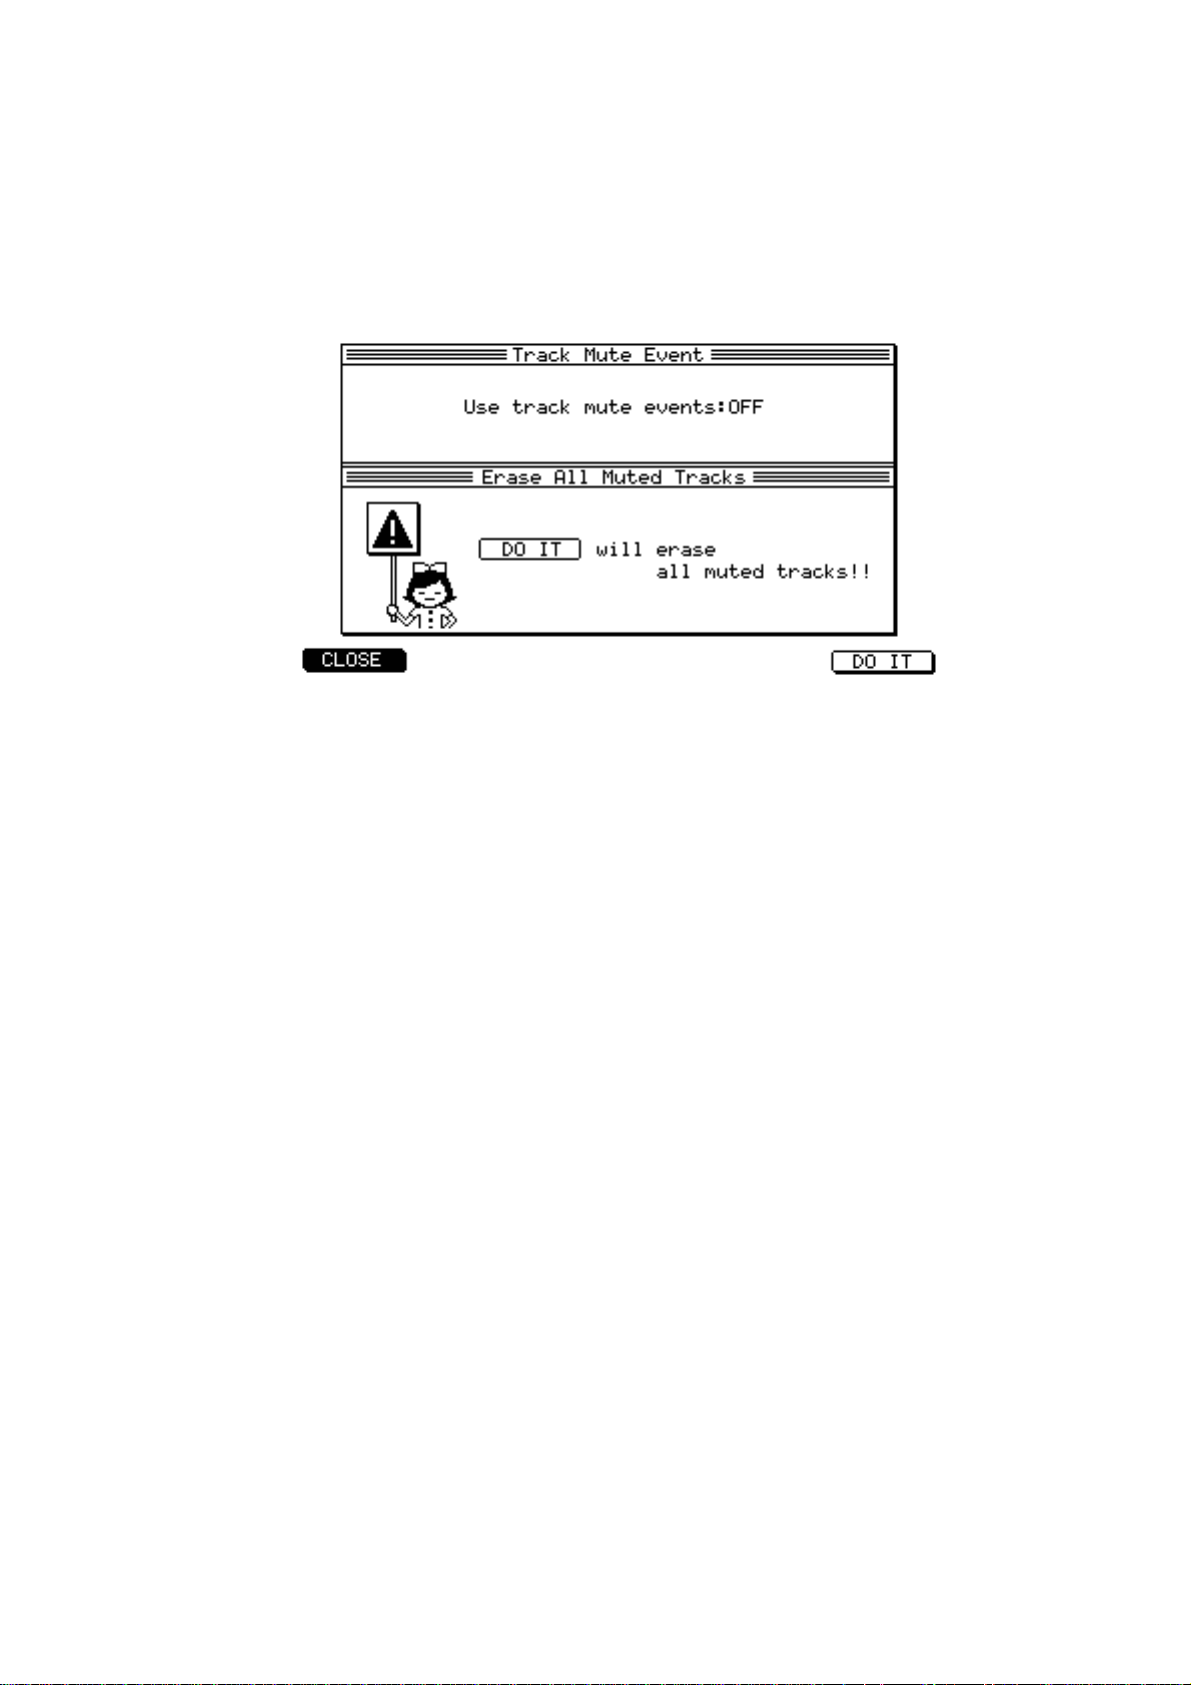
Track Mute Event window/Use track mute event field added
It is now selectable to use the Track Mute Events recorded in the TRACK MUTE page. Also, the
function of Erase All Muted Tracks which erases the muted tracks has been changed.
The Track Mute Event/Erase All Muted Tracks pop-up window opens up when the [WINODW] key is
pressed while the cursor is at Mute field of Track block in MAIN mode.
Use track mute events field
ON In sequence play, the mute of each track is switched on/off automatically according to
the Track Mute Events recorded in the TRACK MUTE page.
OFF In sequence play , the Track Mute Events recorded in the TRACK MUTE page are not used.
Erase All Muted Track function changed
The function of the [F6] (DO IT) key is different from that of previous version by the setting at the Use
track mute events field.
When the Use track mute event is ON;
The mute designated region at the track mute events is erased.
When the Use track mute event is OFF;
The tracks which are set to ON at the Mute field of Track block in MAIN mode are erased.
1

Version 1.20 Addendum
Zone Start Modulation function supported
It is now possible to control the sample zone start using the Program Modulation.
Select the [F6] Zone page in the [F2] Keygroup Mix page of the PROGRAM mode and then set the
Start field of the Pitch block in the range of +/-9999.
While the cursor is at the Start field, press the [WINDOW] key to open up the Program Modulation
pop-up window. Select ZONE START (1-4) at the Destination field and then assign the control source
at the Source field.
Example 1 When +0000 is set at the Start field and VELOCITY is selected at the Source field and its
Depth is set as +100 in the Program Modulation pop-up window, the sample is played
from 0 sample with velocity 0 and from 9,999 sample with velocity 127.
Example 2 When +9999 is set at the Start field and VELOCITY is selected at the Source field and its
Depth is set as +100 in the Program Modulation pop-up window, the sample is played
from 9,999 sample with velocity 0 and from 19,998 sample with velocity 127.
Example 3 When +9999 is set at the Start field and VELOCITY is selected at the Source field and its
Depth is set as -100 in the Program Modulation pop-up window, the sample is played
from 9,999 sample with velocity 0 and from 0 sample with velocity 127.
Also, using a bi-polar controller (i.e. one that changes direction at 0, such as Pitch Bend or the LFOs),
you can control the sample start in two directions.
DOWN 0 UP
2

Version 1.20 Addendum
Zone Switch Modulation function added
The additional option of REAL TIME at the Zone X-fade field is now available and the previous option
of ON has been changed to VELOCITY.
When the REAL TIME option is selected, switching zones is possible using the Program Modulation.
In PROGRAM mode, open up the [F6] Zone page from the [F2] Keygroup Mix page. Move the cursor
to the Zone X-fade field in Sample block and rotate the Jog Dial. There, you have the options to
select, i.e. OFF, VELOCITY and REAL TIME.
OFF Zone switching by the velocity value.
VELOCITY Zone switching by the velocity value, but with Zone X-fade by setting the Range
field of samples overlapped.
REAL TIME Zone switching using the Modulation Matrix. The Zone X-fade is possible by set-
ting the Range field of samples overlapped.
For example, when the REAL TIME is selected at Zone X-fade field and, in the Program Modulation
pop-up window, the MODWHEEL is selected as Source and the ZONE SELECT is set as Destination,
the Modulation Wheel can be used for Zone Switching (or X-fade) control. Further, when used together with TRACK in Q-Link, described later , the Zone Switching (or X-fade) can be controlled using
the Q-Link knob/slider.
AUTO FIND KG function added
The AUTO FIND KG function that allows the selection of Keygroup via a MIDI keyboard has been
added.
In PROGRAM mode, when the MIDI note is received while holding down the [SHIFT] and [GO TO]
keys, the cursor will move to the appropriate keygroup.
BEAT Display function added
The sample time can now be displayed in beat from the start point.
The field next to BEAT field sets the tempo for the base of beat display.
In the [F2] Trim/Loop page of SAMPLE mode, move the cursor to TRIM END field and rotate the Jog
Dial to see BEAT as selectable options.
Send field in Quick-FX-Resampling window added
It is now possible to adjust the FX Send Level in Q-FX.
In SAMPLE mode, open up the Quick-FX-Resampling pop-up window by pressing the [F4] (Q-FX)
key from the [F2] Trim/Loop page. There, you can adjust the effect send level at the Send field.
3

Version 1.20 Addendum
[F4] (ALL NOTE) key in Copy Data window added
When you want to copy all note events, in the Copy Data pop-up window, pressing the newly added
[F4] (ALL NOTE) key now sets ALL at Pad field and 0 (C-2) - 127 (G8) at Notes field.
In SEQ EDIT mode, when you press the [F3] (COPY) key , the Copy Data pop-up window appears and
you will see the [F4] (ALL NOTE) key there.
Sync field and Sync In/Out pop-up window added
In SONG mode, the Sync field has been added in Song block and when the [WINDOW] key is pressed
while the cursor is at this field, the Sync In/Sync Out pop-up window now appears.
The settings of parameters are common to those in Sync In/Sync Out pop-up window of MAIN mode,
however, the Sequence start time field can be set for each Song/Sequence.
Note: The [F2] Sync page in MISC. mode has been removed. Open up the Sync In/Sync Out pop-up
window, by pressing the [WINODW] key while the cursor is at Sync field in Sequence block of the [F1]
Main page in MAIN mode, or at Sync field in Song block in SONG mode, to set them up.
Audio CD Player function added
Now, the internal CD Drive can be used as an Audio CD Player.
When the internal CD Drive supported is connected with the Audio cable properly, the options of INTERNAL (ANALOG) and/or INTERNAL (DIGITAL) will be available to select as the Input Source in RECORD
mode.
When INTERNAL is selected, as the transport control icons will appear below the level meters in Record
block, the recording can be made by playing it back from any point of the track. Also, the Audio CD disc in
the drive can be ejected by pressing the [F3] (1) key.
Note: Refer to the page 255 of MPC4000 Reference Manual for the installation of internal CD Drive and
the connection of audio cables.
4

Version 1.20 Addendum
Step edit event monitor field added
It is now possible to set whether to play the MIDI event, at which the cursor is, in the Event List block
in STEP EDIT mode.
It can be set to on or off at Step edit event monitor field in MISC. mode.
Step edit event monitor field
ON In Event List block of STEP EDIT mode, the MIDI events will be played back.
OFF In Event List block in STEP EDIT mode, the MIDI events are not played back.
NOTE REPEAT key field added
It is now possible to select the switch type, i.e. LA TCH or UNLATCH, at the NOTE REPEAT key field
in MISC. mode.
NOTE REPEAT key field
LATCH Pressing the [NOTE REPEAT] key enables the Repeat mode with its indicator
turned on. Pressing it again turns the Repeat mode and its indicator off.
UNLATCH The Repeat mode is enabled with its indicator turned on only while the [NOTE
REPEAT] key is held down.
ERASE key field added
It is now possible to select the switch type, i.e. LA TCH or UNLA TCH, at the ERASE key field in MISC.
mode.
ERASE key field
LATCH Pressing the [ERASE] key enables the Erase mode with its indicator turned on.
Pressing it again turns the Erase mode and its indicator off.
UNLATCH The Erase mode is enabled with its indicator turned on only while the [ERASE]
key is held down.
5

Version 1.20 Addendum
OS Update via Drive Media supported
1. Connect the DOS or ISO9660 format media, with the MPC4000 OS file (M4C***.bin file, where ***
is the version number) saved on it, to the MPC4000.
2. In LOAD mode, select the “M4C***.bin” file and then press [F6] (DO IT) key.
3. The OS Upgrade pop-up window comes up with the “Do you want to install Operating System?”
prompt displayed. Press [F6] (INSTALL) key to initiate the installation.
4. When all is done, the “Upgrading of the Flash ROM was successful!” prompt appears.
5. Press [F6] (RESTART) key in the OS Upgrade pop-up window to restart the MPC4000.
6. Press [F6] (INITIAL) key in [F1] GLOBAL page of GLOBAL mode to initialize it. This completes the
OS upgrade.
Note: When the unit is turned off while updating the OS, the internal Flash ROM may get destructed.
Do not power off the unit during the OS update process.
EIIITM Sound Library CD-ROM supported
The MPC4000 can now load the Presets/Samples on the CD-ROM for Emulator III of E-mu.
Although every effort has been made to ensure that these sounds translate accurately, because of
hardware differences, AKAI professional cannot guarantee that these sounds will be converted with
100% accuracy.
However, they should be pretty close and will certainly be very ‘usable’.
EJECT in other than Disk List pop-up window supported
The removable media can now be ejected by pressing the [F3] (1) key in LOAD mode without opening the Disk List pop-up window.
Multiple SOLO tracks select using SHIFT key and PAD supported
In TRACK MUTE page, after specifying one solo track using a PAD while holding down the [F6]
(SOLO) key , pressing the P AD while holding down the [SHIFT] key enables to select multiple tracks to
SOLO.
Edit Part function added
In MAIN mode and MUL TI mode, it is now possible to edit the selected Part while the monitor is still in
Multi mode. As the Part only can be edited while in sequence play, etc., it is not necessary to change
it at Monitor field by moving into PROGRAM mode.
The structure of the screen is similar to that of PROGRAM mode, however, as the setting of the
Monitor field is fixed as Multi, it is indicated as =EditPart=. Also, only the selected Part is edited, the
[F1] key is changed from LIST to MISC. and it is not possible to select other Part at Part Name field.
In MAIN mode, press the [WINDOW] key while the cursor is at Part Name field of [F1] Main page to
open up the Program List pop-up window. Then press the [F5] (EDIT) key to access it. In MULTI
mode, press the [WINDOW] key while the cursor is at Part Name field of [F2] Mix page to open up the
Program List pop-up window. Then press the [F5] (EDIT) key to access it.
6

Version 1.20 Addendum
Destination field added
The Q-Link operation can now be recorded as the MIDI Control Change event on to the sequencer.
The Destination field has been added in the Destination block in the SETUP page of the Q-Link
section to select INTERNAL/TRACK (RECORDABLE).
Destination field
INTERNAL The Q-Link information is sent to the internal sound module to control the Part or
Effect parameter with Q-Link in real time.
TRACK The Q-Link information is sent to the sequence track to record the Q-Link operation
as the MIDI Control Change events on the sequencer.
For example, select TRACK at the Destination field of Q1 and set 10 at the Ctrl field.
While the ACTIVE indicator for Q1 is turned on, when the sequence is recorded as Q1 is operated in
MAIN mode, the operation of Q1 is recorded on to the track as the Control Change No. 10, i.e. PAN.
Also, when it is used together with the Program Modulation in PROGRAM mode, the Q-Link knob/
slider can control the Destination.
For example, select TRACK at the Destination field of Q4 and set 0 at the Ctrl field.
When CONTROLLER 0 at Source field and CUT OFF at Destination field are selected and Depth is
set as appropriate in Program Modulation, the Cut-off can now be controlled by the Q4.
7

Version 1.20 Addendum
Space entry by TAP TEMPO key supported
In the Name/Rename pop-up window, the [TAP TEMPO] key is now used as the space key.
Scroll Up/Down in List Screen supported
It is now possible to scroll the cursor up/down in the List screen by pressing the [BLOCK CURSOR
▲/▼] keys while holding down the [SHIFT] key.
For example, select a drum program in PROGRAM mode and move the cursor to select C-2 in the
Sample List block in the [F2] Keygroup Mix page. Pressing the [BLOCK CUOSOR ▼] key while
holding down the [SHIFT] key will move to C-1.
NOTE NUMBER/NOTE NAME Switching supported
Now, the Note Number/Note Name display can be switched by pressing the currently selected function key (inverted) again.
For example, in the [F2] Keygroup Mix page of the PROGRAM mode, while the note is displayed by
Note Name, pressing the [F2] (KG MIX) key again switches the display by Note Number.
PANIC function by tapping STOP key supported
Tapping the [STOP] key three times in a row now acts as the [F6] (PANIC) key in the [F1] Routing
page and/or [F2] Filter page of MIDI mode.
When the STOP key is tapped three times in a row, the All Notes Off, Reset All Controllers, Damper
Off, and Bend 0 messages will be sent out from the MIDI out terminal. This is convenient when you
want to stop playing back a long sample in one shot mode.
USB Host Driver improved
The improvement on the MPC4000 USB driver has been made to support the following command
sets.
C/DVD Device: SFF-8020i / MMC-2
FD Device: SFF-8070i / UFI
Other Device: SFF-8070i / SCSI transparent command set
The USB mass-storage devices that are compliant with those command sets can now be used with
the MPC4000.
8

 Loading...