

Page 1

Reference Manual
WARNING
To prevent fire or shock hazard, do not
expose this appliance to rain or moisture.
Page 2
Important Notice
The material in this document is copyright to AKAI professional M.I. Corp., and may not be
quoted or reproduced in any form without written permission from the company.
LIMITED SOFTWARE WARRANTY POLICY
All the software provided with, or purchased especially for, AKAI professional products has
been tested for functionality. AKAI professional M.I. Corp. will make its best efforts to correct
reported software defects for future releases subject to technical practicabilities.
AKAI professional M.I. Corp. makes no warranty or representation either expressed or implied with respect to the system's performance or fitness for a particular purpose.
In no event will AKAI professional M.I. Corp. be liable for direct or indirect damages arising
from any defect in the software or its documentation. Further, AKAI professional M.I. Corp.
will not accept any liability for any programs, sounds, audio recording or sequences stored in
or used with AKAI professional products, including the cost of recovery of such data.
The warranties, remedies and disclaimers above are exclusive and take precedence over all
others, oral or written, express or implied, to the extent permitted by law in the geographical
area of the product's use. No employee of AKAI professional M.I. Corp., agent, distributor or
employee of an agent or distributor is authorised to offer any variation from this policy.
WARNING!!
To prevent fire or shock hazard, do not expose this appliance to rain or moisture.
CAUTION
RISK OF ELECTRIC SHOCK
DO NOT OPEN
CAUTION: TO REDUCE THE RISK OF ELECTRIC SHOCK
DO NOT REMOVE COVER (OR BACK).
NO USER-SERVICEABLE PARTS INSIDE.
REFER SERVICING TO QUALIFIED SERVICE PERSONNEL.
THE SYMBOLS ARE RULED BY UL STANDARDS (U.S.A.)
The lightning flash with arrowhead symbol, within an equilateral triangle, is
intended to alert the user to the presence of uninsulated “dangerous voltage”
within the product’s enclosure; that may be of sufficient magnitude to
constitute a risk of electric shock to persons.
The exclamation point within an equilateral triangle is intented to alert the user
to the presence of important operating and maintenance (servicing) instructions in the literature accompanying the appliance.
1-En
5B-En
Lithium battery
This product uses a lithium battery for memory backup.
The lithium battery should only be replaced by qualified service personnel.
Improper handling may cause risk of explosion.
3/5/2002
24A-En
Page 3

WARNING: WHEN USING ELECTRIC PRODUCTS, BASIC PRECAUTIONS SHOULD ALWAYS
BE FOLLOWED, INCLUDING THE FOLLOWING:
WARNING
The MPC4000 is designed to be used in a standard household environment.
Power requirements for electrical equipment vary from area to area. Please ensure that your MPC4000
meets the power requirements in your area. If in doubt, consult a qualified electrician or AKAI professional dealer.
120 VAC @ 60 Hz for USA and Canada
220~240 VAC @ 50 Hz for Europe
240 VAC @ 50 Hz for Australia
PROTECTING YOURSELF AND THE MPC4000
• Never touch the AC plug with wet hands.
• Always disconnect the MPC4000 from the power supply by pulling on the plug, not the cord.
• Allow only an AKAI professional dealer or qualified professional engineer to repair or reassemble the MPC4000. Apart from voiding the warranty, unauthorized engineers might touch
live internal parts and receive a serious electrical shock. There are no user serviceable parts
inside.
• Do not put, or allow anyone to put any object, especially metal objects, into the MPC4000.
• Use only a household AC power supply. Never use a DC power supply.
• If water or any other liquid is spilled into or onto the MPC4000, disconnect the power, and call
your dealer.
• Make sure that the unit is well-ventilated, and away from direct sunlight.
• To avoid damage to internal circuitry, as well as the external finish, keep the MPC4000 away
from sources of direct heat (stoves, radiators, etc.).
• Avoid using aerosol insecticides, etc. near the MPC4000. They may damage the surface, and
may ignite.
• Do not use denatured alcohol, thinner or similar chemicals to clean the MPC4000. They will
damage the finish.
• Modification of this equipment is dangerous, and can result in the functions of the MPC4000
being impaired. Never attempt to modify the equipment in any way.
• Make sure that the MPC4000 is always well-supported when in use (either in a speciallydesigned equipment rack, or on a firm level surface).
• In order to assure optimum performance of your MPC4000, select the setup location carefully,
and make sure the equipment is used properly. Avoid setting up the MPC4000 in the following
locations:
1. In a humid or dusty environment
2. In a room with poor ventilation
3. On a surface which is not horizontal
4. Inside a vehicle such as a car, where it will be subject to vibration
5. In an extremely hot or cold environment
Page 4

For U.K. customers only
WARNING
THIS APPARATUS MUST BE EARTHED
IMPORTANT
This equipment is fitted with an approved non-rewireable UK mains plug.
To change the fuse in this type of plug proceed as follows:
1) Remove the fuse cover and old fuse.
2) Fit a new fuse which should be a BS1362 5 Amp A.S.T.A or BSI approved type.
3) Refit the fuse cover.
If the AC mains plug fitted to the lead supplied with this equipment is not suitable for your type of
AC outlet sockets, it should be changed to an AC mains lead, complete with moulded plug, to the
appropriate type. If this is not possible, the plug should be cut off and a correct one fitted to suit the
AC outlet. This should be fused at 5 Amps.
If a plug without a fuse is used, the fuse at the distribution board should NOT BE GREATER than
5 Amp.
PLEASE NOTE: THE SEVERED PLUG MUST BE DESTROYED TO AVOID A POSSIBLE
SHOCK HAZARD SHOULD IT BE INSERTED INTO A 13 AMP SOCKET
ELSEWHERE.
The wires in this mains lead are coloured in accordance with the following code:
GREEN and YELLOW — Earth
BLUE — Neutral
BROWN — Live
As the colours of the wires in the mains lead of this apparatus may not correspond with the coloured
markings identifying the terminals in your plug, please proceed as follows:
The wire which is coloured GREEN and YELLOW must be connected to the terminal which is
marked with the letter E or with the safety earth symbol or coloured GREEN or coloured
GREEN and YELLOW.
The wire which is coloured BLUE must be connected to the terminal which is marked with the
letter N or coloured BLACK.
The wire which is coloured BROWN must be connected to the terminal which is marked with
the letter L or coloured RED.
THIS APPARATUS MUST BE EARTHED
Ensure that all the terminals are securely tightened and no loose strands of wire exist.
Before replacing the plug cover, make certain the cord grip is clamped over the outer sheath of the
lead and not simply over the wires.
6D-En
Page 5

FCC WARNING
This equipment has been tested and found to comply with the limits for a Class B digital device
pursuant to Part 15 of the FCC rules. These limits are designed to provide reasonable protection against harmful interference in a residential installation. This equipment generates, uses,
and can radiate radio frequency energy and, if not installed and used in accordance with the
instructions, may cause harmful interference to radio communications. However, there is no
guarantee that interference will not occur in a particular installation. If this equipment does
cause harmful interference to radio or television reception, which can be determined by turning the equipment off and on, the user is encouraged to try to correct the interference by one
or more of the following measures:
• Reorient or relocate the receiving antenna.
• Increase the separation between the equipment and receiver.
• Connect the equipment into an outlet on a circuit different from that to which the receiver is
connected.
• Consult the dealer or an experienced radio/TV technician for help.
21B-En
AVIS POUR LES ACHETEURS CANADIENS DU MPC4000
Le présent appareil numérique n’ément pas de bruits radioélectriques dépassant les limites
applicables aux appareils numériques de la Class B prescrites dans le Règlement sur le
brouillage radioélectrique édicté par le ministère des Communications du Canada.
27-F
This digital apparatus does not exceed the Class B limits for radio noise emissions from digital
apparatus set out in the Radio Interference Regulations of the Canadian Department of Communications.
27-En
VENTILATION
Do not prevent the unit’s ventilation, especially by placing the unit on soft carpet, in a narrow
space, or by placing objects on the unit’s chassis—top, side, or rear panels. Always keep the
unit’s chassis at least 10 centimeters from any other objects.
31C-En
CHANGES OR MODIFICA TIONS NOT EXPRESSLY APPROVED BY THE MANUF ACTURER
FOR COMPLIANCE COULD VOID THE USER’S AUTHORITY TO OPERATE THE EQUIPMENT.
32-En
COPYRIGHT NOTICE
The AKAI professional MPC4000 is a computer-based device, and as such contains and uses
software in ROMs. This software, and all related documentation, including this Operator’s Manual,
contain proprietary information which is protected by copyright laws. All rights are reserved. No
part of the software or its documentation may be copied, transferred or modified. You may not
modify , adapt, translate, lease, distribute, resell for profit or create derivative works based on the
software and its related documentation or any part thereof without prior written consent from
AKAI professional M.I. Corp., Yokohama, Japan.
Page 6

■
■
■
■
■
■
■
■
■
■
■
■
■
■
■
■
■
■
Contents
■
■
■
■
■
■
■
■
■
■
■
Contents
MPC400 Reference Manual . . . . . . . . . . . . . . . . . . . . . . . . . . . 1
How to use this reference manual . . . . . . . . . . . . . . . . . . . . . . . . . . . . . . 1
Main mode . . . . . . . . . . . . . . . . . . . . . . . . . . . . . . . . . . . . . . . . . 4
Main page. . . . . . . . . . . . . . . . . . . . . . . . . . . . . . . . . . . . . . . . . . . . . . . . . 4
Recording/playing a sequence. . . . . . . . . . . . . . . . . . . . . . . . . . . . . . . 4
Recording a sequence . . . . . . . . . . . . . . . . . . . . . . . . . . . . . . . . . 9
Customizing the metronome sound. . . . . . . . . . . . . . . . . . . . . . 12
Inserting a tempo change in the middle of a sequence . . . . . . . 13
Cutting/inserting/copying measures of a sequence. . . . . . . . . . 14
Transposing the entire sequence . . . . . . . . . . . . . . . . . . . . . . . . 15
Copying a sequence. . . . . . . . . . . . . . . . . . . . . . . . . . . . . . . . . . 16
Deleting a sequence. . . . . . . . . . . . . . . . . . . . . . . . . . . . . . . . . . 17
Copying a track. . . . . . . . . . . . . . . . . . . . . . . . . . . . . . . . . . . . . 18
Deleting a track. . . . . . . . . . . . . . . . . . . . . . . . . . . . . . . . . . . . . 19
Customizing the default settings for a sequence. . . . . . . . . . . . 20
Applying timing correction to an already-recorded track. . . . . 21
Rewriting the velocity of note events . . . . . . . . . . . . . . . . . . . . 22
Rewriting the duration of note events. . . . . . . . . . . . . . . . . . . . 23
Transposing a recorded track . . . . . . . . . . . . . . . . . . . . . . . . . . 24
Customizing the default settings for each track number. . . . . . 25
Changing the track number. . . . . . . . . . . . . . . . . . . . . . . . . . . . 26
Separating a track by MIDI channels . . . . . . . . . . . . . . . . . . . . 27
Erasing all muted tracks . . . . . . . . . . . . . . . . . . . . . . . . . . . . . . 28
Making program change transmission settings. . . . . . . . . . . . . 28
Performing auto punch-in/out. . . . . . . . . . . . . . . . . . . . . . . . . . 29
Using the Simul Play function . . . . . . . . . . . . . . . . . . . . . . . . . 30
Naming the external devices connected
to the MIDI OUT connectors . . . . . . . . . . . . . . . . . . . . . . . . . . 31
TR list/Out 1 page . . . . . . . . . . . . . . . . . . . . . . . . . . . . . . . . . . . . . . . . . 32
Listing the track output destinations (Out 1). . . . . . . . . . . . . . . . . . . 32
TR list/Out 2 page . . . . . . . . . . . . . . . . . . . . . . . . . . . . . . . . . . . . . . . . . 34
Listing the track output destinations (Out 2). . . . . . . . . . . . . . . . . . . 34
TR list/PARAMS page . . . . . . . . . . . . . . . . . . . . . . . . . . . . . . . . . . . . . . 35
Listing the track parameters. . . . . . . . . . . . . . . . . . . . . . . . . . . . . . . . 35
Sequence edit mode. . . . . . . . . . . . . . . . . . . . . . . . . . . . . . . . 37
Sequence edit page. . . . . . . . . . . . . . . . . . . . . . . . . . . . . . . . . . . . . . . . . 37
Using the graphic editor to edit a sequence. . . . . . . . . . . . . . . . . . . . 37
Step-recording note events . . . . . . . . . . . . . . . . . . . . . . . . . . . . 41
Deleting MIDI events . . . . . . . . . . . . . . . . . . . . . . . . . . . . . . . . 42
Moving MIDI events. . . . . . . . . . . . . . . . . . . . . . . . . . . . . . . . . 43
Copying/cutting MIDI events . . . . . . . . . . . . . . . . . . . . . . . . . . 45
Pasting MIDI events . . . . . . . . . . . . . . . . . . . . . . . . . . . . . . . . . 46
Simultaneously editing values in a selected region. . . . . . . . . . 47
Inserting continuously-variable events . . . . . . . . . . . . . . . . . . . 49
v
Page 7

■
■
■
■
■
■
■
■
■
■
■
■
■
■
■
■
■
■
Contents
Step edit mode. . . . . . . . . . . . . . . . . . . . . . . . . . . . . . . . . . . . . 52
Step edit page . . . . . . . . . . . . . . . . . . . . . . . . . . . . . . . . . . . . . . . . . . . . . 52
Using the event list to edit a sequence . . . . . . . . . . . . . . . . . . . . . . . . 52
Copying/cutting MIDI events . . . . . . . . . . . . . . . . . . . . . . . . . . 56
Pasting MIDI events . . . . . . . . . . . . . . . . . . . . . . . . . . . . . . . . . 57
Song mode . . . . . . . . . . . . . . . . . . . . . . . . . . . . . . . . . . . . . . . . 64
Song page . . . . . . . . . . . . . . . . . . . . . . . . . . . . . . . . . . . . . . . . . . . . . . . . 64
Creating a song. . . . . . . . . . . . . . . . . . . . . . . . . . . . . . . . . . . . . . . . . . 64
MISC mode . . . . . . . . . . . . . . . . . . . . . . . . . . . . . . . . . . . . . . . . 73
Setup page. . . . . . . . . . . . . . . . . . . . . . . . . . . . . . . . . . . . . . . . . . . . . . . . 73
Making other settings. . . . . . . . . . . . . . . . . . . . . . . . . . . . . . . . . . . . . 73
Sync page . . . . . . . . . . . . . . . . . . . . . . . . . . . . . . . . . . . . . . . . . . . . . . . . 75
Making synchronization-related settings . . . . . . . . . . . . . . . . . . . . . . 75
Synchronizing the MPC4000 to an external device . . . . . . . . . 76
Synchronizing an external device to the MPC4000 . . . . . . . . . 77
MIDI mode . . . . . . . . . . . . . . . . . . . . . . . . . . . . . . . . . . . . . . . . 78
Routing page. . . . . . . . . . . . . . . . . . . . . . . . . . . . . . . . . . . . . . . . . . . . . . 78
Changing the routing of MIDI events . . . . . . . . . . . . . . . . . . . . . . . . 78
Filter page . . . . . . . . . . . . . . . . . . . . . . . . . . . . . . . . . . . . . . . . . . . . . . . . 80
Filtering the incoming MIDI events. . . . . . . . . . . . . . . . . . . . . . . . . . 80
Event page. . . . . . . . . . . . . . . . . . . . . . . . . . . . . . . . . . . . . . . . . . . . . . . . 82
Monitoring MIDI events . . . . . . . . . . . . . . . . . . . . . . . . . . . . . . . . . . 82
Save mode . . . . . . . . . . . . . . . . . . . . . . . . . . . . . . . . . . . . . . . . 84
Save page . . . . . . . . . . . . . . . . . . . . . . . . . . . . . . . . . . . . . . . . . . . . . . . . 84
Saving data to a storage device . . . . . . . . . . . . . . . . . . . . . . . . . . . . . 84
Saving all sequences and songs. . . . . . . . . . . . . . . . . . . . . . . . . 86
Saving an individual sequence. . . . . . . . . . . . . . . . . . . . . . . . . . 88
Saving samples . . . . . . . . . . . . . . . . . . . . . . . . . . . . . . . . . . . . . 89
Saving programs . . . . . . . . . . . . . . . . . . . . . . . . . . . . . . . . . . . . 91
Saving multis. . . . . . . . . . . . . . . . . . . . . . . . . . . . . . . . . . . . . . . 93
Disk utility page . . . . . . . . . . . . . . . . . . . . . . . . . . . . . . . . . . . . . . . . . . . 96
Managing files on a storage device . . . . . . . . . . . . . . . . . . . . . . . . . . 96
Deleting a file from a storage device. . . . . . . . . . . . . . . . . . . . . 97
Formatting a storage device. . . . . . . . . . . . . . . . . . . . . . . . . . . . 98
Load mode . . . . . . . . . . . . . . . . . . . . . . . . . . . . . . . . . . . . . . . 101
Load page . . . . . . . . . . . . . . . . . . . . . . . . . . . . . . . . . . . . . . . . . . . . . . . 101
Loading data from a storage device . . . . . . . . . . . . . . . . . . . . . . . . . 101
Loading an ALL file . . . . . . . . . . . . . . . . . . . . . . . . . . . . . . . . 103
Loading an individual sequence . . . . . . . . . . . . . . . . . . . . . . . 105
Loading samples . . . . . . . . . . . . . . . . . . . . . . . . . . . . . . . . . . . 105
Loading programs . . . . . . . . . . . . . . . . . . . . . . . . . . . . . . . . . . 107
Loading multis. . . . . . . . . . . . . . . . . . . . . . . . . . . . . . . . . . . . . 109
Finding a file . . . . . . . . . . . . . . . . . . . . . . . . . . . . . . . . . . . . . . 111
Global mode . . . . . . . . . . . . . . . . . . . . . . . . . . . . . . . . . . . . . 113
Global page. . . . . . . . . . . . . . . . . . . . . . . . . . . . . . . . . . . . . . . . . . . . . . 113
Making overall settings for the MPC4000. . . . . . . . . . . . . . . . . . . . 113
Setting the internal clock. . . . . . . . . . . . . . . . . . . . . . . . . . . . . 115
vi
Page 8

Contents
■
■
■
■
■
■
■
■
■
■
■
Returning the MPC4000 to the factory-set condition. . . . . . . 116
Memory page . . . . . . . . . . . . . . . . . . . . . . . . . . . . . . . . . . . . . . . . . . . . 117
Viewing the amount of free memory. . . . . . . . . . . . . . . . . . . . . . . . 117
Configuration page. . . . . . . . . . . . . . . . . . . . . . . . . . . . . . . . . . . . . . . . 119
Setting the digital output sync source and the SCSI ID etc. . . . . . . 119
Foot switch page. . . . . . . . . . . . . . . . . . . . . . . . . . . . . . . . . . . . . . . . . . 121
Making foot switch settings. . . . . . . . . . . . . . . . . . . . . . . . . . . . . . . 121
Multi mode . . . . . . . . . . . . . . . . . . . . . . . . . . . . . . . . . . . . . . . 123
List page. . . . . . . . . . . . . . . . . . . . . . . . . . . . . . . . . . . . . . . . . . . . . . . . 123
Selecting a multi . . . . . . . . . . . . . . . . . . . . . . . . . . . . . . . . . . . . . . . 123
Creating a new multi. . . . . . . . . . . . . . . . . . . . . . . . . . . . . . . . 124
Copying a multi. . . . . . . . . . . . . . . . . . . . . . . . . . . . . . . . . . . . 125
Deleting a multi. . . . . . . . . . . . . . . . . . . . . . . . . . . . . . . . . . . . 126
Assigning a multi number to a multi. . . . . . . . . . . . . . . . . . . . 127
Mix page. . . . . . . . . . . . . . . . . . . . . . . . . . . . . . . . . . . . . . . . . . . . . . . . 128
Editing the mix parameters of each part . . . . . . . . . . . . . . . . . . . . . 128
Adding parts to a multi . . . . . . . . . . . . . . . . . . . . . . . . . . . . . . 130
Deleting a part from a multi . . . . . . . . . . . . . . . . . . . . . . . . . . 130
Assigning a program to each part . . . . . . . . . . . . . . . . . . . . . . 131
MIDI page . . . . . . . . . . . . . . . . . . . . . . . . . . . . . . . . . . . . . . . . . . . . . . 132
Making MIDI-related settings for each part . . . . . . . . . . . . . . . . . . 132
Using program change messages
to switch programs for the parts . . . . . . . . . . . . . . . . . . . . . . . 133
Span page . . . . . . . . . . . . . . . . . . . . . . . . . . . . . . . . . . . . . . . . . . . . . . . 134
Specifying the range of notes played by each part . . . . . . . . . . . . . 134
■
■
■
■
Mixer mode . . . . . . . . . . . . . . . . . . . . . . . . . . . . . . . . . . . . . . 136
Part page. . . . . . . . . . . . . . . . . . . . . . . . . . . . . . . . . . . . . . . . . . . . . . . . 136
Adjusting the mix parameters for each part. . . . . . . . . . . . . . . . . . . 136
Effect mode . . . . . . . . . . . . . . . . . . . . . . . . . . . . . . . . . . . . . . 137
Select page . . . . . . . . . . . . . . . . . . . . . . . . . . . . . . . . . . . . . . . . . . . . . . 137
Specifying the effect type and routing. . . . . . . . . . . . . . . . . . . . . . . 137
Switching the effects to stereo input. . . . . . . . . . . . . . . . . . . . 138
Edit page. . . . . . . . . . . . . . . . . . . . . . . . . . . . . . . . . . . . . . . . . . . . . . . . 139
Editing the effect parameters. . . . . . . . . . . . . . . . . . . . . . . . . . . . . . 139
Mix page. . . . . . . . . . . . . . . . . . . . . . . . . . . . . . . . . . . . . . . . . . . . . . . . 152
Adjusting the effect output level . . . . . . . . . . . . . . . . . . . . . . . . . . . 152
Applying effects to each part . . . . . . . . . . . . . . . . . . . . . . . . . 153
Record mode . . . . . . . . . . . . . . . . . . . . . . . . . . . . . . . . . . . . . 155
Record page . . . . . . . . . . . . . . . . . . . . . . . . . . . . . . . . . . . . . . . . . . . . . 155
Recording a sample . . . . . . . . . . . . . . . . . . . . . . . . . . . . . . . . . . . . . 155
Recording a new sample . . . . . . . . . . . . . . . . . . . . . . . . . . . . . 157
Applying Q-FX while you sample . . . . . . . . . . . . . . . . . . . . . 160
Sample mode. . . . . . . . . . . . . . . . . . . . . . . . . . . . . . . . . . . . . 163
List page. . . . . . . . . . . . . . . . . . . . . . . . . . . . . . . . . . . . . . . . . . . . . . . . 163
Viewing the sample list . . . . . . . . . . . . . . . . . . . . . . . . . . . . . . . . . . 163
Copying a sample . . . . . . . . . . . . . . . . . . . . . . . . . . . . . . . . . . 164
Deleting a sample . . . . . . . . . . . . . . . . . . . . . . . . . . . . . . . . . . 165
Trim/Loop page . . . . . . . . . . . . . . . . . . . . . . . . . . . . . . . . . . . . . . . . . . 166
vii
Page 9

Contents
Trimming or looping a sample. . . . . . . . . . . . . . . . . . . . . . . . . . . . . 166
Making various settings for a sample . . . . . . . . . . . . . . . . . . . 169
Setting various points while the sample plays. . . . . . . . . . . . . 170
Automatically detecting the start/end points . . . . . . . . . . . . . . 170
Automatically detecting the loop points . . . . . . . . . . . . . . . . . 171
Applying crossfading. . . . . . . . . . . . . . . . . . . . . . . . . . . . . . . . 172
Resampling with Q-FX . . . . . . . . . . . . . . . . . . . . . . . . . . . . . . 173
Region page . . . . . . . . . . . . . . . . . . . . . . . . . . . . . . . . . . . . . . . . . . . . . 176
Dividing a sample . . . . . . . . . . . . . . . . . . . . . . . . . . . . . . . . . . . . . . 176
Dividing a sample into multiple regions . . . . . . . . . . . . . . . . . 177
Adjusting the region start/region end points . . . . . . . . . . . . . . 178
Using the divided samples to create a sequence/program . . . . 179
Adjusting the tempo of a sample. . . . . . . . . . . . . . . . . . . . . . . 181
Using commands to edit a sample. . . . . . . . . . . . . . . . . . . . . . 183
Program mode . . . . . . . . . . . . . . . . . . . . . . . . . . . . . . . . . . . . 191
List page . . . . . . . . . . . . . . . . . . . . . . . . . . . . . . . . . . . . . . . . . . . . . . . . 191
Viewing a list of programs in internal memory . . . . . . . . . . . . . . . . 191
■Creating a new program. . . . . . . . . . . . . . . . . . . . . . . . . . . . . . 192
■Assigning a program change number to a program. . . . . . . . . 193
■Copying a program . . . . . . . . . . . . . . . . . . . . . . . . . . . . . . . . . 194
■Deleting a program . . . . . . . . . . . . . . . . . . . . . . . . . . . . . . . . . 195
■Converting the program type. . . . . . . . . . . . . . . . . . . . . . . . . . 196
■Merging two programs . . . . . . . . . . . . . . . . . . . . . . . . . . . . . . 197
Key group mix page . . . . . . . . . . . . . . . . . . . . . . . . . . . . . . . . . . . . . . . 198
Editing the mix parameters of a program. . . . . . . . . . . . . . . . . . . . . 198
■Adding new key groups (Key group programs) . . . . . . . . . . . 200
■Copying a key group (Key group programs). . . . . . . . . . . . . . 201
■Deleting a key group (Key group programs). . . . . . . . . . . . . . 201
■Sorting the key groups displayed in the sample list
(Key group programs) . . . . . . . . . . . . . . . . . . . . . . . . . . . . . . . 202
■Copying note number parameters to another note number
(Drum programs). . . . . . . . . . . . . . . . . . . . . . . . . . . . . . . . . . . 203
■Making program modulation settings . . . . . . . . . . . . . . . . . . . 204
■Viewing information on samples. . . . . . . . . . . . . . . . . . . . . . . 206
Pitch page . . . . . . . . . . . . . . . . . . . . . . . . . . . . . . . . . . . . . . . . . . . . . . . 207
Specifying the tuning or zone of a key group or note number. . . . . 207
■Specifying the key range of a key group
(Key group programs) . . . . . . . . . . . . . . . . . . . . . . . . . . . . . . . 208
■Specifying mute groups. . . . . . . . . . . . . . . . . . . . . . . . . . . . . . 209
Edit 1 page . . . . . . . . . . . . . . . . . . . . . . . . . . . . . . . . . . . . . . . . . . . . . . 211
Adjusting the pitch, filter, and amp . . . . . . . . . . . . . . . . . . . . . . . . . 211
■Filter types. . . . . . . . . . . . . . . . . . . . . . . . . . . . . . . . . . . . . . . . 214
Edit 2 page . . . . . . . . . . . . . . . . . . . . . . . . . . . . . . . . . . . . . . . . . . . . . . 215
Adjusting the program LFOs and auxiliary envelope . . . . . . . . . . . 215
Zone page . . . . . . . . . . . . . . . . . . . . . . . . . . . . . . . . . . . . . . . . . . . . . . . 219
Editing the zone 1–4 parameters . . . . . . . . . . . . . . . . . . . . . . . . . . . 219
■Switching between zones. . . . . . . . . . . . . . . . . . . . . . . . . . . . . 221
MISC. page. . . . . . . . . . . . . . . . . . . . . . . . . . . . . . . . . . . . . . . . . . . . . . 223
Editing parameters common to the entire program . . . . . . . . . . . . . 223
■
■
■
■
■
■
■
■
■
■
■
viii
Page 10

Contents
■Making portamento settings (Key group programs). . . . . . . . 225
■Specifying the temperament of a program
(Key group programs). . . . . . . . . . . . . . . . . . . . . . . . . . . . . . . 226
Assign page . . . . . . . . . . . . . . . . . . . . . . . . . . . . . . . . . . . . . . . . . . . . . 227
Assigning note numbers to pads (Drum programs). . . . . . . . . . . . . 227
The Q-LINK function . . . . . . . . . . . . . . . . . . . . . . . . . . . . . . . . 229
Q-LINK setup page . . . . . . . . . . . . . . . . . . . . . . . . . . . . . . . . . . . . . . . 229
Assigning parameters to the Q-LINK knobs/sliders . . . . . . . . . . . . 229
■Assigning parameters to the Q-LINK knobs/sliders. . . . . . . . 231
Q-Link sequence page . . . . . . . . . . . . . . . . . . . . . . . . . . . . . . . . . . . . . 232
Recording and playing movements of the Q-LINK knobs and sliders . . . 232
■Recording and playing knob/slider movements . . . . . . . . . . . 233
Track Mute function . . . . . . . . . . . . . . . . . . . . . . . . . . . . . . . . 235
Track Mute page. . . . . . . . . . . . . . . . . . . . . . . . . . . . . . . . . . . . . . . . . . 235
Using pads to mute tracks . . . . . . . . . . . . . . . . . . . . . . . . . . . . . . . . 235
■Using the pads to control track muting. . . . . . . . . . . . . . . . . . 236
Edit page. . . . . . . . . . . . . . . . . . . . . . . . . . . . . . . . . . . . . . . . . . . . . . . . 238
Editing track mute operations that were recorded in a sequence. . . 238
■Editing mute operations that you recorded . . . . . . . . . . . . . . . 239
Next Sequence function . . . . . . . . . . . . . . . . . . . . . . . . . . . . 240
Next Sequence page . . . . . . . . . . . . . . . . . . . . . . . . . . . . . . . . . . . . . . . 240
Using the pads to switch sequences. . . . . . . . . . . . . . . . . . . . . . . . . 240
■Using the pads to switch sequences . . . . . . . . . . . . . . . . . . . . 241
Pad Assign Functions . . . . . . . . . . . . . . . . . . . . . . . . . . . . . . . 243
Current page. . . . . . . . . . . . . . . . . . . . . . . . . . . . . . . . . . . . . . . . . . . . . 243
Changing the note number and sample assignment for each pad . . 243
Sensitivity page . . . . . . . . . . . . . . . . . . . . . . . . . . . . . . . . . . . . . . . . . . 246
Adjusting the sensitivity of the pads . . . . . . . . . . . . . . . . . . . . . . . . 246
Other popup windows . . . . . . . . . . . . . . . . . . . . . . . . . . . . . . 247
Name/Rename popup window . . . . . . . . . . . . . . . . . . . . . . . . . . . . . . . 247
Inputting a name . . . . . . . . . . . . . . . . . . . . . . . . . . . . . . . . . . . . . . . 247
Locate popup window . . . . . . . . . . . . . . . . . . . . . . . . . . . . . . . . . . . . . 248
Performing auto locate operations and making transport settings. . 248
Appendix: Installing storage devices (for service engineers) . . 251
Check the included items . . . . . . . . . . . . . . . . . . . . . . . . . . . . . . . . . . . 251
Opening the top panel. . . . . . . . . . . . . . . . . . . . . . . . . . . . . . . . . . . . . . 251
Installing a drive. . . . . . . . . . . . . . . . . . . . . . . . . . . . . . . . . . . . . . . . . . 253
Cable connections. . . . . . . . . . . . . . . . . . . . . . . . . . . . . . . . . . . . . . . . . 254
ix
Page 11
MPC400 Reference Manual
This reference manual explains the pages that appear in the display , the major popup windows, and typical procedures for each mode and function of the MPC4000.
* Adobe and Adobe Acrobat are trademarks of Adobe Systems Incorporated.
How to use this reference manual
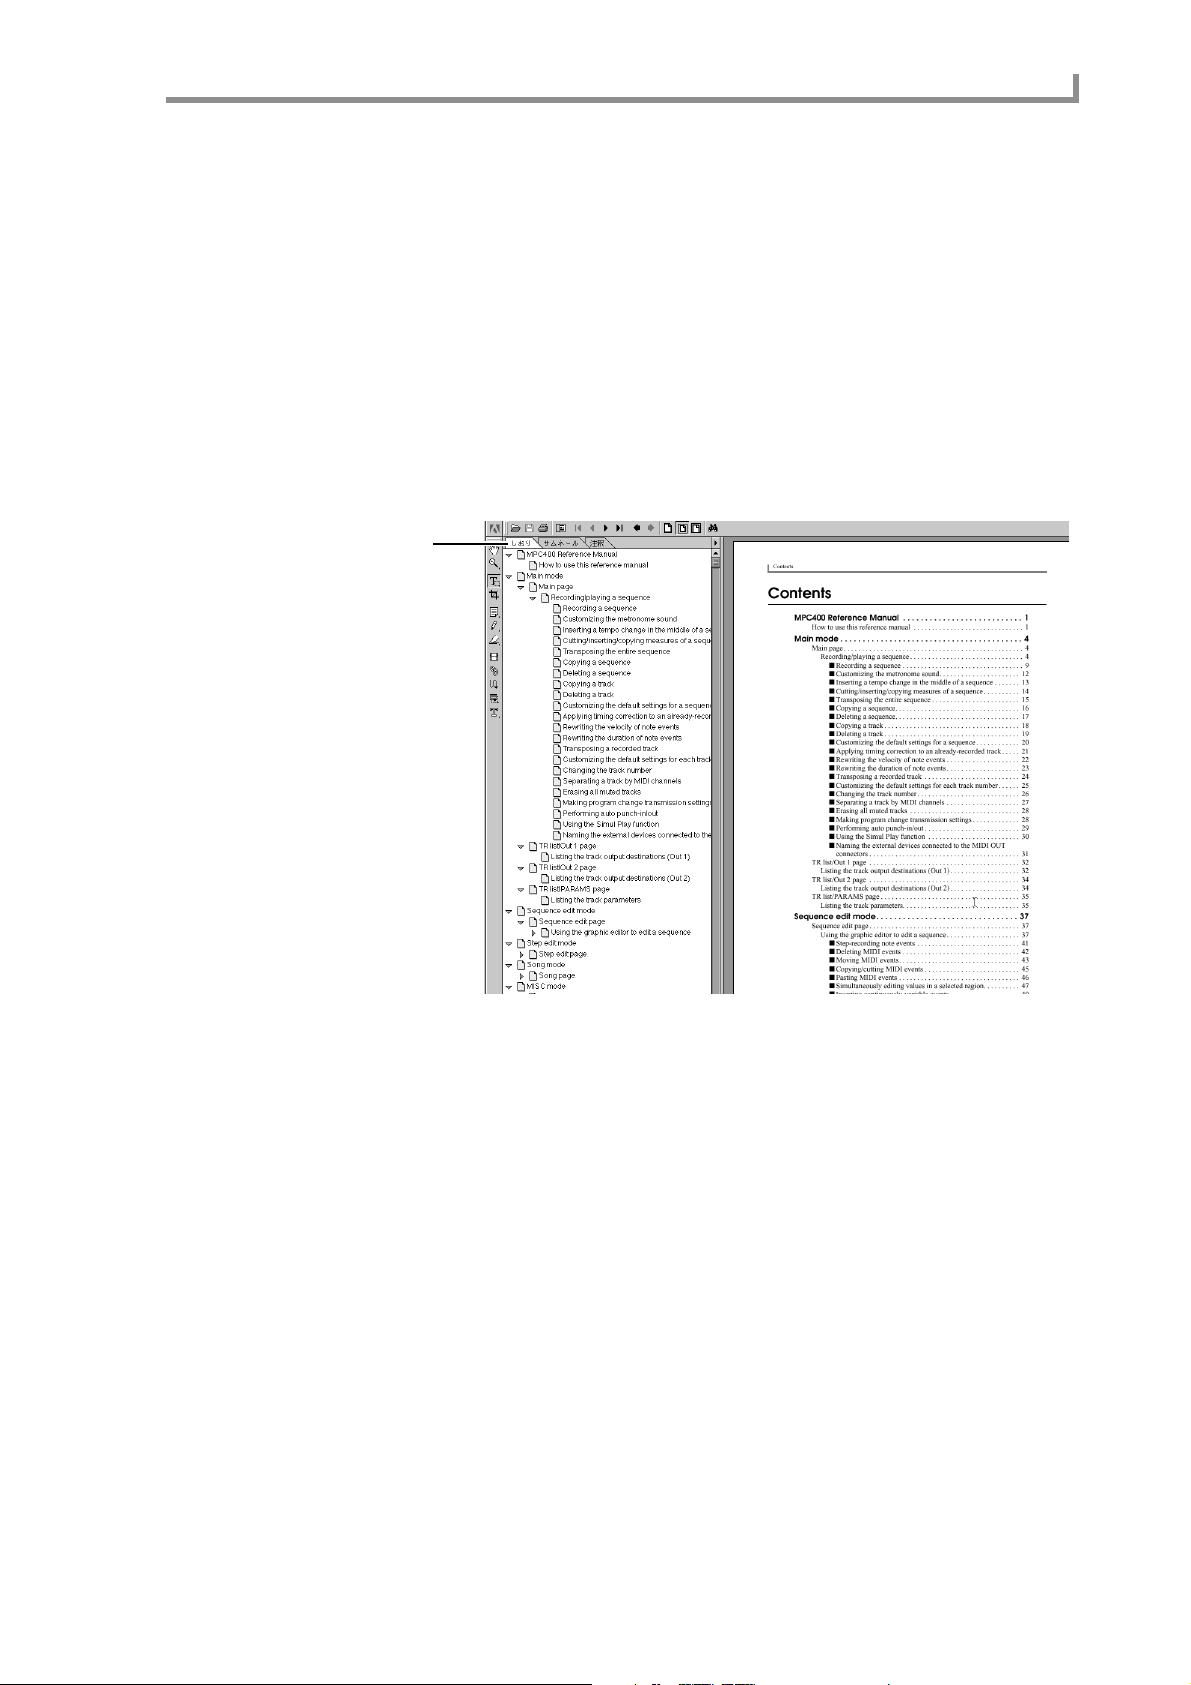
To learn about a specific mode or page
→Use the index or bookmarks to find the name of the mode (function) or page.
Since the reference manual is organized by mode/page, you can quickly find the mode
(function) or page you are looking for.
You can use Adobe Acrobat Reader’s bookmark function to go directly to the desired
mode or page.
Bookmark
How to use this reference manual
1
Page 12
MPC400 Reference Manual
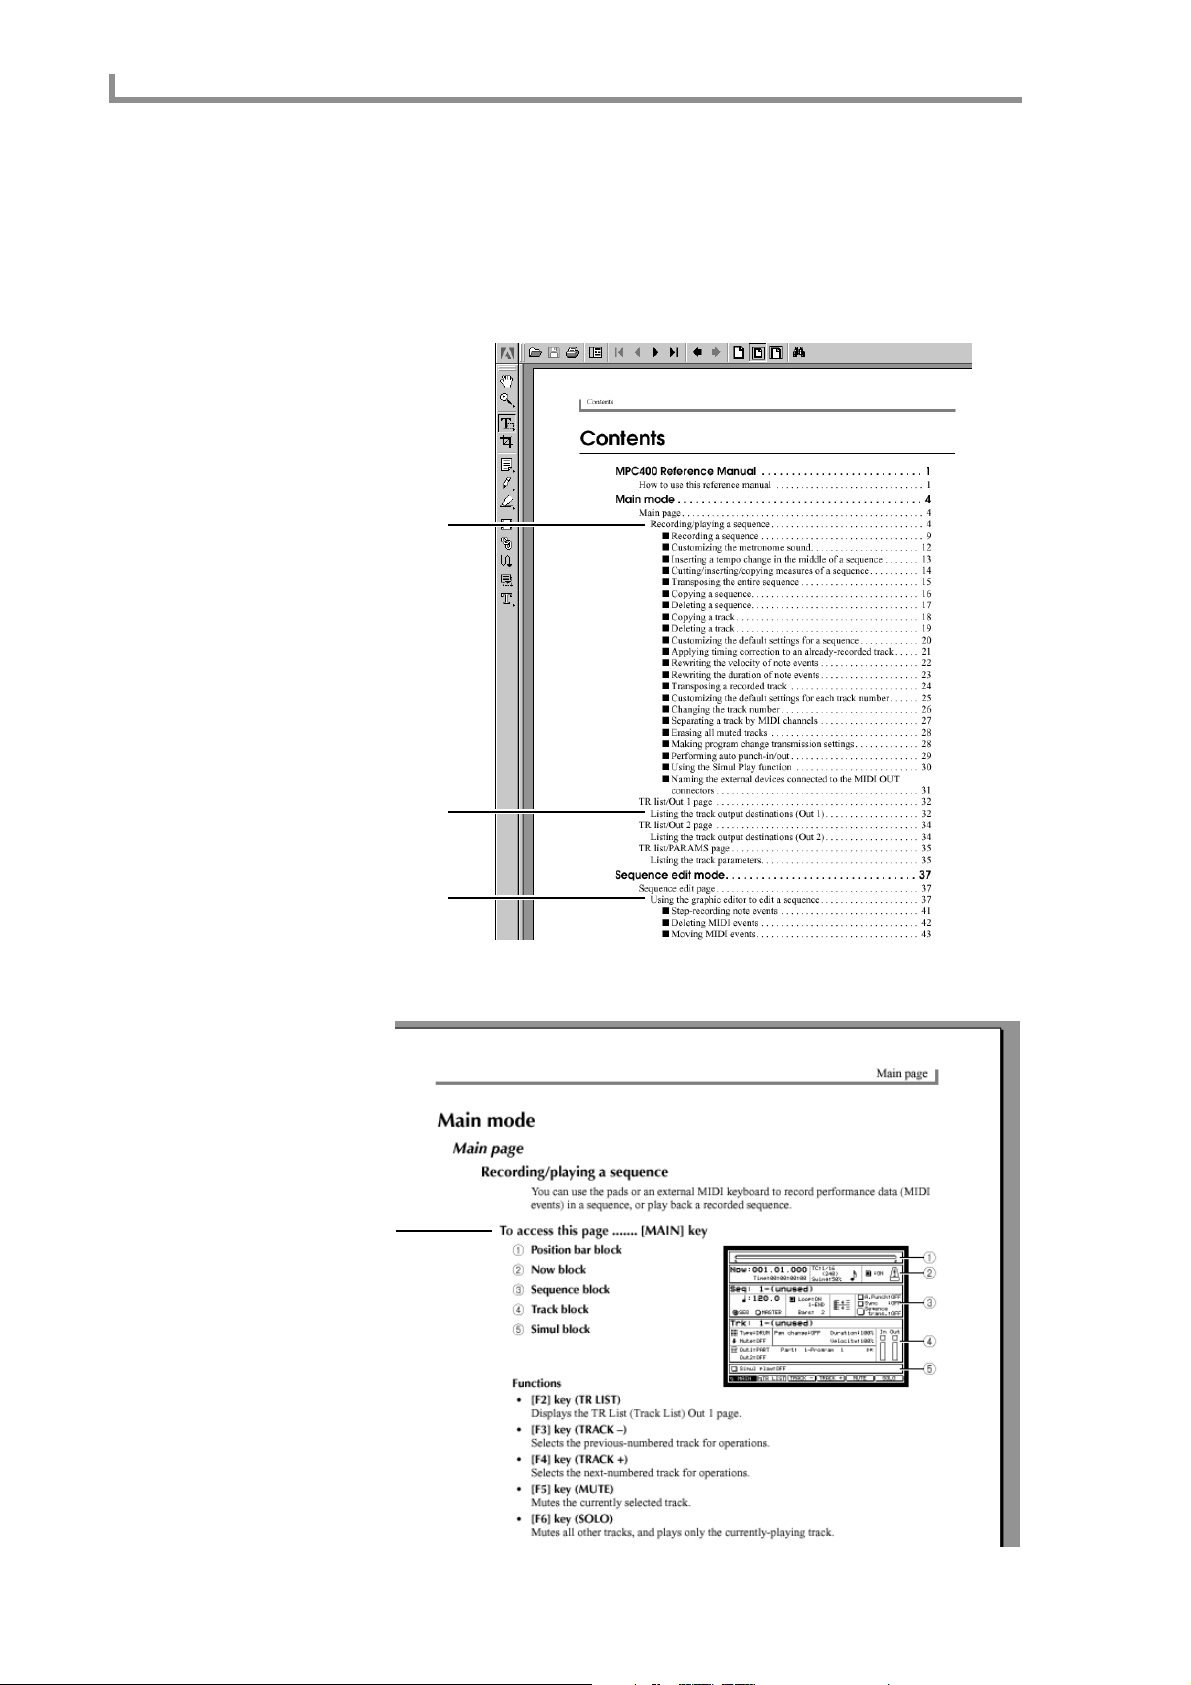
To learn which page to use for a specific function
→Use the table of contents to find the subtitle of the page.
The explanation in each page has a subtitle that describes the function and use of that
page. In the table of contents, look for the appropriate subtitle to see which mode or page
you should use.
In Adobe Acrobat Reader, you can click an entry in the table of contents to go directly to
that mode or page.
Subtitle
Subtitle
Subtitle
Instructions on how to access that page are giv en at the beginning of the explanation for
each page.
How to access
this page
2
Page 13

How to use this reference manual
To learn the procedure for a specific use
→Look for the procedure in the table of contents.
The explanation of each page begins with a summary of how that page can be used.
Search the table of contents to find the desired procedure.
In Adobe Acrobat Reader, you can click an entry in the table of contents to go directly to
that mode or page.
3
Page 14
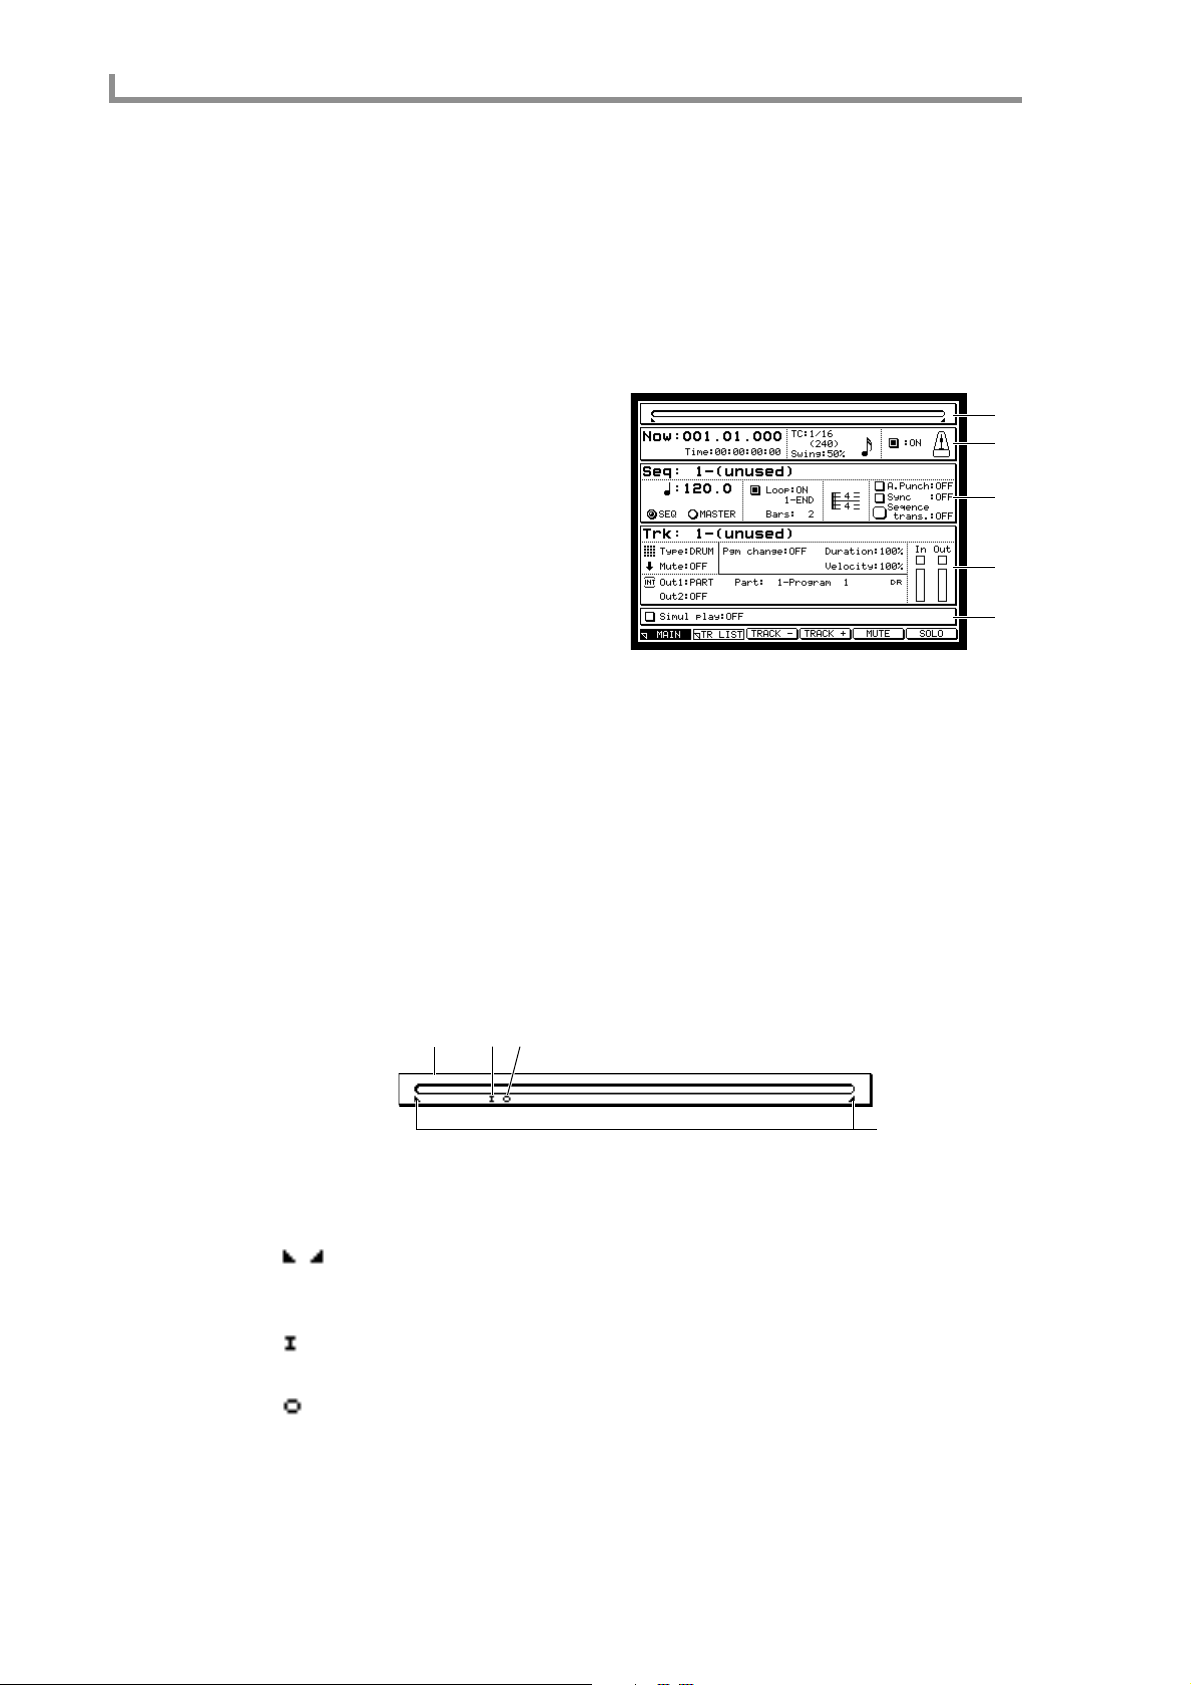
Main mode
Main mode
Main page
Recording/playing a sequence
To access this page........[MAIN] key
You can use the pads or an external MIDI keyboard to record performance data (MIDI
events) in a sequence, or play back a recorded sequence.
A Position bar block
B Now block
C Sequence block
D Track block
E Simul block
Functions
• [F2] key (TR LIST)
Displays the TR List (Track List) Out 1 page.
• [F3] key (TRACK –)
Selects the previous-numbered track for operations.
• [F4] key (TRACK +)
Selects the next-numbered track for operations.
• [F5] key (MUTE)
Mutes the currently selected track.
• [F6] key (SOLO)
Mutes all other tracks, and plays only the currently-playing track.
Position bar block
This bar indicates the current location within the sequence.
1
2
3
4
5
3
1
4
2
A Bar display
This bar indicates the current location within the sequence.
B symbols
These symbols indicate the loop region that you specified in the loop region field of the
sequence block.
C symbol
This symbol indicates the punch-in point. This will appear if auto punch-in is enabled.
D symbol
This symbol indicates the punch-out point. This will appear if auto punch-out is enabled.
4
Page 15

Now block
This indicates the current location within the sequence.
1 3
2
45
A Now field
Shows the current location within the sequence, in units of measures/beats/ticks. When
the cursor is at each field, you can move the current location in units of measures/beats/10
ticks/1 tick.
B Time field
Shows the time of the current location within the sequence. If loop playback is occurring,
this shows the time from when playback began until now.
C TC field
Selects the unit for timing correction (quantization). You can choose from the following
units.
1/8...........................8th note (minimum unit 480 ticks)
1/8[3]......................8th note triplets (minimum unit 320 ticks)
1/16.........................16th note (minimum unit 240 ticks)
1/16[3]....................16th note triplets (minimum unit 160 ticks)
1/32.........................32nd note (minimum unit 120 ticks)
1/32[3]....................32nd note triplets (minimum unit 80 ticks)
1/64.........................64th note (minimum unit 60 ticks)
1/64[3]....................64th note triplets (minimum unit 40 ticks)
OFF[96]..................1/96th note resolution (minimum unit 10 ticks)
OFF ........................Timing correction will not be used (minimum unit 1 tick)
Main page
D Swing field
Specifies the amount of swing, in a range of 50–75 (%). The value of this field indicates
the length of the upbeats in proportion to the length of one beat. As you increase this
value, note ev ents located on the upbeats will be moved further back, producing a greater
sense of swing.
This field will be displayed only if the Timing Correct field is set to 1/8, 1/16, 1/32, or
1/64. If you move the cursor to the TC field (
[WINDOW] key, the Timing Correct popup window will
appear, allowing you to apply timing correction to note events that have
already been recorded.
3) or the Swing field (4) and press the
E Metronome field
Switches the metronome on/off.
If you move the cursor to this field and press the [WINDO W] key, the Metronome popup
window will appear, allowing you to make various settings for the metronome.
5
Page 16

Main mode
Sequence block
Here you can select the sequence that you want to record or play back, and make v arious
settings for the sequence such as the number of measures and the time signature.
1 5 76
2
3
9
J
K
48
A Seq field
Selects the sequence that will be recorded or played. If you turn the [JOG] dial to select a
different sequence while a sequence is playing, playback will switch to the newly selected
sequence when the current sequence has been played to the end. (This is called the Next
Sequence function.) The sequence to be played next is shown in the Simul Play block.
If you move the cursor to this field and press the [WINDO W] k ey , the Sequence popup window will appear, allowing you to copy or delete a sequence, or specify the initial settings.
B Tempo field
According to the setting of the SEQ/MASTER field (
specific to that sequence or the tempo that is common to all sequences.
If you move the cursor to this field and press the [WINDOW] key, the Tempo Change
popup window will appear, allowing you to insert tempo changes into the sequence.
C Init field
Displays the base tempo that will be used when using the Tempo Change function. This
field will be displayed only if the Tempo Change field is turned on in the T empo Change
popup window.
4), this field sets either the tempo
D SEQ/MASTER field
Selects the tempo source for the sequence.
If you select SEQ, the tempo specific to that sequence will be used.
If you select MASTER, the tempo currently displayed in the Tempo field will apply to all
sequences.
If you move the cursor to this field and press the [WINDOW] key, the Tempo Change
popup window will appear.
E Loop field
Turns looping on/off. If this field is on, pressing the [PLAY START] key will make the
sequence play back from the loop-start location.
F Loop region field
Specifies the loop region in measure units. Specify the loop-start at the left of the “–”,
and the end of the loop region in the right field.
G Time signature field
Displays the time signature of the sequence. When you turn the [JOG] dial, the Change
Time Signature popup windo w will appear , allowing you to specify the time signature of
the sequence.
H Bars field
Modifies the number of measures in the sequence. When you turn the [JOG] dial, the
Change Bars popup window will appear , allowing you to specify the number of measures
in the sequence.
I A.PUNCH field
Turn auto punch-in/out on/off.
6
Page 17
If you move the cursor to this field and press the [WINDO W] key, the Auto Punch In/Out
popup window will appear, allowing you to specify the punch-in/punch-out points.
J Sync field
Turns synchronization with external devices on/off. If you move the cursor to this field
and press the [WINDOW] ke y , the Sync In/Out popup windo w will appear , allowing you
make synchronization-related settings.
Hint: Synchronization-related settings can also be made in the MISC. mode Sync page.
K Sequence Trans. field
Transposes the playback pitch of all INST type tracks in the sequence. (This does not
affect the note ev ents recorded in the tracks.) Positi v e settings will cause a # to appear at
the left of the field, and negative settings will cause a b to appear.
If you move the cursor to this field and press the [WINDOW] key, the Transpose Permanent popup window will appear, allowing you to convert the pitch of the note events
recorded in the INST tracks.
Track block
Here you can select the track that you want to record, and specify the output destination
and other settings for the recorded MIDI events.
Main page
1 6 8 J9
2
3
45
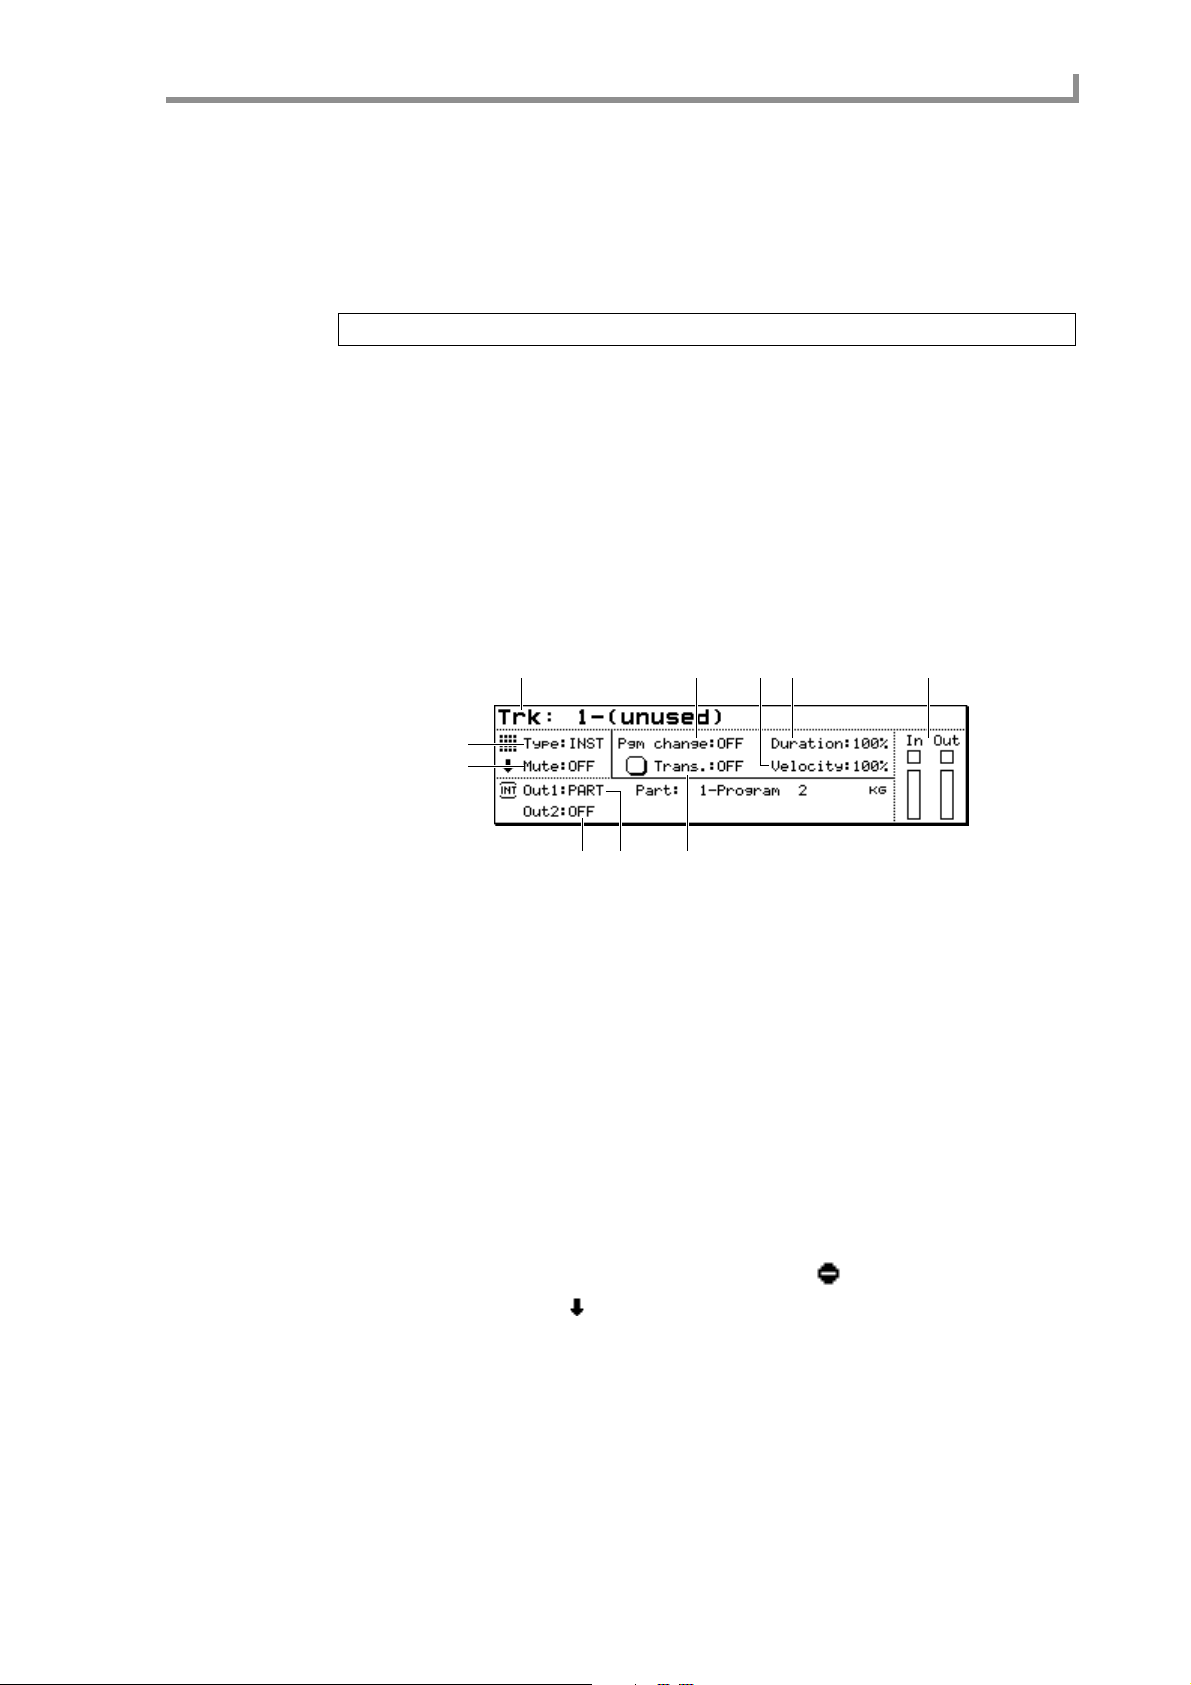
A Trk field
Selects the track that your operations will affect. If you press the [WINDOW] key, the
Track popup windo w will appear , allo wing you to assign a name to the track, erase/cop y
a track, or specify default settings.
B Type field
Selects one of the following two types for the currently selected track.
DRUM....................The currently selected track will be used as a DRUM type track. Y ou
can use the matrix display to edit the note events recorded in this
type of track.
INST.......................The currently selected track will be used as an INST type track. You
can use the piano roll display to edit the note events recorded in this
type of track.
C Mute field
Switches muting on/off for the currently selected track. A symbol indicates tracks for
which muting is on, and a symbol indicates tracks for which muting is off.
If you press the [WINDOW] ke y , the Erase All Muted T racks popup windo w will appear,
allowing you to erase all currently muted tracks.
7
D Out1 field
Selects the output destination of the track. Y ou can select the follo wing output destinations.
PART......................A specific part of the sampler section.
MIDI A–D..............[MIDI OUT A]–[MIDI OUT D] connector
INT-A/INT-B..........Virtual MIDI port A or B of the sampler section
7
Page 18
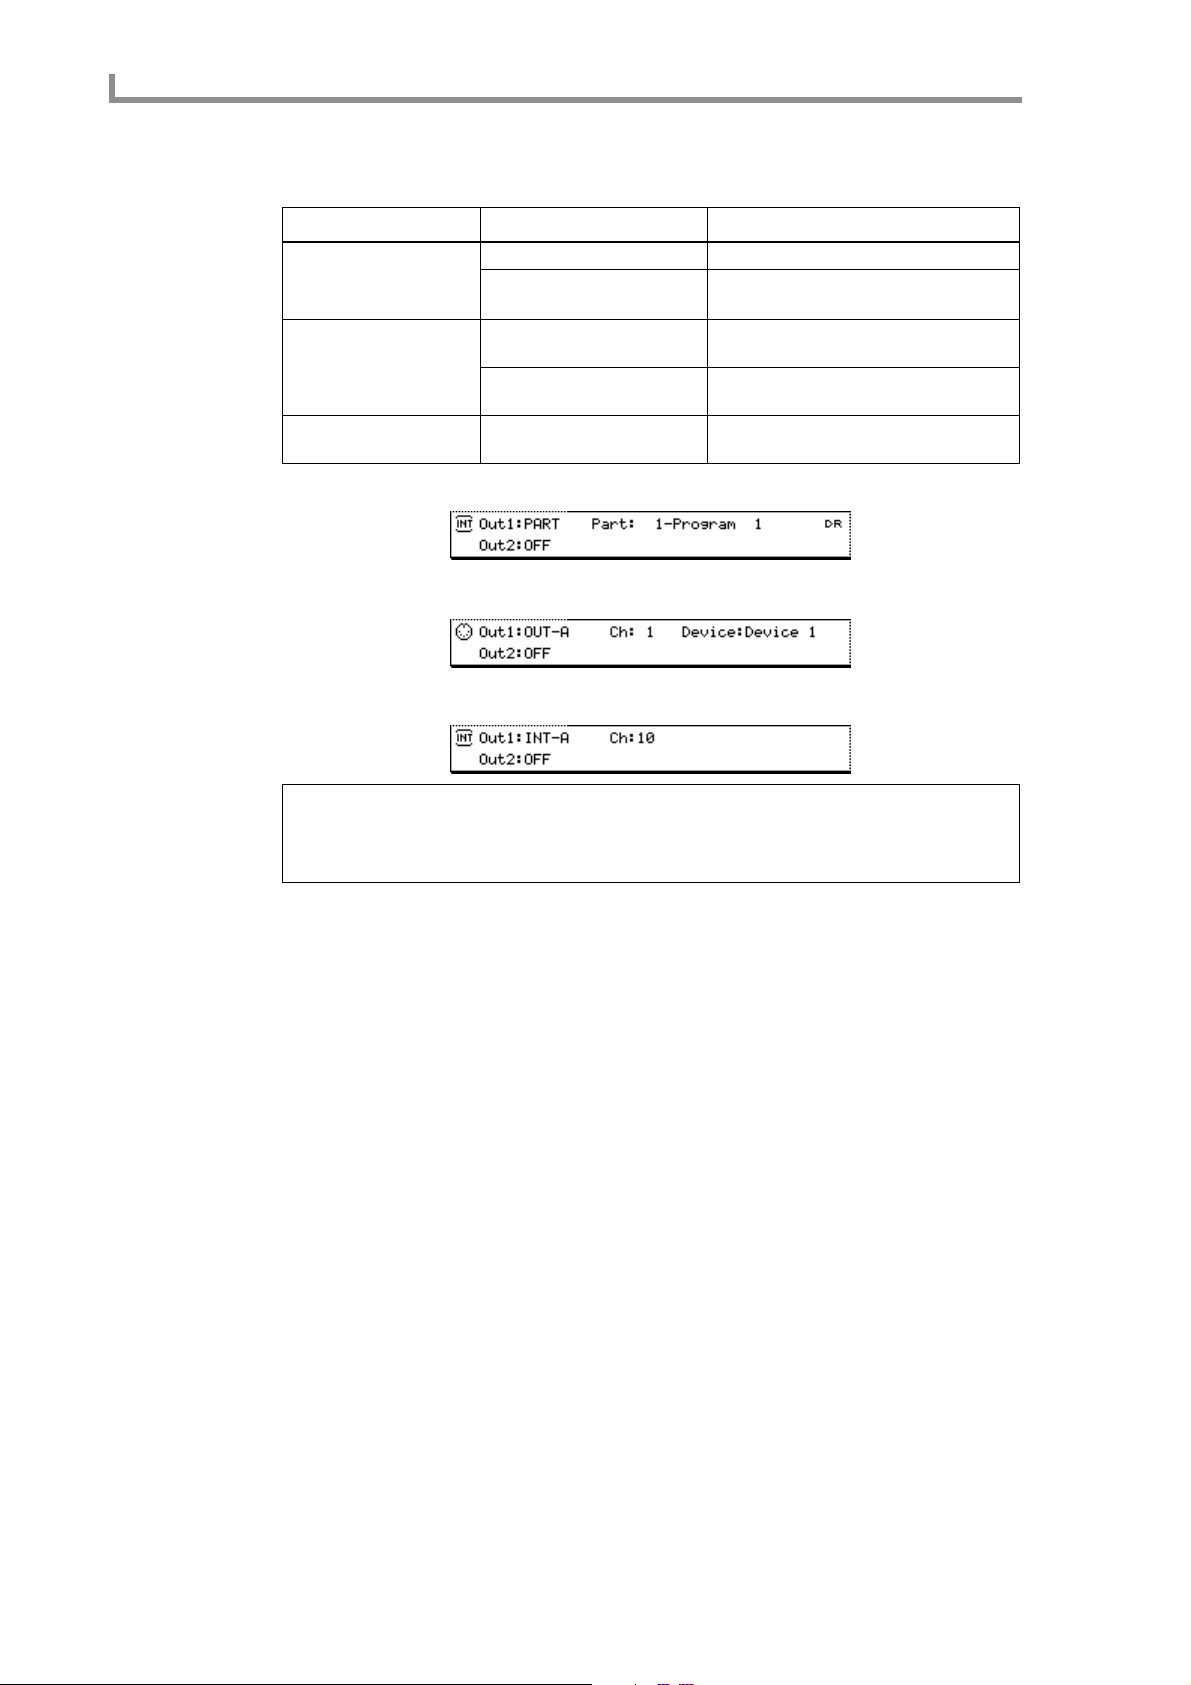
Main mode
Depending on the value you select, one of the following fields will appear at the right of
the PART field.
OUT1 field display Field Content
PART Part field (left of field) Selects the destination part number.
Program field (right of field)
MIDI A–D Ch field Selects MIDI channel 1–16 or ANY as the
Device field Displays the device name for the MIDI
INT-A/B Ch field Selects MIDI channel 1–16 or ANY as the
If you select PART
If you select OUT-A–D
Displays the program name assigned to
the part.
output destination.
channel selected in the Ch field.
output destination.
If you select INT-A/B
Hint: If you select ANY for the Ch field, the MIDI c hannel that was input to the track will also be used
as the output channel.
If you press the [WINDO W] key at the Device field, the Device List popup window will appear, allowing
you to edit the device name.
E Out2 field
Selects the second output destination of the track. You can choose from the same output
destinations as the Out1 field, or OFF.
F Pgm change field
Specifies the program change number that will be sent to the output destination of the
track. The program change number you specify here will be transmitted when you press
the [PLA Y START] ke y , or when the sequence is switched while using the Next Sequence
function or Song function. If this setting is OFF , a program change will not be transmitted.
If you move the cursor to this field and press the [WINDOW] key, the Program Change
popup window will appear.
G Trans. field
Transposes the playback of the selected track upward or do wnward in a range of –12–+12
semitones. (The note events recorded in the track will not be af fected.) This field will be
displayed only if the track type is INST.
If you move the cursor to this field and press the [WINDOW] key, the Transpose Permanent popup window will appear, allowing you to rewrite the pitches of the note events
recorded in the track.
H Duration field
This lets you apply a relative adjustment during playback to the duration (note length) of
the note events recorded in the selected track. (This does not af fect the note e vents recorded
in the track.) The range is 1–200%. With a setting of 100% the durations will be unchanged.
If you move the cursor to this field and press the [WINDOW] key, the Edit Duration
popup window will appear, allowing you to rewrite the durations of the note events
recorded in the track.
8
Page 19
I Velocity field
This lets you apply a relative adjustment during playback to the note-on velocities of the
note events recorded in the selected track. (This does not affect the note events recorded in
the track.) The range is 1–200%. With a setting of 100%, the velocities will be unchanged.
If you move the cursor to this field and press the [WINDO W] ke y , the Edit Velocity window
will appear, allowing you to rewrite the velocities of the note events recorded in the track.
J Track monitor
The indicators ( ) and bars in this area provide a realtime display of the state of MIDI
event transmission and reception for this track. When a MIDI event is transmitted or
received, the will blink. When a note event is transmitted or received, the height of
the bar will indicate the velocity value.
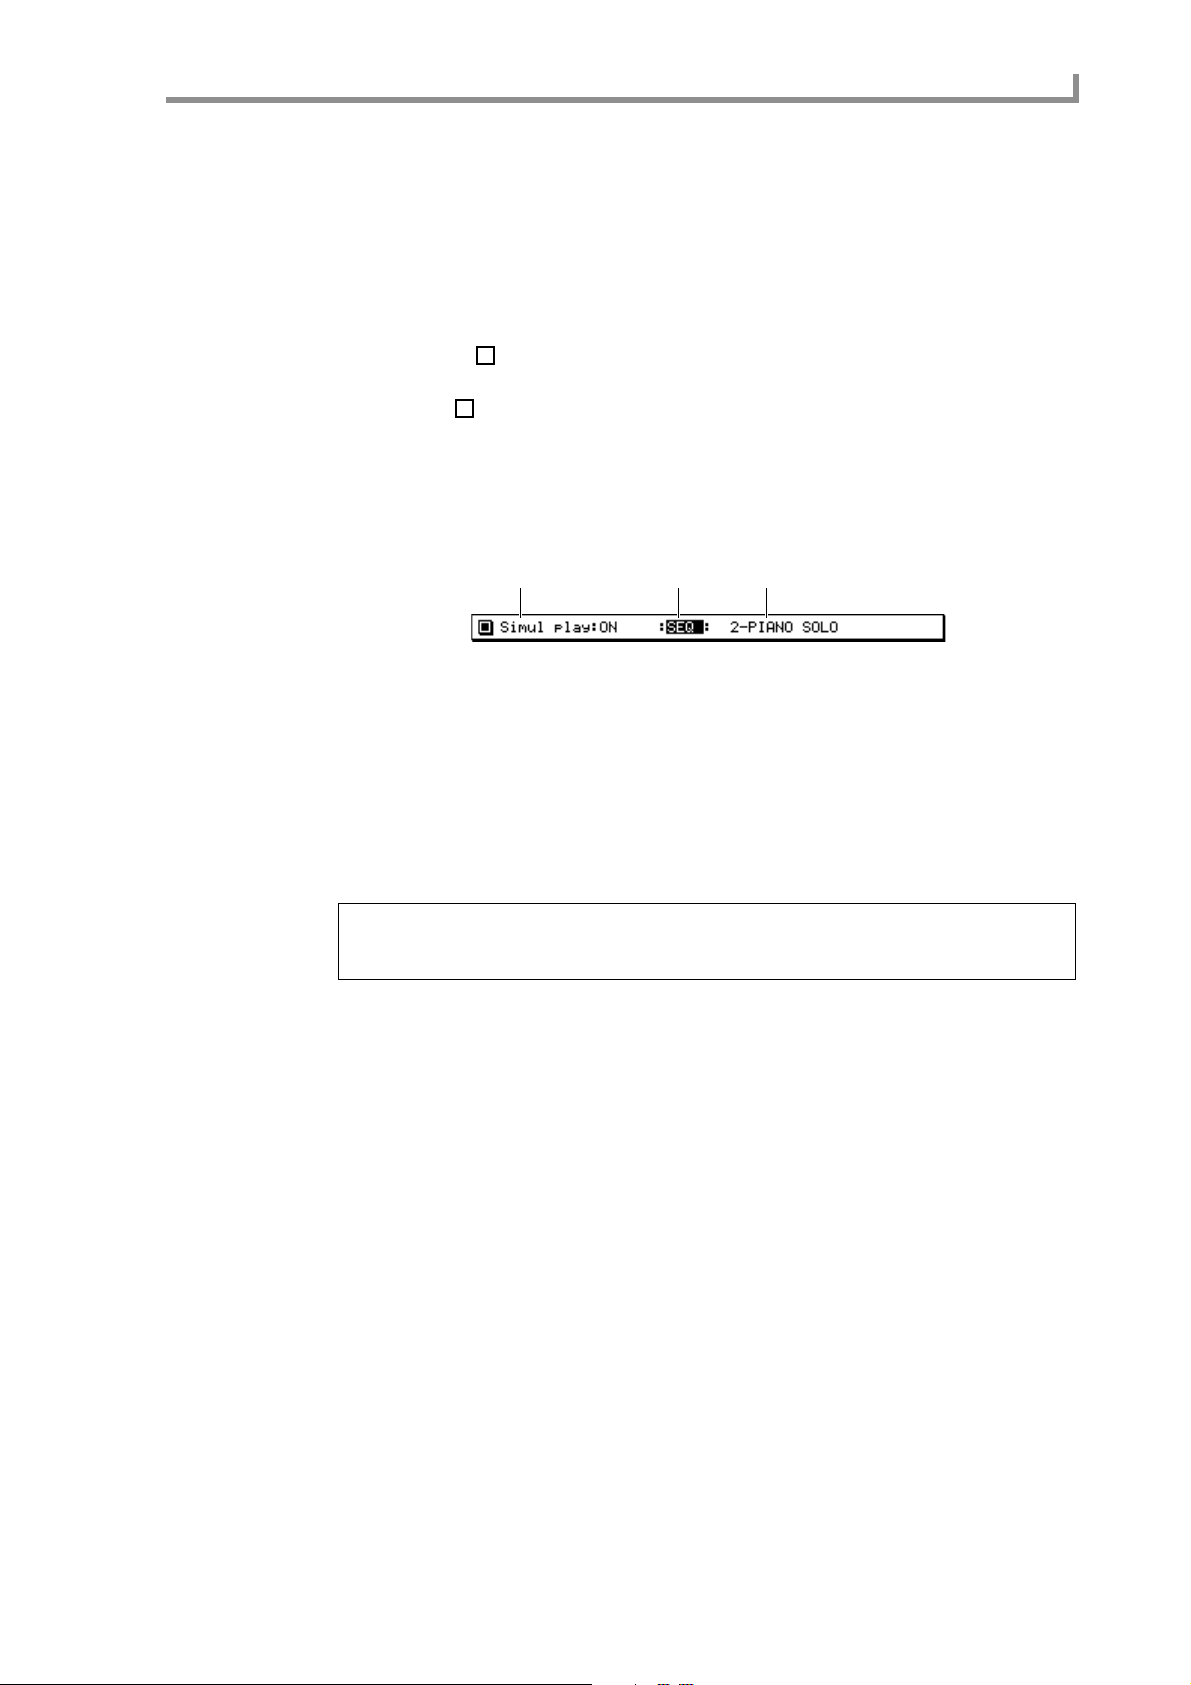
Simul Play block
This lets you play the currently selected sequence simultaneously with another
sequence/song.
1 2 3
Main page
A Simul play field
Switches the Simul Play function on/off. If this is on, the SEQ/SONG field will be displayed at the right of this field.
B SEQ/SONG field
Selects the type of data that will be played simultaneously.
C Sequence/song number
Turn the [JOG] dial to select the data that will be played simultaneously. You can select
any sequence or song that is loaded into the memory of the MPC4000.
Hint: If you select another sequence in the Seq field while Simul Play is occurring, the current sequence
will play to the end, and then playback will switch to the next-selected sequence (the Next Sequence
function). The sequence to be played back next will be displayed in the Simul Play block.
■Recording a sequence
Here’s how to use the pads or your MIDI keyboard to record a performance into a
sequence track.
1. Access the Main page.
2. Move the cursor to the Seq field, and turn the [JOG] dial to select an empty
sequence.
The empty sequence will have default settings of time signature = 4/4, number of measures = 2, and tempo = 120.
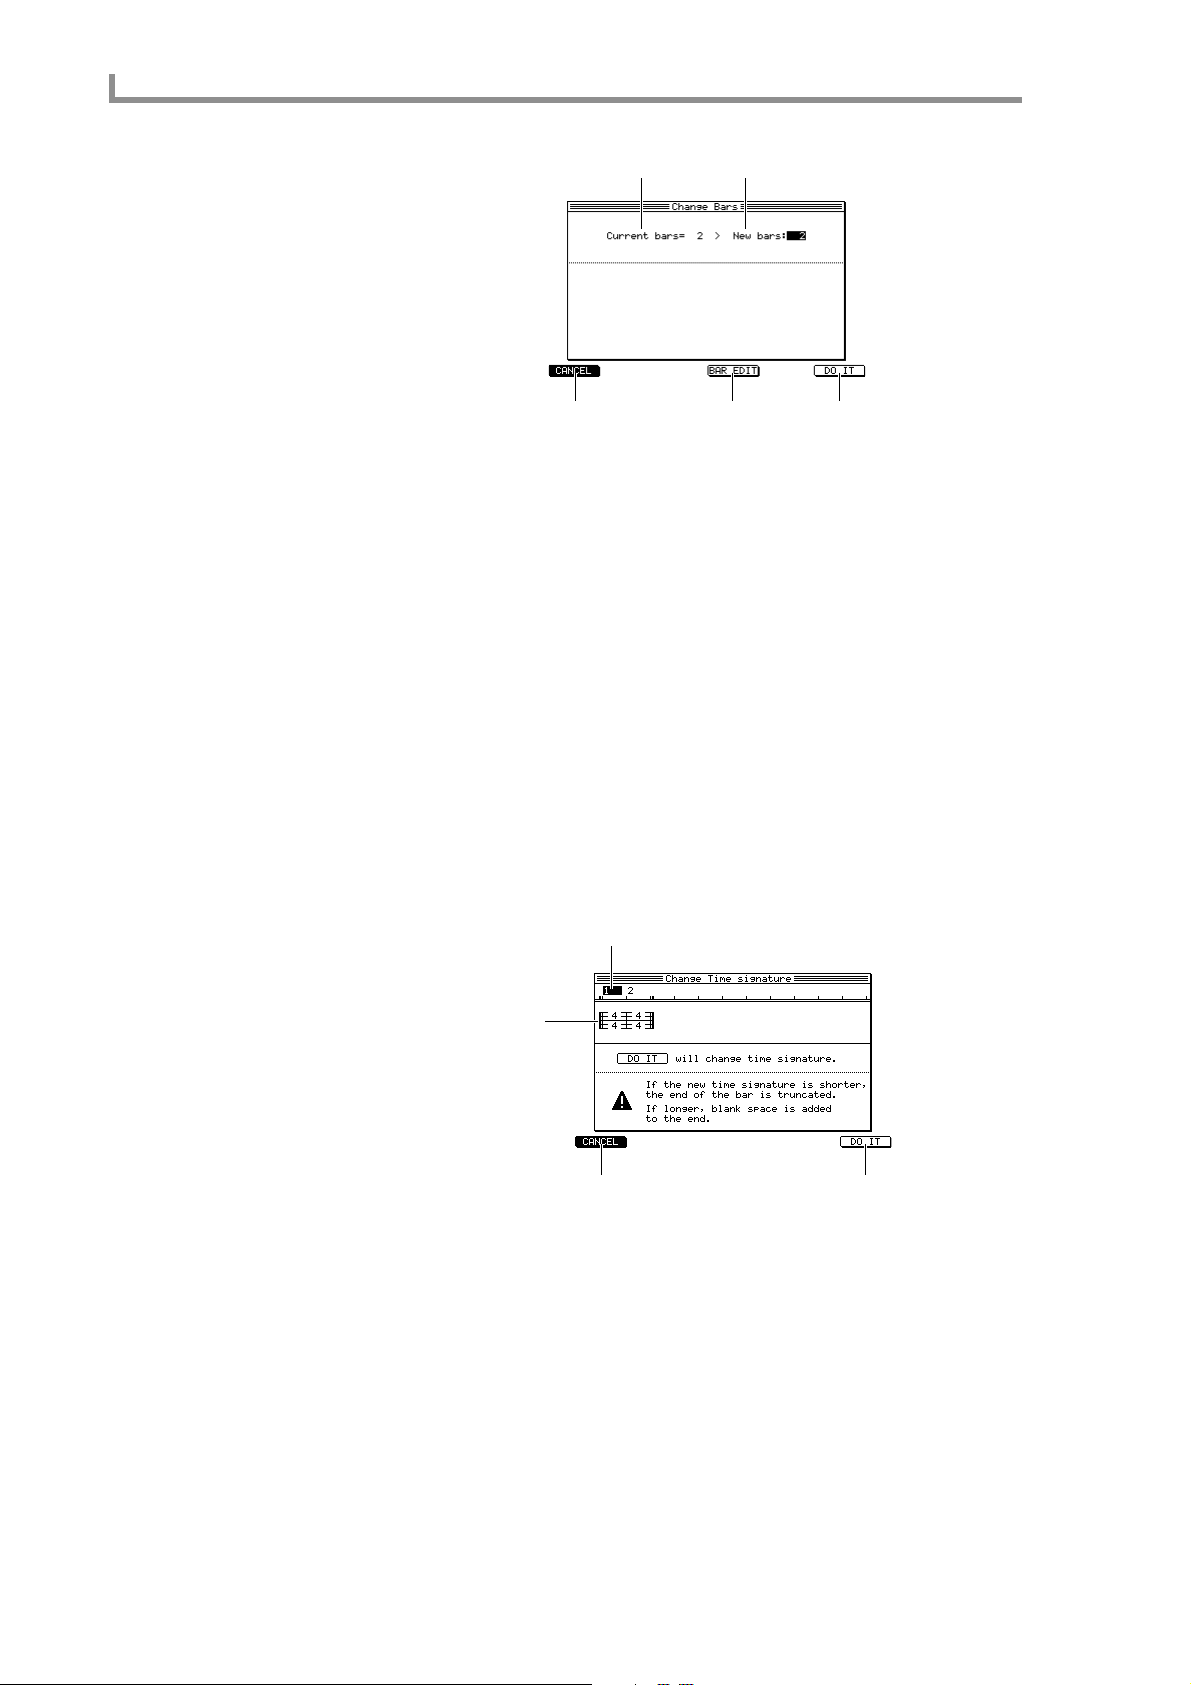
3. To change the number of measures, move the cursor to the Bars field, and turn
the [JOG] dial.
The Change Bars popup window will appear.
9
Page 20
Main mode
12
345
A Current bars field
Displays the current number of measures.
B New bars field
Specifies the number of measures to which the sequence will be changed.
C [F1] key (CANCEL)
Cancels the operation and closes the popup window.
D [F4] key (BAR EDIT)
Displays the Edit Bars popup window, where you can edit the sequence in units of measures.
E [F6] key (DO IT)
Finalizes the changes you have made.
4. Move the cursor to the New bars field, turn the [JOG] dial to select the number
of measures, and press the [F6] key (DO IT) to finalize the setting.
When you finalize the number of measures, the popup window will close.
5. To change the time signature of the sequence, move the cursor to the time
signature field, and turn the [JOG] dial.
The Change Time Signature popup window will appear.
1
2
34
A Measure number
Displays the measure numbers within the sequence.
10
B Time signature field
Specifies the time signature of the sequence.
C [F1] key (CANCEL)
Cancels the operation and closes the popup window.
D [F6] key (DO IT)
Executes the time signature change.
6. Move the cursor to the time signature field, turn the [JOG] dial to specify the
time signature, and press the [F6] key (DO IT).
You can set the time signature in a range of 1/4–16/4, 1/8–16/8, 1/16–16/16, or
1/32–32/32. When you execute, the popup window will close.
Page 21
Main page
Hint: The time signature is specified independently for each measure.
A “–” symbol will be displayed below the time signature field of measur es that you modified. By holding
down the [SHIFT] key and pressing the CURSOR [
change the time signature of the selected measures in a single operation.
®
] key, you can select multiple measures, and
7. Make settings as desired for the other fields of the Sequence block.
8. Move the cursor to the Trk field, and turn the [JOG] dial to select the track that
you want to record.
9. Move the cursor to the Out1 field, and turn the [JOG] dial to select the output
destination for the track.
10. Perform the following steps according to the output destination you selected.
If you selected PART
Use the Part field to select the part number, and use the program field to select the pro-
gram that you want to play.
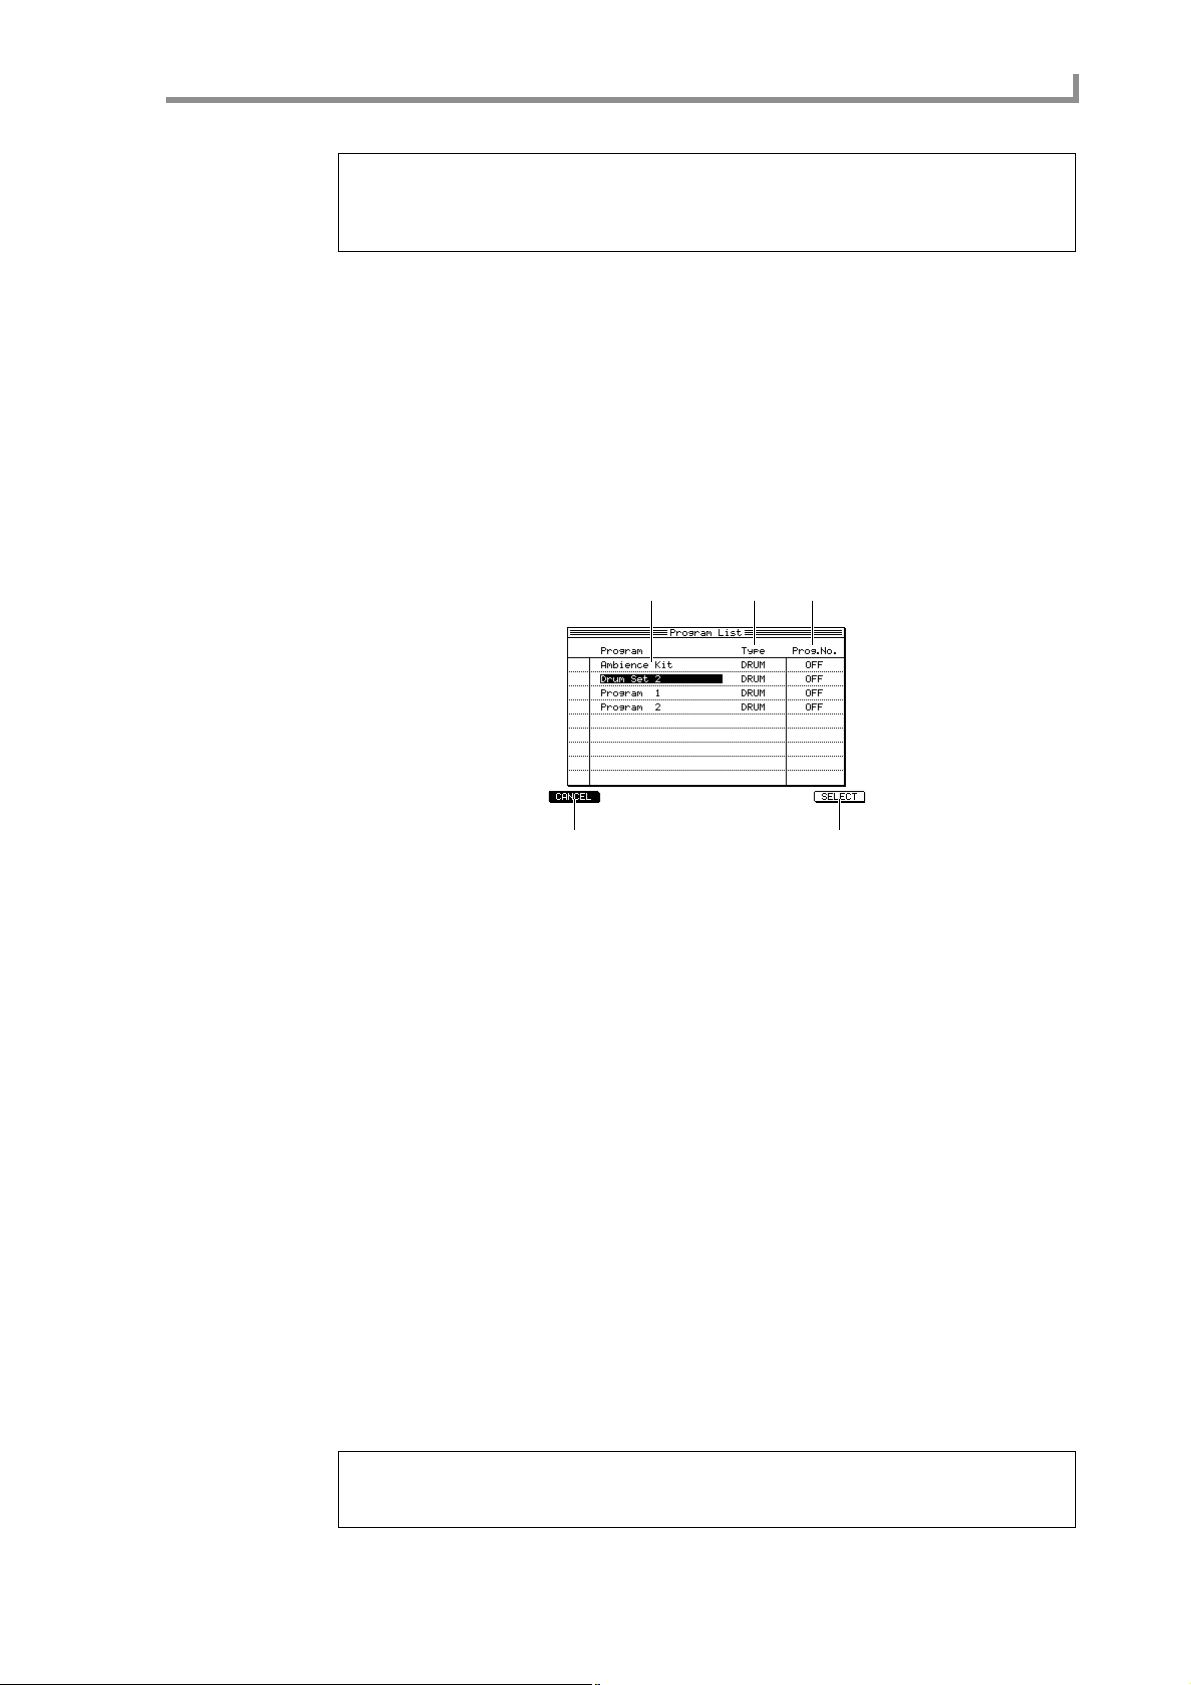
When you select a program, the Program List popup window will appear.
1 2 3
45
A Program field
Displays the programs in the memory of the MPC4000. The cursor indicates the program
you have selected.
B Type field
Indicates the type of the program.
C Prog. field
Indicates the program change number assigned to that program.
D [F1] key (CANCEL)
Cancels the operation and closes the popup window.
E [F6] key (SELECT)
Finalizes the program selection.
If you selected OUT-A–OUT-D
Use the Ch field to select the output destination MIDI channel.
If you selected INT-A/INT-B
Use the CH field to select the output destination MIDI channel.
11. Strike the pads to verify that you can play the desired program or MIDI sound
module.
12. Move the cursor to the TC field, and turn the [JOG] dial to select the note value
that will be the minimum timing interval recorded in the track.
Hint: While you are pressing the [TIMING CORRECT] key, the cursor will temporarily move to the
TC field re gardless of the curr ent cursor location. You can hold down this ke y and turn the [JOG] dial
to adjust the setting.
11
Page 22
Main mode
13. Hold down the [REC] key and press the [PLAY] key.
Sequence recording will begin.
14. Perform using the pads or your MIDI keyboard.
Hint: On the MPC4000, MIDI events r eceived from the MIDI IN connector or generated by the pads
are input to the track as “omni on.” If the data being recorded contains multiple MIDI channels, the
events will be recorded with their channel information preserved.
15. To stop recording, press the [STOP] key.
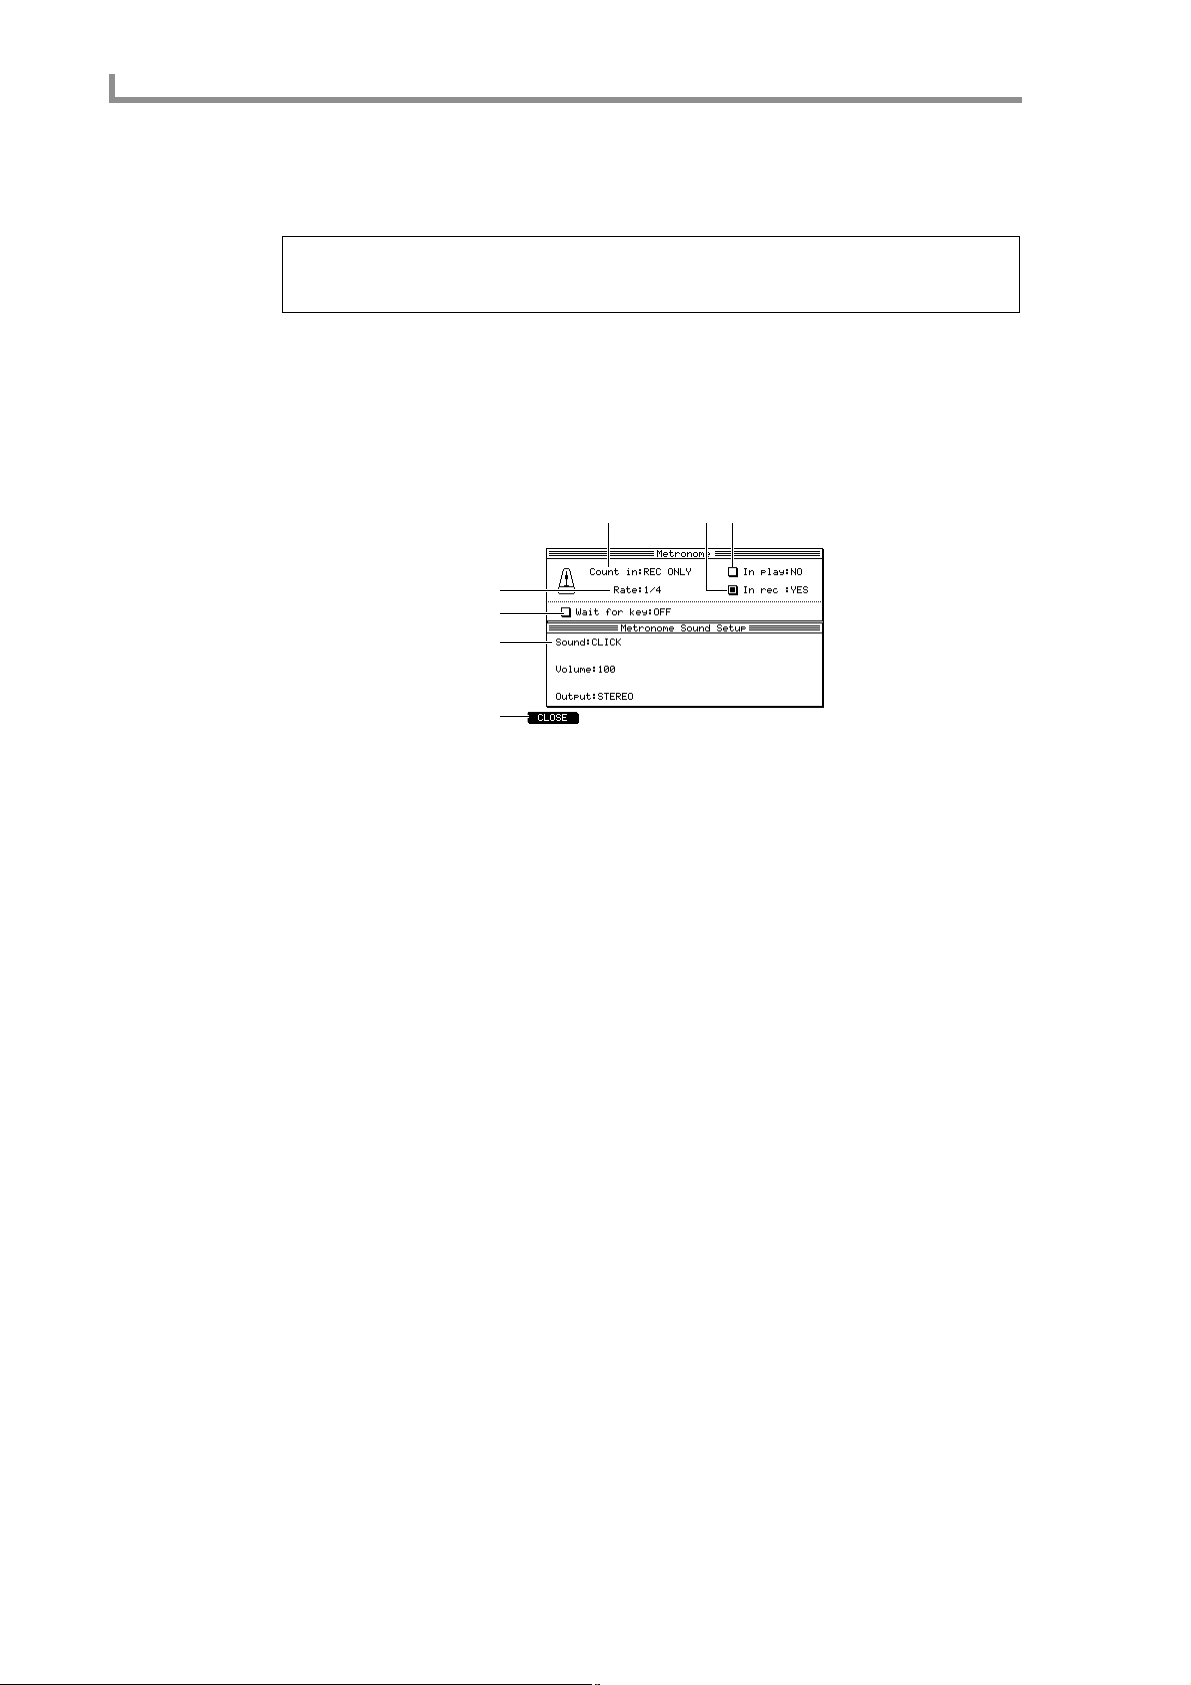
■Customizing the metronome sound
You can change the metronome sound, and adjust the way in which it sounds.
1. Move the cursor to the metronome field, and press the [WINDOW] key.
The Metronome popup window will appear.
1
34
2
5
6
7
A Count in field
Specifies whether a one-measure count will be inserted when you record/play a sequence.
You can choose OFF (no count), REC ONLY (insert a count only when recording), or
REC+PLAY (insert a count when recording/playing).
B Rate field
Selects the note value at which the metronome will sound. You can choose from a range
of 1/4 (quarter notes)–1/32(3) (32nd note triplets).
C In play field
Switches the metronome on/off for sequence playback.
D In rec field
Switches the metronome on/off for sequence recording.
E Wait for keys field
If this field is on, sequence recording/playback will begin the moment a MIDI event is
received from the pads or an external MIDI device.
12
F Sound field
Selects the metronome sound. The content below this field will change depending on
your selection.
G [F1] key (CLOSE)
Finalizes your settings and closes the popup window.
2. Move the cursor to the Sound field, and select the metronome sound from the
following choices.
According to the sound that you select, the fields that are displayed will change as follows.
If you selected CLICK (“blip blip blip blip”)
• Volume field.................Specifies the volume of the metronome sound.
• Output field..................Indicates the output destination of the metronome sound.
If you selected PART (a specific part of the sampler section)
• Part field.......................Selects the part number.
• Accent field..................Specifies the note number and velocity for accented beats.
Page 23

• Normal field................ Specifies the note number and velocity for unaccented beats.
MIDI (an externally-connected MIDI device)
• Port field...................... Selects the MIDI connector.
• Ch field........................ Selects the MIDI channel.
• Accent field................. Specifies the note number and velocity for accented beats.
• Normal field................ Specifies the note number and velocity for unaccented beats.
3. Make settings for the fields displayed below the Sound field.
4. When you have finished making settings, press the [F1] key (CLOSE).
5. Make sure that the metronome field is turned on.
If it is off, turn the [JOG] dial to switch it on.
■Inserting a tempo change in the middle of a sequence
Here’s ho w to insert a tempo change e vent in a middle of a sequence to change the tempo
during the sequence.
1. Move the cursor to the tempo field, and press the [WINDOW] key.
The Tempo change popup window will appear.
4
567
Main page
1
2
3
89JK
A Tempo change field
Switches the tempo change function on/off.
B Initial tempo field
Specifies the reference tempo used by the tempo change function. The tempo that results
from this change will be calculated automatically according to the ratio between the
value of this field and the value of the Change field.
C SEQ/MASTER field
Selects the tempo source.
D Event number
Displays the event number of the tempo change event.
E Location field
Specifies the location at which the tempo change event is placed.
F Change field
Specifies the amount of tempo change relative to the Initial tempo.
G Tempo field
Specifies the tempo.
H [F1] key (CLOSE)
Closes the popup window.
I [F4] key (DELETE)
Deletes the selected tempo change event.
13
Page 24
Main mode
J [F5] key (NOW)
Inserts a tempo change event at the current location of the sequence.
K [F6] key (INSERT)
Inputs a tempo change event at the same location as the selected event.
2. Move the cursor to the Tempo change field, and turn the [JOG] dial to switch it
on.
When the Tempo change field is on, the tempo change events you specify in this popup
window will be valid.
3. Move the cursor to any row of the Location field, and press the [F6] key
(INSERT).
A tempo change event will be input at the same location as the selected event.
Hint: If you press the [F5] key (NOW) instead of the [F6] key, the tempo change event will be input
at the current location of the sequence.
√
4. Use the [JOG] dial and the CURSOR[
]/[®] keys to specify the location
(measure/beat/tick) at which you want to input the tempo change.
Hint: You cannot input the tempo change before or after the preceding or following tempo change.
5. Move the cursor to the Tempo field, and turn the [JOG] dial to specify the
tempo value that you want to insert.
6. If you want to delete a tempo change event that you inserted, move the cursor
to the corresponding event, and press the [F4] key (DELETE).
7. When you have finished inputting tempo change events, press the [F1] key
(CLOSE) to close the popup window.
■Cutting/inserting/copying measures of a sequence
Here’s how to cut/insert/copy measures of a sequence.
1. Move the cursor to the Bars field, and press the [WINDOW] key.
The Edit Bars popup window will appear . In this popup windo w , you can insert measures
into the sequence, or cut or copy the sequence data in measure units.
2. Move the cursor to the Edit field, and turn the [JOG] dial to select one of the
following editing methods.
INSERT..................Insert blank measures at the desired location.
DELETE ................Delete a specified range of measures.
COPY.....................Copy measures from any sequence.
3. Turn the [JOG] dial to set the various fields in the popup window, according to
the editing method you selected.
If you selected INSERT
• After bar field ..............Specify the measure number at which the measures will be
inserted.
The measures will be inserted after the measure you select
here.
• Number of bars field....Specify the number of measures that will be inserted.
14
Page 25
Main page
• Time signature field.... Specify the time signature of the measures that will be
inserted.
If you selected DELETE
• First bar....................... Specify the first measure number that will be deleted.
• Last bar....................... Specify the last measure number that will be deleted.
If you selected COPY
• From Seq field............. Select the sequence from which you want to copy measures.
• To Seq field ................. Select the copy-destination sequence.
• First bar field/Last bar field..........Specify the beginning and end of the measures that
will be copied.
• After bar field/Copies field ..........Specify the measure number at which the measures
will be pasted, and the number of times the measures will be pasted.
4. To execute the editing operation, press the [F6] key (DO IT).
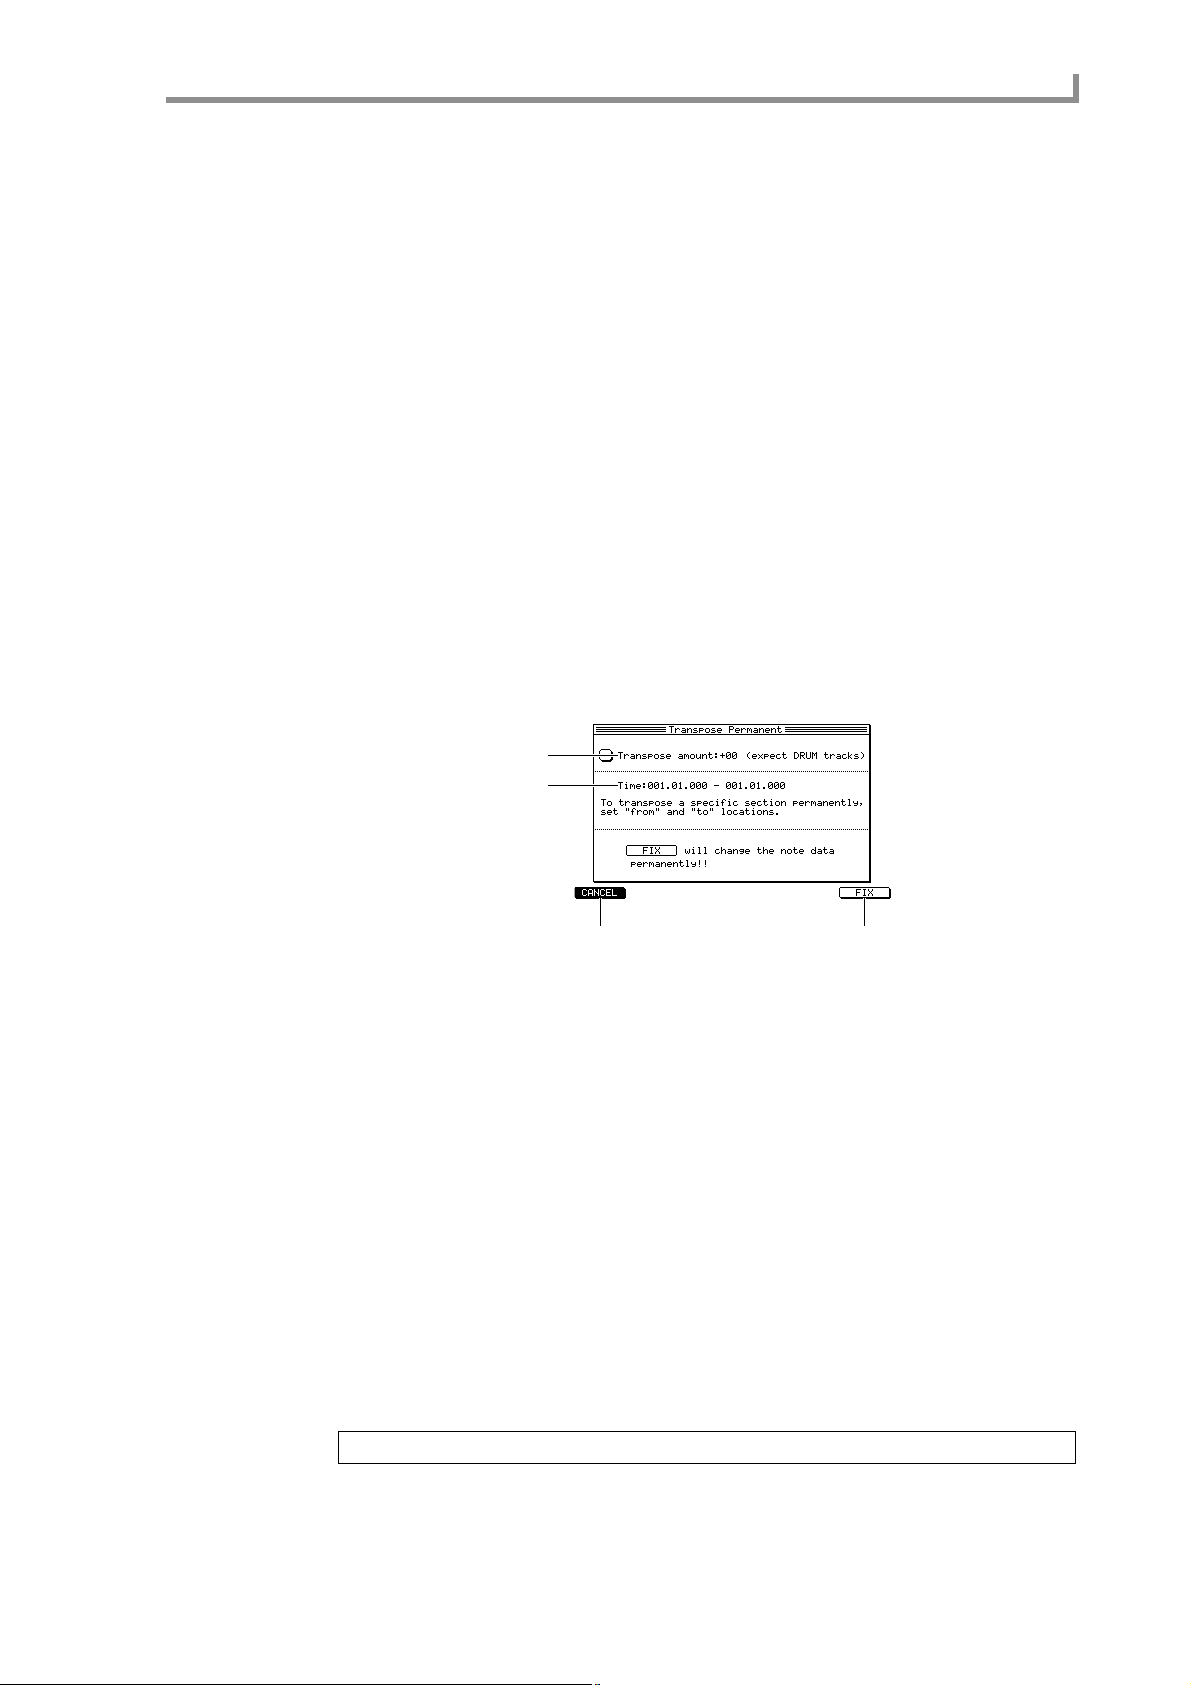
■Transposing the entire sequence
Here’s how to transpose all INST type tracks in the sequence. Executing this transpose
operation will rewrite the pitch (note number) of the note events.
1. Move the cursor to the Sequence trans field, and press the [WINDOW] key.
The Transpose Permanent popup window will appear.
1
2
34
A Transpose amount field
Specifies the amount of transposition in a range of –12–+12 semitones.
B Time field
Selects the time axis region for which transposition will occur.
C [F1] key (CANCEL)
Cancels the operation and closes the popup window.
D [F6] key (FIX)
Executes the transposition.
2. Move the cursor to the Transpose amount field, and turn the [JOG] dial to
adjust the transpose amount.
3. Move the cursor to the left side of the Time field, and turn the [JOG] dial
specify the location where transposition will start.
4. Move the cursor to the right side of the Time field, and turn the [JOG] dial
specify the location where transposition will end.
5. To execute the transposition, press the [F6] key (FIX).
Note: This transpose operation will affect only INST type tracks.
15
Page 26
Main mode
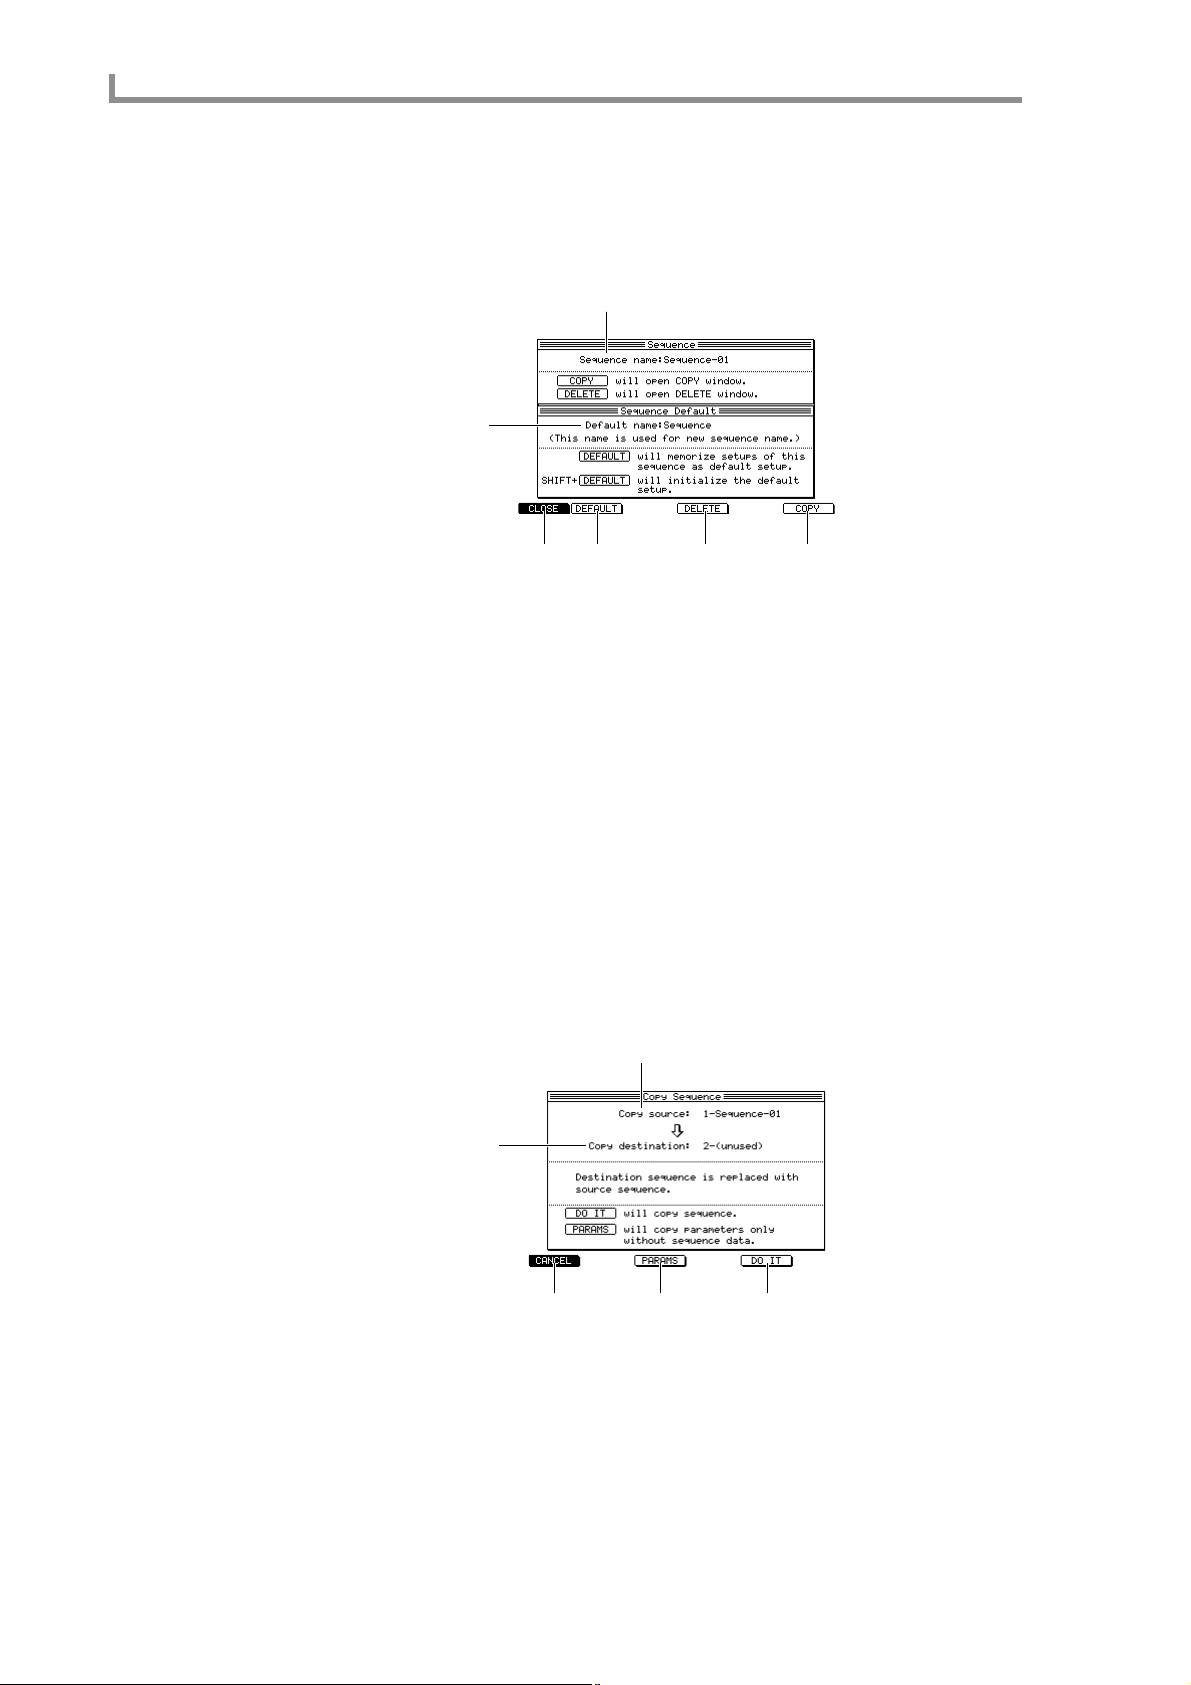
■Copying a sequence
Here’s how to copy a sequence from memory to an empty sequence.
1. Move the cursor to the Seq field, and press the [WINDOW] key.
The Sequence popup window will appear.
1
2
34 5 6
A Sequence name field
Edits the sequence name.
B Default name field
Edits the default sequence name.
C [F1] key (CLOSE)
Closes the popup window.
D [F2] key (DEFAULT)
Registers the various settings of the sequence as the def ault v alues for an empty sequence.
E [F4] key (DELETE)
Opens the Delete Sequence window, where you can delete a sequence.
F [F6] key (COPY)
Opens the Copy Sequence window, where you can copy a sequence.
2. Press the [F6] key (COPY).
The Copy Sequence popup window will appear.
1
2
16
345
A Copy source field
Selects the copy-source sequence.
B Copy destination field
Selects the copy-destination sequence.
C [F1] key (CANCEL)
Closes the popup window.
Page 27
Main page
D [F3] key (PARAMS)
Copies only settings such as the number of measures in the sequence, and the time signature. The MIDI events will not be copied.
E [F5] key (DO IT)
Executes the copy.
3. Move the cursor to the Copy source field, and turn the [JOG] dial to select the
copy-source sequence.
4. Move the cursor to the Copy destination field, and turn the [JOG] dial to select
the copy-destination sequence.
As the copy-destination, you may select a sequence in which MIDI events have already
been recorded. In this case, executing the copy will cause the cop y-destination sequence
to be overwritten (replaced) by the copy-source sequence.
5. To execute the copy, press the [F5] key (DO IT).
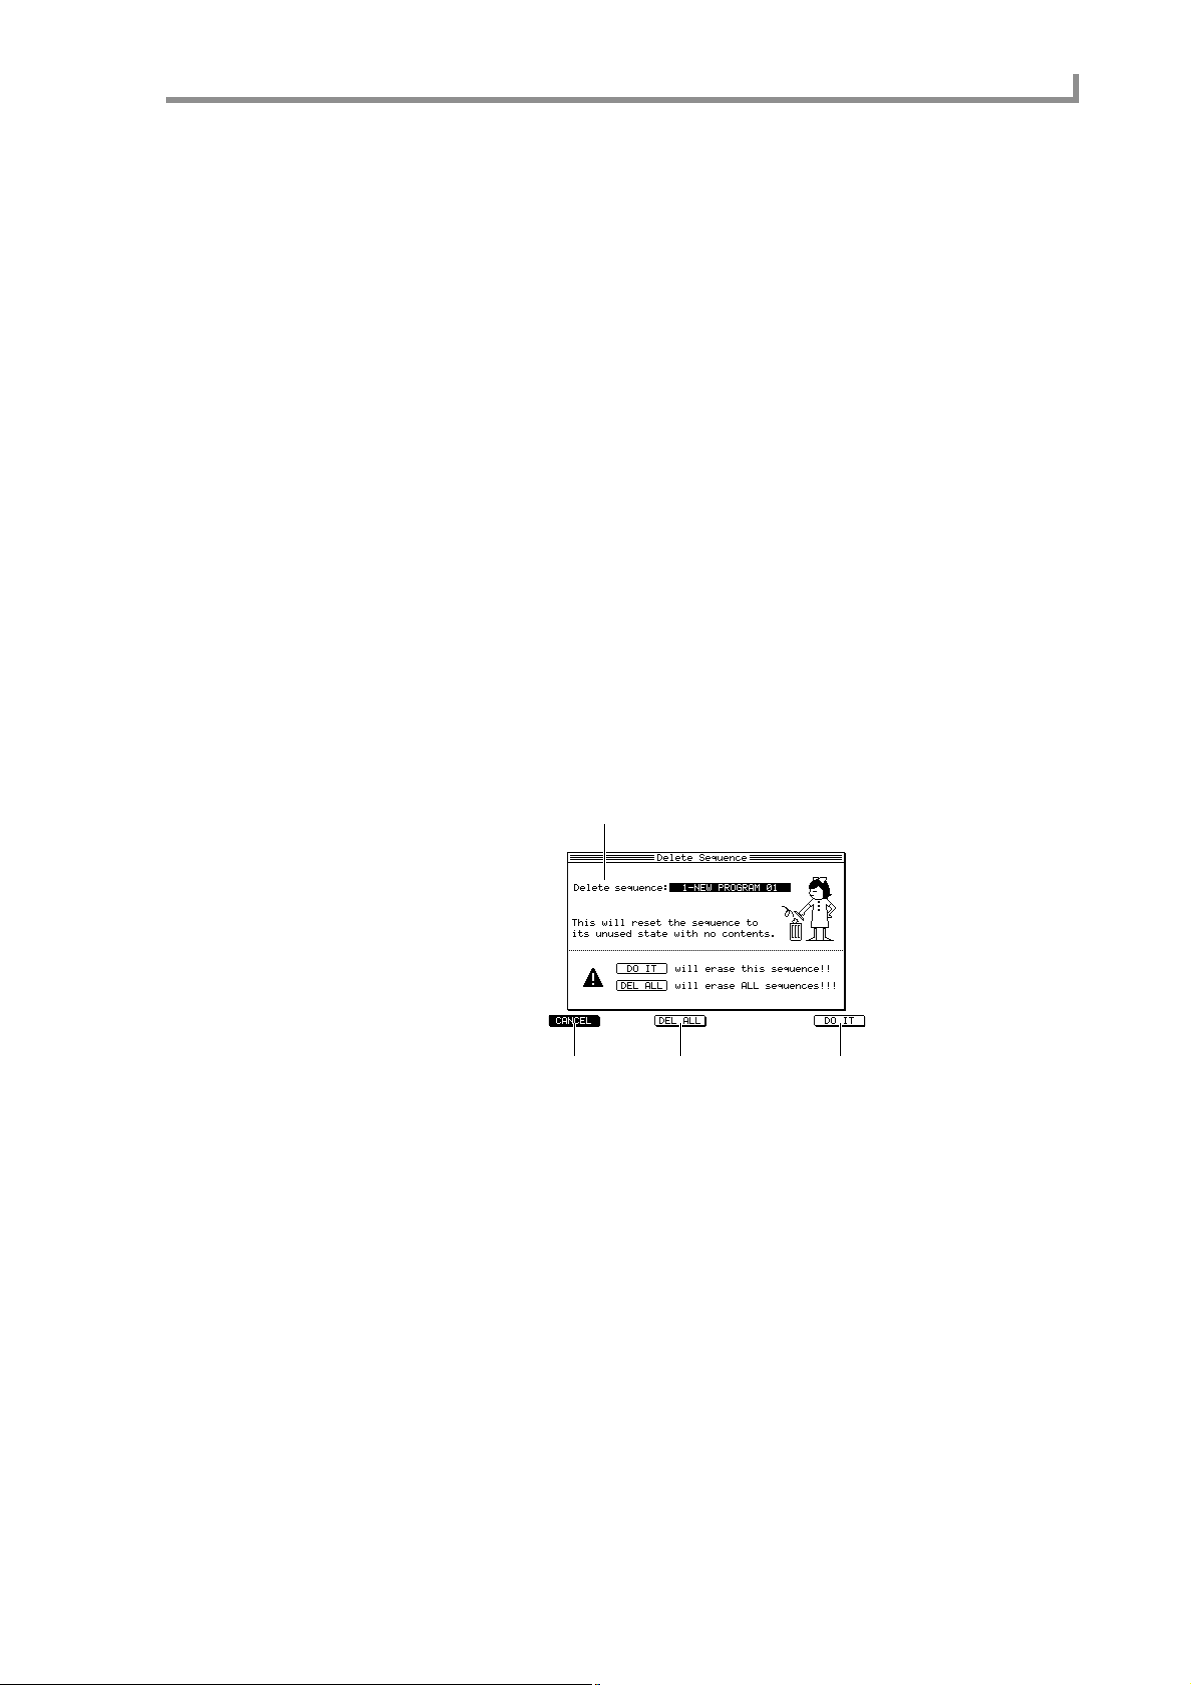
■Deleting a sequence
Here’s how to delete a specific sequence in memory. Once you delete a sequence, that
sequence cannot be recovered to its original state. Please use this operation with caution.
1. Move the cursor to the Seq field.
2. Press the [WINDOW] key.
The Sequence popup window will appear.
3. Press the [F4] key (DELETE).
The Delete Sequence popup window will appear.
1
23 4
A Delete sequence field
Selects the sequence that you want to delete.
B [F1] key (CANCEL)
Cancels the operation and closes the popup window.
C [F3] key (DEL ALL)
Opens the Delete ALL Sequence popup window, which lets you delete all sequences
from the memory of the MPC4000. When this popup windo w is displayed, you can press
the [F6] key (DO IT) to delete all sequences.
D [F6] key (DO IT)
Deletes the specified sequence.
4. Move the cursor to the Delete Sequence field, and turn the [JOG] dial to select
the sequence that you want to delete.
5. To delete the sequence, press the [F6] key (DO IT).
The deleted sequence will return to a blank state.
17
Page 28
Main mode
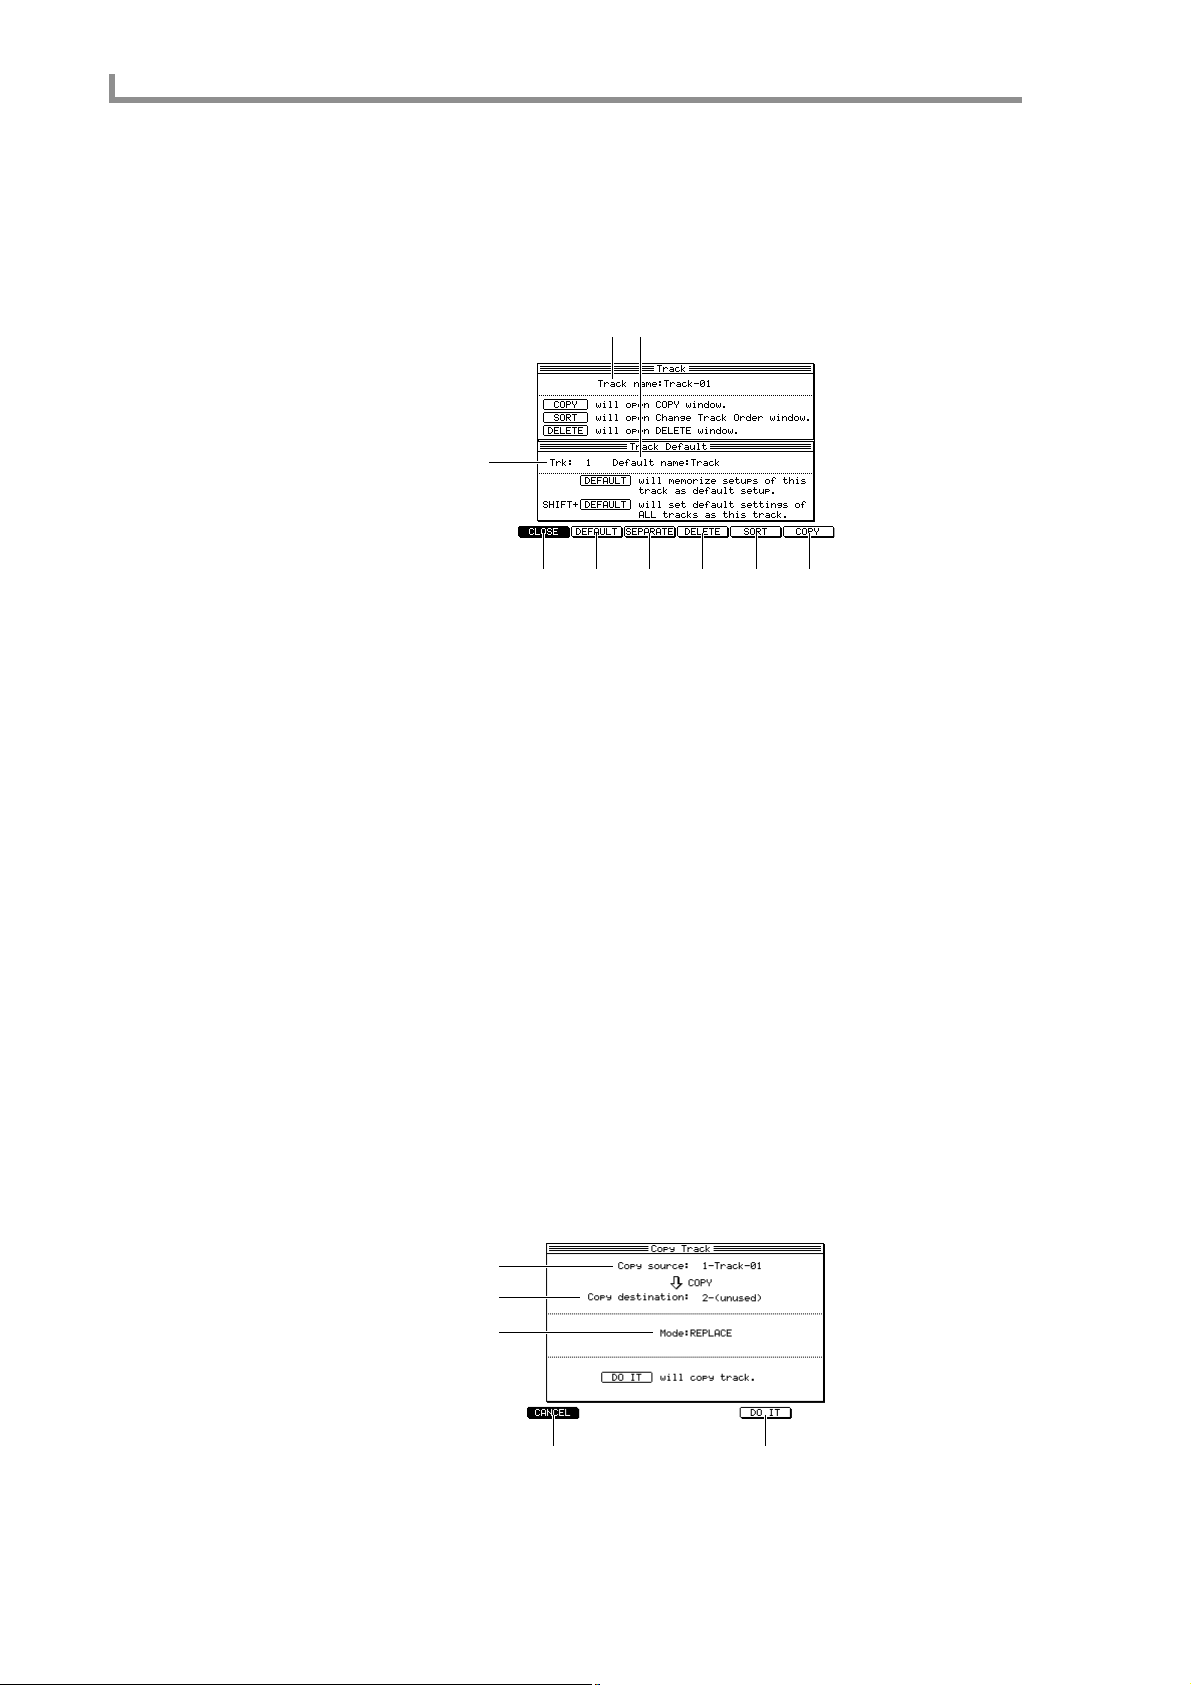
■Copying a track
Here’s how the settings and MIDI events recorded in a track within a sequence can be
copied to another track.
1. Move the cursor to the Trk field, and press the [WINDOW] key.
The Track popup window will appear.
1 3
2
456789
A Track name field
Edits the track name.
B Trk field
Selects the track whose settings will be memorized as the default.
C Default name field
Edits the default name for the track you selected in the Trk field (
D [F1] key (CLOSE)
Closes the popup window.
E [F2] key (DEFAULT)
Memorizes the settings of the track you selected in the T rk field (
F [F3] key (SEPARATE)
Opens the Separate by MIDI popup window.
G [F4] key (DELETE)
Opens the Delete Track popup window.
H [F5] key (SORT)
Opens the Change Track Order popup window.
I [F6] key (COPY)
Opens the Copy Track popup window.
2. Press the [F6] key (COPY).
The Copy Track popup window will appear.
1
2
2).
2) as the default.
18
3
45
A Copy source field
Selects the copy-source track.
Page 29
Main page
B Copy destination field
Selects the copy-destination track.
C Mode field
Specifies whether any data existing in the copy-destination track will be overwritten
(REPLACE), or merged with the copied data (MERGE).
D [F1] key (CANCEL)
Closes the popup window.
E [F5] key (DO IT)
Executes the copy.
3. Move the cursor to the Copy source field, and turn the [JOG] dial to select the
copy-source track.
4. Move the cursor to the Copy destination field, and turn the [JOG] dial to select
an empty track.
5. To execute the copy, press the [F5] key (DO IT).
If desired, a track that already contains MIDI data may be selected as the copy-destination. In this case, use the Mode field to select REPLACE (overwrite) or MERGE (combine), and then press the [F5] key (DO IT).
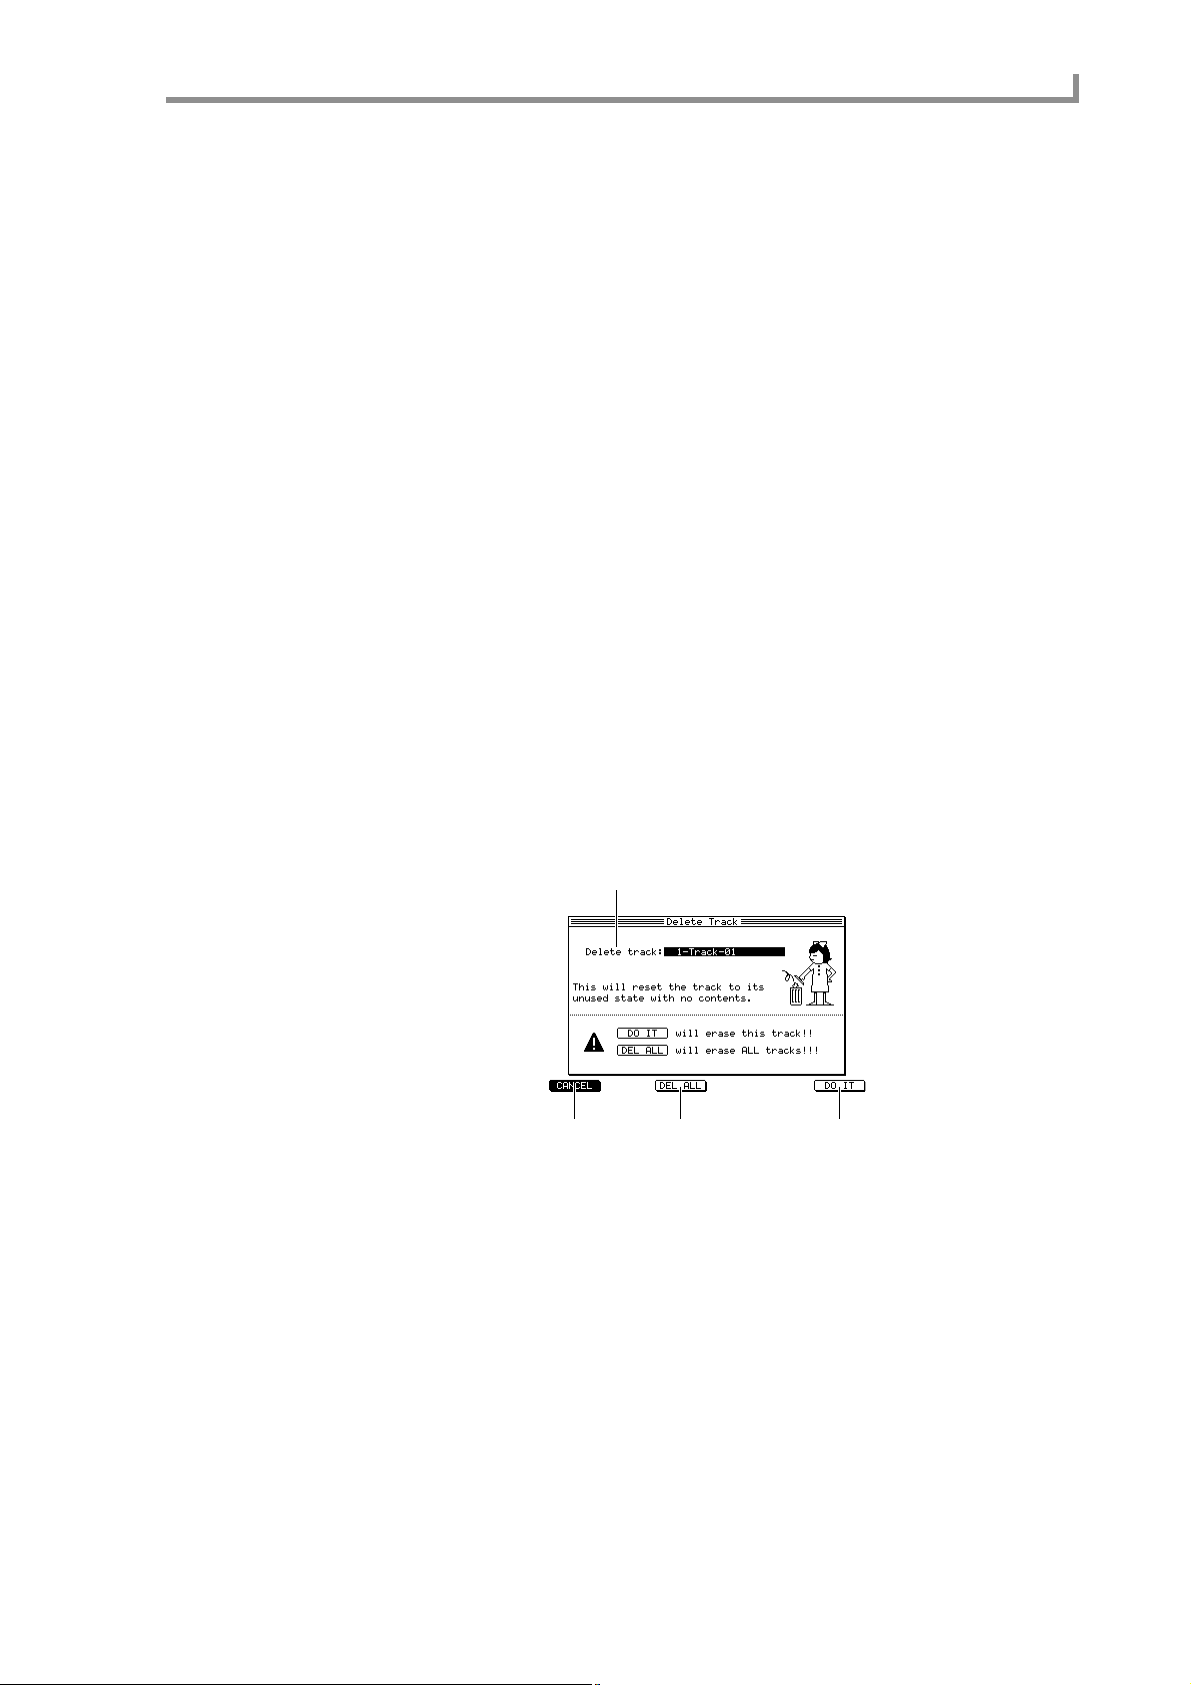
■Deleting a track
Here’s how to delete a specific track from the sequence.
1. Move the cursor to the Trk field, and press the [WINDOW] key.
The Track popup window will appear.
2. Press the [F4] key (DELETE).
The Delete TRACK popup window will appear.
1
23 4
A Delete track field
Selects the track that will be deleted.
B [F1] key (CANCEL)
Cancels the operation and closes the popup window.
C [F3] key (DEL ALL)
Opens the Delete ALL Tracks popup window, where you can delete all tracks of the currently selected sequence. When this popup window is displayed, you can press the [F6]
key (DO IT) to delete the entire sequence.
D [F6] key (DO IT)
Executes the track deletion.
3. Move the cursor to the Delete track field, and turn the [JOG] dial to select the
track that you want to delete.
19
Page 30

Main mode
4. To execute the deletion, press the [F6] key (DO IT).
The contents that were recorded in the track will be deleted, and the track will return to
an empty state.
■Customizing the default settings for a sequence
Y ou can customize the def ault settings (number of measures, time signature, tempo, loop
on/off, etc.) that are used when you select an empty sequence, and specify the default
name that is assigned when you record data in an empty sequence.
1. Select an empty sequence, move the cursor to the Sequence block, and set each
item to the value that you want to specify as the default.
The following items can be stored as default settings for a sequence.
• Tempo
• Time signature
• Number of measures
• Loop on/off
• Transpose
• Settings for each track
2. Press the [WINDOW] key.
The Sequence popup window will appear.
1
2
A Sequence name field
Displays the name of the currently selected sequence. You can turn the [JOG] dial to
access the RENAME popup window and edit the sequence name.
B Default name field
Edits the default sequence name that will be assigned when you create a sequence.
3. Move the cursor to the Default name field, and turn the [JOG] dial.
The Rename popup window will appear.
√
4. Use the [JOG] dial, CURSOR [
sequence name, and press the [F6] key (ENTER).
The sequence name you specify here, with the addition of an automatically incremented
number, will be assigned automatically when you record MIDI events into an empty
sequence.
5. Press the [F2] key (DEFAULT).
The sequence settings and sequence name will be memorized as the default settings for
when you select an empty sequence.
Hint: The above operations will not affect sequences in which events have already been recorded.
If you want to restor e these default settings to the factory-set values, hold down the [SHIFT] key and
press the [F2] key (DEFAULT).
]/[®] keys, and panel keys to specify the default
20
6. To finish the procedure and close the popup window, press the [F1] key
(CLOSE).
Page 31

Main page
■Applying timing correction to an already-recorded track
You can apply timing correction to a track that has already been recorded. Executing this
operation will rewrite the timings of the note events.
1. Play back the sequence, and verify the track, measure location, and range of
notes (or pads) to which you want to apply timing correction.
Hint: You can press the [SEQ EDIT] ke y to access the Sequence Edit page, and use the matrix display
or piano-roll display to verify the location or range of the note events.
2. Move the cursor to the TC field, and press the [WINDOW] key.
The Timing Correct popup window will appear.
1
2 4
3
5
6
7
8 9
A TC field
Selects the unit of timing correction.
B Swing field
Specifies the amount of swing.
C Shift timing field
Selects the direction in which the entire sequence will be shifted. If you select EARLIER,
the sequence will be shifted toward the beginning. If you select LATER, the sequence
will be shifted toward the end. Use the Shift amount field to adjust the amount of shift.
D Shift amount field
Specifies the amount of shift for the entire sequence, in tick units. The maximum value
that you can set for this field will be half of the value you specify in the TC field.
E Track field
Selects the track that will be affected.
F Time field
Specifies the start and end locations of the region to which timing correct will be applied,
in units of measures/beats/ticks. Timing correct will not affect note data outside this
region.
G Notes/Pad field
Specifies the range of note numbers/pad numbers to which timing correct will be applied.
H [F1] key (CLOSE)
Cancels the operation and closes the popup window.
I [F6] key (DO IT)
Executes the timing correct operation.
3. Move the cursor to the Track field, and turn the [JOG] dial to select the track to
which you want to apply timing correct.
If you select track number 0 (All tracks), all tracks in the sequence will be affected.
21
Page 32

Main mode
4. Move the cursor to the Time field, and specify the region to which timing
correct will be applied.
5. Perform the following operations as appropriate for the type of track.
For a DRUMS type track
Move the cursor to the Pad field, and press the pad to which you want to apply timing
correct. The corresponding pad number will be displayed in the field, and will be selected
for editing.
For an INST type track
Move the cursor to the Notes field, and on your MIDI ke yboard, simultaneously press the
highest and lowest notes of the region that you want to select.
The note number at the left of the field will be the lowest note of the range to which timing correct will be applied, and the note number at the right will be the highest note.
You can also turn the [JOG] dial to change the settings of the Notes field.
6. Press the [PLAY] key to play back the sequence.
You will be able to audition the sequence with the timing correct settings applied.
Note: While auditioning, timing correct will be applied to the entire sequence, r egardless of the settings
of the Time field.
7. Adjust the settings of the TC field or Swing field to modify how timing correct is
applied.
When you are satisfied with your adjustments, press the [STOP] key to stop the sequence.
8. To execute timing correct, press the [F6] key (DO IT).
When the note events have been rewritten, the popup window will close.
Note: Y ou can also execute the T iming Correct operation fr om the Sequence Edit page or Step Edit page.
You can return to the previous state by pressing the [UNDO SEQ] key immediately after executing
Timing Correct.
■Rewriting the velocity of note events
Here’s how to increase or decrease the velocity of the note events recorded in a track.
Executing this operation will rewrite the velocity values of the note events.
1. Move the cursor to the Trk field, and turn the [JOG] dial to select the track in
which you want to modify the velocity.
2. Move the cursor to the Velocity field, and press the [WINDOW] key.
The Edit Velocity popup window will appear.
1
2
3
4
56
A Edit type field
Selects the way in which velocity values will be altered.
B Value field
Specifies the amount by which the velocity values will be altered.
22
C Time field
Specifies the region in which the velocity values will be altered.
Page 33

Main page
D Notes/Pad field
Specifies the note numbers/pad numbers for which the velocity values will be rewritten.
E [F1] key (CANCEL)
Closes the popup window.
F [F6] key (DO IT)
Executes the velocity change operation.
3. Move the cursor to the Time field, and turn the [JOG] dial to specify the region
of time in which the velocity values will be rewritten.
4. Move the cursor to the Notes/Pad field, and select the note numbers/pad
numbers for which the velocity will be rewritten.
You can also use your MIDI keyboard or the pads to specify this.
5. Move the cursor to the Edit type field, and select one of the following ways in
which the velocity will be altered.
ADD VALUE.......... The value specified in the
SUB VALUE..........The value specified in the Value field will be subtracted from the cur-
rent value.
MULT VAL%.........The current value will be increased or decreased by the proportion
specified in the Value field.
SET TO VAL..........The velocity values will all be set to the value specified in the Value
field.
6. Move the cursor to the Value field, and turn the [JOG] dial to adjust the amount
by which the velocity values will be altered.
7. To execute the velocity change, press the [F6] key (DO IT).
When the data has been rewritten, the popup window will close.
Hint: Y ou can return to the pre vious state by pressing the [UNDO SEQ] key immediately after executing
this operation.
V alue field
will be added to the current value.
■Rewriting the duration of note events
Here’s how to increase or decrease the duration of the note events recorded in a track.
Executing this operation will rewrite the durations of the note events.
1. Move the cursor to the Trk field, and turn the [JOG] dial to select the track in
which you want to modify the duration.
2. Move the cursor to the Duration field, and press the [WINDOW] key.
The Edit Duration popup window will appear.
1
2
3
4
56
A Edit type field
Selects the way in which duration will be altered.
B Value field
Specifies the amount by which the duration will be altered.
C Time field
Specifies the region in which the duration will be altered.
23
Page 34

Main mode
D Notes/Pad field
Specifies the note numbers/pad numbers for which the duration will be rewritten.
E [F1] key (CANCEL)
Closes the popup window.
F [F6] key (DO IT)
Executes the change in duration.
3. Move the cursor to the Time field, and turn the [JOG] dial to specify the region
of time in which the duration will be rewritten.
The left side of the Time field specifies the starting location, and the right side specifies
the ending location.
4. Move the cursor to the Notes/Pad field, and select the note numbers/pad
numbers for which the duration will be rewritten.
You can also use your MIDI keyboard or the pads to specify this.
5. Move the cursor to the Edit type field, and select one of the following ways in
which the duration will be altered.
ADD VALUE.........The value specified in the Value field will be added to the current
duration.
SUB VALUE..........The value specified in the Value field will be subtracted from the cur-
rent duration.
MULT VAL%.........The current duration will be increased or decreased by the propor-
tion specified in the Value field.
SET TO VAL..........The duration values will all be set to the value specified in the Value
field.
6. Move the cursor to the Value field, and turn the [JOG] dial to adjust the amount
by which the duration will be altered.
7. To execute the duration change, press the [F6] key (DO IT).
When the data has been rewritten, the popup window will close.
Hint: Y ou can return to the pre vious state by pressing the [UNDO SEQ] key immediately after executing
this operation.
■Transposing a recorded track
Here’s how to transpose an INST type track that you recorded. When you execute this
transpose operation, the pitch (note number) of the note events will be rewritten.
1. Move the cursor to the Trk field, and turn the [JOG] dial to select the track that
you want to transpose.
2. Move the cursor to the Trans. field, and press the [WINDOW] key.
The Transpose Permanent popup window will appear.
1
2
345
A Transpose amount field
Specifies the transpose amount over a range of –12–+12 semitones.
24
Page 35

Main page
B Time field
Selects the region of time for which the pitch will be transposed.
C [F1] key (CANCEL)
Cancels the operation and closes the popup window.
D [F4] key (ALL)
Transposes all INST type tracks by the v alue specified in the Transpose field of the Main
page.
E [F6] key (FIX)
Executes the transpose operation.
3. Move the cursor to the Transpose amount field, and turn the [JOG] dial to
specify the amount of transposition.
4. Move the cursor to the left Time field, and turn the [JOG] dial to specify the
starting location for the transposition.
5. Move the cursor to the right Time field, and turn the [JOG] dial to specify the
ending location for the transposition.
6. To execute the transposition, press the [F6] key (FIX).
■Customizing the default settings for each track number
For each track number, you can independently specify the default settings (track type,
output destination, etc.) that will be used when you select an empty track.
For example, if you specify that track number 1 have a track name = Drums, type =
DRUM, output destination = part 1, and that track number 2 have a track name = Bass,
type = INST , output destination = part 2, you w ould be able to use the same track configuration every time you select a new sequence.
1. Select an empty track, move the cursor to the Track block, and set each field to
the values that you want to use as the defaults.
You can specify default values for the following settings of a track.
• Track type
• Amount of relative change for velocity/duration
• Program change on/off
• Output destination
• Mute on/off
2. Move the cursor to the Trk field, and press the [WINDOW] key.
The Track popup window will appear.
1
2
A Track name field
Indicates the name of the currently selected track.
B Trk field
Selects the track number for which you will specify default settings.
C Default name field
Specifies the default track name.
3. Move the cursor to the Trk field, and turn the [JOG] dial to select the track
number for which you want to specify default settings.
3
25
Page 36

Main mode
4. Move the cursor to the Default name field, and turn the [JOG] dial to input the
default name.
5. Press the [F2] key (DEFAULT).
The track settings and track name will be memorized as the default settings for that track
number.
Hint: This procedure will not affect tracks in which events have already been recorded.
If you hold down the [SHIFT] key and pr ess the [F2] ke y, the state of the currently selected track will
be memorized as the default setting for all empty tracks.
6. To end the procedure and close the popup window, press the [F1] key (CLOSE).
■Changing the track number
Here’s ho w to change the track number of a track to a dif ferent track number in the sequence.
1. Move the cursor to the Trk field, and press the [WINDOW] key.
The Track popup window will appear.
2. Press the [F5] key (SORT).
The Change Track Order popup window will appear.
1 3
2
4
A Seq field
Indicates the sequence that is selected for operations.
B Track field
Indicates the track numbers/track name that are included in the sequence selected in the
Seq field (
C Type field
Indicates the type and output destination of the track.
D [F1] key (CLOSE)
Cancels the operation and closes the popup window.
E [F6] key (SELECT)
Selects the track.
3. Move the cursor to the Track field, and turn the [JOG] dial to select the track
that you want to move.
4. Press the [F6] key (SELECT).
That track will be selected. When you select the track, the function of the [F6] key will
change to INSERT.
1).
5
26
Page 37

Main page
5. Turn the [JOG] dial to select the location into which the track will be inserted.
6. To finalize the changed track number, press the [F5] key (INSERT).
■Separating a track by MIDI channels
Here’s how a track containing multiple MIDI channels can be separated by MIDI channel.
1. Move the cursor to the Trk field, and press the [WINDOW] key.
The Track popup window will appear.
2. Press the [F3] key (SEPARATE).
The Separate by Midi popup window will appear.
1 2
34
A Ch field
Indicates the MIDI channels within the track.
B Track field
Selects the track numbers into which those MIDI channels will be separated.
C [F1] key (CANCEL)
Cancels the operation and closes the popup window.
D [F6] key (DO IT)
Executes the separation.
3. Move the cursor to the Ch field, and turn the [JOG] dial to select the MIDI
channel for which you want to select a destination track.
®
4. Press the CURSOR [
channel.
5. Turn the [JOG] dial to select the track into which that MIDI channel will be
placed.
If you select a track that already contains MIDI events, e xecuting this Separate operation
will overwrite those MIDI events.
6. Use the same procedure to specify the destination track for the other MIDI
channels.
7. To execute the separation, press the [F6] key (DO IT).
] key to move the cursor to the Track field for that MIDI
27
Page 38

Main mode
■Erasing all muted tracks
Here’s how to erase all tracks for which muting is currently turned on.
1. Check the muted status of the tracks in the sequence.
2. Move the cursor to the Mute field, and press the [WINDOW] key.
The Erase All Muted Tracks popup window will appear.
12
A [F1] key (CANCEL)
Cancels the operation and closes the popup window.
B [F6] key (DO IT)
Execute the erasure.
3. To execute, press the [F6] key (DO IT).
■Making program change transmission settings
Here’s how to make settings related to program change transmission, such as selecting
the program change number that is sent to the output destination of a track, and enabling
or disabling transmission of program change events recorded within a track.
1. Move the cursor to the Pgm Change field, and press the [WINDOW] key.
The Program Change popup window will appear.
1
2
3
4
5
6
A Bank select field
Switches transmission on/off for bank select messages.
28
B MSB field
Specifies the bank select MSB (control change #0) value that will be sent to the output
destination of the track.
C LSB field
Specifies the bank select LSB (control change #32) value that will be sent to the output
destination of the track.
D Program change field
Specifies the program change number that will be sent to the output destination of the
track.
Page 39

E Transmit program changes in this track field
Specifies whether program change events within the track will be transmitted. Program
change events will be transmitted if you select YES, and will be ignored if you select NO.
F [F1] key (CLOSE)
Updates the settings and closes the popup window.
2. Set each field as desired.
3. To update the settings, press the [F1] key (CLOSE).
■Performing auto punch-in/out
Here’s how to use auto punch-in/out to automate sequence recording.
1. Select the sequence that you want to record.
2. Move the cursor to the A.Punch field, and press the [WINDOW] key.
The Auto Punch In/Out popup window will appear.
1 3
2
Main page
4
A Type field
Selects the way in which auto punch-in/out will be performed: PUNCH IN ONLY (automate only punch-in), PUNCH OUT ONLY (automate only punch-out), or PUNCH
IN-OUT (automate punch-in/out).
B In time field
Specifies the punch-in point.
C Out time field
Specifies the punch-out point.
D [F1] key (CLOSE)
Finalizes the settings and closes the popup window.
3. Make sure that the Type field is set to PUNCH IN-OUT.
If you want to perform only punch-in or punch-out, move the cursor to the Type field and
turn the [JOG] dial to select PUNCH IN ONLY or PUNCH OUT ONLY.
The graphic in the center of the popup window will change according to the punch-in/out
type you select.
4. Move the cursor to the In time field, and turn the [JOG] dial to specify the
punch-in point.
The punch-in point is indicated by a symbol in the position bar of the Main page.
29
Page 40

Main mode
5. In the same way, move the cursor to the Out time field, and turn the [JOG] dial
to set the punch-out point.
The punch-in point is indicated by a symbol in the position bar of the Main page.
6. Press the [F1] key (CLOSE).
7. Make sure that the setting of the A.Punch field is ON.
8. Hold down the [REC] key, and press the [PLAY] key (or [PLAY START] key) to
perform the sequence record operation.
When you perform the record operation, the [PLAY] key LED will light, the [REC] key
LED will blink, and the sequence will begin playing.
When you reach the punch-in point, the [REC] key LED will change from blinking to lit,
and recording will begin.
When you reach the punch-out point, the [REC] key will go dark, and playback will
resume.
9. When you are finished recording, press the [STOP] key.
10. Move the cursor to the A.Punch field, and change the setting to OFF.
Auto punch-in/out will be disabled.
■Using the Simul Play function
Simul Play is a function that simultaneously plays the currently selected sequence and
another sequence/song that you specify.
1. Move the cursor to the Seq field, and turn the [JOG] dial to select the sequence
that you want to play back simultaneously.
2. Move the cursor to the Simul play field, and turn the [JOG] dial to switch it ON.
The Simul Play function will be enabled.
3. Move the cursor to the SEQ/SONG field, and turn the [JOG] dial to select the
type of data (sequence or song) that you want to play back simultaneously.
4. Move the cursor to the sequence/song number, and turn the [JOG] dial select
the sequence/song that you want to play back simultaneously.
This completes preparations for Simul Play.
5. Press the [PLAY] key to play back the sequence.
Hint: If during Simul Play you select a different sequence in the Seq field of the Sequence block, the
current sequence will play to the end, and then playback will switch to the next sequence (the Next
Sequence function). The Simul Play block will show the sequence that will be played next.
30
Page 41

Main page
■Naming the external devices connected to the MIDI OUT connectors
You can assign a name to the external device(s) connected to the [MIDI OUT A]–[MIDI
OUT D] connectors. A separate device name can be specified for each MIDI channel.
1. Access the Main page, and make sure that the Out1 field is set in the range of
MIDI A–D.
2. Move the cursor to the Device field, and press the [WINDOW] key.
The Device List popup window will appear.
1 2 3
4
A Out field
Selects the MIDI connector A–D for which you want to edit the device names.
B MIDI channel
Displays MIDI channels 1–16 for the MIDI connector you selected in the Out field.
C Device names
Displays the device names for MIDI channels 1–16.
D [F1] key (CLOSE)
Finalizes the settings and closes the popup window.
3. Move the cursor to the Out field, and turn the [JOG] dial to select the MIDI
connector that is connected to the device(s) you want to name.
4. Move the cursor to the device name you want to edit, and turn the [JOG] dial.
The Rename popup window will appear.
√
5. Use the CURSOR[
name, and press the [F6] key (ENTER).
6. In the same way, edit the device names for the other MIDI channels.
7. When you are finished editing the device names, press the [F1] key (CLOSE) to
close the popup window.
]/[®]keys, [JOG] dial, and panel keys to edit the device
31
Page 42
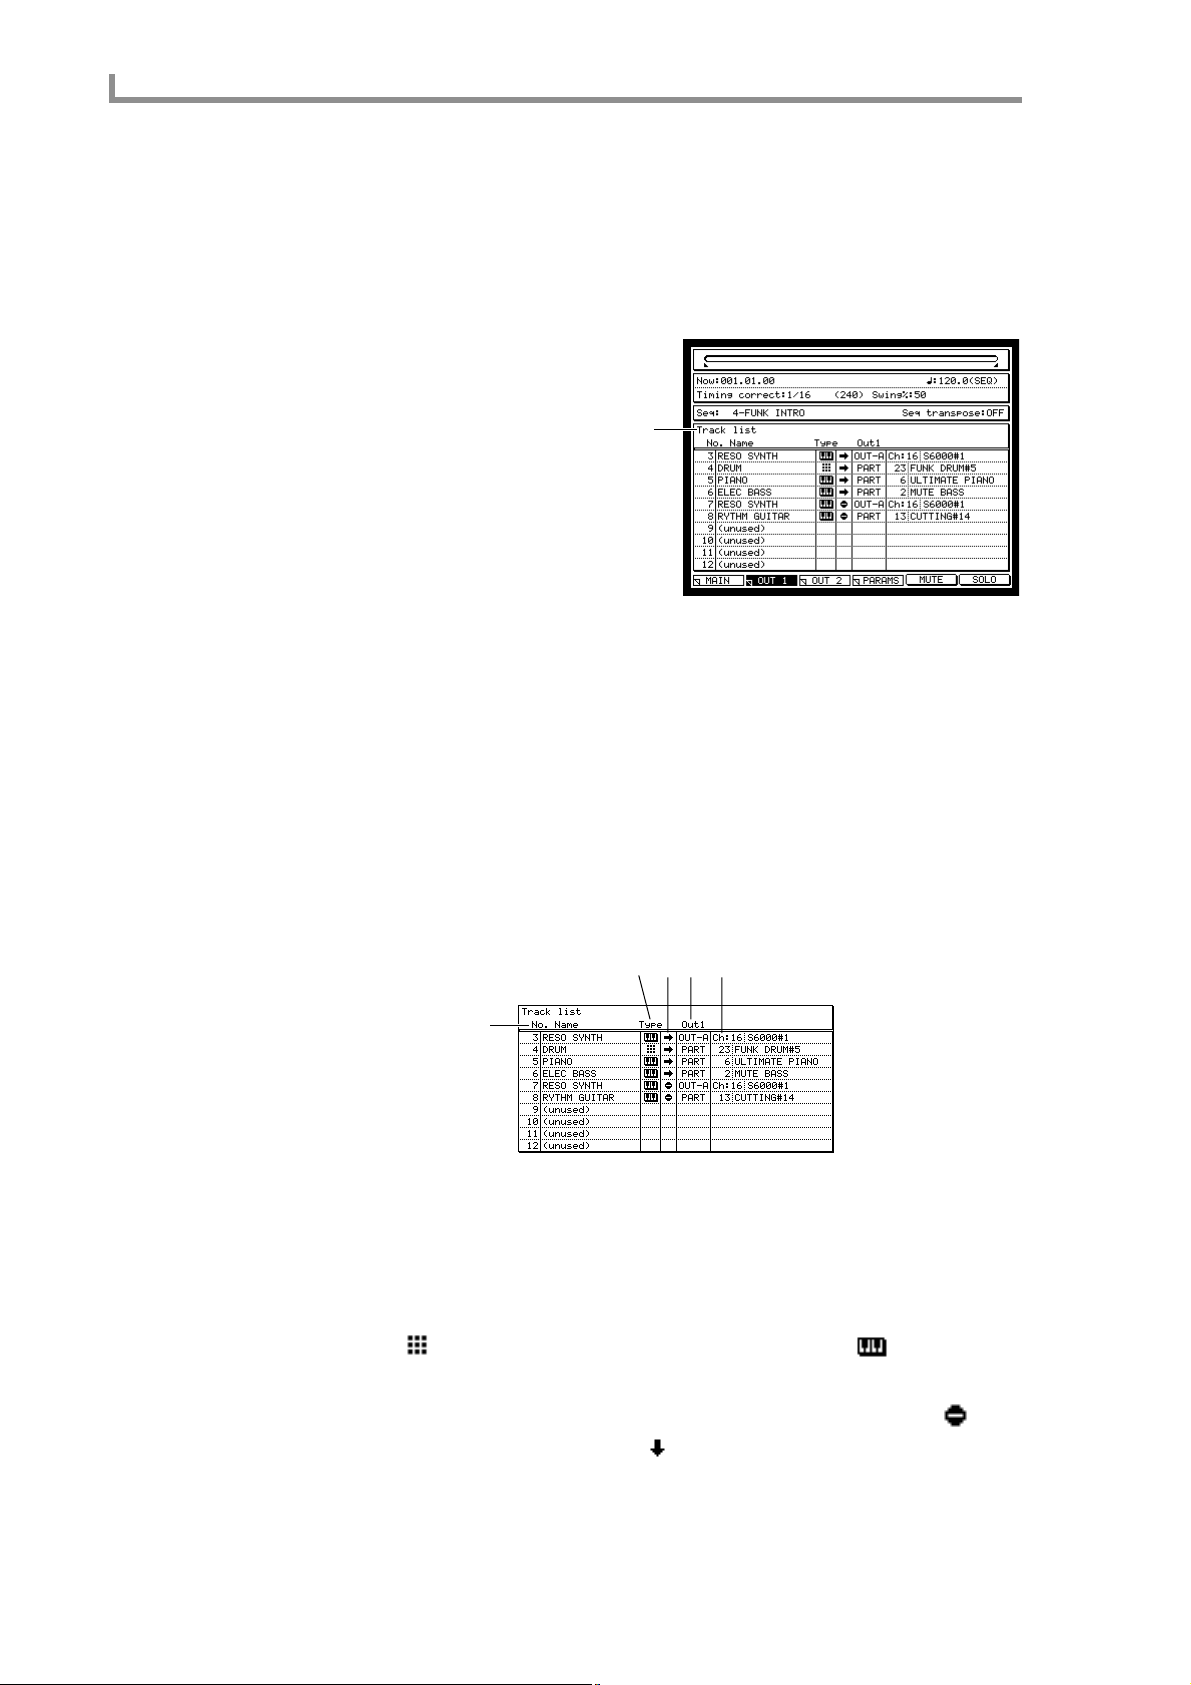
Main mode
TR list/Out 1 page
Listing the track output destinations (Out 1)
Here you can view a list of the output destinations (Out 1) for the tracks in the currently
selected sequence.
To access this page........[MAIN] key → [F2] key (TR LIST)
A Track list block
Functions
• [F1] key (MAIN)
Displays the main page.
• [F3] key (OUT 2)
Displays the TR List/Out 2 page.
• [F4] key (PARAMS)
Displays the TR List/PARAMS page.
• [F5] key (MUTE)
Mutes the currently selected track.
• [F6] key (SOLO)
Solos the track that is selected in the track list.
1
Track list block
This block lists the tracks in the currently selected sequence.
2
34 5
1
A No./Name field
Displays the track numbers/track names. When the cursor is located at the track number ,
you can turn the [JOG] dial to scroll the track list.
You can press the [WINDOW] key to access the Track popup window.
B Type field
Turn the [JOG] dial to select the type of track (DRUM or INST). A DRUM type track is
indicated by a symbol, and an INST type track is indicated by a symbol.
C Mute field
Switches the mute on/off status of the track. A track that is on is indicated by a symbol, and a track that is off is indicated by a symbol. By holding down the [SHIFT]
key and using the CURSOR [
the [JOG] dial to switch the on/off state for multiple tracks at once.
π
]/[†] keys to select multiple on/off fields, you can turn
32
Page 43

TR list/Out 1 page
D Out1 field
Selects the main output destination for each track.
E Channel/part field
Selects the channel number or part number that will be the output destination. The de vice
name or program name is shown at the right of the field.
33
Page 44

Main mode
TR list/Out 2 page
Listing the track output destinations (Out 2)
Here you can view a list of the output destinations (Out 2) for the tracks in the currently
selected sequence.
To access this page......... [MAIN] key → [F2] key (TR LIST) → [F3] key (OUT 2)
A Track list block
Functions
• [F1] key (MAIN)
Displays the main page.
• [F2] key (OUT 1)
Displays the TR List/Out 1 page.
• [F4] key (PARAMS)
Displays the TR List/PARAMS page.
• [F5] key (MUTE)
Mutes the currently selected track.
• [F6] key (SOLO)
Solos the track that is selected in the track list.
1
Track list block
This block lists the tracks in the currently selected sequence.
1 2
A Out 2 field
Selects the sub output destination for each track.
B Channel/part field
According to the setting of the Out2 field, this displays the channel number/part number
in the same way as in the Out1 page. If the Out2 field is turned OFF, nothing will be displayed.
34
Page 45

TR list/PARAMS page
Listing the track parameters
Here you can view a list of settings such as transpose and duration for each track in the
currently selected sequence.
To access this page ....... [MAIN] key → [F2] key (TR LIST) → [F4] key
A Track list block
Functions
• [F1] key (MAIN)
Displays the Main page.
• [F2] key (OUT 1)
Displays the TR List/Out 1 page.
• [F3] key (OUT 2)
Displays the TR List/Out 2 page
• [F5] key (MUTE)
Mutes the currently selected track.
• [F6] key (SOLO)
Solos the track that is selected in the track list.
TR list/PARAMS page
(PARAMS)
1
Track list block
This lists the tracks in the currently selected sequence.
1234
A Pgm field
Displays the program change on/off status.
The Program change popup window will appear if you press the [WINDOW] key.
B Trans field
Specifies the transposition for each track. Changing this value will not affect the events
recorded in the track.
The Transpose Permanent popup window will appear if you press the [WINDOW] key.
35
Page 46

Main mode
C Dura% field
Specifies the amount of relative change in duration for each track. Changing this value
will not affect the events recorded in the track.
The Edit Duration popup window will appear if you press the [WINDOW] key.
D Velo% field
Specifies the amount of relative change in velocity for each track. Changing this value
will not affect the events recorded in the track.
The Edit Velocity popup window will appear if you press the [WINDOW] key.
36
Page 47

Sequence edit mode
Sequence edit page
Using the graphic editor to edit a sequence
Here’s how to use the graphic editor to edit the MIDI events recorded in a track.
To access this page ....... [SEQ EDIT] key
Sequence edit page
A Track block
B Now block
C Graphic editor block
D View block
1
2
3
4
Functions
• [F1] key (OPTION)
Displays the Step Edit Option popup window, where you can make option settings for
step input.
• [F2] key (MOVE)
Displays the MOVE block, where you can move the selected MIDI event to a different
location.
• [F3] key (COPY)
Copies the selected MIDI event. If you ha ve selected more than one e vent, the Copy Data
popup window will appear.
• [F4] key (CUT)
Cuts the selected MIDI event. If you have selected more than one event, the Cut Data
popup window will appear.
• [F5] key (PASTE)/(EDIT)
Displays the Paste Data popup window, which lets you paste MIDI events from the clipboard or from a phrase library.
If multiple MIDI events are selected in the graphic editor, the function assigned to this
key will be different, and the Edit Multiple popup window will appear.
• [F6] key (PLAY)/(INSERT)
Plays the selected region. During step input, the INSER T function will be assigned to this
key, and the Insert Event popup window will appear.
Track block
Here you can select the track that you want to edit, and switch settings such as tempo and
timing correct.
1
23
45
37
Page 48

Sequence edit mode
A Track field
Turn the [JOG] dial to select the track that you w ant to edit. If you move the cursor to this
field and press the [WINDOW] key, the Track popup window will appear.
B Tempo field
Specifies the tempo of the sequence. If you move the cursor to this field and press the
[WINDOW] key, the Tempo Change popup window will appear.
C SEQ/MAS field
Selects the timing source of the sequence.
D Timing correct field
Specifies the timing correct setting. If you move the cursor to this field and press the
[WINDOW] key, the Timing Correct popup window will appear.
E Swing field
Modifies the amount of swing. This field will be displayed only if the T iming correct field
is set to a value of 1/8 or 1/16. If you move the cursor to this field and press the [WINDOW] key, the Timing Correct popup window will appear.
Now block
This area indicates the current location within the sequence.
1
A Now field
Indicates or changes the current location within the sequence.
Graphic editor block
This area provides a graphic display of the MIDI events recorded in the track. The contents of the display will depend on the type of track you are editing, and on the type of
MIDI events that are shown.
Hint: When the cursor is located in the graphic editor, use the CURSOR[√]/[®]/[π]/[†] keys to
select the editing location or re gion. T o mo ve the cursor to a differ ent block, use the BLOCK CURSOR
[
π
]/[†] keys.
Matrix display
This block will appear if you select NOTES in the View field for a DRUM type track.
1
3
2
38
45
A Time ruler
Displays the time axis of the track. The numbers above the ruler are the measure numbers. The markings in the ruler are the minimum units by which you can select e vents to
be edited. Use the Timing Correct field to specify the resolution of these markings.
Page 49

Sequence edit page
B Pad number
Indicates the pad numbers. You can use the [PAD BANK] keys to switch the pad bank
that is shown in the matrix.
C Grid
Specifies the editing region. If one or more note events exist within a grid location, a ●
symbol will be displayed. The Timing correct field of the Track block sets the horizontal
resolution of the grid.
D Vertical marker
This is used to indicate the current location or to select a grid. The grid at which the horizontal and vertical markers intersect is selected for editing.
To extend the selected region, hold down the [SHIFT] key and using the CURSOR
[
√
]/[®] keys.
E Horizontal marker
This is used to select the pad number for editing.
T o extend the selected region, hold do wn the [SHIFT] key and use the CURSOR [
keys.
To simultaneously select two or more pad numbers that are not adjacent in the display,
hold down the [SHIFT] key and press two or more pads.
π
]/[†]
Piano-roll display
This block will be displayed if you select NOTES in the V ie w field for an INST type track.
1
2
35 4
A Time ruler
Displays the time axis of the track. The markings in the ruler are the minimum units by
which you can select a region.
B Note number
Indicates the note numbers in the track.
C Vertical marker
This is used to indicate the current location or to select note events.
T o extend the selected re gion, hold do wn the [SHIFT] key and use the CURSOR [
keys.
√
]/[®]
D Horizontal marker
This used to select the pad number for editing.
T o extend the selected region, hold do wn the [SHIFT] key and use the CURSOR [
keys.
E Note events
The note events recorded in the track are displayed here as bars. The length of the bar
indicates the duration of the note. Events whose beginning (note-on) falls within the
selected region will be selected for editing.
π
]/[†]
39
Page 50

Sequence edit mode
Graph display
This block will be displayed if you select other than note events (i.e., control changes or
pitch bend, etc.) in the View field for a DRUM or INST type track.
A Graph display
Displays the continuously-variable events recorded in the track. The horizontal dimension is the time axis, and the vertical dimension is the value of the continuously-v ariable
event.
B Time ruler
Displays the time axis of the track. The markings in the ruler are the minimum units by
which you can select a region.
2
1
3
C Marker
This is used to indicate the current location or to select continuously-variable events.
T o extend the selected re gion, hold do wn the [SHIFT] key and use the CURSOR [
keys.
Event list display
When the cursor is located in the graphic editor, you can press the [WINDOW] key to
view an event list containing only the currently selected events.
1
A Event list block
Displays the events included in the selected region.
To delete an event, use the cursor to select a MIDI event and then press the [F4] key
(DELETE).
To select multiple events, hold down the [SHIFT] key and use the CURSOR [
keys (or turn the [JOG] dial).
To return to the previous block display, press the [F1] key (CLOSE).
π
√
]/[®]
]/[†]
40
View block
This area selects the type of MIDI events displayed in the graphic editor.
12
Page 51

Sequence edit page
A View field
Selects the type of MIDI events that will be displayed in the graphic editor . Y ou can select
the following types of MIDI events.
• NOTES (note events)
• PITCH BEND (pitch bend)
• CONTROL CHANGE (control change)
• CH PRESSURE (channel pressure)
• POLY PRESSURE (polyphonic key pressure)
If you select control change or polyphonic key pressure, you can use the field at the right
to specify the control change number or note number.
B MIDI ch field
Selects the MIDI channel(s) that will be displayed in the graphic editor. This is convenient when multiple channels of MIDI events are recorded in the track, and you w ant to
view only a specific channel.
■Step-recording note events
Here’s how to step-record note events from the pads or your MIDI keyboard.
1. Access the Main page, and select the sequence that you want to step-record.
2. Select the track that you want to step-record, and specify the output
destination.
3. Access the Sequence Edit page.
4. Move the cursor to the View field, and turn the [JOG] dial to change the setting
to NOTES.
The graphic editor will display either the matrix or the piano-roll, depending on the type
of track you selected.
5. Press the [F1] key (OPTION).
The Step Edit Option popup window will appear.
1
2
3
A Duration of recorded notes field
Selects the way in which the duration of the step-recorded note events will be specified.
B Auto step increment on key release field
Specifies whether the current location will be advanced after you input a note event
(YES), or whether you will remain at that the location (NO).
C [F1] key (CLOSE)
Updates the settings and closes the popup window.
6. Move the cursor to the Duration of recorded notes field, and turn the [JOG]
dial to select one of the following ways in which to specify the duration.
41
Page 52

Sequence edit mode
• TC VALUE ..................The setting of the Timing correct field will specify the dura-
• AS PLAYED................The duration of the note event will depend on the length of
7. Move the cursor to the Auto Step increment on key release field, and turn the
[JOG] dial to set the value to YES.
8. Press the [F1] key (CLOSE).
The settings will be finalized, and the popup window will close.
9. Move the cursor to the Timing correct field, and set the timing correct value to
the shortest note value that you want to record.
This will change the resolution for the horizontal axis of the matrix or piano roll display.
10. Move the cursor to the measure/beat/tick of the Now field, and specify the
location at which you will begin step-recording.
11. Press the [REC] key or the [OVER DUB] key.
The [OVER DUB] key LED will light, and you are now ready to begin step-recording.
12. Strike a pad (or play a note on your MIDI keyboard).
A note event will be input, and the current location will advance according to the length
of the note value specified in the Timing correct field. The velocity value will be input
according to the velocity with which you struck the pad or played your MIDI keyboard.
tion. The value at the right of the field indicates the proportion
of the duration relative to the timing correct value. If this is
set to 100%, the duration will match the number of ticks in the
TC field.
time that you hold down the pad or MIDI keyboard.
Hint: When you press the [TIMING CORRECT] key, the cursor will move to the T iming correct field
re gardless of the current location of the cursor. While you hold down this key, you can use the [JOG]
dial to adjust the value.
Hint: If you adjusted the value at the right of TC VALUE in step 6, the duration of the recorded note
event will be determined according to that proportion.
>
13. If you want to input a rest, press the STEP [
] key.
The current location will advance according to the timing correct note value.
14. Continue step-recording the rest of the notes in the same way.
If you reach the end of the sequence and want to continue step-recording from the beginning of the sequence, move the cursor to the Now field, and use the [JOG] dial to change
the current location.
15. When you are finished step-recording, press the [STOP] key.
Step-recording will end.
Hint: During step-recording, the function assigned to the [F6] key will change to INSERT. To insert
a note event at a given location, use the graphic editor to specify that location and press the [F6] k ey.
(The timing correct value will determine the duration of the note event.)
■Deleting MIDI events
1. Select the track that contains the MIDI event(s) you want to delete.
2. Move the cursor to the View field, and turn the [JOG] dial so that the MIDI
event you want to delete is shown in the graphic editor.
If you selected control change or polyphonic key pressure, use the right side of the View
field to select the control change number or note number that you want to see.
3. Move the cursor to the graphic editor, and select the region of MIDI events you
want to delete.
When the cursor is located in the graphic editor, you can select a re gion by holding down
the [SHIFT] key and using the CURSOR[
√
]/[®]/[π]/[†] keys to extend the selection.
42
Page 53

Sequence edit page
4. Press the [F4] key (CUT).
If you had selected a single grid, pressing this key will delete the data and copy it to the
clipboard.
If you had selected a region, the Cut Data dialog box will appear.
1
2
34
A Time field
Displays the region of the time axis (left/right) from which data will be deleted.
B Notes field
Displays the region of note numbers (up/down) that will be deleted.
C [F1] key (CANCEL)
Cancels the Delete operation and closes the popup window.
D [F3] key (DELETE)
Executes the Delete operation.
5. Verify that the Time field shows the time axis region you selected in step 3.
Hint: You can move the cursor to the Time field and make fine adjustments to the selected region of
the time axis.
6. If you are deleting note events, make sure that the Notes field shows the range
of note numbers you want to delete.
Hint: You can move the cursor to the Notes field and make fine adjustments to the selected range of
note numbers.
7. To execute the deletion, press the [F3] key (DELETE).
The MIDI events will be deleted, and the popup window will close.
■Moving MIDI events
The MIDI event(s) selected in the graphic editor can be mo ved left/right (in the time axis)
or up/down (to change the note number).
1. Select the track that contains the MIDI event(s) you want to move.
2. Move the cursor to the View field, and turn the [JOG] dial so that the graphic
editor shows the MIDI event(s) you want to move.
If you selected control change or polyphonic key pressure, use the right side of the View
field to select the control change number or note number that you want to see.
3. Move the cursor to the graphic editor, and select the region of MIDI events you
want to move.
When the cursor is located in the graphic editor, you can select a re gion by holding down
√
the [SHIFT] key and using the CURSOR [[
4. Press the [F2] key (MOVE).
]/[®]]/[π]/[†] keys to extend the selection.
43
Page 54

Sequence edit mode
The screen will switch to the piano-roll display, and various fields will appear , allowing
you to specify the move-destination of the MIDI e vent(s), and ho w the mov e will be handled.
1
5
2
678
34
A Move field
Selects the direction in which the data will be moved.
B From field
Indicates the current location of the move-source MIDI event. If you have selected multiple MIDI events, this indicates the location of the first event. If the Move field (
set to NOTE, this selects the note number.
C to field
Specifies the move-destination location. If you hav e selected multiple MIDI events, this
indicates the move-destination of the first event. If the Move field (
this selects the note number.
1) is set to NOTE,
D Mode field
Selects how processing will be performed if note events exist in both the move-source
and move-destination.
E [F1] key (CANCEL)
Cancels the operation and returns the block to the normal display.
1) is
F [F2] key (DO IT)
Executes the MIDI event Move operation.
G [F3] key (–)
Moves the selected region toward the beginning of the track, in steps of one tick.
H [F4] key (+)
Moves the selected region toward the end of the track, in steps of one tick.
5. Move the cursor to the Move field, and turn the [JOG] dial to select one of the
following ways in which the data will be moved.
TIME......................Move along the time axis (left/right)
NOTE.....................Move the note number (up/down)
You will be able to select NOTE only if you have selected note events in an INST type
track.
6. Move the cursor to the to field, and specify the move-destination for the MIDI
events.
7. As necessary, move the cursor to the Mode field, and select one of the following
to specify how processing will be performed if note events exist in both the
move-source and move-destination.
MERGE..................Existing note events will remain, and the move-source note events
will be added.
REPLACE..............Existing note events will be erased, and overwritten by the
move-source events.
8. Press the [F2] key (DO IT) to execute the move.
44
Page 55

Sequence edit page
■Copying/cutting MIDI events
A phrase (MIDI events) selected in the graphic editor can be cut/copied and placed in the
clipboard or phrase library.
Hint: The clipboard contains only the content that was most recently copied or cut. The contents of
the clipboard will be lost when the power is turned off.
1. Select the track that contains the phrase you want to cut or copy.
2. Move the cursor to the View field, and turn the [JOG] dial to make the graphic
editor show the MIDI events you want to cut or copy.
If you selected control change or polyphonic key pressure, use the right side of the View
field to select the control change number or note number that you want to see.
3. Move the cursor to the graphic editor, and select the region of MIDI events you
want to cut or copy.
When the cursor is located in the graphic editor, you can select a re gion by holding down
√
the [SHIFT] key and using the CURSOR[
4. If you want to keep the original events, press the [F3] key (COPY). If you want
to delete the original events, press the [F4] key (CUT).
The Copy Data or Cut Data popup window will appear , according to the ke y you pressed.
]/[®]/[π]/[†] keys to extend the selection.
1
2
3
456
1
2
3
4
A Time field
Adjusts the time region that will be copied or cut.
B Notes field
Adjusts the note numberspad numbers that will be copied or cut. This field will not be
displayed if you are copying MIDI events other than note events.
756
C New Name field
Edits the name of the new phrase library.
D [F1] key (CANCEL)
Cancels the operation and closes the popup window.
E [F5] key (LIBRARY)
Saves the copied or cut MIDI events to the phrase library.
45
Page 56

Sequence edit mode
F [F6] key (CLIP BD)
Places the copied or cut MIDI events in the clipboard.
G [F3] key (DELETE)
Only deletes the data without copying it.
5. As necessary, move the cursor to the Time field and the Notes field, and adjust
the region to be copied.
6. If you want to place the copied/cut MIDI events in the clipboard, press the [F6]
key (CLIP BD).
The MIDI events in the selected region will be placed in the clipboard.
7. If you want to save the copied/cut MIDI events in the phrase library, move the
cursor to the New name field and turn the [JOG] dial to access the RENAME
popup window.
8. Specify the desired library name, and press the [F6] key (ENTER).
9. To save the data to the library, press the [F5] key (LIBRARY).
The copied data will be saved in the phrase library under the name you specified in the
New Name field.
■Pasting MIDI events
MIDI events that you saved in the clipboard or the phrase library can be pasted into the
desired track.
1. Select the track into which you want to paste MIDI events.
2. Move the cursor to the graphic editor, and move the marker to the starting
location where you want to paste the events.
3. Press the [F5] key (PASTE).
The Paste Data popup window will appear.
1
2
3
4
5
6789JK
A Phrase Library field
Lists the phrase libraries saved in flash ROM.
B Paste event field
Selects the MIDI events that you want to paste from the phrase library.
C Paste Mode field
Selects how processing will occur if MIDI events already exists in the paste-destination.
D Copies field
Specifies the number of times the data will be copied.
E Free field
Displays the amount of free phrase library memory.
F [F1] key (CANCEL)
Cancels the operation and closes the popup window.
46
Page 57

Sequence edit page
G [F2] key (RENAME)
Displays the Rename popup window, allowing you to edit the name of the phrase library.
H [F3] key (DELETE)
Deletes the phrase library that you selected in the Phrase Library field.
I [F4] key (PLAY)
Plays the phrase library that you selected in the Phrase Library field.
J [F5] key (LIBRARY)
Pastes the phrase library that you selected in the Phrase Library field.
K [F6] key (CLIP BD)
Pastes the contents of the clipboard.
4. Move the cursor to the Paste event field, and turn the [JOG] dial to select one of
the following choices for the MIDI events that will be pasted.
• NOTE.......................... Paste only the note events from the clipboard or the selected
phrase library.
• ALL............................. Paste all MIDI events from the clipboard or the selected
phrase library.
5. Move the cursor to the Paste Mode field, and turn the [JOG] dial to select one
of the following ways in which the data will be pasted.
• REPLA CE................... If the same type of MIDI events exist in the paste-destination,
the pasted data will overwrite the existing data.
• MERGE...................... The contents of the phrase library will be added to the exist-
ing MIDI events.
6. If necessary, move the cursor to the Copies field, and turn the [JOG] dial to
specify the number of times the data will be copied.
7. If you want to paste MIDI events that you placed in the clipboard, press the [F6]
key (CLIP BD).
The data will be pasted, and the popup window will close.
8. If you want to paste a phrase library, move the cursor to the Phrase Library and
turn the [JOG] dial to select the phrase library you want to paste.
9. If you want to paste the selected phrase, press the [F5] key (LIBRARY).
The data will be pasted, and the popup window will close.
Note: If you have specified a region in the graphic editor, the [F5] key will operate as the EDIT key.
■Simultaneously editing values in a selected region
Here’s how the value of MIDI events in a selected region can be edited simultaneously.
1. Select the track that contains the events you want to edit.
2. Move the cursor to the View field, and turn the [JOG] dial to select the MIDI
events you want to edit.
If you select control change or polyphonic key pressure, use the right side of the View
field to select the control change numbers or note numbers you want to view.
3. Move the cursor to the graphic editor, and select the region of MIDI events you
want to edit.
The function assigned to the [F5] key will change to EDIT. When the cursor is located in
the graphic editor, you can hold down the [SHIFT] key and use the CURSOR
[
√
]/[®]/[π]/[†] keys to select a region by extending the selected location.
47
Page 58

Sequence edit mode
4. Press the [F5] key (EDIT).
The Edit Multiple popup window will appear.
1
2
3
4
5
6
7
A Edit field
Selects the element of MIDI data that will be modified. This field will be displayed only
if you selected note events.
B Edit type field
Selects the way in which the data will be modified.
C Value field
Specifies the adjustment value.
D Time field
Specifies the region in which data will be modified.
E Notes field
Indicates the range of note events that will be modified. This field will be displayed only
if you have selected note events.
F [F1] key (CANCEL)
Cancels the operation and closes the popup window.
G [F6] key (DO IT)
Executes the editing operation.
5. If you selected note events in step 2, move the cursor to the Edit field, and turn
the [JOG] dial to select one of the following elements to edit.
• VELOCITY.................Edit the velocities of the note events in the selected region.
• DURATION.................Edit the durations of the note events in the selected region.
6. Move the cursor to Edit type, and turn the [JOG] dial to select one of the
following methods by which the value will be modified.
• ADD VALUE...............Add the Value field setting to each current value.
• SUB VALUE................Subtract the Value field setting from each current value.
• MULT VAL% ..............Multiply each current value by the Value field setting.
• SET TO VALUE..........Set each current value to the Value field setting.
7. Move the cursor to the Value field, and turn the [JOG] dial to set the value.
8. Press the [F6] key (DO IT) to execute the change.
48
Page 59

Sequence edit page
■Inserting continuously-variable events
Here’s how to insert continuously-variable events (such as control changes) into the
desired track. You can insert a series of continuously-variable events by specifying the
desired values for the starting and ending locations.
1. Select the sequence/track into which you want to insert events.
2. Move the cursor to the View field, and turn the [JOG] dial to make the graphic
editor show the continuously-variable event you want to insert.
If you select control change or polyphonic key pressure, use the right part of the V iew field
to select the control change number or note number that you want to see.
3. Move the cursor to the graphic editor, and select the region into which you
want to insert events.
When the cursor is located in the graphic editor , you can specify a region by holding do wn
√
the [SHIFT] key and using the CURSOR[
4. Press the [OVER DUB] key.
Y ou will no w be able to perform step-recording, and the function assigned to the [F6] key
will change to INSERT.
5. Press the [F6] key (INSERT).
The Insert Event popup window will appear. The fields that are displayed will depend on
the event you selected in step 2.
]/[®]/[π]/[†] keys to extend the selection.
PITCH BEND
• Time field
Indicates the location at which the data will be inserted. The left side of the Time field
shows the starting location of the inserted ev ents, and the right side sho ws the ending
location.
• Value (Start value) field
Specifies the value of the pitch bend ev ents that will be inserted. If you hav e specified
a region, this specifies the pitch bend value that will be inserted at the starting point.
• End value field
Specifies the value that will be inserted at the ending point. (Displayed only if you
specified a region.)
• Interval field
Selects the spacing of the pitch bend events that will be inserted. (Displayed only if
you specified a region.)
• Curve field
Selects either LINEAR, LOGARITHM, or EXPONENTIAL as the curve by which
the pitch bend values will change. (Displayed only if you specified a region.)
• Graph display
Displays a curve showing the pitch bend v alues that will be inserted. (Displayed only
if you specified a region.)
CONTROL CHANGE
• Time field
Indicates the location at which the data will be inserted. The left side of the T ime field
shows the starting location of the inserted ev ents, and the right side sho ws the ending
location.
49
Page 60

Sequence edit mode
• Control number field
• Value (Start value) field
• End value field
• Interval field
• Curve field
• Graph display
CH PRESSURE
• Time field
• Value (Start value) field
• End value field
• Interval field
• Curve field
• Graph display
POLY PRESSURE
• Time field
• Note field
• Value (Start value) field
• End value field
Selects the control change number.
Specifies the value of the control change ev ents that will be inserted. If you hav e specified a region, this specifies the value of the control change that will be inserted at the
starting point.
Specifies the value that will be inserted at the ending point. (Displayed only if you
specified a region.)
Selects the spacing of the control change events that will be inserted. (Displayed only
if you specified a region.)
Selects the curve by which the control change values will change. (Displayed only if
you specified a region.)
Displays a curve showing the control change v alues that will be inserted. (Displayed
only if you specified a region.)
Indicates the location at which the data will be inserted. The left side of the Time field
shows the starting location of the inserted ev ents, and the right side sho ws the ending
location.
Specifies the value of the channel pressure events that will be inserted. If you have
specified a region, this specifies the channel pressure value that will be inserted at the
starting point.
Specifies the value that will be inserted at the ending point. (Displayed only if you
specified a region.)
Selects the spacing of the channel pressure events that will be inserted. (Displayed
only if you specified a region.)
Selects the curve by which the channel pressure values will change. (Displayed only
if you specified a region.)
Displays a curve showing the channel pressure values that will be inserted. (Displayed only if you specified a region.)
Indicates the location at which the data will be inserted. The left side of the Time field
shows the starting location of the inserted ev ents, and the right side sho ws the ending
location.
Selects the polyphonic key pressure note number.
Specifies the value of the polyphonic key pressure e v ents that will be inserted. If you
have specified a region, this specifies the polyphonic key pressure value that will be
inserted at the starting point.
Specifies the value that will be inserted at the ending point. (Displayed only if you
specified a region.)
50
Page 61

Sequence edit page
• Interval field
Selects the spacing of the polyphonic key pressure events that will be inserted. (Displayed only if you specified a region.)
• Curve field
Selects the curve by which the polyphonic key pressure values will change. (Displayed only if you specified a region.)
• Graph display
Displays a curve showing the polyphonic key pressure values that will be inserted.
(Displayed only if you specified a region.)
6. Make sure that the Time field is set to the desired region.
If you want to adjust the region, mov e the cursor to the T ime field, and turn the [JOG] dial
to specify the starting and ending locations.
Hint: You can insert a single event by setting the left and right Time fields to the same value.
7. Set the various fields to specify the event(s) you want to insert.
8. To execute the insertion, press the [F5] key (DO IT).
51
Page 62

Step edit mode
Step edit mode
Step edit page
Using the event list to edit a sequence
You can use the event list to edit MIDI events recorded in a sequence.
To access this page........[STEP EDIT] key
A Track block
B Now block
C Event list block
D View block
Functions
• [F1] key (OPTION)
Opens the Step Edit Option popup window, where you can make option settings for
step-recording.
• [F2] key (MOVE)
Moves the location of the selected MIDI event(s).
• [F3] key (COPY)
Copies the selected MIDI event(s). If you have selected multiple events, the Copy Data
popup window will appear.
• [F4] key (CUT)
Cuts the selected MIDI event(s). If you ha ve selected multiple ev ents, the Cut Data popup
window will appear.
• [F5] key (PASTE)/(EDIT)
Opens the Paste Data popup window , which lets you paste pre viously-sav ed MIDI events
from the clipboard or phrase library. If you have selected multiple MIDI events in the
event list, the function assigned to this ke y will change, and the Event Edit popup window
will appear.
• [F6] key (PLAY)/(INSERT)
Plays the selected region. During step-recording, the function assigned to this key will
change to INSERT, which inserts MIDI events.
1
2
3
4
52
Track block
Here you can select the track that you want to edit, and switch the tempo and timing correct settings.
Now block
This indicates the current location within the sequence.
Page 63

Event list block
This displays an event list showing the MIDI events recorded in the track.
Hint: When the cursor is located in the event list, you can use the CURSOR [π]/[†] keys to select
the event or re gion that you want to edit. Use the BLOCK CURSOR [
to a different block.
Step edit page
π
]/[†] keys to move the cursor
23
4
1
A Event list
Shows the MIDI ev ents recorded in the track. The event at which the cursor is located is
selected for editing. You can select multiple events by holding do wn the [SHIFT] key and
pressing the CURSOR [
B Time field
Shows the location at which each MIDI event is recorded, in measures/beats/ticks.
C Channel field
Shows the MIDI channel of each MIDI event in the track. This field will be displayed
only if a MIDI connector or an internal virtual port is selected as the output destination
of the track, and the output destination MIDI channel is set to ANY.
D Event field
Shows the type of each recorded MIDI ev ent, and its value(s). The follo wing MIDI events
may be shown here.
Note events
π
]/[†] keys.
From the left, these are the note number, D (duration), and V (velocity) fields.
Pitch bend
The value is displayed at the right.
Program change
The value is displayed at the right.
Control change
From the left, these are the C:XXX (control change number), value, and bar fields.
Channel key pressure
From the left, these are the value and bar fields.
53
Page 64

Step edit mode
View block
Polyphonic key pressure
From the left, these are the note number, value, and bar fields.
System exclusive
The system exclusive message is displayed in hexadecimal form.
This selects the type of MIDI event that will be displayed in the graphic editor.
1
2
A View field
Selects the MIDI events that will be displayed in the event list.
• ALL EVENTS.............All MIDI events
• NOTES ........................Note events
• PITCH BEND..............Pitch bend
• CONTROL CHANGE.Control change
• PROGRAM CHANGEProgram change
• CH. PRESSURE..........Channel key pressure
• POLY PRESSURE ......Polyphonic key pressure
• EXCLUSIVE...............System exclusive
If you selected control change or polyphonic key pressure, specify the control change
number or note number at the right of the View field.
B MIDI ch field
Selects the MIDI channel that will be displayed in the event list. If you select ALL, e vents
of all channels recorded in the track will be displayed.
Step-recording note events
Here’s how to step-record note events from the pads or your MIDI keyboard.
1. Access the Main page, and select the sequence that you want to step-record.
2. Select the track that you want to step-record, and specify the output
destination.
3. Access the Step Edit page.
4. Press the [F1] key (OPTION).
The Step Edit Option popup window will appear, allowing you to make option settings
for step-recording. For details on this popup window, refer to page 41.
5. Set the fields of the popup window, and press the [F1] key (CLOSE).
Your settings will be finalized, and the popup window will close.
6. Move the cursor to the Timing correct field, and set the timing correct value to
the shortest note value that you want to record.
Hint: When you press the [TIMING CORRECT] key, the cursor will move to the T iming correct field
re gardless of the current location of the cursor. While you hold down this key, you can use the [JOG]
dial to adjust the value.
54
7. Move the cursor to the measure/beat/tick of the Now field, and specify the
location at which you will begin step-recording.
Page 65

Step edit page
8. Press the [REC] key or the [OVER DUB] key.
The [OVER DUB] key LED will light, step-recording will be enabled.
9. Strike the pads (or play your MIDI keyboard).
Note events will be input. The velocity values will be input according to how strongly
you strike the pads or play your MIDI keyboard.
The settings you made in step 5 will determine what happens after an event has been
input, and the duration value.
>
10. When you want to input a rest, press the STEP [
The current location will advance by the timing correct note value.
11. Step-record additional notes in the same way.
12. When you are finished step-recording, press the [STOP] key.
Step-recording will be disabled.
Hint: During step-recording, the function assigned to the [F6] key will change to INSERT. You can
use the Now field to specify a location, and press the [F6] key to insert an event there.
] key.
Moving MIDI events
Here’s how the MIDI events you select in the event list can be moved in the time axis.
1. Move the cursor to the event list block, and select the MIDI event(s) that you
want to move.
π
By using the [SHIFT] key and the CURSOR [
multiple MIDI events, you can move a selected region in one operation.
2. Press the [F2] key (MOVE).
The display of the view block will change, showing fields that let you mak e settings such
as the move-destination for the MIDI events.
]/[†] keys (or the [JOG] dial) to select
1
5
2
678
34
A Move field
Selects the direction in which the MIDI events will be moved. When you are moving
MIDI events in step edit mode, you can only select TIME (time axis) movement.
B From field
Indicates the current location of the move-source MIDI event. If you have selected multiple MIDI events, this indicates the location of the first event.
C to field
Specifies the move-destination location. If you hav e selected multiple MIDI events, this
indicates the move-destination of the first event.
D Mode field
Selects how processing will be performed if note events exist in both the move-source
and move-destination.
E [F1] key (CANCEL)
Cancels the operation and returns the block to the normal display.
F [F2] key (DO IT)
Executes the MIDI event Move operation.
G [F3] key (–)
Moves the selected region toward the beginning of the track, in steps of one tick.
55
Page 66

Step edit mode
3. Move the cursor to the to field, and specify the move-destination for the MIDI
4. As necessary, move the cursor to the Mode field, and select one of the following
5. Press the [F2] key (DO IT) to execute the move.
■Copying/cutting MIDI events
1. Select the track that contains the phrase you want to cut or copy.
2. If you want to cut/copy only specific types of MIDI events, move the cursor to
3. Move the cursor to the event list, and select the MIDI event(s) you want to cut
4. If you want to keep the original events, press the [F3] key (COPY). If you want
H [F4] key (+)
Moves the selected region toward the end of the track, in steps of one tick.
events.
to specify how processing will be performed if note events exist in both the
move-source and move-destination.
MERGE..................Existing note events will remain, and the move-source note events
will be added.
REPLACE..............Existing note events will be erased, and overwritten by the
move-source events.
MIDI events selected in the event list can be cut/copied and placed in the clipboard.
Hint: The clipboard contains only the content that was most recently copied or cut. The contents of
the clipboard will be lost when the power is turned off.
the View field, and turn the [JOG] dial to make the event list show only the
MIDI events you want to cut or copy.
If you selected control change or polyphonic key pressure, use the right side of the View
field to select the control change number or note number that you want to see.
or copy.
When the cursor is located in the event list, you can select multiple MIDI e v ents by hold-
π
ing down the [SHIFT] key and using the [
to delete the original events, press the [F4] key (CUT).
The selected events will be placed in the clipboard. If you selected multiple events, the
Copy Data/Cut Data popup window will appear. For details on each field of the popup
window, refer to page 45.
]/[†] keys.
56
5. If you are cutting/copying multiple events, make sure that the Time field and
Notes field show the selected region.
You can also edit the value of these fields to make fine adjustments to the region that will
be cut or copied.
Page 67

Step edit page
6. To place the selected region in the clipboard, press the [F6] key (CLIP BD).
The MIDI events in the selected region will be placed in the clipboard.
Hint: The data that was copied/cut fr om the e vent list can be saved in a phrase library if you pr ess the
[F5] key (LIBRARY) instead of the [F6] key. For details on saving data to a phrase library, refer to
page 46.
■Pasting MIDI events
MIDI events that you saved in the clipboard or the phrase library can be pasted into the
desired track.
1. Select the track into which you want to paste MIDI events.
2. Move the cursor to the Now field, and move the current location to the starting
point at which you want to paste the events.
3. Press the [F5] key (PASTE).
The Paste Data popup window will appear . F or details on the fields of the popup window ,
refer to page 46
.
4. Set the various fields so that the MIDI data will be pasted as you wish.
5. If you want to paste MIDI events that you placed in the clipboard, press the [F6]
key (CLIP BD).
The data will be pasted, and the popup window will close.
6. If you want to paste a phrase library, move the cursor to the Phrase Library field
and turn the [JOG] dial to select the phrase library you want to paste.
7. If you want to paste the selected phrase, press the [F5] key (LIBRARY).
The data will be pasted, and the popup window will close.
Simultaneously editing values in a selected region
Here’s how the value of multiple MIDI events can be edited simultaneously.
1. Move the cursor to the View field, and turn the [JOG] dial to select the MIDI
events you want to edit.
2. Move the cursor to the Event List block, and use the [SHIFT] key and CURSOR
π
]/[†] keys to select the region that you want to edit.
[
The function assigned to the [F5] key will change to EDIT.
3. Press the [F5] key (EDIT).
57
Page 68

Step edit mode
The Edit Multiple popup window will appear.
1
2
3
4
5
6
78
A Type field
Selects the type of MIDI event that will be edited.
B Edit field
Selects the element of MIDI data that will be modified. This field will be displayed only
if you selected note events.
C Edit type field
Selects the way in which the data will be modified.
D Value field
Specifies the adjustment value.
E Time field
Specifies the region in which data will be modified.
F Notes field
Indicates the range of note events that will be modified. This field will be displayed only
if you have selected note events.
G [F1] key (CANCEL)
Cancels the operation and closes the popup window.
H [F6] key (DO IT)
Executes the editing operation.
4. If you are editing note events, move the cursor to the Edit field, and turn the
[JOG] dial to select one of the following elements to edit.
VELOCITY............Edit the velocities of the note events in the selected region.
DURATION ...........Edit the durations of the note events in the selected region.
5. Move the cursor to Edit type field, and turn the [JOG] dial to select one of the
following methods by which the value will be modified.
• ADD VALUE...............Add the Value field setting to each current value.
• SUB VALUE................Subtract the Value field setting from each current value.
• MULT VAL% ..............Multiply each current value by the Value field setting.
• SET TO VALUE..........Set each current value to the Value field setting.
6. Move the cursor to the Value field, and turn the [JOG] dial to set the value of
the Edit type field.
7. Press the [F6] key (DO IT) to execute the change.
58
Page 69

Step edit page
Inserting note events
Here’s how to insert note data into a track.
1. Select the sequence/track into which you want to insert note events.
2. Move the cursor to the Now field, and move the current location to the location
at which you want to insert a note event.
3. Press the [OVER DUB] key.
Now you are ready to step-record. During step-recording, the function assigned to the
[F6] key will change to INSERT.
4. Press the [F6] key (INSERT).
The Insert Event popup window will appear.
1
A Type field
Selects the MIDI event that will be inserted.
5. Move the cursor to the Type field, and turn the [JOG] dial to select NOTE.
If the Type field is set to NOTE, you will be able to insert note events. When you select
NOTE, the following fields will appear.
• Time field
Indicates the location at which the note event will be inserted.
• Note field
Selects the note number that will be inserted.
6. Make sure that the Time field is set to the location at which you want to insert
the note event.
While the cursor is at this field, you can turn the [JOG] dial to adjust the input location.
7. Move the cursor to the Note field, and turn the [JOG] dial to select the note
number you want to insert.
8. To insert the note number, press the [F5] key (DO IT).
The note event will be inserted, and the popup window will close.
Inserting continuously-variable events or program change events
Here’s how to insert continuously-variable events (such as control changes) or program
change events into the desired track. You can insert a series of continuously-variable
events by specifying the desired values for the starting and ending locations.
1. Select the sequence/track into which you want to insert events.
2. Press the [OVER DUB] key.
Y ou will enter step-recording mode, and the function assigned to the [F6] k ey will change
to INSERT.
3. Press the [F6] key (INSERT).
The Insert Event popup window will appear.
4. Move the cursor to the Type field, and turn the [JOG] dial to select one of the
following as the type of MIDI event that you want to insert.
59
Page 70

Step edit mode
PITCH BEND............................. Pitch bend
CONTROL CHANGE................ Control change
PROGRAM Change.................... Program change
CH PRESSURE.......................... Channel key pressure
POLY PRESSURE...................... Polyphonic key pressure
The fields that are displayed will depend on the event you selected.
PITCH BEND
• Time field
Indicates the location at which the data will be inserted. If you are inserting multiple
events in a single operation, the left side of the Time field shows the starting location
of the inserted events, and the right side shows the ending location.
• Value (Start value) field
Specifies the value of the pitch bend ev ents that will be inserted. If you hav e specified
a region, this specifies the pitch bend value that will be inserted at the starting point.
• End value field
Specifies the value that will be inserted at the ending point. (Displayed only if you
specified a region.)
• Interval field
Selects the spacing of the pitch bend events that will be inserted. (Displayed only if
you specified a region.)
• Curve field
Selects either LINEAR, LOGARITHM, or EXPONENTIAL as the curve by which
the pitch bend values will change. (Displayed only if you specified a region.)
• Graph display
Displays a curve showing the pitch bend v alues that will be inserted. (Displayed only
if you specified a region.)
CONTROL CHANGE
• Time field
Indicates the location at which the data will be inserted. If you are inserting multiple
events in a single operation, the left side of the Time field shows the starting location
of the inserted events, and the right side shows the ending location.
• Control number field
Selects the control change number.
• Value (Start value) field
Specifies the value of the control change ev ents that will be inserted. If you hav e specified a region, this specifies the value of the control change that will be inserted at the
starting point.
• End value field
Specifies the value that will be inserted at the ending point. (Displayed only if you
specified a region.)
• Interval field
Selects the spacing of the control change events that will be inserted. (Displayed only
if you specified a region.)
• Curve field
Selects the curve by which the control change values will change. (Displayed only if
you specified a region.)
• Graph display
Displays a curve showing the control change v alues that will be inserted. (Displayed
only if you specified a region.)
PROGRAM CHANGE
• Time field
Indicates the location at which the data will be inserted.
60
Page 71

Step edit page
• Program number field
Selects the program change number that will be inserted.
CH PRESSURE
• Time field
Indicates the location at which the data will be inserted. If you are inserting multiple
events in a single operation, the left side of the Time field shows the starting location
of the inserted events, and the right side shows the ending location.
• Value (Start value) field
Specifies the value of the channel pressure events that will be inserted. If you have
specified a region, this specifies the channel pressure value that will be inserted at the
starting point.
• End value field
Specifies the value that will be inserted at the ending point. (Displayed only if you
specified a region.)
• Interval field
Selects the spacing of the channel pressure events that will be inserted. (Displayed
only if you specified a region.)
• Curve field
Selects the curve by which the channel pressure values will change. (Displayed only
if you specified a region.)
• Graph display
Displays a curve showing the channel pressure values that will be inserted. (Displayed only if you specified a region.)
POLY PRESSURE
• Time field
Indicates the location at which the data will be inserted. The left side of the Time field
shows the starting location of the inserted ev ents, and the right side sho ws the ending
location.
• Note field
Selects the polyphonic key pressure note number.
• Value (Start value) field
Specifies the value of the polyphonic key pressure e v ents that will be inserted. If you
have specified a region, this specifies the polyphonic key pressure value that will be
inserted at the starting point.
• End value field
Specifies the value that will be inserted at the ending point. (Displayed only if you
specified a region.)
• Interval field
Selects the spacing of the polyphonic key pressure events that will be inserted. (Displayed only if you specified a region.)
• Curve field
Selects the curve by which the polyphonic key pressure values will change. (Displayed only if you specified a region.)
• Graph display
Displays a curve showing the polyphonic key pressure values that will be inserted.
(Displayed only if you specified a region.)
5. Perform the following steps according to the MIDI events you want to insert.
To insert continuously-variable events
Move the cursor to the Time field. Use the left side to field to set the starting location to
events to be inserted, and the right side to specify the ending location.
To insert a program change event
Move the cursor to the Time field, and specify the location at which the event will be
inserted.
61
Page 72
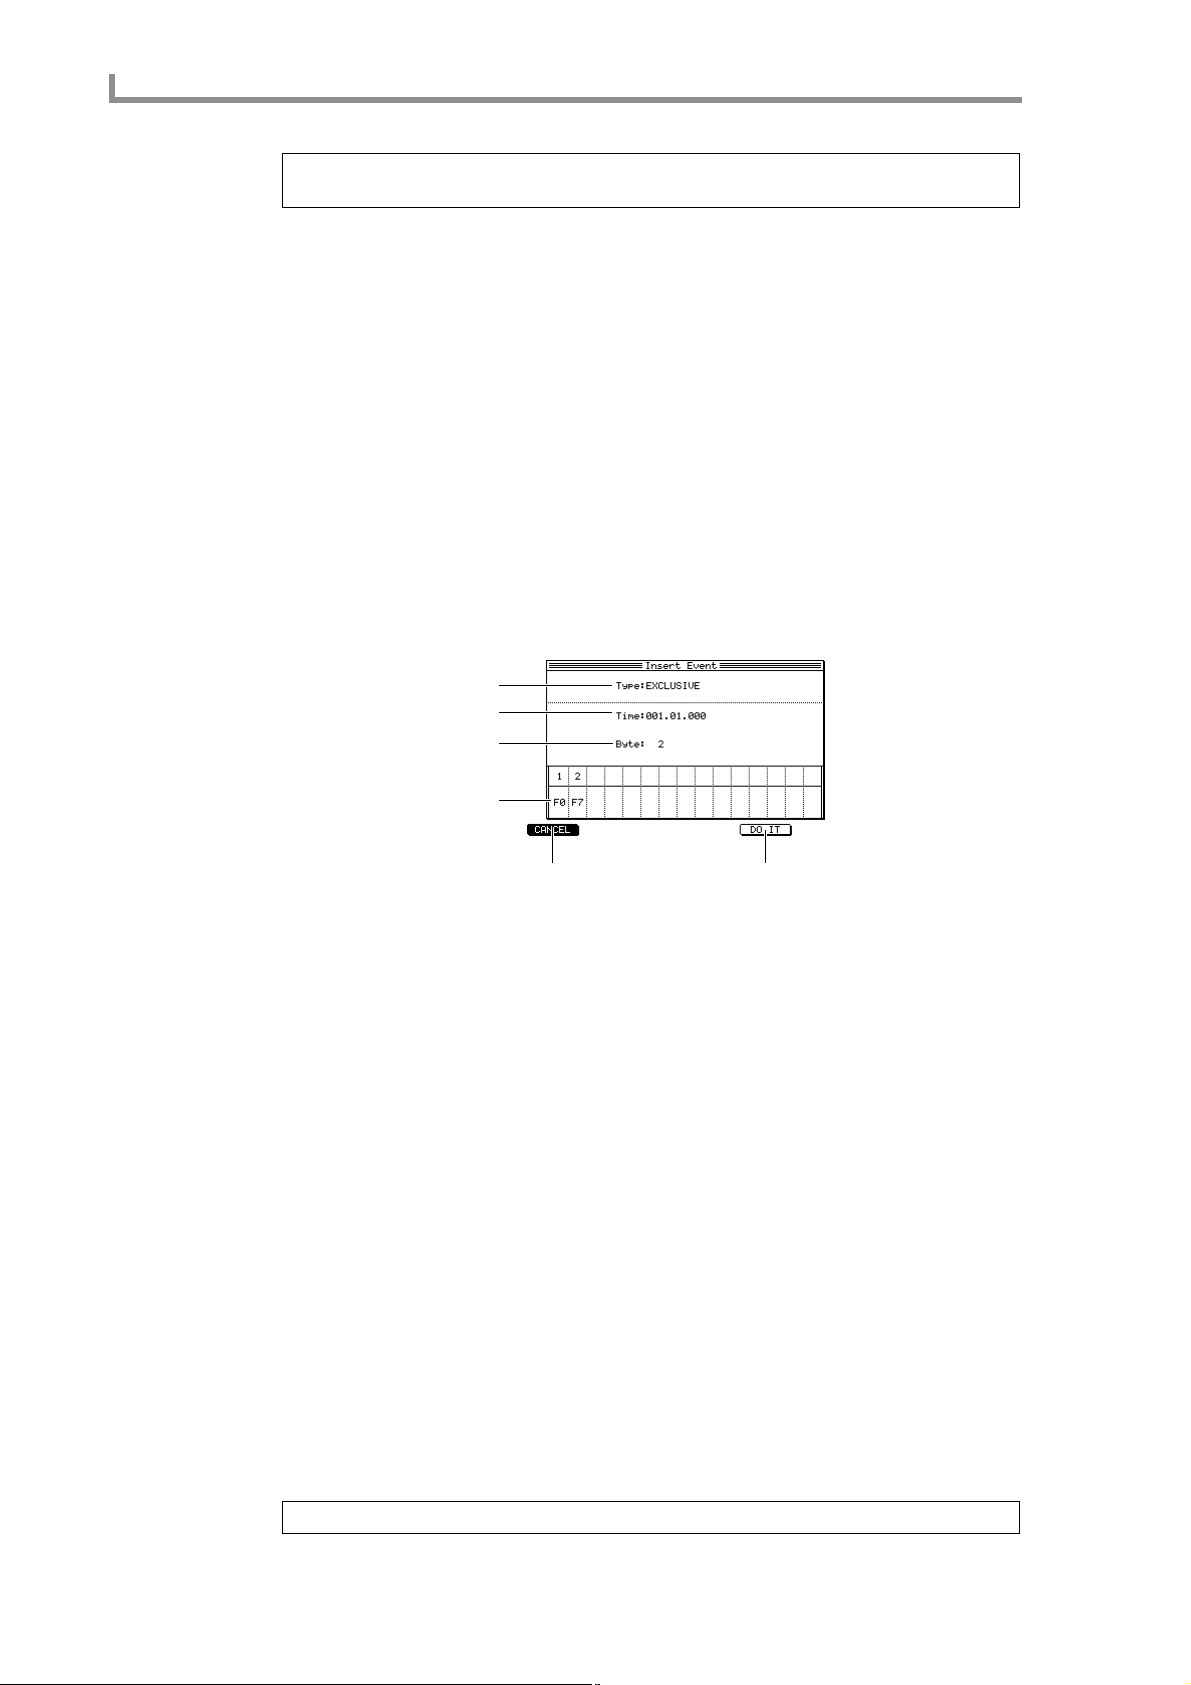
Step edit mode
6. Set the various fields to specify the event(s) you want to insert.
7. To execute the insertion, press the [F5] key (DO IT).
Inserting a system exclusive message
1. Select the sequence/track into which you want to insert a system exclusive
2. Press the [OVER DUB] key.
3. Press the [F6] key (INSERT).
4. Move the cursor to the Type field, and turn the [JOG] dial to change the setting
Hint: You can insert a single event by setting the left and right values of the Time field to the same
location.
Here’s how to insert a system exclusive message into a recorded track.
message.
Step-recording will be enabled, and the function assigned to the [F6] key will change to
INSERT.
The Insert Event popup window will appear.
to EXCLUSIVE.
The popup window display will change as follows.
1
2
3
4
56
A Type field
Selects the type of MIDI event that will be inserted.
B Time field
Specifies the location at which the system exclusive message will be inserted.
C Byte field
Specifies the number of bytes in the system exclusive message.
D Data field
The upper row of this field selects the byte number for which you can input a hexadecimal value. If there are more than 15 bytes, you can scroll the display.
E [F1] key (CANCEL)
Cancels the operation and closes the popup window.
F [F6] key (DO IT)
Inserts the system exclusive message.
Input hexadecimal values in the lower part of the field.
5. Move the cursor to the
(measures/beats/ticks) at which you want to insert the system exclusive message.
6. Move the cursor to the Byte field, and turn the [JOG] dial to specify the number
of bytes (the number of hexadecimal values) in the system exclusive message.
7. Move the cursor to data field “2” (the second byte), and turn the [JOG] dial to
input a hexadecimal value into the system exclusive message.
Hint: The system exclusive message will always start with F0 and end with [F7].
Time field
, and specify the location
62
Page 73

Step edit page
8. Press the CURSOR [®] key to move to the next field, and specify the next
hexadecimal value in the same way.
9. Repeat the preceding step to finish inputting all of the hexadecimal values.
10. To finalize the system exclusive message you specified, press the [F5] key (DO
IT).
63
Page 74

Song mode
Song mode
Song page
Creating a song
To access this page........[SONG] key
Sequences you create can be arranged in the desired playback order to create a song.
A Position bar block
B Now block
C Song block
D Sequence list block
1
2
3
4
Functions
• [F1]/[F2] keys (CONVERT TO SEQ)
Displays the Convert Song to Sequence popup windo w, where a song you created can be
converted into a sequence.
• [F3] key (COPY)
Copies the selected step to the clipboard.
• [F4] key (DELETE)/(SUDDEN)
Deletes the selected step. If you press this key while a song is playing, the playback will
proceed immediately to the next step even if you were in the middle of a step.
• [F5] key (INSERT)
Inserts the same content as the selected step into the location of the selected step.
• [F6] key (PASTE)/(NEXT)
Pastes the contents of the clipboard into the selected step. If you press this key while a
song is playing, the playback will proceed to the next step when it reaches the end of the
sequence, even if there were one or more repeats remaining.
64
Position bar block
This bar indicates the current location within the song.
1
A Bar display
Indicates the current location within the song.
Now block
Indicates the current location within the song in units of measures/beats/ticks and in time.
12
Page 75

A Now field
Indicates the current location within the song in units of measures/beats/ticks. When the
cursor is at each of these fields, you can turn the [JOG] dial to move the current location
in steps of measures/beats/ten ticks/one tick.
B Time field
Indicates the current time location within the song.
Song block
Here you can select the song to be created or played, and turn tempo and looping on/off.
1
2
3 4
A Song field
Selects the song that will be played or created. If you move the cursor to this field and
press the [WINDOW] key, the Song popup window will appear.
Song page
B Tempo field
Sets the tempo of the song in a range of 30–300 BPM. If you move the cursor to this field
and press the [WINDOW] key, the Tempo popup window will appear.
C SEQ/MAS field
Selects the tempo source according to which the song will play.
If you select SEQ, the tempo specified for each sequence will be valid. If you select
MAS, all sequences in the song will play back at the tempo specified by the tempo field.
Even if you select MAS, tempo change events that were input within the sequence are
still valid. In this case, these events will adjust the tempo proportionally, relative to the
master tempo.
D Loop field
Switches looping on/off. When playback reaches the end of the song, it will return to the
beginning and resume if loop is turned on.
Sequence list block
Here you can assign a sequence to each step of the song.
Hint: When the cursor is located in the sequence list, use the CURSOR [√]/[®]/[π]/[†] keys to select
the field that you want to set. Use the BLOCK CURSOR [
π
]/[†] keys to move the cur sor to another block.
12 3 4 5
A Start bar field
Indicates the measure number at which the step will start.
B Step field
Indicates the step number.
65
Page 76

Song mode
C Sequence field
Selects the sequence that will play at that step. The step that displays (end of song) indicates the end of the song.
D Bars field
Indicates the number of measures in the sequence selected for that step. If you move the
cursor to this field and press the [WINDOW] ke y, the Copy and Replace popup window
will appear.
E Repeats field
Specifies the number of times that the step will be repeated. If you set this to HOLD, that
step will play back repeatedly until you press the [F6] key (NEXT). In this case, the Start
bar field of the subsequent steps will change to “–”.
Creating a song
Here’s how to arrange sequences within the memory of the MPC4000 to create a new
song.
1. Create or load sequences so that memory contains the sequences you want to
use in your new song.
2. Access the Song page.
3. Move the cursor to the Song field, and turn the [JOG] dial to select an empty
song number.
4. Move the cursor to “(end of song)” in the Sequence field, and turn the [JOG]
dial to select the sequence that you want to play in step 1.
When you select a sequence, the “(end of song)” indication will move to the next step.
5. If you want the sequence selected in step 4 to play more than once, move the
cursor to the Repeats field of step 1 and use the [JOG] dial to specify the
number of repeats.
6. Move the cursor to the Sequence field for step 2, and turn the [JOG] dial to
select the next sequence.
The Start bar field will indicate the starting location of step 2 (the number of measures
from the beginning of the song).
7. As described in steps 4–6, specify the desired sequences for the song.
8. If you want to edit your settings, move the cursor to the desired field of that
step, and use the [JOG] dial to edit the setting.
9. If necessary, move the cursor to the SEQ/MAS field and turn the [JOG] dial to
select the tempo source.
10. If you specified MAS as the tempo source, move the cursor to the tempo field,
and turn the [JOG] dial to specify the tempo for the song.
11. To play the song, press the [PLAY] key.
To stop the song, press the [STOP] key.
Hint: In the song page, you can use the STEP [<]/[>] keys or BAR [<<]/[>>] keys perform
locate operations.
66
Editing a song
Here’s how to copy/paste steps within a song, or to insert/delete steps.
1. Move the cursor to the Song field and turn the [JOG] dial to select the song that
you want to edit.
2. Move the cursor to the step that you want to edit.
Page 77

Song page
When copying or deleting a step, your operation will apply to the step you select here.
When inserting or pasting a step, the step will be inserted or pasted at the location of the
step you select here.
Hint: When copying/deleting/pasting steps, you can hold down the [SHIFT] key and use the CURSOR
[
π
]/[†] keys to select two or more adjacent steps as the edit region.
3. Use the [F3] key (COPY)–[F6] key (PASTE) to execute the editing function.
Each key has the following function.
• [F3] key (COPY)........ Copies the selected step(s) to the clipboard.
COPY
1 Sequence A
2 Sequence B
3 Sequence C
4 Sequence D
• • • •
Clipboard
Sequence C
copied
• [F4] key (DELETE).... Deletes the selected step(s). Subsequent steps will move for-
ward.
DELETE
1 Sequence A
2 Sequence B
3 Sequence C
4 Sequence D
• • • •
deleted
1 Sequence A
2 Sequence B
3 Sequence D
• • • •
• [F5] key (INSERT)..... Inserts a step with the identical contents at the location of the
currently selected step. Subsequent steps will move backward.
INSERT
1 Sequence A
2 Sequence B
3 Sequence C
4 Sequence D
• • • •
inserted
1 Sequence A
2 Sequence B
3 Sequence C
4 Sequence C
5 Sequence D
• • • •
• [F6] key (PASTE) ....... Pastes the contents of the clipboard at the location of the cur-
rently selected step. When you execute this, steps later than
the paste location will be moved backward. If the clipboard is
empty, pressing this key will do nothing.
PASTE
1 Sequence A
2 Sequence B
3 Sequence C
4 Sequence D
Clipboard
Sequence X
1 Sequence A
2 Sequence B
3 Sequence X
• • • •
pasted
4 Sequence C
5 Sequence D
• • • •
67
Page 78

Song mode
Copying a song
Here’s how to copy a song in memory to a different song number.
1. Move the cursor to the Song field, and turn the [JOG] dial to select the song
you want to copy.
2. Press the window key.
The Song popup window will appear.
1
2
345
A Song name field
Displays the name of the currently selected song. If you turn the [JOG] dial in this field,
the Rename popup window will appear, allowing you to edit the song name.
B Default name field
Displays the default song name that will be assigned when you create a song. If you turn
the [JOG] dial in this field, the Rename popup window will appear, allowing you to edit
the default song name.
C [F1] key (CLOSE)
Closes the popup window.
D [F4] key (DELETE)
Opens the Delete Song popup window, where you can delete songs.
E [F6] key (COPY)
Opens the Copy Song popup window, where you can copy songs.
3. Press the [F6] key (COPY).
The Copy Song popup window will appear.
1
2
68
34
A Copy source field
Selects the copy-source song.
B Copy destination field
Selects the copy-destination song number.
Page 79

Song page
C [F1] key (CANCEL)
Cancels the operation and closes the popup window.
D [F5] key (DO IT)
Executes the copy.
4. Move the cursor to the Copy source field, and turn the [JOG] dial to select the
copy-source song.
5. Move the cursor to the Copy destination field, and turn the [JOG] dial to select
the copy-destination song number.
6. To execute the copy, press the [F5] key (DO IT).
The window will close automatically when the copy has been completed.
If you select an already-existing song number in step 5, the copy-destination song will be
overwritten.
Deleting a song
Here’s how to delete a specified song from memory, returning it to an empty state.
1. 1Move the cursor to the Song field, and turn the [JOG] dial to select the song
that you want to delete.
Note: T o avoid deleting an important song by mistake, we recommend that you play bac k the song first
to confirm that it really is the song you want to delete.
2. Press the [WINDOW] key.
The Song popup window will appear.
3. Press the [F4] key (DELETE).
The Delete Song popup window will appear.
1
2
A Delete song field
Selects the song that will be deleted.
B [F1] key (CANCEL)
Cancels the operation and closes the popup window.
3 4
C [F3] key (DEL ALL)
Opens the Delete ALL Song popup window, which lets you delete all songs from memory. Pressing the [F6] key (DO IT) while this window is displayed will delete all songs
from memory in a single operation.
D [F6] key (DO IT)
Executes the Delete operation.
4. Move the cursor to the Delete song field, and turn the [JOG] dial to select the
song you want to delete.
69
Page 80

Song mode
5. To execute the deletion, press the [F6] key (DO IT).
The song you selected in step 4 will return to an empty state.
The window will close automatically when the deletion is completed.
Converting a song into a sequence
Here’s how you can convert a completed song into a sequence. When you execute this
conversion, the sequences within the song will be combined by track number. This is convenient when you want to add solo parts to a completed song.
1. Move the cursor to the Song field, and turn the [JOG] dial to select the song
that you want to convert into a sequence.
2. Press the [F1] key or [F2] key (CONVERT TO SEQ).
The Convert Song to Sequence popup window will appear.
1
2
3
4
A From song field
Indicates the song that will be converted.
B To sequence field
Selects the sequence number for the resulting sequence.
C Track status field
Selects how processing will occur if the sequences in the song contain muted tracks.
D [F1] key (CANCEL)
Cancels the operation and closes the popup window.
E [F6] key (DO IT)
Executes the conversion.
3. Make sure that the song you want to convert into a song is selected in the From
song field.
4. Move the cursor to the To sequence field, and turn the [JOG] dial to select the
sequence number into which the song will be converted.
When the popup window first appears, the lowest-numbered vacant sequence will be
selected. If you select a sequence number that already contains events, the con verted song
will be written over that sequence, replacing it.
5. Move the cursor to the Track status field, and turn the [JOG] dial select how the
tracks will be processed.
• REFERENCED TO 1ST SQ .......The settings for each track in the first sequence will
be assigned to the corresponding track of each following sequence.
5
70
Page 81
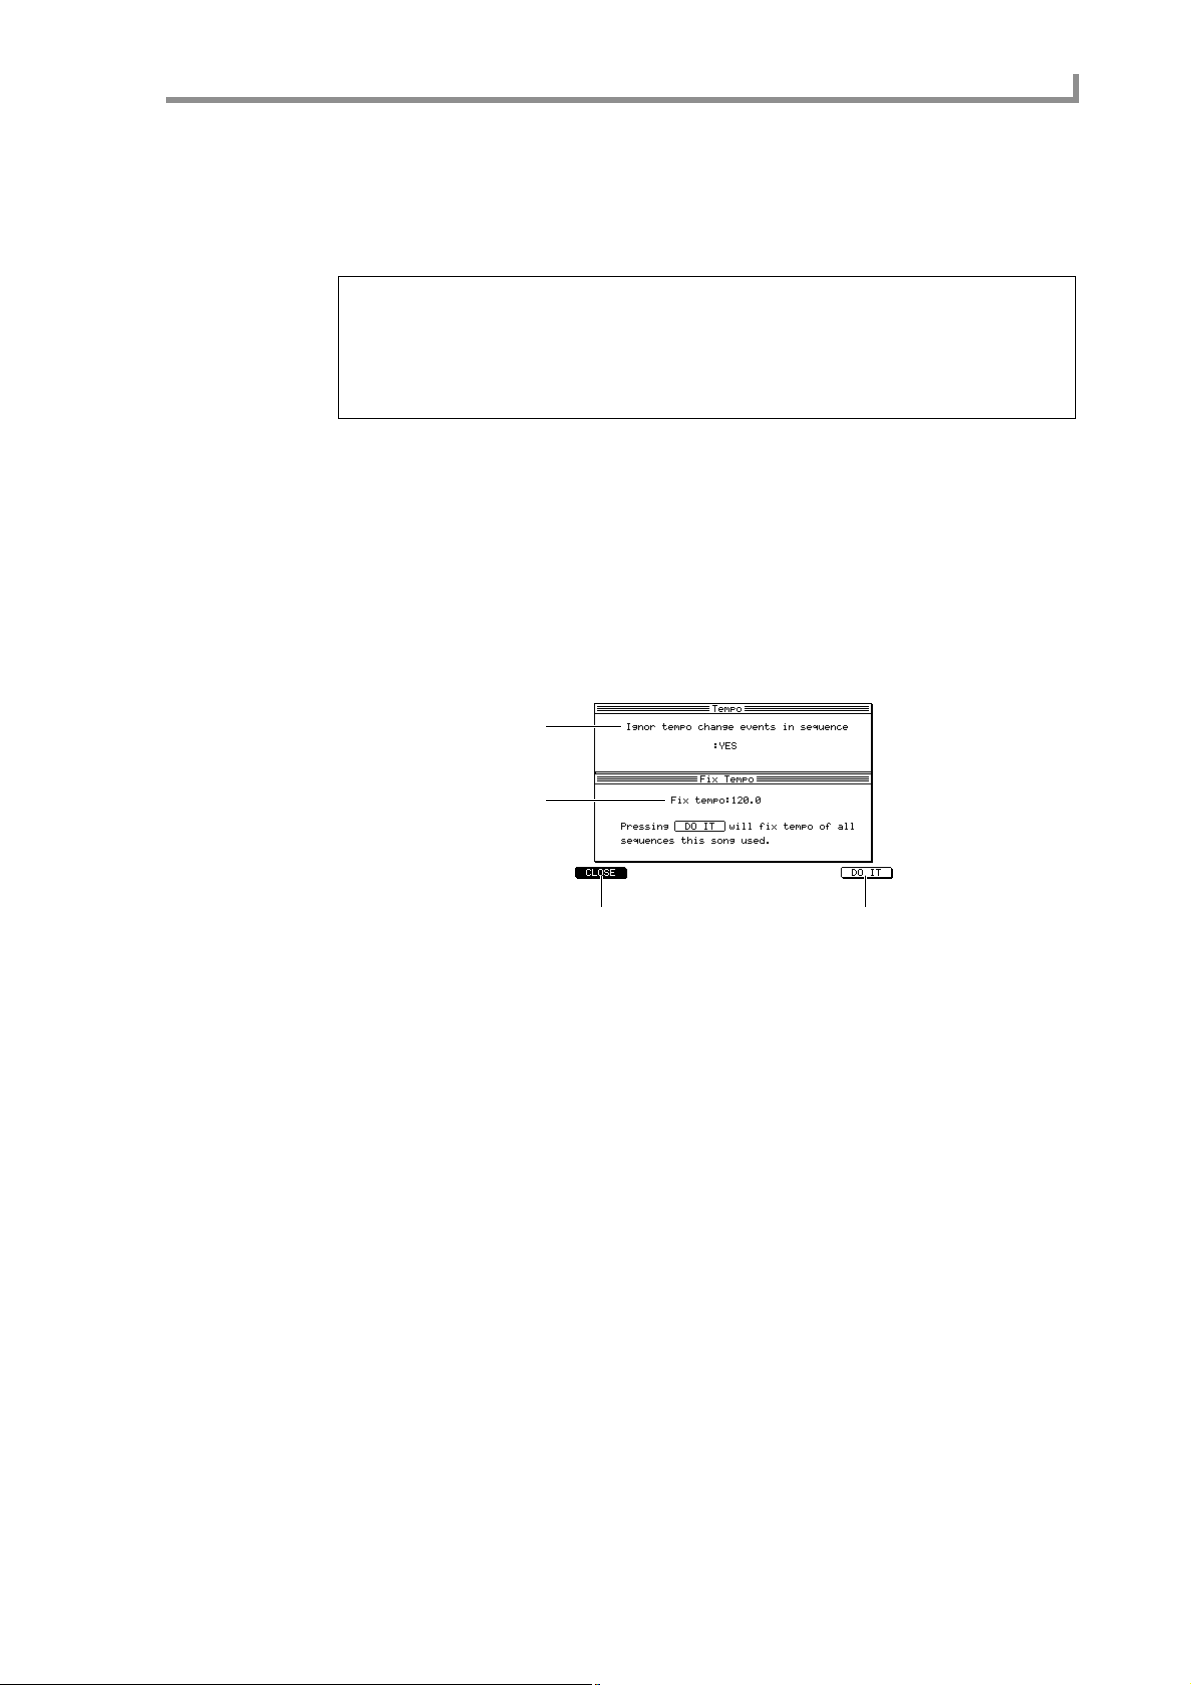
Song page
• OFF TRACKS IGNORED ..........Tracks in each sequence that are turned off will not
be converted. After conversion, all tracks will be
on. (Howev er, there will be no data for the regions
in which tracks were off.) Settings such as MIDI
output will be the same as for the first sequence.
Note: Re gar dless of the method you select, the settings of the sequence selected for step 1 will be used
as the track settings (e.g., output destination, tr ac k type , etc.) after conversion. If the sequences later
than step 1 have a track order that dif fers from the tr ack order of the step 1 sequence, those steps cannot
be converted correctly. In such cases, use the Change Track Order popup window to rearrange the
tracks to the same order as the step 1 sequence . (F or details on the Change T rack Or der popup window ,
refer topage 26.)
6. To execute the conversion, press the [F6] key (DO IT).
The window will close automatically when the conversion has been completed.
Enabling/disabling tempo change events
T empo change e vents recorded in a sequence within the song can be enabled or disabled.
1. Move the cursor to the Song field, and turn the [JOG] dial to select the song for
which you want to make settings.
2. Move the cursor to the tempo field, and press the [WINDOW] key.
The Tempo popup window will appear.
1
2
3 4
A Ignore tempo change events in sequence field
Selects whether tempo change events within the sequences included in the song will be
ignored.
B Fix tempo field
Fixes a standard tempo for all sequences included in the song.
C [F1] key (CLOSE)
Closes the popup window.
D [F6] key (DO IT)
Modifies the tempo of the sequence.
3. Move the cursor to the Ignore tempo change events in sequence field, and
select one of the following settings.
YES........................T empo change e vents within sequences included in the song will be
ignored.
NO..........................Tempo change e v ents within sequences included in the song will be
valid. If this field is set to NO when the SEQ/MAS field is set to
MAS, tempo change events will adjust the tempo relative to the
tempo specified in the Tempo field.
4. To finalize the setting, press the [F1] key (CLOSE).
71
Page 82

Song mode
Setting all tempo values to the tempo of the sequence
This operation sets the basic tempo of each sequence in the song to the same value. When
you execute this operation, the basic tempo of each sequence will be rewritten.
1. Move the cursor to the Song field, and turn the [JOG] dial to select the song for
which you want to make settings.
2. Move the cursor to the tempo field, and press the [WINDOW] key.
The Tempo popup window will appear.
3. Move the cursor to the Fix tempo field, and turn the [JOG] dial to specify the
desired tempo.
Tempo change events recorded in the sequence will not be affected. The tempo will be
proportionally adjusted by the tempo change events, relative to the tempo of the
sequence.
4. To rewrite the tempo values, press the [F6] key (DO IT).
72
Page 83

MISC mode
Setup page
Making other settings
To access this page ....... [MISC.] key
A Setup block
Functions
• [F2] key (SYNC)
Setup page
Here you can make various settings for the sequencer.
1
Displays the Sync page.
Setup block
Here you can make various settings such as specifying how events will be processed
when you record a sequence in realtime, selecting the receive MIDI channel, and specifying whether program changes will switch sequences.
1
2
3
4
5
6
A Convert sustain pedal to duration field
Selects how sustain pedal (control change #64) will be processed while realtime-recording a sequence.
Choose one of the following settings.
YES........................Sustain pedal on/off will be converted into note durations. (The
duration of the recorded note events will be lengthened.)
NO..........................Sustain pedal will be recorded as normal data.
Hint: This function lets you prevent pr oblems that can occur if a sustain pedal Off event is accidentally
erased, causing the sustain pedal to “stick” in the On position.
B Truncate duration field
Selects one of the following to specify what will happen if the end of a sequence is
reached with a note still On while loop-recording a sequence.
UP TO SEQUENCE LENGTH... The length of the looped sequence will be recorded as
the maximum duration. The duration of the recorded
notes will not exceed the length of the sequence.
73
Page 84

MISC mode
UP TO SEQUENCE END.......... The duration will automatically be adjusted so that
note-off occurs at the end of the sequence. (The note
will not play back across the loop.)
AS RECORDED......................... The note events will be recorded just as you play them.
C Active track receive channel field
Selects the MIDI channel(s) that the MPC4000 will receive; either ALL (all MIDI channels) or a specific channel 1–16. If you select a specific MIDI channel, incoming MIDI
events on other channels will be ignored.
D Sequence change with Pgm change field
Selects whether program changes will be used to switch sequences. If this field is ON, an
incoming program change will select the sequence of the corresponding number.
E Tap averaging field
Specifies the number of [TAP TEMPO] key presses that will be used to calculate the
tempo. When you press the [TAP TEMPO] key the number of times you specify here, the
tempo will be automatically calculated from the average interval between each press.
F Send pad pressure as POLY PRESSURE message field
Specifies whether the force with which you press a pad will be transmitted as polyphonic
key pressure messages. If this field is set to YES, polyphonic key pressure messages will
be transmitted.
74
Page 85

Sync page
Making synchronization-related settings
Here you can make various settings for synchronization between an e xternal device and
the MPC4000.
To access this page ....... [MISC.] key → [F2] key (SYNC)
A Sync In/Sync Out block
Functions
• [F1] key (SETUP)
Displays the Setup page.
Sync page
1
Sync In/Sync Out block
Here you can make settings for the synchronization signals that the MPC4000 will transmit and receive.
1
2
3
4
5
6
7
A Mode field
Selects one of the following synchronization signals for reception. Fields for additional
settings will appear according to the type of signal you select. The av ailable types of synchronization and their parameters are as follows.
MIDI clock
SYNC in field................... Selects the MIDI connector that will receive MIDI clock.
MIDI time code
Sync in field ..................... Selects the MIDI connector that will receive MIDI time code
(MTC).
Frame rate field ................ Selects the MTC frame rate (the number of frames per sec-
ond) from a range of 24/25/30D/30.
Sequence start time field .. Specifies the time code for the beginning of the
sequence/song, in units of hours/minutes/frames/subframes.
SMPTE
Frame rate field..................Selects the SMPTE frame range from a range of 24/25/30D/30.
Sequence start time field....Specifies the time code for the beginning of the sequence/song.
B Receive MMC (MIDI Machine Control) field
Switches MMC reception on/off. If this is ON, the transport of the MPC4000 can be controlled from an MMC-compatible external device.
75
Page 86

MISC mode
C MIDI clock field
Selects the MIDI connector that will transmit MIDI clock. If you select OFF , MIDI clock
will not be transmitted.
D MIDI time code field
Selects the MIDI connector that will transmit MTC. If you select OFF, MTC will not be
transmitted.
E SMPTE field
Switches SMPTE output on/off.
F Frame rate field
Specifies the frame rate of the MTC/SMPTE that is transmitted.
G Send MMC (MIDI Machine Control) field
Switches MMC transmission on/off. If transmission is ON, the transport of an
MMC-compatible external device can be controlled from the MPC4000.
■Synchronizing the MPC4000 to an external device
You can use MIDI clock, MTC, or SMPTE to synchronize the MPC4000 to an external
device.
Note: In order to sync hr onize oper ation with an e xternal device, you must also mak e synchronization
settings on that external device.
1. Connect the MPC4000 and external device as appropriate for the
synchronization method you want to use.
To synchronize to the external device using MIDI clock or MTC
Connect the MPC4000’s [MIDI IN] connector to the e xternal device’ s MIDI OUT connector .
To synchronize to the external device using SMPTE
Connect the MPC4000’s [SMPTE IN] connector to the external device’s SMPTE OUT
connector.
2. Access the Sync page and move the cursor to the Mode field.
3. Turn the [JOG] dial to select the synchronization signal you want to receive.
• MIDI CLOCK .............Synchronize using MIDI clock.
• MIDI TIME CODE.....Synchronize using MTC (MIDI time code).
• SMPTE........................Synchronize using SMPTE signals.
4. If you selected MIDI clock or MTC in step 3, move the cursor to the Sync in
field and turn the [JOG] dial to select the MIDI connector that will receive
MIDI clock or MTC.
If you selected MIDI clock, synchronization may not occur correctly if the time signature
of the MPC4000’s sequence/song does not match that of the external device.
Also, the MPC4000’s tempo will be ignored, and the tempo data of the external device
will be used.
5. If you selected MTC/SMPTE in step 3, move the cursor to the
use the [JOG] dial to set the value to match the frame rate of the external device.
Synchronization will not occur correctly if the frame rate does not match that of the external device.
6. If you are synchronizing via MTC/SMPTE, move the cursor to the Sequence
start field and specify the starting location of the sequence/song as necessary.
7. When you have finished making settings, press the [MAIN] key to access the
Main page.
8. Make sure that the cursor is located at Sync, and turn the [JOG] dial to switch
the setting of the field ON.
The settings of the Sync In/Sync Out window are valid when the Sync field is turned ON.
In this state, the MPC4000 will synchronize to an external device.
Frame rate field
and
76
Page 87

Sync page
9. If you want to synchronize an MPC4000 sequence with the external device, go
to the Main page and select the sequence that you want to play.
10. If you want to synchronize an MPC4000 song with the external device, press
the [SONG] key and select the song that you want to play.
11. Begin playback on the external device.
The MPC4000 will operate in synchronization with the external device, and will begin
playing the sequence or song.
■Synchronizing an external device to the MPC4000
You can use MIDI clock, MTC, or SMPTE to synchronize an external device to the
MPC4000.
Note: In order to sync hr onize oper ation with an e xternal device, you must also mak e synchronization
settings on that external device.
1. Connect the MPC4000 and external device as appropriate for the
synchronization method you want to use.
To synchronize the external device using MIDI clock or MTC
Connect the MPC4000’s [MIDI OUT] connector to the external device’s MIDI IN connector.
To synchronize the external device using SMPTE
Connect the MPC4000’s [SMPTE OUT] connector to the external device’s SMPTE IN
connector.
2. Access the Sync page.
3. If you want to use MIDI clock as the synchronization signal, move the cursor to
the MIDI clock field, and select the MIDI connector that will transmit MIDI
clock messages.
If you select MIDI clock, make sure that the time signature of the MPC4000’s
sequence/song matches that of the external device. If the time signature does not match,
locate operations will not occur correctly.
4. If you want to use MTC as the synchronization signal, move the cursor to the
MIDI time code field and select the MIDI connector that will transmit MTC
messages.
5. If you want to use SMPTE as the synchronization signal, move the cursor to the
SMPTE field and turn the setting ON.
6. If you are using MTC/SMPTE, move the cursor to the Frame rate field and use
the [JOG] dial to set the frame rate to match that of the external device.
If the frame rates of the MPC4000 and the external device do not match, correct synchronization will not be possible.
7. When you have finished making settings, access the Main page.
8. Make sure that the cursor is located at the Sync field, and turn the [JOG] dial to
switch the setting ON.
9. Make settings on the external device so that it will follow the type of
synchronization signal you selected in steps 3–5, and put it in playback-ready
mode.
10. If you want the external device to synchronize to an MPC4000 sequence, go to
the Main page and select the sequence that you want to play.
11. If you want the external device to synchronize to an MPC4000 song, press the
[SONG] key and select the song that you want to play.
12. Press the [PLAY] key to play back the sequence/song.
The external device will operate in synchronization with the MPC4000. If you perform
a locate operation on the MPC4000, the external device will also change its location.
77
Page 88

MIDI mode
MIDI mode
Routing page
Changing the routing of MIDI events
To access this page........[MIDI] key
A Routing block
Functions
• [F2] key (FILTER)
• [F3] key (EVENT)
• [F6] key (PANIC)
Here you can changing the routing of the MIDI events that are input from the [MIDI IN
I] and [MIDI IN II] connectors or generated by the pads.
1
Displays the Filter page.
Displays the Event page.
Sends All Note Off, Reset All Controllers, Damper Off, and Bend 0 messages from the
MIDI connectors.
Routing block
Here you can change the destination of the MIDI events that are input from the [MIDI IN
I]/[MIDI IN II] connectors or generated by the pads.
1
2
3
4
A Block diagram
Displays the current routing of MIDI messages.
B MIDI in-I field
Selects one of the following as the destination of the MIDI e v ents recei v ed at the [MIDI
IN I] connector.
INT-A.....................Virtual MIDI port A of the sampler section
SEQUENCER........The sequencer section
78
C MIDI in-II field
Selects one of the following as the destination of the MIDI e v ents recei v ed at the [MIDI
IN II] connector.
Page 89

Routing page
INT-B .....................Virtual MIDI port B of the sampler section
SEQUENCER........The sequencer section
D Drum pad field
Selects one of the following as the destination of the MIDI e vents generated by the pads.
INT-A.....................Virtual MIDI port A of the sampler section
OUT-A....................MIDI OUT A
SEQUENCER........The sequencer section
79
Page 90

MIDI mode
Filter page
Filtering the incoming MIDI events
To access this page........[MIDI] key → [F2] key (FILTER)
Here you can filter out specific MIDI events that are being input from the [MIDI IN I]
and [MIDI IN II] connectors.
A MIDI input filter block
B Event block
1
2
Functions
• [F1] key (ROUTING)
Displays the Routing page.
• [F3] key (EVENT)
Displays the Event page.
• [F6] key (PANIC)
Sends All Note Off, Reset All Controllers, Damper Off, and Bend 0 messages from the
MIDI connectors.
MIDI input filter block
Here you can select the input connector for which you will make settings, and switch the
MIDI filter on/off.
1 2
A MIDI in field
Selects either I ([MIDI IN I] connector) or II ([MIDI IN II] connector) as the connector
for which you will make settings. You can make filter settings independently for each
connector.
B Filter field
Switches MIDI filtering on/off for the selected connector.
Input block
Here you can select the type of MIDI event and the MIDI channel to be filtered.
1 2 3
80
Page 91

Filter page
A Event type field
Indicates the various type of MIDI ev ent. When the cursor is in this field, you can scroll
the display.
B ALL field
By turning the [JOG] dial in this field you can switch the symbols on/off for all channels.
C 1–16 field
Indicates MIDI channels 1–16. By turning the [JOG] dial you can switch the symbol
on/off. The corresponding MIDI event will be filtered out from channels for which this
symbol is displayed.
81
Page 92

MIDI mode
Event page
Monitoring MIDI events
To access this page........[MIDI] key → [F3] key (EVENT)
Here you can view a list of MIDI events for the specified channel.
A MIDI event monitor block
1
Functions
• [F1] key (ROUTING)
Displays the Routing page.
• [F2] key (FILTER)
Displays the Filter page.
• [F6] key (CLEAR)
Clears the list display.
MIDI event monitor block
This displays a list of the MIDI events that are being transmitted or recei v ed on the specified channel.
12
3
A MIDI monitor field
Selects one of the following as the MIDI connector/port whose MIDI e vents will be monitored.
MIDI IN I...............[MIDI IN I] connector
MIDI IN II..............[MIDI IN II] connector
MIDI OUT-A .........[MIDI OUT A] connector
MIDI OUT-B..........[MIDI OUT B] connector
MIDI OUT-C..........[MIDI OUT C] connector
MIDI OUT-D .........[MIDI OUT D] connector
INT-A.....................Virtual MIDI port A of the sampler section
INT-B.....................Virtual MIDI port B of the sampler section
82
Page 93

Event page
B View channel field
Selects the MIDI channel(s) that will be displayed in the list, from a range of 1–16 or
ALL (all MIDI channels). By selecting ALL, you can monitor all MIDI events that are
being transmitted or received via the selected MIDI connector or port.
C List field
Displays the MIDI events that are being transmitted or received. The MIDI event displayed at the “Latest>” indicator is the event that was transmitted or received most
recently.
83
Page 94

Save mode
Save mode
Save page
Saving data to a storage device
A Type block
B Disk information block
C Data list block
Here you can save various types of data from internal memory to an external storage
device.
1
D Disk block
E File list block
2
Functions
• [F2] key (UTILITY)
Displays the Disk Utility page.
• [F3] key ( NEW)
Creates a new folder in the selected level of the file list.
• [F5] key (MULTIPLE)
Displays a popup window where you can save multiple items of data. You can use this
function if you have selected samples/programs/multis as the data to be saved.
• [F6] key (DO IT)
Executes the Save operation.
Type block
Selects the type of data that will be saved to the storage device.
1
3
4
5
84
A Type field
Selects the type of file to be saved, from the following choices.
• SAVE SEQUENCE .......................... Save an individual sequence.
• SAVE ALL SEQs AND SONGs....... Save all sequences and songs (ALL file).
• SAVE SAMPLEs.............................. Save one or more samples.
• SAVE PROGRAMs.......................... Save one or more programs.
• SAVE MULTIs .................................Save one or more multis.
Page 95

Disk information block
This area shows various information about the storage device that is selected as the
save-destination.
1
2
3
A Device field
An icon indicates the type of device that is selected. The w ay in which the de vice is connected is shown below this icon.
• INTERNAL................ Internal A T A device
• USB............................. USB device
• SCSI0–7...................... SCSI device (the number following “SCSI” indicates the
SCSI ID)
Save page
B Type field
Indicates the format type of the storage device.
C Free field
Indicates the amount of free space on the selected storage device.
Data list block
In this area you can select the internal memory data that will be saved. The contents of
this block will depend on what you selected in the Type block.
Disk block
Here you can select the save-destination storage device.
1
A Disk field
Selects the save-destination storage device. When you turn the [JOG] dial in this field,
the Device List popup window will appear.
Hint: If you press the [WINDO W] key in the Disk field, the Disk Information popup window will appear .
In this popup window you can view detailed information about the storage device selected by the cur sor ,
such as the name of the vendor and the system version.
85
Page 96

Save mode
File list block
Here you can select the save-destination folder.
2
1
A File list
Displays the internal hierarchy of the storage device. The left side of the list shows the
level in which the save-destination folder is located, and the right side of the list shows
√
the contents of the save-destination folder. Use the CURSOR [
π
between levels, and use the CURSOR [
level or to select a file. Existing fi les are shown by the follo wing icons in the file list block.
ALL icon...........................ALL file (all sequences and songs)
]/[†] keys to mov e between folders in the same
]/[®] keys to move
MID icon...........................Individual sequence file
SAMPLE icon.............Sample file
PROGRAM icon.......Program file
MULTI icon..................Multi file
B Save field
Indicates the name of the folder that is selected as the save-destination.
Hint: In the file list block, use the CURSOR[√]/[®]/[π]/[†] keys to move between levels and to
select files. When you want to move to a different block, use the BLOCK CURSOR [
When you execute the Save operation, the file will be saved in the folder that is selected in the left side
of the file list (i.e., the level whose contents are shown in the right side of the file list).
π
]/[†] keys.
■Saving all sequences and songs
Here’s how to save all data of the sequencer section as a single ALL file on the storage
device.
1. In the Save page, move the cursor to the Type field and turn the [JOG] dial to
select SAVE ALL SEQs AND SONGs.
The data list block will change to a display like the following.
1
86
2
A File name field
Specifies the name of the ALL file that will be saved.
B Size field
Indicates the size of the ALL file that will be saved.
2. Move the cursor to the File name field, and input a name for the file.
Page 97

Save page
3. Move the cursor to the Disk field, and turn the [JOG] dial to open the Disk List
popup window.
1 2 3 4
5678
A Media field
Indicates the type of storage device.
B Name field
Indicates the volume name of the storage device.
C Device field
Indicates the way in which the storage device is connected.
D Free field
Indicates the free space on the storage device.
E [F1] key (CANCEL)
Cancels the operation and closes the popup window.
F [F3] key (UPDATE)
Updates the displayed information. Use this if a storage device that should be connected
is not shown in the display.
G [F4] key ( )
Ejects the media if removable storage such as a CD-ROM or Zip drive is selected.
H [F6] key (SELECT)
Finalizes your selection of a storage device.
4. 4Move the cursor to the storage device that you want to use, and press the [F6]
key (SELECT).
The save-destination storage device will be selected, and the popup window will close.
5. In the file list block, select the save-destination folder.
Hint: When you execute the Save operation, the file will be saved in the folder that is selected in the
left side of the file list (i.e., the level whose contents are shown in the right side of the file list).
6. To execute the Save operation, press the [F6] key (DO IT).
The data will be saved in the specified folder as an ALL file.
87
Page 98

Save mode
If an identically-named file already exists in the save-destination folder, the File Exists
popup window will appear.
1 2 3
A [F1] key (CANCEL)
Cancels the operation and closes the popup window.
B [F3] key (RENAME)
Changes the file name and saves the file.
C [F5] key (REPLACE)
Overwrites the file (i.e., the existing file will be lost).
Either press the [F3] key (REN AME) to change the name of the file, or press the [F5] key
(REPLACE) to overwrite the existing file.
■Saving an individual sequence
Here’s how to save an individual sequence from memory to a storage device.
1. In the Save page, move the cursor to the Type field and turn the [JOG] dial to
select SAVE SEQUENCE.
The data list block will change to a display like the following.
1
2
3
A Sequence list field
Lists the sequences that are in memory.
B MIDI file type field
Selects the type of file that will be saved; either 0 (SMF format 0) or 1 (SMF format 1).
C Size field
Indicates the size of the sequence.
2. Move the cursor to the Disk field and turn the [JOG] dial to open the Disk List
popup window.
3. Move the cursor to the storage device on which you want to save the data, and
press the [F6] key (SELECT).
That storage device will be selected as the save-destination, and the popup window will
close.
88
Page 99

Save page
4. Move the cursor to the data list, and use the CURSOR [π]/[†] keys to move the
cursor to the sequence that you want to save.
When the cursor is in the data list, you can also turn the [JOG] dial to select a sequence.
5. In the file list block, select the folder in which you want to save the data.
Hint: When you execute the Save operation, the file will be saved in the folder that is selected in the
left side of the file list (i.e., the level whose contents are shown in the right side of the file list).
6. To execute the Save operation, press the [F6] key (DO IT).
The individual sequence will be saved in the selected folder.
If an identically-named file already exists in the save-destination folder, the File Exists
popup window will appear when you execute the Save operation. Either press the [F3]
key (RENAME) to change the name of the fi le, or press the [F5] key (REPLA CE) to ov erwrite the existing file.
■Saving samples
Here’s how to save one or more samples from memory to a storage device.
1. In the Save page, move the cursor to the Type field and turn the [JOG] dial to
select SAVE SAMPLEs.
The data list block will change to a display like the following.
2
3 4
1
A Sample list field
Lists the samples that are in internal memory.
B Tag field
Assigns a tag to individual samples, selecting them for saving.
C Sample field
Lists the samples in memory (and displays information about the samples). If you are
saving a single sample, the sample selected in this field is the one that will be saved.
D Size field
Indicates the size of the sample.
Hint: The * symbol in fr ont of the sample name indicates that the sample has been edited after it was
last saved or loaded.
If you press the [WINDO W] k ey in the Tag field, a popup window will appear in which you can clear
all tags at once.
2. If you want to save a single sample, move the cursor to the sample list field, and
select the sample that you want to save.
3. If you want to save two or more samples, move the cursor to the Tag field and
assign a tag to each sample you want to save.
4. Move the cursor to the Disk field, and turn the [JOG] dial to open the Disk List
popup window.
5. Move the cursor to the storage device on which you want to save the data, and
press the [F6] key (SELECT).
That storage device will be selected as the save-destination, and the popup window will
close.
89
Page 100

Save mode
6. In the file list block, select the folder in which the data will be saved.
Hint: When you execute the Save operation, the file(s) will be saved in the folder that is selected in
the left side of the file list (i.e., the level whose contents are shown in the right side of the file list).
● To save a single sample
7. To save a single sample, make sure that the appropriate sample is selected in
the sample list field, and press the [F6] key (DO IT).
The selected sample will be saved to the storage device.
● To save multiple samples
8. To save two or more samples at once, press the [F5] key (MULTIPLE) after step 6.
The Save Multiple Samples popup window will appear.
1
2 3 4 5
A Replace same samples field
Specifies what will be done if an identically-named file exists in the save-destination.
B [F1] key (CANCEL)
Cancels the operation and closes the popup window.
C [F3] key ( TAGGED)
Saves only tagged samples, and closes the popup window.
D [F4] key (MODIFY)
Saves only samples indicated by the * symbol, and closes the popup window.
E [F6] key (ALL)
Saves all samples, and closes the popup window.
9. Move the cursor to the Replace same samples field, and select one of the
following to specify what will be done if an identically-named file exists in the
save-destination.
YES........................The saved data will overwrite the existing data.
NO..........................Identically-named data will not be saved.
10. According to the type of samples that you want to save, press the [F3] key (
TAGGED)–[F6] key (ALL).
The selected samples will be saved to the storage device.
90
 Loading...