

Page 1

V
ers
QUICKSTART MANUAL
ion
2.
0
Page 2

Page 3
Quickstart Manual (English) --- [ 1 - 11 ]
Manual de inicio rápido (Español) --- [ 13 - 25 ]
Guide d’utilisation simplifié (Français) --- [ 27 - 39 ]
Kurzbedienungsanleitung (Deutsch) --- [ 41 - 53 ]
Manuale rapido di utilizzazione (Italiano) --- [ 55 - 67 ]
Page 4

This page has been intentionally left blank
Page 5

Quickstart Manual (English)
Table of Contents
Basic information …….............................................................................
Tutorial of the MPC1000..........................................................................
Playing back a demo song.........................................................................
Playing a preset program .........................................................................
Recording a performance with the pads ...................................................
Playing back several sequences in a series ................................................
Selecting the sequences in real time ......................................................................
Playing back the sequences in the selected order .................................................
Recording a sound....................................................................................
Preparing the recording ..........................................................................................
Starting the recording .............................................................................................
Assigning the recorded sound to the pad ...............................................................
Loop playback of a phrase sample ...........................................................
1
2
2
2
3
4
4
4
5
5
5
6
7
Adjusting the start/end points of the sample ..........................................................
Recording to a sequence ........................................................................................
Setting the same number of bars for sample and sequence ..................................
Setting the same tempo for sample and sequence ................................................
Saving the data ........................................................................................
Turning off the Autoload function ...........................................................
Other useful functions .............................................................................
7
8
8
8
9
9
10
Page 6

This page has been intentionally left blank
Page 7
MPC1000 Quickstart Manual
Welcome to MUSIC PRODUCTION CENTER MPC1000. This Quickstart Manual describes basic operations to get started
with the MPC1000. For detailed information, see the Operator's Manual.
Basic information
Below is basic information that you need to know in order to use the MPC1000.
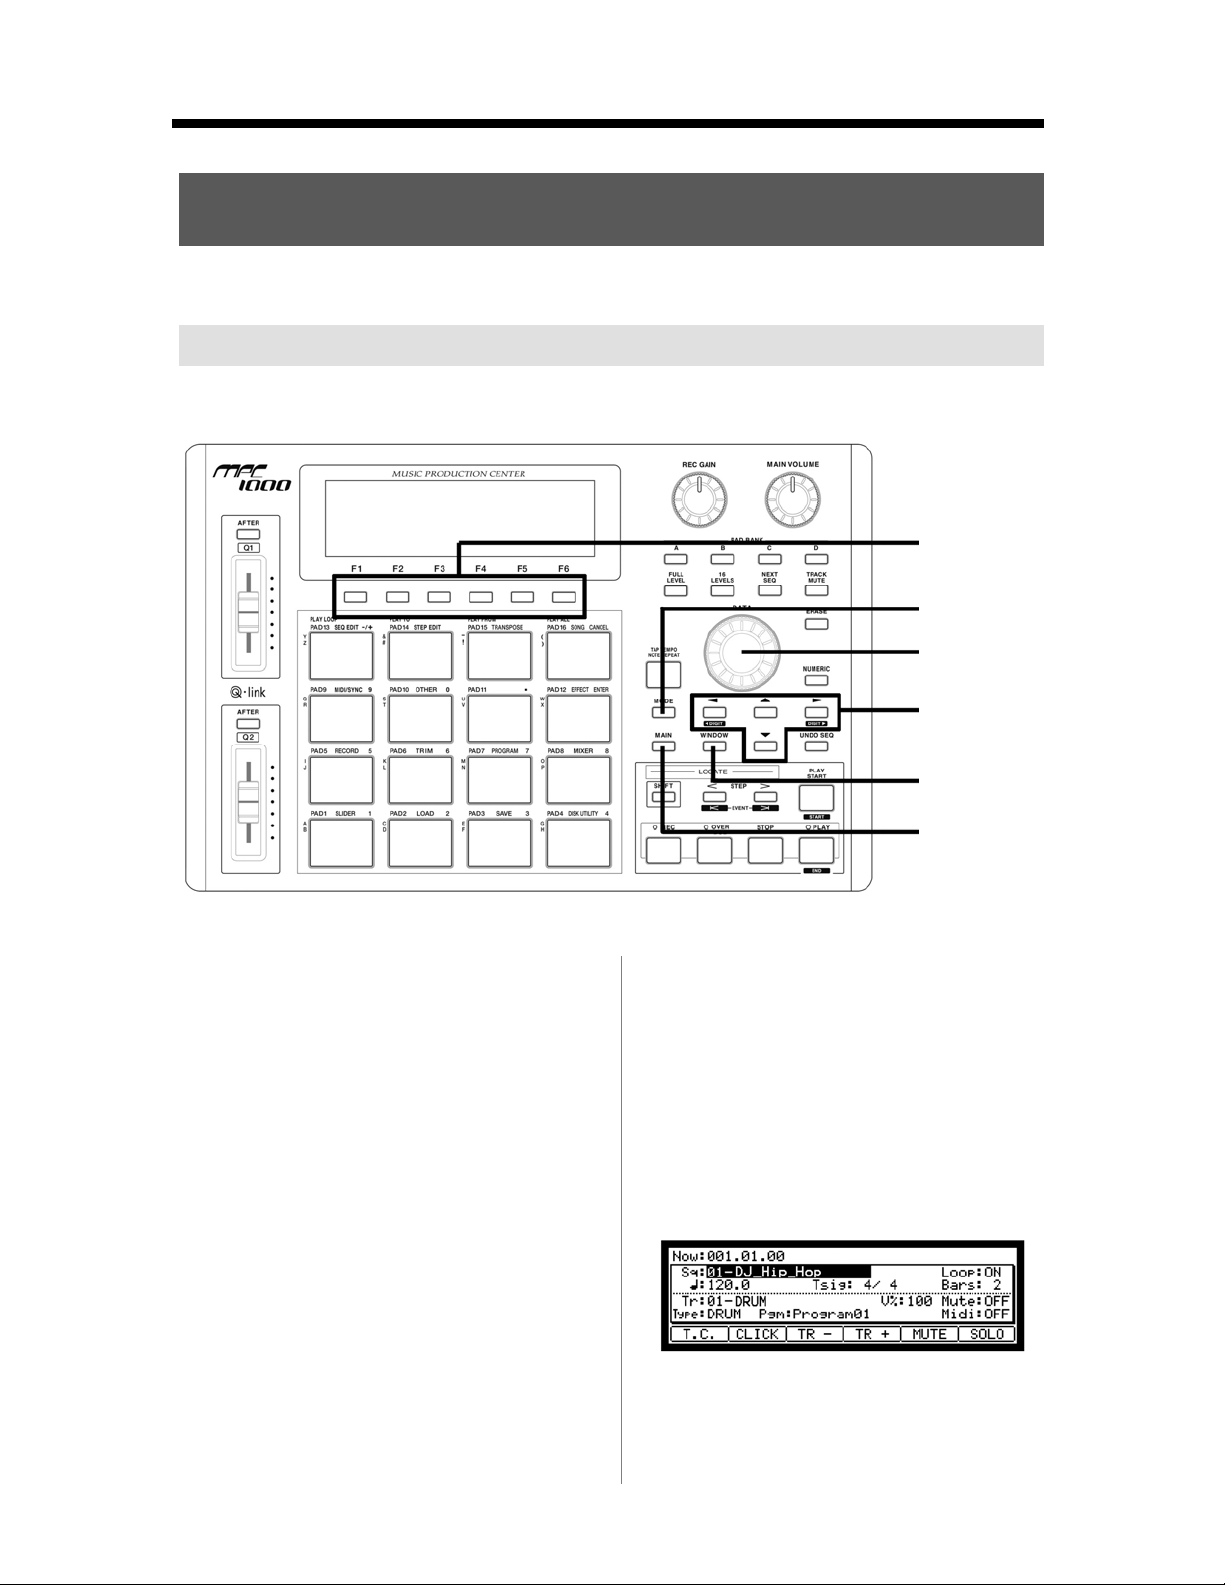
• Function buttons
These are six buttons (F1 to F6) aligned under the LCD
(liquid crystal display) that are used as function buttons.
These buttons correspond to each of the six functions
that are displayed on the bottom of the LCD. The
functions that each button represents will change,
depending on which options are displayed on the LCD.
• [ MODE ] button
You can switch modes by pressing the [ MODE ] button
and hitting a pad. The mode that a pad corresponds to is
displayed above each pad.
• [ DATA ] wheel
The location of the cursor is called a “field.” You can
change the settings of the selected field, by turning the
[ DATA ] wheel.
• Cursor buttons
The highlighted part on the screen is called the “cursor.”
You can move the cursor on the screen using the four
cursor buttons on the panel.
• [ WINDOW ] button
Pressing the [ WINDOW ] button brings up a window
for the detailed setting of the selected field. This is
not available for all fields. If there are detailed
settings for a specific field, the LED of the
[ WINDOW ] button will be lit.
• [ MAIN ] button
When pressed, this button takes you to the main
screen of the MPC1000 where you record and play
back sequences.
Function buttons
[ MODE ] button
[ DATA ] wheel
Cursor buttons
[ WINDOW ] button
[ MAIN ] button
1
Page 8
2
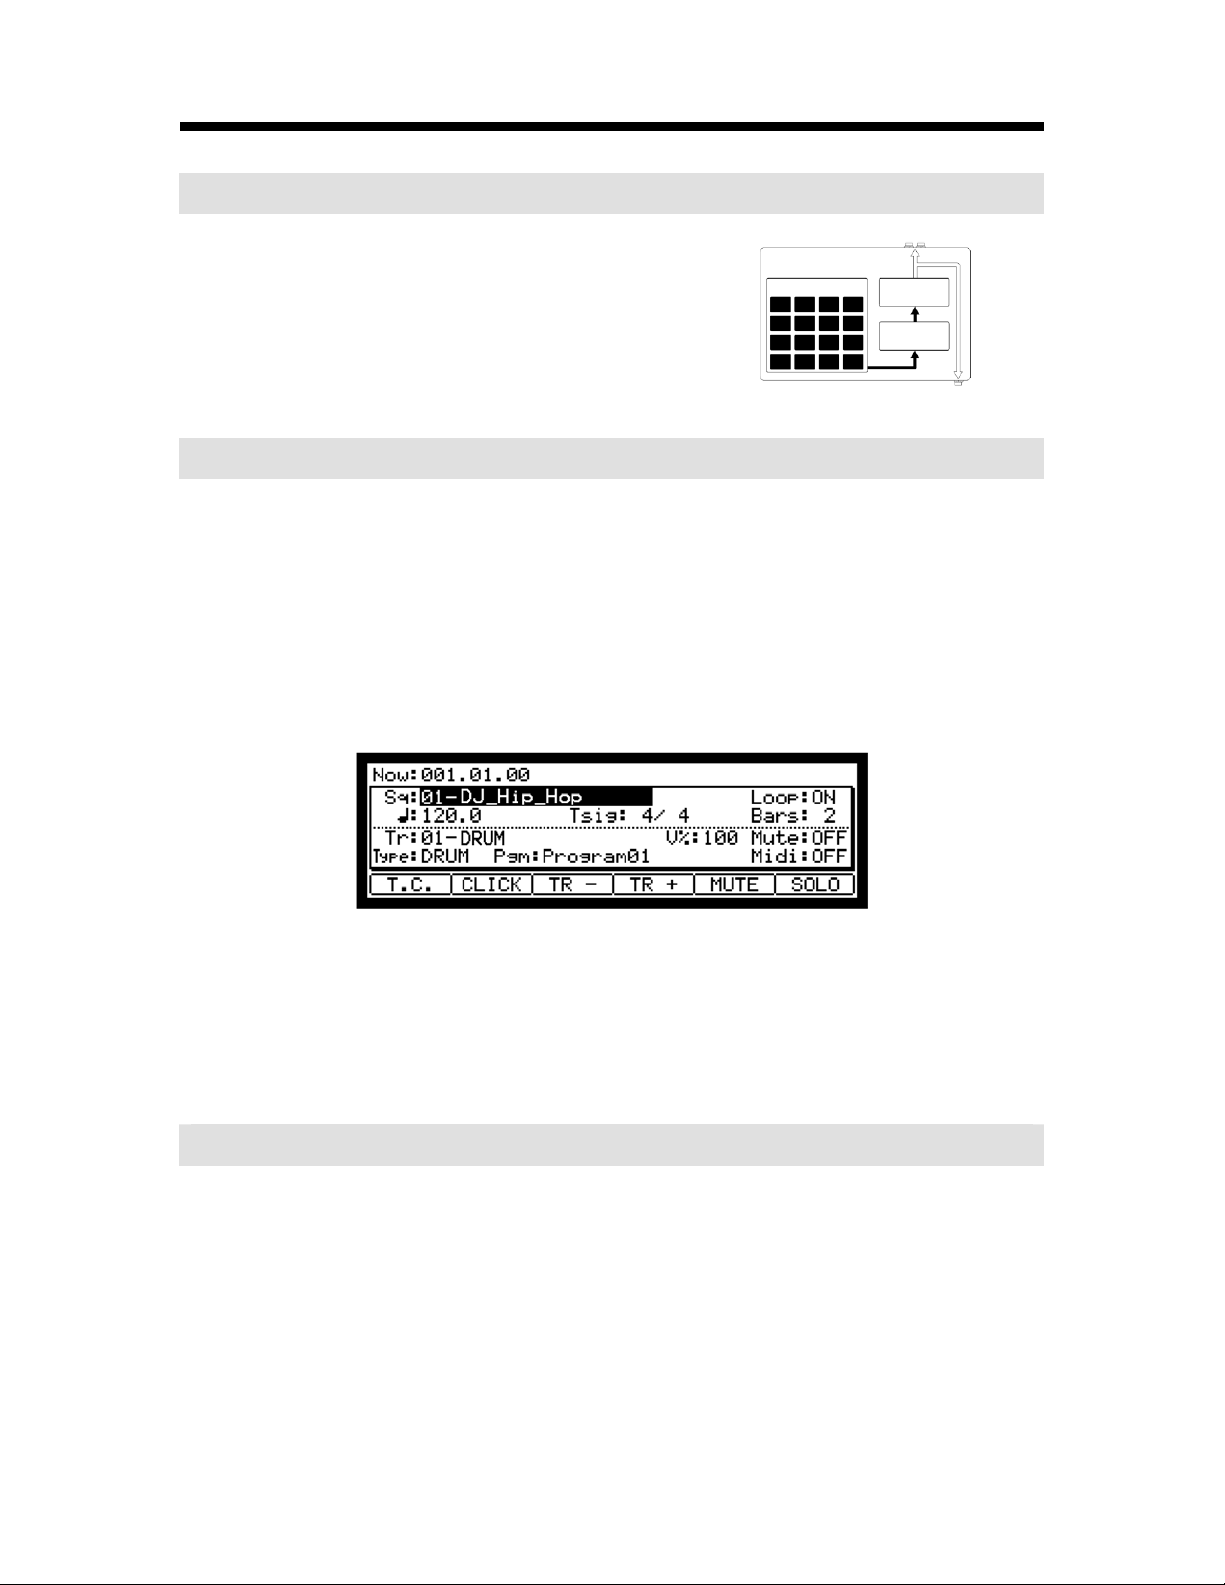
Tutorial of the MPC1000
The MPC1000 consists of the sampler section, where you record and playback
the sound, the sequencer section, where you record the performance, and the
pads, which you use to play the sounds. You record your performance to the
sequencer and play the sounds of the sampler using the recorded sequences.
The performance data (MIDI data) is sent from the pads to the sequencer and
from the sequencer to the sampler. The sampler plays the actual sound from
the performance data.
PADS SAMPLER
SEQUENCER
STEREO OUT
PHONES
Playing back a demo song
The MPC1000 has a demo song and a preset program in its internal memory and it loads the data automatically when you turn
on the unit. This is called Autoload function. To play back a demo song, proceed as follows:
01. Connect headphones to the PHONES jack of the MPC1000.
For more information about connecting devices, see the “Connecting MPC1000 to external Audio/MIDI
device” section of the Operator's Manual (page 5).
02. Turn on the MPC1000.
When you turn on the MPC1000, it displays the start-up screen and then loads the internal data automatically.
After the data is loaded, the MAIN page is displayed.
03. Make sure that "01-DJ_Hip_Hop" is selected in the Sq field and press the [ PLAY START ] button.
Pressing the [ PLAY START ] button starts playback of the demo song. To stop playback, press the
[ STOP ] button. When you press the [ PLAY ] button again, the MPC1000 will start playback at the point
where you last stopped.
After you finish playing back "01-DJ_Hip_Hop", try to play another song. You can select a song by turning
the [ DATA ] wheel in the Sq field.
Playing a preset program
Next, let’s try to play the preset program using the pads. You can play the program selected in the Pgm field of the MAIN
page by hitting the pad.
01. Select any of the (unused) sequences in the Sq field.
(Unused) means that the sequence is not yet used.
02. Use the cursor buttons to switch to the Pgm field and select the program that you wish to play.
You can select the program by turning the [ DATA ] wheel while in the Pgm field.
03. Hit the pad. The MPC1000 will play the preset program.
You can play up to 64 pads by switching between pad bank A through D, but samples may not be assigned to
all the pads.
Page 9

Recording a performance with the pads
To record the performance to a sequence using the internal preset program, proceed as follows:
01. Press the [ MAIN ] button to display the MAIN page.
02. In the Sq field, select a sequence to which you wish to record the performance.
You can select any sequence for recording a performance but, for the purposes of this section, select a
sequence that says “unused.”
03. In the Tr field, select a track to which you wish to record the performance.
The performance data will be recorded on a track in the sequence. You can select any track but, for the
purposes of this section, select “Tr : 01”.
04. In the Pgm field, select a program you wish to play.
05. Press the [ PLAY START ] button while holding the [ REC ] button.
The recording will start after 4 counts.
06. Play the pads to the click sounds.
In default, the sequence is set to 2 bars. After recording for 2 bars, the MPC1000 will start playing back the
recorded performance. If you make another performance with the pads, you can add the performance to the
current recording. This is called “over dub”.
07. You can stop the over dub by pressing [ STOP ] button.
08. Press the [ PLAY ] button to play the recorded performance.
09. If you do not like the performance, you can start a new recording by pressing the [ REC ] + [ PLAY START ]
buttons.
This cancels the currently recorded performance data and starts a new recording.
10. To add the recording to the already recorded data, press the [ PLAY START ] button while holding the
[OVER DUB] button.
This plays back the currently recorded performance and you can add the new performance by using the pads.
Deleting only a specific pad:
11. Start the overdub by pressing the [ PLAY START ] button while holding the [ OVER DUB ] button.
12. Hold the pad that you wish to delete, while holding [ ERASE ] button.
Only the section beginning where you press the [ ERASE ] button and pad and ending where you release them
will be deleted from the performance recording. By pressing the pad at the right timing, you can delete the
performance data at certain timing in the phrase. If you select another sequence in the Sq field, you can record
a new performance separately. By playing back those sequences, you can create one whole song.
Tip : You can set the length of the sequence in the Bar field, and the time signature in the Tsig field. For more
information, see the“Chapter 3 : Sequence feature” section of the Operator's Manual. ( page 12)
3
Page 10
4
Playing back several sequences in a series
There are two ways to play back several sequences in a series. You can either select the sequences to be played in real time,
or set the order of the sequences in SONG mode.
Selecting the sequences in real time
01. In the Sq field in the MAIN page, select the sequence you wish to play first.
02. Press the [ PLAY START ] button to start the playback of the sequence.
03. Select the Sq field during play back, and select the next sequence to play.
Selecting a sequence in the Sq field during the playback brings up the Next field, where you can
select the next sequence. After playing the currently selected sequence to the end, the MPC1000
will start playing the sequence selected in the Next field. By repeating this step, you can play back
several sequences continuously.
Playing back the sequences in the selected order
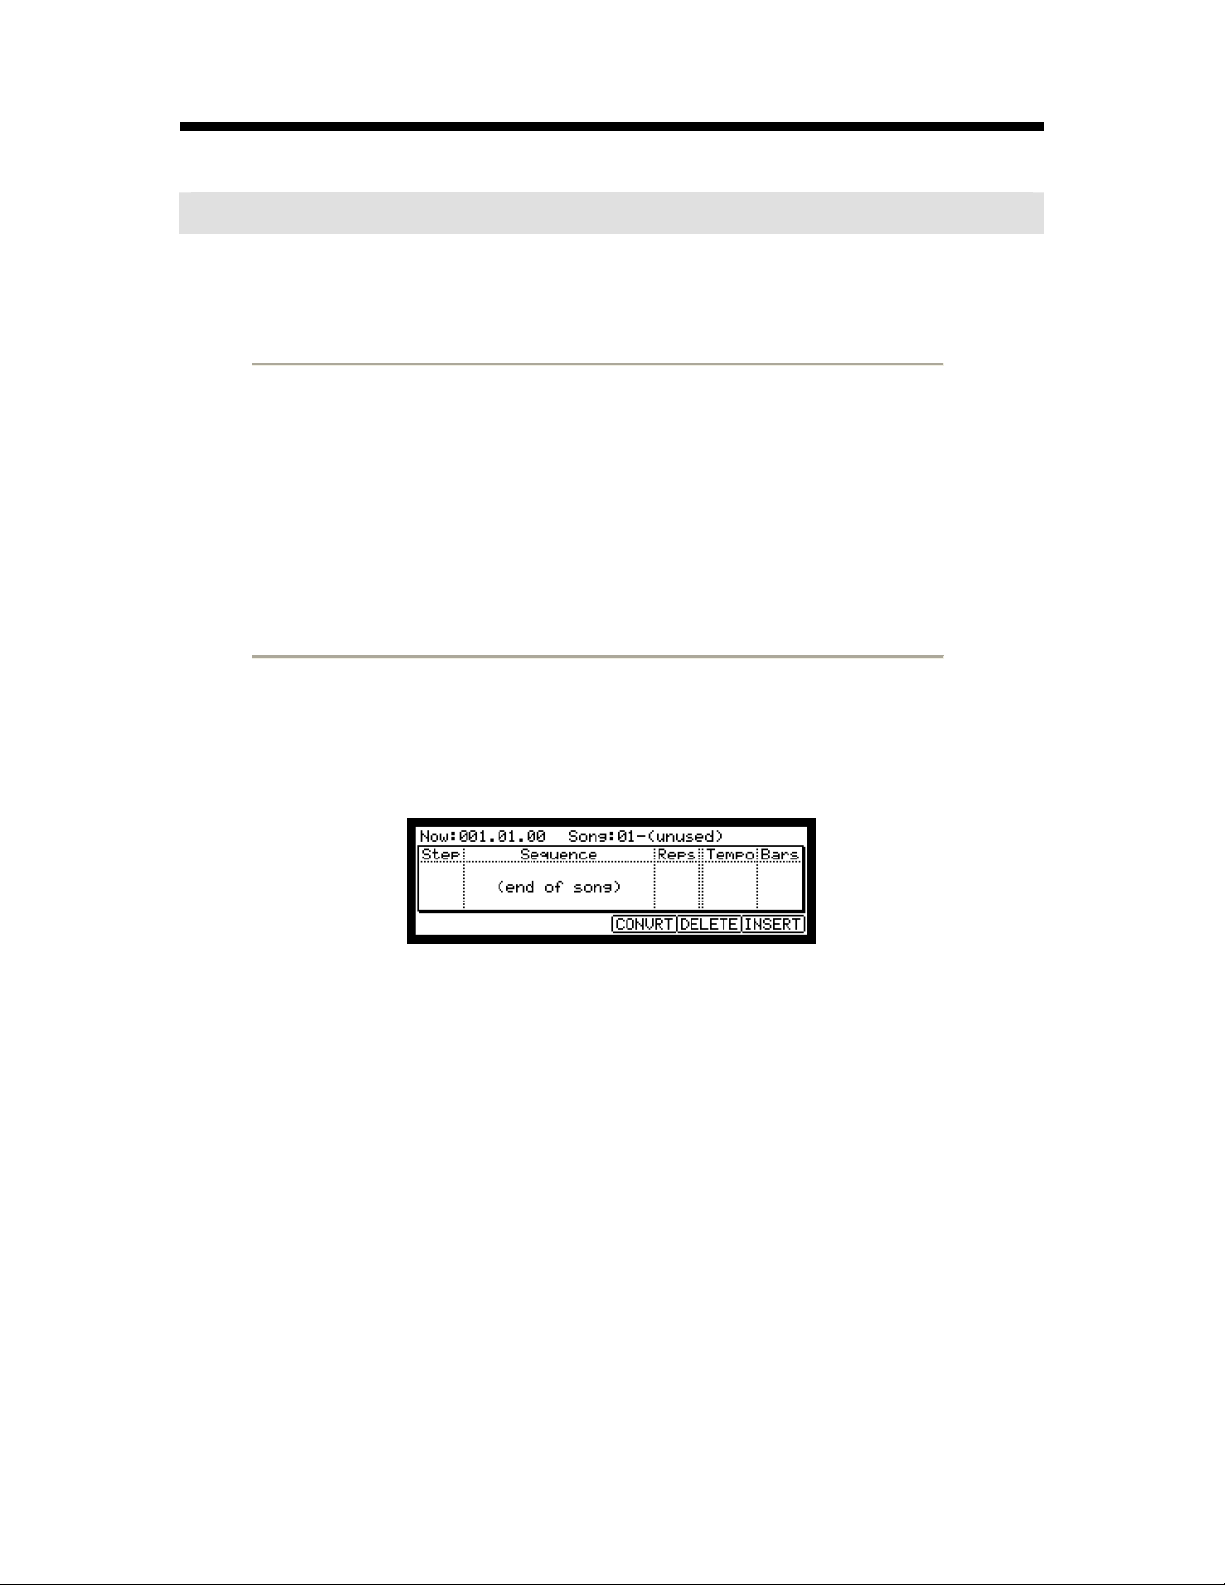
To play back the sequences in the selected order, use the SONG mode.
01. Press the [ MODE ] button and then [ PAD 16 ] (SONG).
This brings up the SONG page, where you can set the order of the sequences to be played.
02. In the Song field, select a song whose name is (unused).
03. Select the (end of song) field by pressing the down cursor button, and select the sequence that you
want played next using the [ DATA ] wheel.
Assign the sequences in the desired order by repeating this step.
04. Press the [ PLAY START ] button.
The assigned sequence will be played in the order that you specify.
Tip : For more information about the SONG mode, see the “Chapter 6 : Song mode” section
of the operator's manual. (on page 37)
Page 11
Recording a sound
In this section, you will learn how to record sounds into the MPC1000
and assign these sounds so they can be played with the pads. This
way you are not restricted to only playing with the sounds that are
already included in the presets. Below is how to record an analog
signal from a CD player connected to the RECORD IN on the rear
panel of the MPC1000.
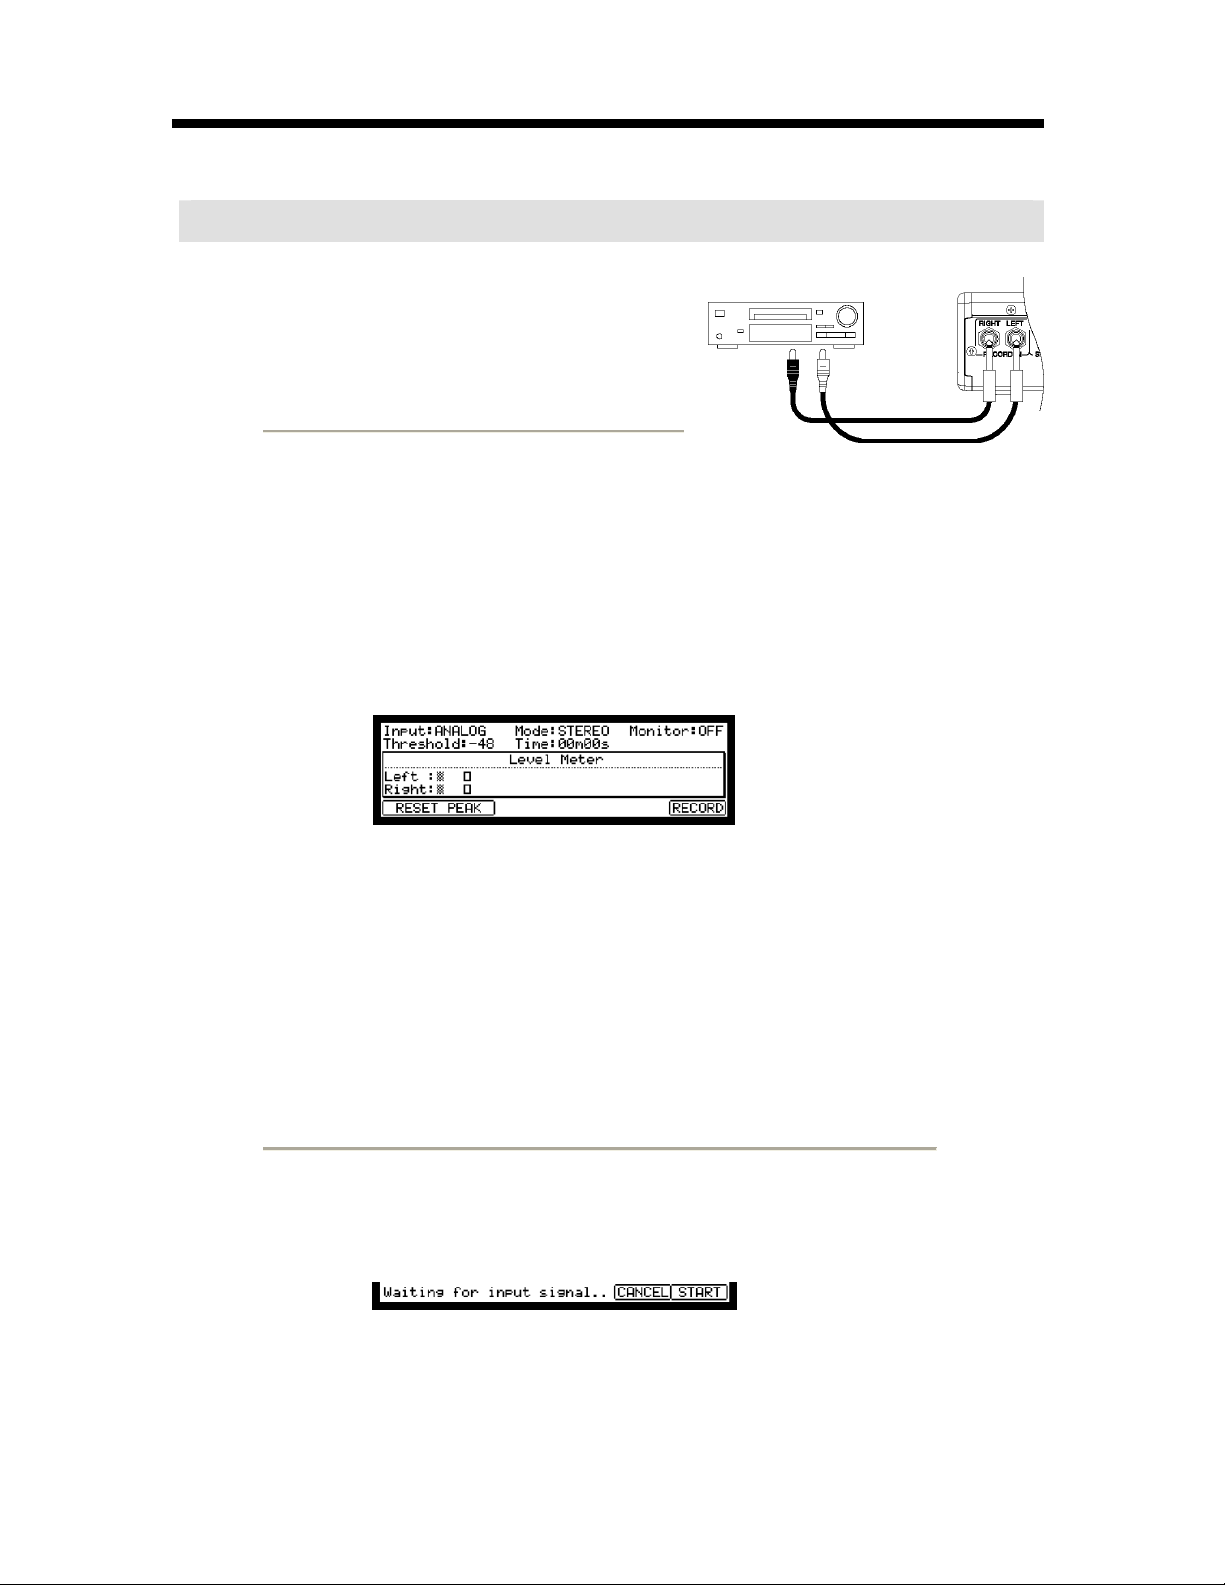
Preparing the recording
01. Connect the LINE OUT of your CD player
to the RECORD IN of the MPC1000.
The analog input of the MPC1000 is a
standard phone jack, while the CD Player’s
LINE OUT is most likely a dual RCA jack.
To connect the CD player, you will need
two RCA to ¼ inch TS connectors.
02. Once you have connected the CD player’s audio output to the RECORD IN of the MPC1000,
press the [ MODE ] button and then [ PAD 5 ] (RECORD).
This brings up the RECORD page, where you can change the settings for the recording.
CD PLAYER
LINE OUT
5
03. Select the Input field, and select ANALOG.
04. Select the Time field and set the recording time.
The MPC1000 will finish the recording at the time set in this field. We recommend you set the time
a little longer than the actual recording time. You may also finish the recording manually.
05. Test the recording level by playing the CD. Check the level meter on screen and adjust the level
using the [ REC GAIN ] knob.
Important: If the meter goes too far to the right, the sound will be distorted, but if the sound level
is too low, the sample will gain a lot of noise. Set the level as high as possible but not reaching the
right edge.
Starting the recording
06. Cue up your CD player with the audio that you would like to record.
07. Press [ F6 ] (RECORD) button while in the RECORD page.
The MPC1000 will be in record enable mode and the bottom of the screen will look like this:
This indicates that the MPC1000 is waiting for the incoming signal. The recording will begin
automatically when the CD begins playing.
Pressing the [ F5 ] (CANCEL) button cancels the record enable mode and resets the MPC1000.
Pressing the [ F6 ] (START) button manually starts the recording before you play the CD player.
Note: If you press the [ F6 ] (RECORD) button while a sound is already playing,
the MPC1000 will start the recording right after you press the button.
Page 12
6
Assigning the recorded sound to the pad
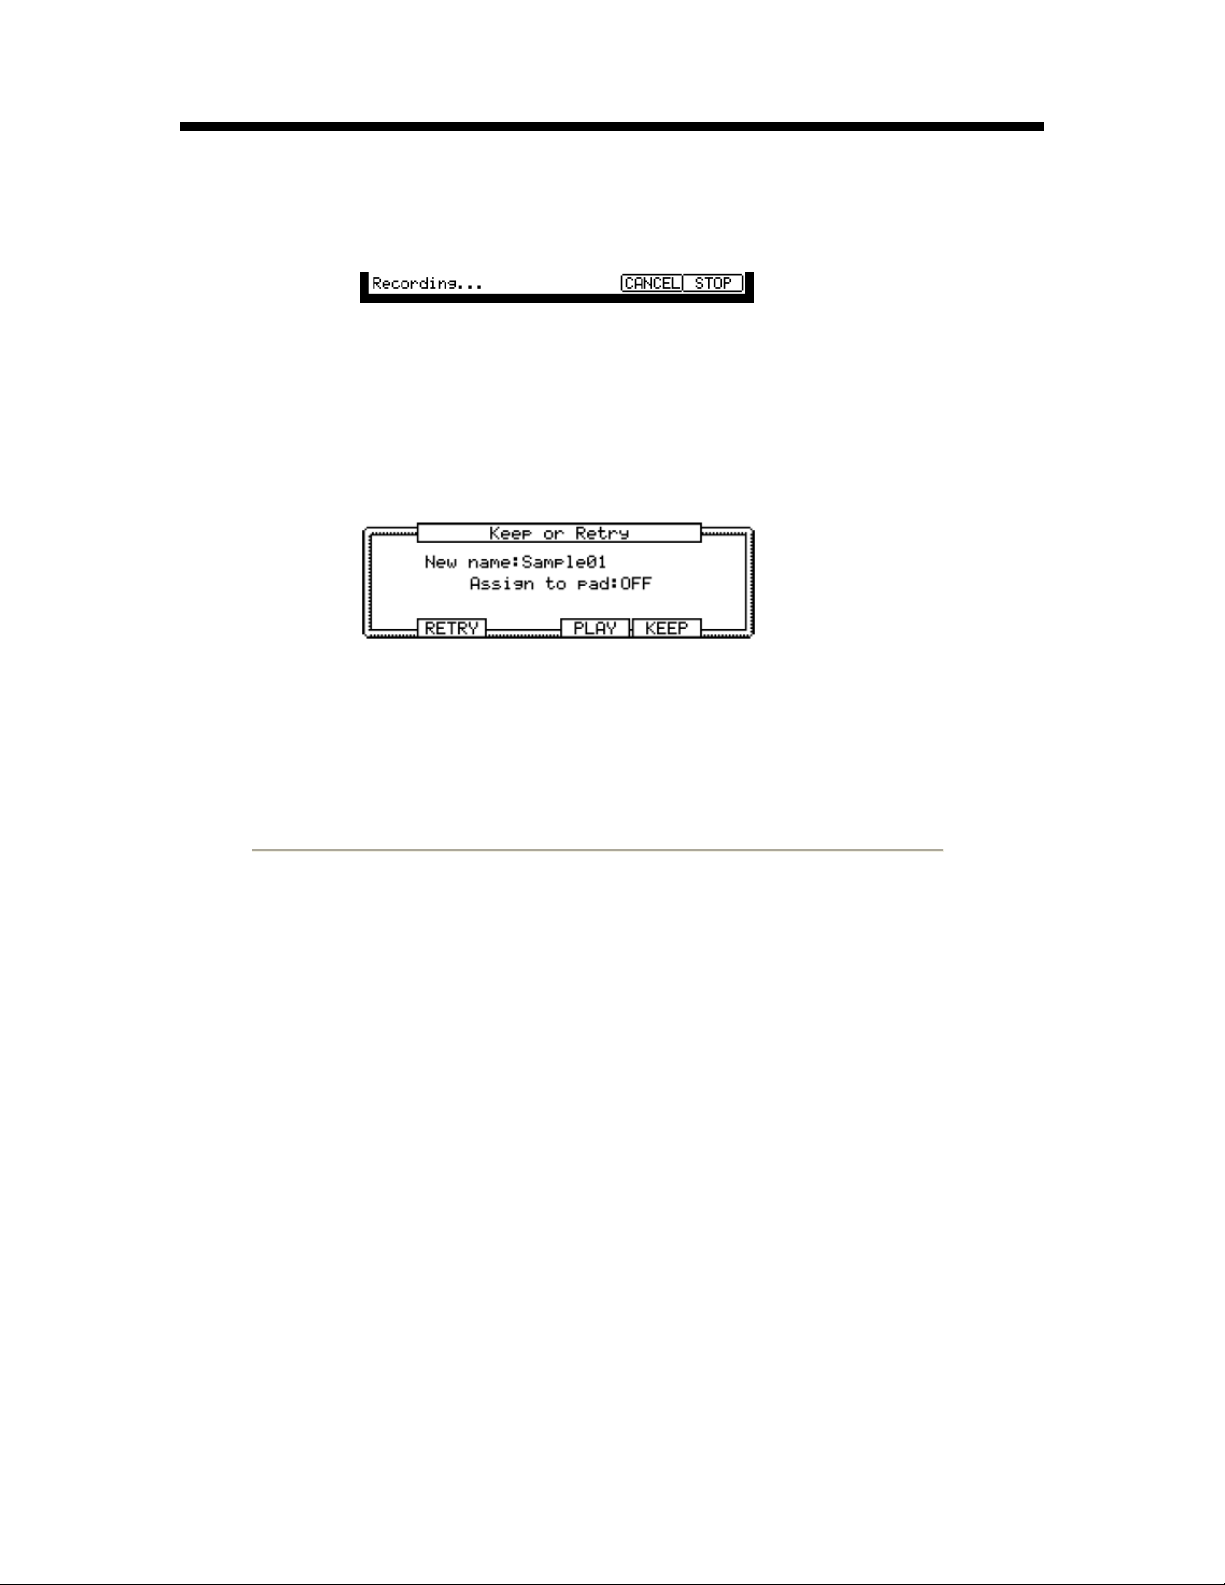
08. Press “Play” on the CD Player.
The MPC1000 will start the recording automatically when the CD player starts the playback and the
bottom of the screen will change as below:
Tip : If the recording level is too low, the MPC1000 may not start the recording when you play the
CD player. In this case, go back to step 5 and adjust the level with the [ REC GAIN ] knob again.
09. Press the [ F6 ] (STOP) button to stop the recording.
If you do not press [ F6 ] (STOP), the MPC1000 will stop the recording at the time set in the Time
field.
When the MPC1000 finishes the recording, the Keep or Retry window will be displayed.
10. You can check the recorded sample by pressing and holding the [ F4 ] (PLAY) button.
The recorded sample will play until you release the button.
If you do not like the recording, you can remove the recording by pressing the [ F2 ] (RETRY)
button.
11. Select the Assign to pad field with the cursor and hit the pad to which you wish to assign the
sample.
The number of this pad will be displayed in the Assign to pad field.
12. Press the [ F5 ] (KEEP) button to save the sample to the selected pad.
This closes the Keep or Retry window and returns to the RECORD page.
Now you can play the recorded sample with the pad. Hit the pad to make sure the recorded sound
will be played.
Tip : The samples will be assigned to the pads of the program that is selected in the Pgm field of the
MAIN page. To assign the samples to a new program, you need to create a new program in
PROGRAM mode and select it in the Pgm field of the MAIN page in advance. For more information
about creating a new program, see the “Creating a program” section of the Operator's Manual.
(page 66)
Tip : You can play back only a specific part of the sample by adjusting the start/end points. For
more information, see the “Setting the loop” section of the Operator's Manual. (page 64)
Tip : You can change the assigned sample or set the playback method in the PROGRAM mode. For
more information, see the “Chapter12 : Program” section of the Operator's Manual. (page 66)
Page 13
7
Loop playback of a phrase sample
In this section, you will learn how to create a sequence using a phrase sample. To handle the phrase sample with the sequence
function, you need to adjust the start/end points of the sample and then set the tempo of the sequence to the tempo of the
phrase.
Proceed as described in the “Recording a sound” section on page 5 and record a phrase sample. To play back the
loop to the rhythm, record by bars (1bar, 2 bars….).
Tip : When you record a phrase, start the recording a little before and stop the recording a little after the part
that you wish to use. This way, you ensure that you are not chopping off any desired audio.
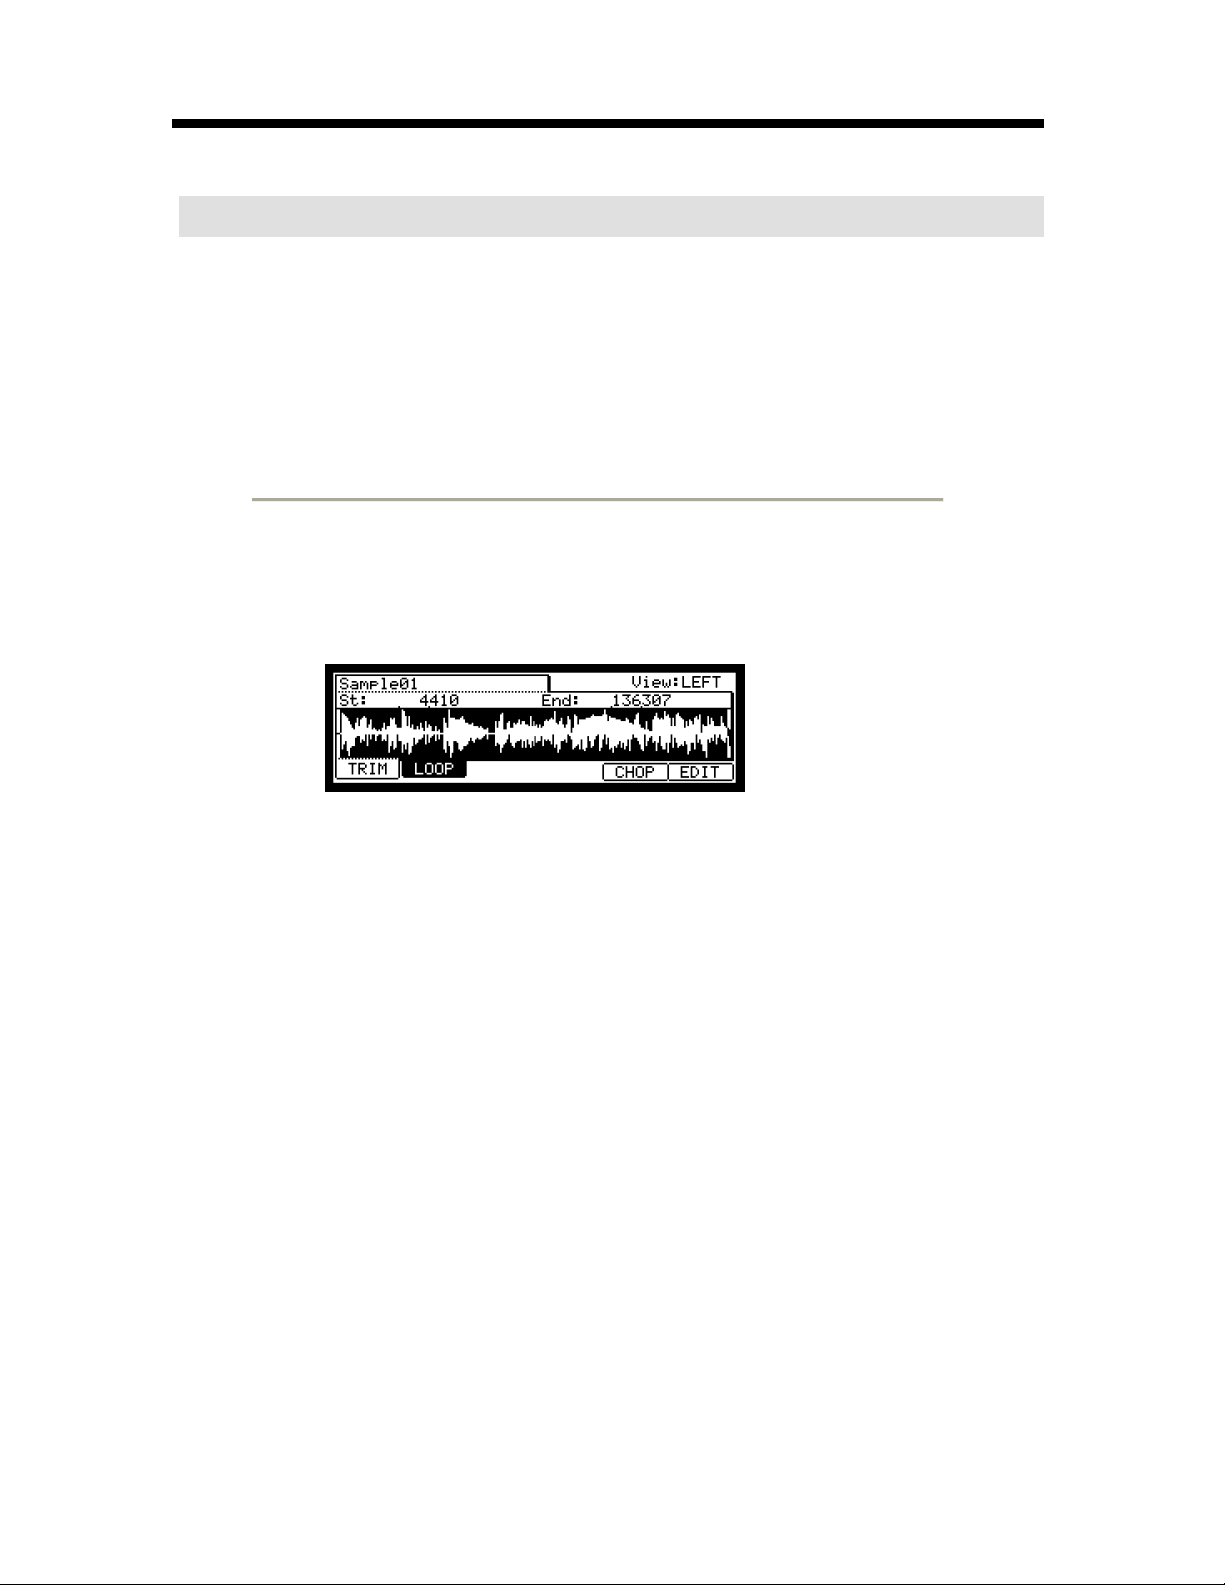
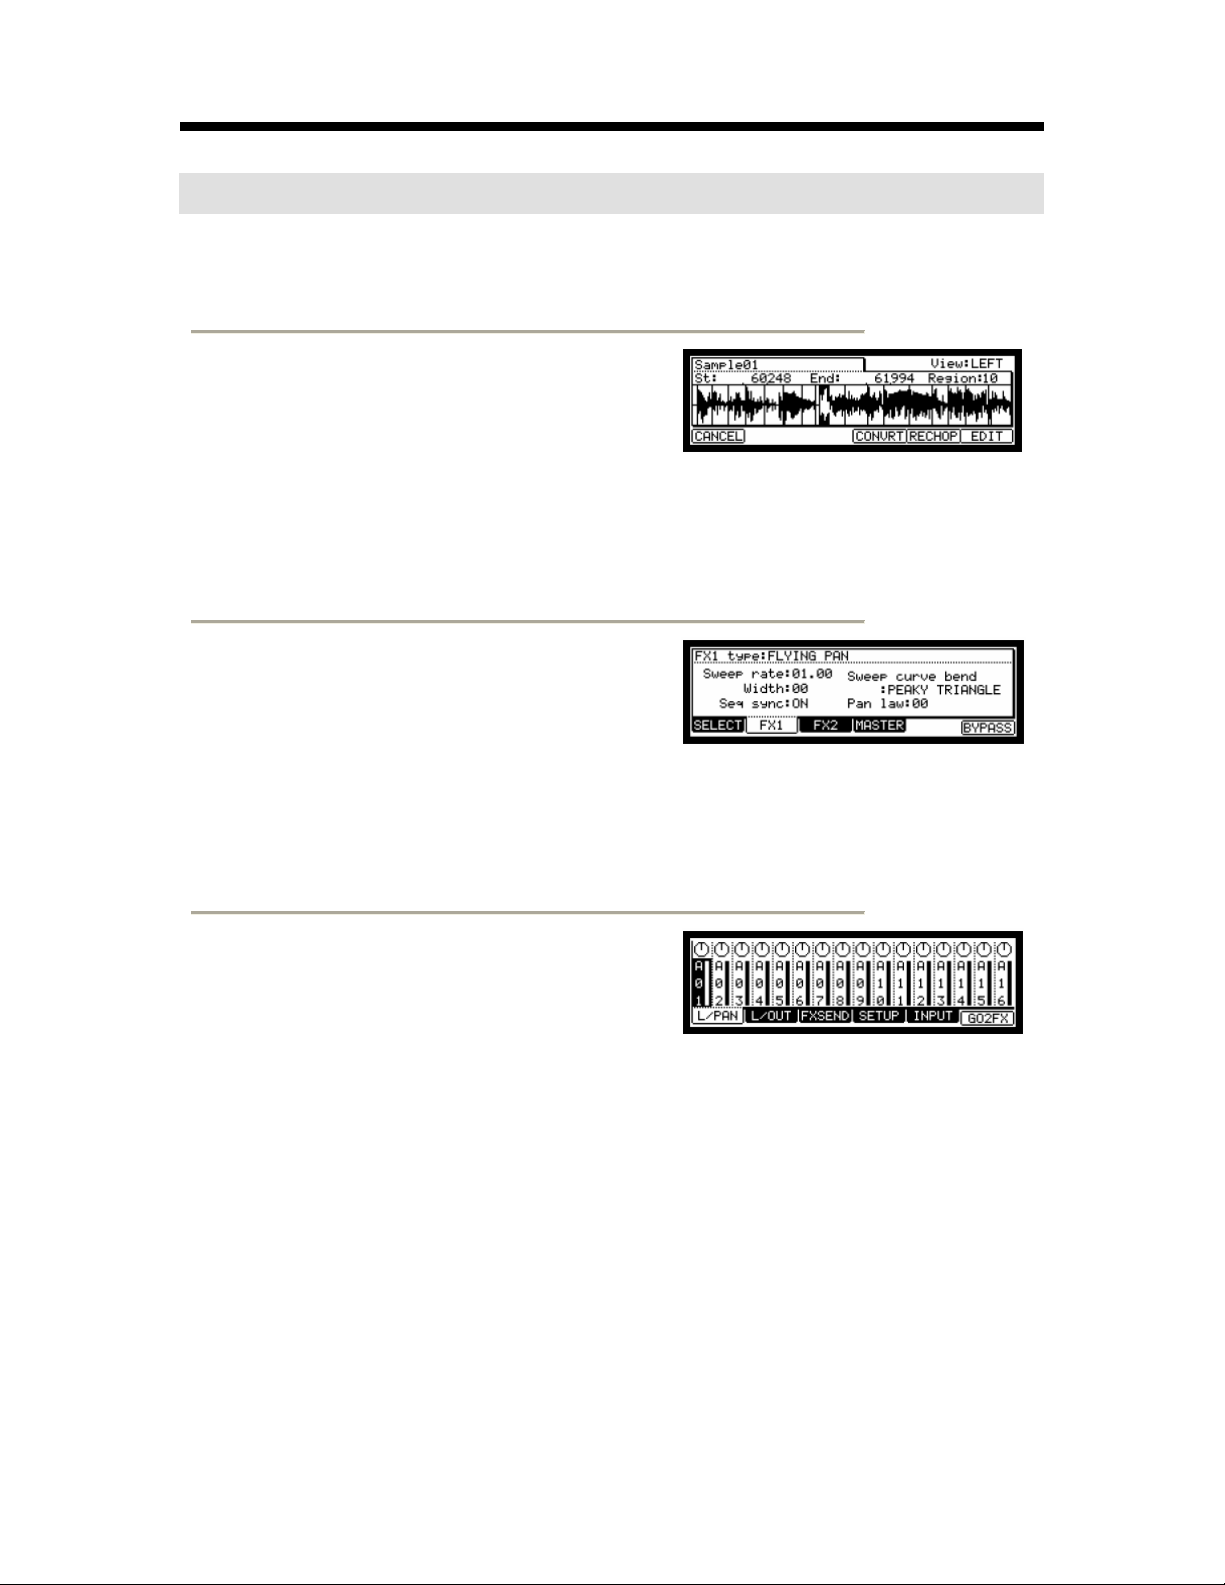
Adjusting the start/end points of the sample
To play the loop to the rhythm, you need to adjust the start/end points so that only the desired part of the sample
will be played. To adjust the start/end points, use TRIM mode.
01. Press the [ MODE ] button and then [ PAD 6 ] (TRIM).
This switches to the TRIM mode, where you can edit samples.
02. Select the Sample field in the upper left corner and select a sample you wish to edit.
03. Select the St (start) field and adjust the start point. You can change the start point by turning the
04. Select the End field and adjust the end point. You can change the end point by turning the [ DATA ]
In this mode, you can set the start and end points in the St and End Field of the TRIM page, respectively.
The waveform from the set start point to the set end point will be highlighted and the MPC1000 will play
only the highlighted part.
[ DATA ] wheel.
Adjust this point so that the first beat of the phrase will be played when you hit the pad. You can check
the sound by hitting any pad 1 - 12.
Note : If you set the start point too early (smaller value), it may take some time to play the first beat after
you hit the pad. If you set the start point too late (larger value), the first beat may be missing.
wheel.
Adjust this point so that the playback of the phrase will end when you hit the pad. You can check the
sound by hitting any pad 1 -12.
Note : If you set the end point too early (smaller value), the playback may end before the end of the
phrase. If you set the end point too late (larger value), the playback may have unnecessary noise or
silence at the end of the phrase.
Tip : If you hold [ PAD 13 ] while in the TRIM page, the MPC1000 will play back the sample from
the start point to the end point repeatedly (loop playback). Use this function to make sure you set
the start and the end points properly. If you don’t set those points properly, the phrase will not be
played to the rhythm and will sound off-beat.
Page 14
8
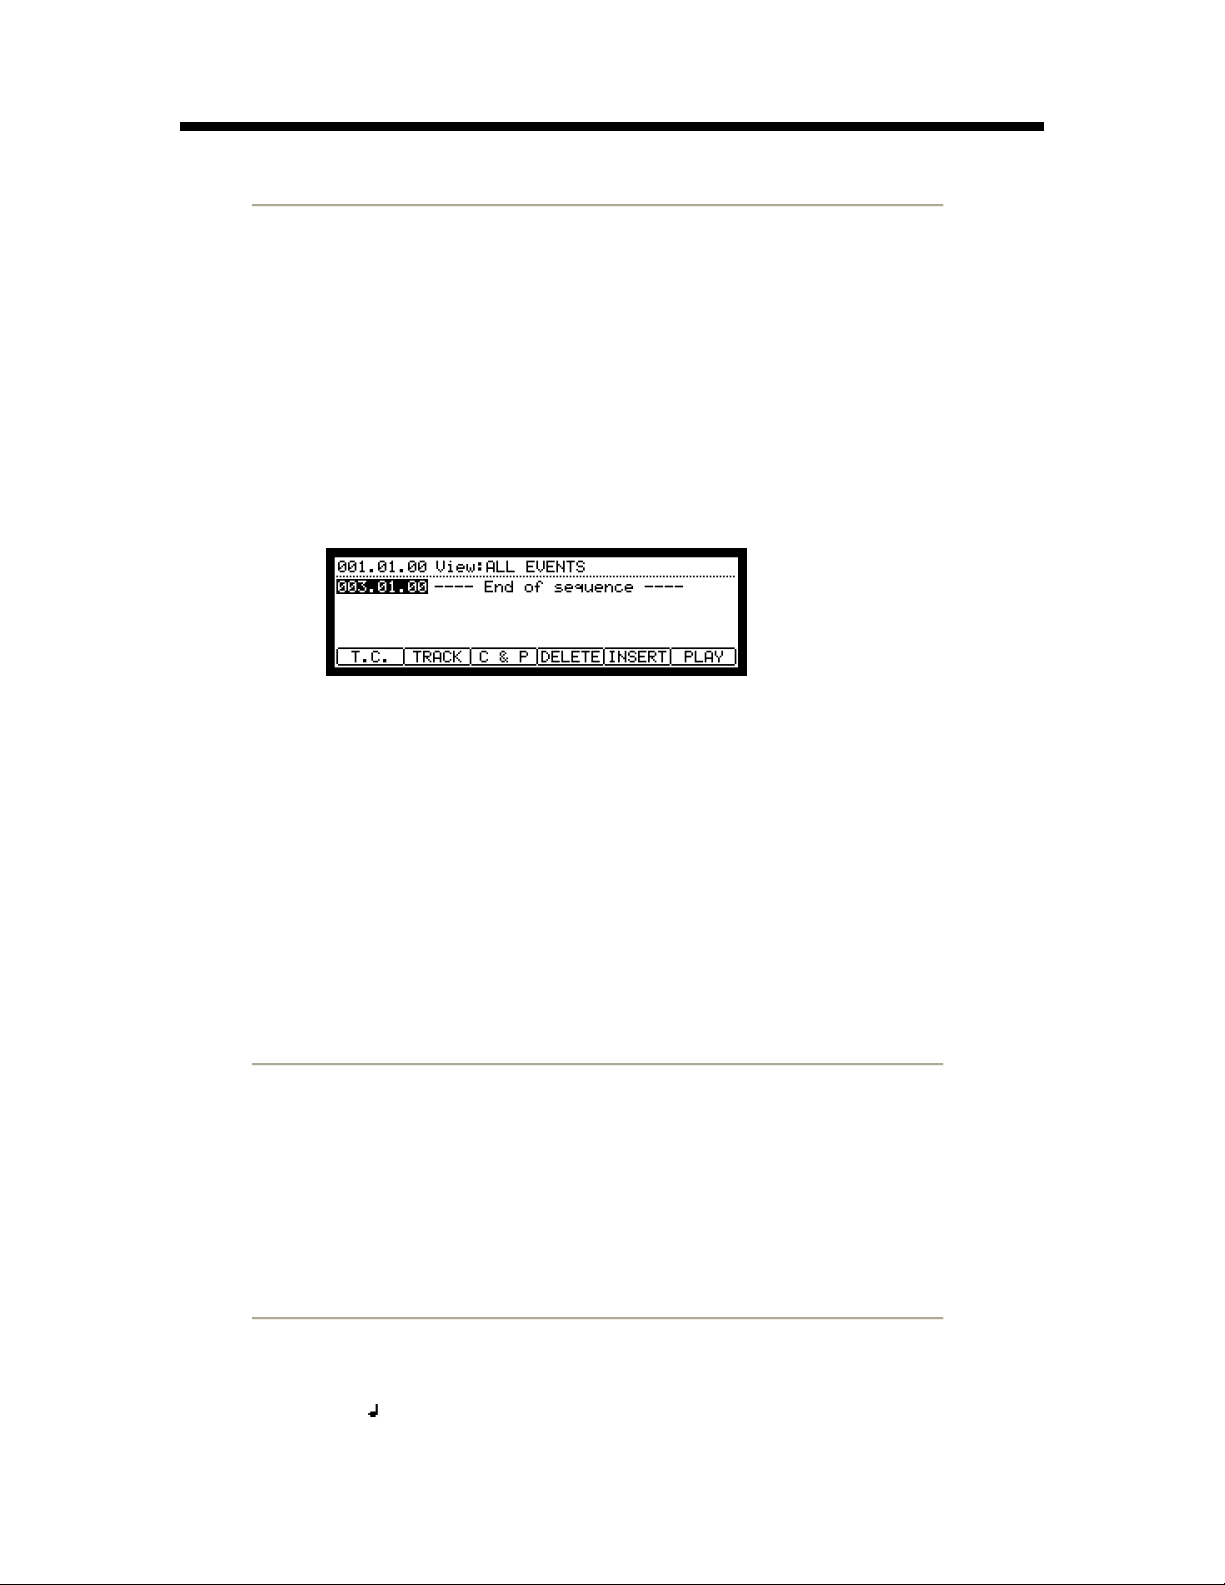
Recording to a sequence
To loop the phrase with the sequence function, proceed as follows:
01. Press the [ MAIN ] button to display the MAIN page.
02. In the Sq field, select a sequence that says “unused.”
03. In the Pgm field, select the track that you assigned the recorded sample to.
You can record the sequence in real time by pressing the [ PLAY START ] button while pressing the
[ REC ] button.. For the purposes of this tutorial, we will enter an event with the step recording in the
STEP EDIT mode to play the phrase at the beginning of the sequence.
04. Press the [ MODE ] button and then [ PAD 14 ] (STEP EDIT).
In the STEP EDIT page, the performance data of the pad will be listed.
05. Turn the [ DATA ] wheel to select “001.01.00”.
06. Press the [ OVER DUB ] button.
The LED of the button will be lit which indicates that you are in STEP EDIT mode.
07. Hit the pad that contains a phrase sample.
The event of this pad will be entered at the point of 001.01.00.
If you hit a different pad by mistake, press the [ F4 ] (DELETE) button. The entered event will be
deleted.
08. Press the [ STOP ] button.
This deactivates the STEP EDIT mode.
Setting the same number of bars for sample and sequence
A new sequence is set to 2 bars in default. If the recorded phrase is also 2 bars, there is no problem. However, if
the number of the bars of the phrase is different from that of the sequence, you need to adjust the number of bars of
the sequence to match that of the phrase.
09. Press the [ MAIN ] button to display the MAIN page.
10. Select the Bars field and press the [ WINDOW ] button.
The Change Bars window will be displayed. Set the number of the bars in the New bars field, and press
the [ F5 ] (DO IT) button. This closes the window and changes the length of the sequence.
Setting the same tempo for sample and sequence
Finally, you need to set the same tempo for the sample and the sequence.
11. Press the [ PLAY START ] button to play back the sequence.
12. In the
(tempo) field, adjust the tempo of the sequence.
If the end of the phrase overlaps the beginning of the next phrase, set the tempo slower (smaller value), if
there is silence part between phrases, set the tempo faster (greater value).
Page 15

9
The MPC1000 also has a Patched Phrase function which allows the
phrase sample to follow the tempo of the sequence when it is
dynamically changed. For more information, see the “Dividing a
phrase sample to several Regions” (page 59) section of the
Operator’s Manual.
Saving the data
The data and audio that you input into the MPC1000 will be deleted when you turn off the unit, unless you save it. If you
wish to keep the data, proceed as described in the “Save / Load” section (page 89) or the “Connecting the MPC1000 to your
computer” (page 98) of the Operator's Manual.
Turning off the Autoload function
The MPC1000 is designed like the other MPC series samplers. However, the MPC1000 is set to automatically load the preset
file when you switch on the unit, so that you can start playing with the pads immediately. You can also turn this feature off, if
you would like the MPC1000 not to load the preset file. In this case, when you turn on the unit you have to manually load or
record samples on the MPC1000.
01. Press the [ MODE ] button and then [ PAD 2 ] (LOAD).
When you press the [ MODE ] button, its LED will turn on to let you know that you can select a mode. If you
press [ PAD 2 ] (LOAD) when the LED is lit, the LOAD page will be displayed.
02. In the LOAD from field, press the [ WINDOW ] button.
This brings up the Load Setup window, where you can set the Autoload function.
03. Select OFF in the Autoload field, and press [ F4 ] (CLOSE).
04. Turn off the MPC1000 and then turn it on again.
Page 16
10
Other useful functions
The MPC1000 has many exciting and clever functions to assist you with music production.
Patched Phrase / Sliced Sample
The MPC1000 can divide a phrase sample into several regions.
After dividing the phrase sample, there are two ways you can use
the sample. One is the “SLICED SAMPLES” where each divided
region is assigned to an individual sample. The other is the
“PATCHED PHRASE” which maintains the phrase as one sample
but you can change the tempo of the phrase freely later.
See “Dividing a phrase sample to several regions” section of the Operator's Manual. (page 59)
Effect & LFO with tempo synchronization
The MPC1000 has two stereo effects and one master effect. In the
Effect types, some parameter in Flying Pan / Delay can be
synchronized to the tempo of the sequence. The LFO in the
program can also be synced to the tempo of the sequence. See
“Chapter15 : Effect” section of the Operator's Manual. (page 97)
See “Chapter 14: Effect” section of the Operator's Manual. (page 83)
Mixer Automation function
The MPC1000 can record information such as Level and Pan,
which you can change with the Q-Link sliders and knobs during
sequence recording and reproduce them during sequence play
back.
See “Setting a LFO (Low Frequency Oscillator)” section of the Operator's Manual. (page 77)
See “Mixer Automation” section of the Operator's Manual. (page 80)
Page 17
Input Thru function
The MPC1000 can mix an incoming audio signal from REC IN or
DIGITAL IN with the internal playback from the MPC1000. You
can also control level, pan, cut-off frequency and resonance of the
incoming signal with the Q-Link sliders and knobs in real-time.
Q-Link sliders & knobs
By using the Q-Link sliders and knobs, you can control parameters
such as filter, tune, etc. For controlling the parameter in a Pad,
there are two ways - “NOTE ON” and “REAL TIME.”
This manual only describes the basic operation of the MPC1000. The MPC1000 has a lot more features for your music
See “Input Thru Function” section of the Operator's Manual. (on page 81)
See “Chapter 8 : Q-Link Slider” section of the Operator's Manual. (on page 44)
creation. Please read the Operator's Manual to learn the operation and functions of the MPC1000.
Have fun with the MPC1000!
7-51-0225-B
11
Page 18

12
This page has been intentionally left blank
Page 19

13
Manual de inicio rápido (Español)
Índice
Información básica..…..............................................................................
Tutorial del MPC1000…..........................................................................
Reproducción de una canción demo..........................................................
Interpretación de un programa predeterminado.......................................
Grabación de una interpretación con los pads...........................................
Interpretación de varias secuencias en serie..............................................
Selección de las secuencias en tiempo real............................................................
Reproducción de las secuencias en el orden seleccionado....................................
Grabación de un sonido............................................................................
Preparación de la grabación ...................................................................................
Inicio de la grabación...............................................................................................
Asignación del sonido grabado al pad ....................................................................
Reproducción en loop de una muestra de frase.........................................
15
16
16
16
17
18
18
18
19
19
19
20
21
Ajuste de los puntos inicial/final de la muestra .......................................................
Grabación en secuencia .........................................................................................
Fijación del mismo número de barras para la muestra y la secuencia ...................
Fijación del mismo tempo para la muestra y la secuencia .....................................
Archivo de los datos .................................................................................
Desactivación de la función Autoload .......................................................
Otras funciones útiles ..............................................................................
21
22
22
22
23
23
24
Page 20

14
Esta página se dejó intencionalmente en blanco.
Page 21

15
Manual de inicio rápido del MPC1000
Bienvenido al CENTRO DE PRODUCCIÓN MUSICAL MPC1000. Este manual de inicio rápido describe las operaciones
básicas para iniciarse con el MPC1000. Para obtener información más detallada, consulte el Operator’s Manual.
Información básica
Se incluye a continuación la información básica que usted necesita conocer para usar el MPC1000.
Botones de funciones
Botón de [MODE]
Rueda de [DATA]
Botones de cursor
• Botones de funciones
Son seis botones (F1 a F6) alineados debajo de la LCD
(pantalla de cristal líquido) que se usan como botones de
funciones. Estos botones corresponden a cada una de las
seis funciones que se muestran al pie de la pantalla LCD.
Las funciones que representa cada botón varían en
función de las opciones que se muestran en la LCD.
• Botón de [MODE]
Es posible conmutar los modos pulsando el botón de
[MODE] y golpeando un pad. El modo al que
corresponde el pad se muestra arriba de cada pad.
• Rueda de [DATA]
La ubicación del cursor se llama “campo”. Es posible
cambiar los parámetros del campo seleccionando girando
la rueda de [DATA]
• Botones de cursor
La parte resaltada de la pantalla se denomina "cursor",
Es posible mover el cursor en la pantalla usando los
cuatro botones de cursor del panel.
• Botón de [WINDOW]
Al pulsar el botón de [WINDOW] aparece una
ventana para la configuración detallada del campo
seleccionado. Esta función no está disponible para
todos los campos. Si hay parámetros detallados para
un campo específico, el LED del
botón de [WINDOW] se enciende.
• Botón [MAIN]
Cuando se pulsa, este botón lo lleva a la pantalla
principal del MPC1000, donde puede grabar y
reproducir secuencias.
Botón de [WINDOW]
Botón [MAIN]
Page 22

16
Tutorial del MPC1000
El MPC1000 consiste en la sección del muestreador, donde se graba y
reproduce el sonido, la sección del secuenciador, donde se graba la
interpretación, y los pads, que se usan para tocar los sonidos. Usted graba su
interpretación en el secuenciador y toca los sonidos del muestreador usando
las secuencias grabadas. Los datos de la interpretación (datos MIDI) se
envían desde los pads al secuenciador y de éste al muestreador. El
muestreador toca el sonido propiamente dicho a partir de los datos de la
interpretación.
PAD MUESTREADOR
SECUENCIADOR
SALIDA ESTÉREO
AURICULARES
Reproducción de una canción demo
El MPC1000 tiene una canción demo y un programa predeterminado en su memoria interna y carga los datos automáticamente
cuando se enciende la unidad. Esta función se denomina “carga automática” (Autoload). Para reproducir una canción demo,
haga lo siguiente:
01. Conecte los auriculares al jack PHONES del MPC1000.
Para obtener más información acerca de la conexión de dispositivos, vea la sección “Connecting the MPC1000
to external Audio/MIDI device” del Operator’s Manual (página 5).
02. Encienda el MPC1000.
Cuando encienda el MPC1000, aparece la pantalla de inicio y luego se cargan automáticamente los datos
internos. Después de cargarse los datos, aparece la página PRINCIPAL (Main).
03. Asegúrese de que esté seleccionado "01-DJ_Hip_Hop" en el campo Sq y pulse el botón [PLAY START].
Al pulsar el botón [PLAY START] se inicia la reproducción de la canción demo. Para detener la
reproducción, pulse el botón [STOP]. Cuando pulse el botón [PLAY] otra vez, el MPC1000 iniciará la
reproducción en el punto donde usted la detuvo la última vez.
Después de terminar la reproducción de "01-DJ_Hip_Hop", pruebe a reproducir otra canción. Puede
seleccionar una canción girando la rueda de [DATA] en el campo Sq.
Interpretación de un programa predeterminado
Ahora, vamos a interpretar el programa predeterminado usando los pads. Puede tocar el programa seleccionado en el campo
Pgm de la página PRINCIPAL golpeando el pad.
01. Seleccione cualquiera de las secuencias (unused) del campo Sq.
(Unused) significa que la secuencia no se uso todavía.
02. Use los botones de cursor para conmutar al campo Pgm y seleccione el programa que desea tocar.
Puede seleccionar el programa girando la rueda de [DATA] en el campo Pgm.
03. Golpee el pad. El MPC1000 tocará el programa predeterminado.
Puede tocar hasta 64 pads conmutando entre el banco de pads A hasta el D, pero las muestras no se pueden
asignar a todos los pads.
Page 23

Grabación de una interpretación con los pads
Para grabar la interpretación en una secuencia usando el programa predeterminado interno, haga lo siguiente:
01. Pulse el botón [MAIN] para mostrar la página PRINCIPAL.
02. En el campo Sq, seleccione la secuencia en la cual desea grabar la interpretación.
Es posible seleccionar cualquier secuencia para grabar una interpretación pero, a los fines de esta sección,
Eliminación de un pad específico únicamente:
seleccione una secuencia que diga “unused.”
03. En el campo Tr, seleccione la pista en la cual desea grabar la interpretación.
Los datos de la interpretación se grabarán en una pista en la secuencia. Es posible seleccionar cualquier
pista pero, a los fines de esta sección, seleccione “Tr: 01”.
04. En el campo Pgm, seleccione el programa que desea tocar.
05. Pulse el botón [PLAY START] mientras mantiene oprimido el botón [REC].
La grabación comenzará después de 4 conteos.
06. Toque los pads según los sonidos clic.
Por defecto, la secuencia se ajusta a 2 barras. Después de grabar por 2 barras, el MPC1000 comenzará a
reproducir la interpretación grabada. Si realiza otra interpretación con los pads, puede agregarla a la
grabación existente. Esto se llama “over dub” (sobregrabación).
07. Puede detener la sobregrabación pulsando el botón [STOP].
08. Pulse el botón [PLAY] para reproducir la interpretación grabada.
09. Si no le gusta, puede iniciar una nueva grabación pulsando los botones [REC] + [PLAY START].
Con esta acción se cancelan los datos de la interpretación grabada existente y se inicia una nueva
grabación.
10. Para agregar una grabación a los datos ya grabados, pulse el botón [PLAY START] mientras mantiene
oprimido el botón [OVER DUB].
De esta forma se reproduce la interpretación grabada actualmente y es posible agregar la nueva
interpretación usando los pads.
11. Inicie la sobregrabación pulsando el botón [PLAY START] mientras mantiene oprimido el botón [OVER
DUB].
12. Mantenga oprimido el pad que desea eliminar, mientras mantiene oprimido el botón [ERASE].
Sólo se eliminarán de la grabación de la interpretación la sección que comienza cuando oprime el botón
[ERASE] y el pad y termina cuando los libera. Oprimiendo el pad en los momentos apropiados, puede
eliminar los datos de la interpretación en ciertos momentos de la frase. Si selecciona otra secuencia en el
campo Sq, puede grabar una nueva interpretación por separado. Reproduciendo estas secuencias, puede
crear una canción completa.
Consejo: Es posible fijar la longitud de la secuencia en el campo Bar y la firma de tiempo en el
campo Tsig. Para más información, consulte la sección "Chapter 3: Sequence feature” del
Operator’s Manual (página 12).
17
Page 24

18
Interpretación de varias secuencias en serie
Hay dos maneras de reproducir varias secuencias en serie. Puede seleccionar las secuencias a reproducir en tiempo real o
establecer el orden de las secuencias en modo SONG (Canción).
Selección de las secuencias en tiempo real
01. En el campo Sq de la página PRINCIPAL, seleccione la secuencia que desea reproducir primero.
02. Pulse el botón [PLAY START] para iniciar la reproducción de la secuencia.
03. Seleccione el campo Sq durante la reproducción y elija la próxima secuencia a reproducir.
Al seleccionar una secuencia en el campo Sq durante la reproducción, aparece el campo Next (Siguiente)
donde puede seleccionar la secuencia siguiente. Después de reproducir la secuencia seleccionada
actualmente hasta el final, el MPC1000 comenzará a reproducir la secuencia seleccionada en el campo
Next. Repitiendo este paso, es posible reproducir varias secuencias continuamente.
Reproducción de las secuencias en el orden seleccionado
Para reproducir las secuencias en el orden seleccionado, use el modo SONG.
01. Pulse el botón de [MODE] y luego [PAD 16] (SONG).
De esta forma aparece la página SONG, donde puede seleccionar el orden de las secuencias a reproducir.
02. En el campo Song, seleccione una canción cuyo nombre sea (unused)
03. Seleccione el campo (end of song) (final de la canción) oprimiendo el botón de cursor descendente y elija
la secuencia que desea reproducir a continuación usando la rueda de [DATA].
Asigne las secuencias en el orden deseado repitiendo este paso.
04. Pulse el botón [PLAY START].
La secuencia asignada se reproducirá en el orden que usted especifique.
Consejo: Para obtener más información acerca del modo SONG, consulte la sección
“Chapter 6: Song Mode” del Operator’s Manual (página 37).
Page 25

Grabación de un sonido
En esta sección, aprenderá cómo grabar sonidos en el MPC1000 y
asignarlos de modo que se puedan tocar con los pads. De esta forma,
usted no está restringido a tocar sólo con los sonidos que ya están
incluidos en los predeterminados. Se indica a continuación cómo
grabar una señal analógica de un reproductor de CD conectado a la
entrada de grabación RECORD IN del panel trasero del MCP2500.
Preparación de la grabación
01. Conecte la SALIDA DE LÍNEA de su
reproductor de CD a la entrada RECORD IN del
MPC1000.
La entrada analógica del MPC1000 es un jack
fonográfico estándar, mientras que la SALIDA
DE LÍNEA del reproductor de CD es muy
probablemente un jack RCA doble. Para
conectar el reproductor de CD, necesitará dos
conectores RCA a TS de ¼ pulg.
02. Una vez conectada la salida de audio del reproductor de CD a la entrada RECORD IN del MPC1000,
pulse el botón de [MODE] y luego [PAD 5] (RECORD).
Al hacerlo, aparece la página RECORD (Grabación), donde puede cambiar los parámetros de la
grabación.
REPRODUCTOR DE CD
SALIDA DE LÍNEA
19
03. Seleccione el campo Input (Entrada) y elija ANALOG (Analógica)
04. Seleccione el campo Time (Tiempo) y configure el tiempo de grabación.
El MPC1000 terminará la grabación cuando transcurra el tiempo configurado en este campo.
Recomendamos que configure un tiempo un poco mayor que el tiempo de grabación real. También
puede terminar la grabación manualmente.
05. Pruebe el nivel de grabación reproduciendo el CD. Verifique el nivel del medidor en pantalla y ajuste el
nivel usando la perilla [REC GAIN].
Importante: Si el medidor va demasiado lejos a la derecha, el sonido se distorsionará, pero si el
nivel de sonido es demasiado bajo, la muestra adquirirá mucho ruido. Configure el nivel tan alto
como sea posible sin llegar al borde derecho.
Inicio de la grabación
06. Señale en su reproductor de CD el audio que desea grabar.
07. Pulse el botón [F6] (RECORD) en la página RECORD.
El MPC1000 pasa al modo de habilitación de grabación y el pie de la pantalla se verá de esta
manera:
Esto indica que el MPC1000 está esperando la señal entrante. La grabación comenzará
Page 26

20
automáticamente cuando se comience a reproducir el CD.
Pulsando el botón [F5] (CANCEL) se cancela el modo de habilitación de grabación y reinicia el
MPC1000.
Pulsando el botón [F6] (START) se inicia manualmente la grabación antes de comenzar a
reproducir el CD.
Nota: Si pulsa el botón [F6] (RECORD) mientras ya se está reproduciendo un sonido, el MPC1000
comenzará la grabación inmediatamente después que pulse el botón.
08. Pulse “Reproducir” en el reproductor de CD.
El MPC1000 comenzará la grabación automáticamente cuando el reproductor de CD inicie la
reproducción y el pie de la pantalla cambiará como se muestra a continuación:
09. Pulse el botón [F6] (STOP) para detener la grabación.
10. Es posible verificar la muestra grabada pulsando y reteniendo el botón [F4] (PLAY).
Asignación del sonido grabado a un pad
11. Seleccione el campo Assign to pad con el cursor y golpee el pad al cual desea asignar la muestra.
12. Pulse el botón [F5] (KEEP) para guardar la muestra en el pad seleccionado.
Consejo: Si el nivel de grabación es demasiado bajo, el MPC1000 puede no iniciar la grabación cuando
el reproductor de CD comienza la reproducción. En este caso, vuelva al paso 5 y ajuste el nivel
nuevamente con la perilla [ REC GAIN].
Si no pulsa [F6] (STOP), el MPC1000 detendrá la grabación al transcurrir el tiempo configurado en
el campo Time.
Cuando el MPC1000 termina la grabación, aparecerá la ventana Keep or Retry (Conservar o
reintentar).
La muestra grabada se reproducirá hasta que suelte el botón.
Si no le gusta la grabación, puede eliminarla pulsando el botón [F2] (RETRY).
El número de este pad se muestra en el campo Assign to pad.
De esta forma se cierra la ventana Keep or Retry y se vuelve a la página RECORD.
Ahora puede tocar la muestra grabada con el pad. Golpee el pad para asegurarse de que se toque el
sonido grabado.
Consejo: Las muestras se asignan a los pads del programa que se selecciona en el campo Pgm de
la página PRINCIPAL. Para asignar las muestras a un nuevo programa, es necesario que cree un
nuevo programa en modo PROGRAM (Programa) y lo seleccione en el campo Pgm de la página
PRINCIPAL anticipadamente. Para obtener más información acerca de la creación de un nuevo
programa, consulte la sección “Creating a program” del Operator’s Manual (página 66).
Consejo: Es posible reproducir sólo una parte específica de la muestra ajustando los puntos de
inicio y fin. Para más información, consulte la sección “Setting the loop” del Operator’s Manual
(página 64).
Consejo: Es posible cambiar la muestra asignada o configurar el método de reproducción en el
modo PROGRAM. Para obtener más información, consulte la sección "Chapter 12: Program” del
Operator’s Manual (página 66).
Page 27

21
Reproducción en loop de una muestra de frase
En esta sección, aprenderá cómo crear una secuencia usando una muestra de frase. Para manejar la muestra de frase con la
función de secuencia, es necesario que ajuste los puntos de inicio/fin de la muestra y luego ajuste el tempo de la secuencia al
tempo de la frase.
Proceda como se describe en la sección "Grabación de un sonido" de la página 5 y grabe una muestra de frase. Para
tocar el loop al ritmo, grabe por barras (1 barra, 2 barras….).
Consejo: Cuando grabe una frase, inicie la grabación un poco antes y deténgala un poco después de la parte
que desea usar. De esta manera, se asegura de no recortar nada del audio deseado.
Ajuste de los puntos de inicio y fin de la muestra
Para tocar el loop al ritmo, necesita ajustar los puntos de inicio y fin de modo que sólo se reproduzca la parte
deseada de la muestra. Para ajustar los puntos de inicio y fin, use el modo TRIM (Recorte).
01. Pulse el botón de [MODE] y luego [PAD 6] (TRIM).
De esta forma conmuta al modo TRIM, donde puede editar las muestras.
02. Seleccione el campo Sample (Muestra) de la esquina superior izquierda y elija la muestra que desea
03. Seleccione el campo St (inicio) y ajuste el punto de inicio. Puede variar el punto de inicio girando la
04. Seleccione el campo End (Fin) y ajuste el punto de fin. Puede variar el punto de fin girando la rueda de
En este modo, puede ajustar los puntos de inicio y fin en el campo St y End de la página TRIM,
respectivamente. Se resaltará la forma de onda desde el punto inicial hasta el final y el MPC1000
reproducirá sólo la parte resaltada.
editar.
rueda de [DATA].
Ajuste este punto de modo que el primer beat de la frase se toque cuando usted golpee el pad. Puede
verificar el sonido golpeando cualquier pad de 1 a 12.
[DATA].
Ajuste este punto de modo que la reproducción del primer beat de la frase termine cuando usted golpee el
pad. Puede verificar el sonido golpeando cualquier pad de 1 a 12.
Nota: Si ajuste el punto de inicio demasiado temprano (valor más pequeño), puede demorar
algún tiempo para tocar el primer beat después de que golpee el pad. Si lo ajusta demasiado
tarde (valor más grande), puede perderse el primer beat.
Nota: Si ajusta el punto de fin demasiado temprano (valor más pequeño), la reproducción
puede terminar antes del final de la frase. Si lo ajusta demasiado tarde (valor más grande), la
reproducción puede tener ruidos o silencios innecesarios al final de la frase.
Consejo: Si retiene oprimido el [ PAD 13 ] mientras está en la página TRIM, el MPC1000 tocará la
muestra desde el punto de inicio hasta el final repetidamente (reproducción en loop). Use esta
función para asegurarse de que ajusta los puntos de inicio y fin correctamente. Si no ajusta estos
puntos correctamente, la frase no se reproducirá al ritmo y sonará fuera de beat.
Page 28

22
Grabación en secuencia
Para hacer un loop de la frase con la función de secuencia, haga lo siguiente:
01. Pulse el botón [MAIN] para mostrar la página PRINCIPAL.
02. En el campo Sq, seleccione una secuencia que diga “unused”.
03. En el campo Pgm, seleccione la pista a la que asignó la muestra grabada.
Puede grabar la secuencia en tiempo real pulsando el botón [PLAY START] mientras oprime el botón [REC].
A los fines de este tutorial, introduciremos un evento con grabación por pasos en el modo STEP EDIT (Edición
por pasos) para tocar la frase al comienzo de la secuencia.
04. Pulse el botón de [MODE] y luego [PAD 14] (STEP EDIT).
En la página STEP EDIT, se indicarán los datos de interpretación del pad.
05. Gire la rueda de [DATA] para seleccionar “001.01.00”.
06. Pulse el botón [OVER DUB].
El LED del botón se enciende para indicar que está en modo STEP EDIT.
07. Golpee el pad que contenga una muestra de frase.
El evento de este pad se introducirá en el punto de 001.01.00.
Si golpeó por error un pad diferente, pulse el botón [F4] (DELETE). Se eliminará el evento introducido.
08. Pulse el botón [STOP].
De esta forma se desactiva el modo STEP EDIT.
Configuración del mismo número de barras para la muestra y la secuencia
Una secuencia nueva se configura a 2 barras por defecto. Si la frase grabada es también de 2 barras, no hay problemas. En
cambio, si el número de barras de la frase es diferente al de la secuencia, es necesario que ajuste el número de barras de la
secuencia para que coincida con el de la frase.
09. Pulse el botón [MAIN] para mostrar la página PRINCIPAL.
10. Seleccione el campo Bars (Barras) y pulse el botón [WINDOW].
Se abre la ventana Change Bars (Cambiar barras). Configure el número de barras en el campo New bars y pulse
el botón [F5] (DO IT). De esta forma se cierra la ventana y cambia la longitud de la secuencia.
Fijación del mismo tempo para la muestra y la secuencia
Finalmente, es necesario que fije el mismo tempo para la muestra y la secuencia.
11. Pulse el botón [PLAY START] para reproducir la secuencia.
12. En el campo
Si el extremo de la frase se solapa con el comienzo de la frase siguiente, fije el tempo más lento (valor más
pequeño); si hay partes de silencio entre las frases, fije el tempo más rápido (valor más grande).
(tempo), ajuste el tempo de la secuencia.
Page 29

23
El MPC1000 tiene también una función Patched Phrase (Frase
emparchada) que permite que la muestra de frase siga el tempo de
la secuencia cuando se cambia dinámicamente. Para obtener más
información, consulte la sección “Dividing a phrase sample to
several regions” del Operator’s Manual (página 59).
Archivo de los datos
Los datos y el audio que usted introduce al MPC1000 se borrarán cuando apague la unidad, a menos que los archive. Si desea
conservar los datos, proceda como se explica en la sección “Save / Load” (página 89) o “Connecting the MPC1000 to your
computer” (página 98) del Operator’s Manual.
Desactivación de la función Autoload
El MPC1000 está diseñado como los demás muestreadores de la serie MPC. Sin embargo, el MPC1000 está configurado para
cargar automáticamente el archivo predeterminado cuando usted lo enciende, de modo que pueda empezar a tocar con los pads
inmediatamente. También puede desactivar esta función, si desea que el MPC1000 no cargue el archivo predeterminado. En
este caso, cuando usted encienda la unidad tendrá que cargar o grabar las muestras manualmente en el MPC1000.
01. Pulse el botón de [MODE] y luego [PAD 2] (LOAD).
Cuando pulsa el botón [MODE], el LED del mismo se enciende para indicar que puede seleccionar un modo.
Si pulsa [PAD 2] (LOAD) cuando el LED está encendido, aparece la página LOAD (Carga).
02. En el campo LOAD from, pulse el botón [WINDOW].
De esta forma aparece la ventana Load Setup, donde puede configurar la función Autoload.
03. Seleccione OFF (Desactivada) en el campo Autoload y pulse [F4] (CLOSE).
04. Apague y encienda nuevamente el MPC1000.
Page 30

24
Otras funciones útiles
El MPC1000 tiene numerosas funciones interesantes e inteligentes para asistirle en la producción musical.
Patched Phrase / Sliced Sample
El MPC1000 divide una muestra de frase en varias regiones.
Después de dividir la muestra de frase, hay dos maneras de usarla.
Una es “SLICED SAMPLES” (Muestras en rodajas) en la que
cada región dividida se asigna a una muestra individual. La otra es
“PATCHED PHRASE” que mantiene la frase como una muestra
pero usted puede cambiar libremente el tempo de la misma más
tarde.
Efecto y LFO con sincronización de tempo
El MPC1000 tiene dos efectos estéreo y un efecto master
(maestro). En los tipos de efecto, algunos parámetros de Flying
Pan / Delay se pueden sincronizar al tempo de la secuencia. El
LFO del programa también se puede sincronizar al tempo de la
secuencia.
Función de automación del mezclador
Consulte la sección “Dividing a sample to several regions” del Operator’s Manual (página 59).
Consulte la sección “Chapter 14: Effect” del Operator’s Manual (página 83).
Consulte la sección “Setting a LFO (Low Frequency Oscillator)” del Operator’s Manual (página 77).
El MPC1000 puede grabar información tal como Nivel y
posiciones de Pan, que usted puede cambiar con las perillas y los
cursores Q-Link durante la grabación de la secuencia y
reproducirlos durante la reproducción de la misma.
Consulte la sección “Mixer Automation” del Operator’s Manual (página 80).
Page 31

Función Input Thru
25
El MPC1000 puede mezclar una señal de audio entrante de las
entradas de grabación (REC IN) o digital (DIGITAL IN) con la
reproducción interna del mismo. Usted también puede controlar
nivel, posición de pan, frecuencia de corte y resonancia de la señal
entrante con las perillas y los cursores Q-Link en tiempo real.
Perillas y cursores Q-Link
Usando las perillas y los cursores Q-Link, usted puede controlar
parámetros tales como filtro, afinación, etc., en un pad en el que se
usa una perilla o cursor. Para controlar el parámetro en un pad,
hay dos maneras “NOTE ON” y “REAL TIME” y usted puede
usar cualquiera de ellas.
Este manual describe sólo la operación básica del MPC1000. Este equipo tiene muchas funciones más para su creación
Consulte la sección “Input Thru Function” del Operator’s Manual (página 81).
Consulte la sección “Chapter 8: Q-Link Slider” del Operator’s Manual (página 44).
musical. Lea el Operator’s Manual para aprender la operación y las funciones del MPC1000.
¡Que se divierta con el MPC1000!
7-51-0225-B
Page 32

26
Page 33

27
Guide d’utilisation simplifié (Français)
Table des matières
Renseignements généraux ……......................................................................
Tutoriel sur le MPC1000 ...............................................................................
Faire la lecture d’une piste de démonstration ................................................
Faire la lecture d'un programme prédéfini ....................................................
Faire l'enregistrement d’une performance à l’aide des pads ...........................
Faire la lecture en série de plusieurs séquences ..............................................
Sélection des séquences en temps réel ........................................................................
Faire la lecture des séquences dans l’ordre sélectionné ...............................................
L'enregistrement d’un son .............................................................................
Préparation de l’enregistrement .....................................................................................
Lancement de l’enregistrement .....................................................................................
Affectation du son enregistré à un pad ..........................................................................
Lecture en boucle d'un échantillon de phrase ...............................................
29
30
30
30
31
32
32
32
33
33
33
34
35
Réglage des points de départ et de fin de boucle de l’échantillon .................................
Enregistrement sur une séquence .................................................................................
Réglage identique du nombre de mesures pour les échantillons et les séquences …..
Réglage identique du tempo pour les échantillons et les séquences ............................
Sauvegarde des données ................................................................................
Désactiver la fonction de chargement automatique (autoload) .......................
Autres fonctions utiles ...................................................................................
35
36
36
36
37
37
38
Page 34

28
Cette page a été laissée vierge intentionnellement.
Page 35

29
MPC1000 Guide d’utilisation simplifié
Voici la STATION DE PRODUCTION MUSICALE MPC1000. Ce guide d’utilisation simplifié explique le fonctionnement
de base de la MPC1000 pour que vous puissiez commencer à jouer plus rapidement. Pour de plus amples renseignements,
voir le Operator’s Manual.
Renseignements généraux
Vous trouverez ci-dessous l’information nécessaire pour commencer à utiliser la MPC1000.
• Touches des fonctions
Il y a six touches (F1 à F6) alignées sous l’écran ACL (à
cristaux liquides) pour les différentes fonctions. Ces
touches correspondent chacune à une des six fonctions
qui sont affichées au bas de l’écran ACL. Les fonctions
que chaque bouton représente changent selon les options
affichées sur l'écran à cristaux liquides.
• Touche [MODE]
Il est possible de changer de mode en appuyant sur la
touche [ MODE ] et en tapant sur un pad. Le mode
correspondant au pad est affiché au-dessus de chaque
pad.
• Molette [ DATA ]
L’emplacement du curseur s’appelle un champ. Il est
possible de modifier les réglages du champ sélectionné
en tournant la molette [ DATA ].
• Touches de déplacement du curseur
La partie surlignée de l’écran s’appelle le curseur. Il est
possible de déplacer le curseur à l’écran à l'aide des
touches sur le panneau de commande.
• Touche [WINDOW]
La touche [ WINDOW ] permet de visionner la
fenêtre des paramètres de réglages pour le champ
sélectionné. Cette option n'est pas disponible pour
tous les champs. S'il y a des paramètres de réglages
pour le champ sélectionné, le voyant DEL de la
touche [ WINDOW ] sera allumé.
• Touche [MAIN]
Lorsqu’enfoncée, cette touche appelle la fenêtre
principale de la MPC1000 d’où il est possible
d’enregistrer et de faire la lecture des séquences.
Touches des
fonctions
Touche [MODE]
Molette [DATA]
Touches de
déplacement du
curseur
Touche
[WINDOW]
Touche [MAIN]
Page 36

30
Tutoriel sur le MPC1000
La MPC1000 est dotée d'une section échantillonneur, à partir de laquelle il est
possible d'enregistrer et d'écouter les sons et d'une section séquenceur, d’où il
est possible d’enregistrer sa performance, et des pads qui servent à jouer des
sons. Vous enregistrez votre performance à l'aide du séquenceur et faites
jouer les sons de l’échantillonneur à l'aide des séquences enregistrées. Les
données de performance (données MIDI) sont envoyées par les pads au
séquenceur, puis vers l’échantillonneur. L'échantillonneur joue les sons des
données de performance.
PAD ÉCHANTILLONNEUR
SÉQUENCEUR
SORTIE STÉRÉO
CASQUE D’ÉCOUTE
Faire la lecture d’une piste de démonstration
La MPC1000 a une piste de démonstration et un programme prédéfini dans sa mémoire interne et charge automatiquement les
données lorsque l’appareil est mis sous tension. C'est la fonction d’autochargement (Autoload). Pour refaire la lecture de la piste de
démonstration, suivre les indications suivantes :
01. Branchez votre casque d’écoute à l’entrée pour casque d’écoute (PHONES) de la MPC1000.
Pour plus d’information, veuillez consulter la section intitulée « Connecting the MPC1000 to external Audio/MIDI
device » à la page 5 du Operator’s Manual.
02. Mettre la MPC1000 sous tension.
Lorsque la MPC1000 est sous tension, l’écran de démarrage s’affiche et les données internes se chargent
automatiquement. Une fois les données chargées, la fenêtre principale (MAIN) est affichée.
03. Assurez-vous que « 01-DJ_Hip_Hop » est sélectionné dans le champ Sq et appuyez sur la touche [ PLAY START ].
En appuyant sur la touche [ PLAY START ] la piste de démonstration débute. Pour arrêter la lecture de la piste,
appuyez sur la touche [ STOP ]. Lorsque vous appuyez de nouveau sur la touche [ PLAY ], la MPC1000
recommencera la lecture à l’endroit où vous l’avez arrêté.
Une fois que vous aurez terminé la lecture de « 01-DJ_Hip_Hop », essayez de faire jouer une autre piste. Il est
possible de sélectionner une autre piste en tournant la molette [ DATA ] dans le champ Sq.
Faire la lecture d'un programme prédéfini
Essayons de faire la lecture d’un programme prédéfini à l’aide des pads. Vous pouvez faire l’écoute du programme sélectionné d ans
le champ Pgm de la fenêtre MAIN en tapant le pad.
01. Selectionnez une des séquences inutilisées (unused) dans le champ Sq.
(Unused) signifie que la séquence n’est pas utilisée.
02. Utilisez les touches de déplacement du curseur pour aller au champ Pgm et sélectionnez celui que vous désirez
écouter.
Vous pouvez sélectionner un programme en tournant la molette [ DATA ] dans le champ Pgm.
03. Tapez le pad. La MPC1000 fait jouer le programme prédéfini.
Il est possible de jouer avec 64 pads en utilisant les banques de pads de A à D, cependant les échantillons ne peuvent
être assignés à tous les pads.
Page 37

Faire l'enregistrement d’une performance à l’aide des pads
Pour enregistrer une performance à une séquence en utilisant le programme prédéfini, procédez de la manière suivante :
01. Pour afficher la page principale, appuyez sur la touche [ MAIN ].
02. Dans le champ Sq, sélectionnez une séquence sur laquelle enregistrer la performance.
Vous pouvez choisir n'importe quelle séquence pour enregistrer une performance, mais pour les besoins de la
cause, choisissez une séquence « inutilisée ».
03. Dans le champ Tr, sélectionnez une piste sur laquelle enregistrer la performance.
Les données de performance seront enregistrées sur une piste sur la séquence. Vous pouvez choisir n'importe
quelle piste pour enregistrer une performance, mais pour les besoins de la cause, choisissez la piste « Tr : 01 ».
04. Vous pouvez sélectionner un programme dans le champ Pgm.
05. Appuyez sur la touche [ PLAY START ] tout en maintenant la touche [ REC ] enfoncée.
L'enregistrement débute après 4 coups.
06. Jouez les pads au rythme des clics.
Dans le programme par défaut, la séquence est réglée à 2 mesures. Après avoir enregistré pendant 2 mesures,
la MPC1000 fait rejouer la performance qu’elle vient d’enregistrer. Si vous faites une autre performance avec
les pads, vous pouvez l’ajouter à celle que vous venez d’enregistrer. Cela s’appelle l’enregistrement
fractionné (over dub).
07. Pour arrêter l'enregistrement fractionné, appuyez sur la touche [ STOP ].
08. Appuyez sur la touche [ PLAY ] pour faire l'écoute de l’enregistrement.
09. Si vous n'aimez pas la performance, vous pouvez en faire une nouvelle en appuyant sur la touche [ REC ] et
[ PLAY START ] simultanément.
Ceci à pour effet d’effacer les données de la performance enregistrée précédemment et de recommencer
l’enregistrement.
10. Pour ajouter la nouvelle performance aux données déjà enregistrées, appuyez sur la touche [PLAY START]
tout en maintenant la touche [OVER DUB] enfoncée.
Ceci à pour effet de faire rejouer la performance enregistrée et d'ajouter la nouvelle performance à cette
dernière à l’aide des pads.
Effacer un pad :
11. Commencez l’enregistrement fractionné en appuyant sur la touche [PLAY START] tout en maintenant la
touche [OVER DUB] enfoncée.
12. Enfoncez le pad que vous désirez effacer, tout en maintenant enfoncée la touche [ERASE].
Uniquement la section commençant où vous avez enfoncé la touche [ERASE] et le pad, et finissant où vous les
avez relâchés est effacée de l'enregistrement. En appuyant sur le pad au bon moment, vous pouvez effacer les
données de performance de certaines portions de la phrase. Si vous sélectionnez une autre séquence dans le
champ Sq, vous pouvez enregistrer séparément une nouvelle performance. En faisant rejouer ces séquences
ensemble, vous pouvez créer une chanson.
Conseil : Vous pouvez régler la durée de la séquence dans le champ Bar, et la signature temporelle dans
le champ Tsig. Pour de plus amples renseignements, voir la section « Sequence feature » à la page 12,
dans le chapitre 3 du Operator’s Manual.
31
Page 38

32
Faire la lecture en série de plusieurs séquences
Il y a deux façons de faire la lecture en série de plusieurs séquences. Vous pouvez choisir les séquences à jouer en temps réel,
ou programmer l’ordre des séquences en mode SONG.
Sélection des séquences en temps réel
01. Dans le champ Sq dans la fenêtre principale (MAIN), sélectionnez la séquence que vous désirez écouter
Faire l'écoute des séquences dans l’ordre sélectionné
en premier.
02. Appuyez sur la touche [PLAY START] pour faire l'écoute de la séquence.
03. Selectionnez le champ Sq durant la lecture pour sélectionner la prochaine séquence à écouter.
Sélectionner une séquence dans le champ Sq durant la lecture permet d’appeler le champ Next d’où
il est possible de choisir la prochaine séquence. Après avoir fait rejouer entièrement la séquence, la
MPC1000 commence la lecture de la séquence sélectionnée dans le champ Next. En répétant cette
étape, vous pouvez faire rejouer plusieurs séquences les unes après l’autre.
Pour faire la lecture des séquences dans l’ordre sélectionné, utilisez le mode SONG.
01. Appuyez sur la touche [ MODE ] et ensuite sur [ PAD 16 ] (SONG).
Ceci permet d'appeler la fenêtre SONG d’où vous pouvez choisir l’ordre des séquences à faire
rejouer.
02. Dans le champ Song, sélectionnez une piste inutilisée (unused).
03. Sélectionnez le champ (end of song) en appuyant sur la touche de déplacement du curseur et en
choisissant la prochaine séquence à faire jouer à l’aide de la molette [DATA].
Pour assigner un ordre aux séquences, répétez cette étape.
04. Appuyez sur la touche [ PLAY START ].
L’ordre des séquences sera tel que vous l’avez spécifié.
Conseil : Pour de plus amples renseignements sur le mode SONG, voir la section
« Song Mode » à la page 37, dans le chapitre 6 du Operator’s Manual.
Page 39

L'enregistrement d’un son
Dans cette section, vous apprendrez comment enregistrer les sons dans la
MPC1000 et comment les assigner afin de pouvoir les rejouer avec les
pads. De cette façon, vous n’êtes pas restreint aux sons préenregistrés de
la MPC1000. Les indications ci-dessous vous expliquent comment faire
pour enregistrer un signal analogique provenant d’un lecteur CD branché
dans l’entrée RECORD IN sur le panneau arrière de la MPC1000.
Préparation de l’enregistrement
01. Branchez la sortie LINE OUT du lecteur CD à
l’entrée RECORD IN de la MPC1000.
LECTEUR DE DISQUES COMPACTS
SORTIE LIGNE
33
L'entrée analogique de la MPC1000 est une prise de casque d’écoute standard, alors que la sortie
du lecteur CD est probablement une prise RCA double. Pour brancher le lecteur CD, vous aurez
besoin de deux câbles à connecteurs RCA à TS de ¼ po.
02. Une fois que vous avez branché la sortie audio du lecteur CD à l’entrée RECORD IN de la MPC1000,
appuyez sur la touche [ MODE ] et ensuite sur [ PAD 5 ] (RECORD).
Ceci permet d'appeler la fenêtre RECORD d’où vous pouvez modifier le réglage de
l’enregistrement.
03. Sélectionner le champ Input, puis ANALOG.
04. Sélectionnez le champ Time et réglez la durée de l’enregistrement.
La MPC1000 cesse d’enregistrer d’après la durée réglée dans ce champ. Nous vous recommandons
de prévoir une durée un peu plus longue que la durée réelle de l’enregistrement. Il est également
possible d'arrêter l’enregistrement manuellement.
05. Vérifiez le niveau d’enregistrement en faisant jouer le CD. Vérifiez le vumètre (level meter) à l’écran et
faites l'ajustement du niveau à l'aide du bouton [ REC GAIN ].
Important : Si le vumètre indique que le niveau est trop élevé (extrémité droite), le son sera
déformé, mais si le niveau sonore est trop bas, l'échantillon contiendra beaucoup de bruit. Réglez le
niveau au plus élevé possible sans atteindre l’extrémité droite.
Lancer l'enregistrement
06. Préparez le lecteur CD à la piste que vous désirez enregistrer.
07. Appuyez sur la touche [ F6 ] (RECORD) tout en étant dans la fenêtre RECORD.
La MPC1000 passera en mode enregistrement et le bas de votre écran devrait ressembler à celui
ci-dessous :
Indiquant que la MPC1000 est en attente du signal entrant. L'enregistrement débutera
automatiquement lorsque le lecteur CD commencera la lecture.
Appuyer sur la touche [ F5 ] (CANCEL) permet de désactiver le mode enregistrement et permet de
remettre la MPC1000 à son état initial.
Appuyer sur la touche [ F6 ] (START) permet de lancer manuellement l’enregistrement avant
que le lecteur CD commence la lecture.
Remarque : Si vous appuyez sur la touche [ F6 ] (RECORD) lorsque un son joue
déjà, la MPC1000 commence l’enregistrement aussi tôt que vous appuyez sur la
touche.
Page 40

34
08. Appuyez sur la touche de mise en marche (PLAY) du lecteur CD.
La MPC1000 lance l’enregistrement automatiquement lorsque le lecteur CD commence la lecture et
le bas de votre écran devrait ressembler à celui ci-dessous :
09. Appuyez sur la touche [ F6 ] (STOP) pour arrêter l’enregistrement.
10. Vous pouvez vérifier l’échantillon enregistré en appuyant et en maintenant la touche [ F4 ] (PLAY)
Assignation du son enregistré à un pad
11. Sélectionnez le champ Assign to pad avec le curseur et tapez sur le pad auquel vous voulez assigner
12. Appuyez la touche [ F5 ] (KEEP) pour sauvegarder l'échantillon au pad sélectionné.
Conseil : Si le niveau d’enregistrement est trop bas lorsque le lecteur CD lance la lecture, il se peut
que la MPC1000 ne commence pas l’enregistrement. Si tel est le cas, retournez à l'étape 5 et ajustez
de nouveau le niveau à l’aide du bouton [ REC GAIN ].
Si vous n'appuyez pas sur la touche [ F6 ] (STOP), la MPC1000 cessera l’enregistrement en
fonction de la durée réglée dans le champ Time.
Lorsque la MPC1000 a terminé l’enregistrement, la fenêtre Keep (garder) ou Retry (réessayer) est
alors affiché.
enfoncée.
L'échantillon enregistré rejouera jusqu’à ce que vous relâchiez la touche.
Si vous n'aimez pas l’enregistrement, vous pouvez l’effacer en appuyant sur la touche [ F2 ]
(RETRY).
l’échantillon.
Le numéro de ce pad devrait être affiché dans le champ Assign to pad.
La fenêtre Keep ou Retry est alors remplacée par la fenêtre RECORD.
Vous pouvez maintenant faire l'écoute de l'échantillon enregistré à l’aide du pad. Tapez le pad pour
vous assurer que le son enregistré peut être entendu.
Conseil : Les échantillons seront assignés aux pads du programme sélectionné dans le champ Pgm
de la fenêtre MAIN.. Pour assigner les échantillons à un nouveau programme, vous devez créer un
nouveau programme en mode PROGRAM et le sélectionner dans le champ Pgm de la fenêtre MAIN
avant de procéder à l’assignation. Pour de plus amples renseignements sur comment créer un
nouveau programme, voir la section « Creating a program » à la page 66 du Operator’s Manual.
Conseil : Vous pouvez rejouer seulement une partie de l'échantillon en modifiant les points de
repère de départ et de fin. Pour de plus amples renseignements, voir la section « Setting the loop »
à la page 64 du Operator’s Manual.
Conseil : Il est possible de modifier l’assignation de l'échantillon ou de modifier la méthode de
lecture en mode PROGRAM. Pour de plus amples renseignements, voir la section « Program » à la
page 66, dans le chapitre 12 du Operator’s Manual.
Page 41

35
Lecture en boucle d'un échantillon de phrase
Dans cette section, vous apprendrez comment créer une séquence à l’aide d’un échantillon de phrase. Pour maîtriser
l’échantillon de phrase avec la fonction de séquence, vous devez ajuster les points de repère de l’échantillon et régler ensuite
le tempo de la séquence au tempo de la phrase.
Suivez les indications de la section « Enregistrement d’un son » à la page 5 et enregistrez un échantillon de phrase.
Pour faire rejouer la boucle en suivant le rythme, enregistrez par mesures (1 mesure, 2 mesures...).
Conseil : Lorsque vous enregistrez une phrase, commencez l’enregistrement un peu avant le début et arrêtez-le
un peu après la partie que vous désirez utilisée. De cette façon, vous vous assurez que vous avez enregistré
toute la partie désirée.
Réglage des points de repère de l'échantillon
Pour faire rejouer la boucle en suivant le rythme, vous devez ajuster les points de repère de départ et de fin pour ne
faire jouer que la partie désirée de l’échantillon. Pour régler les points de repère de départ et de fin, utilisez le mode
TRIM.
01. Appuyez sur la touche [ MODE ] et ensuite sur [ PAD 6 ] (TRIM).
Ceci permet d’entrer en mode TRIM et où il est possible de modifier les échantillons.
02. Sélectionnez le champ Sample dans le coin supérieur gauche, puis l’échantillon que vous désirez
03. Sélectionnez le champ St (départ) et réglez le point de repère de départ. Vous pouvez modifier le point
04. Sélectionnez le champ End et réglez le point de repère de fin. Vous pouvez modifier le point de repère
En mode TRIM, vous pouvez régler le point de repère de départ dans le champ St et de fin dans le champ
End de la fenêtre TRIM. La forme d'ondes sera mise en relief à partir du point de repère de départ réglé
jusqu’au point de repère de fin et la MPC1000 ne jouera que cette partie.
modifier.
de repère de départ en tournant la molette [ DATA ].
Réglez ce point de repère pour que le premier battement de la phrase joue lorsque vous taperez sur le pad.
Vous pouvez vérifier le son en tapant sur un des pads (1 à 12).
Remarque : Si vous réglez le point de départ trop tôt (valeur plus petite), un peu plus de temps peut
s’écouler avant que le premier battement joue après que vous ayez tapé sur le pad. Si vous réglez le
point de départ trop tard (valeur plus grande), il se peut que le premier battement ne joue pas.
de fin en tournant la molette [ DATA ].
Réglez ce point de repère de façon à ce que lorsque vous taperez sur le pad, la lecture de la phrase
s'arrête. Vous pouvez vérifier le son en tapant sur un des pads (1 à 12).
Remarque : Si vous réglez le point de départ trop tôt (valeur plus petite), la lecture peut s'arrêter
avant la fin de la phrase. Si vous réglez le point de départ trop tard (valeur plus grande), il se peut
que le signal contienne du bruit ou des silences à la fin de la phrase.
Conseil : Si vous maintenez [ PAD 13 ] enfoncé lorsque vous êtes sur la fenêtre TRIM,
la MPC1000 fera la lecture de l’échantillon du point de départ jusqu’au point de fin en
continu (lecture en boucle). Utilisez cette fonction pour vérifier si vous avez bien réglé
vos points de repère. Si vos points de repère ne sont pas réglés correctement, la phrase
ne joue pas en suivant le rythme.
Page 42

36
Enregistrement sur une séquence
Pour boucler la phrase avec la séquence, suivre les indications suivantes :
01. Pour afficher la page principale, appuyez sur la touche [ MAIN ].
02. Dans le champ Sq, sélectionnez une séquence inutilisée (unused).
03. Dans le champ Pgm, sélectionnez la piste à laquelle vous avez assigné l’échantillon enregistré.
Vous pouvez enregistrer la séquence en temps réel en appuyant sur la touche [ PLAY START ] tout en
enfonçant la touche [ REC ]. Pour cet exercice, nous allons inscrire un évènement avec l'enregistrement
par étapes en mode STEP EDIT pour faire l'écoute de la phrase au début de la séquence.
04. Appuyez sur la touche [ MODE ] et ensuite sur [ PAD 14 ] (STEP EDIT).
Dans la fenêtre STEP EDIT, les données de performance du pad sont listées.
05. Tournez la molette [ DATA ] pour sélectionner « 001.01.00 ».
06. Appuyer sur la touche [ OVER DUB ].
Le voyant DEL de la touche sera allumé, indiquant que vous êtes en mode STEP EDIT.
07. Tapez sur un pad qui contient un échantillon de phrase.
L'évènement de ce pad sera entré à 001.01.00.
Si par mégarde, vous tapiez le mauvais pad, appuyez sur la touche [ F4 ] (DELETE). L'évènement sera
effacé.
08. Appuyez sur la touche [ STOP ].
Ceci désactive le mode STEP EDIT.
Réglage identique du nombre de mesures pour l’échantillon et la séquence
Chaque nouvelle séquence est réglée par défaut à 2 mesures. Si la phrase enregistrée contient également 2 mesures,
il n'y a pas de problème. Cependant, si le nombre de mesures de la phrase est différent de celui de la séquence,
vous devez ajuster le nombre de mesures de la séquence pour qu’il soit identique à celui de la phrase.
09. Pour afficher la page principale, appuyez sur la touche [ MAIN ].
10. Sélectionnez le champ Bar et appuyez sur la touche [ WINDOW ].
La fenêtre Change Bars est alors affichée. Réglez le nombre de mesure dans le champ New Bars, et
appuyez sur la touche [ F5 ] (DO IT).
Ceci ferme la fenêtre et modifie la durée de la séquence.
Réglage identique du tempo pour l’échantillon et pour la séquence
Finalement, vous devez régler le tempo des échantillons et des séquences afin qu'ils soient identiques
11. Appuyez sur la touche [PLAY START] pour faire l'écoute de la séquence.
12. Dans le champ (tempo), réglez le tempo de la séquence.
Si la fin de la phrase chevauche le début de la prochaine phrase, ralentissez le tempo (valeur plus petite),
s’il y a des silences entre les phrases, augmentez le tempo (valeur plus grande).
Page 43

37
La MPC1000 est également dotée de la fonction Patched Phrase
qui permet à l’échantillon de phrase de suivre le tempo de la
séquence lorsque celle-ci est modifiée. Pour de plus amples
renseignements, voir la section « Dividing a phrase sample to
several Regions » à la page 59 du Operator’s Manual.
Sauvegarde des données
Les données et l’audio que vous ajoutez à la MPC1000 sont effacés lorsque vous fermez l’appareil, sauf si vous les
sauvegardez. Si vous désirez garder les données, suivez les indications dans la section « Save / Load » à la page 89 du
Operator’s Manual, ou dans la section « Connecting the MPC1000 to your computer » à la page 98.
Désactiver la fonction de chargement automatique (Autoload)
La MPC1000 est conçue de la même façon que les autres échantillonneurs de la gamme MPC. Cependant, la MPC1000 est
programmée pour charger automatiquement le fichier des préréglages lors de la mise en marche, pour que vous puissiez jouer
immédiatement avec les pads. Il est possible de désactiver cette fonction pour que la MPC1000 ne charge pas le fichier des
préréglages. Dans ce cas, vous devrez charger manuellement les échantillons ou encore enregistrer des échantillons sur la
MPC1000.
01. Appuyez sur la touche [ MODE ] et ensuite sur [ PAD 2 ] (LOAD).
Lorsque vous appuyez sur la touche [ MODE ], le voyant DEL s’allume indiquant que vous pouvez
sélectionner un mode. Si vous appuyez sur [ PAD 2 ] (LOAD) lorsque le voyant DEL est allumé, la page
LOAD s’affiche.
02. Dans le champ LOAD from, appuyez sur la touche [ WINDOW ].
Ceci permet d'appeler la fenêtre Load Setup, d’où vous pouvez régler la fonction Autoload.
03. Sélectionnez OFF dans le champ Autoload et appuyez sur la touche [ F4 ] (CLOSE).
04. Mettre la MPC1000 hors tension, puis de nouveau sous tension.
Page 44

38
Autres fonctions utiles
La MPC1000 est dotée de plusieurs fonctions très intéressantes et originales pour vous aider dans la production musicale.
Patched Phrase/Sliced Sample
La MPC1000 vous permet de diviser un échantillon de phrase en
plusieurs zones. Après avoir divisé l’échantillon, il y a deux
façons de l’utiliser. La première, « SLICED SAMPLES » vous
permet d’assigner chaque zone divisée à un échantillon en
particulier. La deuxième, « Patched Phrase » garde la phrase
entière, mais permet de modifier le tempo de la phrase plus tard.
Effet et LFO avec synchronisation du tempo
La MPC1000 est dotée de deux effets stéréo et un effet général.
Dans les types d'effets, certains paramètres dans Flying Pan/Delay
peuvent être synchronisé au tempo de la séquence. Le LFO dans
le programme peut être synchronisé également au tempo de la
séquence.
Voir la section « Dividing a phrase sample to several regions » à la page 59 du Operator’s Manual.
Voir la section « Effects » à la page 83, dans le chapitre 14 du Operator’s Manual.
Automatisation du mixage
La MPC1000 peut enregistrer des informations telles que le niveau
et le panoramique, que vous pouvez modifier à l'aide de
potentiomètres et boutons Q-Link durant l’enregistrement de la
séquence et les reproduire durant la lecture.
Voir la section « Setting a LFO (Low Frequency Oscillator » à la page 77 du Operator’s Manual.
Voir la section « Mixer Automation » à la page 80 du Operator’s Manual.
Page 45

Fonction Input Thru
La MPC1000 peut mixer le signal audio entrant provenant de
l’entrée REC IN ou DIGITAL IN tout en faisant la lecture interne.
Vous pouvez également contrôler le niveau, le panoramique, la
fréquence de coupure et la résonance en temps réel du signal
entrant à l’aide des potentiomètres et boutons Q-Link
Potentiomètres et boutons Q-Link
En utilisant les potentiomètres et les boutons Q-Link, vous pouvez
contrôler le filtre, la syntonisation, etc. à l’aide d’un pad et d’un
potentiomètre ou d’un bouton. Pour contrôler un paramètre d’un
pad, il y a feux façons de faire, « NOTE ON » et « REAL TIME ».
Ce guide explique le fonctionnement de base de la MPC1000. La MPC1000 est dotée d’encore beaucoup plus de fonctions
vous permettant de créer des pièces musicales originales. Veuillez lire le Operator’s Manual pour connaître toutes les
Voir la section « Input Thru Function » à la page 81 du Operator’s Manual
Voir la section « Chapter 8 : Q-Link Slider » à la page 44, dans le chapitre 8 du Opertor’s Manual .
fonctions et pour en apprendre davantage sur le fonctionnement de la MPC1000.
Nous vous souhaitons beaucoup de plaisir avec la MPC1000!
7-51-0225-B
39
Page 46

40
Page 47

41
Kurzbedienungsanleitung (Deutsch)
Inhaltsverzeichnis
Grundlegende Informationen ……...........................................................
MPC1000 Tutorial...................................................................................
Wiedergabe eines Demosongs...................................................................
Spielen eines Preset Programs..................................................................
Aufnahme von Spieldaten mit den Pads....................................................
Wiedergabe verschiedener Sequencen mit den Pads..................................
Auswahl der Sequencen in Echtzeit........................................................................
Wiedergabe der Sequencen in einer gewählten Reihenfolge.................................
Aufnahme eines Sounds............................................................................
Aufnahme vorbereiten.............................................................................................
Starten der Aufnahme.............................................................................................
Zuweisung des aufgenommenen Sounds zu einem Pad........................................
Loop-Wiedergabe eines Phrase Samples ..................................................
43
44
44
44
45
46
46
46
47
47
47
48
49
Justieren der Start/End Punkte des Samples..........................................................
Aufnehmen in einer Sequence….............................................................................
Einstellen der identischen Taktanzahl für Sample und Sequence..........................
Einstellen des identischen Tempos für Sample und Sequence..............................
Speichern der Daten.................................................................................
Deaktivieren der Autoload Funktion........................................................
Weitere hilfreiche Funktionen..................................................................
49
50
50
50
51
51
52
Page 48

42
Page 49

43
MPC1000 Kurzbedienungsanleitung
Willkommen zum MUSIC PRODUCTION CENTER MPC1000. Diese Kurzbedienungsanleitung erklärt die zum Beginnen
wichtigen Grundlagen der MPC1000. Detaillierte Informationen finden Sie in der Operator’s manual der MPC1000.
Grundlegende Informationen
Hier finden Sie die Grundlagen der MPC1000, die Sie bei der Bedienung des Gerätes kennen sollten.
• Function Buttons
Diese sechs, unter dem LCD Display liegenden Buttons
(F1 to F6), werden als Funktionstasten verwendet. Die
Buttons stehen in Verbindung mit den sechs Funktionen,
die im unteren Displaybereich angezeigt werden. Die
Buttons haben, je nach im Display angezeigter Option,
verschiedene Funktionen.
• [ MODE ] Button
Indem Sie den [ MODE ] Button drücken und ein Pad
anschlagen, können Sie verschiedene Modes aufrufen.
Der Mode eines Pads wird über jedem Pad dargestellt.
• [ DATA ] Rad
Die gegenwärtige Cursorposition im Display wird „Feld“
genannt. Einstellungen eines gewählten Feldes lassen
sich mit dem [ DATA ] Rad ändern.
• Cursor Buttons
Der markierte Teil der Anzeige wird als „Cursor”
bezeichnet. Mit den vier Cursor Buttons können Sie den
Cursor im Display bewegen.
• [ WINDOW ] Button
Mit dem [ WINDOW ] Button rufen Sie ein Fenster
mit detaillierten Einstellungen zu einem ausgewählten
Feld auf. Der Button ist nicht bei allen Feldern aktiv.
Wenn es zu einem bestimmten Feld detaillierte
Parameter gibt, leuchtet der [ WINDOW ] Button auf.
• [ MAIN ] Button
Wenn Sie den Main Button drücken, gelangen Sie zur
Hauptanzeige der MPC1000. Hier lassen sich
Sequencen aufnehmen und abspielen.
Function Buttons
[ MODE ] Button
[ DATA ] Rad
Cursor Buttons
[ WINDOW ] Button
[ MAIN ] Button
Page 50

44
MPC1000 Tutorial
Die MPC1000 besteht aus der Sampler Sektion, in der Sie Sounds aufnehmen
und wiedergeben, der Sequencer Sektion, in der Sie Ihre Spieldaten
aufnehmen und den Pads, die zum Spielen der Sounds dienen. Spieldaten
lassen sich im Sequencer aufzeichnen. Mit Hilfe dieser Sequencen werden die
Sounds des Samplers abgespielt. Die Spieldaten (MIDI Daten) werden von
den Pads zum Sequencer und von dort zum Sampler übertragen. Der Sampler
spielt aufgrund der Spieldaten den Sound ab
PAD SAMPLER
SEQUENCER
STEREO AUSGANG
KOPFHÖRER
Wiedergabe eines Demosongs
Die MPC1000 besitzt einen internen Speicher, der beim Einschalten des Gerätes automatisch geladen wird und einen
Demosong sowie ein Preset Program enthält. Wir nennen dies Autoload Funktion. Zum Abspielen eines Demosongs gehen
Sie wie folgt vor:
01. Schließen Sie ein Paar Kopfhörer an die PHONES Buchse der MPC1000 an.
Weitere Informationen zum Anschließen von Geräten erhalten Sie im Abschnitt “Connecting MPC1000 to
external Audio/MIDI device” der MPC1000 Operator’s Manual (Seite 5).
02. Schalten Sie die MPC1000 ein.
Beim Einschalten sehen Sie zunächst eine Startanzeige. Danach werden die internen Daten automatisch
geladen. Nach dem Ladevorgang wird die MAIN Seite angezeigt.
03. Überprüfen Sie, dass "01-DJ_Hip_Hop" im Sq Feld ausgewählt ist und drücken Sie den [ PLAY START ]
Button.
Mit dem [ PLAY START ] Button beginnen Sie die Wiedergabe des Demosongs. Zum Stoppen der
Wiedergabe drücken Sie den [ STOP ] Button. Wenn Sie den [ PLAY ] Button drücken, startet die MPC1000
die Wiedergabe ab dem Punkt, an dem sie zuletzt gestoppt wurde.
Nachdem die Wiedergabe von "01-DJ_Hip_Hop" beendet wurde, spielen Sie einen anderen Song ab. Einen
Song wählen Sie aus, indem Sie das [ DATA ] Rad im Sq Feld drehen.
Spielen eines Preset Programs
Jetzt wollen wir ein Preset Program mit den Pads spielen. Dabei wird das im Pgm Feld der MAIN Seite gewählte Program
durch Anschlagen der Pads abgespielt.
01. Wählen Sie eine der (unused) Sequencen im Sq Feld.
(unused) bedeutet, dass diese Sequence noch nicht verwendet und ohne Spieldaten ist.
02. Gehen Sie mit den Cursor Buttons in das Pgm Feld und wählen Sie das zu spielende Program aus.
Sie können ein Program durch Drehen des [ DATA ] Rades im Pgm Feld auswählen.
03. Schlagen Sie ein Pad an. Die MPC1000 spielt das Preset Program ab.
Sie können auf bis zu 64 Pads spielen, wenn Sie zwischen den Pad Banks A bis D umschalten. Einige Pads
könnten jedoch noch kein zugewiesenes Sample besitzen.
Page 51

Aufnahme von Spieldaten mit den Pads
Um unter Verwendung des internen Preset Programs Spieldaten in eine Sequence aufzunehmen, gehen Sie wie folgt vor:
01. Drücken Sie den [ MAIN ] Button, um die MAIN Seite anzeigen zu lassen.
02. Wählen Sie im Sq Feld eine Sequence, in die Sie Ihre Spieldaten aufnehmen wollen, aus.
Sie können jede Sequence für eine Aufnahme auswählen, für unsere Zwecke benötigen wir jedoch eine
„ununsed“ Sequence.
03. Wählen Sie im Tr Feld einen Track aus, auf den Sie Ihre Spieldaten aufnehmen wollen.
Die Spieldaten werden auf einem Track innerhalb einer Sequence gespeichert. Jeder Track ist anwählbar, Sie
sollten aber zunächst den „Tr : 01” wählen.
04. Definieren Sie im Pgm Feld das zu spielende Program.
05. Halten Sie den [ REC ] Button gedrückt und drücken Sie den [ PLAY START ] Button.
Die Aufnahme beginnt nach vier Einzählern.
06. Spielen Sie die Pads zum Takt des Metronomsounds.
In der Grundeinstellung ist eine Sequence 2 Takte (Bars) lang. Nach der Aufnahme der 2 Takte startet die
MPC1000 mit der Wiedergabe der Aufnahme. Wenn Sie nun mit den Pads weitere Spieldaten erzeugen,
werden diese zur gegenwärtigen Aufnahme hinzugefügt. Wir nennen das „Overdub”.
07. Den Overdub beenden Sie mit dem [ STOP ] Button.
08. Drücken Sie [ PLAY ] zur Wiedergabe der aufgenommenen Spieldaten.
09. Wenn Ihnen die Aufnahme nicht gefällt, können Sie eine neue Aufnahme mit dem [ REC ] + [ PLAY
START] Buttons starten.
Dadurch löschen Sie die alten Spieldaten und nehmen neue Daten auf.
10. Um bereits aufgenommenen Spieldaten weitere hinzuzufügen, halten Sie den [ OVER DUB ] Button und
drücken Sie [ PLAY START ].
Dadurch werden vorher aufgenommene Daten abgespielt und Sie können mit den Pads neue Spieldaten auf
denselben Track einspielen.
Löschen eines bestimmten Pad:
11. Starten Sie den Overdub durch Drücken von [ PLAY START ], während der [ OVER DUB ] Button gedrückt
ist.
12. Halten Sie das Pad, dessen Daten gelöscht werden sollen, gedrückt, während Sie den [ ERASE ] Button halten.
Dabei werden nur die Daten aus dem Bereich, beginnend vom Drücken des [ ERASE ] Button und des Pads
bis zum Loslassen des [ ERASE ] Buttons und des Pads gelöscht. Wenn Sie das Pad zur richtigen Zeit
drücken, können gezielt Daten einer bestimmten Zeitposition gelöscht werden. Wenn Sie eine andere
Sequence im Sq Feld wählen, können Sie neue Spieldaten aufnehmen. Wenn Sie die verschiedenen Sequencen
abspielen können Sie so leicht einen ganzen Song erstellen.
Tipp : Die Länge einer Sequence lässt sich im Bar Feld definieren. Die Takteinstellung kann im Tsig Feld
bestimmt werden. Weitere Informationen hierzu finden Sie im Abschnitt “Chapter 3: Sequence function” in der
MPC1000 Operator’s Manual. ( Seite 12)
45
Page 52

46
Wiedergabe verschiedener Sequencen in Folge
Es gibt zwei Möglichkeiten, um verschiedene Sequencen in einer Reihenfolge abspielen zu lassen. Sie können entweder die
Sequencen in Echtzeit auswählen oder die Reihenfolge des Sequencen im SONG Mode definieren.
Auswahl der Sequencen in Echtzeit
01. Wählen Sie im Sq Feld der MAIN Seite die erste abzuspielende Sequence aus.
02. Drücken Sie [ PLAY START ], damit die Wiedergabe der Sequence beginnt.
03. Wählen Sie während der Wiedergabe im Sq die nächste abzuspielende Sequence aus.
Die Auswahl einer Sequence bei der Wiedergabe einer anderen Sequence ruft das Next Feld auf, in
dem Sie die nächste Sequence eingeben können. Nachdem die gegenwärtig abgespielte Sequence
fertig abgespielt wurde, startet die MPC1000 die im Next Feld gewählte Sequence. Wenn Sie
diesen Schritt wiederholen, können Sie verschiedene Sequencen durchgehend abspielen lassen.
Wiedergabe der Sequencen in einer gewählten Reihenfolge
Zur Wiedergabe von Sequencen in einer vorgewählten Reihenfolge, verwenden Sie den SONG Mode.
01. Drücken Sie zuerst den [ MODE ] Button und dann [ PAD 16 ] (SONG).
Dadurch gelangen Sie zur SONG Seite, in der Sie die Reihenfolge der abzuspielenden Sequencen
bestimmen können.
02. Wählen Sie im Song Feld einen Song aus, dessen Name (unused) lautet.
03. Wählen Sie mit dem Nach Unten Cursor das (end of song) Feld aus und definieren Sie mit dem
[ DATA ] Rad eine Sequence, die abgespielt werden soll.
Definieren Sie die nachfolgend abzuspielenden Sequencen, indem Sie diesen Schritt wiederholen.
04. Drücken Sie den [ PLAY START ] Button.
Die definierten Sequencen werden in der von Ihnen bestimmten Reihenfolge abgespielt.
Tipp: Weitere Informationen zum SONG Mode finden Sie unter „Chapter 6: Song Mode” in
der MPC1000 Operator’s Manual auf Seite 37.
Page 53

Aufnahme eines Sounds
In diesem Abschnitt erfahren Sie, wie Sie mit der MPC1000 Sounds
aufnehmen und diese den Pads zum Spielen zuweisen. Dadurch
können Sie nicht nur die mitgelieferten Presets spielen. Nebenstehend
finden Sie eine Abbildung, die den Anschluss eines CD-Players an
den RECORD IN Eingang auf der Rückseite der MPC1000 zum
Ausnehmen des CD-Signals verdeutlicht.
Aufnahme vorbereiten
47
CD-PLAYER
01. Verbinden Sie den LINE OUT Ausgang des
CD-Players mit dem RECORD IN Eingang
der MPC1000.
LINE AUSGANG
Der Analogeingang der MPC1000 ist als
Standard Klinkenbuchse ausgelegt. Da die
meisten CD-Player RCA-Ausgangsanschlüsse besitzen, benötigen Sie zwei
RCA/6,3mm Klinkenkabel.
02. Nachdem Sie den Audioausgang des CD-Players mit dem RECORD IN der MPC1000
verbunden haben,, drücken Sie den [ MODE ] Button und [ PAD 5 ] (RECORD).
Sie gelangen zur RECORD Seite, in der Sie die Einstellungen für die Aufnahme anpassen
können.
03. Wählen Sie im Input Feld ANALOG aus.
04. Definieren Sie im Time Feld die Aufnahmezeit.
Die MPC1000 beendet die Aufnahme nach der in diesem Feld gewählten Zeit. Wir empfehlen,
die Aufnahmedauer länger als eigentlich notwendig einzustellen. Sie können die Aufnahme auch
manuell stoppen.
05. Testen Sie den Aufnahmepegel, indem Sie die CD abspielen. Schauen Sie auf die Pegelmeter
und justieren Sie den Pegel mit dem [ REC GAIN ] Regler.
Wichtig: Wenn die Meter zu weit nach rechts ausschlagen, verzerrt der Sound. Wenn der Pegel
zu niedrig ist, wird das Sample sehr stark rauschen. Stellen Sie den Pegel so hoch wie möglich
ein, ohne dass die Pegelmeter die rechte Seite erreichen.
Starten der Aufnahme
06. Gehen Sie beim CD-Player zu der Stelle auf der CD, die Sie aufnehmen wollen.
07. Drücken Sie in der RECORD Seite den [ F6 ] (RECORD) Button.
Die MPC1000 wird in Aufnahmebereitschaft versetzt. Im unteren Displaybereich steht:
Das bedeutet, dass die MPC1000 auf ein eingehendes Audiosignal wartet. Die Aufnahme
beginnt automatisch, wenn die CD abgespielt wird.
Mit [ F5 ] (CANCEL) verlassen Sie die Aufnahmebereitschaft und setzen die MPC1000 zurück.
Der [ F6 ] (START) Button startet die Aufnahme manuell, bevor die CD abgespielt wird
Hinweis: Wenn Sie den [ F6 ] (RECORD) Button während der Wiedergabe eines
Sounds drücken, beginnt die MPC1000 mit der Aufnahme sofort nachdem Sie
den Button gedrückt haben.
Page 54

48
08. Drücken Sie am CD-Player „Play”.
Die MPC1000 beginnt automatisch mit der Wiedergabe, sobald der CD-Player die Wiedergabe
startet. Der untere Displaybereich ändert sich zu:
Zuweisung des aufgenommenen Sounds zu einem Pad
Tipp: Bei zu niedrigem Aufnahmepegel könnte die MPC1000 nicht mit der Aufnahme beginnen,
wenn der CD-Player spielt. Gehen Sie in diesem Fall zum Schritt 5 zurück und justieren Sie den
Pegel mit dem [ REC GAIN ] Regler nach.
09. Mit dem [ F6 ] (STOP) Button beenden Sie die Aufnahme.
Wenn Sie [ F6 ] (STOP) nicht drücken, beendet die MPC1000 die Aufnahme nach der im Time Feld
definierten Zeit.
Nach dem Abschluss der Aufnahme erscheint das Keep or Retry Fenster.
10. Überprüfen Sie das aufgenommene Sample, indem Sie den [ F4 ] (PLAY) Button gedrückt halten.
Das aufgenommene Sample wird abgespielt, solange Sie den Button gedrückt halten.
Wenn Sie die Aufnahme nicht mögen, löschen Sie sie mit dem [ F2 ] (RETRY) Button.
11. Wählen Sie das Assign to pad Feld mit dem Cursor und schlagen Sie das Pad an, welches das
Sample abspielen soll.
Die Nummer dieses Pads wird im Assign to pad Feld angezeigt.
12. Drücken Sie den Button [ F5 ] (KEEP), um das Sample dem gewählten Pad zuzuweisen.
Dadurch schließen Sie das Keep or Retry Fenster und kehren auf die RECORD Seite zurück.
Nun können Sie das aufgenommene Sample mit dem Pad spielen. Schlagen Sie das Pad an, um zu
überprüfen, dass das Sample auch abgespielt wird.
Tipp: Die Samples werden den Pads des im Pgm Feld der MAIN Seite gewählten Programs
zugewiesen. Um die Samples einem neuen Program zuzuweisen, müssen Sie im PROGRAM Mode
ein neues Program erzeugen und es vorher im Pgm Feld der MAIN Seite auswählen. Weitere
Informationen zum Erzeugen eines neuen Programs finden Sie im Abschnitt „Creating a program”
der MPC1000 Operator’s Manual auf Seite 66.
Tipp: Damit nur ein bestimmter Teil des Samples abgespielt wird, können Sie die Start/End Punkte
des Samples anpassen. Weitere Informationen dazu finden Sie im Abschnitt „Setting the loop” in
der MPC1000 Operator’s Manual auf Seite 64.
Tipp: Sie können das zugewiesene Sample oder die Wiedergabeart im PROGRAM Mode ändern.
Weitere Informationen finden Sie im „Chapter 12: Program” der Operator’s Manual auf Seite 66.
Page 55

49
Loop-Wiedergabe eines Phrase Samples
In diesem Abschnitt erfahren Sie, wie Sie mit einem Phrase Sample eine Sequence erstellen. Damit Sie das Phrase Sample
zusammen mit der Sequence Funktion einsetzen können, müssen Sie die Start/End Punkte des Samples justieren und dann das
Tempo der Sequence auf das Tempo der Phrase setzen.
Um ein Phrase Sample aufzunehmen gehen Sie wie im Punkt 5 des Abschnittes „Aufnahme eines Sounds“ auf Seite
5 vor. Um den Loop rhythmisch wiedergeben zu können, nehmen Sie nach Takten auf (1 Takt, 2 Takte…).
Tipp: Starten Sie beim Aufnehmen einer Phrase die Aufnahme früher und stoppen Sie die Aufnahme später
nach dem aufzunehmenden Part. Dadurch gewährleisten Sie, dass keine der benötigten Audiosignale nicht mit
aufgenommen werden.
Justieren der Start/End Punkte des Samples
Um die Phrase loopen zu können, müssen Sie die Start/End Punkte des Samples so anpassen, dass nur die
gewünschten Teile des Samples wiedergegeben werden. Dazu nutzen Sie den TRIM Mode.
01. Drücken Sie den [ MODE ] Button und dann [ PAD 6 ] (TRIM).
Sie schalten in den TRIM Mode, in dem Sie Samples bearbeiten können.
02. Wählen Sie das Sample Feld in der oberen linken Ecke und bestimmen Sie das zu editierende Sample.
03. Gehen Sie zum St (Start) Feld und legen Sie den Start Punkt fest. Der Start Punkt lässt sich durch
04. Gehen Sie zum End Feld und definieren Sie den End Punkt. Durch Drehung des [ DATA ] Rades lässt
In diesem Mode lassen sich die Start- und End Punkte in den St bzw. End Feld der TRIM Seite
definieren. Die Wellenform zwischen Start- und Endpunkt wird hervorgehoben. Die MPC spielt auch
nur diesen Bereich ab.
Drehen des [ DATA ] Rades anpassen.
Justieren Sie den Punkt so, dass der erste Beat der Phrase gespielt wird, wenn Sie das Pad anschlagen.
Sie können den Sound durch Anschlagen der Pads 1 – 12 überprüfen.
Hinweis: Wenn Sie den Start Punkt zu früh einstellen (kleinere Werte), kann es zwischen Anschlagen
des Pads und Wiedergabebeginn zu einer Verzögerung kommen. Wenn Sie diesen Wert zu hoch
einstellen, fehlt möglicherweise der erste Beat.
sich die Position des End Punktes verändern.
Justieren Sie den Punkt so, dass die Wiedergabe der Phrase endet, wenn Sie das Pad anschlagen. Sie
können den Sound durch Anschlagen der Pads 1 – 12 überprüfen.
Hinweis: Wenn Sie den End Punkt zu früh setzen (kleinere Werte), könnte die Wiedergabe vor dem
Ende der Phrase stoppen. Bei einem zu spät gesetzten End Punkt (hohe Werte), wird am Ende der Phrase
unnötig Stille oder Rauschen abgespielt.
Tipp: Wenn Sie in der TRIM Seite das [ PAD 13 ] halten, spielt die MPC1000 das Sample vom Start
Punkt zum End Punkt wiederholt ab (Loopwiedergabe). Verwenden Sie die Funktion zur
Überprüfung der richtigen Positionen der Start und End Punkte. Wenn diese Punkte nicht richtig
definiert wurden wird die Phrase nicht zum Takt passen und aus dem Rhythmus laufen.
Page 56

50
Aufnehmen in einer Sequence
Um die Phrase mit der Sequence Funktion zu loopen, gehen Sie wie folgt vor:
01. Gehen Sie mit dem [ MAIN ] Button auf die MAIN Seite.
02. Wählen Sie im Sq Feld eine Sequence mit der Bezeichnung “unused” aus.
03. Gehen Sie in das Pgm Feld und wählen Sie für den Track das Program aus, welches das aufgenommene
Sample enthält.
Sie können die Aufnahme in Echtzeit starten, indem Sie den [ REC ] Button gedrückt halten und [ PLAY
START ] drücken. In unserem Falle möchten wir über das Step Recording ein Event im STEP EDIT
Mode eingeben, damit die Wiedergabe der Phrase am Beginn der Sequence anfängt.
04. Drücken Sie den [ MODE ] Button und dann [ PAD 14 ] (STEP EDIT).
Auf der STEP EDIT Seite werden die Spieldaten des Pads aufgelistet.
05. Drehen Sie das [ DATA ] Rad auf „001.01.00”.
06. Drücken Sie den [ OVER DUB ] Button.
Die LED des Buttons leuchtet und zeigt Ihnen so an, dass Sie sich im Step Recording innerhalb des
STEP EDIT Modes befinden.
07. Schlagen Sie das Pad, das dem Phrase Sample zugewiesen wurde, an.
Der Event des Pads wird genau an der 001.01.00 Position eingefügt.
Wenn Sie fälschlicherweise ein falsches Pad angeschlagen haben, drücken Sie [ F4 ] (DELETE). Das
eingegebene Event wird gelöscht.
08. Drücken Sie den [ STOP ] Button.
Sie deaktivieren das Step Recording im STEP EDIT Mode.
Einstellen der identischen Taktanzahl für Sample und Sequence
Eine neue Sequence ist laut Grundeinstellung 2 Takte lang. Wenn also die aufgenommene Phrase auch 2 Takte
lang ist gibt es keine Probleme. Wenn aber die Taktanzahl der Phrase von der der Sequence abweicht, müssen Sie
die Anzahl der Takte der Sequence anpassen.
09. Wechseln Sie mit dem [ MAIN ] Button zur MAIN Seite.
10. Gehen Sie in das Bars Feld und drücken Sie den [ WINDOW ] Button.
Das Change Bars Fenster wird angezeigt. Definieren Sie die Taktanzahl im New bars Feld und drücken
Sie den [ F5 ] (DO IT) Button. Damit schließen Sie das Fenster und übernehmen die Längenänderung.
Einstellen des identischen Tempos für Sample und Sequence
Zuletzt müssen Sie das Tempo für Sample und Sequence anpassen.
11. Beginnen Sie mit dem [ PLAY START ] Button die Wiedergabe der Sequence.
12. Im (tempo) Feld können Sie das Tempo der Sequence bestimmen.
Wenn das Ende der Phrase mit dem Anfang der nächsten Phrase überlappt. Wählen Sie einen niedrigeren
Tempowert. Tritt Stille zwischen beiden Phrasen auf, erhöhen Sie das Tempo der Sequence.
Page 57

51
Die MPC1000 besitzt zudem eine Patched Phrase Funktion, die es
ermöglicht, dass das Tempo des Phrase Samples sich automatisch
mit dem Tempo des Sequencers synchronisiert. Weitere
Informationen dazu finden Sie im Abschnitt „Dividing a phrase
sample to several Regions” auf Seite 59 der MPC1000 Operator’s
Manual.
Speichern der Daten
Die Daten und die Audiosignale, die sich in der MPC1000 befinden, gehen beim Ausschalten des Gerätes verloren, wenn Sie
diese nicht speichern. Wenn Sie Ihre Dateien behalten wollen, folgen Sie den Anweisungen in den Abschnitten „Save / Load”
auf Seite 89 oder „Connecting the MPC1000 to your computer” auf Seite 98 der Operator’s Manual.
Deaktivieren der Autoload Funktion
Die MPC1000 ist wie andere Sampler der MPC Serie aufgebaut. Jedoch ist die MPC1000 so eingestellt, dass automatisch
beim einschalten das Preset File geladen wird, damit Sie sofort mit den Pads spielen können. Sie können diese Funktion
ausschalten, wenn das Preset File nicht geladen werden soll. Dann müssen Sie die Daten nach dem Einschalten manuell laden
oder neue Daten in der MPC1000 aufnehmen.
01. Drücken Sie den [ MODE ] Button und dann [ PAD 2 ] (LOAD).
Wenn Sie den [ MODE ] Button drücken, geht die LED des Buttons an, um Sie wissen zu lassen, dass Sie jetzt
einen Mode wählen können Mit dem [ PAD 2 ] (LOAD) gelangen Sie zur LOAD Seite.
02. Drücken Sie im LOAD from Feld den [ WINDOW ] Button.
Das Load Setup Fenster, in dem Sie die Autoload Funktion einstellen können, öffnet sich.
03. Wählen Sie für das Autoload Feld OFF und drücken Sie [ F4 ] (CLOSE).
04. Starten Sie die MPC1000 neu.
Page 58

52
Weitere hilfreiche Funktionen
In der MPC1000 stehen viele ausgefeilte und verblüffende Funktionen zur Verfügung, die Ihnen bei der Musikproduktion
weiterhelfen.
Patched Phrase / Sliced Sample
Die MPC1000 unterteilt ein Phrase Sample in mehrere Regions.
Nach dem Teilen gibt es zwei Möglichkeiten, um mit dem Sample
weiter zu arbeiten. Die erste ist „SLICED SAMPLES”. Hier wird
jede Region zu einem einzelnen Sample umgewandelt. Bei der
„PATCHED PHRASE” bleibt das Sample als Ganzes erhalten, es
lässt sich jedoch später das Tempo der Phrase frei bestimmen.
Effect & LFO mit Temposynchronisation
In der MPC1000 finden Sie zwei Stereo Effects und einen Master
Effect. Einige Parameter der Flying Pan / Delay Effects lassen
sich zum Tempo des Sequencers synchronisieren. Der LFO des
Programs kann ebenfalls dem Tempo der Sequence angepasst
werden.
Mixer Automation
Die MPC1000 nimmt Informationen, wie Level und Pan, die Sie
mit den Q-Link Slidern und Reglern während der Aufnahme einer
Sequence mit aufzeichnen können, auf. Diese Daten lassen sich
bei der Sequence-Wiedergabe reproduzieren.
Siehe „Dividing a phrase sample to several regions” auf Seite 59 der MPC1000 Operator’s Manual.
Siehe „Chapter 14: Effect” auf Seite 83 der MPC1000 Operator’s Manual.
Siehe „Setting a LFO (Low Frequency Oscillator” auf Seite 77 der MPC1000 Operator’s Manual.
Siehe „Mixer Automation” auf Seite 80 der MPC1000 Operator’s Manual.
Page 59

53
Input Thru Funktion
Die MPC1000 kann eingehende Audiosignale vom REC IN oder
DIGITAL IN mit der internen Wiedergabe der MPC1000 mischen.
Zudem können Si Pegel, Panorama, Cutoff Frequenz und Filter
des eingehenden Signals mit den Q-Link Slidern und Reglern in
Echtzeit ändern.
Q-Link Slider & Regler
Mit Hilfe der Q-Link Slider und Regler lassen sich Parameter
eines Pads, wie Tune, Filter usw. mit einem Slider oder Regler
verändern. Dazu gib es zwei Möglichkeiten: „NOTE ON” und
„REAL TIME”.
Siehe „Input Thru Funktion” auf Seite 81 der MPC1000 Operator’s Manual.
Diese Anleitung beschreibt lediglich die grundlegenden Vorgehensweisen bei der Arbeit mit der MPC1000. Darüber hinaus
besitzt die MPC1000 zahlreiche andere Funktionen für Ihren Musikproduktionsprozess. Bitte lesen Sie deshalb die Operator’s
Siehe “Chapter 8: Q-Link Slider ” auf Seite 44 der MPC1000 Operator’s Manual
Manual aufmerksam, um alle Funktionen der MPC1000 erfolgreich und gewinnbringend einsetzen zu können.
Wir wünschen Ihnen viel Spaß mit der MPC1000!
7-51-0225-B
Page 60

54
Page 61

Manuale rapido di utilizzazione (Italiano)
Indice
55
Informazioni di base….............................................................................
Introduzione all’uso dell’MPC1000……………….......………………........
Riproduzione di una canzone demo..........................................................
Riproduzione di un programma predefinito…………………....…...…......
Registrazione di una prestazione con i pad…………………………............
Riproduzione di numerose sequenze in serie.............................................
Scelta delle sequenze in tempo reale......................................................................
Riproduzione delle sequenze nell’ordine selezionato……......................................
Registrazione di un suono……………………………………………............
Preparare la registrazione…………………………………………………………….....
Avviare la registrazione……………………………………………………………....….
Assegnare il suono registrato al pad……………………………………………..…….
Riproduzione ripetuta (loop) di un campione di frase................................
57
58
58
58
59
60
60
60
61
61
61
62
63
Regolazione dei punti di inizio/fine del campione…………………………………….
Registrazione in una sequenza……………………………………………………...….
Impostazione dello stesso numero di bar per campione e sequenza.………….....
Impostazione dello stesso tempo per campione e sequenza.…………..................
Salvataggio dei dati..................................................................................
Spegnimento della funzione di caricamento automatico…………..............
Altre funzioni utili……………………………………….……….............…..
63
64
64
64
65
65
66
Page 62

56
Pagina lasciata intenzionalmente bianca
Page 63

Manuale rapido di utilizzazione MPC1000
Benvenuti nel MUSIC PRODUCTION CENTER MPC1000. Questo manuale rapido di utilizzazione descrive le funzioni
fondamentali che vi permetteranno di iniziare a servirvi dell’MPC1000. Per informazioni maggiormente dettagliate, fare
riferimento al Operator’s Manual.
Informazioni di base
Di seguito si trovano le informazioni fondamentali per iniziare a utilizzare l'MPC1000.
• Tasti funzione
Sono sei tasti funzione (da F1 a F6) allineati sotto
all’LCD (display a cristalli liquidi). Questi tasti
corrispondono a ciascuna delle sei funzioni visualizzate
sul fondo dell’LCD. Le funzioni rappresentate da
ciascun tasto cambieranno a seconda delle opzioni
visualizzate sull’LCD.
• Rotella [DATA]
La disposizione di un cursore è denominata “campo”. Si
possono modificare le impostazioni del campo
selezionato girando la
• Tasti cursore
La parte di schermo evidenziata è denominata “cursore”.
Si può spostare il cursore sullo schermo servendosi dei
quattro tasti cursore sul pannello.
• Tasto [MODE]
Si può cambiare modalità premendo il tasto [MODE] e
battendo un pad. La modalità a cui corrisponde un pad è
mostrata sopra ogni pad.
rotella [DATA].
• Tasto [WINDOW]
La pressione del tasto [WINDOW] apre una finestra
per l’impostazione dettagliata del campo selezionato.
Questo non è disponibile per tutti i campi. Nel caso in
cui vi siano impostazioni dettagliate per un campo
specifico, il LED del
• Tasto [MAIN]
La pressione di questo tasto porta alla schermata
principale dell’MPC1000 in cui si registrano e
riproducono le sequenze.
tasto [WINDOW] sarà acceso.
Tasti funzione
Tasto [MODE]
Rotella [DATA]
Tasti a cursore
Tasto [WINDOW]
Tasto [MAIN]
57
Page 64

58
Introduzione all’uso dell’MPC1000
L’MPC1000 è composto dal campionatore, per registrare e riprodurre il suono,
il sequenziatore, per registrare la prestazione, e i pad per suonare i vari suoni.
Si registra la prestazione sul sequenziatore e si riproducono i suoni del
campionatore servendosi delle sequenze registrate. La prestazione dei dati
(dati MIDI) è inviata dai pad al sequenziatore e dal sequenziatore al
campionatore. Il campionatore riproduce il suono attuale dai dati della
prestazione.
PAD CAMPIONATORE
SEQUENZIATORE
USCITA STEREO
CUFFIE
Riproduzione di una canzone demo
L’MPC1000 ha una canzone demo e un programma predefinito nella sua memoria interna e carica i dati automaticamente ogni
volta che l’apparecchio viene acceso. Questa è la cosiddetta funzione di caricamento automatico. Per registrare una canzone
demo, procedere come segue:
01. Collegare le cuffie al jack CUFFIE dell’MPC1000.
Per maggiori informazioni sui dispositivi di collegamento, vedi il paragrafo “Connecting MPC1000 to external
Audio/MIDI device” del Operator’s Manual (pagina 5).
02. Accendere l’MPC1000.
Quando si accende l’MPC1000, viene visualizzata la schermata iniziale e vengono caricati automaticamente i
dati interni. Dopo che sono stati caricati i dati, viene visualizzata la pagina principale (MAIN).
03. Assicurarsi di selezionare "01-DJ_Hip_Hop" nel campo Sq e premere il tasto [ PLAY START ].
La pressione del tasto [ PLAY START ] avvia la riproduzione della canzone demo. Per interrompere la
riproduzione, premere il
tasto [STOP]. Premendo nuovamente il tasto [ PLAY ], l’MPC1000 riprenderà la riproduzione nel punto in
cui è stata interrotta.
Una volta terminata la riproduzione di "01-DJ_Hip_Hop", provare a riprodurre un’altra canzone. Si può
selezionare una canzone girando la rotella [DATA] nel campo Sq.
Riproduzione di un programma predefinito
Ora, proviamo a riprodurre il programma predefinito servendoci dei pad. Si può riprodurre il campo selezionato nel campo
Pgm della pagina principale MAIN battendo il pad.
01. Selezionare una qualsiasi delle sequenze (Unused) nel campo Sq.
(Unused) significa che la sequenza non è stata ancora utilizzata.
02. Servirsi dei tasti cursore per passare al campo Pgm e selezionare il programma che si desidera riprodurre.
Si può selezionare il programma girando la rotella [DATA] nel campo Pgm.
03. Battere il pad. L’MPC1000 riprodurrà il programma predefinito.
Si possono suonare fino a 64 pad passando dal banco A al D, ma i campioni non possono essere assegnati a
tutti i pad.
Page 65

Registrazione di una prestazione con i pad
Per registrare la prestazione in una sequenza servendosi del programma interno predefinito, procedere come segue:
01. Premere il tasto [MAIN] per visualizzare la pagina principale (MAIN).
02. Nel campo Sq, selezionare una sequenza in cui si desidera registrare la prestazione.
Per registrare una prestazione si può selezionare qualsiasi sequenza, ma ai fini di questo paragrafo, selezionare
la sequenza indicata “unused” (non utilizzata).
03. Nel campo Tr, selezionare una traccia in cui si desidera registrare la prestazione.
I dati della prestazione verranno registrati in una traccia nella sequenza. Si può selezionare qualsiasi traccia,
ma ai fini di questo paragrafo, selezionare "Tr: 01”.
04. Nel campo Pgm, selezionare un programma che si desidera riprodurre.
05. Premere il tasto [ PLAY START ] tenendo premuto il tasto [REC].
La registrazione inizierà dopo 4 battute.
06. Suonare i pad ai clic.
La sequenza predefinita è impostata a 2 misure. Dopo aver registrato per 2 misure, l’MPC1000 inizierà a
riprodurre la prestazione registrata. Eseguendo un’altra prestazione con i pad è possibile aggiungerla alla
registrazione attuale. Questo è chiamato “doppiaggio”.
07. Si può interrompere il doppiaggio premendo il tasto [ STOP ].
08. Premere il tasto [PLAY] per riprodurre la prestazione registrata
09. Se non si è soddisfatti della prestazione, è possibile avviare una nuova registrazione premendo i tasti [ REC ] +
[ PLAY START ].
Così facendo vengono cancellati i dati relativi alla prestazione registrata e si avvia una nuova registrazione.
10. Per aggiungere la registrazione ai dati già registrati, premere il tasto [ PLAY START ] tenendo premuto il
tasto [OVER DUB].
In questo modo viene riprodotta la prestazione attualmente registrata ed è possibile aggiungere quella nuova
servendosi dei pad.
Cancellare un pad specifico:
11. Avviare il doppiaggio premendo il tasto [ PLAY START ] tenendo premuto il tasto [OVER DUB].
12. Tenere premuto il pad che si desidera cancellare, tenendo premuto il tasto [ ERASE ].
Verrà cancellata dalla registrazione della prestazione solo la parte che inizia dove viene premuto il tasto
[ERASE] con il pad e che termina quando viene rilasciata la pressione. Premendo il pad al tempo giusto,
possono essere cancellati i dati della prestazione in un certo tempo della frase. Selezionando un’altra sequenza
nel campo Sq, si può registrare una nuova prestazione separatamente. Riproducendo quelle sequenze si può
creare un’intera canzone.
Consiglio: si può impostare la lunghezza della sequenza nel campo “Bar”(misura) e il tempo nel campo Tsig.
Per ulteriori informazioni , fare riferimento al capitolo 3: “Sequence feature” del Operator’s Manual. ( pagina
12)
59
Page 66

60
Riproduzione di numerose sequenze in una serie
Vi sono due modi di riprodurre numerose sequenze in una serie. Si possono selezionare sequenze da riprodurre in tempo reale,
oppure impostare l’ordine delle sequenze in modalità SONG.
Scelta delle sequenze in tempo reale
Riproduzione delle sequenze nell’ordine selezionato
01. Nel campo Sq della pagina MAIN, selezionare la sequenza che si desidera riprodurre per prima.
02. Premere il tasto [ PLAY START ] per avviare la riproduzione della sequenza.
03. Selezionare il campo Sq durante la riproduzione e selezionare la sequenza successiva da riprodurre.
Selezionando una sequenza nel campo Sq durante la riproduzione, appare il campo Next
(successivo), in cui si può selezionare la sequenza successiva. Dopo aver riprodotto la sequenza
selezionata fino alla fine, l’MPC1000 inizierà a riprodurre la sequenza selezionata nel campo Next.
Ripetendo questa fase si possono riprodurre numerose sequenza in maniera continua.
Per riprodurre le sequenze nell’ordine selezionato, servirsi della modalità SONG.
01. Premere il tasto [ MODE ] e quindi [ PAD 16 ] (SONG).
Ciò attiva la pagina SONG, in cui si può impostare l’ordine delle sequenze da riprodurre.
02. Nel campo Song, selezionare una canzone il cui nome sia unused (non utilizzato).
03. Selezionare il campo (end of song) premendo il tasto cursore inferiore, e selezionare la sequenza
che si desidera sia la successiva ad essere riprodotta servendosi della rotella [DATA].
Assegnare le sequenze nell’ordine desiderato ripetendo questo passaggio.
04. Premere il tasto [ PLAY START ].
La sequenza assegnata verrà riprodotta nell’ordine specificato.
Consiglio: per ulteriori informazioni sulla modalità SONG, fare riferimento al capitolo 6:
“Song Mode” del Operator’s Manual ( pagina 37).
Page 67

e
Registrazione di un suono
In questo paragrafo si impara a registrare i suoni nell’MPC1000 e ad
assegnarli in modo che possano essere suonati coi pad. In questo
modo non siete costretti a suonare unicamente suoni già inclusi tra
quelli predefiniti. Quello che segue è come registrare un segnale
analogico proveniente da un lettore CD collegato all’ingresso
RECORD IN sul pannello posteriore dell’MPC1000.
Preparare la registrazione
LETTORE CD
61
01. Collegare il LINE OUT del lettore CD al
Avviare la registrazione
RECORD IN dell’MPC1000.
L’ingresso analogico dell’MPC1000 è un
jack fono standard, mentre il LINE OUT del
lettore CD è probabilmente un jack doppio
RCA.. Per collegare il lettore CD occorrono
due connettori RCA a TS da ¼”.
02. Una volta collegata l’uscita audio del lettore CD al RECORD IN dell’MPC1000, premere il tasto
03. Selezionare il campo Input , quindi ANALOG.
04. Selezionare il campo Time ed impostare il tempo di registrazione.
05. Testare il livello di registrazione riproducendo il CD. Verificare il misuratore di livello sullo schermo
[MODE] e quindi [ PAD 5 ] (RECORD).
Si aprirà la pagina RECORD, in cui si possono cambiare le impostazioni di registrazione.
L’MPC1000 terminerà la registrazione al momento impostato in questo campo. Si consiglia di
impostare un tempo leggermente superiore al tempo di registrazione vero e proprio. Si può anche
terminare la registrazione manualmente.
e regolare il livello con la manopola [ REC GAIN ].
Importante: se il misuratore è eccessivamente a destra, il suono sarà distorto, ma se il livello del
suono è troppo basso, il campione presenterà molto rumore. Impostare il livello il più alto possibile,
ma senza raggiungere il margine destro.
USCITA LINEA
06. Eseguire il cueing del lettore CD con l’audio che si desidera registrare.
07. Premere il tasto [ F6 ] (RECORD) dalla pagina RECORD (registra).
L’MPC1000 sarà in modalità di abilitazione registrazione e il fondo dello schermo apparirà così:
Questo indica che l’MPC1000 è in attesa del segnale in ingresso. La registrazione inizierà
automaticamente quando il CD inizia a suonare.
La pressione del tasto [ F5 ] (CANCEL) annulla la modalità di abilitazione di registrazione record
azzera l’MPC1000.
La pressione del tasto [F6] (START) avvia manualmente la registrazione prima di accendere il
lettore CD.
Nota bene: premendo il tasto [F6](RECORD) quando un suono è già in via di
riproduzione, l’MPC1000 inizierà la registrazione subito dopo l’avvenuta
pressione del tasto.
Page 68

62
08. Premere “Play” sul lettore CD.
L’MPC1000 inizierà automaticamente la registrazione quando il lettore CD inizia la riproduzione e
il fondo dello schermo cambierà come segue:
Assegnare il suono registrato al pad
Consiglio: se il livello di registrazione è troppo basso, l’MPC1000 potrebbe non avviare la
registrazione durante la riproduzione del lettore CD. In questo caso, tornare al punto 5 e regolare
nuovamente il livello con la manopola [ REC GAIN ].
09. Premere il tasto [ F6 ] (STOP) per interrompere la registrazione.
Se non viene premuto [ F6 ] (STOP), l’MPC1000 interromperà la registrazione al momento
impostato nel campo Time.
Quando l’MPC1000 termina la registrazione, appare la finestra Keep or Retry (mantieni o riprova).
10. Si può verificare il campione registrato mantenendo premuto il tasto [ F4 ] (PLAY).
Il campione registrato verrà riprodotto fino a quando non si rilascia il tasto.
Se la registrazione non è di proprio gusto, la si può eliminare premendo il tasto [F2] (RETRY).
11. Selezionare il campo Assign to pad (assegna a pad) con il cursore e battere il pad cui si desidera
assegnare il campione.
Il numero di questo pad verrà visualizzato nel campo Assign to pad (assegna a pad).
12. Premere il tasto [F5] (KEEP) per salvare il campione a livello del pad selezionato.
La finestra Keep or Retry si chiude e si torna alla pagine RECORD.
Ora si può riprodurre il campione registrato con il pad. Battere il pad per assicurarsi che il suono
registrato venga suonato.
Consiglio: i campioni verranno assegnati ai pad del programma selezionato nel campo Pgm della
pagina MAIN. Per assegnare i campioni ad un nuovo programma è necessario prima creare un
nuovo programma nell’apposita modalità PROGRAM e selezionarlo nel campo Pgm della pagina
MAIN. Per maggiori informazioni sulla creazione di un nuovo programma, vedi il paragrafo
“Creating a program” del Operator’s Manual (pagina 66).
Consiglio: è possibile riprodurre solo una parte specifica del campione regolando i punti di
inizio/fine. Per maggiori informazioni, vedi il paragrafo “Setting the loop” del Operator’s Manual
(pagina 64).
Consiglio: si può cambiare il campione assegnato o impostare il metodo di riproduzione in
modalità PROGRAM. Per ulteriori informazioni , fare riferimento al capitolo 12: “Program” del
Operator’s Manual (pagina 66).
Page 69

63
Riproduzione ripetuta (loop) di un campione di frase
In questo paragrafo si impara a creare una sequenza servendosi di un campione di frase. Per maneggiare il campione di frase
con la funzione sequenza
tempo della frase.
Procedere come descritto nel paragrafo “Registrazione di un suono” a pagina 5 e registrare un campione di frase.
Per riprodurre il loop a tempo con il ritmo, registrare per misure (1 misura, 2 misure…).
Regolazione dei punti di inizio/fine del campione
Per riprodurre il loop al ritmo, bisogna regolare i punti di inizio/fine in modo tale che venga riprodotta solo la parte
di campione desiderata. Per regolare i punti di inizio/fine, servirsi della modalità TRIM.
01. Premere il tasto [ MODE ] e quindi [ PAD 6 ] (TRIM).
bisogna regolare i punti di inizio/fine del campione e quindi impostare il tempo della sequenza al
Consiglio: quando si registra una frase, avviare la registrazione un po’ prima e interromperla un po’ dopo la
parte che si desidera utilizzare. In questo modo ci si assicura che non vi siano tagli dell’audio desiderato.
Così facendo si passa in modalità TRIM, dove si possono modificare i campioni.
02. Selezionare il campo Sample nell’angolo superiore sinistro e selezionare un campione da modificare.
03. Selezionare il campo St (inizio) e regolare il punto di inizio. Si può modificare il punto di inizio girando
04. Selezionare il campo End e regolare il punto di fine. Si può modificare il punto di fine girando la rotella
In questa modalità si possono impostare i punti di inizio e fine, rispettivamente nel campo St e nel campo
End della pagina TRIM. L’onda dal punto d’inizio al punto finale impostati sarà evidenziata e
l’MPC1000 riprodurrà solo tale parte.
la rotella [DATA].
Regolare questo punto in modo tale che il primo battito della frase venga riprodotto quando si batte sul
pad. Si può verificare il suono battendo qualsiasi pad da 1-12.
Nota bene: se si imposta il punto d’inizio troppo presto (valore inferiore), può volerci del tempo per
riprodurre il primo battito dopo aver battuto il pad. Se si imposta il punto d’inizio troppo tardi (valore
maggiore), il primo battito potrebbe mancare.
[DATA].
Regolare questo punto in modo tale che la riproduzione della frase termini quando si batte sul pad. Si può
verificare il suono battendo qualsiasi pad da 1-12.
Nota bene: se si imposta il punto di fine troppo presto (valore inferiore), la riproduzione potrebbe
terminare prima della fine della frase. Se si imposta il punto di fine troppo tardi (valore maggiore), la
riproduzione potrebbe presentare rumore inutile o silenzio alla fine della frase.
Consiglio: tenendo premuto il [ PAD 13 ] in pagina TRIM, l’MPC1000 riprodurrà il campione dal
punto d’inizio al punto di fine ripetutamente (riproduzione loop). Servirsi di questa funzione per
assicurarsi di impostare i punti di inizio/fine adeguatamente. Se non si impostano questi punti
adeguatamente, la frase non verrà riprodotta al ritmo, e suonerà fuori tempo.
Page 70

64
Registrazione in una sequenza
Per riprodurre ripetutamente la frase con la funzione sequenza, procedere come segue:
01. Premere il tasto [MAIN] per visualizzare la pagina principale (MAIN).
02. Nel campo Sq, selezionare una sequenza il cui nome sia “non utilizzato”.
03. Nel campo Pgm, selezionare la traccia cui è stato assegnato il campione registrato.
Si può registrare la sequenza in tempo reale premendo il tasto [ PLAY START ] tenendo premuto il tasto
[REC]. Per questa esercitazione, inseriremo un evento con la registrazione della fase in modalità STEP
EDIT per riprodurre la frase all’inizio della sequenza.
04. Premere il tasto [ MODE ] e quindi [ PAD 14 ] (STEP EDIT).
Nella pagina STEP EDIT, verranno elencati i dati di prestazione del pad.
05. Girare la rotella [DATA] per selezionare “001.01.00”.
06. Premere il tasto [OVER DUB].
07. Battere il pad che contiene un campione di frase.
08. Premere il tasto [STOP].
Impostazione dello stesso numero di bar per campione e sequenza
Una nuova sequenza è impostata in maniera predefinita a 2 misure. Se la frase registrata è a sua volta di 2 misure,
non c’è problema Tuttavia, se la quantità di misure della frase è diversa da quella della sequenza, bisogna regolare
il numero di misure della sequenza in modo che corrisponda a quello della frase
09. Premere il tasto [MAIN] per visualizzare la pagina principale (MAIN).
10. Selezionare il campo Bars e premere il tasto [WINDOW].
Impostazione dello stesso tempo per campione e sequenza
Infine, è necessario impostare lo stesso tempo per campione e sequenza.
11. Premere il tasto [ PLAY START ] per avviare la riproduzione della sequenza.
12. Nel campo (tempo), regolare il tempo della sequenza.
Il LED del tasto sarà acceso a indicare che ci si trova in modalità STEP EDIT.
L’evento di questo pad sarà inserito al punto 001.01.00.
Se per sbaglio viene battuto un altro pad, premere il tasto [F4] (DELETE). L’evento inserito sarà
cancellato.
Così facendo viene disattivata la modalità STEP EDIT.
La finestra Change Bars (cambia misure) verrà visualizzata. Impostare il numero di misure nel campo
New bars (nuove misure), e premere il
modifica la lunghezza della sequenza.
Se la fine della frase si sovrappone all’inizio di quella successiva, impostare un tempo più lento (valore
più piccolo), se vi sono silenzi tra le frasi, impostare il tempo più veloce (maggiore valore).
tasto [F5] (DO IT). In questo modo si chiude la finestra e si
Page 71

65
L’MPC1000 è dotato inoltre di una funzione Patched Phrase che
permette al campione di frase di seguire il tempo della sequenza
quando è cambiata dinamicamente. Per maggiori informazioni,
vedi il paragrafo “Dividing a phrase sample to several regions”
(pagina 59) del Operator’s Manual.
Salvataggio dei dati
I dati e l’audio inseriti nell’MPC1000 verranno cancellati al momento dello spegnimento dell’apparecchio, a meno che non
vengano salvati. Se si desidera conservare i dati, procedere come descritto nel paragrafo “Save / Load” (pagina 89) o
“Connecting the MPC1000 to your computer” (pagina 98) del Operator’s Manual.
Spegnimento della funzione di caricamento automatico
L’MPC1000 è progettato come altri campionatori della serie MPC. Tuttavia, l’MPC1000 è impostato per caricare
automaticamente il file predefinito al momento dell’accensione dell’apparecchio, in modo da poter suonare immediatamente
con i pad. Si può anche spegnere questa funzione, se si desidera che l’MPC1000 non carichi il file predefinito. In questo caso,
al momento dell’accensione andranno caricati o registrati manualmente campioni sull’MPC1000.
01. Premere il tasto [ MODE ] e quindi [ PAD 2 ] (LOAD).
Quando si preme il tasto [MODE], il LED si accende a indicare che si può selezionare una modalità.
Premendo [PAD 2] (LOAD) a LED acceso, verrà visualizzata la pagina di caricamento LOAD.
02. Nel campo LOAD, premere il tasto [WINDOW].
Questo fa aprire la finestra Load Setup, in cui si può impostare la funzione di caricamento automatico.
03. Selezionare OFF nel campo Autoload e premere [F4] (CLOSE).
04. Spegnere e riaccendere l’MPC1000.
Page 72

66
Altre funzioni utili
L’MPC1000 ha molte funzioni eccitanti e intelligenti per aiutarvi nella produzione musicale.
Funzione ChopShop & Patched Phrase / Sliced Sample
L’MPC1000 divide un campione di frase in numerose regioni.
Dopo la suddivisione del campione di frase, vi sono due modi di
utilizzare il campione stesso. Uno è il “SLICED SAMPLES in cui
ogni regione divisa è assegnata a un singolo campione. L’altro è il
“PATCHED PHRASE”, che mantiene la frase come un unico
campione, ma di cui si può in seguito modificare liberamente il
tempo della frase.
Effetti e LFO con sincronizzazione del tempo
L’MPC1000 presenta due effetti stereo e un effetto master. Tra i
tipi di effetti, alcuni parametri in Flying Pan / Delay possono
essere sincronizzati al tempo della sequenza. L’LFO nel
programma può a sua volta essere sincronizzato al tempo della
sequenza.
Funzione di automazione del mixer
Vedi il paragrafo “Dividing a phrase sample to several regions” del Operator’s Manual (pagina 59).
Vedi Il “Chapter 14: Effect” del Operator’s Manual (pagina 83)
Vedi “Setting a LFO (Low Frequency Oscillator)” nel Operator’s Manual (pagina 77).
L’MPC1000 può registrare informazioni quali Livello e Pan, che
possono essere modificate con i cursori Q-Link e le manopole
durante la registrazione della sequenza e riprodotte durante la
riproduzione della sequenza.
Vedi paragrafo “Mixer Automation” del Operator’s Manual (pagina 80).
Page 73

Funzione Input Thru
67
L’MPC1000 può mixare un segnale audio in ingresso da REC IN o
DIGITAL IN con la riproduzione interna dall’MPC1000. Si può
anche controllare livello, pan, frequenza di taglio e risonanza del
segnale in ingresso con i cursori Q-Link e le manopole in tempo
reale.
Cursori Q-Link e manopole
Servendosi dei cursori Q-Link e delle manopole si possono
regolare parametri quali filtro, sintonia, ecc in un pad servendosi di
un cursore o di una manopola. Per il controllo di un parametro di
un Pad, ci sono due modi: “NOTE ON” e “REAL TIME” che
possono essere utilizzati indifferentemente.
Questo manuale descrive unicamente le funzioni di base dell’MPC1000. L’MPC1000 mette a disposizione delle vostre
creazioni musicali molte più funzioni. Leggere il Operator’s Manual per imparare l’uso e le funzioni dell’MPC1000.
Vedi paragrafo “Input Thru Function” del Operator’s Manual (pagina 81).
Vedi “Chapter 8: Q-Link Sliders” del Operator’s Manual (pagina 44)
Buon divertimento con l’MPC1000!
7-51-0225-B
Page 74

 Loading...