


 Loading...
Token Ring-in-Fast
Ethernet Server
Network Interface Card
User Guide
http://www.3com.com/
Part No. 09-1128-000
Published February 1998
3Com Corporation ■ 5400 Bayfront Plaza ■ Santa Clara, California ■ 95052-8145
Copyright © 1998, 3Com Corporation. All rights reserved. No part of this documentation may be reproduced in any form or by any means or used to make any derivative work (such as translation, transformation, or adaptation) without written permission from 3Com Corporation.
3Com Corporation reserves the right to revise this documentation and to make changes in content from time to time without obligation on the part of 3Com Corporation to provide notification of such revision or change.
3Com Corporation provides this documentation without warranty, term, or condition of any kind, either implied or expressed, including, but not limited to, the implied warranties of merchantability and fitness for a particular purpose. 3Com may make improvements or changes in the product(s) and/or the program(s) described in this documentation at any time.
UNITED STATES GOVERNMENT LEGENDS:
If you are a United States government agency, then this documentation and the software described herein are provided to you subject to the following:
United States Government Legend: All technical data and computer software is commercial in nature and developed solely at private expense. Software is delivered as Commercial Computer Software as defined in DFARS 252.227-7014 (June 1995) or as a commercial item as defined in FAR 2.101(a) and as such is provided with only such rights as are provided in 3Com’s standard commercial license for the Software. Technical data is provided with limited rights only as provided in DFAR 252.227-7015 (Nov 1995) or FAR 52.227-14 (June 1987), whichever is applicable. You agree not to remove or deface any portion of any legend provided on any licensed program or documentation contained in, or delivered to you in conjunction with, this User Guide.
If there is any software on removable media described in this documentation, it is furnished under a license agreement included with the product as a separate document, in the hard copy documentation, or on the removable media in a directory file named LICENSE.TXT. If you are unable to locate a copy, please contact 3Com and a copy will be provided to you.
Unless otherwise indicated, 3Com registered trademarks are registered in the United States and may or may not be registered in other countries.
3Com, EtherLink, Net Age, and Parallel Tasking are registered trademarks of 3Com Corporation. 3ComFacts is a service mark of 3Com Corporation.
CompuServe is a trademark of CompuServe, Inc. Pentium is a registered trademark of Intel Corporation. Microsoft, Windows, and Windows NT are registered trademarks of Microsoft Corporation. Novell and NetWare are registered trademarks of Novell, Inc.
Other brand and product names may be registered trademarks or trademarks of their respective holders.
ii

CONTENTS
ABOUT THIS GUIDE
Conventions 1
Related Documentation 2
1INTRODUCTION
2HARDWARE INSTALLATION
|
Safety Precautions |
2-1 |
|
|
|
|
Installation Requirements 2-2 |
|
|||
|
Installation Instructions |
2-2 |
|
|
|
|
Before You Install Software |
2-5 |
|
||
3 |
|
|
|||
SOFTWARE INSTALLATION |
|
||||
|
Obtaining the Latest Drivers |
3-1 |
|
||
|
Installing the NetWare Server Driver |
3-1 |
|||
|
NetWare 3.12 |
3-2 |
|
|
|
|
NetWare 4.1x |
3-2 |
|
|
|
|
Installing the Windows NT Driver |
3-3 |
|||
|
Windows NT 3.51 |
3-3 |
|
|
|
|
Windows NT 4.0 |
|
3-4 |
|
|
4 |
|
|
|
|
|
TROUBLESHOOTING |
|
|
|
||
|
LEDs 4-1 |
|
|
|
|
|
DOS Diagnostic Tests |
4-2 |
|
|
|
|
About the Configuration and Diagnostic Program 4-2 |
||||
|
Running Group 1 Tests |
4-3 |
|
||
|
Running the Group 3 Test |
4-4 |
|
||
|
Changing the Test Setup |
4-5 |
|
||
|
Getting Help If a Test Fails |
4-5 |
|||
|
Further Testing 4-6 |
|
|
|
|
iii

5 |
CONFIGURATION |
|
|
Changing Configuration Settings |
5-2 |
|
Changing the Windows NT Registry |
5-3 |
|
|
|
A SPECIFICATIONS |
|
|
|
NIC Specifications A-1 |
|
|
RJ-45 Connector Pin Assignments |
A-2 |
B |
|
|
TECHNICAL SUPPORT |
|
|
|
Online Technical Services B-1 |
|
World Wide Web Site B-1 |
|
|
3Com Bulletin Board Service |
B-1 |
|
Access by Analog Modem |
B-2 |
|
Access by Digital Modem |
B-2 |
|
3ComFacts Automated Fax Service |
B-2 |
|
3ComForum on CompuServe Online Service B-3 |
||
Support from Your Network Supplier |
B-3 |
|
Support from 3Com B-4 |
|
|
Returning Products for Repair B-6 |
|
|
INDEX
3COM CORPORATION LIMITED WARRANTY
FCC CLASS B STATEMENT
FCC DECLARATION OF CONFORMITY
3COM END USER SOFTWARE LICENSE AGREEMENT
iv
FIGURES
1-1 |
Basic TR-in-FE System |
1-1 |
|
1-2 |
Larger-Scale TR-in-FE System |
1-2 |
|
2-1 |
Inserting the NIC in a PCI Slot |
2-3 |
|
2-2 |
Connecting the Cable |
2-4 |
|
2-3 |
NIC LEDs at Power Up |
2-5 |
|
A-1 |
3C395 NIC RJ-45 Connector Pin Assignments A-2 |
||
v
TABLES
1 |
Notice Icons 1 |
|
|
|
2 |
Text Conventions 2 |
|
|
|
2-1 |
Installation Requirements |
2-2 |
|
|
4-1 |
3C395 NIC LED Descriptions |
4-1 |
|
|
4-2 |
DOS Diagnostic Tests |
4-2 |
|
|
4-3 |
Using the Configuration and Diagnostic Program |
4-3 |
||
4-4 |
Troubleshooting Tips |
4-6 |
|
|
5-1 |
Configuration Settings |
5-1 |
|
|
5-2 |
Using the Configuration and Diagnostic Program |
5-2 |
||
vi

Lifetime Limited
Warranty
3Com’s EtherLink®, Fast EtherLink, TokenLink®, TokenLink Velocity®, ATMLink™ PCI, FDDILink™, and Token Ring-in-Fast Ethernet Server network interface cards have a Lifetime Limited Warranty. For further details, please see 3Com’s Limited Warranty statement in this guide.
To ensure the very best 3Com service and support, take the time to complete the product registration card.
Customers in the countries or regions shown below should send the completed registration card to the appropriate address. Customers in other non-U.S. locations should send the registration card to the U.S. address on the front of the card.
■ Asia |
■ Italy, Greece, Spain, Portugal, Malta |
|
3Com Asia Ltd., Marketing Department |
3Com Mediterraneo Srl, |
|
Room 2506-07, 25/F. |
Marketing Department |
|
Citibank Tower |
Via Michelangelo Buonarroti, 1 |
|
Citibank Plaza, Central |
20093 Cologno Monzese MI |
|
Hong Kong |
Italy |
|
■ Australia, New Zealand |
■ Japan |
|
3Com Australia, Marketing Department |
3Com Japan, Marketing Department |
|
99 Walker Street |
Shinjuku Sumitomo Building 23F |
|
Level 7 |
2-6-1 Nishi Shinjuku, Shinjuku-ku |
|
North Sydney |
Tokyo 163-02 |
|
New South Wales 2060 |
Japan |
|
Australia |
■ Sweden, Finland, Norway, |
|
■ Belgium, Netherlands, Luxembourg |
||
Denmark |
||
3Com Benelux B.V., |
3Com Nordic, Marketing Department |
|
Marketing Department |
Torshamsgatan 39 |
|
Nevelgaarde 8-9 |
Box 1110 |
|
3436 ZZ |
164 22 KISTA |
|
Nieuwegein |
Sweden |
|
Netherlands |
■ United Kingdom, Eire |
|
■ France, Israel |
||
3Com UK Ltd., Marketing Department |
||
3Com France, Marketing Department |
Pacific House |
|
Immeuble McKinley |
Third Avenue |
|
BP 965 |
Globe Park Marlow-on-Thames |
|
1, Avenue de l’Atlantique |
Buckinghamshire, SL7 1YL |
|
91976 Les Ulis Courtaboeuf Cedex |
England |
|
France |
|
|
■ Germany, Austria, Switzerland |
|
|
3Com GmbH, Marketing Department |
|
|
Gustav-Heinemann-Ring 123 |
|
|
D-81739 Muenchen |
|
|
Munich |
|
|
West Germany |
|
ABOUT THIS GUIDE
This guide contains installation procedures and technical information about the 3Com® Token Ring-in-Fast Ethernet Server network interface card (3C395 NIC).
This guide is for those who install the card as part of a 3Com Token Ring-in-Fast Ethernet (TR-in-FE) network configuration.
It is assumed that users are familiar with NICs and with Ethernet, Fast Ethernet, and token ring network operations.
If the information in the release notes shipped with the product differs from the information in this guide, follow the information in the release notes.
Conventions
Table 1 and Table 2 list conventions that are used throughout this guide.
Table 1 Notice Icons
Icon |
Notice Type |
Description |
|
|
|
|
Information note |
Important features or instructions |
|
Caution |
Information to alert you to potential damage to a |
|
|
program, system, or device |
|
Warning |
Information to alert you to potential personal injury |
|
|
|

2 ABOUT THIS GUIDE
Table 2 Text Conventions
Convention |
Description |
|
|
Screen displays |
This typeface represents information as it appears on |
|
the screen. |
|
|
The words “enter” |
When you see the word “enter” in this guide, you must |
and “type” |
type something, and then press the Return or Enter key. |
|
Do not press the Return or Enter key when an |
|
instruction simply says “type.” |
|
|
Keyboard key names |
If you must press two or more keys simultaneously, the |
|
key names are linked with a plus sign (+). For example: |
|
Press Ctrl+Alt+Del. |
|
|
Menu commands |
Menu commands or button names appear in italics. |
and buttons |
Example: |
|
From the Help menu, select Contents. |
|
|
Words in italicized |
Italics emphasize a point or denote new terms at the |
type |
place where they are defined in the text. |
|
|
Words in bold-face |
Bold text denotes key features. |
type |
|
|
|
Related Documentation
The following document contains information about installing and using a TR-in-FE network configuration:
SuperStack II Switch 2000 TR Token Ring-in-Fast Ethernet Module (part number 99045)
1 INTRODUCTION
The 3Com Token Ring-in-Fast Ethernet Server network interface card (3C395 NIC) allows a Fast Ethernet server to receive encapsulated token ring packets. The 3C395 NIC is part of a 3Com Token Ring-in-Fast Ethernet (TR-in-FE) system that allows both Ethernet and token ring clients to share Fast Ethernet servers without the use of bridging, routing, or proprietary code.
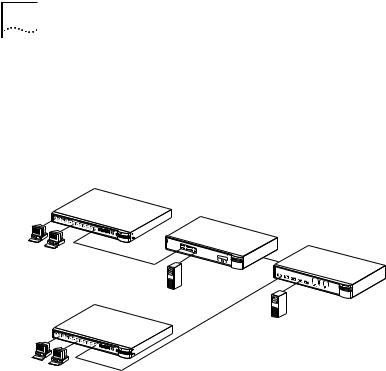
A basic TR-in-FE system, shown in Figure 1-1, gives token ring clients access to a 100 Mbps server. Such a system requires these components:
■Fast Ethernet switch (SuperStack II Switch 3000)
■TR-in-FE server (a Fast Ethernet server with a 3C395 NIC)
■3Com SuperStack II Switch 2000 TR with a 3Com SuperStack II Switch 2000 TR Token Ring-in-Fast Ethernet Module (TR-in-FE module)
SuperStack II Switch 3000
SuperStack II Switch 2000 TR with TR-in-FE module
100 Mbps TR-in-FE server
with 3C395 NIC
16/4 Mbps token ring clients
Figure 1-1 Basic TR-in-FE System
In a basic system, token ring clients connect to a SuperStack II Switch 2000 TR equipped with a TR-in-FE module. The TR-in-FE module encapsulates token ring packets within Fast Ethernet frames and allows interconnection to a Fast Ethernet switch connected to the TR-in-FE server. The 3C395 NIC allows the TR-in-FE server to receive the encapsulated token ring packets, thus providing access to the 100 Mbps server for token ring clients.
1-2 CHAPTER 1: INTRODUCTION
A larger-scale TR-in-FE configuration appears in Figure 1-2. Such a system allows both token ring and Ethernet devices to share the same Fast Ethernet physical wiring infrastructure and server base. Servers that are to be used for both token ring and Fast Ethernet clients must be equipped with both 3C395 and Fast Ethernet NICs.
SuperStack II Hub TR
16/4 Mbps token ring clients
SuperStack II Hub 100
SuperStack II Switch 2000 TR with TR-in-FE module
SuperStack II Switch 3000
Token ring servers
Servers with both 3C395 and Fast Ethernet NICs
Ethernet
clients
Figure 1-2 Larger-Scale TR-in-FE System
The 3C395 NIC is based on 3Com Fast Ethernet technology. The NIC has the following features:
■Parallel Tasking architecture for high throughput and low processor utilization
■Support for full-duplex operation
■Support for PCI 2.0 or higher specifications
■32-bit bus master design
■Status LEDs
■Single shielded RJ-45 connector
■Support for Category 5 unshielded twisted-pair (UTP) cabling for 100BASE-TX Fast Ethernet networks
2 |
HARDWARE INSTALLATION |
|
The 3C395 NIC is only part of an entire TR-in-FE system. This guide only describes how to install the NIC in a
Fast Ethernet server. For details on installing and setting up the TR-in-FE module, see the documentation for the TR-in-FE module: SuperStack II Switch 2000 TR
Token Ring-in-Fast Ethernet Module (part number 99045).
Safety Precautions
Observe the following safety precautions.
WARNING: Personal computers operate with voltages that can be lethal. Before removing the cover, turn off the computer and unplug it. Disconnect all cables that are connected to the main system unit. Remove jewelry from your hands and wrists. Use insulated or nonconductive tools.
CAUTION: The NIC is packed in an antistatic container to protect it during shipment. To avoid damaging the NIC or the PC, reduce static electricity on your body by wearing an electrostatic discharge wrist strap attached to the chassis or by touching an unpainted metal part of the chassis before handling the NIC.
CAUTION: Install the 3C395 NIC in a PCI slot that conforms to PCI 2.0 or higher specifications. Do not attempt to install the NIC in an ISA or EISA slot. Doing so may damage the NIC and the computer.

2-2 CHAPTER 2: HARDWARE INSTALLATION
Installation Requirements
Before you install the 3C395 NIC, the TR-in-FE module must be installed in the SuperStack II Switch 2000 TR and set up as described in the TR-in-FE documentation. Other installation requirements are summarized in Table 2-1.
Table 2-1 Installation Requirements
Processor |
80486 or Pentium. |
|
|
|
|
Server RAM |
At least 640 KB. |
|
|
|
|
PCI slot |
One slot that conforms to PCI 32-bit |
|
|
specifications, revision 2.0 or higher. |
|
|
|
|
Disk drive |
High-density 3.5-inch floppy diskette. |
|
|
|
|
Cable |
UTP Category 5. |
|
|
|
|
Connector |
RJ-45. |
|
|
|
|
Software |
One 3Com software diskette containing |
|
|
TR-in-FE drivers. |
|
|
|
|
Operating system |
■ Novell NetWare version 3.12 with |
|
|
|
LANDR9.EXE and 312PTA.EXE upgrade |
|
|
patches for ODI 3.3. |
|
■ |
Novell NetWare version 4.1x. |
|
■ |
Microsoft Windows NT version 3.5.1. |
|
■ |
Microsoft Windows NT version 4.0. |
|
|
|
Server BIOS |
Latest version. Contact the PC manufacturer |
|
|
to verify. |
|
|
|
|
Installation Instructions
Be sure that the TR-in-FE module is installed and set up as described in the TR-in-FE documentation. Then follow these steps to install the 3C395 NIC:
1Unpack and inspect the NIC.
Observe static electricity precautions. Verify that you have the following items:
■3C395 NIC
■3Com software diskette
■Token Ring-in-Fast Ethernet Network Interface Card User Guide

Installation Instructions |
2-3 |
If you find a problem, contact the network supplier and the carrier that delivered the package. If you need to return a NIC to 3Com, pack it in the original (or equivalent) packing material to maintain the warranty.
Complete the Product Registration Card and return it to 3Com. Or call 1-800-NET-3Com for immediate registration.
2Remove the computer cover.
If necessary, refer to the PC manufacturer’s documentation for details on removing the computer cover.
3Insert the 3C395 NIC in a PCI slot.
The PCI slot must conform to PCI Local Bus Specification, revision 2.0 or higher.
Select an available PCI slot and remove the expansion cover plate. (Keep the screw.) Insert the NIC securely in the
PCI slot (not in an ISA or EISA slot). Replace the screw. See Figure 2-1.
If necessary, refer to the PC manufacturer’s documentation for details on installing expansion boards.
PCI slot |
ISA/EISA slot |
Figure 2-1 Inserting the NIC in a PCI Slot
Loading...