


Contents
Congratulations |
4 |
Sunbeam’s Safety Precautions |
5 |
Features of your Café Series® Food Processor |
6 |
Attachments for your Café Series® |
|
Food Processor |
8 |
Using your Café Series® Food Processor |
9 |
Fitting/using the tools on your Café Series® |
|
Food Processor |
11 |
Storing your Café Series® Food Processor |
13 |
Handy hints for processing |
15 |
Care and cleaning |
17 |
Recipes |
18 |
Important instructions – retain for future use.
3
Congratulations
Congratulations on the purchase of your Sunbeam Café Series® Food Processor. The Sunbeam Café Series® delivers quality,
style and superior performance capturing the essence of the commercial kitchen.
Inspired by heavy-duty equipment found in restaurants, cafes and bars, the Sunbeam Café Series® is built to last. It brings together a range of appliances designed to expertly create authentic café food and beverages at home.
Uncompromising blends of stainless steel, chrome and die-cast alloy characterise the range. This combined with advanced
technology and functional design, guarantee the performance, that each product will surpass expectations.
The Sunbeam Café Series® Food Processor is designed with quality components, a die-cast metal base and includes a number of features, to create a versatile addition to your kitchen.
4
Sunbeam’s Safety Precautions
|
SAFETY PRECAUTIONS FOR YOUR SUNBEAM |
• |
All blades and attachments should be removed |
|
|
FOOD PROCESSOR LC9000. |
|
with care before cleaning. |
|
• |
Always use extreme care when handling blades and |
• |
Do not over fill the processor. |
|
|
cutting discs. These are extremely sharp and may |
• |
Do not process for longer than the time periods |
|
|
cause injury if handled incorrectly. Always store |
|||
|
|
recommended in the operating chart. |
||
|
blades and cutting discs in their respective covers |
|
||
|
• |
Always remove the blade before emptying the |
||
|
or processing containers. |
|||
|
|
processing bowl of its contents. |
||
• |
Unplug from power outlet when not in use, before |
|
||
• |
Do not operate for more than 30 seconds at a time |
|||
|
putting on or taking off attachments, and before |
|||
|
|
when processing heavy loads. None of the recipes |
||
|
cleaning. |
|
||
|
|
in this manual are considered a ‘heavy load’. |
||
• |
Do not put hot liquids into the processing bowl. |
|
||
• |
Take care when removing the bowl from the base, |
|||
|
Cool to room temperature before placing in |
|||
|
|
emptying the bowl or during fitting and removal of |
||
|
processing bowl. |
|
||
|
|
blade system, as blades are extremely sharp. |
||
• |
Avoid contacting moving parts at all times. |
|
||
|
|
|||
• |
Place the processing bowl onto the base of the |
|
|
|
|
processor before fitting any attachments. |
|
|
|
|
|
|
|
|
|
Sunbeam is very safety conscious when designing and |
• |
Do not use an appliance for any purpose |
|
|
manufacturing consumer products, but it is essential |
|
other than its intended use. |
|
|
that the product user also exercise care when using |
• |
Do not place an appliance on or near a hot gas |
|
|
an electrical appliance. Listed below are precautions |
|
flame, electric element or on a heated oven. |
|
|
which are essential for the safe use of an electrical |
• |
Do not place on top of any other appliance. |
|
|
appliance: |
• |
Do not let the power cord of an appliance hang over |
|
• |
Read carefully and save all the instructions provided |
|
the edge of a table or bench top or touch any hot |
|
|
with an appliance. |
|
surface. |
|
• |
Always turn the power off at the power outlet before |
• |
Do not operate any electrical appliance with a |
|
|
you insert or remove a plug. Remove by grasping the |
|
damaged cord or after the appliance has been |
|
|
plug - do not pull on the cord. |
|
damaged in any manner. If damage is suspected, |
|
• |
Turn the power off and remove the plug when the |
|
return the appliance to the nearest Sunbeam |
|
|
appliance is not in use and before cleaning. |
|
Appointed Service Centre for examination, repair |
|
• |
Do not use your appliance with an extension cord |
|
or adjustment. |
|
|
unless this cord has been checked and tested by a |
• |
For additional protection, Sunbeam recommend the |
|
|
qualified technician or service person. |
|
use of a residual current device (RCD) with a tripping |
|
• |
Always use your appliance from a power outlet of the |
|
current not exceeding 30mA in the electrical circuit |
|
|
voltage (A.C. only) marked on the appliance. |
|
supplying power to your appliances. |
|
• |
This appliance is not intended for use by persons |
• |
Do not immerse the appliance in water or any other |
|
|
(including children) with reduced physical, sensory |
|
liquid unless recommended. |
|
|
or mental capabilities, or lack of experience and |
• |
Appliances are not intended to be operated |
|
|
knowledge, unless they have been given supervision |
|
by means of an external timer or separate remote |
|
|
or instruction concerning use of the appliance by a |
|
control system. |
|
|
person responsible for their safety. |
• |
This appliance is intended to be used in household |
|
• |
Children should be supervised to ensure that they do |
|
and similar applications such as: staff kitchen areas |
|
|
not play with the appliance. |
|
in shops, offices and other working environments; |
|
• |
The temperature of accessible surfaces may be high |
|
farm houses; by clients in hotels, motels and other |
|
|
when the appliance is operating. |
|
residential type environments; bed and breakfast |
|
• |
Never leave an appliance unattended while in use. |
|
type environments. |
If you have any concerns regarding the performance and use of your appliance, please visit www.sunbeam.com.au or contact the Sunbeam Consumer Service Line.
Ensure the above safety precautions are understood.
5
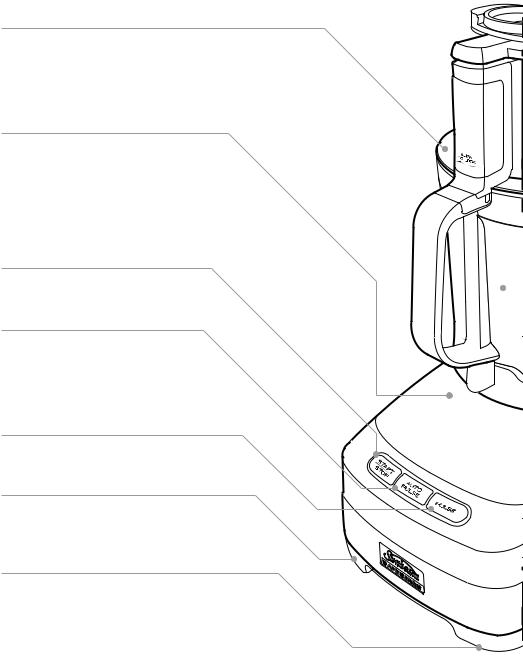
Features of your Café Series® Food Processor
Processing cover
The processing cover or lid of bowl provides a safety feature to the appliance. The appliance will not operate unless the bowl, cover and large feed pusher are correctly positioned and locked into place.
1400 watt induction motor
The die-cast base houses a powerful 1400 watt motor. This motor is ideal for high load applications during processing, and provides a
greater starting strength whilst maintaining speed throughout. The Cafe Series® Food Processor motor is reliable, quiet, will provide a long life and is backed by a 10 year guarantee.
START/STOP button
For easy use the START/STOP button starts and stops the operation of the food processor.
Auto Pulse
The Auto Pulse function is a clever
and versatile feature providing short bursts of processing, for a set length of time. Creating bread or biscuit crumbs couldn’t be easier.
Pulse
The control panel includes a Pulse function for optimum cutting precision during processing.
Storage drawer
The unique drawer design enables attachments to be stored conveniently, and safely, within the appliance when not in use.
Non-slip feet
Keeps the food processor secure on the bench top during use.
6
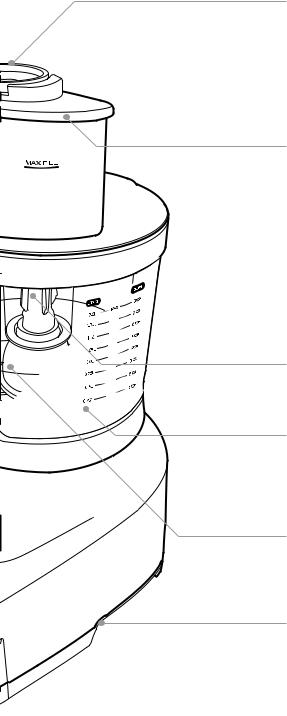
Food Pushers
The food pushers assist in guiding the food through the chute to ensure ingredients hit the blade vertically for best processing results. Three food pushers are included, depending on the size of the chute being used and the size of foods. For thinner foods, use the smaller internal pusher for consistent even slicing. This pusher also doubles as a measuring cup.
Wide Chute
At 14cm’s wide, the extra wide chute eliminates the need to cut most ingredients, to fit into the chute. Guide ingredients through the chute into the selected blades. Additional ingredients can be added during other processing tasks.
Chute Safety Feature
The wide chute pusher provides a safety interlock feature to the appliance. The motor will not operate unless the bowl and lid are correctly locked in position, and the large feed pusher is inserted.
Spindle
Drives all the food processing attachments. The spindle must be in place to operate the food processor.
Processing bowl with handle
Large 2 litre capacity processing bowl.
The handle of the processing bowl includes a patent-pending robust stainless steel interlock that prevents food catching and building up, ensuring easy cleaning.
Second processing bowl
The smaller processing bowl is ideal for small amounts of ingredients. At 400ml in volume, this bowl is perfect for chopping nuts, creating pesto or chopping herbs.
Cord storage facility
For added convenience the unused cord length can easily be pushed into the base of the processor for storage.
7
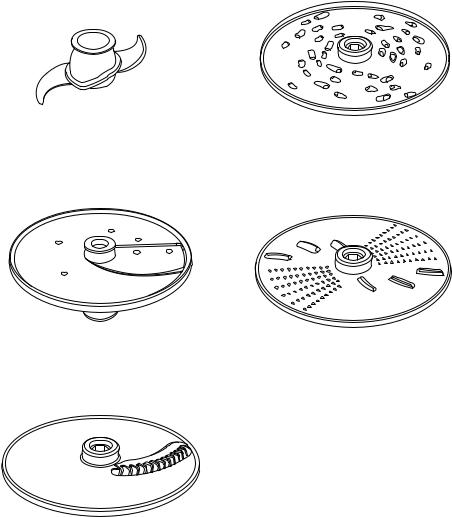
Attachments for your Café Series® Food Processor
1. Universal 's' blade
Stainless steel smooth edged processing blade is designed for cutting, kneading, whisking and emulsifying. The second smaller ‘s’ blade is suitable for the smaller bowl.
4. Reversible shredding disc - fine and coarse
Ideal control, the reversible stainless steel shredding blades allow for the choice of fine or coarse results.
2. Variable slicing blade
The variable stainless steel slicing blade allows foods to be sliced to a variety of thicknesses, up to 7mm. This blade can not be used in the small processing bowl.
5. Reversible grating and shaving disc
Unique to processing is the shaving blade. It does lovely thin flakes, great for parmesan
and sweet potato crisps. The alternate side is ideal for hard cheeses and chocolate.
3. Julienne disc
The stainless steel julienne blade is perfect for achieving consistent julienne cut food, perfect for salad, stir fry or garnishing.
8
Using your Café Series® Food Processor
•Before using your Cafe Series® Food Processor, familiarise yourself with all parts, remove all promotional and
packaging materials. Use caution when handling blades, as blades are sharp.
•Wash the processing bowl, processing cover and all attachments in warm water using a mild detergent. Dry each part thoroughly before use.
•Before you assemble the food processor, ensure that the power cord is unplugged.
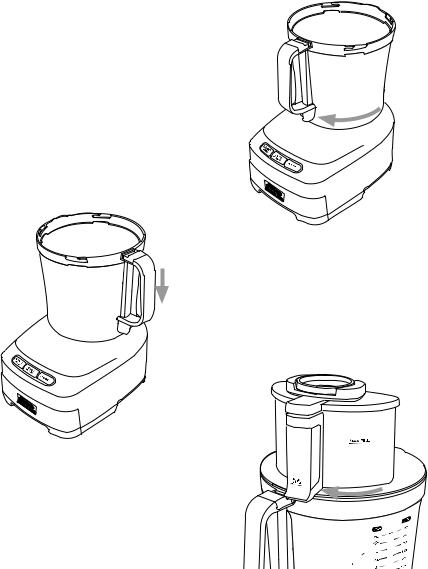
1.Place the motor base facing you on a dry, level surface.
2.Place the processing bowl onto the motor base, the bowl will only sit correctly on the base when the handle is positioned to the right, see figure 1.
Fig 1
3.Rotate the handle clockwise to lock, as indicated by the graphics on the left side of the motorbase, see figure 2.
Fig 2
4.Position the lid onto the processing bowl. You will notice a solid grey line  to the left of the holding lip on the lid, when placing the lid onto the bowl this arrow needs
to align with the solid grey line  on the handle of the bowl. To lock, turn the lid clockwise, as indicated by the graphics, on the top of the handle, see figure 3.
Fig 3
9
Using your Café Series® Food Processor continued
Important: If the processing bowl, processing cover and large pusher are not correctly assembled, the food processor will not operate. This is a safety feature.
Using your Food Processor
1.Plug the power cord into a 230-240V AC power outlet and turn the power ‘ON’.
2.Using the START/STOP button on the control panel, press once to start processing.
The Pulse function remains on as long as the Pulse button is pressed down.
The Auto Pulse function will run for a predetermined length of time.
Further ingredients can be added whilst the appliance is running by pouring through the medium or small feed tube once the food pusher/s have been removed. Removing the large pusher will stop the motor running.
3.After you have completed processing, press the START/STOP button to stop processing.
Note: For maximum control, load the feed tube before turning on your food processor. Always use the food pusher for more evenly processed foods and never push with your fingers.
Important: The food processor is fitted with a safety thermal cut-out device and will shut off in the event of overload. If this occurs, switch the appliance off and it will automatically reset when cool.
10
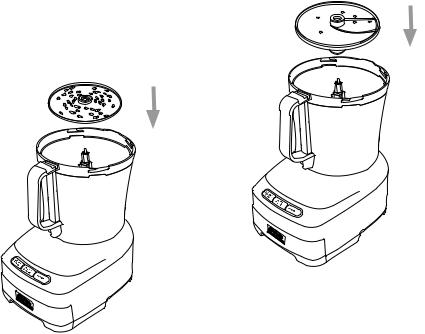
Fitting/Using the tools on your Café Series® Food Processor
Note: All attachments must be firmly attached to the spindle. Always adjust the attachments until you are sure that they are correctly fitted.
Placing the spindle
1.Fit the spindle onto the drive shaft, see figure 4.
3.Place food into the processing bowl.
4.Fit the processing cover to the processing bowl, see figure 3 and place the food pusher in the feed chute.
5.Plug the power cord into a 230-240V AC power outlet and turn the power ‘ON’.
6.Start processing using the START/STOP or Pulse buttons.
7.When processing is complete, remove the spindle and blade from the processing bowl before removing the processed food.
Fig 4
Universal 's' Blade
1.Fit the processing bowl and spindle as detailed previously in figures 1, 2 & 4.
2.Fit the universal 's' blade over the spindle and press firmly into place, see figure 5.
Warning: Use caution, as blades are sharp. Always handle the processing blade by its central plastic section.
Fig 5
11
Fitting/Using the tools on your Café Series® Food Processor continued
Reversible grating/shaving, shredding and julienne discs
1.Fit the processing bowl and spindle as detailed previously, in figures 1, 2 and 4.
2.Select the 'Reversible' disc of your choice – Shredding (fine or coarse), Grating/Shaving or the dedicated Julienne disc.
3.Fit the disc over the spindle and press firmly into place, see figure 6.
Warning: Use caution as the blades are sharp.
Variable slicing blade
1.Fit the processing bowl and spindle as detailed previously in figures 1, 2 and 4.
2.Fit the slicing disc over the spindle and press firmly into place, see figure 7.
Fig 7
Fig 6
Warning: The variable slicing blade can be used in the large processing bowl only.
Do Not use the variable slicing blade in the small bowl.
4.Fit the processing cover to the processing bowl as previously shown in figure 3 and place the food pusher in the feed chute.
5.Plug the power cord into a 230-240V AC power outlet and turn the power ‘ON’.
6.Start processing using the START/STOP button.
7.When processing is complete, remove the disc and spindle from the processing bowl before removing the processed food.
Warning: Use caution as the blades are sharp.
3.Fit the processing cover to the processing bowl as previously shown in figure 3 and place the food pusher in the feed tube.
4.Plug the power cord into 230-240V AC power outlet and turn the power 'ON'.
5.Start processing using the START/STOP button.
6.When processing is complete, remove the disc and spindle from the processing bowl before removing the processed food.
12

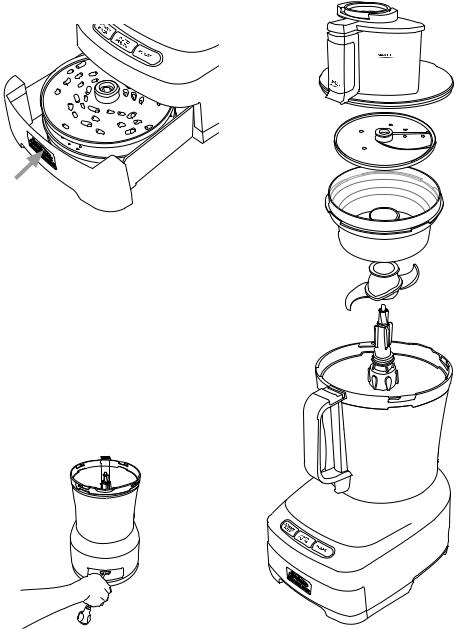
Storing your Café Series® Food Processor
The Café Series® Food Processor was designed so that all attachments can be stored within the unit itself, see figure 8.
3.Place one of the 'Reversible discs' in storage drawer as indicated in figure 10.
Fig 8
Storage drawer
The 'Julienne Blade', 'Reversible Shredding' disc, 'Reversible Grating and Shaving' disc are all stored in the storage drawer.
1.Slide out the storage drawer at the base of the food processor.
2.Place the small universal ‘s’ blade at the rear of the drawer as indicated in figure 9.
Fig 10
4.Place the 'Julienne Disc' in the storage drawer as indicated in figure 11.
Fig 11
5.Place the remaining 'Reversible Disc' in on top of the first 'Julienne Disc' as indicated in figure 12.
Fig 9
Fig 12
13
Storing your Café Series® Food Processor continued
6.Close storage drawer, see figure 13.
Fig 13
Processing bowl storage, see figure 14.
1.Place the processing bowl onto the base of the food processor.
2.Fit the spindle over the drive shaft.
3.Fit the large universal 's' blade over spindle.
3.Place the small bowl inside the large bowl.
4.Place the 'Variable Slicing' blade over the spindle and then fit the processing cover to the processing bowl.
Cord storage
The power cord can be stored by pushing it into the back of the motor base,
see figure 15.
Fig 14
Fig 15
14
 Loading...