


Instructions for
Installation and Use Electric built-in
double oven
Contents
GB
/*
English, 2
FID20WH/1 FIDM20IX/1 FID20BK/1 FID20IX/1
Introduction, 2 Safety Information, 3 Features, 4-5
Temperature Conversion Chart, 6 Controls, 7-8
Multifunction Switch (FIDM20 only), 9 The electronic programmer, 10
Grill Pan and Handle, 11
Operation when using the Top Oven for Grilling (FID20), 12
Conventional Grilling, 13
Operation when using the Top Oven for Grilling (FIDM20), 14
Using the Top Oven as a Convection Oven, 15 Operation when using the Top Oven as a Convection Oven, 16
Top Oven Cookery Notes, 17
Top Oven Temperature Charts, 18-19 Main Oven - Fan Grilling (FID20 only), 20
Main Oven - Fan Grilling Roasting Chart (FID20 only), 21
Using the Main Oven for Other Functions, 22 Main Oven - Convention Oven (FIDM20 only), 23 Main Oven - Fan Oven (all Models), 24
Main Oven - Fan Oven Cookery Notes, 25-26 Main Oven Temperature Chart, 27-28
Main Oven Grilling (FIDM20), 29 Care and Cleaning, 30-32 Installation, 33
Tall Cabinet Ventilation, 34-35
If Something Goes Wrong?, 36 If it Still Won't Work, 37 Guarantee Information, 38 Service Information, 39
You must read these instructions prior to using your appliance and retain them for future use.
Introduction
Your new appliance is guaranteed* and will give GB lasting service.This guarantee is only applicable if
the appliance has been installed in accordance with the installation instructions detailed in this booklet. To help make best use of your cooking equipment, please read this booklet carefully.
The cooker is designed specifically for domestic use and responsibility will not be accepted for use in any other installation.
When the cooker is first used an odour may be emitted, this will cease after a period of use.
When first using the cooker ensure that the room is well ventilated (e.g. open a window or use an extractor fan) and that persons who may be sensitive to the odour avoid any fumes.
It is suggested that any pets be removed from the room until the smell has ceased. This odour is due to temporary finish on oven liners and elements and also any moisture absorbed by the insulation.
* The guarantee is subject to the provisions that the appliance:
(a)Has been used solely in accordance with the Users Instruction Book.
(b)Has been properly connected to a suitable supply voltage as stated on the rating plate attached to this equipment.
(c)Has not been subjected to misuse or accident or been modified or repaired by any person other than the authorised employee or agent.
(d)Has been correctly installed.
This appliance conforms to the following EEC
Directive:
Electromagnetic Compatibility 89/336/EEC
92/31/EEC
93/68/EEC
Low Voltage Equipment 2006/95/EEC 93/68/EEC
Technical Characteristics
Top Oven
Usable Volume: 35 Litres
ENERGY LABEL - Top Oven
Directive 2002/40/EC on the label of electric ovens Norm EN 50304
Declared energy consumption for Natural convection Class
heating mode: Conventional
Main Oven
Usable Volume: 65 Litres
ENERGY LABEL - Main Oven
Directive 2002/40/EC on the label of electric ovens Norm EN 50304
Declared energy consumption for Natural convection Class
heating mode: Fan Oven 


Voltage and Frequency
230-240V~ 50Hz
2

Safety Information
When used properly your appliance is completely safe but as with any electrical product there are certain precautions that must be observed. PLEASE READ THE PRECAUTIONS BELOW BEFORE USING YOUR APPLIANCE.
Always
•Always make sure you remove all packaging and literature from inside the oven and grill compartments before switching on for the first time.
•Always make sure you understand the controls prior to using the appliance.
•Always keep children away from the appliance when in use as the surfaces will get extremely hot during and after cooking.
•Always make sure all controls are turned off when you have finished cooking and when not in use.
•Always stand back when opening an oven door to allow any build up of steam or heat to disperse.
•Always use dry, good quality oven gloves when removing items from the oven/grill.
•Always take care to avoid heat/steam burns when operating the controls.
•Always turn off the electricity supply at the wall switch before cleaning and allow the appliance to cool.
•Always make sure the shelves are in the correct position before switching on the oven.
•Always keep the oven and grill doors closed when the appliance is not in use.
•Always take care when removing utensils from the top oven when the main oven is in use as the contents may be hot.
•Always keep the appliance clean as a build up of grease or fat from cooking can cause a fire.
•Always follow the basic principles of food handling and hygiene to prevent the possibility of bacterial growth.
•Always keep ventilation slots clear of obstructions.
•Always refer servicing to a qualified appliance service engineer.
•During use the oven becomes hot. Care should be taken to avoid touching heating elements inside the oven.
SAFETY ADVICE
IN THE EVENT OF A CHIP PAN OR ANY OTHER PAN FIRE:
1.TURN OFF THE COOKER APPLIANCE AT THE WALL SWITCH.
2. COVER THE PAN WITH A FIRE BLANKET OR
DAMP CLOTH, this will smother the flames and |
GB |
|
|
extinguish the fire. |
|
3.LEAVE THE PAN TO COOL FOR AT LEAST 60 MINUTES BEFORE MOVING IT. Injuries are often caused by picking up a hot pan and rushing outside with it. NEVER USE A FIRE EXTINGUISHER TO PUT OUT A PAN FIRE as the force of the extinguisher is likely to tip the pan over. Never use water to extinguish oil or fat fires.
Never
•Never leave children unsupervised where a cooking appliance is installed as all cooking surfaces will be hot during and after use.
•Never allow anyone to sit or stand on any part of the appliance.
•Never store items above the appliance that children may attempt to reach.
•Never remove the oven shelves whilst the oven is hot.
•Never heat up unopened food containers as pressure can build up causing the container to burst.
•Never store chemicals, food stuffs or pressurised containers in or on the appliance, or in cabinets immediately above or next to the appliance.
•Never operate the grill with the door closed as this will cause the appliance to overheat.
•Never use the appliance as a room heater.
•Never use the grill to warm plates.
•Never dry any items on the oven doors.
•Never install the appliance next to curtains or other soft furnishings.
•Never allow children to play with the appliance controls.
•Never use 'steam cleaners'.
Children should be supervised to ensure that they do not play with the appliance.
! The appliance should not be operated by people (including children) with reduced physical, sensory or mental capacities, by inexperienced individuals or by anyone who is not familiar with the product. These individuals should, at the very least, be supervised by someone who assumes responsibility for their safety or receive preliminary instructions relating to the operation of the appliance.
3
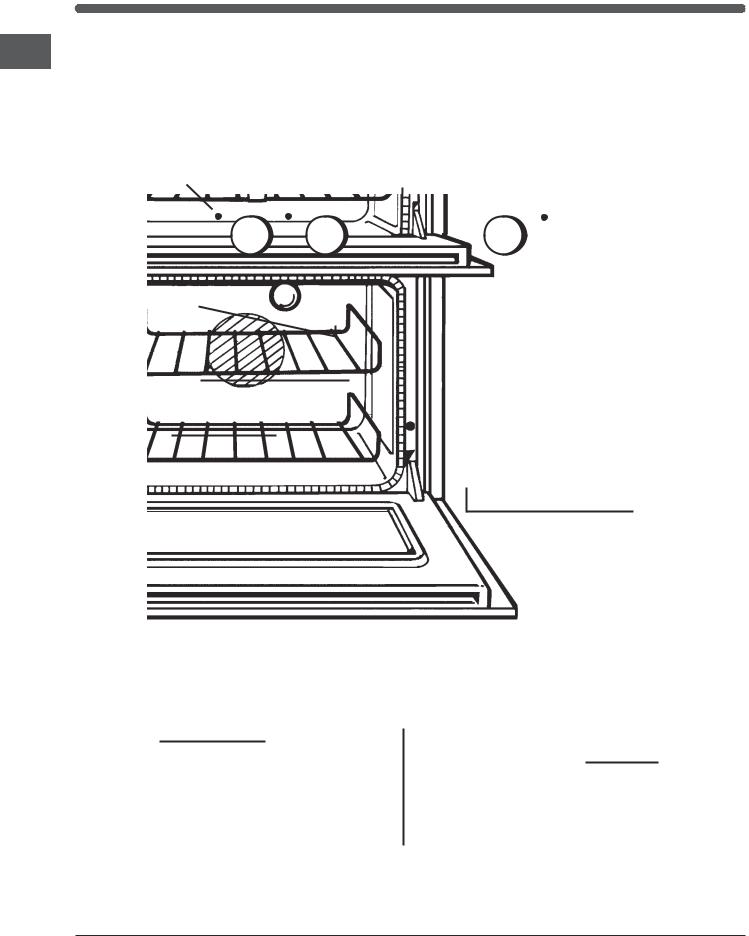
Features (FID20 only)
WARNING: DO NOT TOUCH THE GLASS DOORS WHEN THE OVEN IS IN USE AS GB THESE AREAS CAN BECOME HOT.
TOP OVEN
TEMPERATURE
|
|
|
|
|
|
|
CONTROL |
|
|
|
MAIN OVEN TEMPERATURE |
||||||||||||
GRILL |
TOP OVEN |
|
|
|
|
& FUNCTION CONTROL |
|||||||||||||||||
PILOT |
PILOT LIGHT |
|
TIMER |
|
|
|
MAIN OVEN PILOT LIGHT |
||||||||||||||||
LIGHT |
|
|
|
|
|
|
|
||||||||||||||||
GRILL |
|
|
|
|
|
|
|
|
|
|
|
|
|
|
|
|
|
|
|
|
|||
SETTING |
|
|
|
|
|
|
|
|
|
|
|
|
|
|
|
|
|
|
|
|
|||
|
|
|
|
|
|
|
|
|
|
|
|
|
|
|
|
|
|
|
|
||||
CONTROL |
|
|
|
|
|
|
|
|
|
|
|
|
|
|
|
|
|
|
|
|
|
||
|
|
|
|
|
|
|
|
|
|
|
|
|
|
|
|
|
|
|
|
|
|||
GRILL |
|
|
|
|
|
|
|
|
|
|
|
|
|
|
|
|
|
|
|
|
|||
ELEMENT |
|
|
|
|
|
|
|
|
|
|
|
|
|
|
|
|
|
|
|
|
|||
|
|
|
|
|
|
|
|
|
|
|
|
|
|
|
|
|
|
|
CATALYTIC |
||||
|
|
|
|
|
|
|
|
|
|
|
|
|
|
|
|
|
|
||||||
GRILL PAN & |
|
|
|
|
|
|
|
|
|
|
|
|
|
|
|
|
|
LINER |
|||||
|
|
|
|
|
|
|
|
|
|
|
|
|
|
|
|
|
|
|
|
||||
FOOD SUPPORT |
|
|
|
|
|
|
|
|
|
|
|
|
|
|
|
GRILLSHELF |
|||||||
INNER DOOR |
|
|
|
|
|
|
|
|
|
|
|
|
|
|
|
||||||||
|
|
|
|
|
|
|
|
|
|
|
|
|
|
|
|
|
|
|
|
||||
GLASS |
|
|
|
|
|
|
|
|
|
|
|
|
|
|
|
|
|
|
TOP OVEN |
||||
|
|
|
|
|
|
|
|
|
|
|
|
|
|
|
|
|
|
|
|
|
|
||
OVEN LIGHT |
|
|
|
|
|
|
|
|
|
|
|
|
|
|
|
|
|
|
|
|
DOOR |
||
|
|
|
|
|
|
|
|
|
|
|
|
|
|
|
|
|
|
|
|
||||
|
|
|
|
|
|
|
|
|
|
|
|
|
|
|
|
|
|
FAN GRILL |
|||||
|
|
|
|
|
|
|
|
|
|
|
|
|
|
|
|
|
|
||||||
|
|
|
|
|
|
|
|
|
|
|
|
|
|
|
|
|
|
|
|
|
ELEMENT |
||
|
|
|
|
|
|
|
|
|
|
|
|
|
|
|
|
|
|
|
|
|
OVEN SHELF |
||
|
|
|
|
|
|
|
|
|
|
|
|
|
|
|
|
|
|
|
|
|
|||
CATALYTIC |
|
|
|
|
|
|
|
|
|
|
|
|
|
|
|
|
|
|
|
|
|
OVEN FAN |
|
|
|
|
|
|
|
|
|
|
|
|
|
|
|
|
|
|
|
|
|
|
|||
|
|
|
|
|
|
|
|
|
|
|
|
|
|
|
|
|
|
|
|
|
|
||
|
|
|
|
|
|
|
|
|
|
|
|
|
|
|
|
|
|
|
|
|
|
||
LINER |
|
|
|
|
|
|
|
|
|
|
|
|
|
|
|
|
|
|
|
|
|||
INNER DOOR
GLASS
MAIN OVEN
DOOR
MODEL & SERIAL NUMBER
NEVER line the shelves, floor or sides of the oven or grill with aluminium foil as overheating and damage may result.
4

Features (FIDM20 only)
WARNING: DO NOT TOUCH THE GLASS DOORS WHEN THE OVEN IS IN USE AS
THESE AREAS CAN BECOME HOT. |
GB |
|
GRILL
PILOT
LIGHT
GRILL
SETTING
CONTROL
GRILL
ELEMENT
GRILL PAN & FOOD SUPPORT
INNER DOOR
GLASS
MAIN OVEN
LIGHT
CATALYTIC
LINER
INNER DOOR GLASS
TOP OVEN
TEMPERATURE
CONTROL
TOP OVEN
PILOT LIGHT
MAIN OVEN
TEMPERATURE
CONTROL
MAIN OVEN PILOT LIGHT
TIMER
MULTIFUNCTION
SELECTOR
TOP OVEN LIGHT
GRILL SHELF
CATALYTIC
LINER
TOP OVEN
DOOR
FAN GRILL
ELEMENT
OVEN SHELF
OVEN FAN
MAIN OVEN
DOOR
MODEL & SERIAL NUMBER
NEVER line the shelves, floor or sides of the oven or grill with aluminium foil as overheating and damage may result.
5

Temperature Conversion Chart
The chart below gives details of comparisons of oven settings for gas conventional ovens and fan oven in
GB |
degrees °F and °C |
|
|
|
|
|
|
|
|
|
|
|
|
|
|
|
|
|
Gas Mark |
|
Conventional Oven |
Fan Oven |
|
|
|
|
|
|
|
|
°F |
|
°C |
°C |
|
|
|
|
|||
|
|
|
|
|
|
|
½ |
250 |
|
120 |
100 |
|
|
|
|
|
|
|
1 |
275 |
|
140 |
120 |
|
|
|
|
|
|
|
2 |
300 |
|
150 |
130 |
|
|
|
|
|
|
|
3 |
325 |
|
160 |
140 |
|
|
|
|
|
|
|
4 |
350 |
|
180 |
160 |
|
|
|
|
|
|
|
5 |
375 |
|
190 |
170 |
|
|
|
|
|
|
|
6 |
400 |
|
200 |
180 |
|
|
|
|
|
|
|
7 |
425 |
|
220 |
200 |
|
|
|
|
|
|
|
8 |
450 |
|
230 |
210 |
|
|
|
|
|
|
|
9 |
475 |
|
240 |
220 |
|
|
|
|
|
|
6
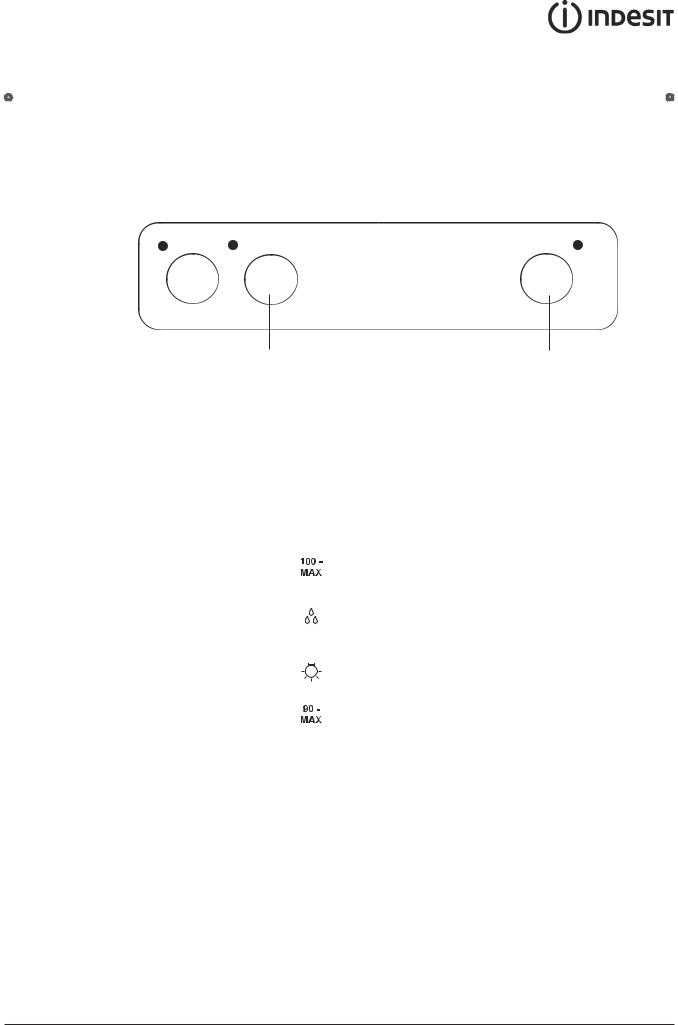
Controls (FID20 only)
|
|
|
|
|
|
|
|
|
|
|
|
|
A GRILL SETTING |
|
|
|
|
|
|
||||
|
|
|
|
|
|
GB |
|||||
|
|
CONTROL |
|
|
|
|
|
||||
|
|
|
|
|
|
|
|
||||
|
|
|
|
TOP OVEN |
|
|
MAIN OVEN |
||||
|
|
|
|
|
|
||||||
|
|
|
|
PILOT LIGHT |
TIMER |
PILOT LIGHT |
|||||
GRILL |
|
|
|
|
|
|
|
|
|
|
|
|
|
|
|
|
|
|
|
|
|
|
|
|
|
|
|
|
|
|
|
|
|
||
|
|
|
|
|
|
||||||
PILOT |
|
|
|
|
|
|
|
|
|
||
|
|
|
|
|
|
|
|
|
|||
LIGHT |
|
|
|
|
|
|
|||||
|
|
|
|
|
|
||||||
|
B TOP OVEN TEMPERATURE |
C MAIN OVEN TEMPERATURE |
|||
|
CONTROL |
AND FUNCTION |
|||
|
|
|
|
|
CONTROL |
|
|
|
|
|
|
Control |
Description |
Function |
|
||
Knob |
|
||||
|
|
|
|
|
|
|
|
|
|
|
|
|
|
Selects the heat at which the grill will cook the food. |
|||
A |
Grill Setting Control |
min - max Grill Control Settings: |
|||
|
|
||||
|
|
Min = Low, Max = High |
|||
|
|
|
|
|
|
B |
Top Oven Temperature Control |
|
|
|
Selects the cooking temperature (Degrees |
|
|
|
|||
|
|
|
Centigrade) when using the top oven as a |
||
|
|
|
|
|
conventional oven. |
|
|
|
|
|
|
|
|
|
|
|
|
|
|
|
|
|
Fan Only Setting |
|
|
|
|
|
|
|
|
|
|
|
- This is used to decrease the amount of time |
|
|
|
|
|
required to defrost food items. |
|
|
|
|
|
|
C |
Main Oven Temperature & |
|
|
|
Oven Light Only |
|
|
|
|||
|
|
|
- Switches on the Main Oven Interior Light Only |
||
Function Control |
|
|
|
||
|
|
|
|
Main Oven Temperature Scale |
|
|
|
|
|
|
|
|
|
|
|
|
|
|
|
|
|
|
(In Degrees Centigrade). |
|
|
|
|
|
- When cooking select the required |
|
|
|
|
|
cooking temperature. |
|
|
|
|
|
|
Cooling Fan
A gentle flow of air will be blown below the control panel when the grill control is used and after a short period of time when the ovens are used.
Note: Whenever the appliance has been used, the cooling fan may run on or restart itself after all the controls have been turned off. This indicates that the appliance is still warm.
Oven Interior Lights
The oven lights are operated when their respective oven control is used.
(N.B. Not all models have a top oven interior light). The main oven has a light only position.
Slow Cooking
The main oven has a "Slow Cook Setting" this can be used for slow cooking, keeping food warm and warming plates for a short period.
Note: It is advisable to check that all oven controls have been switched off when you have finished using the appliance.
7
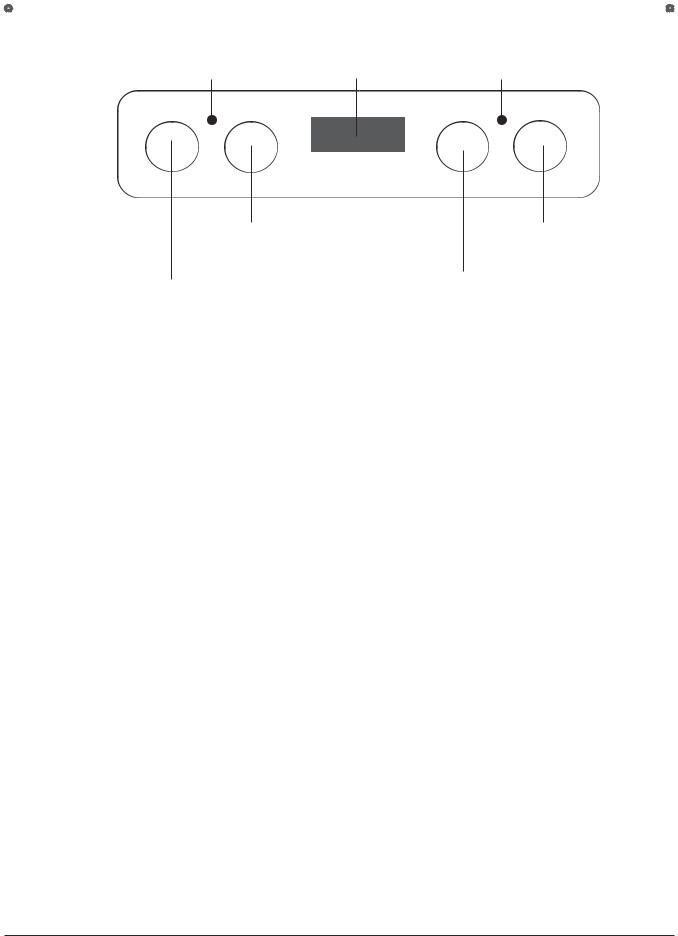
Controls (FIDM20 only)
|
|
|
|
|
|
|
TOP OVEN |
|
MAIN OVEN |
GB |
|
|
||
|
PILOT LIGHT |
TIMER |
PILOT LIGHT |
|
|
|
|||
|
GRILL 

PILOT
LIGHT
B TOP OVEN TEMPERATURE |
D MULTIFUNCTION |
|
CONTROL |
SELECTOR |
|
A GRILL SETTING |
C MAIN OVEN TEMPERATURE |
|
CONTROL |
||
CONTROL |
||
|
IMPORTANT
Before using your oven in the ordinary way, ALWAYS make sure that the timer has been set to MANUAL operation. Unless this is done, the main oven cannot heat up. Before seeking assistance, make sure this is done (refer to oven timer operation).
MULTIFUNCTION SELECTOR
Rotate the control knob in either direction to the required function. Many of the functions will also require the main oven thermostat to be set before the oven will heat up.
MAIN OVEN TEMPERATURE CONTROL
This is used in addition to the multifunction selector. This is used for the functions: fan oven, fan grill, half grill and full grill and convection oven.
Turn the control clockwise to set the oven thermostat to the required temperature.
If the timer is set correctly and the selector switch set to a suitable function an indicator light will illuminate (Fan Oven, Convection Oven and Fan Grilling modes only). This will remain on until the oven reaches the required temperature. This light will then cycle on and off as the thermostat maintains control of the oven temperature.
TOP OVEN TEMPERATURE CONTROL
Turn the control clockwise to set the top oven thermostat to the required temperature.
An indicator light will illuminate. This will remain on until the oven reaches the required temperature. This light will then cycle on and off as the thermostat maintains control of the oven thermostat.
GRILL CONTROL
The grill control is designed to provide variable heat control of either both grill elements on together or the single left-hand grill element only.
To set the grill power, turn the grill control:
-clockwise for FULL grill to any setting MIN - MAX, or
-anti-clockwise for HALF grill to any setting MIN - MAX.
COOLING FAN
A gentle flow of air will be blown below the control panel when the grill control is used and after a short period of time when the ovens are used.
Note: Whenever the appliance has been used, the cooling fan may run on or restart itself after all the controls have been turned off. This indicates that the appliance is still warm.
8

Multifunction Selector
Switch (FIDM20 only)
The Multifunction selector switch is used when operating the main oven.
With the exception of the O position the main oven light will remain on when this selector switch is used.
Off
With the selector in this position the main oven will not heat up. The timer will still operate.
Fan Oven 


The oven fan and a rear element are controlled when this function is selected.
Use the main oven thermostat control to set the required temperature.
Conventional Oven
Top and base elements are controlled when this function is selected.
Use the main oven thermostat to set the required temperature.
Half Grill
With this function selected only the left hand side of the grill will be on.
Use the oven thermostat control to set the required temperature.
Oven door must be open for grilling.
Full Grill |
|
|
|
|
|
|
|
GB |
|
|
|
|
|
|
|
||
|
|
|
|
|
|
|
|
|
Both left and right hand grill elements will be on in |
|
|||||||
|
||||||||
this position. |
|
|||||||
Use the oven thermostat control to set the required |
|
|||||||
temperature. |
|
|||||||
Oven door must be open for grilling. |
|
|||||||
|
|
|
|
|
|
|
|
|
Fan Grill |
|
|
|
|
|
|
|
|
|
|
|
|
|
|
|
|
|
The oven fan and fan grill element are controlled |
|
|||||||
when this function is selected. |
|
|||||||
Use the oven thermostat control to set the required |
|
|||||||
temperature. |
|
|||||||
Oven door must be closed for fan grilling. |
|
|||||||
|
|
|
|
|
|
|||
Fan Only |
|
|
|
|
|
|||
|
|
|
|
|
|
|||
The oven fan will operate when this function is |
|
|||||||
selected. |
|
|||||||
The oven thermostat control must be set in the off |
|
|||||||
position. |
|
|||||||
|
|
|
|
|||||
Light Only |
|
|
|
|||||
|
|
|
|
|||||
This function switches on the oven light only. |
|
|||||||
9
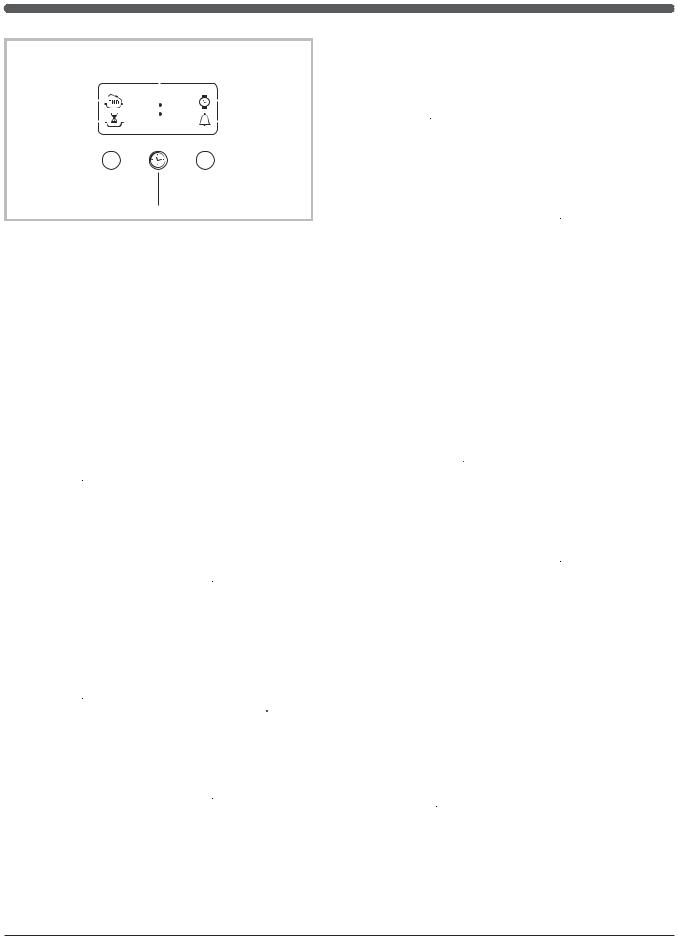
Theelectronic programmer
GB |
|
|
|
|
|
|
DISPLAY |
|
|
|
|
|
|
|
|
|
|
|
|
|
|
|
|
|
|
||
|
|
|
|
|
|
|
|
|
|
|
|
|
|
|
|
|
|
|
|
|
|
|
|
|
|
||
|
END OF |
|
|
|
•• •• |
|
|
|
|
CLOCK icon |
|||
|
|
|
|
|
|
|
|
|
|
||||
|
COOKING icon |
|
|
|
|
|
|
||||||
|
DURATION |
|
|
|
|
|
|
|
TIMER icon |
||||
|
|
|
|
|
|
|
|||||||
|
icon |
|
|
|
|
|
|
|
|
|
|||
|
DECREASE TIME |
|
|
|
|
|
|
|
|
|
|
|
INCREASE TIME |
|
|
|
|
|
|
|
|
|
|
|
|
||
|
|
|
|
|
|
|
|
||||||
|
button |
|
|
|
|
|
|
|
|
button |
|||
SET TIME button
The Main Oven (only) can be controlled by the automatic timer.
Operate the grill or top oven when the main oven is set to cook automatically because the oven cavity can become warm and this may cause bacterial growth in food.
Setting the clock
The clock may be set when the oven is switched off or when it is switched on, provided that a the end time of a cooking cycle has not been programmed previously.
After the appliance has been connected to the mains,
or after a blackout, the  icon and the four numerical digits on the DISPLAY will begin to flash.
1.Press the 
 button several times until the
  icon and the four digits on the display begin to flash.
2.Use the “+” and “-” buttons to adjust the time; if you press and hold either button, the display will scroll through the values more quickly, making it quicker and easier to set the desired value.
3.Wait for 10 seconds or press the 
 button again to finalise the setting.
Settingthetimer
This function does not interrupt cooking and does not affect the oven; it is simply used to activate the buzzer when the set amount of time has elapsed.
1.Press the 
 button several times until the
  icon and the three digits on the display begin to flash.
2.Use the “+” and “-” buttons to set the desired time; if you press and hold either button, the display will scroll through the values more quickly, making it quicker and easier to set the value.
3.Wait for 10 seconds or press the 
 button again to finalise the setting.
The display will then show the time as it counts down. When this period of time has elapsed the buzzer will be activated.
Programming cooking
A cooking mode must be selected before programming can take place.
Programming the cooking duration
1.Press the 
 button several times until the
 icon and the three digits on the DISPLAY begin to flash.
2.Use the “+” and “-” buttons to set the desired duration; if you press and hold either button, the display will scroll through the values more quickly, making it quicker and easier to set the value.
3.Wait for 10 seconds or press the 
 button again to finalise the setting.
4.When the set time has elapsed, the text END appears on the DISPLAY, the oven will stop cooking and a buzzer sounds. Press any button to stop it.
• For example: it is 9:00 a.m. and a time of 1 hour and 15 minutes is programmed. The programme will stop automatically at 10:15 a.m.
Setting the end time for a cooking mode
A cooking duration must be set before the cooking end time can be scheduled.
1.Follow steps 1 to 3 to set the duration as detailed above.
2.Next, press the 
 button until the
  icon and the four digits on the DISPLAY begin to flash.
3.use the “+” and “-” buttons to adjust the cooking end time; if you press and hold either button, the display will scroll through the values more quickly, making it quicker and easier to set the desired value.
4.Wait for 10 seconds or press the 
 button again to finalise the setting.
5.When the set time has elapsed, the text END appears on the DISPLAY, the oven will stop cooking and a buzzer sounds.Press any button to stop it.
Programming has been set when the and
and buttons are illuminated. The DISPLAY shows the cooking end time and the cooking duration alternately.
•For example: It is 9:00 a.m. and a duration of 1 hour has been programmed. 12:30 is scheduled as the end time. The programme will start automatically at 11:30 a.m.
Cancelling a programme
To cancel a programme:
•press the 
 button until the icon corresponding to the setting you wish to cancel and the digits on the display are no longer flashing. Press the “-” button until the digits 00:00 appear on the display.
•Press and hold the “+” and “-” buttons; this will cancel all the settings selected previously, including timer settings.
10
GrillPanandHandle
The grill pan handle is detachable from the pan, to facilitate cleaning and storage.
The grill pan handle can be fixed as follows:
Step 1 Remove the screw and washers from the grill pan bracket
(a). Step 1
Step 2 Tilt the handle over the recess (b).
Step 3 Slide it towards the centre of the pan
(c).
Step 4 Locate the handle over the bracket (d). For a fixed handle,
Step 2
replace the screw and washers and ensure they are fully tightened up. If a detachable handle is required, do not replace the screw and washers.
Step 3
Note: If a fixed handle is required, the grill pan
cannot be kept in the main oven with the door closed but may be stored in the top oven with the door closed,
when the top oven is not in Step 4 use.
Grill Pan, Food Support
FOOD SUPPORT
Top Oven Shelf Positioning for Grilling
GB
ENSURE SHELVES ARE
FITTED CORRECT WAY UP.
3 |
3 |
2 |
2 |
1 |
1 |
DO NOT PLACE FOOD/UTENSILS
DIRECTLY ON THE OVEN FLOOR
NOTE:
- Preheat the grill if indicated on grill chart.
-The grill pan must be placed on the correct shelf and positioned centrally under the grill element.
-Leave the control at MAX for toast, and for fast cooking of foods.
-For thicker foods requiring longer cooking, turn the switch to a lower setting after the initial sealing on both sides at MAX. The thicker the food, the lower the control should be set.
-DO NOT line the grill pan with aluminium foil, as this increases the amount of fat spitting which can cause a fire.
-After use always return the grill control to the OFF (0) position.
11
Operation when using the Top
Oven for Grilling (FID20)
|
|
|
|
|
|
|
|
|
|
|
|
|
|
A GRILL SETTING |
|
|
|
||||
GB |
|
|
|
|
|
|||||
|
|
|
CONTROL |
|
|
|
||||
|
|
|
|
|
|
|
||||
|
|
|
|
|||||||
|
|
|
|
|
|
TOP OVEN |
|
|
|
|
|
|
|
|
|
|
|
|
|
||
|
|
|
|
|
|
PILOT LIGHT |
TIMER |
|||
|
|
GRILL |
|
|
|
|
|
|
|
|
|
|
|
|
|
|
|
|
|
|
|
|
|
|
|
|
|
|
|
|
||
|
|
|
|
|
||||||
|
|
PILOT |
|
|
|
|
|
|
||
|
|
|
|
|
|
|
|
|||
|
|
LIGHT |
|
|
|
|||||
|
|
|
|
|
||||||
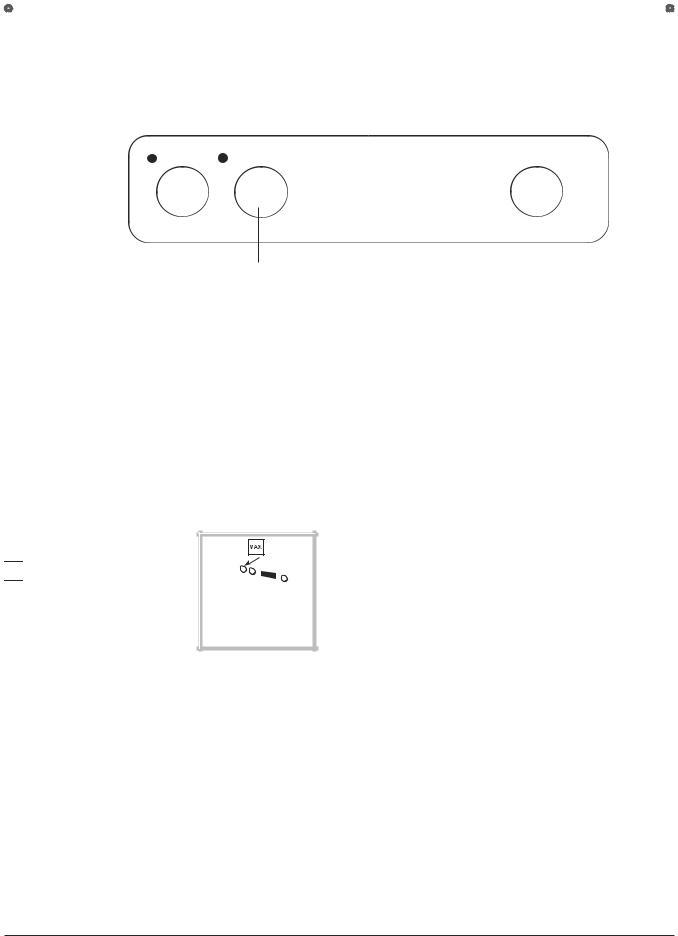
B TOP OVEN TEMPERATURE
CONTROL
Step 1 Ensure that the timer is set to manual.
Step 2 Place the grill pan runner/support in the correct position (see Grilling Guide). Locate the grill pan in the runner/support, position centrally under the grill element.
Leave the door fully open.
Step 3 Turn knob (A) clockwise for FULL grill or anti-clockwise for HALF grill, to select the Grill Setting (min-max):
(MIN = Low, MAX = High)
Grill Controls Example:


 = Maximum Grill Setting.
NOTE: Do not grill with the grill/top oven door closed.
DOOR POSITION FOR GRILLING
Step 4 After use, turn the grill control (A) to the off position (•).
!The Grill Pilot Light is lit when grill is used.
!Ensure knob (B) is in "0 position". The grill and the top oven cannot work simultaneously
DO NOT allow young children near to the appliance when the grill is in use as the surfaces get extremely hot.
12
 Loading...