


Instructions for use
WASHING MACHINE
|
|
|
|
|
|
|
|
|
|
|
|
|
|
|
Contents |
|
|
|
|
|
|
|
|
GB |
||
|
|
|
|
|
|
|
|
|
|
|
|
|
|
|
Installation, 2-3 |
|
|
|
|
|
|
|
|
|
||
GB |
|
RO |
|
HU |
|
|
||
|
|
|
Unpacking and levelling |
|
||||
|
|
|
|
|
|
Connecting the electricity and water supplies |
|
|
|
|
|
|
|
|
|
||
English, 1 |
Română, 13 |
Magyar, 25 |
The first wash cycle |
|
||||
|
|
|
|
|
|
Technical data |
|
|
DE |
|
PT |
|
FR |
|
|
|
|
|
|
|
Deutsch, 37 |
Português, 49 |
Français, 61 |
|||
BG
Български,73
EWE 71252
їнська
Care and maintenance, 4
Cutting off the water or electricity supply Cleaning the washing machine
Cleaning the detergent dispenser drawer Caring for the door and drum of your appliance Cleaning the pump
Checking the water inlet hose
Precautions and tips, 5
General safety
Disposal
Description of the washing machine, 6-7
Control panel Display
Running a wash cycle, 8
Wash cycles and options, 9
Table of wash cycles
Wash options
Detergents and laundry, 10
Detergent dispenser drawer
Preparing the laundry
Fast daily cycles
Special wash cycles
Load balancing system
Troubleshooting, 11
Service, 12
1
Installation
! This instruction manual should be kept in a safe GB place for future reference. If the washing machine is sold, transferred or moved, make sure that the instruction manual remains with the machine so that the new owner is able to familiarise himself/
herself with its operation and features.
! Read these instructions carefully: they contain vital information relating to the safe installation and operation of the appliance.
Unpacking and levelling
Unpacking
1.Remove the washing machine from its packaging.
2.Make sure that the washing machine has not been damaged during the transportation process. If it has been damaged, contact the retailer and do not proceed any further with the installation process.
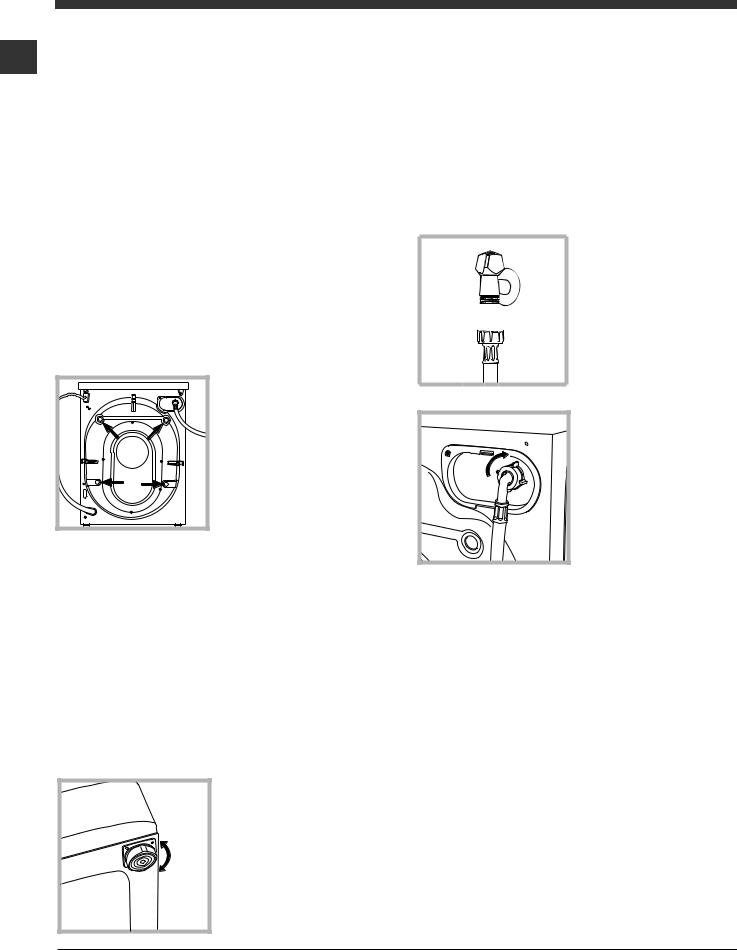
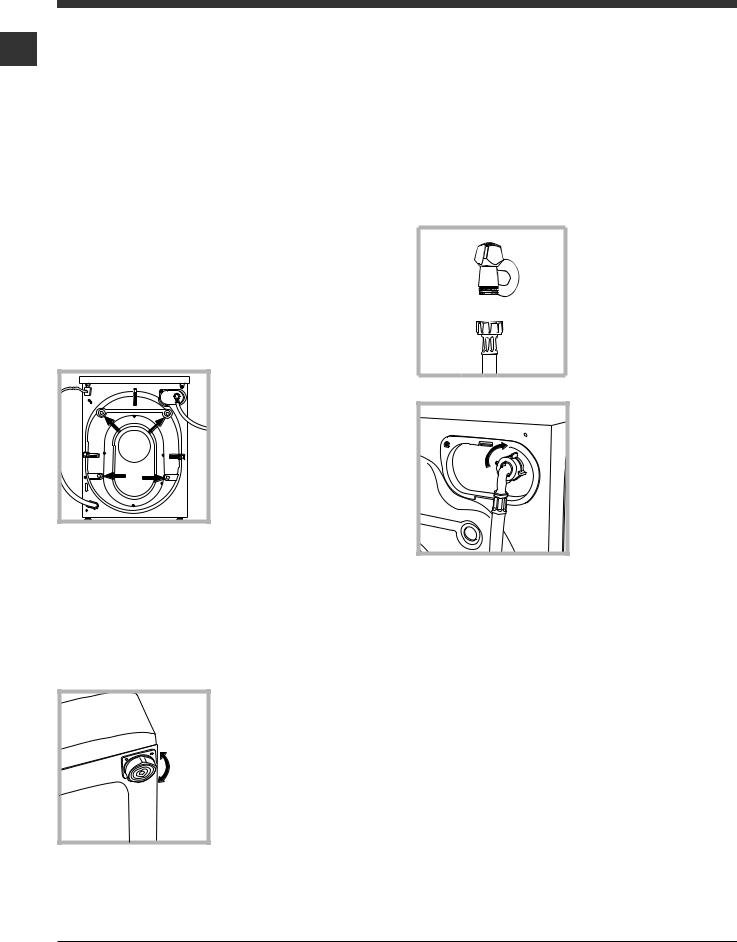
3. Remove the 4 protective screws (used during transportation) and the rubber washer with the corresponding spacer, located on the rear part of the appliance (see figure).
4.Close off the holes using the plastic plugs provided.
5.Keep all the parts in a safe place: you will need them again if the washing machine needs to be moved to another location.
! Packaging materials should not be used as toys for children.
Levelling
1. Install the washing machine on a flat sturdy floor, without resting it up against walls, furniture cabinets or anything else.
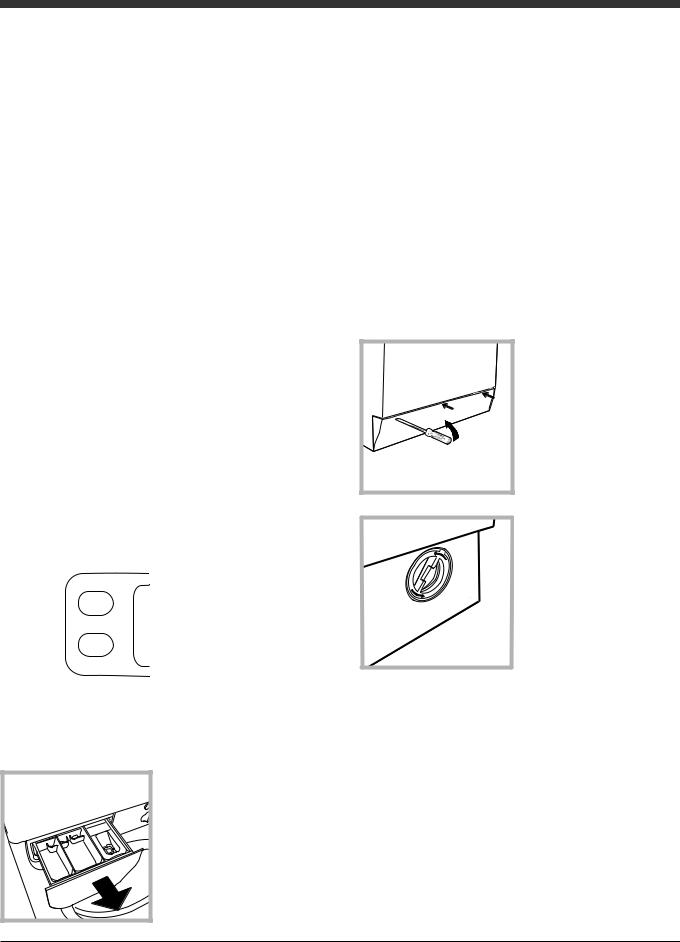
2. If the floor is not perfectly level, compensate for any unevenness by tightening or loosening the adjustable front feet (see figure); the angle of inclination, measured in relation to the worktop, must not exceed 2°.
Levelling the machine correctly will provide it with stability, help to avoid vibrations and excessive noise and prevent it from shifting while it is operating. If it is placed on carpet or a rug, adjust the feet in such a way as to allow a sufficient ventilation space underneath the washing machine.
Connecting the electricity and water supplies
Connecting the water inlet hose
1. Connect the supply pipe by screwing it to a cold water tap using a ¾ gas threaded connection (see figure).
Before performing the connection, allow the water to run freely until it is perfectly clear.
2. Connect the inlet hose to the washing machine by screwing it onto the corresponding water inlet of the appliance, which is situated on the top righthand side of the rear part of the appliance
(see figure).
3. Make sure that the hose is not folded over or bent.
! The water pressure at the tap must fall within the values indicated in the Technical details table
(see next page).
!If the inlet hose is not long enough, contact a specialised shop or an authorised technician.
!Never use second-hand hoses.
!Use the ones supplied with the machine.
2
Connecting the drain hose
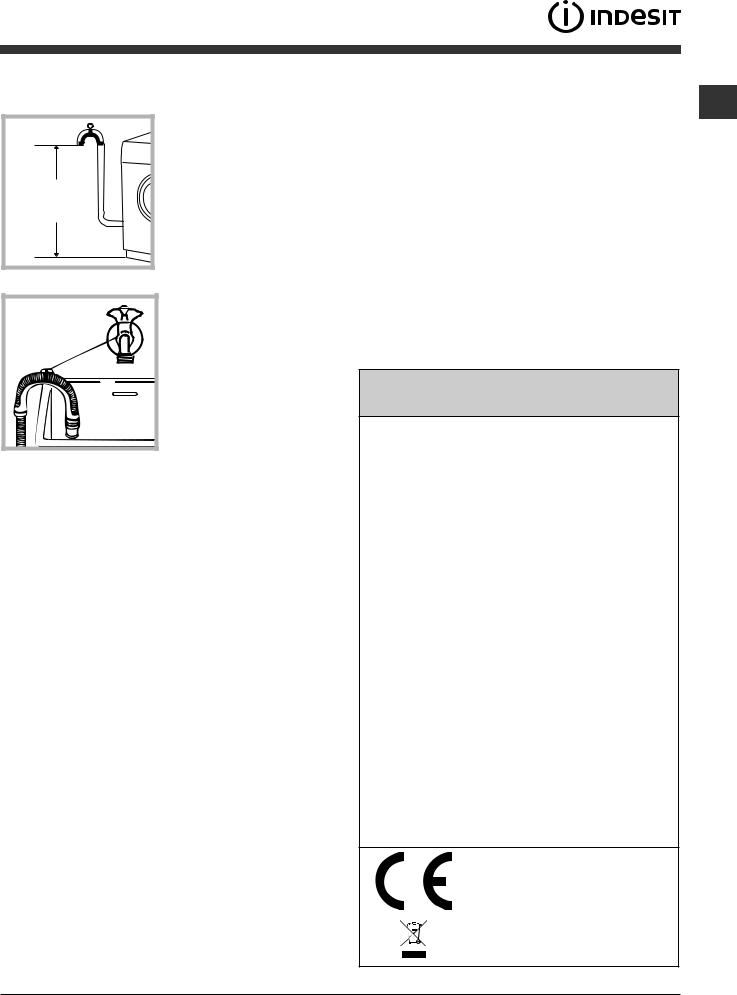
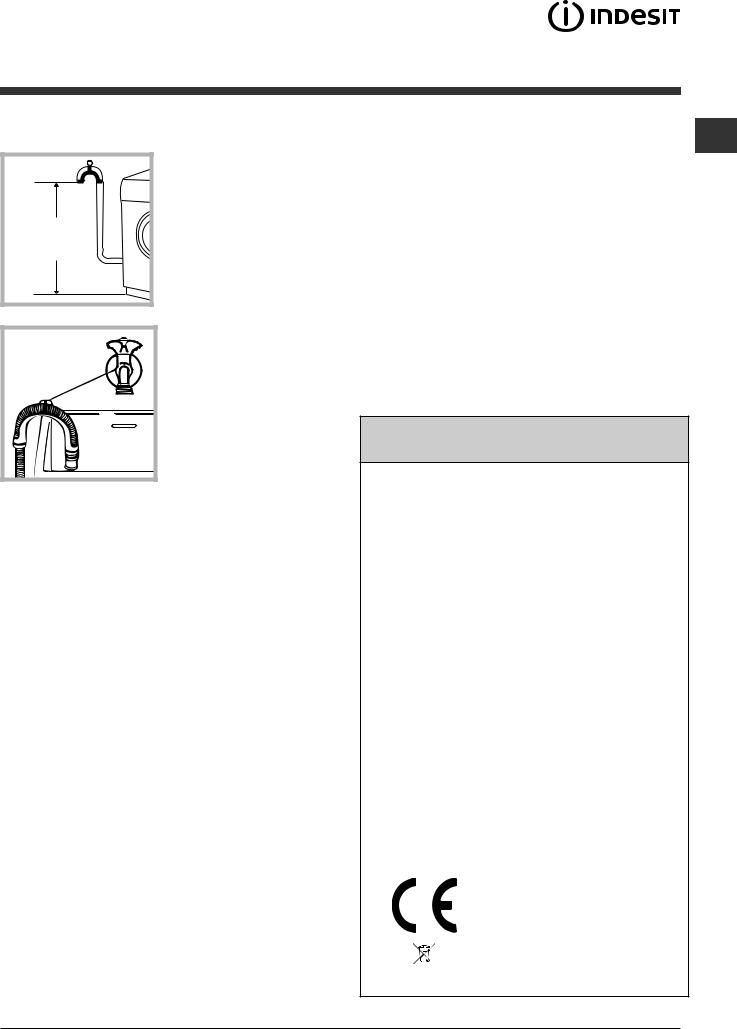
65 - 100 cm |
Connect the drain hose, without bending it, to a drainage duct or a wall drain located at a height between 65 and 100 cm from the floor;
alternatively, rest it on the side of a washbasin or bathtub, fastening the duct supplied to the tap (see figure). The free end of the hose should not be underwater.
! We advise against the use of hose extensions; if it is absolutely necessary, the extension must have the same diameter as the original hose and must not exceed 150 cm in length.
Electrical connections
Before plugging the appliance into the electricity socket, make sure that:
•the socket is earthed and complies with all applicable laws;
•the socket is able to withstand the maximum power load of the appliance as indicated in the Technical data table (see opposite);
•the power supply voltage falls within the values indicated in the Technical data table (see opposite);
•the socket is compatible with the plug of the washing machine. If this is not the case, replace the socket or the plug.
!The washing machine must not be installed outdoors, even in covered areas. It is extremely dangerous to leave the appliance exposed to rain, storms and other weather conditions.
!When the washing machine has been installed, the electricity socket must be within easy reach.
! Do not use extension cords or multiple sockets.
GB
!The cable should not be bent or compressed.
!The power supply cable must only be replaced by authorised technicians.
Warning! The company shall not be held responsible in the event that these regulations are not respected.
The first wash cycle
Once the appliance has been installed, and before you use it for the first time, run a wash cycle with detergent and no laundry, using the wash cycle “Auto Clean” (see “Cleaning the washing machine”).
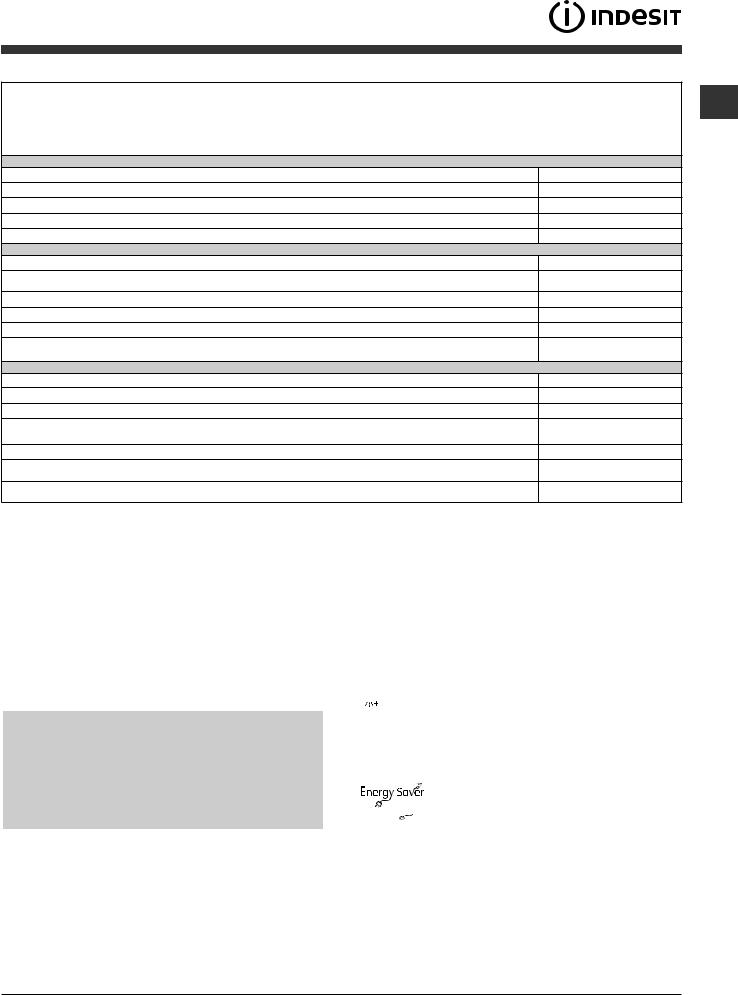
Technical data
Model |
EWE 71252 |
|
|
|
|
|
width 59.5 cm |
|
Dimensions |
height 85 cm |
|
|
depth 53.5 cm |
|
Capacity |
from 1 to 7 kg |
|
|
|
|
Electrical |
please refer to the technical |
|
connections |
data plate fixed to the machine |
|
|
|
|
|
maximum pressure |
|
Water |
1 MPa (10 bar) |
|
minimum pressure |
||
connection |
||
0.05 MPa (0.5 bar) |
||
|
||
|
drum capacity 52 litres |
|
Spin speed |
up to 1200 rotations per minute |
|
|
|
|
Test wash |
|
|
cycles in |
Programme 14: |
|
accordance |
||
with re- |
Eco Cotton 60°C. |
|
gulations |
Programme 14: |
|
1061/2010 |
Eco Cotton 40°C. |
|
and |
|
|
1015/2010 |
|
This appliance conforms to the following EC Directives:
-EMC 2014/30/EU (Electromagnetic Compatibility)
-LVD 2014/35/EU (Low
Voltage)
- 2012/19/EU (WEEE)
3

Care and maintenance
|
Cutting off the water and electri- |
|
GB |
||
city supplies |
||
|
||
|
• Turn off the water tap after every wash cycle. |
|
|
This will limit wear on the hydraulic system |
|
|
inside the washing machine and help to pre- |
|
|
vent leaks. |
|
|
• Unplug the washing machine when cleaning |
|
|
it and during all maintenance work. |
|
|
Cleaning the washing machine |
•The outer parts and rubber components of the appliance can be cleaned using a soft cloth soaked in lukewarm soapy water. Do not use solvents or abrasives.
•The washing machine has a “Auto Clean” programme for its internal parts that must be
run with no load in the drum.
For maximum performance you may want to use either the detergent (i.e. a quantity 10% the quantity specified for lightly-soiled garments) or special additives to clean the washing machine. We recommend running a cleaning programme every 40 wash cycles.
To start the programme press buttons A and B simultaneously for 5 seconds (see figure).
The programme will start automatically and will last approximately 70 minutes.
A
B
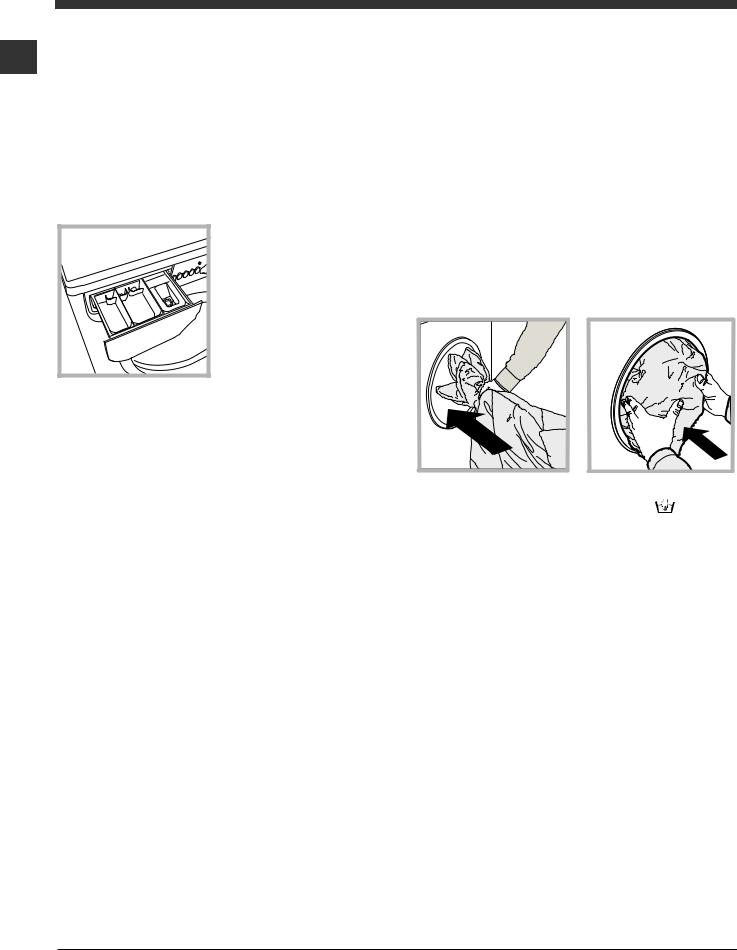
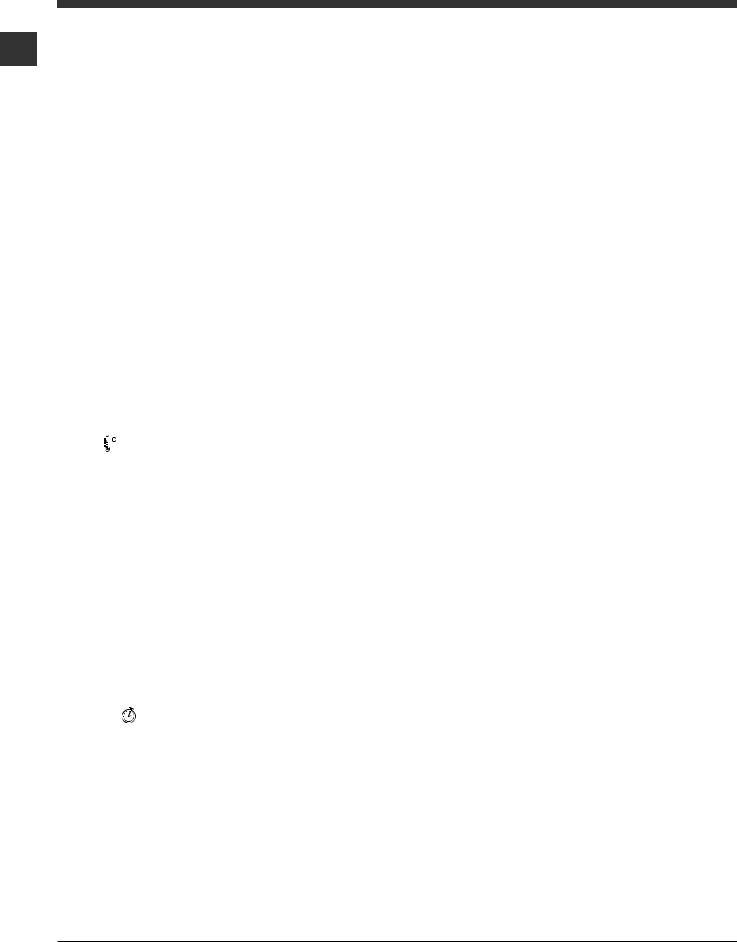
Cleaning the detergent dispenser drawer
Remove the dispenser by raising it and pulling it out (see figure).
Wash it under running water; this operation should be repeated frequently.
Caring for the door and drum of your appliance
•Always leave the porthole door ajar in order to prevent unpleasant odours from forming.
Cleaning the pump
The washing machine is fitted with a self-clea- ning pump which does not require any maintenance. Sometimes, small items (such as coins or buttons) may fall into the pre-chamber which protects the pump, situated in its bottom part.
! Make sure the wash cycle has finished and unplug the appliance.
To access the pre-chamber:
1. using a screwdriver, remove the cover panel on the lower front part of the washing machine (see figure);
2. unscrew the lid by rotating it anticlockwise (see figure): a little water may trickle out. This is perfectly normal;
3.clean the inside thoroughly;
4.screw the lid back on;
5.reposition the panel, making sure the hooks are securely in place before you push it onto the appliance.
Checking the water inlet hose
Check the inlet hose at least once a year. If there are any cracks, it should be replaced immediately: during the wash cycles, water pressure is very strong and a cracked hose could easily split open.
! Never use second-hand hoses.
4

Precautions and tips
! This washing machine was designed and constructed in accordance with international safety regulations. The following information is provided for safety reasons and must therefore be read carefully.
the appliance it must be separately collected. Consumers
should contact their local authority or retailer for information GB concerning the correct disposal of their old appliance.
General safety
•This appliance was designed for domestic use only.
•This appliance can be used by children aged
from 8 years and above and persons with reduced physical, sensory or mental capabilities or lack of experience and knowledge if they have been given supervision or instruction concerning use of the appliance in a safe way and understand the hazards involved. Children shall not play with the appliance. Cleaning and user maintenance shall not be made by children without supervision.
•Do not touch the machine when barefoot or with wet or damp hands or feet.
•Do not pull on the power supply cable when unplugging the appliance from the electricity socket. Hold the plug and pull.
•Do not open the detergent dispenser drawer while the machine is in operation.
•Do not touch the drained water as it may reach extremely high temperatures.
•Never force the porthole door. This could damage the safety lock mechanism designed to prevent accidental opening.
•If the appliance breaks down, do not under any circumstances access the internal mechanisms in an attempt to repair it yourself.
•Always keep children well away from the appliance while it is operating.
•The door can become quite hot during the wash cycle.
•If the appliance has to be moved, work in a group of two or three people and handle it with the utmost care. Never try to do this alone, because the appliance is very heavy.
•Before loading laundry into the washing machine, make sure the drum is empty.
Disposal
•Disposing of the packaging materials: observe local regulations so that the packaging may be re-used.
•TheEuropeanDirective2012/19/EU - WEEEonWasteElectrical and Electronic Equipment, requires that old household electrical appliances must not be disposed of in the normal unsorted municipal waste stream. Old appliances must be collected separately in order to optimise the recovery and recycling of the materials they contain and reduce the impact on human health and the environment.
The crossed out “wheeled bin” symbol on the product reminds you of your obligation, that when you dispose of
5
Description of the washing machine
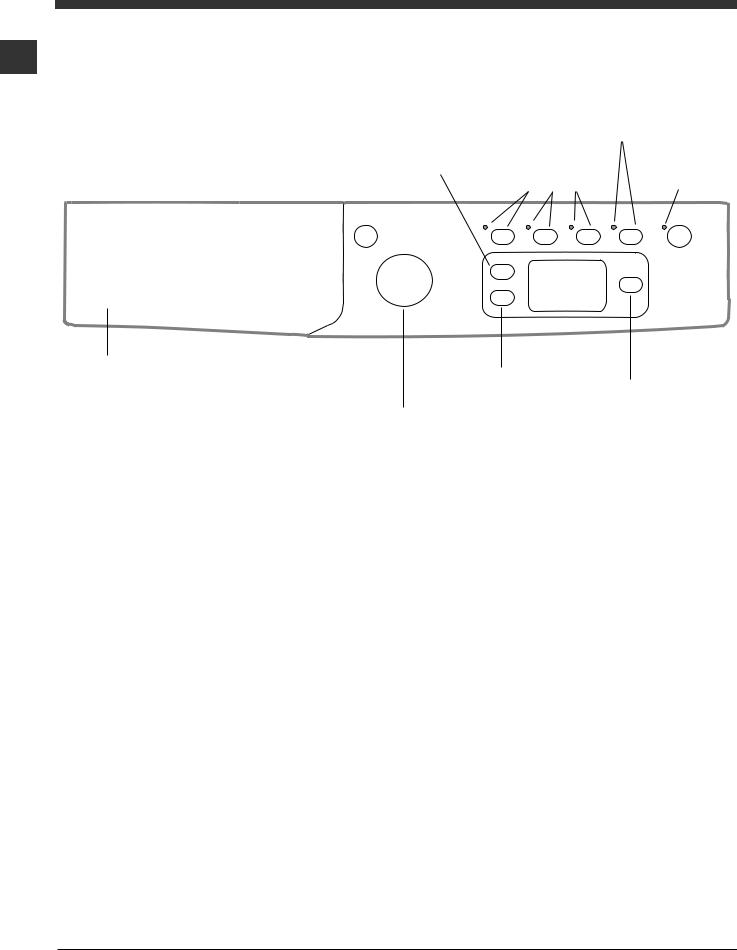
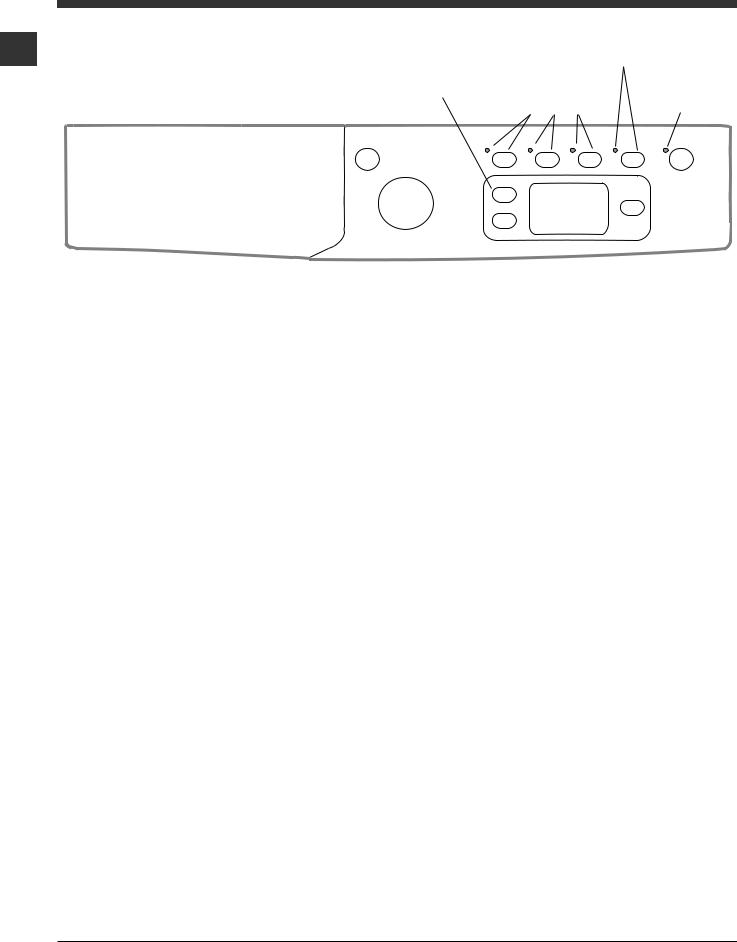
Control panel
GB
Button with indicator light
KEYPAD LOCK
ON/OFF |
|
TEMPERATURE |
OPTION |
START/PAUSE |
|
|
|||||
|
buttons with |
||||
button |
|
Button |
button with indicator light |
||
|
indicator lights |
||||
|
|
|
|
|
|
|
|
|
|
|
|
|
|
|
|
|
|
DISPLAY
Detergent dispenser drawer
|
|
DELAYED |
WASH CYCLE |
SPIN SPEED |
START Button |
Button |
|
|
knob |
|
|
Detergent dispenser drawer: used to dispense detergents and washing additives (see “Detergents and laundry”).
ON/OFF button  : press this briefly to switch the machine on or off. The START/PAUSE indicator light, which flashes slowly in a green colour shows that the machine is switched on. To switch off the washing machine during the wash cycle, press and hold the button for approximately 2 seconds; if the button is pressed briefly or accidentally the machine will not switch off. If the machine is switched off during a wash cycle, this wash cycle will be cancelled.
WASH CYCLE knob: used to set the desired wash cycle
(see “Table of wash cycles”).
OPTION buttons with indicator light: used to select the available options. The indicator light corresponding to the selected option will remain lit.
Button with indicator light KEYPAD LOCK  : This option locks the control panel (except for the ON/OFF button) in order to prevent both children from changing the washingmachine settings while in operation and any involuntary starting. Press it for at least 2 seconds to enable/disable it.
SPIN button  : press to reduce or completely exclude the spin cycle - the value is indicated on the display.
TEMPERATURE button  : press to decrease or completely exclude the temperature: the value will be shown on the display.
DELAYED START button  : press to set a delayed start time for the selected wash cycle. The delay time will be shown on the display.
START/PAUSE button 
 with indicator light: when the green indicator light flashes slowly, press the button to start a wash cycle. Once the cycle has begun the indicator light will remain lit in a fixed manner. To pause the wash cycle, press the button again; the indicator light will flash in an orange colour. If the symbol
  is not illuminated, the door may be opened (wait approximately 3 minutes). To start the wash cycle from the point at which it was interrupted, press the button again.
Standby mode
This washing machine, in compliance with new energy saving regulations, is fitted with an automatic standby system which is enabled after about 30 minutes if no activity is detected. Press the ON-OFF button briefly and wait for the machine to start up again.
6

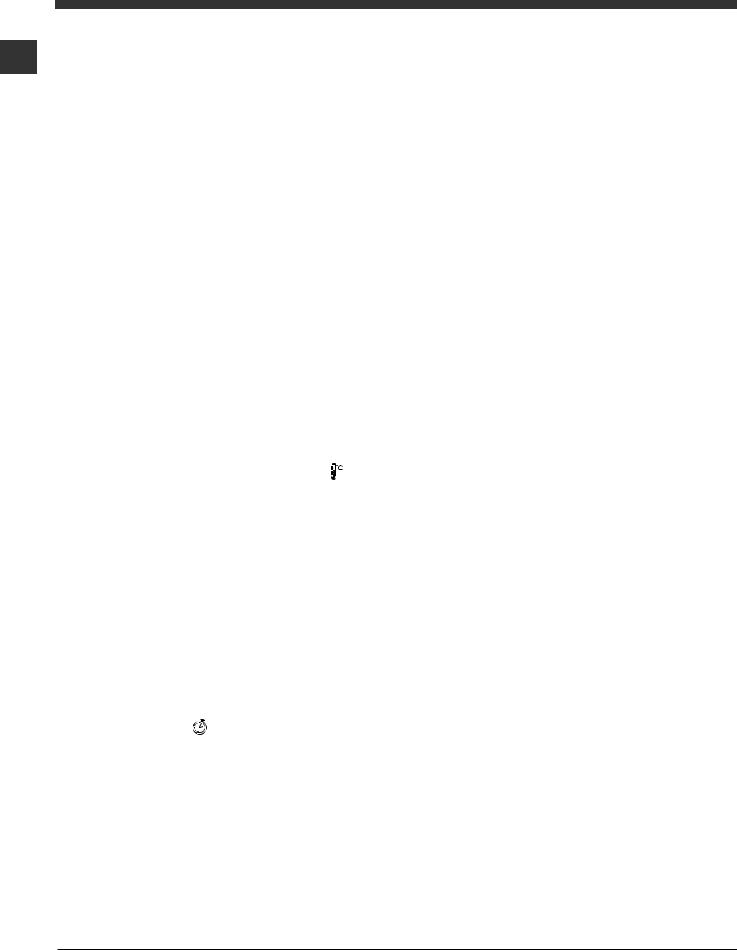
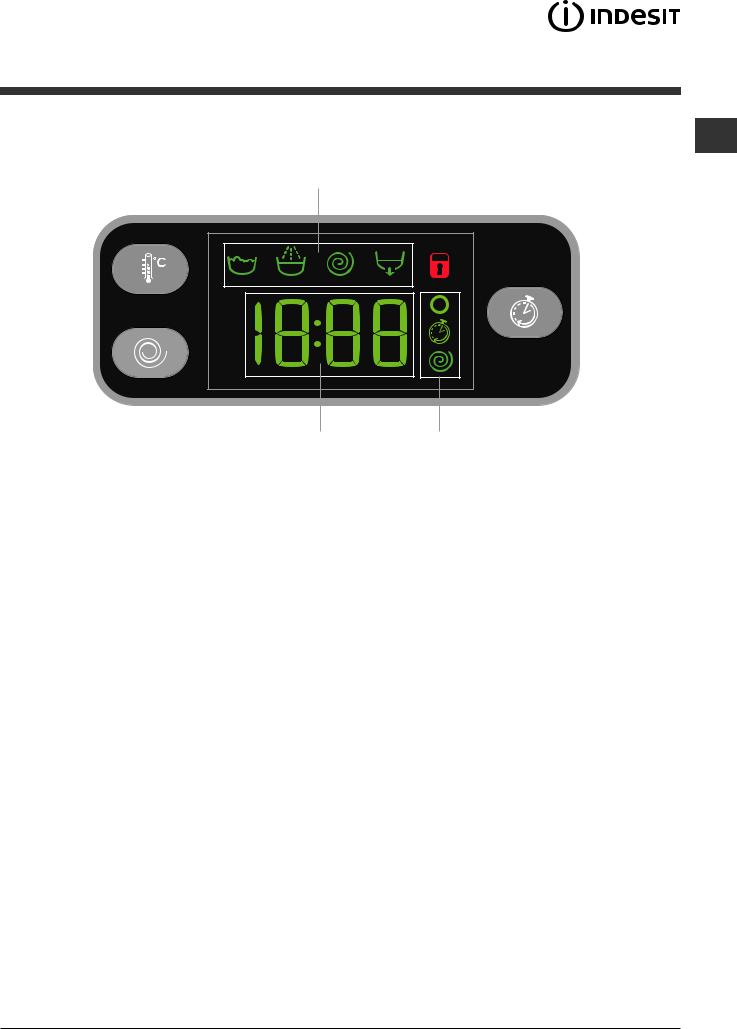
Display
GB
B
A C
The display is useful when programming the machine and provides a great deal of information.
The duration of the available programmes and the remaining time of a running cycle appear in section A; if the DELAY START option has been set, the countdown to the start of the selected programme will appear. Pressing the relative button, the machine automatically displays the maximum temperature and spin speed values set for the selected cycle, or the most recently-used settings if they are compatible with the selected cycle.
The “programme phases” relative to the selected programme and the “programme phase” of the running programme appear
in section B:  Wash
Wash  Rinse
Rinse
Spin Drain
The icons corresponding to “temperature”  , “Programmed start”
  and “spin”
  appear in section C from top to bottom: If the
  symbol lights up, the display will visualise the set “temperature” value.
When a “delayed start” has been set, the  symbol lights up.
If the  symbol lights up, the display will visualise the set “spin” value.
Door locked symbol 
The lit symbol indicates that the door is locked. To prevent any damage, wait until the symbol turns off before opening the
door.
To open the door while a cycle is in progress, press the START/PAUSE button; if the DOOR LOCKED  symbol is switched off the door may be opened (wait approximately 3 minutes).
7
Running a wash cycle
1. SWITCH THE MACHINE ON. Press the  button;
GB the START/PAUSE indicator light will flash slowly in a green colour.
2.LOAD THE LAUNDRY. Open the porthole door. Load the laundry, making sure you do not exceed the maximum load value indicated in the table of programmes on the following page.
3.MEASURE OUT THE DETERGENT. Pull out the detergent dispenser drawer and pour the detergent into the relevant compartments as described in “Detergents and laundry”.
4.CLOSE THE DOOR.
5.SELECT THE WASH CYCLE. Set the WASH CYCLE knob to the desired programme; a temperature and spin speed is set for each wash cycle; these may be adjusted. The duration of the cycle will appear on the display.
6.CUSTOMISE THE WASH CYCLE. Use the relevant buttons:

 Modifying the temperature and/or spin speed. The machine automatically displays the maximum temperature and spin speed values set for the selected cycle, or the most recently-used settings if they are compatible with the selected cycle. The temperature can be decreased by pressing the button, until the cold wash “OFF” setting is reached. The spin speed may be progressively reduced by pressing the
  button, until it is completely excluded (the “OFF” setting). If these buttons are pressed again, the maximum values are restored.
!Exception: if the 7 programme is selected, the temperature can be increased up to a value of 90°C.
!Exception: if the 15 programme is selected, the temperature can be increased up to a value of 60°C.
!Exception: if the 16 programme is selected, the temperature can be increased up to a value of 60°C.
 Setting a delayed start.
To set a delayed start for the selected programme, press the corresponding button repeatedly until the required delay period has been reached. When this option is enabled, the symbol lights up on the display. To remove the delayed start option press the
button until the text “OFF” appears on the display.
Modifying the cycle settings.
•Press the button to enable the option; the indicator light corresponding to the button will switch on.
•Press the button again to disable the option; the indicator light will switch off.
! If the selected option is not compatible with the programmed wash cycle, the indicator light will flash and the option will not be activated.
! If the selected option is not compatible with another option which has been selected previously, the indicator light corresponding to the first option selected will flash and only the second option will be activated; the indicator
light corresponding to the enabled option will remain lit.
! The options may affect the recommended load value and/or the duration of the cycle.
7.START THE PROGRAMME. Press the START/ PAUSE button. The corresponding indicator light will become green, remaining lit in a fixed manner, and the
door will be locked (the DOOR LOCKED symbol  will be on). To change a wash cycle while it is in progress, pause the washing machine using the START/PAUSE button (the START/PAUSE indicator light will flash slowly in an orange colour); then select the desired cycle and press the START/PAUSE button again.
To open the door while a cycle is in progress, press
the START/PAUSE button; if the DOOR LOCKED  symbol is switched off the door may be opened (wait approximately 3 minutes). Press the START/PAUSE button again to restart the wash cycle from the point at which it was interrupted.
8.THE END OF THE WASH CYCLE. This will be indicated by the text “END” on the display; when the
DOOR LOCKED  symbol switches off the door may be opened (wait approximately 3 minutes). Open the door, unload the laundry and switch off the machine.
! If you wish to cancel a cycle which has already begun, press and hold the  button. The cycle will be stopped and the machine will switch off.
8
Wash cycles and options
Table of wash cycles
cycles |
|
Max. |
Max. |
Detergents |
|||
|
|
||||||
|
|
|
|
|
|||
Wash |
Description of the wash cycle |
temp. |
speed |
|
|
|
|
|
|
|
|||||
|
(°C) |
(rpm) |
Pre-wash |
Wash |
Fabric |
||
|
|
|
|||||
|
|
|
|
softener |
|||
|
EVERYDAY FAST |
|
|
|
|
|
|
|
|
|
|
|
|
||
1 |
Colour Mix 59’ |
40° |
1000 |
- |
|
|
|
2 |
Cotton 59’ |
60° |
1000 |
- |
|
|
|
3 |
Synthetics 59’ |
30° |
1000 |
- |
|
|
|
4 |
Daily 45’ |
40° |
1200 |
- |
|
|
|
5 |
Mix 30’ |
30° |
800 |
- |
|
|
|
|
Special&Partial |
|
|
|
|
|
|
6 |
Gym Kit |
40° |
600 |
- |
|
|
|
7 |
Whites: extremely soiled whites. |
60° |
1200 |
+90° |
|
|
|
(Max.90°) |
|||||||
|
|
|
|
|
|
||
8 |
Baby: Heavily soiled delicate colours. |
40° |
800 |
- |
|
|
|
9 |
Rinse |
- |
1200 |
- |
- |
|
|
10 |
Spin + Drain |
- |
1200 |
- |
- |
- |
|
10 |
Only Drain * |
- |
OFF |
- |
- |
- |
|
|
Dedicated |
|
|
|
|
|
|
|
|
|
|
|
|
||
11 |
Duvet: for down-stuffed garments. |
30° |
1000 |
- |
|
|
|
12 |
Wool: for wool, cashmere, etc. |
40° |
800 |
- |
|
|
|
13 |
Silk/Curtains: for garments in silk and viscose, lingerie. |
30° |
0 |
- |
|
|
|
14 |
Eco Cotton 60° (1): heavily soiled whites and resistant |
60° |
1200 |
- |
|
|
|
colours. |
|||||||
14 |
Eco Cotton 40° (2): lightly soiled whites and delicate colours. |
40° |
1200 |
- |
|
|
|
15 |
Cotton (3): lightly soiled whites and delicate colours. |
40° |
1200 |
- |
|
|
|
(Max.60°) |
|||||||
|
|
|
|
|
|
||
16 |
Synthetics (4): lightly soiled resistant colours. |
40° |
1000 |
- |
|
|
|
(Max.60°) |
|||||||
|
|
|
|
|
|
||
*If you select programme 10 and exclude the spin cycle, the machine will drain only.
**The duration of the wash cycle can be checked on the display.
load |
dampness |
consumption |
ltwaterTotal |
duration |
(kg) |
% |
|
|
|
Residual |
Energy kWh |
|
Cycle |
|
Max. |
|
|||
7 |
|
|
|
59’ |
|
|
|
||
- |
- |
- |
||
7 |
- |
- |
- |
59’ |
3.5 |
- |
- |
- |
59’ |
3.5 |
- |
- |
- |
45’ |
3.5 |
70 |
0.16 |
32 |
30’ |
3.5 |
|
|
|
|
- |
- |
- |
** |
|
7 |
- |
- |
- |
** |
3 |
- |
- |
- |
** |
7 |
- |
- |
- |
** |
7 |
- |
- |
- |
** |
7 |
- |
- |
- |
** |
2 |
|
|
|
|
|
|
|
|
|
- |
- |
- |
** |
|
1.5 |
- |
- |
- |
** |
1 |
- |
- |
- |
** |
7 |
53 |
1.07 |
52.5 |
205’ |
7 |
53 |
0.97 |
75 |
220’ |
7 |
53 |
0.97 |
75 |
220’ |
3.5 |
46 |
0.68 |
55 |
120’ |
|
|
|
|
|
The length of cycle shown on the display or in this booklet is an estimation only and is calculated assuming standard working conditions. The actual duration can vary according to factors such as water temperature and pressure, the amount of detergent used, the amount and type of load inserted, load balancing and any wash options selected.
1) Test wash cycle in compliance with regulations 1061/2010: set wash cycle 14 with a temperature of 60°C.
This cycle is designed for cotton loads with a normal soil level and is the most efficient in terms of both electricity and water consumption; it should be used for garments which can be washed at 60°C. The actual washing temperature may differ from the indicated value.
2) Test wash cycle in compliance with regulations 1061/2010: set wash cycle 14 with a temperature of 40°C.
This cycle is designed for cotton loads with a normal soil level and is the most efficient in terms of both electricity and water consumption; it should be used for garments which can be washed at 40°C. The actual washing temperature may differ from the indicated value.
For all Test Institutes:
3)Long wash cycle for cottons: set wash cycle 15 with a temperature of 40°C.
4)Long wash cycle for synthetics: set wash cycle 16; with a temperature of 40°C.
Wash options
-If the selected option is not compatible with the programmed wash cycle, the indicator light will flash and the option will not be activated.
-If the selected option is not compatible with another option which has been selected previously, the indicator light corresponding to the first option selected will flash and only the second option will be activated; the indicator light corresponding to the enabled option will remain lit.
Extra Wash 
Enable the Extra Wash  option for very dirty items, where compatible. Press this option to let the cycle automatically readjust all wash parameters through a longer lasting cycle. The option always leaves the temperature unchanged, while the spin cycle is automatically brought back to maximum levels. The user can set the spin cycle back to the desired value at any time.
 Extra Rinse
By selecting this option, the efficiency of the rinse is increased and optimal detergent removal is guaranteed. It is particularly useful for sensitive skin.
The 


 option washes cotton and synthetic items, saving energy and helping the environment. Energy saving is due to a cold wash cycle, while an enhanced mechanical action and optimised water use make it possible to reach the desired result. Recommended for slightly soiled garments. Use of liquid detergent recommended.
GB
9
Detergents and laundry
Detergent dispenser drawer
GB Good washing results also depend on the correct dose of detergent: adding too much detergent will not necessarily result in a more efficient wash, and may in fact cause build up on the inside of your appliance and contribute to environmental pollution.
!Do not use hand washing detergents because these create too much foam.
!Use powder detergent for white cotton garments, for prewashing, and for washing at temperatures over 60°C.
!Follow the instructions given on the detergent packaging.
1 |
2 |
3 |
Open the detergent dispenser drawer and pour in the detergent or washing additive, as follows.
compartment 1: Pre-wash detergent (powder) compartment 2: Detergent for the wash cycle (powder or liquid)
Liquid detergent should only be poured in immediately prior to the start of the wash cycle.
compartment 3: Additives (fabric softeners, etc.)
The fabric softener should not overflow the grid.
Note: If a “tablet detergent” is used, always follow the manufacturer’s instructions.
Preparing the laundry
•Divide the laundry according to:
-the type of fabric/the symbol on the label
-the colours: separate coloured garments from whites.
•Empty all garment pockets and check the buttons.
•Do not exceed the values listed in the “Table of wash cycles”, which refer to the weight of the laundry when dry.
How much does your laundry weigh?
1 sheet 400-500 g
1 pillow case 150-200 g
1 tablecloth 400-500 g
1 bathrobe 900-1200 g
1 towel 150-250 g
Fast daily cycles
A complete set of fast programmes to wash the most commonly used fabrics - even with a full load - and to remove the most frequent daily dirt in less than 1 hour.
Colour Mix 59’: to wash mixed and coloured items together. Cotton 59’: cycle designed to wash cotton garments - mainly white items. It can be used with powder detergent too.
Synthetics 59’: specific for synthetic items. If the dirt is difficult to remove, the temperature can be increased up to 60° and powder detergent can be used too.
Daily 45’: short cycle designed to wash delicate cotton items.
Mix 30’: short cycle designed to wash a mixed load of cotton and synthetic fabrics - white and coloured items together.
Special wash cycles
Gym Kit: cycle suitable to wash all sports items together, including gym towels, while respecting their fibres (follow the instructions in the garment labels).
Baby: cycle designed for dirt typical of children’s garments in that it effectively removes any traces of residual detergent.
Duvet: to wash single duvets (the weight of which should not exceed 2 kg), cushions or clothes padded with goose down such as puffa jackets, use the special wash programme number 11. We recommend that duvets are placed in the drum with their edges folded inwards (see figure) and that no more than ¾ of the total volume of the drum is used. To achieve the best results, we recommend that a liquid detergent is used and placed inside the detergent dispenser drawer.
Wool: all wool garments can be washed using programme 12, even those carrying the “hand-wash only” label. For best results, use special detergents and do not exceed 1,5 kg of laundry.
Silk: use special wash cycle 13 to wash all silk garments. We recommend the use of special detergent which has been designed to wash delicate clothes.
Curtains: fold curtains and place them in a pillow case or mesh bag. Use wash cycle 13.
Load balancing system
Before every spin cycle, to avoid excessive vibrations and to distribute the load in a uniform manner, the drum rotates continuously at a speed which is slightly greater than the washing rotation speed. If, after several attempts, the load is not balanced correctly, the machine spins at a reduced spin speed. If the load is excessively unbalanced, the washing machine performs the distribution process instead of spinning. To encourage improved load distribution and balance, we recommend small and large garments are mixed in the load.
10
Troubleshooting
Your washing machine could fail to work. Before contacting the Technical Assistance Centre (see “Assistance”), make sure |
GB |
that the problem cannot be solved easily using the following list. |
Problem:
The washing machine does not switch on.
The wash cycle does not start.
The washing machine does not take in water (“H2O” will flash on the display).
Possible causes / Solutions:
•The appliance is not plugged into the socket fully, or is not making contact.
•There is no power in the house.
•The washing machine door is not closed properly.
•The ON/OFF button has not been pressed.
•The START/PAUSE button has not been pressed.
•The water tap has not been opened.
•A delayed start has been set..
•The water inlet hose is not connected to the tap.
•The hose is bent.
•The water tap has not been opened.
•There is no water supply in the house.
•The pressure is too low.
•The START/PAUSE button has not been pressed.
The washing machine continuously takes in and
drains water.
•The drain hose is not fitted at a height between 65 and 100 cm from the floor
(see “Installation”).
•The free end of the hose is under water (see “Installation”).
•The wall drainage system is not fitted with a breather pipe.
If the problem persists even after these checks, turn off the water tap, switch the appliance off and contact the Assistance Service. If the dwelling is on one of the upper floors of a building, there may be problems relating to water drainage, causing the washing machine to fill with water and drain continuously. Special anti-draining valves are available in shops and help to avoid this inconvenience.
The washing machine does not drain or spin.
•The wash cycle does not include draining: some wash cycles require the drain phase to be started manually.
•The drain hose is bent (see “Installation”).
•The drainage duct is clogged.
The washing machine vibrates a lot during the spin cycle.
The washing machine leaks.
•The drum was not unlocked correctly during installation (see “Installation”).
•The washing machine is not level (see “Installation”).
•The washing machine is trapped between cabinets and walls (see “Installation”).
•The water inlet hose is not screwed on properly (see “Installation”).
•The detergent dispenser drawer is blocked (for cleaning instructions, see “Care and maintenance”).
•The drain hose is not fixed properly (see “Installation”).
The “option” indicator lights and the “start/pause” indicator light flash and an error code appears on the display (e.g.: F-01, F-..).
There is too much foam.
•Switch off the machine and unplug it, wait for approximately 1 minute and then switch it back on again.
If the problem persists, contact the Technical Assistance Service.
•The detergent is not suitable for machine washing (it should display the text
“for washing machines” or “hand and machine wash”, or the like).
•Too much detergent was used.
11

Service
|
|
|
|
|
|
Before calling for Assistance: |
|
GB |
|||
|
• Check whether you can solve the problem alone (see “Troubleshooting”); |
||
|
|
||
|
|
• Restart the programme to check whether the problem has been solved; |
|
|
|||
|
|
• If this is not the case, contact an authorised Technical Assistance Centre using the telephone number provided on the |
|
|
|
guarantee certificate. |
|
|
|
! Always request the assistance of authorised technicians. |
Have the following information to hand:
•the type of problem;
•the appliance model (Mod.);
•the serial number (S/N).
This information can be found on the data plate applied to the rear of the washing machine, and can also be found on the front of the appliance by opening the door.
12

Instrucţiuni de folosire
MAŞINĂ DE SPĂLAT RUFE
RO
Română
Sumar |
|
|
RO |
||
|
||
Instalare, 14-15 |
|
|
|
||
Despachetare şi punere la nivel |
|
|
Racorduri hidraulice şi electrice |
|
|
Primul ciclu de spălare |
|
|
Date tehnice |
|
Întreţinere şi curăţare, 16
Întreruperea alimentării cu apă şi curent electric Curăţarea maşinii de spălat
Curăţarea compartimentului pentru detergent Îngrijirea uşii şi a tamburului
Curăţarea pompei
Controlarea furtunului de alimentare cu apă
EWE 71252
Precauţii şi sfaturi, 17
Norme de protecţie şi siguranţă generale
Aruncarea reziduurilor
Descrierea maşinii de spălat, 18-19
Panoul de control Display
Cum se desfăşoară un ciclu de spălare, 20
Programe şi funcţii, 21
Tabel de programe Funcţii de spălare
Detergenţi şi rufe albe, 22
Compartimentul pentru detergenţi Pregătirea rufelor
Cicluri zilnice rapide Programe optionale
Sistemul de echilibrare a încărcăturii
Anomalii şi remedii, 23
Asistenţă, 24
13
Instalare
! Este important să păstraţi acest manual pentru RO a-lputeaconsultaînoricemoment.Încazdevân- zare, de cesiune sau de schimbare a locuinţei, acestatrebuiesărămânăîmpreunăcumaşinade spălat pentru a informa noul proprietar cu privire
la funcţionare şi la respectivele avertismente.
! Citiţi cu atenţie instrucţiunile: veţi găsi informaţii importante cu privire la instalare, la folosire şi la siguranţă.
Despachetare şi punere la nivel
Despachetare
1.Scoaterea din ambalaj a maşinii de spălat.
2.Controlaţi ca maşina de spălat să nu fi fost deteriorată în timpul transportului. Dacă este deteriorată nu o conectaţi şi luaţi legătura cu vânzătorul.
3. Scoateţi cele 4 şuruburi de protecţie pentru transport şi cauciucul cu respectivul distanţier, situate în partea posterioară
(a se vedea figura).
4.Închideţiorificiilecudopuriledinplasticaflate în dotare.
5.Păstraţi toate piesele: pentru cazul în care maşina de spălat va trebui să fie transportată, piesele vor trebui montante din nou.
! Ambalajele nu sunt jucării pentru copii!
Punere la nivel
1. Instalaţi maşina de spălat pe o suprafaţă plană şi rigidă, fără a o sprijini de ziduri, mobilă sau altceva.
2. Dacă podeaua nu este perfect
orizontală, compensaţi neregularităţile deşurubând sau
înşurubând picioruşele anterioare (a se vedea figura); unghiul de înclinare, măsurat pe planul de lucru, nu trebuie să depăşească 2°.
O nivelare precisă conferă stabilitate maşinii şi evită vibraţii, zgomote şi deplasări pe timpul funcţionării. În cazul mochetelor sau a unui covor, reglaţi picioruşele astfel încât să menţineţi sub maşina de spălat un spaţiu suficient pentru ventilare.
Racorduri hidraulice şi electrice
Racordarea furtunului de alimentare cu apă
1. Conectaţi tubul de alimentare, înşurubându-l la un robinet de apă rece cu gurafiletatăde3/4gaz
(a se vedea figura).
Înainte de conectare, lăsaţi apa să curgă pânăcândnuadevine limpede.
2. Conectaţi tubul de alimentare la maşina de spălat, înşurubându-l la sursa de apă respectivă, amplasată în partea posterioară, sus în dreapta (a se vedea figura).
3. Fiţi atenţi ca furtunul să nu fie nici pliat nici îndoit.
!Presiunea apei de la robinet trebuie să fie cuprinsă în valorile din tabelul Date tehnice
(a se vedea pagina alăturată).
!Dacă lungimea furtunului de alimentare nu este suficientă, adresaţi-vă unui magazin specializat sau unui instalator autorizat.
!Nu folosiţi niciodată tuburi folosite deja.
!Utilizaţi tuburile furnizate împreună cu maşina.
14
Conectarea furtunului de golire
65 - 100 cm |
Conectaţi furtunul de golire - fără a-l îndoi - la canalizare sau la racordul de golire prevăzut pe perete, la o înălţime de 65 - 100 cm de sol;
Sprijiniţi-l de marginea căzii sau chiuvetei şi racordaţi şina de ghidare din dotare la robinet (a se vedea figura). Capătul liber al furtunului de golire nu trebuie să rămână cufundat în apă.
! Nu se recomandă folosirea furtunurilor prelungitoare; dacă este indispensabil, acestea trebuie să aibă acelaşi diametru ca şi furtunul original şi nu trebuie să depăşească 150 cm lungime.
Racordarea electrică
Înainte de a introduce stecherul în priză, asiguraţi-vă ca:
•priza să fie cu împământare şi conform prevederilor legale;
•priza să poată suporta sarcina maximă de putere a maşinii, indicată în tabelul Date Tehnice (a se vedea alături);
•tensiunea de alimentare să fie cuprinsă în valorile indicate în tabelul Date Tehnice (a se vedea alături);
•priza să fie compatibilă cu stecherul maşinii de spălat. În caz contrar înlocuiţi stecherul.
!Maşina de spălat nu trebuie instalată afară, nici chiar în cazul în care spaţiul este adăpostit, deoarece este foarte periculoasă expunerea maşinii la ploi şi furtuni.
!După instalarea maşinii de spălat, priza de curent trebuie să fie uşor accesibilă.
! Nu folosiţi prelungitoare şi prize multiple. |
RO |
|
!Cablul nu trebuie să fie îndoit sau comprimat.
!Cablul de alimentare trebuie să fie înlocuit doar de tehnicieni autorizaţi ai centrului de service ce apare scris pe certificatul de garantie emis de producator.
Atenţie! Producătorul îşi declină orice responsabilitate în cazul în care aceste norme nu se respectă.
Primul ciclu de spălare
După instalare, înainte de folosire, efectuaţi un ciclu de spălare cu detergent şi fără rufe, selectând programul „AUTOCURĂŢARE” (a se vedea “Curăţarea maşinii de spălat”).
Date tehnice
Model |
EWE 71252 |
|||
|
|
|
lãrgime 59,5 cm |
|
Dimensiuni |
înãlþime 85 cm |
|||
|
|
|
profunzime 53,5 cm |
|
Capacitate |
de la 1 la 7 kg |
|||
Legãturi elec- |
Vezi placuta cu caracteristi- |
|||
cile tehnice, aplicata pe ma- |
||||
trice |
||||
sina. |
||||
|
|
|
||
|
|
|
presiune maximã |
|
Legãturi |
1 MPa (10 bari) |
|||
presiune minimã |
||||
hidrice |
||||
0,05 MPa (0,5 bari) |
||||
|
|
|
||
|
|
|
capacitatea cuvei 52 litri |
|
Viteza de cen- |
pânã la 1200 de rotaþii |
|||
trifugare |
pe minut |
|||
Progra- |
|
|||
me de con- |
Programul 14: Eco bum- |
|||
trol conform |
bac 60°C. |
|||
reglementările |
Programul 14: Eco bum- |
|||
1061/2010 şi |
bac 40°C. |
|||
1015/2010. |
|
|||
|
|
|
Acest aparat este con- |
|
|
|
|
form cu urmãtoarele |
|
|
|
|
Directive Comunitare: |
|
|
|
|
- EMC 2014/30/EU (Com- |
|
|
|
|
patibilitate Electromagne- |
|
|
|
|
ticã) |
|
|
|
|
- LVD 2014/35/EU (Tensiuni |
|
|
|
|
Joase) |
|
|
|
|
||
|
|
|
||
|
|
|
-2012/19/EU - WEEE |
|
15
Întreţinere şi curăţare
|
|
Întreruperea alimentării cu apă şi cu- |
||||||
RO |
||||||||
|
rent electric |
|||||||
|
|
• Închideţi robinetul de apă după fiecare |
||||||
|
|
spălare. Se limitează astfel uzura instalaţiei |
||||||
|
|
hidraulice a maşinii de spălat şi se elimină |
||||||
|
|
pericolul scurgerilor. |
||||||
|
|
• Scoateţi stecherul din priza de curent atunci |
||||||
|
|
când curăţaţi maşina de spălat şi când se |
||||||
|
|
efectuează lucrări de întreţinere. |
||||||
|
|
Curăţarea maşinii de spălat |
||||||
|
|
•Parteaexternăşipărţiledincauciucpotficurăţate |
||||||
|
|
cu o lavetă înmuiată în apă călduţă şi săpun. Nu |
||||||
|
|
folosiţi solvenţi sau substanţe abrazive. |
||||||
|
|
• Maşina de spălat este prevăzută cu un |
||||||
|
|
program de „AUTOCURĂŢARE” a pieselor |
||||||
|
|
interne care trebuie realizat fără niciun fel de |
||||||
|
|
încărcătură în cuvă. |
||||||
|
|
Detergentul (în cantitate de 10% din cea |
||||||
|
|
recomandată pentru rufe puţin murdare) sau |
||||||
|
|
aditivii specifici pentru curăţarea maşinii de |
||||||
|
|
spălat pot fi folosite ca mijloace auxiliare în |
||||||
|
|
programul de spălare. Se recomandă efectua- |
||||||
|
|
rea programului de curăţare la fiecare 40 de |
||||||
|
|
cicluri de spălare. |
||||||
|
|
Pentru a activa programul, apăsaţi butoanele |
||||||
|
|
A şi B în acelaşi timp pentru 5 secunde (a se |
||||||
|
|
vedea figura). |
||||||
|
|
Programul porneşte automat şi durează apro- |
||||||
|
|
ximativ 70 de minute. |
||||||
|
|
|
|
|
|
|
||
|
|
A |
|
|
|
|
||
|
|
|
||||||
|
|
B |
|
|
|
|||
|
|
|||||||
|
|
|
|
|||||
|
|
Curăţarea compartimentului pentru deter- |
||||||
|
|
gent |
||||||
Îngrijirea uşii şi a tamburului
•Lăsaţimereuuşaîntredeschisăpentruaevita formarea de mirosuri neplăcute.
Curăţarea pompei
Maşina de spălat este dotată cu o pompă de autocurăţare care nu are nevoie de întreţinere. Se poate întâmpla însă ca unele obiecte mici (monede, nasturi) să cadă în anticamera care protejează pompa, situată în partea inferioară a acesteia.
! Verificaţi ca ciclul de spălare să fie încheiat şi scoateţi stecherul din priză.
Pentru a avea acces la anticameră:
1. scoateţi panoul de acoperire din partea din faţă a maşinii de spălat folosind o şurubelniţă
(a se vedea figura);
2. deşurubaţi capacul rotindu-l în sens invers acelor de ceasornic (a se vedea figura). Este normal să iasă puţină apă;
3.curăţaţi cu grijă interiorul;
4.înşurubaţi la loc capacul;
5.montaţi din nou panoul verificând, înainte de a-l împinge spre maşină, de a fi introdus cârligele în orificiile respective.
Trageti afara compa- |
Controlareafurtunuluidealimentarecu |
|
timentul ridicându-l si |
apă |
|
tragându-l spre exte- |
|
|
rior (a se vedea figu- |
Controlaţi tubul de alimentare cel puţin o |
|
ra). |
||
dată pe an. Dacă prezintă crăpături sau fisuri |
||
Spălaţi-l sub un jet de |
||
trebuie înlocuit: pe parcursul spălărilor, pre- |
||
apă; această operaţie |
||
siunea puternică ar putea provoca crăpături |
||
trebuie efectuată cât |
||
neaşteptate. |
||
mai des posibil. |
||
|
||
|
! Nu folosiţi niciodată tuburi folosite deja. |
|
16 |
|

Precauţii şi sfaturi
! Maşina de spălat a fost proiectată şi construită conform
normelorinternaţionaledeprotecţie.Acesteavertizărisuntfur- RO nizatedinmotivedesiguranţăşitrebuiesăfiecititecuatenţie.
Norme de protecţie şi siguranţă generale
• Acest aparat a fost conceput exclusiv pentru utilizarea în locuinţe unifamiliale.
• Aparat aparat poate fi folosit de copii începând cu vârsta de 8 ani şi de persoane cu capacităţifizice,senzorialesaumentaleredusesaucuexperienţăşicunoştinţeinsuficiente dacă sunt supravegheate sau dacă au primit o pregătire adecvată privind folosirea aparatului în mod sigur şi înţelegând pericolele respective. Copiii nu trebuie să se joace cu aparatul. Întreţinerea şi curăţarea nu trebuie să fie efectuate de copii fără supraveghere.
•Nu atingeţi maşina când sunteţi desculţi sau cu mâinile sau picioarele ude sau umede.
•Nu scoateţi stecherul din priză trăgând de cablu.
•Nu deschideţi compartimentul pentru detergent în timp ce maşina se află în funcţiune.
•Nu atingeţi apa golită din maşină: poate avea o temperatură ridicată.
•Nu forţaţi în nici un caz uşa: s-ar putea deteriora mecanismul de siguranţă care evită deschiderea accidentală.
•În caz de defecţiune, nu umblaţi în nici un caz la mecanismele din interior şi nu încercaţi să o reparaţi singuri.
•Controlaţi mereu ca în apropierea maşinii aflate în funcţiune, să nu se afle copii.
•Pe durata spălării uşa se poate încălzi.
•Dacă trebuie să deplasaţi maşina, cereţi ajutor unei alte (sau2)persoaneşifiţifoarteatenţi.Niciodatănudeplasaţi maşina singuri deoarece aceasta este foarte grea.
•Înainte de a introduce rufele, controlaţi cuva să fie goală.
Aruncarea reziduurilor
•Eliminarea ambalajelor: respectaţi normele locale, în acest fel ambalajele vor putea fi utilizate din nou.
•Directiva Europeană 2012/19/EU - WEEE cu privire la deşeurile care provin de la aparatura electrică sau electronicăprevedecaaparatele electrocasnicesănufie colectateîmpreunăcudeşeurileurbanesolide,obişnuite. Aparatele scoase din uz trebuie să fie colectate separat atât pentru a optimiza rata de recuperare şi de reciclare amaterialelorcomponentecâtşipentruaevitapericolele care pot duce la dăunarea sănătăţii omului sau poluarea mediului înconjurător. Simbolul tomberonului tăiat care apare pe toate produsele vă aminteşte tocmai obligaţia de a le colecta separat.
Pentru informaţii suplimentare cu privire la scoaterea din uz a electrocasnicelor, deţinătorii acestora pot apela la centrele de colectare a deşeurilor sau la vânzătorii de la care au achiziţionat produsele respective.
17
Descrierea maşinii de spălat
Panoul de control
RO
|
|
|
Tastă cu led |
||
|
|
Tastă |
BLOCARE TASTE |
||
|
|
|
|
|
|
Tastă |
|
TEMPERATURĂ |
|
Tastă cu led |
|
|
|
||||
|
Taste cu led |
||||
ON/OFF |
|
START/PAUSE |
|||
|
FUNCŢII |
|
|||
|
|
|
|
|
|
DISPLAY
|
|
|
|
|
|
|
|
|
|
|
|
|
|
Sertarul detergenţilor |
Tastă |
|
|
|
|
|
|
|
|
||||
|
Selector |
CENTRIFUGARE Tastă |
|
|
||
|
|
|||||
|
|
|
PORNIRE ÎNTÂRZIATĂ |
|||
|
PROGRAME |
|
|
|
|
|
|
|
|
|
|
|
|
Sertarul detergenţilor: pentru a introduce detergenţi sau aditivi (a se vedea “Detergenţi şi rufe albe”).
Tastă ON/OFF  : apăsaţi scurt tasta pentru a porni sau opri maşina de spălat. Indicatorul START/PAUSE emite un semnal intermitent de culoare verde, ceea ce vă confirmă pornirea maşinii. Pentru a opri funcţionarea maşinii de spălat în timpul spălării, este necesar să ţineţi apăsată tasta circa 2 secunde; o apăsare de scurtă durată sau accidentală nu va opri maşina. Oprirea maşinii de spălat în timpul executării unui ciclu va anula programul în curs de desfăşurare.
Selector PROGRAME: pentru a selecta programele. Pe durata desfăşurării programului selectorul rămâne în aceeaşi poziţie.
Tasteculed FUNCŢII:pentruaselectafuncţiiledisponibile. Indicatorul corespunzător funcţiei alese va rămâne aprins.
BLOCARE TASTE  : Opţiunea blochează panoul de comenzi (cu excepţia tastei ON/OFF) şi este utilă pentru a împiedica modificarea setărilor maşinii de spălat de către copii în timpul funcţionării şi pentru a evita activarea involuntară. Se activează şi dezactivează ţinând-o apăsată pentru cel puţin 2 secunde.
Tastă CENTRIFUGARE  : apăsaţi tasta pentru a reduce numărul de rotaţii sau a opri storcerea; numărul de turaţii se poate vedea pe display.
Tastă TEMPERATURĂ  : apăsaţi tasta pentru a diminua sau exclude temperatura; valoarea acesteia va fi afişată pe display.
Tastă PORNIRE ÎNTÂRZIATĂ  : apăsaţi pentru a programa pornirea maşinii la o anumită oră. Întârzierea va fi indicată pe display.
Tastă cu led START/PAUSE 
 : când ledul verde emite un semnal intermitent, apăsaţi tasta pentru a porni ciclul de spălare. După activarea ciclului, ledul rămâne aprins. Pentru a introduce o pauză în timpul spălării, apăsaţi din nou tasta: ledul va emite o lumină intermitentă, de culoare portocalie. După stingerea indicatorului luminos
  , puteţi deschide uşa (aşteptaţi aproximativ 3 minute). Pentru a continua spălarea, de unde a fost întreruptă, apăsaţi din nou tasta.
Modalitatea de stand by
Aceastamasinadespalatrufe,conformnoilornormelegate de economia de curent electric, este dotata cu un sistem de oprire automat (stand-by) care intra în functiune dupa 30 minute de neutilizare. Apasati scurt tasta ON-OFF si asteptati repunerea în functiune a masinii.
18
Display |
RO |
|
B
A C
Ecranul este util pentru a programa maşina şi a furniza numeroase informaţii.
În secţiunea A este afişată durata diferitelor programe la dispoziţie şi a celui rămas, în cazul unui ciclu de spălare deja în desfăşurare; dacă a fost programat un interval de PORNIRE ÎNTÂRZIATĂ, este afişat intervalul rămas până la pornirea programului selectat. În plus, prin apăsarea tastei corespunzătoare, masina afiseaza automat temperatura si centrifuga maxime prevazute pentru programul ales, sau ultimele selectate, daca sunt compatibile cu programul.
În secţiunea B sunt afişate „fazele de spălare” prevăzute pentru ciclul selecţionat şi cele în curs de desfăşurare, în cazul unui program deja pornit.:
 Spălare
 Clătire
 Centrifugă
 Evacuare
În secţiunea C sunt afişate, începând de sus în jos, icoanele referitoare la temperatură  , la „Pornire întârziată”
  şi la „centrifugare”
  .
.
Simbolul  iluminat indică faptul că pe afişaj este indicată valoarea „temperaturii” programate. Simbolul
  iluminat indică faptul că a fost programat un interval de „Pornire întârziată”. Simbolul
  iluminat indică faptul că pe afişaj este indicată valoarea de „centrifugare” programată.
Indicator Uşă blocată 
Iluminarea simbolului indică blocarea hubloului. Pentru a evita daune este necesar să se aştepte ca simbolul să se stingă înainte de a deschide uşa.
Pentru a deschide uşa în timpul executării unui ciclu, apăsaţi tasta START/PAUSE; când simbolul UŞĂ BLOCATĂ  se stinge, puteţi deschide uşa (aşteptaţi aproximativ 3 minute).
19
Cum se desfăşoară un ciclu de spălare
1. PUNEREA ÎN FUNCŢIUNE A MAŞINII. Apăsaţi tasta
RO  ; Indicatorul START/PAUSE va emite un semnal intermitent de culoare verde.
2.INTRODUCEREA RUFELOR. Deschideţi uşa. Introduceţi rufele în maşină, fiind atenţi să nu depăşiţi cantitatea indicată în tabelul de programe (vezi pagina următoare).
3.DOZAREA DETERGENTULUI. Extrageţi sertarul şi turnaţi detergent în compartimentele respective, după indicaţiile din cap. „Detergenţi şi rufe albe”.
4.ÎNCHIDEŢI UŞA.
5.ALEGEREAPROGRAMULUI. Selectaţi programul dorit cu ajutorul selectorului de PROGRAME, împreună cu temperatura de spălare şi viteza storcătorului, acestea din urmă putând fi modificate. Pe ecran va apărea şi durata ciclului.
6.PERSONALIZAREACICLULUIDESPĂLARE. Apăsaţi tastele respective.

 Modificaretemperaturiişi/sauavitezeidestoarcere.
Masina afiseaza automat temperatura si centrifuga maxime prevazute pentru programul ales, sau ultimele selectate, daca sunt compatibile cu programul.Apăsând tasta se poate reduce progresiv temperatura până la excluderea completă a încălzirii apei, “OFF”, care corespunde cu spălarea la rece.Apăsând tasta puteţi micşoratreptatvitezadestoarcere,pânălazero,anulând complet centrifuga “OFF”. Din acest moment, apăsarea ulterioară a tastelor va aduce valorile de temperatură şi viteză de stoarcere la cele maxime prevăzute.
!Excepţie:dacăselectaţiprogramul7temperaturapoate fi crescută până la 90°.
!Excepţie: dacă selectaţi programul 15 temperatura poate fi crescută până la 60°.
!Excepţie: dacă selectaţi programul 16 temperatura poate fi crescută până la 60°.
 Configurarea pornirii întârziate.
Pentru a programa pornirea întârziată a maşinii, apăsaţi tasta respectivă pentru a alege timpul de întârziere dorit. Când opţiunea este activă, pe ecran se va aprinde simbolul . Pentru a anula pornirea întârziată, apăsaţi
tasta până când pe ecran veţi vedea mesajul OFF.
Modificarea caracteristicilor unui ciclu.
•Apăsaţi tasta pentru a activa funcţia; ledul corespunzător butonului se va aprinde.
•Apăsaţi din nou tasta pentru a dezactiva funcţia; indicatorul luminos se va stinge.
! Dacăfuncţiaselectatănuestecompatibilăcuprogramul ales, ledul corespunzător se va aprinde intermitent iar funcţia nu se va activa.
! Dacă funcţia aleasă nu este compatibilă cu o funcţie selectată anterior, indicatorul care corespunde primei funcţiivaemiteunsemnalintermitentiarindicatorulcelei de a doua se va aprinde: acest lucru înseamnă că se va
activa numai a doua funcţie (ultima aleasă).
! Cantitatea de rufe admisă precum şi durata ciclului pot varia în funcţie de funcţia aleasă.
7.ACTIVAREA UNUI PROGRAM. Apăsaţi tasta START/ PAUSE. Indicatorul luminos se va aprinde (culoarea verde) şi uşa se va bloca (simbolul UŞĂ BLOCATĂ  se va aprinde). Pentru a modifica un program în timpul executăriiunuiciclu,apăsaţitastaSTART/PAUSEpentru a întrerupe momentan ciclul; indicatorul corespunzător tasteiSTART/PAUSEsevaaprindeintermitent(culoarea portocalie). Alegeţi noul ciclul dorit şi apăsaţi din nou tasta START/PAUSE.
Pentru a deschide uşa în timpul executării unui ciclu, apăsaţi tasta START/PAUSE; când simbolul UŞĂ BLOCATĂ  se stinge, puteţi deschide uşa.Apăsaţi din nou tasta START/PAUSE pentru a relua programul de unde era oprit.
8.TERMINAREAPROGRAMULUI.La încheierea ciclului, pe ecran va apărea mesajul “END”; când simbolul UŞĂ BLOCATĂ  se stinge, puteţi deschide uşa (aşteptaţi aproximativ 3 minute). Deschideţi uşa, scoateţi rufele şi opriţi maşina de spălat.
! Dacă doriţi să anulaţi un ciclu deja demarat,ţineţi apăsată tasta  câtevasecunde.Ciclulvaîncetadefinitiviarmaşina se va opri.
20
Programe şi funcţii
Tabel de programe
Programe |
|
|
|
Viteza |
pãlare |
Detergenþi |
rufe |
||
|
|
|
minut) |
|
re |
||||
|
|
|
Temp. |
max. |
|
|
|
|
|
|
|
Descrierea Programului |
max. (°C) |
(ro- |
|
|
|
|
|
|
|
|
taþii pe |
Pres- |
|
Spãla- |
|
Balsam |
|
1 |
|
EVERYDAY FAST |
|
|
|
|
|
|
|
|
|
|
|
|
|
|
|
||
|
Mix Colorate 59’ |
40° |
1000 |
- |
|
|
|
|
|
2 |
|
Bumbac 59’ |
60° |
1000 |
- |
|
|
|
|
3 |
|
Sintetice 59’ |
30° |
1000 |
- |
|
|
|
|
4 |
|
Zilnic 45’ |
40° |
1200 |
- |
|
|
|
|
5 |
|
Mix 30’ |
30° |
800 |
- |
|
|
|
|
6 |
|
Special&Partial |
|
|
|
|
|
|
|
|
Îmbrăcăminte sportivă |
40° |
600 |
- |
|
|
|
|
|
7 |
|
Albe: Albe ºi colorate rezistente foarte murdare. |
60° |
1200 |
+90° |
|
|
|
|
|
(Max.90°) |
|
|
||||||
|
|
|
|
|
|
|
|
|
|
8 |
|
Baby |
40° |
800 |
- |
|
|
|
|
9 |
|
Clãtire |
- |
1200 |
- |
|
- |
|
|
10 |
|
Centrifugare + Evacuare |
- |
1200 |
- |
|
- |
|
- |
10 |
|
Numai golire * |
- |
OFF |
- |
|
- |
|
- |
11 |
|
Dedicated |
|
|
|
|
|
|
|
|
|
|
|
|
|
|
|
||
|
Pilote: pentru articole căptuşite cu puf de gâscă. |
30° |
1000 |
- |
|
|
|
|
|
12 |
|
Lânã: Pentru articole din lânã, caºmir. |
40° |
800 |
- |
|
|
|
|
13 |
|
Mãtase /Perdele: Pentru articolele din mãtase, viscozã, |
30° |
0 |
- |
|
|
|
|
|
|
lenjerie. |
|
|
|
|
|
|
|
14 |
|
Eco Bumbac 60°C (1): Albe ºi colorate rezistente foarte |
60° |
1200 |
- |
|
|
|
|
|
|
murdare. |
|
|
|
|
|
|
|
14 |
|
Eco Bumbac 40°C (2): Albe ºi colorate delicate puþin |
40° |
1200 |
- |
|
|
|
|
|
|
murdare. |
40° |
|
|
|
|
|
|
15 |
|
Bumbac (3): Albe ºi colorate delicate puþin murdare. |
1200 |
- |
|
|
|
|
|
|
(Max.60°) |
|
|
||||||
|
|
|
|
|
|
|
|
|
|
16 |
|
Sintetice (4): colorate rezistente foarte murdare. |
40° |
1000 |
- |
|
|
|
|
|
(Max.60°) |
|
|
||||||
|
|
|
|
|
|
|
|
|
|
* Dacă selectaţi programul 10 şi excludeţi centrifugarea, maşina va face doar evacuarea. ** Puteþi vizualiza durata programelor de spãlare pe display.
RO
Sarcina Max. (Kg) |
Umiditate rezidualã % |
Consum energie kWh |
|
Apã totalã lt |
|
Durata ciclului de spãlare |
7 |
|
- |
|
- |
|
59’ |
- |
|
|
||||
7 |
- |
- |
|
- |
|
59’ |
3,5 |
- |
- |
|
- |
|
59’ |
3,5 |
- |
- |
|
- |
|
45’ |
3,5 |
70 |
0,16 |
|
32 |
|
30’ |
3,5 |
|
|
|
|
||
- |
- |
|
- |
|
** |
|
7 |
- |
- |
|
- |
|
** |
3 |
- |
- |
|
- |
|
** |
7 |
- |
- |
|
- |
|
** |
7 |
- |
- |
|
- |
|
** |
7 |
- |
- |
|
- |
|
** |
2 |
|
|
|
|
|
|
|
|
|
|
|||
- |
- |
|
- |
|
** |
|
1,5 |
- |
- |
|
- |
|
** |
1 |
- |
- |
|
- |
|
** |
7 |
53 |
1,07 |
|
52,5 |
|
205’ |
7 |
53 |
0,97 |
|
75 |
|
220’ |
7 |
53 |
0,97 |
|
75 |
|
220’ |
3,5 |
46 |
0,68 |
|
55 |
|
120’ |
|
|
|
|
|
|
|
Durata ciclului indicată pe display sau în carte este calculată în baza unor condiţii standard. Timpul efectiv poate varia în baza a numeroşi factori, precum temperatura şi presiunea apei la intrare, temperatura mediului, cantitatea de detergent, cantitatea şi tipul încărcăturii, echilibrarea încărcăturii, opţiunile suplimentare selectate.
1) Programul de control conform reglementările 1061/2010: selectaţi programul 14 şi temperatura de 60°C.
Acest ciclu este potrivit pentru curăţarea unei încărcături de bumbac cu grad de murdărie normal şi este cel mai eficient din punct de vedere al consumului combinat de energie şi apă; se foloseşte pentru articole de îmbrăcăminte care pot fi spălate la 60°C. Temperatura efectivă de spălare poate diferi de cea indicată.
2) Programul de control conform reglementările 1061/2010: selectaţi programul 14 şi temperatura de 40°C.
Acest ciclu este potrivit pentru curăţarea unei încărcături de bumbac cu grad de murdărie normal şi este cel mai eficient din punct de vedere al consumului combinat de energie şi apă; se foloseşte pentru articole de îmbrăcăminte care pot fi spălate la 40°C. Temperatura
efectivă de spălare poate diferi de cea indicată.
Pentru toate Instituţiile de Testare:
3) Program pentru bumbac, prelungit: selectaţi programul 15 şi temperatura de 40°C. 4) Program sintetic lung: setaţi programul 16 cu o temperatură de 40°C.
Funcţiidespălare
-Dacăfuncţiaselectatănuestecompatibilăcuprogramul ales, ledul corespunzător se va aprinde intermitent iar funcţia nu se va activa.
-Dacă funcţia aleasă nu este compatibilă cu o funcţie selectată anterior, indicatorul care corespunde primei funcţii va emite un semnal intermitent iar indicatorul celei de a doua se va aprinde: acest lucru înseamnă că se va activa numai a doua funcţie (ultima aleasă).
Extra Wash 
Pentrurufefoartemurdare,activaţiopţiuneaExtra Wash  , dacă este compatibilă. Apăsând această opţiune, ciclul readaptează automat toţi parametrii de spălare, trecând la un ciclu cu o durată mai lungă. Opţiunea lasă temperatura neschimbată, iar centrifugarea este pusă automat pe nivelurile maxime. Utilizatorul poate regla oricum centrifugarea la valoarea dorită.
 Extra Clătire
Selectând această opţiune, clătirea va fi mai eficientă, ceea ce asigură eliminarea totală a detergentului din rufe. Este recomandată cu precădere persoanelor cu pielea sensibilă.
Opţiunea 


 îţi permite să speli rufe de bumbac şi sintetice economisind energie şi deci, protejând mediul înconjurător. Economia este generată de spălarea care se efectuează la rece, iar printr-o acţiune mecanică intensificatăşio utilizareoptimizatăaapei seobţineoricum rezultatul dorit. Este indicat pentru rufe puţin murdare. Se recomandă folosirea unui detergent lichid.
21

Detergenţi şi rufe albe
|
Compartimentul pentru detergenţi |
|
RO |
||
Un rezultat bun la spălare depinde şi de dozarea corectă a |
||
|
detergentului:excesuldedetergentnugaranteazăospălare |
|
|
||
|
maieficientă,cicontribuieladeteriorareapărţilorinterneale |
|
|
maşinii de spălat şi la poluarea mediului înconjurător. |
|
|
! Nu introduceţi în maşină detergenţii pentru spălarea |
|
|
manuală deoarece formează prea multă spumă. |
|
|
! Utilizaţi detergenţi praf pentru rufele albe de bumbac, |
|
|
pentru prespălare şi pentru spălarea la temperaturi mai |
|
|
mari de 60°C. |
|
|
! Respectaţi indicaţiile de pe ambalajul detergentului. |
1 |
2 |
3 |
Deschideţi compartimentul pentru detergenţi şi introduceţi detergentul sau aditivul după cum urmează:
compartiment 1: Detergent pentru prespălare (sub formă de praf)
compartiment 2: Detergent pentru spălare (sub formă de praf sau lichid)
Detergentul lichid trebuie vărsat doar înainte de pornire. compartiment 3: Aditivi (soluţie de înmuiat, balsam rufe etc.)
Soluţia de înmuiat nu trebuie să iasă deasupra grătarului.
Notă:Încazulfolosirii”detergentuluiîntablete”serecomandă să respectaţi întotdeauna indicaţiile producătorului.
Pregătirea rufelor
• Sortaţi rufele în funcţie de:
-tipul de material / simbolul de pe etichetă.
-culori: separaţi rufele colorate de cele albe.
• Goliţi buzunarele şi controlaţi nasturii.
• Nu depăşiţi valorile indicate în “Tabel Programe” referitoare la greutatea rufelor uscate.
Cât cântăresc rufele?
1 cearceaf 400-500 g.
1 faţă de pernă 150-200 g.
1 faţă de masă 400-500 g.
1 halat de baie 900-1.200 g.
1 prosop 150-250 g.
Cicluri zilnice rapide
Unsetcompletdeprogramerapidepentruaspălalaîntreaga capacitateţesuturileobişnuiteşipentruaîndepărtamurdăria zilnică frecventă în mai puţin de 1 oră.
Mix Colorate 59’: pentru a spăla rufe mixte şi colorate împreună.
Bumbac59’:cicluconceputpentruaspălarufedinbumbac, în special albituri. Se poate utiliza şi cu detergent praf. Sintetice 59’: specific pentru a spăla rufe sintetice. În prezenţa unei murdării mai rezistente, se poate mări temperatura până la 60° şi se poate utiliza şi un detergent praf.
Zilnic 45’: ciclu scurt conceput pentru a spăla rufe de bumbac delicate.
Mix 30’: ciclu scurt conceput pentru a spăla rufe mixte de bumbac şi şesături sintetice, albe ţi colorate împreună.
Programe optionale
Îmbrăcăminte sportivă: ciclul este adecvat pentru a spăla împreunătoaterufelesportive,inclusivprosopulpentrusala de sport, respectând fibrele (respectaţi indicaţiile de pe eticheta articolelor).
Baby: ciclu conceput pentru murdăria tipică a hainelor copiilor, îndepărtând eficient şi eventualele urme rămase de detergent.
Pilote: pentru a spăla articolele cu căptuşeală din puf de gâscă, ca de exemplu, pilotele singură persoană (care nu depăşesc 2 kg greutate), pernele, pardesiele, folosiţi programul special 11. Vă recomandăm să introduceţi pilotele în cuva maşinii îndoind marginile spre interior (vezi figura) şi să nu depăşiţi ¾ din volumul cuvei. Pentru o spălare optimală, vă recomandăm să folosiţi un detergent lichid, de dozat în sertarul pentru detergenţi.
Lână:cuprogramul12sepotspălacumaşinatoatehainele delână,inclusivcelecueticheta„asespălanumaimanual”  . Pentru a obţine cele mai bune rezultate, folosiţi un detergent specific şi nu depăşiţi 1,5 kg de rufe.
Mătase: utilizaţi programul special 13 pentru spălarea articolelor din mătase. Se recomandă folosirea unui detergent special pentru articole delicate.
Perdele: împăturiţi-le şi aşezaţi-le într-o faţă de pernă sau într-un sac de tip plasă. Utilizaţi programul 13.
Sistemul de echilibrare a încărcăturii
Pentruaevitatrepidaţiileexcesive,înaintedestoarcere,cuva maşiniivadistribuicantitateaderufeînmoduniform,centrifugaefectuândcâtevarotaţiilaovitezămaimaredecâtvitezade spălare.Dacă,dupănumeroaseîncercări,maşinanureuşeşte să echilibreze greutatea, stoarcerea rufelor se va face la o vitezămaimicădecâtceaprevăzutăînprogram.Dacăinstabilitateaestepreamare,maşinavadistribuigreutateaînlocul centrifugei. Pentruafavorizaomai bunărepartizarearufelor şiechilibrareacorectăamaşinii,serecomandăsăintroduceţi în maşină atât articole mari cât şi mici.
22

Anomalii şi remedii
|
|
|
|
|
Se poate întâmpla ca maşina de spălat să nu funcţioneze. Înainte de a apela serviciul de Service |
|
|||
RO |
||||
(a se vedea “Asistenţă”), verificaţi dacă nu este vorba de o problemă uşor de rezolvat: |
||||
Anomalii: |
Cauze posibile / Rezolvare: |
|
||
|
||||
Maşina de spălat nu porneşte.
Ciclul de spălare nu porneşte.
Maşina de spălat nu se alimentează cu apă (pe afişaj se aprinde intermitent mesajul „H2O”).
Maşina de spălat încarcă şi descarcă apă continuu.
Maşina de spălat nu se goleşte sau nu stoarce.
Maşina de spălat vibrează foarte mult în timpul stoarcerii.
Maşina de spălat pierde apă.
Indicatoarelede“optiuni”si“start/pauza” suntintermitenteiarecranulafiseazaun coddeeroare(deex., F-01,F-..).
Se formează prea multă spumă.
•Stecherul nu este introdus în priza de curent, sau nu face contact.
•Aveţi o pană de curent la domiciliu.
•Uşa nu este bine închisă.
•Tasta ON/OFF nu a fost apăsată.
•Tasta START/PAUSE nu a fost apăsată.
•Robinetul de apă nu este deschis.
•A fost fixată o întârziere de pornire (a se vedea “Cum se desfăşoară un ciclu de spălare”).
•Furtunul de alimentare cu apă nu este racordat la robinet.
•Furtunul este îndoit.
•Robinetul de apă nu este deschis
•Apa la domiciliul dumneavoastră.
•Apa nu are presiune suficientă.
•Tasta START/PAUSE nu a fost apăsată.
•Furtunul de golire nu a fost instalat la o înălţime cuprinsă între 65 şi 100 cm de pământ (a se vedea “Instalare”).
•Capătulfurtunuluideevacuareestecufundatînapă(a se vedea “Instalare”).
•Evacuarea din perete nu are răsuflare pentru aer.
Dacădupăacesteverificăriproblemanuserezolvă,închideţirobinetuldeapă,opriţi maşinadespălatşichemaţiService-ul.Dacălocuinţaseaflălaultimeleetajealeunui edificiu,esteposibilsăaibălocfenomenedesifonare,motivpentrucaremaşinade spălatîncarcăşidescarcăapăîncontinuu.Pentruaeliminaacestinconvenient,se găsescîncomerţsupapeanti-sifonare.
•Programul nu prevede golirea apei: în cazul anumitor programe, este necesară activarea manuală (a se vedea “Programe şi funcţii”).
•Furtunul de golire este îndoit (a se vedea “Instalare”).
•Conducta de descărcare este înfundată.
•Cuva, în momentul instalării, nu a fost deblocată în mod corespunzător (a se vedea “Instalare”).
•Maşina de spălat este în pantă (a se vedea “Instalare”).
•Maşina de spălat este prea aproape de pereţi şi mobilier (a se vedea “Instalare”).
•Furtunuldealimentarecuapănuestebineînşurubat (a se vedea “Instalare”).
•Compartimentul de detergenţi este înfundat (pentru a-l curăţa a se vedea “Întreţinere şi curăţare”).
•Furtunul de golire nu este bine fixat (a se vedea “Instalare”).
•Opriţi maşina şi scoateţi stecherul din priză; aşteptaţi aproximativ 1 minut înainte de a o reaprinde. Dacă nu obţineţi nici un rezultat, apelaţi Centrul de service pentru asistenţă.
•Detergentul nu este compatibil cu maşina de spălat (trebuie să fie scris „pentru maşina de spălat”, „de mână sau în maşina de spălat”, sau ceva asemănător).
•Dozajul a fost excesiv.
23

Asistenţă
|
|
|
|
|
|
|
Înainte de a lua legătura cu Service-ul: |
||
RO |
||||
|
• |
Verificaţi dacă puteţi rezolva singuri problema (a se vedea “Anomalii şi remedii”); |
||
|
|
• |
Porniţi din nou programul pentru a controla dacă inconvenientul a fost eliminat; |
|
|
||||
|
|
• |
În caz negativ, luaţi legătura cu asistenţa tehnică autorizată la numărul telefonic indicat pe certificatul de garanţie. |
|
|
|
! Nu apelaţi niciodată la persoane neautorizate. |
||
|
|
Comunicaţi: |
||
|
|
• |
tipul de anomalie; |
|
|
|
• |
modelul maşinii (Mod.); |
|
|
|
• |
numărul de serie (S/N). |
|
Aceste informaţii sunt specificate pe plăcuţa cu date tehnice, lipită în partea din spate a maşinii de spălat precum şi în partea anterioară, după ce deschideţi uşa.
Atenţionãri în conformitate cu legislaţia în vigoare
•Conform prevederilor legislaţiei privind gestionarea deşeurilor, este interzisã eliminarea deşeurilor de echipamente electrice şi electronice (DEEE) alãturi de deşeurile municipale nesortate. Ele trebuie predate la punctele municipale de colectare, societãţile autorizate de colectare/reciclare sau distribuitori (în cazul în care se achiziţioneazã echipamente noi de acelaşi tip).
•Autoritãţile locale trebuie sã asigure spaţiile necesare pentru colectarea selectivã a deşeurilor precum şi funcţionalitatea acestora. Contactaţi societatea de salubrizare sau compartimentul specializat din cadrul primãriei pentru informaţii detaliate.
•Deşeurile de echipamente electrice şi electronice pot fi predate şi distribuitorilor, la achiziţionarea de echipamente noi de acelaşi tip (schimb 1 la 1).
•Predarea, de cãtre utilizatori, a deşeurilor de echipamente electrice şi electronice, la punctele de colectare municipale, societãţile autorizate de colectare/reciclare sau distribuitori (în cazul în care se achiziţioneazã echipamente noi de acelaşi tip) faciliteazã refolosirea, reciclarea sau alte forme de valorificare a acestora.
•Deşeurile de echipamente electrice şi electronice pot conţine substanţe periculoase care pot avea un impact
negativ asupra mediului şi sãnãtãţii umane în cazul în care DEEE nu sunt colectate selectiv şi gestionate conform  prevederilor legale.
• Simbolul alãturat (o pubela cu roţi, barata cu douã linii în forma de X), aplicat pe un echipament electric sau electronic, semnificã faptul cã acesta face obiectul unei colectãri separate şi nu poate fi eliminat împreunã cu deşeurile municipale nesortate.
24

Használati utasítás
MOSÓGÉP
HU
Magyar
Összefoglalás |
HU |
|
Üzembe helyezés, 26-27
Kicsomagolás és vízszintbe állítás Vízés elektromos csatlakozás
Első mosási ciklus Műszaki adatok
Karbantartás és ápolás, 28
A víz elzárása és az elektromos áram kikapcsolása A mosógép tisztítása
A mosószer-adagoló fiók tisztítása Az ajtó és a forgódob ápolása
A szivattyú tisztítása
A vízbevezető cső ellenőrzése
EWE 71252
Óvintézkedések és tanácsok, 29
Általános biztonság
Hulladékelhelyezés
A mosógép leírása, 30-31
Kezelőpanel
Kijelző
A mosási ciklusok végrehajtása, 32
Programok és funkciók, 33
Programtáblázat
Mosási funkciók
Mosószerek és mosandók, 34
Mosószer-adagoló fiók
A mosandó ruhák előkészítése Mindennapi gyors ciklusok
Különleges programok
A bepakolt ruhák kiegyensúlyozására szolgáló rendszer
Rendellenességek és elhárításuk, 35 Szerviz, 36
25
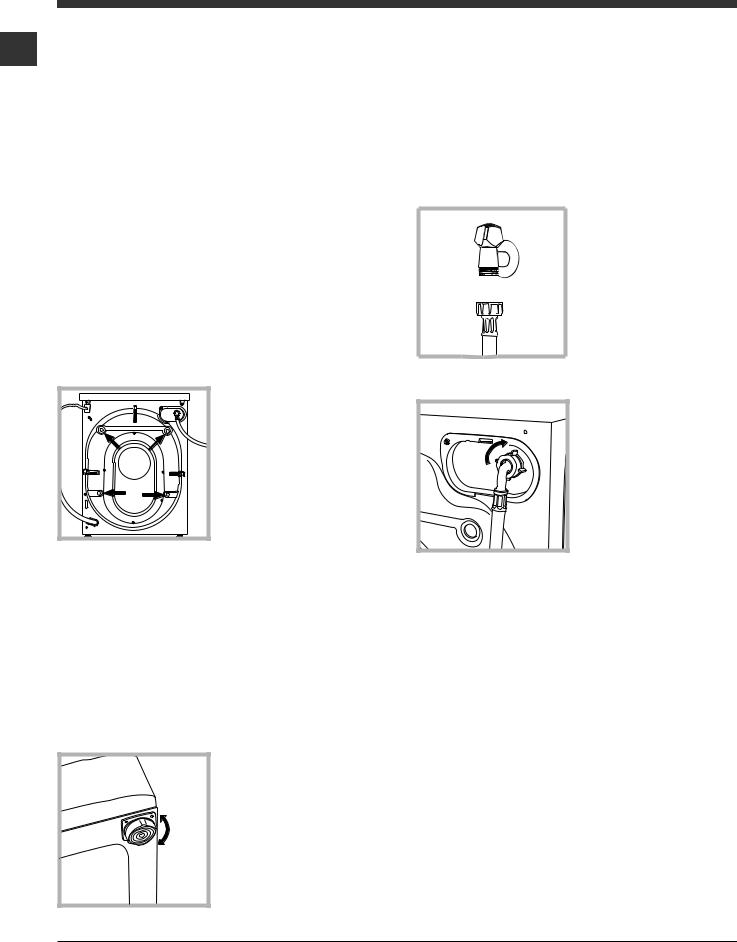
Üzembe helyezés
HU |
! Fontos, hogy megőrizze ezt a kézikönyvet, |
A pontos vízszintezés biztosítja a gép sta- |
hogy mindig kéznél legyen. Ha a mosógépet |
bilitását, így az a működés során nem fog |
|
|
eladná, átadná vagy másnál helyezné el, |
rezegni, zajt okozni, illetve elmozdulni. |
|
gondoskodjon arról, hogy e kézikönyv a |
Szőnyegpadló vagy szőnyeg esetén a lá- |
|
mosógéppel együtt maradjon, hogy az új |
bakat úgy állítsa be, hogy a mosógép alatt |
|
tulajdonos is megismerhesse a készülék fun- |
elegendő hely maradjon a szellőzésre. |
|
kcióit és az ezekre vonatkozó figyelmezteté- |
Vízés elektromos csatlakozás |
|
seket. |
|
|
! Figyelmesen olvassa el az utasításokat: |
Vízbevezető cső csatlakoztatása |
|
fontos információkat tartalmaznak az üzem- |
|
|
be helyezésről, a használatról és a biztonsá- |
1. A vízbevezető cső |
|
gról. |
|
|
Kicsomagolás és vízszintbe állítás |
csatlakoztatásához |
|
csavarozza fel a |
|
|
Kicsomagolás |
csövet egy 3/4”- |
|
os külső menettel |
|
|
1. Csomagolja ki a mosógépet. |
rendelkező hidegvíz |
|
csapra (lásd ábra). |
|
|
2. Ellenőrizze, hogy a mosógép nem sérült-e |
A csatlakoztatás előtt |
|
meg a szállítás során. Ha a gépen sérülést |
eressze meg a csa- |
|
talál, ne csatlakoztassa, és forduljon a vis- |
pot addig, amíg a víz |
|
zonteladóhoz. |
teljesen átlátszóvá nem válik. |
|
3. Csavarozza ki a |
2. A vízbevezető cső |
|
gép hátsó részén |
|
|
található, a szál- |
csatlakoztatásához |
|
lításhoz szükséges |
csavarozza a csövet |
|
4 védőcsavart, és |
a mosógép hátol- |
|
távolítsa el a gumiba- |
dalán jobbra fent |
|
kot (lásd ábra). |
található vízbemeneti |
|
|
csonkra (lásd ábra)! |
|
4. Zárja le a furatokat a mellékelt műanyag |
3. Ügyeljen arra, hogy a csövön ne legyen |
|
dugókkal. |
|
|
5. Minden darabot őrizzen meg: ha a mo- |
törés vagy szűkület! |
|
sógépet szállítani kell, előtte ezeket vissza |
! A csap víznyomásának a műszaki adatok |
|
kell szerelni. |
|
|
! A csomagolóanyag nem gyermekjáték! |
táblázatában szereplő határértékek között |
|
|
kell lennie (lásd a szemben lévő oldalt). |
Vízszintbe állítás |
! Amennyiben a vízbevezető cső nem elég |
|
1. A mosógépet sík és kemény padlóra ál- |
||
hosszú, forduljon szaküzlethez vagy enge- |
||
lítsa, úgy, hogy ne érjen falhoz, bútorhoz |
déllyel rendelkező szakemberhez. |
|
vagy máshoz. |
! Soha ne használjon korábban már használt |
|
2. Ha a padló nem |
||
tökéletesen vízszin- |
csöveket. |
|
tes, azt az első lá- |
! Használja a készülékhez mellékelteket. |
|
bak be-, illetve kicsa- |
||
varásával kompen- |
|
|
zálhatja (lásd ábra). A |
|
|
gép felső burkolatán |
|
|
mért dőlés nem hala- |
|
|
dhatja meg a 2°-ot. |
|
26
 Loading...