


OPERATION MANUAL
MANUAL DE INSTRUCCIONES
® |

"IMPORTANT SAFETY INSTRUCTIONS"
When using the sewing machine, basic safety precautions should always be followed, including the following:
"Read all instructions before using." DANGER – To reduce the risk of electric shock:
1.The sewing machine should never be left unattended when plugged in. Always unplug this sewing machine from the electrical outlet immediately after using and before cleaning.
2.Always unplug before relamping.
Replace bulb with same type rated 12 volts 5 watts (for Models PS-2500, PS-2400, PS-2300, STAR 140E, STAR 130E, STAR 120E).
Replace bulb with same type rated 15 watts (for Models PS-2200, STAR 110).
WARNING – To reduce the risk of burns, fire, electric shock, or injury to persons:
1.Do not allow this machine to be used as a toy. Close attention is necessary when the sewing machine is used by or near children.
2.Use this sewing machine only for its intended use as described in this manual. Use only accessories recommended by the manufacturer as contained in this manual.
3.Never operate this sewing machine if it has a damaged cord or plug, is not working properly, has been dropped or damaged, or has been dropped into water. Return the sewing machine to the nearest authorized dealer or service center for examination, repair, electrical or mechanical adjustment.
4.Never operate the sewing machine with any air openings blocked. Keep ventilation openings of the sewing machine and foot controller free from the accumulation of lint, dust, and loose cloth.
5.Never drop or insert any object into any opening.
6.Do not use outdoors.
7.Do not operate where aerosol (spray) products are being used or where oxygen is being administered.
8.To disconnect, turn the main switch to the symbol “O” position which represents off, then remove plug from outlet.
9.Do not unplug by pulling on cord. To unplug, grasp the plug, not the cord.
10.Keep fingers away from all moving parts. Special care is required around the sewing machine needle.
11.Always use the proper needle plate. The wrong plate can cause the needle to break.
12.Do not use bent needles.
13.Do not pull or push fabric while stitching. It may deflect the needle causing it to break.
14.Switch the sewing machine to the OFF position, symbol “O” position when making any adjustments in the needle area, such as threading needle, changing needle, threading bobbin, or changing the presser foot, and the like.
15.Always unplug the sewing machine from the electrical outlet when removing covers, lubricating, or when making any of the user service adjustments mentioned in the instruction manual.
16.The sewing machine is not intended for use by young children or infirm persons without supervision.
17.Young children should be supervised to ensure that do not play with the sewing machine.
"SAVE THESE INSTRUCTIONS"
"This sewing machine is intended for household use."
“IMPORTANTES INSTRUCCIONES DE
SEGURIDAD”
Cuando se usa una máquina de coser, debe seguirse unas precauciones básicas y que vienen incluidas a continuación.
“Leer las instrucciones antes de usar” PELIGRO – Para reducir el riesgo de una descarga eléctrica.
1.La máquina no debe dejarse nunca desatendida mientras esté conectada. Desconectar la máquina de la red eléctrica inmediatamente después de su uso y antes de limpiarla.
2.Antes de cambiar la bombilla, asegúrese siempre de que la máquina de coser está apagada.
Cambie la bombilla por otra del mismo tipo de 12 V y 5 W (para los modelos PS-2500, PS-2400, PS-2300, STAR 140E, STAR 130E y STAR 120E).
Cambie la bombilla por otra del mismo tipo de 15 W (para los modelos PS-2200, STAR 110).
CUIDADO – Para reducir el riesgo de quemaduras, fuego, descargas eléctricas o causar daños a personas.
1.No usar la máquina como un juguete.
Prestar atención si fuese necesario cuando la máquina está siendo usada por niños o cerca de ellos.
2.Usar la máquina de coser solamente como se describe en este manual.
Usar únicamente los accesorios recomendados por el fabricante y que vienen especificados en este manual.
3.Nunca haga funcionar la máquina de coser si el cordón de alimentación o la clavija están deteriorados, si no funciona correctamente, si se ha caído o si estuvo mojada. Entregar la máquina de coser al centro de servicio autorizado más cercano para que la examinen, la reparen o hagan los ajustes eléctricos o mecánicos que correspondan.
4.No usar la máquina con los orificios de ventilación bloqueados. Mantener los orificios de ventilación de la máquina de coser y el pedal sin acumulacíon de povo. Suciedad y restos de tejido.
5.No introducir no insertar objetos en los orificios de ventilación.
6.No usar al, aire libre.
7.No usar mientras se estén utilizando productos aerosoles (spray) o en lugares donde se esté administrando oxígeno.
8.Para desconectar, girar el interruptor hasta la posición del símbolo “O” que representa off, luego desconectar el enchufe de la red.
9.Nunca desconectar el enchufe tirando del cable. Para desconectar la máquina, tirar de la clavija y no del cable.
10.Mantener los dedos alejados de todas las partes movibles de la máquina. Tener un cuidado especial con la aguja.
11.Usar siempre la placa de agujas apropiada. Una placa de agujas impropia puede producir la rotura de la aguja.
12.No usar agujas torcidas.
13.No presionar ni tirar del tejido mientras se está cosiendo. Esto podría doblar la aguja y romperla.
14.Apagar la máquina de coser, poniendo el interruptor principal en la posición cerrada (en “O”) cuando quiera realizar algún ajuste en el área de la aguja tal como enhebrar la aguja, cambiarla, bobinar la canilla, cambiar el prensatelas y operaciones similares.
15.Desconectar siempre la máquina de la red eléctrica cuando se retiren las tapas, para lubricar, o cuando quiera realizar algún tipo de ajuste mecánico tal como mencionado en el manual de instrucciones.
16.La máquina de coser no está pensada para el uso de los niños o personas enfermas sin supervisión.
17.Evite que los niños jueguen con la máquina de coser.
“CONSERVE ESTE MANUAL DE INSTRUCCIONES” “Esta máquina de coser es para uso doméstico”
FOR USERS IN UK, EIRE, MALTA AND CYPRUS ONLY.
If your sewing machine is fitted with a 3 pin non-rewireable BS plug then please read the following.
IMPORTANT (in the United Kingdom)
Main supply (AC 230/240V~, 50Hz)
DO NOT cut off the mains plug from equipment. If the plug fitted is not suitable for the power point in your home or the cable is too short to reach a power point, then obtain an appropriate safety approved extension lead or consult your dealer.
BE SURE to replace the fuse only with an identical approved type, as originally fitted and to replace the fuse cover.
If none the less the mains plug is cut off ensure to remove the fuse and dispose of the plug immediately, to avoid a possible shock hazard by inadvertent connection to the main supply.
IMPORTANT (in the other countries)
If the available socket outlet is not suitable for the plug supplied with this equipment, it should be cut off and an appropriate three pin plug fitted. With alternative plugs an approved fuse must be fitted in the plug.
NOTE: The plug severed from the main leads must be destroyed as a plug with bared flexible cords is hazardous if engaged in a live socket outlet. In the event of replacing the plug fuse, use a fuse approved by ASTA to BS 1362, i.e. carrying the ASA mark, rating as marked on plug.
Always replace the fuse cover. Never use plugs with the fuse cover removed.
WARNING: DO NOT CONNECT EITHER WIRE TO THE EARTH TERMINAL WHICH IS MARKED WITH THE LETTER ‘E’, BY THE EARTH SYMBOL  OR COLOURED GREEN OR YELLOW.
The wires in these main leads are coloured in accordance with the following code:
Blue |
Neutral |
Brown |
Live |
As the colours of the wiring in the mains lead of this appliance may not correspond with the coloured markings identifying the terminals in your plug, proceed as follows:
The wire which is coloured blue must be connected to the terminal which is marked with the letter ‘N’ or coloured black or blue.
The wire which is coloured brown must be connected to the terminal which is marked with the letter ‘L’ or coloured red or brown.
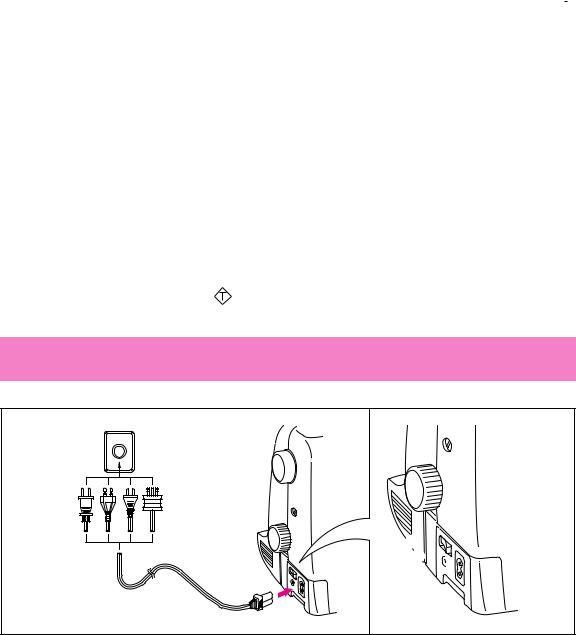
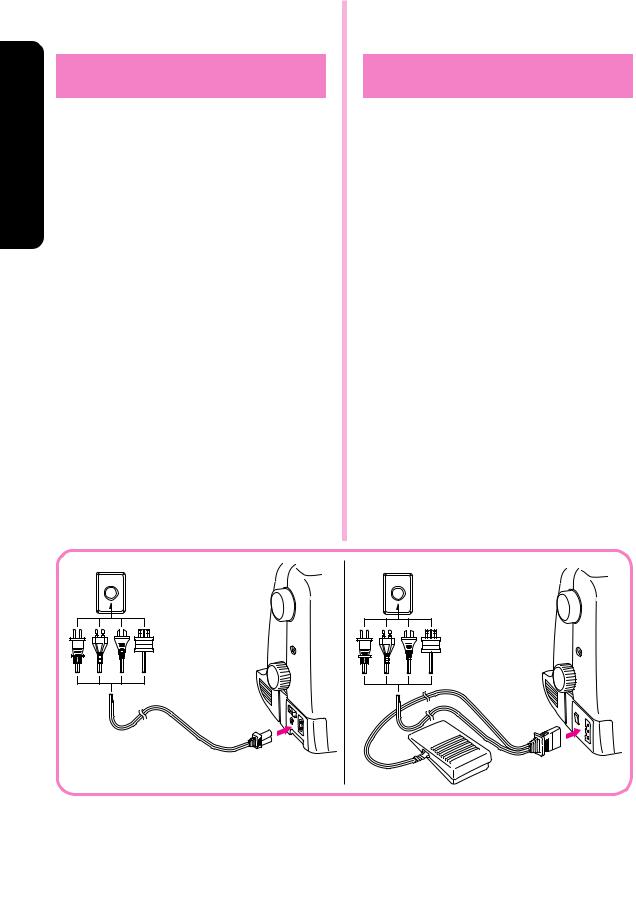
Connecting Plugs and Main Power / Sewing Light Switch
( Model PS-2500, PS-2400, PS-2300 STAR140E, STAR130E, STAR120E )
2
1
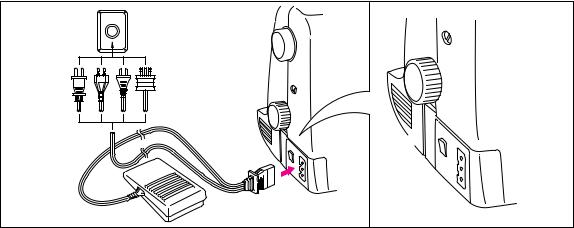
(Model PS-2200, STAR110)
1
2
1.Connect the power cord or three-prong plug into the machine.
2.Connect the electrical supply plug into a wall outlet.
-When leaving the sewing machine unattended, the main switch of the machine must be switched off or the plug must be removed from the socket outlet.
Turn on or off the switch for the main power and sewlight.
1 Turn on
2 Turn off
-When servicing the sewing machine, or when removing covers or changing lamps, the machine or the electrical set must be disconnected from the supply by removing the plug from the socket outlet.
TABLE OF CONTENTS
KNOWING YOUR SEWING MACHINE |
|
Principal parts ..................................................... |
1 |
Principal parts ..................................................... |
3 |
Accessories ......................................................... |
5 |
OPTIONAL ACCESSORIES ............................... |
6 |
OPERATING YOUR SEWING MACHINE .......... |
7 |
Connecting Plugs ...................................... |
7 |
Main Power and Sewing Light Switches ... |
8 |
Foot Controller ........................................... |
8 |
Replacing the Needle ................................ |
9 |
Checking the Needle ................................. |
9 |
Changing the Presser Foot ...................... |
10 |
Extension Table (Accessories) ................ |
10 |
VARIOUS CONTROLS ..................................... |
11 |
Pattern Selection Dial .............................. |
11 |
RECOMMENDED WIDTHS AND |
|
LENGTHS FOR STITCHES .................... |
12 |
Stitch Length Dial .................................... |
14 |
Stitch Width Dial ...................................... |
15 |
Reverse Sewing Button ........................... |
16 |
Drop Feed Lever ...................................... |
17 |
Start/stop Button ...................................... |
18 |
Speed Range Control Lever .................... |
19 |
Automatic Thread Cutter ......................... |
20 |
Converting to Free-arm Style .................. |
21 |
THREADING THE MACHINE ........................... |
22 |
Winding the Bobbin ................................. |
22 |
Lower Threading ...................................... |
25 |
Upper Threading ...................................... |
26 |
Using Needle Threader ........................... |
28 |
Manually Drawing Up Lower Thread ....... |
29 |
Twin Needle Sewing ................................ |
30 |
Thread Tension Control ........................... |
31 |
Thread Tension ....................................... |
32 |
RELATIVE CHART OF SEWING FABRICS, |
|
NEEDLES AND THREADS ............................... |
34 |
STRAIGHT AND ZIGZAG STITCHING |
|
Straight Stitching ..................................... |
36 |
Zigzag Stitching ....................................... |
40 |
BUILT-IN STITCHES |
|
Blind Hem Stitching ................................. |
41 |
Shell Tuck Stitching ................................. |
42 |
Elastic Stitching ....................................... |
43 |
Double Action Stitching ........................... |
44 |
Scallop Stitching ...................................... |
45 |
Decorative Stitching ................................. |
46 |
Patchwork ................................................ |
47 |
Overedge Stitching .................................. |
48 |
Feather Stitching ..................................... |
49 |
Triple Zigzag Stretch Stitching ................. |
50 |
BUTTONHOLE AND BUTTON SEWING |
|
Making a Buttonhole ................................ |
51 |
Odd-shaped buttons that |
|
do not fit into the button holder plate ....... |
53 |
Buttonhole Fine Adjustment .................... |
54 |
Button Sewing ......................................... |
57 |
USING ATTACHMENTS AND APPLICATIONS |
|
Zipper Insertion ........................................ |
58 |
Gathering ................................................. |
59 |
Darning .................................................... |
59 |
Appliques ................................................. |
60 |
Monogramming and Embroidering .......... |
61 |
OPTIONAL ACCESSORIES |
|
Using the Walking Foot ........................... |
63 |
Using the Spring-action Quilting Foot ...... |
65 |
Using the 1/4" Seam Guide Foot ............. |
67 |
MAINTENANCE |
|
Changing the Bulb ................................... |
68 |
Cleaning .................................................. |
70 |
Automatic Thread Cutting ........................ |
72 |
Correcting a Problem with |
|
the Automatic Thread Cutter ................... |
73 |
Performance Checklist ............................ |
75 |
Repacking the Machine ..................................... |
82 |
INDEX |
|
INDICE
CONOZCA SU MÁQUINA DE COSER |
|
Elementos principales ......................................... |
1 |
Elementos principales ......................................... |
3 |
Accesorios ........................................................... |
5 |
Funcionamiento de la máquina de coser ............ |
7 |
Conexión de los enchufes ......................... |
7 |
Interruptor principal y de luz ...................... |
8 |
Pedal ......................................................... |
8 |
Cambio de la aguja .................................... |
9 |
Verificación de la aguja ............................. |
9 |
Cambio del prensatelas ........................... |
10 |
Soporte de accesorios (mesita extensible) ... |
10 |
Distintos mandos ............................................... |
11 |
Selector de puntadas .............................. |
11 |
Anchos y largos recomendados para cada |
|
puntada .................................................... |
13 |
Selector de largo de puntada .................. |
14 |
Selector de ancho de puntada ................ |
15 |
Pulsador de retroceso ............................. |
16 |
Palanca de los alimentadores ................. |
17 |
Pulsador de puesta en marcha/parada ... |
18 |
Palanca de control de zona de velocidad . 19 |
|
Cortahilos automático .............................. |
20 |
Conversión en modalidad de brazo libre ... |
21 |
Enhebrado de la máquina ................................. |
22 |
Bobinado de la canilla ............................. |
22 |
Enhebrado inferior ................................... |
25 |
Enhebrado superior ................................. |
26 |
Uso del enhebrador ................................. |
28 |
Levantar manualmente el hilo inferior ..... |
29 |
Costura con aguja doble ......................... |
29 |
Control de la tensión de los hilos ............ |
31 |
Tensión de los hilos ................................. |
32 |
Tabla de relación entre tejidos, hilos y agujas .. |
35 |
PUNTADAS RECTAS Y ZIGZAG |
|
Puntadas rectas ....................................... |
36 |
Puntadas zigzag ...................................... |
40 |
PUNTADAS INCORPORADAS |
|
Puntadas invisibles .................................. |
41 |
Puntada ondas ........................................ |
42 |
Puntada elástica ...................................... |
43 |
Puntada de acción doble ......................... |
44 |
Ondas decorativas ................................... |
45 |
Puntadas decorativas .............................. |
46 |
Patchwork ................................................ |
47 |
Puntada por encima de la orilla ............... |
48 |
Puntada pluma ........................................ |
49 |
Triple puntada zigzag elástica ................. |
50 |
OJALES Y COSTURA DE BOTONES |
|
Para coser ojales ..................................... |
51 |
Botones con formas extrañas que no |
|
caben en el soporte del botón ................. |
53 |
Ajuste fino de los ojales ........................... |
54 |
Costura de botones ................................. |
57 |
USO DE ACCESORIOS Y APLICACIONES |
|
Inserción de cremalleras ......................... |
58 |
Fruncido ................................................... |
59 |
Zurcido ..................................................... |
59 |
Aplicaciones ............................................ |
60 |
Monogramas y bordados ......................... |
61 |
ACCESORIOS OPCIONALES |
|
Utilización del pie caminante ................... |
63 |
Utilización del prensatelas |
|
enguatador accionado por muelle ........... |
65 |
MANTENIMIENTO |
|
Cambio de la bombilla ............................. |
68 |
Limpieza .................................................. |
70 |
Cortahilos automático .............................. |
72 |
Corrección de problemas en el |
|
cortahilos automático ............................... |
73 |
Listado de posibles incidencias ............... |
75 |
Embalaje de la máquina .......................... |
82 |
ÍNDICE |
|
COSERDEMÁQUINASUCONOZCA |
MACHINESEWINGYOURKNOWING |
|
|
|
|
|
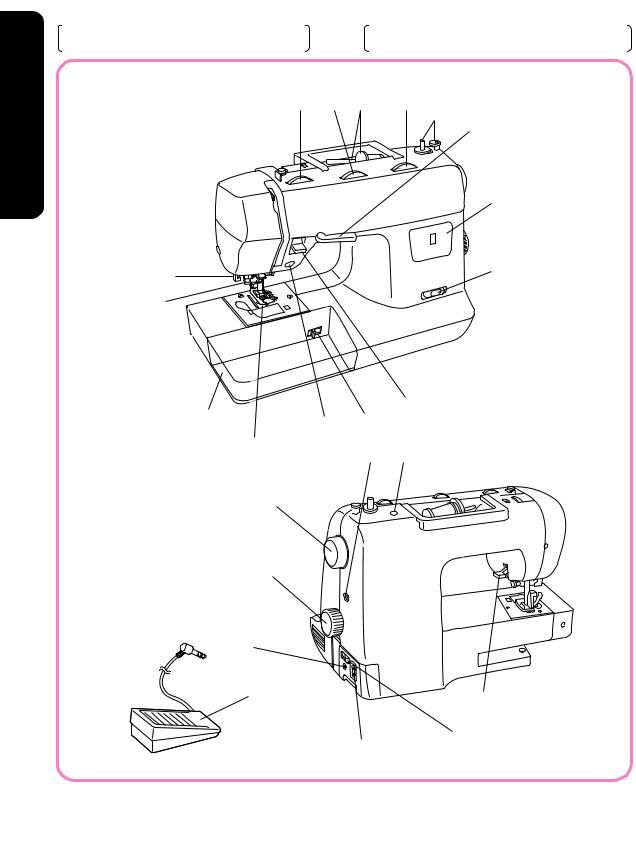
Principal parts |
|
|
Elementos principales |
|
Model PS-2500, PS-2400, PS-2300 |
|
|
Modelos PS-2500, PS-2400, PS-2300, |
|
STAR140E, STAR130E, STAR120E |
|
|
STAR 140E, STAR 130E y STAR 120E |
|
5 4 3 2
1
M
F
J |
0 |
|
6
9
7 |
8 |
H |
|
||
|
|
|
|
I |
E G |
|
|
|
|
L |
|
A
C
N K
B
D
1

1BOBBIN WINDER DEVICE
Winds the thread onto the bobbin to be used for the lower thread.
2STITCH LENGTH DIAL
Controls the length of the stitches.
3 SPOOL PIN AND SPOOL HOLDER
4STITCH WIDTH DIAL
Controls the stitch width.
5UPPER TENSION CONTROL DIAL
Controls the tension of the upper thread.
6 NEEDLE THREADER
7EXTENSION TABLE & ACCESSORIES COMPARTMENT
8START/STOP BUTTON
Touch to start or stop machine.
9REVERSE SEWING BUTTON
Push for stitching in the reverse direction.
0SPEED RANGE CONTROL LEVER
Controls the speed range.
APATTERN SELECTION DIAL
Turn any direction to select the stitch you need.
BMAIN SWITCH
Turn on/off the main power/sewing light switch.
CCONTROLLER JACK
Insert for foot controller operation.
DPOWER CORD PLUG
Connect machine to power supply.
E BUTTONHOLE FINE ADJUSTMENT SCREW
FPATTERN INDICATION WINDOW
Shows the stitch number to be performed.
GHOLE FOR VERTICAL SPOOL PIN
Used to hold a second spool of thread for twin needle sewing.
H DROP FEED LEVER
I ZIGZAG PRESSER FOOT
J BUTTONHOLE LEVER
K PRESSER FOOT LEVER
L PULLEY/HAND WHEEL
M“AUTOMATIC THREAD CUTTER” LEVER refer to page 20.
(Model PS-2500, STAR 140E)
NFOOT CONTROLLER
Used to control sewing speed/start and stop.
1Dispositivo de bobinado de la canilla
Hace bobina para la canilla que va a ser utilizada como hilo inferior.
2Selector de largo de puntada
Controla el largo de las puntadas.
3 Eje del carrete y porta carretes
4Selector de ancho de puntada
Controla el ancho de las puntadas.
5Disco de control de la tensión superior
Controla la tensión del hilo superior.
6 Enhebrador de agujas
7Soporte de accesorios y compartimento de accesorios
8Botón de puesta en marcha/parada
Apriete el botón para poner la máquina en marcha o pararla.
9Pulsador de retroceso
Apriete el pulsador para coser hacia atrás.
0Palanca de control del rango de velocidad
Controla el rango de velocidad.
ASelector de puntadas
Gírelo en cualquier sentido para seleccionar la puntada deseada.
BInterruptor principal
Enciende o apaga la máquina así como la luz de costura.
CConectador del pedal
Inserte la clavija del pedal para que éste funcione.
DClavija del cordón de alimentación
Permite conectar la máquina a una toma de corriente.
E Tornillo de ajuste fino de los ojales
FINDICADOR DE PUNTADA
Muestra el número de puntada que se debe realizar.
GOrifico para el porta carretes vertical
Sirve para poner un segundo carrete de hilo, para coser con una aguja doble.
H PALANCA DE ALIMENTADORES I PRENSATELAS ZIGZAG
J PALANCA DE OJALES
K PALANCA DEL PRENSATELAS L RUEDA MANUAL/POLEA
M PALANCA "CORTAHILOS AUTOMÁTICO".
VÉASE PÁG. 20 (MODELO PS-2500, STAR 140E)
NPEDAL
Se utiliza para controlar la velocidad, el inicio y el final del cosido.
2
YOURSEWINGMACHINE |
SUMÁQUINADECOSER |
KNOWING |
CONOZCA |
COSERDEMÁQUINASUCONOZCA |
MACHINESEWINGYOURKNOWING |
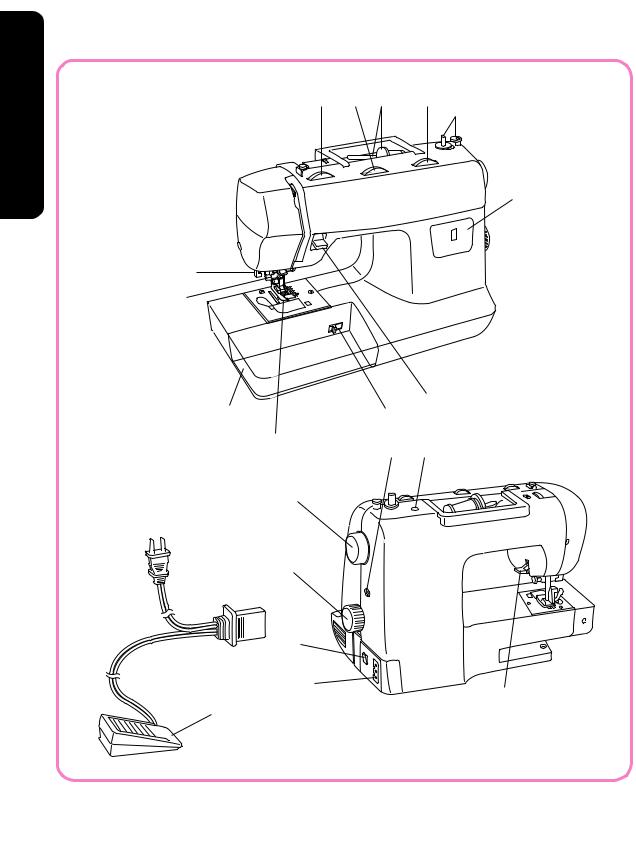
Principal parts |
|
Elementos principales |
(Model PS-2200, STAR110) |
|
(Modelo PS-2200, STAR110) |
|
|
|
5 4 3 2
1
C
H
6
8
7F
G
B D
J
9
0
A
I
E
3
1BOBBIN WINDER DEVICE
Winds the thread onto the bobbin to be used for the lower thread.
2STITCH LENGTH DIAL
Controls the length of the stitches.
3 SPOOL PIN AND SPOOL HOLDER
4STITCH WIDTH DIAL
Controls the stitch width.
5UPPER TENSION CONTROL DIAL
Controls the tension of the upper thread.
6 NEEDLE THREADER
7EXTENSION TABLE & ACCESSORIES COMPARTMENT
8REVERSE SEWING BUTTON
Push for stitching in the reverse direction.
9PATTERN SELECTION DIAL
Turn in either direction to select the desired stitch.
0MAIN POWER/SEWING LIGHT SWITCH
Turn on/off the main power/sewing light switch.
AFOOT CONTROLLER RECEPTACLE
Insert the foot controller plug for operation
B BUTTONHOLE FINE ADJUSTMENT SCREW
CPATTERN INDICATION WINDOW
Shows the stitch number to be performed.
DHOLE FOR VERTICAL SPOOL PIN
Used to hold a second spool of thread for twin needle sewing.
EFOOT CONTROLLER
Used to control sewing speed/start and stop.
F DROP FEED LEVER
G ZIGZAG PRESSER FOOT
H BUTTONHOLE LEVER
I PRESSER FOOT LEVER
J PULLEY/HAND WHEEL
|
3 Eje del carrete y porta carretes |
MACHINESEWINGYOUR |
COSERDEMÁQUINASU |
|
1 Dispositivo de bobinado de la canilla |
|
|
|
Hace bobina para la canilla que va a ser utilizada |
|
|
|
como hilo inferior. |
|
|
|
2 Selector de largo de puntada |
|
|
|
Controla el largo de las puntadas. |
KNOWING |
CONOZCA |
|
4 Selector de ancho de puntada |
||
|
|
|
|
|
Controla el ancho de las puntadas. |
|
|
|
5 Disco de control de la tensión superior |
|
|
|
Controla la tensión del hilo superior. |
|
|
|
6 Enhebrador de agujas |
|
|
7Soporte de accesorios y compartimento de accesorios
8PULSADOR DE RETROCESO
Apriete el pulsador para coser hacia atrás.
9SELECTOR DE PUNTADAS
Gírelo en cualquier sentido para seleccionar la puntada deseada.
0INTERRUPTOR PRINCIPAL/LUZ DE COSIDO
Encienda/apague el interruptor principal/luz de cosido
ARECEPTÁCULO DEL PEDAL
Inserte la clavija del pedal para que éste funcione.
BTORNILLO DE AJUSTE FINO DE LOS OJALES
CINDICADOR DE PUNTADA
Muestra el número de puntada que se debe realizar.
DORIFICIO PARA EL PORTABOBINAS VERTICAL
Sirve para poner un segundo carrete de hilo para coser con una aguja doble.
EPEDAL
Se utiliza para controlar la velocidad, el inicio y el final del cosido.
F PALANCA DE ALIMENTADORES
GPRENSATELAS ZIGZAG
Sirve para poner un segundo carrete de hilo, para coser con una aguja doble.
H PALANCA DE OJALES
I PALANCA DEL PRENSATELAS
J RUEDA MANUAL/POLEA
4
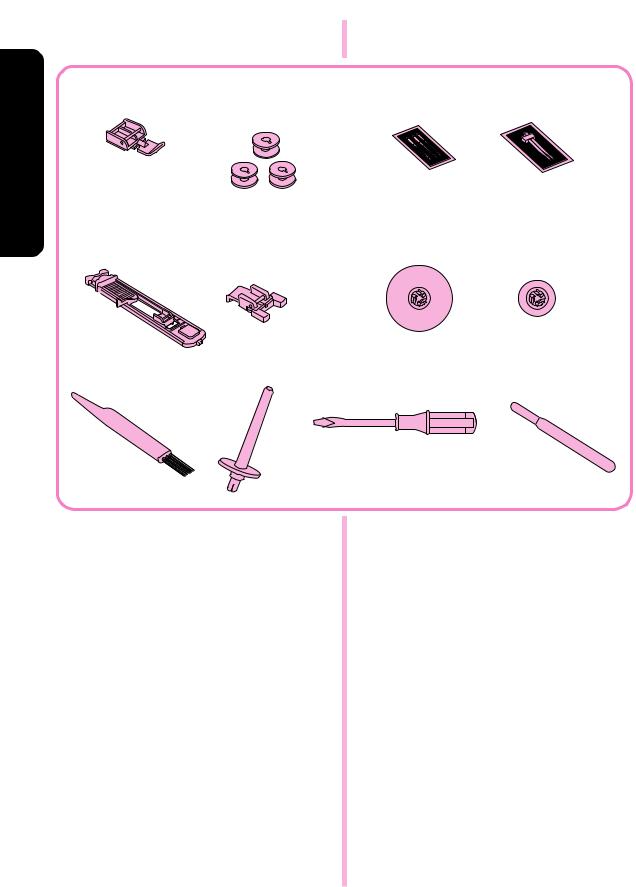
Accessories
CONOZCA |
KNOWING |
1 X59370-051 |
2 XA3811-051 |
|
COSERDEMÁQUINASU |
MACHINESEWINGYOUR |
|
XA3812-052 |
|
5 XA4973-051 |
6 X59375-051 |
|||
|
|
9 X59476-051 |
0 130920-051 |
1 Zipper Foot (1 pc.)
2 Bobbin (3 pcs.) XA3811-051 (For U.S.A) XA3812-052 (Forothercountries) Replacements (10-piece set)
3Needle Pack (Regular Single Needle No. 14) (3 pcs.)
4 Twin Needle (1 pc.)
5 Buttonhole Foot (1 pc.)
6 Button Sewing Foot (1 pc.)
7 Spool Holder (Large) (1 pc.)
8 Spool Holder (Small) (1 pc.)
9 Brush (1 pc.)
0 Extra Spool Pin (1 pc.) A Screwdriver (1 pc.)
B Seam Ripper (1 pc.)
5
Accesorios
3 X57117-051 |
4 X59296-001 |
7 130012-053 |
8 130013-053 |
A X55467-051 |
B X54243-001 |
1 Pata de cremalleras (1 pza)
2 Canilla (3 pzas) XA 3811-051 (para EE UU) XA 3812-052 (para otros países) Recambios (paquetede10piezas)
3Paquete de agujas (agujas simples normales No 14) (3 pzas)
4 Aguja doble (1 pza)
5 Prensatelas para ojales (1 pza)
6 Prensatelas para la costura de botones (1 pza)
7 Tope para carretes (grande) (1 pza)
8 Tope para carretes (pequeño) (1 pza)
9 Cepillo (1 pza)
0 Porta carretes extra (1 pza) A Destornillador (1 pza)
B Cortador para abrir costuras (1 pza)
Parts Code for Zigzag Presser Foot: XA5530-051
Model PS-2500, PS-2400, PS-2300 STAR140E, STAR130E STAR120E
Foot Controller: Model N5V Parts Code: XA3931051 Note (For U.S.A. only)
This foot controller can be used for sewing machine Models PS-2500, PS-2400, PS-2300.
(Model PS-2200, STAR110) Foot Controller: Model N
Parts Code: J00360051 (110/120V Area) J00016051 (220/240V Area) J00492051 (U.K.)
J00921051 (Australia, New Zealand)
J00478051 (110/220V Dual Ara) Note (For U.S.A. only)
Foot Controller: Model N
Parts Code: J00360051 (110/120V Area)
This foot controller can be used for sewing machine Model PS-2200.
The above accessories are stored in the extension table. These accessories have been designed to help complete most sewing tasks.
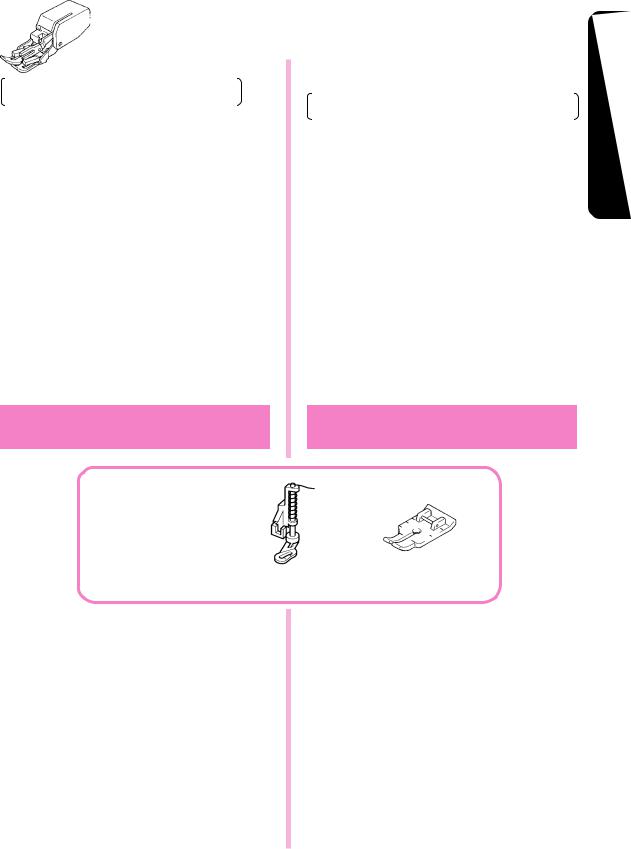
OPTIONAL ACCESSORIES
|
Código del prensatelas para la puntada |
MACHINESEWINGYOUR |
COSERDEMÁQUINASU |
|
|
|
|
|
zigzag:XA5530-051 |
|
|
|
Modelos PS-2500, PS-2400, PS-2300, |
|
|
|
STAR 140E, STAR 130E y STAR 120E |
|
|
|
Pedal: modelo N5V |
|
|
|
Código: XA3931051 |
|
|
|
Nota (sólo para EE UU) |
KNOWING |
CONOZCA |
|
(Modelos PS-2200 y STAR 10) |
||
|
Este pedal puede utilizarse para los modelos de |
|
|
|
máquinas de coser PS-2500, PS-2400 y PS2300. |
|
|
|
Pedal: modelo N |
|
|
|
Códigos: J00360051 (110/120 V Área) |
|
|
|
J00016051 (220/240 V Área) |
|
|
|
J00492051 (RU) |
|
|
|
J00921051 (Australia y Nueva Zelanda) |
|
|
|
J00478051 (110/220 V Área Dual) |
|
|
|
Nota (sólo para EE UU) |
|
|
|
Pedal: modelo N |
|
|
|
Código: J00360051 (110/120 V) |
|
|
|
Este pedal puede utilizarse para el modelo de |
|
|
|
máquina de coser PS-2200. |
|
|
|
Los accesorios anteriores están almacenados en la |
|
|
|
mesa extensible. Han sido diseñados para ayudar |
|
|
|
en la realización de la mayoría de tareas de cosido. |
|
|
ACCESORIOS OPCIONALES
1 184987-001 |
2 |
3 |
|
1 Walking foot |
|
1 Pie caminante |
|
2 Springaction Quilting foot |
|
2 Prensatelas enguatador |
|
X81021-001 (For U.S.A) |
|
X81021-001 |
(para EEUU) |
X81021-002 (For other countries) |
|
X81021-002 |
(para otros países) |
3 1/4" Seam guide foot |
|
3 Pie guía para costuras de 1/4" |
|
X80980-001 (For U.S.A) |
|
X80980-001 |
(For U.S.A) |
X80980-002 (For other countries) |
|
X80980-002 (For other countríes) |
|
NOTE: |
|
NOTA: |
|
The contents of accessories depend on models. |
|
El contenido de los accesorios depende del modelo. |
|
6
COSERDEMÁQUINASUCONOZCA |
MACHINESEWINGYOURKNOWING |
OPERATING YOUR SEWING MACHINE
Connecting Plugs
1.Connect the power cord plug into the machine.
2.Connect the power supply plug into a wall outlet.
CAUTION
1.When changing the needle, bobbin or light bulb or when the sewing machine is not in use, it is recommended that the power supply plug be disconnected from the wall socket to avoid electrical hazards.
2.For U.S.A. only
This appliance has a polarized plug (one blade wider than the other). To reduce the risk of electric shock, this plug is intended to fit in a polarized outlet only one way. If the plug does not fit fully in the outlet, reverse the plug.
If it still does not fit, contact a qualified electrician to install the proper outlet. Do not modify the plug in any way.
Funcionamiento de la máquina de coser
Conexión de los enchufes
1.Conecte la clavija del cordón de alimentación a la máquina.
2.Conecte el enchufe de alimentación a una toma de corriente.
ATENCION:
1.Cuando se cambia una aguja, la canilla o la bombilla de luz, o cuando se deja la máquina sin funcionar, se recomienda siempre retirar el enchufe de la toma de corriente para evitar choques eléctricos.
2.Sólo para EE UU
Esta máquina está provista de un enchufe polarizado (un borne más ancho que el otro). Como medida de seguridad, existe una sola manera de introducir el enchufe en la toma de corriente. Si no puede introducir el enchufe a fondo en la toma de corriente, cambie de lado el enchufe. Si sigue sin poderlo introducir, póngase en contacto con un electricista cualificado para que le instale una toma de corriente adecuada. No intente modificar el enchufe.
7
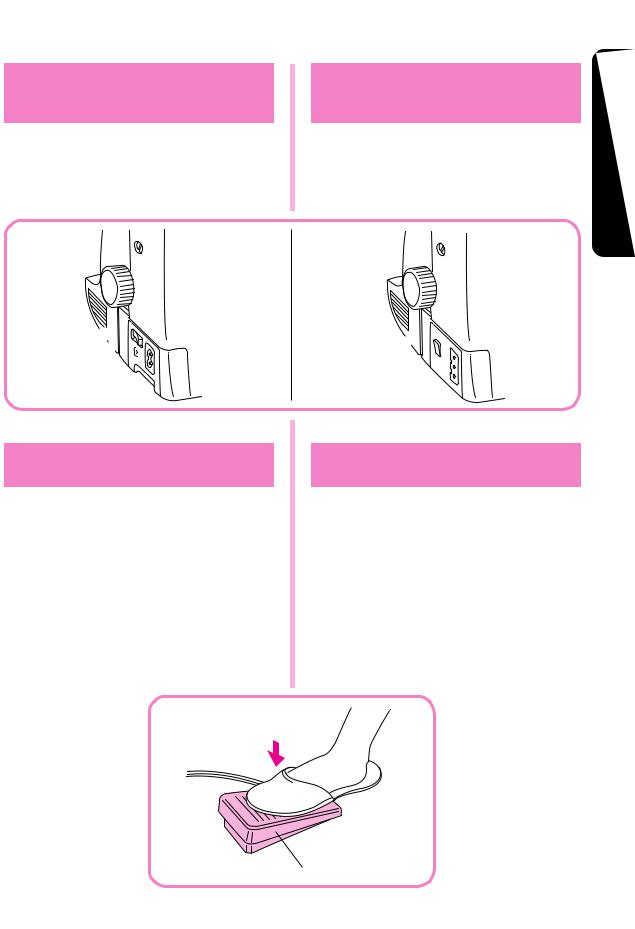
Main Power and Sewing
Light Switches
This switch turns the main power and sewing light on or off.
1 Turn on (toward the “I” mark)
2 Turn off (toward the “O” mark)
2
1
Interruptor principal y de luz
Este interruptor permite apagar y encender la máquina y la luz.
1 Encender (hacia la marca “I”)
2 Apagar (hacia la marca “O”)
1
2
YOURSEWINGMACHINE |
SUMÁQUINADECOSER |
KNOWING |
CONOZCA |
Foot Controller
When the foot controller is depressed lightly, the machine will run at a low speed. When the pressure on the foot controller is increased, the machine’s speed will increase. When pressure on the foot controller is released, the machine will stop. Care should be taken that nothing is placed on the foot controller when the machine is not in use.
1 Foot controller
Pedal
Al presionar ligeramente el pedal, la máquina funcionará a baja velocidad. Al aumentar la presión, se incrementa también la velocidad de la máquina. Al soltar el pedal, la máquina se para. Asegúrese siempre de no poner ningún objeto sobre el pedal cuando la máquina no esté utilizada.
1 Pedal
1
8
COSERDEMÁQUINASUCONOZCA |
MACHINESEWINGYOURKNOWING |
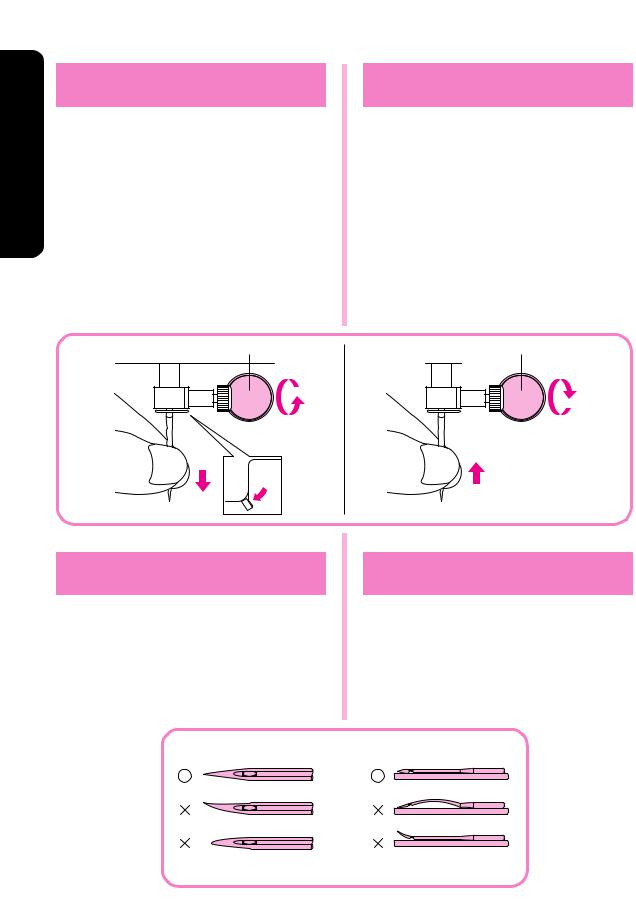
Replacing the Needle
1. Remove the power supply plug from the outlet.
2. Raise the needle bar to its highest position.
3. Lower the presser foot.
4. Remove the needle by loosening the needle clamp.
5. Insert a different needle as far as possible up against the needle stopper with its flat side facing the back.
6. Tighten the needle clamp.
1 Use a coin or screw driver
1
Cambio de la aguja
1. Retire el enchufe de alimentación de la toma de corriente.
2. Levante la barra de la aguja a su posición más alta.
3. Baje el prensatelas.
4. Retire la aguja, aflojando la abrazadera de la aguja.
5. Introduzca otra aguja, con la parte redonda cara a usted. Hay que meterla lo más adentro posible hasta que toque arriba con el pasador.
6. Vuelva a apretar el tornillo de la aguja.
1 Utilice una moneda o un destornillador
1
Checking the Needle
1.The sewing needle must always be straight and sharp for smooth sewing.
2.To check if the needle is bent, place the flat side of the needle down as shown in the illustration.
3.Replace the needle if it is bent or dull.
Verificación de la aguja
1.La aguja de costura siempre debe estar bien recta y afilada para una buena costura.
2.Para averiguar si la aguja no está doblada, coloque la parte plana de la aguja hacia abajo como muestra el dibujo.
3.Cambie la aguja si está doblada o gastada.
9
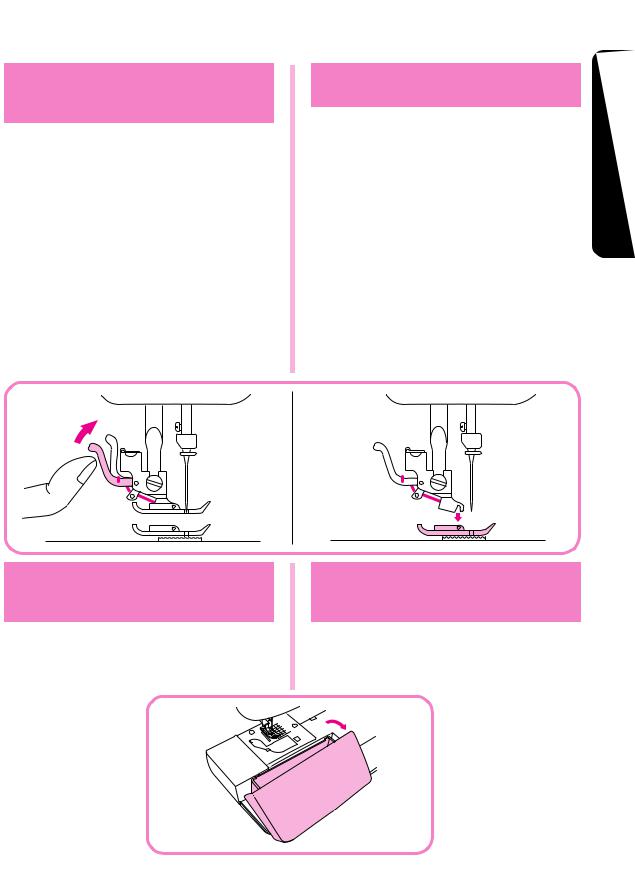
Changing the Presser
Foot
It may be necessary to change the presser foot according to your sewing needs.
SNAP-ON TYPE
1.Raise the needle to its highest position by turning the balance wheel toward you (counter clockwise) and raise the presser foot lever.
2.Release the foot by raising the lever located at the back of the holder.
3.Place a different presser foot on the needle plate so that the bar on the presser foot is in line with the slot on the shank.
4.Lower the presser foot lever and fix the presser foot onto the shank. If the presser foot is in the correct location, the bar should snap in.
Cambio del prensatelas
Según sus necesidades de costura, puede ser necesario cambiar el prensatelas.
Tipo de enganche de golpe
1.Levante la aguja a su posición más alta, girando la ruedecilla hacia usted (en el sentido contrario al de las manecillas de un reloj) y levante la palanca del prensatelas.
2.Suelte el prensatelas levantando la palanca que hay en la parte trasera del soporte.
3.Coloque otro prensatelas en la placa de agujas de tal forma que la barra del prensatelas quede alineada con la ranura del soporte.
4.Baje la palanca del prensatelas y fije el prensatelas en el soporte. Si el prensatelas está bien colocado, la barra debe engancharse de golpe.
YOURSEWINGMACHINE |
SUMÁQUINADECOSER |
KNOWING |
CONOZCA |
Extension Table
(Accessories)
The accessories are stored in a compartment under the extension table cover, which can be opened by flipping it toward you.
Soporte de accesorios (mesita extensible)
Los accesorios están almacenados en un compartimiento situado debajo de la tapa de la mesa extensible. Para abrir la tapa, tire de ella hacia usted.
10

COSERDEMÁQUINASUCONOZCA |
MACHINESEWINGYOURKNOWING |
VARIOUS CONTROLS |
|
|
|
Distintos mandos |
|||||||||||||||
Pattern Selection Dial |
|
|
|
|
Selector de puntadas |
||||||||||||||
To select a stitch, simply turn the Pattern Selection |
|
Para seleccionar una puntada, sólo hace falta girar |
|||||||||||||||||
Dial, located on the right side of the machine. The |
|
el selector de puntadas, situado en la derecha de la |
|||||||||||||||||
Pattern Selection Dial may be turned in either direc- |
|
máquina. Este selector se puede girar en cualquier |
|||||||||||||||||
tion. The following page shows the recommended |
|
sentido. En la página siguiente, se indican las zonas |
|||||||||||||||||
range of stitch lengths and widths. |
|
|
|
|
|
recomendadas de largos y anchos de puntadas. |
|||||||||||||
1 Pattern selection dial |
|
|
|
|
|
|
|
|
1 Selector de puntadas |
|
|
||||||||
2 Pattern number |
|
|
|
|
|
|
|
|
|
2 Número de puntada |
|
|
|||||||
The stitches that are available depend on the Stitch |
|
Las puntadas disponibles dependen de la posición |
|||||||||||||||||
Length Dial setting. If the Stitch Length Dial is set |
|
del selector de largo de puntada. Si está situado |
|||||||||||||||||
between 0 and 4, any of the stitches in the top row |
|
entre 0 y 4, pueden seleccionarse todas las puntadas |
|||||||||||||||||
can be selected. If the Stitch Length Dial is set to SS, |
|
que aparecen en la fila superior. Si está situado en |
|||||||||||||||||
any of the stitches in the bottom row can be selected. |
|
SS, pueden seleccionarse todas las puntadas que |
|||||||||||||||||
3 Stitch length dial |
|
|
|
|
|
|
aparecen en la fila inferior. |
|
|
|
|
||||||||
|
|
|
|
|
|
|
|
|
|
|
3 Selector de largo de puntada |
|
|||||||
|
|
3 |
|
|
|
|
|
|
|
|
|
|
|
|
3 |
|
|
|
|
|
|
|
|
|
|
|
|
|
|
|
|
3 |
2 |
1 |
|
|
|
|
|
|
|
|
|
|
|
|
|
|
|
|
|
|
0 |
|
|
|
|
||
|
|
|
|
|
|
|
|
|
|
|
4 |
|
|
|
|
|
|
|
|
|
|
|
|
1 |
|
|
|
|
|
|
|
|
|
|
3 |
|
|
|
|
|
|
|
|
|
|
|
|
|
|
|
|
|
|
|
|
|
|
|
|
2 |
|
|
|
|
|
|
|
|
|
|
|
|
SS |
|
|
|
|
|
|
|
|
|
|
|
|
|
|
|
|
|
|
|
|
|
|
|
|
|
|
1 |
2 |
3 |
4 |
5 |
6 |
7 |
8 |
9 |
10 |
11 |
12 |
|
13 |
14 |
15 |
16 |
17 |
18 |
19 |
PS-2500 |
|
|
|
|
|
|
|
|
|
|
|
|
|
|
|
|
|
|
|
PS-2400 |
|
|
|
|
|
|
|
|
|
|
|
|
|
|
|
|
|
|
|
STAR140E |
|
|
|
|
|
|
|
|
|
|
|
|
|
|
|
|
|
|
|
STAR130E |
20 |
21 |
22 |
23 |
24 |
25 |
26 |
27 |
28 |
29 |
30 |
|
31 |
32 |
33 |
34 |
35 |
36 |
37 |
1 |
2 |
3 |
4 |
5 |
6 |
7 |
8 |
9 |
10 |
11 |
12 |
|
13 |
14 |
|
|
|
|
|
PS-2300 |
|
|
|
|
|
|
|
|
|
|
|
|
|
|
|
|
|
|
|
STAR120E |
|
|
|
|
|
|
|
|
|
|
|
|
|
|
|
|
|
|
|
|
15 |
16 |
17 |
18 |
19 |
20 |
21 |
22 |
23 |
24 |
25 |
|
26 |
27 |
|
|
|
|
|
1 |
2 |
3 |
4 |
5 |
6 |
7 |
8 |
9 |
10 |
11 |
|
|
|
|
|
|
|
|
|
PS-2200 |
|
|
|
|
|
|
|
|
|
|
|
|
|
|
|
|
|
|
|
STAR110 |
|
|
|
|
|
|
|
|
|
|
|
|
|
|
|
|
|
|
|
|
12 |
13 |
14 |
15 |
16 |
17 |
18 |
19 |
20 |
21 |
|
|
|
|
|
|
|
|
|
NOTE: |
NOTA: |
|
Since the Pattern Selection Dial is not a continuous |
||
El selector de puntada no es un selector continuo, y, |
||
dial, it cannot be turned directly from the last stitch to |
||
por tanto, no puede girarse directamente desde la |
||
the first one or from the first stitch to the last one. To |
||
última puntada hasta la primera o viceversa. Para |
||
select the first stitch when the last one is displayed or |
||
seleccionar la primera puntada cuando está |
||
to select the last stitch when the first one is displayed, |
||
seleccionada la última, o viceversa, gire el selector |
||
turn the Pattern Selection Dial in the opposite direction |
||
de puntada en sentido opuesto hasta que aparezca |
||
until the desired stitch is displayed. |
||
la puntada deseada. |
||
|
11
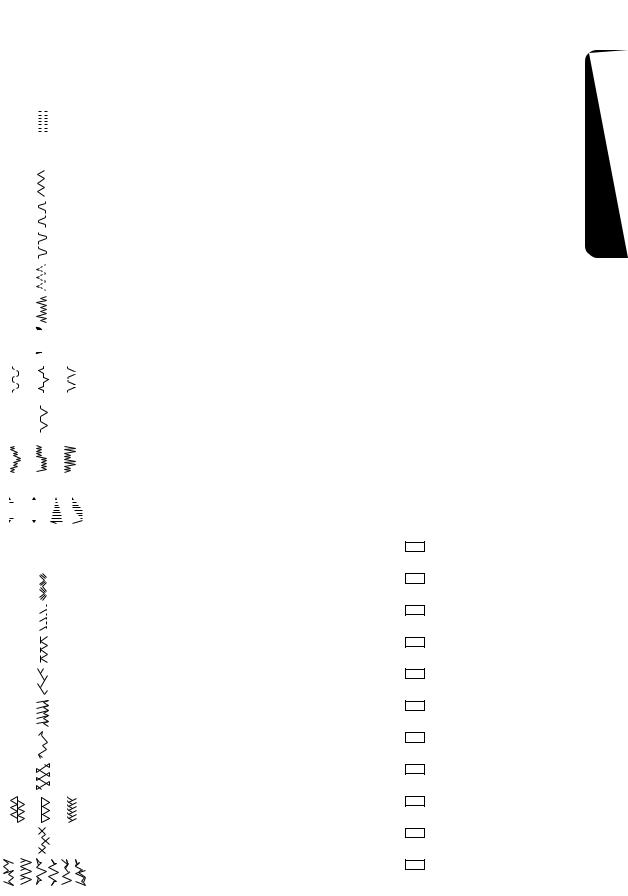
RECOMMENDED WIDTHS AND LENGTHS FOR STITCHES
|
PATTERN |
STITCH NAME |
RECOMMENDED WIDTH |
RECOMMENDED |
INSTRUCTION |
|||
|
[mm(inch)] |
LENGTH [mm(inch)] |
MANUAL PAGE |
|||||
|
|
|
|
|
|
|||
|
|
|
|
|
|
|
|
|
|
|
|
|
|
1-STEP AUTOMATIC |
3-5 (Dial 4~6) |
F-1.5 |
46 |
|
|
|
|
|
||||
|
|
|
|
|
BUTTONHOLE |
(1/8-13/64) |
(1/64-1/16) |
|
|
|
|
|
|
|
|||
|
|
|
|
|
STRAIGHT STITCH |
6 |
1-4 |
36 |
|
|
|
|
|
||||
|
|
|
|
|
(1/4) |
(3/64-5/32) |
||
|
|
|
|
|
|
|
||
|
|
|
|
|
ZIGZAG STITCH |
0-5 |
F-4 |
40 |
|
|
|
|
|
(0-13/64) |
(1/64-5/32) |
||
|
|
|
|
|
|
|
||
|
|
|
|
|
|
|
|
|
|
|
|
|
|
BLIND HEM STITCH |
3-6 |
F-2 |
41 |
|
|
|
|
|
(1/8-1/4) |
(1/64-5/64) |
||
|
|
|
|
|
|
|
||
|
|
|
|
|
SHELL TUCK STITCH |
3-6 |
F-3 |
42 |
|
|
|
|
|
(1/8-1/4) |
(1/64-1/8) |
||
|
|
|
|
|
|
|
||
|
|
|
|
|
|
|
|
|
|
|
|
|
|
ELASTIC STITCH |
3-6 |
F-2.5 |
43 |
|
|
|
|
|
(1/8-1/4) |
(1/64-3/32) |
||
|
|
|
|
|
|
|
||
|
|
|
|
|
STRETCH BLIND STITCH |
3-6 |
F-1.5 |
41 |
|
|
|
|
|
(1/8-1/4) |
(1/64-1/16) |
||
|
|
|
|
|
|
|
||
|
|
|
|
|
|
|
|
|
|
|
|
|
|
SCALLOP STITCH |
3-6 |
F-1.5 |
45 |
|
|
|
|
|
||||
|
|
|
|
|
(1/8-1/4) |
(1/64-1/16) |
||
|
|
|
|
|
|
|
|
|
|
|
|
|
|
DOUBLE ACTION STITCH |
3-6 |
F-3 |
|
|
|
|
|
|
BRIDGING STITCH |
44 |
||
|
|
|
|
|
(1/8-1/4) |
(1/64-1/8) |
||
|
|
|
|
|
RAMPART STITCH |
|
||
|
|
|
|
|
|
|
|
|
|
|
|
|
|
|
|
|
|
|
|
|
|
|
ELASTIC SHELL TUCK STITCH |
3-6 |
F-3 |
48 |
|
|
|
|
|
(1/8-1/4) |
(1/64-1/8) |
||
|
|
|
|
|
|
|
||
|
|
|
|
|
|
|
|
|
|
|
|
|
|
LIGHTNING STITCH |
6 |
F-1 |
|
|
|
|
|
|
SQUARE STITCH |
46 |
||
|
|
|
|
|
(1/4) |
(1/64-3/64) |
||
|
|
|
|
|
DECORATIVE STITCH |
|
||
|
|
|
|
|
|
|
|
|
|
|
|
|
|
|
|
|
|
|
|
|
|
|
TRIANGLE STITCH |
|
|
|
|
|
|
|
|
BEAD STITCH |
3-6 |
F-1 |
46 |
|
|
|
|
|
ARROW HEAD STITCH |
(1/8-1/4) |
(1/64-3/64) |
|
|
|
|
|
|
|
|||
|
|
|
|
|
|
|||
|
|
|
|
|
PARALLELOGRAM STITCH |
|
|
|
|
|
|
|
|
TRIPLE STRETCH STITCH |
6 |
SS Fixed |
36 |
|
|
|
|
|
||||
|
|
|
|
|
||||
|
|
|
|
|
(1/4) |
2.5 (3/32) |
||
|
|
|
|
|
||||
|
|
|
|
|
|
|
||
|
|
|
|
|
|
|
|
|
|
|
|
|
|
TRIPLE ZIGZAG STRETCH |
3-6 |
SS Fixed |
50 |
|
|
|
|
|
STITCH |
(1/8-1/4) |
2.5 (3/32) |
|
|
|
|
|
|
|
|||
|
|
|
|
|
SLANT OVERLOCK STITCH |
3-6 |
SS Fixed |
48 |
|
|
|
|
|
(1/8-1/4) |
2.5 (3/32) |
||
|
|
|
|
|
|
|
||
|
|
|
|
|
|
|
|
|
|
|
|
|
|
ELASTIC OVERLOCK STITCH |
3-6 |
SS Fixed |
48 |
|
|
|
|
|
(1/8-1/4) |
2.5 (3/32) |
||
|
|
|
|
|
|
|
||
|
|
|
|
|
FEATHER STITCH |
3-6 |
SS Fixed |
49 |
|
|
|
|
|
(1/8-1/4) |
2.5 (3/32) |
||
|
|
|
|
|
|
|
||
|
|
|
|
|
|
|
|
|
|
|
|
|
|
COMB STITCH |
3-6 |
SS Fixed |
48 |
|
|
|
|
|
(1/8-1/4) |
2.5 (3/32) |
||
|
|
|
|
|
|
|
||
|
|
|
|
|
DECORATIVE STITCH |
6 |
SS Fixed |
46 |
|
|
|
|
|
(1/4) |
2.5 (3/32) |
||
|
|
|
|
|
|
|
||
|
|
|
|
|
|
|
|
|
|
|
|
|
|
FAGOTING STITCH |
3-6 |
SS Fixed |
47 |
|
|
|
|
|
(1/4) |
2.5 (3/32) |
||
|
|
|
|
|
|
|
||
|
|
|
|
|
DECORATIVE STITCH |
6 |
SS Fixed |
46 |
|
|
|
|
|
||||
|
|
|
|
|
(1/8-1/4) |
2.5 (3/32) |
44 |
|
|
|
|
|
|
|
|||
|
|
|
|
|
|
|
|
|
|
|
|
|
|
LINK STITCH |
3-6 |
SS Fixed |
47 |
|
|
|
|
|
(1/8-1/4) |
2.5 (3/32) |
||
|
|
|
|
|
|
|
||
|
|
|
|
|
DECORATIVE STITCH |
6 |
SS Fixed |
46 |
|
|
|
|
|
(1/4) |
2.5 (3/32) |
||
|
|
|
|
|
|
|
||
YOURSEWINGMACHINE |
SUMÁQUINADECOSER |
KNOWING |
CONOZCA |
12
COSERDEQUINAÁMSUCONOZCA |
MACHINESEWINGYOURKNOWING |
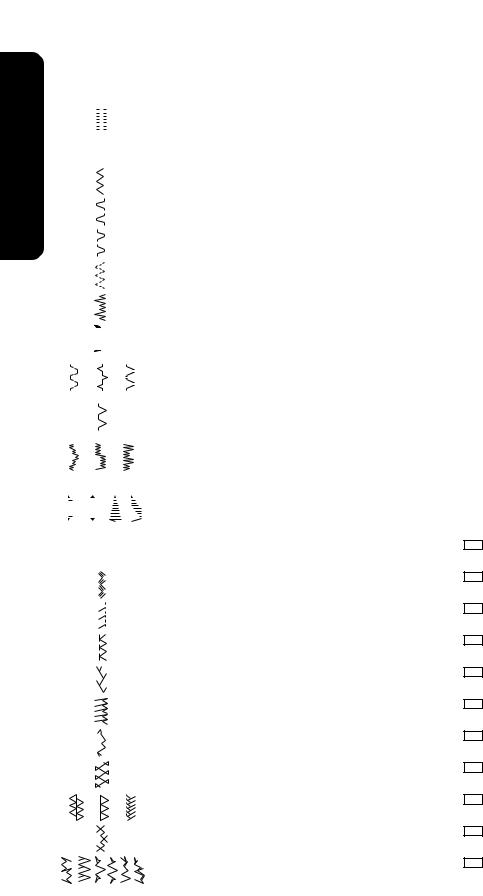
Anchos y largos recomendados para cada puntada
|
|
|
|
|
|
ANCHO |
LARGO |
PÁGINA DEL |
|
|
PUTADA |
NOMBRE |
RECOMENDADO EN |
RECOMENDADO EN |
|||
|
|
MANUAL |
||||||
|
|
|
|
|
|
mm (pulgadas) |
mm (pulgadas) |
|
|
|
|
|
|
|
|
||
|
|
|
|
|
OJAL AUTOMÁTICO DE |
3-5 (Dial 4~6) |
F-1.5 |
51 |
|
|
|
|
|
||||
|
|
|
|
|
1 PASO |
(1/8-13/64) |
(1/64-1/16) |
|
|
|
|
|
|
|
|||
|
|
|
|
|
|
|
|
|
|
|
|
|
|
PUNTADA RECTA |
6 |
1-4 |
36 |
|
|
|
|
|
||||
|
|
|
|
|
(1/4) |
(3/64-5/32) |
||
|
|
|
|
|
|
|
||
|
|
|
|
|
PUNTADA ZIGZAG |
0-5 |
F-4 |
40 |
|
|
|
|
|
(0-13/64) |
(1/64-5/32) |
||
|
|
|
|
|
|
|
||
|
|
|
|
|
|
|
|
|
|
|
|
|
|
PUNTADA INVISIBLE |
3-6 |
F-2 |
41 |
|
|
|
|
|
(1/8-1/4) |
(1/64-5/64) |
||
|
|
|
|
|
|
|
||
|
|
|
|
|
PUNTADA ONDAS |
3-6 |
F-3 |
42 |
|
|
|
|
|
(1/8-1/4) |
(1/64-1/8) |
||
|
|
|
|
|
|
|
||
|
|
|
|
|
|
|
|
|
|
|
|
|
|
PUNTADA ELÁSTICA |
3-6 |
F-2.5 |
43 |
|
|
|
|
|
(1/8-1/4) |
(1/64-3/32) |
||
|
|
|
|
|
|
|
||
|
|
|
|
|
PUNTADA INVISIBLE ELÁSTICA |
3-6 |
F-1.5 |
41 |
|
|
|
|
|
(1/8-1/4) |
(1/64-1/16) |
||
|
|
|
|
|
|
|
||
|
|
|
|
|
|
|
|
|
|
|
|
|
|
PUNTADA FESTÓN |
3-6 |
F-1.5 |
45 |
|
|
|
|
|
||||
|
|
|
|
|
(1/8-1/4) |
(1/64-1/16) |
||
|
|
|
|
|
|
|
|
|
|
|
|
|
|
PUNTADA DE ACCIÓN DOBLE |
3-6 |
F-3 |
|
|
|
|
|
|
PUNTADA PUENTE |
44 |
||
|
|
|
|
|
(1/8-1/4) |
(1/64-1/8) |
||
|
|
|
|
|
PUNTADA ONDAS ABIERTAS |
|
||
|
|
|
|
|
|
|
|
|
|
|
|
|
|
|
|
|
|
|
|
|
|
|
PUNTADA ONDAS ELÁSTICAS |
3-6 |
F-3 |
48 |
|
|
|
|
|
(1/8-1/4) |
(1/64-1/8) |
||
|
|
|
|
|
|
|
||
|
|
|
|
|
|
|
|
|
|
|
|
|
|
PUNTADA ESCALERA |
6 |
F-1 |
|
|
|
|
|
|
PUNTADA FESTÓN DOBLE |
46 |
||
|
|
|
|
|
(1/4) |
(1/64-3/64) |
||
|
|
|
|
|
PUNTADA DECORATIVA |
|
||
|
|
|
|
|
|
|
|
|
|
|
|
|
|
|
|
|
|
|
|
|
|
|
PUNTADA TRIÁNGULO |
|
|
|
|
|
|
|
|
PUNTADA FESTÓN DOBLE |
3-6 |
F-1 |
46 |
|
|
|
|
|
PUNTADA FLECHA |
(1/8-1/4) |
(1/64-3/64) |
|
|
|
|
|
|
|
|||
|
|
|
|
|
|
|||
|
|
|
|
|
PUNTADA PARALELOGRAMO |
|
|
|
|
|
|
|
|
TRIPLE PUNTADA PESPUNTO |
6 |
SS Fixed |
36 |
|
|
|
|
|
||||
|
|
|
|
|
(1/4) |
2.5 (3/32) |
||
|
|
|
|
|
|
|
||
|
|
|
|
|
|
|
|
|
|
|
|
|
|
TRIPLE PUNTADA |
3-6 |
SS Fixed |
50 |
|
|
|
|
|
ZIGZAG ELÁSTICA |
(1/8-1/4) |
2.5 (3/32) |
|
|
|
|
|
|
|
|||
|
|
|
|
|
PUNTADA OVERLOCK ESTRECHA |
3-6 |
SS Fixed |
48 |
|
|
|
|
|
(1/8-1/4) |
2.5 (3/32) |
||
|
|
|
|
|
|
|
||
|
|
|
|
|
|
|
|
|
|
|
|
|
|
PUNTADA OVERLOCK ELÁSTICA |
3-6 |
SS Fixed |
48 |
|
|
|
|
|
(1/8-1/4) |
2.5 (3/32) |
||
|
|
|
|
|
|
|
||
|
|
|
|
|
PUNTADA PLUMA |
3-6 |
SS Fixed |
49 |
|
|
|
|
|
(1/8-1/4) |
2.5 (3/32) |
||
|
|
|
|
|
|
|
||
|
|
|
|
|
|
|
|
|
|
|
|
|
|
PUNTADA PEINE |
3-6 |
SS Fixed |
48 |
|
|
|
|
|
(1/8-1/4) |
2.5 (3/32) |
||
|
|
|
|
|
|
|
||
|
|
|
|
|
PUNTADA DECORATIVA |
6 |
SS Fixed |
46 |
|
|
|
|
|
(1/4) |
2.5 (3/32) |
||
|
|
|
|
|
|
|
||
|
|
|
|
|
|
|
|
|
|
|
|
|
|
PUNTADA FAGOTING |
3-6 |
SS Fixed |
47 |
|
|
|
|
|
(1/4) |
2.5 (3/32) |
||
|
|
|
|
|
|
|
||
|
|
|
|
|
PUNTADA DECORATIVA |
6 |
SS Fixed |
46 |
|
|
|
|
|
||||
|
|
|
|
|
(1/8-1/4) |
2.5 (3/32) |
44 |
|
|
|
|
|
|
|
|||
|
|
|
|
|
|
|
|
|
|
|
|
|
|
PUNTADA DE UNIÓN |
3-6 |
SS Fixed |
47 |
|
|
|
|
|
(1/8-1/4) |
2.5 (3/32) |
||
|
|
|
|
|
|
|
||
|
|
|
|
|
PUNTADA DECORATIVA |
6 |
SS Fixed |
46 |
|
|
|
|
|
(1/4) |
2.5 (3/32) |
||
|
|
|
|
|
|
|
||
13
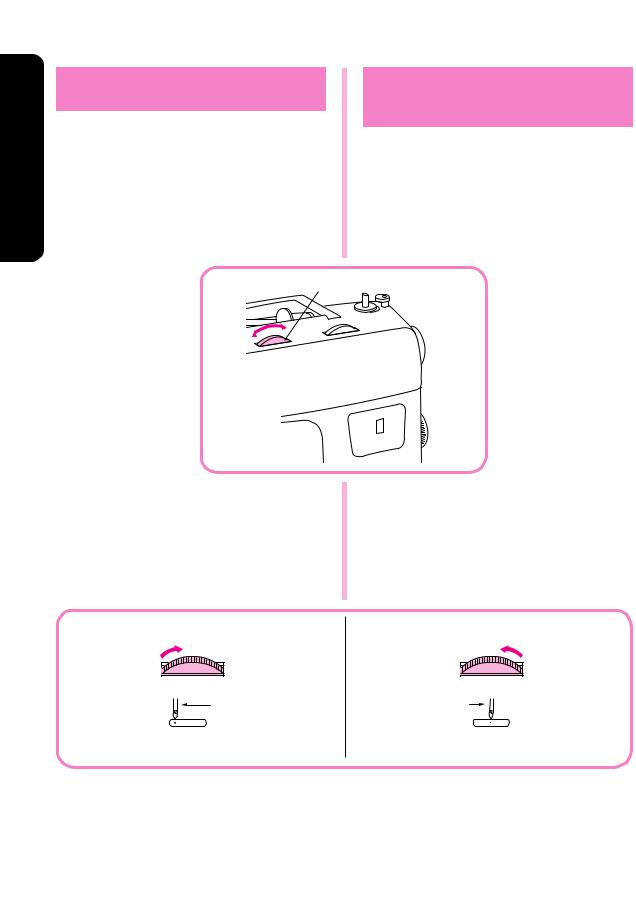
Stitch Length Dial
Depending on your selected stitch, you may need to adjust the stitch length for best results.
The numbers marked on the Stitch Length Dial represent the length of the stitch in millimeters (mm). THE HIGHER THE NUMBER, THE LONGER THE STITCH.
The “O” setting does not feed the material. This is used for sewing on a button.
The “F” area is used for making a Satin Stitch (a dense zigzag stitch) which can be used in making buttonholes and decorative stitches. The position needed for making the Satin Stitch varies according to the material and thread being used. To determine the exact dial position, you should first test the stitch and length settings on a scrap of fabric to observe the feeding of the material.
1 Stitch length dial
2 Length
3 Fine → SS
4 Coarse
Selector de largo de puntada
Según la puntada seleccionada, puede ser necesario ajustar su largo para lograr mejores resultados. Los números indicados en el disco representan el largo de las puntadas en milímetros.
CUANTO MAS ALTO EL NUMERO, MAS LARGA LA PUNTADA.
El ajuste “O” no alimenta el tejido. Sirve para coser un botón.
La zona "F" se usa para realizar bordados de realce (una puntada densa en zigzag), que puede servir para coser ojales o como puntadas decorativas. La posición necesaria para realizar puntadas de realce varia dependiendo del tejido e hilo utilizados. Para determinar la posición exacta del botón, conviene primero probar la puntada y los ajustes de largo en un pedazo de tejido para ver como se alimenta el material.
1 Selector de largo de puntada
2 Largo
3 Fina → SS
4 Más largo
YOURSEWINGMACHINE |
SUMÁQUINADECOSER |
KNOWING |
CONOZCA |
1
|
|
2 |
3 |
|
4 |
|
|
2 |
|
3 |
1 |
|
|
|
...................4 3 2 1 - F - O |
|
SS |
|
||
Turn the dial to the left past “O” for the |
|
position. |
Para colocarse en la posición |
|
|
, gire el selector |
||
SS |
SS |
|
||||||
|
|
|
hacia la izquierda más allá de "O". |
|
|
|
||
14
COSERDEQUINAÁMSUCONOZCA |
MACHINESEWINGYOURKNOWING |
Stitch Width Dial
Depending on the stitch selected, you may need to adjust the stitch width.
The numbers marked on the dial represent the stitch width.
THE HIGHER THE NUMBER, THE WIDER THE STITCH.
1
1 Stitch width dial
NOTE:
When you choose the Straight Stitch or the Triple Stretch Stitch you can change the needle position from left to center.
Selector de ancho de puntada
Según el modelo de puntada seleccionado, se necesitará o no ajustar el ancho de puntada.
Los números indicados en el selector representan el ancho de las puntadas.
A MAYOR NUMERO SELECCIONADO, MAYOR ANCHO DE PUNTADA.
1 Selector de ancho de puntada
NOTA:
Cuando elige la puntada recta o la triple puntada elástica, es posible cambiar la posición de la aguja de izquierda a derecha.
6
5
0
1
15
Reverse Sewing Button
To sew in reverse, push the Reverse Sewing Button in as far as possible and hold in that position while pressing lightly on the foot pedal. To sew forward, release the Reverse Sewing Button. The machine will then sew forward. Reverse sewing is used for back tacking and reinforcing seams.
Model PS-2500, PS-2400, PS-2300 STAR140E, STAR130E, STAR120E
When the foot controller is depressed, push this button and hold it. Then, the machine will sew at ordinary speed in reverse.
When the button is released, the machine will sew forward.
When the foot controller is not depressed, push this button and hold it, the machine will sew slowly in reverse sewing.
Pulsador de retroceso
Para coser hacia atrás, apriete a fondo el pulsador de retroceso y manténgalo en esa posición mientras presiona ligeramente el pedal. Para volver a coser hacia adelante, suelte el pulsador. La costura hacia atrás se usa para remates y para reforzar las costuras.
Modelos PS-2500, PS-2400, PS-2300,
STAR 140E, STAR 130E y STAR 120E Mientras presiona el pedal, apriete el pulsador y manténgalo apretado. La máquina coserá a velocidad normal y al revés.
Al soltar el pulsador, la máquina va a volver a coser hacia adelante.
Si aprieta el pulsador y lo mantiene apretado sin presionar el pedal, la máquina va a coser despacio hacia atrás.
|
|
YOURSEWINGMACHINE |
SUMÁQUINADECOSER |
KNOWING |
CONOZCA |
1 Reverse sewing button
1 Pulsador de retroceso
 1
1
16
COSERDEQUINAÁMSUCONOZCA |
MACHINESEWINGYOURKNOWING |
Drop Feed Lever
Use the Drop Feed Lever to raise or lower the feed dogs according to the job that is being done. When monogramming, embroidering, darning or sewing on buttons, the feed dogs should be lowered. (The garment will not be fed.)
NOTE:
When raising or lowering the feed dogs, move the Drop Feed Lever as far as possible to the appropriate side. Since the feed dogs can not be lowered using the Drop Feed Lever immediately after they are raised, turn the balance wheel toward you once and after the feed dogs are raised, lower them using the Drop Feed Lever.
1 Drop feed lever
2 Down position
3 Up position
3 2
2
Palanca de los alimentadores
Utilice la palanca de los alimentadores para levantar o bajar los dientes de los alimentadores de conformidad con el trabajo a realizar. Para monogramas, bordados, zurcidos o para la costura de botones, los alimentadores deben ser bajados (para que el tejido no se alimente).
NOTA:
Al subir o bajar los alimentadores, conviene desplazar la palanca de los alimentadores lo más posible hacia la posición deseada. Dado que los alimentadores no pueden ser bajados con la palanca inmediatamente después de su subida, gire primero la ruedecilla hacia usted y, cuando los alimentadores se encuentren subidos, bájelos con la palanca arriba mencionada.
1 Palanca de los alimentadores
2 Posición baja
3 Posición alta
1
17
Model PS-2500, PS-2400, PS-2300
STAR140E, STAR130E, STAR120E
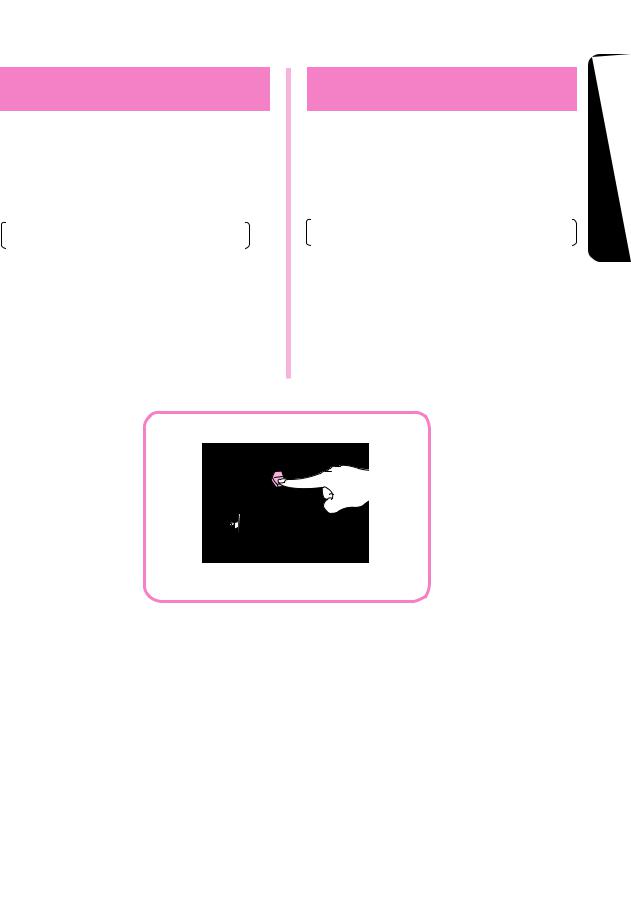
START/STOP Button
Pressing the “START/STOP” Button once starts the sewing machine; pressing the button again stops the machine.
(Model PS-2500, STAR140E)
The button lights up in green when the sewing machine is ready to start sewing and while sewing. If the machine is not ready to start sewing, the button lights up in red. While the bobbin is being wound (the bobbin winder shaft is moved to the right), the button lights up in orange.
•The machine sews at a slow speed when sewing with the button held down.
•With automatic thread cutter model, the needle stops in its lowest position when sewing stops.
•Without automatic thread cutter model, the needle stops in its highest position when sewing stops.
1 START/STOP button
Modelos PS-2500, PS-2400, PS-2300,
STAR 140E, STAR 130E y STAR 120E
Pulsador de puesta en marcha/parada
Presione una vez el pulsador de puesta en marcha/ parada para conectar la máquina de coser; presione el botón otra vez para pararla.
(Modelos PS-2500 y STAR140E)
El pulsador emitirá una luz verde cuando la máquina de coser esté lista para coser y durante el trabajo. Si la máquina no está lista para coser, el pulsador emitirá una luz roja. Cuando la canilla se está bobinando (el eje de hacer canilla se desplaza a la derecha), el pulsador emite una luz naranja).
•La máquina cose a baja velocidad si se cose con el pulsador apretado hacia abajo.
•Con el modelo de cortahilos automático, la aguja se detiene en su posición más baja cuando se deja de coser.
•Sin el modelo de cortahilos automático, la aguja se detiene en su posición más elevada cuando se deja de coser.
1 Pulsador de puesta en marcha/parada
YOURSEWINGMACHINE |
SUMÁQUINADECOSER |
KNOWING |
CONOZCA |
 1
1
*The sewing machine will not start sewing if the Presser Foot Lever is raised.
Be sure to lower the Presser Foot Lever before sewing.
*La máquina de coser no empezará a coser si la palanca del prensatelas está levantada. Asegúrese de bajar la palanca del prensatelas antes de coser.
18
COSERDEQUINAÁMSUCONOZCA |
MACHINESEWINGYOURKNOWING |
Model PS-2500, PS-2400, PS-2300
STAR140E, STAR130E, STAR120E
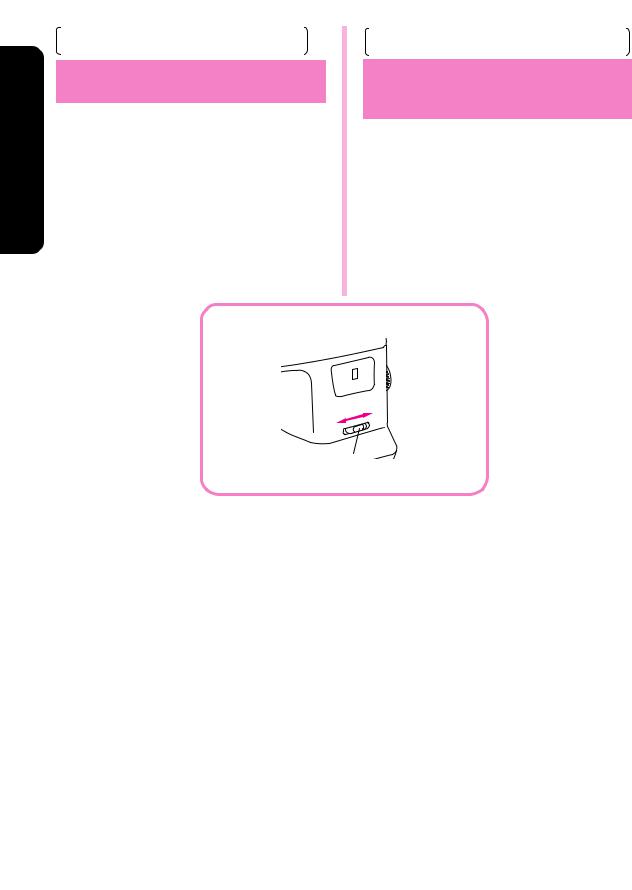
Speed Range Control Lever
Controls the speed range.
In case the foot controller is used, you can control maximum speed by the speed range control lever. The control lever should be set at right (fastest) position for normal usage with foot controller.
1 Speed range control lever
Modelos PS-2500, PS-2400, PS-2300,
STAR 140E, STAR 130E y STAR 120E
Palanca de control de zona de velocidad
Controla la zona de velocidad.
Si se usa el pedal, se puede controlar una velocidad máxima gracias a la palanca de control de zona de velocidad.
La palanca debe estar puesta a la derecha (velocidad más rápida) para un uso normal del pedal.
1 Palanca de control de la zona de velocidad
1
19
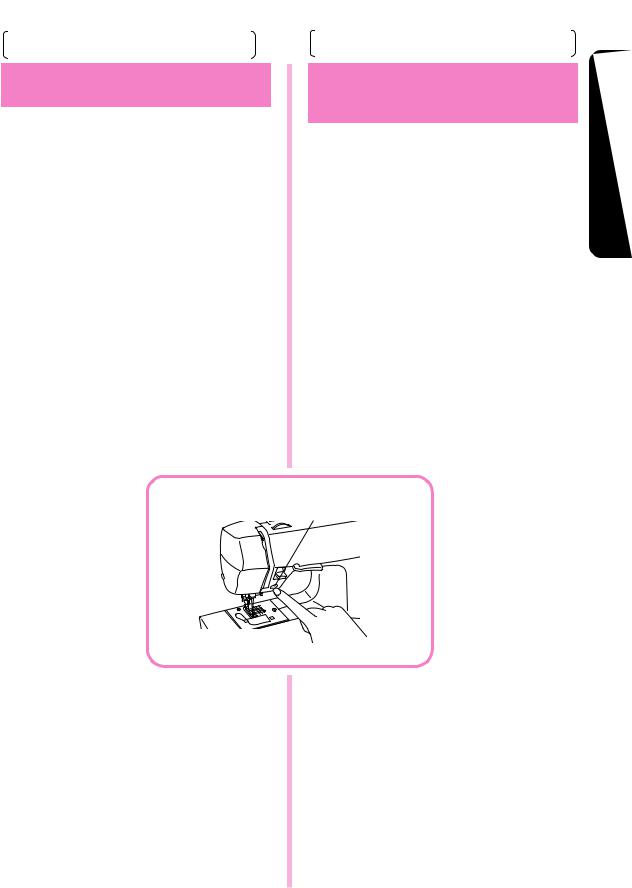
(Model PS-2500, STAR140E)
Automatic Thread Cutter
Use the Thread Cutter Lever to cut the threads.
1.After finishing sewing, move the needle to its lowest position, pull the Thread Cutter Lever down as far as possible, then release it.
NOTE:
Do not operate the Thread Cutter Lever while sewing or when there is no fabric in the sewing machine. Threads may become tangled or other problem may be incurred.
2.After the threads are cut, the needle moves up and the Thread Cutter Lever returns to its original position.
(Modelo PS-2500, STAR140E)
Cortahilos automático
Utilice la palanca del cortahilos para cortar los hilos.
1.Al terminar de coser, desplace la aguja hasta su posición más baja, empuje hacia abajo y a fondo la palanca del cortahilos y suéltela.
NOTA:
No toque la palanca del cortahilos mientras esté cosiendo o si no hay tejido en la máquina de coser, ya que podrían enredarse los hilos o podrían surgir otros problemas.
2.Una vez cortados los hilos, la aguja se desplaza hacia arriba y la palanca del cortahilos vuelve a su posición original.
YOURSEWINGMACHINE |
SUMÁQUINADECOSER |
KNOWING |
CONOZCA |
20
COSERDEMÁQUINASUCONOZCA |
MACHINESEWINGYOURKNOWING |
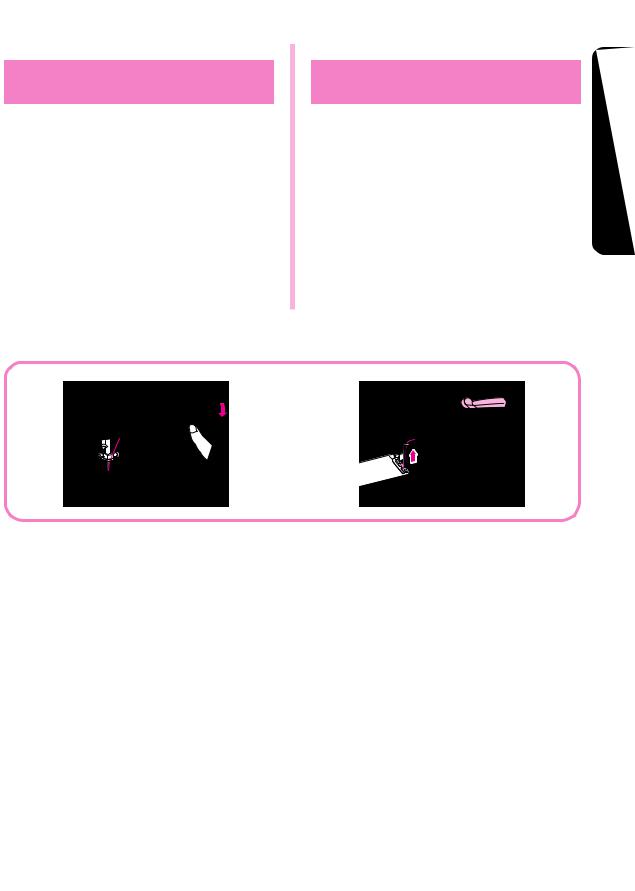
*During twin needle sewing and when sewing with thread thicker than #30 or with nylon, metallic and other specialty threads, cut the threads with the thread cutter on the left side of the machine.
*After the threads are cut using the Thread Cutter Lever, you can continue sewing without drawing up the lower thread.
*The automatic thread cutter cannot be used when the needle or presser foot are raised or the bobbin winder shaft is moved to the right.
*Refer to “Automatic Thread Cutting” on page 72 if the threads become tangled or cannot be cut or if any other problems occur while using the automatic thread cutter.
*Si cose con aguja doble o con una aguja cuyo grosor supera el #30 o con hilos de nylon metálico u otros hilos especiales, corte los hilos con el cortahilos situado en el lado izquierdo de la máquina.
*Una vez cortados los hilos con la palanca del cortahilos, puede seguir cosiendo sin levantar el hilo inferior.
*El cortahilos automático no puede utilizarse cuando la aguja o el prensatelas están levantados, o si el eje de hacer canilla se ha desplazado a la derecha.
*Si los hilos se enredan, si no puede cortarlos o si aparece cualquier otro problema al utilizar el cortahilos automático, consulte la sección "Cortahilos automático" (pág. 72).
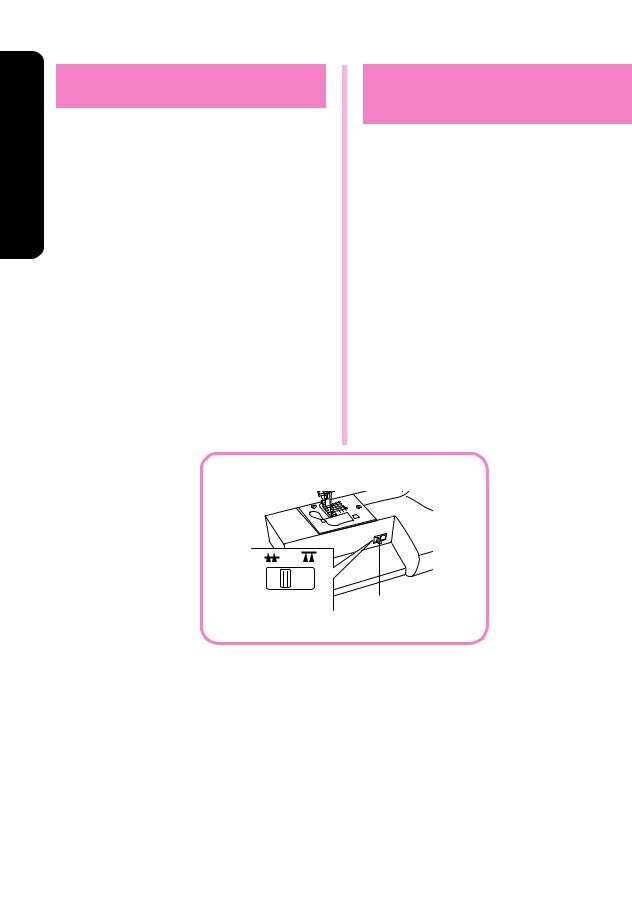
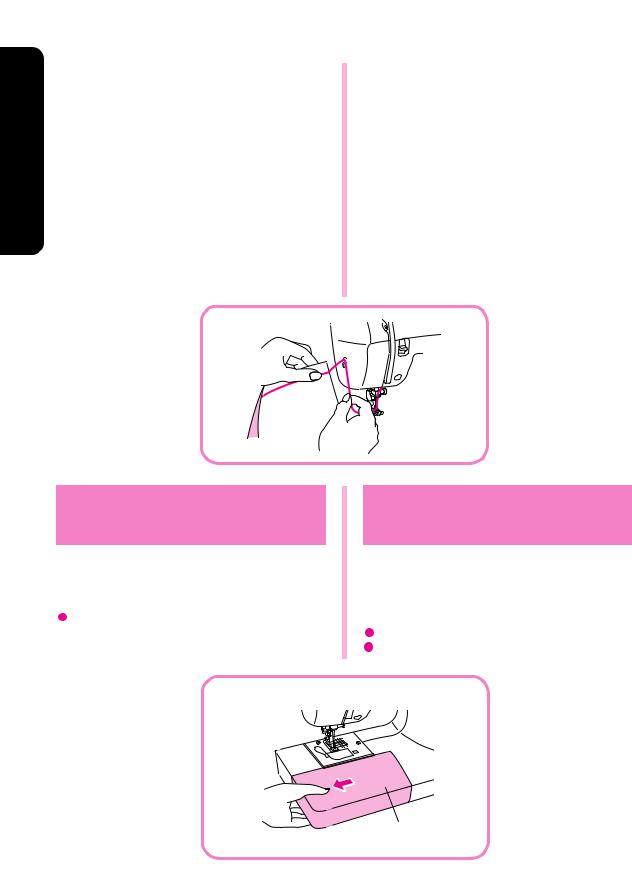
Converting to
Free-arm Style
Free-arm sewing is convenient for sewing tubular and hard-to-reach areas on a garment. To change your machine to the free-arm style, simply lift out the extension table.
1 Slide the extension table to the left.
1 Extension table
21
Conversión en modalidad de brazo libre
La costura con brazo libre es práctica para coser zonas tubulares y difíciles de acceso en los tejidos. Para transformar su máquina en esa modalidad, sólo hace falta levantar el soporte de los accesorios y sacarlo.
1 Levante el soporte de accesorios.
2 Deslícelo hacia la izquierda para sacarlo.
1 Soporte de accesorios
1
 Loading...