


EMBROIDERY MACHINE
PR-620
O P E R A T I O N M A N U A L

Important Safety Instructions
When using this machine, basic safety precautions should always be taken, including the following:
Read all instructions before using.
DANGER - To reduce the risk of electric shock:
1.The machine should never be left unattended while plugged in. Always unplug the machine from the electrical outlet immediately after using and before cleaning.
WARNING - To reduce the risk of burns, fire, electric shock, or injury to persons:
1.Do not allow this machine to be used as a toy. Close attention is necessary when the machine is used by or near children.
2.Use this machine only for its intended use as described in this manual. Use only accessories recommended by the manufacturer as contained in this manual.
3.Never operate this machine if it has a damaged cord or plug, if it is not working properly, if it has been dropped or damaged, or dropped into water. Return the machine to the nearest authorized retailer or service center for examination, repair, and electrical or mechanical adjustment.
4.Never operate the machine with any air openings blocked. Keep ventilation openings of the machine free from the accumulation of lint, dust, and loose cloth.
5.Never drop or insert any object into any opening.
6.Do not use outdoors.
7.Do not operate where aerosol (spray) products are being used or where oxygen is being administered.
8.To disconnect, set the main power switch to the “{” position, which represents off, and then remove the plug from the outlet.
9.Do not unplug by pulling on the cord. To unplug, grasp the plug, not the cord.
10.Keep fingers away from all moving parts. Special care is required around the machine needle.
11.Always use the proper needle plate. The wrong plate can cause the needle to break.
12.Do not use bent needles.
13.Set the main power switch to the “{” position when making any adjustments in the needle area, such as changing the needle.
14.Always unplug the machine from the electrical outlet when lubricating it or when making any other user servicing adjustments mentioned in the manual.
15.This sewing machine is not intended for use by young children or infirm persons without supervision.
16.Young children should be supervised to ensure that they do not play with this machine.
17.Keep fingers out of all sewing machine openings, such as near the carriage, otherwise injuries may result.
18.If the LED light unit (light-emitting diode) is damaged, it must be replaced by authorized dealer.
SAVE THESE INSTRUCTIONS
This machine is intended for household use.
i

FOR USERS IN THE UK, EIRE, MALTA AND CYPRUS ONLY
If this machine is fitted with a three-pin non-rewireable BS plug, then please read the following.
IMPORTANT
If the available socket outlet is not suitable for the plug supplied with this equipment, it should be cut off and an appropriate three-pin plug fitted. With alternative plugs, an approved fuse must be fitted in the plug.
NOTE
The plug served from the main lead must be destroyed as a plug with bared flexible cords is hazardous if engaged in a live socket outlet. In the event that the plug fuse must be replaced, use a fuse approved by ASTA to BS 1362, i.e. carrying the  mark, rating as marked on plug.
Always replace the fuse cover, never use plugs with the fuse cover omitted.
WARNING
DO NOT CONNECT EITHER WIRE TO THE EARTH TERMINAL WHICH IS MARKED WITH THE LETTER ‘E’, BY THE EARTH SYMBOL  OR COLOURED GREEN OR GREEN AND YELLOW.
The wires in this main lead are coloured in accordance with the following code:
Blue Neutral
Brown Live
As the colours of the wiring in the main lead of this appliance may not correspond with the coloured markings identifying the terminals in your plug, proceed as follows.
The wire that is coloured blue must be connected to the terminal that is marked with the letter ‘N’ or coloured black or blue.
The wire that is coloured brown must be connected to the terminal that is marked with the letter ‘L’ or coloured red or brown.
ii

Federal Communications Commission (FCC) Declaration of
Conformity (For USA Only)
Responsible Party: Brother International Corporation
100 Somerset Corporate Boulevard
Bridgewater, NJ 08807-0911 USA
TEL : (908) 704-1700
declares that the product
Product Name: Brother Sewing Machine Model Number: PR-620
complies with Part 15 of the FCC Rules. Operation is subject to the following two conditions: (1) this device may not cause harmful interference, and (2) this device must accept any interference received, including interference that may cause undesired operation.
This equipment has been tested and found to comply with the limits for a Class B digital device, pursuant to Part 15 of the FCC Rules. These limits are designed to provide reasonable protection against harmful interference in a residential installation. This equipment generates, uses, and can radiate radio frequency energy and, if not installed and used in accordance with the instructions, may cause harmful interference to radio communications. However, there is no guarantee that interference will not occur in a particular installation. If this equipment does cause harmful interference to radio or television reception, which can be determined by turning the equipment off and on, the user is encouraged to try to correct the interference by one or more of the following measures:
•Reorient or relocate the receiving antenna
•Increase the separation between the equipment and receiver.
•Connect the equipment into an outlet on a circuit different from that to which the receiver is connected.
•Consult the retailer or an experienced radio/TV technician for help.
•The enclosed interface cable should be used in order to ensure compliance with the limits for a Class B digital device.
•Changes or modifications not expressly approved by Brother Industries, Ltd. could void the user's authority to operate the equipment.
iii

THANK YOU FOR CHOOSING OUR MACHINE
Your machine is one of the most advanced computerized household embroidery machines. To fully enjoy all the features available, we suggest that you study the manual before using the machine.
PLEASE READ BEFORE USING THIS MACHINE
For safe operation
1.Be sure to keep your eye on the needle while sewing. Do not touch the handwheel, thread takeup lever, needle, or other moving parts.
2.Remember to turn off the power switch and unplug the cord when:
•Operation is completed
•Replacing or removing the needle or any other parts
•A power failure occurs during use
•Maintaining the machine
•Leaving the machine unattended
3.Plug the machine directly into the wall. Do not use extension cords.
For a longer service life
1.When storing this machine, avoid direct sunlight and high humidity locations. Do not use or store the machine near a space heater, iron, halogen lamp, or other hot objects.
2.Use only neutral soaps or detergents to clean the machine. Benzene, thinner, and scouring powders can damage the machine, and should never be used.
3.Do not drop or hit the machine.
4.Always consult the manual when replacing or installing any assemblies, needle, or other parts to assure correct installation.
For repair or adjustment
In the event a malfunction occurs or adjustment is required, first follow the troubleshooting table at the back of this Operation Manual to inspect and adjust the machine yourself. If the problem persists, consult your local authorized Brother dealer.
For additional product information and updates, visit our web site at www.brother.com
iv

License Agreement
The enclosed machine includes data, software and/or documentation (collectively “CONTENT”) that are proprietary products of Brother Industries, Ltd. ("BROTHER"). BY USING THE CONTENT, THE CUSTOMER ACCEPTS THE TERMS AND CONDITIONS OF THIS AGREEMENT. BROTHER retains ownership of all rights to CONTENT and to the copies of the CONTENT included in this package.
The CONTENT are licensed (not sold) to you (“CUSTOMER”) under the terms and conditions of this Agreement.
CUSTOMER is licensed to:
•Use the CONTENT in combination with an embroidery machine to create embroidery.
•Use the CONTENT in combination with an embroidery machine that CUSTOMER owns or uses, provided that the CONTENT is not used on more than one embroidery machine at a time.
Except as otherwise provided herein, CUSTOMER may not:
•Allow more than one copy of the CONTENT to be available for use at any one time.
•Reproduce, modify, publish, distribute, sell, rent, sublicense or otherwise make available to others CONTENT.
•Distribute, rent, sublicense, lease, sell, transfer or assign the media card or CONTENT.
•Decompile, disassemble or otherwise reverse engineer the CONTENT or assist others to do the same.
•Alter, translate, modify or adapt the CONTENT or any part thereof for business, commercial or industrial purposes.
•Sell or otherwise distribute the EMBROIDERY created by use of the CONTENT, WHICH ORIGINALLY BEARS CERTAIN COPYRIGHT NOTICE UNDER THE NAME OF ANY THIRD PARTIES OTHER THAN BROTHER (e.g. “©DISNEY”).
BROTHER retains all rights not expressly granted to CUSTOMER herein.
Nothing in this agreement constitutes a waiver of the rights of BROTHER under any law. This agreement shall be governed by the laws of Japan.
Please direct all inquiries concerning this Agreement in writing by regular mail, to Brother Industries, Ltd., 1-1-1 Kawagishi, Mizuho-ku, Nagoya 467-8562, Japan, Attention: P&H company Sales and Marketing Dept.
v

Warning Labels
The following warning labels are on the machine.
Be sure to observe the precautions described in the labels.
1
2
Label locations
Please put a drop of oil onto the hook once a day before use.
vi

Precautions
Concerning optional embroidery cards
•Do not disassemble or alter the embroidery cards.
•Do not forcefully bend, drop, scratch or place heavy objects on top of the embroidery cards.
•Do not allow the embroidery cards to become wet, such as with water, solvents, drinks or any other liquids.
•Do not use or store the embroidery cards in a location exposed to strong static electricity or electrical interference.
•Do not use or store embroidery cards in locations exposed to vibrations or impacts, direct sunlight, extreme dust (or lint), high temperatures, high humidity, severe temperature fluctuations, or strong magnetic forces (such as from speakers).
•While embroidery data is being recalled from the embroidery card, do not allow the machine to be exposed to vibrations or impacts, and do not attempt to remove the embroidery card from the machine.
•Store embroidery cards in their protective cases.
•If an embroidery card other than our original embroidery cards are used, the embroidery machine may not operate correctly. Be sure to use only recommended embroidery cards.
•Some licensed or copyright embroidery cards cannot be used with this embroidery machine.
•Embroidery cards sold overseas cannot be used with this embroidery machine.
•Only insert or remove embroidery cards while  appears in the display or while the embroidery machine is turned off (see page 112).
Concerning USB media
•Do not disassemble or alter the USB media.
•Do not allow the USB media to become wet, such as with water, solvents, drinks or any other liquids.
•Do not use or store the USB media in a location exposed to strong static electricity or electrical interference.
•Do not use or store USB media in locations exposed to vibrations or impacts, direct sunlight, extreme dust (or lint), high temperatures, high humidity, severe temperature fluctuations, or strong magnetic forces (such as from speakers).
•While embroidery data is being recalled from the USB media, do not allow the machine to be exposed to vibrations or impacts, and do not attempt to remove the USB media from the machine.
•Some USB media may not be usable with this machine. Please visit our web site for more details.
•Only insert or remove USB media while  appears in the display, or when prompted to change media by a message on the display (see page 137).
•For additional information, refer to the instruction manual included with the USB media that you have purchased.
vii
——————————————————————————————————————————————————————————
Machine Structure and Features
Six-needle machine embroidering
Your machine has six needles, each threaded with a different color of thread. It can sew embroidery patterns that contain several colors by automatically selecting the appropriate needle for each color. The mechanism that moves the needles up and down is called the needle bar, and the needle bars are in the needle bar case. The needle bars are named from right to left: needle bar 1, needle bar 2, needle bar 3, needle bar 4 , needle bar 5, and needle bar 6.
3
1
2
1 Needle bar 1
2 Needle 1
3 Needle bar case
The machine automatically assigns a thread color to each needle. If a needle is already threaded by a color that will be used on the next pattern the machine will assign the color to that needle, reducing the number of thread spool changes. This also means that the machine does not always assign colors according to the needle number, it assigns colors based on the currently threaded colors.
 Memo
Memo
●Sewing is not necessarily performed in the order of the needle bar numbers.
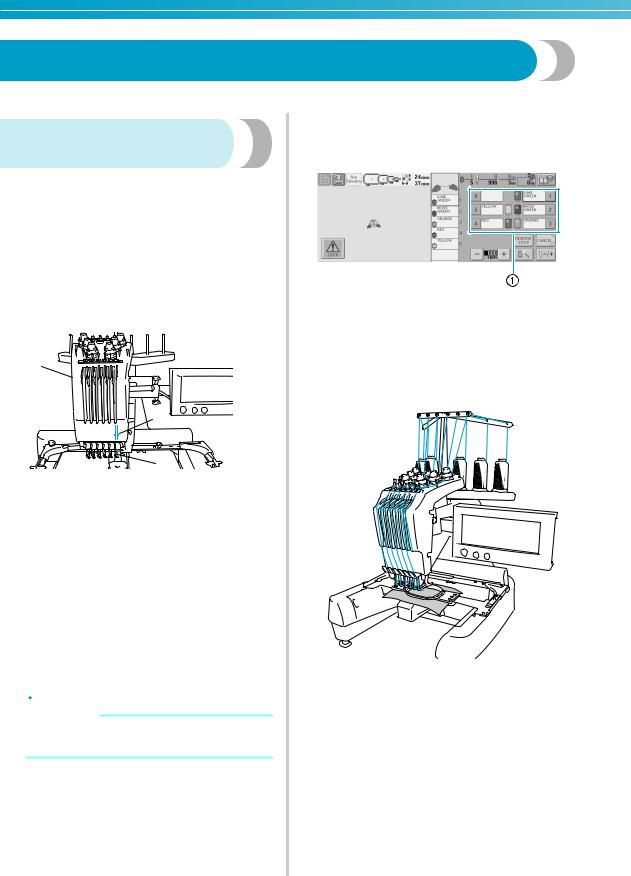
The thread colors assigned to the needle bars are listed on the screen. Thread the needle bars as indicated.
1The threads threaded on the needle bars are indicated as shown here.
The spool pins, thread tension knobs, thread take-up levers and thread paths, mentioned when threading the upper thread, are different according to their corresponding needle bar number.
viii
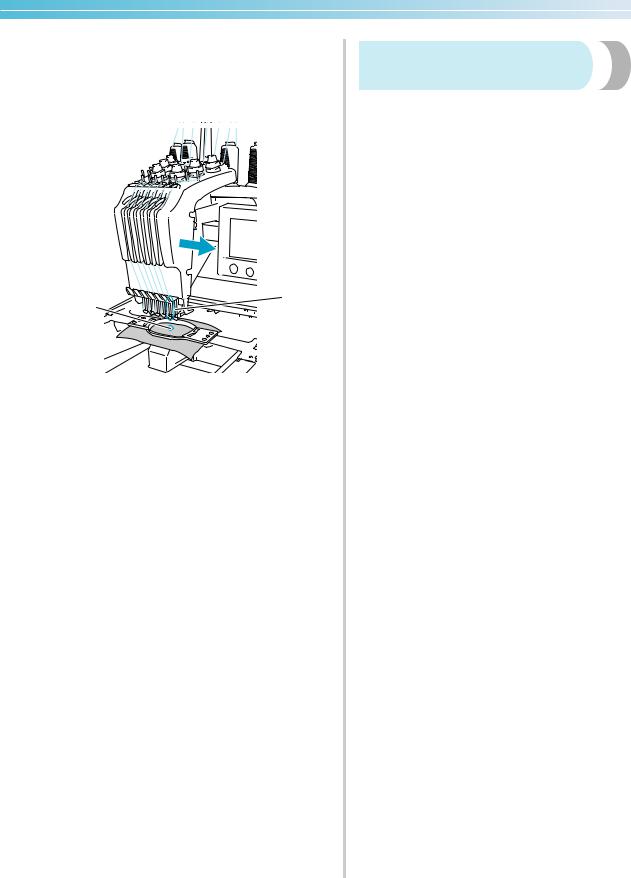
Not all six needles can be used to sew at the same time. Only one needle is moved to the embroidering position at a time. According to the sewing order, the needle bar case is moved to the left and right so that the needle bar and needle thread with the required color can be moved to the embroidering position.
1
2
1Needle at the embroidering position
The needle is positioned over the hole in the needle plate 2.
When starting the machine, the presser foot is automatically lowered, and the embroidery is sewn while performing pulling thread from the materials at the thread trimming and while changing thread colors (moving the needle to be sewn within the embroidering). When sewing is finished, the machine stops. If the pattern uses seven or more thread colors, the machine will stop when it is necessary for the thread spools to be changed, and the corresponding instructions appear on the LCD.
Differences with single-needle machines
■Can sew embroidery patterns using six or less colors without the need to replace the thread spools
With single-needle machines, the thread spool must be changed and the machine must be threaded each time a different thread color is used. With this machine, it is not necessary to change the thread spool or rethread the machine with embroidery patterns containing six or less colors. If total colors are less than 6 colors, and if total color change is more than 7 times, machine will come back to the needle that the machine is already used and sew the same color again automatically.
■Automatic sewing reduces sewing time
Except to change the thread spools with patterns containing seven or more colors, once the machine is started, it continues to operate automatically, from lowering the presser foot to performing the specified operations at the starting and end positions in addition to changing the thread colors. Since the machine can change threads and finish stitching, sewing time is reduced.
■Automatically pulls and holds the thread tails to the under side of fabric at the beginning and end of stitching
Since the machine automatically pulls the upper thread under the fabric at the beginning of a color, and pulls the upper thread from the fabric at the time of thread trimming, you don’t need to deal with the upper thread tail at all.
■Automatically moves the embroidery frame to the embroidering position
With single-needle machine, in most cases, the embroidery pattern is centered in the frame and the fabric must be correctly positioned within the embroidery frame with the center of the desired embroidering position aligned with the center of the embroidery frame. However, with this machine, the embroidery frame is moved to determine the embroidering position, making it easier to sew the pattern at any place in the frame. In addition, the embroidering position can be freely determined after the fabric is hooped and the embroidery frame is attached to the machine, regardless of how the fabric is positioned in the embroidery frame.
Machine Structure and Features ix
——————————————————————————————————————————————————————————
Other features
■Easy-to-read and easy-to-use LCD
Equipped with a large color LCD, the colors of an embroidery pattern can be previewed in a nearly realistic image. In addition, since the LCD is a touch panel, the keys that are displayed can be touched to easily perform operations.
■Safety mechanism
The machine is equipped with a locking mechanism that helps prevent injuries from accidental operation. The machine can only be started after the machine is unlocked. The color of the start/stop button changes to inform you of whether or not the machine is locked.
Lit in red |
Flashing in green |
The machine is |
The machine can be |
locked. |
started. |
■Wide selection of built-in thread color information
The thread color information for manufacturers’ threads is available, making it easy to choose the appropriate thread color.
■Expanded thread color display feature enables colors to be displayed in almost the true color
The colors and thread color numbers are stored in the machine’s memory. From this thread color library, you can select colors to create your own color thread table. If the pattern colors are changed using this table, the pattern can be displayed with only the thread colors that you have. In addition, the embroidery pattern can be displayed as it would appear after it is embroidered.
■Automatic needle-threading mechanism
Using the automatic needle-threading mechanism, the needle can easily be threaded.
x
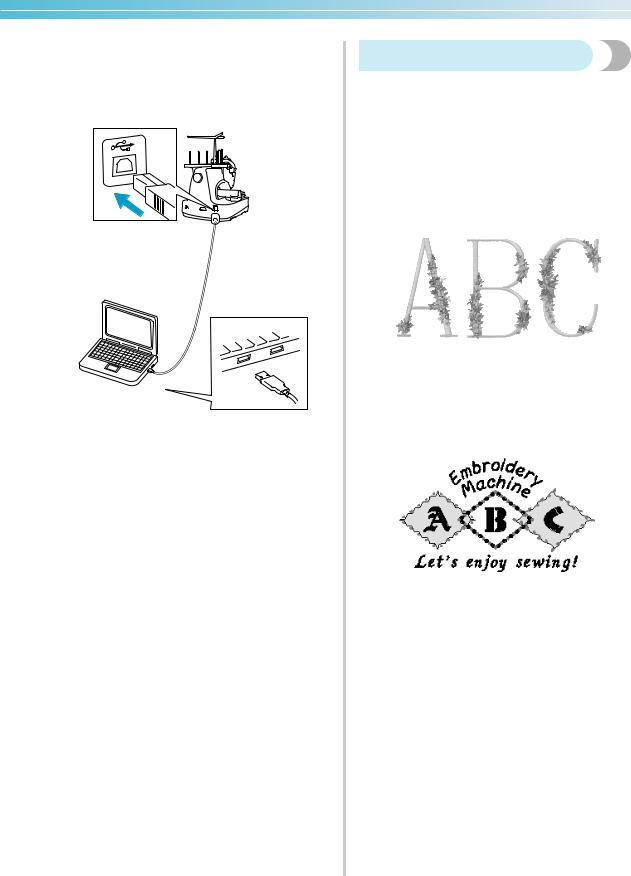
■USB Type “B” (function) port connector available as standard equipment
If a computer is connected to the machine through the included USB cable, embroidery patterns can be recalled from the computer.
Available features
Designs with a maximum size of 200 mm (H) × 300 mm (W) (7-7/8 inches (H) × 11-3/4 inches (W)) can be embroidered. If the optional cap frame is used, embroidery can be sewn on caps.
■Various built-in patterns
In addition to the many lettering patterns, embroidery patterns and frame patterns built into the machine, if an optional embroidery card is used, many more embroidery patterns are available.
■Embroidery pattern editing
Lettering and embroidery patterns can be combined or a text arrangement can be specified to arrange the patterns.
The machine can also be set to repeatedly sew the same pattern.
Machine Structure and Features xi

——————————————————————————————————————————————————————————
Manual Structure
This manual is constructed as described below.
Read before use
Chapter 1: Getting Ready
The setup of the embroidery machine and the various preparations required before starting to sew are described in this chapter.
Chapter 2: Embroidering Tutorial
This chapter describes the basic embroidering operations in order—from turning on the machine and sewing a pattern to finishing sewing. Follow the steps of the tutorial to embroider a pattern and master the operation of this embroidery machine.
Chapter 3: Other Basic Procedures
This chapter provides explanations on operations other than those described in chapter 2, such as when sewing a pattern with seven or more colors, and other necessary operations, for example, to change the needle.
Read when additional information is required
Chapter 4: Embroidering Settings
This chapter contains descriptions on the various embroidering settings, which make editing patterns simple.
Chapter 5: Selecting/Editing/Saving Patterns
This chapter provides details on selecting, editing and saving embroidery patterns.
Chapter 6: Basic Settings and Help Feature
This chapter contains descriptions on the use of the settings key, the machine operations key and the help key. Details on changing the basic embroidery machine settings and viewing operations on the LCD will be provided.
Chapter 7: Appendix
This chapter provides descriptions of techniques for various embroidering operations, pointers for creating beautiful embroidery, and details on maintenance procedures and corrective measures that should be taken when a problem occurs.
Searching for information
■Searching the manual By title
Check the descriptions at the left for the contents of each chapter, and then check the table of contents.
For basic operations, refer to the list of titles on the first page of chapter 2. Find the appropriate page by using the thumbtabs on the right edge of the pages.
By keyword
Search the index at the end of this manual. Look for the desired keyword, and then refer to the page that is indicated.
By screen
Descriptions of the keys and other information that appear in the main LCD screens are provided in the tables on pages 49 to 57. For details, refer to the page that is indicated.
By condition
Various possible conditions and the corresponding operations are described on page 58. For details, refer to the page that is indicated.
■Searching the machine
This machine is equipped with a help feature.
Learning how to perform an operation
Touch the machine operations guide key, and then check for the desired information. For details on using the machine operations guide key, refer to page 151.
Learning how to use a screen feature
Touch the help key, and then check for the desired information. For details on using the help key, refer to page 153.
xii

Contents |
|
Important Safety Instructions ................................................................................................ |
i |
License Agreement ............................................................................................................... |
v |
Warning Labels.................................................................................................................... |
vi |
Precautions......................................................................................................................... |
vii |
Concerning optional embroidery cards ............................................................................................................ |
vii |
Concerning USB media.................................................................................................................................... |
vii |
Machine Structure and Features........................................................................................ |
viii |
Six-needle machine embroidering................................................................................................................... |
viii |
Differences with single-needle machines .......................................................................................................... |
ix |
Other features .................................................................................................................................................... |
x |
Available features.............................................................................................................................................. |
xi |
Manual Structure................................................................................................................ |
xii |
Read before use ............................................................................................................................................... |
xii |
Read when additional information is required.................................................................................................. |
xii |
Searching for information................................................................................................................................. |
xii |
Contents ............................................................................................................................ |
xiii |
GETTING READY |
1 |
Names of Machine Parts and Their Functions ...................................................................... |
2 |
Front view.......................................................................................................................................................... |
2 |
Right-side/rear view ........................................................................................................................................... |
3 |
Operation panel................................................................................................................................................. |
3 |
Included Accessories ............................................................................................................ |
4 |
Accessories ........................................................................................................................................................ |
4 |
Optional Accessories............................................................................................................ |
5 |
Setting Up the Machine........................................................................................................ |
6 |
Setup and transporting precautions .................................................................................................................... |
6 |
Setup location .................................................................................................................................................... |
7 |
Setting up the machine....................................................................................................................................... |
8 |
Adjusting the operation panel position ............................................................................................................... |
9 |
Preparing the thread guide assembly ................................................................................................................ |
10 |
Positioning the spool stand............................................................................................................................... |
11 |
Attaching the embroidery frame holder ............................................................................................................ |
11 |
EMBROIDERING TUTORIAL |
13 |
Operating Precautions........................................................................................................ |
14 |
Power supply precautions ................................................................................................................................ |
14 |
Needle precautions .......................................................................................................................................... |
15 |
Checking the needle ........................................................................................................................................ |
15 |
Bobbin precautions .......................................................................................................................................... |
15 |
Upper thread recommendations....................................................................................................................... |
16 |
Fabric recommendations.................................................................................................................................. |
16 |
Display recommendations................................................................................................................................ |
16 |
Basic Procedures ................................................................................................................ |
17 |
Installing the Bobbin .......................................................................................................... |
18 |
Removing the bobbin case ............................................................................................................................... |
18 |
Installing the bobbin ........................................................................................................................................ |
19 |
Installing the bobbin case................................................................................................................................. |
19 |
Turning ON the Machine ................................................................................................... |
20 |
Understanding the screens ............................................................................................................................... |
21 |
Screen overview............................................................................................................................................... |
22 |
Selecting an Embroidery Pattern ........................................................................................ |
23 |
Selecting an embroidery pattern....................................................................................................................... |
24 |
Editing the Embroidery Pattern........................................................................................... |
25 |
Continuing to the embroidering settings screen ................................................................................................ |
25 |
Specifying Embroidering Setting......................................................................................... |
26 |
xiii

——————————————————————————————————————————————————————————
Previewing the Image ......................................................................................................... |
27 |
Checking a preview image ............................................................................................................................... |
27 |
Hooping the Fabric in the Embroidery Frame..................................................................... |
28 |
Hooping the fabric in the embroidery frame..................................................................................................... |
28 |
Attaching the Embroidery Frame to the Machine ............................................................... |
30 |
Attaching the embroidery frame ....................................................................................................................... |
30 |
Checking the Embroidery Area........................................................................................... |
32 |
Continuing to the embroidering screen ............................................................................................................ |
32 |
Upper Threading ................................................................................................................ |
33 |
Checking the needle bars and thread colors ..................................................................................................... |
33 |
Upper threading............................................................................................................................................... |
35 |
Threading the needle ....................................................................................................................................... |
39 |
Sewing the Embroidery....................................................................................................... |
42 |
Starting embroidering....................................................................................................................................... |
42 |
Stopping embroidering..................................................................................................................................... |
44 |
Checking the Thread Tension ............................................................................................. |
45 |
Removing the Embroidery Frame and Fabric...................................................................... |
46 |
Removing the embroidery frame ...................................................................................................................... |
46 |
Removing the fabric ......................................................................................................................................... |
46 |
Turning OFF the Machine................................................................................................... |
47 |
Screen Quick Reference Guide .......................................................................................... |
49 |
Key displays ..................................................................................................................................................... |
49 |
Common screen controls ................................................................................................................................. |
49 |
Understanding the pattern type selection screen .............................................................................................. |
50 |
Understanding the pattern list screen ............................................................................................................... |
51 |
Understanding the pattern editing screen ......................................................................................................... |
52 |
Understanding the embroidering settings screen .............................................................................................. |
54 |
Understanding the embroidering screen........................................................................................................... |
56 |
When You Have a Question, This May Help You ............................................................... |
58 |
TECHNICAL TERMS:........................................................................................................................................ |
58 |
PATTERNS: ...................................................................................................................................................... |
59 |
EMBROIDERING: ............................................................................................................................................ |
59 |
OTHER BASIC PROCEDURES |
61 |
Resume the Operation Being Performed Before the Machine Was Turned OFF................. |
62 |
Changing the Needle .......................................................................................................... |
63 |
Replacing the needle........................................................................................................................................ |
63 |
Correctly Using the Embroidery Frames............................................................................. |
65 |
Embroidery frame types and applications ......................................................................................................... |
65 |
Attaching Iron-On Stabilizer (Backing) to Fabric ............................................................... |
66 |
Hooping the Fabric............................................................................................................. |
67 |
Hooping the fabric in the extra-large and large embroidery frames .................................................................. |
67 |
Using the embroidery sheet.............................................................................................................................. |
68 |
Large/small pieces of fabric .............................................................................................................................. |
69 |
Embroidery Frame Position and Movement........................................................................ |
70 |
Changing the Embroidering Position .................................................................................. |
72 |
Adjusting the angle .......................................................................................................................................... |
73 |
Embroidering a Pattern Containing Seven or More Colors ................................................. |
75 |
Checking if thread spool changes are necessary ............................................................................................... |
75 |
Changing the Thread Spools with Designs of Seven or More Colors .................................. |
77 |
Change thread spools message......................................................................................................................... |
77 |
Easily changing the thread spools..................................................................................................................... |
78 |
If the Thread Breaks or the Bobbin Thread Runs Out While Embroidering ........................ |
79 |
If the upper thread breaks................................................................................................................................. |
79 |
If the bobbin thread breaks or runs out............................................................................................................. |
80 |
Embroidering From the Beginning or Middle of the Pattern ............................................... |
81 |
Resume Embroidering After Turning OFF the Machine ...................................................... |
83 |
Adjusting the Thread Tension ............................................................................................. |
85 |
Adjusting the tension of the bobbin thread ....................................................................................................... |
85 |
Adjusting the tension of the upper thread ......................................................................................................... |
86 |
xiv

EMBROIDERING SETTINGS |
87 |
Automatic Lock Stitch Setting ............................................................................................ |
88 |
Starting/Ending Position Settings ........................................................................................ |
89 |
Repeatedly sewing a pattern along a diagonal.................................................................................................. |
90 |
Maximum Sewing Speed Setting......................................................................................... |
91 |
Setting the Machine to Stop at Color Changes ................................................................... |
92 |
Stopping the machine at the next color change ................................................................................................ |
92 |
Specifying pause locations before embroidering............................................................................................... |
92 |
Temporary Needle Bar Setting ........................................................................................... |
94 |
Reserved Needle Bar Settings ............................................................................................. |
96 |
SELECTING/EDITING/SAVING PATTERNS |
99 |
Embroidery Data Precautions........................................................................................... |
100 |
Selecting an Embroidery Pattern ...................................................................................... |
102 |
General pattern selection ............................................................................................................................... |
102 |
Embroidery patterns ....................................................................................................................................... |
104 |
Renaissance Alphabet Patterns ....................................................................................................................... |
105 |
Floral alphabet patterns.................................................................................................................................. |
106 |
Appliqué alphabet.......................................................................................................................................... |
107 |
Frame patterns ............................................................................................................................................... |
108 |
Alphabet patterns ........................................................................................................................................... |
109 |
Embroidery patterns stored in the machine..................................................................................................... |
111 |
Embroidery cards (optional) ........................................................................................................................... |
112 |
Computer (USB) ............................................................................................................................................. |
114 |
USB media (Commercially Available) ............................................................................................................ |
117 |
Editing the Embroidery Pattern (Pattern Editing Screen) .................................................. |
119 |
Combining patterns........................................................................................................................................ |
119 |
Selecting the pattern to be edited ................................................................................................................... |
120 |
Moving a pattern............................................................................................................................................ |
120 |
Flipping a pattern horizontally ....................................................................................................................... |
121 |
Flipping a pattern vertically............................................................................................................................ |
121 |
Changing the size of a pattern ........................................................................................................................ |
121 |
Rotating a pattern........................................................................................................................................... |
122 |
Changing the text arrangement of a character ................................................................................................ |
123 |
Changing the character spacing ..................................................................................................................... |
124 |
Changing the thread density (only for some character and frame patterns) ..................................................... |
125 |
Specifying multi-color text ............................................................................................................................. |
126 |
Changing the colors of the pattern.................................................................................................................. |
127 |
Deleting a pattern .......................................................................................................................................... |
128 |
Editing the Embroidery Pattern (Embroidering Settings Screen) ....................................... |
129 |
Rotating the entire pattern .............................................................................................................................. |
129 |
Creating a repeating pattern ........................................................................................................................... |
130 |
Changing the colors of the pattern.................................................................................................................. |
131 |
Editing a Combined Pattern.............................................................................................. |
132 |
Saving Embroidery Patterns.............................................................................................. |
136 |
Machine’s Memory ........................................................................................................................................ |
136 |
If the Embroidery Pattern Cannot Be Saved .................................................................................................... |
136 |
USB Media (Commercially Available) ............................................................................................................ |
137 |
BASIC SETTINGS AND HELP FEATURE |
139 |
Using the Settings Key ...................................................................................................... |
140 |
Understanding the settings screen .................................................................................................................. |
140 |
Adjusting the brightness of the LCD ............................................................................................................... |
142 |
Turning the buzzer on or off........................................................................................................................... |
142 |
Changing the language................................................................................................................................... |
143 |
Changing the units of measurements .............................................................................................................. |
143 |
Changing the display guides........................................................................................................................... |
143 |
Changing the thread color information........................................................................................................... |
145 |
Display expanded thread color ...................................................................................................................... |
146 |
Custom thread table settings........................................................................................................................... |
147 |
xv

——————————————————————————————————————————————————————————
Specifying jumpstitch trimming / “DST” jump codes for trimming .................................................................. |
149 |
Deleting short stitches .................................................................................................................................... |
150 |
Specifying the remaining length of thread ...................................................................................................... |
150 |
Using the Machine Operations Guide Key ....................................................................... |
151 |
Using the Help Key........................................................................................................... |
153 |
APPENDIX |
155 |
Appliqué Sewing............................................................................................................... |
156 |
Sewing appliqué patterns ............................................................................................................................... |
156 |
Using a frame pattern to create appliqués (1) ................................................................................................. |
157 |
Using a frame pattern to create appliqués (2) ................................................................................................. |
158 |
Helpful Tips for the Operation of the Machine ................................................................ |
160 |
Checking the thread tension of built-in patterns ............................................................................................. |
160 |
Sewing a pattern aligned with a mark on the fabric ........................................................................................ |
161 |
Color thread table .......................................................................................................................................... |
163 |
Colors of Tajima (.dst) embroidery data .......................................................................................................... |
163 |
Creating Beautiful Embroidery ......................................................................................... |
164 |
Threads .......................................................................................................................................................... |
164 |
Stabilizers (Backing) ....................................................................................................................................... |
165 |
Hooping Techniques...................................................................................................................................... |
166 |
Fabric/stabilizer compatibility chart ............................................................................................................... |
167 |
OPTIONAL ACCESSORIES |
|
Attaching an optional embroidery frame for industrial embroidery machines ................. |
168 |
Using the Optional Cap Frame ......................................................................................... |
169 |
Cap frame and its accessories......................................................................................................................... |
169 |
Types of caps ................................................................................................................................................. |
170 |
Fabric precautions.......................................................................................................................................... |
171 |
Preparing to use the cap frame ....................................................................................................................... |
171 |
Attaching the standard cap frame to the mounting jig and putting a cap into the frame .................................. |
176 |
Attaching the advanced cap frame to the mounting jig and putting a cap into the frame ................................ |
180 |
Installing the embroidery frame holder........................................................................................................... |
185 |
Additional digitizing information.................................................................................................................... |
186 |
Using the Optional Bobbin Winder .................................................................................. |
188 |
Precautions .................................................................................................................................................... |
188 |
Optional bobbin winder and its accessories ................................................................................................... |
188 |
Setting up the optional bobbin winder ........................................................................................................... |
189 |
Connecting the AC adapter ............................................................................................................................ |
189 |
Winding the bobbin ....................................................................................................................................... |
190 |
Maintenance..................................................................................................................... |
193 |
Cleaning the LCD........................................................................................................................................... |
193 |
Cleaning the machine surface ........................................................................................................................ |
193 |
Cleaning the hook.......................................................................................................................................... |
193 |
Cleaning around the needle plate................................................................................................................... |
194 |
Cleaning the bobbin case............................................................................................................................... |
195 |
Oiling the machine ........................................................................................................................................ |
196 |
Troubleshooting ............................................................................................................... |
198 |
On-screen troubleshooting............................................................................................................................. |
198 |
Troubleshooting ............................................................................................................................................. |
199 |
Error messages ............................................................................................................................................... |
207 |
If the LCD cannot be read .............................................................................................................................. |
213 |
If the machine does not respond when a key is pressed.................................................................................. |
213 |
Specifications ................................................................................................................... |
215 |
Embroidery machine specifications ................................................................................................................ |
215 |
Index ................................................................................................................................ |
216 |
xvi

1 GETTING READY
After unpacking the machine, first refer to “Included Accessories” on page 4, and check that all listed accessories are included. After checking that all accessories are included, the embroidery machine can be set up.
The setup of the machine and the various preparations required before starting to sew are described in this chapter.
Names of Machine Parts and Their Functions ........................................................... |
2 |
|
Front view / 2 |
Right-side/rear view / 3 |
|
Operation panel / 3 |
|
|
Included Accessories................................................................................................. |
|
4 |
Accessories / 4 |
|
|
Optional Accessories................................................................................................. |
|
5 |
Setting Up the Machine............................................................................................. |
|
6 |
Setup and transporting precautions / 6 Setting up the machine / 8
Preparing the thread guide assembly / 10 Attaching the embroidery frame holder / 11
Setup location / 7
Adjusting the operation panel position / 9 Positioning the spool stand / 11
GETTING READY ———————————————————————————————————————————————————
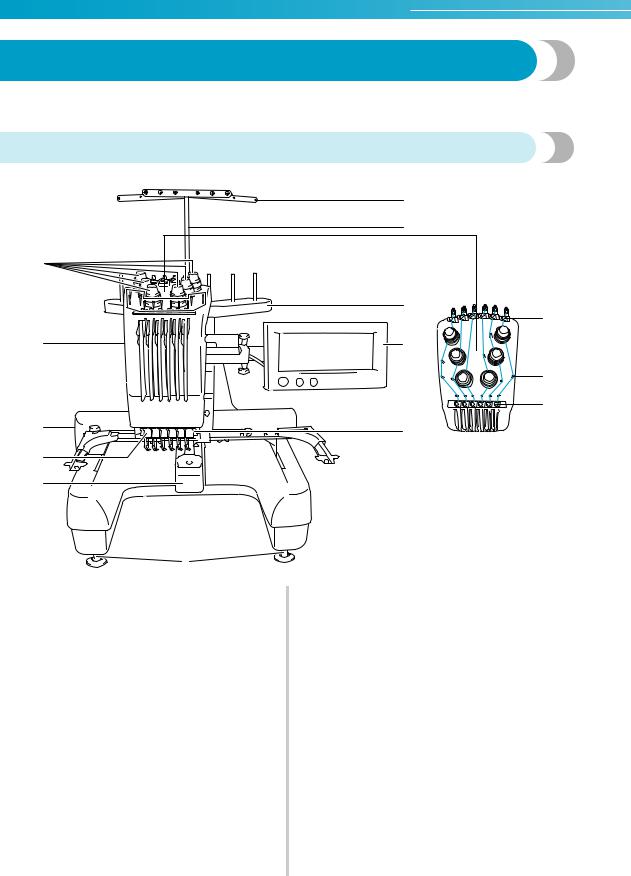
Names of Machine Parts and Their Functions
The names of the various parts of the sewing machine and their functions are described below. Before using the sewing machine, carefully read these descriptions to learn the names of the machine parts.
Front view
|
6 |
|
|
7 |
|
1 |
|
|
|
8 |
|
|
C |
|
2 |
9 |
|
|
B |
|
|
D |
|
3 |
6 5 4 3 2 1 |
|
A |
||
|
||
4 |
|
|
5 |
|
0
1Thread tension knobs
Adjusts the tension of the thread.
2Needle bar case
The case moves to the left and right to move the needle to the embroidering position.
3Carriage
Attach the embroidery frame to the carriage. When the machine is turned on or when the machine does embroidery, the carriage moves forward, backward, left and right.
4 Lower thread guide
5Hook cover/Hook
Open the hook cover, and then insert the bobbin case into the hook.
6 Thread guide
7 Thread guide assembly support
8Spool stand
Put 6 thread spools to embroider.
9 Operation panel
0Feet
Use the feet to adjust the height of the legs.
A Sewing light
B Thread guide pins
C Upper thread guide
D Middle thread guide
2
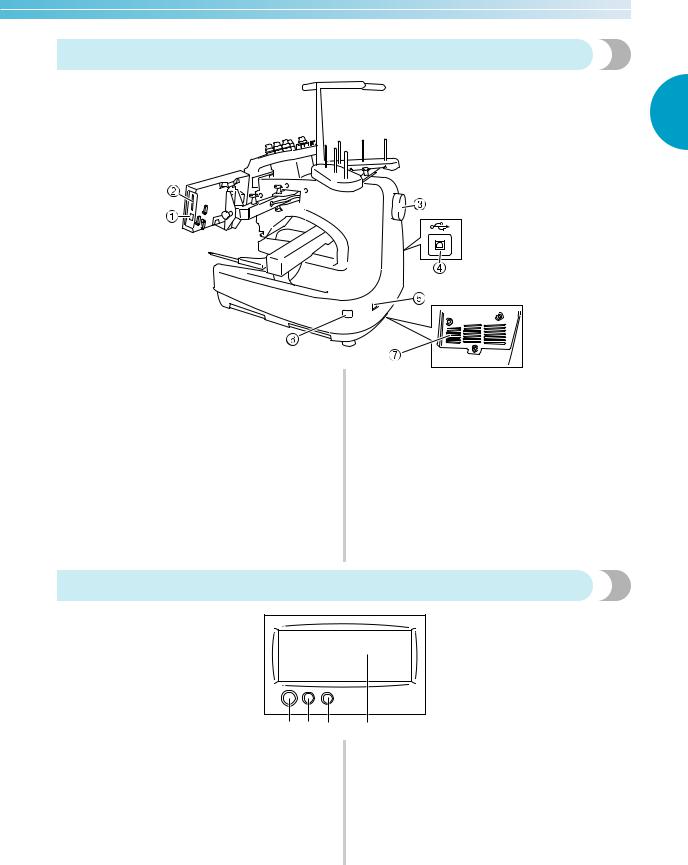
Right-side/rear view
1
1USB Type “A” (host) port connector
When using USB media, plug the USB media into the USB Type “A” (host) port connector.
2Embroidery card slot
Insert the embroidery cards (sold separately) into the embroidery card slot.
3Handwheel
Rotate the handwheel to move the needle up and down. Be sure to rotate the handwheel counterclockwise.
4USB Type “B” (function) port connector
When sending patterns from a computer to the machine, plug the USB cable from the computer into the USB Type “B” (function) port connector.
Bottom
5Power supply plug
Insert the plug on the power supply cord into the power supply plug.
6Main power switch
Use the main power switch to turn the machine ON (I) and OFF ({).
7 Ventilation slots
Operation panel
1 2 3
1 Start/stop button
Press the start/stop button to start or stop machine. The lighting status and color of the button changes depending on the operation condition of the machine.
Lit in red |
: When the machine cannot start |
|
sewing |
Flashing in green: When the machine can start |
|
|
sewing |
Lit in green |
: While the machine is sewing |
Off |
: When the machine is turned off |
4
2Thread trimming button
Press the thread trimming button to trim both the upper and the bobbin threads.
3Automatic needle-threading button
Press the automatic needle threading button to thread the needle.
4LCD (touch panel)
Touch the keys that appear on the touch panel to select and edit patterns and confirm various information.
Names of Machine Parts and Their Functions 3
GETTING READY ———————————————————————————————————————————————————
Included Accessories
After opening the box, check that the following accessories are included. If any item is missing or damaged, contact your retailer.
Accessories
The accessories listed below are included with this machine. Make sure to use the accessories supplied with this machine.
1. 2. 3.
4. 5. 6.
7. 8. 9.
10. 11. 12.
13. 14. 15.
16. 17. 18.
19. 20. 21.
22. 23. 24.
25. 26. 27.
28. 29. 30.
31.32
No. |
Part Name |
Model |
Parts Code |
|
Name |
||||
|
|
|
||
|
|
|
|
|
1 |
Accessory case |
|
XC6482-051 |
|
2 |
Needle set (2 pcs.) |
PRHA1BR11 |
XC6469-001 |
|
3 |
Prewound bobbin (6 pcs.) |
|
XC6368-051 |
|
4 |
Spool net (6 pcs.) |
|
S34455-000 |
|
5 |
Seam ripper |
|
X54243-051 |
|
6 |
Scissors |
|
XC1807-121 |
|
7 |
Tweezers |
|
XC6542-051 |
|
8 |
Touch pen |
|
XA9940-051 |
|
9 |
Needle changing tool (Threader) |
|
XC4957-051 |
|
10 |
Needle plate spacer |
|
XC6499-151 |
|
11 |
Phillips screwdriver |
|
XC6543-051 |
|
12 |
Standard screwdriver |
|
X55468-051 |
|
13 |
Allen screwdriver |
|
XC5159-051 |
|
14 |
Offset screwdriver |
|
XC6545-051 |
|
15 |
Disc-shaped screwdriver |
|
XC1074-051 |
|
16 |
Wrench 13 x 10 |
|
XC6159-051 |
|
17 |
Oiler |
|
XZ0206-051 |
|
18 |
Clean brush |
|
X59476-051 |
|
19 |
Weight |
|
XC5974-151 |
|
20 |
USB cable |
|
XD1563-051 |
|
21 |
Embroidery frame (extra large) |
|
|
|
200 mm (H) × 300 mm (W) |
PRH300 |
XC6284-052 |
||
|
(7-7/8 inches (H) × 11-3/4 inches (W)) |
|
|
|
|
Embroidery frame (large) |
|
|
|
22 |
130 mm (H) × 180 mm (W) |
PRH180 |
XC6285-052 |
|
|
(5-1/8 inches (H) × 7-1/8 inches (W)) |
|
|
|
23 |
Embroidery frame (medium) |
PRH100 |
XC6286-052 |
|
100 mm (H) × 100 mm (W) |
||||
|
(4 inches (H) × 4 inches (W)) |
|
|
|
24 |
Embroidery frame (small) |
PRH60 |
XC6287-052 |
|
40 mm (H) × 60 mm (W) |
||||
|
(1-1/2 inches (H) × 2-3/8 inches (W)) |
|
|
|
25 |
Embroidery sheet (extra large) |
|
|
|
200 mm (H) × 300 mm (W) |
|
XC5704-051 |
||
|
(7-7/8 inches (H) × 11-3/4 inches (W)) |
|
|
|
|
Embroidery sheet (large) |
|
|
|
26 |
130 mm (H) × 180 mm (W) |
|
XC5721-051 |
|
|
(5-1/8 inches (H) × 7-1/8 inches (W)) |
|
|
|
27 |
Embroidery sheet (medium) |
|
XC5759-051 |
|
100 mm (H) × 100 mm (W) |
|
|||
|
(4 inches (H) × 4 inches (W)) |
|
|
|
28 |
Embroidery sheet (small) |
|
XC5761-051 |
|
40 mm (H) × 60 mm (W) |
|
|||
|
(1-1/2 inches (H) × 2-3/8 inches (W)) |
|
|
|
29 |
Operation manual |
|
XD1133-051 |
|
|
|
|
|
|
30 |
Quick reference guide |
|
XD0754-051 |
|
|
|
|
|
|
31 |
Spool mat (6pcs.) |
|
XC7134-051 |
|
|
|
|
|
|
32 |
Spool cap (6pcs.) |
|
130012-054 |
|
|
|
|
|
4
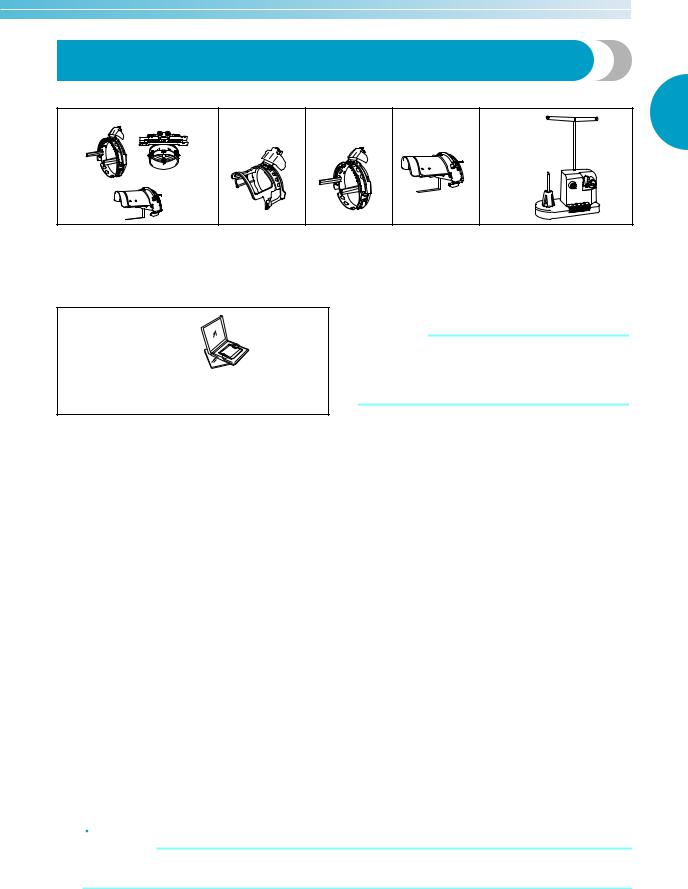
Optional Accessories
The following are available as optional accessories.
1. |
2. |
3. |
4. |
5. |
1 |
1. Advanced cap |
2. Standard |
3. Advanced |
4. Hooping jig |
5. Bobbin winder set |
frame set |
cap frame |
cap frame |
Model name: |
Model Name: PRBW1 |
Model Name: PRCF2 |
Model Name: |
Model name: |
PRCFJ2 |
Parts Code: XC6290-052 |
Parts Code: XC7609-052 |
PRCFH1 |
PRCFH2 |
Parts Code: |
XC6290-061(for Australia) |
|
Parts Code: |
Parts Code: |
XC7611-052 |
(See instructions on page 188.) |
(See instructions on page 169.) |
XC6958-052 |
XC7610-052 |
|
|
6. Embroidery card
No. |
Part Name |
Model |
Parts Code |
|
Name |
|
|||
|
|
|
|
|
|
|
|
|
|
1 |
Alphabet |
SA298 |
X58317-003 |
|
2 |
Flower |
SA299 |
X58321-003 |
|
10 |
Monogram Emblem |
SA307 |
X59567-003 |
|
11 |
Frame |
SA311 |
XA0257-001 |
* |
12 |
Transportation |
SA312 |
XA0275-001 |
* |
13 |
Sports Emblem |
SA313 |
XA0517-003 |
|
14 |
Large Floral |
SA314 |
XA1223-003 |
|
16 |
Dogs & Cats |
SA316 |
XA1406-003 |
|
19 |
Marine |
SA319 |
XA2452-001 |
* |
20 |
Petite Designs |
SA320 |
XA2869-003 |
|
25 |
Horse |
SA325 |
XA3791-003 |
|
27 |
Birds |
SA327 |
XA4289-003 |
|
28 |
Christmas |
SA328 |
XA4502-003 |
|
29 |
Lace |
SA329 |
XA4664-003 |
|
30 |
Wildlife Animals |
SA330 |
XA4771-003 |
|
31 |
Large Flower II |
SA331 |
XA5037-003 |
|
32 |
Musical Instrument |
SA332 |
XA5386-001 |
* |
33 |
Trees |
SA333 |
XA5567-003 |
|
35 |
Cats & Dogs II |
SA335 |
XA5629-003 |
|
36 |
Fruits & Vegetables |
SA336 |
XA5659-003 |
|
37 |
Appliqué Alphabet |
SA337 |
XA5753-003 |
|
38 |
Angel |
SA338 |
XA5781-001 |
* |
39 |
Doll Face |
SA339 |
XA5978-001 |
* |
40 |
Sports 3 |
SA340 |
XA6111-001 |
* |
41 |
Renaissance Alphabet |
SA341 |
XA6586-003 |
|
42 |
Farm |
SA342 |
XA6733-003 |
|
43 |
Victorian |
SA343 |
XA6769-003 |
|
44 |
Lace2 |
SA344 |
XA6849-003 |
|
 Memo
Memo
 Note
Note
●The parts code may be differ depending on the area where the machine was purchased.
●Embroidery cards sold overseas are not compatible with this embroidery machine.
No. |
Part Name |
Model |
Parts Code |
|
Name |
|
|||
|
|
|
|
|
|
|
|
|
|
45 |
Fancy Work |
SA345 |
XA7770-003 |
|
47 |
Butterfly |
SA347 |
XA8206-003 |
|
49 |
Folk Art |
SA349 |
XA8348-001 |
* |
50 |
Fairy & Floral |
SA350 |
XA8414-003 |
|
51 |
Paper Dolls |
SA351 |
XA8563-001 |
* |
52 |
Bear Collections |
SA352 |
XA8511-003 |
|
53 |
Scene |
SA353 |
XA8936-003 |
|
54 |
Tea Time |
SA354 |
XA9129-001 |
* |
55 |
Gardening |
SA355 |
XA9348-003 |
|
56 |
Asian |
SA356 |
XC0025-003 |
|
57 |
Large Christmas |
SA357 |
XC0057-001 |
* |
58 |
New Quilt Traditions |
SA358 |
XC0861-003 |
|
60 |
Summer Fun |
SA360 |
XC1168-001 |
* |
61 |
Blouse Embellishment |
SA361 |
XC1304-003 |
|
62 |
Zodiac Signs |
SA362 |
XC1502-001 |
* |
63 |
Bunny |
SA363 |
XC1646-001 |
* |
64 |
Grand Mom |
SA364 |
XC2176-003 |
|
65 |
Red Work |
SA365 |
XC4220-003 |
|
66 |
Pop Mix |
SA366 |
XC4819-003 |
|
67 |
Home Dec |
SA367 |
XC7048-003 |
|
68 |
Cross Stitch Collection 1 |
SA368 |
XC7097-003 |
|
69 |
Sport Shirt Motifs |
SA369 |
XC7274-003 |
|
70 |
Cross Stitch Collection 2 |
SA370 |
XC7550-003 |
|
71 |
Heir loom |
SA371 |
XC9094-003 |
|
72 |
Cross Stitch Collection 3 |
SA372 |
XC9082-003 |
|
73 |
Japanese Style |
SA373 |
XC0130-003 |
|
74 |
Scrapbooking |
SA374 |
XD1091-003 |
|
75 |
Lace Collection |
SA375 |
XD1193-003 |
|
|
|
|
* Discontinued |
|
●Contact your nearest authorized dealer to order additional parts and optional accessories by using the correct part number.
Optional Accessories 5
GETTING READY ———————————————————————————————————————————————————
Setting Up the Machine
The procedures for setting up the machine are described below. If the machine is not set up correctly, it may shake or produce loud noises and the embroidery will not be sewn correctly. An optional sewing stand is also available.
Setup and transporting precautions

 CAUTION
●The temperature of the operating environment should be between 5 °C (40 °F) and 40 °C (104 °F) . If the machine is operated in an environment that is either too cold or too hot, the machine may malfunction.
●Do not use the machine in a location where it will be exposed to direct sunlight, otherwise the machine may malfunction.
●Set up the machine with four feet completely in contact with the desk or table, so that the machine is level.
●Do not put anything under the embroidery machine that could block the ventilation slots at the bottom toward the back and do not allow lint or dust to accumulate in the ventilation slots, otherwise the machine’s motor may overheat, resulting in a fire or in damage to the machine.
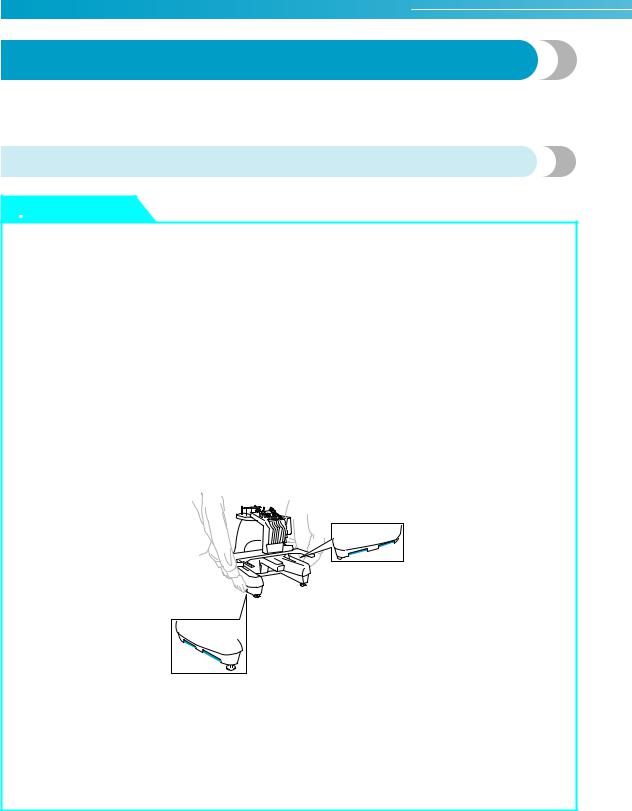
●The machine weight is approximately 37 kg (81 Ibs.). The transporting or setting up of the embroidery machine should be performed by two people.
●When transporting the machine, be sure to lift it from the bottom at the indicated positions by two people. Lifting the machine from any other area may damage the machine or result in the machine falling, which could cause injuries.
●When lightning occurs, turn off the machine and unplug the power supply cord. Lightning may cause the machine to malfunction.
●Do not plug in the power supply cord until setup of the machine is completed, otherwise injuries may result if the start/stop button is accidentally pressed and the machine starts sewing.
●When lubricating the machine, wear protective eyeglasses and gloves to prevent the oil or grease from getting into your eyes or on your skin. Do not put the oil or grease into your mouth. Keep the oil and grease out of the reach of children.
6
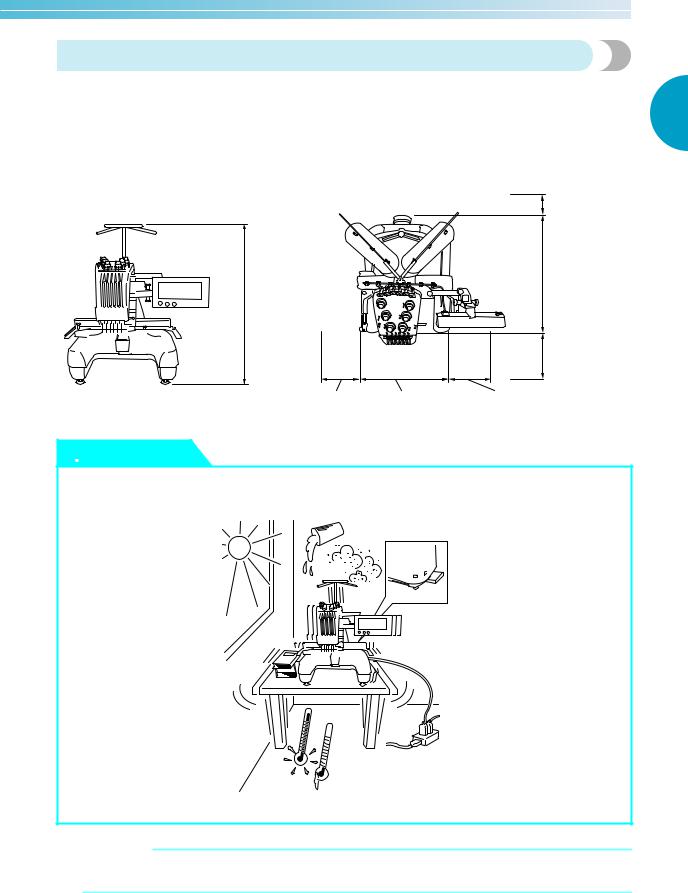
Setup location
Setup the machine in a location that meets the following requirements.
• Position machine more than 50 mm (2 inches) from the wall
• Allow sufficient space around the machine |
|
1 |
|
|
|
• Place no objects within the moving range of the embroidery frame |
|
|
• Set-up machine near an electrical outlet |
|
|
• Use a level and stable surface, such as a desk |
|
|
• Use a surface that can support the weight of the machine (about 37 kg (81 Ibs.)) |
|
|
• Allow open space around the ventilation slots at the bottom toward the back |
|
|
|
|
More than |
|
|
50 mm |
|
|
(2 inches) |
|
|
589 mm |
770 mm |
|
(23-3/16 inches) |
(30-5/16 inches) |
|
|
|
|
More than |
|
|
350 mm |
|
|
(13-3/4 inches) |
More than |
512 mm |
More than |
250 mm |
(20-5/32 inches) |
250 mm |
(9-7/8 inches) |
|
(9-7/8 inches) |

 CAUTION
● In order to prevent malfunctions or damage, do not set up the machine in a location exposed to the following conditions.
Direct sunlight |
Liquids, such as water |
|
Extreme dust |
||
|
Blocked ventilation slots
Objects within the moving range of the embroidery frame
Insufficient space
Connection to extension cords or multiple adapters
An unstable surface
Extremely high or extremely low temperatures (The operating environment should be between 5 °C (40 °F) and 40 °C (104°F)
 Note
Note
●For your safety: Since the machine weighs approximately 37 kg (81 lb.), do not set it up on an unstable table or desk.
Setting Up the Machine 7
GETTING READY ———————————————————————————————————————————————————
Setting up the machine
When setting up the machine, adjust the legs so that the machine is steady.
1Make sure that all packing tape affixed to the machine is peeled off and that all packing material is removed.
2Set up the machine while making sure that there is sufficient space around it.
|
|
More than |
|
|
50 mm |
|
|
(2 inches) |
|
|
589 mm |
|
|
(23-3/16 |
|
|
inches) |
|
|
More than |
|
|
350 mm |
|
|
(13-3/4 inches) |
More than |
512 mm |
More than |
250 mm |
(20-5/32 inches) |
250 mm |
(9-7/8 inches) |
|
(9-7/8 inches) |
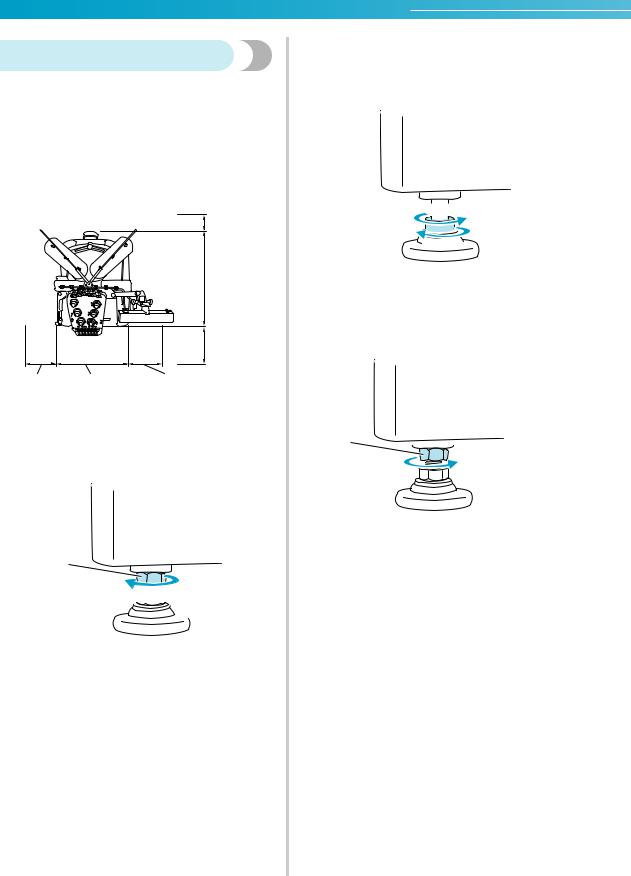
3Adjust the legs so that the machine is steady.
Use the included wrench to loosen the lock nut on the leg that you wish to adjust.
1
2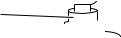


1 Lock nut
2 Adjustable foot nut
X The foot can be turned.
4Use the included wrench to turn the adjustable foot nut on the foot.
Turning the nut in direction 1 lengthens the leg; turning the nut in direction 2 shortens the leg.
 2
2
1

 1
1
1 Adjustable foot nut
•Adjust all four legs so that they securely contact the desk or table.
5After adjusting the legs to the desired length, use the included wrench to tighten the nuts.
1 
1 Lock nut
6Press down on each corner of the embroidery machine to check that it is stable.
If it is still unstable, perform steps 3 through
5again to adjust the legs.
8
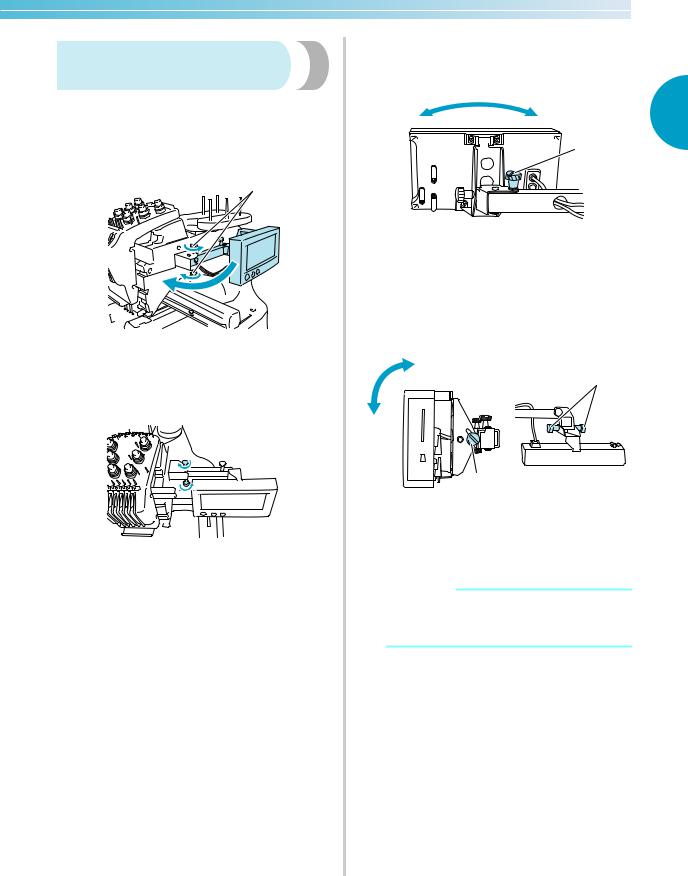
Adjusting the operation panel position
Adjust the orientation and angle of the operation panel so it can easily be operated.
1Loosen 2 thumb screws to bring the operation panel forward.
1
1 Thumb screws
2Adjust the operation panel to an easy-to- operate position, and then tighten the thumb screws.
3Adjust the orientation of the operation panel.
Loosen the thumb screw, adjust the operation panel to an easy-to-view orientation, and then tighten the thumb screw.
1
1
1 Thumb screw
4Adjust the angle of the operation panel.
Loosen the 2 thumb screws behind the operation panel, adjust the operation panel to an easy-to-view angle, and then tighten the thumb screws.
1
1
(Side view) |
(Top view) |
1 Thumb screws
 Note
Note
●Using the disc-shaped screwdriver included, loosen and firmly tighten the five thumb screws.
Setting Up the Machine 9
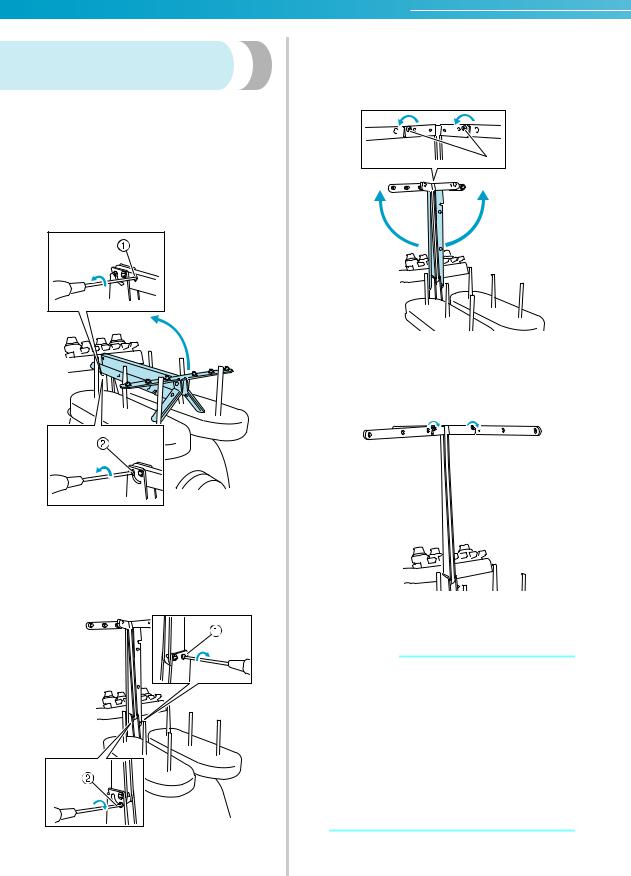
GETTING READY ———————————————————————————————————————————————————
Preparing the thread guide assembly
Raise the thread guide assembly. Locate the included Phillips screwdriver.
1Using the Phillips screwdriver, loosen the screws on the left side of the thread guide assembly support so that the thread guide assembly can be raised.
Remove screw 1, and then turn screw 2 three or four times to loosen it.
1 Remove the screw.
2 Turn the screw three or four times to loosen it.
2Raise thread guide into position and tighten screw2 on the left. Insert screw1 into right side of the thread guide assembly support and tighten.
1 Insert screw and tighten.
2 Tighten screw.
3Using the Phillips screwdriver, loosen the screws on the left and right sides of the thread guide assembly and lift up the thread guide so that it is level.
1
1 Loosen Screws
4Tighten the screws on the left and right sides of the thread guide assembly.
 Note
Note
●If the screws are not loosened enough, it may not be easy to move the thread guide assembly support and the thread guide. Do not apply extreme force when moving the thread guide assembly support and the thread guide. Be sure that the screws are loosened well enough before moving these parts.
●Be sure to tighten each screw well enough that the thread guide assembly support and the thread guide are secured.
10
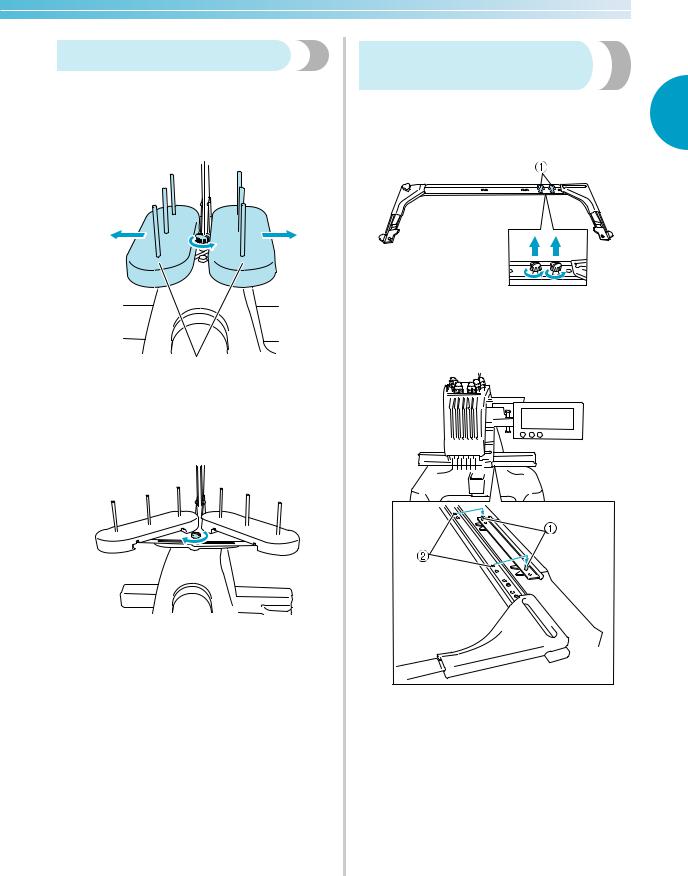
Positioning the spool stand
Secure the spool stand in the embroidering position.
1Loosen the thumb screw, and then open up the spool stand to the left and right.
1
2
1 Thumb screw
2 Spool stand
2After the spool stand is fully opened up, tighten the thumb screw.
XSecure the spool stand in the opened position.
Attaching the embroidery frame holder
Attach the embroidery frame holder to the carriage.
1
1Remove the two thumb screws of the embroidery frame holder.
1 Thumb screws
2Align the holes in the embroidery frame holder with the pins on the frame-mounting plate of the carriage.
1 Pins on the frame-mounting plate
2 Holes in the embroidery frame holder
Setting Up the Machine 11
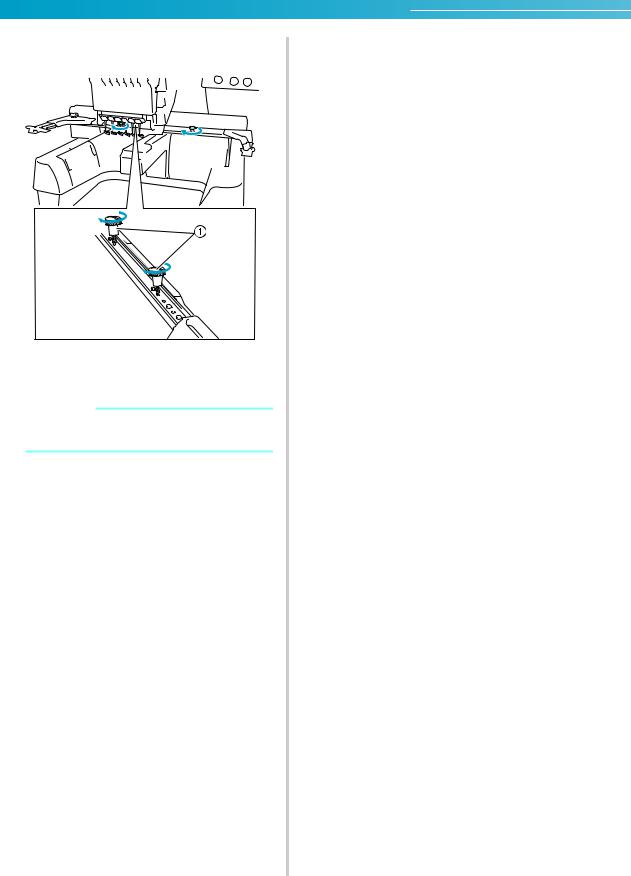
GETTING READY ———————————————————————————————————————————————————
3Secure the embroidery frame holder with the two thumb screws.
1 Use the thumb screws removed in step 1.
 Note
Note
●Using the disc-shaped screwdriver included, firmly tighten the thumb screws.
This completes the preparation of the machine.
12

2 EMBROIDERING TUTORIAL
This chapter describes the basic embroidering operations in order—from turning on the machine and sewing a pattern to finishing sewing. Follow the steps of the tutorial to embroider a pattern and master the operation of this embroidery machine.
Operating Precautions ............................................................................................ |
14 |
Basic Procedures ..................................................................................................... |
17 |
Screen Quick Reference Guide ............................................................................... |
49 |
When You Have a Question, This May Help You.................................................... |
58 |
Installing the Bobbin |
1 |
Turning ON the Machine |
2 |
Selecting an Embroidery Pattern |
3 |
Editing the Embroidery Pattern |
4 |
Specifying Embroidering Setting |
5 |
Previewing the Image |
6 |
Hooping the Fabric in the Embroidery Frame |
7 |
Attaching the Embroidery Frame to the Machine |
8 |
Checking the Embroidery Area |
9 |
Upper Threading |
10 |
Sewing the Embroidery |
11 |
Checking the Thread Tension |
12 |
Removing the Embroidery Frame and Fabric |
13 |
Turning OFF the Machine |
14 |
 Loading...