


Operation Manual
Introduction
Thank you for selecting the ZOOM 606 (hereafter simply called the "606").
Please take the time to read this manual carefully so as to get the most out of the unit and to ensure optimum performance and reliability.
Retain this manual, the warranty card and all other documentation for future reference.
Contents
SAFETY PRECAUTIONS • • • • • • • • • • • • • • • • • • • • • • • • • • • • • • |
2 |
||||
Features • • • • • • • • • • • • • • • • • • • • • • • • • • • • • • • • • • • • • • • • • • • • • |
3 |
||||
Basic Terms • • • • • • • • • • • • • • • • • • • • • • • • • • • • • • • • • • • • • • • • • |
4 |
||||
Operating the Unit on Battery Power |
• • • • • • • • • • • • • • • • • • |
5 |
|||
Controls and Functions / Connections |
• • • • • • • • • • • • • • • • • |
6 |
|||
Selecting Patches for Play |
• • • • • • • • • • • • • • • • • • • • • • • • • • • • |
8 |
|||
Using the Expression Pedal |
• • • • • • • • • • • • • • • • • • • • • • • • • • |
10 |
|||
Using the Tuner Function • • • • • • • • • • • • • • • • • • • • • • • • • • • • |
12 |
||||
Making/Changing DRIVE Module Settings • • • • • • • • • • • • |
14 |
||||
Editing a Patch • • • • • • • • • • • • • • • • • • • • • • • • • • • • • • • • • • • • • • |
16 |
||||
Storing/Copying Patches • • • • • • • • • • • • • • • • • • • • • • • • • • • • |
18 |
||||
Changing the "Patch Call" Method • • • • • • • • • • • • • • • • • • • • |
20 |
||||
Restoring the Factory Defaults |
• • • • • • • • • • • • • • • • • • • • • • • |
22 |
|||
Adjusting the Expression Pedal |
• • • • • • • • • • • • • • • • • • • • • • |
23 |
|||
Effect Sequence |
• • • • • • • • • • • • • • • • • • • • • • • • • • • • • • • • • • • • |
24 |
|||
Effect Parameters |
• • • • • • • • • • • • • • • • • • • • • • • • • • • • • • • • • • • |
25 |
|||
Specifications • • • • • • • • • • • • • • • • • • • • • • • • • • • • • • • • • • • • • • |
38 |
||||
Usage Precautions • • • • • • • • • • • • • • • • • • • • • • • • • • • • • • • • • • |
39 |
||||
Troubleshooting • • • • • • • • • • • • • • • • • • • • • • • • • • • • • • • • • • • • • |
39 |
||||
Patch List |
|
|
|
|
|
PRECAUTIONS SAFETY
SAFETY PRECAUTIONS
In this manual, symbols are used to highlight warnings and cautions for you to read so that accidents can be prevented. The meanings of these symbols are as follows:
This symbol indicates explanations about extremely dangerous
Warning matters. If users ignore this symbol and handle the device the
wrong way, serious injury or death could result.
This symbol indicates explanations about dangerous matters. If users
Caution ignore this symbol and handle the device the wrong way, bodily injury and damage to the equipment could result.
Please observe the following safety tips and precautions to ensure hazard-free use of the 606.
About power
• Since power consumption of this unit is
Warning fairly high, we recommend the use of an AC adapter whenever possible. When
powering the unit from a battery, use only an alkaline type.
AC adapter operation
•Be sure to use only an AC adapter which supplies 9 V DC, 300 mA and is equipped with a "center minus" plug (Zoom AD-0006). The use of an adapter other than the specified type may damage the unit and pose a safety hazard.
•Connect the AC adapter only to an AC outlet that supplies the rated voltage required by the adapter.
•When disconnecting the AC adapter from the AC outlet, always grasp the adapter itself and do not pull at the cable.
•If the unit is not to be used for a long time, disconnect the AC adapter from the outlet.
Battery operation
•Use four IEC R6 (size AA) 1.5 V batteries (alkaline/manganese).
•The 606 cannot be used for recharging. Pay close attention to the labelling of the battery to make sure you choose the correct type.
•If the 606 is not to be used for an extended period of time, remove the battery from the unit.
•If battery leakage has occurred, wipe the battery compartment and the battery terminals carefully to remove all remnants of battery fluid.
•While using the unit, the battery compartment cover should be closed.
Environment
 Avoid using your 606 in environments Caution where it will be exposed to:
•Extreme temperature
•High humidity or moisture
•Excessive dust or sand
•Excessive vibration or shock
Handling
 • The 606 is a precision instrument. Caution Except for the foot switches, do not
push other parts with your feet or subject them to strong force.
•Take care that no foreign objects (coins or pins etc.) or liquids can enter the unit.
•Be sure to turn the power to all equipment off before making connections.
•Before moving the unit, turn the power off, and disconnect all cables and the AC adapter.
Alterations
Never open the case of the 606 or attempt
Caution to modify the product in any way since this can result in damage to the unit.
Features
The 606 is a sophisticated multi-effect processor for guitar with the following great features.
• Outstanding performance
The 606 provides a palette of 35 built-in high-quality effects, including a wide variation of distortion settings and flexible modulation effects. Up to nine effects can be used simultaneously. In terms of performance and features, the 606 far surpasses everythings in its class.
• Built-in expression pedal
The integrated pedal makes it easy to adjust effect depth or volume during play. Whether you choose pedal wah or gutsy pitch bend, the range of available sounds is on par with top of the line.
• Smooth operation feel
The intuitive operation of the unit is derived from the highly popular ZOOM 505 II. Dedicated selectors for the most important distortion effects make the 606 a snap to use. Controlling distortion type and intensity during a performance is smooth and easy.
• Built-in auto-chromatic tuner
The integrated auto-chromatic tuning function is tailored to the needs of the guitarist and can be used on stage.
• Dual power supply enables operation anywhere
The dual power supply principle allows the unit to be powered either from an AC adapter or from four IEC R6 (size AA) batteries. Continuous operation time on batteries is 7 hours with manganese batteries and 24 hours with alkaline batteries.
Features
2 ZOOM 606 GUITAR |
|
ZOOM 606 GUITAR 3 |
|
Terms Basic
Basic Terms
This section explains some important terms that you will find in this manual.
■ Effect module
As shown in the illustration below, the effect sound of the 606 is created by routing the signal through a series of different effects. Each of these effects is called an effect module.
IN COMP WAH DRIVE EQ ZNR AMP MOD/PITCH DLY/REV OUT
In addition to effect modules such as DRIVE (distortion), MOD/PITCH (modulation), or DLY/REV (delay and reverb), you can also use the ZNR (Zoom Noise Reduction) and amp simulator simultaneously. Parameters such as effect intensity can be adjusted for each module, and modules can be switched on and off as needed.
■ Effect type
Each effect module of the 606 contains a variety of effects in the same general family. These are called effect types, and you can select one of these at a time. For example, the MOD/PITCH module comprises the effect types chorus, flanger, pitch shifter, etc.
■ Effect parameter
Each effect module has various parameters that control how the effect operates. By adjusting the parameters for each module, you have a considerable amount of control over the final sound.
■ Patch
In the 606, effects are stored and called up in patches. A patch contains information about module on/off settings, selected effect types, and effect parameter settings. The 606 can store 42 patches in its internal memory.
■ Bank
A combination of 6 patches is called a bank. The 606 has a total of 7 banks which are labelled A through G. The patches in each bank are
|
|
|
|
|
|
|
|
|
|
|
|
|
|
|
|
|
|
|
|
|
|
|
|
|
BANK G |
|
|
|
|
|
|
|
|
|
|
|
|
|
|
|
|
|
|
|
|
BANK F |
|
PATCH 1 |
|||||
|
|
|
|
|
|
|
|
|
|
|
|
|
|
|
|
|
|
|
|
PATCH 2 |
||||||
|
|
|
|
|
|
|
|
|
|
|
|
|
|
BANK E |
|
|
PATCH 1 |
|
PATCH 3 |
|||||||
|
|
|
|
|
|
|
|
|
|
|
|
|
|
|
|
|
|
|
||||||||
|
|
|
|
|
|
|
|
|
|
BANK d |
|
|
PATCH 1 |
|
|
PATCH 2 |
|
|
|
|
PATCH 4 |
|||||
|
|
|
|
|
|
|
|
|
|
|
||||||||||||||||
|
|
|
|
|
|
|
|
|
|
|
|
|
|
|
PATCH 3 |
|
|
|
||||||||
|
|
|
|
|
|
|
|
|
|
|
|
PATCH 2 |
|
|
|
|
|
|
|
|||||||
|
|
|
|
|
|
|
BANK C |
|
PATCH 1 |
|
|
|
|
|
|
|
|
|
|
|
|
PATCH 5 |
||||
|
|
|
|
|
|
|
|
|
|
|
|
|
|
|
|
|
|
|||||||||
|
|
|
|
|
|
|
|
|
|
|
|
|
PATCH 3 |
|
|
|
|
PATCH 4 |
|
|
PATCH 6 |
|||||
|
|
|
|
|
|
|
PATCH 2 |
|
|
|
|
|
|
|
|
|
|
|
|
|
||||||
|
BANK b |
|
PATCH 1 |
|
|
|
|
|
|
PATCH 4 |
|
|
|
PATCH 5 |
|
|
|
|
||||||||
|
|
|
|
|
|
PATCH 3 |
|
|
|
|
|
|
|
|
|
|
|
|
||||||||
|
|
|
|
|
|
|
PATCH 2 |
|
|
|
|
|
|
|
|
|
|
|
|
|
|
|
|
|||
|
|
|
|
|
|
|
|
|
|
|
|
|
|
|
|
|
|
|||||||||
BANK A |
|
PATCH 1 |
|
|
|
|
|
PATCH 4 |
|
|
|
PATCH 5 |
|
|
|
|
PATCH 6 |
|
|
|
|
|||||
|
|
|
|
|
|
|
PATCH 3 |
|
|
|
|
|
|
|
|
|
|
|
|
|
|
|
|
|
||
PATCH 1 |
|
PATCH 2 |
|
|
|
|
|
|
|
|
|
|
PATCH 6 |
|
|
|
|
|
|
|
|
|
|
|||
|
|
|
|
|
|
|
|
|
|
|
|
|
|
|
|
|
|
|||||||||
|
|
|
|
|
|
|
|
|
|
|
|
|
|
|
|
|
|
|
|
|
|
|
||||
|
PATCH 4 |
|
|
PATCH 5 |
|
|
|
|
|
|
|
|
|
|
|
|
|
|||||||||
PATCH 2 |
|
PATCH 3 |
|
|
|
|
|
|
|
|
|
|
|
|
|
|
|
|
|
|
|
|
|
|
||
|
|
|
|
|
|
|
|
|
|
|
|
|
|
|
|
|
|
|
|
|
|
|
|
|
||
|
|
|
|
|
|
PATCH 5 |
|
|
PATCH 6 |
|
|
|
|
|
|
|
|
|
|
|
|
|
|
|||
|
|
|
|
|
|
|
|
|
|
|
|
|
|
|
|
|
|
|
|
|
|
|||||
|
PATCH 4 |
|
|
|
|
|
|
|
|
|
|
|
|
|
|
|
|
|
|
|||||||
|
|
|
|
|
|
|
|
|
|
|
|
|
|
|
|
|||||||||||
PATCH 3 |
|
|
|
|
|
|
|
|
|
|
|
|
|
|
|
|
|
|
|
|
|
|
|
|||
|
PATCH 6 |
|
|
|
|
|
|
|
|
|
|
|
|
|
|
|
|
|
|
|
||||||
|
|
|
|
|
|
|
|
|
|
|
|
|
|
|
|
|
|
|
|
|
|
|
||||
PATCH 4 |
|
PATCH 5 |
|
|
|
|
|
|
|
|
|
|
|
|
|
|
|
|
|
|
|
|
|
|
|
|
|
|
|
|
|
|
|
|
|
|
|
|
|
|
|
|
|
|
|
|
|
|
|
|
|
||
PATCH 5 |
|
PATCH 6 |
|
|
|
|
|
|
|
|
|
|
|
|
|
|
|
|
|
|
|
|
|
|
||
PATCH 6
numbered 1 through 6. To select a patch, you specify the bank and the patch number. A1 selects patch 1 in bank A, and F4 selects patch 4 in bank F.
■ Play mode/edit mode
These terms refer to the operation state of the 606. The mode is selected with the PLAY/EDIT selector. In play mode, you select the effects for playing, and in edit mode, you can change the effect settings.
Operating the Unit on Battery Power
1.Turn the unit over, push the latch of the battery compartment cover, and lift the cover up.
Bottom of 606
Latch
2.Insert four fresh IEC R6 (size AA) batteries into the battery compartment.
All four batteries must face in the same
direction.
Four IEC R6 (size AA)
batteries
Battery compartment cover
3. Close the battery compartment cover.
Make sure that the latch snaps shut.
|
• When a dot (.) flashes on the display, the batteries are almost |
NOTE |
exhausted. Replace them as soon as possible. |
•While not using the 606, you should disconnect the cable plugged into the INPUT jack, to prevent draining the batteries.
Power Battery on Unit the Operating / Terms Basic
4 ZOOM 606 GUITAR |
|
ZOOM 606 GUITAR 5 |
|
Connections / Functions and Controls
Controls and Functions / Connections
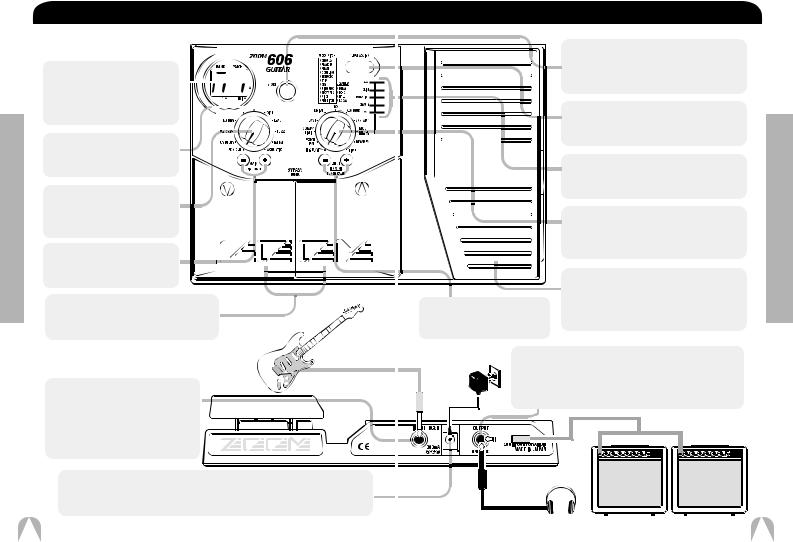
Top Panel
Display
Shows various information 


 necessary for operation of the 606, such as patch number,


 parameter settings, etc.


DRIVE LED
Indicates the on/off status of the DRIVE module.
DRIVE selector
Selects the distortion (effect type) used in the DRIVE module.
GAIN [+] / [-] keys
Adjust the DRIVE module distortion intensity and gain.
[W] / [Q] foot switches
These switches let you select patches, operate the tuner function, etc.
Rear Panel
INPUT jack
Connect the guitar to this jack. When the 606 is operated on battery power, the jack also serves as on/off switch. Plugging a cable into the jack turns the unit on.
DC 9V (AC adapter) jack
The dedicated AC adapter AD-0006 (9 V DC, 300 mA, center minus) can be connected here. Connecting the adapter here turns the unit on.
VALUE [+] / [-] keys
Serve for adjusting settings, switching banks, etc.
Controls and Functions / Connections
STORE key
Serves for storing an edited patch or copying an existing patch to another location.
PEDAL ASSIGN key
Selects the module to be controlled by the expression pedal.
PEDAL ASSIGN LEDs
Indicate which module is being controlled by the expression pedal.
PLAY/EDIT selector
Switches between play mode and edit mode and also serves to select the module for editing.
Expression pedal
Serves to adjust the intensity or level of a specific module in real time. The pedal also incorporates an on/off switch for modules.
OUTPUT jack
This jack is used for conection to a guitar amplifier or a pair of stereo headphones. A Y-splitter cable can also be used in this jack to conect the 606 to two amplifiers.
Connections / Functions and Controls
6 ZOOM 606 GUITAR |
|
ZOOM 606 GUITAR 7 |
|
Play for Patches Selecting
Selecting Patches for Play
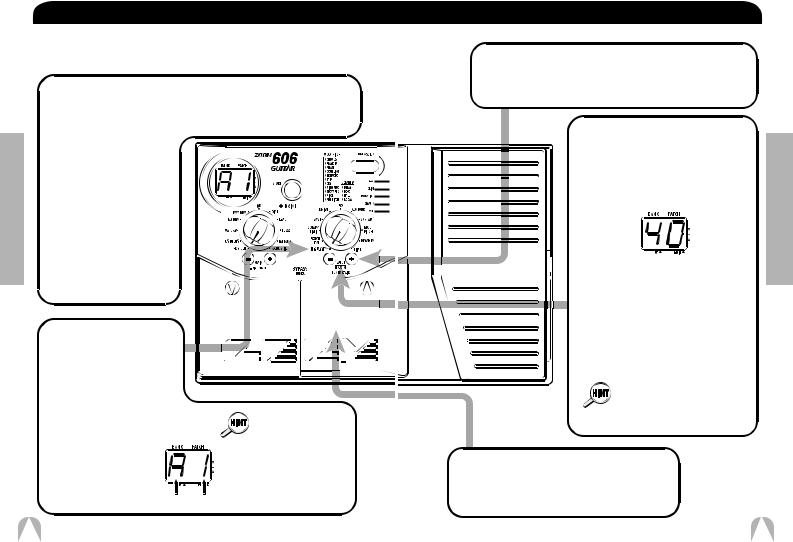
To try out the 606, we recommend that you simply play your instrument while switching patches. This will let you quickly see what the 606 can do.
 Power-on
 When using the 606 on batteries, plug a shielded cable with mono phone plug into the INPUT jack of the 606.
 When using the 606 with the AC adapter, plug the adapter into the outlet and plug the cable from the adapter into the DC 9V jack on the 606.
 Turn on the guitar amplifier and adjust the volume to a suitable position.
 Set 606 to play mode
 When the [PLAY/EDIT] selector is set to a different position, set it to "PLAY".
The currently selected bank and patch number are shown on the display
Immediately after turning on power to the 606, the unit will be in play mode even if the [PLAY/EDIT] selector is set to a different position.
Bank Patch number
Selecting Patches for Play
 To directly switch the bank
 You can use the VALUE [+] / [-] keys to directly switch among the banks A - G.
 To adjust the master volume
 Keep both VALUE [+] / [-] keys depressed for more than 1 second.
 While the master volume setting is shown, pressing the VALUE [+] / [-] key changes the setting.
The setting range is 0 - 50. When the unit is turned off and on again, the setting will be reset to 40.
When using headphones, the master volume setting can be used to adjust the listening volume.
 Switch patches
 To switch patches in play mode, use the [W]/[ Q ] foot switches.
Play for Patches Selecting
8 ZOOM 606 GUITAR |
|
ZOOM 606 GUITAR 9 |
|

Pedal Expression the Using
Using the Expression Pedal |
|
|
|
|
|
|
|
|
Using the Expression Pedal |
|||||||||||||||||||||||||
The 606 has a built-in expression pedal which can be used to control a |
|
|
|
|
|
|
|
|
|
|
|
|
||||||||||||||||||||||
selected effect parameter or the volume level with your foot. |
|
|
|
|
|
|
|
|
Operate the pedal |
|||||||||||||||||||||||||
|
|
Select the module |
|
|
|
|
|
|
|
|
||||||||||||||||||||||||
|
|
|
|
|
|
|
|
|
|
|
|
Rock the pedal |
||||||||||||||||||||||
|
|
to be controlled by |
|
|
|
|
|
|
|
|
|
|
|
|
|
|
|
|
back and forth |
|||||||||||||||
|
|
|
|
|
|
|
|
|
|
|||||||||||||||||||||||||
|
|
the pedal |
|
|
|
|
|
|
|
|
|
|
|
|
|
|
|
|
|
|
|
|
|
|
while playing your |
|||||||||
|
|
|
|
|
|
|
|
|
|
|
|
|
|
|
|
instrument. |
||||||||||||||||||
|
|
|
|
|
|
|
|
|
|
|
|
|||||||||||||||||||||||
|
|
|
|
|
|
|
|
|
|
|
|
|
|
|
|
|
|
|
|
|
|
|
|
|
|
|
|
|
|
|
|
|
|
|
|
|
Press the PEDAL ASSIGN key |
|
|
|
|
|
|
|
|
|
|
|
|
|
|
||||||||||||||||||
|
|
|
|
|
|
|
|
|
|
|
|
|||||||||||||||||||||||
|
|
|
|
|
|
|
|
|
|
|
|
|
|
|
|
|
|
|||||||||||||||||
|
|
|
|
|
|
|
|
|
|
|
|
|
|
|
|
|||||||||||||||||||
|
until the LED corresponding to |
|
|
|
|
|
|
|
|
|
|
|
|
|
|
|||||||||||||||||||
|
|
|
|
|
|
|
|
|
|
|
|
|
|
|
|
|
|
|
||||||||||||||||
|
|
|
|
|
|
|
|
|
|
|
|
|
||||||||||||||||||||||
|
|
the desired module is lit. |
|
|
|
|
|
|
|
|
|
|
|
|
|
|
|
|||||||||||||||||
|
|
|
|
|
|
|
|
|
|
|
|
|
|
|
||||||||||||||||||||
|
The LED indicators |
|
|
|
|
|
|
|
|
|
|
Rock back and forth |
||||||||||||||||||||||
|
|
|
|
|
|
|
|
|
|
|
|
|
|
|
|
|
|
|
|
|
|
|
|
|
|
|
|
|
|
|
|
|
||
|
show which module is |
|
|
|
|
|
|
|
|
|
|
|||||||||||||||||||||||
|
|
|
|
|
|
|
|
|
|
|
|
|
||||||||||||||||||||||
|
currently assigned to |
|
|
|
|
|
|
|
|
|
|
|
|
|
|
|
|
|
The effect of |
|||||||||||||||
|
|
|
|
|
|
|
|
|
|
|
|
|
||||||||||||||||||||||
|
the pedal. |
|
|
|
|
|
|
|
|
|
|
|
|
|
|
|
|
|
|
|
|
|
|
|
|
|
|
|
|
|
|
|||
|
|
|
|
|
|
|
|
|
|
|
|
|
|
|
|
|
|
|
|
|
|
|
|
|
|
|
|
|
|
|
||||
|
|
|
|
|
|
|
|
|
|
|
|
|
|
|
|
|
|
|
|
|
|
operating the pedal |
||||||||||||
|
|
|
|
|
|
|
|
|
|
|
||||||||||||||||||||||||
|
The following modules |
|
|
|
|
|
|
|
|
|
|
|
|
|
|
|
|
|
|
|||||||||||||||
|
|
|
|
|
|
|
|
|
|
|
|
|
|
|
|
|
will differ, depending |
|||||||||||||||||
|
can be selected. |
|
|
|
|
|
|
|
|
|
|
|
|
|
|
|
|
|
|
|||||||||||||||
|
|
|
|
|
|
|
|
|
|
|
|
|
|
|
|
|
on which module was |
|||||||||||||||||
WAH |
|
|
|
|
|
|
|
|
|
|
|
|
|
|
|
|
|
|
||||||||||||||||
|
|
|
|
|
|
|
|
|
|
|
|
|
|
|
|
selected in step . |
||||||||||||||||||
Effect parameter or WAH module |
|
|
|
|
|
|
|
|
|
|
|
|
|
|
|
|
Try moving the pedal |
|||||||||||||||||
DRIVE |
|
|
|
|
|
|
|
|
|
|
|
|
|
|
|
|
to hear the actual |
|||||||||||||||||
Effect parameter of DRIVE module |
|
|
|
|
|
|
|
|
|
|
|
|
|
|
|
|
|
|
||||||||||||||||
|
|
|
|
|
|
|
|
|
|
|
|
|
|
|
|
sound change. |
||||||||||||||||||
MOD/PITCH |
|
|
|
|
|
|
|
|
|
|
|
|
|
|
|
|
|
|
||||||||||||||||
|
|
|
|
|
|
|
|
|
|
|
|
|
|
|
|
|
|
|||||||||||||||||
Effect parameter of MOD/PITCH |
|
|
|
|
|
|
|
|
|
|
|
|
|
|
|
|
|
|
||||||||||||||||
(modulation/pitch) module |
|
|
|
|
|
|
|
|
|
|
|
|
|
|
|
|
|
|
||||||||||||||||
DLY/REV |
|
|
|
|
|
|
|
|
|
|
|
|
||||||||||||||||||||||
|
|
|
|
|
|
|
|
|
|
|
|
|||||||||||||||||||||||
|
|
|
|
|
|
|
|
|
|
|
|
|||||||||||||||||||||||
Effect parameter of DLY/REV |
|
|
|
|
|
|
|
|
|
|
|
|
||||||||||||||||||||||
(delay/reverb) module |
|
|
|
|
|
|
|
|
|
|
|
|
||||||||||||||||||||||
|
|
|
|
|
To switch the module on and off |
|
||||||||||||||||||||||||||||
VOL. |
|
|
|
|
|
|
||||||||||||||||||||||||||||
Overall patch volume |
|
|
|
|
Push the pedal fully down. |
|||||||||||||||||||||||||||||
All PEDAL ASSIGN LEDs out |
|
|
|
|
||||||||||||||||||||||||||||||
|
|
|
|
|
|
|
|
|
|
|
|
|||||||||||||||||||||||
Expression pedal is inactive.
NOTE |
The actual effect of operating the expression pedal will depend |
|
on which effect parameter is selected for the respective module. |
||
|
• If you select a module that is set to OFF in the current patch, the module becomes ON when the pedal is assigned to it. If you later assign the pedal to another module, the previous module becomes OFF again.
•In the bypass mode (effects temporarily switched off), the pedal is automatically assigned to VOL.
The currently lit PEDAL ASSIGN LED starts to flash, and the corresponding module is turned off. To return to the on setting, push the pedal down once more.
• Assignment of modules to the
NOTE
pedal and module on/off status can be stored as part of a patch ( → p. 18).
•The pedal sensitivity can be adjusted ( → p. 23).
Push fully down
When VOL is assigned, the pedal does not perform on/off switching.
Pedal Expression the Using
10 ZOOM 606 GUITAR |
|
ZOOM 606 GUITAR 11 |
|

Function Tuner the Using
Using the Tuner Function
The 606 incorporates an auto-chromatic tuner for guitars. To use the tuner function, the built-in effects must be bypassed (temporarily turned off) or muted (original sound and effect sound turned off).
NOTE The tuner function is not available if the PLAY/EDIT selector is set to a position other than PLAY.
 Switch to bypass or mute
 Press both [W] / [Q] foot switches together.
Pressing and
immediately releasing
the switches sets the unit
to the bypass condition. Pressing and holding the switches for at least 1 second sets the unit to the mute condition.
Bypass Mute
 Tune the
guitar
 Play the open string you want to tune, and watch the display.
The left side of the display shows the note which is closest to the current pitch.
Using the Tuner Function
 Adjusting the reference pitch of the tuner
The default reference pitch of the tuner (the setting which is established when the unit is turned on) is center A = 440 Hz.
You can fine-adjust this reference pitch if desired.
 Press one of the VALUE [+] / [-] keys.
The current reference pitch is shown for about 2 seconds. The default setting is "40" (center A = 440 Hz).
 Use the VALUE [+] / [-] keys to adjust the setting.
The setting range is 35 - 45 (center
A = 435 to 445 Hz).
When power to the unit is turned off and on again, the setting reverts to the default of "40" (center A = 440 Hz).
 Return to play mode
 Press one of the [W] / [Q] foot switches.
Pitch is high Pitch is correct Pitch is low
Indication turns faster the more the pitch is off.
The right side of the display shows a symbol that indicates by how much the tuning is off.
 Tune the other strings in the same way.
Function Tuner the Using
12 ZOOM 606 GUITAR |
|
ZOOM 606 GUITAR 13 |
|
 Loading...