


 Loading...
Copyright
Copyright © 2018 YEALINK(XIAMEN) NETWORK TECHNOLOGY
Copyright © 2018Yealink (Xiamen) Network Technology CO., LTD. All rights reserved. No parts of this publication may be reproduced or transmitted in any formor by any means, electronic or mechanical, photocopying, recording, or otherwise, for any purpose, without the express written permission of Yealink (Xiamen) Network Technology CO., LTD.
Under the law, reproducing includes translating into another language or format.
When this publication is made available on media, Yealink (Xiamen) Network Technology CO., LTD. gives its consent to downloading and printing copies of the content provided in this file only for private use but not for redistribution. No parts of this publication may be subject to alteration, modification or commercial use. Yealink (Xiamen) Network Technology CO., LTD. will not be liable for any damages arising fromuse of an illegally modified or altered publication.
Trademarks
Yealink®, the logo and the name and marks is trademark of Yealink (Xiamen) Network Technology CO., LTD, which are registered legally in China, the United States, EU (European Union) and other countries.
All other trademarks belong to their respective owners. Without Yealink’s express written permission, recipient shall not reproduce or transmit any portion hereof in any formor by any means, with any purpose other than personal use.
Warranty
(1) Warranty
THE SPECIFICATIONSANDINFORMATION REGARDING THE PRODUCTSIN THISGUIDE ARE SUBJECT TO CHANGE WITHOUT NOTICE. ALL STATEMENTS, INFORMATION, ANDRECOMMENDATIONSIN THISGUIDE ARE BELIEVEDTO BE ACCURATE ANDPRESENTEDWITHOUT WARRANTY OF ANY KIND, EXPRESSOR IMPLIED. USERSMUST TAKE FULL RESPONSIBILITY FOR THEIR APPLICATION OF PRODUCTS.
(2) Disclaimer
YEALINK (XIAMEN) NETWORK TECHNOLOGY CO., LTD. MAKESNO WARRANTY OF ANY KINDWITH REGARDTO THIS GUIDE, INCLUDING, BUT NOT LIMITEDTO, THE IMPLIEDWARRANTIESOF MERCHANTABILITY ANDFITNESSFOR A PARTICULAR PURPOSE. Yealink (Xiamen) Network Technology CO., LTD. shall not be liable for errors contained herein nor for incidental or consequential damages in connection with the furnishing, performance, or use of this guide.
(3) Limitation of Liability
Yealink and/or its respective suppliers are not responsible for the suitability of the information contained in this document for any reason. The information is provided “as is”, and Yealink does not provide any warranty and is subject to change without notice. All risks other than risks caused by use of the information are borne by the recipient. In no event, even if Yealink has been suggested the occurrence of damages that are direct, consequential, incidental, special, punitive or whatsoever (Including but not limited to loss of business profit, business interruption or loss of business information), shall not be liable for these damages.
End User License Agreement
This End User License Agreement ("EULA") is a legal agreement between you and Yealink. By installing, copying or otherwise using the Products, you: (1) agree to be bounded by the terms of this EULA, (2) you are the owner or an authorized user of the device, and (3) you represent and warrant that you have the right, authority and capacity to enter into this agreement and to abide by all its terms and conditions, just as if you had signed it. The EULA for this product is available on the Yealink Support page for the product.
Patent Information
China, the United States, EU (European Union) and other countries are protecting one or more patents of accompanying products and/or patents being applied by Yealink.
Customer Feedback
We are striving to improve our documentation quality and we appreciate your feedback. Email your opinions and comments to DocsFeedback@yealink.com.
Technical Support
Visit Yealink WIKI (http://support.yealink.com/) for the latest firmware, guides, FAQ, Product documents, and more. For better service, we sincerely recommend you to use Yealink Ticketing system(https://ticket.yealink.com) to submit all your technical issues.
GNU GPL INFORMATION
Yealink CP960HDIP conference phone firmware contain third-party software under the GNU General Public License (GPL). Yealink uses software under the specific terms of the GPL. Please refer to the GPL for the exact terms and conditions of the license.
The original GPL license, source code of components licensed under GPL and used in Yealink products can be downloaded online: http://www.yealink.com/onepage_83.html.

Table of Contents
Table of Contents
About This Guide
Related Documentation
In This Guide
Getting Started with Your Phone
Hardware Overview
CP960Hardware
Mute Key LEDIndicators
Screen and Icons
Control Center/Notification Center
Idle Screen
The Home Screen
The DSSKey Screen
Configuration Screen
Dialing Screen
Calls Screen
Icons in the Status Bar
CP960Line Key Icons
Call History Icons
Navigating Menus and Fields
Entering Characters
Using the Onscreen Keyboard
English (UK) Input Method
Google Pinyin Input Method
Using the Dial Pad
Customizing Your Phone
Changing the Administrator Password
Wallpaper
Changing Wallpaper on Idle Screen
Screen Saver
Changing the Waiting Time for Screen Saver
Setting the Screen Saver Type
Changing the Screen Backlight Brightness and Time
Changing the Backlight and Time on Idle Screen
Changing the Backlight on Control Center
Changing the Language
Changing the Input Method
Time & Date
Setting the Time and Date Manually
Changing the Time and Date Format
Table of Contents
1
9
9
9
11
11
11
13
13
13
15
15
16
17
17
18
19
19
22
22
23
23
24
26
27
29
29
29
29
30
30
30
31
31
31
33
33
33
33
34
1

Yealink CP960User Guide
Phone Lock
Phone Lock and Waiting Time
Setting the Phone Lock
Setting a Phone Lock Key
Locking Your Phone Manually
Unlocking Your Phone
Changing Your Phone Unlock PIN
Line Keys
Assigning Functionality to a Line Key
Changing the Location of the Line Keys
Deleting a Line Key
Wireless Network
Activating the Wi-Fi Mode
Deactivating the Wi-Fi Mode
Connecting to the Wireless Network
Connecting to an Available Wireless Network Manually
Connecting to the Wireless Network Using Wi-Fi Protected Setup (WPS) Adding a Wireless Network Manually
Viewing the Wireless Network Information
Disconnecting the Wireless Network Connection
Connecting a Mobile Phone Using Bluetooth
Activating the Bluetooth Mode
Deactivating the Bluetooth Mode
Pairing and Connecting the Bluetooth-Enabled Mobile Phone Configuring the Phone Audio Feature
Configuring the Media Audio Feature
Handling a Mobile Phone Call on the IP Phone
Renaming the Paired Bluetooth -Enabled Mobile Phone
Making the IP Phone Discoverable
Editing Device Name of your Phone for Recognition
Unpairing the Mobile Phone
Disconnecting the Bluetooth-Enabled Mobile Phone
Audio Settings
Adjusting the Volume
Adjusting the Audio Volume
Adjusting the Ringer Volume
Adjusting the Media Volume
Setting the Ring Tone
Setting a Ring Tone for the Phone
Setting a Ring Tone for an Account
Setting a Ring Tone for a Group
Setting a Ring Tone for a Contact
Setting the Key Tone
Enabling Touch Sounds
34
35
35
35
35
36
36
36
36
37
38
38
39
39
39
39
40
41
42
42
43
44
44
44
45
46
46
47
47
48
49
50
51
51
51
51
51
52
52
53
53
53
54
54
2

Configuring Notification Sound
Enabling Silent Mode
Directory
Local Directory
Managing the Local Directory Groups
Adding Contact Groups
Editing Contact Groups
Deleting Contact Groups
Managing the Local Directory Contacts
Adding Contacts
Editing Contacts
Deleting a Contact
Deleting All Contacts
Moving a Local Directory Contact to Blacklist
Searching for Contacts
Blacklist
Adding a Blacklist Contact
Editing a Blacklist Contact
Deleting Blacklist Contacts
Deleting a Blacklist Contact
Deleting all Blacklist Contacts
Moving a Blacklist Contact to the Local Directory
Remote Phone Book
Searching for Remote Phone Book Contacts
Adding a Remote Phone Book Contact to the Local Directory or Blacklist
Call History
Viewing History Records
Adding a History Record to Local Directory or Blacklist
Deleting History Records
Deleting a Call Record
Deleting All Call Records
Disabling History Record
Call Features
Placing Calls
Placing a Call fromthe Dialer
Placing Multiple Calls
Placing a Call with a Speed Dial Key
Setting a Speed Dial Key Manually
Speed Dialing a Contact Using a Speed Dial Key
Placing a Call Back to the Last Incoming Number
Setting a Recall Key
Recalling a Contact
Redialing a Number
Table of Contents
54
55
57
57
57
57
57
58
58
58
59
59
59
59
60
60
61
61
61
61
61
62
62
62
62
65
65
65
65
65
66
66
67
67
67
68
68
68
68
69
69
69
69
3

Yealink CP960User Guide
Dialing a Hotline Number
Setting a Hotline Number and Delay Time
Placing a Call fromthe Call History
Placing a Call fromthe Directory
Placing an Anonymous Call
Enabling Anonymous Call
Placing an Anonymous Call
Answering Calls
Answering a Call
Answering a Call When in a Call
Enabling Call Waiting
Answering a Call Automatically
Silencing or Rejecting Incoming Calls
Silencing a Call
Rejecting a Call Manually
Rejecting Anonymous Calls Automatically
Ending Calls
Auto Redial
Setting the Auto Redial
Redialing a Call Automatically
Call Mute
Call Hold
Holding a Call
Resuming a Held Call
Swapping Between Active and Held Calls
Do Not Disturb (DND)
Enabling DND
Disabling DND
Redirecting Incoming Calls
Forwarding All Incoming Calls to a Contact Forwarding an Incoming Call Manually Forwarding Incoming Calls with a Forward Key
Setting a Forward Key
Forwarding Incoming Calls Using a Forward Key
Transferring Calls
Performing a Blind Transfer
Performing a Blind Transfer
Performing a Semi-Attended/Attended Transfer
Conference Calls
Local Conference
Initiating a Conference by Dialing Multiple Numbers Initiating a Conference by Inviting Participants Merging Multiple Calls into a Conference Call Creating a Hybrid UCConference
70
70
70
70
70
71
71
72
73
73
73
73
74
74
74
75
75
75
75
76
76
77
77
77
77
78
78
78
79
79
79
79
80
80
80
80
80
81
81
82
82
83
84
85
4

Holding/Resuming a Conference Call
Muting/Unmuting a Conference Call
Splitting a Conference Call
Managing the Conference Participants
Enabling/Disabling the DNDMode for a Conference Call Managing the Conference Participants
Network Conference
Setting Up a Network Conference
Call Recording
Recording a Call
Recording a Conference
Managing a Call While Recording
Setting a Mark When Recording a Call
Stopping a Recording
Playing a Recorded Call
Pause/Resuming a Playback
Fast Forwarding/Rewinding a Playback
Stopping a Playback
Deleting a Recorded File
Checking Storage Space
Multicast Paging
Sending Multicast Paging
Setting a Multicast Paging Key
Setting a Paging List Key
Setting a Paging Group
Deleting a Paging Group
Sending a Paging by a Multicast Paging Key
Sending Pages by a Paging List Key
Receiving Multicast Paging
Managing a Paging Call
Advanced Features
Call Completion
Enabling Call Completion
Using Call Completion
Call Pickup
Picking up a Call Directly
Picking up a Group Call Directly
Picking up a Call with a Directed Pickup Key
Setting a Directed Pickup Key
Directed Picking up a Call Using a Directed Pickup Key Picking up a Call with a Group Pickup Key
Setting a Group Pickup Key
Picking up a Group Call Using a Group Pickup Key Call Park
Table of Contents
86
86
86
86
87
87
87
88
88
88
89
89
89
89
90
90
90
91
91
91
91
92
92
93
93
93
94
94
95
95
97
97
97
97
98
98
99
99
99
100
100
100
101
101
5

Yealink CP960User Guide
Configuring a Call Park Key
Using Call Park Feature
Busy Lamp Field (BLF)
Setting a BLF Key
State Indicator of Remote Line by BLF Key
Visual Alert for Monitored Lines
Picking up a Remote Call by BLF Key
Setting the Directed Call Pickup Code for BLF key Picking up a Remote Call
Transferring a Call by BLF Key
Performing a Blind Transfer
Performing a Semi-attended/Attended Transfer
BLF List
State Indicator of Remote Line by BLF List Key
Visual Alert for Monitored Lines
Picking up a Remote Call by BLF List Key
Transferring a Call by BLF List Key
Performing a Blind Transfer
Performing a Semi-attended/Attended Transfer Retrieving a Call by a BLF List Key
Barging In an Active Call by BLF List Key
Shared Line
State Indicator of Shared Line
Placing Calls on a Shared Line
Answering Calls on a Shared Line
Placing a Call on Public Hold
Placing a Call on Private Hold
Setting a Private Hold Key
Holding a Call Privately
Retrieving a Held Call Remotely on a Shared line Barging In an Active Call on a Shared line Pulling a Shared Call on a Shared line
Intercom
Placing an IntercomCall
Setting an IntercomKey
Placing an IntercomCall to the Target Extension Picking Up an Incoming Call of the Target Extension
Setting the Directed Call Pickup Code for IntercomKey Picking Up a Remote Call by IntercomKey
Answering an IntercomCall
Setting Intercom
Answering an IntercomCall
Voice Mail
Setting the Voice Mail Code
101
101
102
102
103
103
104
104
104
105
105
105
105
106
106
106
107
107
107
107
108
108
108
109
109
110
110
110
110
111
111
111
112
112
113
113
113
113
114
114
114
115
115
115
6
Receiving a Voice Message
Leaving Voice Mails
Listening to Voice Mails
Hot Desking
System Applications
Recorder
Recording Audios
Playing the Recorded Audios
Pause/Resuming a Playback
Fast Forwarding/Rewinding a Playback
Stopping a Playback
Copying Recorded Audios to USB Flash Drive
Copying All Recorded Audios to USB Flash Drive
Renaming the Recorded Audios
Deleting a Recorded File
Deleting All Recorded Audios
Checking Storage Space
Browser
Browsing a Web Page
Managing Bookmarks
Adding a Web Page to the Bookmarks List
Opening a Web Page fromthe Bookmarks List
Editing a Bookmark
Deleting a Bookmark
Setting a Home Page
Clearing the Navigation History
Modifying Browser Settings
Clock
Using Your IP Phone with PC
Setting CP960as the PCAudio of the PCConnecting Managing the PCAudio
Hold/Resume the Placing PCAudio
Muting or Unmuting the Microphone
Setting the IP Phone as PCAudio Device
Setting the IP Phone as PCAudio Device via Softphone Setting the IP Phone as PCAudio Device via PC
Disabling the PCAudio
Using the CP Wireless Expansion Mic CPW90
Placing the CPW90
Turning the CPW90On or Off
Registering the CPW90
Registering the CPW90with Another IP Phone
Unregistering the CPW90
Table of Contents
116
116
116
117
119
119
119
120
120
120
120
121
121
121
121
122
122
122
123
123
123
124
125
125
125
126
126
126
129
129
130
131
131
131
131
132
132
133
133
133
134
135
135
7

Yealink CP960User Guide
Muting or Unmuting the CPW90
Idle Mode
Viewing CPW90Information
Finding the CPW90
Charging the CPW90
CPW90LEDInstructions
CPW90Working Frequency
Using CP960 Star Connection Feature
State Indicator of CP960Star Connection
Configuring the Master Phone
Setting Up a Star Connection Group
Sending Broadcast fromMaster Phone
Removing a Slave Phone
Dissolving a Star Connection Group
Finding a Slave Phone
Stop Finding a Slave Phone
Configuring the Slave Phone
Joining a Star Connection Group
Quitting a Star Connection Group
Finding a Master Phone
Stop Finding a Master Phone
Maintaining Your Phone
Investigating Warnings
Clearing Warnings
Rebooting Your Phone
Resetting to Factory Settings
Updating the Phone Configuration
Appendix - Menu Structure
135
136
136
136
136
137
137
140
140
140
140
141
141
141
141
142
142
142
143
143
143
145
145
145
146
146
146
147
8

About This Guide
About This Guide
Thanks for choosing Yealink CP960IP conference phone, which comprises the power of the Android 5.1operating systemand is exquisitely designed for the medium-to-large conference room. CP960is a 5-inch touchable conference phone which simply putting all of the key conferencing functions at your fingertips, allowing users to enjoy its powerful business telephony features, such as Call Hold, Call Transfer, Call and Conference Recording, Multicast Paging and five-way Conference over an IP network. Meanwhile, users can benefit fromtwo optional expansion microphones for wider voice pickup range.
This guide provides everything you need to quickly use your new phone. Firstly, verify with your systemadministrator that the IP network is ready for phone configuration. Also be sure to read the Quick Start Guide which can be found in your phone package before you set up and use the IP phone. As you read this guide, keep in mind that some features are only configurable by your systemadministrator or determined by your phone environment. As a result, some features may not be enabled or may be operated differently on your phone. Additionally, the examples and graphics in this guide may not directly reflect what is displayed or is available on your phone screen.
Read the Yealink Products Regulatory Notices guide for all regulatory and safety guidance.
Related Documentation
You can obtain additional information for CP960on the Yealink support page.
The following types of related documents are available on each support page:
•Release Notes, which details bug fixes and feature enhancements when an update is released.
•Quick Start Guide, which describes how to assemble your phone and configure the basic phone features.
•Administrator Guide, which provides the detailed information on how to configure phone features for systemadministrator.
•Regulatory Notice, which provides information about all regulatory and safety guidance.
In This Guide
Chapters in this guide include:
•Chapter 1 About This Guide
•Chapter 2 Getting Started with Your Phone
•Chapter 3 Customizing Your Phone
•Chapter 4 Audio Settings
• |
Chapter 5 |
Directory |
• |
Chapter 6 |
Call History |
•Chapter 7 Call Features
•Chapter 8 Advanced Features
•Chapter 9 SystemApplications
•Chapter 10 Using Your IP Phone with PC
•Chapter 11 Using the CP Wireless Expansion Mic CPW90
•Chapter 12 Using CP960Star Connection Feature
•Chapter 13 Maintaining Your Phone
•Chapter 14 Appendix - Menu Structure
9

Yealink CP960User Guide
10
Getting Started with Your Phone
Getting Started with Your Phone
This chapter provides the overview of phone hardware and screen layout, and introduces how to navigate your phone for the best performance.
Topics
Hardware Overview
Screen and Icons
Navigating Menus and Fields
Entering Characters
Hardware Overview
Topics
CP960Hardware
Mute Key LEDIndicators
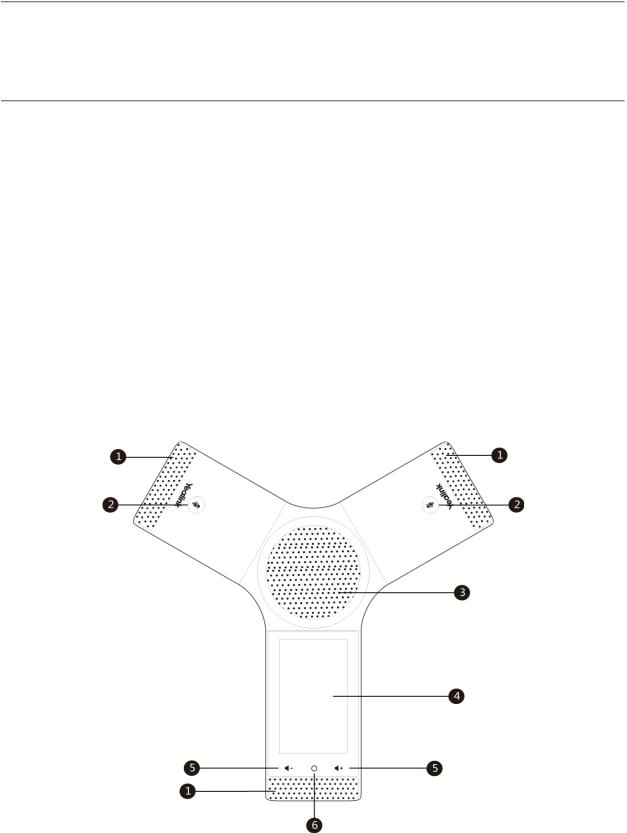
CP960 Hardware
The following figure shows the primary hardware component of CP960IP phone:
11
Yealink CP960User Guide
Hardware component instructions of the phone are:
|
Item |
Description |
1 |
Three Internal |
Provide 20-feet and 360-degree coverage to transmit sound to other phones. |
|
Microphones |
|
2Mute Touch Keys • Indicate phone statuses.
•Toggle mute feature.
3 |
Speaker |
Provides hands-free (speakerphone) audio output. |
||
|
|
5inch (720x 1280) capacitive (5points) touch screen with two idle screens. Tap to select |
||
|
|
items and navigate menus. |
||
|
|
Shows information about calls, messages, time, date and other relevant data: |
||
4 |
Touch Screen |
• Call information—caller ID, call duration |
||
• Icons (for example, |
) |
|||
|
|
|||
•Missed call list or second incoming caller information
•Prompt text (for example, “Save successfully!”)
•Time and date
5 |
Volume Touch |
Adjust the volume of the speaker, ringer or media. |
|
|
Keys |
|
|
6 |
HOME Touch |
Returns to the idle screen. |
|
|
Key |
|
|
7 |
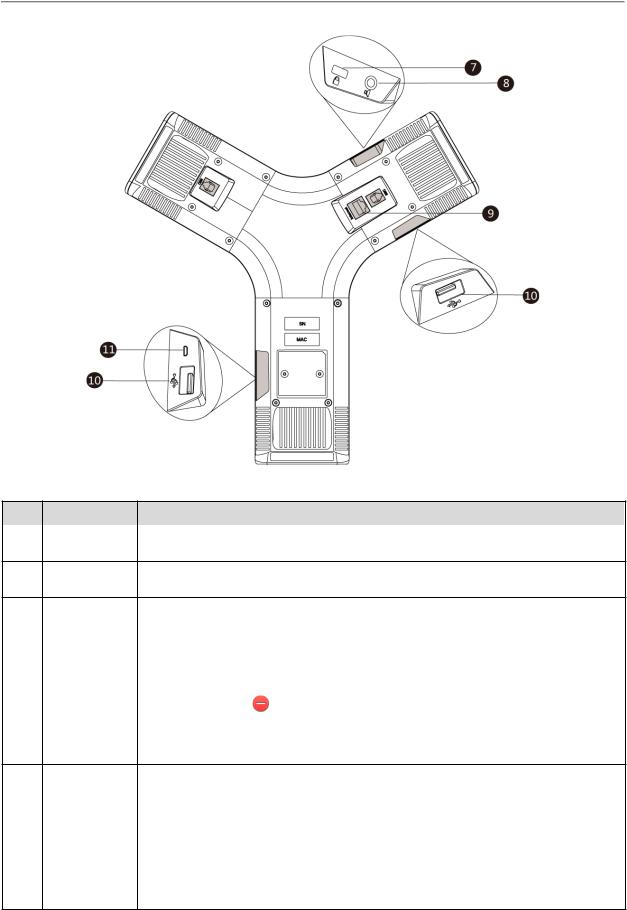
Security Slot |
Allows you to connect a universal security cable to your phone so you can lock down your |
|
phone. The phone will not be removed after locked. |
|||
|
|
||
|
|
|
|
8 |
3.5mmAudio- |
Allows you to connect an optional external speaker. |
|
|
out Port |
|
12

Getting Started with Your Phone
|
Item |
Description |
|
|
|
9 |
Network Port |
Allows you to connect the IP phone to the wired network. |
|
|
|
10 |
USB Ports |
Allow you to connect an optional USB flash drive or CPW90charging cradle. |
|
|
|
11 |
Micro USB Port |
Allows you to connect a PCand turn CP960into an external speaker and microphone for |
|
|
your PC. |
Mute Key LED Indicators
LED Status |
Description |
|
|
|
|
Solid red |
The phone is initializing. |
|
The phone is muted. |
||
|
||
|
|
|
Flashing red |
The phone is ringing. |
|
|
|
|
Solid green |
The phone is placing a call. |
|
There is an active call on the phone. |
||
|
||
|
|
|
Off |
The phone is powered off. |
|
The phone is idle. |
||
|
||
|
|
Screen and Icons
Before you use the phone, you need to be familiar with the state of your phone, including phone screen layout and icons.
Topics
Control Center/Notification Center
Idle Screen
Configuration Screen
Dialing Screen
Calls Screen
Icons in the Status Bar
CP960Line Key Icons
Call History Icons
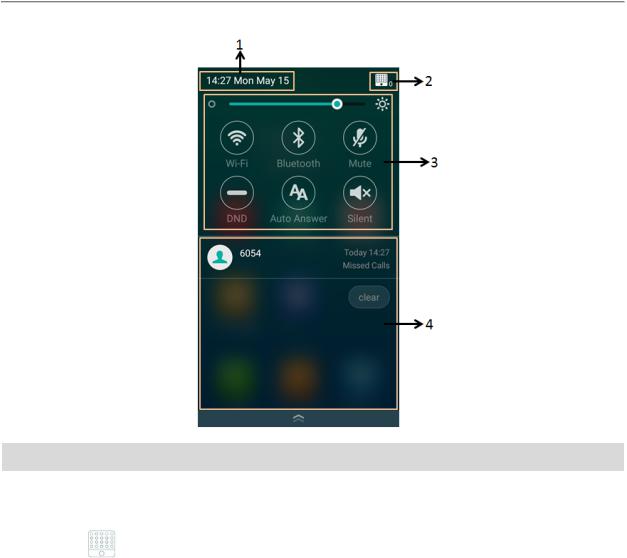
Control Center/Notification Center
Control center or notification center allows you to access common features or view important notifications quickly. You cannot enter the control center and notification center when calling, ringing or in a call.
Procedure
1. Swipe down fromthe top of the screen to enter the control center and the notification center:
13
Yealink CP960User Guide
No. |
Name |
Description |
||
|
|
|
|
|
1 |
Time and date |
Display the phone’s time and date. |
||
|
|
|
|
|
2 |
|
|
• Indicate the number of the connected wireless microphones. |
|
|
|
• Tap to enter the wireless microphone settings screen. |
||
|
|
|
||
|
|
|
|
|
|
|
Backlight |
Drag the slider to adjust the screen brightness quickly. You can also enter the Backlight |
|
|
|
Slider |
setting screen to adjust the screen brightness. |
|
|
|
|
|
|
|
|
Wi-Fi |
• Tap to turn Wi-Fi on or off quickly. |
|
|
|
• Long tap to enter Wi-Fi setting screen. |
||
|
|
|
||
|
|
|
|
|
|
Control |
Bluetooth |
• Tap to turn Bluetooth on or off quickly. |
|
3 |
• Long tap to enter the Bluetooth setting screen. |
|||
Center |
|
|||
|
|
|||
|
|
|
||
|
|
|
|
|
|
|
DND |
Tap to turn DNDon or off quickly. |
|
|
|
|
|
|
|
|
Auto |
Tap to turn auto answer on or off quickly. |
|
|
|
Answer |
||
|
|
|
|
|
|
|
Mute |
Tap to turn mute on or off quickly. |
|
|
|
|
|
|
|
|
Silent |
Tap to turn silent mode on or off quickly. |
|
|
|
|
|
|
4 |
Notification Center |
• Tap the desired notification message to view the details. |
||
|
|
|
|
|
14
Getting Started with Your Phone
No. |
Name |
Description |
•Swipe left or right to delete a specific notification.
•Tap clear to delete all notifications.
1.Swipe up fromthe bottomof the screen or tap the Home touch key to exit the control center and the notification center.
Idle Screen
The CP960IP phone supports two idle screens by default. You can swipe left or right to switch between two idle screens.
Note
A third idle screen will appear if your system administrator customizes shortcut keys for you.
Topics
The Home Screen
The DSSKey Screen
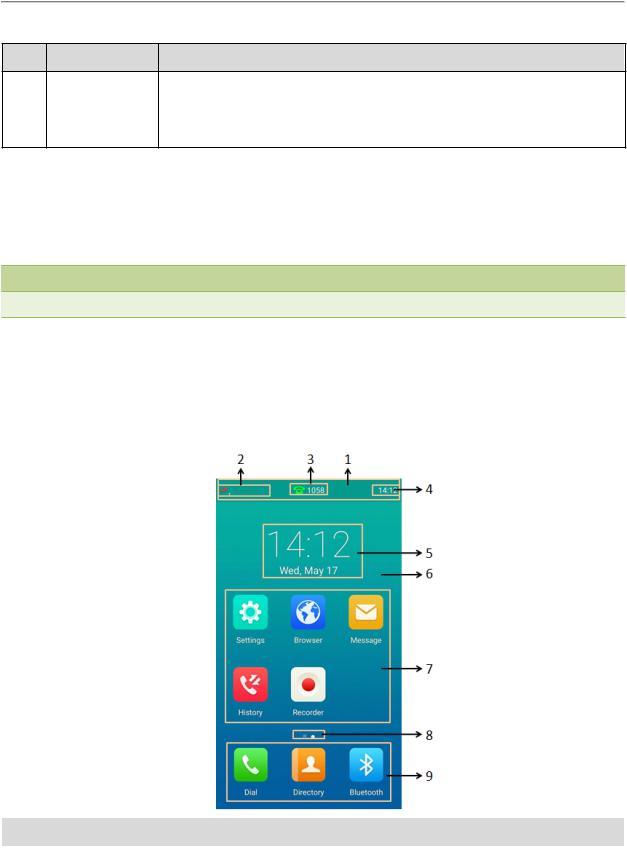
The Home Screen
The Home screen displays as below:
No. |
Name |
Description |
|
|
|
1 |
Status Bar |
Displays the label of the current account, icons and time. |
|
|
|
2 |
Icons |
Icons are displayed on the left of the status bar. |
|
|
|
3 |
Current Account |
If there is no account registered on the IP phones, this field will display No |
|
|
|
15
Yealink CP960User Guide
No. |
Name |
|
Description |
|
|
|
|
|
|
|
Service. |
|
|
|
If the phone is registered and there is a Bluetooth-Enabled mobile phone con- |
|
|
|
nected with the phone, this field will display Multiple account. |
4 |
Time |
|
The phone’s time is displayed on the right of the status bar. |
|
|
|
|
5 |
Digital Clock |
Displays the phone’s time and date. |
|
|
|
|
|
6 |
Wallpaper |
Shows the specified wallpaper, which can be customized. |
|
|
|
|
|
|
|
Settings |
Tap to access phone settings and features. |
|
SystemApplic- |
Browser |
Tap to present and explore content on the World Wide Web. |
7 |
Message |
Tap to access the voice mails or leave voice mails for someone. |
|
|
ations |
|
|
|
History |
Tap to enter the History screen and view call history. |
|
|
|
||
|
|
Recorder |
Tap to record audio. |
8 |
Screen Indicator |
Indicates idle screen you are currently viewing. |
|
|
|
|
|
|
Programmable |
Dial |
Tap to enter the dialing screen. |
|
|
|
|
9 |
Directory |
Tap to enter the Directory screen and view contacts. |
|
|
Keys |
|
|
|
Bluetooth |
Tap to enter the Bluetooth settings screen. |
|
|
|
||
|
|
|
|
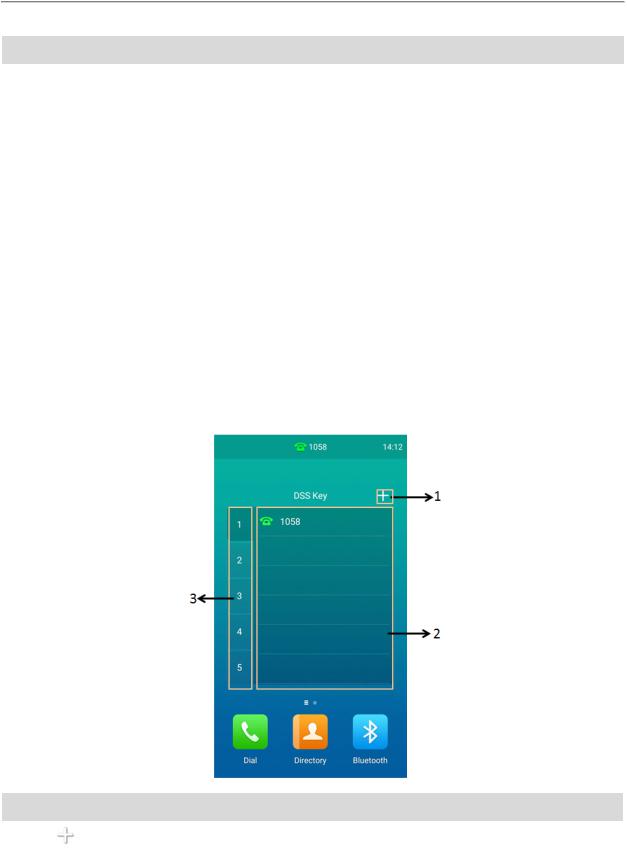
The DSS Key Screen
The DSSkey screen displays phone’s line keys.
No. |
Application |
Description |
|
|
|
1 |
|
Tap to add a line key. |
|
|
|
2 |
Line Key List |
This area shows the line key labels. You can customize the line key as other functions. |
|
|
|
16
Getting Started with Your Phone
No. |
Application |
Description |
|
|
|
3 |
Page Keys |
Tap to turn to the corresponding page. |
|
|
|
Related Topic
Line Keys
Configuration Screen
You can tap  to access phone settings and features, and then configure the corresponding settings and features.
No. |
Name |
Description |
|
|
|
1 |
Title Area |
Displays the title of the current menu screen. |
|
|
|
2 |
|
Tap to accept the settings. |
Displays configuration items of the highlighted menu itemin the menu tree area. 3 Configuration Area • Tap the switch button to turn the feature on or off.
• Enter the data using the onscreen keyboard.
4 |
Tap to go back to previous screen. |
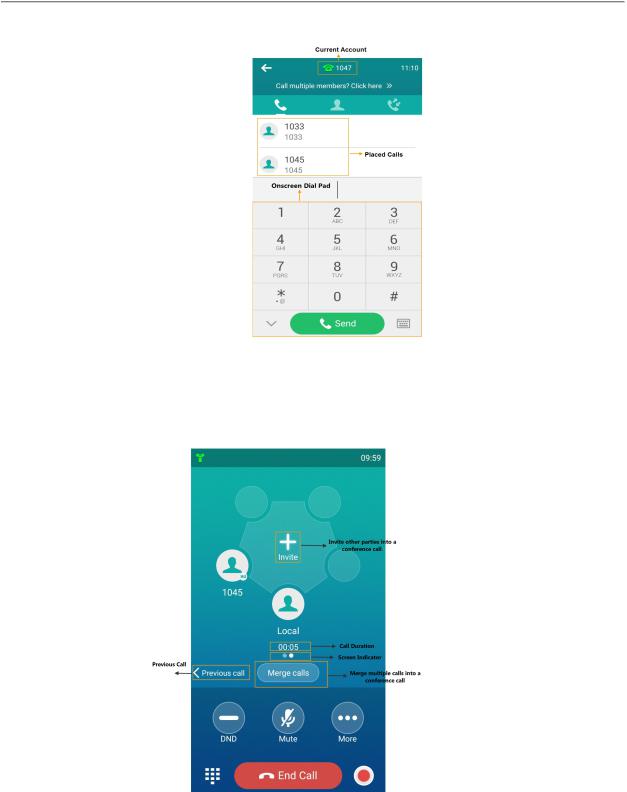
Dialing Screen
You can tap to access the Dialing screen.
FromDialing screen, the placed call records are displayed. You can also use the phone keypad to enter and edit data. The contacts whose name or phone number matches the entered characters appear on the phone screen. You can select the desired contact to place a call directly.
Note
Your system administrator can configure the search source list in dialing, and disable the phone to displaythe placed call records. Check with your system administrator to find out if theyare available on your phone.
17
Yealink CP960User Guide
Calls Screen
All of your active and held calls are displayed on the calls screen. You can tap Previous call/Next call or swipe left or right to switch to desired calls screen.
When there is an active call and a held call, the calls screen on the IP phone is shown as below:
18
Getting Started with Your Phone
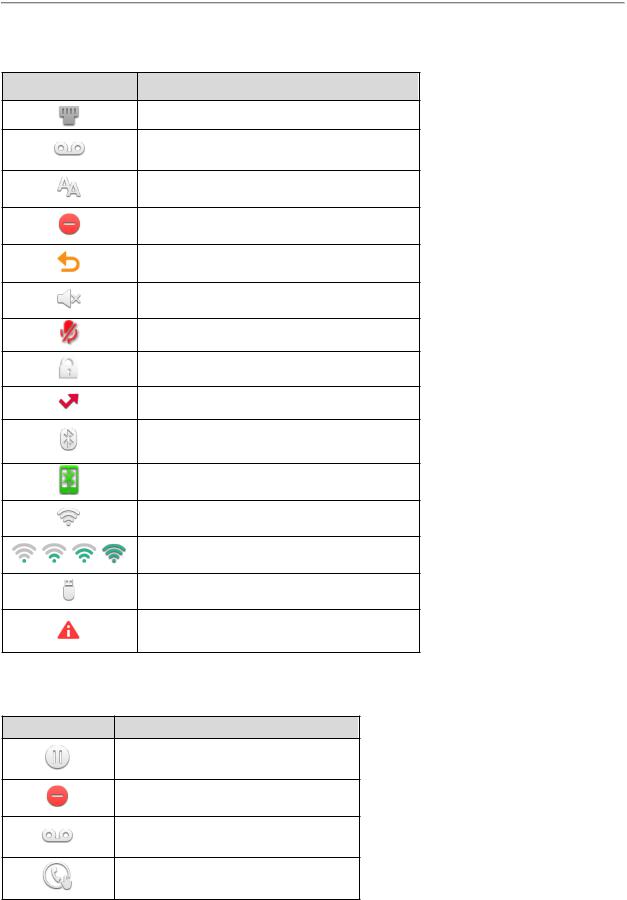
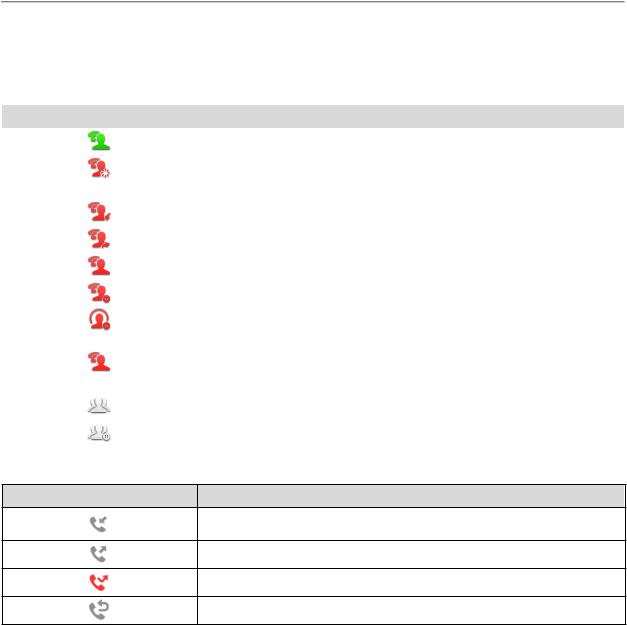
Icons in the Status Bar
Icons |
Description |
Unavailable wired network
Voice Mail
Auto Answer
Do Not Disturb
Call Forward
Silent mode
Keep Mute
Phone Lock
Missed Calls
Bluetooth enabled
Bluetooth-enabled mobile phone paired and connected
Wi-Fi enabled
Wi-Fi signal strength fromweak to strong after connecting successfully
USB flash drive detected
Phone Warning
CP960 Line Key Icons
Icon indicator (associated with line key features):
Icons |
Description |
Hold/Public Hold
Private Hold
DND
Voice Mail
Direct Pickup
19

Yealink CP960User Guide
Icons |
Description |
Group Pickup
DTMF
Prefix
LDAP
Local Group
XML Group
XML Browser
Forward
ReCall
Record
URL Record
Recording starts successfully (Record/URL
Record)
Multicast Paging
Paging List
Hot Desking
Zero Touch
URL
Phone Lock
Directory
Speed Dial
Icon indicator (associated with line)
Icons |
Description |
Registered private line
Register failed
Registering
(Flashing)
20
Getting Started with Your Phone
Icons |
Description |
Registered shared line
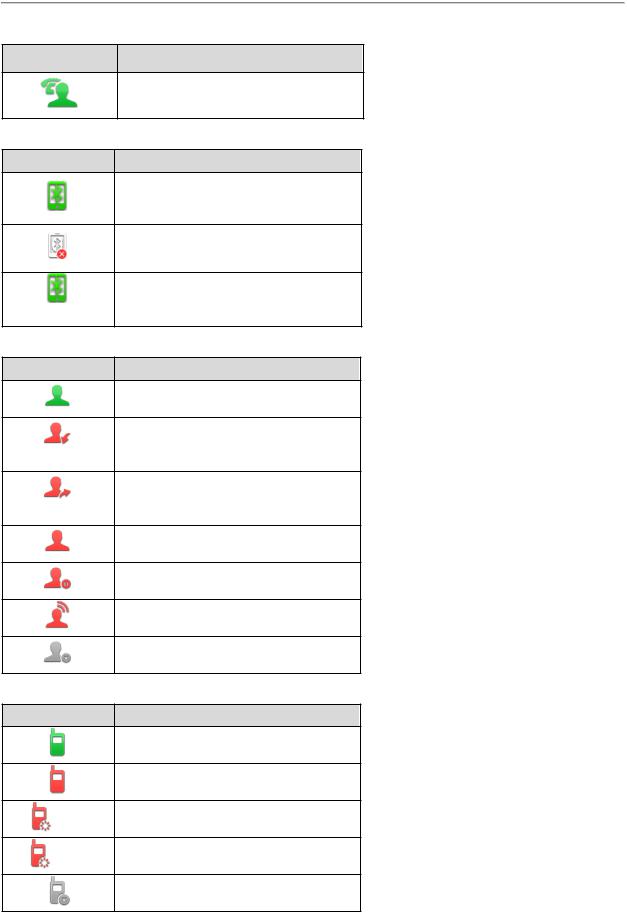
Icon indicator (associated with the mobile account)
Icons |
Description |
Mobile Account (Bluetooth-Enabled mobile phone is both paired and connected)
Mobile Account (Bluetooth-Enabled mobile phone fails to connect)
Mobile Account (Bluetooth-Enabled mobile
phone is connecting)
(Flashing)
Icon indicator (associated with BLF/BLF List)
Icons |
Description |
BLF/BLF list idle state
BLF/BLF list ringing state
(Flashing)
BLF/BLF list callout state
(Flashing)
BLF/BLF list talking state
BLF hold state
BLF list call park state
BLF/BLF list failed state
Icon indicator (associated with Intercom)
Icons |
Description |
Intercomidle state
Intercomringing state
Intercomcallout state
Callout
Intercomtalking state
Talking
Intercomfailed state
21
Yealink CP960User Guide
Icon indicators (associated with a shared line)
The Local SCA Phone is involved in an SCA call, while the Monitoring SCA Phone is not involved in the SCA call and used for monitoring shared line.
Icons |
Description |
|
|
|
The shared line is idle. |
|
|
(Monitoring SCA Phone) |
The shared line is seized. |
|
|
|
|
|
The shared line receives an incoming call. |
|
|
|
The shared line is dialing. |
|
|
|
The shared line is in busy or is in a call. |
|
|
|
The call on the shared line is placed on public hold. |
|
|
(Local SCA Phone) |
The call on the shared line is placed on private hold. |
|
|
(Monitoring SCA Phone) |
|
|
|
|
The call on the shared line is barged in by the other shared line party. |
|
|
|
In a multi-party call, all the participants place the call on hold. |
|
|
Call History Icons
Icons |
Description |
Received Calls
Placed Calls
Missed Calls
Forwarded Calls
Navigating Menus and Fields
Procedure
1.To navigate menus and fields, you can:
• Tap corresponding keys on the touch screen.
• Tap menu items, fields, and arrows on the touch screen. • Press keys on the phone keypad.
2.To operate your phone using gestures, follow these tips:
22

|
|
Getting Started with Your Phone |
|
|
|
Gesture |
Action |
|
|
|
|
Tap |
|
Touch an itemon the screen with your finger, and then lift your finger. |
|
|
|
Long Tap |
|
Touch an itemfor about 2seconds without lifting your finger fromthe screen till an action |
|
occurs. |
|
|
|
|
|
|
|
Swipe |
|
Touch and move. When you want to scroll quickly, swipe your finger across the screen, either |
|
up, down, left or right. |
|
|
|
|
|
|
|
Drag |
|
Touch and hold, then move. To stop scrolling, stop the dragging motion. |
|
|
|
Pinch |
|
Touch the screen with two or more fingers, and then move the fingers away fromeach other |
Open |
|
(stretch). |
|
|
|
Pinch |
|
Touch the screen with two or more fingers, and then move the fingers towards each other |
Close |
|
(pinch). |
|
|
|
Entering Characters
The phone provides onscreen keyboard and onscreen dial pad to enter data. Onscreen dial pad provides a standard key layout, which enables users to use existing or familiar key positions.
Topics
Using the Onscreen Keyboard
Using the Dial Pad
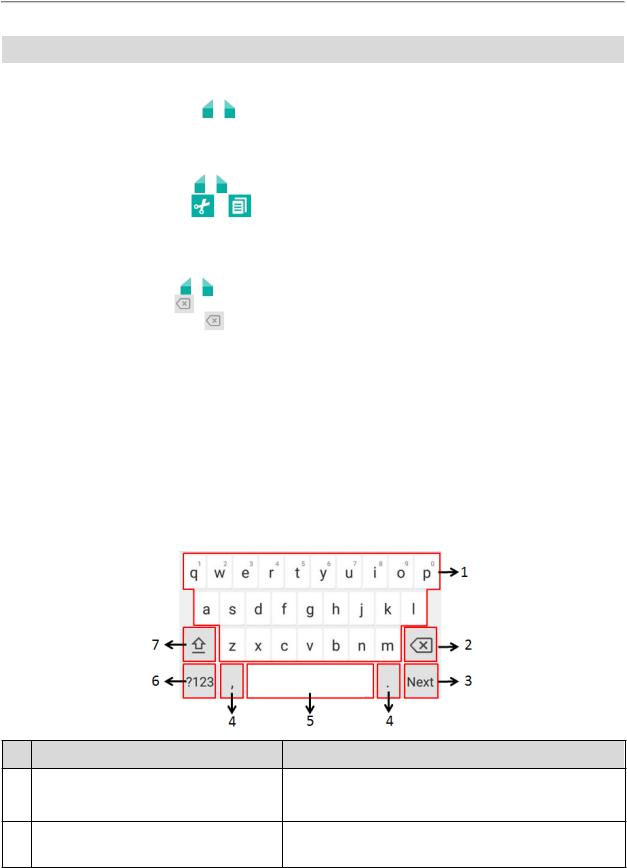
Using the Onscreen Keyboard
Before using the onscreen keyboard to enter data, you need to know the function of the keys on the onscreen keyboard. The phone supports two kinds of input methods: English (UK) and Google Pinyin.
When you use the onscreen keyboard, the other following things you need to know:
If you want to |
|
|
Action |
|
|
||
Position the cursor. |
Tap to position. |
||
|
|
|
|
|
1. |
Long tap the entered character(s). |
|
Select all characters. |
2. |
Do one of the following: |
|
|
|
• Tap |
on the top of the touch screen. |
|
|
|
|
23
If you want to |
|
|
|
|
Action |
|
|
|
|
|
|||
|
|
• Drag |
/ to select all characters. |
|||
|
|
|
||||
|
1. |
Long tap the entered character(s). |
||||
|
2. |
Drag |
|
/ to select the characters you want to cut/copy. |
||
Cut/Copy characters. |
3. |
Tap |
|
/ |
on the top of the touch screen. |
|
|
4. |
Long tap the desired field. |
||||
|
5. |
Tap PASTE. |
|
|||
|
|
|||||
|
• Long tap the entered character(s). |
|||||
Delete more characters at |
Drag |
/ |
to select the characters you want to delete. |
|||
a time. |
Tap |
. |
|
|
||
|
• Long tap |
|
. |
|||
|
|
|
||||
Replace characters. |
1. |
Drag your finger to highlight the characters you want to replace. |
||||
2. |
Tap the desired character. |
|||||
|
||||||
|
|
|
|
|
|
|
Description
• Tap to enter letters.
• Long tap a key then slide to choose one of the options to enter an alternate character.
• Tap to delete the entered characters one by one.
• Long tap to delete two or more characters.
24
Getting Started with Your Phone
No. |
Item |
|
Description |
|
|
|
|
|
|
|
|
Next Key |
Tap to go to the next field. |
|
|
|
|
|
|
|
|
Done |
Tap to confirmthe settings. |
|
3 |
Label automatically to identify the |
Key |
||
context-sensitive features. |
Send |
Tap to dial out the number. |
||
|
||||
|
|
Key |
||
|
|
Go Key |
Tap to browse the web page. |
|
|
|
|
|
|
|
|
|
• Tap to enter special characters. |
|
4 |
Two Special Characters |
|
• Long tap point key (.) then slide to choose one of the options |
|
|
|
|
to enter an alternate character. |
|
5 |
Space Key |
|
• Tap to enter spaces. |
|
|
• Long tap to change input method. |
|||
|
|
|
||
6 |
|
|
Tap to switch to the numeric&symbolic input mode. |
|
|
|
|
|
|
7 |
|
|
Tap to switch to the uppercase input mode. |
|
|
|
|
|
|
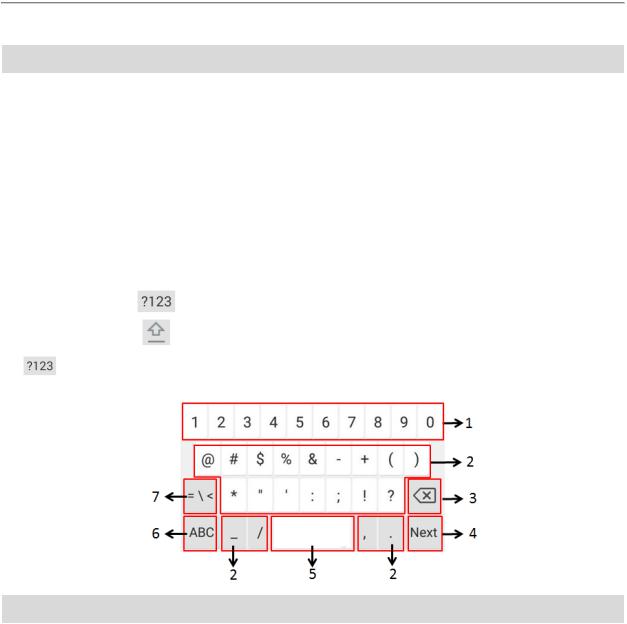
Tap |
to switch to the numeric&symbolic input mode as shown below: |
|||
No. |
Item |
|
Description |
|
|
|
|
|
|
|
• Tap to enter numbers. |
1 |
Numbers |
|
• Long tap a key then slide to choose one of the options to |
|
|
|
enter an alternate character. |
|
|
|
• Tap to enter special characters. |
2 |
Special Characters |
|
• Long tap a key then slide to choose one of the options to |
|
|
|
enter an alternate character. |
3 |
Delete Key |
|
• Tap to delete the entered characters one by one. |
|
• Long tap to delete two or more characters. |
||
|
|
|
|
|
|
Next |
Tap to go to the next field. |
|
|
Key |
|
4 |
Label automatically to identify the con- |
Done |
Tap to confirmthe settings. |
text-sensitive features. |
Key |
||
|
|
Send |
Tap to dial out the number. |
|
|
Key |
|
|
|
|
|
25
Yealink CP960User Guide
No. |
Item |
|
Description |
|
|
|
|
|
|
Go Key |
Tap to browse the web page. |
|
|
|
|
5 |
Space Key |
|
• Tap to enter spaces. |
|
• Long tap to change input method. |
||
|
|
|
|
6 |
|
|
Tap to switch to the lowercase input mode. |
|
|
|
|
7 |
|
|
Tap to switch to the symbolic input mode. |
|
|
|
|
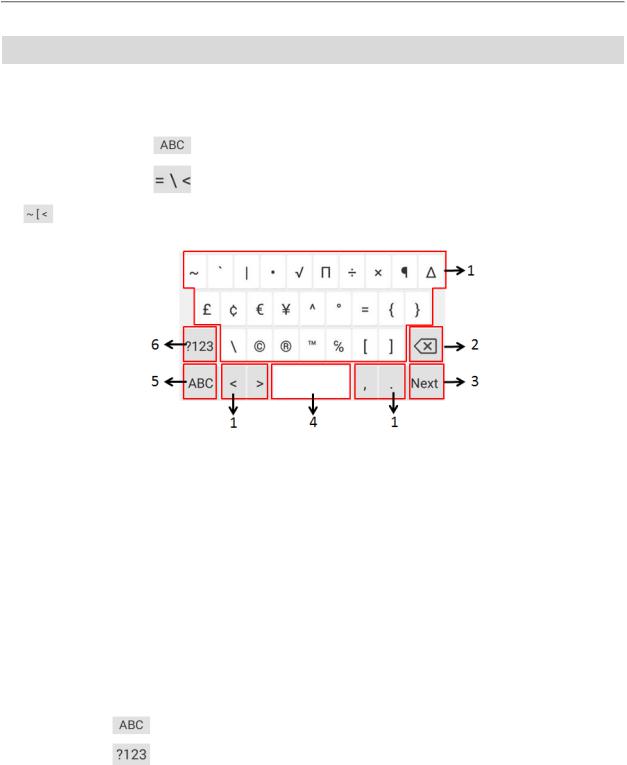
Tap |
to switch to the symbolic input mode as shown below: |
||
No. |
Item |
|
Description |
|
|
|
|
|
|
|
|
|
|
• Tap to enter special characters. |
1 |
Special Characters |
• Long tap a key then slide to choose one of the options to enter an altern- |
||
|
|
|
|
ate character. |
2 |
Delete Key |
|
• Tap to delete the entered characters one by one. |
|
|
• Long tap to delete two or more characters. |
|||
|
|
|
|
|
|
|
|
Next Key |
Tap to go to the next field. |
|
Label automatically |
|
|
|
|
|
Done Key |
Tap to confirmthe settings. |
|
3 |
to identify the con- |
|
||
text-sensitive fea- |
|
Send Key |
Tap to dial out the number. |
|
|
|
|||
|
tures. |
|
|
|
|
|
Go Key |
Tap to browse the web page. |
|
|
|
|
||
|
|
|
|
|
4 |
Space Key |
|
• Tap to enter spaces. |
|
|
• Long tap to change input method. |
|||
|
|
|
|
|
5 |
|
|
|
Tap to switch to the lowercase input mode. |
|
|
|
|
|
6 |
|
|
|
Tap to switch to the numeric&symbolic input mode. |
|
|
|
|
|
Google Pinyin Input Method
You can use Google Pinyin input method ( ) to enter Chinese characters.
When you change the input method to Google Pinyin, the onscreen keyboard displays the English input mode as shown below by default:
26
Loading...