


 Loading...

Copyright
Copyright © 2016 YEALINK(XIAMEN) NETWORK TECHNOLOGY CO., LTD
Copyright © 2016 Yealink(Xiamen) Network Technology CO., LTD. All rights reserved. No parts of this publication may be reproduced or transmitted in any form or by any means, electronic or mechanical, photocopying, recording, or otherwise, for any purpose, without the express written permission of Yealink(Xiamen) Network Technology CO., LTD. Under the law, reproducing includes translating into another language or format.
When this publication is made available on media, Yealink(Xiamen) Network Technology CO., LTD. gives its consent to downloading and printing copies of the content provided in this file only for private use but not for redistribution. No parts of this publication may be subject to alteration, modification or commercial use. Yealink(Xiamen) Network Technology CO., LTD. will not be liable for any damages arising from use of an illegally modified or altered publication.
Warranty
THE SPECIFICATIONS AND INFORMATION REGARDING THE PRODUCTS IN THIS GUIDE ARE SUBJECT TO CHANGE WITHOUT NOTICE. ALL STATEMENTS, INFORMATION, AND RECOMMENDATIONS IN THIS GUIDE ARE BELIEVED TO BE ACCURATE AND PRESENTED WITHOUT WARRANTY OF ANY KIND, EXPRESS OR IMPLIED. USERS MUST TAKE FULL RESPONSIBILITY FOR THEIR APPLICATION OF PRODUCTS.
YEALINK(XIAMEN) NETWORK TECHNOLOGY CO., LTD. MAKES NO WARRANTY OF ANY KIND WITH REGARD TO THIS GUIDE, INCLUDING, BUT NOT LIMITED TO, THE IMPLIED WARRANTIES OF MERCHANTABILITY AND FITNESS FOR A PARTICULAR PURPOSE. Yealink(Xiamen) Network Technology CO., LTD. shall not be liable for errors contained herein nor for incidental or consequential damages in connection with the furnishing, performance, or use of this guide.
Declaration of Conformity
Hereby, Yealink(Xiamen) Network Technology CO., LTD. declares that this phone is in conformity with the essential requirements and other relevant provisions of the CE, FCC.
You can find the CE and FCC information from the label on the back of the IP phone.
Statements of compliance can be obtained by contacting support@yealink.com.
CE Mark Warning
This device is marked with the CE mark in compliance with EC Directives 2014/35/EU and 2014/30/EU.
Part 15 FCC Rules
Any changes or modifications not expressly approved by the party responsible for compliance could void the user's authority to operate the equipment.
This device complies with Part 15 of the FCC Rules. Operation is subject to the following two conditions: 1. This device may not cause harmful interference, and

2. this device must accept any interference received, including interference that may cause undesired operation.
Industry Canada (IC)
This Class [B] digital apparatus complies with Canadian ICES-003 Rules.
Class B Digital Device or Peripheral
Note: This device is tested and complies with the limits for a Class B digital device, pursuant to Part 15 of the FCC Rules. These limits are designed to provide reasonable protection against harmful interference in a residential installation. This equipment generates, uses, and can radiate radio frequency energy and, if not installed and used in accordance with the instructions, may cause harmful interference to radio communications. However, there is no guarantee that interference will not occur in a particular installation. If this equipment does cause harmful interference to radio or television reception, which can be determined by turning the equipment off and on, the user is encouraged to try to correct the interference by one or more of the following measures:
1.Reorient or relocate the receiving antenna.
2.Increase the separation between the equipment and receiver.
3.Connect the equipment into an outlet on a circuit different from that to which the receiver is connected.
4.Consult the dealer or an experience radio/TV technician for help.
WEEE Warning
To avoid the potential effects on the environment and human health as a result of the presence of hazardous substances in electrical and electronic equipment, end users of electrical and electronic equipment should understand the meaning of the crossed-out wheeled bin symbol. Do not dispose of WEEE as unsorted municipal waste and have to collect such WEEE separately.
Customer Feedback
We are striving to improve our documentation quality and we appreciate your feedback. Email your opinions and comments to DocsFeedback@yealink.com.
GNU GPL INFORMATION
Yealink SIP-T21(P) E2 IP phone firmware contains third-party software under the GNU General Public License (GPL). Yealink uses software under the specific terms of the GPL. Please refer to the GPL for the exact terms and conditions of the license.
The original GPL license, source code of components licensed under GPL and used in Yealink products can be downloaded online: http://www.yealink.com/GPLOpenSource.aspx?BaseInfoCateId=293&NewsCateId=293&CateId=293.

About This Guide
About This Guide
Thank you for choosing the SIP-T21 E2/SIP-T21P E2 (hereinafter referred to as SIP-T21(P) E2) IP phone, exquisitely designed to provide business telephony features, such as Call Hold, Call Transfer, Busy Lamp Field, Multicast Paging and Conference over an IP network. The difference between the SIP-T21 E2 and SIP-T21P E2 IP phones is that only SIP-T21P E2 supports PoE.
This guide provides everything you need to quickly use your new phone. First, verify with your system administrator that the IP network is ready for phone configuration. Also be sure to read the Packaging Contents and Regulatory Notices sections in this guide before you set up and use the SIP-T21(P) E2 IP phone.
Note Network Directory and Network Call Log features are hidden for IP phones in neutral firmware, which are designed for the BroadWorks environment. Please contact your system administrator for more information.
In This Guide
Topics provided in this guide include:
|
Chapter 1 Overview |
Chapter 2 Getting Started
Chapter 3 Customizing Your Phone
Chapter 4 Basic Call Features
Chapter 5 Advanced Phone Features
Summary of Changes
This section describes the changes to this guide for each release and guide version.
Changes for Release 81, Guide Version 81.20
None
Changes for Release 81, Guide Version 81.15
The contents in the following section are removed to Frequently Asked Questions on Yealink IP Phones:
Troubleshooting
v

User Guide for the SIP-T21(P) E2 IP Phone
The following sections are new:
Power Saving on page 35
BLF Ring Type on page 49
Major updates have occurred to the following section:
Incoming Intercom Calls on page 143
Changes for Release 81, Guide Version 81.10
The following section is new:
Key Tone on page 48
Major updates have occurred to the following sections:
Basic Network Settings on page 30
Language on page 39
Phone Lock on page 43
Volume on page 46
DSS Keys on page 69
Dial Plan on page 81
Call Mute on page 98
Do Not Disturb (DND) on page 100
Call Transfer on page 112
Call Park on page 120
Busy Lamp Field (BLF) on page 131
Intercom on page 142
Multicast Paging on page 145
Changes for Release 80, Guide Version 80.95
The following section is new:
Entering Data and Editing Fields on page 32 Major updates have occurred to the following sections:
Icon Instructions on page 15
Optional Accessories on page 24
Phone Installation on page 25
Appendix on page 183
vi

About This Guide
Changes for Release 80, Guide Version 80.60
The following sections are new:
Shared Call Appearance (SCA) on page 155
Bridged Line Appearance (BLA) on page 168 Major updates have occurred to the following sections:
Icon Instructions on page 15
LED Instructions on page 17
Web User Interface on page 19
Call Forward on page 104
vii

User Guide for the SIP-T21(P) E2 IP Phone
viii

Table of Contents
Table of Contents
About This Guide ........................................................................... |
v |
In This Guide.............................................................................................................................................................. |
v |
Summary of Changes............................................................................................................................................. |
v |
Changes for Release 81, Guide Version 81.20.......................................................................................... |
v |
Changes for Release 81, Guide Version 81.15.......................................................................................... |
v |
Changes for Release 81, Guide Version 81.10......................................................................................... |
vi |
Changes for Release 80, Guide Version 80.95......................................................................................... |
vi |
Changes for Release 80, Guide Version 80.60........................................................................................ |
vii |
Table of Contents.......................................................................... |
ix |
Overview....................................................................................... |
13 |
Hardware Component Instructions ............................................................................................................... |
13 |
Icon Instructions.................................................................................................................................................... |
15 |
Feature Status Icons......................................................................................................................................... |
15 |
Line Key Icons..................................................................................................................................................... |
15 |
Other Icons.......................................................................................................................................................... |
16 |
LED Instructions..................................................................................................................................................... |
17 |
User Interfaces ....................................................................................................................................................... |
19 |
Phone User Interface....................................................................................................................................... |
19 |
Web User Interface........................................................................................................................................... |
19 |
Documentations.................................................................................................................................................... |
22 |
Getting Started............................................................................. |
23 |
Packaging Contents............................................................................................................................................. |
23 |
Optional Accessories....................................................................................................................................... |
24 |
Phone Installation................................................................................................................................................. |
25 |
Phone Initialization............................................................................................................................................... |
28 |
Phone Status........................................................................................................................................................... |
28 |
Basic Network Settings....................................................................................................................................... |
30 |
Registration............................................................................................................................................................. |
31 |
Idle Screen ............................................................................................................................................................... |
32 |
Entering Data and Editing Fields..................................................................................................................... |
32 |
Customizing Your Phone............................................................. |
35 |
General Settings .................................................................................................................................................... |
35 |
ix

User Guide for the SIP-T21(P) E2 IP Phone
Power Saving...................................................................................................................................................... |
35 |
Contrast................................................................................................................................................................ |
38 |
Backlight............................................................................................................................................................... |
38 |
Language.............................................................................................................................................................. |
39 |
Time & Date........................................................................................................................................................ |
40 |
Administrator Password................................................................................................................................. |
42 |
Key As Send ........................................................................................................................................................ |
42 |
Phone Lock.......................................................................................................................................................... |
43 |
Audio Settings........................................................................................................................................................ |
46 |
Volume.................................................................................................................................................................. |
46 |
Ring Tones........................................................................................................................................................... |
47 |
Key Tone............................................................................................................................................................... |
48 |
BLF Ring Type..................................................................................................................................................... |
49 |
Contact Management ......................................................................................................................................... |
49 |
Directory............................................................................................................................................................... |
49 |
Local Directory................................................................................................................................................... |
51 |
Blacklist................................................................................................................................................................. |
59 |
Remote Phone Book........................................................................................................................................ |
61 |
Call History Management.................................................................................................................................. |
63 |
Viewing History Records................................................................................................................................ |
63 |
Placing a Call from History Records.......................................................................................................... |
63 |
Adding a Contact to the Local Directory/Blacklist............................................................................... |
63 |
Deleting History Records............................................................................................................................... |
64 |
Disabling History Record............................................................................................................................... |
64 |
Search Source List in Dialing............................................................................................................................ |
65 |
System Customizations....................................................................................................................................... |
66 |
Logo Customization......................................................................................................................................... |
66 |
Headset Use........................................................................................................................................................ |
67 |
DSS Keys............................................................................................................................................................... |
69 |
Account Management .................................................................................................................................... |
79 |
Dial Plan................................................................................................................................................................ |
81 |
Emergency Number......................................................................................................................................... |
86 |
Live Dialpad......................................................................................................................................................... |
87 |
Hotline................................................................................................................................................................... |
88 |
Basic Call Features........................................................................ |
89 |
Placing Calls ............................................................................................................................................................ |
89 |
Answering Calls...................................................................................................................................................... |
92 |
Ending Calls............................................................................................................................................................. |
93 |
Redialing Numbers............................................................................................................................................... |
93 |
Recent Call In Dialing .......................................................................................................................................... |
93 |
Auto Answer............................................................................................................................................................ |
95 |
Auto Redial.............................................................................................................................................................. |
95 |
Call Completion..................................................................................................................................................... |
96 |
x
|
Table of Contents |
ReCall......................................................................................................................................................................... |
97 |
Call Mute.................................................................................................................................................................. |
98 |
Mute a Call .......................................................................................................................................................... |
98 |
Keep Mute........................................................................................................................................................... |
99 |
Call Hold/Resume................................................................................................................................................. |
99 |
Do Not Disturb (DND)....................................................................................................................................... |
100 |
Call Forward .......................................................................................................................................................... |
105 |
Static Forwarding............................................................................................................................................ |
105 |
Dynamic Forwarding ..................................................................................................................................... |
112 |
Call Transfer........................................................................................................................................................... |
112 |
Blind Transfer.................................................................................................................................................... |
113 |
Semi-attended Transfer................................................................................................................................ |
115 |
Attended Transfer........................................................................................................................................... |
116 |
Call Waiting........................................................................................................................................................... |
116 |
Conference ............................................................................................................................................................ |
117 |
Local Conference ............................................................................................................................................ |
117 |
Network Conference...................................................................................................................................... |
118 |
Call Park.................................................................................................................................................................. |
120 |
FAC Mode.......................................................................................................................................................... |
120 |
Transfer Mode.................................................................................................................................................. |
123 |
Call Pickup ............................................................................................................................................................. |
124 |
Directed Call Pickup....................................................................................................................................... |
125 |
Group Call Pickup........................................................................................................................................... |
126 |
Anonymous Call .................................................................................................................................................. |
128 |
Anonymous Call Rejection .............................................................................................................................. |
129 |
Advanced Phone Features......................................................... |
131 |
Busy Lamp Field (BLF)........................................................................................................................................ |
131 |
Configuring the BLF Feature on the IP Phone..................................................................................... |
131 |
Using BLF Feature on the Phone .............................................................................................................. |
135 |
BLF List .................................................................................................................................................................... |
137 |
Call Recording...................................................................................................................................................... |
139 |
Configuring a Record Key ........................................................................................................................... |
139 |
Configuring a URL Record Key.................................................................................................................. |
140 |
Recording a Call .............................................................................................................................................. |
140 |
Hot Desking .......................................................................................................................................................... |
141 |
Intercom ................................................................................................................................................................. |
142 |
Configuring the Intercom Feature on the IP Phone.......................................................................... |
142 |
Using Intercom ................................................................................................................................................ |
145 |
Multicast Paging.................................................................................................................................................. |
145 |
Sending RTP Stream...................................................................................................................................... |
146 |
Receiving RTP Stream ................................................................................................................................... |
149 |
Using Multicast Paging................................................................................................................................. |
151 |
Music on Hold (MoH)........................................................................................................................................ |
152 |
xi

User Guide for the SIP-T21(P) E2 IP Phone
Automatic Call Distribution (ACD) ............................................................................................................... |
153 |
Shared Call Appearance (SCA)....................................................................................................................... |
155 |
Configuring SCA Feature on the IP Phone ........................................................................................... |
155 |
Using SCA Feature on the IP Phone........................................................................................................ |
162 |
Bridged Line Appearance (BLA)..................................................................................................................... |
168 |
Configuring BLA Feature on the IP Phone............................................................................................ |
169 |
Using BLA Feature on the IP Phone......................................................................................................... |
172 |
Messages................................................................................................................................................................ |
174 |
Short Message Service (SMS)..................................................................................................................... |
174 |
Voice Mail .......................................................................................................................................................... |
176 |
Message Waiting Indicator (MWI) ........................................................................................................... |
178 |
Regulatory Notices .................................................................... |
181 |
Service Agreements ........................................................................................................................................... |
181 |
Limitations of Liability....................................................................................................................................... |
181 |
Safety Instructions.............................................................................................................................................. |
181 |
Appendix..................................................................................... |
183 |
Appendix A – Time Zones................................................................................................................................ |
183 |
Appendix B – Menu Structure........................................................................................................................ |
185 |
Index ........................................................................................... |
187 |
xii

Overview
Overview
This chapter provides the overview of the SIP-T21(P) E2 IP phone. Topics include:
Hardware Component Instructions
Icon Instructions
LED Instructions
User Interfaces
Documentations
If you require additional information or assistance with your new phone, contact your system administrator.
Hardware Component Instructions
The main hardware components of the SIP-T21(P) E2 IP phone are the LCD screen and the keypad.
13
User Guide for the SIP-T21(P) E2 IP Phone
Hardware component instructions of the SIP-T21(P) E2 IP phone are:
|
|
|
Item |
|
|
|
Description |
|
|
|
|
|
|
|
|
||
|
|
|
|
|
|
Shows information about calls, messages, soft keys, time, date |
||
|
|
|
|
|
|
and other relevant data: |
|
|
|
|
|
|
|
|
• Default account |
|
|
|
|
LCD Screen |
|
• Call information—caller ID, call duration |
||||
|
|
• Icons (for example, |
) |
|
||||
|
|
|
|
|
|
|
||
|
|
|
|
|
|
• Missed call text or second incoming caller information |
||
|
|
|
|
|
|
• Prompt text (for example, "Saving config file!") |
||
|
|
|
|
|
|
• Time and date |
|
|
|
|
|
|
|
|
|
||
|
|
|
|
|
|
Indicates phone power status and phone status. |
||
|
|
Power Indicator LED |
|
• Receives an incoming call—Fast flashing |
||||
|
|
|
|
|
|
• Receives a voice mail or text message—Slowly flashing |
||
|
|
|
|
|
|
|
||
|
|
Line Keys |
|
Use these keys to activate up to two accounts and assign |
||||
|
|
various features. |
|
|
||||
|
|
|
|
|
|
|
|
|
|
|
|
|
|
||||
|
|
Soft Keys |
|
Label automatically to identify their context-sensitive features. |
||||
|
|
|
|
|
|
|
||
|
|
|
|
|
|
Scroll through the displayed information. |
||
|
|
|
|
|
|
|
||
|
|
|
|
|
|
Confirms actions or answers incoming calls. |
||
|
|
|
|
|
|
|||
|
|
|
|
|
|
Cancels actions, rejects incoming calls, mutes or un-mutes |
||
|
|
|
|
|
|
calls. |
|
|
|
|
|
|
|
||||
|
|
MESSAGE Key |
|
Indicates and accesses voice mails. |
||||
|
|
|
|
|
||||
|
|
HEADSET Key |
|
Toggles the headset mode. |
||||
|
|
|
|
|
||||
|
|
TRAN Key |
|
Transfers a call to another party. |
||||
|
|
|
|
|
||||
|
|
RD Key |
|
Redials a previously dialed number. |
||||
|
|
|
|
|
||||
|
|
Speakerphone Key |
|
Toggles the hands-free speakerphone mode. |
||||
|
|
|
|
|
|
|
||
|
|
Volume Key |
|
Adjusts the volume of the handset, headset, speaker or ringer. |
||||
|
|
|
|
|
||||
|
|
|
|
|
|
|
||
|
|
Keypad |
|
Provides the digits, letters and special characters in |
||||
|
|
context-sensitive applications. |
||||||
|
|
|
|
|
|
|||
|
|
|
|
|
||||
|
|
Speaker |
|
Provides hands-free (speakerphone) audio output. |
||||
|
|
|
|
|
|
|
||
|
|
|
|
|
|
• Picking up the handset from the handset cradle, the |
||
|
|
Hookswitch |
|
hookswitch bounces and the phone connects to the line. • |
||||
|
|
Laying the handset down on the handset cradle, the phone |
||||||
|
|
|
|
|
|
|||
|
|
|
|
|
|
disconnects from the line. |
||
|
|
|
|
|
|
|
||
|
|
|
|
|
|
Secures the handset in the handset cradle when the IP phone |
||
|
|
Hookswitch Tab |
|
is mounted vertically. For more information on how to adjust |
||||
|
|
the hookswitch tab, refer to Yealink Wall Mount Quick |
||||||
|
|
|
|
|
|
|||
|
|
|
|
|
|
Installation Guide for Yealink IP Phones. |
||
|
|
|
|
|
|
|
|
|
14
Overview
Icon Instructions
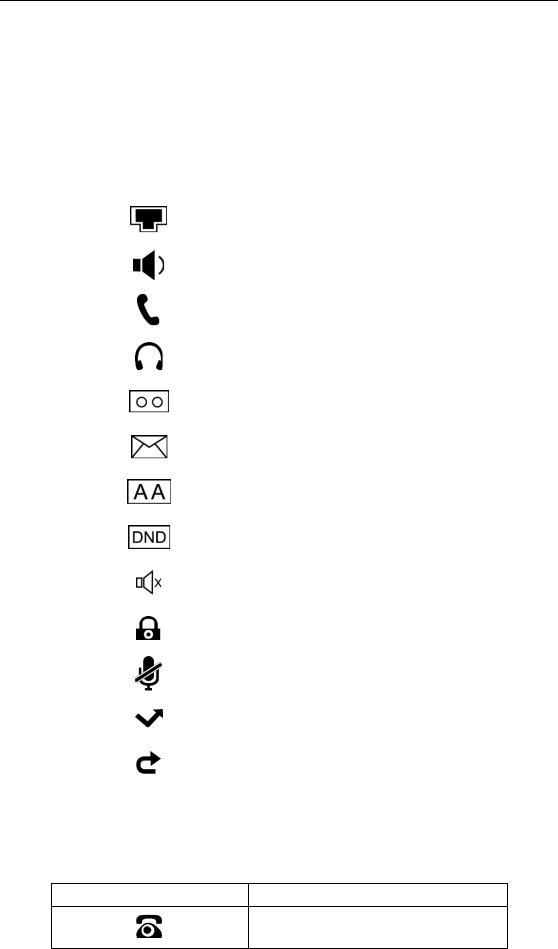
Feature Status Icons
Icons appearing on the status bar are described in the following table:
|
Icons |
|
|
Description |
|
|
|
|
|
||
|
|
|
|
|
|
|
|
|
|
Network is unavailable |
|
|
|
|
|
|
|
|
|
|
|
Hands-free speakerphone mode |
|
|
|
|
|
|
|
|
|
|
|
Handset mode |
|
|
|
|
|
|
|
|
|
|
|
Headset mode |
|
|
|
|
|
|
|
|
|
|
|
Voice Mail |
|
|
|
|
|
|
|
|
|
|
|
Text Message |
|
|
|
|
|
|
|
|
|
|
|
Auto Answer |
|
|
|
|
|
|
|
|
|
|
|
Do Not Disturb (DND) |
|
|
|
|
|
|
|
|
|
|
|
Ringer volume is 0 |
|
|
|
|
|
|
|
|
|
|
|
Phone Lock |
|
|
|
|
|
|
|
|
|
|
|
Keep Mute |
|
|
|
|
|
|
|
|
|
|
|
Missed Calls |
|
|
|
|
|
|
|
|
|
|
|
Call Forward |
|
|
|
|
|
|
|
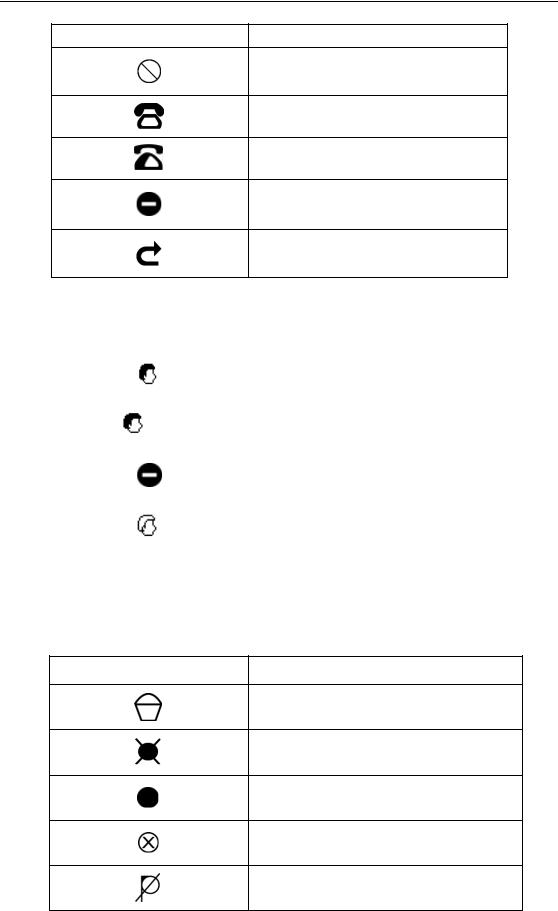
Line Key Icons
Icon indicator (associated with line)
|
Icons |
|
Description |
|
|
|
|
||
|
|
|
|
|
|
|
|
|
|
The private line registers successfully
15
User Guide for the SIP-T21(P) E2 IP Phone
|
Icons |
|
Description |
|
|
|
|
||
|
|
|
|
|
|
|
|
|
|
Register failed
Registering
The shared/bridged line registers successfully
DND is enabled on this line
Call forward is enabled on this line
Icon indicator (associated with ACD)
|
Icon |
|
Description |
|
|
|
|
|
|
|
The ACD state is available |
|
|
|
|
|
and x |
|
The ACD state is unavailable |
|
|
|
|
|
|
|
|
|
|
|
The ACD state is Wrap up |
|
|
|
|
|
|
|
Logged out of the ACD system |
|
|
|
|
Other Icons
Icon indicator (associated with call recording)
|
Icons |
|
Description |
|
|
|
|
||
|
|
|
|
|
|
|
|
|
|
Recording box is full
A call cannot be recorded
Recording starts successfully
Recording cannot be started
Recording cannot be stopped
16
Overview
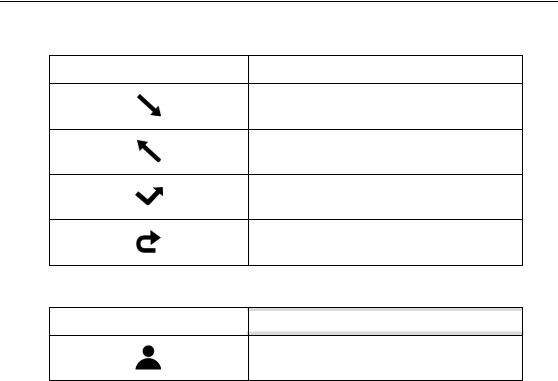
Icon indicator (associated with call history)
|
Icons |
|
Description |
|
|
|
|
||
|
|
|
|
|
|
|
|
|
|
Received Calls
Placed Calls
Missed Calls
Forwarded Calls
Icon indicator (associated with contact)
|
|
Icons |
Description |
|
|
The contact icon
LED Instructions |
|
|
|
|||
|
Power Indicator LED |
|
|
|
||
|
|
|
|
|
|
|
|
|
LED Status |
|
|
Description |
|
|
|
|
|
|
|
|
|
|
Solid red |
|
The phone is initializing. |
||
|
|
|
|
|
||
|
|
Fast flashing red (300ms) |
|
The phone is ringing. |
||
|
|
|
|
|
||
|
|
Slowly flashing red (1s) |
|
The phone receives a voice mail or text message. |
||
|
|
|
|
|
|
|
|
|
|
|
|
The phone is powered off. |
|
|
|
|
|
|
The phone is idle. |
|
|
|
Off |
|
The phone is busy. |
||
|
|
|
|
|
The call is placed on hold or is held. |
|
|
|
|
|
|
The call is muted. |
|
|
|
|
|
|
||
|
Line key LED |
|
|
|
||
|
|
|
|
|
||
|
|
LED Status |
|
|
Description |
|
|
|
|
|
|
|
|
|
|
Solid green |
|
The line is seized. |
||
|
|
|
The line is in conversation. |
|||
|
|
|
|
|
||
|
|
|
|
|
||
|
|
Fast flashing green |
|
The line receives an incoming call. |
||
|
|
|
|
|
||
|
|
Slowly flashing green |
|
The call is placed on hold. |
||
|
|
|
|
|
||
|
|
Off |
|
The line is inactive. |
||
|
|
|
|
|
|
|
17

User Guide for the SIP-T21(P) E2 IP Phone
Line key LED (configured as a BLF key or BLF List key)
|
LED Status |
|
|
Description |
|
|
|
|
|
||
|
|
|
|
|
|
|
Solid green |
|
|
The monitored user is idle. |
|
|
|
|
|
|
|
|
Fast flashing red (200ms) |
|
|
The monitored user receives an incoming call. |
|
|
|
|
|
|
|
|
|
|
|
The monitored user is busy. |
|
|
Solid red |
|
|
The monitored user’s conversation is placed on hold |
|
|
|
|
|
(This LED status requires server support). |
|
|
|
|
|
|
|
|
Slowly flashing red (1s) |
|
|
The call is parked against the monitored user’s phone |
|
|
|
|
number. |
||
|
|
|
|
||
|
|
|
|
|
|
|
Off |
|
|
The monitored user does not exist. |
|
|
|
|
|
|
|
Line key LED (associated with a shared line)
The local SCA phone indicates the phone is involved in a SCA call, while the monitoring SCA phone indicates the phone is not involved in the SCA call.
|
LED Status |
|
|
Description |
|
|
|
|
|
||
|
|
|
|
|
|
|
Off |
|
|
The shared line is idle. |
|
|
|
|
|
|
|
|
Fast flashing green |
|
|
The shared line receives an incoming call. |
|
|
|
|
|
|
|
|
Solid green (for local SCA |
|
|
The shared line is in conversation. |
|
|
|
|
The shared line is dialing. |
||
|
phone) |
|
|
||
|
|
|
The shared line is seized. |
||
|
Solid red (for monitoring SCA |
|
|
||
|
|
|
The shared line conversation is barged in by the other |
||
|
phone) |
|
|
||
|
|
|
shared line party. |
||
|
|
|
|
||
|
|
|
|
|
|
|
Slowly flashing green (for local |
|
|
|
|
|
SCA phone) |
|
|
The shared line conversation is placed on public hold. |
|
|
Slowly flashing red (for |
|
|
||
|
|
|
|
|
|
|
monitoring SCA phone) |
|
|
|
|
|
|
|
|
|
|
|
Slowly flashing green (for local |
|
|
The shared line conversation is placed on private hold. |
|
|
SCA phone) |
|
|
For a multi-party call, all the shared line parties |
|
|
Solid red (for monitoring SCA |
|
|
participating in this call place the shared line |
|
|
phone) |
|
|
conversation on hold. |
|
|
|
|
|
|
|
Line key LED (associated with a bridged line)
The local BLA phone indicates the phone is involved in a BLA call, while the monitoring BLA phone indicates the phone is not involved in the BLA call.
|
LED Status |
|
|
Description |
|
|
|
|
|
||
|
|
|
|
|
|
|
Off |
|
|
The bridged line is idle. |
|
|
|
|
|
|
|
|
Fast flashing green |
|
|
The bridged line receives an incoming call. |
|
|
|
|
|
|
|
18

Overview
|
LED Status |
|
|
Description |
|
|
|
|
|
||
|
|
|
|
||
|
|
|
|
|
|
|
Solid green (for local BLA |
|
|
The bridged line is in conversation. |
|
|
phone) |
|
|
||
|
|
|
The bridged line is dialing. |
||
|
Solid red (for monitoring BLA |
|
|
||
|
|
|
The bridged line is seized. |
||
|
phone) |
|
|
||
|
|
|
|
|
|
|
|
|
|
|
|
|
Slowly flashing green (for local |
|
|
|
|
|
BLA phone) |
|
|
The bridged line conversation is placed on hold. |
|
|
Slowly flashing red (for |
|
|
||
|
|
|
|
|
|
|
monitoring BLA phone) |
|
|
|
|
|
|
|
|
|
|
Note The above introduces the default LED status. The statuses of the power indicator LED and BLF key LED are configurable via web user interface. You can also customize the BLF key LED status and BLF key behavior. For more information, contact your system administrator.
User Interfaces
Two ways to customize configurations of your SIP-T21(P) E2 IP phone:
The user interface on the IP phone.
The user interface in a web browser on your PC.
The hardware components keypad and LCD screen constitute the phone user interface, which allows the user to execute all call operation tasks and basic configuration changes directly on the phone. In addition, you can use the web user interface to access all configuration settings. In many cases, either the phone user interface and/or the web user interface interchangeably. However, in some cases, it is only possible to use one or the other interface to operate the phone and change settings.
Phone User Interface
You can customize your phone by pressing the Menu soft key to access the phone user interface. The Advanced Settings option is only accessible to the administrator, and the default administrator password is “admin” (case-sensitive). For more information on customizing your phone with the available options from the phone user interface, refer to Customizing Your Phone on page 35.
Note For a better understanding of the menu structure, please refer to Appendix B – Menu Structure on page 185.
Web User Interface
In addition to the phone user interface, you can also customize your phone via web user
19

User Guide for the SIP-T21(P) E2 IP Phone
|
interface. In order to access the web user interface, you need to know the IP address of your |
|
new phone. To obtain the IP address, press the OK key on the phone when the phone is idle. |
|
Enter the IP address (e.g., http://192.168.0.10 or 192.168.0.10 for IPv4; |
|
http://[2005:1:1:1:215:65ff:fe64:6e0a] or [2005:1:1:1:215:65ff:fe64:6e0a] for IPv6) in the address |
|
bar of a web browser on your PC. The default administrator user name and password are both |
|
“admin” (case-sensitive). |
Note |
|
The access of Advanced settings page of the Account or Network web page may be |
|
|
restricted by the web explorer (e.g., Chrome, Firebox) if you have installed “Adblock Plus |
|
plugin”. |
|
|
The options you can use to customize the IP phone via phone user interface and/or via web user interface are listed in the following table:
|
Options |
|
|
Phone User Interface |
|
|
Web User Interface |
|
|
|
|
|
|
|
|||
|
|
|
|
|
|
|
|
|
|
Status |
|
|
|
|
|
|
|
|
|
|
|
|
|
|
|
|
|
--IPv4 |
|
|
|
|
|
|
|
|
|
|
|
|
|
|
|
|
|
--MAC Address |
|
|
|
|
|
|
|
|
|
|
|
√ |
|
√ |
||
|
--Firmware |
|
|
|
||||
|
--Network |
|
|
|
|
|
|
|
|
|
|
|
|
|
|
|
|
|
--Phone |
|
|
|
|
|
|
|
|
|
|
|
|
|
|
|
|
|
--Accounts |
|
|
|
|
|
|
|
|
|
|
|
|
|
|
|
|
|
Basic Phone Settings |
|
|
|
|
|
|
|
|
|
|
|
|
|
|
|
|
|
--Power Saving |
|
|
x |
|
|
|
|
|
|
|
|
|
|
|
|
|
|
--Contrast |
|
|
√ |
|
|
|
|
|
|
|
|
|
|
|
|
|
|
--Backlight |
|
|
√ |
|
|
|
|
|
|
|
|
|
|
|
|
|
|
--Language |
|
|
√ |
|
|
|
|
|
|
|
|
|
|
|
|
|
|
--Time & Date |
|
|
√ |
|
|
|
|
|
|
|
|
|
|
|
|
|
|
--Administrator Password |
|
|
√ |
|
|
|
|
|
|
|
|
|
|
|
|
|
|
--Key As Send |
|
|
√ |
|
|
|
|
|
|
|
|
|
|
|
|
|
|
--Phone Lock |
|
|
√ |
|
|
|
|
|
--Audio Settings |
|
|
|
|
|
|
|
|
|
|
|
|
|
√ |
||
|
--Ring Tones |
|
|
√ |
|
|||
|
--Key Tone |
|
|
√ |
|
|
|
|
|
|
|
|
|
|
|
|
|
|
--BLF Ring Type |
|
|
√ |
|
|
|
|
|
|
|
|
|
|
|
|
|
|
--Contact Management |
|
|
|
|
|
|
|
|
|
|
|
|
|
|
|
|
|
--Directory |
|
|
x |
|
|
|
|
|
|
|
|
|
|
|
|
|
|
--Local Directory |
|
|
√ |
|
|
|
|
|
|
|
|
|
|
|
|
|
|
--Blacklist |
|
|
√ |
|
|
|
|
|
|
|
|
|
|
|
|
|
|
--Remote Phone Book |
|
|
x |
|
|
|
|
|
|
|
|
|
|
|
|
|
|
--Call History Management |
|
|
√ |
|
|
|
|
|
|
|
|
|
|
|
|
|
|
--Search Source List in Dialing |
|
|
x |
|
|
|
|
|
|
|
|
|
|
|
|
|
|
--Logo Customization |
|
|
x |
|
|
|
|
|
|
|
|
|
|
|
|
|
20
Overview
|
Options |
|
|
Phone User Interface |
|
|
Web User Interface |
|
|
|
|
|
|
|
|||
|
|
|
|
|
|
|||
|
|
|
|
|
|
|
|
|
|
--Headset Use |
|
|
√ |
|
|
|
|
|
|
|
|
|
|
|
|
|
|
--DSS Keys |
|
|
√ |
|
|
|
|
|
|
|
|
|
|
|
|
|
|
--Account Management |
|
|
√ |
|
|
|
|
|
|
|
|
|
|
|
|
|
|
--Dial Plan |
|
|
x |
|
|
|
|
|
|
|
|
|
|
|
|
|
|
--Emergency Number |
|
|
x |
|
|
|
|
|
|
|
|
|
|
|
|
|
|
--Live Dialpad |
|
|
x |
|
|
|
|
|
|
|
|
|
|
|
|
|
|
--Hotline |
|
|
√ |
|
|
|
|
|
|
|
|
|
|
|
|
|
|
Basic Call Features |
|
|
|
|
|
|
|
|
|
|
|
|
|
|
|
|
|
--Recent Call In Dialing |
|
|
x |
|
|
|
|
|
|
|
|
|
|
|
|
|
|
--Auto Answer |
|
|
√ |
|
|
|
|
|
|
|
|
|
|
|
|
|
|
--Auto Redial |
|
|
√ |
|
|
|
|
|
|
|
|
|
|
|
|
|
|
--Call Completion |
|
|
√ |
|
|
|
|
|
|
|
|
|
|
|
|
|
|
--ReCall |
|
|
√ |
|
|
|
|
|
|
|
|
|
|
|
|
|
|
-- Do Not Disturb (DND) |
|
|
√ |
|
|
|
|
|
|
|
|
|
|
√ |
||
|
--Call Forward |
|
|
√ |
|
|||
|
--Call Transfer |
|
|
√ |
|
|
|
|
|
|
|
|
|
|
|
|
|
|
--Call Waiting |
|
|
√ |
|
|
|
|
|
|
|
|
|
|
|
|
|
|
--Conference |
|
|
x |
|
|
|
|
|
|
|
|
|
|
|
|
|
|
--Call Park |
|
|
√ |
|
|
|
|
|
|
|
|
|
|
|
|
|
|
--Call Pickup |
|
|
√ |
|
|
|
|
|
|
|
|
|
|
|
|
|
|
--Anonymous Call |
|
|
√ |
|
|
|
|
|
|
|
|
|
|
|
|
|
|
--Anonymous Call Rejection |
|
|
√ |
|
|
|
|
|
|
|
|
|
|
|
|
|
|
Advanced Phone Features |
|
|
|
|
|
|
|
|
|
|
|
|
|
|
|
|
|
--Busy Lamp Field (BLF) |
|
|
√ |
|
|
|
|
|
|
|
|
|
|
|
|
|
|
--BLF List |
|
|
x |
|
|
|
|
|
|
|
|
|
|
|
|
|
|
--Call Recording |
|
|
√ |
|
|
|
|
|
|
|
|
|
|
|
|
|
|
--Hot Desking |
|
|
√ |
|
|
|
|
|
|
|
|
|
|
|
|
|
|
--Intercom |
|
|
√ |
|
√ |
||
|
|
|
|
|
|
|
||
|
--Multicast Paging |
|
|
x |
|
|||
|
|
|
|
|
|
|||
|
|
|
|
|
|
|
|
|
|
--Music on Hold |
|
|
x |
|
|
|
|
|
|
|
|
|
|
|
|
|
|
--Automatic Call Distribution (ACD) |
|
|
x |
|
|
|
|
|
|
|
|
|
|
|
|
|
|
--Shared Call Appearance (SCA) |
|
|
x |
|
|
|
|
|
|
|
|
|
|
|
|
|
|
--Bridged Line Appearance (BLA) |
|
|
x |
|
|
|
|
|
|
|
|
|
|
|
|
|
|
--Messages |
|
|
√ |
|
|
|
|
|
|
|
|
|
|
|
|
|
|
SIP Account |
|
|
|
|
|
|
|
|
|
|
|
|
|
|
|
|
|
--User Options |
|
|
|
|
|
|
|
|
|
|
|
|
|
|
|
|
|
--Activation |
|
|
√ |
|
|
|
|
|
|
|
|
|
|
√ |
||
|
--Label |
|
|
√ |
|
|||
|
--Display Name |
|
|
√ |
|
|
|
|
|
|
|
|
|
|
|
|
|
|
--Register Name |
|
|
√ |
|
|
|
|
|
|
|
|
|
|
|
|
|
|
--User Name |
|
|
√ |
|
|
|
|
|
|
|
|
|
|
|
|
|
21

User Guide for the SIP-T21(P) E2 IP Phone
|
Options |
|
|
Phone User Interface |
|
|
Web User Interface |
|
|
|
|
|
|
|
|||
|
|
|
|
|
|
|||
|
|
|
|
|
|
|
|
|
|
--Password |
|
|
√ |
|
|
|
|
|
|
|
|
|
|
|
|
|
|
--Server Options |
|
|
|
|
|
|
|
|
|
|
|
|
|
|
|
|
|
--SIP Server 1/2 |
|
|
√ |
|
|
|
|
|
|
|
|
|
|
|
|
|
|
--Register Port |
|
|
x |
|
|
|
|
|
|
|
|
|
|
|
|
|
|
--Outbound Status |
|
|
√ |
|
|
|
|
|
|
|
|
|
|
|
|
|
|
--Outbound Proxy1/2 |
|
|
√ |
|
|
|
|
|
|
|
|
|
|
|
|
|
|
--Fallback Interval |
|
|
√ |
|
|
|
|
|
|
|
|
|
|
|
|
|
|
--NAT Status |
|
|
√ |
|
|
|
|
|
|
|
|
|
|
|
|
|
Note The table above lists most of the feature options. Please refer to the relevant sections for more information.
Documentations
The following table shows documentations available for the SIP-T21(P) E2 IP phone.
|
Name |
|
|
Contents |
|
|
Where found |
|
|
Language |
|
|
|
|
|
|
|
|
|
||||
|
|
|
|
|
|
|
|
|
|
|
|
|
Quick Start |
|
|
Basic call features |
|
In the package |
|
English |
|||
|
|
|
|
|
|
|
|||||
|
|
|
and phone |
|
|
|
|
|
|
||
|
Guide |
|
|
|
|
|
|
|
|
||
|
|
|
|
On the website |
|
English/Chinese |
|||||
|
|
|
customizations |
|
|
||||||
|
|
|
|
|
|
||||||
|
|
|
|
|
|
|
|
|
|
||
|
|
|
|
|
|
|
|
|
|
|
|
|
|
|
|
Phone/Web user |
|
|
|
|
|
|
|
|
|
|
|
interface settings |
|
|
|
|
|
|
|
|
User Guide |
|
|
Basic call features |
|
On the website |
|
English/Chinese |
|||
|
|
|
|
and advanced |
|
|
|
|
|
|
|
|
|
|
|
phone features |
|
|
|
|
|
|
|
|
|
|
|
|
|
|
|
|
|
|
|
Note You can also download the latest documentations online: http://support.yealink.com/documentFront/forwardToDocumentDetailPage?documentId=77.
22

Getting Started
Getting Started
This chapter provides basic installation instructions and information for obtaining the best performance with the SIP-T21(P) E2 IP phone. Topics include:
Packaging Contents
Phone Installation
Phone Initialization
Phone Status
Basic Network Settings
Registration
Idle Screen
Entering Data and Editing Fields
If you require additional information or assistance with your new phone, contact your system administrator.
Packaging Contents
The following components are included in your SIP-T21(P) E2 IP phone package:
SIP-T21(P) E2 IP Phone
23
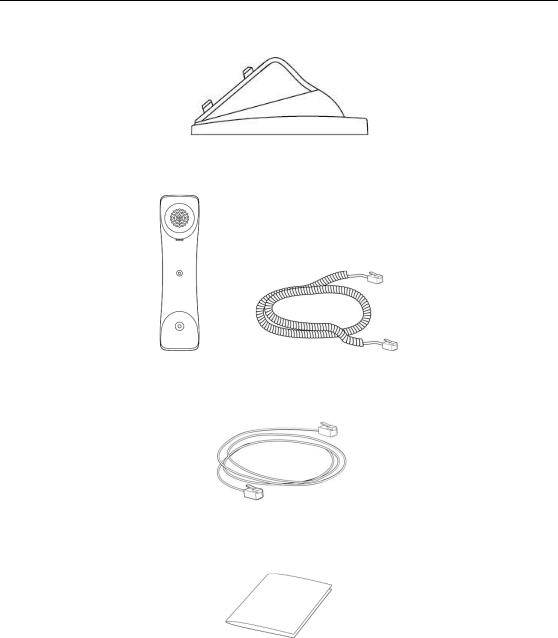
User Guide for the SIP-T21(P) E2 IP Phone
Phone Stand
Handset & Handset Cord
Ethernet Cable
Quick Start Guide
Check the list before installation. If you find anything missing, contact your system administrator.
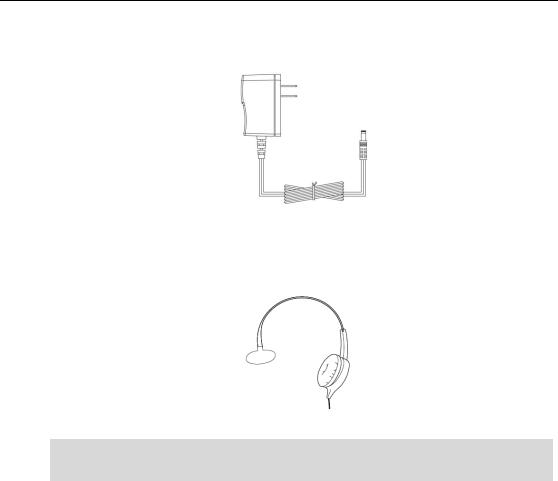
Optional Accessories
The following items are optional accessories for your SIP-T21(P) E2 IP phone. You need to purchase them separately if required.
24
Getting Started
Note
Power Adapter (5.5mm DC plug)
Headset
We recommend that you use the accessories provided or approved by Yealink. The use of unapproved third-party accessories may result in reduced performance.
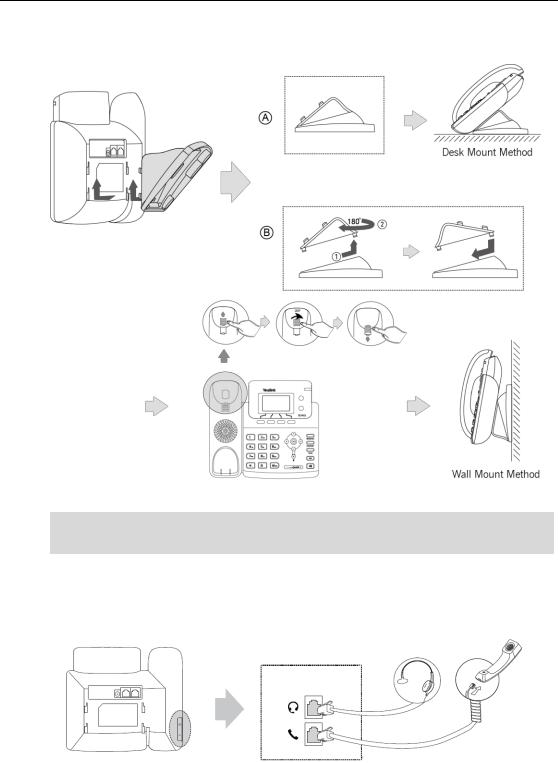
Phone Installation
If your phone is already installed, proceed to Phone Initialization on page 28. This section introduces how to install the phone:
1)Attach the stand
2)Connect the handset and optional headset
3)Connect the network and power
25
User Guide for the SIP-T21(P) E2 IP Phone
1)Attach the stand
Note The hookswitch tab has a lip which allows the handset to stay on-hook when the IP phone is mounted vertically.
2)Connect the handset and optional headset
26
Getting Started
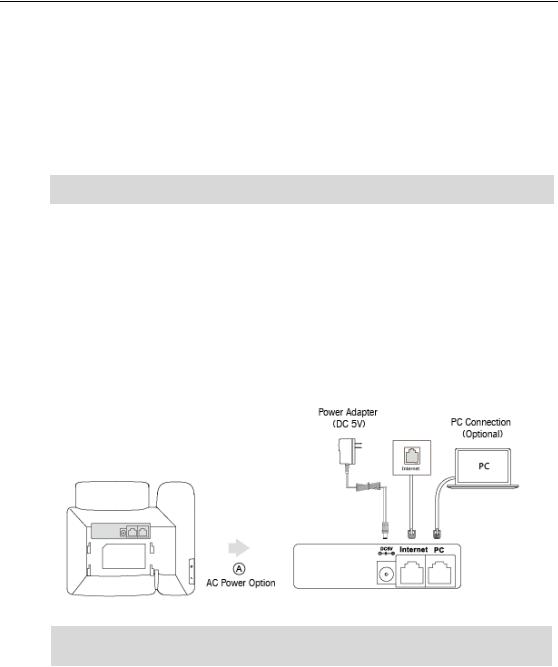
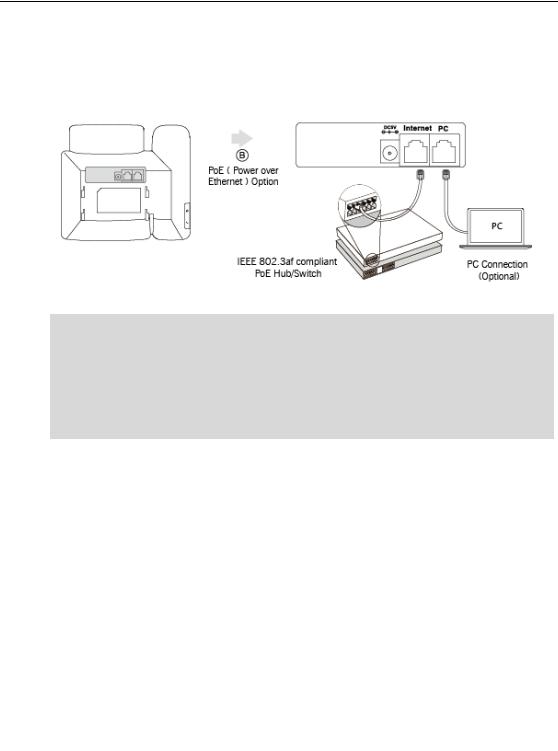
3)Connect the network and power
You have two options for power and network connections. Your system administrator will advise you which one to use.
AC power
Power over Ethernet (PoE)
Note PoE is not applicable to the SIP-T21 E2 IP phone.
AC Power
To connect the AC power:
1.Connect the DC plug on the power adapter to the DC5V port on the phone and connect the other end of the power adapter into an electrical power outlet.
2.Connect the included or a standard Ethernet cable between the Internet port on the phone and the one on the wall or switch/hub device port.
Note The IP phone should be used with Yealink original power adapter (5V/600mA) only. The use of the third-party power adapter may cause the damage to the phone.
Power over Ethernet
With the included or a regular Ethernet cable, the SIP-T21P E2 IP phone can be powered from a PoE-compliant switch or hub.
27
User Guide for the SIP-T21(P) E2 IP Phone
To connect the PoE for the SIP-T21P E2 IP phone:
1.Connect the Ethernet cable between the Internet port on the phone and an available port on the in-line power switch/hub.
Note If in-line power is provided, you don’t need to connect the phone to the power adapter. Make sure the switch/hub is PoE-compliant.
The phone can also share the network with another network device such as a PC (personal computer). This is an optional connection.
Important! Do not remove power from the phone while it is updating firmware and configurations.
Phone Initialization
After your phone is powered on, the system boots up and performs the following steps:
Automatic Phone Initialization
The phone finishes the initialization by loading the saved configuration. The LCD screen displays “Welcome Initializing…please wait” during this process.
DHCP (Dynamic Host Configuration Protocol)
The phone attempts to contact a DHCP server in your network to obtain valid IPv4 network settings (e.g., IP address, subnet mask, default gateway address and DNS address) by default.
Note |
If your network does not use DHCP, proceed to Basic Network Settings on page 30. |
|
|
Phone Status
You can view phone status via phone user interface or web user interface.
Available information of phone status includes:
Network status (IPv4 status or IPv6 status, IP mode and MAC address).
- IPv4 uses a 32-bit address.
28
Getting Started
-IPv6 is an updated version of the current Internet Protocol to meet the increased demands for unique IP addresses, using a 128-bit address.
Phone status (product name, hardware version, firmware version, product ID, MAC address and device certificate status).
Account status (register status of SIP accounts).
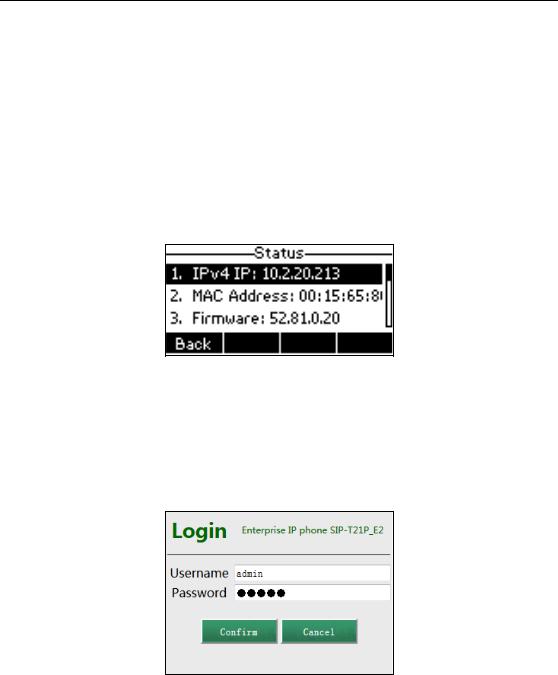
To view the phone status via phone user interface:
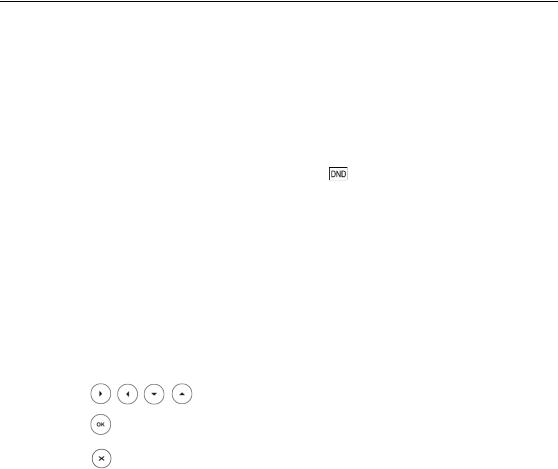
1.Press  , or press Menu->Status.
2.Press  or
or  to scroll through the list and view the specific information.
To view the phone status via web user interface:
1.Open a web browser of your computer.
2.Enter the IP address in the browser’s address bar, and then press Enter key.
(e.g., “http://192.168.0.10” for IPv4 or “http://[2005:1:1:1:215:65ff:fe64:6e0a]” for IPv6).
3.Enter the user name (admin) and password (admin) in the login page.
4.Click Confirm to login.
29
User Guide for the SIP-T21(P) E2 IP Phone
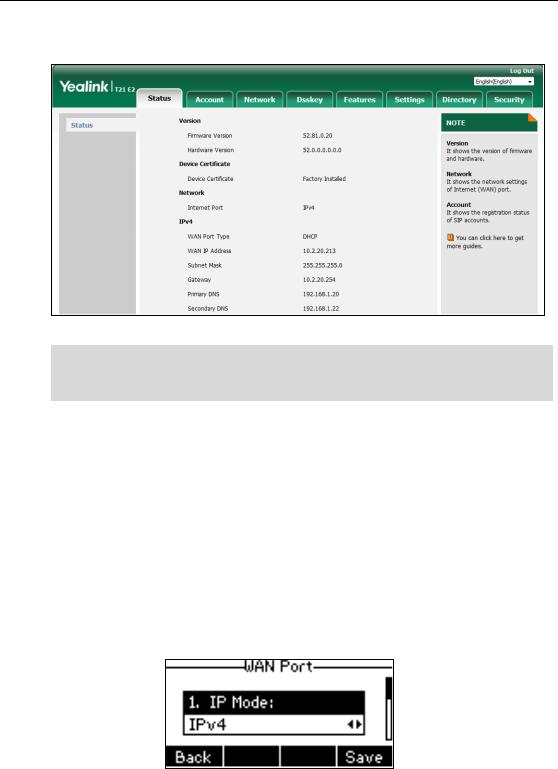
The phone status is displayed on the first page of the web user interface.
Note If IP mode of the phone is configured as IPv4 & IPv6, you can enter either of them in the browser’s address bar to view the phone status. IPv6 is not available on all servers. Contact
your system administrator for more information.
Basic Network Settings
If your phone cannot contact a DHCP server for any reason, you need to configure network settings manually. The IP phone can support either or both IPv4 and IPv6 addresses.
To configure the IP mode via phone user interface:
1.Press Menu->Settings->Advanced Settings (default password: admin) ->Network->WAN Port.
2.Press  or
or  to select IPv4, IPv6 or IPv4 & IPv6 from the IP Mode field.
3.Press the Save soft key to accept the change or the Back soft key to cancel.
You can configure a static IPv4 address for the IP phone. Before configuring it, make sure that the IP mode is configured as IPv4 or IPv4 & IPv6.
To configure a static IPv4 address via phone user interface:
1.Press Menu->Settings->Advanced Settings (default password: admin) ->Network->WAN Port.
30
Loading...