


Yealink Network Technology CO., LTD
Yealink VC500 Full HD Video Conferencing Endpoint Quick Start Guide
V31.10 |
Applies to firmware version 63.31.0.10 or later |
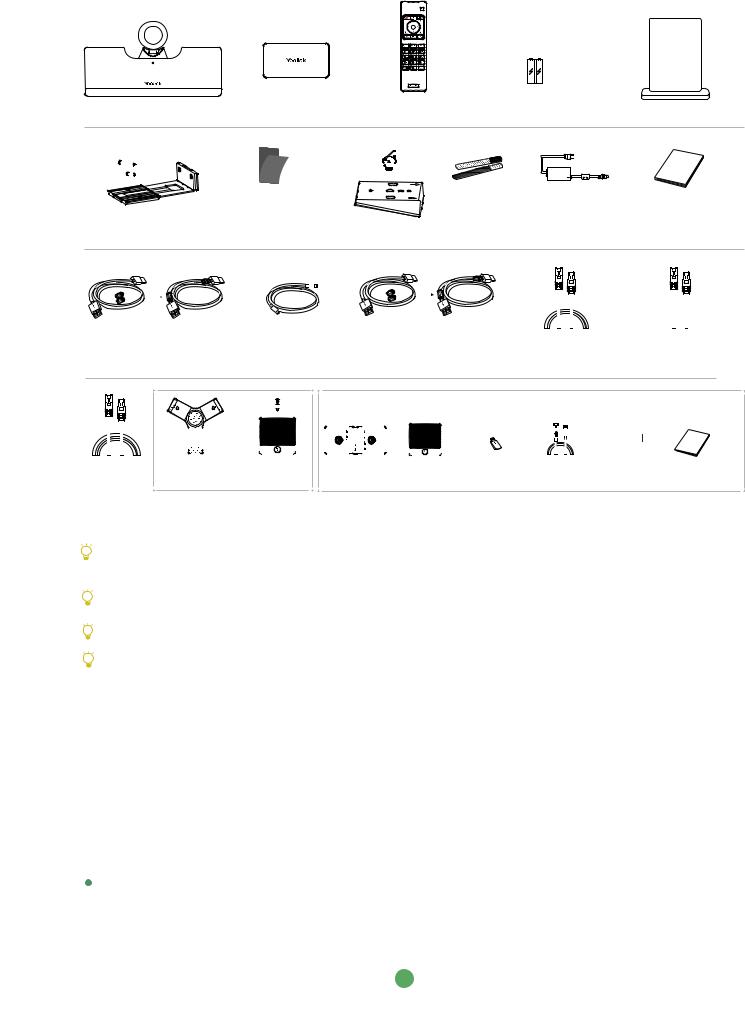
Packaging Contents
OK
VC500 Codec |
VCH50 Video |
VCR11 |
AAA Batteries×2 |
Acrylic board |
Conferencing Hub |
Remote Control |
 +2
+2


 +2
+2 


 +2
+2

 +
+
1
Mounting Bracket |
Velcro×2 |
|
|
VC500 |
and Accessories |
(One Velcro is on the bracket) VESA Accessory |
Cable Ties×5 |
Power Adapter |
Quick Start Guide |
|
|
|
|
|
|
|
|
|
|
|
|
|
|
|
|
|
|
|
|
|
|
|
|
|
|
|
|
|
|
|
|
|
|
|
|
|
|
|
|
|
|
|
|
|
|
|
|
|
|
|
|
|
|
|
|
|
|
|
|
|
|
|
|
|
|
|
|
|
|
|
|
|
|
|
|
|
|
|
|
|
|
|
|
|
|
|
|
|
|
|
|
|
|
|
|
1.2m |
|
|
|
|
|
|
|
|
|
|
|
|
|
|
|
1.8m |
|
|
|
|
|
|
|
|
|
|
|
|
|
|
|
|
|
|
|
|
||||||||
|
|
|
|
|
|
|
|
|
|
|
|
|
|
|
|
|
|
|
|
|
|
|
|
|
|
|
|
|||||||||||||||||||
|
|
HDMI Cable |
|
|
|
1.2m |
|
|
|
|
|
|
HDMI Cable |
|
|
|
|
|
|
3m |
|
|
|
0.8m |
||||||||||||||||||||||
(for content sharing) |
Mini-DP Cable |
|
|
|
|
(for the display device) |
Ethernet Cable |
|
|
Ethernet Cable |
||||||||||||||||||||||||||||||||||||
|
|
|
|
|
|
|
|
|
|
|
|
|
|
|
|
|
|
|
|
|
|
|
|
|
|
|
|
|
|
|
|
|
|
|
|
|
|
|
|
|
|
|
|
|
|
|
|
|
|
|
|
|
|
|
|
|
|
|
|
|
|
|
|
|
|
|
|
|
|
|
|
|
|
|
|
|
|
|
|
|
|
|
|
|
|
|
|
|
|
|
|
|
|
|
|
|
|
|
|
|
|
|
|
|
|
|
|
|
|
|
|
|
|
|
|
|
|
|
|
|
|
|
|
|
|
|
|
|
|
|
|
|
|
|
|
|
|
|
|
|
|
|
|
|
|
|
|
|
|
|
|
|
|
|
|
|
|
|
|
|
|
|
|
|
|
|
|
|
|
|
|
|
|
|
|
|
|
|
|
|
|
|
|
|
|
|
|
|
|
|
|
|
|
|
|
|
|
|
|
|
|
|
|
|
|
|
|
|
|
|
|
|
|
|
|
|
|
|
|
|
|
|
|
|
|
|
|
|
|
|
|
|
|
|
|
|
|
|
|
|
|
|
|
|
|
|
|
|
|
|
|
|
|
|
|
|
|
|
|
|
|
|
|
|
|
|
|
|
|
|
|
|
|
|
|
|
|
|
|
|
|
|
|
|
|
|
|
|
|
|
|
|
|
|
|
|
|
|
|
|
|
|
|
|
|
|
|
|
|
|
|
|
|
|
|
|
|
|
|
|
|
|
|
|
|
|
|
|
|
|
|
|
|
|
|
|
|
|
|
|
|
|
|
|
|
|
|
|
|
|
|
|
|
|
|
|
|
|
|
|
|
|
|
|
|
|
|
|
|
|
|
|
|
|
|
7.5m |
CP960 |
CPE90 Wired |
Charger Cradle |
CPW90 Wireless |
DD10 |
1.8m |
Power Adapter Quick Start Guide |
|
Ethernet Cable |
Conference Phone |
Expansion Mic×2 |
||||||
|
Mic×2 |
USB Dongle |
Micro USB Cable |
|||||
|
A Package |
|
|
B Package |
|
|||
We recommend that you use the accessories provided or approved by Yealink. The use of unapproved third-party accessories may result in reduced performance.
VC500 codec can work with A package or B package.
Use the power adapter provided by Yealink to charge the CPW90 wireless microphones only.
Before using the HDMI cable, put the magnet rings on it to prevent electromagnetic interference.
VC500 Codec Installation
Select one of the following installation method based on your site requirements:
. Put on a Flat Surface
. Mount on top of a TV
. Mount on a wall
. Mount on a ceiling
. Mount onto a TV stand or a tripod
Put on a Flat Surface
You can put the VC500 codec on a conference room table, and make sure that the slope is not more than 5 degrees so that the VC500 can operate correctly.
1
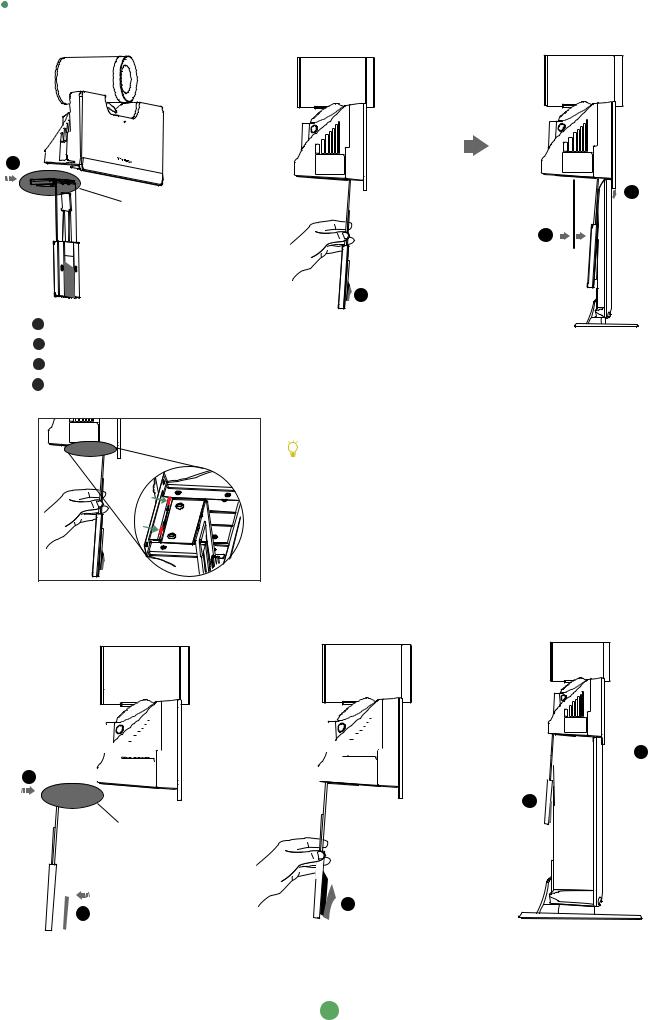
Mount on top of a TV
Please choose the following installation method when the thickness of the TV is between 1mm and 36mm.
1
Notice the direction of the bracket |
3 |
|
|
4 |
TV |
|
|
3 |
|
2 |
|
Steps 1 Push the bracket along the track of the V500 codec to an appropriate location.
2Remove one Velcro.
3Put the bracket on the top of the TV.
4Stick a Velcro onto the back of the TV, and make sure that the bracket and the back of the TV are tightly positioned against each other.
If your VC500 codec cannot be mounted on the top of a TV when the bracket has reached the given location, you should remove the bracket, and then convert its direction. Refer to the following section for more information.
Please choose the following installation method when the thickness of the TV is between 37mm and 77mm.


 4 1
4 1 


5
Notice the direction of the bracket |
TV |
2 |
3 |
|
2
 Loading...