


Yamaha MCRB-043DORA, MCRB-043DBEG, MCRB-043DYLW, MCRB-043DWHI, MCRB-043DRED User Manual
...Micro Component System
MCR-B043D
OWNER'S MANUAL
AB

CAUTION: READ THIS BEFORE OPERATING YOUR UNIT.
1To assure the finest performance, please read this manual carefully. Keep it in a safe place for future reference.
2Install this unit in a well ventilated, cool, dry, clean place - away from direct sunlight, heat sources, vibration, dust, moisture and cold. For proper ventilation, allow the following minimum clearances.
Top: 15 cm (6 in) Rear: 10 cm (4 in) Sides: 10 cm (4 in)
3Locate this unit away from other electrical appliances, motors, or transformers to avoid humming sounds.
4Do not expose this unit to sudden temperature changes from cold to hot, and do not locate this unit in an environment with high humidity (i.e. a room with a humidifier) to prevent condensation inside this unit, which may cause an electrical shock, fire, damage to this unit, and/or personal injury.
5Avoid installing this unit where foreign object may fall onto this unit and/or this unit may be exposed to liquid dripping or splashing. On the top of this unit, do not place:
–Other components, as they may cause damage and/or discoloration on the surface of this unit.
–Burning objects (i.e. candles), as they may cause fire, damage to this unit, and/or personal injury.
–Containers with liquid in them, as they may fall and liquid may cause electrical shock to the user and/or damage to this unit.
6Do not cover this unit with a newspaper, tablecloth, curtain, etc. in order not to obstruct heat radiation. If the temperature inside this unit rises, it may cause fire, damage to this unit, and/or personal injury.
7Do not plug in this unit to a wall outlet until all connections are complete.
8Do not operate this unit upside-down. It may overheat, possibly causing damage.
9Do not use force on switches, knobs and/or cords.
10When disconnecting the power cable from the wall outlet, grasp the plug; do not pull the cable.
11Do not clean this unit with chemical solvents; this might damage the finish. Use a clean, dry cloth.
12Only voltage specified on this unit must be used. Using this unit with a higher voltage than specified is dangerous and may cause fire, damage to this unit, and/or personal injury. Yamaha will not be held responsible for any damage resulting from use of this unit with a voltage other than specified.
13To prevent damage by lightning, keep the power cable disconnected from a wall outlet or this unit during a lightning storm.
14Do not attempt to modify or fix this unit. Contact qualified Yamaha service personnel when any service is needed. The cabinet should never be opened for any reasons.
15When not planning to use this unit for long periods of time (i.e. vacation), disconnect the AC power plug from the wall outlet.
16Be sure to read the “TROUBLESHOOTING” section on common operating errors before concluding that this unit is faulty.
17Before moving this unit, press  to set the unit to off, and disconnect the AC power plug from the wall outlet.
18Condensation will form when the surrounding temperature changes suddenly. Disconnect the power cable from the outlet, then leave this unit alone.
19When using this unit for a long time, this unit may become warm. Turn off, then leave this unit alone for cooling.
20Install this unit near the wall outlet and where the AC power plug can be reached easily.
21The batteries shall not be exposed to excessive heat such as sunshine, fire or the like. When you dispose of batteries, follow your regional regulations.
–Keep the batteries in a location out of reach of children. Batteries can be dangerous if a child were to put in his or her mouth.
–If the batteries grow old, the effective operation range of the remote control decreases considerably. If this happens, replace the batteries with new one as soon as possible.
–Do not use old batteries together with new ones.
–Do not use different types of batteries (such as alkaline and manganese batteries) together. Read the packaging carefully as these different types of batteries may have the same shape and color.
–Exhausted batteries may leak. If the batteries have leaked, dispose of them immediately. Avoid touching the leaked material or letting it come into contact with clothing, etc. Clean the battery compartment thoroughly before installing new batteries.
–If you plan not to use the unit for a long period of time, remove the batteries from the unit. Otherwise, the batteries will wear out, possibly resulting in a leakage of battery liquid that may damage the unit.
–Do not throw away batteries with general house waste. Dispose of them correctly in accordance with your local regulations.
22Excessive sound pressure from earphones and headphones can cause hearing loss.
This unit is not disconnected from the AC power source as long as it is connected to the wall outlet, even if this unit itself is turned off by  . In this state, this unit is designed to consume a very small quantity of power.
WARNING
TO REDUCE THE RISK OF FIRE OR ELECTRIC SHOCK, DO NOT EXPOSE THIS UNIT TO RAIN OR MOISTURE.
CAUTION
Danger of explosion if battery is incorrectly replaced. Replace only with the same or equivalent type.
There is a chance that placing this unit too close to a CRTbased (Braun tube) TV set might impair picture color. Should this happen, move this unit away from the TV set.
i En
CONTENTS
NAMES OF PARTS AND THEIR FUNCTIONS ........ |
2 |
Front panel..................................................................... |
2 |
Front panel display......................................................... |
2 |
Remote control............................................................... |
3 |
CONNECTIONS ........................................................ |
4 |
Connecting the speakers and antenna .......................... |
4 |
Connecting the power cable........................................... |
5 |
Other connections.......................................................... |
5 |
About the standby state ................................................. |
5 |
Selecting DAB stations................................................. |
12 |
Presetting DAB stations (remote control only) ............. |
13 |
Selecting preset DAB stations...................................... |
14 |
Checking the signal strength of DAB stations |
|
(Option menu) .............................................................. |
14 |
LISTENING TO FM STATIONS .............................. |
15 |
Selecting an FM station................................................ |
15 |
Presetting FM stations (remote control only) ............... |
16 |
Selecting preset FM stations........................................ |
17 |
ADJUSTING THE CLOCK (OPTION MENU) ........... |
6 |
LISTENING TO CD AND USB DEVICES ................. |
7 |
Listening to a CD............................................................ |
7 |
Listening to a USB device .............................................. |
8 |
Using repeat/shuffle playback (remote control only) ...... |
8 |
LISTENING TO MUSIC FROM YOUR Bluetooth |
|
COMPONENT............................................................ |
9 |
Playing back from your Bluetooth component................ |
9 |
Connecting an already-paired component via Bluetooth.... |
10 |
Disconnecting a Bluetooth connection......................... |
10 |
LISTENING TO DAB STATIONS............................ |
11 |
Preparing for DAB reception ........................................ |
11 |
LISTENING TO EXTERNAL SOURCES ................ |
17 |
USEFUL FUNCTIONS ............................................ |
18 |
Using the Option menu ................................................ |
18 |
Using the sleep timer ................................................... |
19 |
Using the alarm function (IntelliAlarm) ......................... |
19 |
Setting the alarm .......................................................... |
20 |
Operations while the alarm sound is playing................ |
21 |
TROUBLESHOOTING ............................................ |
22 |
NOTES ON DISCS AND USB DEVICES................ |
25 |
SPECIFICATIONS................................................... |
26 |
Features
•Play back music from external devices such as your audio/data CDs, USB devices, or external devices via the AUX jack, and listen to the radio.
•Listen to the DAB radio.
•By the Bluetooth technology, you can enjoy clear sound without wire connections.
•Use your favorite music or a beep tone as an alarm. When the set time arrives, the music you select is played at the volume that you specify, giving you the ideal start to your day (IntelliAlarm function).
•You can easily store and recall of your favorite radio stations, up to 30 FM and 30 DAB stations.
•Bass, middle, and treble can be adjusted to your taste.
About this manual
•If an operation can be performed using either the buttons on the unit itself or from the remote control, the explanation will focus on operation using the remote control.
• indicates precautions for use of the unit and its feature limitations.
• indicates supplementary explanations for better use.
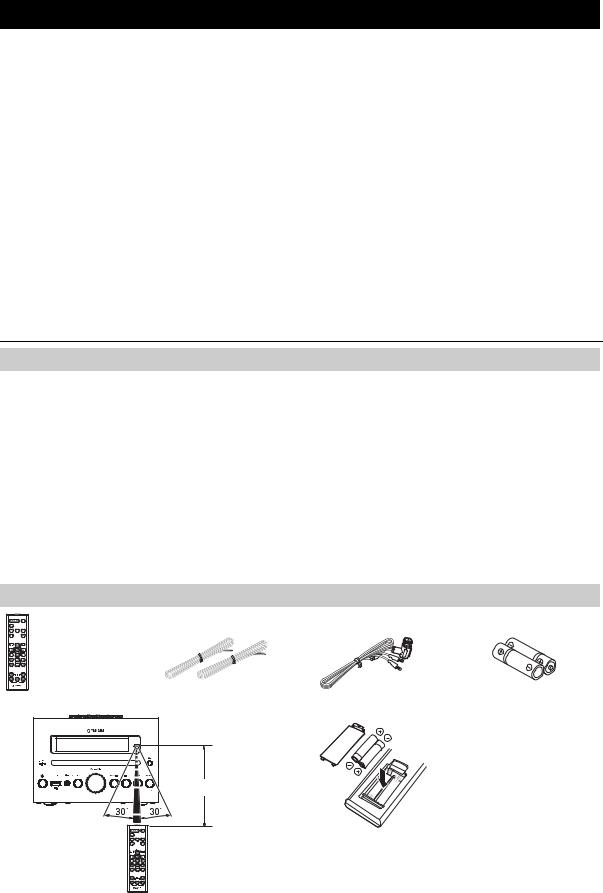
Supplied accessories
Remote control |
Speaker cable |
DAB/FM antenna |
Batteries (x 2) |
|
(1.5 m (4.9') x 2) |
|
(AAA, R03, UM-4) |
How to use the remote control |
Installing batteries in the remote control |
|
Check the “+” and “-” of the |
|
batteries and insert them the |
|
correct way around. |
Within 6 m (20')
1 En

NAMES OF PARTS AND THEIR FUNCTIONS
Front panel
8
9
 :
:
1 2 3 4 |
5 |
6 |
7 |
1 (Power)
Press to turn the unit on/off (standby).
There are two types of the standby state ( P. 5).
2USB port
Connect your USB device here ( P. 5, 8).
3 (Headphone jack)
Connect headphones here.
4SOURCE
Switch the audio source to be played.
Pressing this repeatedly will change the selection in the following order.
CD  USB
USB  DAB
DAB  FM
FM  BT
BT  AUX
AUX
5VOLUME knob
Adjust the volume.
6Audio control buttons
Use these to operate the CD/USB device.

 : Play/Pause
 : Stop
 /
/ : Skip, Search backward/forward (press and hold down)
7PRESET  /
/
Use these buttons to select a radio station that you’ve stored ( P. 16, 17).
8Front panel display
The clock and other information is displayed here.
9Disc slot
Insert a CD here ( P. 7).
0  (Eject button)
Eject the CD (cannot be operated while the option menu ( P. 18) is displayed).
Front panel display
1 |
23 |
4 |
5 |
6 7
1Alarm time
Indicates the alarm time ( P. 20).
2Repeat/shuffle indicator
Displays the playback mode ( P. 8).
3Secondary indicator
Turns on if a secondary station is playing when you listen to a DAB station.
4Multi-function indicator


 ~ ~ ~ ~ ~ ~


 ~ ~ ~ ~ ~ ~
5Remote control signal receiver
Make sure that this sensor is not obstructed ( P. 1).
6Alarm indicator
Turns on if the alarm has been set ( P. 20).
7Sleep indicator
Turns on if the sleep timer has been set ( P. 19).
Displays various information, including the clock time, information about the currently-playing track, and the frequency of the radio station.
2 En
|
|
|
|
|
NAMES OF PARTS AND THEIR FUNCTIONS |
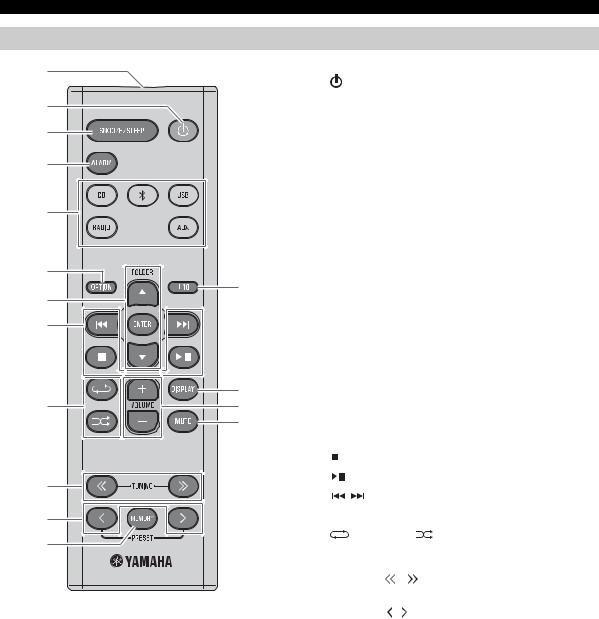
Remote control |
|
|
|
|
|
1 |
|
1Remote control signal transmitter |
|||
|
2 |
(Power) |
|
||
|
|
|
|||
2 |
|
|
Press to turn the unit on/off (standby). |
||
|
|
There are two types of the standby state ( P. 5). |
|||
|
|
|
|||
3 |
|
3SNOOZE/SLEEP |
|||
|
|
|
Set the sleep timer or switch the alarm to snooze mode |
||
4 |
|
|
( P. 19, 21). |
|
|
|
|
4ALARM |
|
|
|
|
|
|
Switch the alarm on/off ( P. 21). |
||
5 |
|
5Source buttons |
|||
|
|
|
Switch the audio source to be played. If you press one of |
||
|
|
|
these while the unit is in standby (except ECO standby), |
||
|
|
|
the unit will automatically turn on. |
||
6 |
|
|
When listening to the radio, press RADIO to switch |
||
|
C |
|
between DAB/FM. |
||
7 |
6OPTION |
|
|
||
|
|
|
|||
8 |
|
|
Display the option menu ( P. 18). |
||
|
7Item selection buttons |
||||
|
|
||||
|
|
|
FOLDER |
/ : Switch the playback folder and select |
|
|
|
|
|
|
items or edit numerical values when |
|
|
|
|
|
playing music on data CDs or USB |
|
D |
|
|
|
devices. |
9 |
E |
|
ENTER: Confirm a selected item or value. |
||
|
F |
8Audio control buttons |
|||
|
|
|
Use these to operate the CD/USB device. |
||
|
|
|
: Stop |
|
|
: |
|
|
: Play/Pause |
|
|
|
|
/ : Skip, Search backward/forward (press and hold |
|||
|
|
|
|||
A |
|
|
down) |
|
|
|
|
|
|
|
|
B |
|
9 |
(Repeat)/ |
(Shuffle) |
|
|
|
Play music on a CD or USB device in repeat/shuffle |
|||
|
|
|
mode ( P. 8). |
|
|
|
|
0TUNING |
/ |
|
|
|
|
|
Tune the radio ( P. 15, 16). |
||
|
|
APRESET |
/ |
|
|
|
|
|
Select a radio station that you stored ( P. 16, 17). |
||
|
|
BMEMORY |
|
|
|
|
|
|
Store a radio station ( P. 16). |
||
|
|
C+10 |
|
|
|
|
|
|
Skip ten songs ahead of the currently-playing song. |
||
|
|
|
When playing a data CD or a USB device, this button |
||
|
|
|
skips ten songs within the current folder. |
||
|
|
DDISPLAY |
|
|
|
|
|
|
Switch the information shown in the front panel display |
||
|
|
|
( P. 7, 8, 15). |
|
|
EVOLUME +/–
Adjust the volume.
FMUTE
Mute or unmute the sound.
3 En

CONNECTIONS
Connecting the speakers and antenna
Connect the speakers and antenna.
Do not connect this unit’s power cable until you’ve finished connecting all cables.
If the radio reception is poor, try changing the height or direction or placement of the antenna to find a location that has better reception.
If you use a commercially available outdoor antenna instead of the supplied antenna, reception may be better.
Speakers
•You must peel off the insulation (covering) from the tip of the speaker cable to expose the conductor.
•Check the connections; make sure that left and right (L, R) and polarity (red: +, black: –) are connected correctly. If connections are incorrect, the sound will be unnatural and the low frequencies may be insufficient. There might not be any sound at all if connections are incorrect.
•Take care that the conductors of the speaker cable do not touch each other, and that the conductors do not touch any other metal part. Such conditions can damage this unit or the speakers.
•Use only the supplied speakers. Using other speakers may result in unnatural sound.
•If you’re using this unit nearby a CRT display and you notice distorted color or noise in the display, move the speakers farther away from the display.
To the AC wall outlet
SPEAKERS |
AUX IN |
Twist the bare wires tightly so the individual strands are not splayed.
DAB/FM antenna
Be sure to stretch out the antenna.
4 En

CONNECTIONS
Connecting the power cable
When you’ve completed all connections, connect this unit’s power cable to an AC outlet.
Rear panel
Other connections
USB device
Connect your USB device to the USB port on the front panel. For details on playable files, refer to “NOTES ON DISCS AND USB DEVICES” ( P. 25).
The USB device is automatically charged when this unit is connected to the AC outlet.
• Stop playback before disconnecting the USB device.
• Charging may not be possible depending on the USB device.
External devices
Using a commercially available 3.5 mm mini-plug cable, connect your external device to the AUX jack on the rear panel of this unit.
Rear panel
AUX IN
About the standby state
This unit has the following two types of standby state. Select the mode in POWER SAVING settings menu ( P. 18).
|
Setting menu |
|
Bluetooth |
Charging of USB |
|
|
Mode |
(POWER |
Clock display |
Alarm setting |
|||
connection |
devices |
|||||
|
SAVING) |
|
|
|||
|
|
|
|
|
||
ECO standby* |
ECO |
No clock display |
Disable |
Enable |
Disable |
|
(power saving mode) |
||||||
|
|
|
|
|
||
|
|
|
|
|
|
|
Standby |
NORMAL |
Show |
Enable |
Enable |
Enable |
|
|
|
|
|
|
|
* Default setting
5 En
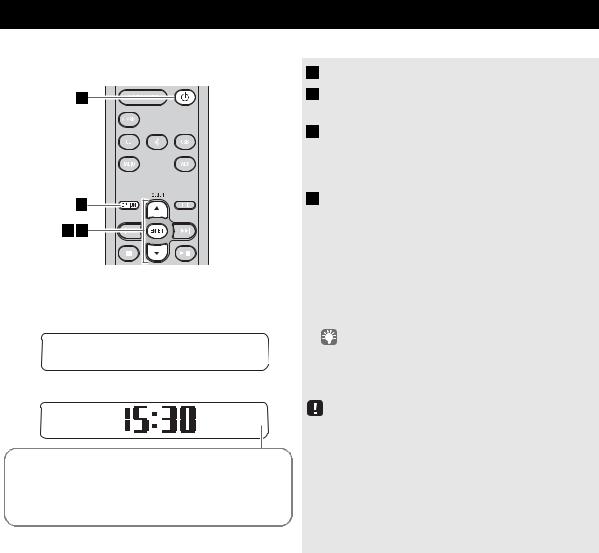
ADJUSTING THE CLOCK (OPTION MENU)
You’ll use the option menu ( P. 18) to set this unit’s date and time.
1 Press  to turn the unit on.
2 Press OPTION.
Clock display
Display (24-hour) when the unit is on
1 5 : 3 0 C D
Display (24-hour) when the unit is off (standby)*
The option menu will appear.
3 Press / to select “CLOCK SET,” and then press ENTER.
The display will indicate “CLOCK YEAR,” and the numerical value to be set will blink.
4 Set the date and time.
Press ▲/▼ to edit each numerical value, and then press ENTER to confirm the setting.
Set the items in the order of year  month
month  day
day  hour
hour  minute.
When clock setting has finished, the display will indicate “Completed!”
The clock will be set to 0 second the moment you complete the clock settings.
•While making these settings, you can press DISPLAY to select the time format (12-hour / 24-hour).
•If you decide to cancel without changing the setting, press OPTION before confirming the change.
2 6
A p r  The time settings will be reset if the unit remains unpowered for about one hour.
Jan |
Feb |
Mar |
Apr |
May |
Jun |
January |
February |
March |
April |
May |
June |
|
|
|
|
|
|
Jul |
Aug |
Sep |
Oct |
Nov |
Dec |
July |
August |
September |
October |
November |
December |
* In ECO standby, the clock display will disappear.
6 En

LISTENING TO CD AND USB DEVICES
The unit will operate as follows when playing back tracks/files on CD/USB devices.
•If the CD/USB device being played is stopped, the track that you listened will start playback from the beginning of the track the next time you play.
•If you press  while playback is stopped, tracks will play as follows the next time playback begins:
−Audio CD: Play from the first track of the CD.
−Data CD*/USB device: Play from the first track of the folder contains the track you listened to last time.
•This unit automatically turns off if no operation has been performed for 20 minutes after CD/USB device playback is stopped.
* “Data CD” is a CD that contains MP3/WMA files.
For details on playable discs and files, refer to “NOTES ON DISCS AND USB DEVICES” ( P. 25).
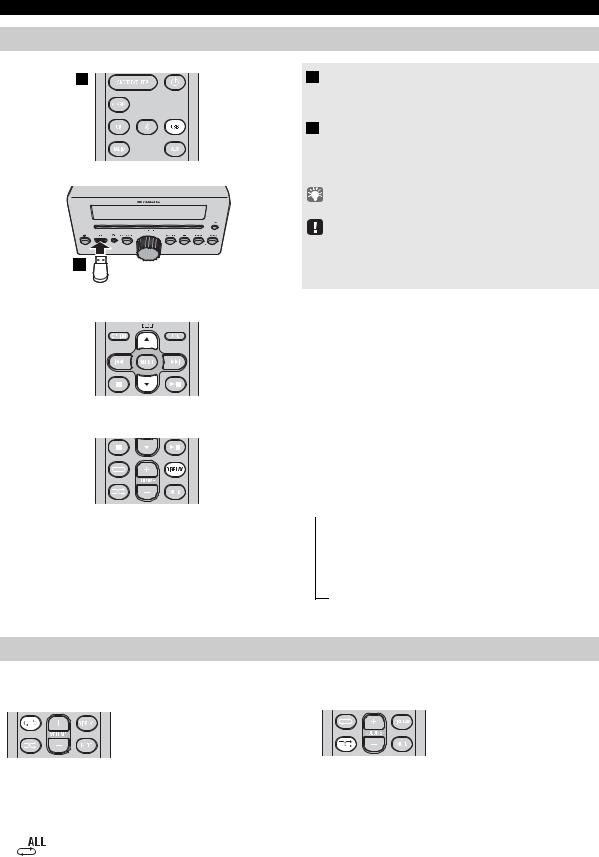
Listening to a CD
1 Press the CD source button to switch the audio source to CD.
If a CD is already inserted, playback will start.
2 Insert a CD into the disc slot.
Playback starts automatically.
Playback can be controlled with either the remote control, or the front panel on this unit ( P. 2, 3).
Insert the CD with the label side facing upward.
Folders and files on a data CD are played in alphabetical order.
2
Skipping folders (remote control only)
Display information (remote control only)
While a data CD is playing, you can use the remote control’s FOLDER ▲/▼ buttons to select the folder.
The folder number (only for a data CD) or the song/file number is shown for several seconds when starting playback or skipping tracks.
If you press DISPLAY on the remote control while a song is playing or paused, the information shown on the front panel display will be switched in the following order.
 - Elapsed song playback time
-Remaining song playback time (only for an audio CD)
-Song name*
-Album name*
-Artist name*
-File name (only for a data CD)
-Folder name (only for a data CD)
*Shown only if this data is included in the song.
7 En
LISTENING TO CD AND USB DEVICES
Listening to a USB device
1 Press the USB source button to switch the audio source to USB.
If a USB device is already connected, playback will start.
2 Connect a USB device to the USB port.
Playback starts automatically.
Playback can be controlled with either the remote control, or the front panel on this unit ( P. 2, 3).
Folders and files will play in the order in which they were written.
Stop playback before disconnecting the USB device.
2
Skipping folders (remote control only)
Display information (remote control only)
While a USB device is playing, you can use the remote control’s FOLDER ▲/▼ buttons to select the folder.
The folder/file number is shown for several seconds when starting playback or skipping tracks.
If you press DISPLAY on the remote control while a song is playing or paused, the information shown on the front panel display will be switched in the following order.
 - Elapsed song playback time
-Song name*
-Album name*
-Artist name*
-File name
-Folder name
*Shown only if this data is included in the song.
Using repeat/shuffle playback (remote control only)
The playback status is shown by the repeat/shuffle indicator in the front panel display.
Repeat playback
Press  (repeat) repeatedly to select one of the following playback modes.
No display: Repeat mode off

 : 1 track
 : All tracks within the folder (data CD/USB device only)
: All tracks
Shuffle playback
Press  (shuffle) repeatedly to select one of the following playback modes.
No display: Shuffle mode off
 : All tracks within the folder (data CD/USB device only)


 : All tracks
8 En
 Loading...