


 Loading...
Lighting Audio System / Systeme Audio Lumineux
OWNER’S MANUAL |
MANUALE DI ISTRUZIONI |
MODE D’EMPLOI |
MANUAL DE INSTRUCCIONES |
BEDIENUNGSANLEITUNG |
GEBRUIKSAANWIJZING |
BRUKSANVISNING |
ИНС ТРУКЦИЯ ПО ЭКСПЛУАТАЦИИ |
Read the supplied booklet “Safety Brochure” before using the unit. Lisez le livret fourni «Brochure sur la sécurité» avant d’utiliser l’unité. Lesen Sie die „Sicherheitsbroschüre“, bevor Sie das Gerät verwenden.
Läs den medföljande broschyren ”Säkerhetsanvisningar” innan du använder receivern. Prima di utilizzare l’unità, leggere il “Volantino sulla sicurezza” fornito.
Lea el “Folleto de seguridad” que se proporciona antes de utilizar la unidad.
Lees het meegeleverde boekje “Veiligheidsbrochure” voordat u dit toestel gebruikt. Перед использованием аппарата прочтите прилагаемую “брошюру по безопасности”.
Русский Nederlands Español Italiano Svenska Deutsch Français English
G
Contents
Introduction
Supplied accessories............ |
4 |
|
About this manual............ |
4 |
|
Recharging this unit............ |
4 |
|
Part names............ |
5 |
|
Preparations |
|
|
Installing “DTA CONTROLLER”............ |
6 |
|
Turning on the lighting/power............ |
6 |
|
Listening to music via Bluetooth connection
Pairing a device with the unit............ |
7 |
8 |
|
||
Performing pairing and playing back music |
9 |
||||
Connecting a paired Bluetooth device and playing back music............ |
|||||
|
|
Terminating the Bluetooth connection |
9 |
|
|
|
|
|
|||
Listening to external sources
Connecting an external device |
............10 |
|
Playing back............ |
10 |
|
Using the SMART TIMER
Setting the SMART TIMER............ |
11 |
Troubleshooting............ |
12 |
Specifications............ |
14 |
2 En

High quality sound with ease of use
Plug and play convenience of your mobile
devices with enhanced sound. ............ |
7, 10 |
|
Convenient remote operation by your |
||
mobile device. ............ |
6 |
|
Music anywhere you want ............ |
4 |
|
English
A fusion of music and lighting
Start your day in the right light and on the right note. |
|
|
Wake to your favorite song in a comfortable atmosphere. ............ |
11 |
|
At the end of the day, immerse yourself in a healing |
|
|
ambience of soft lighting and sound. ............ |
6 |
|
En 3
Introduction
Confirm the package contents and thoroughly read this manual.
 Supplied accessories
AC adaptor (DC 12 V/1.5 A
Model No.: MU18-D120150-C5)
 About this manual
•Operations
“iPhone” described in this manual may also refer to
“iPod touch” or “iPad.”
•Illustrations
Illustrations may differ from actual item depicted.
•Symbols
Indicates precautions for use of the unit and feature limitations.
Indicates supplementary explanations for better use.
& Indicates the corresponding reference page(s).
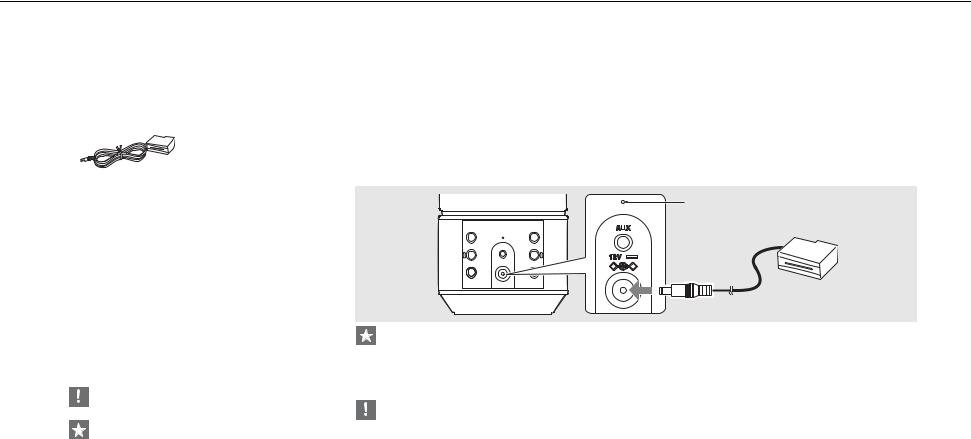
 Recharging this unit
When using this unit for the first time, connect the supplied AC adaptor to the unit and charge it from a wall outlet.
•If charging the unit with both the power and light turned off, the indicator blinks slowly in orange. Once charging is complete, the indicator turns off.
•If the remaining battery level of this unit becomes low, the indicator will blink rapidly in orange.
Indicator
AC adaptor
•The charging time for the battery is approximately 4 hours when the unit is off and approximately 7 hours when the unit is on.
•Check the remaining battery level of the unit from "DTA CONTROLLER" (& P.6).
•In the place where temperature is very high or low, the unit may be recharged earlier than usual or fail to be recharged.
•In order to maintain the function, the unit should be recharged every six months.
•The rechargeable battery has a limited lifespan. Its capacity decreases gradually with the frequency of use and the passage of time.
•The lifespan of the rechargeable battery varies according to how it is stored, usage conditions and usage environment.
•In order to achieve the maximum duration from the battery, there may be a difference in sound volume and quality when using the unit with the battery and when using the unit connected with the AC adaptor.
•The power may turn off depending on the volume and light status regardless of the remaining battery level.
4 En

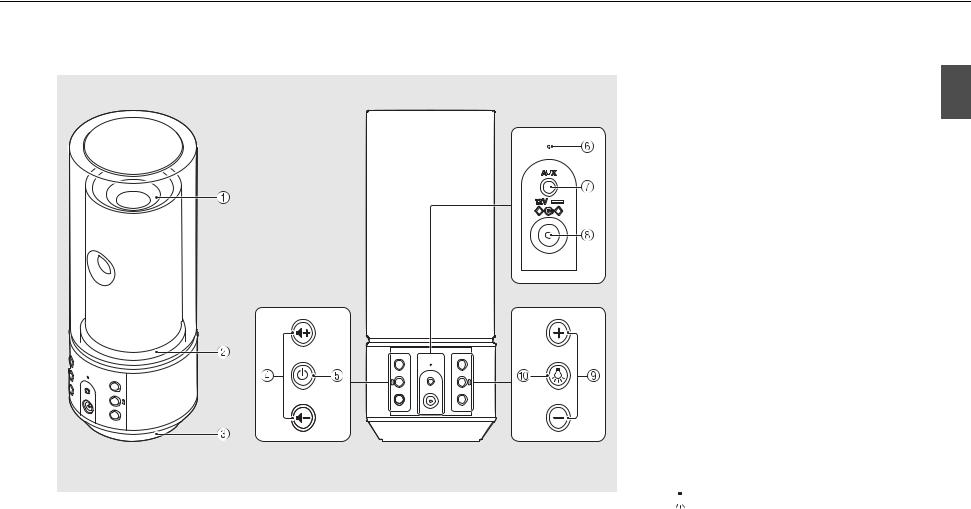
Part names
Familiarize yourself with all parts and these functions.
* The light effects represent the sound expansion.
English
1Light/speaker
2Light
3Speaker
4
 /
/ 
 (VOLUME)
Controls the volume.
5A (Power) (&P.6)
Press: Turns the unit on/off.
Press and hold: Disconnects a Bluetooth device. The unit plays a startup tone when turned on and a shutdown tone when turned off.
6Indicator
Lights up when turning on the unit. Blinks when the status of the Bluetooth connection and the status of the rechargeable battery change.
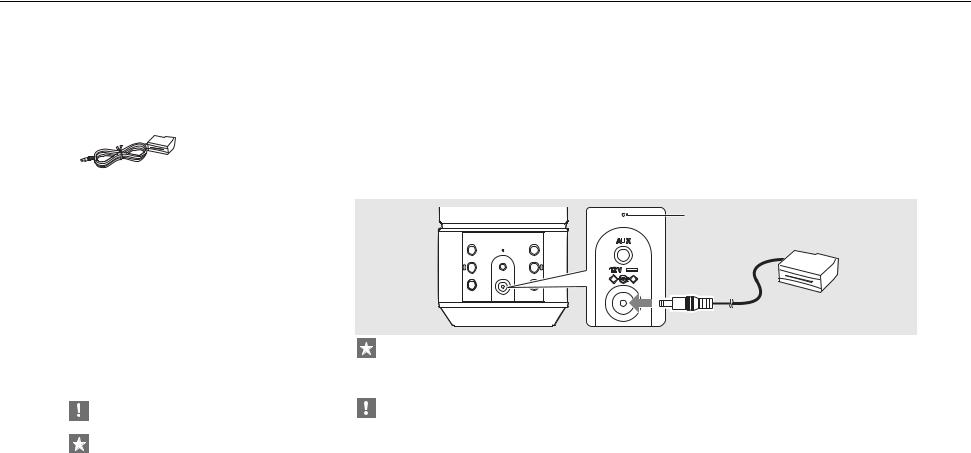
7AUX (&P.10)
Connects to an external device via a commercially available 3.5 mm stereo mini-plug cable.
8DC IN (&P.4)
Connects the supplied AC adaptor.
9Lighting +/– (& P.6)
Press to adjust the lighting brightness.
0 
 (Lighting) (&P.6)
Press to turn on or off the light.
En 5

Preparations
Install Yamaha’s application “DTA CONTROLLER” and turn the unit on.
 Installing “DTA CONTROLLER”
Installing DTA CONTROLLER application on a mobile device, such as a smartphone or tablet computer, allows you to use a variety of additional convenient features of Yamaha desktop audio systems.
Features
•Turning on/off of the unit, adjusting volume
•Turning on/off the lighting, adjusting the brightness of the lighting
•Setting of the SMART TIMER (& P.11)
•Playing back songs stored in a smart phone or tablet
The mobile device needs to be connected with the unit via Bluetooth connection (& P.7).
(For users in the U.S.A.)
http://itunes.com/app/ dtacontroller
https://itunes.apple.com/us/ app/dta-controller-us/ id549333293?mt=8
Google Play™
* If access to any of these fails, search for “DTA
https://play.google.com/ |
CONTROLLER” on the App Store or |
|
store/apps/ |
||
Google Play. |
||
details?id=com.yamaha.av. |
||
|
||
dtacontroller |
|
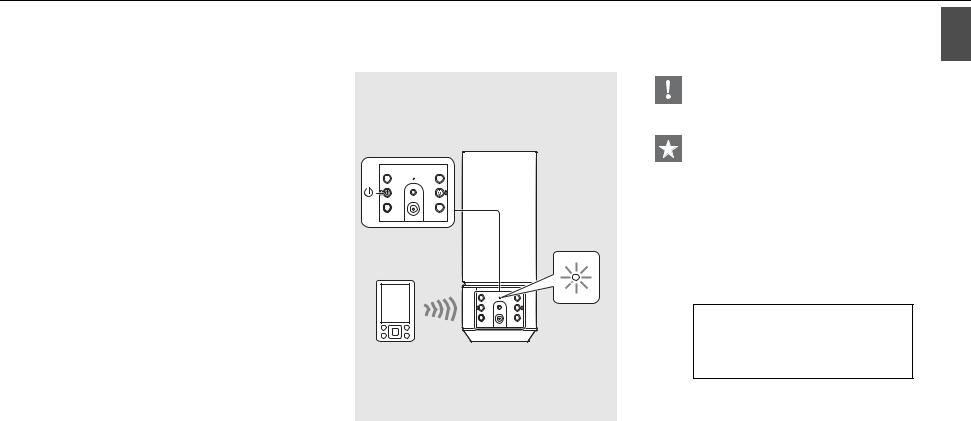
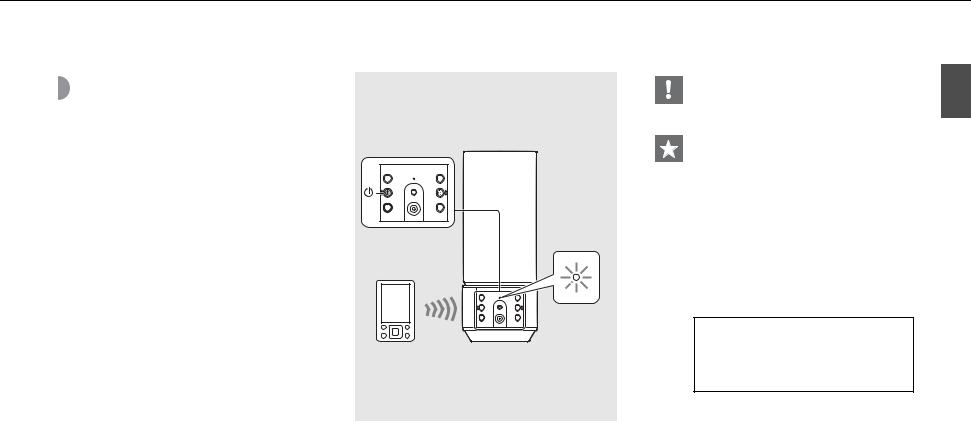
 Turning on the lighting/power
1 Connect the AC adaptor to the unit and plug the power plug into a wall outlet.
2 • Press 
 to turn on the light.
- Lighting can be turned on/off even when the power of the unit is off.
-To adjust the brightness, press the Lighting +/– button (5 steps).
•Press A to turn on the unit.
-The unit plays a startup tone and turns on. You can then play music.
Auto standby function
•The auto standby function will be activated as follows (default setting).
-The unit turns off automatically if no operation has been performed for more than 20 minutes with no device connected to AUX or via Bluetooth connection.
-The unit turns off automatically if no operation has been performed for more than 8 hours.
Activating/deactivating the auto standby function
1Press  to turn on the light.
2Press and hold  for at least 10 seconds.
•The auto standby function switches and the lighting (& P.5) blinks.
-Auto standby is activated: The lighting blinks three times.
-Auto standby is deactivated: The lighting blinks once.
Turning the notification-tone function on/off
•If you want to turn the notification tones (startup tone/shutdown tone, Bluetooth
connection tone, maximum/minimum volume notification tone) on or off, when the unit is off, press A while pressing  to turn on the unit.
-If turning on the notification tones: The unit plays the startup tone.
-If turning off the notification tones: The unit does not play the startup tone.
6 En

Listening to music via Bluetooth connection
You can listen to sound wirelessly from a Bluetooth compatible device.
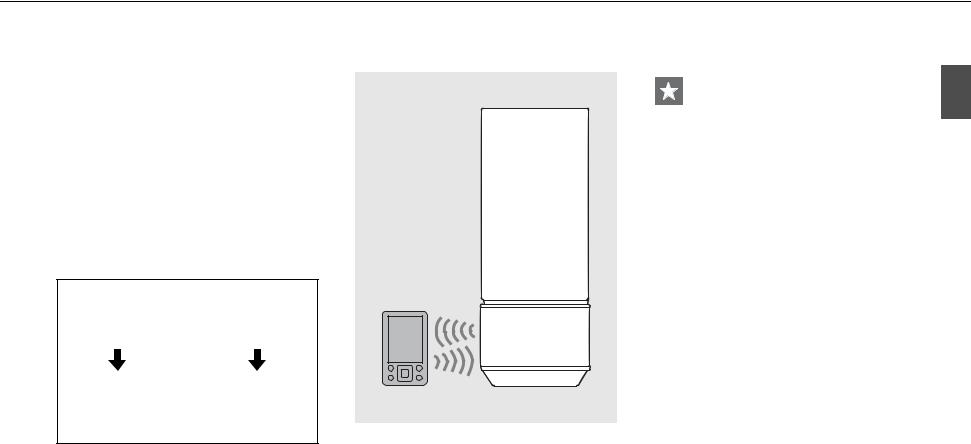
 Pairing a device with the unit
When connecting a Bluetooth device to the unit for the first time, the device is required to be registered to the unit. This process is called “pairing.” Once pairing is completed, subsequent connection can be made with a couple of easy steps.
A Bluetooth device |
A Bluetooth device |
connecting for the first |
already having been |
time |
connected |
Bluetooth
device
Perform pairing and play |
Establish Bluetooth |
|
back music (&P.8) |
connection and play back |
|
|
music (&P.9) |
|
•If pairing information for a device is deleted, you will need to perform pairing of that device again in order to connect it again.
English
En 7

Listening to music via Bluetooth connection
 Performing pairing and playing back music
iPhone
1 Press A to turn on the unit (& P.6).
• The indicator lights in orange.
2 Tap “Settings” and “Bluetooth” on your iPhone to turn on its
Bluetooth function.
3 On the connecting list in the “Device” field, tap “LSX-70 Yamaha.”
•After pairing is complete, the indicator (& P.5) blinks in blue and the unit plays a Bluetooth connection tone when a
Bluetooth connection is established.
4 Play back music on your iPhone.
Other than iPhone
1 Press A to turn on the unit (& P.6).
• The indicator lights in orange.
2 Turn on the Bluetooth function on your device.
3 In the Bluetooth setting of the device, select “LSX-70 Yamaha.”
•After pairing is complete, the indicator (& P.5) blinks in blue and the unit plays a Bluetooth connection tone when a
Bluetooth connection is established.
•If the device does not connect to the unit automatically after the pairing is completed, select “LSX-70 Yamaha” again in the Bluetooth setting on your device.
•For details, see the owner’s manual of your device.
4 Play back music on your device.
•If another device is already connected to the unit,
terminate that Bluetooth connection by pressing and holding A, then perform pairing with the
new device.
•The pairing operation may differ depending on your iPhone or version of device OS.
•If another device is already connected to the unit,
terminate that Bluetooth connection by pressing and holding A, then perform pairing with the
new device.
•If a passkey is required during the pairing operation, enter the number “0000.”
8 En
Listening to music via Bluetooth connection
 Connecting a paired
Bluetooth device and playing back music
If the unit is connected to another device via Bluetooth connection, terminate that connection (see “Terminating the Bluetooth connection” on the right) before connecting to the target device.
1 Press A to turn on the unit.
2 Perform Bluetooth connection.
•Turn on the Bluetooth function on the device and select “LSX-70 Yamaha.”
•The indicator blinks in blue and the unit plays a
Bluetooth connection tone when a connection is established.
•If the device is latest recently connected one via
Bluetooth connection, this unit and the connecting device are connected automatically via Bluetooth connection when you turn on the power of this unit.
3 Play back music on the connected device.
English
• |
Decrease the volume of the unit before |
|
|
playback. Otherwise, playback volume may be |
|
|
too loud. |
|
Terminating the Bluetooth connection |
||
• |
Bluetooth connection can be terminated by either |
|
1 |
one of the following. |
|
- Turn off the Bluetooth function of the connected |
||
|
||
|
device. |
|
|
- Press and hold Aon the unit. |
|
Indicator |
- Turn off both the power and light of the unit. |
|
|
||
• The indicator blinks in blue and the unit plays a |
||
2, 3 |
Bluetooth disconnection tone when the |
|
connection is terminated. |
||
|
Music enhancer |
|
|
This function enhances the sound of compressed |
|
|
digital sound by regenerating musical elements |
|
|
that are lost through compression via Bluetooth |
|
|
connection. |
|
En 9

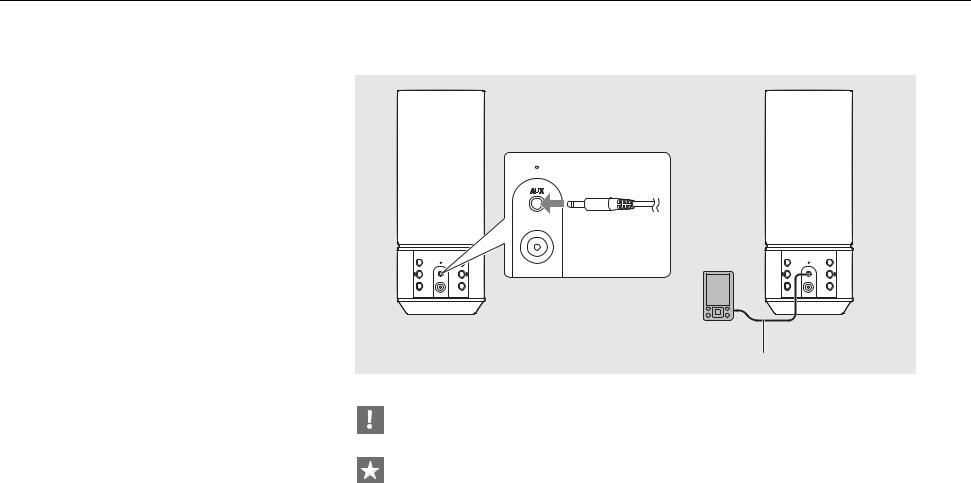
Listening to external sources
This unit allows playback of external devices connected to the AUX terminal. A commercially available 3.5 mm stereo mini-plug cable is required for this connection. Be sure to turn off the unit by pressing
 Connecting an external device
1 Plug the cable into the AUX terminal of the unit.
2 Connect the other end of the cable to the external device.
 Playing back
1 Press A to turn on the unit.
2 Play back the external device.
•For details on playback, see the owner’s manual supplied with the external device.
2
External
device
3.5 mm stereo mini-plug cable
• Decrease the volume of the unit and the external device before connection.
• If both a Bluetooth device and external device are played back, sound from both devices will be heard.
10 En
Using the SMART TIMER
The SMART TIMER allows you to turn on the lighting at the brightness you set and play back your favorite music as a wake-up timer every morning. You can also turn off the lighting and stop music playback automatically while you are in bed listening to music.
SMART TIMER can be used only when the unit is connected to a power source.
What the SMART TIMER can do
On-timer |
Off-timer |
||
• |
Turn on the lighting at a specified time. |
• |
Turn off the lighting at a specified time. |
• |
Specify the brightness of the lighting. |
• |
Turn off the power at a specified time. |
•Play back the music of a connected device at a specified time.
•Specify a song.
•Preset the volume level.
 Setting the SMART TIMER
SMART TIMER settings can be performed with a smart phone or tablet that has the DTA CONTROLLER application (& P.6) installed.
1 Connect a device via Bluetooth connection (& P.8, 9).
2 Start DTA CONTROLLER on the device and make the SMART TIMER settings.
3 Synchronize the SMART TIMER with the unit by DTA CONTROLLER.
•Be sure to synchronize the SMART TIMER with the unit every time you perform the SMART TIMER setting.
•To play back a song via Bluetooth connection at a set time, it is required that the Bluetooth function of your smart phone or tablet is turned on.
Additionally, in the case of an iPhone, do not quit DTA CONTROLLER while multitasking.
•If another Bluetooth device is connected to the unit at the time you set, the song you set as the on-timer will not be played back. Disconnect any other device before the time you set.
•The on-timer and off-timer of the SMART TIMER can be activated/deactivated by DTA CONTROLLER only.
Inner clock of the unit
•The unit copies the time to the unit’s inner clock from DTA CONTROLLER when a device connects to the unit via Bluetooth connection. The SMART TIMER follows the unit’s inner clock.
•If you disconnect the AC adaptor and the remaining battery level completely runs out, the clock setting will reset and SMART TIMER will turn off.
Due to product improvements, specifications and appearance are subject to change without notice.
English
En 11

Troubleshooting
Refer to the table below if the unit does not function properly. If your solution is not listed below or if the instruction below does not help, turn off the unit, disconnect the AC adaptor, and contact your nearest authorized Yamaha dealer or service center.
 General
Problem |
Cause |
Solution |
|
The unit turns off soon after the power is |
The AC adaptor is not properly connected. |
Connect the AC adaptor firmly. |
|
|
|
||
The battery in this unit is weak. |
Recharge the battery (& P.4). |
||
turned on. |
|||
|
|
||
This unit has been exposed to a strong external electric shock such as |
Hold down Aon the front panel for more than 10 seconds to initialize and |
||
The unit does not operate properly. |
|||
lightning or strong static electricity. |
reboot the unit. |
||
|
|||
|
|
|
|
|
The volume is minimum. |
Turn up the volume. |
|
|
|
|
|
The speakers make no sound. |
The power is off. |
Turn on the unit and play the music again. |
|
|
|
|
|
|
The auto standby function is activated. |
Turn on the unit (& P.6). |
|
|
|
|
|
|
The auto standby function is activated. |
Turn on the unit and/or lighting (& P.6). |
|
|
|
|
|
The unit and/or lighting turn off suddenly. |
The off-timer of the SMART TIMER is set. |
Check the setting of the off-timer from DTA CONTROLLER. |
|
|
|
|
|
|
The battery in this unit is weak. |
Recharge the battery (& P.4). |
|
|
|
|
|
The unit and lighting turn on suddenly. |
The on-timer of the SMART TIMER is set. |
Check the setting of the on-timer from DTA CONTROLLER. |
|
|
|
|
|
The indicator blinks rapidly in orange. |
The battery in this unit is weak. |
Recharge the battery (& P.4). |
|
|
|
|
|
SMART TIMER does not operate. |
SMART TIMER is not set from DTA CONTROLLER. |
Set the SMART TIMER from DTA CONTROLLER and synchronize it to the unit |
|
(& P.11). |
|||
|
|
||
|
|
|
|
There is noise interference from digital or |
This unit is too close to the digital or high-frequency equipment. |
Place this unit farther away from such equipment. |
|
high-frequency equipment. |
|||
|
|
||
|
|
|
|
This unit does not work at all. |
The battery in this unit is weak. |
Recharge the battery (& P.4). |
|
|
|
|
12 En

Troubleshooting
 Bluetooth
Problem |
Cause |
Solution |
|
|
The unit is turned off. |
Turn the unit on and perform the paring (& P.8). |
|
|
|
|
|
|
Another Bluetooth device is connected. |
Terminate current Bluetooth connection, and perform pairing with the new |
|
|
device. |
||
|
|
||
|
|
|
|
Cannot make the unit pair with a |
This unit and the device are too far apart. |
Pair the unit and device within a distance of 10 m (33 ft). |
|
|
|
||
There is a device (microwave oven, wireless LAN, etc.) that outputs signals |
Move this unit away from the device that is emitting radio-frequency |
||
Bluetooth device. |
|||
in the 2.4 GHz frequency band nearby. |
signals. |
||
|
|||
|
|
|
|
|
A Bluetooth adaptor, etc., that you want to pair with this unit has a passkey |
Use a Bluetooth adaptor, etc., whose passkey is “0000.” |
|
|
other than “0000.” |
||
|
|
||
|
|
|
|
|
The Bluetooth device does not support A2DP. |
Perform pairing with a device which supports A2DP. |
|
|
|
|
|
|
The unit is turned off. |
Turn the unit on. |
|
|
|
|
|
|
Another Bluetooth device is connected. |
Terminate current Bluetooth connection, then establish a Bluetooth |
|
|
connection with that device again. |
||
|
|
||
|
|
|
|
|
The Bluetooth function of the device is turned off. |
Turn on the Bluetooth function of the device. |
|
Cannot make a Bluetooth connection. |
|
|
|
|
Perform pairing again (& P.8). |
||
|
|
||
|
The pairing information has been deleted. |
This unit can be paired with eight devices. If pairing with a ninth device is |
|
|
performed, the pairing information with the earliest connection date will be |
||
|
|
||
|
|
deleted. |
|
|
|
|
|
|
This unit is not registered on the device’s Bluetooth connection list. |
Perform paring again (& P.8). |
|
|
|
|
|
|
The volume of the connecting device is set too low. |
Turn up the volume of the connecting device. |
|
|
|
|
|
|
The connecting device is not set to send Bluetooth audio signals to the unit. |
Switch the output of Bluetooth audio signals of the connecting device to |
|
|
the unit. |
||
No sound is produced, or the sound is |
|
||
|
|
||
The Bluetooth connection of the unit with the device has terminated. |
Perform Bluetooth connection operations again (& P.9). |
||
interrupted during playback. |
|||
|
|
||
There is a device (microwave oven, wireless LAN, etc.) that outputs signals |
Move this unit away from the device that is emitting radio-frequency |
||
|
|||
|
in the 2.4 GHz frequency band nearby. |
signals. |
|
|
|
|
|
|
This unit and the connecting device are too far apart. |
Move the connecting device to within 10 m (33 ft) of the unit. |
|
|
|
|
English
En 13

Specifications
Bluetooth section
Bluetooth version |
Ver. 2.1+EDR |
|
|
|
|
Supported profile |
A2DP (Advanced Audio Distribution Profile) |
|
|
|
|
Compatible codecs |
SBC, AAC, aptX® |
|
|
|
|
Wireless output |
Bluetooth Class 2 |
|
|
|
|
Maximum communication range |
10 m [33 ft] (without obstructions) |
|
|
|
|
AUX section |
|
|
|
|
|
Input connector |
3.5 mm stereo mini jack |
|
|
|
|
Lighting section (LED*) |
|
|
|
|
|
Lifetime |
(Luminous flux under 70%) About 36,000 hours |
|
|
|
|
Power consumption |
(When only the lighting is on) 8 W |
|
|
|
|
Rechargeable battery |
|
|
|
|
|
Built-in battery |
Lithium-ion battery |
|
|
|
|
Capacity/Voltage |
2900 mAh/3.6 V |
|
|
|
|
Playable time |
Under the fully recharged condition, about 8 hours (output: |
|
200 mW) |
||
|
||
|
|
|
Recharge time |
Power-on condition: About 7 hours |
|
|
||
Power-off condition: About 4 hours |
||
|
||
|
|
|
General |
|
|
|
|
|
Power supply |
AC 230 V, 50 Hz |
|
|
|
|
|
Power-on condition (music is played back and the lighting is on): |
|
|
10 W |
|
Power consumption |
|
|
Power-off condition (lighting and SMART TIMER are off and no |
||
|
Bluetooth connection): 0.2 W |
|
|
Standby condition (SMART TIMER is on): 0.5 W |
|
|
|
|
AC adaptor |
MU18-D120150-C5 (DC 12 V/1.5 A) |
|
|
|
|
Dimensions (W × H × D) |
94 × 241 × 94 mm (3-3/4 × 9-1/2 × 3-3/4 in) |
|
|
|
|
Weight |
950 g (2.09 lbs.) |
|
|
|
As of August 2014. Specifications are subject to change without notice.
*The estimated lifetime of LED lighting is about 36,000 hours.
This figure is based on the shorter of either the duration until the lighting is worn out, or the duration before luminous flux drops to below 70% of the original. Note, however, that the estimated 36,000 hour duration is not guaranteed.
“Made for iPod,” “Made for iPhone,” and “Made for iPad” mean that an electronic accessory has been
designed to connect specifically to iPod, iPhone, or iPad, respectively, and has been certified by the
developer to meet Apple performance standards.
Apple is not responsible for the operation of this device or its compliance with safety and regulatory standards.
Please note that the use of this accessory with iPod, iPhone, or iPad may affect wireless performance.
iPad, iPhone, iPod and iPod touch are trademarks of Apple Inc., registered in the U.S. and other countries.
Bluetooth
•Bluetooth is a technology for wireless communication between devices within an area of about 10 meters (33 ft) employing the 2.4 GHz frequency band, a band which can be used without a license.
•Bluetooth is a registered trademark of the Bluetooth SIG and is used by Yamaha in accordance with a license agreement.
Handling Bluetooth communications
•The 2.4 GHz band used by Bluetooth compatible devices is a radio band shared by many types of equipment. While Bluetooth compatible devices use a technology minimizing the influence of other components using the same radio band, such influence may reduce the speed or distance of communications and in some cases interrupt communications.
•The speed of signal transfer and the distance at which communication is possible differs according to the distance between the communicating devices, the presence of obstacles, radio wave conditions and the type of equipment.
•Yamaha does not guarantee all wireless connections between this unit and devices compatible with Bluetooth function.
© 2013 CSR plc and its group companies.
The aptX® mark and the aptX logo are trade marks of CSR plc or one of its group companies and may be registered in one or more jurisdictions.
Android™
Android and Google Play are trademarks of Google, Inc.
14 En

Table des matières
Introduction
Accessoires fournis............ |
4 |
4 |
|
|
|||
Quelques mots sur ce mode d’emploi |
|
|
|||||
Recharge de cet appareil............ |
4 |
|
|
|
|||
Nom des pièces............ |
5 |
|
|
|
|||
Préparations |
|
|
|
|
|||
Installation de « DTA CONTROLLER »............ |
6 |
6 |
|
||||
Allumage de l’éclairage/Mise sous tension............ |
|
||||||
Écoute de musique avec la connexion Bluetooth |
|
||||||
Appariement d’un périphérique avec l’appareil |
............7 |
|
|||||
Appariement et lecture de musique............ |
8 |
|
9 |
||||
Connexion d’un périphérique Bluetooth apparié et lecture de musique............ |
|||||||
|
|
Désactivation de la connexion Bluetooth |
9 |
|
|||
|
|
|
|||||
Écoute de sources externes |
|
|
|||||
Raccordement d’un périphérique externe............ |
10 |
|
|||||
Lecture............ |
10 |
|
|
|
|
||
Utilisation du SMART TIMER |
|
|
|||||
Réglage du SMART TIMER............ |
11 |
|
|
|
|||
Guide de dépannage............ |
12 |
|
|
||||
Caractéristiques techniques............ |
14 |
|
|||||
2 Fr

Fusion de la musique et de l’éclairage
Commencez votre journée sous le bon éclairage et sur une bonne note.
Réveillez-vous au son de votre morceau préféré, dans
une ambiance conviviale. ............ |
11 |
À la fin de la journée, plongez dans une ambiance reposante de lumière tamisée et de sons calfeutrés. ............6
Son de qualité élevée et simplicité d’utilisation
Aspect pratique de Plug and Play sur vos
périphériques mobiles avec un son |
|
||
amélioré. |
............7, 10 |
|
|
Utilisation commode à distance de |
|||
votre périphérique mobile. ............ |
6 |
||
De la musique partout où vous le |
|||
souhaitez ............ |
4 |
|
|
Français
Fr 3

Introduction
Vérifiez le contenu de l’emballage et lisez entièrement ce manuel.
 Accessoires fournis
Adaptateur secteur (12 V CC/1,5 A
N° de modèle : MU18-D120150-C5)
 Quelques mots sur ce mode d’emploi
•Opérations
L’« iPhone » décrit dans ce manuel peut également faire référence à un « iPod touch» ou à un « iPad ».
•Illustrations
Les illustrations peuvent varier du véritable article représenté.
•Symboles
Signale les précautions à prendre concernant l’utilisation de l’appareil et les limites de ses fonctions.
Donne des explications supplémentaires permettant une meilleure utilisation.
&Indique la ou les pages de référence correspondantes.
 Recharge de cet appareil
Lors de la première utilisation de cet appareil, raccordez l’adaptateur secteur fourni à l’appareil et chargez-le à partir d’une prise murale.
•Si la charge de l’appareil s’effectue alors que l’alimentation et la lampe sont éteintes, le voyant clignote lentement en orange. Une fois la charge terminée, le voyant s’éteint.
•Si le niveau de la batterie de cet appareil s’affaiblit, le voyant clignote rapidement en orange.
Voyant
Adaptateur secteur
•La durée de charge de la batterie est d’environ 4 heures lorsque l’appareil est hors tension et d’environ 7 heures lorsque l’appareil est sous tension.
•Vérifiez le niveau restant de la batterie de l’appareil sur le « DTA CONTROLLER » (& P.6).
•Dans des environnements à températures très élevées ou basses, l’appareil peut se recharger plus rapidement que d’habitude ou ne pas se recharger.
•Pour maintenir l’appareil en état de fonctionnement, il faut le recharger tous les six mois.
•La batterie rechargeable a une durée de vie limitée. Sa capacité diminue progressivement avec le temps et la fréquence d’utilisation.
•La durée de vie de la batterie rechargeable dépend de la façon dont elle est stockée et des conditions et de l’environnement d’utilisation.
•Afin de parvenir à la durée maximale de la batterie, il peut y avoir une différence de volume sonore et de qualité lors de l’utilisation de l’appareil avec la batterie et lors de l’utilisation de l’appareil relié à l’adaptateur secteur.
•Selon le volume et l’état de la lampe, l’alimentation peut se couper indépendamment du niveau de batterie restant.
4 Fr
Nom des pièces
Familiarisez-vous avec toutes les pièces et les fonctions suivantes.
* Les effets lumineux représentent l’expansion du son.
1Lampe/Haut-parleur
2Lampe
3Haut-parleur
4
 /
/ 
 (VOLUME)
Pour régler le volume.
5A (Alimentation) (& P.6)
Si vous appuyez sur cette touche : met l’appareil sous/hors tension.
Si vous maintenez cette touche enfoncée : déconnecte un périphérique Bluetooth.
L’appareil lit une tonalité de démarrage lors de sa mise sous tension et une tonalité d’arrêt lors de sa mise hors tension.
6Voyant
S’allume lorsque vous mettez l’appareil sous tension. Clignote lorsque l’état de la connexion Bluetooth et l’état
de la batterie rechargeable changent.
7AUX (&P.10)
Se connecte à un périphérique externe via un câble minijack stéréo de 3,5 mm disponible dans le commerce.
8DC IN (&P.4)
Se connecte à l’adaptateur secteur fourni.
9Éclairage +/– (&P.6)
Appuyez sur cette touche pour régler la luminosité de l’éclairage.
0 
 (Éclairage) (& P.6)
Appuyez sur cette touche pour allumer ou éteindre la lampe.
Français
Fr 5

Préparations
Installez l’application « DTA CONTROLLER » de Yamaha et mettez l’appareil sous tension.
 Installation de « DTA CONTROLLER »
L’installation de l’application DTA CONTROLLER sur un périphérique mobile, comme un smartphone ou une tablette, vous permet d’utiliser différentes caractéristiques pratiques supplémentaires des systèmes audio de bureau Yamaha.
Fonctions
•Mise sous/hors tension de l’appareil, réglage du volume
•Mise sous/hors tension de l’éclairage, réglage de la luminosité de l’éclairage
•Réglage de la fonction SMART TIMER (& P.11)
•Lecture des morceaux stockés sur un smartphone ou une tablette
Le périphérique mobile doit être connecté à l’appareil via Bluetooth (& P.7).
|
(Pour les utilisateurs aux |
|
États-Unis) |
http://itunes.com/app/ |
|
dtacontroller |
https://itunes.apple.com/us/ |
|
app/dta-controller-us/ |
|
id549333293?mt=8 |
Google Play™
* En cas d’échec de l’un de ces accès,
https://play.google.com/ |
recherchez « DTA CONTROLLER » sur l’App |
|
store/apps/ |
||
Store ou sur Google Play. |
||
details?id=com.yamaha.av. |
||
|
||
dtacontroller |
|
 Allumage de l’éclairage/Mise sous tension
1 Raccordez l’adaptateur secteur à l’appareil, puis branchez la fiche d’alimentation sur une prise murale.
2 • Appuyez sur 
 pour allumer la lampe.
- Il est possible d’allumer/éteindre l’éclairage même lorsque l’appareil est hors tension.
- Pour régler la luminosité, appuyez sur la touche
Éclairage +/– (5 étapes).
•Appuyez sur Apour mettre l’appareil sous tension.
-L’appareil lit une tonalité de démarrage et se met sous tension. Vous pouvez alors lire de la musique.
Fonction de veille automatique
•La fonction de veille automatique sera activée comme suit (réglage par défaut).
-L’appareil se met automatiquement hors tension si aucune opération n’a été
effectuée depuis plus de 20 minutes et qu’aucun périphérique n’est branché à la borne AUX ou via la connexion Bluetooth.
-L’appareil se met automatiquement hors tension si aucune opération n’a été effectuée depuis plus de 8 heures.
Activation/Désactivation de la fonction de veille automatique
1Appuyez sur  pour allumer la lampe.
2Maintenez la touche  enfoncée pendant au moins 10 secondes.
•La fonction de veille automatique commute et l’éclairage (& P.5) clignote.
-La veille automatique est activée : l’éclairage clignote trois fois.
-La veille automatique est désactivée : l’éclairage clignote une fois.
Activation/Désactivation de la fonction de tonalité de notification
•Si vous souhaitez activer ou désactiver les tonalités de notification (tonalité de
démarrage/tonalité d’arrêt, tonalité de connexion Bluetooth, tonalité de notification de volume maximal/minimal), lorsque l’appareil est hors tension, appuyez sur A tout en appuyant sur 
 pour mettre l’appareil sous tension.
-Si vous activez les tonalités de notification : l’appareil lit la tonalité de démarrage.
-Si vous désactivez les tonalités de notification : l’appareil ne lit pas la tonalité de démarrage.
6 Fr
Écoute de musique avec la connexion Bluetooth
Vous pouvez écouter du son sans fil à partir d’un périphérique compatible Bluetooth.
 Appariement d’un périphérique avec l’appareil
Lorsque vous connectez un périphérique Bluetooth à l’appareil pour la première fois, ce périphérique doit être enregistré sur l’appareil. Ce processus est appelé
« appariement ». Une fois l’appariement terminé, il est possible d’effectuer une connexion ultérieure en suivant quelques étapes simples.
Un périphérique |
Un périphérique |
Bluetooth qui se connecte |
Bluetooth qui s’est déjà |
pour la première fois |
connecté |
Périphérique
Bluetooth
•Si les informations d’appariement d’un périphérique sont supprimées, vous devrez recommencer l’appariement de ce périphérique pour pouvoir le reconnecter.
Procédez à l’appariement |
Établissez une connexion |
et lisez de la musique |
Bluetooth et lisez de la |
(&P.8) |
musique (&P.9) |
Français
Fr 7
Écoute de musique avec la connexion Bluetooth
 Appariement et lecture de musique
iPhone
1 Appuyez sur A pour mettre l’appareil sous tension (& P.6).
• Le voyant s’allume en orange.
2 Tapez sur « Réglages » et « Bluetooth » sur votre iPhone pour activer sa fonction Bluetooth.
3 Dans la liste des connexions du champ « Appareils », tapez sur « LSX-70 Yamaha ».
•Une fois l’appariement terminé, le voyant (& P.5) clignote en bleu et l’appareil lit une tonalité de connexion Bluetooth lors de l’établissement d’une connexion Bluetooth.
4 Lisez de la musique sur votre iPhone.
Périphérique autre qu’un iPhone
1 Appuyez sur A pour mettre l’appareil sous tension (& P.6).
• Le voyant s’allume en orange.
2 Activez la fonction Bluetooth de votre périphérique.
3 Dans le réglage Bluetooth du périphérique, sélectionnez « LSX-70 Yamaha ».
•Une fois l’appariement terminé, le voyant (& P.5) clignote en bleu et l’appareil lit une tonalité de connexion Bluetooth lors de l’établissement d’une connexion Bluetooth.
•Si le périphérique ne se connecte pas automatiquement à l’appareil une fois l’appariement terminé, sélectionnez à nouveau « LSX-70 Yamaha » dans le réglage Bluetooth de votre périphérique.
•Pour plus de détails, consultez le mode d’emploi de votre périphérique.
4 Lisez de la musique sur votre périphérique.
•Si un autre périphérique est déjà connecté à l’appareil, désactivez cette connexion Bluetooth en maintenant la touche A enfoncée, puis procédez
à l’appariement avec le nouveau périphérique.
•L’opération d’appariement peut varier en fonction de votre iPhone ou de la version du système d’exploitation du périphérique.
•Si un autre périphérique est déjà connecté à l’appareil, désactivez cette connexion Bluetooth en maintenant la touche A enfoncée, puis procédez
à l’appariement avec le nouveau périphérique.
•Si un code d’accès est nécessaire durant l’opération d’appariement, saisissez le numéro « 0000 ».
8 Fr
Écoute de musique avec la connexion Bluetooth
Connexion d’un |
|
• |
Baissez le volume de l’appareil avant de |
|
|
|
débuter la lecture. Sinon, le volume de lecture |
||
périphérique Bluetooth |
|
|
risque d’être trop fort. |
|
|
|
|
|
|
apparié et lecture de |
|
Désactivation de la connexion Bluetooth |
||
1 |
• |
Bluetooth La connexion peut être désactivée par |
||
musique |
|
l’une ou l’autre des étapes suivantes. |
||
|
|
|
|
|
|
|
|
|
- Désactivez la fonction Bluetooth du |
Si l’appareil est connecté à un autre périphérique via la |
|
|
périphérique connecté. |
|
|
|
- Maintenez enfoncée la touche Ade l’appareil. |
||
connexion Bluetooth, désactivez cette connexion (voir |
|
|
||
|
|
- Coupez l’alimentation et éteignez la lampe de |
||
« Désactivation de la connexion Bluetooth » sur la droite) |
|
Voyant |
||
|
l’appareil simultanément. |
|||
avant la connexion au périphérique cible. |
|
|||
|
|
|||
|
• |
|
||
1 Appuyez sur A pour mettre l’appareil |
2, 3 |
Le voyant clignote en bleu et l’appareil lit une |
||
|
tonalité de déconnexion Bluetooth lors de la |
|||
|
|
désactivation de la connexion. |
||
sous tension. |
|
|
|
|
2 Établissez la connexion Bluetooth. |
|
|
Amplificateur |
|
|
|
Cette fonction améliore le son numérique |
||
• |
Activez la fonction Bluetooth du périphérique et |
|
|
|
|
|
compressé en régénérant les éléments musicaux |
||
|
sélectionnez « LSX-70 Yamaha ». |
|
|
qui se perdent lors de la compression via la |
• |
Le voyant clignote en bleu et l’appareil lit une |
|
|
connexion Bluetooth. |
|
tonalité de connexion Bluetooth lors de |
|
|
|
|
l’établissement d’une connexion Bluetooth. |
|
|
|
•Si le périphérique est celui le plus récemment connecté via Bluetooth, cet appareil et le
périphérique connecté sont connectés automatiquement via Bluetooth lorsque vous mettez cet appareil sous tension.
3 Lisez de la musique sur le périphérique connecté.
Français
Fr 9
Écoute de sources externes
Cet appareil permet de lire des périphériques externes branchés à la borne AUX. Un câble mini-jack stéréo de 3,5 mm disponible dans le commerce est nécessaire à ce raccordement. Assurez-vous de mettre l’appareil hors tension en appuyant sur A avant de raccorder le périphérique externe.
 Raccordement d’un périphérique externe
1
2
1
Branchez le câble à la borne AUX de l’appareil.
Connectez l’autre extrémité du câble au périphérique externe.
 Lecture
1 Appuyez sur A pour mettre l’appareil sous tension.
2 Lisez le périphérique externe.
•Pour plus d’informations sur la lecture, consultez le mode d’emploi du périphérique externe.
2
Périphérique
externe
Câble mini-jack stéréo de 3,5 mm
•Baissez le volume de l’appareil et du périphérique externe avant la connexion.
•Si un périphérique Bluetooth et un périphérique externe sont lus, le son de chacun des deux périphériques sera perceptible.
10 Fr

Utilisation du SMART TIMER
Le SMART TIMER vous permet d’allumer l’éclairage avec la luminosité que vous avez définie et de lire votre musique favorite en guise de réveil tous les matins. Vous pouvez également éteindre l’éclairage et arrêter automatiquement la lecture de la musique lorsque vous l’écoutez de votre lit.
Le SMART TIMER peut uniquement être utilisé lorsque l’appareil est raccordé à une source d’alimentation.
Ce que le SMART TIMER peut faire
Minuterie de mise en marche |
Minuterie d’arrêt |
||
• |
Allumer l’éclairage à une heure précise. |
• |
Éteindre l’éclairage à une heure précise. |
• |
Spécifier la luminosité de l’éclairage. |
• |
Mettre l’appareil hors tension à une heure précise. |
•Lire la musique d’un périphérique connecté à une heure précise.
•Spécifier un morceau.
•Prérégler le niveau de volume.
 Réglage du SMART TIMER
Les réglages du SMART TIMER peuvent être effectués avec un smartphone ou une tablette comportant l’application DTA
CONTROLLER (& P.6).
1 Connectez un périphérique via Bluetooth (& P.8, 9).
2 Lancez le DTA CONTROLLER sur le périphérique et procédez aux réglages du SMART TIMER.
3 Synchronisez le SMART TIMER avec l’appareil au moyen du DTA CONTROLLER.
• Veillez à synchroniser le SMART TIMER avec l’appareil lors de chaque réglage du SMART TIMER.
•Pour lire un morceau via la connexion Bluetooth à une heure précise, il faut que la fonction Bluetooth
de votre smartphone ou tablette ait été activée. En outre, dans le cas d’un iPhone, ne quittez pas le DTA CONTROLLER pendant des tâches multiples.
•Si un autre périphérique Bluetooth est connecté à l’appareil à l’heure que vous avez définie, le morceau que vous avez réglé sur la minuterie de mise en marche ne sera pas lu. Débranchez tout autre périphérique avant l’heure que vous avez définie.
•La minuterie de mise en marche et la minuterie d’arrêt du SMART TIMER ne peuvent être activées/ désactivées que par le DTA CONTROLLER.
Horloge interne de l’appareil
•L’appareil copie l’heure du DTA CONTROLLER sur
son horloge interne lorsqu’un périphérique se connecte à l’appareil via la connexion Bluetooth.
Le SMART TIMER suit l’horloge interne de l’appareil.
•Si vous débranchez l’adaptateur secteur et si le niveau de batterie restant est complètement épuisé, le réglage de l’horloge se réinitialise et SMART TIMER s’éteint.
Pour améliorer le produit, ses caractéristiques techniques et son aspect peuvent faire l’objet de modifications sans préavis.
Français
Fr 11

Guide de dépannage
Reportez-vous au tableau suivant si l’appareil ne fonctionne pas convenablement. Si votre solution n’est pas mentionnée ci-dessous, ou encore si l’action corrective suggérée est sans effet, mettez l’appareil hors tension, débranchez l’adaptateur secteur et prenez contact avec votre revendeur ou centre d’entretien Yamaha agréé le plus proche.
 Généralités
Anomalies |
Causes possibles |
Solution |
|
L’appareil se met hors tension peu de |
L’adaptateur secteur n’est pas raccordé correctement. |
Raccordez correctement l’adaptateur secteur. |
|
|
|
||
temps après la mise sous tension. |
La batterie de l’appareil est faible. |
Rechargez la batterie (& P.4). |
|
L’appareil ne fonctionne pas |
|
|
|
Cet appareil a été exposé à une forte décharge électrique externe telle que |
Maintenez enfoncée la touche A du panneau avant pendant plus de |
||
correctement. |
la foudre ou une forte électricité statique. |
10 secondes pour initialiser et redémarrer l’appareil. |
|
|
|||
|
|
|
|
|
Le volume est réduit au minimum. |
Augmentez le niveau de volume. |
|
|
|
|
|
Les enceintes n’émettent aucun son. |
L’alimentation est coupée. |
Mettez l’appareil sous tension et relancez la lecture de la musique. |
|
|
|
|
|
|
La fonction de veille automatique est activée. |
Mettez l’appareil sous tension (& P.6). |
|
|
|
|
|
L’appareil et/ou l’éclairage s’éteint |
La fonction de veille automatique est activée. |
Mettez l’appareil et/ou l’éclairage sous tension (& P.6). |
|
|
|
||
La minuterie d’arrêt du SMART TIMER est réglée. |
Vérifiez le réglage de la minuterie d’arrêt à partir du DTA CONTROLLER. |
||
soudainement. |
|||
|
|
||
La batterie de l’appareil est faible. |
Rechargez la batterie (& P.4). |
||
|
|||
|
|
|
|
L’appareil et l’éclairage s’allument |
La minuterie de mise en marche du SMART TIMER est réglée. |
Vérifiez le réglage de la minuterie de mise en marche à partir du DTA |
|
soudainement. |
CONTROLLER. |
||
|
|||
|
|
|
|
Le voyant clignote rapidement en orange. |
La batterie de l’appareil est faible. |
Rechargez la batterie (& P.4). |
|
|
|
|
|
Le SMART TIMER ne fonctionne pas. |
Le SMART TIMER n’a pas été réglé à partir du DTA CONTROLLER. |
Réglez le SMART TIMER à partir du DTA CONTROLLER et synchronisez-le |
|
avec l’appareil (& P.11). |
|||
|
|
||
|
|
|
|
Un appareil numérique ou un |
Cet appareil est trop proche de l’équipement numérique ou à haute |
|
|
équipement à haute fréquence génère un |
Éloignez cet appareil de l’équipement concerné. |
||
fréquence. |
|||
brouillage. |
|
||
|
|
||
|
|
|
|
L’appareil ne fonctionne pas du tout. |
La batterie de l’appareil est faible. |
Rechargez la batterie (& P.4). |
|
|
|
|
12 Fr

|
|
Guide de dépannage |
|
Bluetooth |
|
|
|
|
|
|
|
Anomalies |
Causes possibles |
Solution |
|
|
L’appareil est hors tension. |
Mettez l’appareil sous tension et procédez à l’appariement (& P.8). |
|
|
|
|
|
|
Un autre périphérique Bluetooth est connecté. |
Désactivez la connexion Bluetooth en cours, puis procédez à l’appariement |
|
|
du nouveau périphérique. |
||
|
|
||
|
|
|
|
|
Cet appareil et le périphérique sont trop éloignés l’un de l’autre. |
Appariez l’appareil et le périphérique à une distance maximale de 10 m. |
|
Appariement de l’appareil et d’un |
|
|
|
Un périphérique à proximité (four à micro-ondes, réseau local sans fil, etc.) |
Éloignez cet appareil du périphérique qui émet des signaux de |
||
périphérique Bluetooth impossible. |
émet des signaux de sortie dans la bande de fréquences 2,4 GHz. |
radiofréquence. |
|
|
|
|
|
|
Le mot de passe de l’adaptateur Bluetooth, etc. que vous souhaitez apparier |
Utilisez un adaptateur Bluetooth, etc. dont le mot de passe est « 0000 ». |
|
|
avec cet appareil est différent de « 0000 ». |
||
|
|
||
|
|
|
|
|
Le périphérique Bluetooth ne prend pas en charge le profil A2DP. |
Procédez à l’appariement avec un périphérique prenant en charge le profil |
|
|
A2DP. |
||
|
|
||
|
|
|
|
|
L’appareil est hors tension. |
Mettez l’appareil sous tension. |
|
|
|
|
|
|
Un autre périphérique Bluetooth est connecté. |
Désactivez la connexion Bluetooth en cours, puis ré-établissez la connexion |
|
|
Bluetooth avec ce périphérique. |
||
|
|
||
|
|
|
|
|
La fonction Bluetooth du périphérique est désactivée. |
Activez la fonction Bluetooth du périphérique. |
|
|
|
|
|
Connexion Bluetooth impossible. |
|
Renouvelez l’appariement (& P.8). |
|
|
Cet appareil peut être apparié avec huit périphériques. En cas |
||
|
|
||
|
Les informations d’appariement ont été supprimées. |
d’appariement avec un neuvième périphérique, les informations |
|
|
|
d’appariement portant la date de connexion la plus ancienne sont |
|
|
|
supprimées. |
|
|
|
|
|
|
Cet appareil n’est pas enregistré dans la liste des connexions du |
Renouvelez l’appariement (& P.8). |
|
|
périphérique Bluetooth. |
||
|
|
||
|
|
|
|
|
Le volume du périphérique de connexion est défini à un niveau trop bas. |
Augmentez le volume du périphérique de connexion. |
|
|
|
|
|
|
Le périphérique de connexion n’est pas configuré pour envoyer des |
Basculez la sortie des signaux audio Bluetooth du périphérique de |
|
|
signaux audio Bluetooth à l’appareil. |
connexion vers l’appareil. |
|
|
|
|
|
Absence de son ou interruption du son |
La connexion Bluetooth de l’appareil avec le périphérique est désactivée. |
Renouvelez les opérations de connexion Bluetooth (& P.9). |
|
pendant la lecture. |
|
|
|
Un périphérique à proximité (four à micro-ondes, réseau local sans fil, etc.) |
Éloignez cet appareil du périphérique qui émet des signaux de |
||
|
|||
|
émet des signaux de sortie dans la bande de fréquences 2,4 GHz. |
radiofréquence. |
|
|
|
|
|
|
Cet appareil et le périphérique de connexion sont trop éloignés l’un de |
Placez le périphérique de connexion à 10 m au maximum de l’appareil. |
|
|
l’autre. |
||
|
|
||
|
|
|
Français
Fr 13

Caractéristiques techniques
Section Bluetooth
Version de Bluetooth |
Ver. 2.1+EDR |
|
|
|
|
Profil pris en charge |
A2DP (profil de distribution audio avancé) |
|
|
|
|
Codecs compatibles |
SBC, AAC, aptX® |
|
|
|
|
Sortie sans fil |
Bluetooth Classe 2 |
|
|
|
|
Portée de communication |
10 m (sans obstacles) |
|
maximale |
||
|
||
|
|
|
Section AUX |
|
|
|
|
|
Connecteur d’entrée |
Prise mini-jack stéréo de 3,5 mm |
|
|
|
|
Section éclairage (LED*) |
|
|
|
|
|
Durée de vie |
(Flux lumineux inférieur à 70 %) Environ 36 000 heures |
|
|
|
|
Consommation |
(Uniquement lorsque l’éclairage est allumé) 8 W |
|
|
|
|
Batterie rechargeable |
|
|
|
|
|
Batterie intégrée |
Batterie au lithium-ion |
|
|
|
|
Capacité/Tension |
2900 mAh/3,6 V |
|
|
|
|
Durée de lecture |
Entièrement rechargée : environ 8 heures (sortie : 200 mW) |
|
|
|
|
Durée de recharge |
Sous tension : environ 7 heures |
|
|
||
Hors tension : environ 4 heures |
||
|
||
|
|
|
Généralités |
|
|
|
|
|
Alimentation |
230 V CA, 50 Hz |
|
|
|
|
|
Condition de la mise sous tension (la musique est lue et |
|
|
l’éclairage est allumé) : 10 W |
|
|
|
|
Consommation |
Condition de la mise hors tension (l’éclairage et le SMART |
|
TIMER sont éteints et il n’y a aucune connexion Bluetooth) : |
||
|
||
|
0,2 W |
|
|
État de veille (le SMART TIMER est actif) : 0,5 W |
|
|
|
|
Adaptateur secteur |
MU18-D120150-C5 (12 V CC/1,5 A) |
|
|
|
|
Dimensions (L × H × P) |
94 × 241 × 94 mm |
|
|
|
|
Poids |
950 g |
|
|
|
À compter d’août 2014. Les caractéristiques peuvent être modifiées sans préavis.
*La durée de vie estimée de l’éclairage LED est d’environ 36 000 heures.
Ce chiffre est basé sur la durée la plus courte, c’est-à-dire jusqu’à ce que l’éclairage ait atteint la fin de sa vie ou avant que le flux lumineux ne chute en dessous de 70 % du flux d’origine. Notez toutefois que la durée estimée de 36 000 heures n’est pas garantie.
« Made for iPod », « Made for iPhone » et « Made for iPad » signifient qu’un accessoire électronique a été conçu pour se raccorder spécifiquement à un iPod,
un iPhone ou un iPad et a été certifié par le développeur pour répondre aux normes de performance d’Apple.
Apple n’est pas responsable du bon fonctionnement de ce périphérique ou de sa conformité aux normes de sécurité et à la réglementation en vigueur.
Notez que l’utilisation de cet accessoire avec un iPod, un iPhone ou un iPad peut avoir un effet néfaste sur ses fonctions de liaison sans fil.
iPad, iPhone, iPod et iPod touch sont des marques d’Apple Inc., déposées aux États-Unis et dans d’autres pays.
Bluetooth
•Bluetooth est une technologie permettant d’établir des communications sans fil entre des périphériques dans un rayon d’environ 10 mètres dans la bande de fréquences 2,4 GHz, une bande qui peut être utilisée sans licence.
•Bluetooth est une marque déposée de Bluetooth SIG utilisée par Yamaha conformément à un accord de licence.
Gestion des communications Bluetooth
•La bande 2,4 GHz utilisée par les périphériques compatibles Bluetooth est une bande radio
partagée par de nombreux types d’équipement. Bien que les périphériques compatibles Bluetooth fassent appel à une technologie permettant de minimiser l’influence d’autres équipements qui utilisent la même bande radio, une telle influence peut réduire la vitesse ou la distance des communications voire, dans certains cas, interrompre les communications.
•La vitesse de transfert du signal et la distance à laquelle il est possible d’établir une communication diffèrent selon la distance entre les périphériques qui communiquent, la présence d’obstacles, les ondes radio et le type d’équipement.
•Yamaha ne garantit pas toutes les connexions sans fil entre cet appareil et les périphériques compatibles Bluetooth.
© 2013 CSR plc et les sociétés de son groupe.
La marque aptX® et le logo aptX sont des marques déposées de CSR plc ou de l’une des sociétés du groupe et peuvent être enregistrés dans une ou plusieurs juridictions.
Android™
Android et Google Play sont des marques commerciales de Google, Inc.
14 Fr

Inhalt
Einleitung
Mitgeliefertes Zubehör............ |
4 |
|
Über dieses Handbuch............ |
4 |
|
Aufladen des Geräts............ |
4 |
|
Bezeichnungen der Teile............ |
5 |
|
Vorbereitungen |
|
|
Installieren von „DTA CONTROLLER“............ |
6 |
|
Einschalten der Beleuchtung/des Geräts............ |
6 |
|
Wiedergeben von Musik über eine Bluetooth-Verbindung
Koppeln eines Geräts mit der Einheit............ |
7 |
8 |
|
||
Durchführen der Kopplung und Wiedergeben der Musik............ |
9 |
||||
Verbinden eines gekoppelten Bluetooth-Geräts und Wiedergeben von Musik............ |
|||||
|
|
Beenden der Bluetooth-Verbindung |
9 |
|
|
|
|
|
|
||
Wiedergabe von externen Quellen
Anschließen eines externen Geräts............ |
10 |
|
Wiedergabe............ |
10 |
|
Verwenden des SMART TIMER
Einstellen des SMART TIMER............ |
11 |
Problembehebung............ |
12 |
Technische Daten............ |
14 |
2 De
Eine Fusion aus Musik und Beleuchtung
Starten Sie den Tag im richtigen Licht und mit der richtigen Untermalung.
Wachen Sie in einer angenehmen Atmosphäre zu Ihrem
Lieblingslied auf. ............ |
11 |
Versinken Sie am Ende des Tages in einer beruhigenden Atmosphäre aus sanfter
Beleuchtung und Klang. ............ |
6 |
Qualitativ hochwertiger Klang und Benutzerfreundlichkeit
Der Plug-and-Play-Komfort Ihrer
Mobilgeräte mit verbessertem
Klang. |
............7, 10 |
|
Praktische Fernbedienung über Ihr |
||
Mobilgerät. ............ |
6 |
|
|
Musik, wo Sie auch |
|
|
wollen ............ |
4 |
Deutsch
De 3
Einleitung
Überprüfen Sie den Inhalt des Pakets und lesen Sie sich diese Anleitung aufmerksam durch.
 Mitgeliefertes Zubehör
Wechselstrom-Netzteil
(12 V Gleichstrom, 1,5 A
Modellnr.: MU18-D120150-C5)
 Über dieses Handbuch
•Bedienung
Die Bezeichnung „iPhone“ in dieser Anleitung kann sich auch auf den „iPod touch“ oder das „iPad“ beziehen.
•Abbildungen
Die Abbildungen können vom aktuellen Produkt abweichen.
•Symbole
Zeigt Vorsichtsmaßnahmen und
Funktionsbeschränkungen für das Gerät an.
Zeigt zusätzliche Erklärungen zur besseren
Bedienung an.
&Verweist auf die entsprechende(n) Referenzseite(n).
 Aufladen des Geräts
Wenn Sie dieses Gerät zum ersten Mal verwenden, schließen Sie das mitgelieferte Netzteil an das Gerät an und laden Sie es über eine Netzsteckdose auf.
•Wenn das Gerät im ausgeschalteten Zustand und bei ausgeschalteter Beleuchtung geladen wird, blinkt die Anzeige langsam orange. Wenn der Ladevorgang abgeschlossen ist, erlischt die Anzeige.
•Wenn die verbleibende Akkuleistung sehr niedrig ist, blinkt die Anzeige schnell orange.
Anzeige
Wechselstrom-Netzteil
•Die Ladezeit für den Akku liegt bei ungefähr 4 Stunden, wenn das Gerät ausgeschaltet ist, und bei ungefähr 7 Stunden, wenn das Gerät eingeschaltet ist.
•Überprüfen Sie die verbleibende Akkuleistung des Geräts über „DTA CONTROLLER“ (& S.6).
•An Orten mit sehr hohen oder niedrigen Temperaturen muss das Gerät eventuell früher als üblich aufgeladen werden. Es kann sogar sein, dass in diesem Fall ein Aufladen scheitert.
•Damit der Akku möglichst lange hält, sollte das Gerät spätestens alle sechs Monate neu aufgeladen werden.
•Der Akku hat eine begrenzte Lebensdauer. Je häufiger und länger das Gerät verwendet wird, desto schneller nimmt die Kapazität des Akkus ab.
•Die Lebensdauer des Akkus variiert und ist abhängig vom Lagerort, von der Verwendung des Geräts und von dessen Aufstellort.
•Um die maximale Leistung des Akkus zu erzielen, kann es einen gewissen Unterschied bei der Klanglautstärke und -qualität geben, wenn das Gerät mit dem Akku verwendet wird, im Gegensatz zur Verwendung mit dem Netzteil.
•Abhängig von der Lautstärke und dem Lichtstatus kann sich das Gerät unabhängig von der verbleibenden Akkuleistung ausschalten.
4 De
Loading...