


 Loading...
WORLDWIDE
F6AMH, F6BMH
F8CMH, F8CW
USA, CANADA
F6Y
F8Y
|
SERVICE MANUAL |
F |
MANUEL D'ENTRETIEN |
|
|
|
WARTUNGSHANDBUCH |
ES MANUAL DE SERVICIO |
|
290385 |
68T-28197-ZA-C1 |
|

NOTICE
This manual has been prepared by Yamaha primarily for use by Yamaha dealers and their trained mechanics when performing maintenance procedures and repairs to Yamaha equipment. It has been written to suit the needs of persons who have a basic understanding of the mechanical and electrical concepts and procedures inherent in the work, for without such knowledge attempted repairs or service to the equipment could render it unsafe or unfit for use.
Because Yamaha has a policy of continuously improving its products, models may differ in detail from the descriptions and illustrations given in this publication. Use only the latest edition of this manual. Authorized Yamaha dealers are notified periodically of modifications and significant changes in specifications and procedures, and these are incorporated in successive editions of this manual.
F6A/F6, F6B, F8C/F8
SERVICE MANUAL ©2000 by Yamaha Motor Co.,Ltd.
1st Edition, March 2000 All rights reserved.
Any reprinting or unautorized use without the written permission of Yamaha Motor Co., Ltd. is expressly prohibited.
Printed in Japan

REMARQUE |
HINWEIS |
Le présent manuel a été élaboré par Yamaha. Il est principalement destiné à être utilisé par les concessionnaires Yamaha et leurs techniciens qualifiés lorsqu'ils exécutent des procédures d'entretien et des réparations sur du matériel Yamaha. Le présent manuel a été rédigé pour répondre aux besoins des personnes ayant des connaissances élémentaires des principes et des procédures mécaniques et électriques inhérentes au travail, connaissances sans lesquelles toute tentative de réparation ou d'entretien du matériel pourrait s'avérer dangereuse ou inadéquate.
Etant donné que la politique de Yamaha est d'améliorer en permanence ses produits, les modèles peuvent présenter quelques différences par rapport aux descriptions et illustrations fournies dans la présente publication. Il convient d'utiliser uniquement la version la plus récente de ce manuel. Les concessionnaires agréés de Yamaha sont régulièrement informés des modifications et des changements importants apportés aux spécifications et aux procédures qui seront incorporés dans les versions ultérieures de ce manuel.
Dieses Handbuch wurde von Yamaha vorrangig zur Verwendung durch Yamaha-Vertragshändler und ihre geschulten Mechaniker für ihre Wartungsund Reparaturarbeiten an Yamaha-Produkten erstellt. Dieses Handbuch setzt Grundkenntnisse des mechanischen und elektrischen Aufbaus und der zur Wartung nötigen Verfahrensweisen voraus, da die Produkte durch Reparaturoder Service-Arbeiten, die ohne solche Kenntnisse durchgeführt werden, hierdurch unsicher oder unbrauchbar werden könnten.
Da Yamaha immer danach bestrebt ist, ihre Produkte fortlaufend zu verbessern, können die Modelle im Detail u.U. von den in diesem Handbuch zu findenden Beschreibungen und Abbildungen abweichen. Aus diesem Grund sollte immer nur die neueste Ausgabe des Handbuchs verwendet werden. Alle YamahaVertragshändler werden ständig über Änderungen und wesentliche Modifikationen der Spezifikationen und Verfahren informiert, die in zukünftige Ausgaben dieses Handbuchs übernommen werden.
AVISO
Este manual ha sido elaborado por Yamaha. En principio, está destinado a los concesionarios Yamaha y sus mecánicos expertos, para que lo usen en los procedimientos de mantenimiento y al efectuar reparaciones en equipos Yamaha. Se ha redactado suponiendo que los lectores tienen conocimientos básicos de los conceptos y procedimientos mecánicos y eléctricos indispensables para realizar el trabajo, puesto que sin estos conocimientos, intentar reparar o mantener el equipo podría hacer que éste resultase inseguro o no apto para el uso.
Dado que Yamaha sigue una política de mejora continua de sus productos, los modelos pueden diferir en algunos detalles de las descripciones e ilustraciones que figuran en esta publicación. Utilice únicamente la última edición de este manual. A los concesionarios oficiales Yamaha se les notifican periódicamente las alteraciones y modificaciones importantes que experimentan las especificaciones y los procedimientos, que se incorporan a las sucesivas ediciones de este manual.
F6A/F6, F6B, F8C/F8 |
|
F6A/F6, F6B, F8C/F8 |
|
F6A/F6, F6B, F8C/F8 |
MANUEL D'ENTRETIEN |
|
WARTUNGSHANDBUCH |
|
MANUAL DE SERVICIO |
©2000 par Yamaha Motor Co.,Ltd. |
|
©2000 Yamaha Motor Co.,Ltd. |
|
©2000 de Yamaha Motor Co.,Ltd. |
1ère édition, mars 2000 |
|
1. Ausgabe, März 2000 |
|
1ª edición, marzo de 2000 |
Tous droits réservés. |
|
Alle Rechte vorbehalten. |
|
Todos los derechos reservados. Toda |
Toute reproduction ou utilisation |
|
Der Nachdruck bzw. die nicht |
|
reimpresión o uso no autorizado sin |
sans l’autorisation écrite de Yamaha |
|
autorisierte Verwendung ohne |
|
el permiso escrito de Yamaha Motor |
Motor Co., Ltd. est strictement |
|
schriftliche Genehmigung seitens |
|
Co., Ltd. queda expresamente |
interdite. |
|
der Yamaha Motor Co., Ltd. aus |
|
prohibido. |
Imprimé au Japon |
|
ist ausdrücklich untersagt. |
|
Impreso en Japón |
|
|
Gedruckt in Japan |
|
|
|
|
|
|
|

HOW TO USE THIS MANUAL
MANUAL FORMAT
All of the procedures in this manual are organised in a sequential, step-by-step format. The information has been compiled to provide the mechanic with an easy to read, handly reference that contains comprehensive explanations of all disassembly, repair, assembly, and inspection operations.
In this revised format, the condition of a faulty component will precede an arrow symbol and the course of action required will follow the symbol, e.g.,
•Bearings
Pitting/scratches Replace.
To assist you in finding your way through this manual, the section title and major heading is given at the top of every page.
MODEL INDICATION
Multiple models are referred to in this manual and their model indications are noted as follows.
Model name (W/W) |
F6AMH |
F6BMH |
F8CMH |
F8CW |
|
|
|
|
|
USA and Canada name |
F6MH |
— |
F8MH |
— |
|
|
|
|
|
Indication |
F6AMH |
F6BMH |
F8CMH |
F8CW |
|
|
|
|
|
ILLUSTRATIONS
The illustrations within this service manual represent all of the designated models.
CROSS REFERENCES
The cross references have been kept to a minimum. Cross references will direct you to the appropriate section or chapter.

GUIDE D'UTILISATION DU PRESENT MANUEL
FORMAT DU MANUEL
Toutes les procédures décrites dans le présent manuel sont organisées selon une suite séquentielle pas à pas. Les informationsont été compilées de manière à fournir au mécanicien une référence pratique et facile à lire qui contient l'explication détaillée deutesto les opérations de démontage, réparation, montage et contrôle.
Dans ce format révisé, l'état d'un composant défectueux précède le symbole flèche qui est lui-même suivi du déroulement desionsact correctives requises; par exemple,
•Roulements
Piqûres/rayures Remplacer.
Pour vous aider à vous repérer dans le présent manuel, le titre de la section et l'en-tête principal sont indiqués en haut dehaquec page.
INDICATION DU MODELE
Plusieurs modèles sont concernés par le présent manuel et les indications de modèle se présentent de la manière suivante.
Nom du modèle (W/W) |
F6AMH |
F6BMH |
F8CMH |
F8CW |
|
|
|
|
|
Nom aux USA et au Canada |
F6MH |
— |
F8MH |
— |
|
|
|
|
|
Indication |
F6AMH |
F6BMH |
F8CMH |
F8CW |
|
|
|
|
|
ILLUSTRATIONS
Les illustrations contenues dans le présent manuel d'entretien représentent tous les modèles désignés.
RENVOIS
Les renvois ont été limités au minimum. Les renvois renvoient à la section ou au chapitre approprié.

LEITFADEN FÜR DIESES HANDBUCH
AUFBAU DES HANDBUCHS
Alle in diesem Handbuch beschriebenen Verfahren werden der Reihe nach schrittweise dargestellt. Die Informationen wurden zu zusammengestellt, daß der Mechaniker eine leicht zu lesende, praktische Referenz mit umfassenden Erläuterungen der Vorgehensweise beim Auseinanderbauen, Reparieren, Zusammenbauen und Inspizieren an die Hand bekommt.
In diesem überarbeiteten Aufbau wird der Zustand eines fehlerhaften Bauteils durch ein vorangestelltes Pfeilsymbol dargestellt, dem die erforderlichen Maßnahmen folgen, z.B.
•Lager
Lochfraß/Kratzer Ersetzen.
Um das Auffinden gewünschter Stellen in diesem Handbuch zu erleichtern, ist in der Kopfzeile jeder Seite die Überschrift des Kapitels und betreffenden Abschnitts angegeben.
MODELLANGABE
Dieses Handbuch bezieht sich auf mehrere verschiedene Modelle, die wie folgt gekennzeichnet sind.
Modellbezeichnung (W/W) |
F6AMH |
F6BMH |
F8CMH |
F8CW |
|
|
|
|
|
Bezeichnung in USA und |
F6MH |
— |
F8MH |
— |
KANADA |
|
|
|
|
|
|
|
|
|
Kennzeichnung |
F6AMH |
F6BMH |
F8CMH |
F8CW |
|
|
|
|
|
ABBILDUNGEN
Die in diesem Service-Handbuch wiedergegebenen Abbildungen gelten für alle ausgewiesenen Modelle.
QUERVERWEISE
Die Querverweise wurden auf das Notwendigste beschränkt. Sie enthalten jeweils die Seitenangabe für das entsprechende Kapitel bzw. den betreffenden Abschnitt.

CÓMO USAR ESTE MANUAL
FORMATO DEL MANUAL
Todos los procedimientos que se exponen en este manual siguen una estructura ordenada y gradual. Se ha agrupado la información para permitir al mecánico una consulta cómoda y fácil de leer que contenga explicaciones generales de todas las operaciones de desarmado, reparación, armado e inspección.
En este formato revisado, el estado de un componente defectuoso precede a un símbolo de flecha y las medidas a adoptar siguen a dicho símbolo, p. ej.,
•Cojinetes
Picaduras/rayado Sustituya.
Para ayudarle a orientarse en este manual, al principio de cada página se indica el título de la sección y el encabezamiento principal.
INDICACIÓN DEL MODELO
En este manual se hace referencia a diversos modelos, expresándose las indicaciones de los modelos tal como figura a continuación.
Nombre de modelo (W/W) |
F6AMH |
F6BMH |
F8CMH |
F8CW |
|
|
|
|
|
Nombre en EE.UU. y |
F6MH |
— |
F8MH |
— |
Canadá |
|
|
|
|
|
|
|
|
|
Indicación |
F6AMH |
F6BMH |
F8CMH |
F8CW |
|
|
|
|
|
ILUSTRACIONES
En las ilustraciones que figuran en este manual de servicio se representa la totalidad de los modelos indicados.
REFERENCIAS CRUZADAS
Las referencias cruzadas se han reducido al mínimo. Estas referencias cruzadas remiten a la sección o capítulo correspondiente.

IMPORTANT INFORMATION
In this Service Manual particularly important information is distinguished in the following ways.
The safety Alert Symbol means ATTENTION! BECOME ALERT! YOUR SAFETY IS INVOLVED!


 WARNING
Failure to follow WARNING instructions could result in severe injury or death to the machine operator, a bystander or a person inspecting or repairing the outboard motor.
CAUTION
A CAUTION indicates special precautions that must be taken to avoid damage to the outboard motor.
NOTE:
A NOTE provides key information to make procedures easier or clearer.

INFORMATIONS IMPORTANTES
Dans le présent Manuel d'entretien, les informations particulièrement importantes sont signalées de la manière suivante.
Le symbole de sécurité Alerte signifie ATTENTION! FAITES ATTENTION! VOTRE SECURITE EST EN JEU !
AVERTISSEMENT
Le non respect des instructions AVERTISSEMENT peut entraîner des blessures graves ou la mort de l'opérateur de la machine, d'un assistant ou d'une personne contrôlant ou réparant le moteur hors-bord.
ATTENTION
La mention ATTENTION indique que des précautions particulières doivent être prises pour éviter d'endommager le moteur hors-bord.
N.B.:
La mention NOTE précède des informations clés rendant les procédures plus faciles ou plus claires.

WICHTIGE INFORMATIONEN
In diesem Service-Handbuch werden besonders eichtige Informationen folgendermaßen unterschieden.
Das Symbol für den Sicherheitsalarm bedeutet VORSICHT! AUFPASSEN! IHRE SICHERHEIT STEHT AUF DEM SPIEL!
WARNUNG
Eine WARNUNG bezieht sich auf eine besondere Verfahrensweise, die eingehalten werden muß, um schwere Verletzungen, möglicherweise sogar mit Todesfolge für den Bediener, in der Nähe befindliche Personen und Techniker, die den Außenbordmotor inspizieren oder reparieren, zu vermeiden.
ACHTUNG
Die Kennzeichnung ACHTUNG bezieht sich auf besondere Sicherheitsmaßnahmen, die zu treffen sind, um Beschädigungen am Außenbordmotor zu vermeiden.
HINWEIS:
Ein HINWEIS enthält wichtige Informationen, die einen Vorgang einfacher oder deutlicher zu machen.
INFORMACIÓN IMPORTANTE
En este manual de servicio, la información especialmente importante se señala de varias maneras, que se indican a continuación.
El símbolo de alerta de seguridad significa ¡ATENCIÓN! ¡ESTÉ ATENTO! ¡SU SEGURIDAD PUEDE ESTAR AMENAZADA!
ATENCION
La inobservancia de las instrucciones del AVISO podría provocar graves lesiones o la muerte al operario de la máquina, a una persona situada en las proximidades o una persona que inspeccionase o reparase el motor fuera borda.
PRECAUCION:
Una "PRECAUCIÓN" indica que deben adoptarse precauciones especiales para no dañar el motor fuera borda.
NOTA:
Una "NOTA" facilita información clave que simplifica o aclara los procedimientos.

HOW TO USE THIS MANUAL
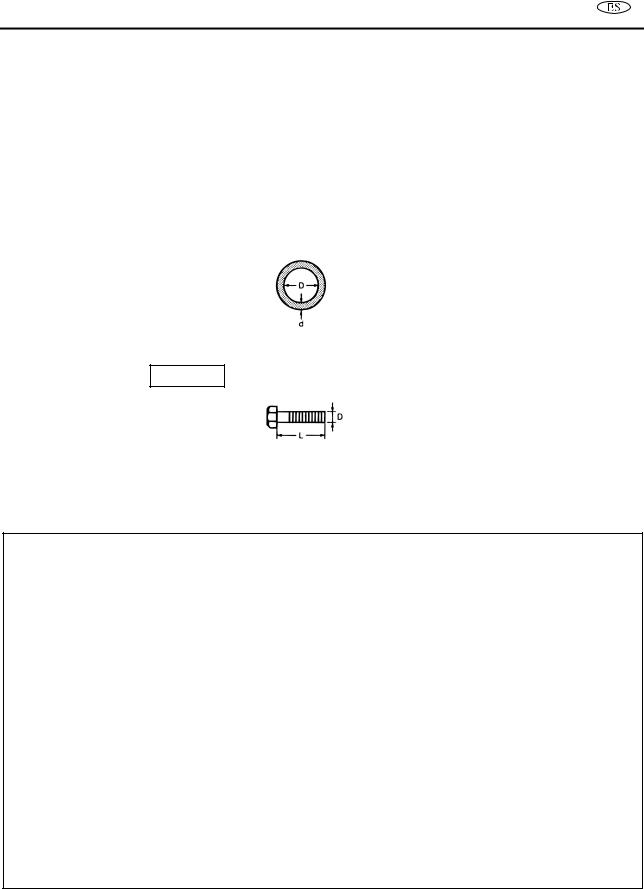
1The main points regarding removing/installing and disassembly/assembly procedure are shown in the exploded views.
2The numbers in the exploded views indicate the required sequence of the procedure and should be observed accordingly.
3Symbols are used in the exploded views to indicate important aspects of the procedure. A list of meanings for these symbols is provided on the following page.
4It is important to refer to the job instruction charts at the same time as the exploded views.
These charts list the sequence that the procedures should be carried out in, as well as providing exploded on part names, quantities, dimensions and important points relating to each relevant task.
Example:
O-ring 39.5 x 2.5 mm: inside diameter (D) x ring diameter (d)
5In addition to tightening torques, the dimensions of the bolts and screws are also mentioned.
Example:
Bolt and screw size 10 x 25 mm : bolt and screw diameter (D) x length (L)
6In addition to the exploded views and job instruction charts, this manual provides individual illustrations when further explanations are required to explain the relevant procedure.

GUIDE D'UTILISATION DU PRESENT MANUEL
1Les points essentiels concernant les procédures de dépose/repose et de démontage/montage sont indiqués dans les vues éclatées.
2Les repères des vues éclatées indiquent l'ordre requis pour la procédure et doivent, par conséquent, être respectés.
3Des symboles sont utilisés dans les vues éclatées pour signaler les aspects importants de la procédure. Une liste de ces symboles et de leur signification est fournie page suivante.
4Il est important de consulter les fiches de travaux en même temps que les vues éclatées.
Ces fiches donnent l'ordre dans lequel les procédures doivent être exécutées et fournissent aussi des détails sur le nom desèces,pi les quantités, dimensions et points importants se rapportant à chaque tâche concernée.
Exemple :
Joint torique 39,5 mm x 2,5 mm : diamètre intérieur (D) x diamètre de la bague (d)
5En plus des couples de serrage, les dimensions des boulons et des vis sont également indiquées. Exemple :
Dimensions des boulons et des vis 10 x 25 mm : diamètre des boulons et des vis (D) x longueur (L)
6En plus des vues éclatées et des fiches de travaux, le présent manuel fournit des illustrations spécifiques lorsque de plus amples explications sont requises pour comprendre la procédure concernée.

LEITFADEN FÜR DIESES HANDBUCH
1Die wichtigsten Punkte beim Ausbauen/Einbauen und Zerlegen/Zusammenbau werden in Explosionszeichnungen wiedergegeben.
2Die in den Explosionszeichnungen angegebenen Zahlen bezeichnen die Reihenfolge in dem betreffenden Verfahren, welche entsprechend einzuhalten ist.
3Symbole werden in Explosionszeichnungen zur Angabe wichtiger Aspekte des Verfahrens verwendet. Auf der folgenden Seite findet sich eine Auflistung dieser Symbole.
4Parallel zu den Arbeitsanweisungen sollten immer auch die Explosionszeichnungen zu Rate gezogen werden. Diese Anweisungen enthalten die Reihenfolge, in der die Arbeitsschritte durchzuführen sind, und enthalten Zeichnungen zu Teilebezeichnungen, Mengen, Abmessungen und wichtige Punkte in bezug auf die jeweilige Arbeit. Beispiel:
O-Ring 39,5 x 2,5 mm: nnendurchmesser (D) x Ringdurchmesser (d)
5Zusätzlich zu Anzugsdrehmomenten werden auch die Abmessungen von Schrauben angegeben. Beispiel:
Schraubengröße 10 x 25 mm : Schraubendurchmesser (D) x Länge (L)
6Zusätzlich zu den Explosionszeichnungen und Arbeitsanweisungen enthält dieses Handbuch Einzelabbildungen, sofern weitere Erläuterungen für den betreffenden Vorgang erforderlich sind
CÓMO USAR ESTE MANUAL
1Los aspectos principales relativos al procedimiento de montaje/desmontaje y de armado/desarmado se indican en las vistas de despiece.
2Los números que figuran en las vistas de despiece indican el orden preciso que debe seguirse al poner en práctica el procedimiento.
3En las vistas de despiece se emplean símbolos para señalar aspectos importantes del procedimiento. En la página siguiente figura una lista con el significado de estos símbolos.
4Es importante consultar las tablas de instrucciones de las tareas al mismo tiempo que las vistas de despiece.
Estas tablas indican el orden que deben seguir los procedimientos, a la vez que detallan nombres de piezas, cantidades, dimensiones y aspectos importantes relacionados con la tarea correspondiente.
Ejemplo:
Junta tórica 39,5 x 2,5 mm: diámetro interno (D) x diámetro de la junta (d)
5Además de los pares de apriete, se mencionan también las dimensiones de los pernos y tornillos. Ejemplo:
Tamaño de perno y tornillo 10 x 25 mm : diámetro (D) x longitud (L) de perno y tornillo
6Además de las vistas de despiece y de las tablas de instrucciones de las tareas, este manual ofrece ilustraciones individualescuando es preciso explicar con mayor grado de detalle el procedimiento correspondiente.
1 |
|
|
|
|
2 |
|
|
|
|
|
|
|
|
|
|
|
|
|
|
|
|
|
|
3 |
|
|
|
|
4 |
|
|
|
|
|
|
|
|
|
|
|
|
|
|
|
|
|
|
5 |
|
|
|
|
6 |
|
|
|
|
|
|
|
|
|
|
|
|
|
|
|
|
|
|
7 |
|
|
|
|
8 |
|
|
|
|
|
|
|
|
|
|
|
|
|
|
|
|
|
|
9 |
|
|
|
|
|
|
|
|
|
|
|
|
|
|
|
|
|
|
|
|
|
|
|
0 |
|
|
A |
|
|
B |
|||||
|
|
|
|
|
|
|
|
|
|
|
|
|
|
|
|
|
|
|
|
|
|
|
|
|
|
|
|
|
|
|
|
|
|
|
|
C |
D |
|
|
E |
|||||||
|
|
|
|
|
|
|
|
|
|
|
|
|
|
|
|
|
|
|
|
|
|
|
|
|
|
|
|
|
|
|
|
|
|
|
|
F |
G |
|
|
H |
|||||||
|
|
|
|
|
|
|
|
|
|
|
|
|
|
|
|
|
|
|
|
|
|
|
|
|
|
|
|
|
|
|
|
|
|
|
|
I |
|
|
|
|
|
|
|
|
|
||
|
|
|
|
|
|
|
|
|
|
|
|
|
|
|
|
|
|
|
|
|
|
|
|
|
|
|
|
|
|
|
|
|
|
|
|
J |
K |
|
|
L |
|||||||
|
|
|
|
|
|
|
|
|
|
|
|
M |
N |
|
|
O |
|||||||
|
|
|
|
|
|
|
|
|
|
|
|
SYMBOLS
Symbols 1to 9 are designed as thumb-tabs to indicate the content of a chapter.
1 General information
2 Specifications
3 Periodic check and adjustment
4 Fuel system
5 Power unit
6 Lower unit
7 Bracket unit
8 Electrical system
9 Trouble analysis
Symbols : to E indicate specific data. > Special tool
A Specified liquid
B Specified engine speed C Specified torque
D Specified measurement
ESpecified electrical value
[Resistance (Ω), Voltage (V), Electrical current (A)]
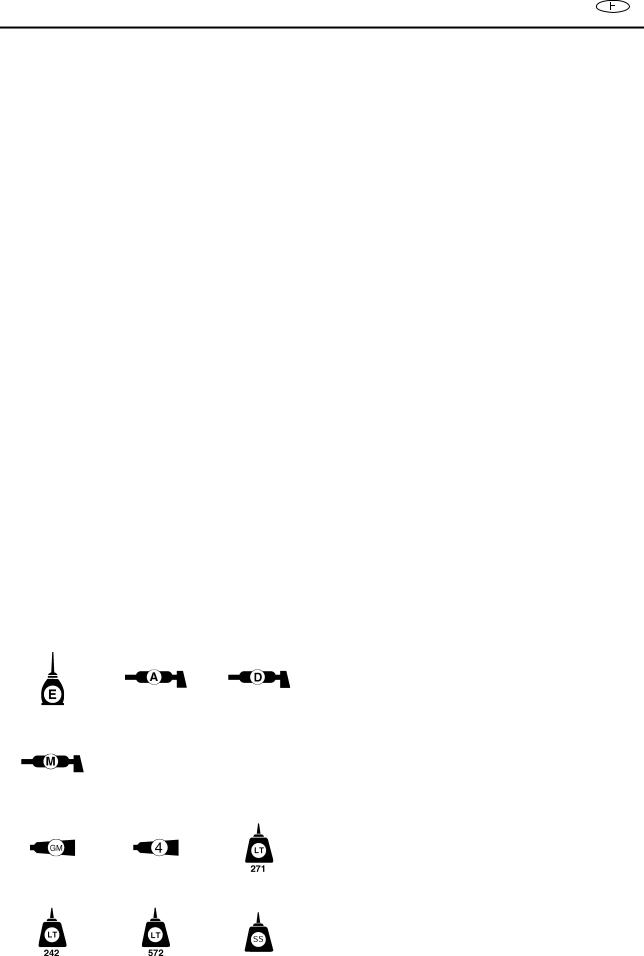
Symbols F to I in an exploded diagram indicate the grade of lubricant and the location of the lubricant point.
F Apply Yamaha 4-stroke motor oil
GApply water resistant grease (Yamaha grease A, Yamaha marine
grease)
H Apply Yamaha grease D
I Apply molybdenum disufied oil
Symbols J to O in an exploded diagram indicate the grade of the sealing or locking agent and the location of the application point.
J Apply Gasket Maker®
KApply Yamabond #4 (Yamaha bond number 4)
L Apply LOCTITE® No.271 (Red LOCTITE)
M Apply LOCTITE® No.242 (Red LOCTITE)
N Apply LOCTITE® No.572 O Apply silicon sealant

SYMBOLES
Les symboles 1 à 9 sont présentés sous forme d'onglets pour indiquer le contenu d'un chapitre.
1Informations generales
2Spécifications
3Vérification et réglage périodiques
4Système d'alimentation
5Moteur
6Boîtier d'hélice
7Unité de support
8Circuit électrique
9Pannes
Les symboles : à E indiquent des données spécifiques.
:Outil spécial
ALiquide spécifié
BRégime de moteur spécifié CCouple spécifié
DMesure spécifiée
EValeur électrique spécifiée [Résistance (Ω), Tension (V), Courant
électrique (A)]
Les symboles F à I dans une vue éclatée indiquent le type de lubrifiant ainsi que l'emplacement du point de lubrification.
FUtiliser de l'huile pour moteur à quatre temps Yamaha
GUtiliser de la graisse résistante à l'eau. (Graisse A Yamaha, graisse marine Yamaha)
HUtiliser la graisse D Yamaha
IUtiliser de l'huile au bisulfure de molybdène
Les symboles J à O dans une vue éclatée indiquent la qualité de l'agent d'étanchéité et de blocage ainsi que l'emplacement du point d'application.
JUtiliser du Gasket Maker®
KUtiliser du Yamabond n° 4 adhésif n° 4 Yamaha)
LUtiliser du LOCTITE® N° 271 (LOCTITE rouge)
MUtiliser du LOCTITE® N° 242 (LOCTITE rouge)
NUtiliser du LOCTITE® N° 572 OUtiliser du mastic au silicone
SYMBOLE
Die Symbole 1 bis 9 sind als Orientierungshilfe für den Inhalt eines Kapitels gedacht.
1Allgemeine informationen
2Spezifikationen
3Regelmäßige Prüfund Einstellarbeiten
4Kraftstoffanlage
5Motorblock
6Antriebseinheit
7Motorhalterung
8Elektrische Anlage
9Störungsanalyse
Die Symbole : bis E stehen für besondere Daten.
:Spezialwerkzeug
AVorgeschriebene Flüssigkeit
BVorgeschriebene Motordrehzahl CVorgeschriebenes Drehmoment DVorschriebene Messung
EVorgeschriebener elektrischer
Wert
[Widerstand (Ω), Spannung (V), Stromstärke (A)]
Die Symbole F bis I in einer Explosionszeichnung zeigen den Schmiermitteltyp und die Schmierstelle an.
FYamaha 4-Takt-Motorenöl verwenden
GWasserfestes Fett auftragen (Yamaha-Fett A, YamahaBootsfett)
HYamaha-Fett D auftragen
IMolybdän-Disufid-Öl auftragen
Die Symbole J bis O in einer Explosionszeichnung zeigen den Typ von Dichtungsoder Bindemittel sowie den Anwendungspunkt an.
JGasket Maker® auftragen
KYamabond Nr. 4 auftragen (Yamaha-Bindemittel Nr. 4)
LLOCTITE® Nr. 271 (rotes LOCTITE) auftragen
MLOCTITE® Nr. 242 (rotes LOCTITE) auftragen
NLOCTITE® Nr. 572 auftragen OSilikon-Dichtmittel auftragen
SÍMBOLOS
Los símbolos 1 a 9 tienen la misma función que las pestañas de los libros, e indican el contenido de un capítulo.
1Información general
2Especificaciones
3Revisión y ajuste programados
4Sistema de combustible
5Motor
6Unidad inferior
7Soporte de fijación
8Sistema eléctrico
9Análisis de fallos
Los símbolos : a E indican datos específicos.
:Herramienta especial ALíquido especificado
BVelocidad especificada del motor CPar especificado
DMedición especificada
EValor eléctrico especificado [Resistencia (Ω), Tensión (V),
Intensidad eléctrica (A)]
Los símbolos F a I indican en un diagrama de despiece el grado del lubricante y la ubicación del punto de lubricación.
FAplique aceite para motor de 4 tiempos Yamaha
GAplique grasa hidrófuga
(grasa A Yamaha, grasa marina Yamaha)
HAplique grasa D Yamaha
IAplique aceite de bisulfuro de molibdeno
Los símbolos J a O indican en un diagrama de despiece el grado del producto sellador o fijador y la ubicación del punto de aplicación.
JAplique Gasket Maker®
KAplique Yamabond nº 4 (pegamento Yamaha número 4)
LAplique LOCTITE® nº 271 (LOCTITE rojo)
MAplique LOCTITE® nº 242 (LOCTITE rojo)
NAplique LOCTITE® nº 572
OAplique sellador de silicona

CONTENTS
GENERAL INFORMATION
SPECIFICATIONS
PERIODIC CHECK AND ADJUSTMENT
FUEL SYSTEM
POWER UNIT
LOWER UNIT
BRACKET UNIT
ELECTRICAL SYSTEM
TROUBLE ANALYSIS

TABLE DES |
INHALT |
|
MATIERES |
|
|
INFORMATIONS |
|
ALLGEMEINE |
GENERALES |
|
INFORMATIONEN |
|
|
|
SPECIFICATIONS SPEZIFIKATIONEN
CONTRÔLES ET |
|
REGELMÄßIGE |
RÉGLAGES |
|
PRÜFUND |
REGULIERS |
|
EINSTELLARBEITEN |
|
|
|
SYSTÈME KRAFTSTOFF-
D'ALIMENTATION ANLAGE
ÍNDICE
INFORMACIÓN |
|
1 |
|
|
|
GENERAL |
|
|
|
|
|
|
|
|
|
|
|
ESPECIFICA- |
|
2 |
|
|
|
CIONES |
|
|
|
|
|
|
|
|
REVISIÓN Y
AJUSTE 3 PROGRAMADOS 
SISTEMA DE ALI- |
|
4 |
MENTACIÓN DE |
|
|
|
|
|
|
|
|
COMBUSTIBLE |
|
|
|
|
|
|
|
|
MOTEUR |
|
MOTORBLOCK |
|
MOTOR |
|
5 |
|
|
|
|
|||
|
|
|
|
|
|
|
|
|
|
|
|
|
|
|
|
|
|
|
|
|
BOITIER D'HELICE |
|
ANTRIEBSEINHEIT |
|
UNIDAD |
|
6 |
|
|
|
|
|||
|
|
INFERIOR |
|
|
||
|
|
|
|
|
|
|
|
|
|
|
|
|
|
|
|
|
|
|
|
|
UNITE DE |
|
MOTORHALTERUNG |
|
SOPORTE DE |
|
7 |
|
|
|
|
|||
SUPPORT |
|
|
FIJACIÓN |
|
|
|
|
|
|
|
|
||
|
|
|
|
|
|
|
|
|
|
|
|
|
|
SYSTEME |
|
ELEKTRISCHE |
|
SISTEMA |
|
8 |
|
|
|
|
|||
ELECTRIQUE |
|
ANLAGE |
|
ELÉCTRICO |
|
|
|
|
|||||
|
|
|
|
|
|
|
|
|
|
|
|
|
|
PANNES |
|
STÖRUNGS- |
|
ANÁLISIS DE |
|
9 |
|
|
|
|
|||
|
|
ANALYSE |
|
FALLOS |
|
|
|
|
|
|
|||
|
|
|
|
|
|
|
|
|
|
|
|
|
|

CHAPTER 1
GENERAL INFORMATION
IDENTIFICATION............................................................................................... |
1-1 |
SERIAL NUMBER ....................................................................................... |
1-1 |
STARTING SERIAL NUMBERS ................................................................. |
1-1 |
SAFETY WHILE WORKING .............................................................................. |
1-2 |
FIRE PREVENTION ..................................................................................... |
1-2 |
VENTILATION............................................................................................. |
1-2 |
SELF-PROTECTION.................................................................................... |
1-2 |
OILS, GREASES AND SEALING FLUIDS.................................................. |
1-2 |
GOOD WORKING PRACTICES .................................................................. |
1-3 |
DISASSEMBLY AND ASSEMBLY ............................................................. |
1-4 |
SPECIAL TOOLS ............................................................................................... |
1-5 |
MEASURING .............................................................................................. |
1-5 |
REMOVING AND INSTALLING ................................................................. |
1-7 |
|
|
|
|
|
|
|
|
|
|
|
|
|
|
|
KAPITEL 1 |
|
|
|
|
|
|
|
CHAPITRE 1 |
|
|
CAPÍTULO 1 |
|
|
|
|
||
|
INFORMATIONS |
|
ALLGEMEINE |
|
INFORMACÍON |
|
|
|
|
|
|
GENERALES |
|
INFORMATIONEN |
|
|
|
|
|
|
|
|
|
|
|
|
|
|
1 |
|||
|
IDENTIFICATION................................................. |
1-1 |
KENNUMMERN .......................................... |
1-1 |
IDENTIFICACIÓN ........................................... |
1-1 |
|
|
||
|
NUMERO DE SERIE .......................................... |
1-1 |
SERIENNUMMER ....................................... |
1-1 |
NÚMERO DE SERIE .......................................... |
1-1 |
|
|
||
|
DEBUT DES NUMEROS DE SERIE................. |
1-1 |
ANFANGSNUMMERN DER SERIE ............ |
1-1 |
NÚMEROS DE SERIE INICIALES ................... |
1-1 |
|
|
||
|
SECURITE PENDANT LE |
|
SICHERHEITSMASSNAHMEN................... |
1-2 |
SEGURIDAD EN EL TRABAJO..................... |
1-2 |
|
|||
|
...........................................FONCTIONNEMENT |
1-2 |
..............................BRANDVORBEUGUNG |
1-2 |
........................PREVENCIÓN DE INCENDIOS |
1-2 |
|
|
|
|
|
|
|
||||||||
|
PREVENTION CONTRE LES INCENDIES ..... |
1-2 |
BELÜFTUNG ............................................... |
1-2 |
VENTILACIÓN................................................... |
1-2 |
|
|
|
|
|
VENTILATION................................................... |
1-2 |
SELBSTSCHUTZ ......................................... |
1-2 |
AUTOPROTECCIÓN.......................................... |
1-2 |
|
|
|
|
|
AUTO-PROTECTION ........................................ |
1-2 |
ÖLE, SCHMIERSTOFFE UND |
|
ACEITES, GRASAS Y LÍQUIDOS |
|
|
|
|
|
|
HUILES, GRAISSES ET FLUIDES |
|
DICHTUNGSMITTEL................................... |
1-2 |
SELLANTES ....................................................... |
1-2 |
|
|
||
|
D'ETANCHEITE ................................................. |
1-2 |
RICHTIGE ARBEITSGEWOHNHEITEN....... |
1-3 |
PROCEDIMIENTOS DE TRABAJO |
|
|
|
|
|
|
PRATIQUES DE TRAVAIL APPROPRIEES.... |
1-3 |
ZERLEGEN UND ZUSAMMENBAU........... |
1-4 |
CORRECTOS ...................................................... |
1-3 |
|
|
||
|
DEMONTAGE ET MONTAGE.......................... |
1-4 |
SPEZIALWERKZEUGE |
1-5 |
DESARMADO Y ARMADO .............................. |
1-4 |
|
|
||
|
|
|
|
|
|
|
|
|
||
|
OUTILS SPECIAUX .............................................. |
1-5 |
MESSEN...................................................... |
1-5 |
HERRAMIENTAS ESPECIALES................... |
1-5 |
|
|
||
|
MESURE.............................................................. |
1-5 |
AUSBAU UND EINBAU.............................. |
1-7 |
MEDICIÓN .......................................................... |
1-5 |
|
|
|
|
|
DEPOSE ET REPOSE......................................... |
1-7 |
|
|
DESMONTAJE Y MONTAJE ............................ |
1-7 |
|
|
||
IDENTIFICATION
IDENTIFICATION
SERIAL NUMBER
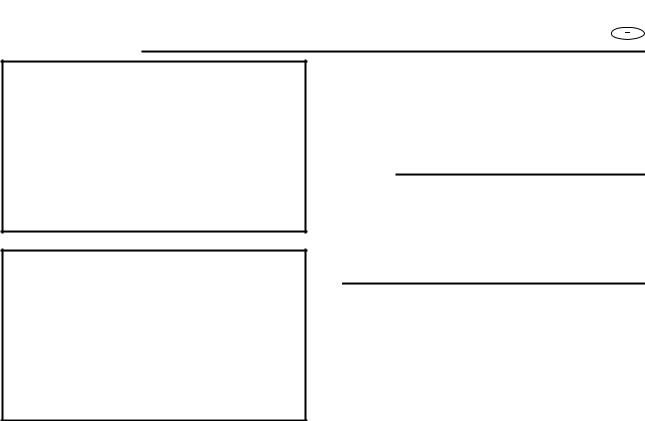
The outboard motor’s serial number is stamped on a label which is attached to the port clamp bracket.
NOTE:
As an antitheft measure, a special label on which the outboard motor’s serial number is stamped is bonded to the port clamp bracket. The label is specially treated so that peeling it off causes cracks across the serial number.
1 Model name
2 Approval model code
3 Transom height
4 Serial number
STARTING SERIAL NUMBERS
The starting serial number blocks are as follows:
Model name |
Applicable |
Starting |
||
World |
USA, |
model |
serial |
|
wide |
Canada |
code |
number |
|
|
|
|
|
|
F6AMH |
F6MH |
68R |
S:000101- |
|
|
||||
L:300101- |
||||
|
|
|
||
|
|
|
|
|
F6BMH |
– |
68R |
S:200101- |
|
|
||||
L:500101- |
||||
|
|
|
||
|
|
|
|
|
F8CMH |
F8MH |
68T |
S:000101- |
|
|
||||
L:300101- |
||||
|
|
|
||
|
|
|
|
|
F8CW |
– |
68T |
S:200101- |
|
|
|
|
|
|
1-1

IDENTIFICATION
KENNUMMERN
IDENTIFICACIÓN
IDENTIFICATION
NUMERO DE SERIE
Le numéro de série du moteur hors-bord est gravé sur une plaquette fixée à gauche du support de serrage.
N.B.:
Par mesure antivol, une plaquette spéciale comportant le numéro de série du moteur hors-bord a été placée à gauche du support de serrage. Cette plaquette a été conçue spécialement pour se fendiller à l'endroit du numéro de série si l'on tente de l'arracher.
1 Nom du modèle
2 Numéro d'homologation du modèle
3 Hauteur de barre d'arcasse
4 Numéro de serie
DEBUT DES NUMEROS DE SERIE
Les blocs de début des numéros de série se présentent comme suit:
Nom du modèle |
N° d'ho- |
Début du |
||
|
|
mologa- |
||
|
USA, Ca- |
numéro de |
||
Mondial |
tion du |
|||
nada |
série |
|||
|
modèle |
|||
|
|
|
||
|
|
|
|
|
F6AMH |
F6MH |
68R |
S:000101- |
|
|
||||
L:300101- |
||||
|
|
|
||
|
|
|
|
|
F6BMH |
– |
68R |
S:200101- |
|
|
||||
L:500101- |
||||
|
|
|
||
|
|
|
|
|
F8CMH |
F8MH |
68T |
S:000101- |
|
|
||||
L:300101- |
||||
|
|
|
||
|
|
|
|
|
F8CW |
– |
68T |
S:200101- |
|
|
|
|
|
|
KENNUMMERN
SERIENNUMMER
Die Seriennummer des Außenbordmotors ist im Typenschild auf der Backbordseite der Motorhalterung eingeschlagen.
HINWEIS:
Zur Diebstahlsicherung ist ein spezielles Etikett mit der eingestanzten Seriennummer des Außenbordmotors auf die Backbordseite geklebt. Das Etikett ist spezialbehandelt, so daß bei der Ablösung Risse an der Seriennummer entstehen.
1 Modellbezeichnung
2 Zugelassener Modell-Code
3 Spiegelhöhe
4 Seriennummer
ANFANGSNUMMERN DER SERIE
Die Anfangsnummern der Serien lauten wie folgt:
Modellbezeichnung |
Gülti- |
Anfangs- |
||
|
|
ger Mo- |
||
|
USA, |
serien- |
||
Weltweit |
dell- |
|||
KANADA |
nummer |
|||
Code |
||||
|
|
|
||
|
|
|
|
|
F6AMH |
F6MH |
68R |
S:000101- |
|
|
||||
L:300101- |
||||
|
|
|
||
|
|
|
|
|
F6BMH |
– |
68R |
S:200101- |
|
|
||||
L:500101- |
||||
|
|
|
||
|
|
|
|
|
F8CMH |
F8MH |
68T |
S:000101- |
|
|
||||
L:300101- |
||||
|
|
|
||
|
|
|
|
|
F8CW |
– |
68T |
S:200101- |
|
|
|
|
|
|
IDENTIFICACIÓN
NÚMERO DE SERIE
El número de serie del motor fuera borda está grabado en una etiqueta fijada al soporte de mordaza de babor.
NOTA:
Como medida antirrobo, se ha fijado una etiqueta especial en la que está grabado el número de serie del motor fuera borda al soporte de mordaza de babor. La etiqueta tiene un tratamiento especial para que al desprenderla, aparezcan grietas en el número de serie.
1 Nombre de modelo
2 Código de aprobación del modelo
3 Altura de espejo de popa
4 Número de serie
NÚMEROS DE SERIE INICIALES
Los bloques de los números de serie iniciales son:
Nombre de modelo |
Código de |
Número |
||
En todo el |
EE.UU., |
modelo |
de serie |
|
mundo |
Canadá |
aplicable |
inicial |
|
|
|
|
|
|
F6AMH |
F6MH |
68R |
S:000101- |
|
|
||||
L:300101- |
||||
|
|
|
||
|
|
|
|
|
F6BMH |
– |
68R |
S:200101- |
|
|
||||
L:500101- |
||||
|
|
|
||
|
|
|
|
|
F8CMH |
F8MH |
68T |
S:000101- |
|
|
||||
L:300101- |
||||
|
|
|
||
|
|
|
|
|
F8CW |
– |
68T |
S:200101- |
|
|
|
|
|
|
1-1

SAFETY WHILE WORKING
SAFETY WHILE WORKING
The procedures given in this manual are those recommended by Yamaha to be followed by Yamaha dealers and their mechanics.
FIRE PREVENTION
Gasoline (petrol) is highly flammable. Petroleum vapor is explosive if ignited. Do not smoke while handling gasoline and keep it away from heat, sparks and open flames.
VENTILATION
Petroleum vapor is heavier than air and is deadly if inhaled in large quantities. Engine exhaust gases are harmful to breathe. When test-running an engine indoors, maintain good ventilation.
SELF-PROTECTION
Protect your eyes with suitable safety glasses or safety goggles, when grinding or when doing any operation which may cause particles to fly off. Protect hands and feet by wearing safety gloves or protective shoes if appropriate to the work you are doing.
OILS, GREASES AND SEALING FLUIDS
Use only genuine Yamaha oils, greases and sealing fluids or those recommended by Yamaha.
1-2

SECURITE PENDANT LE FONCTIONNEMENT
SICHERHEITSMASSNAHMEN
SEGURIDAD EN EL TRABAJO
SECURITE PENDANT LE |
SICHERHEITSMASSNAH- |
SEGURIDAD EN EL |
FONCTIONNEMENT |
MEN |
TRABAJO |
Les procédures décrites dans le présent |
Die in diesem Handbuch |
Los procedimientos que se indican en |
document sont les procédures qui ont été |
angegebenen Verfahren sind von |
este manual son los que Yamaha |
recommandées par Yamaha pour ses |
den Yamaha-Händlern und ihren |
recomienda seguir a los concesionarios |
concessionnaires et leurs mécaniciens. |
Mechanikern zu beachten. |
Yamaha y a sus mecánicos. |
PREVENTION CONTRE LES |
BRANDVORBEUGUNG |
PREVENCIÓN DE INCENDIOS |
INCENDIES |
Kraftstoff (Benzin) ist leicht |
La gasolina es muy inflamable. |
Le carburant (essence) est hautement |
brennbar. |
El vapor de petróleo es explosivo si se |
inflammable. |
Benzindämpfe sind hochexplosiv. |
inflama. |
Les vapeurs d'essence sont explosives si |
Beim Umgang mit Kraftstoff nicht |
No fume mientras manipula gasolina, y |
elles prennent feu. |
rauchen sowie Funken und |
mantenga ésta apartada de calor, chispas |
Pendant la manipulation d'essence, ne |
offenes Feuer vermeiden. |
y llamas. |
pas fumer et se tenir à distance de toute |
|
|
source de chaleur, d'étincelles et de |
|
|
flammes nues. |
|
|
VENTILATION
Les vapeurs d'essence sont plus lourdes que l'air et sont mortelles si elles sont inhalées en grandes quantités. Les gaz d'échappement sont dangereux pour le système respiratoire.
Lors d'essais de fonctionnement à l'intérieur, maintenir une bonne ventilation.
AUTO-PROTECTION
Protégez vos yeux à l'aide de lunettes de sécurité adéquates pendant les opérations de meulage ou toute autre opération pouvant entraîner la projection de particules. Protégez vos mains et vos pieds à l'aide de gants ou de chaussures de sécurité, si ceux-ci sont adaptés au travail que vous effectuez.
HUILES, GRAISSES ET FLUIDES D'ETANCHEITE
N'utilisez que les huiles, graisses et fluides d'étanchéité Yamaha authentiques ou ceux recommandés par Yamaha.
BELÜFTUNG
Benzindämpfe sind schwerer als Luft; beim Einatmen in großen Mengen besteht Lebensgefahr. Motorabgase wirken beim Einatmen gesundheitsschädlich. Beim Probelauf eines Motors in geschlossenen Räumen ist für eine ausreichende Belüftung zu sorgen.
SELBSTSCHUTZ
Beim Schleifen oder bei Spritzgefahr ist eine geeignete Sicherheitsoder Schutzbrille zu tragen. Hände und Füßen sind gegebenenfalls durch Handschuhe bzw. Sicherheitsschuhe zu schützen.
ÖLE, SCHMIERSTOFFE UND DICHTUNGSMITTEL
Es dürfen nur die von Yamaha empfohlenen Öle, Schmierstoffe und Dichtungsmittel verwendet werden.
VENTILACIÓN
El vapor de petróleo es más pesado que el aire y letal si se inhala en grandes cantidades. Los gases de escape del motor son tóxicos si se respiran. Cuando compruebe el funcionamiento de un motor en un local cerrado, mantenga el lugar bien ventilado.
AUTOPROTECCIÓN
Proteja los ojos con gafas o anteojos protectores adecuados, al esmerilar o cuando realice cualquier operación que provoque el desprendimiento de partículas. Proteja las manos y los pies con guantes o calzado protectores apropiados para la tarea que esté realizando.
ACEITES, GRASAS Y LÍQUIDOS SELLANTES
Use únicamente aceites, grasas y líquidos sellantes Yamaha genuinos o recomendados por Yamaha.
1-2

SAFETY WHILE WORKING
Under normal conditions or use, there should be no hazards from the use of the lubricants mentioned in this manual, but safety is allimportant, and by adopting good safety practices, any risk is minimized. A summary of the most important precautions is as follows:
1.While working, maintain good standards of personal and industrial hygiene.
2.Clothing which has become contaminated with lubricants should be changed as soon as practicable, and laundered before further use.
3.Avoid skin contact with lubricants: do not, for example, place a soiled wipingrag in your pocket.
4.Hands and any other parts of the body which have been in contact with lubricants or lubricant-contaminated clothing, should be thoroughly washed with hot water and soap as soon as practicable.
5.To protect the skin, the application of a suitable barrier cream to the hands before working, is recommended.
6.A supply of clean lint-free cloths should be available for wiping purposes.
GOOD WORKING PRACTICES
1.The right tools
Use the recommended special tools to protect parts from damage. Use the right tool in the right manner-do not improvise.
2.Tightening torque
Follow the tightening torque instructions. When tightening bolts, nuts and screws, tighten the large sizes first, and tighten inner-positioned fixings before outer-positioned ones.
1-3

SECURITE PENDANT LE FONCTIONNEMENT
SICHERHEITSMASSNAHMEN
SEGURIDAD EN EL TRABAJO
Dans des conditions d'utilisation normales, l'emploi des lubrifiants mentionnés dans le présent manuel ne devrait présenter aucun danger. Cependant, la sécurité est capitale et le fait d'adopter de bonnes pratiques en matière de sécurité permet de minimiser les risques. Un récapitulatif des mesures de sécurité les plus importantes est fourni ci-après :
1.Pendant le travail, respectez les normes applicables en matière d'hygiène personnelle et d'hygiène du travail.
2.Il convient de quitter le plus rapidement possible les vêtements qui ont été souillés par des lubrifiants et de les faire nettoyer avant toute utilisation ultérieure.
3.Evitez tout contact des lubrifiants avec la peau : par exemple, ne mettez pas un chiffon sale dans votre poche.
4.Les mains et toute autre partie du corps qui ont été en contact avec des lubrifiants ou des vêtements souillés par des lubrifiants doivent être lavées soigneusement à l'eau chaude et au savon aussi rapidement que possible.
5.Pour protéger la peau, il est recommandé d'appliquer une crème protectrice adéquate sur les mains avant de commencer les travaux.
6.Il convient de disposer d'un stock de chiffons propres non pelucheux pour le nettoyage.
PRATIQUES DE TRAVAIL
APPROPRIEES
1.Les bons outils
Utilisez les outils spéciaux recommandés pour ne pas endommager les pièces. Utilisez le bon outil de la bonne manière - n'improvisez pas.
2.Couple de serrage
Respectez les couples de serrage spécifiés. Lorsque vous serrez des boulons, des écrous et des vis, serrez d'abord ceux de plus grande taille et serrez les éléments de fixation intérieurs avant ceux extérieurs.
Unter normalen Betriebsbedingungen entstehen durch die Verwendung der in diesem Handbuch genannten Schmiermittel keine Gefahren. Sicherheit ist jedoch oberstes Gebot, und durch die Einhaltung der Sicherheitsmaßnahmen werden jegliche Gefahren auf ein Minimum reduziert. Nachstehend folgt eine Zusammenfassung der wichtigsten Sicherheitsmaßnahmen:
1.Während der Arbeit immer für saubere, gut sitzende Arbeitskleidung und einen sauberen Arbeitsplatz sorgen.
2.Durch Schmiermittel verschmutzte Kleidung so bald wie möglich wechseln und vor der weiteren Benutzung gründlich reinigen.
3.Schmiermittel möglichst nicht mit der Haut in Berührung bringen: z.B. keinen schmutzigen Lappen in die Tasche stecken.
4.Hände und andere Körperteile, die in Beruhrung mit Schmiermitteln gekommen sind oder durch Schmiermittel verschmutze Kleidung so bald wie möglich gründlich mit warmem Wasser und Seife reinigen.
5.Zum Schutz der Haut wird vor Arbeitsbeginn das Auftragen einer geeigneten Schutzcreme empfohlen.
6.Ein Vorrat an sauberen fusselfreien Putztüchern sollte stets vorhanden sein.
RICHTIGE ARBEITSGEWOHNHEITEN
1.Die richtigen Werkzeuge Um Motorteile vor Beschädigung zu schützen, immer nur empfohlenes
Werkzeug verwenden. Immer mit den richtigen Werkzeugen auf die richtige Art und Weise arbeiten - nie improvisieren.
2.Anzugsdrehmoment
Die Anweisungen über die Anzugsdrehmomente sind zu beachten. Beim Festziehen von Schrauben und Muttern zuerst die größeren Schrauben festziehen, dabei zunächst die innenliegenden und danach die außenliegenden festziehen.
En condiciones normales de uso, el empleo de los lubricantes mencionados en este manual no debiera plantear riesgo alguno, pero la seguridad reviste vital importancia, por lo que la adopción de buenas medidas de seguridad reduce siempre el posible riesgo. A continuación figura un resumen de las precauciones más importantes:
1.Mientras trabaje, mantenga una higiene personal e industrial correcta.
2.Las prendas contaminadas por lubricantes deberán cambiarse lo antes posible y lavarse antes de volver a utilizarlas.
3.Evite el contacto de la piel con lubricantes: por ejemplo, no guarde en el bolsillo trapos sucios.
4.Las manos y cualquier otra parte del cuerpo que haya estado en contacto con lubricantes o prendas contaminadas por lubricantes deben lavarse minuciosamente con agua caliente y jabón lo antes posible.
5.Para proteger la piel, se recomienda aplicar una crema protectora a las manos antes de ponerse a trabajar.
6.Debe disponerse de una provisión de paños limpios para las tareas de limpieza.
PROCEDIMIENTOS DE TRABAJO CORRECTOS
1.Las herramientas adecuadas Emplee las herramientas especiales recomendadas para evitar que las piezas sufran desperfectos. Emplee la herramienta adecuada del modo adecuado: no improvise.
2.Par de apriete
Siga las instrucciones relativas al par de apriete. Al apretar pernos, tuercas y tornillos, apriete primero los de mayor tamaño, y los situados en la parte interior antes de apretar los situados en la parte exterior.
1-3
SAFETY WHILE WORKING
3.Non-reusable items
Always use new gaskets, packings, O- rings, split-pins, circlips, etc., on reassembly.
DISASSEMBLY AND ASSEMBLY
1.Clean parts with compressed air when disassembling.
2.Oil the contact surfaces of moving parts before assembly.
3.After assembly, check that moving parts operate normally.
4.Install bearings with the manufacturers markings on the side exposed to view, and liberally oil the bearings.
5.When installing oil seals, apply a light coating of water-resistant grease to the outside diameter.
1-4

SECURITE PENDANT LE FONCTIONNEMENT
SICHERHEITSMASSNAHMEN
SEGURIDAD EN EL TRABAJO
3. |
Articles non réutilisables |
3. |
Nicht wiederverwertbare Teile |
3. |
Elementos no reutilizables |
|
Lors du remontage, utilisez |
|
Beim Zusammenbauen |
|
Utilice siempre juntas, |
|
toujours des joints, garnitures |
|
immer neue Dichtungen, |
|
guarniciones, juntas tóricas, |
|
d'étanchéité, joints toriques, |
|
Packungen,O-Ringe, Splinte, |
|
pasadores abiertos, anillos |
|
goupilles fendues, circlips, etc. |
|
Sicherungsringe, usw. |
|
elásticos, etc., nuevos cuando |
|
neufs. |
|
verwenden. |
|
vuelva a montar componentes. |
DEMONTAGE ET MONTAGE |
ZERLEGEN UND ZUSAMMENBAU |
DESARMADO Y ARMADO |
|||
1. |
Lors du démontage, nettoyez les |
1. |
Beim Zerlegen die Teile mit |
1. |
Limpie las piezas con aire |
|
pièces à l'air comprimé. |
|
Druckluft reinigen. |
|
comprimido al desarmarlas. |
2. |
Avant le montage, huilez les |
2. |
Kontaktflächen beweglicher |
2. |
Engrase las superficies de contacto |
|
surfaces de contact des pièces |
|
Teile vor dem Zusammenbau |
|
de las piezas móviles antes de |
|
mobiles. |
|
einfetten. |
|
armarlas. |
3. |
Après le montage, vérifiez que les |
3. |
Nach dem Zusammenbau die |
3. |
Después de armarlas, compruebe |
|
pièces mobiles bougent |
|
beweglichen Teile auf |
|
que las piezas móviles funcionan |
|
normalement. |
|
einwandfreie Funktion |
|
con normalidad. |
4. |
Montez les roulements de manière |
|
prüfen. |
4. |
Coloque los cojinetes situando las |
|
à ce que les marquages du |
4. |
Install bearings with the |
|
marcas del fabricante en el lado |
|
fabricant se trouvent du côté |
|
manufacturerís markings on |
|
que queda a la vista, y engráselos |
|
visible et huilez généreusement les |
|
the side exposed to view, and |
|
abundantemente. |
|
roulements. |
|
liberally oil the bearings. |
5. |
Al colocar los retenes de aceite, |
5. |
Pour monter des bagues |
5. |
Beim Einbau von |
|
aplique una ligera capa de grasa |
|
d'étanchéité, appliquez une fine |
|
Öldichtungen diese leicht mit |
|
hidrófuga sobre el diámetro |
|
couche de graisse résistante à l'eau |
|
einem wasserbeständigen |
|
exterior. |
|
sur la bague extérieure. |
|
Fett einreiben. |
|
|
1-4

SPECIAL TOOLS
SPECIAL TOOLS
Using the correct special tools recommended by Yamaha, will aid the work and enable accurate assembly and tune-up.
Improvising and using improper tools can damage the equipment.
NOTE:
For U.S.A. and Canada, use part numbers
|
|
|
that start with “J-”, “YB-” “YM-”, “YU-” |
||
|
|
|
or”YW-”. |
|
|
|
|
|
For other countries, use part numbers |
|
|
1 a |
b |
|
|
||
|
that start with “90890-”. |
|
|||
|
|
|
|
||
|
|
|
MEASURING |
|
|
|
|
|
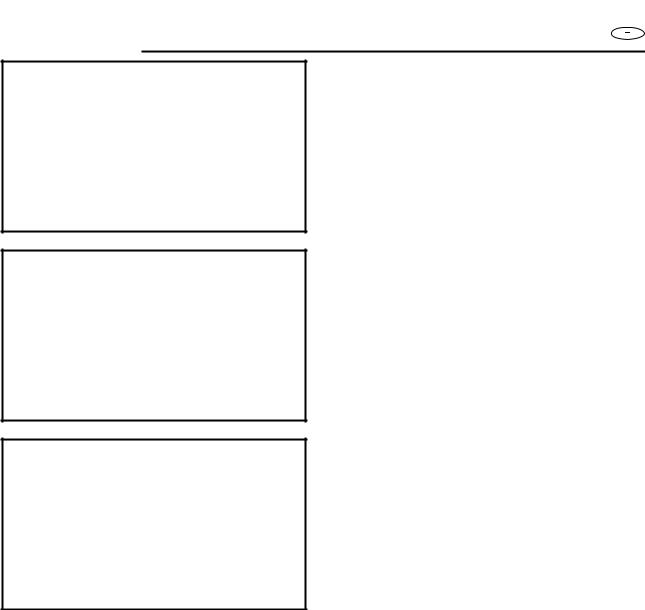
1 Engine tachometer |
|
|
|
|
|
P/N. YU-08036-B .......................... |
a |
|
2 |
3 |
|
|
90890-06760 ......................... |
b |
|
|
|
2 Pilot screw driver |
|
|
|
|
|
P/N. |
N.A. |
|
|
|
|
|
90890-03154 |
|
4 |
|
|
3 Compression gauge |
|
|
|
|
P/N. |
YU-33223 |
|
|
|
|
|
|
||
|
|
|
|
90890-03160 |
|
|
|
|
4 Timing light |
|
|
|
|
|
P/N. YM-33277-A |
|
|
5 a b |
6 |
|
|
90890-03141 |
|
|
|
|
5 Mity vac |
|
|
|
|
|
P/N. YB-35956-A............................ |
a |
|
|
|
|
|
90890-06756........................... |
b |
7 a |
b |
|
6 Leakage tester |
|
|
|
|
|
P/N. |
N.A. |
|
|
|
|
|
90890-06762 |
|
|
|
|
7 Digital circuit tester |
|
|
8 a |
b |
|
P/N. YU-34899-A............................ |
a |
|
|
|
90890-06756 |
b |
||
|
|
|
|
||
|
|
|
8 Peak voltage tester |
|
|
|
|
|
P/N. |
YU-39991 .............................. |
a |
|
|
|
|
90890-03172 ......................... |
b |
9 a |
b |
|
9 Spark gap tester |
|
|
|
|
|
|
||
|
|
|
P/N. |
YM-34487 .............................. |
a |
|
|
|
|
90890-06754 ......................... |
b |
|
|
|
|
|
|
1-5
Loading...