


 YAMAHA
AUTHORIZED
PRODUCT MANUAL
DX7
DIGITAL PROGRAMMABLE
ALGORITHM SYNTHESIZER
 YAMAHA
DigitalProgrammable
Algorithm Synthesizer
OPERATION MANUAL
PRECAUTIONS
Location
Avoid placing the DX7 in direct sunlight or close to a source of heat. Also, avoid locations in which the instrument is likely to be subjected to vibration, excessive dust, cold, or moisture. Extreme temperatures can ruin theLCDdisplay
Handling
Avoid applying excessive force to the slide knobs, dropping or rough handling. While the internal circuitry is of reliable, solid state design, the DX7 is nonetheless a fine instrument that should be treated with care.
Power Cord
Always grip the plug directly when removing it from an AC receptacle. Removing the plug from the AC receptacle by pulling the cord can result in damage to the cord, and possibly a short circuit. It is also a good idea to disconnect the DX7 from the AC receptacle if you don't plan to use the instrument for an extended period of time.
Relocation
If you plan to move the DX7 once it has been set up, first be sure to disconnect all cables that connect it to other equipment. This will help prevent accidental damage to the instrument or shorting of the cables.
Connections
Carefully follow the "Setup" instructions in this man-
ual when you set up the DX7. Improper connection of cables can lead to serious damage of the instrument, amplifier, and/or speakers.
Cartridge Care
The RAM (user programmable) and ROM (factory preset) cartridges have no moving parts, other than their memory protect or bank selector switches, nor do they have batteries. They should, however, be kept clean and dry to protect their connectors. They should also be kept away from strong electrostatic fields, as produced by sparking electric motors and solenoids, fluorescent lights, and so forth; as with all electronic memories, the
data (voices) could be accidentally altered. As a further precaution against voice loss in the event of a synthesizer malfunction, it is a good idea to remove the RAM cartridge from its slot in the DX7 before you turn power on or off.
Cleaning
Use only a mild detergent on a cloth, and dry with a soft cloth. Never use solvents (such as benzine or thinner) since they can melt or discolor the instrument.
Electrical Storms (Lightning)
Computer circuitry including that in the DX7, is sensitive to voltage spikes. For this reason, the DX7 should be turned off and unplugged from the AC receptacle in the event of an electrical storm. This precaution will avoid the chance that a high voltage spike caused by lightning will damage the instrument.
Electromagnetic Fields
Computer circuitry is also sensitive to electromagnetic radiation. Television sets, as well as radio receivers, transmitters and transceivers, and wireless microphone or intercom systems are all potential sources of such radiation, and should be kept at least several feet from the DX7 to avoid possible interference or random "errors."
If The Sound is Too Quiet
Check the FOOT CONTROL. There are two foot controller jacks, VOLUME and MODULATION. Two addi-
tionaljacks are for foot switches, SUSTAIN and PORTAMENTO. Ifthefootcontrollerispluggedintothe SUSTAIN or PORTAMENTO jack, it will not work. Also, when the controller is plugged into the VOLUME jack and is tilted forward, there will be little or no sound regardless of how you set the VOLUME control on the front panel.
Some voices are inherently quieter than others. Often this is due to the amount of touch sensitivity which may be programmed into a voice. If the voice is programmed so that the note will become louder if you press the key harder, or if you press it faster, then a less vigorous playing style will result in a quieter note. Played the same way another voice which is less touch sensitive will sound louder. The voice which is initially louder, however, may not become much louder (if at all) as you play the notes harder. These qualities are user-programma- ble, even for the preset voices, as explained elsewhere in this manual.
Save This Manual
The information in this manual is likely to be useful for future reference. Even if you feel reasonably familiar with the instrument, save this manual; reviewing it a few months from now, after you have had considerable experience with the DX7, may prove to be very informa-
tive.
INTRODUCTION
The DX7 is the world's first fully user programmable and preset FM digital synthesizer. If you're used to conventional synthesizers, one look at the DX7 will tell you that something unique has happened. There are no knobs: just two linear controls, one of which is for volume, an LED digital display a small alphanumeric liquid crystal display (LCD), and a number of flat panel mem-
brane switches. There are no voltage controlled oscillators, amplifiers or filters (VCOs, VCAs, or VCFs), nor are there any conventional envelope generators (EGs).
Instead, the DX7 utilizes a totally unique method to create the richest, most naturally expressive sound available in any electronic keyboard. This special sound generation technology is called FM Digital Synthesis. FM Digital Synthesis enables the DX7 to create the overtones that would be present in an actual acoustic instrument, and to vary them over time in a precise, controllable manner to produce uncanny realism when you're playing an acoustic voice — or to produce incredible fantasy sounds — the possibilities are without limit.
Because the DX7 creates sounds differently than conventional analog or purely digital synthesizers, you'll have to spend some time re-educating yourself with the aid of this manual. After you've become familiar with the panel, a few new terms, and the general concept of FM digital synthesis, you'll love the precision and tremendous versatility at your disposal. If you're already an experienced synthesist, you will soon be able to go right for a particular sound. Whether you're a beginner or a world class performer, you can enjoy the large library of preset sounds that come with the DX7.
The DX7 is delivered ready to play, loaded with 32
beautifully voiced, useful, factory preset sounds. These sounds can be instantly changed, or can be replaced by additional factory-supplied sounds from a library of 128 that are supplied on special solid state cartridges. Liter-
ally hundreds of exciting sounds can be at your finger-
tips with just the press a few selector buttons. You don't have to program a single thing... unless you want to. Presets won't handle every job, and there's nothing that says you have to use ours. You can make your own
voices.
The compact size and relatively few controls of the DX7 can be deceiving. Almost every button and knob
have multiple functions (depending on the selected operating mode) so that a total of some 168 parameters can be altered. In fact, the DX7 has more programmability than any synthesizers Yamaha has ever before
offered to the public, providing greater control over the sound than large or modular systems.
The DX7 keyboard is fully polyphonic with 16-note simultaneous capability, so the sustain of previous notes will not be cut short when you're playing with all 10 fingers. It is also highly responsive to player expression.
The harder or faster a key is played, the louder the initial attack of the note — just like a piano. Unlike a piano, however, the degree of touch response is programmable... both in sensitivity to the speed (velocity) at which the key is pressed, and in sensitivity to how hard you press after the kit hits the stop (after touch).
You can program voices from scratch (using a voice initialize function). If you like an existing voice, you can edit it to make subtle changes, or transform its character completely.
Because the DX7 employs unique FM tone generation techniques and lets you program them with the precision and repeatability of digital control, you'll be able to create voices that are a giant step beyond the capability of former synthesizers. Pure sounds. Richly textured sounds. Outer space sounds. Bold, heavy sounds. Subtle, delicate sounds. Uncannily accurate acoustic sounds. All are possible with the high fidelity that FM digital tone generation can provide.
Once you've edited a voice or created an entirely new one, you can store it in the internal memory and/or in special solid state cartridges. A battery prevents loss of memory — even after the instrument is unplugged from the AC receptacle.
Up to 96 Voices Can Be "On Line" Ready for Instant Recall
Voices (sounds or ''instruments") may be saved in 3 different ways with the DX7. As mentioned above, the synthesizer has 32 internal voice memories that can
hold any combination of factory preset sounds or voices
you create. In addition to the internal memories, one of two types of memory cartridges may be inserted in the instrument for additional "on line" memory. Pushbuttons
enable you to select from the internal and cartridge voices.
A total of 128 factory preset voices are provided. Obviously they all cannot fit in the 32 internal memories at once; these voices are actually supplied to you stored in 2 solid state ROM (Read Only Memory) cartridges that each hold 64 voices, arranged in two banks of 32. You move a slide switch on the cartridge to gain access to
voices 1-32 in Bank A or 1-32 in Bank B — access for playing, editing, or loading into the synthesizers internal memories. Before the DX7 is shipped, 32 of the 128 voices called the "Master Group" are loaded from the bank A of the #3 ROM cartridge into the synthesizer's internal memories. This means that a cartridge does not have to be installed in order for you to open the carton, plug in headphones or an amplifier/speaker system, turn on power, and begin playing.
You can edit the preset voices, or make voices from scratch, but you cannot permanently store your own voices on the ROM cartridges. For this purpose, a third
storage method is provided: an EEPROM (Electrically Eraseable Programmable Read Only Memory) cartridge which, forsimplicity,wecallaRAMcartridge(Random Access Memory). The RAM cartridges go in the same slot as the ROM cartridges, and superficially they look the same. However, because of the added complexity of RAM memory, only 32 voices will fit in one of these car-
tridges. The slide switch on the RAM cartridge is actually an additional "write protect" feature that prevents acccidental erasure of voices you have stored; it is not a bank A-B selector.
This arrangement lets you have a total of 96 voices at your fingertips since you can have any 32 voices you wish loaded in the internal memories, then install one of the 64-voice ROM cartridges. You switch between internal and cartridge voices with the press of a button, and between cartridge banks A & B with a slide switch. Of course, if you allow for changing cartridges, which takes just a second, your live performance voice library is really unlimited.
NOTE Portions of the front panel are used to illustrate the text throughout this manual; it should be relatively easy to see where these "spot" illustrations fit in the context of the entire instrument if you are reading the manual with the DX7 in front of you. If the instrument is not handy we suggest opening this cover fully revealing an overall front panel illustration that will remain visible as you flip through the inside pages. Originally ROM cartridges were numbered #1 & 2. Later models were shipped with ROM cartridges #3 & 4 instead. Both sets have similar voices.
|
NOTE FOR SYNTHESIZERS SOLD BY THE U.S.A. |
2 |
Internally, the DX7 generates signals in the radio frequency spectrum. If the instrument is installed |
in the immediate proximity of some types of audio or video devices (within ten feet), interference may occur.
Federal Communications Commission (FCC) Rule Part 15, Subpart J, establishes design and manufacturing standards that will provide a reasonable level of protection against the possibility that two electronic devices, operating simultaneously, might interfere with each other.
The DX7 has been type tested and found to be in compliance with the design and manufacturing
standards established for "Class B" computing devices. Compliance with the standards established by the FCC does not guarantee that interference will be eliminated. If your instrument is suspected
of causing interference with other electronic devices, verification can be made by turning your instrument on and off. If the interference continues when your instrument is off, the instrument is
not the source of the interference. If your instrument does indeed appear to be the source of the interference, one or more of the following corrective measures should be tried.
(1) Relocate either the instrument or the electronic device that is being affected by the interference.
(2) Utilize power outlets for the instrument and the device being affected that are on different branch circuits (different circuit breakers or fuses), or install AC line filters.
(3) In the case of radio or TV interference, relocate the antenna; if the antenna lead-in wire is 300
ohm ribbon lead, change it to 75 ohm co-axial type cable (utilizing the necessary transformer/ adaptors at either end, as required to match the cable).
If these corrective measures do not produce satisfactory results, please ask for suggestions or seek corrective measures by contacting your Authorized Yamaha Dealer or:
Music Marketing Group
Service Division
YamahaInternationalCorporation 6600 Orangethorpe Avenue
P.O. Box 6600
Buena Park, CA 90622
If, for any reason, you should need additional information relating to radio or TV interference, you may find helpful a booklet prepared by the FCC: "How to Identify and Resolve Radio-TV Interference Problems." This booklet, (stock number 004-000-00345-4) is available from:
U.S.GovernmentPrintingOffice Washington, DC 20402
INTRODUCTION |
Inside front cover |
HOW THE DX7 CREATES SOUNDS |
23 |
THE INTERNAL AND CARTRIDGE MEMORIES |
49 |
||
Operators |
23 |
Memory Protect |
49 |
||||
|
|
|
|||||
PRECAUTIONS |
Inside front cover |
Carriers, Modulators and FM |
23 |
Storing individual voices to RAM cartridge |
49 |
||
|
|
|
Algorithms |
24 |
Saving all 32 internal memory voices to RAM cartridge |
49 |
|
CONVENTIONS |
|
3 |
The relationship between algorithms and the sound |
24 |
Loading all 32 ROM or RAM cartridge voices to internal |
|
|
|
|
|
Feedback is available in every algorithm |
25 |
memory |
49 |
|
"QUICK" BASIC FEATURES |
|
4 |
Envelopes and Envelope Generators |
26 |
Transfering a single voice from one location to another in |
|
|
SETUP |
|
12 |
PROGRAMMING VOICES: A TUTORIAL |
27 |
the RAM cartridge or internal memory |
49 |
|
|
ADVANCED PROGRAMMING NOTES |
|
|||||
Audio Output |
|
12 |
Two basic approaches to creating your own sounds on |
|
51 |
||
External Foot Controller Jacks |
|
12 |
the DX7 |
27 |
Playing style and programming of dynamic control |
51 |
|
Breath Controller |
|
12 |
Programming a voice "from scratch" |
27 |
Additional envelope considerations |
51 |
|
MIDI Connectors |
|
12 |
Voice Initialization |
27 |
Delayed turn-on using the envelopes |
51 |
|
AC Power |
|
12 |
What is initialization? |
28 |
How to select an algorithm |
51 |
|
Installation of Music Rack |
|
12 |
How to interpret the display |
28 |
Leam to program by studying how acoustic instruments |
|
|
Additional Technical Installation Notes |
|
13 |
Looking at the initial EG settings |
28 |
work |
52 |
|
|
|
|
Experimenting with the EG |
29 |
There is more than 1 way to create a pitch |
52 |
|
PLAYING THE FACTORY PRESET VOICES |
|
14 |
Learning to change the operator FREQUENCY settings |
31 |
Ensemble voices may differ from solo voices |
53 |
|
Playing the Internal Voices |
|
14 |
How to create Frequency Modulation: getting acquainted |
|
Breath controller applications and hints |
53 |
|
Playing the Cartridge Voices |
|
14 |
with the OPERATOR SELECT OUTPUT LEVEL |
|
Special effects from [DATA ENTRY] while in PLAY mode |
53 |
|
FUNCTION MODE: SETTING OVERALL |
|
|
and ON-OFF edit features |
33 |
Reference sources on FM synthesis |
54 |
|
|
|
Additionaleditingfeatures:ALGORITHMSELECT |
|
MIDI: A STANDARD INTERFACE FOR REMOTELY |
|
||
PERFORMANCE PARAMETERS |
|
15 |
KEYBOARD RATE SCALING and LEVEL SCALING |
38 |
|
||
Data Entry |
|
15 |
LFO Modulation: The relationship between the "LFO" |
|
PLAYING AND/OR PROGRAMMING MULTIPLE |
|
|
Function |
|
15 |
settingsand the "MODSENSITIVITY" settings, and |
|
SYNTHESIZERS |
55 |
|
Poly/Mono |
|
16 |
how to program these |
40 |
MIDI connections |
55 |
|
Pitch Bend Range & Step |
|
17 |
Programming the remaining 4 operators |
44 |
Transmitting 32 voices from the Master to the Slave |
56 |
|
Portamento Functions |
|
17 |
Programming velocity sensitivity |
45 |
Playing the Slave from the Master |
56 |
|
Portamento & Glissando in Poly Mode |
|
18 |
Naming and storing the newly created voice |
45 |
Transmitting individual voices from the |
|
|
Sustain: Key Pitch Retain |
|
18 |
Edit Recall "Emergency Voice Recovery" instructions |
46 |
Master to the Slave |
56 |
|
Sustain: Key Pitch Follow |
|
18 |
|
|
Using DX7 RAM cartridges to save DX9 voices |
57 |
|
Glissando (Key Pitch Retain & Key Pitch Follow) |
19 |
EDITING A VOICE |
47 |
Programming remotely with MIDI |
57 |
||
Portamento & Glissando in Mono Mode |
|
19 |
Analyzing and keeping a record of voices |
48 |
Escaping from MIDI control |
57 |
|
Fingered Portamento (and Glissando) |
|
19 |
|
|
A special setup with two Masters and no Slave |
57 |
|
Full Time Portamento (and Glissando) |
|
19 |
|
|
More information on MIDI |
57 |
|
MIDI |
|
20 |
|
|
|
|
|
Edit Recall |
|
20 |
|
|
MAINTENANCE AND TROUBLESHOOTING |
58 |
|
Voice Initialize |
|
20 |
|
|
Cleaning |
58 |
|
Cartridge Format |
|
20 |
|
|
Internal Memory Battery Backup |
58 |
|
Battery Check |
|
20 |
|
|
If something goes wrong |
58 |
|
Modulation Wheel |
|
21 |
|
|
|
|
|
Foot Control |
|
21 |
|
|
DX SYNTHESIZER GLOSSARY |
59 |
|
Breath Control |
|
21 |
|
|
|
|
|
After Touch |
|
21 |
|
|
SPECIFICATIONS |
63 |
|
|
|
|
|
|
INDEX |
64 |
|
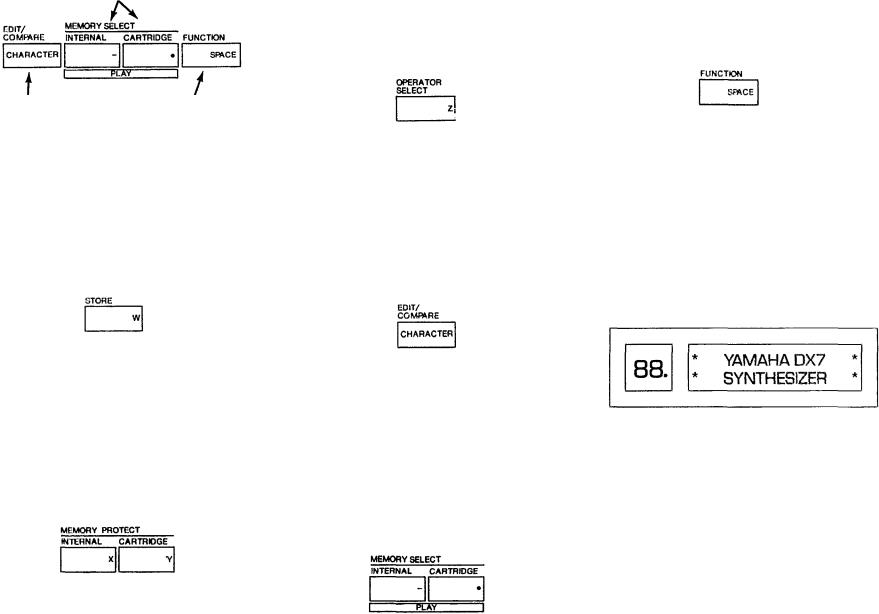
CONVENTIONS
Nearly every button on the DX7 has several functions. Typically, the editing parameters are labeled in violet, the overall instrument functions are labeled in brown, and yet other functions are labeled in white or by reversing out the color of the button. Since this manual is not printed in full color, we have adopted the following conventions when referring to buttons. First, even
though the button has several labels, we name only the
button label which applies to the particular step being discussed. That button name will be bracketed to denote a button. In addition, in many cases we actually illustrate the button so there is no confusion as to which control
is being discussed.
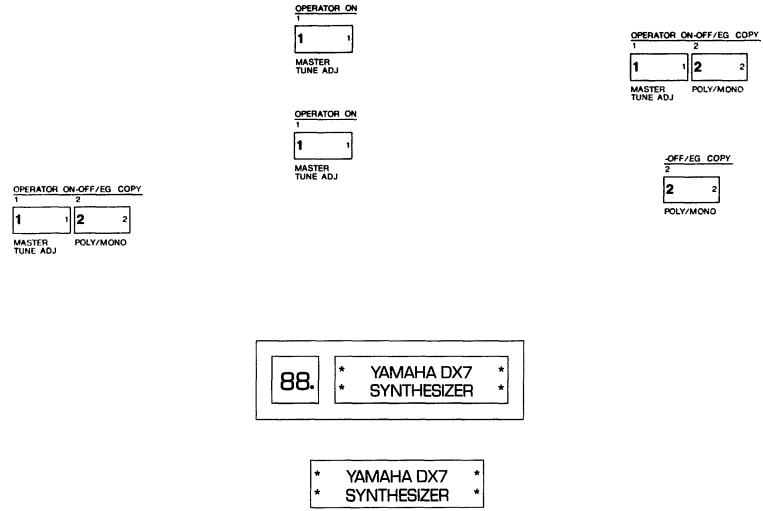
Lets look at a few examples to illustrate the conventions. Find the 32 numbered green buttons, and look at the upper left corner of that area. This is how we illustrate the first two buttons:
Both buttons are part of a group of 6 that are labeled inviolet "OPERATORON-OFF/EGCOPY". Whenthe DX7 is in the EDIT mode, this label indicates that two different functions can be selected or activated by each button: (a) turning the output of an operator on or off, and (b) copying an envelope from one operator to another. Don't worry about what this means right now; we describe operators and envelopes and so forth later. Suffice it to say there are multiple uses for the buttons.
To continue, when we are discussing the left button in the context of (a) above, the printed reference to the button looks like this: [OPERATOR ON-OFF 1]. The same button, used in context (b), is described like this: (EG COPY 1]. When the DX7 is in the FUNCTION
mode rather than the EDIT mode, the brown label below it applies instead of the violet label above it. In this case, the identical button now prepares the DX7 so that its master tuning can be adjusted, and the text describes the button like this: (MASTER TUNE ADJ.). When the DX7 is in PLAY mode, the green buttons serve as Voice Selectors. The label "Voice Selector" does not actually appear on the front panel, but when the text asks you to play internal or cartridge voice #1 by pressing Voice Selector [1], the #1 green button is the correct choice. As you can see, the text reference
changes to suit whichever of the button's several functions is under discussion, yet the button is always illustrated the same way:
In EDIT mode, press the
[OPERATOR ON-OFF 1] button once to turn off operator #1 and again to turn it on.
In FUNCTION mode, press the [MASTER TUNE ADJ] button to set the [DATA ENTRY] slider so it can alter the tuning of the keyboard.
We alternate between showing you the complete display window, including the LED voice number read-
out, and just the LCD portion of the display. There is no particular signficance to this; the abbreviated display saves space on the printed page, and when we don't consider the voice number readout significant for an instruction, we omit it. Similarly in some cases we
This illustration
is the same as this one
illustrate two or more adjacent panel buttons, whereas |
3 |
in other cases we illustrate just one; the multiple buttons |
|
are to help you identify the one button we are discussing.
This illustration
is the same as this one
"QUICK" BASIC FEATURES
4 This section is provided for reference so you can quickly locate a control or access a function. It is meant more for review than as a learning tool. If this is your first time reading the manual, we suggest you either skim this section, or skip it altogether and go on to the section titled "Playing the Factory Preset Voices".
The DX7 has 3 basic operating modes:
• PLAY (MEMORY SELECT) Mode
This is the "normal" performance mode in which pre-
programmed voices can be selected.
•EDIT mode
This mode is used to edit an existing voice or to create an entirely new voice. Some of the "editing" functions do not alter the structure of the voice directly yet can have a major effect on the sound: for example, changing the sensitivity of a given voice to various modulation sources, transposing the voice, or changing the
keyboardscaling.
• FUNCTION mode
This mode is used to adjust parameters that affect more than 1 voice, including the effect of the Modula-
tion Wheel, Foot Controller, Breath Controller and AfterTouch (pressuresensitivity). FUNCTION mode also provides access to certain utility functions such as loading voices from a cartridge, saving voices onto a cartridge, checking the internal backup battery voltage, and initializing the instrument when you want to program a voice "from scratch" (which then automatically places the instrument in EDIT mode).
The DX7 front panel is unlike any conventional synthesizer. There are many more functions than buttons. It is important to bear in mind that the [DATA ENTRY] controls are assignable by means of the other buttons on the DX7. They take the place of the many knobs and sliders on conventional synthesizers. Another thing to remember is that, depending on the operating mode, the front panel controls may be used in different groupings. For example, in one place we may refer to VOICE SELECT button [1]. This is the same physical button as [OPERATOR ON-OFF 1] and the [MASTER TUNE] function selector. The 2 rows of 16 buttons at the right of the synthesizer are, among other things, the [VOICE SELECT] buttons. They include large white numerals [1] to [32], which apply when the buttons are used to select voices from the correspondingly numbered internal or cartridge memories. Many of the buttons include a small letter, number, or word at the right, inside edge.
These are used for labeling voices, as explained in the [VOICE NAME] button description.
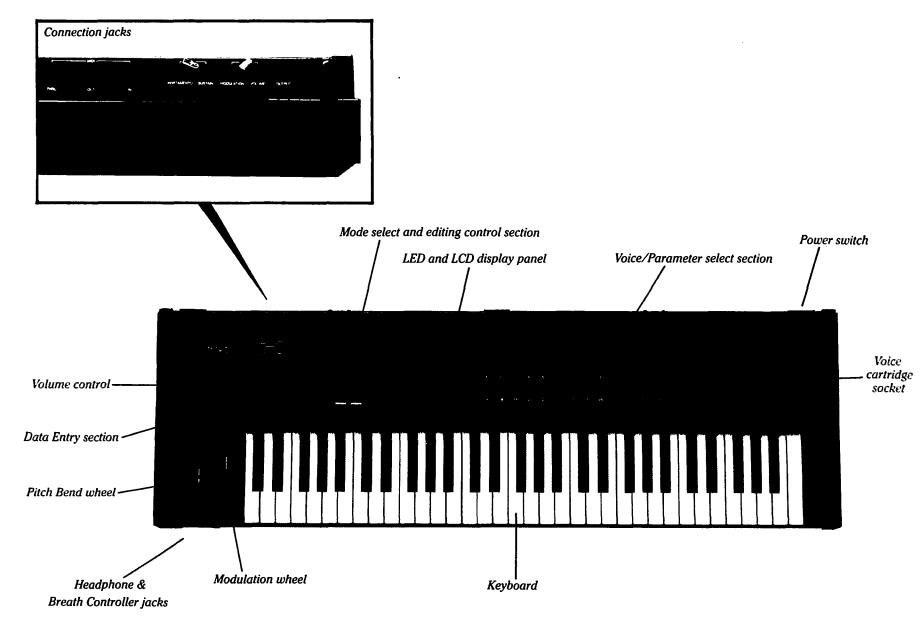
NOTE Refer to the illustration in the foldout front cover to identify the following features.
Rear panel connectors
These jacks include the line level output from the DX7 to an amplifier, foot control jacks, and MIDI interface connections. Refer to the "Setup" and "MIDI" sections of this manual for details.
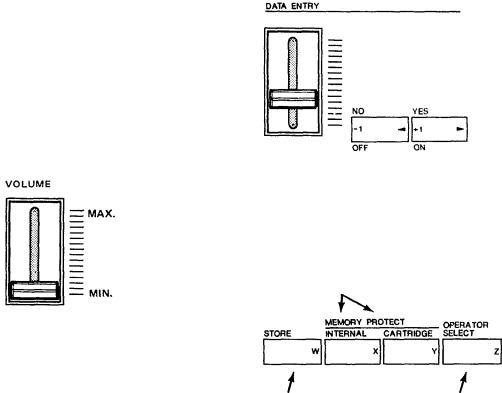
Volume and Data Entry Controls
VOLUME
This adjusts the overall output level at the rear panel OUTPUTjack and the front panel HEADPHONE jack. Some presets are inherently louder than others, and this can be used to compensate, or to do overall fades. If
volume is too low, and the foot controller is plugged into the VOLUME jack, make sure the pedal is tilted flat for maximum level. It is also possible that amplitude modulation sensitivity has been programmed into a voice, in which case, to make the voice play louder, you may
want to use the MODULATION WHEEL, BREATH CONTROLLER, FOOT CONTROLLER (plugged into the MODULATION jack), or the AFTER TOUCH (pressing harder after the key hits bottom). See the FUNCTION mode information on page 10 for more information on these modulation controls.
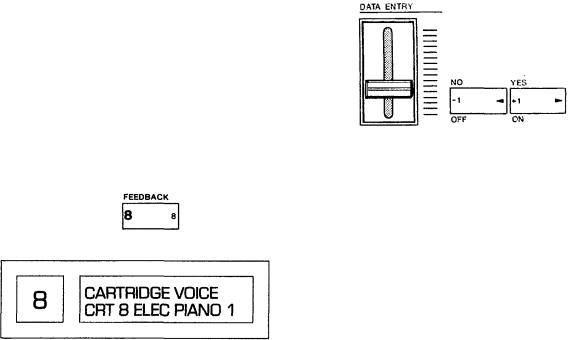
For example, if the DX7 asks you "are you sure", you can reply [NO] or [YES] with the left and right buttons. If you want to turn the glissando or some other programming function on or off, the [OFF] and [ON] labels apply — same buttons. If you want to change the frequency ratio or some other programming value by one unit at a time, the [-1] and [ +1] labels apply. If you just want to move the cursor to a different position when naming a voice, the [<] (move left) and [>] (move right) labels apply Usually you will be able to get the same effect by moving the adjacent slider up and down.
These controls are used primarily in the FUNCTION and EDIT modes, but also continue to modify the last selected FUNCTION parameter after returning to the PLAY mode (MEMORY SELECT INTERNAL or CARTRIDGE).
These buttons are for increas- ing or decreasing the values by
1, for turning a function on or off, and for moving the cursor when writing a voice name.
Thisslider is used for rapidor large changes. Moving it all the way down and up covers the full range available foreachparameter.
Mode Select and Editing Control Section
These buttons let you see & change the MEMORY
PROTECT status-
DATA
This group of a slider and two buttons serve as the main programming controls for the DX7. The two green buttons are single-step increment/decrement controls that do the same thing as the slider; the slider is faster for large changes and the buttons are better for small adjustments.
Each of the buttons has four different labels. The specific labels apply to different programming functions.
This button is used for copying EG data and for storing individual voices on an internal or RAM cartridgememory
This button selects the current operator (the one being adjusted) when the synthesizer is in edit mode
These buttons select the internal or cartridge memory and activate the PLAY mode; they also designate where individual voices may be stored
OPERATOR SELECT
When you are programming or editing a voice, this button lets you select the operator which is to be modified, as shown in the upper right corner of the LCD display. (It sets the "current operator".) Remember that some programming parameters affect the overall voice, in which case this button will have no effect. You can only select from operators that are turned on, as shown by the six 1's or 0's in the top line of the programming display.
This button selects the |
This button selects the |
EDIT mode and com- |
FUNCTION mode |
pares edited to original |
|
voices |
|
STORE
This button can be used to store whatever voice you have selected from cartridge or internal memory, or whatever voice you have just programmed. A voice can be stored into any of 32 internal memories or into any of the 32 memories in a RAM cartridge (provided the memory protect is turned off). This button is also used in conjunction with the [EG COPY] buttons for copying envelopes from one operator to another.
MEMORYPROTECT
This pair of buttons enable you to set the internal and cartridge memories so that voices cannot be accidentally erased. When you press one of the buttons, the display shows you whether the associated memories are protected or not, and you can use the[DATA ENTRY]
controls to change the status. Remember, however, that even if you turn off the cartridge memory protect, you still cannot save a voice on a ROM cartridge, nor can you save a voice if the On/Off switch on the RAM cartidge itself is set to the ON position.
EDIT/COMPARE-CHARACTER
This button places the DX7 in the EDIT mode, wherein you can edit any of the preset voices to change them slightly, or create completely new voices. Once in the EDIT mode, if you have changed a preset, then pressing this button lets you compare the edited version with the original. Once in the EDIT mode, if you have pressed the [VOICE NAME] button, then pressing this button [CHARACTER] and holding it enables you to press other buttons to enter the name of the voice in the display
MEMORYSELECT-PLAY
Pressing either of these buttons prepares the DX7 to PLAY any of the voices that are stored in the 32 INTERNAL memories, or in 32 memories of whatever CARTRIDGE is installed. Once the [INTERNAL] or
[CARTRIDGE] source is designated, specific voices are accessed by pressing the VOICE SELECT buttons [1] to [32]. These buttons are also used to designate where individual voices can be stored, in the internal or cartridge memories, either after being created or edited, or when you want to rearrange the location of voices within these memories.
FUNCTION |
5 |
This button places the DX7 in the FUNCTION mode, which is used to program the entire keyboard rather than individual voices. This mode is also used for checking battery voltage, storing all the internal memories onto cartridge at once, and vice-versa, and a few other specialized functions. The functions designated by brown labels beneath other buttons are available after pressing this button.
LED & LCD Display Panel
The LED (Light Emitting Diode) window indicates the
number of the selected internal or cartridge voice memory. If the voice being played is in the midst of being edited, a decimal point appears to the right of the voice number. If you then press the [EDIT/COMPARE] button to hear the original voice before the editing, the LED numbers blink on and off. The LCD (Liquid Crystal Display) window displays the current status of the synthesizer, which may be the voice name and source, or the FUNCTION or EDIT mode parameter which was most recently selected. Refer to the paragraph "How to interpret the display," on page 28.
LCDsynthesizer stains and voice namedisplay
Voice number LED display
Voice/Edit/Function select section
In PLAY mode. these 32 buttons select either the voices in the DX7's internal memory or on the external cartridge, as determined by the [MEMORY SELECT] buttons and indicated by the large numbers inside the buttons. However, these same buttons actually have multiple functions (up to 5 per button) which are accessible when the DX7 is placed in the FUNCTION and EDIT modes. All labels on these buttons are color and position coded: white numbers on the inside left of the buttons for PLAY mode, dark brown (reversed) type on the inside right of the buttons for naming voices, violet characters above the buttons for EDIT mode parameters,
6and light brown characters below the buttons for FUNCTION mode parameters. A brief example for two buttons is shown here, with the specific references for these two buttons noted in parentheses:
Violet EDIT mode parameters (Pitch and Amplitude
Modulation Sensitivity)
White PLAY mode |
Reverse printed |
|
EDIT mode Voice |
||
voice number (15 |
||
Name character |
||
&16) |
||
(E&F) |
||
|
Brown FUNCTIONmode parameters (SAVEall 32 voices from internal memory to cartridge, or LOAD 32 voices from cartridge to the internal memory)
To simplify the presentation, we have further subdivided these buttons into the EDIT (violet) and FUNCTION (brown) groupings. Therefore, if you don't see the operational description that applies to what you're doing with a particular button as you read through the paragraphs on the EDIT parameters, check the corresponding button in the FUNCTION parameter descriptions (and vice-versa).
Edit Parameter Selection (violet labels)
OPERATOR ON/OFF-EG COPY (1-6)
These buttons have two functions, (a) to turn individual operators on and off while you are programming a voice, and (b) to designate the operator into which you wish to copy an envelope. When you are in the EDIT mode, the top center portion of the LCD display shows 6 number 1's or 0's, corresponding to the 6 operators:
1 =ON, and 0=OFF To toggle operator's output on or off, press the corresponding [OPERATOR ON-OFF] button. To copy the envelope, set the operator whose envelope you wish to copy as the current operator using [OPERATOR SELECT], then press [STORE] and hold it while pressing [EG.COPY] button for operator 1 to 6; all 4 rates and levels are instantly copied.
ALGORITHM
In EDIT mode, this button activates the [DATA ENTRY] section so its controls can be used to select any
of the 32 available algorithms.
FEEDBACK
In EDIT mode, this button activates the [DATA ENTRY] section so its controls can be used to alter the amount of feedback in whatever algorithm is displayed from none (0) to a maximum value (7).
LFO
In EDIT mode, these 6 buttons each activate the [DATA ENTRY] section so it can be used to program or edit individual voices with regard to Low Frequency Oscillator modulation. When the modulation is used to change the pitch, vibrato can be obtained. When it is used to change the amplitude of a carrier, tremolo may result; changing the amplitude of a modulator can create "wah-wah."
WAVE
This lets you set the LFO waveform to any of the following: triangle, sawtooth down, sawtooth up, square, sine, sample & hold.
SPEED
This lets you adjust the LFO frequency in a 100 step range, 0 being the slowest and 99 the fastest.
DELAY
This lets you set the LFO so modulation does not begin until after a specified time after you press the key, 0 being no delay, and 99 the maximum delay.
PMD
This lets you set the Pitch Modulation Depth. This is the amount of modulation that will be applied to shift
the pitch of whatever notes are played (according to the set waveform and speed). However, the modulation can only affect the note if the pitch modulation sensitivity is set to a value greater than zero (see [MOD SENSITIVITY-PITCH]).
AMD
Like PMD, this button lets you set the Amplitude Modulation Depth, the amount of modulation that will be applied when you play but it affects the amplitude (level), not the pitch. Likewise, the modulation can only affect the note if the Amplitude modu-
lation sensitivity is set to a value greater than zero (see [MOD SENSITIVITY-AMPLITUDE]). The same LFO speed and waveform controls both the [PMD] and [AMD].
SYNC
This lets you turn on or off the LFO Key Synchronization. When Sync is ON, the LFO is automatically reset to the beginning of the selected waveform each time you play a note. When sync is OFF the LFO waveform continues, and when you play a note, the result will vary depending on where the LFO is in the cycle. The effect can be easily detected at low LFO frequencies (SPEED settings below 10).
MOD SENSITIVITY
In EDIT mode, this pair of buttons activate the [DATA ENTRY] section so it can be used to set the sensitivity of individual voices to LFO modulation. The modulation sensitivity is like a master control for all the modulation, whether it is "built into" the voice with the adjacent [AMD] and/or [PMD] buttons, or whether it comes from the "real time" modulation controls such as the Modulation Wheel, the Foot Control, the Breath Control or the keyboard After Touch. If the Pitch or Amplitude Modulation Sensitivity is set at zero, then none of the external controllers can affect the voice, regardless of how much Depth is set with their FUNCTION mode controls.
PITCH
This lets you set the sensitivity of the voice to LFO pitch modulation from no sensitivity (0) to maximum
(7). One setting affects the overall voice.
AMPLITUDE
This lets you set the sensitivity of the individual operators in a voice to amplitude modulation from no sensitivity (0) to maximum (3).
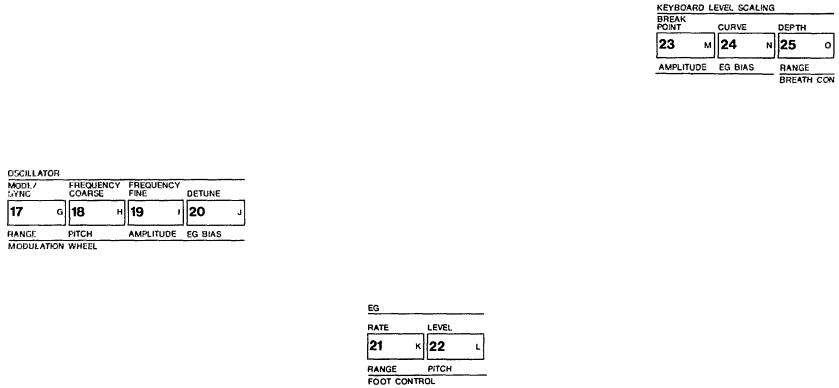
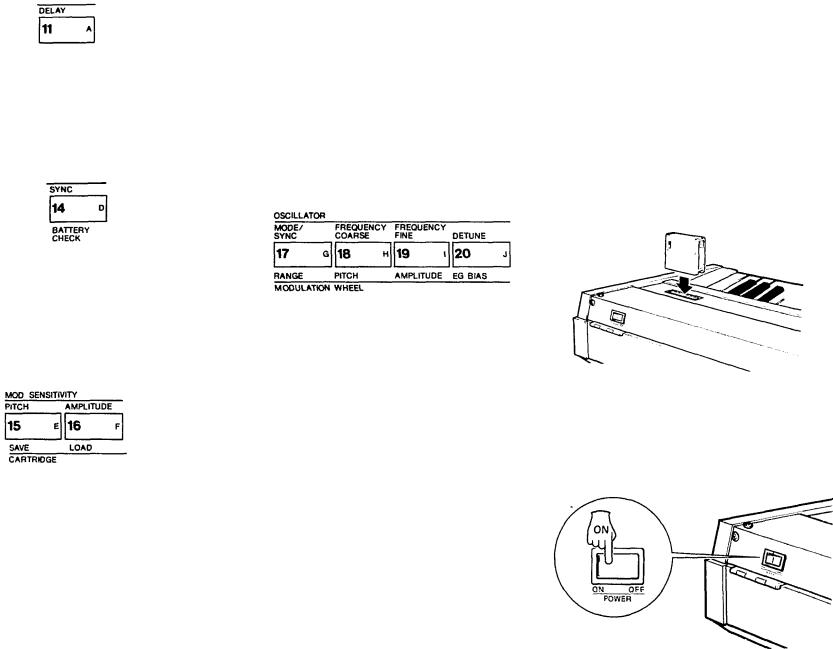
OSCILLATOR
In EDIT mode, these 4 buttons each activate the [DATA ENTRY] section so it can be used to program or edit the frequency of individual operators in a voice.
MODE/SYNC
The DX7 toggles between two different programming functions when you press this button successive times. One function, MODE, enables you to set the current operator so it tracks the keyboard pitch (this is Frequency Ratio Mode), or so the keyboard does not affect that operator's frequency (Fixed Pitch Mode). The other function, SYNC, enables you to set the operator so its "oscillator" begins at the start of the sine wave cycle each time you play a note. When Oscillator Key Sync is OFF, the sine wave continues so that subtle differences will occur even when you play the same note repeatedly. You may not be able to hear much difference in some voices.
FREQUENCY COARSE
This lets you make large changes in the current operator's frequency It operates in conjunction with the adjacent [FREQUENCY FINE] button. Assuming the Fine setting is all the way down, then in Frequency Ratio mode the ratio increases from 0.50 to 1.00 and then by integer values to a maximum of 31.00. In Fixed Frequency mode, this lets you set the beginning frequency to 1 Hz, 10 Hz, 100 Hz, or 1000 Hz.
FREQUENCY FINE
This lets you make small changes in the current operator's frequency With this control, the maximum available increase in frequency is just under the next available "Coarse" setting (1.99 times "F COARSE").
DETUNE
Detune is like a "super fine" frequency adjustment for each operator. You can shift the frequency over a range of -7 to +7. Mild detuning can enrich the harmonic structure and more closely simulate the imperfect nature of a real acoustic instrument. Maximum detuning between carriers can be used to cause "beating" within a voice to help simultate chorusing or multiple instrument effects.
EG
In EDIT mode, this pair of Envelope Generator buttons activate the [DATA ENTRY] section so it can be used to program or edit the envelopes of individual operators in a voice. 4 parameters are programmable with each button, and the range of adjustment is from the minimum of 0 to a maximum of 99 (100 steps).
RATE
Pressing this button 4 successive times gives you access to programming the 4 rates in the EG.
LEVEL
Pressing this button 4 successive times gives you access to programming the 4 levels in the EG.
KEYBOARD LEVEL SCALING
In EDIT mode, these 3 buttons each activate the
[DATA ENTRY] section so it can be used to program or edit individual operators so their output levels change as you play up and down the keyboard. Each operator can be programmed to have any of 4 curves on either side of an adjustable break point. The scaling can be used to make the tone and/or volume change as you move to different octaves, for more realistic acoustic instrument
simulations. Extreme settings can also be used for "split |
7 |
keyboard" effects. |
|
BREAK POINT
The level can be scaled up or down differently on either side of the Break Point in the curve. You can set this break point from 1-1/3 octaves below the lowest key on the keyboard (A -1) to 2 octaves above the highest note on the keyboard.
CURVE
Pressing this button successive times gives you access to programming the scaling curve for the left or right side of the break point. Either curve may then be set to any of four characteristics: negative linear,
negative exponential, positive exponential, positive linear. The linear curves will give you a more exaggerated boost or cut in level at any given depth setting as you play up and down the keyboard,where as the exponential curves tend to give more natural sounding scaling.
DEPTH
Pressing this button successive times gives you access to programming the depth of the selected left or right curve. At a minimum setting (0), there is no scaling, and you can increase or decrease the level up to a maximum of 99. To increase the level, there has to be some "headroom," some operator output,
level available for increase. For example, if the OPERATOR OUTPUT LEVEL is set at 90, and a positive
(+) curve is set, the greatest curve depth that can be achieved is 9. This is because 90 + 9 = 99, and 99 is the maximum possible output level. While the curve depth can be set to a value greater than 9. there will be no more effect than if it were set at 9; if you want more boost as you move up or down the keyboard, then you'll have to set the Operator Output Level at a lower value so that more "headroom" is available for the scaling to boost the level to the maximum of 99. For your reference, a -L1N curve set to a depth of 99 produces a roll-off of 22 dB per octave.
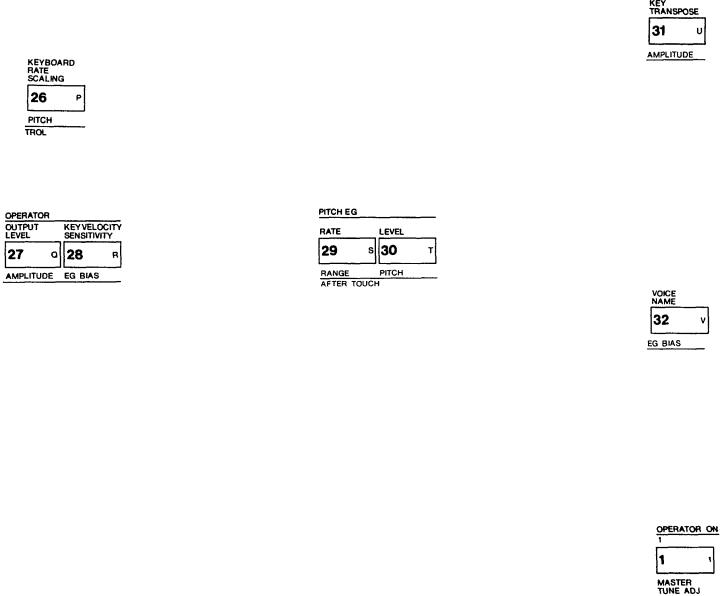
8 KEYBOARD RATE SCALING
In EDIT mode, this button activates the [DATA ENTRY] section so its controls can be used to program or edit each operator so its envelope rates become faster as you move up the keyboard. The minimum setting (0) produces no scaling, so rates Rl, R2, R3 and R4 are the same on all keys, whereas the maximum setting (7) speeds up the rates more and more as you move from the lowest to the highest notes. The scaling is useful for simulating the natural scaling of envelope rates that characterizes many acoustic instruments.
OPERATOR
In EDIT mode, this pair of buttons activate the [DATA ENTRY] section so its controls can be used to change the output level of each of the 6 operators.
OUTPUT LEVEL
This button gives you "direct" programming access to setting the output level of each operator from no
output (0) to maximum (99). Remember that the [OPERATOR ONOFF] buttons only have an effect while you are programming a voice so if you want to keep an operator turned off when you store a voice
(because you don't need its effect), then you have to set its output level to zero. The scaling is such that
half the numerical value (i.e. 50 instead of 99) produces much less than half the audible volume.
KEY VELOCITY SENSITIVITY
This button lets you program the velocity "touch" sensitivity of each operator so that the faster you press a key the greater the output level. This function interacts with the [OUTPUT LEVEL] function so that, if you set a maximum [KEY VELOCITY SENSITIVITY] of 7, and then press a key very slowly there will be virtually no output from the operator;
press that key fast, and you'll get the maximum output level you have set with [OUTPUT LEVEL]. If the operator is a carrier, this function causes the notes to be louder when you play faster, whereas if the operator is a modulator, the timbre changes as you play faster. This is the parameter that determines why some preset voices have touch sensitivity and others do not.
PITCH EG
In EDIT mode, this pair of buttons activate the [DATA ENTRY] section so its controls can be used to change a special envelope generator that alters the frequency of each note you play. The Pitch EG affects all 6 operators equally. The "shape" of the envelope follows the same rules as the individual operators' level envelopes, with four rates and four "levels", although the levels actually refer to frequency excursions. The Pitch EG can be used for automatic pitch bending effects, including the slight pitch changes that occur with plucked strings. However, the 8 octave range of this feature permits all sorts of special effects to be achieved.
RATE
Pressing this button 4 successive times gives you access to programming the 4 rates in the EG.
LEVEL
Pressing this button 4 successive times gives you access to programming the 4 "levels" in the EG. If you don't want any pitch bend, then all 4 levels
should be programmed to a value of 50. When you
set a level below 50, the pitch decreases (a zero value is down 4 octaves from the note you play), and when you set it above 50, the pitch increases (a 99 value is up 4 octaves). The [PITCH] wheel can further add 1
octave above or below this "automatic" pitch bend.
KEYTRANSPOSE
In EDIT mode, this button DOES NOT RELY ON THE [DATA ENTRY] section. Instead, it activates the keyboard so it can be used to transpose the pitch of the entire voice. The "normal" pitch of the keyboard is set
so that middle C (C3) is 262 Hz. When you press [KEY TRANSPOSE], the first key you then press becomes the pitch which is produced when you play middle C (you won't hear anything until you play a subsequent note). The transposition range is great enough that middle C can be set to sound the pitch of any note for 2 octaves up or down.
VOICE NAME
In EDIT mode, this button DOES NOT RELY ON THE [DATA ENTRY] section either. Instead, it converts the [EDIT/COMPARE] button to the (CHARACTER] button so you can enter up to 10 letters, numbers, spaces or punctuation marks to name a voice. Once you've pressed [VOICE NAME], you hold down the [CHARACTER] button and then press each character you wish to enter (indicated by the reversed dark brown type in the right corner of most buttons). A flashing "cursor" shows you the position of the character you are about to enter, and you can move the cursor without entering a character by pressing the [<] and [>] buttons. You can "write" new-characters on top of previous names, or erase a name by using the [CHARACTER] and [SPACE] buttons.
Function Control Parameters (light brown labels)
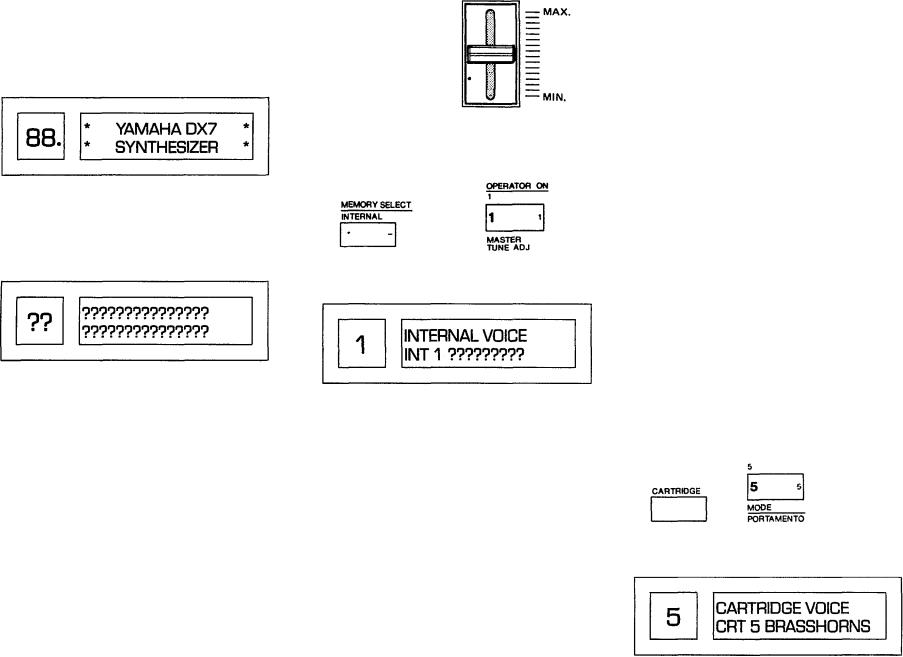
MASTER TUNE ADJ
In FUNCTION mode, this button activates the [DATA ENTRY] slider so it can be used to tune the overall pitch of the keyboard plus or minus 75 cents. (The [-1] and (+1] DATA ENTRY buttons are not used in this case because the tuning adjustment is already very fine.) Larger pitch shifts can be programmed into a voice by using the [KEY TRANSPOSE] button or by resetting the frequencies of all operators.
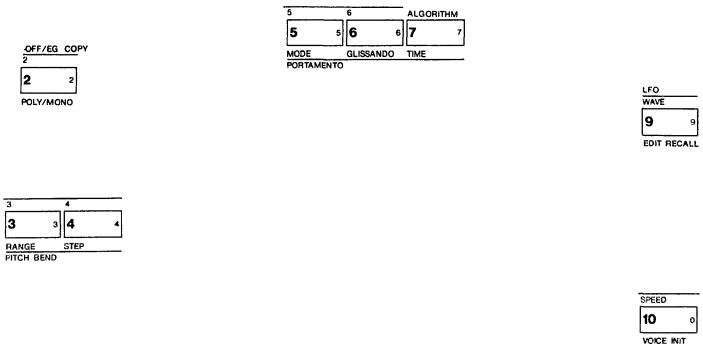
POLY/MONO
In FUNCTION mode, this button activates the [DATA ENTRY] section so its controls can set the keyboard to play polyphonically (up to 16 notes simultaneously) or monophonically (one note at a time).
PITCH BEND
In FUNCTION mode, this pair of buttons activate the [DATA ENTRY] section so its controls can program the range and "smoothness" of the [PITCH] wheel. If the RANGE is set to zero, the [PITCH] wheel will have no effect.
RANGE
This lets you program the maximum amount of pitch
bend from no effect (0) to plus or minus an octave (12 semitones). The numbers in the programming display indicate how many semitones the wheel can change the pitch in each direction. The [RANGE] may only be adjusted when the [STEP] is set to zero. If [STEP] is at 1 or higher, the [RANGE] is automatically fixed at 12 semitones. Remember that a zero setting turns off the pitch bend.
STEP
This permits you to set the size of the increments by which the wheel changes the pitch. A setting of zero
(0) will cause perfectly smooth pitch bending. Each unit above zero represents the number of semitones by which the pitch will "jump" as you move the wheel. The maximum setting of 12, for example, will cause the wheel to change the pitch in a single,
1octave jump.
PORTAMENTO
In FUNCTION mode, these 3 buttons activate the [DATA ENTRY] section so its controls can be used to set portamento (glide) and glissando (stepped glide)
effects, and to control certain sustain characteristics of the keyboard. The particular effects available will
change, depending on whether the DX7 is in Poly or Mono mode.
MODE
When the keyboard is in Mono mode, this lets you select "FINGERED PORTA" or "FULL TIME PORTA" functions. Fingered Portamento is a glide that occurs only when you hold one key down and then press another while holding the first. Full Time Portamento gives you the glide from one note to the next even when you release one key before pressing the next.
When the keyboard is in Poly mode, this lets you select "SUS-KEY P FOLLOW" or "SUS-KEY P RETAIN". In Sustain-Key Pitch Follow mode, ifyou play a note or chord and then play another note or chord, the sustain from the original note/chord glides to the pitch of the most recently played note/chord. In Sustain-Key Pitch Retain mode, the pitch of the new note or chord glides from that original pitch(es) without disturbing the sustain of the original note or chord.
GLISSANDO
When the Glissando feature is turned ON, the glide in pitch occurs in discrete steps. This effect is best heard with a slower rate and when two widely separated notes are played one after the other. When Glissando is turned OFF then normal Portamento (continuous glide) is available.
TIME
This sets the time of the Portamento or Glissando effect. A setting of 0 produces no effect, while a setting of 99 produces the longest (slowest) pitch changes. This is contrary to the operation of most DX7 rate controls whose fastest setting is 99. You don't have to change the Time to zero to turn the effect off. Instead, once an effect is selected, it can also be turned On and Off by plugging an FC-4 or FC-5 foot pedal into the PORTAMENTO jack on the rear panel;
stepping on the pedal then turns ON the portamento.
NOTE: For [MIDI] information, see page 55.
EDIT RECALL |
9 |
This button activates the DATA ENTRY [YES] and [NO] buttons so they can be used to recall a voice that you had been editing in the event you inadvertently leave the editing mode and select another voice to play To "recapture" or recall the edited voice, press [FUNC-
TION], then [EDIT RECALL], then answer [YES] to the two display prompts "Edit Recall?" and "Are You Sure?"
VOICE INIT
The Voice Initialize button lets you create a neutral starting point for programminq a new voice. After you select VOICE INIT from the FUNCTION mode by pressing the button and then answering [YES] to the two display prompts, the DX7 sets itself to the EDIT mode. A neutral "voice" then exists with no modulation, algorithm 1, operator 1 output level at 99 and all others off, "square" envelopes, and all frequency ratios at 1.00.
CART FORM
NOTE: Since the format of a RAM cartridge used for other purposes, such as DX1 performance memories, will vary' from that of a cartridge used for voice memories, make sure you observe the following procedure when storing or saving DX7 internal voices into such a cartridge.
The Cartridge Format button lets you "initialize" all the voices in a RAM cartridge much like you initialized the single voice in the edit buffer using the [VOICE INIT] button. It is like a cartridge "eraser." To use this
function you first have turn off the hardware memory protect switch on the cartridge, then turn off the software [MEMORY PROTECT-CARTRIDGE] function on the DX7. Then press [CART FORM] and answer [YES] to the two displayed prompts. THINK BEFORE YOU DO THIS; IF THERE WERE ANY VOICES YOU
WANTED ON THAT CARTRIDGE, THEY WILL BE GONE FOREVER. (You can load one or more cartridge
10voices into the DX7 internal memory and then format if you like.) You cannot format a ROM (factory preset) cartridge.
BATTERY CHECK
In function mode, this button causes the display to show the voltage level of the battery which preserves the DX7 internal voice and programming memories when power is turned off. The acceptable range is 2.3 to
3.5volts. If the battery is below 2.2 volts, contact your Yamaha dealer to arrange for replacement; this is NOT a do-it-yourself repair.
CARTRIDGE
This pair of buttons sets the DX7 to transfer a full 32 voices between the internal and the cartridge memory Before voices can be transferred TO a cartridge or TO the DX7, the corresponding (MEMORY PROTECT) features must be turned off. (Individual voices can be transferred by first using the Play mode to "pick" the voice, then pressing the [STORE] button and whatever Voice Selector you like from 1 to 32.)
SAVE
Pressing this button in FUNCTION mode stores all 32 internal memories to a RAM cartridge. You have an opportunity to cancel the command by answering [NO] to either displayed prompt; otherwise any voices in the cartridge will be erased when the tranter occurs. The display shows "Under Writing" for 20 seconds while the voices are being "written" to the cartridge.
LOAD
Pressing this button in FUNCTION mode loads 32
RAM or ROM cartridge voices into the DX7 internal memories. Again, you have to answer [YES] twice before the voices are loaded (which erases any existing voices in the internal memories). The actual transfer occurs instantaneously
MODULATION
The bottom row of 16 Function buttons is used to set the Modulation available from 4 control sources: the MODULATION WHEEL, FOOT CONTROL, BREATH CONTROL and key AFTER TOUCH. Since the 4 groups are identical in nature, we'll cover the buttons just once. Pressing any of these buttons activates the [DATA ENTRY] section so you can program different settings.
NOTE: if the Amplitude or EG Bias is turned On, with a low Range setting, certain voices may be inaudible or nearly so due to their high modulation sensitivity.
RANGE
This lets you program the amount of modulation from none (0) to a maximum value (99). Bear in mind, however, that the Pitch and Amplitude modulation "range" may be zero (off) even if this control is set at 99 unless the particular voice being played includes some modulation sensitivity. Since sensitivity differs between voices, the identical Range setting may produce different results with different voices.
PITCH
This lets you turn On LFO modulation of the voice's pitch forvibrato-like effects.
AMPLITUDE
This lets you turn On LFO modulation of the ampli-
tude (level) of those individual operators within a voice that are programmed to be sensitive to it. The effect may therefore be tremolo-like, or wah-like depending on whether a carrier or modulator is being modulated.
EG BIAS
This lets you directly control the operator output
level with the corresponding modulation control (Foot, Breath, etc.). In this case, the LFO is not involved. Again, this will produce changes in brilliance or volume or "wah" depending on the amplitude sensitivity programmed into each operator in the voice.
Voice Cartridge socket
This socket accepts the ROM cartridges which each hold 64 pre-programmed voices (two are supplied with the DX7), or the RAM cartridges which each hold 32 user-programmed voices. A protective door automatically swings away when a cartridge is inserted. The cartridges have a slot in their end connector, and the socket has a keyway so that the cartridges can only be inserted fully when properly oriented. If a cartridge does not seat properly turn it around and try again. DO NOT FORCE a cartridge into place.
Power Switch
This rear panel switch turns power on, permitting the DX7 to be played and/or programmed. The internal voices are preserved even when power is turned off, so long as the internal battery can deliver at least 2.3 volts (which can be verified by selecting the FUNCTION/Battery Check mode).
Keyboard
This is a 61-key keyboard which has initial (velocity) and after (pressure) sensitivity, although these parameters must be programmed into the voice in order to be useable. The keyboard has 16-note polyphonic capability or can be switched to monophonic mode. The overall keyboard pitch produced can be altered + 75 cents using the Master Tune Adjust parameter in FUNCTION mode, and the pitch of a particular voice can be transposed over a 4 octave range using the Key Transpose parameter in EDIT mode. Each voice also may have an inherently higher or lower pitch depending on the frequency settings of components within the voice (the Operators).
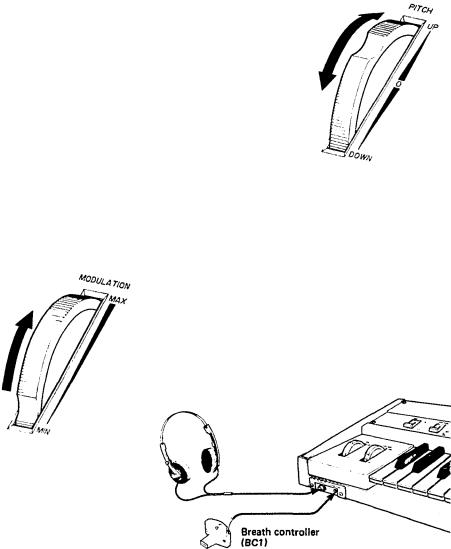
Modulation Wheel
The Modulation wheel permits you to introduce LFO
modulation of pitch and/or amplitude and/or EG bias as you move the wheel away from you. The range and nature of the effect obtained depends on several factors
(1) how the Modulation Wheel parameters are set in FUNCTION mode, and(2) whether the voice has modulation sensitivity programmed into it; if either factor is
not set appropriately the wheel will have no effect.
Pitch Bend Wheel |
11 |
The Pitch Bend wheel permits you to shift the keyboard pitch up and down;
the range of this shift depends on how far the wheel is deflected from the spring-return center position, and on the FUNCTIONmode[PITCH BEND RANGE] setting, with a maximum range of plus or minus one octave.
The smoothness depends on the [PITCH BEND STEP] setting.
Headphone & Breath Controller Jacks
The Headphone jack lets you listen without an external amplifier/speaker system by plugging in almost any pair of mono or stereo headphones that has a standard 1/4" (6.3 mm) diameter phone plug. The Breath Controller jack accepts the miniature stereo phone plug from a Yamaha BC-1 Breath Controller, which may be used to introduce LFO modulation or EG bias into most voices depending upon how the FUNCTION mode Breath Control parameters are set, and on whether modulation sensitivity is programmed into the voice. (If they are not set appropriately the BC-1 will have no effect.)

SETUP
12NOTE: Do not turn power On until all other connections have been made.
Audio Output
The DX7 has a built in headphone amplifier, so stereo headphones may be plugged into the front panel jack. However, the instrument does not have a built in power amplifier, and thus requires an external amplifier/speaker system. The OUTPUT jack is suitable for connection to any unbalanced, low line level input. This includes the input of the self-pow- ered speaker systems, and the 600 ohm or higher impedance line inputs of any Yamaha mixer. Remember (hat the audio output level not only depends on the VOLUME setting, but also on the selected voice, the playing style, and the position of the foot control if it is plugged into the VOLUME jack.
Use a single conductor shielded cable with a standard 1/4" (6.3 mm) tip/sleeve phone plug. Coiled guitar cords are not recommended since they typically degrade the high frequency response more than a straight cord.
goes into the BREATH CONT. jack on the front of the DX7; DO NOT plug anything else into this jack.
MIDI Connectors
These multi-pin DIN connectors are for the Musical Instrument Digital Interface system (MIDI), a standard adopted by several leading synthesizer manufacturers. MIDI allows the DX7 to remotely control (or be controlled by) other keyboards, sequencers and computer interfaces. See the "MIDI" section of this manual for additional information.
AC Power
Plug the DX7 power cord into any 120 volt, 50 or 60 Hz grounded (3-prong) AC receptacle. It draws 40 watts maximum. When using the DX7 with an amplifier or mixer that has an unbalanced input, it is a good idea to plug both units into the same AC receptacle box or the same "leg" of the AC service. This will reduce the chance of hum.
Standard guitar cord, 20 feet maximum recommended length.
The low impedance XLR inputs of Yamaha mixers may be used with an adaptor cable or a "direct box," as explained in the technical notes at the end of this section.
External Foot Controller Jacks
There are 4 phone jacks designed for use with external foot controls. The VOLUME and MODULATION jacks each accept a Yamaha FC-3A foot pedal, which has a tip/ring/sleeve (stereo type) phone plug. The PORTAMENTO and SUSTAIN jacks each accept a Yamaha FC-4 or FC-5 foot switch, which has a tip/sleeve phone plug. None of these jacks needs to be used for normal operation of the DX7, but if the foot controllers are used, be sure you plug in the proper type of controller. The pictorial diagrams on the rear panel should make this clear.
Breath Controller
The optional Yamaha BC-1 Breath Controller is a pressure transducer that is designed for use with this synthesizer. Its miniature tip/ring/sleeve phone plug
After all connections have been made, turn down the mixer or amplifier volume as a precaution. Then turn ON the POWER switch located at the rear of the instrument (on the right side viewed from the keyboard). The display panel will look like the illustration here for a few seconds, and will then change to display the mode which had been engaged before the DX7 was last turned off.
Installation ofMusicRack
The music rack which comes with the DX7 fits into two sockets on the rear panel (see diagram).

Additional Technical Installation Notes
When connecting the DX7 to an amplifier or mixer, a maximum unbalanced cable length of 20 feet will
reduce susceptibility to hum, noise, and high frequency losses; if a longer cable is needed, utilize a "direct box" which uses a transformer or amplifiers to convert the output to a balanced line, and then run 2- conductor shielded cable with XLR-3 or 1/4" Tip/Ring/Sleeve phone plugs to a balanced input on the mixer or amplifier.
If the cable length is under 20 feet, but the mixer or amplifier input requires an XLR connector, a direct box may not be necessary; a simple adaptor cable will often do the job, so long as complex grounding problems don't cause excessive hum. To adapt the phone jack OUTPUT of the DX7 to an XLR input, first check the manual on the other equipment to see which pin of its XLR is the "hot" or "signal" pin. In Yamaha equipment, pin 2 is "hot." Cut the phone plug off one end of a standard guitar-type cable, and connect the center conductor to XLR's "hot" pin. Then wire the shield to the other two pins of the XLR; if hum is a problem, cut the shield connection to pin 1 of the XLR.
The nominal output level is -20 dBm (77.5 mV), |
13 |
although the actual level depends on the voice, the |
|
VOLUME setting, and how many notes are being played at once. The OUTPUT jack will drive low impedance (600 ohm) or higher impedance inputs. Maximum output may be considerably higher; since power amplifiers' nominal input levels are those levels that drive the amplifier to maximum power, an amplifier rated at 0 dBm or +4 dBm input level may be well matched to the DX7 output. Mixers with adjustable input sensitivity may have to be set anywhere from -20 to +4 dBm nominal, depending on the selected voice, the playing style, and the DX7 VOLUME setting.
As is the case with any electric or electronic instrument, the AC power receptacle should be checked for correct voltage and polarity. To find out what to do about operation with power mains that do not meet these specifications, contact a Yamaha dealer or authorized Yamaha DX service center.
Phone-to-XLR adaptor cable.
PLAYING THE FACTORY PRESET VOICES
14Playing the Internal Voices
1.If the DX7 happens to be on, turn it off. Then turn it back on while observing the display window. This will let you see the initial displays we are about to describe. (In the future, you won't have to turn off the instrument just to change modes.) When you first turn on the DX7, the LCD display will briefly show:
The number 88 may or may not appear in the LED voice number display; in any case, after a few seconds, the display will change. However, we don't know what it will show when it changes.
NOTE: A voice number will be shown in the RED window, but its number will depend on the voice that was last selected before the DX7 was turned off; we have used question marks even though an actual number will appear. Similarly we placed question marks in the LCD display because we don't know what will show in that window... it could be an internal (INT) voice name, a cartridge (CRT) voice name, or a function; again, it depends on that which was last used before power was turned off. In order that you can explore the internal voices and find out for yourself what they are, do the following:
2.If you are using an amplifier/speaker system with the DX7, make sure that system is turned on and its volume controls are set appropriately Whether you're using an external amplifier/speaker system, or the DX7 headphone jack and a pair of headphones, be sure to set the DX7 VOLUME control so there is some output; mid scale is a good starting point.
Set the VOLUME so you'll be able to hear something
3.Enter the PLAY mode by pressing the [MEMORY SELECT-INTERNAL] button, then select the #1 internal memory by pressing the [1] button.
Press this... Then... Press this
The display will change to show the new voice
There won't be question marks. However, the 32 internal memories may have been loaded with any of the 4 factory preset banks, something you or another
musician left in memory or something the dealer placed there during checkout of your instrument prior to delivery Therefore, we don't know what voice name will appear. The LCD display "INT 1" is really redundant here; it tells you that internal voice 1 is selected, which you can read from the top line of the LCD window and the red LED voice number display (Later, when you are editing voices, the "INTERNAL VOICE" and "INT 1" areas will have different labels, and the red LED display will become an important reminder of the voice you have selected.)
4. Play the keyboard, and explore this voice. In fact, explore all the voices in the internal memories. You can do this by simply pressing selector buttons [1] through [32]. You don't have to press [MEMORY SELECTINTERNAL] each time.
NOTE Don't worry if you try to play a chord and the keyboard acts monophonically rather than polyphonically This simply means the synthesizer is in monophonic mode, and the change to polyphonic mode is described in the following section of this manual.
AVOID FRUSTRATION Although weencourage you to explore all of the DX7 features on your own, please try not to jump ahead and press buttons other than voice selectors 1 to 32 at this time. This can place the DX7 in a different operating mode so try to resist. There's nothing wrong with pressing any buttons — you can't damage the instrument — but if you do go off on your own, these instructions may no longer make sense. You may think something is wrong with the instrument, and to get back to anything recognizeable you will have to start all over again. Bear with these step by step instructions the first few times, and then after you really know what the controls do, you can go ahead and have fun.
Playing the Cartridge Voices
1.Locate the cartridge labeled "DX7 VOICE ROM" on the top, with a large numeral "3" on one side of the cartridge. Slide the switch on that cartridge upward (away from the connector) to gain access to the 32 voices in bank A. These are labeled "Master Group".
2.Insert the cartridge into the slot near the right side of the keyboard, orienting it so its switch faces away from the keyboard.
3.Select the cartridge voice called "BRASSHORNS", which is in location #A-5 of the DX7 VOICE ROM #3 cartridge. Do this by pressing the [MEMORY SELECT-CARTRIDGE] button and then the [5] button.
Press this... Then press this
The display will change to show the new voice
NOTE Yamaha reserves the right to continue to refine and update factory preset voices. For this reason,
some ROMs may have this voice in a different location, or may have a different voice altogether. Refer to the notes which are packaged with the ROMs.
4.Play the keyboard, and explore this voice. Observe the change in the sound when you press the key gently and when you hit it hard (not all voices have this touch sensitivity programmed into them). You'll probably want to play all the voices in Bank A of this ROM cartridge. You can do this by pressing selector buttons [1] through [32]; you don't have to press [MEMORY SELECT-CARTRIDGE] each time.
NOTE At this point, the voice may not sound "fight" or some of the features of the synthesizer may not appear to work. This is likely to be due to the settings of the FUNCTION controls, as explained in the following section. WHAT YOU'VE HEARDSOFAR MAYBE DRAMATICALLY CHANGED BY MOVING JUST A FEW CONTROLS. This is demonstrated in the next section of the manual.
5.If you want to explore the "Keyboard & Plucked Group" voices that are stored in Bank B of this cartridge, slide the switch on the cartridge down to "B" position, and again press the voice selector buttons [1] to [32]. The same procedures apply to the "Orchestral & Percussive Group" voices in Bank A, and the "Complex & Effects Group" voices in Bank B of the DX7 VOICE ROM #2 cartridge.
FUNCTIONMODE:
SETTING OVERALL PERFORMANCE PARAMETERS
IMPORTANT NOTE
In order to provide meaningful examples as we explain
the various buttons and functions on the DX7, we will refer to specific pre-programmed voices that are provided in the "MASTER GROUP", which is found in bank A of the DX7 VOICE ROM #3 cartridge that comes with
the instrument. (These procedures are virtually the same for the internal voices, but since we don't know what particular voices are loaded in the instrument, we are using a known set of voices for now. Then our examples should match what your instrument actually does.)
Some control functions have no effect unless the voice
with which they are used is already programmed to be sensitive to the control.
To play the voice we are using in this portion of the manual as an example, you will need to set the DX7 to select the cartridge voice called "ELEC PIANO 1" (Electric Piano 1), which is in location A-8 of the DX7 VOICE ROM #3 cartridge. From the previous instuctions we'll assume that cartridge is installed, the [MEMORY SELECTCARTRIDGE] button has already been pressed and the top line of the LCD display already indicates "CARTRIDGE VOICE" (ifnot,do so now). There-
fore you should only have to press the [8] button.
Press this
The display will change to show the voice
NOTE There is no "right way" or "wrong way" to approach programming of the DX7, although some methods may be rather inefficient. This chapter is provided to familiarize you with the use of some of the programming functions. Ifsomething isn't perfectly clear to you at first, don't spend too much time on it; it will eventually make sense as you play the instrument and become familiar with its basic features and functions. We suggest you re-read these instructions after you've gained a certain degree of confidence with the DX7.
[DATA ENTRY] |
15 |
A slider and two buttons at the left side of the control panel are marked [DATA ENTRY]. This group of controls is used for adjusting the settings of almost all the programmable levels and modes. Moving the slider down and up may turn one item OFF and ON, set
another for a level of from 0 to 7, and set still another for a level or rate of from 0 to 99, and so on. For now, just remember that [DATA ENTRY] is an assignable group of controls that you use to change whatever you have selected with other controls on the DX7.
Whatever EDIT mode or FUNCTION mode programming parameter value happens to be displayed may sud-
denly "jump" to a different value as soon as the [DATA ENTRY] slide control is operated, or it may change gradually, depending on the specific value and the position of the slider. Think of the slider as having a scale (from bottom to top) of 0-3, 0-7, 0-12, 0-99 or OFF-ON,
depending on the function. If the slider is positioned at a different point on its relative scale than the value displayed in the LCD window, then as soon as the slider is moved at all, the displayed value will jump to the sliderposition value. In most cases, the two buttons next to the slider will increment or decrement the displayed value by 1 unit, with no "jump." The last selected FUNC-
TION parameter can be adjusted while in the PLAY mode.
[FUNCTION]
There are 3 main modes of operation: PLAY mode, EDIT mode and FUNCTION mode. The parameters
which can be adjusted in FUNCTION mode are those that affect the overall sound, no matter which voice you select (provided, in some cases, that the voice itself is programmed to accept the function control). This includes such parameters as the tuning of the keyboard, whether or not the portamento is active and how it works, and the effects of the modulation wheel, foot control, breath control, and the pressure sensitivity of
16the keys(AfterTouch). Velocity sensitivity is NOT set in this mode; it is programmed into individual voices.
ALL THE PERFORMANCE PARAMETERS AFFECTED BY FUNCTION MODE ARE MARKED IN BROWN on the control panel. The Edit Recall and Voice Initialize functions are also marked in brown, as are the Cartridge Store/Load and Battery Check functions; even though these items do not affect the sound of all the voices, they are accessible from FUNCTION mode.
1.In order to examine and/or change the various performance parameters, you first have to press the brown [FUNCTION] button.
Press this
3.While playing a note or chord, move the [DATA ENTRY] slider up and down. The pitch will move with the slider because you have selected MASTER TUNE mode.
Move slider up to raise the pitch,
-or-
Move it down to lower the pitch
And you will see this
(The message on the second tine of the display could be one of many It doesn't matter now.)
The red LED diplay will continue to indicate the selected voice number (#8), and you can still play that voice, but the LCD display will change to indicate that
the FUNCTION mode has been selected. As with voice selection, the particular FUNCTION that appears in the LCD display will be the last one selected, so we don't know exactly what that is.
2.Press the [MASTER TUNE] button. This sets the [DATA ENTRY] slider so it can adjust the overall pitch of the keyboard.
Press this
The display will now look like this
4. The two buttons next to the (DATA ENTRY] slider normally serve as "fine" adjustments to do the same
thing the slider does as a "coarse" adjusment. In this
particular case, however, the slider by itself is enough to tune the instrument since it is already programmed to have fine resolution in MASTER TUNE mode. Tune the DX7 to A = 440 Hz (slider approximately centered).
NOTE: This function is primarily fortuningthe synthesizer to other instruments. By limiting the adjustment to a narrow range (+ 75 cents), we make it easier to
tune precisely with the slider. However, since each voice can, itself, be programmed to a unique pitch...
or can be easily transposed (as explained elsewhere), there is really no limit to the actual pitch you can create when you press a given key
POLY/MONO
The DX7 is a polyphonic instrument capable of playing 16 notes simultaneously This means that while you are playing additional notes, up to 16 of them can sustain at one time. As soon as all 16 notes have been played, the DX7 will drop the first of the 16 notes when the next one is played. Sometimes, however, you may wish to have the instrument act as a monophonic (single note) synthesizer... for example, when you're playing a lead line. When FUNCTION mode is selected, pressing the [MONO/POLY] button sets the DATA ENTRY controls so you can make the choice.
1.Press the [POLY/MONO] button. This sets the [DATA ENTRY] slider and buttons so they can toggle back
and forth between polyphonic and monophonic modes.
Press this
The display will now look like this
unless MONO mode had last been selected in which case the bottom line will indicate "MONO MODE".
2.If it is not already in MONO mode, set the instrument to that mode by pressing the [>] button (or by pushing the slider to the top) and see how the keyboard reacts. Observe that if you hold down one key then hit a higher or lower note, you will hear the most recent key you press. Thereafter, the keyboard is set correspondingly to high or low note priority until you release all keys. There is no "fixed" low or high note priority.
Press this
And see this
3.Experiment with moving the [DATA ENTRY] slider up and down. Notice the display toggle between "MONO MODE" (slider up) and "POLY MODE" (slider down). Now try pressing the adjacent [<] and [>] buttons. Notice they do the same thing as moving the slider down (<) and up (>). This relationship is true for most programming functions.
4.Set the instrument to POLY mode by pressing the [<]
button or by pulling the slider to the bottom. See how the keyboard reacts. Observe that you can play chords, and if you hold one key pressing another
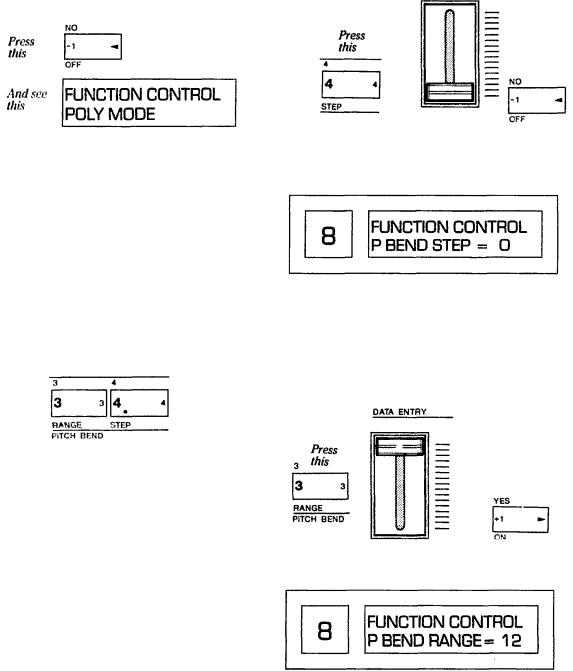
does not cancel the original note. Leave the instrument set to POLY mode for the time being.
PITCH BEND RANGE & STEP
The PITCH bend wheel located at the far left side of the keyboard can be used to "bend" notes or chords,
provided the Pitch Bend Range is set to some non-zero value. The wheel is spring-loaded to return to center from either direction.
The maximum pitch bend range is adjustable from 0 (no pitch bend) to a as much as 12 semitones in either direction (plus or minus an octave). Additionally the PITCH wheel can be programmed for a smooth, continuous bend, or the change can occur in "steps" of a size you set (from 0 to 12 semitones). The RANGE adjustment works only when the step size is set to 0; when discrete steps are selected, the maximum range is 1 octave, with the step size determining the highest and lowest pitch actually available.
1. Press the [PITCH BEND-STEP] button first. This sets the [DATA ENTRY] slider and buttons so they can adjust the size of the steps that will be produced when you operate the PITCH bend wheel. Try it — move the [DATA ENTRY] slider (or press the adjacent [<] and [>] buttons) — then play a note and move the PITCH wheel.
Since the RANGE function works only when the step size is zero (continuous glide), move the [DATA ENTRY] slider, or instead press the adjacent [-1] button as many times as may be necessary to obtain a step size of zero.
Then use either of these
When the DX7 is set for a pitch bend step size of zero, the display should look like this:
2.Press the [PITCH BEND-RANGE] button and move the [DATA ENTRY] slider up and down to get different range values displayed in the window. Play a note or chord and use the PITCH wheel to try each setting. When you've experimented, leave the system set for a maximum 12 semitone pitch bend range. (As soon as you select a [STEP] size other than zero, the [RANGE] is automatically reset to 12 semitones.)
Then use either of these When the DX7 is set for a pitch bend range of plus or minus an octave, the display should look like this:
3. Notice that if you hold a key and hold the PITCH |
17 |
wheel at a given position, moving the [DATA |
|
ENTRY] slider will not have an effect. You have to |
|
release the wheel first and then play to hear the effect of the new pitch bend range setting. (This "set-then- test" rather than "set-while-testing" function characterizes many of the DX7 programming controls.)
4.Go back and experiment with different step sizes by pressing [PITCH BEND-STEP] and moving the slider and/or pressing the [+1] and [-1] buttons. The bend was continuous with the step size at 0. A step size of 1 enables you to hear each semitone as you move the wheel, and, at the other extreme, a step size of 12 means you'll hear the note or chord "jump" a full octave.
Any step size above 0 sets the range to 12, but specific step sizes affects the maximum available range; it may not always be as much as plus or minus an octave. For example, if you choose a step size of 5 steps, and move the PITCH wheel slightly you'll get a jump up or down of 5 semitones. Full deflection of the wheel from its resting position will cause the pitch to jump up or down a total of 10 semitones... and that'sit. A range of 6 steps, however, would allow for an octave of pitch "bend" in 2 increments.
PORTAMENTO FUNCTIONS
NOTES
Several related functions are qrouped under the FUNCTION heading "PORTAMENTO." The actual effects obtained will depend upon more than the PORTAMENTO settings.
What you hear will change when the synthesizer is settoPOLYorMONOmode.Weinitiallyexplorethe PORTAMENTO and GLISSANDO effects in POLY mode since that is the mode to which we have. already set the DX7.
Specific effects also change based on the inherent sustain programmed into a given voice, and whether or not you use the SUSTAIN foot pedal. We recommend that you have the FC-4 or FC-5 foot switch plugged into the rear panel SUSTAIN jack in order to fully benefit from these instructions. Ifa footswitch is not plugged into the PORTAMENTOjack, then the portamento will be ON.
 Loading...