


UC
DVX-C310
(DVR-C310+NX-SW300+NX-F300+NX-C300+NX-S300)
DVX-C310SW
(DVR-C310+NX-SW300)
OWNER’S MANUAL MODE D’EMPLOI
IMPORTANT SAFETY INSTRUCTIONS
CAUTION |
RISK OF ELECTRIC SHOCK |
DO NOT OPEN |
CAUTION: TO REDUCE THE RISK OF
ELECTRIC SHOCK, DO NOT REMOVE
COVER (OR BACK). NO USER-SERVICEABLE
PARTS INSIDE. REFER SERVICING TO
QUALIFIED SERVICE PERSONNEL.
• Explanation of Graphical Symbols
The lightning flash with arrowhead symbol, within an equilateral triangle, is intended to alert you to the presence of uninsulated “dangerous voltage” within the product’s enclosure that may be of sufficient magnitude to constitute a risk of electric shock to persons.
The exclamation point within an equilateral triangle is intended to alert you to the presence of important operating and maintenance (servicing) instructions in the literature accompanying the appliance.
IMPORTANT
Please record the serial number of this DVD receiver in the space below.
MODEL:
Serial No.:
The serial number is located on the rear of this DVD receiver.
Retain this Owner’s Manual in a safe place for future reference.
1Read these instructions.
2Keep these instructions.
3Heed all warnings.
4Follow all instructions.
5Do not use this apparatus near water.
6Clean only with dry cloth.
7Do not block any ventilation openings. Install in accordance with the manufacturer’s instructions.
8Do not install near any heat sources such as radiators, heat registers, stoves, or other apparatus (including amplifiers) that produce heat.
9Do not defeat the safety purpose of the polarized or grounding-type plug. A polarized plug has two blades with one wider than the other. A grounding type plug has two blades and a third grounding prong. The wide blade or the third prong are provided for your safety. If the provided plug does not fit into your outlet, consult an electrician for replacement of the obsolete outlet.
10Protect the power cord from being walked on or pinched particularly at the plugs, convenience receptacles, and the point where they exit from the apparatus.
11Only use attachments/accessories specified by the manufacturer.
12Use only with the cart, stand, tripod,
bracket, or table specified by the manufacturer, or sold with the apparatus. When a cart is used, use caution when moving the cart/apparatus combination to avoid injury from tip-over.
13Unplug this apparatus during lightning storms or when unused for a long periods of time.
14Refer all servicing to qualified service personnel. Servicing is required when the apparatus has been damaged in any way, such as power-supply cord or plug is damaged, liquid has been spilled or objects have fallen into the apparatus, the apparatus has been exposed to rain or moisture, does not operate normally, or has been dropped.
15Be sure to allow spaces of at least 10 cm above, behind and on both sides of DVR-C310, and at least 1m above, 30cm behind and on both sides of NX-SW300.
16Do not place the following objects on this unit: A vessel with water in it.
If the vessel falls by vibrations and water spills, it may cause damage to the unit, and/or you may get an electric shock. Apparatus shall not be exposed to dripping or splashing.
i

FCC INFORMATION (for US customers)
1IMPORTANT NOTICE: DO NOT MODIFY THIS UNIT!
This product, when installed as indicated in the instructions contained in this manual, meets FCC requirements. Modifications not expressly approved by Yamaha may void your authority, granted by the FCC, to use the product.
2IMPORTANT: When connecting this product to accessories and/or another product use only high quality shielded cables. Cable/s supplied with this product MUST be used. Follow all installation instructions. Failure to follow instructions could void your FCC authorization to use this product in the USA.
3NOTE: This product has been tested and found to comply with the requirements listed in FCC Regulations, Part 15 for Class “B” digital devices.
Compliance with these requirements provides a reasonable level of assurance that your use of this product in a residential environment will not result in harmful interference with other electronic devices. This equipment generates/uses radio frequencies and, if not installed and used according to the instructions found in the users manual, may cause interference harmful to the operation of other electronic devices. Compliance with FCC regulations does not guarantee that interference will not occur in all installations. If this product is found to be the source of interference, which can be determined by turning the product “OFF” and “ON”, please try to eliminate the problem by using one of the following measures:
Relocate either this product or the device that is being affected by the interference.
Utilize power outlets that are on different branch (circuit breaker or fuse) circuits or install AC line filter/s.
In the case of radio or TV interference, relocate/reorient the antenna. If the antenna lead-in is 300 ohm ribbon lead, change the lead-in to coaxial type cable.
If these corrective measures do not produce satisfactory results, please contact the local retailer authorized to distribute this type of product. If you can not locate the appropriate retailer, please contact Yamaha Electronics Corp., 6660 Orangethorpe Ave. Buena Park, CA90622.
The above statements apply ONLY to those products distributed by Yamaha Corporation of America or its subsidiaries.
■We Want You Listening For A Lifetime
YAMAHA and the Electronic Industries Association’s Consumer Electronics Group want you to get the most out of your equipment by playing it at a safe level. One that lets the sound come through loud and clear without annoying blaring or distortion - and, most importantly, without affecting your sensitive hearing.
Since hearing damage from loud sounds is often undetectable until it is too late, YAMAHA and the Electronic Industries Association’s Consumer Electronics Group recommend you to avoid prolonged exposure from excessive volume levels.
LASER SAFETY
This unit employs a laser. Due to possible eye injury, only a qualified service person should remove the cover or attempt to service this device.
DANGER
This unit emits visible laser radiation when open. Avoid direct eye exposure to beam. When this unit is plugged into a wall outlet, do not place your eyes close to the opening of the disc tray and other openings or look inside.
SÉCURITÉ LASER
L'appareil utilise un laser. En raison des risques de blessure des yeux, le retrait du couvercle ou les réparations de l'appareil devront être confiés exclusivement à un technicien d'entretien qualifié.
DANGER
Risque d'exposition au laser en cas d'ouverture. Eviter toute exposition au faisceau. Lorsque cet appareil est branché à la prise de courant, ne pas approcher les yeux de l'ouverture du plateau changeur et des autres ouvertures pour regarder à l'intérieur.
ii

CAUTION: READ THIS BEFORE OPERATING YOUR UNIT.
1To assure the finest performance, please read this manual carefully. Keep it in a safe place for future reference.
2Install this sound system in a well ventilated, cool, dry, clean place with at least 10 cm on the top, 10 cm on the left and right, and 10 cm at the back of DVR-C310 and at least 1 m above, 30 cm behind and on both sides of NX-SW300 for adequate ventilation. — away from direct sunlight, heat sources, vibration, dust, moisture, and/or cold.
3Locate this unit away from other electrical appliances, motors, or transformers to avoid humming sounds.
4Do not expose this unit to sudden temperature changes from cold to hot, nor locate this unit in an environment with high humidity (i.e., a room with a humidifier) to prevent condensation inside this unit, which may cause an electrical shock, fire, damage to this unit, and/or personal injury.
5Avoid installing this unit in a location where foreign objects may fall onto this unit or where this unit may be exposed to liquid dripping or splashing. On the top of this unit, do not place:
–Other components, as they may cause damage and/or discoloration on the surface of this unit.
–Burning objects (i.e., candles), as they may cause fire, damage to this unit, and/or personal injury.
–Containers with liquid in them, as they may fall, spilling the liquid and causing an electrical shock to the user and/or damage to this unit.
6Do not cover this unit with a newspaper, tablecloth, curtain, etc. in order not to obstruct heat radiation. If the temperature inside this unit rises, it may cause fire, damage to this unit, and/or personal injury.
7Do not plug in this unit to a wall outlet until all connections are complete.
8Do not operate this unit upside-down. It may overheat, possibly causing damage.
9Do not use excessive force on switches, knobs and/or cords.
10When disconnecting the power cord from the wall outlet, grasp the plug; do not pull the cord.
11Do not clean this unit with chemical solvents; this might damage the finish. Use a clean, dry cloth.
12Use only the voltage specified on this unit. Using this unit with a higher voltage than specified is dangerous and may cause fire, damage to this unit, and/or personal injury.
YAMAHA will not be held responsible for any damage resulting from use of this unit with a voltage other than as specified.
13To prevent damage by lightning, keep the power cord out and outdoor antennas disconnected from a wall outlet or the unit during a lightning storm.
14Do not attempt to modify or fix this unit. Contact qualified YAMAHA service personnel when any service is needed. The cabinet should never be opened for any reason.
15When not planning to use this unit for long periods of time (i.e., vacation), disconnect the AC power plug from the wall outlet.
16Be sure to read the “TROUBLESHOOTING” section on common operating errors before concluding that this unit is faulty.
17Before moving this unit, press STANDBY/ON to set the unit in standby mode, then disconnect the AC power plug from the wall outlet.
18Condensation will form when the surrounding temperature changes suddenly. Disconnect the power cable from the outlet, then leave the unit alone.
19When using the unit for a long time, the unit may become warm. Turn the power off, then leave the unit alone for cooling.
20Install this unit near the AC outlet and where the AC power plug can be reached easily.
FOR CANADIAN CUSTOMERS
To prevent electric shock, match wide blade of plug to wide slot and fully insert.
This Class B digital apparatus complies with Canadian ICES-003.
This unit is not disconnected from the AC power source as long as it is connected to the wall outlet, even if this unit itself is turned off. This state is called the standby mode. In this state, this unit is designed to consume a very small quantity of power.
Laser component in this product is capable of emitting radiation exceeding the limit for Class 1.
WARNING
TO REDUCE THE RISK OF FIRE OR ELECTRIC SHOCK, DO NOT EXPOSE THIS UNIT TO RAIN OR MOISTURE.
CAUTION
Danger of explosion if battery is incorrectly replaced. Replace only with the same or equivalent type.
Be sure to place this unit on the level surface.
If you do not place this unit on the level surface, PLAYXCHANGE will not function correctly, and may damage the disc(s) and/or this unit itself.
LASER |
|
Type |
Semiconductor laser GaAlAs |
Wave length |
650 nm (DVD) |
|
784 nm (VCD/CD) |
Output Power |
7 mW (DVD/VCD/CD) |
Beam divergence |
60 degrees |
|
|
CAUTION
Use of controls or adjustments or performance of procedures other than those specified herein may result in hazardous radiation exposure.
iii

CONTENTS
1. INTRODUCTION |
|
INTRODUCTION ......................................... |
2 |
Main unit ......................................................... |
3 |
Supplied accessories ........................................ |
3 |
FUNCTIONAL OVERVIEW ......................... |
4 |
Front panel (DVR-C310) ................................ |
4 |
Rear panel (DVR-C310) ................................. |
5 |
Remote control (For DVR-C310) ................... |
6 |
2. PREPARATION |
|
SPEAKER SETUP ....................................... |
8 |
Roles and layout of the speakers ..................... |
8 |
Placing the speakers ........................................ |
9 |
Speaker connections ...................................... |
10 |
Connecting the speaker cables ...................... |
11 |
Connecting the subwoofer ............................. |
11 |
Connecting the DVD receiver and |
|
the subwoofer ............................................ |
11 |
CONNECTION ........................................... |
12 |
Connecting a TV ........................................... |
12 |
Connecting an HDMI component ................. |
13 |
Connecting a VCR ........................................ |
14 |
Connecting a YAMAHA |
|
iPod universal dock ................................... |
15 |
Connecting a digital audio component .......... |
16 |
Connecting a portable audio player ............... |
16 |
Connecting the FM/AM antennas ................. |
17 |
GETTING STARTED ................................. |
18 |
Inserting batteries into the remote control .... |
18 |
Using the remote control ............................... |
18 |
Turning on the power .................................... |
19 |
Setting a TV type and display ....................... |
19 |
Setting language preferences ......................... |
20 |
3. BASIC OPERATION |
|
DISC OPERATION .................................... |
21 |
Basic playback .............................................. |
21 |
General operation .......................................... |
21 |
Selecting various repeat/shuffle functions .... |
22 |
Operations for video playback |
|
(DVD/VCD/SVCD) .................................. |
22 |
Special DVD features .................................... |
24 |
Special VCD & SVCD features .................... |
24 |
Playing MP3/JPEG/DivX® WMA discs ...... |
25 |
Playing Super Audio CDs ............................. |
25 |
DVD-Audio Features .................................... |
26 |
Playing JPEG/Kodak picture CDs ................ |
26 |
iPod® OPERATION ................................. |
27 |
Controlling iPod using the OSD .................... |
27 |
DVD SETUP MENU OPTIONS ................. |
28 |
Menu overview .............................................. |
28 |
Using the OSD menu ..................................... |
29 |
General setup ................................................. |
30 |
Audio setup .................................................... |
32 |
Video setup .................................................... |
34 |
Preference setup ............................................. |
36 |
4. TUNING OPERATION |
|
FM/AM TUNING ........................................ |
39 |
Tuning stations .............................................. |
39 |
Presetting stations .......................................... |
39 |
XM® SATELLITE RADIO TUNING .......... |
41 |
Activating XM Satellite Radio ...................... |
43 |
Basic XM Satellite Radio operations ............ |
43 |
Selecting the XM Satellite Radio |
|
search mode ............................................... |
44 |
Setting the XM Satellite Radio |
|
preset channels ........................................... |
45 |
Displaying the XM Satellite Radio |
|
information ................................................ |
45 |
5. ADVANCED OPERATION |
|
SOUND CONTROLS ................................ |
46 |
Selecting surround sound .............................. |
46 |
Selecting digital sound effects ....................... |
46 |
Adjusting the treble/bass level ....................... |
46 |
Adjusting the volume .................................... |
46 |
Muting the sound ........................................... |
46 |
REMOTE CONTROL FEATURES ............ |
47 |
Setting remote control codes ......................... |
47 |
Dimming the display screen .......................... |
48 |
Setting the sleep timer ................................... |
48 |
6. ADDITIONAL INFORMATION |
|
TROUBLESHOOTING .............................. |
49 |
GLOSSARY .............................................. |
52 |
SPECIFICATIONS .................................... |
54 |
1
2
3
4
5
6
English
1 En
INTRODUCTION
Thank you for purchasing this unit. This Owner’s Manual explains the basic operation of this unit. This manual is printed prior to production. Design and specifications are subject to change in part as a result of improvements, etc. In case of differences between the manual and the product, the product has priority.
Notes about discs
–This DVD receiver is designed for use with the following discs: Super Audio CD (SA-CD), DVD-Video, Video CD, Super Video CD, Audio CD, CD-R, CD-RW, DVD-Audio, DVD+RW, DVD+R, DVD-R, DVD-RW and DVD-RW (VR format).
This DVD receiver can play:
–MP3 and picture (Kodak, JPEG) files recorded on CD-R(W)
–JPEG/ISO 9660 format (except Progressive JPEG)
•Up to a resolution of 3072 x 2048
•File name extensions (.jpg) must be used for this DVD receiver to recognize JPEG files
–Maximum 30 character display
–DivX® disc on CD-R[W]/DVD+R[W]/DVD-R[W]
Region codes
DVD discs must be labeled ALL regions or
Region 1 (U.S.A. and Canada models) in order 1 ALL to play on this DVD receiver. You cannot play
discs labeled for other regions.
Features
Active Servo Processing Subwoofer System with built-in power amplifier.
This subwoofer system (NX-SW300) employes Advanced YAMAHA Active Servo Technology which YAMAHA has developed for reproducing higher quality super-bass sound. This super-bass sound adds a more realistic, theater-in-the-home effect to your stereo system.
PLAYXCHANGE
Capable of changing discs without interrupting current disc playback.
Pressing PLAYXCHANGE on the front panel to open the disc tray and reload or unload discs during playback.
Patent information
Manufactured under license from Dolby Laboratories. “Dolby”, “Pro Logic”, “MLP Lossless” and the double-D symbol are trademarks of Dolby Laboratories.
Notes
–The multiple sessions of CD-R/RW can be played.
–Only the single session of DVD+R/RW and DVD-R/RW can be played.
–CD-R, CD-RW and DVD-RW (VR format) cannot be played unless finalized.
–Some discs cannot be played depending on the recording conditions, such as the PC environment and application software. The characteristics and condition of some discs; materials, scratches, curvature, etc., may result in playback failure.
–Be sure to use only CD-R and CD-RW discs made by reliable manufacturers.
–Do not use any non-standard shaped discs (heart-shaped, etc.).
–Do not use discs with tape, seals, or paste on their surface. Doing so may damage this DVD receiver.
–Do not use discs affixed with labels printed by a commercially available label printer.
Cleaning discs
–When a disc becomes dirty, clean it with a cleaning cloth. Wipe the disc from the center out. Do not wipe in a circler motion.
–Do not use solvents such as benzine, thinner, commercially available cleaners, or antistatic spray intended for analog records.
Disc care
–Write only on the printed side of a CD-R/CD-RW and only with a soft felt-tipped pen.
–Handle the disc by its edge; do not touch the surface.
“DTS” and “DTS Digital Surround” are registered trademarks of Digital Theater Systems, Inc.
“DivX”, “DivX Certified”, and associated logos are trademarks of DivXNetworks, Inc. and are used under license.
The XM name and related logos are registered trademarks of XM Satellite Radio Inc.
iPod®
“iPod” is a trademark of Apple Computer, Inc., registered in the U.S. and other countries.
This product incorporates copyright protection technology that is protected by method claims of certain U.S. patents and other intellectual property rights owned by Macrovision Corporation and other rights owners. Use of this copyright protection technology must be authorized by Macrovision Corporation, and is intended for home and other limited viewing uses only unless otherwise authorized by Macrovision Corporation. Reverse engineering or disassembly is prohibited.
2 En
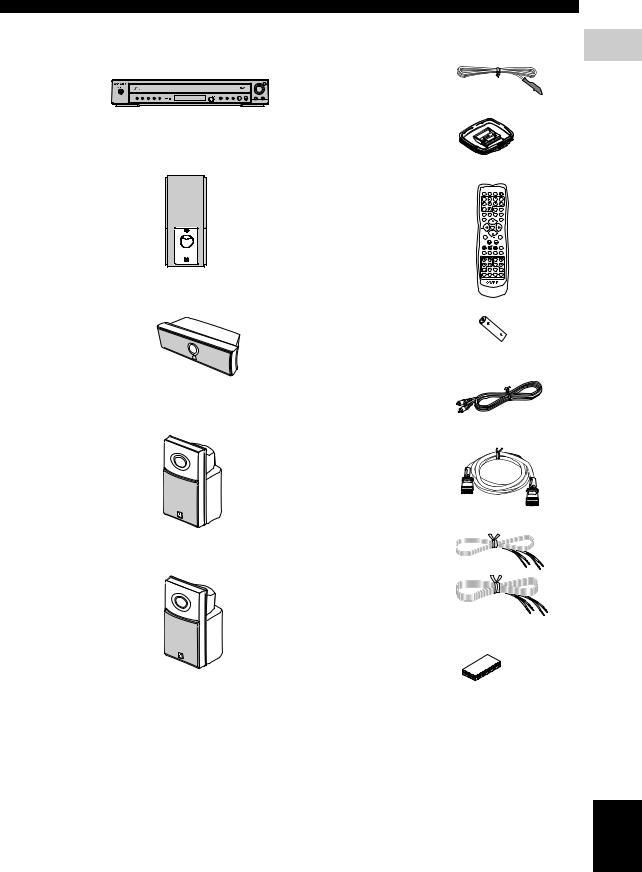
■ Main unit
DVD receiver (DVR-C310)
Subwoofer
(NX-SW300)
1 |
2 |
3 |
4 |
5 |
DISC
INTRODUCTION
■ Supplied accessories
FM wire antenna
AM loop antenna
Remote control
POWER DIMMER |
SLEEP |
POWER |
|
TV |
|
|
|
|
|
SCAN |
PAGE |
PROG REPEAT A - B |
SHUFFLE |
||
TOP MENU/RETURN |
CH + |
ON SCREEN |
|
|
|
|
DISPLAY |
|
ENTER |
|
|
CAT |
OK |
CAT+ |
|
MENU |
|
|
SET UP |
|
CH |
|
|
SRCH |
|
|
|
PRESET |
|
|
|
SUBTITLE |
AUDIO |
ANGLE |
ZOOM |
TVVOL |
TV CH |
|
VOL |
EFFECT |
SURR |
|
|
TV |
AUX |
TUNER |
DVD/CD |
1
INTRODUCTION
Center speaker* (NX-C300)
Front speakers* (NX-F300 x 2)
Surround speakers* (NX-S300 x 2)
Batteries (x 2)
Video pin cable
System control cable
Speaker cables* (5 m x 3)
(15 m x 2)
Fasteners (x 2)*
*DVX-C310 only
*DVX-C310 only
English
3 En

FUNCTIONAL OVERVIEW
■ Front panel (DVR-C310)
1 |
2 |
|
|
3 |
4 |
|
|
NATURAL SOUND HOME THEATER SYSTEM DVR-C310 |
|
|
INPUT |
|
|
|
|
|
VOLUME |
|
|
|
|
AUDIO/VIDEO |
|
1 2 |
3 4 5 |
|
PORTABLE |
PLAYXCHANGE |
|
|
DISC |
|
|
|
|
|
C |
B |
A 0 9 |
8 7 |
6 5 |
1STANDBY/ON (
 )
)
Turns on this DVD receiver, or sets it to the standby mode.
While this DVD receiver is in the standby mode, it consumes a small amount of power.
2Disc tray
Loads up to 5 discs in the disc tray.
3VOLUME
Adjusts the volume level.
4INPUT
Selects the input source.
5
Opens and closes the disc tray.
6PLAYXCHANGE
Reloads or unloads discs without interrupting current disc playback.
7s
DVD/CD mode: stops playback.
TUNER mode: deletes a preset station if held more than two seconds, or cancels the preset installation in Plug and Play (see page 39).
8h/e
DVD/CD mode: starts or pauses playback. TUNER mode: starts preset installation in Plug and Play (see page 39).
9b/a, w/f
DVD/CD mode: selects the previous/next track or chapter. Press and hold to fast forward or fast reverse. TUNER mode: selects the preset number.
0PORTABLE jack
Connects a portable audio player.
ARemote control sensor
Receives infrared signal from the remote control.
BFront panel display
Shows information about the operational status of this DVD receiver.
MULTI
Lights up when you play a multi-channel audio source.
DOWNMIX
Lights up when you play discs that allow down mixing of multi-channel audio sources.
It does not light up for discs that prohibit down mixing, even if you play a multi-channel audio source.
CDISC (1, 2, 3, 4, 5) / LEDs
Selects and directly plays back the preferred disc. Each LED lights up in green when this DVD receiver recognizes that the corresponding disc has been loaded.
4 En
FUNCTIONAL OVERVIEW
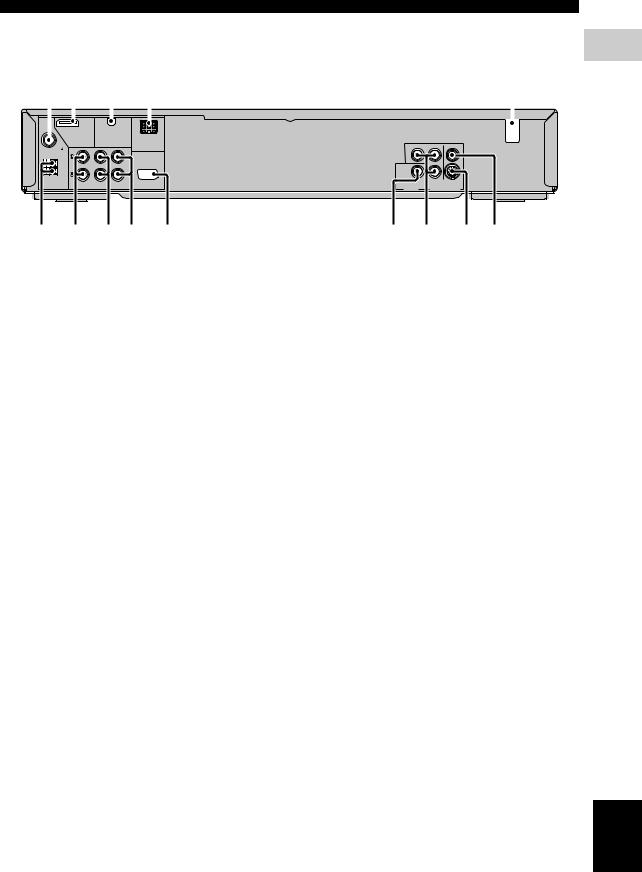
■ Rear panel (DVR-C310)
1
1 2 |
3 |
4 |
5 |
|||||
|
|
|
|
|
|
|
|
|
|
|
|
|
|
|
|
|
|
|
|
|
|
|
|
|
|
|
FM |
HDMI |
|
XM |
DOCK |
|
PR |
|
Y |
VIDEO |
|
|
|
|
|
|
|
|||||
75 |
|
|
|
|
|
|
|
|
|
|
UNBAL. |
|
|
|
|
|
|
|
|
|
|
|
|
|
|
SYSTEM |
|
|
|
|
|
|
GND |
|
|
|
CONNECTOR |
|
PCM/DTS |
|
|
|
|
|
|
|
|
|
|
|
|
|
|
|
AM |
|
|
|
|
|
qDIGITAL |
|
|
|
|
|
|
|
|
|
|
|
|
PB |
|
|
ANTENNA |
TV IN |
AUX IN |
LINE OUT |
TO NX-SW300 |
COAXIAL |
COMPONENT S VIDEO |
|
|||
|
|
|
|
|
|
DIGITAL IN |
|
VIDEO OUT (DVD ONLY) |
|
|
D |
C |
B A |
0 |
9 |
8 |
7 |
6 |
|||
INTRODUCTION
1 |
FM ANT terminal |
8 |
COMPONENT VIDEO OUT jacks |
|
Connect the FM antenna. |
|
Connect to the Y PB/CB PR/CR jacks of your TV |
2 |
HDMI jack |
|
(see page 12). |
|
|
||
|
Connect to an HDMI compatible component |
9 |
COAXIAL input jack |
|
(see page 13). |
|
Connect to the digital out jack on a digital audio |
3 |
XM jack |
|
component (see page 16). |
|
|
||
|
Connect an XM Passport System (see page 41). |
0 |
SYSTEM CONNECTOR terminal |
4 |
DOCK terminal |
|
Connect to the subwoofer (see page 11). |
|
|
||
|
Connect a YAMAHA iPod universal dock |
A LINE OUT jacks |
|
|
(see page 15). |
|
Connect to the audio input jacks of your VCR |
5 |
AC power cord |
|
(see page 14). |
|
|
||
|
Connect to a standard AC outlet. |
B AUX IN jacks |
|
6 |
VIDEO output jack |
|
Connect to the audio output jacks on your VCR or |
|
cassette deck (see page 14). |
||
|
Connect to the video (composite) jack of your TV (see |
|
|
|
C TV IN jacks |
||
|
page 12). |
||
7 |
S-VIDEO output jack |
|
Connect to the corresponding audio output jacks of |
|
your TV (see page 12). |
||
|
Connect to the S-video jack of your TV or VCR (see |
|
|
|
D GND and AM ANT terminals |
||
|
page 12, and 14). |
||
Connect the AM loop antenna (see page 17).
English
5 En

FUNCTIONAL OVERVIEW
■Remote control (For DVR-C310)
1POWER (TV)
Turns on the TV, or sets it to the standby mode.
2DIMMER
1
2
3
4
5
6
7
POWER DIMMER SLEEP |
POWER |
|
TV |
|
|
|
SCAN |
PAGE |
PROG REPEAT A - B |
SHUFFLE |
|
TOP MENU/RETURN |
CH + |
ON SCREEN |
|
|
DISPLAY |
|
ENTER |
|
CAT |
OK |
CAT |
|
+ |
|
Selects different levels of brightness for the display
panel.
H
3 Numeric keypad (0 – 9)
IEnters a track/title number of the disc.
JEnters a number of a preset radio station.
4 REPEAT
K |
Selects various repeat modes. |
|
L |
||
5 PROG |
||
M |
||
DVD/CD mode: starts programming. |
||
N |
||
TUNER mode: starts automatic/manual preset |
||
|
||
|
programming if held for more than two seconds. |
8
9
0 A B C D
E F G
MENU |
SET UP |
CH
SRCH
PRESET
DISC |
SKIP |
SUBTITLE AUDIO ANGLE ZOOM
TRE
TVVOL TV CH |
VOL |
BASS
EFFECT SURR
TV |
MUTE |
|
INPUT |
||
|
XM DOCK
TV |
AUX TUNER DVD/CD |
O6 TOP MENU/RETURN
Returns to the previous menu.
PDisplays the top-level disc menu (if available).
R7 Cursors ( / / /
/ )
)
SDVD/CD mode: Use to select OSD menu items.
t |
TUNER mode: press / to tune into a station or |
||
U |
|||
press |
/ to starts automatic tuning. When this |
||
V |
|||
DVD receiver is in the XM Satellite Radio mode, see |
|||
|
|||
Wpage 42.
XENTER (OK)
Confirms a selection.
Note
For details on how to use the remote control, see page 18.
8MENU
Accesses the menu of a disc. During playback, returns to the main menu.
For VCD version 2.0 only:
Switches PBC (playback control) on or off.
9s
DVD/CD mode: stops playback. Holding down the button opens and closes the disc tray.
TUNER mode: deletes a preset station if held more than two seconds, or cancels the preset installation in Plug and Play (see page 39).
0u PRESET d(b/a)
DVD/CD mode: selects the previous/next track or chapter. Press and hold to fast forward or fast reverse. TUNER mode: selects the preset number.
ASUBTITLE
Selects a subtitle language.
6 En
BAUDIO
Selects an audio language (DVD) or an audio channel (VCD).
CTV CH (+ / –)
Switches the TV channel.
DTV VOL (+ / –)
Adjusts the TV volume.
ETV INPUT
Switches the TV input.
FEFFECT
Selects a sound effect.
GInput selection buttons
Select the input source.
TV: switches to TV input source.
AUX: switches to AUX ANALOG, AUX DIGITAL or AUX FRONT input source.
TUNER: switches to TUNER/FM, TUNER/AM or XM RADIO input source.
DVD/CD: switches to DVD/CD or iPod input source.
HPOWER (
 )
)
Turns on this DVD receiver, or sets it to the standby mode.
While this DVD receiver is in the standby mode, it consumes a small amount of power.
ISLEEP
Sets the sleep timer.
JSCAN
Scans each track/chapter on the disc.
KPAGE
Turns the pages of DVD-Audio still pictures.
LREPEAT A-B
Repeats a specific section on a disc.
MSHUFFLE
Plays tracks in random order.
NON SCREEN/DISPLAY
Accesses or exits from the OSD (on screen display) menu of this DVD receiver.
OSET UP
Accesses or exits from the setup menu of this DVD receiver.
Ph
DVD/CD mode: starts playback.
TUNER mode: starts preset installation in Plug and Play (see page 39).
FUNCTIONAL OVERVIEW
Qe
DVD/CD mode: pauses playback.
RDISC SKIP
Selects another disc.
SZOOM
Enlarges the video image.
TANGLE
Selects a DVD disc camera angle (if available).
UTRE/BASS
Selects the TREBLE (high tone) or BASS (low tone) sound mode.
Use the VOLUME control to change the tone level.
VVOL (+ / –)
Adjusts the volume level.
WMUTE
Mutes the sound. Press again to restore the audio output to the previous volume level.
XSURR
Switches to multi-channel surround mode or stereo mode.
1
INTRODUCTION
English
7 En
SPEAKER SETUP
■ Roles and layout of the speakers
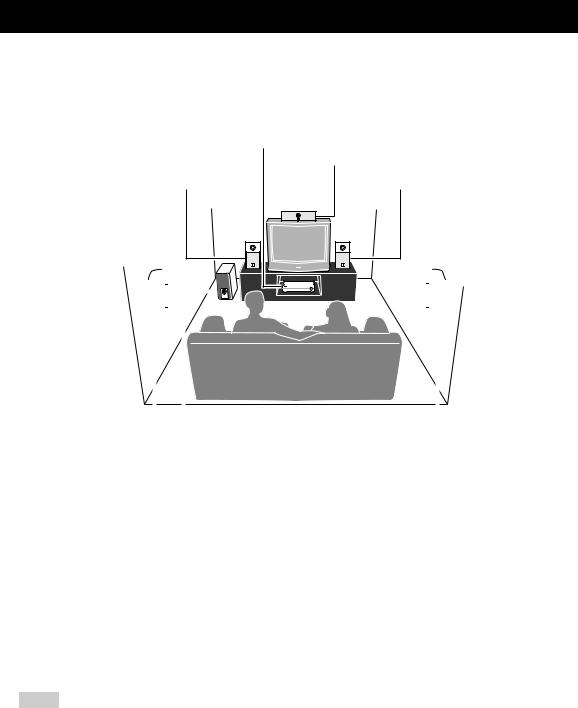
To enjoy quality sounds you need to place the speakers in their appropriate positions and install them correctly.The following shows the recommended layout of the speakers. For the best possible surround sound, all of the speakers (except the subwoofer) should be placed at the same distance from the listening position.
DVD receiver
1speakerFront |
(L) |
2Center speaker
1 Frontspeaker (R)
|
|
|
|
|
|
|
|
|
|
|
|
|
|
|
|
|
|
|
|
4 Subwoofer |
|
|
|
|
|
|
|
|
|
|
|
|
|
|
|
|
|
|
|
||
3 |
|
|
|
3 |
|
||||||||
|
|
|
|
|
|
||||||||
Surround |
|
|
|
Surround |
|||||||||
speaker (L) |
|
|
|
speaker (R) |
|||||||||
1Front Speakers (L, R)
Place the front left/right speakers on both sides of your TV at equal distances. Main roles: Produces front channel (stereo) sounds and effect sounds.
2Center Speaker
Place the center speaker on top of the TV or inside the TV rack so that the speaker and TV are aligned vertically. Main role: Produces sounds oriented toward the center of the screen such as dialogues or vocal sounds.
3Surround Speakers (L, R)
Place the surround left/right speakers behind the listening position. Main roles: Produces surround sounds and effect sounds.
4Subwoofer
Place the subwoofer near a front speaker and turn it slightly toward the center of the room to reduce wall reflections. Main roles: Produces bass sounds and low frequency (LFE) sounds contained in Dolby Digital or DTS.
Notes
–To avoid magnetic interference, do not position the front speakers too close to your TV.
–Allow adequate ventilation around the DVD receiver and subwoofer.
–Bass sounds produced by the subwoofer may be heard differently depending on the listening position and subwoofer location. To enjoy desired sounds, try to change the location of the subwoofer according to the listening position.
8 En
■ Placing the speakers
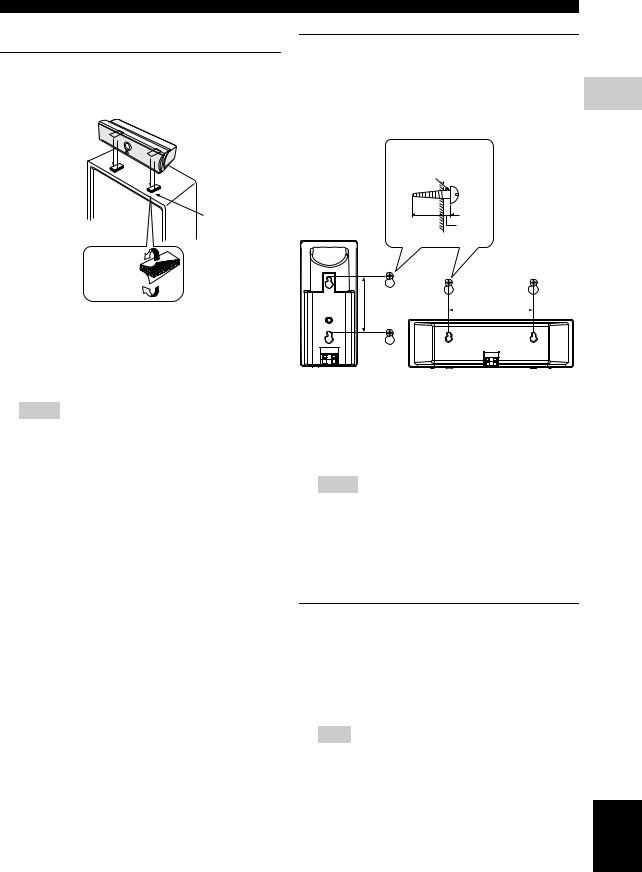
Placing the center speaker (NX-C300)
When placing the center speaker on the top of the TV, use the supplied fasteners to secure the speaker.
Fastener
Peel off the seal
1Peel off the seals on one side of the fasteners and attach them to the bottom of the center speaker.
2Peel off the seals on the other side of the fasteners and attach them to the top of the TV.
Notes
–Do not place the speaker on the TV if the top of the TV is uneven or narrower than the bottom surface of the speaker. Doing so may cause the speaker to fall. In this case, place the speaker inside a TV rack or on a level floor.
–Before attaching the fasteners to the TV, clean the surface with a dry cloth. A dirty or wet surface may weaken the adhesive force and cause the speaker to fall.
–Do not touch the bonding surfaces of the fasteners after peeling off the seals. Doing so may weaken the adhesive force and cause the speaker to fall.
SPEAKER SETUP
Attaching to a wall
You can attach the speakers to a wall using commercially available screws (Diameter: 3.5 to 4 mm
(1/8” to 5/32”), Length: 25 mm (1”) or more). Each 2 speaker requires two screws.
Screws |
|
PREPARATION |
(3.5 (1/8”) to 4 (5/32”) |
|
|
mm dia., commercially |
|
|
available) |
|
|
20 mm (25/32”) |
5 mm |
|
or more |
(1/5”) |
|
|
|
|
79 mm |
151 mm |
|
(5-15/16”) |
||
(2-3/4”) |
– |
+ |
+ |
|
– |
1Install two screws in the wall where you want to place the speaker.
2Hang the speaker on the screws using the holes in the rear of the speaker.
Notes
–To attach a speaker to a wall using screws, the wall must be firm. Do not attach a speaker to a wall that is made of weak materials such as plaster or veneered woods. Doing so may cause the speaker to fall.
–After attaching each speaker, check that the speaker is fixed securely. YAMAHA will bear no responsibility for any accidents caused by improper installations.
Hanging on a wall (NX-F300, NX-S300)
You can hang the speakers on a wall using a commercially available bracket and screws (Diameter: 6 mm). Attach a bracket firmly to the rear of the speakers using screws. Then mount a screw on the wall where the speaker is to be hung and hook the speaker securely onto the mounted screws.
Note
Do not use screw threads measured in inches for this installation. Use metric screw threads only.
English
9 En

SPEAKER SETUP
■ Speaker connections
Note
Do not connect the power cord of the subwoofer and DVD receiver into an AC outlet until all cable connections are completed.
Front |
Front |
Surround |
Surround |
speaker (R) |
speaker (L) |
speaker (R) |
speaker (L) |
Center speaker
– |
+ |
– |
+ |
– |
+ |
– |
+ |
|
|
|
– |
+ |
|
|
|
SPEAKERS |
FRONT CENTER SURROUND
DVD receiver
FM |
HDMI |
XM |
|
|
|
|
DOCK |
PR |
Y |
VIDEO |
|
75Ω |
|
|
|
|
|
UNBAL. |
L |
|
|
|
|
|
SYSTEM |
|
|
|
|
GND |
|
CONNECTOR |
PCM/DTS |
|
FRONT CENTERSURROUND |
AM |
|
|
|
||
R |
|
qDIGITAL |
|
|
|
|
|
|
|
|
|
|
|
|
|
PB |
|
ANTENNA |
TV IN |
AUX IN LINE OUT TO NX-SW300 |
COAXIAL |
COMPONENT S VIDEO |
|
|
|
|
DIGITAL IN |
VIDEO OUT (DVD ONLY) |
|
Subwoofer
10 En
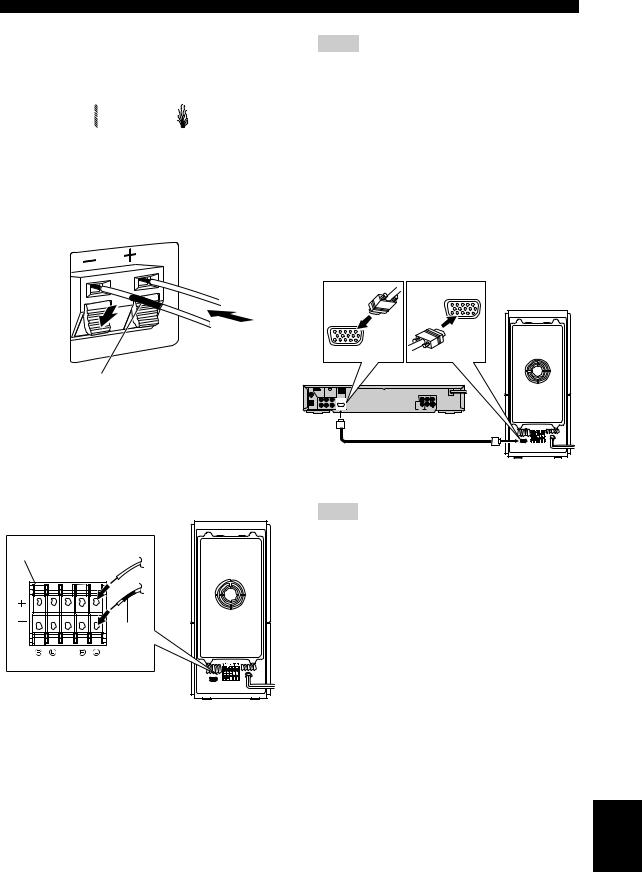
■ Connecting the speaker cables
Be sure to twist the cable core firmly in a clockwise direction. Twisting loosely may cause a short.
Good |
No Good |
||||
|
|
|
|
|
|
|
|
|
|
|
|
Connect the speaker cable with the white line to the plus (Red (+)) connector on the front/center/surround speakers and connect the speaker cable with the black band to the minus (Black (–)) connector.
Lever 
Black |
Press the lever down, then |
|
insert the cable into the hole |
||
band |
||
and release the lever. |
||
|
■ Connecting the subwoofer
Connect the speaker cable with the white line to the plus (Red (+)) connector on the front/center/surround speakers and connect the speaker cable with the black band to the minus (Black (–)) connector.
Lever |
SPEAKERS |
Black |
band |
FRONT CENTER SURROUND
Lift up the lever, then insert |
|
the cable into the hole and |
NX-SW300 |
replace the lever. |
SPEAKER SETUP
Notes
– Do not use excessive force when inserting the cable plug. |
|
|
Doing so may damage the cable or speaker terminals. |
|
|
2 |
||
– When connecting the speakers, fix the speaker cables in |
||
place so that cables do not loosen. If your foot or hand |
|
|
accidentally gets caught on a loose speaker cable, the |
PREPARATION |
|
speaker may fall. |
||
|
||
■ Connecting the DVD receiver and |
|
|
the subwoofer |
|
|
Connect the subwoofer to DVD receiver using the |
|
|
system control cable. Attach one end to the subwoofer |
|
|
and the other to the SYSTEM CONNECTOR |
|
|
terminal at the rear of the DVD receiver. |
|
SYSTEM
CONNECTOR
SYSTEM
CONNECTOR
NX-SW300
Notes
–After inserting the system control cable, be sure to tighten the cable screws.
–Ensure that the speaker cables are correctly connected. Improper connections may damage the system due to a short-circuit.
–When connecting the speakers, fix the speaker cables in place so that cables do not loosen. If your foot or hand accidentally gets caught on a loose speaker cable, the speaker may fall.
–To prevent unwanted noise, do not place the subwoofer too close to the DVD receiver, AC power adaptor, TV or other sources of radiation.
English
11 En
CONNECTION
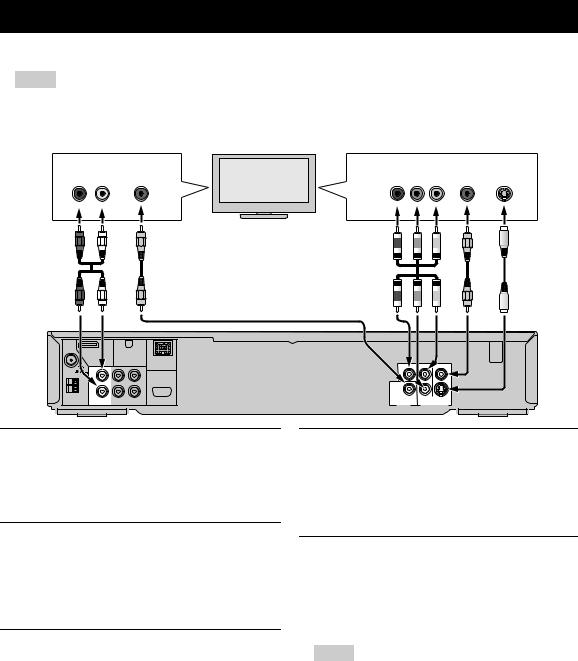
■ Connecting a TV
Notes
–You only need to make one audio connections from the following options (1 or 2) and one video connection from the following options (1,2 or 3) depending on the capabilities of your TV.
–Do not connect the power cords until all cable connections are completed.
Audio connections Video connections
1 |
2 |
3 |
1 |
2 |
AUDIO |
COAXIAL |
Pr/Cr Pb/Cb Y |
VIDEO |
S-VIDEO |
OUT |
OUT |
IN |
IN |
|
R |
L |
|
|
|
TV
|
HDMI |
XM |
|
|
|
|
|
DOCK |
PR |
Y |
VIDEO |
|
L |
SYSTEM |
|
|
|
GND |
|
CONNECTOR |
PCM/DTS |
|
|
|
|
|
|
|
|
AM |
R |
|
qDIGITAL |
|
|
|
|
|
|
|
|
|
|
|
|
PB |
|
ANTENNA |
TV IN |
AUX IN LINE OUT TO NX-SW300 |
COAXIAL |
COMPONENT S VIDEO |
|
|
|
|
DIGITAL IN |
VIDEO OUT (DVD ONLY) |
|
1 VIDEO output jack 1 TV IN jacks
Use the supplied video pin cable (yellow) to connect the VIDEO jack of this DVD receiver to the video input jack (or A/V In/Video In/Composite/Baseband jack) of your TV.
2S VIDEO output jack
S-video connections achieve a clearer picture than composite video connections. Use a commercially available S-video cable to connect the S VIDEO jack of this DVD receiver to the S-video input jack (or Y/C or S-VHS jack) of your TV.
3COMPONENT VIDEO OUT jacks
Use commercially available component video cables (red/blue/green) to connect the Y PB PR jacks of this DVD receiver to the corresponding component video input jacks (or the Y Pb/Cb Pr/Cr/ YUV jacks) of your TV.
Progressive scan video quality is only available when using Y PB PR in conjunction with a progressive scan TV. To activate the progressive scan function see page 34.
To output TV sound from the speakers connected to this DVD receiver, use commercially available audio cables (white/red) to connect the TV IN input jacks of this DVD receiver to the corresponding audio output jacks of your TV.
2COAXIAL jack
To output TV sound from the speakers connected to this DVD receiver, use a commercially available coaxial cable to connect the COAXIAL input jack of this DVD receiver to the corresponding coaxial output jack of your TV.
Notes
–If you connect this DVD receiver to the analog audio and digital audio at the same time, the digital audio signals input at the COAXIAL jack take priority over the analog audio signals input at the TV IN jacks.
–You can connect this DVD receiver to your TV using an HDMI cable. For details, see “Connecting an HDMI component” on page 13.
12 En
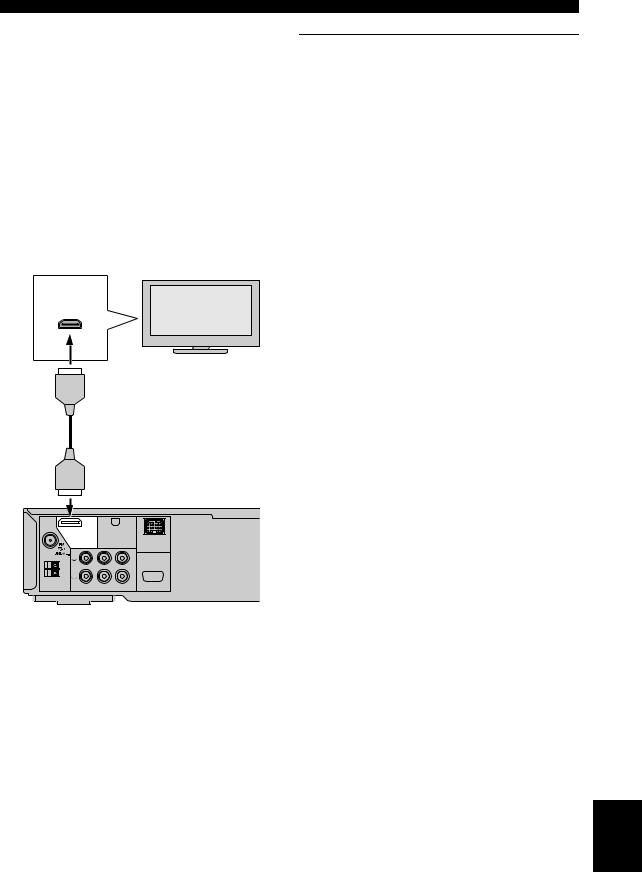
■ Connecting an HDMI component
HDMI (High-Definition Multimedia Interface) is the first industry-supported, uncompressed, all-digital A/V (audio/video) interface.
By connecting to an HDMI component (such as a TV), you can enjoy standard, enhanced or highdefinition video as well as multi-channel digital audio using a single cable.
When used in combination with HDCP (Highbandwidth Digital Content Protection), HDMI provides a secure audio/video interface that meets the security requirements of content providers and system operators.
For further information on HDMI, visit the HDMI website at “http://www.hdmi.org/”.
HDMI
IN
TV
CONNECTION
Viewing and Listening to playback from an HDMI component
1 Connect HDMI output jack of this DVD receiver to the |
|
|||
2 |
||||
|
HDMI input jack of your HDMI compatible |
|||
|
component using a commercially available HDMI |
|
||
PREPARATION |
||||
|
cable. |
|||
|
|
|||
2 Select the appropriate audio output from [HDMI |
|
|||
|
SETUP] in [AUDIO SETUP PAGE] (see page 33). |
|
||
3 Select the appropriate video output from [HDMI |
|
|||
|
SETUP] in [VIDEO SETUP PAGE] (see page 35). |
|
||
|
|
|
||
|
Notes |
|
|
|
|
– This DVD receiver is not compatible with HDCP- |
|
||
|
incompatible HDMI or DVI components. |
|
||
|
– You need a commercially available HDMI/DVI |
|
||
|
conversion cable when you connect this DVD receiver to |
|
||
|
other DVI components. |
|
||
|
– When connecting an HDMI component, refer to the |
|
||
|
instruction manual for the component. |
|
||
|
– Do not disconnect or connect the HDMI cable from this |
|
||
|
DVD receiver or turn off the power of the HDMI/DVI |
|
||
|
component connected to the HDMI jack of this DVD |
|
||
|
receiver while data is being transferred. Doing so may |
|
||
|
disrupt playback or cause noise. |
|
||
|
HDMI |
XM |
|
|
DOCK |
|
L |
SYSTEM |
GND |
|
CONNECTOR |
AM |
R |
|
|
|
|
ANTENNA |
TV IN |
AUX IN LINE OUT TO NX-SW300 |
DVD receiver
English
13 En
CONNECTION
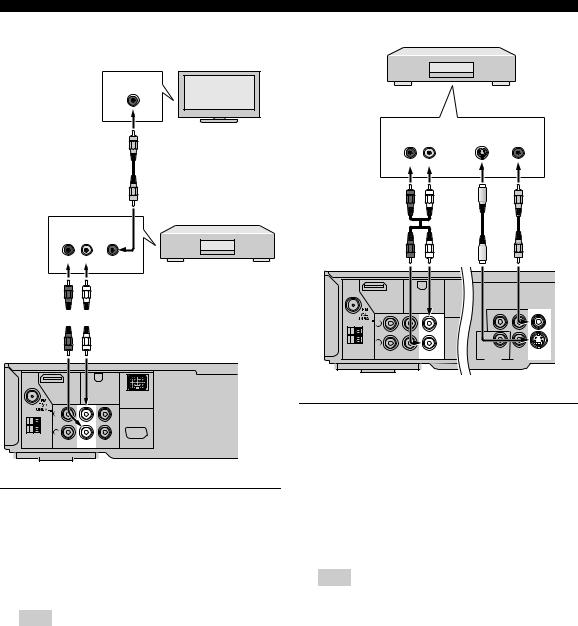
■ Connecting a VCR
Connect a VCR and enjoy video cassette tapes.
VIDEO
IN
TV
1
AUDIO |
VIDEO |
OUT |
OUT |
R |
L |
VCR
2
|
HDMI |
XM |
|
|
DOCK |
|
L |
SYSTEM |
GND |
|
CONNECTOR |
AM |
R |
|
|
|
|
ANTENNA |
TV IN |
AUX IN LINE OUT TO NX-SW300 |
DVD receiver
Viewing and listening to playback from a VCR
1Connect the video output jack of the VCR and the video input jack of your TV.
2Connect the AUX IN jacks of this DVD receiver to the audio output jacks of your VCR.
Note
Before starting operation, press AUX repeatedly to select “AUX ANALOG” to activate the input source.
|
VCR |
|
AUDIO |
S-VIDEO |
VIDEO |
IN |
OUT |
IN |
R |
L |
|
2 |
1 |
|
HDMI |
XM |
PR |
Y |
VIDEO |
|
|
|
|||
|
L |
|
|
|
|
GND |
|
|
PCM/DTS |
|
|
|
|
|
|
|
|
AM |
R |
|
qDIGITAL |
|
|
|
|
|
|
|
|
|
|
|
|
PB |
|
ANTENNA |
TV IN |
AUX IN LINE OUT |
COAXIAL |
COMPONENT S VIDEO |
|
|
|
|
DIGITAL IN |
VIDEO OUT (DVD ONLY) |
|
DVD receiver
Using a VCR for recording DVD playback
1Connect the S VIDEO output of this DVD receiver to the S-video input jack of your VCR.
OR
Connect the VIDEO output jack of this DVD receiver and the video input jack of your VCR.
2Connect the LINE OUT jacks of this DVD receiver to the audio input jacks of your VCR.
Note
Some DVDs are copy protected. You cannot record copyprotected discs using a VCR.
14 En
 Loading...