


DTXPRESS IV
Table of contents
 Loading...
DRUM TRIGGER MODULE
OWNER’S MANUAL
EN

SPECIAL MESSAGE SECTION
This product utilizes batteries or an external power supply
(adapter). DO NOT connect this product to any power supply or
adapter other than one described in the manual, on the name
plate, or specifically recommended by Yamaha.
WARNING: Do not place this product in a position where anyone
could walk on, trip over ,or roll anything over power or connecting
cords of any kind. The use of an extension cord is not recommended! If you must use an extension cord, the minimum wire size
for a 25’ cord (or less ) is 18 AWG. NOTE: The smaller the AWG
number ,the larger the current handling capacity. For longer extension cords, consult a local electrician.
This product should be used only with the components supplied
or; a cart, rack, or stand that is recommended by Yamaha. If a cart,
etc., is used, please observe all safety markings and instructions
that accompany the accessory product.
SPECIFICATIONS SUBJECT TO CHANGE:
The information contained in this manual is believed to be correct
at the time of printing. However, Yamaha reserves the right to
change or modify any of the specifications without notice or obligation to update existing units.
This product, either alone or in combination with an amplifier and
headphones or speaker/s, may be capable of producing sound levels that could cause permanent hearing loss. DO NOT operate for
long periods of time at a high volume level or at a level that is
uncomfortable. If you experience any hearing loss or ringing in the
ears, you should consult an audiologist.
IMPORTANT: The louder the sound, the shorter the time period
before damage occurs.
Some Yamaha products may have benches and / or accessory
mounting fixtures that are either supplied with the product or as
optional accessories. Some of these items are designed to be
dealer assembled or installed. Please make sure that benches are
stable and any optional fixtures (where applicable) are well
secured BEFORE using.
Benches supplied by Yamaha are designed for seating only. No
other uses are recommended.
NOTICE:
Service charges incurred due to a lack of knowledge relating to
how a function or effect works (when the unit is operating as
designed) are not covered by the manufacturer’s warranty, and are
therefore the owners responsibility. Please study this manual carefully and consult your dealer before requesting service.
ENVIRONMENTAL ISSUES:
Yamaha strives to produce products that are both user safe and
environmentally friendly. We sincerely believe that our products
and the production methods used to produce them, meet these
goals. In keeping with both the letter and the spirit of the law, we
want you to be aware of the following:
Battery Notice:
This product MAY contain a small non-rechargeable battery which
(if applicable) is soldered in place. The average life span of this
type of battery is approximately five years. When replacement
becomes necessary, contact a qualified service representative to
perform the replacement.
This product may also use “household” type batteries. Some of
these may be rechargeable. Make sure that the battery being
charged is a rechargeable type and that the charger is intended for
the battery being charged.
When installing batteries, do not mix batteries with new, or with
batteries of a different type. Batteries MUST be installed correctly.
Mismatches or incorrect installation may result in overheating and
battery case rupture.
Warning:
Do not attempt to disassemble, or incinerate any battery. Keep all
batteries away from children. Dispose of used batteries promptly
and as regulated by the laws in your area. Note: Check with any
retailer of household type batteries in your area for battery disposal information.
Disposal Notice:
Should this product become damaged beyond repair, or for some
reason its useful life is considered to be at an end, please observe
all local, state, and federal regulations that relate to the disposal of
products that contain lead, batteries, plastics, etc. If your dealer is
unable to assist you, please contact Yamaha directly.
NAME PLATE LOCATION:
The name plate is located on the bottom of the product. The model
number, serial number, power requirements, etc., are located on
this plate. You should record the model number, serial number, and
the date of purchase in the spaces provided below and retain this
manual as a permanent record of your purchase.
Model
Serial No.
Purchase Date
92-BP (bottom)
PLEASE KEEP THIS MANUAL
■
Introduction
Thank you for purchasing the YAMAHA DTXPRESS IV.
The DTXPRESS IV is a compact drum trigger module that includes a wealth of rich, highquality drum voices and is compatible with snare pads equipped with a pad controller. It also
has a comprehensive variety of features that help you build your drumming and rhythm section skills, a built-in sequencer for recording your own songs and performances, an effective
Groove Check function that helps you tighten your timing, and a versatile, multi-function
metronome for enhancing your practice sessions. Moreover, it provides a large selection of
preset songs that you can play along with and improve your ability in a variety of musical
styles.
To get the most out of your DTXPRESS IV, please read this manual carefully. After reading
through the manual, make sure to store it in a safe place so that you can refer back to it
again as needed.
Accessories
Yamaha AC power adaptor (PA-3C)*
Module stand
Module stand fastening screws x 2
Owner’s Manual (this book)
*May not be included depending on your particular area. Please check with your Yamaha dealer.
About the Descriptions and Conventions in this Manual
• [DRUM KIT], [CLICK], etc.
Panel buttons and controls are indicated with [ ] (brackets).
• [SHIFT] + [DRUM KIT], etc.
This means to simultaneously hold down the [SHIFT] button and press the [DRUM KIT] button.
<<
>>
•[
]/[
], etc.
<<
>>
This means that you can use either the [
• “Completed!”, etc.
Words in quotation marks indicate a message shown on the LCD display.
The illustrations and LCD screens as shown in this owner’s manual are for instructional purposes only, and may
appear somewhat different from those on your instrument.
<<
] button or [
<<
>>
] button in the operation.
>>
About the pads
This Owner’s Manual described the model names of the drum pads which can be connected to the DTXPRESS IV. Note that these were the latest models at
the time this Owner’s Manual was produced. For details about more recently released models, refer to the following website.
http://www.yamaha.co.jp/english/product/drums/ed/
DTXPRESS
IV
Owner’s Manual
3
PRECAUTIONS
PLEASE READ CAREFULLY BEFORE PROCEEDING
* Please keep this manual in a safe place for future reference.
WARNING
Always follow the basic precautions listed below to avoid the possibility of serious injury or even death from electrical
shock, short-circuiting, damages, fire or other hazards. These precautions include, but are not limited to, the following:
Power supply/AC power adaptor
• Only use the voltage specified as correct for the instrument. The required
voltage is printed on the name plate of the instrument.
• Use the specified adaptor (PA-3C, PA-130 or an equivalent recommended by
Yamaha) only. Using the wrong adaptor can result in damage to the instrument
or overheating.
• Check the electric plug periodically and remove any dirt or dust which may have
accumulated on it.
• Do not place the AC adaptor cord near heat sources such as heaters or radiators,
and do not excessively bend or otherwise damage the cord, place heavy objects
on it, or place it in a position where anyone could walk on, trip over, or roll
anything over it.
Do not open
• Do not open the instrument or attempt to disassemble the internal parts or
modify them in any way. The instrument contains no user-serviceable parts. If it
should appear to be malfunctioning, discontinue use immediately and have it
inspected by qualified Yamaha service personnel.
CAUTION
Water warning
• Do not expose the instrument to rain, use it near water or in damp or wet
conditions, or place containers on it containing liquids which might spill into
any openings. If any liquid such as water seeps into the instrument, turn off the
power immediately and unplug the power cord from the AC outlet. Then have
the instrument inspected by qualified Yamaha service personnel.
• Never insert or remove an electric plug with wet hands.
Fire warning
• Do not put burning items, such as candles, on the unit.
A burning item may fall over and cause a fire.
If you notice any abnormality
• If the AC adaptor cord or plug becomes frayed or damaged, or if there is a
sudden loss of sound during use of the instrument, or if any unusual smells or
smoke should appear to be caused by it, immediately turn off the power switch,
disconnect the adaptor plug from the outlet, and have the instrument inspected
by qualified Yamaha service personnel.
Always follow the basic precautions listed below to avoid the possibility of physical injury to you or others, or damage
to the instrument or other property. These precautions include, but are not limited to, the following:
Power supply/AC power adaptor
• When removing the electric plug from the instrument or an outlet, always hold
the plug itself and not the cord.
• Unplug the AC power adaptor when not using the instrument, or during
electrical storms.
• Do not connect the instrument to an electrical outlet using a multiple-connector.
Doing so can result in lower sound quality, or possibly cause overheating in the
outlet.
Location
• Do not expose the instrument to excessive dust or vibrations, or extreme cold or
heat (such as in direct sunlight, near a heater, or in a car during the day) to
prevent the possibility of panel disfiguration or damage to the internal
components.
(3)-11
• Do not use the instrument in the vicinity of a TV, radio, stereo equipment,
mobile phone, or other electric devices. Otherwise, the instrument, TV, or radio
may generate noise.
• Do not place the instrument in an unstable position where it might accidentally
fall over.
• Before moving the instrument, remove all connected adaptor and other cables.
• When setting up the product, make sure that the AC outlet you are using is
easily accessible. If some trouble or malfunction occurs, immediately turn off
the power switch and disconnect the plug from the outlet. Even when the power
switch is turned off, electricity is still flowing to the product at the minimum
level. When you are not using the product for a long time, make sure to unplug
the power cord from the wall AC outlet.
• Use only the stand/rack specified for the instrument. When attaching the stand
or rack, use the provided screws only. Failure to do so could cause damage to
the internal components or result in the instrument falling over.
• Do not place objects in front of the instrument's air vent, since this may prevent
adequate ventilation of the internal components, and possibly result in the
instrument overheating.
1/2
4
DTXPRESS
IV
Owner’s Manual

Connections
• Before connecting the instrument to other electronic components, turn off the
power for all components. Before turning the power on or off for all
components, set all volume levels to minimum. Also, be sure to set the volumes
of all components at their minimum levels and gradually raise the volume
controls while playing the instrument to set the desired listening level.
Maintenance
• When cleaning the instrument, use a soft, dry cloth. Do not use paint thinners,
solvents, cleaning fluids, or chemical-impregnated wiping cloths.
Handling caution
• Never insert or drop paper, metallic, or other objects into the gaps on the panel.
If this happens, turn off the power immediately and unplug the power cord from
the AC outlet. Then have the instrument inspected by qualified Yamaha service
personnel.
• Do not place vinyl, plastic or rubber objects on the instrument, since this might
discolor the panel.
• Do not rest your weight on, or place heavy objects on the instrument, and do not
use excessive force on the buttons, switches or connectors.
• Do not use the instrument/device or headphones for a long period of time at a
high or uncomfortable volume level, since this can cause permanent hearing
loss. If you experience any hearing loss or ringing in the ears, consult a
physician.
Saving data
• Never attempt to turn off the power while data is being written to Flash ROM
(while a "now storing..." message is shown). Turning the power off in this state
results in loss of all user data and may cause the system to freeze (due to
corruption of data in the Flash ROM). This means that this instrument may not
be able to start up properly, even when turning the power on next time.
Yamaha cannot be held responsible for damage caused by improper use or modifications to the instrument, or data that is lost or destroyed.
Always turn the power off when the instrument is not in use.
Even when the power switch is in the “STANDBY” position, electricity is still flowing to the instrument at the minimum level. When you are not using the instrument for a long
time, make sure you unplug the AC power adaptor from the wall AC outlet.
• This product incorporates and bundles computer programs and contents in which Yamaha owns copyrights or with respect to which it has license to
use others’ copyrights. Such copyrighted materials include, without limitation, all computer software, style files, MIDI files, WAVE data, musical
scores and sound recordings. Any unauthorized use of such programs and contents outside of personal use is not permitted under relevant laws. Any
violation of copyright has legal consequences. DON'T MAKE, DISTRIBUTE OR USE ILLEGAL COPIES.
• Copying of the commercially available musical data including but not limited to MIDI data and/or audio data is strictly prohibited except for your
personal use.
• The company names and product names in this Owner’s Manual are the trademarks or registered trademarks of their respective companies.
(3)-11
2/2
DTXPRESS
IV
Owner’s Manual
5

Main Features
The DTXPRESS IV is equipped with a high-quality 32-polyphony tone generator that produces
realistic voices, includes a high-performance, multi-function metronome, a built-in sequencer
and a variety of songs—all combined into a compact, portable package. The DTXPRESS IV is an
exceptionally versatile instrument that can be used in a variety of situations such as live performance, personal practice, and much more.
■
Drum Triggers
• Built into the unit are twelve trigger input jacks and a hi-hat controller jack. The instrument also features jacks that are
compatible with two-zone or three-zone pads (pads that transmit different signals depending on the area that is hit).
Moreover, the snare drum jack is compatible with pad-controller-equipped pads. This lets you adjust the ‘virtual’
snares and the tuning—just as you would with an acoustic snare drum. All in all, the DTXPRESS IV has the operability, functionality and performance that is virtually equivalent to an acoustic drum kit.
•You can connect the DTXPRESS IV to an acoustic drum kit by using drum triggers such as Yamaha DT20. The setup
data such as the trigger input types and sensitivity can be customized to suit your playing preferences, style and particular setup.
• Also included in the unit are 50 preset drum kits which naturally contain acoustic drum kits, and cover a wide range of
music genres, such as rock, funk, jazz, reggae, Latin, etc. Moreover, User kit memory is available for storing 20 sets.
With this, you can set up your own original drum kits using the various drum voices.
* The word “trigger” refers to the means by which hitting a pad sends a signal to the DTXPRESS IV as to what sound to play on the
built-in tone generator and how loud the sound should be played.
■
Tone Generator
• The DTXPRESS IV is equipped with a high-quality, 16-bit AWM2 (PCM) tone generator with 32-voice polyphony
that produces dynamic voices or exceptional realism. The voices—totalling 427—cover a wide range sounds, such as
authentic acoustic drums, unique electronic percussion, sound effects, and much more. The instrument also features a
built-in high-quality digital reverb for enhancing the sound.
■
High-performance Metronome
• The DTXPRESS IV provides with a comprehensive, multi-function metronome, allowing various click settings for
each note value. Each note value can be assigned its own separate click sound and pitch. You can also set a timer that
will determine when the click stops and set breaks which how many measures the click will play and then be muted.
• The DTXPRESS IV also features a “Tap” function that lets you set the tempo for the song or click by tapping in tempo
on a pad to any tempo you like. This lets you set whatever tempo you desire for playing or practicing.
■
Sequencer
• The built-in sequencer contains a wide variety of 63 preset songs. Two functions that make the DTXPRESS IV great
for practice are the Drum Mute Function, which mutes a specific drum part, and the Bass Solo function, which lets you
play along with just the song’s bass part. The DTXPRESS IV also allows you to record your performance in real
time—and allows you to play along with your recorded performance data.
• In addition to one main song that is controlled from the panel, three pad songs can be individually controlled and
simultaneously played by trigger input from the pads.
■
Groove Check
• The Groove Check function monitors your playing and provides instant feedback on your rhythmic skills, providing a
powerful way to quickly improve your technique. It includes a Rhythm Gate function that produces sounds only if
your timing is accurate, and also has a Challenge mode that evaluates your playing, giving you a letter grade—and
makes mastering the drums easier and more fun than ever before.
6
■
Interface
•A MIDI OUT jack on the rear panel lets you connect other devices and play sounds from an external tone generator or
synchronize the metronome with an external sequencer. Also provided are an AUX IN jack, which lets you plug in and
play along with an external audio device, such as a CD player or MD player, and a headphones jack for convenient
practice without disturbing others.
DTXPRESS
IV
Owner’s Manual

Contents
Introduction ............................................................3
Accessories...............................................................3
About the Descriptions and Conventions in
this Manual................................................................3
Main Features ...........................................................6
Controls and Functions.........................................8
Top Panel..................................................................8
Rear Panel ................................................................9
1 Connections ....................................................10
1 Connecting the Pads ..........................................10
DTXPRESS IV Standard Set...........................10
DTXPRESS IV Special Set .............................11
Setting up with Acoustic Drums.......................11
2 Setting Up the Power Supply.............................. 12
3 Connecting to Speakers or Headphones............ 12
4 Turning the Power On.........................................13
5 Selecting the Trigger Setup ................................14
5 Using the Groove Check Function ............... 24
Groove Check Mode............................................... 24
6 Record Your Performance............................. 26
Recording System .................................................. 26
7 Create Your Own Original Drum Kit ............. 28
Factory Set ............................................................. 35
8 Trigger Setup Edit.......................................... 36
Trigger Setup procedure......................................... 36
Explanations of Each Display Page........................ 37
Error Messages ................................................... 40
Trobleshooting .................................................... 40
Index..................................................................... 42
2 Time to Play.....................................................15
Adjusting the Hi-hat.................................................16
Pad Controller Settings ...........................................17
3 Playing Along With the Click .........................18
Click Out Select.......................................................20
Tap Tempo Function ...............................................21
LED Display Setting ................................................21
4 Playing Along With a Song ............................22
Pad Function Settings .............................................23
Appendix.............................................................. 43
MIDI Data Format ...................................................43
LCD Displays .......................................................... 44
MIDI Implementation Chart..................................... 47
Drum Voice List ...................................................... 48
Preset Drum Kit List................................................ 49
Preset Song List ..................................................... 49
Specifications.......................................................... 50
DTXPRESS
IV
Owner’s Manual
7

Controls and Functions
Top Panel
i
o
8.8.8.
~~~~~YAMAHA ~~~~
~~~DTXPRESS IV~~
q
w
e
r
t
y
u
i
o
!0
!1
!0
q
w
er yu
Drum Kit button (DRUM KIT)
.
.
(p. 14)
(p. 15)
•For entering the Drum Kit Select display
• Hold the [SHIFT] button and press the [DRUM KIT] button to
enter the Trigger Setup Select page
• This button can also be used to temporarily mute all sounds of
all voices.
Click button (CLICK)
•For entering the Click (Metronome) Setting page. (p. 18)
• Hold the [SHIFT] button and press the [CLICK] button to enter
the Groove Check Setting display
Song button (SONG
•For entering the Song Select page
• Hold the [SHIFT] button and press the [SONG
enable recording standby mode for the DTXPRESS IV.
• Press this button to start/stop song playback or recording.
>>
>>
/
■
.
(p. 24)
)
.
(p. 22)
>>
>>
/
■
] button to
Shift button (SHIFT)
Holding this button and pressing another specific button switches
to the function printed above each button on the top panel.
<<
>>
<<
Select buttons (
•For selecting an item you want to edit (the selected item
flashes). If there are multiple pages either before or after the
page currently displayed, the buttons are used to view the next
or previous page. Hold the button to continuously move the
flashing cursor.
• Press these two buttons together to scroll continuously back
and forth through the pages. Holding the [
pressing the [
holding the [
to the next.
• Hold the [SHIFT] button and press the [
select the trigger input you want to edit.
>
] button moves to the previous page while
>
] button first and pressing the [
>>
,
)
] button first and
<
<
] button moves
<
>
]/[
] buttons to
t
!1
Click ON/OFF button ( ON/OFF)
p. 18
•For starting/stopping the click sound (metronome). (
• Hold the [SHIFT] button and press the [ ON/OFF] button to
enter the Tap Tempo Setting page. (p. 21)
)
Save/Enter button (SAVE/ENTER)
•For saving data or executing an operation (Enter).
• Hold the [SHIFT] button and press the [SAVE/ENTER] button
to enter the Utility page, which is used to make overall settings
for operating the DTXPRESS IV.
Click lamp
The red lamp lights on the first beat of every measure when the
click or a song is playing. The other beats are indicated with a
green light.
LED display
For indicating the tempo, the number selected in the current page,
or the click timer depending on the setting made. (p. 21)
LCD display
For displaying important information and data used in operating
the DTXPRESS IV.
Jog dial
Rotate the jog dial to change the value selected with the cursor
(the flashed item to be edited) in the display. Rotate the dial to the
right (clockwise) to increase the value, and to the left to decrease.
The jog dial can also be used to change the layer (A/B) and for
Drum mute.
Hold the [SHIFT] button and rotate the knob to change the current tempo.
8
DTXPRESS
IV
Owner’s Manual
!2
!3
1
2
5
7
!4
!5
!6
!7
!8
!9
@0
@1
Controls and Functions
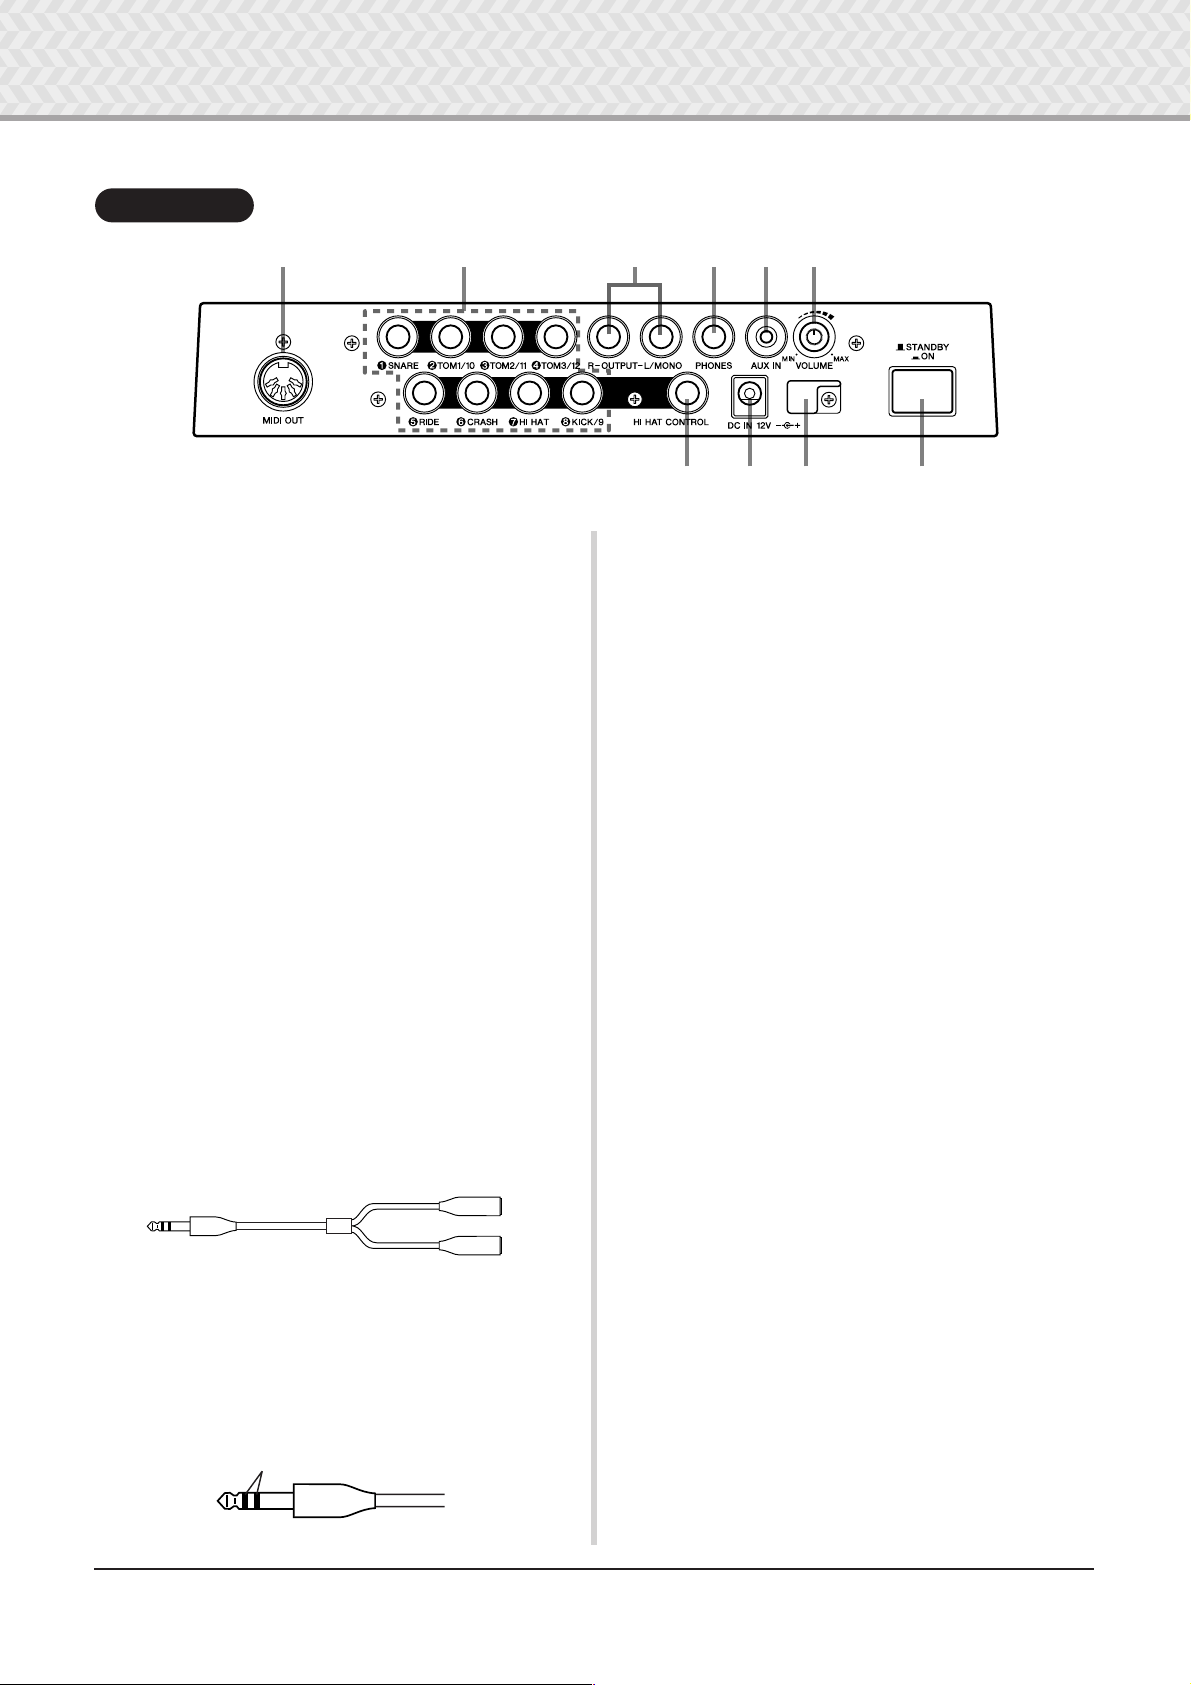
Rear Panel
!2 !3 !6 !7 !8!5
!4 !9 @0 @1
MIDI OUT jack
For sending data from the DTXPRESS IV to an external MIDI
device. With this jack, you can use the DTXPRESS IV as a control device to trigger voices from an external tone generator, or
synchronize song playback or the click of the DTXPRESS IV
with the playback of an external sequencer. (p. 13)
Trigger Input jacks ( 1 SNARE thru 8 KICK/9)
For connecting pads or drum triggers (Yamaha DT20, etc.) to
receive trigger signals.
Connect external pads such as a snare, tom, etc., according to the
indication below each input. (p. 10, 11)
SNARE ..................... Compatible with three-zone pads and the pad
controller.
TOM1/10, 3 TOM2/11, 4 TOM3/12, 8 KICK/9
.............................. Mono x 2 inputs
A Y-shaped cable (stereo plug—mono jack x
2; refer to the illustration below) can be used to
trigger inputs 9, 10, 11, and 12 (monaural pad).
Also, if the KP125/65 kick pad is connected to
this jack with a stereo cable, the external pad
input jack on the KP125/65 can be used as the
input for input jacks 9, 10, 11, or 12.
RIDE, 6 CRASH .....Compatible with three-zone pads.
HI HAT .....................Compatible with stereo pads (with switches)
● Y-shaped cable
Mono phone jack
Output jacks (OUTPUT L/MONO, R)
For connecting the DTXPRESS IV to an external amplifier, mixer,
etc.
For mono playback use the L/MONO jack. For stereo playback
connect both L and R jacks. (p. 12)
Headphones jack (PHONES)
Connect a set of stereo headphones to this jack to monitor the
DTXPRESS IV. (p. 12)
AUX IN jack
Connect the output of an external audio device, etc., to this jack
(stereo mini jack). (p. 13)
This is convenient for playing along with music from a CD
player, etc.
* Use the volume control on the external device to adjust the
volume balance.
Master Volume (VOLUME)
Adjusts the DTXPRESS IV’s overall volume (output level of the
signal sent via the OUTPUT jacks and PHONES jack). Rotate the
knob clockwise to increase the volume, or counter-clockwise to
decrease it.
Power supply jack (DC IN 12V)
Connect the supplied AC power adaptor to this jack. To prevent
the adaptor from becoming unplugged, secure the cable to the
cable clip.
Stereo phone plug
Mono phone jack
Hi-hat controller jack (HI HAT CONTROL)
For connecting a hi-hat controller. (p. 10, 11)
* Use a cable with a stereo plug (shown below) when connect-
ing a hi-hat controller.
Double insulator
Cable clip
Prevents the power cord from accidentally becoming unplugged.
(p. 12)
POWER Switch
The power is turned on when the button is set to this position:
(>). The power is off when set this way: (?).
DTXPRESS
IV
Owner’s Manual
9
→
1
Connections
In this chapter, you’ll learn how to set up the DTXPRESS IV. Read these instructions carefully
and in the following order to ensure that the instrument sounds and operates properly:
1 Connecting the Pads → 2 Setting Up the Power Supply (p. 12) → 3 Connecting to Speakers or Headphones (p. 12)
You’ll need to change the Trigger Settings of the DTXPRESS IV according to the type of drum set you are using
(Standard Set/Special Set/Acoustic Drums, etc.). If the setting is not appropriate, problems may occur—such
as improper sound, or inappropriate volume balance among the pads.
Refer to the “Selecting the Trigger Setup” section on page 14 on how to select the appropriate setup.
1 Connecting the Pads
Referring to the illustration below, connect the output cable from each pad to each Trigger Input jack located on the rear panel of the DTXPRESS IV. All Trigger Input jacks are conveniently labeled (1 SNARE, etc.), so make sure each pad is connected to its corresponding
Trigger Input jack.
CAUTION
To prevent electric shock and damage to the devices, make sure the power is switched OFF on the DTXPRESS
IV and all related devices before making any connections to the DTXPRESS IV’s input and output jacks.
4 Turning the Power On (p. 13) → 5 Selecting the Trigger Setup (p. 14)
!! IMPORTANT !!
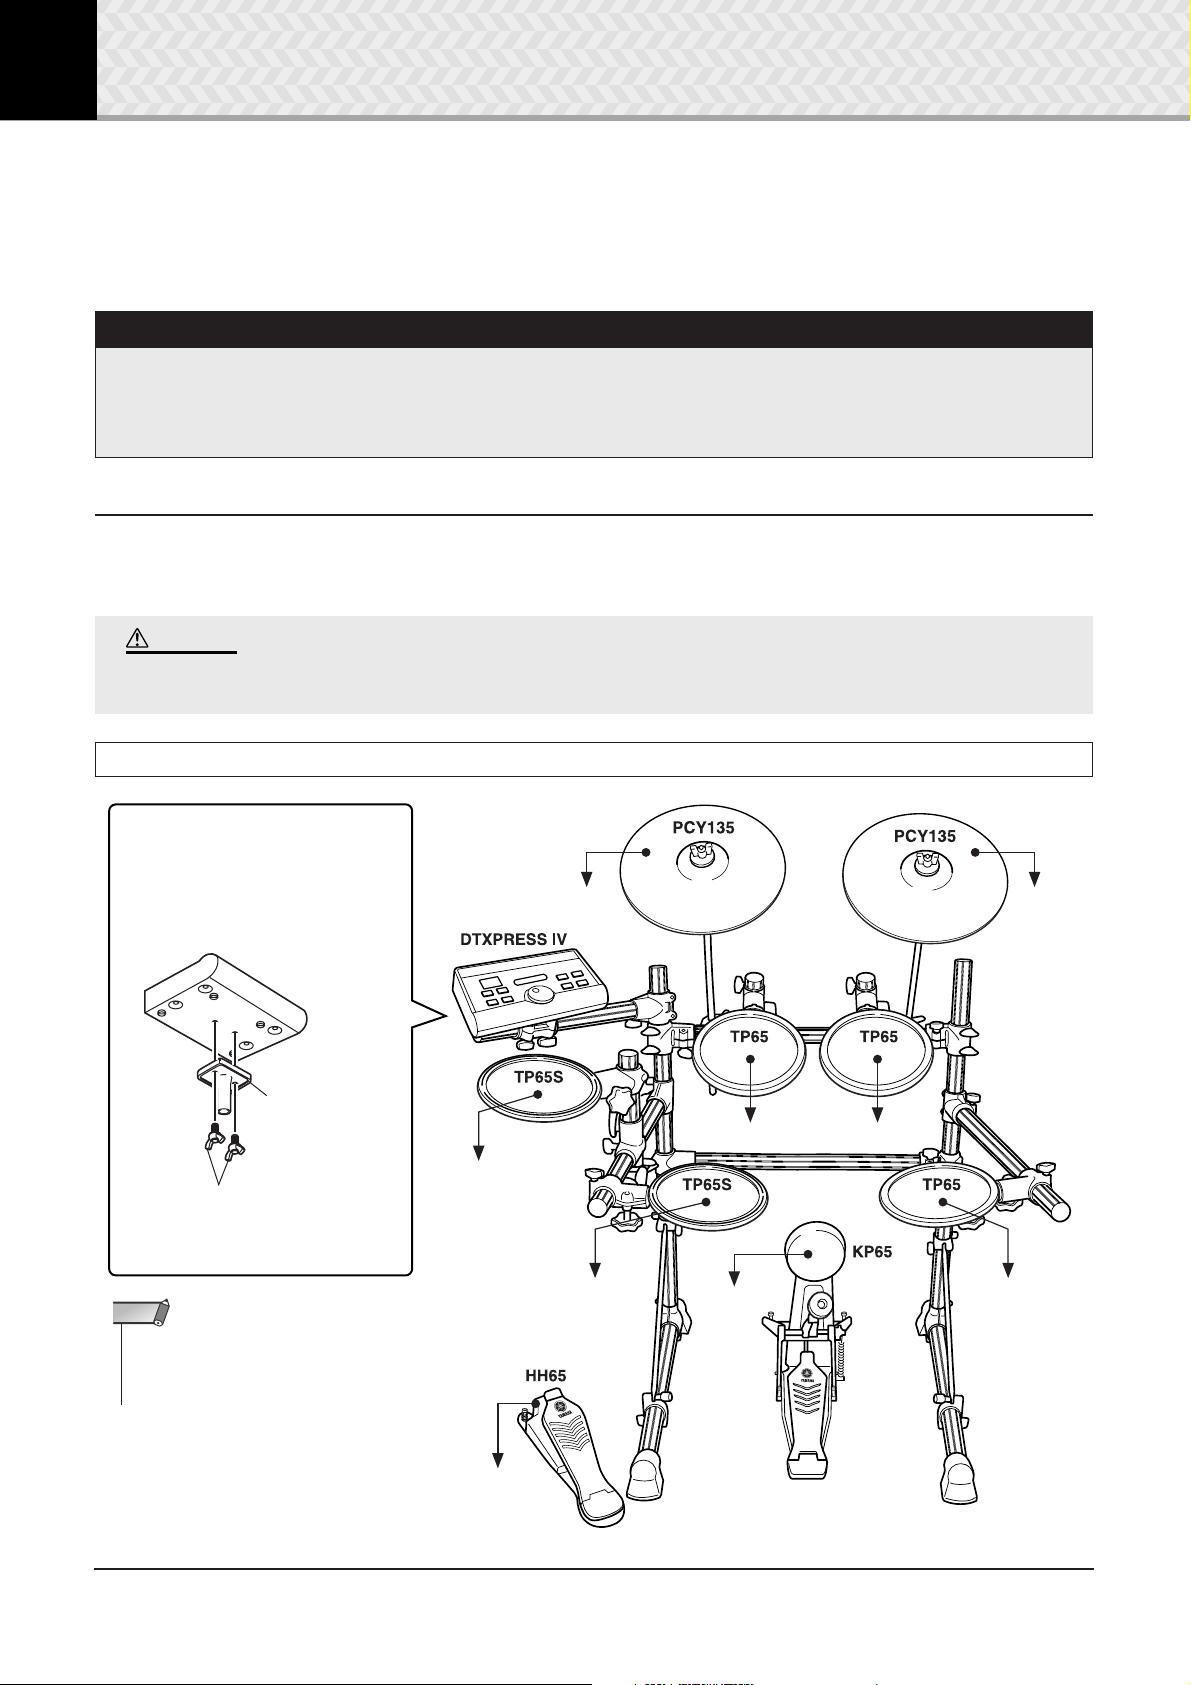
Attaching the Module Stand
Attach the included module stand to
the DTXPRESS IV using the module
stand fastening screws.
DTXPRESS IV
Module stand
(included)
Module stand fastening
screws (2; included)
* Be sure to use the included screws.
NOTE
• The hi-hat pad can also be attached to the
pipe to which the DTXPRESS IV is
attached.
DTXPRESS IV Standard Set
To 6CRASH
To 2TOM1 To 3TOM2
To 7HI HAT
To 1SNARE
To 8KICK
To 5RIDE
To 4TOM3
10
DTXPRESS
IV
Owner’s Manual
To HI HAT
CONTROL
*Foot pedal is not included
in the Standard Set.
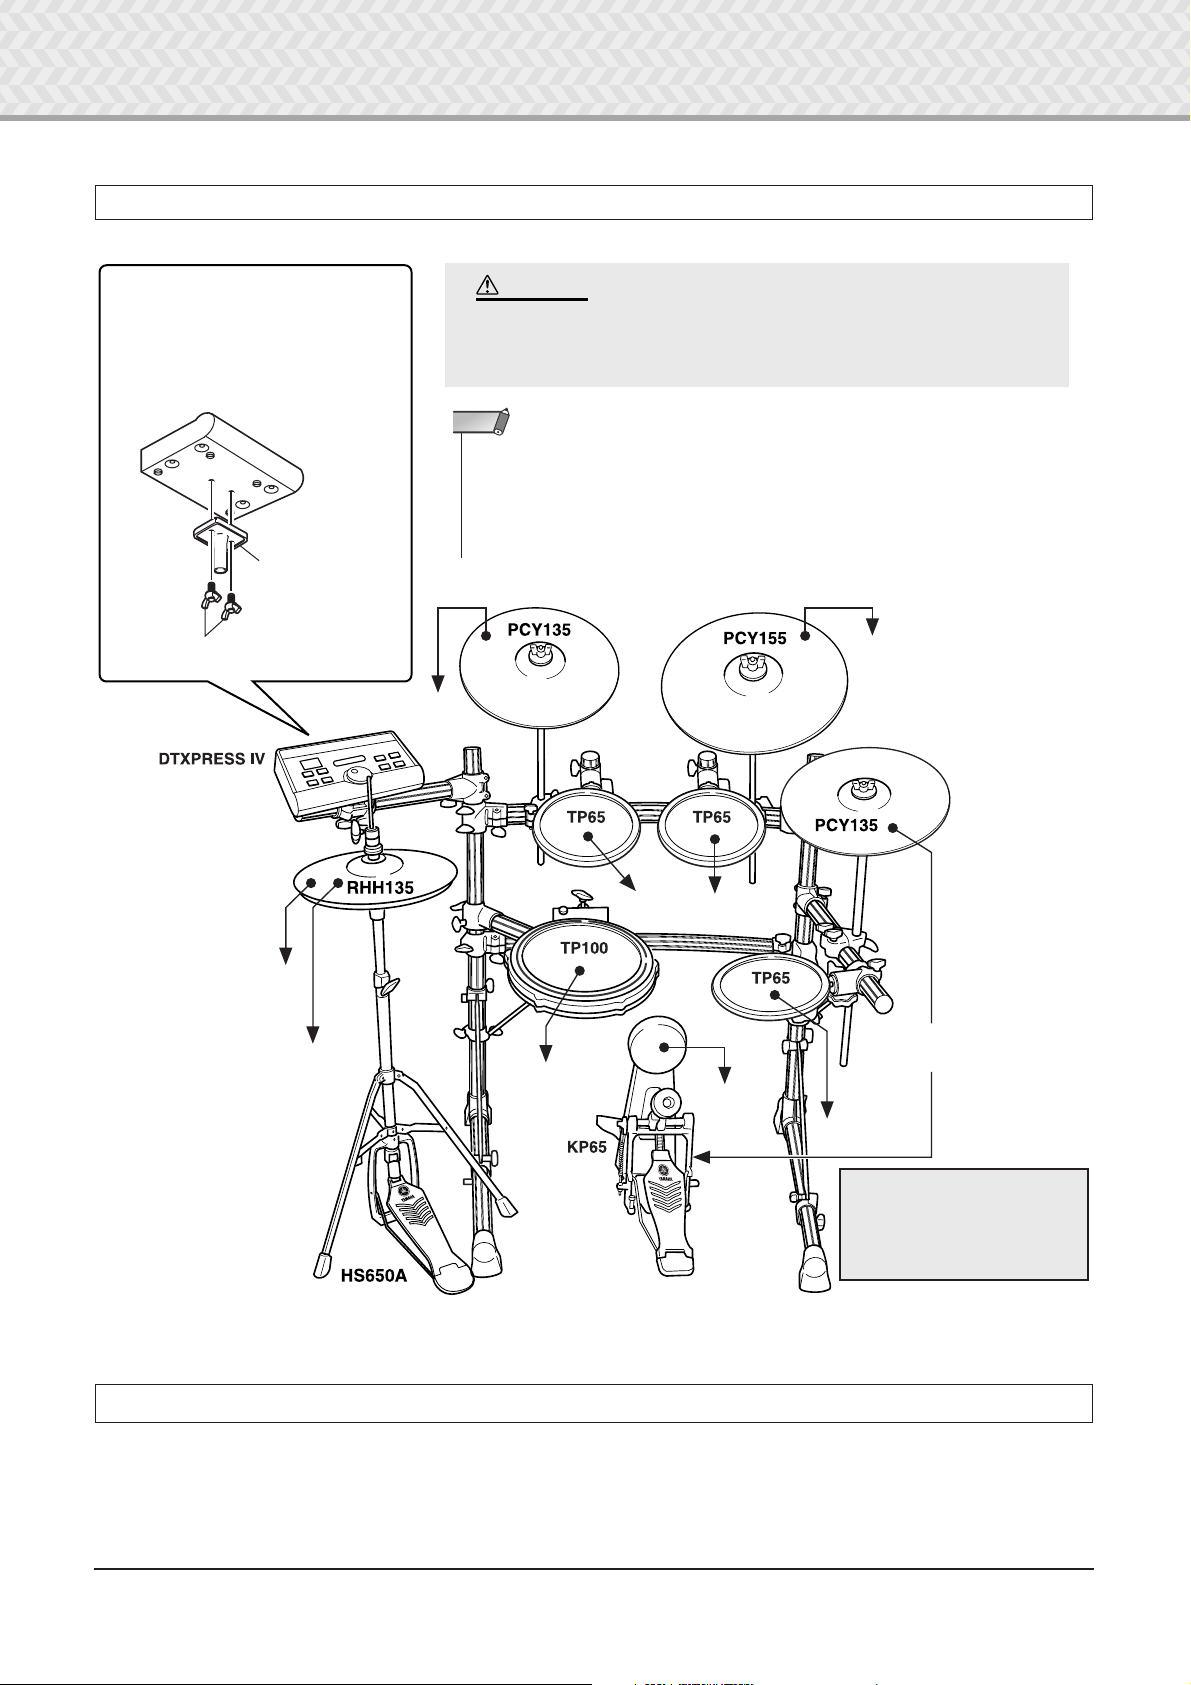
DTXPRESS IV Special Set
1 Connections
Attaching the Module Stand
Attach the included module stand to the
DTXPRESS IV using the module stand
fastening screws.
* Be sure to use the included screws.
DTXPRESS IV
Module stand
(included)
Module stand fastening
screws (2; included)
To 6CRASH
CAUTION
When assembling the Special Set, the legs of the rack must be slid
backwards to maintain proper balance of the set. For details, refer
to the assembly instructions of the rack system.
NOTE
• The pad models described in the illustrations were included in the Standard Set/Special
Set at the moment this Owner’s Manual was produced. Keep in mind that the model names
of your Standard Set or Special Set may be different from the ones illustrated here. For
details about the latest information on Yamaha drum pads, refer to the following website.
http://www.yamaha.co.jp/english/product/drums/ed/
To 5RIDE
To 7HI HAT
To HI HAT
CONTROL
* First, connect the RHH135’s [PAD]
output jack to the 7 HI HAT jack on
the DTXPRESS IV, then connect the
RHH135’s [HI HAT CONTROL] output jack to the HI HAT CONTROL
jack on the DTXPRESS IV.
To 2TOM1
To 1SNARE
*Foot pedal is not included in the
Special Set.
To 3TOM2
To the external pad input
jack of KP65 (kick pad)
To 8KICK
To 4TOM3
* The sound produced by the
edge and cup section of
PCY135 connected to KP65’s
external pad input will not be
produced.
Setting up with Acoustic Drums
The DTXPRESS IV can be played from an acoustic drum kit if the kit is fitted with an optional set of drum triggers (such as Yamaha DT20
Drum Triggers) and the triggers are properly connected to the input jacks of the DTXPRESS IV.
DTXPRESS
IV
Owner’s Manual
11
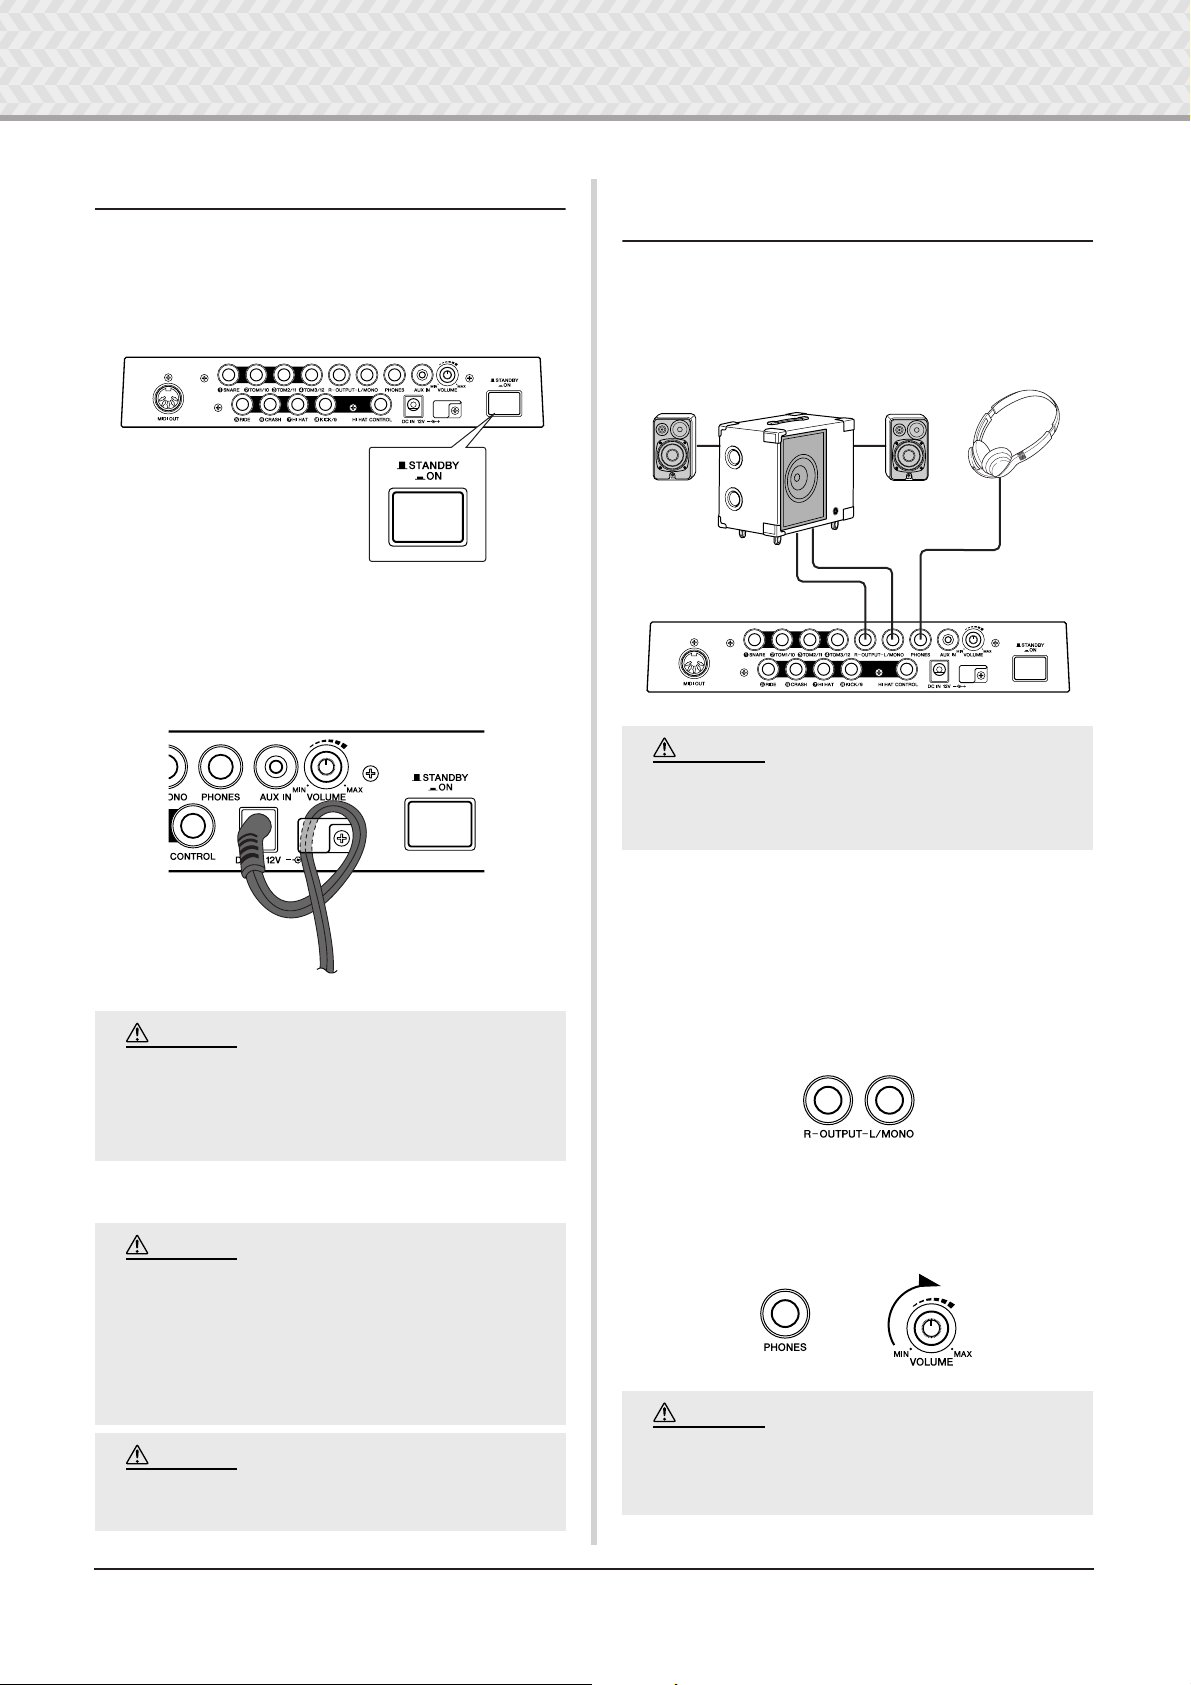
1 Connections
Headphones
Monitor system for the DTX series
MS100DRJ, MS50DRJ, etc.
OUTPUT L/MONO and R jacks
PHONES jack
CAUTION
CAUTION
2 Setting Up the Power Supply
A special power source adaptor supplies power to the DTXPRESS IV.
2-1. Make sure that the power switch of the DTXPRESS IV is
set to the STANDBY(?) position.
2-2. Connect the DC plug of the included AC power adaptor to
the DC IN jack on the rear panel.
To prevent the cord from being unplugged accidentally,
wrap the cord around the cable clip and secure it.
3 Connecting to Speakers or
Headphones
Since the DTXPRESS IV has no built-in speakers, you’ll need an
external audio system or a set of stereo headphones to properly
monitor it.
CAUTION
Make sure that the power adaptor’s cord is not
bent at an extreme angle when wrapping the
cord around the clip. Doing this can damage or
sever the cord and create a fire hazard.
2-3. Connect the other end of the power cord to an AC outlet.
WARNING
• Please use the included AC power adaptor. The
use of any other adaptors may cause irregular
operation or damage to the device.
• Only use the voltage specified as correct for
the DTXPRESS IV. The required voltage is
printed on the name plate of the DTXPRESS IV.
Whenever making connections, make sure that
the plug on the cable being used corresponds to
the type of jack on the device.
● OUTPUT L/MONO, R jacks (standard mono phone)
These jacks allow you to connect the DTXPRESS IV to an external amplifier + speakers and produce full, amplified sound, or
connect the DTXPRESS IV to audio recording equipment for
recording your own performance.
* Use the DTXPRESS IV’s OUTPUT L/MONO jack when
connecting to a device with a mono input.
● PHONES jack (standard stereo phone jack)
Use the VOLUME knob on the rear panel to adjust the headphone
volume.
CAUTION
• Unplug the AC Power Adaptor when not using
the DTXPRESS IV, or during electrical storms.
DTXPRESS IV Owner’s Manual
12
Do not use the DTXPRESS IV at a high volume
level for a long period of time, or your hearing
may be damaged.
1 Connections
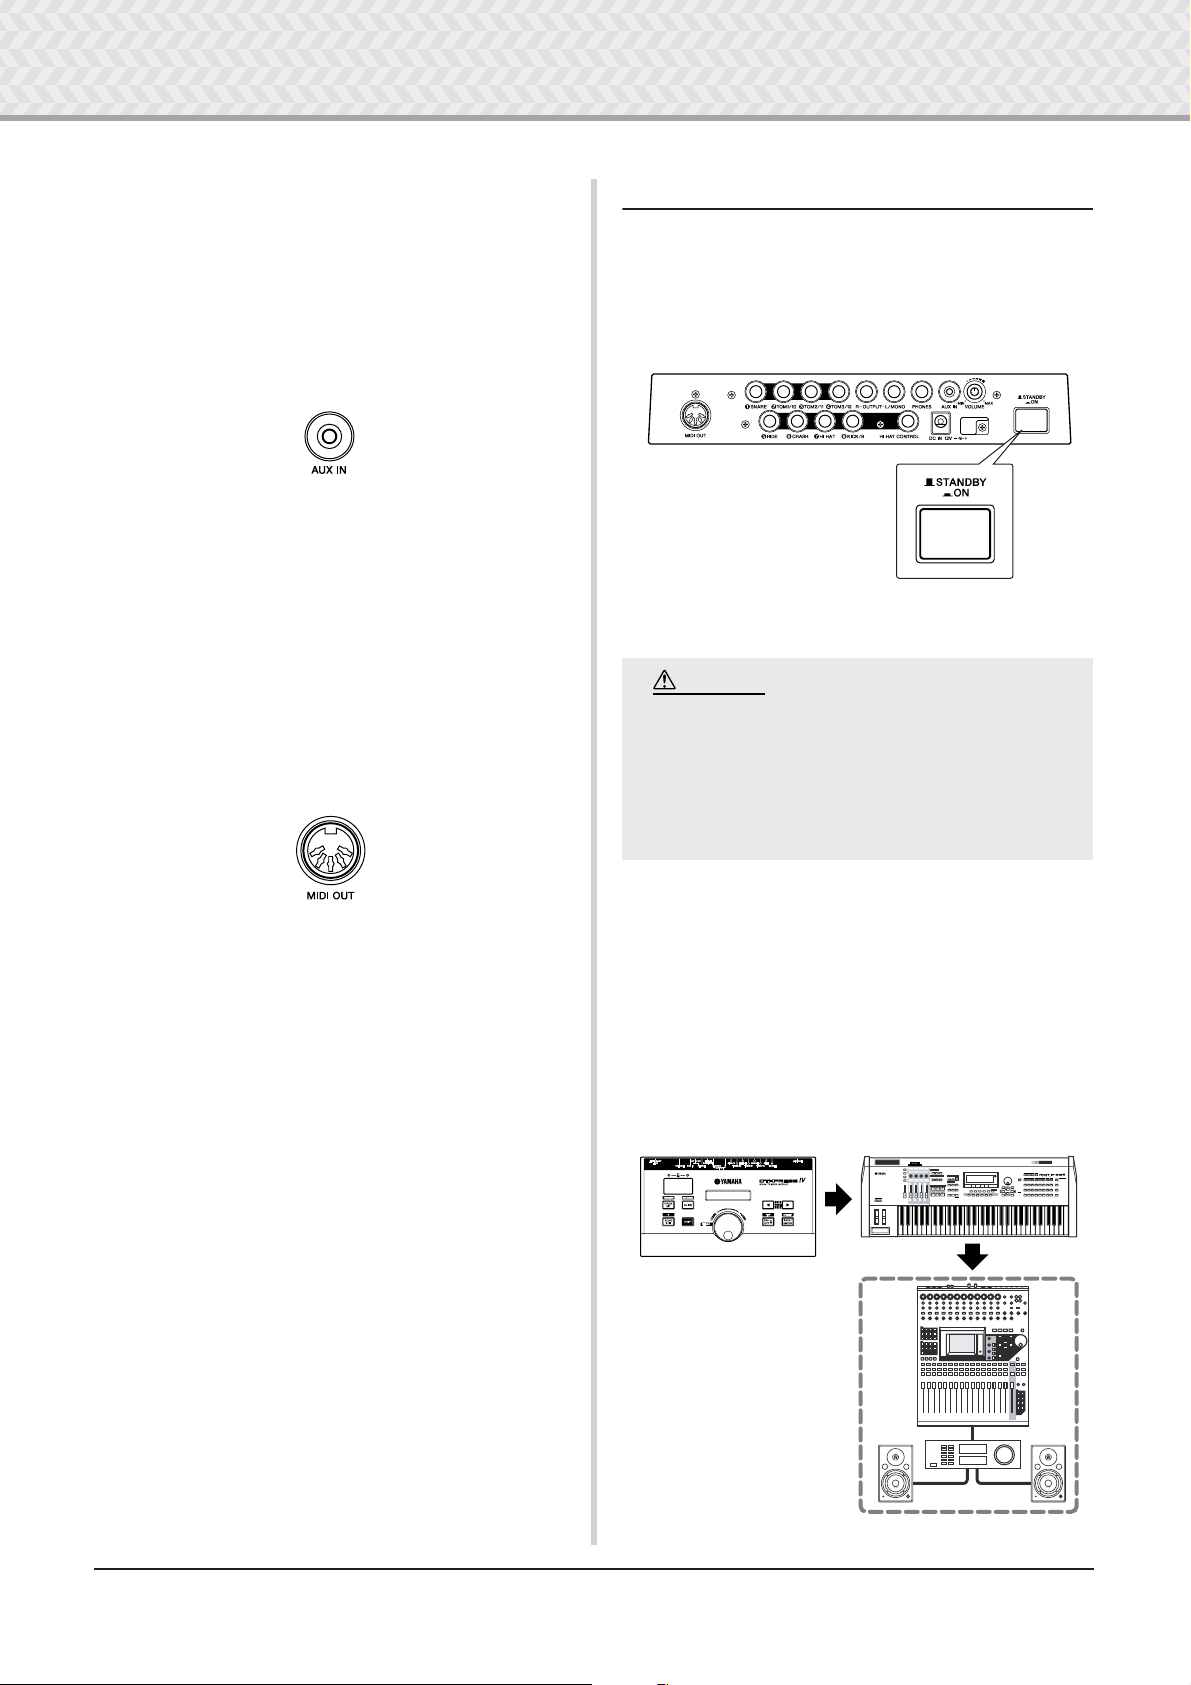
CAUTION
MUSIC PRODUCTION SYNTHESIZER
*~~DTXPRESS~IV~*
*~~~Welcome!~~~*
8.8.8.
3
Audio equipment
(first mixer, then amplifier)
1
DTXPRESS IV (MIDI Master)
2
MIDI slave
● AUX IN jack (stereo mini phone jack)
The audio output from a MP3 player or CD player connected to
the AUX IN jack can be mixed with the sound of the DTXPRESS
IV and transmitted via the OUTPUT jacks or PHONES jack. This
jack can be used when you want to play along with your favorite
songs.
* Use the volume control on the external device (MP3 player,
etc.) to adjust the volume balance.
● MIDI OUT jack
The MIDI functions on the DTXPRESS IV lets you play voices
on an external tone generator with the pads of the DTXPRESS
IV, or synchronize the DTXPRESS IV’s song or click playback
with the playback of an external sequencer.
About MIDI
MIDI (Musical Instrument Digital Interface) is a worldwide standard
that enables you to connect instruments and computers—of different
manufacturers and different types—and transmit performance and
other data among them.
4Turning the Power On
4-1. Make sure the volume settings of the DTXPRESS IV and
external devices are turned down to the minimum.
4-2. Turn the power on (>) by pressing the [STANDBY/ON]
switch on the rear panel of the DTXPRESS IV, then turn on
the power of the amplifiers.
4-3. To turn off the power, press the [STANDBY/ON] switch
again.
Even when the instrument is turned off, electricity is still flowing to the instrument at the minimum level. When you are not using the
DTXPRESS IV for a long time, make sure to
unplug the AC power adaptor from the wall AC
outlet.
* Also, use a MIDI cable that is not more than 15 meters in
length. Using a longer cable may result in irregular operation
and other problems.
● Connecting a Mixer or MIDI Devices
Make sure that all volume settings are turned down all the way to
the minimum. Then turn on the every device in your setup in the
order of MIDI masters (controllers), MIDI slaves (receivers),
then audio equipment (mixers, amplifiers, speakers, etc.).
When powering down the setup, first turn down the volume for
each audio devices, then switch off each device in the reverse
order (first audio equipment, then MIDI).
DTXPRESS IV Owner’s Manual
13
●
3
1 Connections
5 Selecting the Trigger Setup
About Connecting Pads
This setting lets you select the Trigger Setup that most closely
matches the trigger output levels and functions of your pads.
Select an appropriate Trigger Setup for your drum kit from the
pre-programmed Trigger Setups in the DTXPRESS IV.
Use the operation described below to select the Trigger Setup you
want to use.
●
Procedure
5-1.
Press the [SHIFT] + [DRUM KIT] buttons to view Page 1 in
the Trigger Setup Select display (TRG1).
TRG1~~~еееееееее
1~:SP~Med~~~~~~‚
5-2.
Rotate the jog dial to select the Trigger Setup that matches
the drum kit you are using.
TRG1~~~еееееееее
4~:STD~Med~~~~~‚
Tr igger Setup
NOTE
• If you want to replace some of the pads from the DTXPRESS IV
Standard Set / Special Set, refer to the operation on page 36 (Trigger Setup Edit) after the above setting is done, to make sure that
the settings (such as sensitivity) are appropriate for each pad.
• The DTXPRESS IV’s input jack parameters are preset with
settings suitable for pads when an appropriate Trigger Setup
is selected. If you intend to connect any other type of pad or
a drum trigger (Yamaha DT20, etc.) to the input jack, that
jack’s parameters (sensitivity, etc.) should be changed to settings that suit the particular pad. Pad sensitivity is set in the
Trigger Setup Select display’s Page 3 [TRG3 Gain] setting
(p. 38).
•Pad-controller-equipped pads like the TP120SD, TP100,
etc., can be connected to Trigger Input jack 1SNARE.
• Three-zone pads like the TP65S, PCY155/150S, PCY135/
130SC, etc., can be connected to Trigger Input jacks
5
RIDE and 6CRASH.
•7HI HAT is a stereo input type jack. Pads equipped with
trigger switches like the TP65S, PCY65S, PCY130S, etc.
can be connected to this jack.
• The 2TOM1/10, 3TOM2/11, 4TOM3/12 jacks correspond to a two-trigger input that uses a stereo jack for L and
R. A Y-shaped cable (stereo plug—mono jack x 2) can be
used to input two trigger signals.
• The 8KICK/9 jack accepts a two-trigger input using a stereo cable and jack for L and R signals. A Y-shaped cable
(stereo plug—mono jack x 2) can be used to input two trigger signals.
Also, if the KP125/65 kick pad is connected to the DTXPRESS IV’s input jack 9 with a stereo cable, the external
pad input jack on the KP125/65 can be used as the input for
Input jack 9.
• In addition to the 8 KICK/9 jack, the 2 TOM1/10,
TOM2/11, and 4 TOM3/12 jacks can be used to connect
a second bass drum pedal to create a double-bass drum set.
●
Trigger Setup List
No. Name Features
1 SP Med
2 SP Dyna
3 SP Easy
4 STD Med
5 STD Dyna
6 STD Easy
7 DT10/20 — Use for DT10/20 drum trigger systems applied to acoustic drums.
8
|
UserTrig —
11
* In the default setting, "1. SP Med" for Special Drum Set is selected.
DTXPRESS
14
for Special Drum Set
for Standard Drum Set
IV
Owner’s Manual
Normal setting
Wide dynamic range. This setting is designed for maximum expressive control, allowing performance subtleties over a wide dynamic range. Excessive vibration however,
may result in crosstalk (sound being produced by other pads).
Controlled dynamic range delivers stable trigger detection. This setting is designed
for producing a smoother, more uniform sound with reduced volume fluctuations.
→
Allows creation of custom trigger setups. (
Edit on page 36.)
Settings are made using Trigger Setup
KIT2~~~ƒsnare~~˙
”S01:OakCustom~‚
KIT2~~~ƒsnare~~˙
”S01:OakCustom~‚
KIT3~~~ƒsnare~~
”~~Volume=120~~‚
KIT3~~~™tom1~~~˙
”~~Volume=120~~‚
Volume (0–127)
Pad (Input jack)
Layer (˙/¶)
1
2
3
4
5
6
7
8
8
2
Time to Play
Now that your DTXPRESS IV is properly connected, it’s time to make some music!
Play the DTXPRESS IV
1
While hitting the pads, turn the VOLUME knob on the rear
panel to raise the overall volume to a comfortable level.
The trigger input level will be displayed in the bar graph in
the upper right corner of the display. The bar graph indicates
the input levels of the following input jacks.
KIT1~~~∑еееееш¥е
Bar graph
Change the Volume for Each Pad
3
Change the volume for each pad and adjust the overall balance of the Drum Kit.
Press the [
page.
The following display appears and the flashing cursor is at
“
˙
Press the [
“S” position, the first character of “
>
] button once in the previous Drum Kit Select
” in the LCD.
] button again to move the flashing cursor to the
>
1~:Oak~Custom~~‚
S01:OakCustom
”.
Bar graph (from left) Corresponding input jacks
1
2
3
4
5
6
7
8
9
Select a Drum Kit
2
A ‘Drum Kit’ is a collection of drum sounds (or voices) that
play when you hit the pads. Try selecting some of the Drum
Kits (1–50) and enjoy the variety of sounds and drum setups
available.
* Preset Drum Kit List (p. 49)
Rotate the jog dial to select a Drum Kit.
SNARE
TOM1/10
TOM2/11
TOM3/12
RIDE
CRASH
HI HAT
KICK
PAD9
KIT1~~~еееееееее
1~:Oak~Custom~~‚
Drum kit Number Drum kit Name
Press the [
Use the [
item (the cursor flashes). When the page only contains a single item, pressing the [
previous page.
* The “
that a succeeding page is available. Likewise, the “
on the lower left side of the display indicates that a previous
page is available.
In the KIT 3 page, hit the pad for which you want to change
the volume. The selected pad (input jack) is shown in the
upper half of the display.
Rotate the jog dial to adjust the volume (the value is flashing)
of the pad.
* Some drum voices have two voices in a layer (in other words,
two voices sound at the same time when a pad is hit). In case
of two-layer voices, select the
side of the display (press the [
mark flashes, and use the jog dial to select) then adjust each
volume.
] button twice to view the KIT 3 page.
>
<
>
]/[
] buttons in this manner to select the desired
]/[
] buttons will select the next or
<
>
‚
” mark on the lower right side of the display indicates
” mark
”
or
mark in the upper right
˙
<
]/[
>
] buttons so that the
Try out the different drum kits and select one drum kit you
like.
* Some Drum Kits have pad songs and drum loops that start
playback when the corresponding pad is hit.
DTXPRESS
IV
Owner’s Manual
15
2 Time to Play
UTIL1~Hi-hat
HHofs=~~0~T=~~5‚
UTIL1~Hi-hat
HHofs=-12~T=~~5‚
UTIL1~Hi-hat
HHofs=-12~T=~20‚
CAUTION
An asterisk “*” will appear next to “KIT3” in the
display once the volume is changed, indicating
that the kit has been edited. This asterisk will
disappear after the Store operation (p. 34) is carried out. If a different drum kit is selected, etc.,
before carrying out the Store operation, the current settings will return to their original condition. If you want to keep changes made to the
data, make sure you carry out the Store operation.
KIT3*~~™tom1~~~˙
”~~Volume=110~~‚
Change the Output Sound Quality
4
Use the Master Equalizer found on Utility Page 5 to change
the output sound quality. Overall settings for the DTXPRESS
IV are set in the Utility pages.
First, press the [SHIFT] + [SAVE/ENTER] buttons to view
the Utility pages.
Utility (Page 1)
Adjusting the Hi-hat
Hi-hat adjustment is used to determine the point at which
the hi-hat closes when the hi-hat pedal (foot controller) is
pressed. You can also set the threshold at which foot
‘splashes’ are produced.
* This setting is only valid when a foot controller is con-
nected to the HI HAT CONTROL jack. The setting has no
effect on a foot controller connected to any other jack.
Operation
1. Press the [SHIFT] + [SAVE/ENTER] buttons to view
Utility Page 1.
Use this display to adjust the hi-hat.
2. To set the point at which the hi-hat closes, move the
flashing cursor to the “HHofs=” value then use the
jog dial to adjust the value.
The range of adjustment is -32 to 0 to +32. Smaller
values produce a shallower closing point.
UTIL1~Hi-hat
HHofs=~~0~T=~~5‚
Press the [
>] button five times to view Utility Page 5.
UTIL5~MasterEQ
”Lo=+~2~Hi=+~2~‚
Now use the Master Equalizer (two-band shelving type) setting to change the sound quality.
“Lo=” is for the low-range gain setting (+0dB to +12dB) and
“Hi=” for the high-range gain setting (+0dB to +12dB).
Press the [
item you want to set, then rotate the jog dial to set its value.
<]/[>] buttons to move the flashing cursor to the
UTIL5~MasterEQ
”Lo=+~8~Hi=+~0~‚
You can also adjust or set the individual pad voices,
tuning, reverb type/level, and other settings that fine
tune the DTXPRESS IV (p. 28).
To set the ease at which foot splashes are produced,
move the flashing cursor to the “T=” value then use
the jog dial to adjust the value.
Settings include “off” and a range of 1 to 127. Larger
values make foot splashes that are long and easier to
produce. When this is set to “off,” foot splashes are
not produced.
*Too high a value will make foot splashes too easy to pro-
duce, resulting in the continuous production of foot
splashes when the pedal is held down continuously.
DTXPRESS IV Owner’s Manual
16
Loading...