


AKZ 531/IX

SERVICE
Model AKZ 531/IX
Version 8585 531 22031 Page
Whirlpool Europe
Customer Services
AKZ 531/IX
Service Manual
Built-in oven
AKZ 531/IX
Technical data 2 - 3
Spare part list 4
Exploded view 5
Wiring diagram 6 - 7
This documentation is only intended for qualified technicians who are aware of the respective safety regulations.
Date: 14.07.2004 Subject to modification
Document-No.: 4812 725 18578
14.07.2004 / Page 2 AKZ 531/IX Whirlpool Europe
Doc. No: 4812 725 18578 8585 531 22031 Customer Service
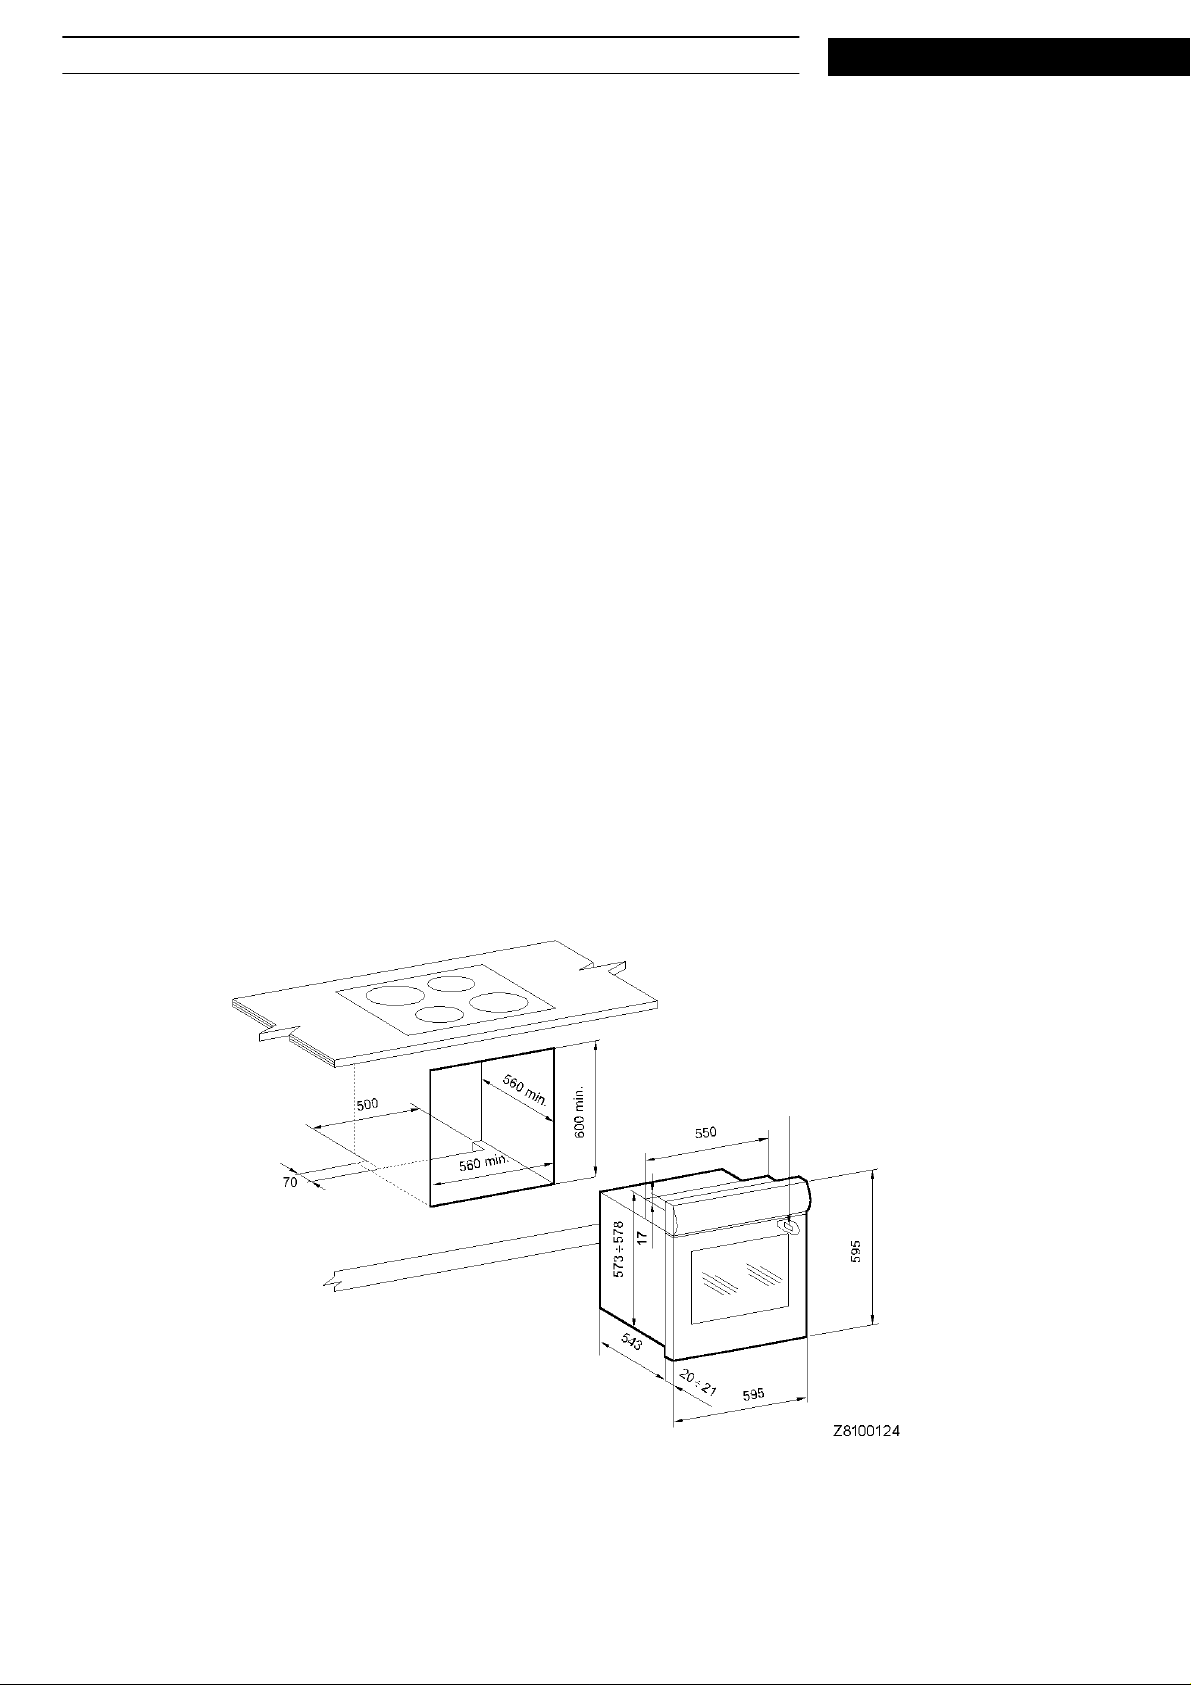
Technical data
Electrical connection
Rated voltage 230 V ~
Main connection 400 V 3N~ 50 Hz
400 V 2N~ 50 Hz
230 V 1N~ 50 Hz
Total connected load 3650 W
Upper heating element / Grill element 2250 W
Lower heating element 1450 W
Forced air 1840 W
Booster 3650 W
Electrical components
Auto timer Interface module
Hob control Electronic control unit
SERVICE
Accessories
Baking tray enameled 375 x 445.5 mm
Fat pan enameled 375 x 445.5 mm
Grid chrome 446.5 x 340 mm
* service sticker
* Configuration code 26

SERVICE
Technical data
Failure codes
Whirlpool Europe AKZ 531/IX 14.07.2004 / Page 3
Customer Service 8585 531 22031 Doc. No: 4812 725 18578
Product
Type
All F01 Temperature Probe First check probe connection. If ok, disconnect the probe
All F02 Temperature Error Check heating elements insulation (disconnect each
All F03 A.M. EEPROM Replace Capricorn or if applicable reprogram Antares
Capricorn
only
Pyro F05 Door Latch First unplug the appliance, wait at least 10sec then
Pyro F06 Door Closure First check connection between Antares and door latch
All F07 Communication UI/AM First check connection between Antares / Capricorn &
TAD F08 UI EEPROM Change G2 Smart.
TAD F09 Communication
Pyro F10 Primary grill First check grill connections. If it is ok, disconnect the
TAD F11 Communication
Failure
Code
F04 W.I.S.P. Protocol First check connection between Capricorn and Scales. If
Failure Type Test
and measure its resistance (1000Ω + 3.75 x Temp
ambient). If value is in range, change Antares / Capricorn.
heating element and check each terminal for continuity to
GROUND). If there is no continuity, change Antares /
Capricorn.
EEPROM using SAM. If the problem persists, change
Antares.
connection is ok, connect a new Capricorn to the Scales
and check if the appliance works correctly. Otherwise
change Scales.
reconnect. Verify that latch system works correctly (door
has to be closed, motor has to run). If this happens, check
the connection between Antares and door latch system. If
itis ok, check micro switch functionality (door switch open
if the door is open and latch switch open if the door is
unlocked). If switches are ok, then change Antares.
system. If it is ok, check door switch functionality (open
circuit if the door is open, closed circuit if the door is
closed). If switch is ok, then change Antares.
User Interface. If connection is ok, connect a new User
Interface to the Antares / Capricorn and check if the
appliance works correctly. In this case change the User
Interface on the appliance. Otherwisechange the Antares
/ Capricorn.
First check connection between Antares & User
G2SMART/Antares
G2SMART/TEX
Interface. If connection is ok, connect a new G2SMART
to the Antares and check if the appliance works correctly.
In this case change the G2SMART on the appliance.
Otherwise change the Antares
heating element and check the resistance between the
terminals (approx. 22Ω± 3Ω). If the value is in range,
change Antares.
First check connection between G2 and TEX. If
connection is ok, connect a new TEX to the G2SMART
and check if the appliance works correctly. Otherwise
change G2SMART
 Loading...