


USER MANUAL
540MM UPRIGHT COOKERS
WLE522WA, WLE525WA, WLE527WA, WLE533WA, WLE535WA, WLE537WA, WLE547WA, WLG503WA, WLG505WA, WLG517WA

CONGRATULATIONS
Congratulations and thank you for choosing our Westinghouse upright cooker. We are sure you will find your new appliance a pleasure to use and a great asset to your cooking. Before you use the appliance, we recommend that you read through the whole user manual which provides a description of the product and its functions. For future reference, please store this booklet in a safe place.
To avoid the risks that are always present when you use a gas appliance, it is important that the appliance is installed correctly and that you read the safety instructions carefully to avoid misuse and hazards.
CONDITIONS OF USE
This appliance is intended to be used in household and similar applications such as:
•Staff kitchen areas in shops, offices and other working environments
•Farm houses
•By clients in hotels, motels and other residential type environments
•Bed and breakfast type environments
Record model and serial number here:
Model:..........................................................................................................
Serial number:.........................................................................................
The symbols you will see in this booklet have these meanings:
 WARNING
This symbol indicates information concerning your personal safety.
 CAUTION
This symbol indicates information on how to avoid damaging the appliance.
 TIPS AND INFORMATION
This symbol indicates tips and information about use of the appliance.
ENVIRONMENTAL TIPS
This symbol indicates tips and information about economical and ecological use of the appliance.
2 CONTENTS
CONTENTS
Important safety instructions 3 Operating for the first time 5 Installing oven accessories 6 Using the gas cooker 7 Using the electric cooker 9 3 button programmable clock 10 General hints and tips 12 Cleaning the cooker 13 Getting to know your oven 16 Oven guide 17 Trouble shooting 18 Installation 20 Replacing the oven light 21 Service Fuse 23 Warranty 31
 TIPS AND INFORMATION
Important – CHECK FOR ANY DAMAGE OR MARKS
If you find the appliance is damaged or marked, you must report it within 7 days if you wish to claim for damage/ marks under the manufacturer’s warranty. This does not affect your statutory rights.
ENVIRONMENTAL TIPS
Information on disposal for users
•Most of the packing materials are recyclable.
Please dispose of those materials through your local recycling depot or by placing them in appropriate collection containers.
•If you wish to discard this product, please contact your local authorities and ask for the correct method of disposal.
Before making a service call
1.Please read the user manual carefully.
2.Cooking variations are natural and to be expected. You should experiment with times, temperatures and recipes to obtain the best results to your own taste.
3.New appliances can have an odour during the first operation.
•It is recommended to ‘run in’ the oven before you cook. Run the oven at 180°C for 30 minutes and ensure that the room is well ventilated.
•For products with separate grill compartment, run the grill on full for 15 minutes with the grill door open.
4.If you have purchased a model with a 3 button programmable clock, you will need to set the clock in order to begin using your oven.

IMPORTANT SAFETY INSTRUCTIONS
 WARNING
To avoid an electric shock or fire
This appliance is NOT intended for use by persons (including children) with reduced physical, sensory or mental capability, or lack of experience and knowledge, unless they have been given supervision or instruction concerning use of the appliance by a person responsible for their safety.
WARNING – Accessible parts may become hot during use. To avoid burns, young children should be kept away.
Young children should be supervised to ensure they DO NOT play with this appliance.
DO NOT operate the hotplates with external timers or a separate remote control system.
During use this appliance becomes hot. Care should be taken
to avoid touching hot external, internal surfaces and hot elements when in use. Use oven gloves.
This appliance must NOT be used as a space heater.
DO NOT install gas models in marine craft, caravans or mobile homes because these products are not fitted with a flame safeguard on each burner.
DO NOT install an aftermarket lid or cover over this appliance.
DO NOT spray aerosols in the vicinity of this appliance while it is in operation.
DO NOT store flammable materials in the appliance storage drawer or near this appliance.
Ensure all specified vents, openings and airspaces are NOT blocked.
Install cooker, shelving and fittings in accordance with the Guide and Installation Instructions, to avoid accidents.
DO NOT operate the gas appliance if the smell of gas persists.
DO NOT MODIFY THIS APPLIANCE.
 WARNING
Grill warnings
DO NOT leave grill on unattended.
Fat left on a grill dish is a fire hazard! Keep grill clean and turn off grill immediately after use.
If gas burner does not light in 8 seconds, allow one minute for gas to clear before trying again.
Placing thick portions of food under grill can be a fire hazard.
DO NOT cover the grill dish insert with foil.
 CAUTION
Separate grill model: Grill with door open.
Grill in oven model: Grill with door closed.
 WARNING
Oven warnings
DO NOT use the oven door as a shelf.
DO NOT push down on an open oven door.
If the gas oven does not light in 8 seconds, allow 1 minute for gas to clear before trying again.
DO NOT line oven with foil or place anything on the bottom of the oven while baking, as trapped heat will crack or craze the floor of the oven cavity liner.
DO NOT use polyunsaturated oils (vegetable oils) as this type of oil can cause black spots or deposits inside the oven. This residue is very difficult to remove.
 WARNING
Hotplate and burner warnings
DO NOT allow pots to boil dry, as damage to the hotplate (and pan) may result.
DO NOT operate without a pot, fry pan etc on the hotplates.
DO NOT allow cookware to overhang the hotplate onto adjacent bench tops, this will cause scorching to the bench top surface.
DO NOT use large utensils that may become unstable.
Gas models: Ensure burner caps and crowns are in their correct position.
IMPORTANT SAFETY INSTRUCTIONS |
3 |

GENERAL APPLIANCE DESCRIPTION
Electric Separate Grill Oven depicted.
Control panel
Removable spill tray
(radiant hotplate models only)
Hotplate
Grill  element/
burner
Grill with removable grill dish side
supports, grill dish & rack (where fitted)
Grill door |
(Fan forced |
(where fitted) |
|
|
models only) |
Removable shelves |
|
|
Anti-tilt plate |
Oven door |
|
Rear adjustable feet
Removable inner glass |
Kick panel |
Front adjustable feet |
|
|
4 APPLIANCE DESCRIPTION

OPERATING FOR THE FIRST TIME
Choosing utensils for electric hotplates
Refer to the diagram below.
|
|
(recessed base)
|
|
(convex base) |
(undersize) |
|
|
|
|
|
|
|
|
|
|
|
|
|
|
|
|
|
|
|
|
|
|
|
|
|
|
|
|
|
|
|
|
|
|
|
|
|
|
|
|
|
|
|
(oversize) |
(moisture on hotplate) (no utensil) |
||||
Choosing utensils for gas hotplates |
Before operating first time |
Refer to the diagram below.
1.Read all the Warning and Safety information.
2.Remove all internal boxes and bags from oven.
3.Clean out the oven interior with detergent and warm water and polish with a soft cloth. DO NOT close oven door until the oven is completely dry.
|
|
|
(undersize) (oversize)
Do not use utensils which are too large or too small.
Installation and service warning
 WARNING
•Only an authorised person must install and service this appliance (Certificate of Compliance to be retained).
•In order to avoid a hazard, the installation instructions MUST be followed.
•In order to avoid the appliance tipping, the anti-tilt plate MUST be installed.
•Appliances requiring connection to 230 – 240V MUST be earthed.
•An authorised person should inspect this appliance every 5 years.
•This appliance must NOT be installed on a base, box or in a closed cupboard.
•If the electrical supply cord is damaged, a qualified person MUST replace the cord to avoid a hazard or
void your warranty.
 WARNING
Surrounding kitchen cabinets MUST WITHSTAND 85°C.
Setting the time
4.If you have purchased a model fitted with a 3 button programmable timer, you must set the time of day before you can operate your appliance.
•After the appliance has been electrically connected '12.00' will be displayed and the 'clock indicator' will flash.
•To set the time of day, press the – or + buttons. 5 seconds after the last change, the 'clock' indicator will disappear, confirming the time has been set.
NOTE: The clock has a 24-hour display.
|
END |
MODE |
+ |
|
5.New appliances can have an odour during first operation. It is recommended to ‘run in’ the oven before you cook Run the oven at 180°C for 30 minutes and ensure that the room is well ventilated.
6.For products with a separate grill compartment, run grill on maximum for 15 minutes with grill door open.
7.If your appliance is fitted with solid hotplates, turn heat setting to high for 3 minutes to fully harden the hotplate coating.
OPERATING 5

INSTALLING OVEN ACCESSORIES
FITTING OVEN SHELVES
1.Ensure shelf orientation is correct (refer to diagram below).
2.Slide oven shelves onto oven supports (side runners) at an angle until raised back of shelf is past the stop on oven supports (side runners).
3.Lower front of shelf and push in until stop is reached.
4.To remove oven shelves, withdraw to the stop and raise the front of shelf to clear the stop.
Fitting the grill dish supports
•Insert the rear hook into the rear hole.
•Align the front peg to the front hole and push in firmly.
Note the orientation of the side and rear features
Oven shelf location
Not a shelf position
5
4
3
2
1
5 shelf positions
NOTE: the top ledge is not a shelf position. There are no stops for shelf withdrawal.
Assemble grill tray handle
FITTING THE GRILL DISH
Separate grilL
Ensure rear of the dish is engaged with the side support before sliding backwards. To remove, simply pull forwards and upwards.
Engagement of
rear of dish
Grill in oven
(refer to Fitting Oven Shelves)
The grill dish with wire insert can be used in any of the
two upper height positions (shelf positions 4 and 5) between the runners.
NOTE: You must remove the grill dish when baking in the oven.
Grill dish insertion
Grill dish final position
Assemble grill tray handle as shown
6 ACCESSORIES

USING THE GAS COOKER
Gas oven features and descriptions
WLG503WA4
WLG505WA
4
7 |
9 |
WLG517WA
8
7 |
4 |
9 |
1.Burner Control Knob – sets burner temperature.
2.Grill Control Knob – sets grilling temperature.
3.Oven Control Knob – sets oven temperature.
4.Timer 60 Minute (where fitted) – sets reminder time. When timer returns to zero, timer gives a short ring.
NOTE: for any time below 15 minutes, turn knob past 15 minutes, then back to required time setting.
5.Oven Piezo Ignitor – ignites oven burner when appropriate control knobs are set.
6.Grill Piezo Ignitor – ignites grill burner.
7.Light Switch (where fitted) – turns oven light on/off.
8.Fan Switch (where fitted) – turns fan on/off.
9.Electronic Ignition Switch – ignites hotplate burners,
grill burner and oven burner.
Gas oven conventional baking
The heat comes from the bottom oven burner. The temperature
at the centre of the oven is the same temperature set on the control knob. When oven is used on this mode, shelf position is important, (refer to ‘Oven Guide’). As hot air naturally rises, the upper half of the oven will be approximately 10°C
higher and the lower half approximately 10°C cooler than the set temperature.
For best results from your gas oven use dark coloured trays and baking dishes on a single shelf. Refer to ‘General Hints and Tips’ section for more information.
For best baking results preheat oven for 30 minutes.
Gas oven fan forced baking
Fan Forced baking generally requires lower temperatures than conventional baking. Most recipe books, unless stated, are for conventional oven temperatures. It is recommended when using the fan forced mode to reduce the oven temperature by 10°C.
In a fan forced gas oven the heat comes from the bottom burner. Hot air is distributed by an electrically operated fan located behind the rear wall of the compartment, providing an even temperature on all shelf levels. This means batches of the same food can be baked using multiple shelf positions simultaneously.
Fan Forced operation can be used for single shelf baking with equal success.
For best baking results preheat oven for 30 minutes.
Cookware
For best baking results with gas ovens, dark coloured trays and baking dishes are recommended.
GAS COOKER |
7 |

USING THE GAS COOKER
Gas hotplate
Ensure burner caps, crowns and trivets are properly assembled. For wok ONLY use the trivet and burner dedicated for
wok cooking.
Burner cap and burner crown must be clean and located correctly for the burner to light.
Flame Port |
Spark Plug Hole |
Burner Crown
Spark Plug
Burner Cap
Burner
Burner Cap
Burner
Crown
Spark Plug
Gas oven burner flame
From a cold start the oven burner flame will be higher
on the left hand-side. After reaching the set temperature, the flame will become even. This does not affect cooking results.
LIGHTING GAS HOTPLATE, GRILL AND OVEN
Hotplate Ignition – (Electronic)
While pressing the Electronic Ignitor Switch, push and turn the appropriate Burner Control Knob to maximum.
Hotplate Ignition – (Manual)
Turn control knob to the maximum. At the same time, hold hand-ignitor next to the burner and ignite (Hand-ignitors not supplied).
Grill Ignition – Electronic
While pressing the Electronic Ignitor Switch, push and turn the Grill Control Knob to maximum.
Grill Ignition – Piezo
Push and turn the Grill Control Knob to maximum, and at the same time press the Grill Piezo Ignition Button (several times if necessary).
Grill – in Oven
Grill is electric and is operated by control knob only.
Oven Ignition – Electronic
While pressing the Electronic Ignitor Switch, push turn and hold the Oven Control Knob to the desired temperature. Hold Control Knob in for 15 seconds after ignition.
Oven Ignition – Piezo
With the left hand push and hold the Oven Control Knob in and turn it a quarter of the way anti-clockwise. Keep the oven Control Knob pushed in firmly and at the same time push the Oven Piezo Ignitor button on the right hand side of the control panel (several times if necessary). It will make a loud ‘clack’ noise as the Piezo mechanism creates a spark.
Hold control knob in for 15 seconds after ignition.
 WARNING
If hotplates, grill or oven do not light within 15 seconds, allow 1 minute for gas to clear before trying again.
8 GAS COOKER

USING THE ELECTRIC COOKER
ELECTRIC OVEN FEATURES AND DESCRIPTIONS
Grill in Oven Models
WLE522WA
2 3 4 5 11
Separate grill models – conventional oven
WLE525WA/WLE533WA/WLE535WA |
6 |
7 |
2 |
10 11 8 9
Separate grill models – fan-forced oven
WLE527WA/WLE537WA/WLE547WA |
12 |
6 |
7 |
2 |
8 9
1.Radiant/Solid/Ceramic Hotplate Control Knob
–sets hotplate temperature.
2.Hotplate Indicator Light – comes on when a hotplate control knob is operated.
3.Grill/Oven Function Control Knob – sets grill or oven function.
4.Grill/Oven Control knob – sets grill/oven temperature.
5.Grill/Oven Indicator Light – comes on when grill/oven temperature knob is operated. Oven indicator light cycles on and off when temperature is reached.
6.Grill Indicator Light – comes on when grill control knob is operated.
7.Oven Indicator Light – comes on when oven control knob is operated.
8.Grill Control Knob – sets grilling temperature.
9.Oven Control Knob – sets oven temperature.
10.Oven Light Switch – turns oven light on/off.
11.Timer 60 Minute – (where fitted) sets reminder time.
–When timer returns to zero, timer gives a short ring.
NOTE: For any time below 15 minutes, turn knob past
15 minutes, then back to required time setting.
12.Programmable Clock – sets baking/grilling reminder times – sets automatic cooking duration and stop time.
NOTE: Clock time must be set before operating oven.
ELECTRIC COOKER |
9 |
USING THE ELECTRIC COOKER
Radiant hotplates
The high-speed radiant hotplates heat rapidly from a cold start. This saves power.
The hotplates have a tray underneath the hob which collects spilt liquids. This tray can be removed by sliding it out through the open grill door (except model WLE522WA).
Radiant elements also swivel for easy cleaning.
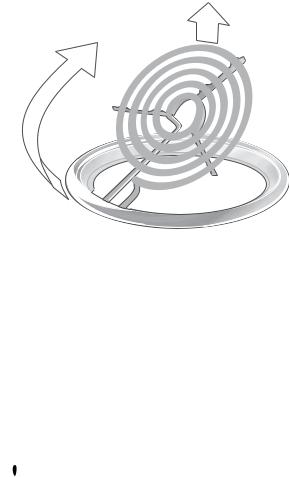
Solid hotplates
The strong solid-cast hotplates give wide contact for fast efficient cooking.
Hotplates are sealed to prevent spilt liquids from running under the hotplates.
If there is a red dot present in the centre of hotplate, this indicates it is a high power hotplate.
When necessary, apply a coating of hotplate protector to solid plates to maintain them.
Ceramic hotplates
 WARNING
If the surface is cracked, switch off the appliance to avoid the possibility of electric shock.
•The ceramic cooktop is made from ceramic glass, a tough, durable material that withstands heating and cooling without breaking. However, it must be noted that as it is glass,
it may break, and must therefore be treated with care. Should you have any questions about the glass in your new appliance, please contact the service centre by dialling 13 13 49.
•The smooth glass surface has a pattern to show where the elements under the glass are located.
•When a hotplate is on, the hot surface warning light will come on. After switching off, this light will continue to glow until the temperature of the hotplate drops below 60°C.
Electric oven conventional baking
Heat comes from two elements, one above and one below the food. The bottom element is hidden below the floor of the oven. As hot air rises naturally, the upper part of the oven will be approximately 10°C higher than the set temperature and the lower part of the oven approximately 10°C cooler.
For grill in oven models, the grill dish must be removed when baking.
For best baking results, preheat oven for 30 minutes, also refer to ‘General Hints and Tips”.
Electric oven fan forced baking
In a fan forced electric oven the heat comes from the rear oven element. Hot air is distributed by a fan behind the rear wall of the compartment, providing an even temperature on all shelf levels. This means, batches of food can be baked using multiple shelf positions simultaneously.
Fan forced operation can be used for single food baking with equal success.
Fan Forced baking generally requires lower temperatures than conventional baking. Most recipe books, unless stated, are typically for conventional oven temperatures. It is recommended that when using the fan forced mode, reduce the oven temperature by 10 degrees (refer to ‘Oven Guide’).
For best baking results preheat oven for 30 minutes.
Cookware
For best cooking results with electric ovens, silver or shiny trays are recommended.
NOTE: Three button timer models MUST have clock set after a power outage to operate oven.
10 ELECTRIC COOKER
 Loading...