


USER’S MANUAL
MANUEL DE L’UTILISATEUR MANUAL DEL USUARIO
WD65MC2240

 TABLE OF CONTENTS
1 |
Important Safety |
|
Instructions |
||
|
||
2 |
Safety Information |
|
3 |
Preparation |
|
4 |
Connecting |
|
External Devices |
||
|
||
5 |
Customizing TV |
|
Settings |
||
|
||
6 |
Parental Control |
|
7 |
Troubleshooting |
|
8 |
Maintaining |
|
9 |
Specification |
|
10 |
OTT APP Service |
|
2 |
|
|
|
|
|
3 |
|
What's Included |
4 |
|
Front View |
5 |
|
Rear View |
6 |
|
Installing the Stand |
7 |
|
Removing the Stand |
7 |
|
for Wall-Mounting |
||
|
||
Remote Control |
8 |
|
|
9 |
|
|
|
|
Initial Setup |
10 |
|
Navigating the Setup |
11 |
|
Settings |
||
|
||
APPS |
12 |
|
Media |
13 |
|
Viewing JPEG |
13 |
|
Viewing MJPEG |
14 |
|
Source |
14 |
|
Setup |
15 |
|
Settings |
15 |
|
Audio |
16 |
|
Picture |
17 |
|
Channel |
18 |
|
Time |
18 |
|
Lock |
19 |
|
Network |
20 |
|
|
22 |
|
|
24 |
|
|
25 |
|
|
26 |
|
|
27 |
En 1

 IMPORTANT SAFETY INSTRUCTIONS
•Read these instructions – All the safety and operating instructions should be read before this product is operated.
•Keep these instructions – The safety and operating instructions should be retained for future reference.
•Heed all warnings – All warnings on the appliance and in the operating instructions should be adhered to.
•Follow all instructions – All operating and use instructions should be followed.
•Do not use this apparatus near water – The appliance should not be used near water or moisture
– for example, in a wet basement or near a swimming pool, and the like.
•Clean only with dry cloth.
•Do not block any ventilation openings. Install in accordance with the manufacturer’s instructions.
•Do not install near any heat sources such as radiators, heat registers, stoves, or other apparatus
(including amplifiers) that produce heat.
•Do not defeat the safety purpose of the polarized or grounding-type plug. A polarized plug has two blades with one wider than the other. A grounding-type plug has two blades and a third grounding prong. The wide blade or the third prong are provided for your safety. If the provided plug does not fit into your outlet, consult an electrician for replacement of the obsolete outlet.
•Protect the power cord from being walked on or pinched particularly at plugs, convenience receptacles, and the point where they exit from the apparatus.
•Only use attachments/accessories specified by the manufacturer.
•Use only with the cart, stand, tripod, bracket, or table specified by the manufacturer, or sold with the apparatus. When a cart is used, use caution when moving the cart/apparatus combination to avoid injury from tip-over.
•Unplug this apparatus during lightning storms or when unused for long periods of time.
•Unplug this apparatus during lightning storms or when unused for long periods of time.
•Refer all servicing to qualified service personnel. Servicing is required when the apparatus has been damaged in any way, such as the power-supply cord or plug is damaged, liquid has been spilled or objects have fallen into the apparatus, the apparatus has been exposed to rain or moisture, does not operate normally, or has been dropped.
•Please keep the unit in a well-ventilated environment.
WARNING: To reduce the risk of fire or electric shock, do not expose this apparatus to rain or moisture. The apparatus should not be exposed to dripping or splashing. Objects filled with liquids, such as vases should not be placed on apparatus.
WARNING: The batteries shall not be exposed to excessive heat such as sunshine, fire or the like.
WARNING: The mains plug is used as disconnect device, the disconnect device shall remain readily operable.
Warning: To reduce the risk of electric shock, do not remove cover (or back) as there are no user-serviceable parts inside. Refer servicing to qualified personnel.
This lightning flash with arrowhead symbol within an equilateral triangle is intended to alert the user to the presence of non-insulated “dangerous voltage” within the product’s enclosure that may be of sufficient magnitude to constitute a risk of electric shock.
The exclamation point within an equilateral triangle is intended to alert the user to the presence of important operating and maintenance instructions in the literature accompanying the appliance.
This equipment is a Class II or double insulated electrical appliance. It has been designed in such a way that it does not require a safety connection to electrical earth.
This product contains electrical or electronic materials. The presence of these materials may,if not disposed of properly, have potential adverse effects on the environment and human health. Presence of this label on the product means it should not be disposed of as unsorted waste and must be collectedseparately. As a consumer, you are responsible for ensuring that this product is disposed of properly.
This product meets ENERGY STAR® guidelines for energy efficiency. ENERGY STAR and the ENERGY STAR mark are registered U.S. marks. ENERGY STAR is a registered mark owned by the U.S. government.
Licensing and Patent Information
This WESTINGHOUSE product may be covered by one or more U.S. and foreign patents and patent applications.
En 2

 SAFETY INFORMATION
To ensure reliable and safe operation of this equipment, please carefully read all the instructions in this user guide, especially the safety information below.
Electrical Safety
•The TV set should only be connected to a main power supply with voltage that matches the label at the rear of the product.
•To prevent overload, do not share the same power supply socket with too many other electronic components.
•Do not place any connecting wires where they may be stepped on or tripped over.
• D o n o t p l a c e h e a v y i t e m s o n a n y connecting wire, which may damage the wire.
•Hold the main plug, not the wires, when removing from a socket.
•During a thunderstorm or when not in using the television for long periods, turn off the power switch on the back of the television.
•Do not allow water or moisture to enter the TV or power adapter. Do not use in wet, moist areas, such as bathrooms, steamy kitchens or near swimming pools.
•Pull the plug out immediately, and seek professional help if the main plug or cable is damaged, liquid is spilled onto the set, if the TV set accidentally exposed to water or moisture, if anything accidentally penetrates the ventilation slots or if the TV set does not work normally.
•Do not remove the safety covers. There are no user serviceable parts inside. Trying to service the unit yourself is dangerous and may invalidate the product’s warranty.
Qualified personnel must only service this apparatus.
•To avoid a battery leakage, remove batteries from the remote control, when the remote is not use for long period, or when the batteries are exhausted.
•Do not break open or throw exhausted batteries into a fire.
Physical Safety
•Do not block ventilation slots in the back cover. You may place the TV in a cabinet, but ensure at least 5cm (2’’) clearance all around.
•Do not tap or shake the TV screen, or you may damage the internal circuits. Take good care of the remote control.
•To clean the TV use a soft dry cloth. Do not use solvents or petroleum based fluids.
•Do not install near any heat sources such as radiators, heat registers, stoves or other apparatus (including amplifiers) that produce heat.
•Do not defeat the safety purpose of the polarized or grounding-type plug. A polarized plug has two blades with one wider than the other. A grounding plug has two blades and a third grounding prong, the wide blade,or the third prong is provided for your safety. If the provided plug does not fit into your outlet, consult an electrician for replacement of the obsolete outlet.
•Protect the power cord from being walked on or pinched particularly at plugs.
•Unplug the apparatus during lightning storms or when unused for long periods.
•Refer all servicing to a qualified service personnel.Servicing is required if the apparatus does not operate normally or if the apparatus, including the power supply cord or pulg, has been damaged in any way.
•Servicing is also required if liquid has been spilled, or objects have fallen into the apparatus; when the apparatus has been exposed to rain or moisture; or if the apparatus has been dropped.
•Always connect your television to a power outlet with protective ground connection.
En 3

 PREPARATION
 What's Included
TV Set |
Remote Control with Batteries |
Base Stand |
Six Screws |
User Manual |
|
Quick |
|
Warranty |
|
Connect |
|
Card |
|
|
|
|
||
|
|
Guide |
|
|
|
|
|
|
|
User Manual |
Quick Connect Guide |
Warranty Card |
||
En 4
PREPARATION
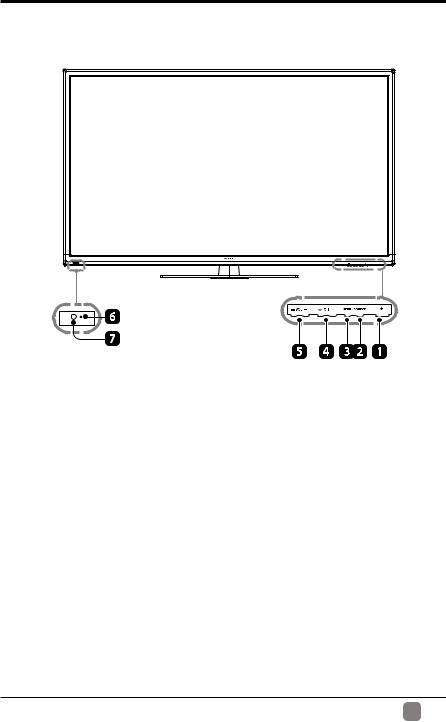
 Front View
1.POWER
Switch the TV between On / Standby mode.
2.SOURCE
Press to select among different input signal sources.
3.MENU
Display the main menu.
4.CH  /
/
Press to select a channel.
5. VOL -/+
Press to adjust the volume.
6.POWER Indicator
Illuminate blue when the TV is turned on. Illuminate red when the TV is in standby mode.
7.IR (Infrared Receiver)
Receive IR signals from the remote control.
En 5

PREPARATION
 Rear View
1.Power Cord
Connect to AC power outlet.
2.Headphone Socket
Connect to the Headphones.
3.USB Port
Connect to a USB storage device to play compatible movie and photo files.
4.LAN
Network connection port.
5.HDMI Input
Connect to a High-Definition (HD) signal input device.
6.VGA Input
Connect to a computer or other devices with a VGA interface.
7.PC AUDIO Input
Connect to a computer audio output.
8.DTV/TV Input
Connect to the antenna (75Ω VHF/UHF) socket with the RF coaxial cable.
9.OPTICAL Output
Connect a digital sound system to this jack.
10.AUDIO Input
Connect to the AUDIO (L/R) output sockets on external audio devices.
11.COMPOSITE/COMPONENT IN
Connect to AV devices with composite/ component (Y/Pb/Pr) video and audio output sockets. COMPOSITE VIDEO and
COMPONENT(Y/PB/PR) share with AUDIO IN(L/R).
En 6

PREPARATION
 Installing the Stand
• 1. Lay the TV face down on a flat, cushioned surface to avoid damaging or scratching.
• 2. Fix the Base Stand to the Base Support using 6 pcs provided screws.
• NOTE:Attach the Base Stand in the direction shown by the arrow.
 Removing the Stand for Wall-Mounting
• 1.Lay the TV face down on a flat, cushioned surface to avoid damaging or scratching.
• 2.Untighten the 6 pcs screws holding the stand support and remove it.
• 3.Attach the wall-mount bracket to the TV using the mounting holes on the back of the TV. Mount this TV according to the instructions included in the wall-mount bracket.
WARNING: This apparatus is intended to be supported by UL Listed wall mount bracket.
En 7

PREPARATION
Remote Control |
|
|
|
1. |
HOME:Display the Home |
||
|
menu. |
|
|
2. |
POWER:Turn the LED TV |
||
|
on or off. |
|
|
3. |
APPS:Press to select the |
||
4. |
desired APPS. |
|
|
: D i s p l a y t h e m a i n T V |
|||
|
menu. |
|
|
5. |
:Return to previous menu |
||
|
button. |
|
|
6. |
|
:Allows you to |
|
|
navigate the OSD menus |
||
|
and adjust the system |
||
|
settings to your preference. |
||
7. |
OK:Confirm the selection in |
||
|
the OSD (on screen display). |
||
8. |
INFO: Displays the current |
||
|
input source and the channel |
||
|
information. |
|
|
9. |
EXIT: E x i t t h e |
m a i n T V |
|
|
menu. |
|
|
16 10. |
I N P U T: S e l e c t |
a m o n g |
|
|
the |
different input signal |
|
|
sources: TV/AV/YPBPR/ |
||
|
HDMI1/ HDMI2/HDMI3/VGA. |
||
11. |
VOL+/-:Press to increase/ |
||
|
decrease the sound level. |
||
12. |
C H |
/ : P r e s s |
t o s c a n |
|
through channels. |
|
|
13. :Press to select Aspect |
|||
|
Ratio. |
|
|
14. :Reverse playback rapidly. |
|||
15. :Start playback or pause. |
|||
16. |
:Advance playback rapidly. |
||
En 8
 Loading...