


WWT6541

Washing Machine
Model: WWT6541, WWT554B

2
CONTENTS
SAFETY INFORMATION
1.
PRODUCT DESCRIPTION
2.
CONTROL PANEL
3.
WASHING INSTRUCTIONS
4.
DAILY USE
5.
CARING FOR YOUR WASHING MACHINE
6.
HELPFUL HINTS IN DEALING WITH WASHING PROBLEMS
7.
A GUIDE TO STAIN REMOVAL
8.
TROUBLE SHOOTING
9.
ENVIRONMENT CONCERNS ....................................................................... 2910.
WARRANTY .................................................................................................. 3111.
................................................................................................... 15
................................................................................. 2
.............................................................................. 5
.......................................................................................... 7
.......................................................................... 13
..................................................................... 24
.................................................................................. 26
CUSTOMER CARE AND SERVICE
We recommend the use of original spare parts.
When contacting Service, ensure that you have the following data available.
The information can be found on the rating plate. Model, PNC, Serial Number.
Warning / Caution-Safety information.
General information and tips.
Environmental information.
Subject to change without notice.
SAFETY INFORMATION
1.
................................................... 19
....................... 22
CONDITIONS OF USE
This appliance is intended to be used
in household and similar applications
such as:
-
Farm houses
-
By clients in serviced apartments,
holiday apartments and residential
type environments.
In the interest of your safety and to
ensure the correct use, before
installing and first using the appliance,
read this user manual carefully,
including its hints and warnings.
To avoid unnecessary mistakes and
accidents, it is important to ensure
that all people using the appliance are
thoroughly familiar with its operation
and safety features.
Save these instructions and make
sure that they remain with the
appliance if it is moved or sold, so
that everyone using it through its life
will be properly informed on
appliance use and safety.
1.1 GENERAL SAFETY
It is dangerous to alter the specifications or attempt to modify this
product in anyway.
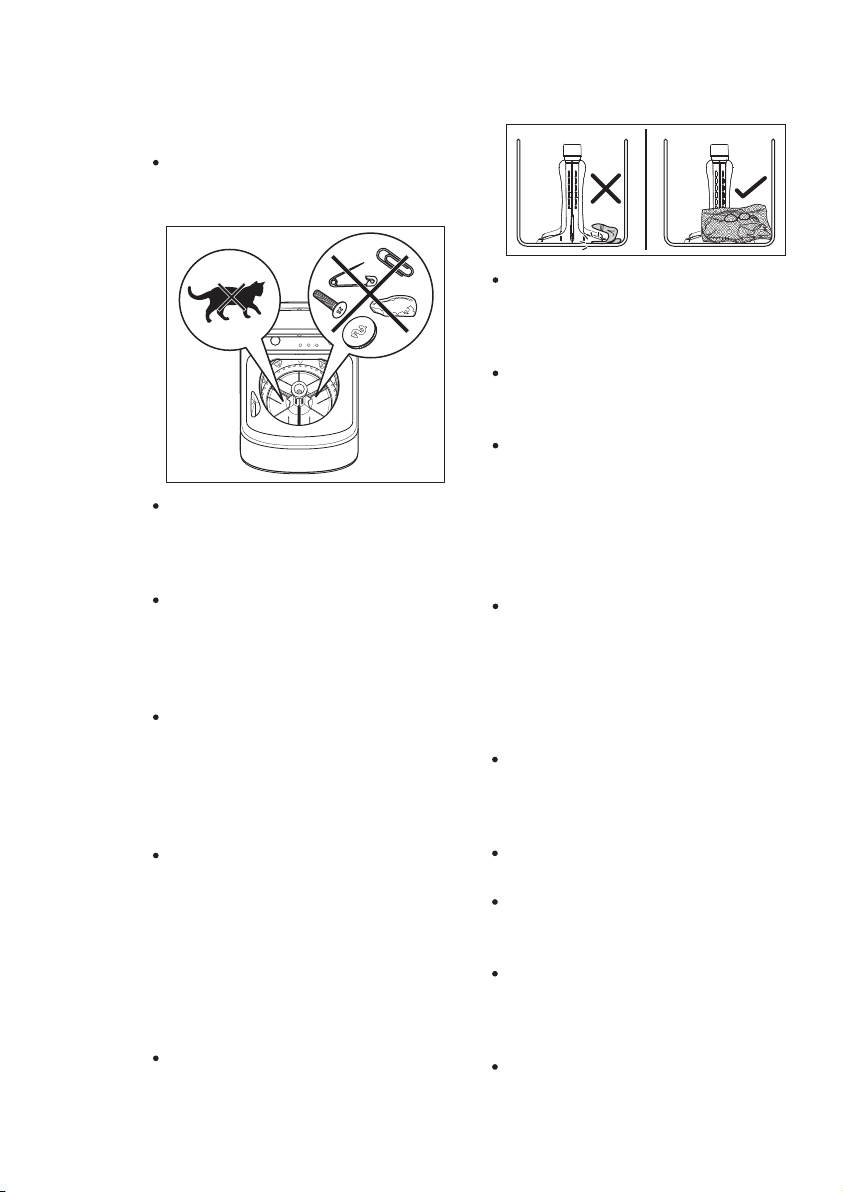
Make sure that small pets do not
climb into the washbowl. To avoid
this, please check into the washbowl before using the appliance.
Any objects such as coins, safety
pins, nails, screws, stones or any
other hard, sharp material can cause
extensive damage and must not be
placed into the machine.
Only use the advised quantities of
fabric softener and detergent.
Damage to the fabric can ensue if
you overfill. Refer to the
manufacturer’s recommendations of
quantities.
This appliance is not intended for
use by persons (including children)
with reduced physical, sensory or
mental capabilities, or lack of
experience and knowledge, unless
they have been given supervision or
instruction concerning use of the
appliance by a person responsible
for their safety.
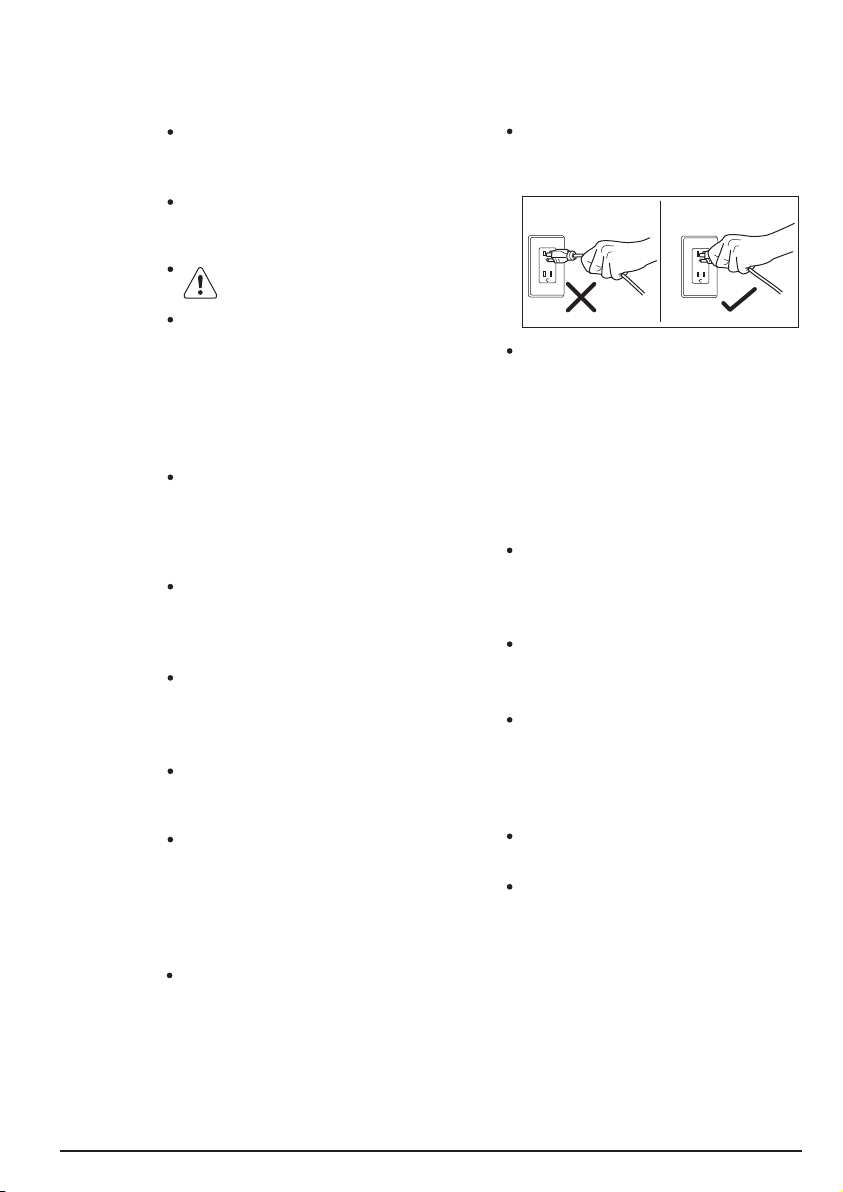
Wash small items such as socks,
laces, washable belts etc in a
washing bag or pillow case as it is
possible for such items to slip down
between the tub and the agitator.
3
Do not use your washing machine
to wash articles with whale bones,
material without hems or torn
material.
Always unplug the appliance and
turn off the water supply after use,
clean and maintenance.
Under no circumstances should you
attempt to repair the machine
yourself. Repairs carried out by
inexperienced persons may cause
injury or serious malfunctioning.
Contact your local Service Centre.
Always insist on genuine spare parts.
If the supply cord is damaged,
should the appliance power supply
cable need to be replaced, this shall
be carried out by our Service Centre.
1.2 INSTALLATION
When unpacking the appliance,
check that it is not damaged. If in
doubt, do not use it and contact
the Service Centre.
Appliance should not be installed in
a humid place.
After having installed the appliance,
check that it is not standing on the
inlet and drain hose.
If the machine is situated on a
carpeted floor, please adjust the
feet in order to allow air to circulate
freely.
Always be sure, that there is no
water leakage from hoses and their
connections after the installation.
4
Any plumbing work required to
install this appliance should be
carried out by a qualified plumber.
Any electrical work required to
install this appliance should be
carried out by a qualified electrician.
Connect the machine to an
earthed socket outlet.
If this appliance is supplied from a
cord extension set or electrical
portable outlet device, the cord
extension set or electrical portable
device must be positioned so that it
is not subject to splashing or
ingress of moisture.
Water pressures between minimum
50kPa and maximum 800kPa are
acceptable.
1.3 USE
This appliance is designed for
domestic use. It must not be used
for purposes other than those for
which it was designed.
Only wash fabrics which are
designed to be machine washed.
Follow the instructions on each
garment label.
Do not overload the appliance. See
the relevant section in the user
manual.
Before washing, ensure that all
pockets are empty and buttons and
zips are fastened. Avoid washing
frayed or torn articles and treat
stains such as paint, ink, rust, and
grass before washing.
Garments which have been in
contact with volatile petroleum
products should not be machine
washed. If volatile cleaning fluids are
used, care should be taken to
ensure that the fluid is removed from
the garment before placing in the
machine.
Never pull the power supply cable
to remove the plug from the socket,
always take hold of the plug itself.
Never use the washing machine if
the power supply cable, the control
panel, the working surface or the
base are damaged so that the
inside of the washing machine is
accessible.
1.4 CHILD SAFETY
This washing machine is not
intended for use by young children
or infirm persons without supervision.
Young children should be supervised to ensure that they do not
play with the appliance.
The packaging components (e.g.
plastic film, polystyrene) can be
dangerous to children - danger of
suffocation! Keep them out of
children’s reach.
Keep all detergents in a safe place
out of children’s reach.
Make sure that children or pets do
not climb into the washbowl.
5
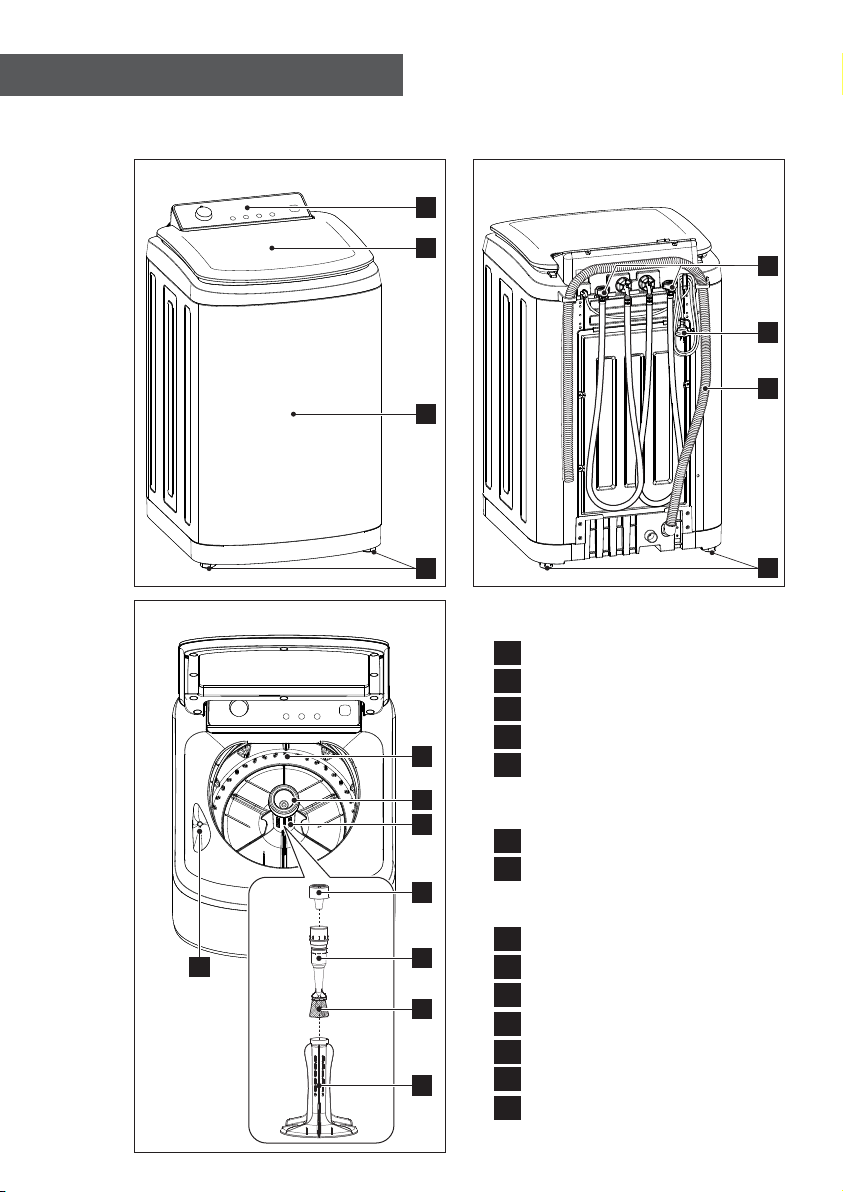
PRODUCT DESCRIPTION2.
WASHING MACHINE PARTS
2.1
FRONT VIEW BACK VIEW
1
2
3
4
PARTS LISTINSIDE VIEW
1
Control Panel
2
Lid
3
Cabinet
4
10
11
12
11
9
14
13
12
Levelling Adjustable Front Feet
Water Inlet Hose
5
- RED fittings (Hot Water)
- BLUE fittings (Cold Water)
Mains Cable
6
Outlet Hose/Drain Hose (See
7
installation instructions sheet to
fit & position drain hose)
Back Feet (fixed)
8
Bleach Dispenser
9
Wash Bowl
10
Fabric Softener Dispenser
11
Agitator
12
Lint Filter
13
Frame Filter
14
5
6
7
8

6
PRODUCT FEATURES
2.2
The Westinghouse wash system
1) Wash operation
The agitator & bowl rotates while it is filled
with water to immerse the clothes.
The agitator then rotate to move the
clothes so that the detergent can be
dissolved and activated at the selected
water temperature.
2) Agitation and dilution
After the wash operation is completed,
the bowl is filled with more water. The
agitator then moves in an energy efficient
mode, generating additional mechanical
actions.
Auto Clear Unbalance
The washing machine can stop during the
spin stage of a wash or spin because of
an out of balance condition. Out of
balance during spin is caused by an
uneven distribution of clothes in the wash
bowl. If the washing machine detects this
problem, it will try to clear itself by
following the steps below:
Stop spinning then starts filling to the
1.
selected water level.
Agitates for 3 minutes to redistribute
2.
the clothes.
Drains the water.3.
Starts the spin cycle again.4.
NOTE
-
If the machine detects the problem
again, it will repeat self clearing steps
one more time. If problem reoccurs the
third time, “ ” will be displayed along
with 3 short beeps repeated 3 time
every 15 seconds to get your attention.
To rectify the out of balance condition,
open the lid and wait until the machine
stops spinning, then redistribute the
clothes evenly in the space between the
agitator and wall of the wash bowl. Close
the lid and press the “Start/Pause” button
to continue the spin stage
NOTE
-
If you have frequent out of balance
interruptions, it may be due to your
washing machine not standing firm and
level on the floor. This can be corrected
by adjusting the washing machine legs
as described in the Installation Instructions sheet supplied with your machine.
If “Eco” rinse option selected, this
function will not operate.
-
This function will not operate in “Tub
Cleaning” and Drain + Spin” programs.
-
If “Extra” rinse option is selected, self
clearing steps will be repeated up to 6
times.
Power Failure Recovery
When there is power failure while
machine is washing or rinsing or
spinning. The machine tries to save the
settings at which stage the machine is
doing and then when the power returns
back the machine will starts washing
from the stage where it is left off.
Button Response and Lights
Always press buttons gently. Watch the
lights on the control panel to see the
effect pressing a button or turning a
program selector knob has, and listen
for “BEEPS”.
When you press a button you will get a
short “BEEP” to acknowledge the entry. If
the option is not available at the time, the
machine will not allow you to select it, and
you will here the three short “BEEP” to
remind you the option is not available and
the display will show “ ” and flashing.
7
After the machine has started, the entire
wash option button will be disabled and
the display will show “ ” and flashing
with three short beeps to indicate the
button is disabled (except Start/Pause
button).
All functions of the washing
machine will stop when the lid is
open.
Enabling/Disabling End-of-Wash
Beeping Mode
This mode permits you to either enable
or disable the beeping (3 beeps every
20 seconds) at the end of the wash. As
an example, you might wish to disable
this beeping when you start a wash
when going to bed, so that when the
wash finished, it will not disturb you
through the night.
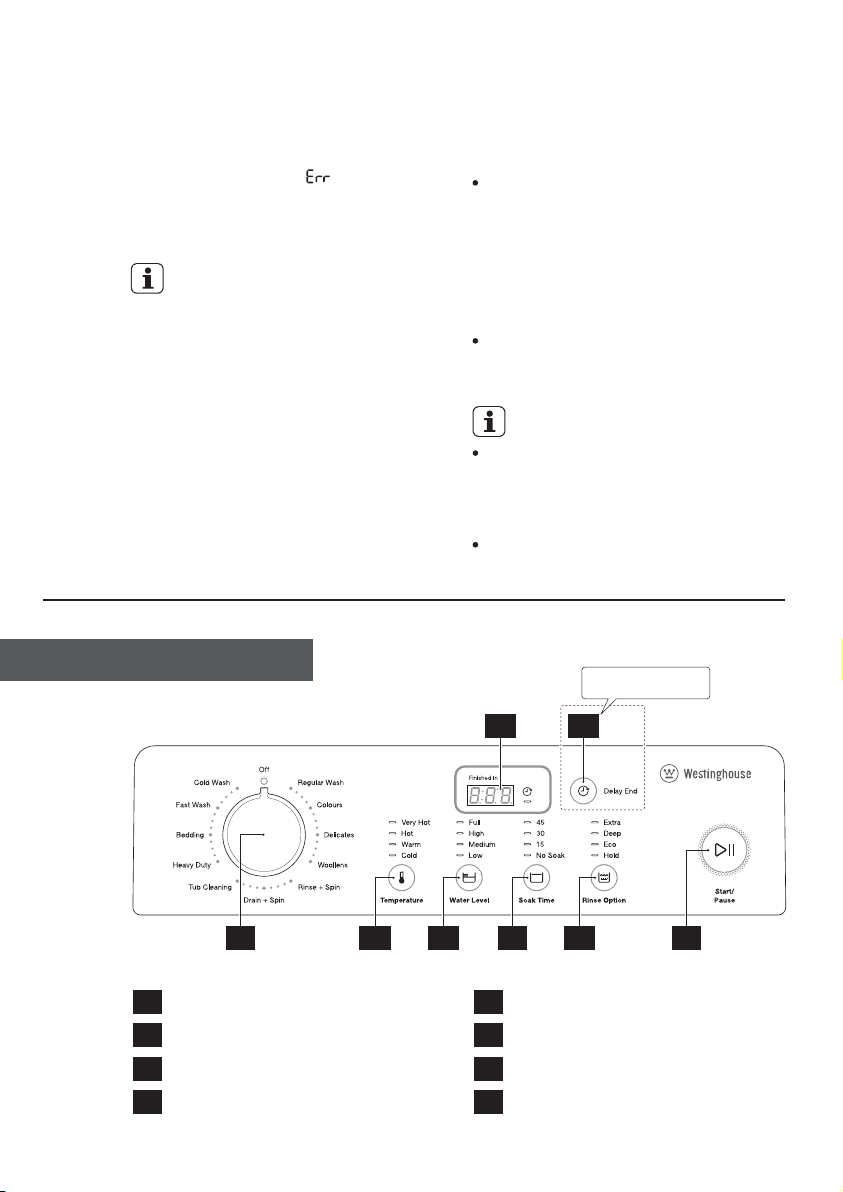
CONTROL PANEL3.
To change the “beeping” selection,
proceed as follows:
If you want to DISABLE the “beeping”
sound, when the washing machine in
Stand-By-Mode (after 7 seconds
passed from machine switching on),
press “Soak Time” and “Water Level”
buttons at the same time until you
hear 2 shorts “BEEP” sound.
To return to default configuration press
these 2 buttons at the same time until
you hear “BEEP” sound.
NOTE:
All error beeping is not disabled by
this feature, such as a critical fault, or
lid open during fill/agitate/spin, or out
of balance during spinning.
Responding sound while pressing the
button is not disabled by this feature.
Delay End Option Button
only for model WWT6541
3.1
Program Selector Knob
3.1
3.2
Water Temperatures Button
Water Level Button
3.3
Soak Time Button
3.4
3.83.6
3.2 3.3 3.4 3.5 3.7
Rinse Option Button
3.5
3.6
Display
Start/Pause Button
3.7
Delay End Option Button
3.8
(Only model WWT6541)

8
3.1
PROGRAM SELECTOR
KNOB
Turn the Program Selector knob to
choose the wash program you
want. The table “Your Program
Guide” shown on page 12 will help
you in selecting the right program.
The Program Selector knob is not a
timer. Once you select a wash
program, the Program Selector
knob will stay at that position for
the whole wash cycle.
NOTE:
When you choose the Woollens
and Bedding program, the Deep
Rinse option is automatically
selected for you. You will NOT be
able to select and use Eco Rinse
with these two programs.
3.2
WATER TEMPERATURES
BUTTON
For each wash program your
washing machine automatically
selects a suitable fill water
temperature. If you want to use a
different wash water temperature,
press the Temperature button
repeatedly.
The water temp lights will tell you
the temperature for each press of
the button.
You have four temperatures to
choose from Very Hot, Hot, Warm
and Cold.
The temperature of warm water will
depend on the temperature and
pressure of your hot and cold water
supplies. The recommended
temperature for warm is 35°C.
You can adjust the flow rate of the
water supplies to adjust the Warm
temperature. All rinse water
temperatures are cold.
Always check your label for the
washing temperature symbols
which the International Care
Labelling Code now uses
Cold, Warm, Hot.
NOTE:
If you have a cold water connection
ONLY and the hot inlet valve is
capped off (refer installation
instructions) you must select Cold
washes only. To fill detergent, you
must follow steps as below:
Measure the correct amount of
1.
powder detergent by following
the recommendations on the
package.
Mix powder detergent in one
2.
litre of hot or warm water.
Add the pre-mixed detergent to
3.
the wash load.
move around
agitator
3.3
WATER LEVEL BUTTON
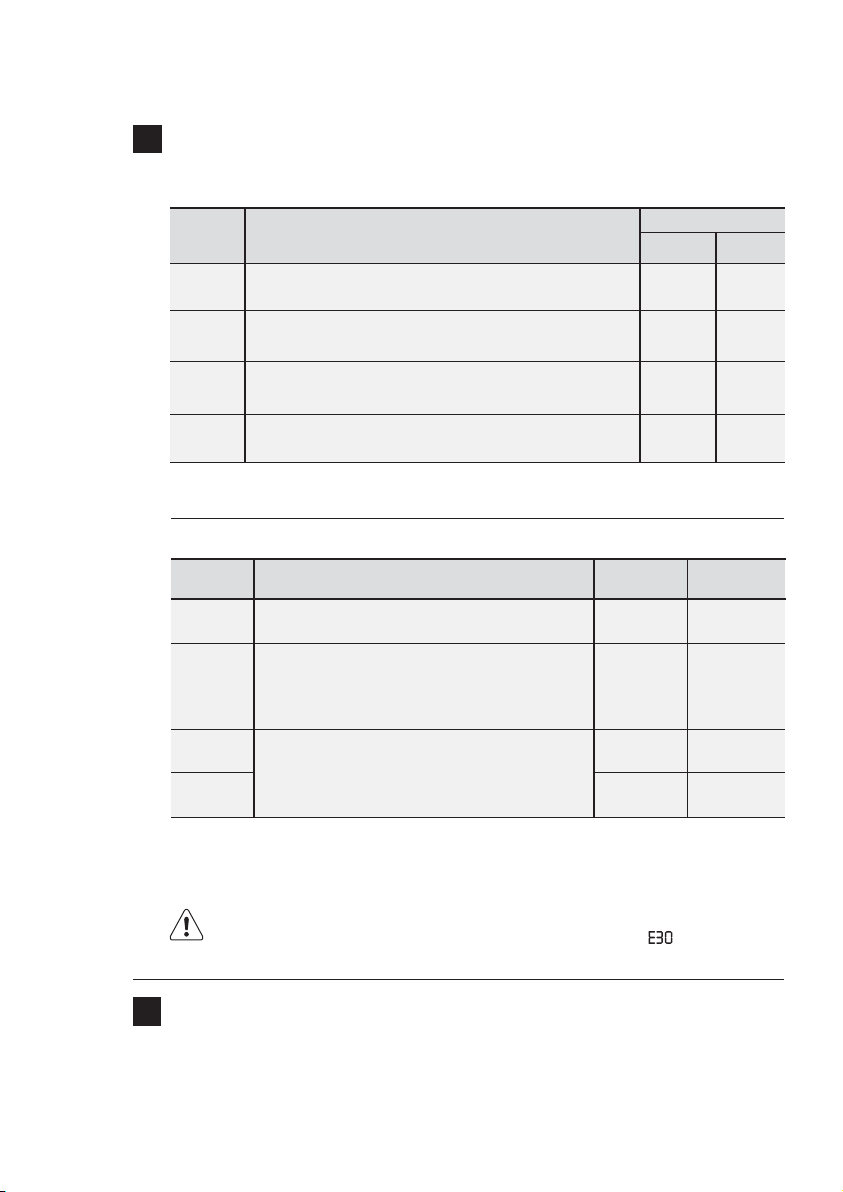
Choose the water level by pressing Water Level button. Use only the amount of
water you need for the wash load.
Water
Level
Full
High
Medium
Low
1) Model WWT554B Maximum mass of dry cloth is 5.5kg
2) Model WWT6541 Maximum mass of dry cloth is 6.5kg
Proportion of Hot and Cold water based on temperature selection.
Temp.
Very Hot
The machine will fill the Full amount of water for
your FULL load.
The machine will fill the High amount of water for
your NEARLY FULL load.
The machine will fill the medium amount of water
for your HALF load.
The machine will fill the Low amount of water for
your SMALL load.
Descriptions
for normally soiled white cottons and linen
(e.g. teacloths, towels, tablecloths, sheets...).
Water level description
Clothes Load (kg)
Model
WWT554B
4 to 5.5 5 to 6.5
3 to 4 3 to 5
1.5 to 3 1.5 to 3
0 to 1.5 0 to 1.5
Water from
HOT valve
Water from
COLD valve
90 % 10 %
for normally soiled, colourfast garments (e.g.
Hot
shirts, night dresses, pyjamas....) in linen,
cotton or synthetic fibres and for lightly
60 % 40 %
soiled white cotton (e.g.underwear).
Warm
Cold
for delicate items (e.g. net curtains), mixed
laundry including synthetic fibres and
woollens bearing the label pure new wool,
machine washable, non-shrink.
50 % 50 %
10 % 90 %
9
Model
WWT6541
IMPORTANT: Components in the washing machine are designed to be used
with water no hotter than 70°C. If your water supply is too hot, you should
have a temperature limiting valve fitted by a qualified plumber.
Flood diagnostic is explained on page 28. You should refer to this if you
have water pouring onto the floorThe display will show “ ” and you will
hear rapid short beep continuously to remind you about this problem.
3.4
SOAK TIME BUTTON
This option allows you to soak
heavily soiled clothes at the
beginning of the wash. To do this,
press Soak Time button to select
the soak time.
The lid must be closed to allow Soak
functions to operate, including the
“Heavy Duty” wash program 6 mins
soak. The machine will agitate for short
periods. At other times, the clothes are
soaking and the machine will be doing
nothing.
10
3.5
RINSE OPTION BUTTON
Pressing the Rinse Option button to
choose the rinse type for your wash
load. For most washes the machine
automatically selects “Deep” rinse
for you.
There are four rinses to choose
from Extra, Deep, Eco and Hold.
Extra rinse, the machine fills
twice, giving you two deep
rinses.
Deep rinse, the machine fills
once, giving you one deep rinse.
Eco rinse, is a spray rinse giving
you maximum water saving.
Hold, by selecting this option the
water of the last rinse is not
emptied out and the drum turns
regularly to prevent the laundry
creases.
After cycle has finished, You
must drain the water from
the washing tub by pressing
“Start/Pause” button to
continue the cycle.
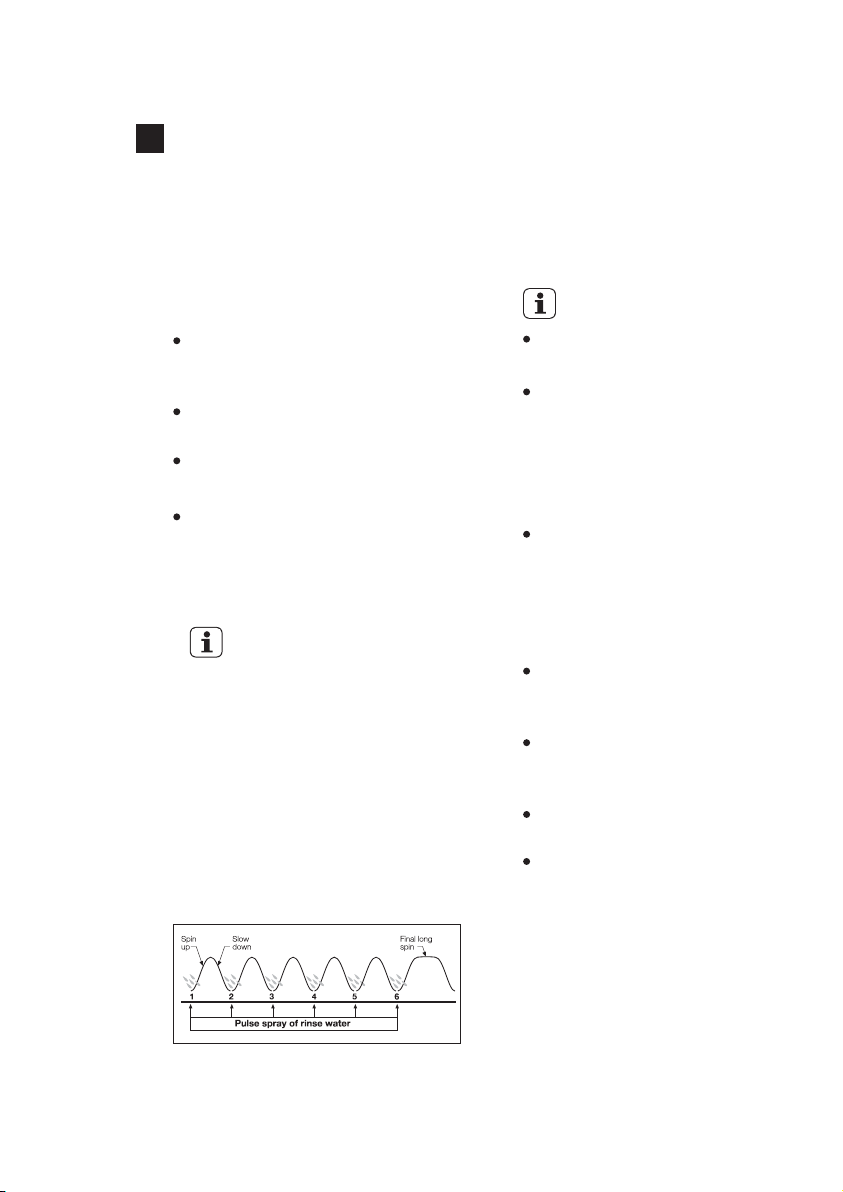
How does Eco Rinse work ?
When Eco rinse is used, rinse water
is sprayed into the washbowl in
pulses. After each pulse the
washbowl will spin to remove
detergent laden water from the
clothes.
The machine will go through a series
of maximum six pulses spray and
short spin cycles in this manner,
depending on program selection,
followed by a final long spin that
removes the water from the clothes
to complete the full wash program.
NOTE:
Compare this with Deep rinse
where much more water is used.
Deep rinse, water enters the
machine filling up to the wash
water level selected. The washer
agitates and finally empties the
rinse water through the drain
hose.
Extra rinse, this is special option
for those people who suffer from
allergies, this extra rinse will
provide two deep rinses to ensure
all detergent residue has been
removed.
Eco Rinse CANNOT be selected
with Woollens and Bedding
program.
Extra and Eco rinse is not
designed to be used with fabric
softener.
Select Deep rinse if you are going
to use fabric softener.
Deep rinse ensures the fabric
softener is correctly dispensed
and thoroughly removed from
your clothes during rinsing.
 Loading...