


USER MANUAL
DISHWASHER
WSF6604WA, WSF6604XA

CONGRATULATIONS
Dear customer,
Congratulations on the purchase of your new Westinghouse dishwasher
Before you use the dishwasher, we recommend that you read through the whole user manual which provides the description of the dishwasher and its functions
To avoid the risks that are always present when you use an electrical appliance, it is important that the dishwasher is installed correctly and that you read the safety instructions carefully to avoid misuse and hazards
We recommend that you keep this instruction booklet for future reference and pass it on to any future owners
After unpacking the appliance, please check it is not damaged If in doubt, do not use the appliance but contact your local Customer Care Centre
For contact details, refer to the last page of this user manual
Conditions of use
This appliance is intended to be used in household and similar applications such as:
•Staff kitchen areas in shops, offices and other working environments
•Farm houses
•By clients in hotels, motels and other residential type environments
•Bed and breakfast type environments
Please ensure you read the instruction manual fully before you call for service, or a full service fee could be applicable.
Record model and serial number here:
Model number:
Serial number:
PNC:
IMPORTANT INFORMATION THAT MAY IMPACT YOUR MANUFACTURER’S WARRANTY
Adherence to the directions for use in this manual is extremely important for health and safety Failure to strictly adhere to the requirements in this manual may result in personal injury, property damage
and affect your ability to make a claim under the Westinghouse manufacturer’s warranty provided with your product Products must be used, installed and operated in accordance with this manual You may not be able to claim on the Westinghouse manufacturer’s warranty in the event that your product fault is due to failure to adhere this manual
CONTENTS
General warnings 3 Safety instructions 4 Product description 5 Technical specifications 5 Control panel 6 Program table 9
Hints and tips 10 Installation 11
Preparing for use |
14 |
Loading 16 Maintenance and cleaning 20 Troubleshooting 21 Warranty 22
Please read the user manual carefully and store in a handy place for later reference
The symbols you will see in this booklet have these meanings:
 WARNING
This symbol indicates information concerning your personal safety.
 CAUTION
This symbol indicates information on how to avoid damaging the appliance.
 IMPORTANT
This symbol indicates tips and information about use of the appliance.
ENVIRONMENT
This symbol indicates tips and information about economical and ecological use of the appliance.
2 CONTENTS

GENERAL WARNINGS
Please read the user manual carefully and store in a handy place for later reference. Pass the user manual on to possible new owners of the appliance.
Read the following carefully to avoid damage or injury.
Note: You must read these warnings carefully before installing or using the appliance. If you need assistance, contact your Customer Care Department. The manufacturer will not accept liability, should these instructions or any other safety instructions incorporated in this book be ignored.
Children and vulnerable people safety.
 WARNING
Risk of injury or permanent disability.
This appliance can be used by children aged from
8 years and above and persons with reduced physical, sensory or mental capabilities or lack of experience and knowledge if they have been given supervision or
instruction concerning use of the appliance in a safe way and understand the hazards involved.
•Do not let children play with the appliance.
•Keep all detergents away from children.
•Keep children and pets away from the appliance door when it is open.
•Cleaning and user maintenance shall not be made by children without supervision.
 WARNING
It is important to use your appliance safely. Check these safety points before using your appliance.
General Safety
•Do not change the specification of this appliance.
•The operating water pressure (minimum and maximum)must be between 0.3 (0.03) /10 (1.0) bar(MPa)
•Obey the maximum number of 15 place settings.
•If the supply cord is damaged, it must be replaced by the manufacturer, its Authorised Service Centre or similarly qualified persons in order to avoid a hazard.
•Put knives and cutlery with sharp points in the cutlery basket with the points down or in a horizontal position.
•Do not leave the appliance door open without supervision to prevent causing a trip hazard.
•Before maintenance, turn the appliance off and disconnect the plug from the mains.
•Do not use water spray and steam to clean the appliance.
•The appliance is to be connected to the water mains using the new supplied hose-sets. Old hose sets must not be reused.
•The ventilation openings in the base (if applicable) must not be obstructed.
•Some dishwasher detergents are strongly alkaline. They can be extremely dangerous if swallowed. Avoid contact with the skin and eyes and keep children away from the dishwasher when the door is open.
•Check that the detergent receptacle is empty after completion of the wash cycle.
Installation
•Remove all the packaging.
•Do not install or use a damaged appliance.
•Do not install or use the appliance where the temperature is less than 0°C.
•Obey the installation instruction supplied with the appliance.
•Make sure that the appliance is installed below and adjacent to safe structures.
SAFETY INFORMATION |
3 |
SAFETY INSTRUCTIONS
 WARNING
Risk of fire and electrical shock.
Electrical connection
•The appliance must be earthed.
•Make sure that the electrical information on the rating plate is the same as the power supply. If not, contact an electrician.
•Always use a correctly installed shockproof socket.
•Do not use multi-plug adapters and extension cables.
•Make sure not to cause damage to the mains plug and to the mains cable. Should the mains cable need to be replaced, this must be carried out by our Authorised Service Centre.
•Connect the mains plug to the mains socket only at the end of the installation. Make sure that there is access to the mains plug after the installation.
•Do not pull the mains cable to disconnect the appliance. Always pull the mains plug.
Water connection
•Make sure not to cause damage to the water hoses.
Before you connect the appliance to new pipes or pipes not used for a long time, let the water flow until it is clean.
•The first time you use the appliance, make sure that there is no leakage.
•WARNING
Use the new water inlet hose supplied with your machine, do not use an old machine’s hose.
•Run water through the new hose before connecting.
 WARNING
Dangerous voltage
•If the water inlet hose is damaged, immediately disconnect the mains plug from the mains socket. Contact the Authorised Service Centre to replace the water inlet hose.
Use
•Do not sit or stand on the open door.
•Dishwasher detergents are dangerous. Obey the safety instructions on the detergent packaging.
•Do not drink and play with the water in the appliance.
•Do not remove the dishes from the appliance until the program is completed. There can be detergent on the dishes.
•The appliance can release hot steam if you open the door while a program operates.
•Do not put flammable products or items that are wet with flammable products in, near or on the appliance.
 WARNING
Risk of injury or suffocation.
Disposal
•Disconnect the appliance from the mains supply.
•Cut off the mains cable and discard it.
•Remove the door catch to prevent children and pets to get closed in the appliance.
4 SAFETY INSTRUCTIONS

PRODUCT DESCRIPTION
1
10
2
6
3
4
9 8
7 |
5 |
1 Worktop
2Upper spray arm
3Lower spray arm
4Filters
5Rating plate
6Air vent
7 |
Rinse aid dispenser |
|
|
8 |
Detergent dispenser |
|
|
9 |
Lower basket |
|
|
10 |
Upper basket |
11 |
|
11 |
2 |
||
|
|||
|
Super Active Drying |
|
TECHNICAL SPECIFICATIONS
MODEL |
WSF6604WA-freestanting |
WSF6604XA-freestanding |
|
Capa |
ty |
13 place sett s |
13 place sett s |
He |
t |
850mm |
850mm |
He |
t hout worktop) |
820mm |
820mm |
dth |
598mm |
598mm |
|
Depth |
598mm |
570mm |
|
Net |
ght |
47kg |
47kg |
Electr |
y nput |
220-240 V, 50 Hz |
220-240 V, 50 Hz |
Current |
10 A |
10 A |
|
Total power |
1900W |
1900W |
|
Water supply pressure |
0.03 MPa (0,3 bar) – 1 MPa (10 bar) |
0.03 MPa (0,3 bar) – 1 MPa (10 bar) |
|
Water supply |
hot or cold water max 60°C 10L/min |
hot or cold water max 60°C 10L/min |
|
PRODUCT DESCRIPTION |
5 |

CONTROL PANEL
9 |
8 7 |
1. On/Off Button
It turns on/off the energy of the machine when it is pushed, The On-Off lamp lights as long as the machine is on.
2. Program Selection Buttons
It is used for program selection with up/ down buttons.
3. Tablet Option Button
It is used for selection for tablet option. If tablet option is activated, tablet lamp turns on. Select the Tablet Detergent option when using a combined detergent that contains salt, rinse aid or other extras. The Tablet Detergent Indicator will remain on for as long as it is selected.
4. Delay Button
It is used for activation of delay timer. When it is pushed once, 3h timer is activated. 6h and 9h delay timer is activated during consecutive pushes, respectively. If both delay leds are active, it means that 9h delay timer is active.
5. Child Lock Feature Led 
This feature is activated by pressing both tablet and delay timer buttons at the same time during 3 seconds. If any button is pushed when the child lock feature is active, all leds blink.
6. Start/Pause Key
When you press the Start/Pause key, the program you have selected with the program selection button will start operating and the washing light will be on. After the program has started, the Start/Pause light will go off. In the Stop (Hold) position, the Start/Pause light blinks while the washing light is lit.
7. Program Monitoring Lights
You can monitor the program flow with the program lights on the control panel.
•Wash 
•Rinse 
• Dry
•End
8. Rinse Aid Indicator 


Check the rinse aid missing warning indicator light on the display to have an idea whether the amount of the rinse aid in your machine is enough. When the rinse aid missing warning indicator is lit, fill the rinse aid compartment.
9. Half Load Button
Thanks to the half load function in your machine, you can shorten the durations of the programs that you have selected and reduce the energy and water consumption by using half load electricity and water.
6CONTROL PANEL
CONTROL PANEL
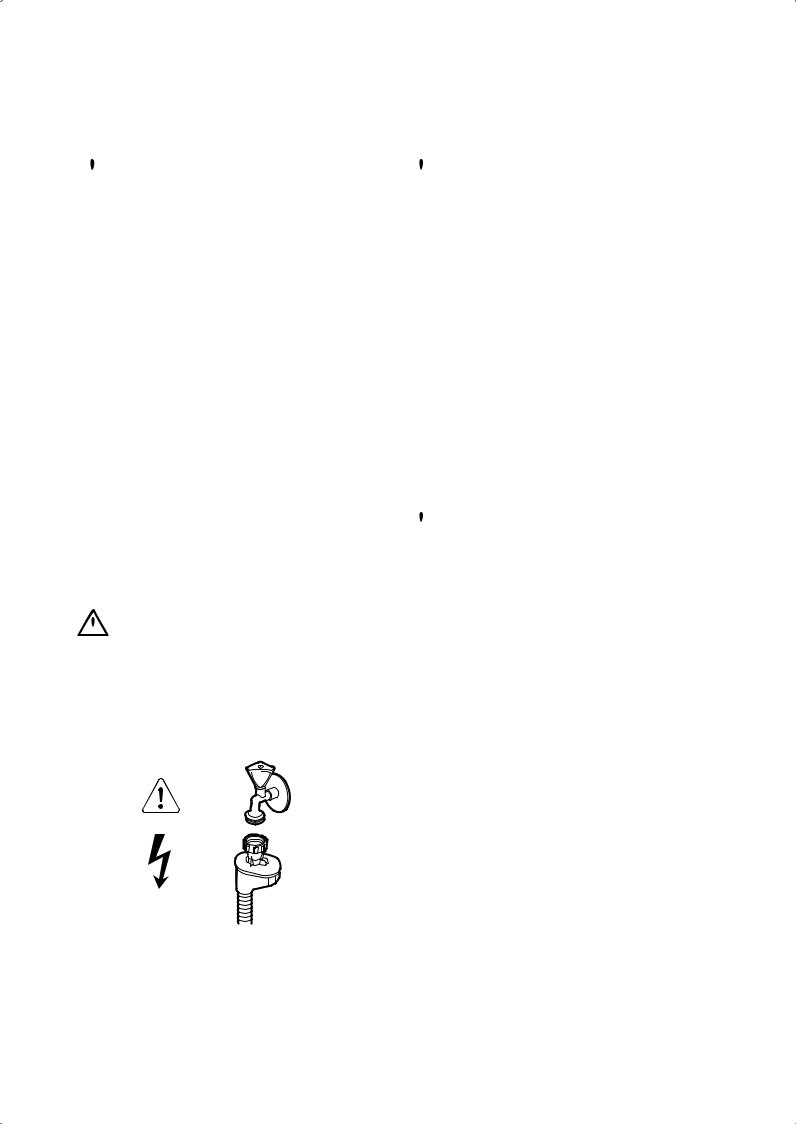
Switch the machine on by pressing the On/Off button. The On/Off lamp remains lit as long as the machine is on.
Press the Start/Pause button to start the selected program. The Start/Pause light will switch off and the Wash light will illuminate. If the door of your machine is opened while a program is in operation, the Start/Pause light will flash.
 NOTE: Press the half load button to activate the Half Load function, which shortens the duration of a program. Press the button again to cancel it.
 NOTE: If an extra feature is used, such as the Delay, Tablet or Half Load, on the most recent wash program, this feature will remain active on the next selected program. To cancel
this feature on the newly selected wash program, turn the machine off and on. Extra features can be activated with the newly selected program.
Delaying the Program
Press the Delay button to delay the start time of a program for 3, 6 or 9 hours. Pressing the button once will delay the start time for 3 hours, pressing twice will delay for 6 hours, and pressing a third time will delay the start time for 9 hours. If the button is pressed for a fourth time, there will be no delay. Press the Start/ Pause button to activate the delay. The program can be selected first and the delay time after, or vice versa. To cancel or change the delay time, press the Start/ Pause button first, then select a new delay time. The delay time can be cancelled by turning off the machine. During a delay, the light corresponding to the remaining time is switched on.
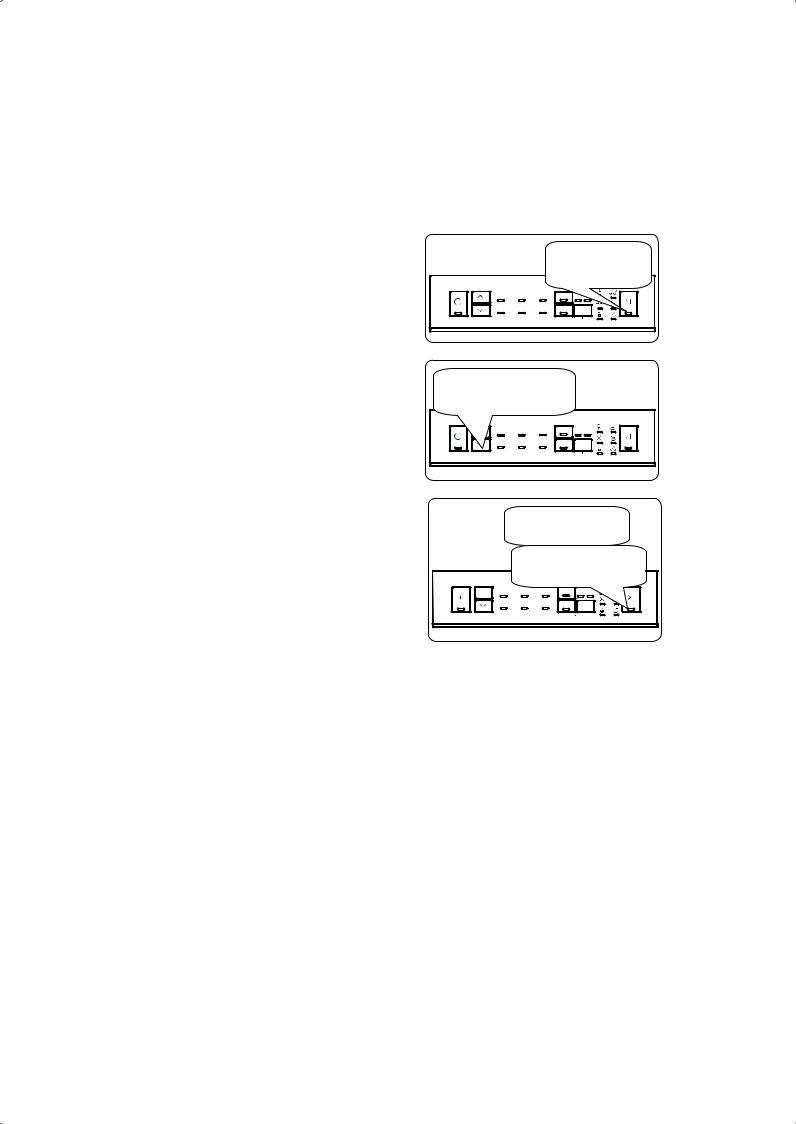
Changing a Program
Follow the steps below to change a program while in operation.
Press the Start/
Pause button.
After the program stops, select a new program using the program
Selection Up/Down buttons.
9h
3h 6h
Press the Start/Pause button to start the newly selected program.
The new program will resume the course of the old program.
CONTROL PANEL 7
CONTROL PANEL
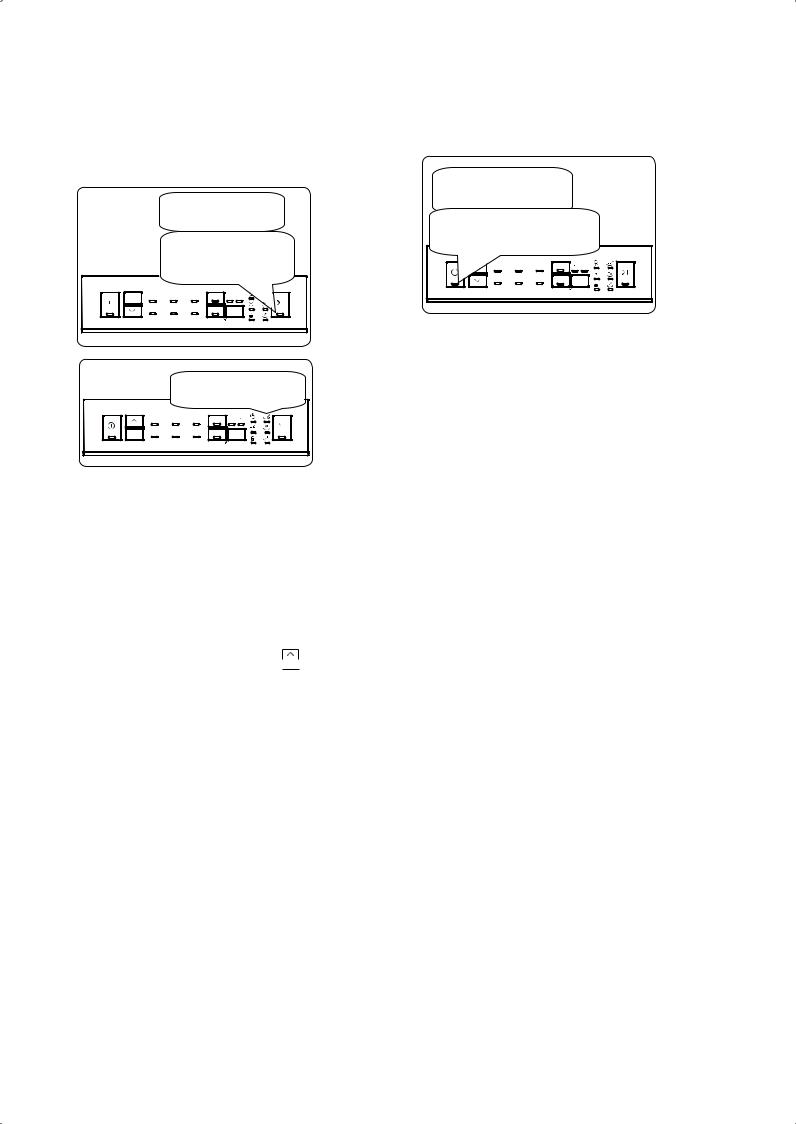
Cancelling a Program
Follow the steps below to cancel a program while in operation.
Press and hold the Start/
Pause button for 3 seconds.
While the program is cancelling, the End led will blink. The water discharge process will start and continue for 30
seconds.
When the program is cancelled, the End light will illuminate.
9h
3h 6h
Saving a Favourite Program
You can add the programs and options that you consider are best for your dishes and you frequently use. To set your favourite program;
1.Select the program that you want to select using the program button .
2.Add the suitable options for the wash using the option buttons if you want to add additional options to this program.
3.When you press “up” and “down”  buttons together after completing your program and option selection, your favourite program and option will be saved.
Selecting a Favourite Program
Press to “Up” button for 3 seconds to select your favourite program
Switching the Machine Off
Disconnect the plug and turn off the water tap.
When the End light illuminates, press the On/Off button to switch your machine off.
 NOTE: Do not open the door before the program is complete.
 NOTE: Leave the door slightly open at the end of a wash program to speed up the drying process.
 NOTE: If the door of the machine is opened or the power is cut off during a wash program, the program will continue when the door is closed or when the power returns.
 NOTE: If the power is interrupted or if the machine door is opened during the drying process, the program will terminate and your machine will now be ready for a new program selection.
8CONTROL DESCRIPTIONS
 Loading...