


USER MANUAL
Side by Side Refrigerators WSE7000, WSE6970, WSE6100, WSE6070

CoNGRAtULAtioNS |
CoNtENtS |
Dear customer,
Congratulations and thank you for choosing our refrigerator We are sure you will find your new appliance a pleasure to use Before you use the appliance, we recommend that you read through the entire user manual, which provides the description of the appliance and its functions To avoid the risks that are always present when you use an electrical appliance, it is important that the appliance is installed correctly and that you read the safety instructions carefully to avoid misuse and hazards
We recommend that you keep this instruction booklet for future reference and pass it on to any future owners
After unpacking the appliance, please check that it is not damaged If in doubt, do not use the appliance but contact your local customer care centre
CoNditioNS of USE
This appliance is intended to be used in household and similar applications such as:
•staff kitchen areas in shops, offices and other working environments
•farm houses.
•by clients in hotels, motels and other residential type environments
•bed and breakfast type environments
•catering and similar non retail-applications
 TIPS & INFORMATION
iMpoRtANt – CHECK foR ANY dAMAGES oR MARKS
If you find the refrigerator is damaged or marked, you must report it within 7 days if you wish to claim for damage/ marks
under the manufacturers warranty This does not affect your statutory rights
ENVIRONMENTAL TIPS
iNfoRMAtioN oN diSpoSAL foR USERS
•Most of the packing materials are recyclable.
Please dispose of those materials through your local recycling depot or by placing them in appropriate collection containers
•If you wish to discard this product, please contact your local authorities and ask for the correct method of disposal
General warnings |
4 |
WSE7000 features |
6 |
WSE6970 features |
7 |
WSE6100 features |
8 |
WSE6070 features |
9 |
General installation |
10 |
Clearances around your refrigerator |
10 |
Installation |
10 |
Adjusting door alignment |
11 |
Internal packaging |
11 |
Ice & water installation |
12 |
Ice maker start up |
16 |
Initial start-up |
16 |
Using your refrigerator – general |
17 |
Using your refrigerator – WSE6100 |
19 |
Using your refrigerator – WSE7000 |
22 |
Using your refrigerator – WSE6970 & WSE6070 |
25 |
Ice & Water dispenser |
29 |
Care & Maintenance |
30 |
The water connection kit |
31 |
Changing the light bulb |
32 |
Cleaning your refrigerator (exterior) |
33 |
Cleaning your refrigerator (interior) |
33 |
Energy consumption |
33 |
Helpful hints for storing food |
34 |
Troubleshooting |
35 |
Ice & water troubleshooting |
36 |
Notes |
37 |
Warranty |
39 |
 BEFORE YOU CALL
Please ensure you read the instruction manual fully before you call for service, or a full service fee could be applicable.
contents 3

GENERAL wARNiNGS
Please read the user manual carefully and store in a handy place for later reference Pass the user manual on to new owners of the refrigerator
The symbols you will see in this booklet have these meanings:
 WARNING
This symbol indicates information concerning your personal safety
 CAUTION
This symbol indicates information on how to avoid damaging the refrigerator
 TIPS & INFORMATION
This symbol indicates tips and information about use of the refrigerator
ENVIRONMENTAL TIPS
This symbol indicates tips and information about economical and ecological use of the refrigerator
 WARNING
•When you dispose of your old refrigerators and freezers, remove any doors Children can suffocate if they get trapped inside
•This appliance is not intended for use by persons
(including children) with reduced physical, sensory or mental capabilities, or lack of experience and knowledge, unless they have been given supervision or instruction concerning use of the appliance by a
person responsible for their safety Children should be supervised to ensure that they do not play with
the appliance
•Don’t use a steam cleaner. If live components come into contact with condensing steam, they may shortcircuit or cause an electric shock
•Do not use mechanical devices or other means to accelerate the defrosting process other than those recommended by the manufacturer
•This appliance contains insulation formed with flammable blowing gases Avoid safety hazards by carefully disposing of this appliance’.
R600A REfRiGERANt wARNiNG
•This appliance may contain flammable R600a refrigerant Avoid safety hazards by carefully installing, handling, servicing and disposing of this appliance
If your appliance contains R600a it will be indicated on the rating plate inside the appliance
•Ensure that the tubing of the refrigerant circuit is not damaged during transportation and installation
•In the event any damage accidentally occurs, keep the appliance away from open fires and any devices that produce sparks or arcs and luminaries during normal or abnormal operation, and unplug the appliance at the power point Call authorised service for necessary action and advice
•Leaking refrigerant may ignite vent area if leak occurs.
•The room for installing appliance must be at least 1m3 per 8g of refrigerant The amount and type of refrigerant in the appliance can be found on the
rating plate inside the appliance
It is hazardous for anyone other than an authorised service person to service this appliance In Queensland the authorised service person MUST hold a gas work authorisation for hydrocarbon refrigerants to carry out servicing or repairs which involve the removal of covers
4 safety
GENERAL wARNiNGS
Read the following carefully to avoid damage or injury
 This symbol indicaTes never To do This
 This symbol indicaTes always do This
It is important to use your refrigerator safely Check these safety points before using your refrigerator
The appliance must be plugged into its own dedicated 220-240V, 50Hz AC electrical outlet
Ensure that the electric outlet is properly earthed to ground Consult a qualified electrician if you are unsure
If the power cord is damaged, it must be replaced by the manufacturer, it’s service agent or similarly qualified persons in order to avoid a hazard
Check the power cord can reach the power point
Don’t plug your refrigerator into an extension cord or double adaptor
Unplug the appliance before cleaning and before changing the light bulb to avoid electric shock
Choose a location that is not too cold – the ambient temperature should be above 10°C
Put the refrigerator in a dry place avoiding areas of high moisture or humidity
Keep ventilation openings, in the appliance enclosure or in the built-in structure, clear of obstruction
It is recommended that the plug to the appliance should be accessible when the unit is in the installed position
Never unplug the appliance by pulling on the power cord Always grip the plug firmly, and pull straight out of the receptacle to prevent damaging the power cord
Don’t plug your refrigerator into a timer fitted to the power point
Do not put the refrigerator in frosty or unprotected areas, for example in a garage or on a veranda
Do not put the refrigerator in direct sunlight, near stoves, fires or heaters
Do not put the refrigerator on an uneven surface
Do not store explosive substances such as aerosol cans with a flammable propellant in this appliance
Do not use electrical appliances inside the food storage compartments of the appliance, unless they are of the type recommended by the manufacturer
Never store fizzy drinks in the freezer compartment
Never try to repair the refrigerator yourself, only use a qualified or authorised service person for repairs
Never use electric heaters or dryers to defrost the freezer because you can receive an electric shock
Do not damage the refrigerant circuit
foR iCE & wAtER ModELS oNLY
Check for water leaks at all water connection points in the first two or three hours after installation
Re-check after 24 hours to ensure connection is watertight If the connection is leaking, contact a licensed plumber
Do not use with water that is microbiologically unsafe or with water of unknown quality without adequate disinfection
Never connect the appliance to a hot water supply
Never install the water filter in an area of the wall where there may be electrical wires and/or water supply pipes
Never install the water filter in an area of direct sunlight
Note: You must read these warnings carefully before installing or using the refrigerator. If you need assistance, contact your Customer Care Department. the manufacturer will not accept liability, should these instructions or any other safety instructions incorporated in this book be ignored.
safety 5
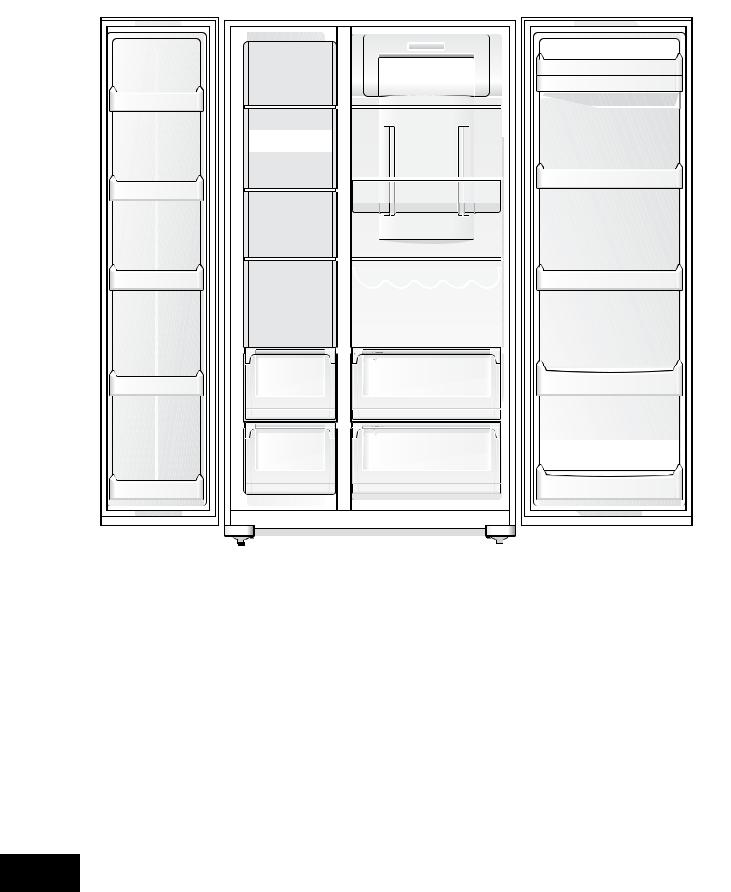
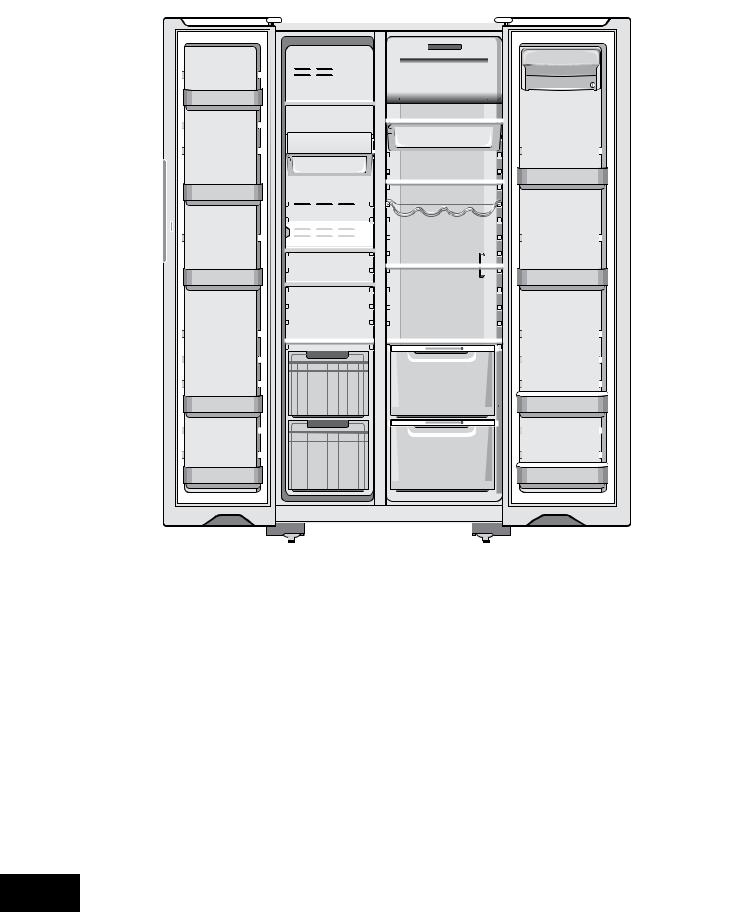
wSE7000 fEAtURES
1 |
10 |
9 |
11
12
2
3
4 |
6 |
7 |
5 |
13 |
14 |
15 |
16
17
18
8
20
1Freezer light
2Twist ice & serve
3Ice cube storage bin
4 Freezer door storage bins
5Wine rack
6 Temperature sensors
7Glass shelves
19
|
Telescopic freezer bins |
|
|
Door storage bins |
8 |
14 |
|||
9 |
Fridge & freezer temperature |
15 |
Deli bin |
|
|
control |
16 |
Adjustable glass shelves |
|
|
Light lens |
|||
10 |
17 |
Humidity controls |
||
|
Dairy compartment |
|||
11 |
18 |
Telescopic crisper bins |
||
|
Storesafe™ bin (lockable) |
|||
12 |
19 |
Bottle bins |
||
|
Multiflow duct |
|||
13 |
20 |
Adjustable rollers |
||
|
(with blue feature lighting) |
|||
|
|
|
|
|
Features may vary depending on model Not all models will have features listed
6 WSE7000 features
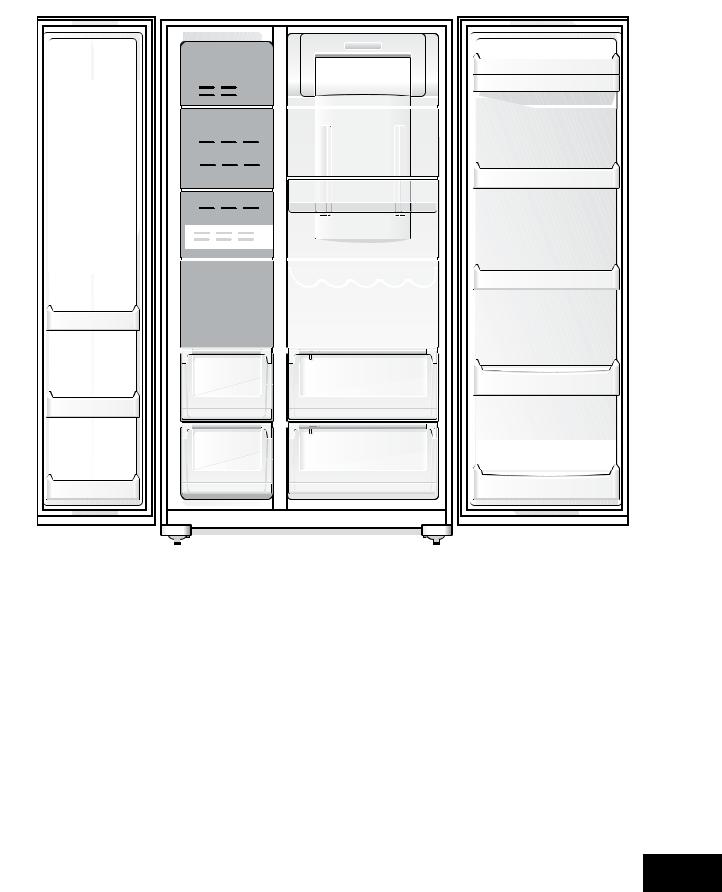
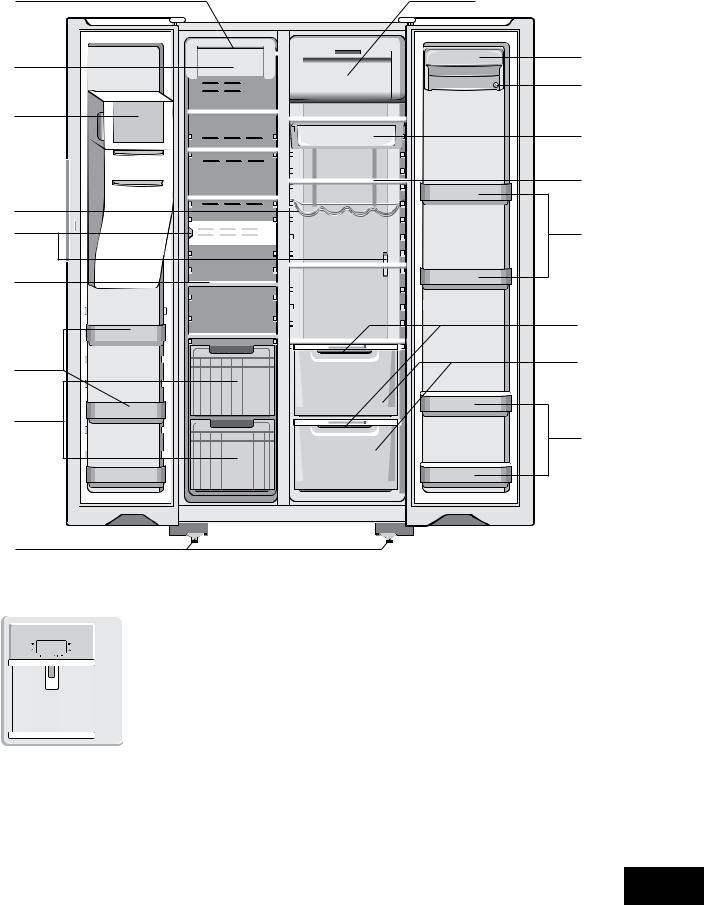
wSE6970 fEAtURES
1 11
2 
3
4 
5
6
7
8
9
10
19
Ice & Water Door Dispenser
1 |
Freezer light |
8 |
Wine rack |
15 |
Door storage bins |
2 |
Ice maker unit |
9 |
Freezer door storage bins |
16 |
Humidity controls |
3 |
Ice bin |
10 |
Telescopic freezer bins |
17 |
Telescopic crisper bin |
4 |
Multiflow duct |
11 |
Light lens |
18 |
Bottle bins |
|
(with blue feature lighting) |
12 |
Dairy compartment |
19 |
Adjustable rollers |
|
Air vents |
||||
5 |
13 |
Storesafe™ bin (lockable) |
|
|
|
|
Glass shelves |
|
|
||
6 |
14 |
Deli bin |
|
|
|
|
|
|
|
7Temperature sensors
Features may vary depending on model Not all models will have features listed
WSE6970 features 7
12
13
14
15
16
17
18
wSE6100 fEAtURES
1 |
8 |
|
9 |
|
10 |
|
11 |
2 |
|
3 |
12 |
|
|
|
13 |
4 |
14 |
|
|
5 |
|
6 |
15 |
|
|
|
16 |
7 |
|
|
17 |
18
1 |
Freezer light |
7 |
Roll out baskets |
13 |
Wine rack |
2 |
Twist ice & serve |
8 |
Light lens |
14 |
Door storage bins |
3 |
Ice cube storage bin |
9 |
Dairy compartment |
15 |
Humidity controls |
4 |
Freezer door storage bins |
10 |
Storesafe™ bin (lockable) |
16 |
Crisper bins |
5 |
Temperature sensors |
11 |
Deli bin |
17 |
Bottle bins |
6 |
Glass shelves |
12 |
Adjustable glass shelves |
18 |
Adjustable rollers |
Features may vary depending on model Not all models will have features listed
8 WSE6100 features
wSE6070 fEAtURES
1 |
9 |
2 |
10 |
|
|
|
11 |
3 |
|
|
12 |
|
13 |
4 |
|
5 |
14 |
6 |
|
|
15 |
7 |
16 |
|
|
8 |
|
|
17 |
18 |
|
Ice & Water Door Dispenser
|
|
|
1 |
Freezer light |
7 |
Freezer door storage bins |
13 |
Adjustable glass shelves |
|
|
|
2 |
Ice maker unit |
8 |
Roll out baskets |
14 |
Door storage bins |
|
|
|
|
Light lens |
||||
|
|
|
3 |
Ice bin |
9 |
15 |
Humidity controls |
|
|
|
|
4 |
Wine rack |
10 |
Dairy compartment |
16 |
Crisper bins |
|
|
|
|
Storesafe™ bin (lockable) |
||||
|
|
|
5 |
Temperature sensors |
11 |
17 |
Bottle bins |
|
|
|
|
|
Deli bin |
||||
|
|
|
6 |
Glass shelves |
12 |
18 |
Adjustable rollers |
|
|
|
|
|
|
||||
|
|
|
|
|
|
|
|
|
|
|
|
|
|
|
|
|
|
Features may vary depending on model Not all models will have features listed
WSE6070 features 9
GENERAL iNStALLAtioN
When correctly installed, your refrigerator should:
•Have adequate clearance to the back, sides and top for air circulation
•Be aligned to the surrounding cupboards
•Have doors that will self close from a partially open position
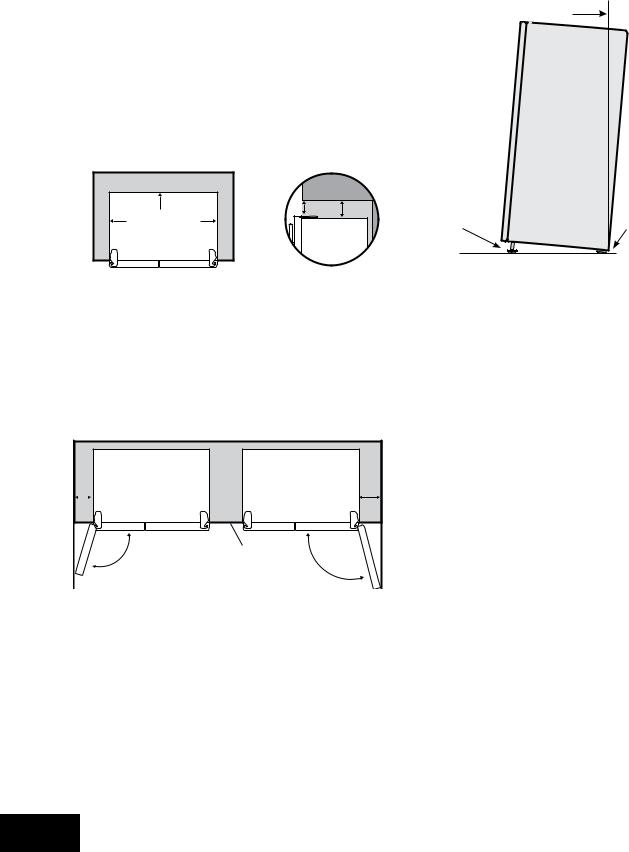
CLEARANCES ARoUNd YoUR REfRiGERAtoR
Your Side by Side refrigerator can be installed between cupboards or fixtures but you must allow for the following spaces around the cabinet
•Allow a minimum of 5 millimetres clearance on both sides (see diagram 1)
•Allow a minimum of 5 millimetres clearance above hinge covers (see diagram 1)
•Allow 10 millimetres clearance at the back of the refrigerator (see diagram 1)
|
10mm |
|
|
5mm |
Recommended |
10mm |
35mm |
minimum airspace |
5mm |
|
|
|
CABINET |
|
|
|
DOORS |
|
|
|
|
Diagram 1 |
|
•Allow a 250 to 350 millimetre minimum clearance on the hinge side of the doors, if you place the refrigerator next to the wall This will make cleaning easier (refer to diagram 2)
•Make sure that cupboards or fixtures do not stick out further than the refrigerator cabinet (refer to diagram 2)
250mm |
350mm |
|
maximum |
|
cupboard depth |
|
Diagram 2 |
iNStALLAtioN
The refrigerator should arrive with the front rollers wound down We recommend that the appliance be tilted backwards by about 10 to 15 millimetres, this will allow the doors to self close providing a consistent door seal To do this follow the instructions below

 10 -15mm
Height adjustable |
Fixed rear rollers |
front rollers |
When you want to install your appliance, take the following steps
1. Roll the refrigerator into it’s final position.
 WARNING
The rollers are designed for forward or backward movement only They are not castors Moving the refrigerator sideways may damage your floor and the rollers
2If the refrigerator is not tilted back you can adjust the two front rollers by adjusting the large plastic roller nut (refer page 11) You may need two people, one to adjust rollers and one to tilt the refrigerator slightly back to take the weight of the appliance off the front rollers This will increase or decrease the height of the rollers One turn of the nut will change the tilt of the refrigerator by approximately 5mm
3If the cabinet is level, then the side walls should be plumb or vertical If the cabinet is built in or partly built in check the alignment of the cabinet side against the cupboard
10 installation
GENERAL iNStALLAtioN
Aligned to cupboard –
even gap
Top of refrigerator  is level – horizontal
Adjust front rollers for unevenness of floor e g adjust this roller down Packing may be required underneath the rear roller to ensure stability
4If the appliance now rocks from one corner to the opposite rear corner, this means that the floor is uneven; you will need to put some packing under one of the rear rollers
5You may now need to fine-tune the installation by adjusting the front rollers once again
AdjUStiNG dooR ALiGNMENt
Each door is independently adjustable in the vertical direction by turning the adjustable bolts under the hinges using the spanner provided
Large plastic roller nut |
|
|
|
|
|
|
|
|
|
Front roller |
Adjusting bolt |
|||
The doors can be adjusted up or down Depending on the amount of adjustment required it may be sufficient to adjust only one door (refer to following diagrams)
Note: When the height of the rollers and adjusting bolts are correctly adjusted the refrigerator will stand firmly on the floor and the doors will be in line with one another.
Spanner
Spanner
iNtERNAL pACKAGiNG
1Please remove all internal packaging material before use Any glue or tape residue or the like should be removed with a solution of mild detergent and water
2Clean your appliance thoroughly following the instructions on page 32 and wipe off any dust that has accumulated during shipping
3It is recommended that the refrigerator is kept upright at all times However if for any reason the refrigerator is laid down, let it stand for a minimum of 1 hour before turning on
 WARNING
Before cleaning: Remove the power cord from the power socket This will make sure there is no chance of getting an electric shock
4Install accessories such as the egg tray The accessories are packed together to prevent damage during delivery
5Plug your appliance into the power point
6We recommend that you let your refrigerator run for two to three hours before you put any food in it This will allow you to check that it is operating properly and that enough cool air is circulating
installation 11
iCE & wAtER iNStALLAtioN
tHE ExtERNAL wAtER fiLtER Kit
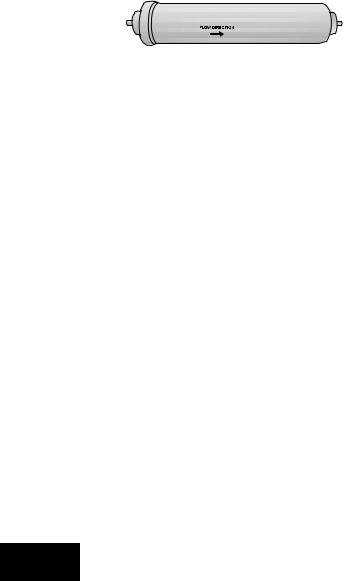
An external water filter and connection kit has been supplied for use with your Ice & Water refrigerator The external filter design allows more space within the refrigerator and provides double the life of previous filters reducing the cost of replacement
The filter is designed to significantly reduce chlorine, taste, odour, heavy metals, turbidity (cloudiness) and scale build up The included plastic water tube allows quick connection to the filter and is designed for high durability and kink resistance
This filter is designed only to be used with a potable water supply It should not be used on water that is micro biologically unsafe or with water of unknown quality The filter should be replaced every 12 months The service life of the filter may be reduced in water supplies that contain an excess of particles or other impurities. Reduced flow rate is an indication that a new filter is required Failure to replace the filter when required can affect the function of the ice maker Service calls caused by a failure to replace the filter are not covered by warranty
CoNtENtS of Kit –iNStALL Kit witH pRESSURE
REdUCiNG vALvE.
DATE FITTED___/___/___
1 x water filter with push fit connections
2 x mounting brackets and screws
4 + 1 metres of water tubing
1 x ½" tap fitting
2 x circlips
bEfoRE bEGiNNiNG iNStALLAtioN, pLEASE REAd:
The water connection to your ice and water product can be self-installed It is recommended that you seek advice from a licensed plumber (if necessary) before commencing the installation
 CAUTION
Your warranty may be voided by an incorrect installation
water supply and Plumbing
A drinkable water supply to suit a ½’ tap fitting is required adjacent to the refrigerator It is recommended that a licensed plumber install a new water supply outlet nearer to the appliance should the tubing supplied not be
long enough It is not recommended that the tubing be extended as this could adversely affect the flow of water to the ice maker or water dispenser
The water dispenser and automatic ice maker require a drinkable water supply with a pressure range of between 206kPa and 689kPa (30PSI and 100PSI) If the water supply pressure is below 206kPa (30PSI) then a separate pump will need to be installed
It is recommended that a Noise Reduction Valve also be fitted in the water supply line This will reduce water hammer and its effects from quick action house hold taps and fast acting valves on appliances The refrigerator water valve is pre-fitted with a push-fit connector for
inserting the water tube Where the tap connection is other than 1/2’, adapters can be purchased from plumbing supply stores or good hardware stores
water Filter
Locate the water filter within 1 metre of the water supply tap, in a vertical orientation where possible The filter will need to be replaced every 12 months to prevent excess filtered micro-organism build-up, and thus ensure continuous purified water and ice supply for you and your family. Replacement water filters are available from
Electrolux Home Products Spare Parts Centres and can be posted to you for your convenience (refer to back page for contact details)
 WARNING
If the appliance is not connected to a water supply ensure that the ice maker is switched off (refer to STEP 1 overleaf)
If you don’t do this a loud buzzing noise will be heard intermittently The new hose-sets supplied with the appliance must be used and old hose-sets should not be reused Do not use with water that is microbiologically unsafe or with water of unknown quality without adequate disinfection
Never connect the appliance to a hot water supply Never install the water filter in an area of the wall where there may be electrical wires and/or water supply pipes Never install the water filter in an area of direct sunlight
12 installation
 Loading...